1
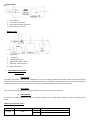
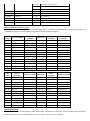
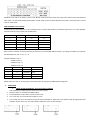
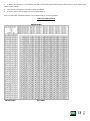
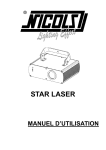
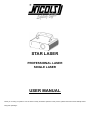
STAR LASER PROFESSIONAL LASER SINGLE LASER USER MANUAL Thank you for using our products. For the sake of safety and better operation of this product, please read this manual carefully before using and operating it. 1. GENERAL INSTRUCTIONS a. UNPACKING Thank you for purchasing this product. Please read the user guide for safety and operations information before using the product. They contain important information about the security of the facility and on the use and maintenance of equipment. Keep this manual for future reference. In case of sale of equipment to another user, it is important that this manual is attached to the equipment to the new user has the necessary information to use and can read the warnings on safety. This product is suitable for creating perfect laser programs and high-quality laser effects. Before any first use, unpack the set and make sure there was no damage during transport. Check for missing any part supplied with the laser: - 1 x STAR LASER - 1 x POWER CABLE - 1 x USER MANUAL NOTES : Never look directly at the beam to avoid any visual problems. Do not turn off and then turn on the unit back repeatedly so as not to reduce the lifetime of the device. It is important to connect the laser to the ground to prevent electric shock. Before any first use, make sure the power is compatible with the local voltage. This device is designed for indoor use only. The working temperature is 18-30 ° C. Do not operate the device continuously for more than 4 hours to not reduce the lifetime of the device. Use soft cloth to remove dust on the external lenses of the laser to optimize the light output. Do not remove the labels on the device. Always use parts of the same type. LASER RADIATION AVOID EXPOSURE TO BEAM CLASS I LASER PRODUCT a. SPECIFICATIONS Voltage : 230V/50Hz Fuse : 2A/250V Rated Power : 30W Laser : Green 532 nm / 50 mW DMX Control channels: 7 channels Working modes : DMX, Sound activation, Auto, Master/Slave Effects : more than 100 patterns, over 300 effects Interface 3 pin XLR jack for DMX or Master/Slave linking Dimensions : 240 x 220 x 140 mm Weight : 3.5 kg 2. FEATURES Various operating modes: 4 modes with DMX, Sound activation, Auto, Master/Slave Different programs: more than 50 patterns, over 200 laser effects. DMX Control: The unit has 7 DMX channels + BLACK OUT. The unit will shut off if no DMX 512 signal. Master/Slave function: several units can be interconnected in sound activation and auto mode. LED indicating: In sound active mode, the unit’s panel has LED indicating for sound activation. The unit will shut off after 8 seconds when the music stops. LASER : Green FRONT PANEL 1. Laser aperture 2. Sound active microphone 3. Sound active Indicated : Blue LED 4. Power indicator : Red LED REAR PANEL 1. 3. Power Jack 2. Cooling Fan 3. Audio sensitivity knob 4. DMX signal indicator : Green 5. Dipswitch : Setting functions 6. DMX or linking jack FUNCTIONS AND SETTINGS a. FUNCTIONS i. MUSIC MODE The change in the shape of the laser is controlled by the music. So, the rhythm of the music controls the effect of changing program of the laser. By turning the sensitivity knob in the direction of clockwise, you increase the sensitivity of the device. Instead, turning the same knob anticlockwise, you reduce the sensitivity. The laser turns off automatically after 8 seconds if the music fades. ii. AUTO MODE Auto cycles the built-in programs without being controlled by external sources. It has no laser OFF. iii. DMX CONTROL The system only accepts the DMX 512 signal to control the system mode: the laser pattern ON/OFF, the size, the position and the speed. DMX Control Parameters Chart CHANNELS FUNCTION CHANNEL 1 MODE VALUE DESCRIPTION 0~49 Closed, beam OFF 50~99 DMX MODE: static patterns 100~149 DMX MODE: dynamic patterns 150~199 Sound active mode 200~255 AUTO MODE CHANNEL 2 Pattern selection 0~255 52 static/dynamic mode CHANNEL 3 Position-X 0~255 Adjust position -X CHANNEL 4 Position-Y 0~255 Adjust position-Y CHANNEL 5 Scanning speed 0~255 0 : quick, 255 :slow CHANNEL 6 Speed patterns 0~255 0 : quick, 255 : slow, 10 levels CHANNEL 7 Static pattern size 0~255 0 : small ; 255 : big Parameter Chart for Patterns selection There are 52 static patterns. The sizes of the pattern that DMX value is 140 previous are adjustable, the following irregular patterns are not adjustable. There are 52 dynamic patterns programs whose size can not be changed. DMX DYNAMC STATIC PATTERNS VALUE STATIC DYNAMC PATTERNS PATTERNS DMX VALUE PATTERNS 0~4 circle circle to big 130~134 christcross dot diagonal move 5~9 dot circle 1 dot circle to big 135~139 chiasm line horizontal line flex 10~14 dot circle 1 scan circle to big 140~144 hor-extend line hori dot line flex 15~19 scan circle circle flash 145~149 hori-shrink line hori line move 20~24 horizontal line dot circle flash 150~154 hori-flex line hori dot line move 25~29 hori-dot line circle roll 155~159 ho-flex dot line vertical line move 30~34 vertical line dot circle roll 160~164 ver-extend line vert-dot line move 35~39 vert-dot line circle turn 165~169 vert-shrink line rectangle extend 40~44 45° diagonal dot circle turn 170~174 vert-flex line dot rectangle extend 45~49 dot diagonal dot circe to add 175~179 ve-flex dot line square extend 50~54 135° diagonal scan circle extend 180~184 ladder line 1 dot square extend 55~59 dot diagonal circle jump 185~189 ladder line 2 rectangle turn 60~64 V line 1 dot circle jump 190~194 ladder line 3 dot rectangle turn DMX STATIC STATIC DYNAMC PATTERNS VALUE DMX VALUE PATTERNS DYNAMC PATTERNS PATTERNS 65~69 V dot line 1 horizontal line jump 195~199 ladder line 4 square turn 70~74 V line 2 hori-dot line jump 200~204 tetragon 1 dot square turn 75~79 V dot line 2 vertical line jump 205~209 tetragon 2 pentagon turn 80~84 triangle 1 ver-dot line jump 210~214 pentagon 1 dot pentagon turn 85~89 dot triangle 1 diagonal jump 215~219 pentagon 2 tetragon turn 90~94 triangle 2 dot diagonal jump 220~224 pentagon 3 pentagon star turn 95~99 dot triangle 2 short sector round 1 225~229 pentagon 4 bird fly 100~104 square short sector round 2 230~234 wave line dot bird fly 105~109 dot square long sector round 1 235~239 wave dot line wave flowing 110~114 rectangle 1 long sector round 2 240~244 spirality line dot wave flowing 115~119 dot rectangle 1 line scan 245~249 many dot 1 many dot jump 1 120~124 rectangle 2 dot line scan 250~254 many dot 2 square dot jump 125~129 dot rectangle 2 45° diagonal move 255 square dot many dot jump 2 FUNCTION SETTINGS Use DIP switches to assign a unit’s function : DMX, Master / Slave, sound active or auto mode. For the unit is DMX mode, set the DMX address using dipswitch. Each dipswitch represents a binary value. Please refer to the chart below. Dipswitch #10 is used to set master or slave mode. Master modes have sound active and AUTO mode. Slave modes have DMX and Slave mode. The units automatically identify DMX or SLAVE mode by data received. Dipswitch #9 is used to set sound active or AUTO mode in master mode. DMX ADDRESS CALCULATION In DMX mode, the DIP switch from # 1 to # 9 should be set to record a DMX address. The address ranges from 1-511. Each dipswitch represents a binary value. Please refer to table below. Dipswitch VALUE Dipswitch VALUE #1 1 #6 32 #2 2 #7 64 #3 4 #8 128 #4 8 #9 256 #5 16 #10 DMX, on "0" Each unit has 7 channels. So each product may be receiving a 7-channel DMX address at least. If you assign an address on 8 channels, the DMX address is: 8*N +1, N=0, 1, 2, 3…. Example: Address 1 loop =1 Address 2 loop = 9 Address 3 loop = 17 Address 4 loop = 25 LOOP ADDRESS CODE DIPSWITCH 1 1 100000000 #1 2 9 100100000 #1+#4 3 17 100010000 #1+#5 4 25 100110000 #1+#4+#5 Please refer to the chart on the last page to set the DIP switch according to the DMX address assignment. 4. OPERATION a. STAND ALONE OPERATION : Sound activation and AUTO This mode allows a single device to react to the sound of music. 1. Place the device in a suitable and stable position. 2. Set the dipswitch to select AUTO or Sound active mode. 3. Turn on the unit. The unit resets then it begins to work. 4. The unit will react to low frequencies through the internal microphone. Adjust the sound sensitivity with the appropriate knob located at the rear of the unit. The LED indicates whether the music mode is activated. b. MODE MASTER / SLAVE This mode allows you to connect up to 32 units together without controller. 1. Install the unit in a suitable and stable position. 2. Choose a unit to function as master mode, set dipswitch to select AUTO or Sound active mode. The others must be set in slave mode. Set the DIP switch to slave mode. 3. Use an XLR cable to connect devices together. Taken at the rear of the unit. 4. Turn on all units. The devices reset and then begin to work. The slave units will react the same as the master unit. 5. The units respond to low frequencies through the internal microphone. Adjust the sound sensitivity with the appropriate knob located at the rear of the unit. The LED indicates whether the music mode is activated. c. DMX MODE This mode allows you to use the DMX 512 console to operate your devices. 1. Install the unit in a suitable and stable position. 2. Use an XLR cable to connect devices together. Taken at the rear of the unit 3. Assign a DMX address for each device using the DIP switch. Please refer to the chart on the last page. 4. Turn on all devices. The units reset, then begin to start working. 5. Use a DMX console to control your devices. NOTE: 1. DMX console can not be operated in Master / Slave (AUTO / SOUND ACTIVE mode) 2. There must be only 1 single master unit in Master / Slave mode 5. 1. TROUBLESHOOTING If the power indicator does not lit up and the device does not work, please check the power cable is properly connected and if the input voltage is compatible with that of the device. 2. In Stand alone operation, if the power indicator lights up and sound active indicator does not lit up and the light beam does not work. 3. 4. a. The sound is too low. Increase the volume of music or sound sensitivity. b. Check if the device is in slave mode then set up in master mode. In Master / Slave mode, the slave units does not work a. Make sure there is only 1 single unit in the master channel and the other units are set as a slave. b. Make sure you are not using a DMX console c. Make sure the cables are of good quality and the connections are properly made. In DMX mode, the beam does not work and the DMX signal is off. a. Make sure the DMX mode is activated. b. Make sure the cables are of good quality and the connections are properly made. 5. In DMX mode, the laser is not controlled by the DMX console, DMX signal indicator flashes. Make sure the console and the units have the same channel. 6. If the direction of the beam is not correct, restart the machine. 7. If the unit does not work properly, turn the unit off then back on. If the unit meets other operational problems, we recommend that you contact your dealer. TABLE SET DMX ADDRESS