1
P3PC-3252-01ENZ0
Operator's Guide
Introduction
Thank you for purchasing the color image scanner ScanSnap S1100 (hereinafter referred to
as "the ScanSnap").
This manual explains how to handle and operate the ScanSnap.
Be sure to read this guide and "Getting Started" thoroughly before using the ScanSnap to
ensure correct use.
We hope that this manual will provide you with useful information in order to utilize the
ScanSnap.
If you are using a Microsoft® Windows® operating system, either Adobe® Acrobat® (7.0 or
later) or Adobe® Reader® (7.0 or later) is required to display or print this manual.
Trademarks
Microsoft, Windows, Windows Vista, Excel, PowerPoint, Outlook, SharePoint, and
Entourage are either registered trademarks or trademarks of Microsoft Corporation in the
United States and/or other countries.
Word is the product of Microsoft Corporation in the United States.
Apple, the Apple logo, Mac, Mac OS, iPhoto, and Rosetta are trademarks of Apple Inc.
Adobe, the Adobe logo, Acrobat, and Adobe Reader are either registered trademarks or
trade names of Adobe Systems Incorporated in the United States and/or other countries.
Intel, Pentium, and Intel Core are registered trademarks or trademarks of Intel Corporation in
the United States and other countries.
PowerPC is a registered trademark or trademark of International Business Machines
Corporation in the United States, other countries, or both.
Cardiris is a trademark of I.R.I.S.
ABBYY and FineReader are trademarks of ABBYY.
Evernote is a registered trademark or trademark of Evernote Corporation.
Google and Google Docs are registered trademarks or trademarks of Google Inc.
ScanSnap, the ScanSnap logo, CardMinder, and Rack2-Filer are registered trademarks or
trademarks of PFU LIMITED in Japan.
Other company names and product names are the registered trademarks or trademarks of
the respective companies.
Manufacturer
PFU LIMITED
International Sales Dept., Imaging Business Division, Products Group
Solid Square East Tower
580 Horikawa-cho, Saiwai-ku, Kawasaki-shi, Kanagawa 212-8563, Japan
Phone: (81-44) 540-4538
All Rights Reserved, Copyright© PFU LIMITED 2010
2
Introduction
Disclaimer
zReproducibility of the image data
Confirm that the image data scanned with the ScanSnap meets your requirements (e.g.
image reproducibility in size accuracy, information amount, fidelity, content and color).
zDisposing of the original document
Check the image data using the application where you transferred the image data to
make sure that there are no missing parts before disposing of the original document
scanned with the ScanSnap.
It is the responsibility of the customer to store and manage the scanned image, and
dispose of the original document scanned with the ScanSnap.
Manuals
Read the following manuals as needed when using the ScanSnap.
Manual
Description
ScanSnap S1100
Getting Started
Read this manual before you
start using the product
because it contains important
information about the safe use
of the ScanSnap.
It also explains about the
ScanSnap package contents,
software installation,
connecting the ScanSnap, and
checking the operation.
ScanSnap S1100
Operator's Guide
(this manual)
Read this manual for
information about basic
operations of the ScanSnap,
software installation, scanning
methods, various settings, and
handling of the ScanSnap.
3
Reference Method
Included in the package.
Select [Start] menu [All Programs]
[ScanSnap Manager] [ScanSnap
Operator's Guide].
Select [Applications] from the sidebar in
Finder, and double-click [ScanSnap]
[Manual] [Operator's Guide].
Introduction
Manual
Troubleshooting
(installation)
Description
Read this manual when you
failed to install the software or
when the ScanSnap does not
operate normally after
software installation. It
explains about the resolutions
for such troubles.
Reference Method
z Click [Manuals] [Troubleshooting
(installation)] in the [ScanSnap Setup]
dialog box that appears when you insert
the Setup DVD-ROM into the DVD-ROM
drive.
z Select [Start] menu [All Programs]
[ScanSnap Manager]
[Troubleshooting (installation)].
z Double-click the [Troubleshooting
(installation)] icon in the [ScanSnap]
window that appears when you insert the
Setup DVD-ROM into the DVD-ROM
drive.
z Select [Applications] from the sidebar in
Finder, and double-click [ScanSnap]
[Manual] [Troubleshooting
(installation)].
ScanSnap Organizer
User's Guide
CardMinder User's Guide
Read these manuals when
using this product for the first
time, or when you need more
information on product
features, dialog boxes/
windows, operating
environment and functions.
Select [Start] menu [All Programs]
[ScanSnap Organizer] [Manual].
Select [Start] menu [All Programs]
[CardMinder] [Manual].
Cardiris
GETTING STARTED
From Finder, select [Applications] and
double-click [Cardiris 3.6 for ScanSnap]
[User's Manual.pdf].
ABBYY FineReader for
ScanSnap User's Guide
Select [Start] menu [All Programs]
[ABBYY FineReader for ScanSnap(TM)
4.1] [User's Guide].
Scan to Microsoft
SharePoint User Guide
Select [Start] menu [All Programs]
[KnowledgeLake] [Scan to Microsoft
SharePoint User Guide].
4
Introduction
Manual
ScanSnap Manager
Help
Description
Read this Help file when
questions or problems
regarding operations (e.g.
when setting items) arise.
This Help file explains about
scanner operations,
operational troubles and their
resolution, dialog boxes/
windows and messages.
Reference Method
Refer to this Help by either of the following
methods:
z Right-click the ScanSnap Manager icon
on the taskbar, and then select
[Help] [Help] from the menu that
appears.
In Windows 7, the ScanSnap Manager
icon
is displayed in the menu that
appears when you click
on the
taskbar.
z Click the Help button (
) for
ScanSnap Manager.
z Press the [F1] key on the keyboard when
a dialog box is displayed.
z Click the [Help] button in each dialog
box.
z Click the ScanSnap Manager icon
in
the Dock while pressing the [control] key
on the keyboard, and then select [Help]
[Help] from the menu that appears.
z Click the Help button ( ) for ScanSnap
Manager.
z From the menu bar, select [Help]
[ScanSnap Manager Help].
ScanSnap Organizer
Help
CardMinder Help
Cardiris Help
Read these Help files when
questions or problems
regarding operations (e.g.
when setting items) arise.
These Help files explain about
operations, dialog boxes/
windows and messages.
ABBYY FineReader for
ScanSnap Help
For details about how to start up the Help,
refer to the User's Guide for each product.
From the menu bar, select [Help]
Help].
From the menu bar, select [Help]
[FineReader for ScanSnap Help].
5
[Cardiris
Introduction
■ About This Manual
Structure of This Manual
This manual consists of the following:
ScanSnap Overview
This chapter explains about the features, the names and functions of the parts,
system requirements, and basic operations of the ScanSnap.
Installing the Software
This chapter explains about the software bundled with the ScanSnap and how
to install them.
Using the ScanSnap (for Windows Users)/ Using the ScanSnap (for Mac OS
Users)
This chapter explains how to perform a scan, change or save scan settings,
add, change or delete profiles, as well as other various scanner functions.
Troubleshooting
This chapter provides references for resolving troubles such as removing
jammed documents.
Daily Care
This chapter explains about the cleaning materials and how to clean the
ScanSnap.
Appendix
This appendix explains how to update ScanSnap Manager, how to uninstall
the software, about settings that differ by the scanning method, how to
purchase/clean the Carrier Sheet and the ScanSnap installation specifications.
Read this manual in order starting from "ScanSnap Overview" through "Using the
ScanSnap" for a better understanding of ScanSnap operations.
6
Introduction
Symbols Used in This Manual
The following indications are used in this manual to obviate any chance of accident or
damage to you and people near you, and your property. Warning labels indicate the warning
level and statements. The symbols indicating warning levels and their meanings are as
follows.
Indication
Description
WARNING
This indication alerts operators to an operation that, if not
strictly observed, may result in severe injury or death.
CAUTION
This indication alerts operators to an operation that, if not
strictly observed, may result in safety hazards to personnel or
damage to the product.
Besides warning indicators, the following symbols are also used in this manual.
Symbol
Description
This symbol alerts operators to particularly important information.
Be sure to read this information.
This symbol alerts operators to helpful advice regarding operations.
This symbol indicates operations using Windows.
This symbol indicates operations using Mac OS.
Arrow Symbols in This Manual
Right-arrow symbols ( ) are used to connect icons or menu options you should select in
succession.
Example: Select [Start] menu
[Computer].
7
Introduction
Screen Examples in This Manual
zWindows screen
Screenshots in this manual are used according to guidelines provided by Microsoft
Corporation.
The screenshots used in this manual are of Windows Vista.
The actual windows and operations may differ depending on the operating system that you
are using.
zMac OS screen
The screenshots used in this manual are of Mac OS X v10.6.
The actual windows and operations may differ depending on the Mac OS that you are using.
The screen examples in this manual are subject to change without notice in the interest of
product development.
If the actual screen differs from the screen examples in this manual, operate by following the
actual displayed screen.
8
Introduction
Abbreviations Used in This Manual
The following abbreviations are used in this manual:
Windows 7
: Windows® 7 Starter operating system, English Version
Windows® 7 Home Premium operating system, English Version
Windows® 7 Professional operating system, English Version
Windows® 7 Enterprise operating system, English Version
Windows® 7 Ultimate operating system, English Version
Windows Vista
: Windows Vista® Home Basic operating system, English Version
Windows Vista® Home Premium operating system, English Version
Windows Vista® Business operating system, English Version
Windows Vista® Enterprise operating system, English Version
Windows Vista® Ultimate operating system, English Version
Windows XP
: Windows® XP Home Edition operating system, English Version
Windows® XP Professional operating system, English Version
Windows
: Windows 7, Windows Vista or Windows XP operating system
Microsoft Office
: Microsoft® Office
Word
: Microsoft® Word 2010
Microsoft® Office Word 2007
Microsoft® Office Word 2003
Microsoft® Office Word 2002
Excel
: Microsoft® Excel® 2010
Microsoft® Office Excel® 2007
Microsoft® Office Excel® 2003
Microsoft® Office Excel® 2002
PowerPoint
: Microsoft® PowerPoint® 2010
Microsoft® Office PowerPoint® 2007
Microsoft® Office PowerPoint® 2003
Microsoft® Office PowerPoint® 2002
SharePoint
: Microsoft® SharePoint® Server 2010, English Version
Microsoft® Office SharePoint® Server 2007, English Version
Microsoft® Office SharePoint® Portal Server 2003, English Version
Microsoft® SharePoint® Foundation 2010, English Version
Microsoft® Windows® SharePoint® Services 2.0/3.0, English Version
Office Live
: Microsoft® Office Live
Internet Explorer
: Windows® Internet Explorer®
Microsoft® Internet Explorer®
Windows Live Mail
: Windows Live™ Mail
Windows Mail
: Microsoft® Windows® Mail
Outlook
: Microsoft® Outlook® 2010
Microsoft® Office Outlook® 2007
Microsoft® Office Outlook® 2003
Outlook Express
: Microsoft® Outlook® Express
9
Introduction
.NET Framework
: Microsoft® .NET Framework
Entourage
: Microsoft® Entourage®
Mac OS
: Mac OS X v10.6
Mac OS X v10.5
Mac OS X v10.4
Adobe Acrobat
: Adobe® Acrobat®
Adobe Reader
: Adobe® Reader®
ABBYY FineReader for
ScanSnap
: ABBYY FineReader for ScanSnap™
All the descriptions in this manual assume the usage of ABBYY
FineReader for ScanSnap bundled with the ScanSnap. Unless otherwise
specified, the term ABBYY FineReader for ScanSnap refers to the ABBYY
FineReader for ScanSnap bundled with the ScanSnap.
Note that ABBYY FineReader for ScanSnap may be upgraded without
notice.
If the descriptions differ from the actual displayed screens, refer to ABBYY
FineReader for ScanSnap Help.
Cardiris
: Cardiris™ for ScanSnap
Google Docs
: Google Docs™
ScanSnap
: Color image scanner ScanSnap S1100
Carrier Sheet
: ScanSnap Carrier Sheet
10
Contents
Introduction ................................................................................... 2
■ About This Manual ....................................................................... 6
ScanSnap Overview.................................................................... 15
Features of the ScanSnap ................................................................. 16
Parts and Functions ........................................................................... 19
■ Front..................................................................................................... 19
■ Side ...................................................................................................... 20
■ Output Guide........................................................................................ 20
System Requirements ........................................................................ 21
■ Windows............................................................................................... 21
■ Mac OS ................................................................................................ 23
Turning the ScanSnap ON/OFF ......................................................... 25
Documents for Scanning ................................................................... 27
■ Conditions for Documents That Can Be Scanned ............................... 27
■ Conditions for Using the Carrier Sheet ................................................ 29
How to Load Documents ................................................................... 30
Scanning Operation Flow .................................................................. 32
Installing the Software................................................................ 34
Bundled Software Overview .............................................................. 35
Installing in Windows ......................................................................... 36
■ How to Install the Software .................................................................. 36
■ ScanSnap Software ............................................................................. 38
■ Evernote for Windows .......................................................................... 42
■ Scan to Microsoft SharePoint............................................................... 44
■ Trial Software ....................................................................................... 46
11
Contents
Installing in Mac OS ........................................................................... 48
■ How to Install the Software .................................................................. 48
■ ScanSnap Software ............................................................................. 49
■ Evernote for Mac.................................................................................. 54
Using the ScanSnap (for Windows Users) ............................... 57
ScanSnap Manager Icon and Operations ......................................... 58
■ Right-Click Menu.................................................................................. 59
■ Left-Click Menu .................................................................................... 60
How to Perform a Scan ...................................................................... 61
■ Preparation........................................................................................... 61
■ Using the Quick Menu.......................................................................... 63
■ Without Using the Quick Menu............................................................. 69
■ Stopping the Scan................................................................................ 73
■ Finishing ScanSnap Operation ............................................................ 74
Configuring ScanSnap Manager ....................................................... 75
■ Quick Menu Settings ............................................................................ 75
■ How to Configure Scan Settings .......................................................... 78
■ Profile Management ............................................................................. 81
■ Automatic Linkage with Applications.................................................... 90
■ ScanSnap's Communication Status ..................................................... 93
■ Showing the Scanning Progress .......................................................... 95
Actions ................................................................................................ 97
■ Saving Data in a Specified Folder........................................................ 98
■ Attaching Files to E-Mail .................................................................... 105
■ Using the ScanSnap as a Copy Machine........................................... 117
■ Saving Files to Picture Folder ............................................................ 124
■ Converting into Word/Excel/PowerPoint Documents ......................... 131
■ Storing Business Cards in CardMinder .............................................. 139
■ Saving Data in SharePoint ................................................................. 146
■ Saving to Rack2-Filer......................................................................... 155
■ Saving Documents to Evernote.......................................................... 162
■ Saving Handwritten Notes to Evernote .............................................. 171
■ Saving Documents to Google Docs ................................................... 178
Using the ScanSnap in Various Ways ............................................ 187
■ Scanning Color Documents in Gray or Black & White Mode ............. 187
12
Contents
■ Scanning Color Documents in High Compression Mode ................... 189
■ Correcting Skewed Character Strings ................................................ 191
■ Correcting the Orientation of Scanned Images .................................. 194
■ Scanning Documents Larger Than A4/Letter Size ............................. 197
■ Scanning Documents Such as Photographs and Clippings ............... 202
■ Long Page Scanning.......................................................................... 206
■ Saving Scanned Images in Multiple PDF Files .................................. 208
■ Creating Searchable PDF Files.......................................................... 210
■ Automatically Setting Keywords for PDF Files................................... 213
■ Setting Document Open Passwords for PDF Files ............................ 218
Using the ScanSnap (for Mac OS Users) ................................ 222
ScanSnap Manager Icon and Operations ....................................... 223
■ ScanSnap Manager Menu ................................................................. 224
■ Profile Menu ....................................................................................... 226
How to Perform a Scan .................................................................... 227
■ Preparation......................................................................................... 227
■ Using the Quick Menu........................................................................ 228
■ Without Using the Quick Menu........................................................... 233
■ Stopping the Scan.............................................................................. 237
■ Finishing ScanSnap Operation .......................................................... 238
Configuring ScanSnap Manager ..................................................... 239
■ Quick Menu Settings .......................................................................... 239
■ How to Configure Scan Settings ........................................................ 242
■ Profile Management ........................................................................... 245
■ Automatic Linkage with Applications.................................................. 255
■ Showing the Scanning Progress ........................................................ 256
Actions .............................................................................................. 258
■ Saving Data in a Specified Folder...................................................... 259
■ Attaching Files to E-Mail .................................................................... 266
■ Using the ScanSnap as a Copy Machine........................................... 276
■ Converting into Word/Excel Documents ............................................ 283
■ Storing Business Cards in Cardiris .................................................... 291
■ Storing Scanned Images in iPhoto..................................................... 300
■ Saving Documents to Evernote.......................................................... 305
■ Saving Handwritten Notes to Evernote .............................................. 313
■ Saving Documents to Google Docs ................................................... 319
13
Contents
Using the ScanSnap in Various Ways ............................................ 328
■ Scanning Color Documents in Gray or Black & White Mode ............. 328
■ Correcting Skewed Character Strings................................................ 330
■ Correcting the Orientation of Scanned Images .................................. 333
■ Scanning Documents Larger Than A4/Letter Size ............................. 336
■ Scanning Documents Such as Photographs and Clippings ............... 341
■ Long Page Scanning.......................................................................... 345
■ Saving Scanned Images in Multiple PDF Files .................................. 347
■ Creating Searchable PDF Files.......................................................... 349
■ Automatically Setting Keywords for PDF Files................................... 352
Troubleshooting........................................................................ 357
Daily Care................................................................................... 358
Cleaning Materials ............................................................................ 359
Cleaning the Outside of the ScanSnap .......................................... 360
Cleaning the Inside of the ScanSnap ............................................. 361
Appendix.................................................................................... 365
Updating ScanSnap Manager .......................................................... 366
■ Updating in Windows ......................................................................... 366
■ Updating in Mac OS ........................................................................... 368
Uninstalling the Software ................................................................ 370
■ Uninstalling in Windows ..................................................................... 370
■ Uninstalling in Mac OS....................................................................... 372
Setting Items With/Without the Quick Menu .................................. 376
Purchasing/Cleaning the Carrier Sheet .......................................... 380
■ Purchasing the Carrier Sheet............................................................. 380
■ Cleaning the Carrier Sheet................................................................. 381
Installation Specifications ............................................................... 382
About Maintenance ................................................................... 383
Index........................................................................................... 384
14
ScanSnap Overview
This chapter explains about the features, part names and functions, system requirements, and
basic operations of the ScanSnap.
Features of the ScanSnap . . . . . . . . . . . . . . . . . . . . . . . . . . . . . . . . . . . . . . . . . . . . . . 16
Parts and Functions . . . . . . . . . . . . . . . . . . . . . . . . . . . . . . . . . . . . . . . . . . . . . . . . . . . 19
System Requirements . . . . . . . . . . . . . . . . . . . . . . . . . . . . . . . . . . . . . . . . . . . . . . . . . 21
Turning the ScanSnap ON/OFF. . . . . . . . . . . . . . . . . . . . . . . . . . . . . . . . . . . . . . . . . . 25
Documents for Scanning . . . . . . . . . . . . . . . . . . . . . . . . . . . . . . . . . . . . . . . . . . . . . . . 27
How to Load Documents . . . . . . . . . . . . . . . . . . . . . . . . . . . . . . . . . . . . . . . . . . . . . . . 30
Scanning Operation Flow. . . . . . . . . . . . . . . . . . . . . . . . . . . . . . . . . . . . . . . . . . . . . . . 32
15
Features of the ScanSnap
Features of the ScanSnap
The main features of the ScanSnap are as follows:
zTurn documents into digital data by just pressing the [Scan/Stop] button
By converting paper documents cluttering up your desk into PDF or JPEG files, you can
conveniently view, edit, manage and archive the documents in your computer.
zSpeedy scanning
A4 or Letter size documents can be scanned at a speed of 7.5 seconds per page under
the following conditions:
z System requirements
Intel® Core™ 2 Duo 2.2 GHz or higher
Windows 7, Windows Vista or Windows XP operating system
Intel® Core™ 2 Duo 2.4 GHz or higher
Mac OS X v10.6, Mac OS X v10.5 or Mac OS X v10.4
z Scan setting (*)
When [Image quality] is set to [Automatic resolution], [Color mode] to [Auto color
detection], [Compression rate] to [3], and other settings are in default
*
: - Scanning speed may slow down in [B&W] (black & white) mode depending on the document.
Example: Scanning color brochures in [B&W] mode (converting a color image to black &
white)
- Scanning speed may slow down when [Correct skewed character strings automatically] and/
or [Allow automatic image rotation] is enabled.
zCompact, lightweight and portable
Compact enough to place on your desktop next to your computer, the ScanSnap can be
powered by a single USB cable. This allows you to carry it anywhere with your laptop
and have the flexibility to use it in or outside the office.
zThe Quick Menu makes the operation easy even for beginners
The Quick Menu will allow you to start using the ScanSnap right away even if it is your
first time. Simply press the [Scan/Stop] button on the scanner to scan your document,
and then the Quick Menu will appear where you can select the action you want to
perform.
16
Features of the ScanSnap
zAutomatically recognize color and black & white documents (Auto color
detection)
The ScanSnap determines the color mode of each document, saves color documents in
color, black & white documents in black & white, and black & white documents with
photos or illustrations in grayscale. This function will optimize your PDF file size.
zScan documents without specifying paper size (Automatic page size
detection)
Paper size is automatically recognized so that you do not need to change the paper size
setting. The Carrier Sheet (sold separately) allows you to scan documents larger than
A4/Letter size including photos and clippings.
zScan various types of documents
The ScanSnap allows you to scan not only paper documents such as standard office
paper, postcards, business cards, photographs or clippings but also plastic cards
(including embossed ones) such as driver’s licences or ID cards.
zAutomatically set the resolution by the paper size (Automatic resolution
function)
Documents are scanned at 300 dpi at first, then the image is saved at 300 dpi if the
document length is 148 mm (5.83 in.) or less, and converted to 200 dpi for longer
documents. When linked with a text recognition application (e.g. for scanning business
cards), you can save high resolution image data without having to change the scan
settings.
zCreate searchable PDF files
You can create searchable PDF files by performing automatic text recognition for PDF
files after scanning.
You can also perform text recognition on character strings marked by a highlight pen in
black & white documents, and add them as keywords for the PDF file.
zE-mail or print a scanned image directly from scanning
You can attach the scanned image to an e-mail without needing any additional
application or print it out instead of using a copy machine.
zCompatible with both Windows and Mac OS
You can use the ScanSnap in a manner that best suits your office environment in either
Windows or Mac OS (*).
*
: The following functions are not available for Mac OS:
• Color high compression
• Setting passwords for PDF files
zConvert paper documents into Word/Excel/PowerPoint files
Use the bundled "ABBYY FineReader for ScanSnap" to directly convert the scanned
image into a Word/Excel/PowerPoint file.
In Mac OS, only conversion to Word and Excel files is supported.
17
Features of the ScanSnap
zOrganize and manage scanned images by linking with ScanSnap
Organizer
z Setting a keyword (Intelligent Indexing)
Keywords can be set by the following methods:
- Recognize a character string on a page (OCR) and set as a keyword (Zone OCR)
- Set any character string as a keyword
- Set a marked character string as a keyword (Marker Index)
- Drag and drop a keyword from the keyword list (Keyword Addition by Drag&Drop)
The keywords can be viewed in thumbnails. (Keyword Overlay)
z Distributing files by keyword (Automatic Keyword Sort)
Files can also be sorted into folders according to the keyword set for files as a sorting
condition.
z Search a variety of files (Search Engine Selection)
Files can be found quickly searched by file name, keyword, text or date.
z Cropping marked sections (Intelligent Cropping)
Selections on a page that are marked with a highlight pen can be cut and pasted
elsewhere to create scrapbooks.
zEasy filing of business cards
Text recognition can be performed on business cards which then can be easily
converted into digital data with the bundled business card application. With CardMinder,
you can create a database which facilitates data search of business cards converted
into digital data.
The bundled business card application is as follows:
CardMinder
Cardiris
zShare documents converted into digital data with others
You can conveniently share documents by saving the scanned image directly in
SharePoint or Office Live.
z Access documents converted into digital data anytime, anywhere
By converting scanned images into digital data and saving them in Evernote or Google
Docs, you can later access them anytime from your computer or smartphone no matter
where you are.
Note: The ScanSnap does not conform to the TWAIN, ISIS and WIA standards.
18
Parts and Functions
Parts and Functions
This section explains names and functions of the ScanSnap parts.
■ Front
Feed guide
Open to use the ScanSnap.
Opening the feed guide turns on the ScanSnap.
Output guide
For details, refer to "Output Guide" (page 20).
Top cover
Open to remove jammed documents or clean the
inside of the ScanSnap.
For details about how to clean the inside of the
ScanSnap, refer to "Cleaning the Inside of the
ScanSnap" (page 361).
[Scan/Stop] button
Press this button to start or finish scanning.
It indicates the status of the ScanSnap as follows:
Blue (lit)
: Ready
Blue (flashing)
: Scanning
Orange (flashing) : Error
Feed guide
You can load the document here after opening it.
Feeding section
Insert the document here to load.
19
Parts and Functions
■ Side
Tape seal
Remove this tape seal after installing the software.
USB connector
■ Output Guide
Output guide
Open the output guide to eject documents from the
front of the ScanSnap.
Select an ejection method depending on the
document type you are scanning.
For details about the documents that can be
scanned with the ScanSnap, refer to "Documents
for Scanning" (page 27).
When the output guide is closed
When the output guide is open
20
System Requirements
System Requirements
The system requirements for the ScanSnap are as follows:
■ Windows
Operating system
CPU
Memory
Display
resolution
Hard disk space
Windows 7
(32 bit/64 bit)
Windows Vista (*1)
(32 bit/64 bit)
Windows XP (*2)
(32 bit)
Intel® Core™ 2 Duo 2.2 GHz or higher recommended
(minimum: Intel® Pentium® 4 1.8 GHz)
32 bit: 1 GB or more
64 bit: 2 GB or more
512 MB or more (1 GB or more recommended)
800 × 600 pixels or higher (*3)
Disk space required to install the software bundled with the ScanSnap is as follows:
z ScanSnap Manager: 480 MB
z ScanSnap Organizer: 580 MB
z CardMinder: 280 MB
z ABBYY FineReader for ScanSnap: 600 MB
z Evernote for Windows: 120 MB
z Scan to Microsoft SharePoint: 40 MB
USB port (*4)
USB2.0/USB1.1
*1: Service Pack 1 or later required
*2: Service Pack 3 or later required
*3: When the font size is large, some screens may not be displayed properly.
In that case, use a smaller font size.
*4: When using a USB 3.0 port, data is transferred at the same speed as USB 2.0.
z .NET Framework 3.5 (SP1) must be installed to use Evernote for Windows.
z If .NET Framework 3.5 (SP1) is not installed, it will be installed (500 MB free disk space
required) at the same time when ScanSnap Manager or ScanSnap Organizer is installed.
z Do not use the USB port on the keyboard or the monitor to connect the ScanSnap (it may not
function properly).
z Make sure to use a powered hub equipped with an AC adapter if you are using a
commercially available USB hub.
z If the USB port or the USB hub is USB 1.1, scanning speed will slow down.
z If the CPU or the memory do not meet the required specifications, scanning speed will slow
down.
z The actual increase in used disk space after installation and the required disk space for
installation may differ from each other depending on your Windows system disk
management.
z A disk space approximately three times larger than the resulting scanned file size is required
when scanning documents.
21
System Requirements
The following shows the estimated file size when scanning one side of a color
document.
File format
Compression rate
PDF
3
Paper size
A4 (catalog)
Estimated image data size (KB)
Color mode
Color
Automatic
resolution
Normal
Better
Best
413.6
275.7
427.7
877.9
Excellent
3231.1
Gray
367.9
260.5
403.9
746.9
2729.1
B&W
172.4
120.2
174.0
362.0
2048.4
Color high compression
224.3
168.8
240.0
165.3
—
22
System Requirements
■ Mac OS
Operating system (*1)
CPU
Memory
Mac OS X v10.6 (*2)
Mac OS X v10.4 (*3)
Intel® Core™ 2 Duo 2.4 GHz or higher recommended
(minimum: Intel® Core™ Duo 1.83 GHz or PowerPC® G5 1.6 GHz)
1 GB or more
512 MB or more (1 GB or more recommended)
Display resolution
Hard disk space
Mac OS X v10.5 (*3)
1024 × 768 pixels or higher
Disk space required to install the software bundled with the ScanSnap is as
follows:
z ScanSnap Manager: 670 MB
z ABBYY FineReader for ScanSnap: 570 MB
z Cardiris : 150 MB
z Evernote for Mac: 55 MB
USB port (*4)
USB2.0/USB1.1
*1: It is recommended to apply the latest updates to the Mac OS.
*2: Rosetta must be installed to use Cardiris.
You can install Rosetta from the [Optional Installs] package on the Mac OS installation disc.
*3: Evernote for Mac is not supported for versions earlier than Mac OS X v.10.5.8.
*4: When using a USB 3.0 port, data is transferred at the same speed as USB 2.0.
z Do not use the USB port on the keyboard or the monitor to connect the ScanSnap (it may not
function properly).
z Make sure to use a powered hub equipped with an AC adapter if you are using a
commercially available USB hub.
z If the USB port or the USB hub is USB 1.1, scanning speed will slow down.
z If the CPU or the memory do not meet the required specifications, scanning speed will slow
down.
z A disk space approximately three times larger than the resulting scanned file size is required
when scanning documents.
23
System Requirements
The following shows the estimated file size when scanning one side of a color
document.
File format
Compression rate
PDF
3
Paper size
A4 (catalog)
Estimated image data size (KB)
Automatic
resolution
Normal
Better
Best
Color
413.6
275.7
427.7
877.9
3231.1
Gray
367.9
260.5
403.9
746.9
2729.1
B&W
172.4
120.2
174.0
362.0
2048.4
Color mode
24
Excellent
Turning the ScanSnap ON/OFF
Turning the ScanSnap ON/OFF
This section explains how to turn the ScanSnap ON/OFF.
The ScanSnap is turned ON/OFF in conjunction with the computer. Therefore, you do not
have to worry about turning the power ON/OFF as long as the ScanSnap is connected to a
computer.
zTurning the ScanSnap on
Open the feed guide when the computer is turned on.
The [Scan/Stop] button flashes blue to indicate that the ScanSnap is turned on, and
lights in blue when the ScanSnap is ready to scan.
With some computers, the initialization of the ScanSnap may be performed several
times when the computer is started up.
z Turning the ScanSnap off
Turn off the computer or close the feed guide.
The [Scan/Stop] button switches off when the ScanSnap is turned off.
With some computers, it may take two to three minutes until the light of the [Scan/Stop]
button goes out after the computer is turned off.
25
Turning the ScanSnap ON/OFF
zScanSnap in sleep mode
When the ScanSnap has not been in operation for one minute while the power is on, it
enters sleep (power saving) mode.
The ScanSnap’s internal light switches off in sleep mode.
26
Documents for Scanning
Documents for Scanning
This section explains about the documents that can be scanned with the ScanSnap.
■ Conditions for Documents That Can Be Scanned
Conditions for documents that can be scanned with the ScanSnap are as follows:
Eject method (*1)
With the output guide open
With the output guide closed
Standard office paper
Standard office paper, postcards, business cards
Cards conforming to the ISO7810 ID-1 Type
standard (54 × 86 mm)
52.3 to 80 g/m² (14 to 20 lb)
52.3 to 209.3 g/m² (14 to 56.1 lb)
Paper type
Paper weight
Paper size
Plastic cards
0.76 mm (embossed cards are supported)
Width : 25.4 to 216 mm (1 to 8.5 in.)
Length : 25.4 to 360 mm (1 to 14.17 in.)
Maximum size for long page scanning (*2): 216 × 863 (mm) / 8.5 × 34 (in.)
*1: For details about how to eject documents, refer to "Output Guide" (page 20).
*2: Scanning starts when you hold down the [Scan/Stop] button on the ScanSnap for three seconds
or longer.
27
Documents for Scanning
z When you scan documents written in pencil, there may be black traces left on them. It is
recommended that you scan such documents by using the Carrier Sheet. Clean the rollers as
often as possible when you scan such documents directly without using a Carrier Sheet
because dirt accumulating on the rollers may cause feeding errors.
For details about how to clean the inside of the ScanSnap, refer to "Cleaning the Inside of
the ScanSnap" (page 361).
z The following types of documents must not be scanned:
- Paper-clipped or stapled documents (remove the paper clips and staples for scanning)
- Documents on which the ink is still wet (wait until the ink dries completely to scan these
documents)
- Documents larger than 216 × 863 (mm) / 8.5 × 34 (in.) (width x length)
- Documents other than paper such as fabric, metal foil and OHP film
z Be aware that picture side of postcards may get damaged when you scan picture postcards.
z Cards that are bent may not be fed properly.
z If the surface of the card is dirty with grease marks (e.g. fingerprints) and such, perform
scanning after wiping the dirt off.
z Insert the plastic card straight into the feeding section of the ScanSnap. Do not tilt the plastic
card when you insert it because the plastic card may not be fed properly.
z When you scan plastic cards with strong luster, some parts of the image may appear lighter
or darker than the original.
e.g. gold colored credit card
z Insert embossed cards in landscape orientation to achieve better scanning results.
z If the background color of the card and the color of the embossed characters are similar (e.g.
no gold or silver embossing), it may be difficult for the ScanSnap to recognize embossed
characters. In that case, click the [Option] button in the [Scanning] tab of the ScanSnap setup
dialog box, and select the [Setting for text only document] check box for a possible resolution.
z Scanning the following types of documents without using the Carrier Sheet can result in
documents being damaged or scanned incorrectly. It is recommended that you use the
Carrier Sheet to scan them.
- Documents smaller than 25.4 × 25.4 (mm) / 1 × 1 (in.) (width × length)
- Documents whose paper weight is less than 52.3 g/m² (17 lb)
- Documents of non-uniform thickness (e.g. envelopes and paper sheets with attached
materials)
- Wrinkled or curled documents
- Folded or torn documents
- Tracing paper
- Coated paper
- Photographs (photographic paper)
- Perforated or punched documents
- Odd shaped documents (not square or rectangular)
- Carbon paper or thermal paper
- Documents with memo papers or sticky notes attached
z Since carbonless paper may contain chemicals that can harm the rollers, take note of the
following when scanning carbonless paper:
- It is recommended that you use the Carrier Sheet to scan such documents.
- Make sure to clean the rollers regularly to maintain the scanner performance when
scanning carbonless paper directly without using the Carrier Sheet. Depending on the
type of carbonless paper, the life span of the scanner may be shortened compared to
scanning standard office paper.
28
Documents for Scanning
■ Conditions for Using the Carrier Sheet
The Carrier Sheet (sold separately) is a sheet designed to transport documents through the
ScanSnap.
You can scan documents that are larger than A4/Letter size, photographs and clippings.
Conditions for documents that can be scanned using the optional Carrier Sheet are as follows:
CAUTION
z Do not use a damaged Carrier Sheet because it may damage or cause the scanner to
malfunction.
z Be careful not to cut your finger on the edge of the Carrier Sheet.
Eject method (*1)
Paper type
Paper weight
Paper size
With the output guide closed
Documents that cannot be fed directly into the ScanSnap
Up to 127 g/m² (up to 34 lb)
Up to 63.5 g/m² (17 lb) (when scanning documents folded in half)
Carrier Sheet size (216 × 297 mm)
A3 (297 × 420 mm) (*2)
A4 (210 × 297 mm)
A5 (148 × 210 mm)
A6 (105 × 148 mm)
B4 (257 × 364mm) (*2)
B5 (JIS) (182 × 257 mm)
B6 (JIS) (128 × 182 mm)
Post card (100 × 148 mm)
Business card (90 × 55 mm, 55 × 90 mm)
Letter (8.5 × 11 in. (216 × 279.4 mm))
11 × 17 in (279.4 × 431.8 mm) (*2)
Custom size
Width : 25.4 to 216 mm (1 to 8.5 in.)
Length : 25.4 to 297 mm (1 to 11.69 in.)
*1: For details about how to eject documents, refer to "Output Guide" (page 20).
*2: Fold in half to scan.
z Do not stain, or cut the end with a black & white pattern because the Carrier Sheet will not be
recognized properly.
z Do not place the Carrier Sheet upside down. Otherwise, a paper jam may occur and damage
the Carrier Sheet and the document inside.
z Do not leave your document inside the Carrier Sheet for a long time. Otherwise, the ink on
the document may be transferred onto the Carrier Sheet.
z To avoid deformation, do not use or leave the Carrier Sheet in high temperature places such
as under direct sunlight or near a heating apparatus for a long time.
z Do not fold or pull the Carrier Sheet.
z To avoid deformation, store the Carrier Sheet on a flat surface without any weight on it.
z Paper jams may occur when several small size documents such as photographs and
postcards are placed inside the Carrier Sheet to be scanned at once. It is recommended that
you scan such documents one at a time.
29
How to Load Documents
How to Load Documents
Load a document in the ScanSnap in the following procedure.
For details about documents that can be loaded, refer to "Documents for Scanning" (page
27).
You can only load one document at a time in the ScanSnap.
1. Open the feed guide of the ScanSnap.
Feed guide
z If you want the document to be ejected from the front of the ScanSnap or when there is
not enough space where the document exits the ScanSnap, open the output guide.
For details about documents that can be scanned with the output guide open, refer to
"Documents for Scanning" (page 27).
Output guide
z How the document is ejected differs as below depending on whether the output guide is
open or closed.
With the output guide closed
30
With the output guide open
How to Load Documents
2. Insert the document straight into the feeding section of the ScanSnap,
with the scanning side facing up.
The document is pulled in until it is set inside the ScanSnap.
z Insert the document by aligning it with the left edge of
the feeding section if you specify a standard size
other than [Automatic detection] which is the default
paper size.
For details about how to change the scan settings,
refer to the following:
For Windows ( page 78)
For Mac OS ( page 242)
z When you perform scanning with the output guide closed, leave enough space at the
back of the ScanSnap to allow the document to be completely ejected. Make sure that
the area where the document exits the scanner is clear of any obstacles. Otherwise,
paper jam may occur.
z If you scan the following documents with the output
Output guide
guide open, a paper jam may occur and damage the
documents. Scan the following documents with the
output guide closed.
- Thick paper (80 g/m² (20 lb) or heavier)
- Postcards
- Business cards
- Plastic cards
- Carrier Sheet
31
Scanning Operation Flow
Scanning Operation Flow
This section explains the flow of operations for scanning documents.
You can scan documents in two different ways. Choose either way depending on your
intended use.
zUsing the Quick Menu
With the Quick Menu, even the first time users can easily use each ScanSnap function
by following the instructions on the screen and perform scanning.
After scanning, select an application to link with ScanSnap Manager in the Quick Menu.
For details about how to perform scanning using the Quick Menu, refer to the following:
For Windows ( page 63)
For Mac OS ( page 228)
zWithout Using the Quick Menu
You can perform scanning by using predefined scan settings.
Before you perform scanning, select a profile which is already configured with an
application to link with ScanSnap Manager. Documents are scanned according to the
scan settings of the selected profile.
For details about how to perform scanning without using the Quick Menu, refer to the
following:
For Windows ( page 69)
For Mac OS ( page 233)
Specify whether or not to use the Quick Menu by selecting or clearing the [Use Quick Menu]
check box in the ScanSnap setup dialog box/window.
Display the ScanSnap setup dialog box/window in the following procedure:
Right-click the ScanSnap Manager icon
on the taskbar, and select [Scan Button Settings].
In Windows 7, the ScanSnap Manager icon
is displayed in the menu which appears when
you click
on the taskbar.
Click the ScanSnap Manager icon
keyboard, and select [Settings].
in the Dock while pressing the [control] key on the
32
Scanning Operation Flow
Using the Quick Menu
Without Using the Quick Menu
Turn on the ScanSnap.(
page 25)
Select a profile
1
2
1. Load a document in the ScanSnap.
You can only load one document at a time.
z Documents for scanning ( page 27)
z How to load documents ( page 30)
2. Press the [Scan/Stop] button to start scanning.
3. To continue scanning, load the next document
after confirming that the current document has
been ejected. Scanning starts automatically when
the next document is loaded.
The [Scan/Stop] button flashes in blue throughout
the scan.
3
4. Press the [Scan/Stop] button to finish scanning
when scanning is completed.
4
Select an application from the Quick Menu
The selected application starts up.
33
Installing the Software
This chapter explains about the software bundled with the ScanSnap and how to install them.
Bundled Software Overview. . . . . . . . . . . . . . . . . . . . . . . . . . . . . . . . . . . . . . . . . . . . . 35
Installing in Windows . . . . . . . . . . . . . . . . . . . . . . . . . . . . . . . . . . . . . . . . . . . . . . . . . . 36
Installing in Mac OS . . . . . . . . . . . . . . . . . . . . . . . . . . . . . . . . . . . . . . . . . . . . . . . . . . . 48
34
Bundled Software Overview
Bundled Software Overview
This section gives an overview of each bundled software and their functions. You can edit,
manage and arrange the scanned image by using the following software:
zScanSnap Manager
This scanner driver is required to scan documents with the ScanSnap. The scanned
image can be saved as a PDF or JPEG file.
zScanSnap Organizer
You can use this application to display image data (PDF or JPEG files) without opening
them, create folders and arrange files as you like.
zCardMinder
You can use this application to efficiently digitalize a large number of business cards.
Text recognition can be performed on business cards and you can create a database to
facilitate card data management and searches.
zCardiris
You can use this application to efficiently digitalize a large number of business cards by
performing text recognition on them.
zABBYY FineReader for ScanSnap
This application can perform text recognition on the scanned images using OCR
(Optical Character Recognition) and convert the image data to Word, Excel or
PowerPoint files that can be edited.
In Mac OS, only conversion to Word and Excel files is supported.
zEvernote for Windows
/ Evernote for Mac
You can easily save files in Evernote using the ScanSnap.
zScan to Microsoft SharePoint
You can easily save files in SharePoint and Office Live using the ScanSnap.
zRack2-Filer V5.0 Trial Version
This application provides integrated management of digitalized paper documents
(electronic documents) and digital data created with computer, as if you are filing paper
documents in actual binders.
For details about the languages supported in Rack2-Filer, refer to Rack2-Filer
"Readme".
35
Installing in Windows
Installing in Windows
This section explains how to install the software in Windows.
■ How to Install the Software
When you insert the Setup DVD-ROM into the DVD-ROM drive on your computer, the
[ScanSnap Setup] dialog box appears.
The functions of each button in the [ScanSnap Setup] dialog box are as follows.
Button
Function
Readme
Displays the [Readme] dialog box where you can refer to the Readme file of
each software.
Install Products
Displays the [Install Products] dialog box from which you can install the
following software:
z [ScanSnap] button
- ScanSnap Manager
- ScanSnap Organizer
- CardMinder
- ABBYY FineReader for ScanSnap
z [Evernote] button
- Evernote for Windows
z [Scan to Microsoft SharePoint] button
- Scan to Microsoft SharePoint
Manuals
Displays the [Manuals] dialog box where you can refer to the software manuals
including "Troubleshooting (installation)".
Browse DVD Contents
Opens Windows Explorer to display the files from the DVD-ROM.
36
Installing in Windows
Button
Function
Contact Us
Displays contact information for customer support.
Trial Software
Displays the [Trial Software] dialog box from which you can install the trial
version software.
37
Installing in Windows
■ ScanSnap Software
Install the following software:
z
z
z
z
ScanSnap Manager
ScanSnap Organizer
CardMinder
ABBYY FineReader for ScanSnap
The procedure is as follows.
1. Turn on the computer and log on as a user with Administrator privileges.
2. Insert the Setup DVD-ROM into the DVD-ROM drive.
The [ScanSnap Setup] dialog box appears.
If the [ScanSnap Setup] dialog box does not appear, double-click "ScanSnap.exe" in the
Setup DVD-ROM via Windows Explorer.
3. Click the [Install Products] button.
The [Install Products] dialog box appears.
38
Installing in Windows
4. Click the [ScanSnap] button.
The [ScanSnap] dialog box appears, displaying the [Welcome to the InstallShield
Wizard for ScanSnap] screen.
5. Click the [Next] button.
The [Select Features] screen appears.
6. Confirm that all check boxes are selected, and click the [Next] button.
z The software will not be installed unless the check box is selected.
z Note that you must install ScanSnap Manager. Also, it is recommended to install all
software in order to utilize the features of the ScanSnap.
39
Installing in Windows
The [Choose Destination Location] screen appears.
7. Confirm the destination folder, and then click the [Next] button.
A confirmation about accepting the license agreement appears.
8. Read the "END-USER LICENSE AGREEMENT FOR ScanSnap", select [I
accept the terms of the license agreement], and then click the [Next]
button.
Depending on the number of the installed software, this step may be required more than
once.
The [Start Copying Files] screen appears.
9. Confirm the settings, and then click the [Next] button.
Installation starts. When the installation is complete, the [ScanSnap S1100 How to
load a document (1/2)] screen appears.
10.Read the instructions, and click the [Next] button.
The [ScanSnap S1100 How to load a document (2/2)] screen appears.
40
Installing in Windows
11.Read the instructions, and click the [Next] button.
The [InstallShield Wizard Complete] screen appears.
12.Click the [Finish] button.
13.Remove the Setup DVD-ROM from the DVD-ROM drive.
If the installation is not successfully completed, select [Manuals] [Troubleshooting
(installation)] in the [ScanSnap Setup] dialog box and refer to Troubleshooting (installation).
41
Installing in Windows
■ Evernote for Windows
Install Evernote for Windows in the following procedure.
1. Turn on the computer and log on as a user with Administrator privileges.
2. Insert the Setup DVD-ROM into the DVD-ROM drive.
The [ScanSnap Setup] dialog box appears.
If the [ScanSnap Setup] dialog box does not appear, double-click "ScanSnap.exe" in the
Setup DVD-ROM via Windows Explorer.
3. Click the [Install Products] button.
The [Install Products] dialog box appears.
42
Installing in Windows
4. Click the [Evernote] button.
Installation starts.
5. Follow the instructions on the screen to complete the installation.
6. Click the [Finish] button when the "InstallShield Wizard Complete"
notification is displayed.
7. Remove the Setup DVD-ROM from the DVD-ROM drive.
43
Installing in Windows
■ Scan to Microsoft SharePoint
Install Scan to Microsoft SharePoint in the following procedure.
For details about system requirements and notes on installation, refer to "Readme" of Scan to
Microsoft SharePoint. Click the [Readme] button in the [Scan to Microsoft SharePoint] dialog
box to open the Readme file.
1. Turn on the computer and log on as a user with Administrator privileges.
2. Insert the Setup DVD-ROM into the DVD-ROM drive.
The [ScanSnap Setup] dialog box appears.
If the [ScanSnap Setup] dialog box does not appear, double-click "ScanSnap.exe" in the
Setup DVD-ROM via Windows Explorer.
3. Click the [Install Products] button.
The [Install Products] dialog box appears.
44
Installing in Windows
4. Click the [Scan to Microsoft SharePoint] button.
Installation starts.
5. Follow the instructions on the screen to complete the installation.
6. Click the [Finish] button when the "InstallShield Wizard Complete"
notification is displayed.
7. Remove the Setup DVD-ROM from the DVD-ROM drive.
For details about how to use Scan to Microsoft SharePoint, refer to the Scan to Microsoft
SharePoint User Guide. Click the [Scan to Microsoft SharePoint] button in the [Manuals] dialog
box to open the Scan to Microsoft SharePoint User Guide.
45
Installing in Windows
■ Trial Software
Install the trial versions of the software in the following procedure.
For details about system requirements and installation, refer to "Readme" of the trial version
software. Click on the name of the software in the [Trial Software] dialog box, then click the
[Readme] button to open the Readme file.
1. Turn on the computer and log on as a user with Administrator privileges.
2. Insert the Setup DVD-ROM into the DVD-ROM drive.
The [ScanSnap Setup] dialog box appears.
If the [ScanSnap Setup] dialog box does not appear, double-click "ScanSnap.exe" in the
Setup DVD-ROM via Windows Explorer.
3. Click the [Trial Software] button.
The [Trial Software] dialog box appears.
46
Installing in Windows
4. Click the button of the trial software you want to install.
The setup dialog box of the trial software appears (e.g. [Rack2-Filer Setup]).
5. Click the [Install Product] button.
Installation starts.
6. Follow the instructions on the screen to complete the installation.
7. Click the [Finish] button when the "InstallShield Wizard Complete"
notification is displayed.
8. Remove the Setup DVD-ROM from the DVD-ROM drive.
For details about how to use trial versions of the software, refer to the software manual. Click
the [Manuals] button in the setup dialog box of the trial software to open the manual.
47
Installing in Mac OS
Installing in Mac OS
This section explains how to install software in Mac OS.
■ How to Install the Software
When you insert the Setup DVD-ROM into the DVD-ROM drive on your computer, the
[ScanSnap] window appears.
The functions of each icon in the [ScanSnap] window are as follows.
Icon
Function
ScanSnap
Installs the following software:
z ScanSnap Manager
z ABBYY FineReader for ScanSnap
z Cardiris
Evernote
Installs Evernote.
Readme
Displays the Readme file.
Troubleshooting (installation)
Displays "Troubleshooting (installation)".
Operator's Guide
Displays this manual.
48
Installing in Mac OS
■ ScanSnap Software
Install the following software:
z ScanSnap Manager
z ABBYY FineReader for ScanSnap
z Cardiris
The procedure is as follows.
1. Turn on the computer and log in as a user with Administrator privileges.
2. Insert the Setup DVD-ROM into the DVD-ROM drive.
The [ScanSnap] window appears.
3. Double-click the [ScanSnap] icon.
A confirmation message appears to proceed with the installation.
49
Installing in Mac OS
4. Click the [Continue] button.
The [Install ScanSnap] window appears, displaying the [Welcome to the ScanSnap
Installer] screen.
5. Click the [Continue] button.
The [Important Information] screen appears.
6. Read [Important Information], and then click the [Continue] button.
The [Software License Agreement] screen appears.
7. Read the "END-USER LICENSE AGREEMENT FOR ScanSnap", and click
the [Continue] button.
A confirmation about accepting the license agreement appears.
8. To accept the license agreement, click the [Agree] button.
The [Standard Install on "disk name"] screen appears.
50
Installing in Mac OS
9. Click the [Install] button.
z To install only ScanSnap Manager, clear the [ABBYY FineReader for ScanSnap] and
[Cardiris] checkboxes in the [Custom install on "disk name"] screen which is displayed
by clicking the [Customize] button.
z ABBYY FineReader for ScanSnap or Cardiris cannot be installed on its own.
Installation starts.
The [Cardiris 3.6 for ScanSnap] window appears, displaying the [License] screen.
10.Scroll down and read the "License" to the end, and then click the
[Continue] button.
A confirmation message appears.
11.Click the [Agree] button.
The [Select Destination] screen appears.
By default, Cardiris is installed in the Applications folder.
12.Click the [Continue] button.
The [Installation Type] screen appears.
13.Confirm that [Easy Install] is specified in the [Installation Type] pop-up
menu.
51
Installing in Mac OS
14.Click the [Install] button.
Installation starts.
The [Finish Up] screen appears.
15.Click the [Quit] button.
The [Startup item registration] window appears.
16.Click the [OK] button.
Note that the [Startup item registration] window will close automatically after a certain
period of time elapses without operation.
The [ScanSnap S1100 How to load a document 1] screen appears.
17.Read the instructions and click the [Continue] button.
The [ScanSnap S1100 How to load a document 2] screen appears.
52
Installing in Mac OS
18.Read the instructions and click the [Continue] button.
The message "The installation was successfully." appears on the screen.
19.Click the [Close] button.
20.Remove the Setup DVD-ROM from the DVD-ROM drive.
53
Installing in Mac OS
■ Evernote for Mac
Install Evernote for Mac in the following procedure.
1. Turn on the computer and log in as a user with Administrator privileges.
2. Insert the Setup DVD-ROM into the DVD-ROM drive.
The [ScanSnap] window appears.
3. Double-click the [Evernote] icon.
A confirmation about accepting the license agreement appears.
54
Installing in Mac OS
4. To accept the license agreement, click the [Accept] button.
A window to start installing Evernote for Mac appears.
5. Drag the [Evernote] icon onto the [Applications] icon.
Evernote for Mac is copied into the [Applications] folder.
6. When the copying is finished, drag the Evernote icon on the desktop into
the Trash.
55
Installing in Mac OS
7. Remove the Setup DVD-ROM from the DVD-ROM drive.
If the installation is not successfully completed, select [Troubleshooting (installation)] in the
[ScanSnap] window and refer to Troubleshooting (installation).
8. Prepare for the linkage with Evernote.
Start up Evernote and create a new Notebook.
56
Using the ScanSnap (for Windows Users)
This chapter explains how to perform scanning, configure scan settings, add, change or
delete profiles, as well as various scanner functions and uses.
ScanSnap Manager Icon and Operations . . . . . . . . . . . . . . . . . . . . . . . . . . . . . . . . . . 58
How to Perform a Scan . . . . . . . . . . . . . . . . . . . . . . . . . . . . . . . . . . . . . . . . . . . . . . . . 61
Configuring ScanSnap Manager . . . . . . . . . . . . . . . . . . . . . . . . . . . . . . . . . . . . . . . . . 75
Actions . . . . . . . . . . . . . . . . . . . . . . . . . . . . . . . . . . . . . . . . . . . . . . . . . . . . . . . . . . . . . 97
Using the ScanSnap in Various Ways . . . . . . . . . . . . . . . . . . . . . . . . . . . . . . . . . . . . 187
57
ScanSnap Manager Icon and Operations (for Windows users)
ScanSnap Manager Icon and Operations
All operations on the ScanSnap are managed by ScanSnap Manager.
The ScanSnap Manager icon automatically appears on the taskbar when Windows starts up.
The ScanSnap Manager icon indicates whether or not ScanSnap Manager is successfully
communicating with the ScanSnap. The appearance of the icon changes according to the
communication status as shown below.
Status
ScanSnap Manager icon
Communicating
Not communicating
A menu is displayed when you click the ScanSnap Manager icon.
In Windows 7, the ScanSnap Manager icon
is displayed in the menu which appears when
you click
on the taskbar.
To have the ScanSnap Manager icon
always displayed on the taskbar, drag the icon
and
drop it onto the taskbar.
58
ScanSnap Manager Icon and Operations (for Windows users)
■ Right-Click Menu
This menu appears when you right-click the ScanSnap Manager icon
.
Right-click
Item
Function
Scan
Starts scanning. Follows the settings configured in [Scan Button Settings].
Scan Button Settings
Displays the ScanSnap setup dialog box.
You can configure the scan settings in this dialog box.
"How to Configure Scan Settings" (page 78)
Profile Management
Displays the [ScanSnap Manager - Profile Management] dialog box.
You cannot select [Profile Management] when the [Use Quick Menu] check
box is selected in the ScanSnap setup dialog box.
"Profile Management" (page 81)
Show scanning results
After scanning is completed, a message appears to inform you whether blank
pages are removed or the image is rotated.
Help
Displays the following menu:
z Help
Opens the ScanSnap Manager Help.
z Troubleshooting
Displays [Troubleshooting] in the ScanSnap Manager Help.
z ScanSnap Portal Site
Opens the ScanSnap global homepage (http://scansnap.fujitsu.com)
z About ScanSnap Manager
Displays the [Version Information] dialog box.
z Preferences
Displays the [ScanSnap Manager - Preferences] dialog box.
z Online Update
Displays the [ScanSnap Manager - Online Update] dialog box (page 366).
Exit
Exits ScanSnap Manager.
"Finishing ScanSnap Operation" (page 74)
59
ScanSnap Manager Icon and Operations (for Windows users)
■ Left-Click Menu
This menu appears when you click the ScanSnap Manager icon
.
Available profiles are shown in the Left-Click Menu.
Left-click
Left-Click Menu example
Select a profile in the Left-Click Menu before you perform scanning. Documents are scanned
according to the scan settings of the profile you select.
For details about how to add, change or delete profiles, refer to "Profile Management" (page
81).
z To enable the Left-Click Menu, clear the [Use Quick Menu] check box in the ScanSnap setup
dialog box. The Left-Click Menu does not appear when this check box is selected.
z Profiles configured for the following scanner models will be carried over to ScanSnap S1100
if the computer is the same:
- ScanSnap S1500/S1500M
- ScanSnap S1300
- ScanSnap S510
- ScanSnap S500
- ScanSnap S300
60
How to Perform a Scan (for Windows users)
How to Perform a Scan
This section explains how to perform scanning with the ScanSnap.
■ Preparation
1. Turn on the computer.
The ScanSnap Manager icon
appears on the taskbar when Windows starts up.
z If the ScanSnap Manager icon
is not displayed, select [Start] menu [All Programs] [ScanSnap Manager] [ScanSnap Manager] to start up ScanSnap Manager. Normally, ScanSnap Manager is registered under [Startup] when installed so its
icon
is displayed on the taskbar when Windows starts.
z When ScanSnap Manager is not registered under [Startup], register ScanSnap Manager in the following procedure:
1. Select [Help] [Preferences] in the Right-Click Menu.
[ScanSnap Manager - Preferences] dialog box appears.
2. In the [Auto Startup] tab, select the [Start up ScanSnap Manager when you log on]
check box.
z In Windows 7, the ScanSnap Manager icon
is displayed in the menu which appears
when you click
on the taskbar.
For details about how to display the ScanSnap Manager icon
on the taskbar, refer
to "ScanSnap Manager Icon and Operations" (page 58).
2. Open the feed guide of the ScanSnap to turn the power on.
Feed guide
The ScanSnap Manager icon changes from
to
.
There may be a slight delay before the ScanSnap Manager icon changes to
depending
on your computer's performance, operating environment and load such as when multiple
programs are running at the same time.
61
How to Perform a Scan (for Windows users)
There are two ways to perform scanning, either with the Quick Menu or without using the
Quick Menu. For details, refer to the following:
z Using the Quick Menu ( page 63)
z Without Using the Quick Menu ( page 69)
62
How to Perform a Scan (for Windows users)
■ Using the Quick Menu
The following explains the procedure for scanning by using the Quick Menu.
1. Select [Scan Button Settings] from the Right-Click Menu.
For details about the Right-Click Menu, refer to "Right-Click Menu" (page 59).
The ScanSnap setup dialog box appears.
2. Select the [Use Quick Menu] check box.
3. Click one of the profile buttons.
Profile Button
Profile Button
Description
[Recommended] button
Settings are [Automatic resolution] for [Image quality] in the [Scanning]
tab in the ScanSnap setup dialog box and default for other settings.
It is recommended that you select this button when you want to scan
documents in optimum quality suitable for the paper size of the
document.
[Small File] button
Settings are [Normal] (Color/Gray: 150 dpi, B&W: 300 dpi) for [Image
quality] in the [Scanning] tab in the ScanSnap setup dialog box and
default for other settings.
It is recommended that you select this button when you want to reduce
the file size.
[High Quality] button
Settings are [Best] (Color/Gray: 300 dpi, B&W: 600 dpi) for [Image
quality] in the [Scanning] tab in the ScanSnap setup dialog box and
default for other settings.
It is recommended that you select this button when you want to scan
documents in high quality.
63
How to Perform a Scan (for Windows users)
Profile Button
[Customize] button
Description
Default settings are the same as the [Recommended] settings.
Scan settings can be changed depending on your scanning purpose.
z The [Recommended] button is selected in default.
z For details about the default settings when using the Quick Menu, refer to the
ScanSnap Manager Help.
z You cannot change the settings for the [Recommended], [Small File], and [High Quality]
buttons. If you change any of these settings, the profile automatically switches to [Customize].
For details about how to change scan settings, refer to "How to Configure Scan
Settings" (page 78).
4. Click the [OK] button to close the ScanSnap setup dialog box.
5. Load the document in the ScanSnap.
For details about how to load documents, refer to "How to Load Documents" (page 30).
6. Press the [Scan/Stop] button on the ScanSnap to start scanning.
You can also start scanning from the Right-Click Menu.
For more details, refer to "Right-Click Menu" (page 59).
z Do not connect or disconnect the ScanSnap and other USB devices during scanning.
z Do not close the feed guide during scanning.
z Do not switch users during scanning. Doing so will cancel scanning.
The [ScanSnap Manager - Image scanning and file saving] dialog box appears.
64
How to Perform a Scan (for Windows users)
After the scanning has completed, the [ScanSnap Manager - Image scanning and
file saving] dialog box then shows a new message indicating that the ScanSnap is
ready for the next scan.
Load another document in the ScanSnap when you want to scan multiple sheets. Scanning
starts automatically when a document is loaded.
7. Press the [Scan/Stop] button on the ScanSnap to finish scanning.
The Quick Menu appears.
z You can also finish scanning by clicking the [Finish Scanning] button in the [ScanSnap
Manager - Image scanning and file saving] dialog box.
z The [Scan/Stop] button on the ScanSnap flashes in blue during the scan.
65
How to Perform a Scan (for Windows users)
8. In the Quick Menu, click the icon of the application to link with ScanSnap
Manager.
The selected application is started.
z To specify which applications to display/hide in the Quick Menu, or change the display
order of the applications, refer to "Quick Menu Settings" (page 75).
z To select an application to link with ScanSnap Manager before scanning, refer to "Without Using the Quick Menu" (page 69).
66
How to Perform a Scan (for Windows users)
Application
Description
Scan to ScanSnap
Organizer (*1)
Displays the [ScanSnap Organizer] dialog box.
Scanned image is saved in a folder specified in ScanSnap Organizer.
For details about how to operate ScanSnap Organizer, refer to the
ScanSnap Organizer User's Guide.
Scan to CardMinder (*2)
Displays the [CardMinder] dialog box.
Scanned image is stored in CardMinder.
For details about how to continue the process after you select this
item, refer to "Storing Business Cards in CardMinder" (page 139).
Scan to Folder
Displays the [Scan to Folder] dialog box.
Indicates the destination folder for saving the scanned image.
For details about how to continue the process after you select this
item, refer to "Saving Data in a Specified Folder" (page 98).
Scan to E-mail
Displays the [Scan to E-mail] dialog box.
Scanned image is attached to an e-mail message.
For details about how to continue the process after you select this
item, refer to "Attaching Files to E-Mail" (page 105).
Scan to Print
Displays the [Scan to Print] dialog box.
Scanned image can be printed.
For details about how to continue the process after you select this
item, refer to "Using the ScanSnap as a Copy Machine" (page 117).
Scan to Rack2-Filer (*3)
Scanned image is saved as a PDF file in a Rack2-Filer binder.
For details about how to continue the process after you select this
item, refer to "Saving to Rack2-Filer" (page 155).
Scan to Evernote
(Document) (*4)
Scanned image is saved as a PDF file in Evernote.
For details about how to continue the process after you select this
item, refer to "Saving Documents to Evernote" (page 162).
Scan to Evernote (Note)
(*4)
Scanned image is saved as a JPEG file in Evernote.
For details about how to continue the process after you select this
item, refer to "Saving Handwritten Notes to Evernote" (page 171).
Scan to Google Docs(TM)
(*5)
Scanned image is saved as a PDF file in Google Docs.
For details about how to continue the process after you select this
item, refer to "Saving Documents to Google Docs" (page 178).
Scan to Word (*6)
Text recognition is performed on the scanned image which is then
converted to a Word file.
For details about how to continue the process after you select this
item, refer to "Converting into Word/Excel/PowerPoint Documents"
(page 131).
Scan to Excel (*6)
Text recognition is performed on the scanned image which is then
converted to an Excel file.
For details about how to continue the process after you select this
item, refer to "Converting into Word/Excel/PowerPoint Documents"
(page 131).
Scan to PowerPoint(R)
(*6)
Text recognition is performed on the scanned image which is then
converted to a PowerPoint file.
For details about how to continue the process after you select this
item, refer to "Converting into Word/Excel/PowerPoint Documents"
(page 131).
67
How to Perform a Scan (for Windows users)
Application
Description
Scan to SharePoint (*7)
Scanned image is saved in SharePoint or Office Live.
For details about how to continue the process after you select this
item, refer to "Saving Data in SharePoint" (page 146).
Scan to Picture Folder
Displays the [Scan to Picture Folder] dialog box.
Scanned image is saved as a JPEG file in the pictures folder.
For details about how to continue the process after you select this
item, refer to "Saving Files to Picture Folder" (page 124).
*1: Displayed when ScanSnap Organizer is installed.
*2: Displayed when CardMinder is installed.
*3: Displayed when Rack2-Filer trial version (bundled with the ScanSnap) or Rack2-Filer (V5.0 or
later recommended/bundled model or sold separately) is installed.
*4: Displayed when Evernote for Windows 3.5 or later is installed.
*5: Displayed when .NET Framework 3.0 is installed.
Note that .NET Framework 3.0 is also included in .NET Framework 3.5 (SP1 or later). It is
recommended that you use .NET Framework 3.5 (SP1 or later) by updating Windows.
Even if .NET Framework 4 or later is already installed, you need to install .NET Framework 3.0
separately because .NET Framework 3.0 is not included in .NET Framework 4.0 or later
version.
*6: Displayed when ABBYY FineReader for ScanSnap is installed.
*7: Displayed when Scan to Microsoft SharePoint is installed.
z The output image may slightly differ from the original document in size.
z When ScanSnap Organizer, CardMinder, Rack2-Filer trial version (bundled with the
ScanSnap), or Rack2-Filer (V5.0 or later recommended/bundled model or sold separately) becomes active (with the application's dialog box brought to front and selected
on taskbar), performing a scan by pressing the [Scan/Stop] button on the ScanSnap
automatically starts the linkage between Scansnap Manager and the active application.
For details about automatic linkage, refer to "Automatic Linkage with Applications"
(page 90).
z You cannot start scanning when the Quick Menu is displayed. Either select an icon from
the Quick Menu and finish the process, or close the Quick Menu before you perform the
next scan.
z Do not move, delete, or rename the scanned image in other applications while the
Quick Menu is displayed.
68
How to Perform a Scan (for Windows users)
■ Without Using the Quick Menu
The following explains the procedure for scanning without using the Quick Menu.
1. Select [Scan Button Settings] from the Right-Click Menu.
For details about the Right-Click Menu, refer to "Right-Click Menu" (page 59).
The ScanSnap setup dialog box appears.
2. Clear the [Use Quick Menu] check box.
69
How to Perform a Scan (for Windows users)
3. Select a profile.
Select a profile from either of the following:
z [Profile] drop-down list
z Left-Click menu
4. Load the document in the ScanSnap.
For details about how to load documents, refer to "How to Load Documents" (page 30).
70
How to Perform a Scan (for Windows users)
5. Press the [Scan/Stop] button on the ScanSnap to start scanning.
You can also start scanning from the Right-Click Menu.
For more details, refer to "Right-Click Menu" (page 59).
z Do not connect and disconnect the ScanSnap and other USB devices during scanning.
z Do not close the feed guide during scanning.
z Do not switch users during scanning. Doing so will cancel scanning.
The [ScanSnap Manager - Image scanning and file saving] dialog box appears.
The [ScanSnap Manager - Image scanning and file saving] dialog box then shows a
new message indicating that the ScanSnap is ready for the next scan.
Load another document in the ScanSnap when you want to scan multiple sheets. Scanning
starts automatically when a document is loaded.
71
How to Perform a Scan (for Windows users)
6. Press the [Scan/Stop] button on the ScanSnap to finish scanning.
The application specified for the selected profile starts up.
z You can also finish scanning by clicking the [Finish Scanning] button in the [ScanSnap
Manager - Image scanning and file saving] dialog box.
z The [Scan/Stop] button on the ScanSnap flashes in blue throughout the scan.
z To select an application to link with ScanSnap Manager in the Quick Menu after scanning is completed, refer to "Using the Quick Menu" (page 63).
z When the [Set the marked text as a keyword for the PDF file] or the [Convert to Searchable PDF] check box is selected in the [File option] tab, the application starts after text
recognition has been performed on the scanned image.
A dialog box showing the text recognition progress appears during text recognition
process.
z By default, documents are scanned with the following settings: [Image quality: Automatic resolution] and [Color mode: Auto color detection].
For details about how to change scan settings, refer to "How to Configure Scan
Settings" (page 78).
z The application that starts after scanning varies depending on what is selected in the
[Application] tab in the ScanSnap setup dialog box. For details, refer to the ScanSnap
Manager Help.
z The output image may slightly differ from the original document in size.
z When ScanSnap Organizer, CardMinder, Rack2-Filer trial version (bundled with the
ScanSnap), or Rack2-Filer (V5.0 or later recommended/bundled model or sold separately) is active (with the application's dialog box brought to the front and selected on
the taskbar), performing a scan by pressing the [Scan/Stop] button on the ScanSnap
automatically starts the linkage between ScanSnap Manager and the active application.
For details about automatic linkage, refer to "Automatic Linkage with Applications"
(page 90).
72
How to Perform a Scan (for Windows users)
■ Stopping the Scan
You can stop a scan in progress in case you are scanning a wrong document or the wrong
side of a document.
Stop the scan in the following procedure:
1. Click the [Stop] button in the [ScanSnap Manager - Image scanning and
file saving] dialog box which appears during scanning.
You can also stop the scan during scanning by pressing the [Scan/Stop] button on the
ScanSnap.
Remove the document from the ScanSnap after stopping the scan. For details about how
to remove documents, refer to "Troubleshooting" in the ScanSnap Manager Help.
The following message appears when the scanning stops.
2. Click the [Quit] button.
To continue scanning, click the [Continue Scanning] button or press the [Scan/Stop]
button on the ScanSnap after loading another document in the ScanSnap.
73
How to Perform a Scan (for Windows users)
■ Finishing ScanSnap Operation
Exiting ScanSnap Manager
Select [Exit] from the Right-Click Menu.
Normally, you do not have to exit ScanSnap Manager.
You cannot use the ScanSnap after exiting ScanSnap Manager.
Select [Start] menu [All Programs] [ScanSnap Manager] [ScanSnap Manager] to
start up ScanSnap Manager when you want to use the ScanSnap.
Disconnecting the ScanSnap
1. Close the feed guide to turn off the ScanSnap.
The ScanSnap Manager icon on the taskbar changes from
to
.
2. Disconnect the USB cable from the computer.
The ScanSnap does not have a power switch and is turned ON/OFF in conjunction with the
computer’s power. The ScanSnap can also be automatically turned ON/OFF by opening or
closing the feed guide.
74
Configuring ScanSnap Manager (for Windows users)
Configuring ScanSnap Manager
This section explains how to specify which applications to display in the Quick Menu, set scan
settings, how to add, change and delete profiles, automatic linkage with applications,
scanning progress status, and dialog boxes displayed during scanning.
■ Quick Menu Settings
You can specify which applications to display or hide in the Quick Menu, as well as change
the display order of the applications in the following procedure.
1. Click [Applications to Show/Hide] in the Quick Menu.
For details about how to display the Quick Menu, refer to "Using the Quick Menu" (page
63).
The [Applications to Show/Hide] dialog box appears.
75
Configuring ScanSnap Manager (for Windows users)
2. Specify which applications to display in the Quick Menu.
zShowing or Hiding Application Icons
The icons of the applications listed under [Show] are displayed in the Quick Menu.
When you select an application in [Show] and click the [Remove] button, the application
is moved to [Hide]. Likewise, when you select an application in [Hide] and click the [Add]
button, the application is moved to [Show].
To display all the applications in the Quick Menu, click the [Restore Default] button.
zDisplay Order of Applications
Application icons are displayed in the Quick Menu in the same order as they are listed in
[Show].
You can change the display order of an application by selecting an application in [Show]
and clicking either the [Up] or [Down] button.
To restore the default display order of the applications displayed in the Quick Menu,
click the [Restore Default] button.
76
Configuring ScanSnap Manager (for Windows users)
The applications are displayed in the order shown below in the Quick Menu and in
[Show] of the [Applications to Show/Hide] dialog box.
3. Click the [OK] button to close the [Applications to Hide/Show] dialog
box.
The applications to be displayed in the Quick Menu and their display order are set.
77
Configuring ScanSnap Manager (for Windows users)
■ How to Configure Scan Settings
You can configure scan settings in the ScanSnap setup dialog box depending on your
intended use.
Configure the scan settings in the following procedure.
1. Select [Scan Button Settings] from the Right-Click Menu.
For details about the Right-Click Menu, refer to "Right-Click Menu" (page 59).
The ScanSnap setup dialog box appears.
You can open the ScanSnap setup dialog box by the following ways:
z Double-click the ScanSnap Manager icon
.
z Press [Ctrl], [Shift], and [Space] keys simultaneously.
2. Click the [Detail] button to switch to the detail view mode.
zUsing the Quick Menu
Outline view
Detail view
78
Configuring ScanSnap Manager (for Windows users)
zWithout Using the Quick Menu
Outline view
Detail view
The ScanSnap setup dialog box retains the display status from the last time the ScanSnap
was used. For example, if it was closed in detail view mode, the dialog box is displayed in
detail mode next time you open it.
3. Change the scan settings in each tab.
The following items can be configured in each tab:
For details, refer to the ScanSnap Manager Help.
z [Application] tab
- Application to be used with the ScanSnap
z [Save] tab
- Folder in which scanned image is saved
- File name used for saving the scanned image
z [Scanning] tab
- Scanning
(Which image quality to scan with, use color, gray or black & white, enable or
disable [Setting for text only document], [Allow automatic blank page removal],
[Correct skewed character strings automatically], [Allow automatic image rotation]
and [Continue scanning after current scan is finished].)
79
Configuring ScanSnap Manager (for Windows users)
z [File option] tab
- File format of the scanned image (*.pdf, *.jpg)
- Whether to perform text recognition on a marked character string in the scanned
image and add the character string as a keyword for the PDF file
(Whether to perform text recognition only on the character strings in the first
marked section or all marked sections to be added as keywords, and in which
language to perform text recognition.)
- Whether to perform text recognition on character strings in the scanned image to
convert the file to a searchable PDF file
(Whether to convert the first page only or all pages, and in which language to
perform text recognition.)
- Whether to create separate PDF files
(Whether to include all scanned images in a single PDF file, or create PDF files,
each of which including a preset number of pages)
- Whether to password-protect the created PDF files
(Whether to set the same password for all PDF files, or set a different password
per scan.)
z [Paper] tab
- Paper size of documents (paper size selection)
z [Compression] tab
- File size of the scanned image (compression rate)
Scan settings vary depending on whether you use the Quick Menu or not.
For details about items that can be set, refer to "Setting Items With/Without the Quick
Menu" (page 376).
4. Click the [OK] or [Apply] button.
When you use the Quick Menu, scan settings for the [Customize] button are
changed.
When you do not use the Quick Menu, scan settings for the currently selected profile
are changed.
If you press the [Scan/Stop] button on the ScanSnap while the ScanSnap setup dialog box
is displayed, the ScanSnap setup dialog box closes and scanning starts. Scan setting
changes made up to this point are saved and documents are scanned by these settings.
Note that when other dialog boxes are open, scanning does not start even if you press the
[Scan/Stop] button on the ScanSnap unless open dialog boxes are closed.
80
Configuring ScanSnap Manager (for Windows users)
■ Profile Management
You can manage up to 20 profiles.
You can select a profile in the [Profile] drop-down list in the ScanSnap setup dialog box or
from the Left-Click Menu.
z [Profile] drop-down list
z Left-Click Menu
Once the frequently used scan settings are saved as profiles, you do not have to open the
ScanSnap setup dialog box to change scan settings every time you perform scanning. You
can easily switch to an appropriate profile you want by just selecting it.
For details about how to add, change or delete profiles, refer to the following:
z
z
z
z
To add new profiles ( page 82)
To change scan settings for profiles (
To rename profiles ( page 87)
To delete profiles ( page 89)
81
page 85)
Configuring ScanSnap Manager (for Windows users)
Adding Profiles
1. Select [Scan Button Settings] from the Right-Click Menu.
For details about the Right-Click Menu, refer to "Right-Click Menu" (page 59).
The ScanSnap setup dialog box appears.
Clear the [Use Quick Menu] check box if it is selected.
2. Configure the scan settings in each tab.
For details about each tab, refer to the ScanSnap Manager Help.
82
Configuring ScanSnap Manager (for Windows users)
3. Select [Add Profile] from the [Profile] drop-down list.
The [Add new profile] dialog box appears.
4. Type in a new profile name and click the [OK] button.
The added profile appears in the [Profile] drop-down list in the ScanSnap setup
dialog box.
83
Configuring ScanSnap Manager (for Windows users)
5. Click the [OK] button to close the ScanSnap setup dialog box.
z Up to 20 profiles can be saved including the [Standard] profile.
z You can change the display order of profiles except for the [Standard] profile.
1. Select [Profile Management] from the Right-Click Menu or the [Profile] drop-down list
in the ScanSnap setup dialog box.
The [ScanSnap Manager - Profile Management] dialog box appears.
2. Select a profile from the list to arrange profiles in a different order.
3. Click the [Up] or [Down] button to move the profile to its desired position in the list.
4. Click the [Close] button to close the [ScanSnap Manager - Profile Management]
dialog box.
84
Configuring ScanSnap Manager (for Windows users)
Changing Profile Settings
1. Select [Scan Button Settings] from the Right-Click Menu.
For details about the Right-Click Menu, refer to "Right-Click Menu" (page 59).
The ScanSnap setup dialog box appears.
Clear the [Use Quick Menu] check box if it is selected.
2.
Select a profile from the [Profile] drop-down list.
3. Change the scan settings in each tab.
For details about each tab, refer to the ScanSnap Manager Help.
85
Configuring ScanSnap Manager (for Windows users)
4. When you finish changing the settings for the selected profile, click the
[OK] button.
A confirmation message appears asking if you want to overwrite the current profile
settings.
If you select another profile from the [Profile] drop-down list before clicking the [OK]
button, the following message appears.
When you click the [Yes] button, the modified settings are overwritten and the profile
switches to the one you selected from the [Profile] drop-down list.
When you click the [No] button, the modified settings are canceled and the profile
switches to the one you selected from the [Profile] drop-down list.
5. To overwrite the profile, click the [Yes] button. To save the settings as
"Standard", click the [No] button.
The confirmation message does not appear when the [Standard] profile is selected in step
2.
86
Configuring ScanSnap Manager (for Windows users)
Renaming Profiles
1. Select [Profile Management] from the Right-Click Menu.
For details about the Right-Click Menu, refer to "Right-Click Menu" (page 59).
The [ScanSnap Manager-Profile Management] dialog box appears.
z If you cannot select [Profile Management] in the Right-Click Menu, clear the [Use
Quick Menu] check box in the ScanSnap setup dialog box.
z You can also display the [Profile Management] dialog box by selecting [Profile Management] from the [Profile] drop-down list in the ScanSnap setup dialog box.
2. Select a profile and click the [Rename] button.
The [Rename] dialog box appears.
The [Standard] profile cannot be renamed.
87
Configuring ScanSnap Manager (for Windows users)
3. Type in a new name, and click the [OK] button.
The profile is renamed.
4. Click the [Close] button to close the [ScanSnap Manager - Profile
Management] dialog box.
88
Configuring ScanSnap Manager (for Windows users)
Deleting Profiles
1. Select [Profile Management] from the Right-Click Menu.
For details about the Right-Click Menu, refer to "Right-Click Menu" (page 59).
The [ScanSnap Manager-Profile Management] dialog box appears.
z If you cannot select [Profile Management] in the Right-Click Menu, clear the [Use
Quick Menu] check box in the ScanSnap setup dialog box.
z You can also display the [Profile Management] dialog box by selecting [Profile Management] from the [Profile] drop-down list in the ScanSnap setup dialog box.
2. Select a profile and click the [Delete] button.
The [Standard] profile cannot be deleted.
The [Delete Profile] dialog box appears.
3. Click the [Yes] button.
The selected profile is deleted.
4. Click the [Close] button to close the [ScanSnap Manager - Profile
Management] dialog box.
89
Configuring ScanSnap Manager (for Windows users)
■ Automatic Linkage with Applications
When one of the applications which can automatically link with ScanSnap Manager is running
and you perform scanning, ScanSnap Manager will automatically link with the corresponding
application regardless of the current scan settings or whether you are using the Quick Menu.
Applications that can automatically link with ScanSnap Manager are as follows:
z ScanSnap Organizer
Scanned image is displayed in ScanSnap Organizer.
z CardMinder
Scanned image is displayed in CardMinder.
z Rack2-Filer trial version (bundled with the ScanSnap) and Rack2-Filer (V5.0 or later
recommended/bundled model or sold separately)
Scanned image is saved in a binder in Rack2-Filer.
There are two modes for automatic linkage.
zLink when one of the above applications is active (recommended)
When ScanSnap Organizer, CardMinder or Rack2-Filer becomes active (with the
application’s dialog box brought to front and selected on taskbar), performing a scan by
pressing the [Scan/Stop] button automatically starts the linkage between ScanSnap
Manager and the active application.
Not active
Active
The example above shows ScanSnap Manager automatically linking with CardMinder
when CardMinder dialog box is in front (active).
90
Configuring ScanSnap Manager (for Windows users)
zAlways link when one of the above applications is running
When ScanSnap Organizer, CardMinder, or Rack2-Filer is started, the application
specified for [Application] in the [Application] tab in the ScanSnap dialog box
automatically switches to the running application. The application will automatically link
with ScanSnap Manager even when the application window is minimized or not
displayed in the front. The linkage between the application and ScanSnap Manager
automatically ends once you exit the application.
When more than one application is running at the same time, priority will be given in the
following order:
-
CardMinder
ScanSnap Organizer
Rack2-Filer trial version (bundled with the ScanSnap) and Rack 2-Filer (V5.0 or
later recommended/bundled model or sold separately)
When the Quick Menu is disabled, the name of the interacting application on the LeftClick Menu is followed by "is interacting".
When ScanSnap Organizer is automatically interacting with ScanSnap Manager
91
Configuring ScanSnap Manager (for Windows users)
Changing Automatic Linkage Mode
Change automatic linkage mode options in the following procedure.
1. Select [Help]
[Preferences] from the Right-Click Menu.
For details about the Right-Click Menu, refer to "Right-Click Menu" (page 59).
The [ScanSnap Manager - Preferences] dialog box appears.
2. Select the automatic linkage mode in the [Automatic Linkage] tab.
3. Click the [OK] button to close the [ScanSnap Manager - Preferences]
dialog box.
Application will link with ScanSnap Manager using the linkage mode you selected.
92
Configuring ScanSnap Manager (for Windows users)
■ ScanSnap's Communication Status
If you turn the ScanSnap ON/OFF when ScanSnap Manager is running, the pop-up balloon
appearing from the taskbar icon notifies you of the communication status of the ScanSnap.
zWhen the ScanSnap is on
zWhen the ScanSnap is off
To disable notifications of the ScanSnap’s communication status, click the pop-up balloon
and clear the [Notify of the communication status] check box in the [ScanSnap Manager Preferences] dialog box that appears.
93
Configuring ScanSnap Manager (for Windows users)
Receiving or hiding the ScanSnap's communication status notifications
You can specify whether or not to receive notifications of the ScanSnap’s communication
status with a pop-up balloon.
Configure the setting in the following procedure.
1. Select [Help]
[Preferences] from the Right-Click Menu.
For details about the Right-Click Menu, refer to "Right-Click Menu" (page 59).
The [ScanSnap Manager - Preferences] dialog box appears.
2. In the [Status Display] tab, either select or clear the [Notify of the
communication status] check box.
If you select the [Notify of the communication status] check box, you will be notified of
the communication status in conjunction with the ScanSnap being turned ON/OFF.
If you clear the [Notify of the communication status] check box, you will not be notified of
the communication status.
3. Click the [OK] button to close the [ScanSnap Manager - Preferences]
dialog box.
94
Configuring ScanSnap Manager (for Windows users)
■ Showing the Scanning Progress
When scanning starts, the [ScanSnap Manager - Image scanning and file saving] dialog box
appears.
The [ScanSnap Manager - Image scanning and file saving] dialog box consists of the
following:
z Scan status
z Scan settings
z Save completed
z Preview
Also, note that you can stop scanning by clicking the [Stop] button in the [ScanSnap Manager
- Image scanning and file saving] dialog box, or by pressing the [Scan/Stop] button on the
ScanSnap.
For details about how to stop scanning, refer to "Stopping the Scan" (page 73).
The following message appears in the [ScanSnap Manager - Image scanning and file saving]
dialog box after the document has been scanned. Load another document in the ScanSnap
when you want to scan multiple sheets. Scanning starts automatically when a document is
loaded.
The [ScanSnap Manager - Image scanning and file saving] dialog box closes when you press
the [Scan/Stop] button on the ScanSnap or when you click the [Finish Scanning] button.
When the [Continue scanning after current scan is finished] check box in the [Scanning] tab of
the ScanSnap setup dialog box is cleared, the [ScanSnap Manager - Image scanning and file
saving] dialog box automatically closes after saving the scanned image.
95
Configuring ScanSnap Manager (for Windows users)
Hiding the Scanning Progress Status
You can hide the [ScanSnap Manager - Image scanning and file saving] dialog box in the
following procedure.
1. Select [Help]
[Preferences] from the Right-Click Menu.
For details about the Right-Click Menu, refer to "Right-Click Menu" (page 59).
The [ScanSnap Manager - Preferences] dialog box appears.
2. In the [Status Display] tab, clear the [Show the scan progress status
(recommended)] check box.
3. Click the [OK] button to close the [ScanSnap Manager - Preferences]
dialog box.
The [ScanSnap Manager - Image scanning and file saving] dialog box is hidden from
next scanning on.
When the scanning progress status dialog box is hidden, the ScanSnap Manager icon
alternates between
and
.
96
Actions (for Windows users)
Actions
The ScanSnap has functions useful in your office work available as Actions.
Actions allow you to:
zShare the scanned document files with others.
Save the scanned image directly in a shared folder on a network after scanning, share
the scanned image with others and inform them of the destination folder path by an email message automatically created with the path stated.
zSend document files to participants of a meeting via e-mail.
Send an e-mail message to others with the scanned image file attached.
zUse a printer rather than a copy machine to make copies of documents.
Print the scanned image with a printer.
zConvert catalogs and pamphlets into digital data and save them.
Save scanned images of catalogs and pamphlets directly into your pictures folder.
zQuote text from your paper documents when you do not want to type it.
Have the scanned image text recognized and converted into a Word, Excel, or
PowerPoint document.
zFile and organize a large number of business cards.
Store and manage business cards in CardMinder.
zShare the scanned document files through linkage with SharePoint.
Save the scanned image in SharePoint and Office Live.
zConvert your paper documents into digital data to conveniently
organize them.
Save the scanned image directly in Rack2- Filer to manage and organize it.
zManage scanned documents through linkage with Evernote.
Save PDF files in Evernote and access them easily anytime, anywhere.
zManage handwritten notes through linkage with Evernote.
Save JPEG files in Evernote and access them easily anytime, anywhere.
zManage scanned documents through linkage with Google Docs.
Save PDF files in Google Docs and access them easily anytime, anywhere.
The following are explanations on how to use Actions.
97
Actions (for Windows users)
■ Saving Data in a Specified Folder
This section explains how to save the scanned image file in a specified folder.
You can save the scanned image file in a shared folder on the network and share it with
others. In addition, you can inform others of the destination folder path by an e-mail message
automatically created with the path stated.
The default e-mail program is used as the e-mail program to link with.
The e-mail program may not properly link with ScanSnap Manager even if it is the default e-mail
program. In this case, contact the manufacturer of the e-mail software.
Configure e-mail program settings in the following procedure.
Windows 7/Windows Vista
1. Select [Start] menu [Default Programs] [Set your default programs].
The [Set your default programs] dialog box appears.
2. Select an e-mail program to link with ScanSnap Manager from [Programs].
3. Select [Set this program as default] and click the [OK] button.
Windows XP
The e-mail program selected in Internet Explorer [Tools] menu [Internet Options] the
[Programs] tab [E-mail] drop-down list is used to link with ScanSnap Manager.
If no e-mail program is selected, select an e-mail program to link with ScanSnap Manager in
the [E-mail] drop-down list. E-mail programs that cannot be selected here cannot be set to
link with ScanSnap Manager.
Tested e-mail programs
- Windows Live Mail
- Windows Mail (Windows Vista)
- Outlook 2010 / 2007 / 2003
- Outlook Express 6
- Thunderbird version 3.1
For details about the procedure to scan and save the scanned image in a specified folder
using or without using the Quick Menu, refer to the following:
z Using the Quick Menu ( page 99)
z Without Using the Quick Menu ( page 102)
98
Actions (for Windows users)
Using the Quick Menu
To use the Quick Menu, you need to select the [Use Quick Menu] check box in the ScanSnap
setup dialog box.
For details about how to perform scanning by using the Quick Menu, refer to "Using the Quick
Menu" (page 63).
1. Load the document in the ScanSnap.
For details about how to load documents, refer to "How to Load Documents" (page 30).
2. Press the [Scan/Stop] button on the ScanSnap to start scanning.
Load another document in the ScanSnap when you want to scan multiple sheets. Scanning
starts automatically when a document is loaded.
3. Press the [Scan/Stop] button on the ScanSnap to finish scanning.
The Quick Menu appears.
4. Click the [Scan to Folder] icon.
The [Scan to Folder] dialog box appears.
99
Actions (for Windows users)
5. Check the scanned image in the preview area.
In the [Scan to Folder] dialog box, you can change files names, destination folders, and
specify whether to state a path to a destination folder in an e-mail message to notify
others.
For details about the [Scan to Folder] dialog box, refer to the ScanSnap Manager Help.
Preview
100
Actions (for Windows users)
6. Click the [Save] button.
The scanned image file is saved in the specified folder.
When you select the [State a path to a destination folder in an E-mail message]
check box in the [Scan to Folder] dialog box, a new message window appears listing
the destination folder path where the file is saved.
z You cannot start scanning after the Quick Menu is displayed and before the [Scan to
Folder] dialog box is closed. Close the [Scan to Folder] dialog box before scanning the
next document.
z Do not move, delete, or rename scanned image in other applications after the Quick
Menu is displayed and before the [Scan to Folder] dialog box is closed.
101
Actions (for Windows users)
Without using the Quick Menu
To disable the Quick Menu, you need to clear the [Use Quick Menu] check box in the ScanSnap
setup dialog box.
For details about how to perform scanning without using the Quick Menu, refer to "Without Using
the Quick Menu" (page 69).
1. Select [Scan Button Settings] from the Right-Click Menu.
For details about the Right-Click Menu, refer to "Right-Click Menu" (page 59).
The ScanSnap setup dialog box appears.
2. In the [Application] drop-down list in the [Application] tab, select [Scan
to Folder].
ScanSnap Manager can also link with [Scan to Folder] when you select:
z [Scan to Folder] from the [Profile] drop-down list of the ScanSnap setup dialog box
z [Scan to Folder] from the Left-Click Menu.
3. Click the [OK] button to close the ScanSnap setup dialog box.
4. Load the document in the ScanSnap.
For details about how to load documents, refer to "How to Load Documents" (page 30).
102
Actions (for Windows users)
5. Press the [Scan/Stop] button on the ScanSnap to start scanning.
Load another document in the ScanSnap when you want to scan multiple sheets. Scanning
starts automatically when a document is loaded.
6. Press the [Scan/Stop] button on the ScanSnap to finish scanning.
The [Scan to Folder] dialog box appears.
7. Check the scanned image in the preview area.
In the [Scan to Folder] dialog box, you can change files names, destination folders, and
specify whether to state a path to a destination folder in an e-mail message to notify
others.
For details about the [Scan to Folder] dialog box, refer to the ScanSnap Manager Help.
Preview
103
Actions (for Windows users)
8. Click the [Save] button.
The scanned image file is saved in the specified folder.
When you select the [State a path to a destination folder in an E-mail message]
check box in the [Scan to Folder] dialog box, a new message window appears listing
the destination folder path where the file is saved.
z You cannot start scanning when the [Scan to Folder] dialog box is displayed. Close the
[Scan to Folder] dialog box before scanning the next document.
z Do not move, delete or rename the scanned image in other applications when the [Scan
to Folder] dialog box is displayed.
104
Actions (for Windows users)
■ Attaching Files to E-Mail
This section explains how to attach the scanned image file to an e-mail message.
The default e-mail program is used as the e-mail program to link with.
The e-mail program may not properly link with ScanSnap Manager even if it is the default e-mail
program. In this case, contact the manufacturer of the e-mail software.
Configure e-mail program settings in the following procedure.
Windows 7/Windows Vista
1. Select [Start] menu [Default Programs] [Set your default programs].
The [Set your default programs] dialog box appears.
2. Select an e-mail program to link with ScanSnap Manager from [Programs].
3. Select [Set this program as default] and click the [OK] button.
Windows XP
The e-mail program selected in Internet Explorer [Tools] menu [Internet Options] the
[Programs] tab [E-mail] drop-down list is used to link with ScanSnap Manager.
If no e-mail program is selected, select an e-mail program to link with ScanSnap Manager in
the [E-mail] drop-down list. E-mail programs that cannot be selected here cannot be set to
link with ScanSnap Manager.
Tested e-mail programs
- Windows Live Mail
- Windows Mail (Windows Vista)
- Outlook 2010 / 2007 / 2003
- Outlook Express 6
- Thunderbird version 3.1
For details about the procedure to scan and attach the scanned image file to an e-mail
message using or without using the Quick Menu, refer to the following:
z Using the Quick Menu ( page 106)
z Without Using the Quick Menu ( page 112)
105
Actions (for Windows users)
Using the Quick Menu
To use the Quick Menu, you need to select the [Use Quick Menu] check box in the ScanSnap
setup dialog box.
For details about how to perform scanning by using the Quick Menu, refer to "Using the Quick
Menu" (page 63).
1. Load the document in the ScanSnap.
For details about how to load documents, refer to "How to Load Documents" (page 30).
Up to ten files can be attached to an e-mail message.
When you scan more than one document with the scan settings shown below, multiple
files are created. Pay attention to the number of documents to scan:
z File format: JPEG (*.jpg)
z [Generate one PDF file per (n) page(s)] check box is selected
2. Press the [Scan/Stop] button on the ScanSnap to start scanning.
Load another document in the ScanSnap when you want to scan multiple sheets. Scanning
starts automatically when a document is loaded.
3. Press the [Scan/Stop] button on the ScanSnap to finish scanning.
The Quick Menu appears.
106
Actions (for Windows users)
4. Change settings for the [Scan to E-mail] (If you do not want to change
any settings, go to step 5.).
1. Move the mouse cursor to the
the [Settings] menu.
mark on the [Scan to E-mail] icon, and then select
The [Scan to E-mail - Options] dialog box appears.
2. Change the settings.
For details about the [Scan to E-mail - Options] dialog box, refer to the ScanSnap
Manager Help.
3. Click the [OK] button to close the [Scan to E-mail - Options] dialog box.
107
Actions (for Windows users)
5. Click the [Scan to E-mail] icon.
The [Scan to E-mail] dialog box appears.
If you clear the [Show preview] check box of the [Scan to E-mail - Options] dialog box
in step 4., the [Scan to E-mail] dialog box is not displayed. Instead, a new message
window appears with the file(s) attached.
108
Actions (for Windows users)
6. Check the scanned image in the preview area.
In the [Scan to E-mail] dialog box, you can rename the file, specify whether to set a
"Document Open Password", and save the scanned image in the folder specified for
[Image saving folder] after sending it by e-mail.
For details about the [Scan to E-mail] dialog box, refer to the ScanSnap Manager Help.
Preview
109
Actions (for Windows users)
7. Click the [Attach] button.
When the [Set a "Document Open password" for PDF files] check box is selected in
the [Scan to E-mail - Options] dialog box or the [Scan to E-mail] dialog box, the [Scan
to E-mail - Set a password] dialog box appears.
Enter a password, and then click the [OK] button.
The following message appears if you click the [Cancel] button in the [Scan to E-mail - Set a
password] dialog box.
If you do not want to set a document open password, click the [Yes] button.
A new message dialog box appears with the file attached.
110
Actions (for Windows users)
z You cannot start scanning after the Quick Menu is displayed and before the [Scan to Email] dialog box is closed. Close the [Scan to E-mail] dialog box before scanning the
next document.
z Do not move, delete, or rename scanned image in other applications after the Quick
Menu is displayed and before the [Scan to E-mail] dialog box is closed.
111
Actions (for Windows users)
Without using the Quick Menu
To disable the Quick Menu, you need to clear the [Use Quick Menu] check box in the ScanSnap
setup dialog box.
For details about how to perform scanning without using the Quick Menu, refer to "Without Using
the Quick Menu" (page 69).
1. Select [Scan Button Settings] from the Right-Click Menu.
For details about the Right-Click Menu, refer to "Right-Click Menu" (page 59).
The ScanSnap setup dialog box appears.
2. In the [Application] drop-down list in the [Application] tab, select [Scan
to E-mail].
ScanSnap Manager can also link with [Scan to E-mail] when you select:
z [Scan to E-mail] from the [Profile] drop-down list of the ScanSnap setup dialog box
z [Scan to E-mail] from the Left-Click Menu.
112
Actions (for Windows users)
3. Change settings for the [Scan to E-mail] (If you do not want to change
any settings, go to step 4.).
1. Click the [Application Settings] button.
The [Scan to E-mail - Options] dialog box appears.
2. Change the settings.
For details about the [Scan to E-mail - Options] dialog box, refer to the ScanSnap
Manager Help.
3. Click the [OK] button to close the [Scan to E-mail - Options] dialog box.
4. Click the [OK] button to close the ScanSnap setup dialog box.
5. Load the document in the ScanSnap.
For details about how to load documents, refer to "How to Load Documents" (page 30).
Up to ten files can be attached to an e-mail message.
When you scan more than one document with the scan settings shown below, multiple
files are created. Pay attention to the number of documents to scan:
z File format: JPEG (*.jpg)
z [Generate one PDF file per (n) page(s)] check box is selected
113
Actions (for Windows users)
6. Press the [Scan/Stop] button on the ScanSnap to start scanning.
Load another document in the ScanSnap when you want to scan multiple sheets. Scanning
starts automatically when a document is loaded.
7. Press the [Scan/Stop] button on the ScanSnap to finish scanning.
The [Scan to E-mail] dialog box appears.
If you clear the [Show preview] check box of the [Scan to E-mail - Options] dialog box
in step 3., the [Scan to E-mail] dialog box is not displayed. Instead, a new message
window appears with the file(s) attached.
8. Check the scanned image in the preview area.
In the [Scan to E-mail] dialog box, you can rename the file, specify whether to set a
"Document Open Password", and save the scanned image in the folder specified for
[Image saving folder] after sending it by e-mail.
For details about the [Scan to E-mail] dialog box, refer to the ScanSnap Manager Help.
Preview
114
Actions (for Windows users)
9. Click the [Attach] button.
When the [Set a "Document Open password" for PDF files] check box is selected in
the [Scan to E-mail - Options] dialog box or the [Scan to E-mail] dialog box, the [Scan
to E-mail - Set a password] dialog box appears.
Enter a password, and then click the [OK] button.
The following message appears if you click the [Cancel] button in the [Scan to E-mail - Set a
password] dialog box.
If you do not want to set a document open password, click the [Yes] button.
An e-mail message dialog box appears with the file attached.
115
Actions (for Windows users)
z You cannot start scanning when the [Scan to E-mail] dialog box is displayed. Close the
[Scan to E-mail] dialog box before scanning the next document.
z Do not move, delete or rename the scanned image in other applications when the [Scan
to E-mail] dialog box is displayed.
116
Actions (for Windows users)
■ Using the ScanSnap as a Copy Machine
This section explains how to print the scanned image with a printer.
When a printer links with ScanSnap Manager, the ScanSnap can be used as a copy machine.
Note that shadows around the edges of the document may appear as lines on the generated
scanned image, depending on the scanning method and paper conditions. If you print such an
image, the printed image will also have lines appearing in it.
For details about the procedure to scan and print the scanned image using or without using
the Quick Menu, refer to the following:
z Using the Quick Menu ( page 118)
z Without Using the Quick Menu ( page 121)
117
Actions (for Windows users)
Using the Quick Menu
To use the Quick Menu, you need to select the [Use Quick Menu] check box in the ScanSnap
setup dialog box.
For details about how to perform scanning by using the Quick Menu, refer to "Using the Quick
Menu" (page 63).
1. Load the document in the ScanSnap.
For details about how to load documents, refer to "How to Load Documents" (page 30).
2. Press the [Scan/Stop] button on the ScanSnap to start scanning.
Load another document in the ScanSnap when you want to scan multiple sheets. Scanning
starts automatically when a document is loaded.
3. Press the [Scan/Stop] button on the ScanSnap to finish scanning.
The Quick Menu appears.
4. Change settings for the [Scan to Print] (If you do not want to change any
settings, go to step 5.).
1. Move the mouse cursor to the
the [Settings] menu.
mark on the [Scan to Print] icon, and then select
The [Scan to Print - Options] dialog box appears.
118
Actions (for Windows users)
2. Change the settings.
For details about the [Scan to Print- Options] dialog box, refer to the ScanSnap
Manager Help.
3. Click the [OK] button to close the [Scan to Print- Options] dialog box.
5. Click the [Scan to Print] icon.
The [Scan to Print] dialog box appears.
If the [Show "Print" dialog] check box is cleared in step 4., printing is immediately
performed.
119
Actions (for Windows users)
6. Check the scanned image in the preview area.
In the [Scan to Print] dialog box, you can specify the printer to be used, the number of
copies and size of the scanned image to be printed, and whether to save the scanned
image in the folder specified for [Image saving folder].
For details about the [Scan to Print] dialog box, refer to the ScanSnap Manager Help.
Preview
7. Click the [Print] button.
The scanned image is printed.
z You cannot start scanning after the Quick Menu is displayed and before the [Scan to
Print] dialog box is closed. Close the [Scan to Print] dialog box before scanning the next
document.
z Do not move, delete, or rename the scanned image in other applications after the Quick
Menu is displayed and before the [Scan to Print] dialog box is closed.
120
Actions (for Windows users)
Without using the Quick Menu
To disable the Quick Menu, you need to clear the [Use Quick Menu] check box in the ScanSnap
setup dialog box.
For details about how to perform scanning without using the Quick Menu, refer to "Without Using
the Quick Menu" (page 69).
1. Select [Scan Button Settings] from the Right-Click Menu.
For details about the Right-Click Menu, refer to "Right-Click Menu" (page 59).
The ScanSnap setup dialog box appears.
2. In the [Application] drop-down list in the [Application] tab, select [Scan
to Print].
ScanSnap Manager can also link with [Scan to Print] when you select:
z [Scan to Print] from the [Profile] drop-down list of the ScanSnap setup dialog box
z [Scan to Print] from the Left-Click Menu
121
Actions (for Windows users)
3. Change settings for the [Scan to Print] (If you do not want to change any
settings, go to step 4.).
1. Click the [Application Settings] button.
The [Scan to Print - Options] dialog box appears.
2. Change the settings.
For details about the [Scan to Print - Options] dialog box, refer to the ScanSnap
Manager Help.
3. Click the [OK] button to close the [Scan to Print - Options] dialog box.
4. Click the [OK] button to close the ScanSnap setup dialog box.
5. Load the document in the ScanSnap.
For details about how to load documents, refer to "How to Load Documents" (page 30).
6. Press the [Scan/Stop] button on the ScanSnap to start scanning.
Load another document in the ScanSnap when you want to scan multiple sheets. Scanning
starts automatically when a document is loaded.
122
Actions (for Windows users)
7. Press the [Scan/Stop] button on the ScanSnap to finish scanning.
The [Scan to Print] dialog box appears.
If the [Show "Print" dialog] check box is cleared in step 3., printing is immediately
performed.
8. Check the scanned image in the preview area.
In the [Scan to Print] dialog box, you can specify the printer to be used, the number of
copies and size of the scanned image to be printed, and whether to save the scanned
image in the folder specified for [Image saving folder].
For details about the [Scan to Print] dialog box, refer to the ScanSnap Manager Help.
Preview
9. Click the [Print] button.
The scanned image is printed.
z You cannot start scanning when the [Scan to Print] dialog box is displayed. Close the
[Scan to Print] dialog box before scanning the next document.
z Do not move, delete or rename the scanned image in other applications when the [Scan
to Print] dialog box is displayed.
123
Actions (for Windows users)
■ Saving Files to Picture Folder
This section explains how to save the scanned image as a JPEG file in the "Pictures folder".
The following folder is set as the "Pictures folder" by default:
z Windows 7/Windows Vista
Drive name (such as C):\Users\(user name)\Pictures\ScanSnap
z Windows XP
Drive name (such as C):\Documents and Settings\(user name)\My Documents\
My Pictures\ScanSnap
For details about the procedure to scan and save the scanned image in the "Pictures folder"
using or without using the Quick Menu, refer to the following:
z Using the Quick Menu ( page 125)
z Without Using the Quick Menu ( page 128)
124
Actions (for Windows users)
Using the Quick Menu
To use the Quick Menu, you need to select the [Use Quick Menu] check box in the ScanSnap
setup dialog box.
For details about how to perform scanning by using the Quick Menu, refer to "Using the Quick
Menu" (page 63).
1. Load the document in the ScanSnap.
For details about how to load documents, refer to "How to Load Documents" (page 30).
2. Press the [Scan/Stop] button on the ScanSnap to start scanning.
Load another document in the ScanSnap when you want to scan multiple sheets. Scanning
starts automatically when a document is loaded.
3. Press the [Scan/Stop] button on the ScanSnap to finish scanning.
The Quick Menu appears.
4. Change settings for the [Scan to Picture Folder] (If you do not want to
change any settings, go to step 5.).
1. Move the mouse cursor to the
select the [Settings] menu.
mark on the [Scan to Picture Folder] icon, and then
The [Scan to Picture Folder - Options] dialog box appears.
125
Actions (for Windows users)
2. Change the settings.
For details about the [Scan to Picture Folder - Options] dialog box, refer to the
ScanSnap Manager Help.
3. Click the [OK] button to close the [Scan to Picture Folder - Options] dialog box.
5. Click the [Scan to Picture Folder] icon.
The [Scan to Picture Folder] dialog box appears.
If you clear the [Show preview] check box in step 4., the image data is directly saved
in the pictures folder.
126
Actions (for Windows users)
6. Check the scanned image in the preview area.
In the [Scan to Picture Folder] dialog box, you can rename the file, change the
destination folder, and save the scanned image in the folder specified for [Image saving
folder].
For details about the [Scan to Picture Folder] dialog box, refer to the ScanSnap
Manager Help.
Preview
In [Specify destination folder], you can change the destination folder for the image data to a
folder other than the pictures folder.
7. Click the [Save] button.
The scanned image is saved in the pictures folder.
z You cannot start scanning after the Quick Menu is displayed and before the [Scan to
Picture Folder] dialog box is closed. Close the [Scan to Picture Folder] dialog box before
scanning the next document.
z Do not move, delete, or rename scanned image in other applications after the Quick
Menu is displayed and before the [Scan to Picture Folder] dialog box is closed.
127
Actions (for Windows users)
Without using the Quick Menu
To disable the Quick Menu, you need to clear the [Use Quick Menu] check box in the ScanSnap
setup dialog box.
For more details about how to perform scanning without using the Quick Menu, refer to "Without
Using the Quick Menu" (page 69).
1. Select [Scan Button Settings] from the Right-Click Menu.
For details about the Right-Click Menu, refer to "Right-Click Menu" (page 59).
The ScanSnap setup dialog box appears.
2. In the [Application] drop-down list in the [Application] tab, select [Scan
to Picture Folder].
When you add the customized settings as profiles, the application to link with ScanSnap
Manager can be selected from the [Profile] drop-down list or Left-Click Menu next time you
perform a scan.
For details about how to add a profile, refer to "Profile Management" (page 81).
128
Actions (for Windows users)
3. Change settings for the [Scan to Picture Folder] (If you do not want to
change any settings, go to step 4.).
1. Click the [Application Settings] button.
The [Scan to Picture Folder - Options] dialog box appears.
2. Change the settings.
For details about the [Scan to Picture Folder - Options] dialog box, refer to the
ScanSnap Manager Help.
3. Click the [OK] button to close the [Scan to Picture Folder - Options] dialog box.
4. Click the [OK] button to close the ScanSnap setup dialog box.
5. Load the document in the ScanSnap.
For details about how to load documents, refer to "How to Load Documents" (page 30).
6. Press the [Scan/Stop] button on the ScanSnap to start scanning.
Load another document in the ScanSnap when you want to scan multiple sheets. Scanning
starts automatically when a document is loaded.
129
Actions (for Windows users)
7. Press the [Scan/Stop] button on the ScanSnap to finish scanning.
The [Scan to Picture Folder] dialog box appears.
If you clear the [Show preview] check box in step 3., the scanned image is directly
saved in the pictures folder.
8. Check the scanned image in the preview area.
In the [Scan to Picture Folder] dialog box, you can rename the file, change the
destination folder, and save the scanned images in the folder specified for [Image
saving folder].
For details about the [Scan to Picture Folder] dialog box, refer to the ScanSnap
Manager Help.
Preview
In [Specify destination folder], you can change the destination folder for the scanned image
to a folder other than the pictures folder.
9. Click the [Save] button.
The scanned image is saved in the pictures folder.
z You cannot start scanning when the [Scan to Picture Folder] dialog box is displayed.
Close the [Scan to Picture Folder] dialog box before scanning the next document.
z Do not move, delete or rename the scanned image in other applications when the [Scan
to Picture Folder] dialog box is displayed.
130
Actions (for Windows users)
■ Converting into Word/Excel/PowerPoint Documents
This section explains how to convert the scanned image into Word/Excel/PowerPoint files
using ABBYY FineReader for ScanSnap bundled with the ScanSnap.
...
ABCD
A
B
C
123
4567
-1569
z The following applications must be installed in your computer in order to perform text-recognition:
- ABBYY FineReader for ScanSnap (bundled with the ScanSnap)
- Word
- Excel
- PowerPoint
- Visual Basic for Applications of Office Shared Features (installed at the same time when
you perform a standard installation of Microsoft Office)
z You cannot view the documents converted into Word, Excel and PowerPoint files unless
these applications are installed and you completed the user registration to use them. Install
these applications and complete the user registration to view the converted documents on
your computer.
z ABBYY FineReader for ScanSnap can be used with the following versions of Word, Excel
and PowerPoint:
- Word: 2010/2007/2003/2002
- Excel: 2010/2007/2003/2002
- PowerPoint: 2010/2007/2003/2002
z Do not use this function while you are working in Word, Excel or PowerPoint. In addition, do
not use Word, Excel or PowerPoint while this function is being executed. Otherwise, a message such as "Call is rejected by callee" may appear and the conversion result may not be
displayed.
131
Actions (for Windows users)
About the OCR function of ABBYY FineReader for ScanSnap
z ABBYY FineReader for ScanSnap is an application used exclusively with the ScanSnap. This
application can perform text recognition only for PDF files created by using the ScanSnap. It
cannot perform text recognition for PDF files created using Adobe Acrobat or other applications.
z The optical character recognition program has the following features. Before performing text
recognition, check whether the documents you want to convert are suitable for conversion
according to the following guidelines:
Application
Suitable for conversion
Not suitable for conversion
Scan to Word Documents with simple layouts Documents with complex layouts containing
consisting of single or double
a mixture of diagrams, tables and text (e.g.
columns
brochures, magazines and newspapers)
Scan to Excel Documents containing simple
tables with no cells merged
Documents containing;
- tables witrh no solid border lines
- tables with complicated cell formats
- complex tables containing sub-tables
- diagrams, graphs, photos and/or vertical
text
(Note that documents containing diagrams,
graphs or vertical text will not be reproduced.)
Scan to
Documents containing text and - Documents with complex layouts
PowerPoint(R) simple diagrams/tables on a
containing text mixed with diagrams or
white or light monocolor backillustrations
ground
- Documents containing photographs or
patterns set as the background
- Documents with light colored text on a
deep colored background
132
Actions (for Windows users)
z The following parameters may not be reproduced as they are in the original document. It is
recommended that you check the conversion result in Word, Excel or PowerPoint and edit the
data if necessary:
- Character font and size
- Character and line spacing
- Underlined, bold and italic characters
- Superscript/subscript
z The following types of documents (characters) may not be recognized correctly.
Better results in text recognition may be achieved by changing the color mode or increasing
the resolution:
- Documents including handwritten characters
- Documents containing small characters (smaller than 10 points)
- Skewed documents
- Documents written in languages other than the specified language
- Documents with characters on an unevenly colored background
e.g. Shaded characters
- Documents with many decorated characters
e.g. Decorated characters (embossed/outlined)
- Documents with characters on a patterned background
e.g. Characters overlapping illustrations and diagrams
- Documents with many characters contacting underlines or borders
- Documents with a complex layout and documents with image noise
(It may take extra time to process text recognition for these documents.)
z The following message appears when you convert a long page document into a Word file, and
the conversion result may be divided into more than one page.
z When converting to Excel files, if the recognition result exceeds 65,536 lines, no more results
are saved.
z When converting to Excel files, information about the layout of the entire document, diagrams,
and length/width of graphs and tables is not duplicated. Only tables and character strings are
reproduced.
z A converted PowerPoint document will not have the original background color and patterns.
z Documents placed upside down or in landscape orientation cannot be recognized properly.
Select the [Allow automatic image rotation] check box (page 195), or load documents face
down in portrait orientation.
z In the ScanSnap setup dialog box, even if the [Generate one PDF file per (n) page (s)] check
box is selected in the [File option] tab [Option], the conversion result is saved as one file.
133
Actions (for Windows users)
You can change the settings applied during conversion to Word, Excel or PowerPoint documents
in the ABBYY FineReader for ScanSnap setup dialog box.
Select [Start] menu [All Programs] [ABBYY FineReader for ScanSnap (TM) 4.1]
FineReader for ScanSnap (TM) 4.1] to display the following dialog box.
[ABBYY
For details about how to configure settings, refer to ABBYY FineReader for ScanSnap User's
Guide.
For details about the procedure to scan and convert the scanned image into Word/Excel/
PowerPoint files using or without using the Quick Menu, refer to the following:
z Using the Quick Menu ( page 135)
z Without Using the Quick Menu ( page 137)
134
Actions (for Windows users)
Using the Quick Menu
To use the Quick Menu, you need to select the [Use Quick Menu] check box in the ScanSnap
setup dialog box.
For details about how to perform scanning by using the Quick Menu, refer to "Using the Quick
Menu" (page 63).
1. Load the document in the ScanSnap.
For details about how to load documents, refer to "How to Load Documents" (page 30).
2. Press the [Scan/Stop] button on the ScanSnap to start scanning.
z It is recommended that you select [Automatic resolution] or [Best] for [Image quality] in
the [Scanning] tab of the ScanSnap setup dialog box.
z Load another document in the ScanSnap when you want to scan multiple sheets. Scanning starts automatically when a document is loaded.
3. Press the [Scan/Stop] button on the ScanSnap to finish scanning.
The Quick Menu appears.
4. Click the [Scan to Word], [Scan to Excel] or [Scan to PowerPoint(R)]
icon.
135
Actions (for Windows users)
z When you perform a scan with [JPEG(*.jpg)] selected for [File format] in the [File option]
tab of the ScanSnap setup dialog box, scanned data cannot be converted into a Word,
Excel or PowerPoint file.
z You cannot start scanning when the Quick Menu is displayed. Wait until the conversion
is over to scan another document.
z Do not move, delete or rename the scanned image in other applications when the Quick
Menu is displayed.
The following dialog box appears, and image data conversion to Word, Excel or
PowerPoint files starts.
When the conversion is completed, Word, Excel or PowerPoint starts up and the
conversion result is displayed.
In a computer environment where Word, Excel or PowerPoint is not installed, the scanned
image is saved in one of the following formats when the conversion is completed:
z Scan to Word: RTF format (.rtf)
z Scan to Excel: XLS format (.xls)
z Scan to PowerPoint: PPT format (.ppt)
136
Actions (for Windows users)
Without using the Quick Menu
To disable the Quick Menu, you need to clear the [Use Quick Menu] check box in the ScanSnap
setup dialog box.
For details about how to perform scanning without using the Quick Menu, refer to "Without Using
the Quick Menu" (page 69).
1. Select [Scan Button Settings] from the Right-Click Menu.
For details about the Right-Click Menu, refer to "Right-Click Menu" (page 59).
The ScanSnap setup dialog box appears.
2. In the [Application] drop-down list in the [Application] tab, select
[ABBYY Scan to Word], [ABBYY Scan to Excel], or [ABBYY Scan to
PowerPoint(R)].
z It is recommended to select [Automatic resolution] or [Best] for [Image quality] in the
[Scanning] tab of the ScanSnap setup dialog box.
z ScanSnap Manager can also link with [ABBYY Scan to Word], [ABBYY Scan to Excel]
or [ABBYY Scan to PowerPoint(R) when you select:
- [ABBYY Scan to Word], [ABBYY Scan to Excel] or [ABBYY Scan to PowerPoint(R)]
from the [Profile] drop-down list of the ScanSnap setup dialog box
- [ABBYY Scan to Word], [ABBYY Scan to Excel] or [ABBYY Scan to PowerPoint(R)]
from the Left-Click Menu
3. Click the [OK] button to close the ScanSnap setup dialog box.
137
Actions (for Windows users)
4. Load the document in the ScanSnap.
For details about how to load documents, refer to "How to Load Documents" (page 30).
5. Press the [Scan/Stop] button on the ScanSnap to start scanning.
Load another document in the ScanSnap when you want to scan multiple sheets. Scanning
starts automatically when a document is loaded.
6. Press the [Scan/Stop] button on the ScanSnap to finish scanning.
The following dialog box appears, and image data conversion to Word, Excel or
PowerPoint files starts.
When the conversion is completed, Word, Excel or PowerPoint starts up and the
conversion result is displayed.
In a computer environment where Word, Excel or PowerPoint is not installed, the image
data is saved in one of the following formats when the conversion is completed:
z Scan to Word: RTF format (.rtf)
z Scan to Excel: XLS format (.xls)
z Scan to PowerPoint: PPT format (.ppt)
138
Actions (for Windows users)
■ Storing Business Cards in CardMinder
This section explains how to store business card images and the related information in
CardMinder.
z Blank pages are not removed even if the [Allow automatic blank page removal] is selected
when you store scanned images of business cards in CardMinder.
z Data of up to 1,000 pages, including blank pages, can be stored in CardMinder at once.
For details about the procedure to scan and manage business cards in CardMinder using or
without using the Quick Menu, refer to the following:
z Using the Quick Menu ( page 140)
z Without Using the Quick Menu ( page 143)
139
Actions (for Windows users)
Using the Quick Menu
To use the Quick Menu, you need to select the [Use Quick Menu] check box in the ScanSnap
setup dialog box.
For details about how to perform scanning by using the Quick Menu, refer to "Using the Quick
Menu" (page 63).
1. Insert the business card straight into the feeding section of the
ScanSnap, with the scanning side facing up.
Business card is pulled in until it is set inside the ScanSnap.
z When [Business card] is specified for [Paper size] in the [Paper] tab of the ScanSnap
setup dialog box, insert the business card by aligning it with the left edge of the feeding
section.
z If you perform a scan with the output guide open, a
paper jam may occur and damage business cards.
Make sure to close the output guide when you scan
business cards.
140
Output guide
Actions (for Windows users)
2. Press the [Scan/Stop] button on the ScanSnap to start scanning.
It is recommended that you select [Automatic resolution] or [Best] for [Image quality] in the
[Scanning] tab of the ScanSnap setup dialog box. ScanSnap Manager cannot link with
CardMinder when [Image quality] is set to [Excellent].
Load another business card in the ScanSnap when you want to scan multiple business
cards. Scanning starts automatically when a business card is loaded.
3. Press the [Scan/Stop] button on the ScanSnap to finish scanning.
The Quick Menu appears.
4. Click the [Scan to CardMinder] icon.
z You cannot start scanning when the Quick Menu is displayed. Wait until ScanSnap Manager links with CardMinder before scanning another document.
z Do not move, delete, or rename the scanned image in other applications when the
Quick Menu is displayed.
CardMinder starts up.
141
Actions (for Windows users)
5. Check the scanned card image and the text recognition result.
For details about the functions of CardMinder and how to use it, refer to CardMinder
User's Guide and CardMinder Help.
142
Actions (for Windows users)
Without using the Quick Menu
To disable the Quick Menu, you need to clear the [Use Quick Menu] check box in the ScanSnap
setup dialog box.
For details about how to perform scanning without using the Quick Menu, refer to "Without Using
the Quick Menu" (page 69).
1. Select [Scan Button Settings] from the Right-Click Menu.
For details about the Right-Click Menu, refer to "Right-Click Menu" (page 59).
The ScanSnap setup dialog box appears.
2. In the [Application] drop-down list in the [Application] tab, select
[CardMinder].
It is recommended that you select [Automatic resolution] or [Best] for [Image quality] in the
[Scanning] tab of the ScanSnap setup dialog box. ScanSnap Manager cannot link with
CardMinder when [Image quality] is set to [Excellent].
ScanSnap Manager can also link with [CardMinder] when you select:
z [CardMinder] from the [Profile] drop-down list of the ScanSnap setup dialog box
z [CardMinder] from the Left-Click Menu
3. Click the [OK] button to close the ScanSnap setup dialog box.
143
Actions (for Windows users)
4. Insert the business card straight into the feeding section of the
ScanSnap, with the scanning side facing up.
Business card is pulled in until it is set inside the ScanSnap.
z When [Business card] is specified for [Paper size] in the [Paper] tab of the ScanSnap
setup dialog box, insert the business card by aligning it with the left edge of the feeding
section.
z If you perform a scan with the output guide open, a
paper jam may occur and damage business cards.
Make sure to close the output guide when you scan
business cards.
Output guide
5. Press the [Scan/Stop] button on the ScanSnap to start scanning.
Load another business card in the ScanSnap when you want to scan multiple business
cards. Scanning starts automatically when a business card is loaded.
6. Press the [Scan/Stop] button on the ScanSnap to finish scanning.
CardMinder starts up.
144
Actions (for Windows users)
7. Check the scanned card image and the text recognition result.
For details about the functions of CardMinder and how to use it, refer to CardMinder
User's Guide and CardMinder Help.
145
Actions (for Windows users)
■ Saving Data in SharePoint
This section explains how to save the scanned image in SharePoint or Office Live.
z To save a large file to SharePoint or Office Live, you may need to have the system administrator change the SharePoint or Office Live setting.
z When you start up Scan to Microsoft SharePoint for the first time, you need to register a
SharePoint site. Once you register the SharePoint site, ScanSnap Manager automatically
connects to that site from the next startup.
For more details, refer to the Scan to Microsoft SharePoint User Guide.
For details about the procedure to scan and save the scanned image in SharePoint/Office
Live using or without using the Quick Menu, refer to the following:
z Using the Quick Menu ( page 147)
z Without Using the Quick Menu ( page 151)
146
Actions (for Windows users)
Using the Quick Menu
To use the Quick Menu, you need to select the [Use Quick Menu] check box in the ScanSnap
setup dialog box.
For details about how to perform scanning by using the Quick Menu, refer to "Using the Quick
Menu" (page 63).
1. Load the document in the ScanSnap.
For details about how to load documents, refer to "How to Load Documents" (page 30).
2. Press the [Scan/Stop] button on the ScanSnap to start scanning.
Load another document in the ScanSnap when you want to scan multiple sheets. Scanning
starts automatically when a document is loaded.
3. Press the [Scan/Stop] button on the ScanSnap to finish scanning.
The Quick Menu appears.
4. Change settings for the [Scan to SharePoint] (If you do not want to
change any settings, go to step 5.).
1. Move the mouse cursor to the
select the [Settings] menu.
mark on the [Scan to SharePoint] icon, and then
The [Scan to SharePoint - Options] dialog box appears.
147
Actions (for Windows users)
2. Change the setting.
For details about the [Scan to SharePoint - Options] dialog box, refer to the
ScanSnap Manager Help.
3. Click the [OK] button to close the [Scan to SharePoint - Options] dialog box.
5. Click the [Scan to SharePoint] icon.
z You cannot start scanning when the Quick Menu is displayed. Wait until ScanSnap Manager links with Microsoft SharePoint before scanning another document.
z Do not move, delete or rename the scanned image in other applications when the Quick
Menu is displayed.
Scan to Microsoft SharePoint starts up.
148
Actions (for Windows users)
6. Save the image data.
zSaving to SharePoint
1. Select a folder in which you want to save the scanned image.
2. In the Scan to Microsoft SharePoint Index Pane, enter information, such as the title,
and click the [Accept] button.
The scanned image is saved in the specified folder.
zSaving to Office Live
1. Select [Connect to Office Live] from the menu.
The Office Live logon dialog box appears.
149
Actions (for Windows users)
2. Enter the ID and the password in the Office Live logon dialog box, and then click the
[Sign In] button.
The [Scan to Microsoft SharePoint] dialog box appears after the ScanSnap is
connected to Office Live.
3. Select a folder in which you want to save the scanned image.
4. In the Scan to Microsoft SharePoint Index Pane, enter information, such as the title,
and click the [Accept] button.
The scanned image is saved in the specified folder.
For details, refer to the Scan to Microsoft SharePoint User Guide.
150
Actions (for Windows users)
Without using the Quick Menu
To disable the Quick Menu, you need to clear the [Use Quick Menu] check box in the ScanSnap
setup dialog box.
For details about how to perform scanning without using the Quick Menu, refer to "Without Using
the Quick Menu" (page 69).
1. Select [Scan Button Settings] from the Right-Click Menu.
For details about the Right-Click Menu, refer to "Right-Click Menu" (page 59).
The ScanSnap setup dialog box appears.
2. In the [Application] drop-down list in the [Application] tab, select [Scan
to SharePoint].
When you add the customized settings as profiles, the application to link with ScanSnap
Manager can be selected in the [Profile] drop-down list or Left-Click Menu next time you
perform a scan.
For details about how to add a profile, refer to "Profile Management" (page 81).
151
Actions (for Windows users)
3. Change settings for the [Scan to SharePoint] (If you do not want to
change any settings, go to step 4.).
1. Click the [Application Settings] button.
The [Scan to SharePoint - Options] dialog box appears.
2. Change the settings.
For details about the [Scan to SharePoint - Options] dialog box, refer to the
ScanSnap Manager Help.
3. Click the [OK] button to close the [Scan to SharePoint - Options] dialog box.
4. Click the [OK] button to close the ScanSnap setup dialog box.
5. Load the document in the ScanSnap.
For details about how to load documents, refer to "How to Load Documents" (page 30).
6. Press the [Scan/Stop] button on the ScanSnap to start scanning.
Load another document in the ScanSnap when you want to scan multiple sheets. Scanning
starts automatically when a document is loaded.
152
Actions (for Windows users)
7. Press the [Scan/Stop] button on the ScanSnap to finish scanning.
Scan to Microsoft SharePoint starts up.
8. Save the scanned image.
zSaving to SharePoint
1. Select a folder in which you want to save the scanned image.
2. In the Scan to Microsoft SharePoint Index Pane, enter information, such as the title,
and click the [Accept] button.
The scanned image is saved in the specified folder.
zSaving to Office Live
1. Select [Connect to Office Live] from the menu.
The Office Live logon dialog box appears.
153
Actions (for Windows users)
2. Enter the ID and the password in the Office Live logon dialog box, and then click the
[Sign In] button.
The [Scan to Microsoft SharePoint] dialog box appears after the ScanSnap is
connected to Office Live.
3. Select a folder in which you want to save the scanned image.
4. In the Scan to Microsoft SharePoint Index Pane, enter information, such as the title,
and click the [Accept] button.
The scanned image is saved in the specified folder.
For more details, refer to the Scan to Microsoft SharePoint User Guide.
154
Actions (for Windows users)
■ Saving to Rack2-Filer
This section explains how to save the scanned image as a PDF file in Rack2-Filer trial version
(bundled with the ScanSnap) or Rack2-Filer (V5.0 or later recommended/bundled model or
sold separately).
z Rack2-Filer trial version (bundled with the ScanSnap) or Rack2-Filer (V5.0 or later recommended/bundled model or sold separately) is required to use this function.
Rack2-Filer is an application that converts paper documents and electronic documents into
PDF files and manages them in a computer. You can manage the documents as if you bind
them, store them on a cabinet shelf, and browse them as if you flip through a book.
z The following settings in ScanSnap Manager are disabled when the scanned image is saved
to Rack2-Filer:
- Rename file after scanning
- Color high compression
For details about the procedure to scan and save the scanned image in Rack2-Filer using or
without using the Quick Menu, refer to the following:
z Using the Quick Menu ( page 156)
z Without Using the Quick Menu ( page 159)
155
Actions (for Windows users)
Using the Quick Menu
To use the Quick Menu, you need to select the [Use Quick Menu] check box in the ScanSnap
setup dialog box.
For details about how to perform scanning by using the Quick Menu, refer to "Using the Quick
Menu" (page 63)
1. Load the document in the ScanSnap.
For details about how to load documents, refer to "How to Load Documents" (page 30).
2. Press the [Scan/Stop] button on the ScanSnap to start scanning.
Load another document in the ScanSnap when you want to scan multiple sheets. Scanning
starts automatically when a document is loaded.
3. Press the [Scan/Stop] button on the ScanSnap to finish scanning.
The Quick Menu appears.
4. Change settings for the [Scan to Rack2-Filer] (If you do not want to
change any settings, go to step 5.).
1. Move the mouse cursor to the
select the [Settings] menu.
mark on the [Scan to Rack2-Filer] icon, and then
The [ScanSnap - > Rack2] dialog box appears.
156
Actions (for Windows users)
2. Change the settings.
In this dialog box, specify the destination to save the scanned image.
For details about the [ScanSnap - > Rack2] dialog box, refer to Rack2-Filer Help.
Click the [Help] button in the [ScanSnap - > Rack2] dialog box to display Rack2-Filer
Help.
3. Click the [OK] button to close the [ScanSnap - > Rack2] dialog box.
5. Click the [Scan to Rack2-Filer] icon.
157
Actions (for Windows users)
z When you perform a scan with [JPEG(*.jpg)] selected for [File format] in the [File option]
tab of the ScanSnap setup dialog box, you cannot save the image in Rack2-Filer.
z You cannot start scanning when the Quick Menu is displayed. Save the scanned image
to Rack2-Filer before scanning another document.
z Do not move, delete or rename the scanned image in other applications when the Quick
Menu is displayed.
Rack2-Filer starts up, and the PDF file created by the ScanSnap is saved in Rack2Filer in accordance with the settings specified in step 4.
For details about how to use Rack2-Filer, refer to the Rack2-Filer User’s Guide.
158
Actions (for Windows users)
Without using the Quick Menu
To disable the Quick Menu, you need to clear the [Use Quick Menu] check box in the ScanSnap
setup dialog box.
For details about how to perform scanning without using the Quick Menu, refer to "Without Using
the Quick Menu" (page 69).
1. Select [Scan Button Settings] from the Right-Click Menu.
For details about the Right-Click Menu, refer to "Right-Click Menu" (page 59).
The ScanSnap setup dialog box appears.
2. In the [Application] drop-down list in the [Application] tab, select [Rack2Filer].
ScanSnap Manager can also link with [Rack2-Filer] when you select:
z [Rack2-Filer] from the [Profile] drop-down list of the ScanSnap setup dialog box
z [Rack2-Filer] from the Left-Click Menu
159
Actions (for Windows users)
3. Change settings for the [Scan to Rack2-Filer] (If you do not want to
change any settings, go to step 4.).
1. Click the [Application Setting] button.
The [ScanSnap - > Rack2] dialog box appears.
2. Change the settings.
In this dialog box, specify the destination to save the scanned image.
For details about the [ScanSnap -> Rack2] dialog box, refer to Rack2-Filer Help.Click
the [Help] button in the [ScanSnap -> Rack2] dialog box to display Rack2-Filer Help.
3. Click the [OK] button to close the [ScanSnap -> Rack2] dialog box.
4. Click the [OK] button to close the ScanSnap setup dialog box.
5. Load the document in the ScanSnap.
For details about how to load documents, refer to "How to Load Documents" (page 30).
160
Actions (for Windows users)
6. Press the [Scan/Stop] button on the ScanSnap to start scanning.
Load another document in the ScanSnap when you want to scan multiple sheets. Scanning
starts automatically when a document is loaded.
7. Press the [Scan/Stop] button on the ScanSnap to finish scanning.
Rack2-Filer starts up, and the PDF file created by the ScanSnap is saved in Rack2Filer in accordance with the settings specified in step 3.
For details about how to use Rack2-Filer, refer to the Rack2-Filer User’s Guide.
161
Actions (for Windows users)
■ Saving Documents to Evernote
This section explains how to save the scanned image as a PDF file to Evernote.
When you save a scanned image to Evernote after converting it into a searchable PDF, the
PDF file becomes searchable in Evernote.
You first need to sign in to Evernote for Windows to save a file to Evernote.
For details about the procedure to scan and save the scanned image to Evernote using or
without using the Quick Menu, refer to the following:
z Using the Quick Menu ( page 163)
z Without Using the Quick Menu ( page 167)
162
Actions (for Windows users)
Using the Quick Menu
To use the Quick Menu, you need to select the [Use Quick Menu] check box in the ScanSnap
setup dialog box.
For details about how to perform scanning by using the Quick Menu, refer to "Using the Quick
Menu" (page 63).
1. Load a document in the ScanSnap.
For details about how to load documents, refer to "How to Load Documents" (page 30).
2. Press the [Scan/Stop] button on the ScanSnap to start scanning.
Load another document in the ScanSnap when you want to scan multiple sheets.
Scanning starts automatically when a document is loaded.
3. Press the [Scan/Stop] button on the ScanSnap to finish scanning.
The Quick Menu appears.
163
Actions (for Windows users)
4. Change settings for the [Scan to Evernote (Document)] (If you do not
want to change any settings, go to step 5.).
1. Move the mouse cursor to the
mark on the [Scan to Evernote (Document)] icon,
and then select the [Settings] menu.
The [Scan to Evernote - Options] dialog box appears.
2. Change the settings.
For details about the [Scan to Evernote- Options] dialog box, refer to the ScanSnap
Manager Help.
3. Click the [OK] button to close the [Scan to Evernote - Options] dialog box.
164
Actions (for Windows users)
5. Click the [Scan to Evernote (Document)] icon.
z You cannot start scanning when the Quick Menu is displayed. Save the PDF file to Evernote before scanning the next document.
z Do not move, delete, or rename the scanned image in other applications when the
Quick Menu is displayed.
When you perform a scan with [JPEG(*.jpg)] selected for [File format] in the [File
option] tab of the ScanSnap setup dialog box, a PDF file is created from the JPEG
file. A separate PDF file is created for each JPEG file.
The following dialog box is displayed when the PDF file is being created.
165
Actions (for Windows users)
If the [Convert to Searchable PDF] check box is selected in step 4., text recognition
is performed according to the [OCR options] settings in the [Scan to Evernote Options] dialog box.
The following dialog box is displayed during text recognition.
Text recognition will be performed if there are any pages containing text which is not
yet recognized. Note that text recognition will be performed on those pages only.
Evernote for Windows starts up, and the PDF file is saved to Evernote.
The file in which the scanned image is saved remains in the folder specified for [Image
saving folder] in the [Save] tab of the ScanSnap setup dialog box even after the scanned
image is saved to Evernote. Delete this file if unnecessary.
166
Actions (for Windows users)
Without using the Quick Menu
To disable the Quick Menu, you need to clear the [Use Quick Menu] check box in the ScanSnap
setup dialog box.
For details about how to perform scanning without using the Quick Menu, refer to "Without Using
the Quick Menu" (page 69).
1. Select [Scan Button Settings] from the Right-Click Menu.
For details about the Right-Click Menu, refer to "Right-Click Menu" (page 59).
The ScanSnap setup dialog box appears.
2. In the [Application] drop-down list in the [Application] tab, select [Scan
to Evernote (Document)].
ScanSnap Manager can also link with [Scan to Evernote (Document)] when you select:
z [Scan to Evernote (Document)] from the [Profile] drop-down list of the ScanSnap setup
dialog box
z [Scan to Evernote (Document)] from the Left-Click Menu
167
Actions (for Windows users)
3. Change settings for the [Scan to Evernote (Document)] (If you do not
want to change any settings, go to step 4.).
1. Click the [Application Settings] button.
The [Scan to Evernote - Options] dialog box appears.
2. Change the settings.
For details about the [Scan to Evernote - Options] dialog box, refer to the ScanSnap
Manager Help.
3. Click the [OK] button to close the [Scan to Evernote - Options] dialog box.
4. Click the [OK] button to close the ScanSnap setup dialog box.
5. Load a document in the ScanSnap.
For details about how to load documents, refer to "How to Load Documents" (page 30).
6. Press the [Scan/Stop] button on the ScanSnap to start scanning.
Load another document in the ScanSnap when you want to scan multiple sheets.
Scanning starts automatically when a document is loaded.
168
Actions (for Windows users)
7. Press the [Scan/Stop] button on the ScanSnap to finish scanning.
When you perform a scan with [JPEG(*.jpg)] selected for [File format] in the [File
option] tab of the ScanSnap setup dialog box, a PDF file is created from the JPEG
file. A separate PDF file is created for each JPEG file.
The following dialog box is displayed when the PDF file is being created.
If the [Convert to Searchable PDF] check box is selected in step 3., text recognition
is performed according to the [OCR options] settings in the [Scan to Evernote Options] dialog box.
The following dialog box is displayed during text recognition.
Text recognition will be performed if there are any pages containing text which is not
yet recognized. Note that text recognition will be performed on those pages only.
169
Actions (for Windows users)
Evernote for Windows starts up, and the PDF file is saved to Evernote.
The file in which the scanned image is saved remains in the folder specified for [Image
saving folder] in the [Save] tab of the ScanSnap setup dialog box even after the scanned
image is saved to Evernote. Delete this file if unnecessary.
170
Actions (for Windows users)
■ Saving Handwritten Notes to Evernote
This section explains how to save the scanned image as a JPEG file to Evernote.
When you save a JPEG file to Evernote, text recognition is performed on all text, including
handwritten characters, and the file becomes searchable in Evernote.
You first need to sign in to Evernote for Windows to save a file to Evernote.
For details about the procedure to scan and save the scanned image to Evernote using or
without using the Quick Menu, refer to the following:
z Using the Quick Menu ( page 172)
z Without Using the Quick Menu ( page 175)
171
Actions (for Windows users)
Using the Quick Menu
To use the Quick Menu, you need to select the [Use Quick Menu] check box in the ScanSnap
setup dialog box.
For details about how to perform scanning by using the Quick Menu, refer to "Using the Quick
Menu" (page 63).
1. Load a document in the ScanSnap.
For details about how to load documents, refer to "How to Load Documents" (page 30).
2. Press the [Scan/Stop] button on the ScanSnap to start scanning.
Load another document in the ScanSnap when you want to scan multiple sheets.
Scanning starts automatically when a document is loaded.
3. Press the [Scan/Stop] button on the ScanSnap to finish scanning.
The Quick Menu appears.
172
Actions (for Windows users)
4. Click the [Scan to Evernote (Note)] icon.
z You cannot start scanning when the Quick Menu is displayed. Save the JPEG file to
Evernote before scanning the next document.
z Do not move, delete, or rename the scanned image in other applications when the
Quick Menu is displayed.
When you perform a scan with [PDF(*.pdf)] selected for [File format] in the [File
option] tab of the ScanSnap setup dialog box, a JPEG file is created from the PDF
file. A separate JPEG file is created for each page of the PDF file.
The following dialog box is displayed when the JPEG file is being created.
173
Actions (for Windows users)
Evernote for Windows starts up, and the JPEG file is saved to Evernote.
z When you select [PDF (*.pdf)] for [File format] in the [File option] tab of the ScanSnap
setup dialog box, a four-digit serial number is automatically added to the name of the
file which is saved to Evernote.
e.g. When the file name is [ScanSnap], the file is saved as:
ScanSnap_0001, ScanSnap_0002, ScanSnap_0003...
z The file in which the scanned image is saved remains in the folder specified for [Image
saving folder] in the [Save] tab of the ScanSnap setup dialog box even after the
scanned image is saved to Evernote. Delete this file if unnecessary.
174
Actions (for Windows users)
Without using the Quick Menu
To disable the Quick Menu, you need to clear the [Use Quick Menu] check box in the ScanSnap
setup dialog box.
For details about how to perform scanning without using the Quick Menu, refer to "Without Using
the Quick Menu" (page 69).
1. Select [Scan Button Settings] from the Right-Click Menu.
For details about the Right-Click Menu, refer to "Right-Click Menu" (page 59).
The ScanSnap setup dialog box appears.
2. In the [Application] drop-down list in the [Application] tab, select [Scan
to Evernote (Note)].
ScanSnap Manager can also link with [Scan to Evernote (Note)] when you select:
z [Scan to Evernote (Note)] from the [Profile] drop-down list of the ScanSnap setup dialog
box
z [Scan to Evernote (Note)] from the Left-Click Menu
3. Click the [OK] button to close the ScanSnap setup dialog box.
4. Load a document in the ScanSnap.
For details about how to load documents, refer to "How to Load Documents" (page 30).
175
Actions (for Windows users)
5. Press the [Scan/Stop] button on the ScanSnap to start scanning.
Load another document in the ScanSnap when you want to scan multiple sheets. Scanning
starts automatically when a document is loaded.
6. Press the [Scan/Stop] button on the ScanSnap to finish scanning.
When you perform a scan with [PDF(*.pdf)] selected for [File format] in the [File
option] tab of the ScanSnap setup dialog box, a JPEG file is created from the PDF
file. A separate JPEG file is created for each page of the PDF file.
The following dialog box is displayed when the JPEG file is being created.
176
Actions (for Windows users)
Evernote for Windows starts up, and the JPEG file is saved to Evernote.
z When you select [PDF (*.pdf)] for [File format] in the [File option] tab of the ScanSnap
setup dialog box, a four-digit serial number is automatically added to the name of the
file which is saved to Evernote.
e.g. When the file name is [ScanSnap], the file is saved as:
ScanSnap_0001, ScanSnap_0002, ScanSnap_0003...
z The file in which the scanned image is saved remains in the folder specified for [Image
saving folder] in the [Save] tab of the ScanSnap setup dialog box even after the
scanned image is saved to Evernote. Delete this file if unnecessary.
177
Actions (for Windows users)
■ Saving Documents to Google Docs
This section explains how to save the scanned image as a PDF file to Google Docs.
You need to have .NET Framework 3.0 installed in order to use this function.
Note that .NET Framework 3.0 is also included in .NET Framework 3.5 (SP1 or later). It is
recommended that you use .NET Framework 3.5 (SP1 or later) by updating Windows.
You need to install .NET Framework 3.0 separately even if .NET Framework 4.0 or later is
already installed because .NET Framework 3.0 is not included in the .NET Framework 4.0 or
later version.
For details about the procedure to scan and save the scanned image to Google Docs using or
without using the Quick Menu, refer to the following:
z Using the Quick Menu ( page 179)
z Without Using the Quick Menu ( page 183)
178
Actions (for Windows users)
Using the Quick Menu
To use the Quick Menu, you need to select the [Use Quick Menu] check box in the ScanSnap
setup dialog box.
For details about how to perform scanning by using the Quick Menu, refer to "Using the Quick
Menu" (page 63).
1. Load a document in the ScanSnap.
For details about how to load documents, refer to "How to Load Documents" (page 30).
2. Press the [Scan/Stop] button on the ScanSnap to finish scanning.
Load another document in the ScanSnap when you want to scan multiple sheets.
Scanning starts automatically when a document is loaded.
3. Press the [Scan/Stop] button on the ScanSnap to finish scanning.
The Quick Menu appears.
4. Change settings for [Scan to Google Docs(TM)] (If you do not want to
change any settings, go to step 5.).
1. Move the mouse cursor to the
then select the [Settings] menu.
mark on the [Scan to Google Docs(TM)] icon, and
The [Scan to Google Docs(TM) - Options] dialog box appears.
179
Actions (for Windows users)
2. Change the settings.
For details about the [Scan to Google Docs(TM) - Options] dialog box, refer to the
ScanSnap Manager Help.
If the computer is shared with other users, do not enter your information in [Email] and
[Password] in this dialog box.
Otherwise, other users will be able to log into Google Docs automatically.
3. Click the [OK] button to close the [Scan to Google Docs(TM) - Options] dialog box.
5. Click the [Scan to Google Docs(TM)] icon.
z You cannot start scanning when the Quick Menu is displayed. Save the PDF file to
Google Docs before scanning the next document.
z Do not move, delete, or rename the scanned image in other applications when the
Quick Menu is displayed.
180
Actions (for Windows users)
If you did not specify a Google account in the [Scan to Google Docs(TM) - Options]
dialog box in step 4., the [Scan to Google Docs(TM)] dialog box appears. Saving will
continue after you enter an e-mail address and a password, and click the [OK]
button.
If the computer is shared with other users, do not select the [Save your account
information.] check box in this dialog box.
Otherwise, other users will be able to log into Google Docs automatically.
When you perform a scan with [JPEG(*.jpg)] selected for [File format] in the [File
option] tab of the ScanSnap setup dialog box, a PDF file is created from the JPEG
file. A separate PDF file is created for each JPEG file.
The following dialog box is displayed when the PDF file is being created.
If the [Convert to Searchable PDF] check box is selected in the [Scan to Google
Docs(TM) - Options] dialog box in step 4., text recognition is performed according to
the [OCR options] settings in the [Scan to Google Docs(TM) - Options] dialog box.
The following dialog box is displayed during text recognition.
Text recognition will be performed if there are any pages containing text which is not
yet recognized. Note that text recognition will be performed on those pages only.
181
Actions (for Windows users)
The following dialog box appears when saving starts. Click the [Close] button to
close the [Scan to Google Docs(TM)] dialog box when the saving completes.
When you select the [Close this window when save completes] check box in the
[Scan to Google Docs(TM)] dialog box, from next scanning on, the [Scan to Google
Docs(TM) dialog box automatically closes after the PDF file is saved to Google
Docs.
Google Docs does not start up after the saving has completed. To check the saved PDF file,
start a web browser and log in to Google Docs.
182
Actions (for Windows users)
Without using the Quick Menu
To disable the Quick Menu, you need to clear the [Use Quick Menu] check box in the ScanSnap
setup dialog box.
For details about how to perform scanning without using the Quick Menu, refer to "Without Using
the Quick Menu" (page 69).
1. Select [Scan Button Settings] from the Right-Click Menu.
For details about the Right-Click Menu, refer to "Right-Click Menu" (page 59).
The ScanSnap setup dialog box appears.
2. In the [Application] drop-down list in the [Application] tab, select [Scan
to Google Docs(TM)].
ScanSnap Manager can also link with [Scan to Google Docs(TM)] when you select:
z [Scan to Google Docs(TM)] from the [Profile] drop-down list of the ScanSnap setup dialog box
z [Scan to Google Docs (TM)] from the Left-Click Menu
183
Actions (for Windows users)
3. Change settings for the [Scan to Google Docs(TM)] (If you do not want to
change any settings, go to step 4.).
1. Click the [Application Settings] button.
The [Scan to Google Docs(TM)- Options] dialog box appears.
2. Change the settings.
For details about the [Scan to Google Docs(TM) - Options] dialog box, refer to the
ScanSnap Manager Help.
If the computer is shared with other users, do not enter your information in [Email]
and [Password] in this dialog box.
Otherwise, other users will be able to log into Google Docs automatically.
3. Click the [OK] button to close the [Scan to Google Docs(TM) - Options] dialog box.
4. Click the [OK] button to close the ScanSnap setup dialog box.
5. Load the document in the ScanSnap.
For details about how to load documents, refer to "How to Load Documents" (page 30).
184
Actions (for Windows users)
6. Press the [Scan/Stop] button on the ScanSnap to start scanning.
Load another document in the ScanSnap when you want to scan multiple sheets. Scanning
starts automatically when a document is loaded.
7. Press the [Scan/Stop] button on the ScanSnap to finish scanning.
If you did not specify a Google account in the [Scan to Google Docs(TM) - Options]
dialog box in step 3., the [Scan to Google Docs(TM)] dialog box appears. Saving will
continue after you enter an e-mail address and a password, and click the [OK]
button.
If the computer is shared with other users, do not select the [Save account
information] check box in this dialog box.
Otherwise, other users will be able to log into Google Docs automatically.
When you perform a scan with [JPEG(*.jpg)] selected for [File format] in the [File
option] tab of the ScanSnap setup dialog box, a PDF file is created from the JPEG
file. A separate PDF file is created for each JPEG file.
The following dialog box is displayed when the PDF file is being created.
185
Actions (for Windows users)
If the [Convert to Searchable PDF] check box is selected in the [Scan to Google
Docs(TM) - Options] dialog box in step 3., text recognition is performed according to
the [OCR options] settings in the [Scan to Google Docs(TM) - Options] dialog box.
The following dialog box is displayed during text recognition.
Text recognition will be performed if there are any pages containing text which is not
yet recognized. Note that text recognition will be performed on those pages only.
The following dialog box appears when saving starts. Click the [Close] button to
close the [Scan to Google Docs(TM)] dialog box when the saving completes.
When you select the [Close this window after save completes] check box in the
[Scan to Google Docs(TM) dialog box, from next scanning on, the [Scan to Google
Docs(TM) dialog box automatically closes after the PDF file is saved to Google
Docs.
Google Docs does not start up after the saving has completed. To check the saved PDF file,
start a web browser and log in to Google Docs.
186
Using the ScanSnap in Various Ways (for Windows users)
Using the ScanSnap in Various Ways
This section explains about various ways of using the ScanSnap.
■ Scanning Color Documents in Gray or Black & White
Mode
When [Auto color detection] is specified for [Color mode] in the [Scanning] tab of the
ScanSnap setup dialog box, the ScanSnap automatically recognizes whether the scanned
document is color, gray or black & white, and saves the documents in their respective color
modes.
If you want to scan and save color documents in gray or black & white, change the settings in
the following procedure.
1. Select [Scan Button Settings] from the Right-Click Menu.
For details about the Right-Click Menu, refer to "Right-Click Menu" (page 59).
The ScanSnap setup dialog box appears.
2. In the [Color mode] drop-down list in the [Scanning] tab, select [Gray] or
[B&W].
187
Using the ScanSnap in Various Ways (for Windows users)
3. Click the [OK] button to close the ScanSnap setup dialog box.
4. Load the document in the ScanSnap.
For details about how to load documents, refer to "How to Load Documents" (page 30).
5. Press the [Scan/Stop] button on the ScanSnap to start scanning.
Load another document in the ScanSnap when you want to scan multiple sheets. Scanning
starts automatically when a document is loaded.
6. Press the [Scan/Stop] button on the ScanSnap to finish scanning.
Image data is saved in gray or black & white.
188
Using the ScanSnap in Various Ways (for Windows users)
■ Scanning Color Documents in High Compression
Mode
The ScanSnap can save image data of color documents in high compression mode. You can
scan large quantities of color documents in high compression mode and save them as a
compact PDF file.
To scan color documents in high compression mode, perform the following steps to change
the setting.
In [Color high compression] mode, different compression rates are applied to characters and
backgrounds. Therefore, the file size of a document with mostly text characters is reduced, while
the quality of the characters is kept high. However, high compression is applied to photographs
and figures since they are regarded as backgrounds, resulting in deteriorated image data. For
this reason, this mode is not appropriate for scanning photographs, images and such.
1. Select [Scan Button Settings] from the Right-Click Menu.
For details about the Right-Click Menu, refer to "Right-Click Menu" (page 59).
The ScanSnap setup dialog box appears.
2. In the [Color mode] drop-down list in the [Scanning] tab, select [Color
high compression].
3. Click the [OK] button to close the ScanSnap setup dialog box.
189
Using the ScanSnap in Various Ways (for Windows users)
4. Load the document in the ScanSnap.
For details about how to load documents, refer to "How to Load Documents" (page 30).
5. Press the [Scan/Stop] button on the ScanSnap to start scanning.
Load another document in the ScanSnap when you want to scan multiple sheets. Scanning
starts automatically when a document is loaded.
6. Press the [Scan/Stop] button on the ScanSnap to finish scanning.
The scanned document is saved as highly compressed color image data.
190
Using the ScanSnap in Various Ways (for Windows users)
■ Correcting Skewed Character Strings
When documents with skewed character strings are scanned, the ScanSnap is able to detect
the skewed character strings and correct them.
To correct skewed character strings, change the settings in the following procedure.
z Up to +/-5 degrees of skew can be corrected.
z Since this option is performed assuming that the document contains a certain amount of text,
character strings may be adjusted at a wrong angle when scanning the following types of
documents. In that case, clear the [Correct skewed character strings automatically] check
box:
- Documents on which pitches between lines or characters are extremely narrow, or
characters are overlapped
- Documents with many outlined or decorated characters
- Documents with many photographs or figures and few characters
- Documents with characters on a patterned background
e.g. Characters overlapping illustrations and diagrams
- Documents with characters printed in various directions such as drawings
- Documents with long diagonal lines
- Documents including handwritten characters.
z This setting is disabled when you perform a scan using the Carrier Sheet.
You do not have to enable [Correct skewed character strings automatically] when [Automatic
detection] is specified for [Paper size] in the [Paper] tab of the ScanSnap setup dialog box
because the skewed image is always corrected when documents are scanned by this setting.
1. Select [Scan Button Settings] from the Right-Click Menu.
For details about the Right-Click Menu, refer to "Right-Click Menu" (page 59).
The ScanSnap setup dialog box appears.
191
Using the ScanSnap in Various Ways (for Windows users)
2. Click the [Option] button in the [Scanning] tab.
The [Scanning mode option] dialog box appears.
3. Select the [Correct skewed character strings automatically] check box.
4. Click the [OK] button to close all open dialog boxes.
5. Load the document in the ScanSnap.
For details about how to load documents, refer to "How to Load Documents" (page 30).
192
Using the ScanSnap in Various Ways (for Windows users)
6. Press the [Scan/Stop] button on the ScanSnap to start scanning.
Load another document in the ScanSnap when you want to scan multiple sheets. Scanning
starts automatically when a document is loaded.
7. Press the [Scan/Stop] button on the ScanSnap to finish scanning.
Image data is saved with skewed character strings corrected.
193
Using the ScanSnap in Various Ways (for Windows users)
■ Correcting the Orientation of Scanned Images
In an office environment, it is often the case that a single batch contains same size documents
of different page orientations.
The ScanSnap is able to automatically rotate each scanned image to its correct orientation for
such document batches.
To rotate scanned images to their correct orientations, change the settings in the following
procedure.
Since this option determines the document’s page orientation based on the character strings
printed on the document, the following types of documents may be rotated to the wrong
orientation. In that case, clear the [Allow automatic image rotation] check box.
z Documents with many extremely large or small characters
z Documents on which pitches between lines or characters are extremely narrow, or characters
are overlapped
z Documents with many characters contacting underlines or borders
z Documents with many photographs or figures and few characters
z Documents with characters on an unevenly colored background
e.g. Shaded characters
z Documents with many decorated characters
e.g. Decorated characters (embossed/outlined)
z Documents with characters on a patterned background
e.g. Characters overlapping illustrations and diagrams
z Documents with characters printed in various directions such as drawings
z Documents written using only capital letters
z Documents including handwritten characters
z Skewed documents
z Documents written in an unsupported language (language other than Japanese/English/
French/German/Italian/Spanish/Chinese (simplified)/Chinese (traditional)/Korean/Russian/
Portuguese)
z Documents with complex layouts
z Documents with a large amount of image noise
z Documents with faint characters
z Documents with faded characters
1. Select [Scan Button Settings] from the Right-Click Menu.
For details about the Right-Click Menu, refer to "Right-Click Menu" (page 59).
The ScanSnap setup dialog box appears.
194
Using the ScanSnap in Various Ways (for Windows users)
2. Click the [Option] button in the [Scanning] tab.
The [Scanning mode option] dialog box appears.
3. Select the [Allow automatic image rotation] check box.
4. Click the [OK] button to close all open dialog boxes.
5. Load the document in the ScanSnap.
For details about how to load documents, refer to "How to Load Documents" (page 30).
195
Using the ScanSnap in Various Ways (for Windows users)
6. Press the [Scan/Stop] button on the ScanSnap to start scanning.
Load another document in the ScanSnap when you want to scan multiple sheets. Scanning
starts automatically when a document is loaded.
7. Press the [Scan/Stop] button on the ScanSnap to finish scanning.
The scanned image is saved in the correct orientation.
196
Using the ScanSnap in Various Ways (for Windows users)
■ Scanning Documents Larger Than A4/Letter Size
You can scan documents larger than A4/Letter size such as A3, Double Letter and B4 using
the Carrier Sheet (sold separately). By folding the document in half and scanning both sides
consecutively in simplex mode, the two sides are merged into a single image and saved.
In the [Scanning mode option] dialog box ([Scanning] tab [Option] button in the ScanSnap
setup dialog box), the [Correct skewed character strings automatically] check box is disabled.
You can also scan documents smaller than A4/Letter size and have both sides saved as a single
image.
1. Select [Scan Button Settings] from the Right-Click Menu.
For details about the Right-Click Menu, refer to "Right-Click Menu" (page 59).
The ScanSnap setup dialog box appears.
2. In the [Paper] tab, select [Automatic detection] in [Paper size], and then
click the [Carrier Sheet Settings] button.
The [Carrier Sheet Settings] dialog box appears.
197
Using the ScanSnap in Various Ways (for Windows users)
3. Select [one double-page spread image] in [Save as].
For details about the Carrier Sheet settings, refer to the ScanSnap Manager Help.
4. Click the [OK] button to close all the dialog boxes.
5. Place the document inside the Carrier Sheet.
1. Fold the document in half so that the sides to be scanned are facing out.
Fold it tightly and smooth out any creases.
198
Using the ScanSnap in Various Ways (for Windows users)
2. Open the Carrier Sheet and place the document inside.
Align the fold line with the right edge of the
Carrier Sheet so that the document fits in
the upper right-hand corner of the Carrier
Sheet.
Note that the front side of the Carrier Sheet has a thick vertical line in
the upper right-hand corner.
6. Insert the part with the black and white pattern straight into the feeding
section of the ScanSnap, with the front side of the Carrier Sheet facing
up.
The Carrier Sheet is pulled in until it is set inside the ScanSnap.
If you perform a scan using the Carrier Sheet with the
output guide open, a paper jam may occur and damage the
documents. Make sure to close the output guide when you
perform a scan using the Carrier Sheet.
199
Output guide
Using the ScanSnap in Various Ways (for Windows users)
7. Press the [Scan/Stop] button on the ScanSnap to start scanning.
Scanning starts and the [ScanSnap Manager - Image scanning and file saving]
dialog box appears. When the front side of the Carrier Sheet is scanned, the image
data is displayed in the preview area.
8. Turn over the Carrier Sheet and insert it as explained in step 6.
Make sure to scan the front and back side of the Carrier Sheet consecutively.
Scanning starts automatically and the [ScanSnap Manager - Image scanning and file
saving] dialog box appears. When the back side of the Carrier Sheet is scanned,
scanned images of the front and back side of the document inside the Carrier Sheet
are displayed as a double-page spread image in the preview area.
Repeat steps 5. to 8. to scan more documents larger than A4/Letter size.
You can continue with scanning documents that can be set directly in the ScanSnap. For
details about how to load documents, refer to "How to Load Documents" (page 30).
Scanning starts automatically when a document is loaded in the ScanSnap.
200
Using the ScanSnap in Various Ways (for Windows users)
9. Press the [Scan/Stop] button on the ScanSnap to finish scanning.
The scanned images of the front and back side of
the document inside the Carrier Sheet are saved as
a double-page spread image.
z There may be a line or a gap appearing between the front and back side images. Also when
you scan thick papers, images on both left and right may skew towards each other from the
top.
The degree of these symptoms varies depending on how the document was set or folded.
In that case, try the following for possible resolutions:
- Fold the document properly
- Neatly align the edges of the document with the edges of the Carrier Sheet when placing
the document inside the Carrier Sheet
z When [Automatic detection] is selected from the [Paper size] drop-down list in the [Carrier
Sheet Settings] dialog box, the image is output in an optimal size selected automatically from
the available standard sizes (A3, B4 or 11 × 17 in.) in the [Paper size] dialog box. However,
depending on the document, the size of the saved image data may be smaller than the original document or some parts of the image may be missing.
Example: When you scan an A3 size document with an A4 size image printed in the center,
image data is saved in B4 size.
To save an image data in the actual size of the document, specify the document size in the
[Paper size] drop-down list.
z Part of the image data around where the document is folded may appear missing. In that
case, place the document so that its edge is about 1 mm inside from the edge of the Carrier
Sheet.
201
Using the ScanSnap in Various Ways (for Windows users)
■ Scanning Documents Such as Photographs and
Clippings
You can scan photographs you do not want to damage or documents that are difficult to scan
such as clippings using the Carrier Sheet (sold separately).
Change the settings to scan documents such as photographs and clippings in the following
procedure.
In the [Scanning mode option] dialog box ([Scanning] tab [Option] button in the ScanSnap
setup dialog box), the [Correct skewed character strings automatically] check box is disabled.
1. Select [Scan Button Settings] from the Right-Click Menu.
For details about the Right-Click Menu, refer to "Right-Click Menu" (page 59).
The ScanSnap setup dialog box appears.
2. In the [Paper] tab, select [Automatic detection] in [Paper size], and then
click the [Carrier Sheet Settings] button.
The [Carrier Sheet Settings] dialog box appears.
202
Using the ScanSnap in Various Ways (for Windows users)
3. Select [two separate images (front and back)] in [Save as].
For details about the Carrier Sheet settings, refer to the ScanSnap Manager Help.
4. Click the [OK] button to close all open dialog boxes.
5. Place the document inside the Carrier Sheet.
Open the Carrier Sheet and place the top of the
document against the top center of the Carrier Sheet.
203
Using the ScanSnap in Various Ways (for Windows users)
6. Insert the part with the black and white pattern straight into the feeding
section of the ScanSnap, with the scanning side of the document inside
the Carrier Sheet facing up.
The Carrier Sheet is pulled in until it is set inside the ScanSnap.
If you perform a scan using the Carrier Sheet with the
output guide open, a paper jam may occur and damage the
documents. Make sure to close the output guide when you
perform a scan using the Carrier Sheet.
Output guide
7. Press the [Scan/Stop] button on the ScanSnap to start scanning.
When scanning is completed, the scanned image of the document inside the Carrier
Sheet is displayed in the preview area.
Repeat step 5. to 6. to scan more documents such as photographs and clippings.
You can continue with scanning documents that can be set directly in the ScanSnap. For
details about how to load documents, refer to "How to Load Documents" (page 30).
Scanning starts automatically when documents are loaded in the ScanSnap.
204
Using the ScanSnap in Various Ways (for Windows users)
8. Press the [Scan/Stop] button on the ScanSnap to finish scanning.
Scanned image is saved.
z The scanned image is output at the center of the page in the size specified in the
[Paper size] drop-down list of the [Carrier Sheet Settings] dialog box.
z When [Automatic detection] is specified in the [Paper size] drop-down list of the [Carrier Sheet Settings] dialog box, the image is output in an optimal size selected automatically from the available standard sizes in the [Paper size] drop-down list.
However, depending on the document, the size of the saved image data may be
smaller than the original document or part of the image may be missing.
Example: When you scan an A5 size image printed in the middle of an A4 size
document, the scanned image is saved in A5 size.
To save the scanned image in its original size, specify the document size in the [Paper
size] drop-down list.
Place the document over a blank sheet if the following is observed:
z Scanned image is not saved in the same size as the document (when [Automatic
detection] is specified in the [Paper size] drop-down list of the [Carrier Sheet Settings]
dialog box)
z There are shadows around the edges of the scanned image
z There are black lines around the scanned image of a uniquely shaped cutting
Blank sheet
205
Using the ScanSnap in Various Ways (for Windows users)
■ Long Page Scanning
Documents up to 863 mm (34 in.) in length can be scanned.
The following explains how to scan long pages.
1. Insert the document straight into the feeding section of the ScanSnap,
with the scanning side facing up.
The document is pulled in until it is set inside the ScanSnap.
Secure enough space where the
document exits the ScanSnap, and pick
up the document with your hands to
prevent it from falling off the unit where
the ScanSnap is placed on.
206
Using the ScanSnap in Various Ways (for Windows users)
2. Press the [Scan/Stop] button on the ScanSnap for three seconds or
longer until it flashes in blue.
Scanning starts.
When you scan the first page as a long page and continue scanning, the next document
is also scanned as long page.
z The error message below appears and long page scanning is disabled when [Excellent] is selected in the [Image quality] drop-down list of the [Scanning] tab in the
ScanSnap setup dialog box.
z When you perform a long page scan, the setting for [Paper size] in the [Paper] tab of
the ScanSnap setup dialog box automatically switches to [Automatic detection]. The
current settings are used for other scan settings.
207
Using the ScanSnap in Various Ways (for Windows users)
■ Saving Scanned Images in Multiple PDF Files
The ScanSnap is able to save scanned image in separate PDF files based on the specified
number of pages. For example, you can scan a batch of slips, and save each slip as a PDF
file.
To save image data in multiple PDF files, change the settings in the following procedure.
1. Select [Scan Button Settings] from the Right-Click Menu.
For details about the Right-Click Menu, refer to "Right-Click Menu" (page 59).
The ScanSnap setup dialog box appears.
2. From the [File format] drop-down list in the [File option] tab, select [PDF
(*.pdf)], and then click the [Option] button.
The [PDF file format option] dialog box appears.
208
Using the ScanSnap in Various Ways (for Windows users)
3. Select [Generate one PDF file per (n) page(s)] and enter the number of
pages to split.
One PDF is created every time the number of pages specified here has been saved.
4. Click the [OK] button to close all open dialog boxes.
5. Load the document in the ScanSnap.
For details about how to load documents, refer to "How to Load Documents" (page 30).
6. Press the [Scan/Stop] button on the ScanSnap to start scanning.
Load another document in the ScanSnap when you want to scan multiple sheets. Scanning
starts automatically when a document is loaded.
7. Press the [Scan/Stop] button on the ScanSnap to finish scanning.
One PDF file is created every time the number of pages specified in step 3. has been
scanned.
209
Using the ScanSnap in Various Ways (for Windows users)
■ Creating Searchable PDF Files
The ScanSnap is able to perform text recognition on a scanned image automatically and
create a searchable PDF file.
To create searchable PDF files, change the settings in the following procedure.
1. Select [Scan Button Settings] from the Right-Click Menu.
For details about the Right-Click Menu, refer to "Right-Click Menu" (page 59).
The ScanSnap setup dialog box appears.
2. From the [File format] drop-down list in the [File option] tab, select [PDF
(*.pdf)].
It is recommended that you select [Better] or [Best] for [Image quality] in the [Scanning] tab
of the ScanSnap setup dialog box.
210
Using the ScanSnap in Various Ways (for Windows users)
3. Select the [Convert to Searchable PDF] check box.
The following message appears.
Click the [OK] button to close the dialog box.
z Language
Select the language. Japanese, English, French, German, Italian, Spanish, Chinese
(simplified), Chinese (traditional), Korean, Russian, and Portuguese can be selected.
z Target pages
Select [All pages] to perform text recognition for all pages and [First page] for just the
first page.
4. Click the [OK] button to close the ScanSnap setup dialog box.
5. Load the document in the ScanSnap.
For details about how to load documents, refer to "How to Load Documents" (page 30).
6. Press the [Scan/Stop] button on the ScanSnap to start scanning.
Load another document in the ScanSnap when you want to scan multiple sheets. Scanning
starts automatically when a document is loaded.
211
Using the ScanSnap in Various Ways (for Windows users)
7. Press the [Scan/Stop] button on the ScanSnap to finish scanning.
Text recognition is performed on the scanned image and a searchable PDF file is
created.
z It may take extra time to process text recognition depending on your computer system
environment when you enable this setting in step 3.
z Scanned images of the following types of documents (characters) may not be recognized correctly.
In that case, better results in text recognition may be achieved by changing the setting
for [Color mode] or specifying a higher resolution in [Image quality].
- Documents including handwritten characters
- Documents with small characters scanned at a low resolution
- Skewed documents
- Documents written in languages other than the specified language
- Documents including texts written in italic characters
- Documents containing characters with superscripts/subscripts and complicated
mathematical expressions
- Documents with characters on an unevenly colored background
e.g. Shaded characters
- Documents with many decorated characters
e.g. Decorated characters (embossed/outlined)
- Documents with characters on a patterned background
e.g. Characters overlapping illustrations and diagrams
- Documents with many characters contacting underlines or borders
z It may take extra time to perform text recognition on the following documents:
- Documents with complex layouts
- Documents with information other than text
e.g. Text on a shaded background
212
Using the ScanSnap in Various Ways (for Windows users)
■ Automatically Setting Keywords for PDF Files
If the document is black & white, character strings (e.g. page heading, title) can be set as
keywords and used for a PDF file search.
Mark a character string to be set as a keyword with a water-based highlight pen so that the
character string is completely covered.
When you perform a scan, the marked character strings are recognized and set as keywords
for the PDF file.
Searchable PDF file
Sets text as a keyword for
the PDF file
Scan
Scan
Scan
Keyword
Image
Converts a character string in
a marked section into text
You can search for the file through
the set keyword
Scan
Mark black & white documents in the following way:
z Any regular highlight pen can be used.
The following shows the colors and thickness recommended for highlight pens:
Pink
Yellow
Blue
z Mark a straight line over a single character string.
z The supported range of a marked section is as follows:
Minimum : 3 mm (short side) × 10 mm (long side)
Maximum : 20 mm (short side) × 150 mm (long side)
z Use only one color per page for marking.
213
Green
Using the ScanSnap in Various Ways (for Windows users)
z Make sure to cover the entire character string when marking it.
Mark sections so that the entire section is evenly colored.
Good example:
Bad example 1:
(does not cover the entire section)
Bad example 2:
(unevenly colored)
z Do not mark more than ten sections per page.
z It is recommended that you use a blue or a green highlight pen for marking. When you use
colors such as pink or yellow for marking, the marked sections may not be recognized as
keywords.
z Use a blue highlight pen for documents with dark background colors such as newspapers.
Marked sections may not be detected when a color other than blue is used.
z For the following document types, marked sections cannot be recognized and set as keywords:
- Color documents such as catalogues or pamphlets
- Documents in which two or more colors are used for marking
- Documents containing colors other than for marking (pens other than highlight pens are
used or the document is stained)
- Documents with too many marked sections on a single page
z The following types of marked character strings cannot be set as keywords:
- The size of marked section is outside the supported range
- The marking is irregular (e.g. skewed)
- Multiple marked sections are too close to each other
- The color of the highlight pen is too pale or the color has faded
z When you mark more than one character string, make sure to leave a gap of at least 5 mm
between the marked sections.Marked sections that are too close to each other may be
detected as one marked section.
z In the following case, character strings surrounding marked sections may be set as keywords:
- Marked section overlaps the line above and below
z In the following cases, unmarked character strings may be set as keywords:
- Color documents such as catalogues or pamphlets
- Documents with color text, diagrams, pictures, tables and lines
- Documents containing sections framed by a highlight pen
- Stained documents
z Increase the resolution when you have trouble setting the keywords correctly.
z Keywords set for a PDF file can be checked in the ScanSnap Organizer Main Window
(thumbnail view), or in [Document Properties] of Adobe Acrobat / Adobe Reader.
214
Using the ScanSnap in Various Ways (for Windows users)
Change the settings in the following procedure to automatically set keywords for PDF files.
1. Select [Scan Button Settings] from the Right-Click Menu.
For details about the Right-Click Menu, refer to "Right-Click Menu" (page 59).
The ScanSnap setup dialog box appears.
2. From the [File format] drop-down list in the [File option] tab, select [PDF
(*.pdf)].
It is recommended that you select [Better] or [Best] for [Image quality] in the [Scanning] tab
of the ScanSnap setup dialog box.
215
Using the ScanSnap in Various Ways (for Windows users)
3. Select the [Set the marked text as a keyword for the PDF file] check box.
z Target marked sections
Select [First marked section] to perform text recognition and set a keyword for the
PDF file only for the character strings in the first marked section, and [All marked
sections] for all marked sections.
The following explanation is for when you select [First marked section]:
z Select this button to set a character string such as a title of a document as a keyword for the PDF file.
Example: When only the title of a document is marked, the marked character
string is set as a keyword for the PDF file, and the PDF file becomes
searchable by the title character string.
z When multiple marked sections exist in line, the marked character string closest to
the top of the document is set as a keyword.
Example: In the following case, the character string in marked section B, which is
higher than marked section A, is set as a keyword.
Marked section A
Marked section B
z Language
Select the language. Japanese, English, French, German, Italian, Spanish, Chinese
(simplified), Chinese (traditional), Korean, Russian, and Portuguese can be selected.
z Target pages
Select [First page] to perform text recognition and set a keyword for the PDF file only
for the first page, and [All pages] for all pages.
216
Using the ScanSnap in Various Ways (for Windows users)
4. Click the [OK] button to close the ScanSnap setup dialog box.
5. Load the document in the ScanSnap.
For details about how to load documents, refer to "How to Load Documents" (page 30).
6. Press the [Scan/Stop] button on the ScanSnap to start scanning.
Load another document in the ScanSnap when you want to scan multiple sheets. Scanning
starts automatically when a document is loaded.
7. Press the [Scan/Stop] button on the ScanSnap to finish scanning.
Text recognition is performed on marked character strings and a PDF file is created
with the keywords added.
z It may take extra time to process text recognition depending on your computer system
environment when you enable this setting in step 3.
z Scanned images of the following types of documents (characters) may not be recognized correctly.
In that case, better results in text recognition may be achieved by specifying a higher
resolution in [Image quality].
- Documents including handwritten characters
- Documents with small characters scanned at a low resolution
- Skewed documents
- Documents written in languages other than the specified language
- Documents including texts written in italic characters
- Documents containing characters with superscripts/subscripts and complicated
mathematical expressions
- Documents with characters on an unevenly colored background
e.g. Shaded characters
- Documents with many decorated characters
e.g. Decorated characters (embossed/outlined)
- Documents with characters on a patterned background
e.g. Characters overlapping illustrations and diagrams
- Documents with many characters contacting underlines or borders
z It may take extra time to perform text recognition on the following documents:
- Documents with complex layouts
- Documents with information other than text
e.g. Text on a shaded background
z If the same character string is marked several times in the document, the same keyword
is added multiple times in the PDF file.
z Total length of all the keywords can be up to 255 characters, including punctuation
marks in between keywords.
z When you check keywords in Adobe Acrobat or Adobe Reader, the added keywords
may be displayed with a set of quotation marks (e.g. "ABC").
217
Using the ScanSnap in Various Ways (for Windows users)
■ Setting Document Open Passwords for PDF Files
You can set Document Open passwords for PDF files when saving the image data as PDF
files.
Once you set a password for a PDF file, the password-protected PDF files cannot be opened
by anyone except the person who knows the password. You can protect important information
by setting a password for private or confidential documents.
Change the settings to set passwords for PDF files in the following procedure.
When you use the Quick Menu, you cannot set passwords to scanned documents.
1. Select [Scan Button Settings] from the Right-Click Menu.
For details about the Right-Click Menu, refer to "Right-Click Menu" (page 59).
The ScanSnap setup dialog box appears.
2. In the [File format] drop-down list in the [File option] tab, select [PDF
(*.pdf)], and then click the [Option] button.
The [PDF file format option] dialog box appears.
218
Using the ScanSnap in Various Ways (for Windows users)
3. Select the [Set a password for PDF file] check box.
zTo set a different password per scan
Clear the [Use a fixed password] check box.
You can set a different password per scan.
219
Using the ScanSnap in Various Ways (for Windows users)
zTo use a preset password
1. Select the [Use a fixed password] check box.
The same password is set for all PDF files. You do not have to set a password every
time a document is scanned.
2. Type in the same password in the [Password] and [Confirm] fields.
The following characters can be used to set passwords:
Up to 16 characters
Alphanumeric characters : A-Z, a-z, 0-9
Symbols : ! " # $ % & ' ( ) * + , - . / : ; < = > ? @ [ \ ] ^ _ ` { | } ~
4. Click the [OK] button to close all open dialog boxes.
5. Load the document in the ScanSnap.
For details about how to load documents, refer to "How to Load Documents" (page 30).
220
Using the ScanSnap in Various Ways (for Windows users)
6. Press the [Scan/Stop] button on the ScanSnap to start scanning.
Load another document in the ScanSnap when you want to scan multiple sheets. Scanning
starts automatically when a document is loaded.
7. Press the [Scan/Stop] button on the ScanSnap to finish scanning.
When the [Use a fixed password] check box is cleared in step 3., the following dialog
box appears after scanning is completed.
Type in the same password in the [Password] and [Confirm] fields, and then click the
[OK] button.
z The following characters can be used to set passwords:
Up to 16 characters
Alphanumeric characters: A-Z, a-z, 0-9
Symbols: ! " # $ % & ' ( ) * + , - . / : ; < = > ? @ [ \ ] ^ _ ` { | } ~
z If you click the [Cancel] button, the PDF file is saved without a password.
The scanned image is saved as a password-protected PDF file.
It is not possible to open a PDF file if you forget the password.
221
Using the ScanSnap (for Mac OS Users)
This chapter explains how to perform scanning, configure scan settings, add, change or
delete profiles, as well as various scanner functions and uses.
ScanSnap Manager Icon and Operations . . . . . . . . . . . . . . . . . . . . . . . . . . . . . . . . . 223
How to Perform a Scan . . . . . . . . . . . . . . . . . . . . . . . . . . . . . . . . . . . . . . . . . . . . . . . 227
Configuring ScanSnap Manager . . . . . . . . . . . . . . . . . . . . . . . . . . . . . . . . . . . . . . . . 239
Actions . . . . . . . . . . . . . . . . . . . . . . . . . . . . . . . . . . . . . . . . . . . . . . . . . . . . . . . . . . . . 258
Using the ScanSnap in Various Ways . . . . . . . . . . . . . . . . . . . . . . . . . . . . . . . . . . . . 328
222
ScanSnap Manager Icon and Operations (for Mac OS users)
ScanSnap Manager Icon and Operations
All operations on the ScanSnap are managed in ScanSnap Manager.
The ScanSnap Manager icon appears in the Dock to indicate that ScanSnap Manager is
running. The icon automatically appears in the Dock when Mac OS starts up.
The ScanSnap Manager icon indicates whether or not ScanSnap Manager is successfully
communicating with the ScanSnap. The appearance of the icon changes according to the
communication status as shown below.
Status
ScanSnap Manager icon
Communicating
Not communicating
A menu is displayed when you click the ScanSnap Manager icon while pressing the [control]
key on the keyboard.
When you add the ScanSnap Manager icon to the Dock, normally
appears.
A blue light appears under the ScanSnap Manager icon when ScanSnap
Manager is running.
223
ScanSnap Manager Icon and Operations (for Mac OS users)
■ ScanSnap Manager Menu
This menu appears when you click the ScanSnap Manager icon
while pressing the
[control] key on the keyboard.
Click while pressing the [control]
key on the keyboard
Item
Function
Scan
Starts scanning. Follows the settings configured in [Settings].
Settings
Displays the ScanSnap setup window.
You can configure the scan settings in this window.
"How to Configure Scan Settings" (page 242)
Profile
Displays the Profile menu.
"Profile Menu" (page 226)
Profile Management
Displays the [ScanSnap Manager - Profile Management] window.
You cannot select [Profile Management] when the [Use Quick Menu] checkbox is
selected in the ScanSnap setup window.
"Profile Management" (page 245)
Help
Displays the following menu:
z Help
Opens the ScanSnap Manager Help.
z Troubleshooting
Displays [Troubleshooting] in the ScanSnap Manager Help.
z ScanSnap Portal Site
Opens the ScanSnap global homepage (http://scansnap.fujitsu.com)
z About ScanSnap Manager
Displays the [Version Information] window.
z Preferences
Displays the [ScanSnap Manager - Preferences] window.
z Online Update
Displays the [ScanSnap Manager - Online Update] window (page 368)
windows.
Keep in Dock (*)
Adds the ScanSnap Manager icon
Open at Login (*)
Automatically launches ScanSnap Manager when Mac OS is started up.
224
to the Dock.
ScanSnap Manager Icon and Operations (for Mac OS users)
Item
Function
Show in the Finder (*)
Displays the contents of the [ScanSnap] folder by using the Finder.
Hide/Show
Hides or redisplays all windows of ScanSnap Manager that are being displayed.
Quit
Exits ScanSnap Manager.
"Finishing ScanSnap Operation" (page 238)
*
: Select the [Options] sub-menu to display these items.
225
ScanSnap Manager Icon and Operations (for Mac OS users)
■ Profile Menu
This menu appears when you click the ScanSnap Manager icon
.
Available profiles are displayed in the Profile menu.
Click
Profile menu example
Select a profile in the Profile menu before you perform scanning. Documents are scanned
according to the scan settings of the profile you select.
For details about how to add, change or delete profiles, refer to "Profile Management" (page
245).
z To enable the Profile menu, clear the [Use Quick Menu] checkbox in the ScanSnap setup
window. The Profile menu does not appear when this checkbox is selected.
z You can also display the Profile menu by selecting [Profile] from ScanSnap Manager menu.
z Profiles configured for the following scanner models will be carried over to ScanSnap S1100
if the connected computer is the same:
- ScanSnap S1500/S1500M
- ScanSnap S1300
- ScanSnap S510M
- ScanSnap S500M
- ScanSnap S300M
226
How to Perform a Scan (for Mac OS users)
How to Perform a Scan
This section explains how to perform scanning with the ScanSnap.
■ Preparation
1. Turn on the computer.
The ScanSnap Manager icon
appears in the Dock when Mac OS starts up.
z If the ScanSnap Manager icon
is not displayed, select [Applications] and doubleclick [ScanSnap] [ScanSnap Manager] from Finder to start up ScanSnap Manager.
z If the ScanSnap Manager icon
does not automatically appear in the Dock when
Mac OS starts up, select [Accounts] [My Account] [Login Items] [+]
[ScanSnap Manager] in the [System Preferences] window to start up ScanSnap
Manager.
2. Open the feed guide to turn on the ScanSnap.
Feed guide
The ScanSnap Manager icon in the Dock changes from
to
.
There may be a slight delay before the ScanSnap Manager icon changes to
depending
on your computer's performance, operating environment and load such as when there are
many programs running at the same time.
There are two ways to perform scanning, either with the Quick Menu or without using the
Quick Menu. For details, refer to the following:
z Using the Quick Menu ( page 228)
z Without Using the Quick Menu ( page 233)
227
How to Perform a Scan (for Mac OS users)
■ Using the Quick Menu
The following explains the procedure for scanning by using the Quick Menu.
1. Select [Settings] from the ScanSnap Manager menu.
For details about the ScanSnap Manager menu, refer to "ScanSnap Manager Menu"
(page 224).
The ScanSnap setup window appears.
2. Select the [Use Quick Menu] checkbox.
3. Click one of the profile buttons.
Profile Button
Profile Button
Description
[Recommended] button
Settings are [Automatic resolution] for [Image quality] in the [Scanning]
tab in the ScanSnap setup window and default for other settings.
It is recommended that you select this button when you want to scan
documents in optimum quality suitable for the paper size of the
document.
[Small File] button
Settings are [Normal] (Color/Gray: 150 dpi, B&W: 300 dpi) for [Image
quality] in the [Scanning] tab in the ScanSnap setup window and default
for other settings.
It is recommended that you select this button when you want to reduce
the file size.
228
How to Perform a Scan (for Mac OS users)
Profile Button
Description
[High Quality] button
Settings are [Best] (Color/Gray: 300 dpi, B&W: 600 dpi) for [Image
quality] in the [Scanning] tab in the ScanSnap setup window and default
for other settings.
It is recommended that you select this button when you want to scan
documents in high quality.
[Customize] button
Default settings are the same as the [Recommended] settings.
Settings can be changed depending on your scanning purpose.
z The [Recommended] button is selected in default.
z For details about the default settings when using the Quick Menu, refer to the
ScanSnap Manager Help.
z You cannot change the settings for the [Recommended], [Small File], and [High Quality]
buttons. If you change any of these settings, the profile automatically switches to
[Customize].
For details about how to change scan settings, refer to "How to Configure Scan
Settings" (page 242).
4. Click the [Apply] button.
5. Click the [
] button in the upper left corner to close the ScanSnap
setup window.
6. Load the document in the ScanSnap.
For details about how to load documents, refer to "How to Load Documents" (page 30).
229
How to Perform a Scan (for Mac OS users)
7. Press the [Scan/Stop] button on the ScanSnap to start scanning.
You can also start scanning from the ScanSnap Manager menu.
For more details, refer to "ScanSnap Manager Menu" (page 224).
z Do not connect and disconnect the ScanSnap and other USB devices during scanning.
z Do not close the feed guide during scanning.
z Do not switch users during scanning.
The [ScanSnap Manager - Image scanning and file saving] window appears.
After the scanning has completed, the [ScanSnap Manager - Image scanning and
file saving] window shows a new message indicating that the ScanSnap is ready for
the next scan.
Load another document in the ScanSnap when you want to scan multiple sheets. Scanning
starts automatically when a document is loaded.
8. Press the [Scan/Stop] button on the ScanSnap to finish scanning.
The Quick Menu appears.
z You can also finish scanning by clicking the [Finish Scanning] button in the [ScanSnap
Manager - Image scanning and file saving] window.
z The [Scan/Stop] button on the ScanSnap flashes in blue throughout the scan.
230
How to Perform a Scan (for Mac OS users)
9. In the Quick Menu, click the icon of the application to link with ScanSnap
Manager.
The selected application is started.
z To specify which applications to display/hide in the Quick Menu, or change the display
order of the applications, refer to "Quick Menu Settings" (page 239).
z To select an application to link with ScanSnap Manager before scanning, refer to
"Without Using the Quick Menu" (page 233).
Application
Description
Scan to Folder
Displays the [Scan to Folder] window.
Indicates the destination folder for saving the scanned image.
For details about how to continue the process after you select
this item, refer to "Saving Data in a Specified Folder" (page
259).
Scan to E-mail
Displays the [Scan to E-mail] window.
Scanned image is attached to an e-mail message.
For details about how to continue the process after you select
this item, refer to "Attaching Files to E-Mail" (page 266).
Scan to Print
Displays the [Print] window.
Scanned image can be printed.
For details about how to continue the process after you select
this item, refer to "Using the ScanSnap as a Copy Machine"
(page 276).
Scan to Evernote
(Document)
(*1) (*2)
Scanned image is saved as a PDF file in Evernote.
For details about how to continue the process after you select
this item, refer to "Saving Documents to Evernote" (page 305).
Scan to Evernote (Note)
(*1) (*2)
Scanned image is saved as a JPEG file in Evernote.
For details about how to continue the process after you select
this item, refer to "Saving Handwritten Notes to Evernote" (page
313).
Scan to Google Docs(TM)
(*1)
Scanned image is saved as a PDF file in Google Docs.
For details about how to continue the process after you select
this item, refer to "Saving Documents to Google Docs" (page
319).
Scan to Word (*3)
Text recognition is performed on the scanned image which is
then converted to a Word file.
For details about how to continue the process after you select
this item, refer to "Converting into Word/Excel Documents"
(page 283).
231
How to Perform a Scan (for Mac OS users)
Application
*1
*2
*3
*4
*5
:
:
:
:
:
Description
Scan to Excel (*3)
Text recognition is performed on the scanned image which is
then converted to an Excel file.
For details about how to continue the process after you select
this item, refer to "Converting into Word/Excel Documents"
(page 283).
Cardiris (*4)
Displays the [Cardiris] window.
Scanned image is stored in Cardiris.
For details about how to continue the process after you select
this item, refer to "Storing Business Cards in Cardiris" (page
291).
iPhoto (*5)
PDF or JPEG files are created from the scanned image and
saved in iPhoto.
For details about how to continue the process after you select
this item, refer to "Storing Scanned Images in iPhoto" (page
300).
Displayed when Mac OS X v10.5.8 or later is installed.
Displayed when Evernote for Mac 1.10 or later is installed.
Displayed when ABBYY FineReader for ScanSnap is installed.
Displayed when Cardiris is installed.
Displayed when iPhoto 5 or later is installed.
z The output image may slightly differ from the original document in size.
z When Cardiris is active (Cardiris menu appears in the menu bar), scanning business
cards by pressing the [Scan/Stop] button on the ScanSnap automatically starts the
linkage between ScanSnap Manager and Cardiris.
For details about automatic linkage, refer to "Automatic Linkage with Applications"
(page 255).
z You cannot start scanning when the Quick Menu is displayed. Either select an icon from
the Quick Menu and finish the process, or close the Quick Menu before you perform the
next scan.
z Do not move, delete, or rename the scanned image in other applications when the
Quick Menu is displayed.
232
How to Perform a Scan (for Mac OS users)
■ Without Using the Quick Menu
The following explains the procedure for scanning without using the Quick Menu.
1. Select [Settings] from the ScanSnap Manager menu.
For details about the ScanSnap Manager menu, refer to "ScanSnap Manager Menu"
(page 224).
The ScanSnap setup window appears.
2. Clear the [Use Quick Menu] checkbox.
233
How to Perform a Scan (for Mac OS users)
3. Select a profile.
Select a profile from either of the following:
z [Profile] pop-up menu in the ScanSnap setup window
z Profile menu
4. Load the document in the ScanSnap.
For details about how to load documents, refer to "How to Load Documents" (page 30).
234
How to Perform a Scan (for Mac OS users)
5. Press the [Scan/Stop] button on the ScanSnap to start scanning.
You can also start scanning from the ScanSnap Manager menu.
For details, refer to "ScanSnap Manager Menu" (page 224).
z Do not connect and disconnect the ScanSnap and other USB devices during scanning.
z Do not close the feed guide during scanning.
z Do not switch users during scanning.
The [ScanSnap Manager - Image scanning and file saving] window appears.
The [ScanSnap Manager - Image scanning and file saving] window then shows a
new message indicating that the ScanSnap is ready for the next scan.
Load another document in the ScanSnap when you want to scan multiple sheets. Scanning
starts automatically when a document is loaded.
235
How to Perform a Scan (for Mac OS users)
6. Press the [Scan/Stop] button on the ScanSnap to finish scanning.
The application specified for the selected profile starts up.
z You can also finish scanning by clicking the [Finish Scanning] button in the [ScanSnap
Manager - Image scanning and file saving] window.
z The [Scan/Stop] button on the ScanSnap flashes in blue throughout the scan.
z To select an application to link with ScanSnap Manager in the Quick Menu after
scanning is completed, refer to "Using the Quick Menu" (page 228).
z When the [Set the marked text as a keyword for the PDF file] checkbox or the [Convert
to Searchable PDF] checkbox is selected in the [File option] tab, the application starts
after text recognition has been performed on the scanned image.
A window showing the text recognition progress appears during text recognition
process.
z By default, documents are scanned with the following settings: [Image quality:
Automatic resolution] and [Color mode: Auto color detection].
For details about how to change scan settings, refer to "How to Configure Scan
Settings" (page 242).
z The application that starts up after scanning varies depending on what is selected in the
[Application] tab in the ScanSnap setup window. For details, refer to the ScanSnap
Manager Help.
z The output image may slightly differ from the original document in size.
z When Cardiris is active (Cardiris menu appears in the menu), scanning business cards
by pressing the [Scan/Stop] button on the ScanSnap automatically starts the linkage
between ScanSnap Manager and Cardiris.
For details about automatic linkage, refer to "Automatic Linkage with Applications"
(page 255).
236
How to Perform a Scan (for Mac OS users)
■ Stopping the Scan
You can stop a scan in progress in case you are scanning a wrong document or the wrong
side of a document.
Stop the scan in the following procedure:
1. Click the [Stop] button in the [ScanSnap Manager - Image scanning and
file saving] window which appears during scanning.
You can also stop the scan during scanning by pressing the [Scan/Stop] button on the
ScanSnap.
Remove the document from the ScanSnap after stopping the scan. For details about how
to remove documents, refer to "Troubleshooting" in the ScanSnap Manager Help.
The following message appears when the scanning stops.
2. Click the [Quit] button.
To continue scanning, click the [Continue Scanning] button or press the [Scan/Stop]
button on the ScanSnap after loading another document in the ScanSnap.
237
How to Perform a Scan (for Mac OS users)
■ Finishing ScanSnap Operation
Exiting ScanSnap Manager
Select [Quit] from the ScanSnap Manager menu.
Normally, you do not have to exit ScanSnap Manager.
You cannot use the ScanSnap after exiting ScanSnap Manager.
Select [Applications]
[ScanSnap]
[ScanSnap Manager] from Finder to start up
ScanSnap Manager when you want to use the ScanSnap.
Disconnecting the ScanSnap
1. Close the feed guide to turn off the ScanSnap.
The ScanSnap Manager icon in the Dock changes from
to
.
2. Disconnect the USB cable from your computer.
The ScanSnap does not have a power switch and is turned ON/OFF in conjunction with the
computer’s power. The ScanSnap can also be automatically turned ON/OFF by opening or
closing the feed guide.
238
Configuring ScanSnap Manager (for Mac OS users)
Configuring ScanSnap Manager
This section explains how to set scan settings, how to add, change and delete profiles,
automatic linkage with applications and windows displayed during scanning.
■ Quick Menu Settings
You can specify which applications to display or hide in the Quick Menu, as well as change
the display order of the applications in the following procedure.
1. Click [
] in the Quick Menu.
For details about how to display the Quick Menu, refer to "Using the Quick Menu" (page
228).
The [Applications to Show/Hide] window appears.
239
Configuring ScanSnap Manager (for Mac OS users)
2. Specify which applications to display in the Quick Menu.
zShowing or Hiding Application Icons
Select the checkbox to display the application in the Quick Menu.
To display all the applications in the Quick Menu, click the [Restore Default] button.
zDisplay Order of Applications
Application icons are displayed in the Quick Menu in the same order as they are listed in
the [Applications to Show/Hide] window.
Drag an application to change its order.
To restore the default display order of the applications displayed in the Quick Menu,
click the [Restore Default] button.
240
Configuring ScanSnap Manager (for Mac OS users)
The applications are displayed in the order shown below in the Quick Menu and in the
[Applications to Show/Hide] window.
3. Click the [OK] button to close the [Applications to Hide/Show] window.
The applications to be displayed in the Quick Menu and their display order are set.
241
Configuring ScanSnap Manager (for Mac OS users)
■ How to Configure Scan Settings
You can configure scan settings in the ScanSnap setup window depending on your intended
use.
Configure the scan settings in the following procedure.
1. Select [Settings] from the ScanSnap setup window.
Select [Settings] from the ScanSnap Manager menu.
For details about the ScanSnap Manager menu, refer to "ScanSnap Manager Menu"
(page 224).
The ScanSnap setup window appears.
You can also open the ScanSnap setup window by pressing simultaneously the [command
(
)] and [S] keys on the keyboard. This operation is only enabled when ScanSnap
Manager is active (when "ScanSnap Manager" is displayed in the menu bar).
2. Click the [Detail] button to switch to the detail view mode.
zUsing the Quick Menu
Outline view
Detail view
242
Configuring ScanSnap Manager (for Mac OS users)
zWithout Using the Quick Menu
Outline view
Detail view
The ScanSnap setup window retains the display status from the last time the ScanSnap
was used. For example, if it was closed in detail view mode, the window is displayed in
detail view mode next time you open it.
3. Set the scan settings in each tab.
The following items can be configured in each tab:
For details, refer to the ScanSnap Manager Help.
z [Application] tab
- Application to be used with the ScanSnap
z [Save] tab
- Folder in which scanned image is saved
- File name used for saving the scanned image
243
Configuring ScanSnap Manager (for Mac OS users)
z [Scanning] tab
- Scanning
(Which image quality to scan with, use color, gray or black & white, enable or
disable [Setting for text only document], [Allow automatic blank page removal],
[Correct skewed character strings automatically], [Allow automatic image
rotation], and [Continue scanning after current scan is finished].)
z [File option] tab
- File format of the scanned image (*.pdf, *.jpg)
- Whether to perform text recognition on a marked character string in the scanned
image and add the character string as a keyword for the PDF file
(Whether to perform text recognition only on the character strings in the first
marked section or all marked sections to be added as keywords, and in which
language to perform text recognition.)
- Whether to perform text recognition on character strings in the scanned image to
convert the file to a searchable PDF file
(Whether to convert the first page only or all pages, and in which language to
perform text recognition.)
- Whether to create separate PDF files
(Whether to include all scanned images in a single PDF file, or create PDF files,
each of which including a preset number of pages)
z [Paper] tab
- Paper size of documents (paper size selection)
z [Compression] tab
- File size of the scanned image (compression rate)
Scan settings vary depending on whether or not you use the Quick Menu.
For details about items that can be set, refer to "Setting Items With/Without the Quick
Menu" (page 376).
4. Click the [Apply] button.
When you use the Quick Menu, scan settings for the [Customize] button are
changed.
When you do not use the Quick Menu, scan settings for the currently selected profile
are changed.
If you press the [Scan/Stop] button on the ScanSnap while the ScanSnap setup window is
displayed, the ScanSnap setup window closes and scanning starts. Scan setting changes
made up to this point are saved and documents are scanned by these settings.
Note that when other windows are open, scanning does not start even if you press the
[Scan/Stop] button on the ScanSnap unless open windows are closed.
244
Configuring ScanSnap Manager (for Mac OS users)
■ Profile Management
You can manage up to 20 profiles.
You can select a profile in the [Profile] pop-up menu in the ScanSnap setup window or from
the Profile menu.
z [Profile] pop-up menu
z Profile menu
Once the frequently used scan settings are saved as profiles, you do not have to open the
ScanSnap setup window to change scan settings every time you perform scanning. You can
easily switch to an appropriate profile you want by just selecting it.
For details about how to add, change or delete profiles, refer to the following:
z
z
z
z
To add new profiles ( page 246)
To change scan settings for profiles (
To rename profiles ( page 251)
To delete profiles ( page 253)
245
page 249)
Configuring ScanSnap Manager (for Mac OS users)
Adding Profiles
1. Select [Settings] from the ScanSnap Manager menu.
For details about the ScanSnap Manager menu, refer to "ScanSnap Manager Menu"
(page 224).
The ScanSnap setup window appears.
Clear the [Use Quick Menu] checkbox if it is selected.
2. Configure the scan settings in each tab.
For details about each tab, refer to the ScanSnap Manager Help.
246
Configuring ScanSnap Manager (for Mac OS users)
3. Select [Add Profile] from the [Profile] pop-up menu.
The [Add new profile] window appears.
4. Type in a new profile name and click the [OK] button.
The added profile appears in the [Profile] pop-up menu in the ScanSnap setup
window.
5. Click the [Apply] button.
247
Configuring ScanSnap Manager (for Mac OS users)
6. Click the [
] button in the upper left corner to close the ScanSnap
setup window.
z Up to 20 profiles can be saved including the [Standard] profile.
z You can change the display order of profiles except for the [Standard] profile.
1. Select [Profile Management] from the ScanSnap Manager menu or from the [Profile]
pop-up menu in the ScanSnap setup window.
The [ScanSnap Manager - Profile Management] window appears.
2. Drag the profile to move it to its desired position in the list.
3. Click the [
window.
] button to close the [ScanSnap Manager - Profile Management]
248
Configuring ScanSnap Manager (for Mac OS users)
Changing Profile Settings
1. Select [Settings] from the ScanSnap Manager menu.
For details about the ScanSnap Manager menu, refer to "ScanSnap Manager Menu"
(page 224).
The ScanSnap setup window appears.
Clear the [Use Quick Menu] checkbox if it is selected.
2. Select a profile from the [Profile] pop-up menu.
3. Change the scan settings in each tab.
For details about each tab, refer to the ScanSnap Manager Help.
249
Configuring ScanSnap Manager (for Mac OS users)
4. When you finish changing the settings for the selected profile, click the
[Apply] button.
5. Click the [
] button in the upper left corner to close the ScanSnap
setup window.
250
Configuring ScanSnap Manager (for Mac OS users)
Renaming Profiles
1. Select [Profile Management] from the ScanSnap Manager menu.
For details about the ScanSnap Manager menu, refer to "ScanSnap Manager Menu"
(page 224).
The [ScanSnap Manager - Profile Management] window appears.
z If you cannot select [Profile Management] in the ScanSnap Manager menu, clear the
[Use Quick Menu] checkbox in the ScanSnap setup window.
z You can also display the [Profile Management] window by selecting [Profile
Management] from the [Profile] pop-up menu in the ScanSnap setup window.
2. Select a profile, click the [
] button in the lower left corner, and select
[Rename].
The name field of the profile becomes editable.
The [Standard] profile cannot be renamed.
251
Configuring ScanSnap Manager (for Mac OS users)
3. Type in a new name.
The profile is renamed.
4. Click the [
] button to close the [ScanSnap Manager - Profile
Management] window.
A message window appears.
5. Click the [Apply] button.
252
Configuring ScanSnap Manager (for Mac OS users)
Deleting Profiles
1. Select [Profile Management] from the ScanSnap Manager menu.
For details about the ScanSnap Manager menu, refer to "ScanSnap Manager Menu"
(page 224).
The [ScanSnap Manager - Profile Management] window appears.
z If you cannot select [Profile Management] in the ScanSnap Manager menu, clear the
[Use Quick Menu] checkbox in the ScanSnap setup window.
z You can also display the [Profile Management] window by selecting [Profile
Management] from the [Profile] pop-up menu in the ScanSnap setup window.
2. Select a profile and click the [
] button.
The [Standard] profile cannot be deleted.
The selected profile is deleted.
3. Click the [
] button to close the [ScanSnap Manager - Profile
Management] window.
A message window appears.
253
Configuring ScanSnap Manager (for Mac OS users)
4. Click the [Apply] button.
254
Configuring ScanSnap Manager (for Mac OS users)
■ Automatic Linkage with Applications
When Cardiris is active (Cardiris menu appears in the menu bar), scanning business cards by
pressing the [Scan/Stop] button on the ScanSnap automatically starts the linkage between
ScanSnap Manager and Cardiris even when the Quick Menu is enabled. The scanned card
image is displayed in Cardiris when automatic linkage is established.
255
Configuring ScanSnap Manager (for Mac OS users)
■ Showing the Scanning Progress
When scanning starts, the [ScanSnap Manager - Image scanning and file saving] window
appears.
The [ScanSnap Manager - Image scanning and file saving] window consists of the following:
z Scan status
z Scan settings
z Save completed
z Preview
Also, note that you can stop scanning by clicking the [Stop] button in the [ScanSnap Manager
- Image scanning and file saving] window, or by pressing the [Scan/Stop] button on the
ScanSnap.
For details about how to stop scanning, refer to "Stopping the Scan" (page 237).
The following message appears in the [ScanSnap Manager - Image scanning and file saving]
window after the document has been scanned. Load another document in the ScanSnap
when you want to scan multiple sheets. Scanning starts automatically when a document is
loaded.
The [ScanSnap Manager - Image scanning and file saving] window closes when you press the
[Scan/Stop] button on the ScanSnap or when you click the [Finish Scanning] button.
When the [Continue scanning after current scan is finished] checkbox in the [Scanning] tab in the
ScanSnap setup window is cleared, the [ScanSnap Manager - Image scanning and file saving]
window automatically closes after saving the scanned image.
256
Configuring ScanSnap Manager (for Mac OS users)
Hiding the Scanning Progress Status
You can hide the [ScanSnap Manager - Image scanning and file saving] window in the
following procedure.
1. Select [Help]
[Preferences] from the ScanSnap Manager menu.
For details about the ScanSnap Manager menu, refer to "ScanSnap Manager Menu"
(page 224).
The [ScanSnap Manager - Preferences] window appears.
2. Clear the [Show the scan progress status (recommended)] checkbox.
3. Click the [
] button in the upper left corner to close the [ScanSnap
Manager - Preferences] window.
The [ScanSnap Manager - Image scanning and file saving] window is hidden from
next scanning on.
When the scanning progress status window is not displayed, the current
number of pages saved is indicated on the ScanSnap Manager icon
the Dock.
257
in
Actions (for Mac OS users)
Actions
The ScanSnap keeps the functions useful in your office work available as Actions.
Actions allow you to:
zShare the scanned document files with others.
You can save the scanned image directly in a shared folder on a network upon
scanning, share the scanned image with others and inform them of the destination
folder path by an e-mail message automatically created with the path stated.
zSend document files to participants of a meeting via e-mail.
Send an e-mail message to others with the scanned image file attached.
zUse a printer rather than a copy machine to make copies of documents.
Print the scanned image with a printer.
zQuote text from your paper documents when you do not want to type it.
Have the scanned image text recognized and converted into a Word or Excel document.
zFile and organize a large number of business cards.
Store and manage business cards in Cardiris.
zConvert catalogs and pamphlets into digital data and save them.
Store and manage scanned images of catalogs and pamphlets directly in iPhoto.
zManage scanned documents through linkage with Evernote.
Save PDF files in Evernote and access them easily anytime, anywhere.
zManage handwritten notes through linkage with Evernote.
Save JPEG files in Evernote and access them easily anytime, anywhere.
zManage scanned documents through linkage with Google Docs.
Save PDF files in Google Docs and access them easily anytime, anywhere.
The following are explanations on how to use Actions.
258
Actions (for Mac OS users)
■ Saving Data in a Specified Folder
This section explains how to save the scanned image file in a specified folder.
You can save the scanned image file in a shared folder on the network and share it with
others. In addition, you can inform others of the destination folder path by an e-mail message
automatically created with the path stated.
The e-mail program configured in Mail when you select [Mail] menu
button
[Preferences]
[General]
[Default email reader] is used as the e-mail program to link with ScanSnap Manager.
The following e-mail programs are supported:
z Mail
z Entourage 2004 for Mac
z Entourage 2008 for Mac
For details about the procedure to scan and save the scanned image in a specified folder
using or without using the Quick Menu, refer to the following:
z Using the Quick Menu ( page 260)
z Without Using the Quick Menu ( page 263)
259
Actions (for Mac OS users)
Using the Quick Menu
To use the Quick Menu, you need to select the [Use Quick Menu] checkbox in the ScanSnap
setup window.
For details about how to perform scanning by using the Quick Menu, refer to "Using the Quick
Menu" (page 228)
1. Load the document in the ScanSnap.
For details about how to load documents, refer to "How to Load Documents" (page 30).
2. Press the [Scan/Stop] button on the ScanSnap to start scanning.
Load another document in the ScanSnap when you want to scan multiple sheets. Scanning
starts automatically when a document is loaded.
3. Press the [Scan/Stop] button on the ScanSnap to finish scanning.
The Quick Menu appears.
4. Click the [Scan to Folder] icon.
The [Scan to Folder] window appears.
260
Actions (for Mac OS users)
5. Check the scanned image in the preview area.
In the [Scan to Folder] window, you can change files names, destination folders, and
specify whether to state a path to a destination folder in an e-mail message to notify
others.
For details about the [Scan to Folder] window, refer to the ScanSnap Manager Help.
Preview
261
Actions (for Mac OS users)
6. Click the [Save] button.
The scanned image file is saved in the specified folder.
When you select the [State a path to a destination folder in an E-mail message]
checkbox in the [Scan to Folder] window, a new message window appears listing the
destination folder path where the file is saved.
z You cannot start scanning after the Quick Menu is displayed and before the [Scan to
Folder] window is closed. Close the [Scan to Folder] window before scanning the next
document.
z Do not move, delete, or rename scanned image in other applications after the Quick
Menu is displayed and before the [Scan to Folder] window is closed.
262
Actions (for Mac OS users)
Without using the Quick Menu
To disable the Quick Menu, you need to clear the [Use Quick Menu] checkbox in the ScanSnap
setup window.
For details about how to perform scanning without using the Quick Menu, refer to "Without Using
the Quick Menu" (page 233).
1. Select [Settings] from the ScanSnap Manager menu.
For details about the ScanSnap Manager menu, refer to "ScanSnap Manager Menu"
(page 224).
The ScanSnap setup window appears.
2. In the [Application] pop-up menu in the [Application] tab, select [Scan to
Folder].
ScanSnap Manager can also link with [Scan to Folder] when you select:
z [Scan to Folder] from the [Profile] pop-up menu of the ScanSnap setup window
z [Scan to Folder] from the Profile menu
3. Click the [Apply] button.
4. Click the [
] button in the upper left corner to close the ScanSnap
setup window.
263
Actions (for Mac OS users)
5. Load the document in the ScanSnap.
For details about how to load documents, refer to "How to Load Documents" (page 30).
6. Press the [Scan/Stop] button on the ScanSnap to start scanning.
Load another document in the ScanSnap when you want to scan multiple sheets. Scanning
starts automatically when a document is loaded.
7. Press the [Scan/Stop] button on the ScanSnap to finish scanning.
The [Scan to Folder] window appears.
8. Check the scanned image in the preview area.
In the [Scan to Folder] window, you can change files names, destination folders, and
specify whether to state a path to a destination folder in an e-mail message to notify
others.
For details about the [Scan to Folder] window, refer to the ScanSnap Manager Help.
Preview
264
Actions (for Mac OS users)
9. Click the [Save] button.
The scanned image file is saved in the specified folder.
When you select the [State a path to a destination folder in an E-mail message]
checkbox in the [Scan to Folder] window, a new message window appears listing the
destination folder path where the file is saved.
z You cannot start scanning when the [Scan to Folder] window is displayed. Close the
[Scan to Folder] window before scanning the next document.
z Do not move, delete or rename the scanned image in other applications when the [Scan
to Folder] window is displayed.
265
Actions (for Mac OS users)
■ Attaching Files to E-Mail
This section explains how to attach the scanned image file to an e-mail message.
The e-mail program configured in Mail when you select [Mail] menu
button
[Preferences]
[General]
[Default email reader] is used as the e-mail program to link with ScanSnap Manager.
The following e-mail programs are supported:
z Mail
z Entourage 2004 for Mac
z Entourage 2008 for Mac
For details about the procedure to scan and attach the scanned image to an e-mail message
using or without using the Quick Menu, refer to the following:
z Using the Quick Menu ( page 267)
z Without Using the Quick Menu ( page 271)
266
Actions (for Mac OS users)
Using the Quick Menu
To use the Quick Menu, you need to select the [Use Quick Menu] checkbox in the ScanSnap
setup window.
For details about how to perform scanning using the Quick Menu, refer to "Using the Quick
Menu" (page 228).
1. Load the document in the ScanSnap.
For details about how to load documents, refer to "How to Load Documents" (page 30).
Up to ten files can be attached to an e-mail message.
When you scan more than one document with the scan settings shown below, multiple
files are created. Pay attention to the number of documents to scan:
z File format: JPEG (*.jpg)
z [Generate one PDF file per (n) page(s)] checkbox is selected
2. Press the [Scan/Stop] button on the ScanSnap to start scanning.
Load another document in the ScanSnap when you want to scan multiple sheets. Scanning
starts automatically when a document is loaded.
3. Press the [Scan/Stop] button on the ScanSnap to finish scanning.
The Quick Menu appears.
4. Change settings for the [Scan to E-mail] (If you do not want to change
any settings, go to step 5.).
1. Click [Settings] under the [Scan to E-mail] icon.
The [Scan to E-mail - Options] window appears.
267
Actions (for Mac OS users)
2. Change the settings.
For details about the [Scan to E-mail - Options] window, refer to the ScanSnap
Manager Help.
3. Click the [OK] button to close the [Scan to E-mail - Options] window.
5. Click the [Scan to E-mail] icon.
The [Scan to E-mail] window appears.
If you clear the [Show preview] checkbox of the [Scan to E-mail - Options] window in
step 4., the [Scan to E-mail] window is not displayed. Instead, a new message
window appears with the file(s) attached.
268
Actions (for Mac OS users)
6. Check the scanned image in the preview area.
In the [Scan to E-mail] window, you can rename the file and decide whether to save the
scanned image in the folder specified for [Image saving folder] after sending it by e-mail.
For details about the [Scan to E-mail] window, refer to the ScanSnap Manager Help.
Preview
269
Actions (for Mac OS users)
7. Click the [Attach to E-mail] button.
An e-mail message window appears with the file attached.
z You cannot start scanning after the Quick Menu is displayed and before the [Scan to Email] window is closed. Close the [Scan to E-mail] window before scanning the next
document.
z Do not move, delete, or rename scanned image in other applications after the Quick
Menu is displayed and before the [Scan to E-mail] window is closed.
270
Actions (for Mac OS users)
Without using the Quick Menu
To disable the Quick Menu, you need to clear the [Use Quick Menu] checkbox in the ScanSnap
setup window.
For details about how to perform scanning without using the Quick Menu, refer to "Without Using
the Quick Menu" (page 233).
1. Select [Settings] from the ScanSnap Manager menu.
For details about the ScanSnap Manager menu, refer to "ScanSnap Manager Menu"
(page 224).
The ScanSnap setup window appears.
2. In the [Application] pop-up menu in the [Application] tab, select [Scan to
E-mail].
ScanSnap Manager can also link with [Scan to E-mail] when you select:
z [Scan to E-mail] from the [Profile] pop-up menu of the ScanSnap setup window
z [Scan to E-mail] from the Profile menu
271
Actions (for Mac OS users)
3. Change settings for the [Scan to E-mail] (If you do not want to change
any settings, go to step 4.).
1. Click the [Application Setting] button.
The [Scan to E-mail - Options] window appears.
2. Change the settings.
For details about the [Scan to E-mail - Options] window, refer to the ScanSnap
Manager Help.
3. Click the [OK] button to close the [Scan to E-mail - Options] window.
4. Click the [Apply] button in the ScanSnap setup window.
5. Click the [
] button in the upper left corner to close the ScanSnap
setup window.
272
Actions (for Mac OS users)
6. Load the document in the ScanSnap.
For details about how to load documents, refer to "How to Load Documents" (page 30).
Up to ten files can be attached to an e-mail message.
When you scan more than one document with the scan settings shown below, multiple
files are created. Pay attention to the number of documents to scan:
z File format: JPEG (*.jpg)
z [Generate one PDF file per (n) page(s)] checkbox is selected
7. Press the [Scan/Stop] button on the ScanSnap to start scanning.
Load another document in the ScanSnap when you want to scan multiple sheets. Scanning
starts automatically when a document is loaded.
8. Press the [Scan/Stop] button on the ScanSnap to finish scanning.
The [Scan to E-mail] window appears.
If you clear the [Show preview] checkbox of the [Scan to E-mail - Options] window in
step 3., the [Scan to E-mail] window is not displayed. Instead, a new message
window appears with the file(s) attached.
273
Actions (for Mac OS users)
9. Check the scanned image in the preview area.
In the [Scan to E-mail] window, you can rename the file and decide whether to save the
scanned image in the folder specified for [Image saving folder] after sending it by e-mail.
For details about the [Scan to E-mail] window, refer to the ScanSnap Manager Help.
Preview
274
Actions (for Mac OS users)
10.Click the [Attach to E-mail] button.
An e-mail message window appears with the file attached.
z You cannot start scanning when the [Scan to E-mail] window is displayed. Close the
[Scan to E-mail] window before scanning the next document.
z Do not move, delete or rename the scanned image in other applications when the [Scan
to E-mail] window is displayed.
275
Actions (for Mac OS users)
■ Using the ScanSnap as a Copy Machine
This section explains how to print the scanned image with a printer.
When a printer links with ScanSnap Manager, the ScanSnap can be used as a copy machine.
z Note that shadows around the edges of the document may appear as lines on the generated
scanned image, depending on the scanning method and paper conditions. If you print such
an image, the printed image will also have lines appearing in it.
z When you perform a borderless printing, save the image data to file first, and then print it by
using Preview, Adobe Acrobat or Adobe Reader.
For details about the procedure to scan and print the scanned image using or without using
the Quick Menu, refer to the following:
z Using the Quick Menu ( page 277)
z Without Using the Quick Menu ( page 280)
276
Actions (for Mac OS users)
Using the Quick Menu
To use the Quick Menu, you need to select the [Use Quick Menu] checkbox in the ScanSnap
setup window.
For details about how to perform scanning by using the Quick Menu, refer to "Using the Quick
Menu" (page 228)
1. Load the document in the ScanSnap.
For details about how to load documents, refer to "How to Load Documents" (page 30).
2. Press the [Scan/Stop] button on the ScanSnap to start scanning.
Load another document in the ScanSnap when you want to scan multiple sheets. Scanning
starts automatically when a document is loaded.
3. Press the [Scan/Stop] button on the ScanSnap to finish scanning.
The Quick Menu appears.
4. Change settings for the [Scan to Print] (If you do not want to change any
settings, go to step 5.).
1. Click [Settings] under the [Scan to Print] icon.
The [Scan to Print - Options] window appears.
2. Change the settings.
For details about the [Scan to Print - Options] window, refer to the ScanSnap
Manager Help.
277
Actions (for Mac OS users)
3. Click the [OK] button to close the [Scan to Print - Options] window.
5. Click the [Scan to Print] icon.
The [Print] window appears.
6. Configure print setup options in the [Print] window.
In the [Print] window, you can specify the printer to be used, the number of copies, and
size and position of the scanned image to be printed, and whether to save the scanned
image in the folder specified for [Image saving folder].
For details about the [Print] window, refer to the ScanSnap Manager Help.
278
Actions (for Mac OS users)
7. Click the [Print] button.
The scanned image is printed.
z You cannot start scanning after the Quick Menu is displayed and before the [Print]
window is closed. Close the [Print] window before scanning the next document.
z Do not move, delete, or rename the scanned image in other applications after the Quick
Menu is displayed and before the [Print] window is closed.
279
Actions (for Mac OS users)
Without using the Quick Menu
To disable the Quick Menu, you need to clear the [Use Quick Menu] checkbox in the ScanSnap
setup window.
For details about how to perform scanning without using the Quick Menu, refer to "Without Using
the Quick Menu" (page 233).
1. Select [Settings] from the ScanSnap Manager menu.
For details about the ScanSnap Manager menu, refer to "ScanSnap Manager Menu"
(page 224).
The ScanSnap setup window appears.
2. From the [Application] pop-up menu in the [Application] tab, select [Scan
to Print].
ScanSnap Manager can also link with [Scan to Print] when you select:
z [Scan to Print] from the [Profile] pop-up menu of the ScanSnap setup window
z [Scan to Print] from the Profile menu
280
Actions (for Mac OS users)
3. Change settings for the [Scan to Print] (If you do not want to change any
settings, go to step 4.).
1. Click the [Application Setting] button.
The [Scan to Print - Options] window appears.
2. Change the settings.
For details about the [Scan to Print - Options] window, refer to the ScanSnap
Manager Help.
3. Click the [OK] button to close the [Scan to Print - Options] window.
4. Click the [Apply] button in the ScanSnap setup window.
5. Click the [
] button in the upper left corner to close the ScanSnap
setup window.
6. Load the document in the ScanSnap.
For details about how to load documents, refer to "How to Load Documents" (page 30).
281
Actions (for Mac OS users)
7. Press the [Scan/Stop] button on the ScanSnap to start scanning.
Load another document in the ScanSnap when you want to scan multiple sheets. Scanning
starts automatically when a document is loaded.
8. Press the [Scan/Stop] button on the ScanSnap to finish scanning.
The [Print] window appears.
9. Configure print setup options in the [Print] window.
In the [Print] window, you can specify the printer to be used, the number of copies, and
size and position of the scanned image to be printed, and whether to save the scanned
image in the folder specified for [Image saving folder].
For details about the [Print] window, refer to the ScanSnap Manager Help.
10.Click the [Print] button.
The scanned image is printed.
z You cannot start scanning when the [Print] window is displayed. Close the [Print] window
before scanning the next document.
z Do not move, delete, or rename the scanned image in other applications while the [Print]
window is displayed.
282
Actions (for Mac OS users)
■ Converting into Word/Excel Documents
This section explains how to convert the scanned image into Word/Excel files using ABBYY
FineReader for ScanSnap bundled with the ScanSnap.
z The following applications must be installed in your computer in order to perform textrecognition:
- ABBYY FineReader for ScanSnap (bundled with the ScanSnap)
- Word
- Excel
z You cannot view the documents converted into Word and Excel files unless these
applications are installed and you completed the user registration to use them. Install these
applications and complete the user registration to view the converted documents on your
computer.
z If Word is not installed in your computer, text-only results of converted documents to Word
will be displayed in TextEdit. If Excel is not installed in your computer, you cannot view
documents converted to Excel.
z ABBYY FineReader for ScanSnap can be used with the following versions of Word and
Excel:
- Word: 2008 / 2004
- Excel: 2008 / 2004
z Do not use this function while you are working in Word or Excel. In addition, do not use Word
or Excel while this function is being executed. If you use either Word or Excel together with
this function, the conversion result is saved to a file, but the conversion result may not be
displayed even if the [Open file after recognition] checkbox is selected on the [FineReader for
ScanSnap Preferences] window.
283
Actions (for Mac OS users)
About the OCR function of ABBYY FineReader for ScanSnap
z ABBYY FineReader for ScanSnap is an application used exclusively with the ScanSnap. This
program can perform text recognition only for PDF files created by using the ScanSnap. It
cannot perform text recognition for files created using Adobe Acrobat or other applications.
z The optical character recognition program has the following features. Before performing text
recognition, check whether the documents you want to convert are suitable for conversion
according to the following guidelines:
Application
Suitable for conversion
Not suitable for conversion
Scan to Word
Documents with simple layouts consisting of single or
double columns
Documents with complex layouts containing a mixture of diagrams, tables,
and text (e.g. brochures, magazines, and
newspapers)
Scan to Excel
Documents containing simple
tables with no cells merged
Documents containing;
- tables with no solid border lines
- tables with complicated cell formats
- complex tables containing sub-tables
- diagrams, graphs, photos and/or
vertical text
(Note that documents containing diagrams, graphs or vertical text will not be
reproduced.)
284
Actions (for Mac OS users)
z The following parameters may not be reproduced as they are in the original document. It is
recommended that the converted documents be opened with Word or Excel to correct or edit
misrecognized characters:
- Character font and size
- Character and line spacing
- Underlined, bold and italic characters
- Superscript/subscript
z The following types of documents (characters) may not be recognized correctly.
Better results in text recognition may be achieved by changing the color mode or increasing
the resolution:
- Documents including handwritten characters
- Documents containing small characters (smaller than 10 points)
- Skewed documents
- Documents written in languages other than the specified language
- Documents with characters on an unevenly colored background
e.g. Shaded characters
- Documents with many decorated characters
e.g. Decorated characters (embossed/outlined)
- Documents with characters on a patterned background
e.g. Characters overlapping illustrations and diagrams
- Documents with many characters contacting underlines or borders
- Documents of complex layouts as well as documents including unreadable characters
(It may take extra time to process text recognition for these documents.)
z When converting to Excel files, if the recognition result exceeds 65,536 lines, no more results
are saved.
z When converting to Excel files, information about the layout of the entire document,
diagrams, and length/width of graphs and tables is not duplicated. Only tables and character
strings are reproduced.
z Documents upside down or in landscape orientation cannot be recognized properly. Select
the [Allow automatic image rotation] checkbox (page 334), or load documents face down in
portrait orientation.
285
Actions (for Mac OS users)
You can change the settings applied during conversion to Word or Excel documents in the
ABBYY FineReader for ScanSnap setup window.
Select the [Applications]
[ABBYY FineReader for ScanSnap]
Preferences]. Then, select [FineReader for ScanSnap] menu
[FineReader for ScanSnap
[Preferences] to display the
following window.
For details about how to configure settings, refer to the ABBYY FineReader for ScanSnap Help.
For details about the procedure to scan and convert the scanned image into Word/Excel files
using or without using the Quick Menu, refer to the following:
z Using the Quick Menu ( page 287)
z Without Using the Quick Menu ( page 289)
286
Actions (for Mac OS users)
Using the Quick Menu
To use the Quick Menu, you need to select the [Use Quick Menu] checkbox in the ScanSnap
setup window.
For details about how to perform scanning by using the Quick Menu, refer to "Using the Quick
Menu" (page 228).
1. Load the document in the ScanSnap.
For details about how to load documents, refer to "How to Load Documents" (page 30).
2. Press the [Scan/Stop] button on the ScanSnap to start scanning.
z It is recommended that you select [Automatic resolution] or [Best] for [Image quality] in
the [Scanning] tab of the ScanSnap setup window.
z Load another document in the ScanSnap when you want to scan multiple sheets.
Scanning starts automatically when a document is loaded.
3. Press the [Scan/Stop] button on the ScanSnap to finish scanning.
The Quick Menu appears.
4. Click the [Scan to Word] or [Scan to Excel] icon.
z When you perform a scan with [JPEG(*.jpg)] selected for [File format] in the [File
option] tab in the ScanSnap setup window, scanned data cannot be converted into a
Word or Excel file. If you click either of these icons, an error message appears.
z You cannot start scanning when the Quick Menu is displayed. Wait until the
conversion is over to scan another document.
z Do not move, delete or rename the scanned image in other applications when the
Quick Menu is displayed.
287
Actions (for Mac OS users)
The following window appears and conversion is started.
When the conversion is completed, Word or Excel starts up, displaying the converted
document in the applicable format.
The Word or Excel file is saved in one of the following formats:
z Scan to Word: RTF format (.rtf)
z Scan to Excel: XLS format (.xls)
288
Actions (for Mac OS users)
Without using the Quick Menu
To disable the Quick Menu, you need to clear the [Use Quick Menu] checkbox in the ScanSnap
setup window.
For details about how to perform scanning without using the Quick Menu, refer to "Without Using
the Quick Menu" (page 233).
1. Select [Settings] from the ScanSnap Manager menu.
For details about the ScanSnap Manager menu, refer to "ScanSnap Manager Menu"
(page 224).
The ScanSnap setup window appears.
2. In the [Application] pop-up menu in the [Application] tab, select [Scan to
Word] or [Scan to Excel].
z It is recommended to select [Automatic resolution] or [Best] for [Image quality] in the
[Scanning] tab in the ScanSnap setup window.
z ScanSnap Manager can also link with [Scan to Word] or [Scan to Excel] when you
select:
- [Scan to Word] or [Scan to Excel] from the [Profile] pop-up menu of the ScanSnap
setup window
- [Scan to Word] or [Scan to Excel] from the Profile menu
3. Click the [Apply] button in the ScanSnap setup window.
289
Actions (for Mac OS users)
4. Click the [
] button in the upper left corner to close the ScanSnap
setup window.
5. Load the document in the ScanSnap.
For details about how to load documents, refer to "How to Load Documents" (page 30).
6. Press the [Scan/Stop] button on the ScanSnap to start scanning.
Load another document in the ScanSnap when you want to scan multiple sheets. Scanning
starts automatically when a document is loaded.
7. Press the [Scan/Stop] button on the ScanSnap to finish scanning.
The following window appears and image data conversion to Word or Excel files
starts.
When the conversion is completed, Word or Excel starts up and the conversion
result is displayed.
The Word or Excel file is saved in one of the following formats:
z Scan to Word: RTF format (.rtf)
z Scan to Excel: XLS format (.xls)
290
Actions (for Mac OS users)
■ Storing Business Cards in Cardiris
This section explains how to store business card images in Cardiris.
Data of up to 250 pages, including blank pages, can be stored in Cardiris at once.
For details about the procedure to scan and manage business cards in Cardiris using or
without using the Quick Menu, refer to the following:
z Using the Quick Menu ( page 292)
z Without Using the Quick Menu ( page 295)
291
Actions (for Mac OS users)
Using the Quick Menu
To use the Quick Menu, you need to select the [Use Quick Menu] checkbox in the ScanSnap
setup window.
For details about how to perform scanning by using the Quick Menu, refer to "Using the Quick
Menu" (page 228).
1. Insert the business card straight into the feeding section of the
ScanSnap, with the scanning side facing up.
Business card is pulled in until it is set inside the ScanSnap.
z When [Business card] is specified for [Paper size] in the [Paper] tab of the ScanSnap
setup window, insert the business card by aligning it with the left edge of the feeding
section.
z If you perform a scan with the output guide open, a
paper jam may occur and damage business cards.
Make sure to close the output guide when you scan
business cards.
292
Output guide
Actions (for Mac OS users)
2. Press the [Scan/Stop] button on the ScanSnap to start scanning.
It is recommended to select [Automatic resolution] or [Best] for [Image quality] in the
[Scanning] tab in the ScanSnap setup window.
Load another business card in the ScanSnap when you want to scan multiple business
cards. Scanning starts automatically when a business card is loaded.
3. Press the [Scan/Stop] button on the ScanSnap to finish scanning.
The Quick Menu appears.
4. Click the [Cardiris] button.
z You cannot start scanning when the Quick Menu is displayed. Wait until ScanSnap
Manager links with Cardiris before scanning another document.
z Do not move, delete, or rename the scanned image in other applications when the
Quick Menu is displayed.
Cardiris starts up and the Cardiris window appears.
293
Actions (for Mac OS users)
5. Check the scanned card image and the text recognition result.
[Card Style]
button
Card image
[Send] button
[Format] button
Card toolbar
Recognition
result
The current card image is displayed on the top-right.
A list of already scanned business cards is displayed in the card toolbar.
The recognition result is displayed under the card image.
Do not exit Cardiris while setup or message window is open.
z To recognize a business card of a different language from the one currently set in
Cardiris, click the [Card Style] button and change the country setting.
z For details about the functions of Cardiris and how to use it, refer to Cardiris GETTING
STARTED and Cardiris Help.
294
Actions (for Mac OS users)
Without using the Quick Menu
To disable the Quick Menu, you need to clear the [Use Quick Menu] checkbox in the ScanSnap
setup window.
For details about how to perform scanning without using the Quick Menu, refer to "Without Using
the Quick Menu" (page 233).
1. Select [Settings] from the ScanSnap Manager menu.
For details about the ScanSnap Manager menu, refer to "ScanSnap Manager Menu"
(page 224).
The ScanSnap setup window appears.
2. In the [Application] pop-up menu in the [Application] tab, select
[Cardiris].
It is recommended that you select [Automatic resolution] or [Best] for [Image quality] in the
[Scanning] tab of the ScanSnap setup window.
ScanSnap Manager can also link with [Cardiris] when you select:
z [Cardiris] from the [Profile] pop-up menu of the ScanSnap setup window
z [Cardiris] from the Profile menu
295
Actions (for Mac OS users)
3. Click the [Apply] button.
4. Click the [
] button in the upper left corner to close the ScanSnap
setup window.
5. Insert the business card straight into the feeding section of the
ScanSnap, with the scanning side facing up.
Business card is pulled in until it is set inside the ScanSnap.
z When [Business card] is specified for [Paper size] in the [Paper] tab in the ScanSnap
setup window, insert the business card by aligning it with the left edge of the feeding
section.
z If you perform a scan with the output guide open, a
paper jam may occur and damage business cards.
Make sure to close the output guide when you scan
business cards.
Output guide
6. Press the [Scan/Stop] button on the ScanSnap to start scanning.
Load another business card in the ScanSnap when you want to scan multiple business
cards. Scanning starts automatically when a business card is loaded.
296
Actions (for Mac OS users)
7. Press the [Scan/Stop] button on the ScanSnap to finish scanning.
Cardiris starts up and the Cardiris window appears.
8. Check the scanned card image and the text recognition result.
[Card Style]
button
Card image
[Send] button
[Format] button
Recognition
result
Card toolbar
The current card image is displayed on the top-right.
A list of already scanned business cards is displayed in the card toolbar.
The recognition result is displayed under the card image.
Do not exit Cardiris while setup or message window is open.
z To recognize a business card of a different language from the one currently set in
Cardiris, click the [Card Style] button and change the country setting.
z For details about functions of Cardiris and how to use it, refer to Cardiris GETTING
STARTED and Cardiris Help.
297
Actions (for Mac OS users)
Using the Address Book in Cardiris
To register the recognized characters of a scanned business card in the Address Book,
perform the following procedure.
Do not exit Cardiris when setup or message window is open.
1. Click the [Format] button or select [Settings]
[Output Format] on the
menu bar.
The following window appears.
2. Select [Address Book] in the [Format] pop-up menu.
3. Click the [OK] button.
298
Actions (for Mac OS users)
4. Click the [Send] button or select [Process]
[Send] on the menu bar.
The Address Book window appears, and the recognized characters of all scanned
business cards in the card toolbar are registered in the Address Book.
5. Select [Cardiris]
[Quit Cardiris] on the menu bar to quit Cardiris.
z The recognition result of scanned business cards can be output in text or vCard format.
z For more details, refer to Cardiris GETTING STARTED and Cardiris Help.
299
Actions (for Mac OS users)
■ Storing Scanned Images in iPhoto
This section explains how to store the scanned image in iPhoto.
For details about the procedure to scan and store the scanned image in iPhoto using or
without using the Quick Menu, refer to the following:
z Using the Quick Menu ( page 301)
z Without Using the Quick Menu ( page 303)
300
Actions (for Mac OS users)
Using the Quick Menu
To use the Quick Menu, you need to select the [Use Quick Menu] checkbox in the ScanSnap
setup window.
For more details about how to perform scanning by using the Quick Menu, refer to "Using the
Quick Menu" (page 228).
1. Load the document in the ScanSnap.
For details about how to load documents, refer to "How to Load Documents" (page 30).
2. Press the [Scan/Stop] button on the ScanSnap to start scanning.
Load another document in the ScanSnap when you want to scan multiple sheets. Scanning
starts automatically when a document is loaded.
3. Press the [Scan/Stop] button on the ScanSnap to finish scanning.
The Quick Menu appears.
4. Click the [iPhoto] button.
z You cannot start scanning when the Quick Menu is displayed. Wait until ScanSnap
Manager links with iPhoto before scanning another document.
z Do not move, delete, or rename the scanned image in other applications when the
Quick Menu is displayed.
The [iPhoto] window appears.
301
Actions (for Mac OS users)
5. Check the scanned image stored in iPhoto.
The scanned image is also saved in the folder specified for [Image saving folder] in the
[Save] tab of the ScanSnap setup window at the same time when it is saved to iPhoto.
Delete this file if unnecessary.
302
Actions (for Mac OS users)
Without using the Quick Menu
To disable the Quick Menu, you need to clear the [Use Quick Menu] checkbox in the ScanSnap
setup window.
For more details about how to perform scanning without using the Quick Menu, refer to "Without
Using the Quick Menu" (page 233).
1. Select [Settings] from the ScanSnap Manager menu.
For details about the ScanSnap Manager menu, refer to "ScanSnap Manager Menu"
(page 224).
The ScanSnap setup window appears.
2. From the [Application] pop-up menu in the [Application] tab, select
[iPhoto].
ScanSnap Manager can also link with [iPhoto] when you select:
z [iPhoto] from the [Profile] pop-up menu of the ScanSnap setup window
z [iPhoto] from the Profile menu
3. Click the [Apply] button.
4. Click the [
] button in the upper left corner to close the ScanSnap
setup window.
303
Actions (for Mac OS users)
5. Load the document in the ScanSnap.
For details about how to load documents, refer to "How to Load Documents" (page 30).
6. Press the [Scan/Stop] button on the ScanSnap to start scanning.
Load another document in the ScanSnap when you want to scan multiple sheets. Scanning
starts automatically when a document is loaded.
7. Press the [Scan/Stop] button on the ScanSnap to finish scanning.
The [iPhoto] window appears.
8. Check the scanned image stored in iPhoto.
The scanned image is also saved in the folder specified for [Image saving folder] in the
[Save] tab of the ScanSnap setup window at the same time when it is saved to iPhoto.
Delete this file if unnecessary.
304
Actions (for Mac OS users)
■ Saving Documents to Evernote
This section explains how to save the scanned image as a PDF file to Evernote.
When you save the scanned image to Evernote after converting it into a searchable PDF, the
PDF file becomes searchable in Evernote.
z You first need to create a notebook in Evernote for Mac to save a file to Evernote.
z Disable [Bring the new note to the front]
in Evernote [Preferences] window
beforehand to prevent new notes
appearing on the screen when you
scan documents consecutively.
The screenshot on the left is from
Evernote for Mac 1.10.1. Clear the
[Bring the new note to the front]
checkbox in this window.
The actual window and the contents
may differ depending on the Evernote
version you are using.
For details about the procedure to scan and save the scanned image to Evernote using or
without using the Quick Menu, refer to the following:
z Using the Quick Menu ( page 306)
z Without Using the Quick Menu ( page 309)
305
Actions (for Mac OS users)
Using the Quick Menu
To use the Quick Menu, you need to select the [Use Quick Menu] checkbox in the ScanSnap
setup window.
For details about how to perform scanning by using the Quick Menu, refer to "Using the Quick
Menu" (page 228).
1. Load a document in the ScanSnap.
For details about how to load documents, refer to "How to Load Documents" (page 30).
2. Press the [Scan/Stop] button on the ScanSnap to start scanning.
Load another document in the ScanSnap when you want to scan multiple sheets.
Scanning starts automatically when a document is loaded.
3. Press the [Scan/Stop] button on the ScanSnap to finish scanning.
The Quick Menu appears.
4. Change settings for the [Scan to Evernote (Document)] (If you do not
want to change any settings, go to step 5.).
1. Click [Settings] under the [Scan to Evernote (Document)] icon.
The [Scan to Evernote (Document) - Options] window appears.
306
Actions (for Mac OS users)
2. Change the settings.
For details about the [Scan to Evernote (Document) - Options] window, refer to the
ScanSnap Manager Help.
3. Click the [OK] button to close the [Scan to Evernote (Document) - Options] window.
5. Click the [Scan to Evernote (Document)] icon.
z You cannot start scanning when the Quick Menu is displayed. Save the PDF file to Evernote before scanning the next document.
z Do not move, delete, or rename the scanned image in other applications when the
Quick Menu is displayed.
When you perform a scan with [JPEG(*.jpg)] selected for [File format] in the [File
option] tab of the ScanSnap setup window, a PDF file is created from the JPEG file.
A separate PDF file created for each JPEG file.
The following window is displayed when the PDF file is being created.
307
Actions (for Mac OS users)
If the [Convert to Searchable PDF] checkbox is selected in step 4., text recognition is
performed according to the [OCR options] settings in the [Scan to Evernote Options] window.
The following window is displayed during text recognition.
Text recognition will be performed if there are any pages containing text which is not yet
recognized. Note that text recognition will be performed on all pages, including pages
containing text on which text recognition has already been performed.
Evernote for Mac starts up, and the PDF file is saved to Evernote.
The file in which the scanned image is saved remains in the folder specified for [Image
saving folder] in the [Save] tab of the ScanSnap setup window even after the scanned
image is saved to Evernote. Delete this file if unnecessary.
308
Actions (for Mac OS users)
Without using the Quick Menu
To disable the Quick Menu, you need to clear the [Use Quick Menu] checkbox in the ScanSnap
setup window.
For details about how to perform scanning without using the Quick Menu, refer to "Without Using
the Quick Menu" (page 233).
1. Select [Settings] from the ScanSnap Manager menu.
For details about the ScanSnap Manager menu, refer to "ScanSnap Manager Menu"
(page 224).
The ScanSnap setup window appears.
2. In the [Application] pop-up menu in the [Application] tab, select [Scan to
Evernote (Document)].
ScanSnap Manager can also link with [Scan to Evernote (Document)] when you select:
z [Scan to Evernote (Document)] from the [Profile] pop-up menu of the ScanSnap setup
window
z [Scan to Evernote (Document)] from the Profile menu
309
Actions (for Mac OS users)
3. Change settings for the [Scan to Evernote (Document)] (If you do not
want to change any settings, go to step 4.).
1. Click the [Application Setting] button.
The [Scan to Evernote (Document) - Options] window appears.
2. Change the settings.
For details about the [Scan to Evernote (Document) - Options] window, refer to the
ScanSnap Manager Help.
3. Click the [OK] button to close the [Scan to Evernote (Document) - Options] window.
4. Click the [Apply] button.
5. Click the [
] button in the upper left corner to close the ScanSnap
setup window.
6. Load a document in the ScanSnap.
For details about how to load documents, refer to "How to Load Documents" (page 30).
310
Actions (for Mac OS users)
7. Press the [Scan/Stop] button on the ScanSnap to start scanning.
Load another document in the ScanSnap when you want to scan multiple sheets.
Scanning starts automatically when a document is loaded.
8. Press the [Scan/Stop] button on the ScanSnap to finish scanning.
When you perform a scan with [JPEG(*.jpg)] selected for [File format] in the [File
option] tab of the ScanSnap setup window, a PDF file is created from the JPEG file.
A separate PDF file is created for each JPEG file.
The following window is displayed when the PDF file is being created.
If the [Convert to Searchable PDF] checkbox is selected in step 3., text recognition is
performed according to the [OCR options] settings in the [Scan to Evernote Options] window.
The following window is displayed during text recognition.
Text recognition will be performed if there are any pages containing text which is not yet
recognized. Note that text recognition will be performed on all pages, including pages
containing text on which text recognition has already been performed.
311
Actions (for Mac OS users)
Evernote for Mac starts up, and the PDF file is saved to Evernote.
The file in which the scanned image is saved remains in the folder specified for [Image
saving folder] in the [Save] tab of the ScanSnap setup window even after the scanned
image is saved to Evernote. Delete this file if unnecessary.
312
Actions (for Mac OS users)
■ Saving Handwritten Notes to Evernote
This section explains how to save the scanned image as a JPEG file to Evernote.
When you save a JPEG file to Evernote, text recognition is performed on all text, including
handwritten characters, and the file becomes searchable in Evernote.
z You first need to create a notebook in Evernote for Mac to save a file to Evernote.
z Disable [Bring the new note to the
front] in Evernote [Preferences]
window beforehand to prevent new
notes appearing on the screen when
you scan more documents
consecutively.
The screenshot on the left is from
Evernote for Mac 1.10.1. Clear the
[Bring the new note to the front]
checkbox in this window.
The actual window and the contents
may differ depending on the Evernote
version you are using.
For details about the procedure to scan and send the scanned image to Evernote using or
without using the Quick Menu, refer to the following:
z Using the Quick Menu ( page 314)
z Without Using the Quick Menu ( page 316)
313
Actions (for Mac OS users)
Using the Quick Menu
To use the Quick Menu, you need to select the [Use Quick Menu] checkbox in the ScanSnap
setup window.
For details about how to perform scanning by using the Quick Menu, refer to "Using the Quick
Menu" (page 228).
1. Load a document in the ScanSnap.
For details about how to load documents, refer to "How to Load Documents" (page 30).
2. Press the [Scan/Stop] button on the ScanSnap to start scanning.
Load another document in the ScanSnap when you want to scan multiple sheets.
Scanning starts automatically when a document is loaded.
3. Press the [Scan/Stop] button on the ScanSnap to finish scanning.
The Quick Menu appears.
4. Click the [Scan to Evernote (Note)] icon.
z You cannot start scanning when the Quick Menu is displayed. Save the JPEG file to
Evernote before scanning the next document.
z Do not move, delete, or rename the scanned image in other applications when the
Quick Menu is displayed.
314
Actions (for Mac OS users)
When you perform a scan with [PDF(*.pdf)] selected for [File format] in the [File
option] tab of the ScanSnap setup window, a JPEG file is created from the PDF file.
A separate JPEG file is created for each page of the PDF file.
The following window is displayed when the JPEG file is being created.
Evernote for Mac starts up, and the JPEG file is saved to Evernote.
z When you select [PDF (*.pdf)] for [File format] in the [File option] tab of the ScanSnap setup
window, a four-digit serial number is automatically added to the name of the file which is
saved to Evernote.
e.g. When the file name is [ScanSnap], the file is saved as:
ScanSnap_0001, ScanSnap_0002, ScanSnap_0003...
z The file in which the scanned image is saved remains in the folder specified for [Image
saving folder] in the [Save] tab of the ScanSnap setup window even after the scanned
image is saved to Evernote. Delete this file if unnecessary.
315
Actions (for Mac OS users)
Without using the Quick Menu
To disable the Quick Menu, you need to clear the [Use Quick Menu] checkbox in the ScanSnap
setup window.
For details about how to perform scanning without using the Quick Menu, refer to "Without Using
the Quick Menu" (page 233).
1. Select [Settings] from the ScanSnap Manager menu.
For details about the ScanSnap Manager menu, refer to "ScanSnap Manager Menu"
(page 224).
The ScanSnap setup window appears.
2. In the [Application] pop-up menu in the [Application] tab, select [Scan to
Evernote (Note)].
ScanSnap Manager can also link with [Scan to Evernote (Note)] when you select:
z [Scan to Evernote (Note)] from the [Profile] pop-up menu of the ScanSnap setup window
z [Scan to Evernote (Note)] from the Profile menu
316
Actions (for Mac OS users)
3. Click the [Apply] button.
4. Click the [
] button in the upper left corner to close the ScanSnap
setup window.
5. Load a document in the ScanSnap.
For details about how to load documents, refer to "How to Load Documents" (page 30).
6. Press the [Scan/Stop] button on the ScanSnap to start scanning.
Load another document in the ScanSnap when you want to scan multiple sheets. Scanning
starts automatically when a document is loaded.
7. Press the [Scan/Stop] button on the ScanSnap to finish scanning.
When you perform a scan with [PDF(*.pdf)] selected for [File format] in the [File
option] tab in the ScanSnap setup window, a JPEG file is created from the PDF file.
A separate JPEG file is created for each page of the PDF file.
The following window is displayed when the JPEG file is being created.
317
Actions (for Mac OS users)
Evernote for Mac starts up, and the JPEG file is saved to Evernote.
z When you select [PDF (*.pdf)] for [File format] in the [File option] tab of the ScanSnap
setup window, a four-digit serial number is automatically added to the name of the file
which is saved to Evernote.
e.g. When the file name is [ScanSnap], the file is saved as:
ScanSnap_0001, ScanSnap_0002, ScanSnap_0003...
z The file in which the scanned image is saved remains in the folder specified for [Image
saving folder] in the [Save] tab of the ScanSnap setup window even after the scanned
image is saved to Evernote. Delete this file if unnecessary.
318
Actions (for Mac OS users)
■ Saving Documents to Google Docs
This section explains how to save the scanned image as a PDF file to Google Docs.
For details about the procedure to scan and save the scanned image to Google Docs using or
without using the Quick Menu, refer to the following:
z Using the Quick Menu ( page 320)
z Without Using the Quick Menu ( page 324)
319
Actions (for Mac OS users)
Using the Quick Menu
To use the Quick Menu, you need to select the [Use Quick Menu] checkbox in the ScanSnap
setup window.
For details about how to perform scanning by using the Quick Menu, refer to "Using the Quick
Menu" (page 228).
1. Load a document in the ScanSnap.
For details about how to load documents, refer to "How to Load Documents" (page 30).
2. Press the [Scan/Stop] button on the ScanSnap to start scanning.
Load another document in the ScanSnap when you want to scan multiple sheets.
Scanning starts automatically when a document is loaded.
3. Press the [Scan/Stop] button on the ScanSnap to finish scanning.
The Quick Menu appears.
4. Change settings for [Scan to Google Docs(TM)] (If you do not want to
change any settings, go to step 5.).
1. Click [Settings] under the [Scan to Google Docs(TM)] icon.
The [Scan to Google Docs(TM) - Options] window appears.
320
Actions (for Mac OS users)
2. Change the settings.
For details about the [Scan to Google Docs(TM) - Options] window, refer to the
ScanSnap Manager Help.
If the computer is shared with other users, do not enter your information in [Email] and
[Password] in this window.
Otherwise, other users will be able to log into Google Docs automatically.
3. Click the [OK] button to close the [Scan to Google Docs(TM) - Options] window.
5. Click the [Scan to Google Docs(TM)] icon.
z You cannot start scanning when the Quick Menu is displayed. Save the scanned image
to Google Docs before scanning the next document.
z Do not move, delete, or rename the scanned image in other applications when the
Quick Menu is displayed.
321
Actions (for Mac OS users)
If you did not specify a Google account in the [Scan to Google Docs(TM) - Options]
window in step 4., the [Scan to Google Docs(TM) window appears. Saving will
continue after you enter an e-mail address and a password, and click the [OK]
button.
If the computer is shared with other users, do not select the [Remember the password
in the keychain] checkbox in this window.
Otherwise, other users will be able to log into Google Docs automatically.
When you perform a scan with [JPEG(*.jpg)] selected for [File format] in the [File
option] tab of the ScanSnap setup window, a PDF file is created from the JPEG file.
A separate PDF file is created for each JPEG file.
The following window is displayed when the PDF file is being created.
If the [Convert to Searchable PDF] checkbox is selected in the [Scan to Google
Docs(TM) - Options] window in step 4., text recognition is performed according to the
[OCR options] settings in the [Scan to Google Docs(TM) - Options] window. The
following window is displayed during text recognition.
Text recognition will be performed if there are any pages containing text which is not
yet recognized. Note that text recognition will be performed on all pages, including
pages containing text on which text recognition has already been performed.
322
Actions (for Mac OS users)
The following window appears when saving starts. Click the [Close] button to close
the [Scan to Google Docs(TM)] window when the saving completes.
When you select the [Close this window when save completes] checkbox in the
[Scan to Google Docs(TM)] window, from next scanning on, the [Scan to Google
Docs(TM) window automatically closes after the PDF file is saved to Google Docs.
Google Docs does not start up after the saving has completed. To check the saved PDF file,
start a web browser and log in to Google Docs.
323
Actions (for Mac OS users)
Without using the Quick Menu
To disable the Quick Menu, you need to clear the [Use Quick Menu] checkbox in the ScanSnap
setup window.
For details about how to perform scanning without using the Quick Menu, refer to "Without Using
the Quick Menu" (page 233).
1. Select [Settings] from the ScanSnap Manager menu.
For details about the ScanSnap Manager menu, refer to "ScanSnap Manager Menu"
(page 224).
The ScanSnap setup window appears.
2. In the [Application] pop-up menu in the [Application] tab, select [Scan to
Google Docs(TM)].
ScanSnap Manager can also link with [Scan to Google Docs(TM)] when you select:
z [Scan to Google Docs(TM)] from the [Profile] pop-up menu of the ScanSnap setup
window
z [Scan to Google Docs(TM)] from the Profile menu
324
Actions (for Mac OS users)
3. Change settings for the [Scan to Google Docs(TM)] (If you do not want to
change any settings, go to step 4.).
1. Click the [Application Settings] button.
The [Scan to Google Docs(TM) - Options] window appears.
2. Change the settings.
For details about the [Scan to Google Docs(TM) - Options] window, refer to the
ScanSnap Manager Help.
If the computer is shared with other users, do not enter your information in [Email]
and [Password] in this window.
Otherwise, other users will be able to log into Google Docs automatically.
3. Click the [OK] button to close the [Scan to Google Docs(TM) - Options] window.
4. Click the [Apply] button.
325
Actions (for Mac OS users)
5. Click the [
] button in the upper left corner to close the ScanSnap
setup window.
6. Load the document in the ScanSnap.
For details about how to load documents, refer to "How to Load Documents" (page 30).
7. Press the [Scan/Stop] button on the ScanSnap to start scanning.
Load another document in the ScanSnap when you want to scan multiple sheets. Scanning
starts automatically when a document is loaded.
8. Press the [Scan/Stop] button on the ScanSnap to finish scanning.
If you did not specify a Google account in the [Scan to Google Docs(TM) - Options]
window in step 3., the [Scan to Google Docs(TM)] window appears. Saving will
continue after you enter an e-mail address and a password, and click the [OK]
button.
If the computer is shared with other users, do not select the [Remember the password
in the keychain] checkbox in this window.
Otherwise, other users will be able to log into Google Docs automatically.
When you perform a scan with [JPEG(*.jpg)] selected for [File format] in the [File
option] tab of the ScanSnap setup window, a PDF file is created from the JPEG file.
A separate PDF file is created for each JPEG file.
The following window is displayed when the PDF file is being created.
326
Actions (for Mac OS users)
If the [Convert to Searchable PDF] checkbox is selected in the [Scan to Google
Docs(TM) - Options] window in step 3., text recognition is performed according to the
[OCR options] settings in the [Scan to Google Docs(TM) - Options] window. The
following window is displayed during text recognition.
Text recognition will be performed if there are any pages containing text which is not
yet recognized. Note that text recognition will be performed on all pages, including
pages containing text on which text recognition has already been performed.
The following window appears when saving starts. Click the [Close] button to close
the [Scan to Google Docs(TM)] window when the saving completes.
When you select the [Close this window when save completes] checkbox in the
[Scan to Google Docs(TM)] window, from next scanning on, the [Scan to Google
Docs(TM) window automatically closes after the PDF file is saved to Google Docs.
Google Docs does not start up after the saving has completed. To check the saved PDF file,
start a web browser and log in to Google Docs.
327
Using the ScanSnap in Various Ways (for Mac OS users)
Using the ScanSnap in Various Ways
This section explains about various ways of using the ScanSnap.
■ Scanning Color Documents in Gray or Black & White
Mode
When [Auto color detection] is specified for [Color mode] in the [Scanning] tab of the
ScanSnap setup window, the ScanSnap automatically recognizes whether the scanned
document is color, gray or black & white, and saved the documents in their respective color
modes.
1. Select [Settings] from the ScanSnap Manager menu.
For details about the ScanSnap Manager menu, refer to "ScanSnap Manager Menu"
(page 224).
The ScanSnap setup window appears.
2. From the [Color mode] pop-up menu in the [Scanning] tab, select [Gray]
or [B&W].
328
Using the ScanSnap in Various Ways (for Mac OS users)
3. Click the [Apply] button.
4. Click the [
] button in the upper left corner to close the ScanSnap
setup window.
5. Load the document in the ScanSnap.
For details about how to load documents, refer to "How to Load Documents" (page 30).
6. Press the [Scan/Stop] button on the ScanSnap to start scanning.
Load another document in the ScanSnap when you want to scan multiple sheets. Scanning
starts automatically when a document is loaded.
7. Press the [Scan/Stop] button on the ScanSnap to finish scanning.
Scanned image is saved in gray or black & white.
329
Using the ScanSnap in Various Ways (for Mac OS users)
■ Correcting Skewed Character Strings
When documents with skewed character strings are scanned, the ScanSnap is able to detect
the skewed character strings and correct them.
To correct skewed character strings, change the settings in the following procedure.
z Up to +/-5 degrees of skew can be corrected.
z Since this option is performed assuming that the document contains a certain amount of text,
character strings may be adjusted at a wrong angle when scanning the following types of
documents. In that case, clear the [Correct skewed character strings automatically]
checkbox:
- Documents on which pitches between lines or characters are extremely narrow, or
characters are overlapped
- Documents with many outlined or decorated characters
- Documents with many photographs or figures and few characters
- Documents with characters on a patterned background
e.g. Characters overlapping illustrations and diagrams
- Documents with characters printed in various directions such as drawings
- Documents with long diagonal lines
- Documents including handwritten characters
z This setting is disabled when you perform a scan using the Carrier Sheet.
You do not have to enable [Correct skewed character strings automatically] when [Automatic
detection] is specified for [Paper size] in the [Paper] tab in the ScanSnap setup window because
the skewed image is always corrected when documents are scanned by this setting.
1. Select [Settings] from the ScanSnap Manager menu.
For details about the ScanSnap Manager menu, refer to "ScanSnap Manager Menu"
(page 224).
The ScanSnap setup window appears.
330
Using the ScanSnap in Various Ways (for Mac OS users)
2. Click the [Option] button in the [Scanning] tab.
The [Scanning mode option] window appears.
3. Select the [Correct skewed character strings automatically] checkbox.
4. Click the [OK] button to close the [Scanning mode option] window.
5. Click the [Apply] button in the ScanSnap setup window.
6. Click the [
] button in the upper left corner to close the ScanSnap
setup window.
331
Using the ScanSnap in Various Ways (for Mac OS users)
7. Load the document in the ScanSnap.
For details about how to load documents, refer to "How to Load Documents" (page 30).
8. Press the [Scan/Stop] button on the ScanSnap to start scanning.
Load another document in the ScanSnap when you want to scan multiple sheets. Scanning
starts automatically when a document is loaded.
9. Press the [Scan/Stop] button on the ScanSnap to finish scanning.
Image data is saved with skewed character strings corrected.
332
Using the ScanSnap in Various Ways (for Mac OS users)
■ Correcting the Orientation of Scanned Images
In an office environment, it is often the case that a single batch contains same size documents
of different page orientations.
The ScanSnap is able to automatically rotate each scanned image to its correct orientation for
such document batches.
To rotate scanned images to their correct orientations, change the settings in the following
procedure.
Since this option determines the document’s page orientation based on the character strings
printed on the document, the following types of documents may be rotated to the wrong
orientation. In that case, clear the [Allow automatic image rotation] checkbox.
z Documents with many extremely large or small characters
z Documents on which pitches between lines or characters are extremely narrow, or characters
are overlapped
z Documents with many characters contacting underlines or borders
z Documents with many photographs or figures and few characters
z Documents with characters on an unevenly colored background
e.g. Shaded characters
z Documents with many decorated characters
e.g. Decorated characters (embossed/outlined)
z Documents with characters on a patterned background
e.g. Characters overlapping illustrations and diagrams
z Documents with characters printed in various directions such as drawings
z Documents written using only capital letters
z Documents including handwritten characters
z Skewed documents
z Documents written in an unsupported language (language other than Japanese/English/
French/German/Italian/Spanish/Russian/Portuguese)
z Documents with complex layouts
z Documents with a large amount of image noise
z Documents with faint characters
z Documents with faded characters
1. Select [Settings] from the ScanSnap Manager menu.
For details about the ScanSnap Manager menu, refer to "ScanSnap Manager Menu"
(page 224).
The ScanSnap setup window appears.
333
Using the ScanSnap in Various Ways (for Mac OS users)
2. Click the [Option] button in the [Scanning] tab.
The [Scanning mode option] window appears.
3. Select the [Allow automatic image rotation] checkbox.
4. Click the [OK] button to close the [Scanning mode option] window.
5. Click the [Apply] button in the ScanSnap setup window.
6. Click the [
] button in the upper left corner to close the ScanSnap
setup window.
334
Using the ScanSnap in Various Ways (for Mac OS users)
7. Load the document in the ScanSnap.
For details about how to load documents, refer to "How to Load Documents" (page 30).
8. Press the [Scan/Stop] button on the ScanSnap to start scanning.
Load another document in the ScanSnap when you want to scan multiple sheets. Scanning
starts automatically when a document is loaded.
9. Press the [Scan/Stop] button on the ScanSnap to finish scanning.
The scanned image is saved in the correct orientation.
335
Using the ScanSnap in Various Ways (for Mac OS users)
■ Scanning Documents Larger Than A4/Letter Size
You can scan documents larger than A4/Letter size such as A3, Double Letter and B4 using
the Carrier Sheet (sold separately). By folding the document in half and scanning both sides
consecutively in simplex mode, the two sides are merged into a single image and saved.
Change the settings to scan documents larger than A4/Letter size in the following procedure.
In the [Scanning mode option] window ([Scanning] tab
[Option] button in the ScanSnap setup
window), the [Correct skewed character strings automatically] checkbox is disabled.
You can also scan documents smaller than A4/Letter size and have both sides saved as a single
image.
1. Select [Settings] from the ScanSnap Manager menu.
For details about the ScanSnap Manager menu, refer to "ScanSnap Manager Menu"
(page 224).
The ScanSnap setup window appears.
2. In the [Paper] tab select [Automatic detection] in [Paper size], and then
click the [Carrier Sheet Settings] button.
The [Carrier Sheet Settings] window appears.
336
Using the ScanSnap in Various Ways (for Mac OS users)
3. Select [one double-page spread image] in [Save as].
For details about the Carrier Sheet settings, refer to the ScanSnap Manager Help.
4. Click the [OK] button to close the [Carrier Sheet Settings] window.
5. Click the [Apply] button in the ScanSnap setup window.
6. Click the [
] button in the upper left corner to close the ScanSnap
setup window.
7. Place the document inside the Carrier Sheet.
1. Fold the document in half so that the sides to be scanned are facing out.
Fold it tightly and smooth out any creases.
337
Using the ScanSnap in Various Ways (for Mac OS users)
2. Open the Carrier Sheet and place the document inside.
Align the fold line with the right edge of the
Carrier Sheet so that the document fits in
the upper right-hand corner of the Carrier
Sheet.
Note that the front side of the Carrier Sheet has a thick vertical line in the
upper right-hand corner.
8. Insert the part with the black and white pattern straight into the feeding
section of the ScanSnap, with the front side of the Carrier Sheet facing
up.
The Carrier Sheet is pulled in until it is set inside the ScanSnap.
If you perform a scan using the Carrier Sheet with the
output guide open, a paper jam may occur and damage the
documents. Make sure to close the output guide when you
perform a scan using the Carrier Sheet.
338
Output guide
Using the ScanSnap in Various Ways (for Mac OS users)
9. Press the [Scan/Stop] button on the ScanSnap to start scanning.
Scanning starts and the [ScanSnap Manager - Image scanning and file saving]
window appears. When the front side of the Carrier Sheet is scanned, the image
data is displayed in the preview area.
10.Turn over the Carrier Sheet and insert it as explained in step 8.
Make sure to scan the front and back side of the Carrier Sheet consecutively.
Scanning starts automatically and the [ScanSnap Manager - Image scanning and file
saving] window appears. When the back side of the Carrier Sheet is scanned,
scanned images of the front and back side of the document inside the Carrier Sheet
are displayed as a double-page spread image in the preview area.
Repeat steps 7. to 10. to scan more documents larger than A4/Letter size.
You can continue with scanning documents that can be set directly in the ScanSnap. For
details about how to load documents, refer to "How to Load Documents" (page 30).
Scanning starts automatically when a document is loaded in the ScanSnap.
339
Using the ScanSnap in Various Ways (for Mac OS users)
11.Press the [Scan/Stop] button on the ScanSnap to finish scanning.
The scanned images of the front and back side of
the document inside the Carrier Sheet are saved as
a double-page spread image.
z There may be a line or a gap appearing between the front and back side images. Also when
you scan thick papers, images on both left and right may skew towards each other from the
top.
The degree of these symptoms varies depending on how the document was set or folded.
In that case, try the following for possible resolutions:
- Fold the document properly
- Neatly align the edges of the document with the edges of the Carrier Sheet when placing
the document inside the Carrier Sheet
z When [Automatic detection] is selected from the [Paper size] pop-up menu in the [Carrier
Sheet Settings] window, the image is output in an optimal size selected automatically from
the available standard sizes (A3, B4 or 11 × 17 in.) in the [Paper size] pop-up menu.
However, depending on the document, the size of the saved image data may be smaller than
the original document or some parts of the image may be missing.
Example: When you scan an A3 size document with an A4 size image printed in the center,
image data is saved in B4 size.
To save an image data in the actual size of the document, specify the document size in the
[Paper size] pop-up menu.
z Part of the image data around where the document is folded may appear missing. In that
case, place the document so that its edge is about 1 mm inside from the edge of the Carrier
Sheet.
340
Using the ScanSnap in Various Ways (for Mac OS users)
■ Scanning Documents Such as Photographs and
Clippings
You can scan photographs you do not want to damage or documents that are difficult to scan
such as clippings using the Carrier Sheet (sold separately).
Change the settings to scan documents such as photographs and clippings in the following
procedure.
In the [Scanning mode option] window ([Scanning] tab
[Option] button in the ScanSnap setup
window), the [Correct skewed character strings automatically] checkbox is disabled.
1. Select [Settings] from the ScanSnap Manager menu.
For details about the ScanSnap Manager menu, refer to "ScanSnap Manager Menu"
(page 224).
The ScanSnap setup window appears.
2. In the [Paper] tab, select [Automatic detection] in [Paper size], and then
click the [Carrier Sheet Settings] button.
The [Carrier Sheet Settings] window appears.
341
Using the ScanSnap in Various Ways (for Mac OS users)
3. Select [two separate images (front and back)] in [Save as].
For details about the Carrier Sheet settings, refer to the ScanSnap Manager Help.
4. Click the [OK] button to close the [Carrier Sheet Settings] window.
5. Click the [Apply] button in the ScanSnap setup window.
6. Click the [
] button in the upper left corner to close the ScanSnap
setup window.
7. Place the document inside the Carrier Sheet.
Open the Carrier Sheet and place the top of the
document against the top center of the Carrier Sheet.
342
Using the ScanSnap in Various Ways (for Mac OS users)
8. Insert the part with the black and white pattern straight into the feeding
section of the ScanSnap, with the scanning side of the document inside
the Carrier Sheet facing up.
The Carrier Sheet is pulled in until it is set inside the ScanSnap.
If you perform a scan using the Carrier Sheet with the
Output guide
output guide open, a paper jam may occur and damage the
documents. Make sure to close the output guide when you
perform a scan using the Carrier Sheet.
9. Press the [Scan/Stop] button on the ScanSnap to start scanning.
When scanning is completed, the scanned image of the document inside the Carrier
Sheet is displayed in the preview area.
Repeat steps 7. to 8. to scan more documents such as photographs and clippings.
You can continue with scanning documents that can be set directly in the ScanSnap. For
details about how to load documents, refer to "How to Load Documents" (page 30).
Scanning starts automatically when a document is loaded in the ScanSnap.
343
Using the ScanSnap in Various Ways (for Mac OS users)
10.Press the [Scan/Stop] button on the ScanSnap to finish scanning.
Scanned image is saved.
z The scanned image is output at the center of the page in the size specified in the
[Paper size] pop-up menu of the [Carrier Sheet Settings] window.
z When [Automatic detection] is specified in the [Paper size] pop-up menu of the
[Carrier Sheet Settings] window, the image is output in an optimal size selected
automatically from the available standard sizes in the [Paper size] pop-up menu.
However, depending on the document, the size of the saved image data may be
smaller than the original document or part of the image may be missing.
Example: When you scan an A5 size image printed in the middle of an A4 size
document, the scanned image is saved in A5 size.
To save the scanned image in its original size, specify the document size in the [Paper
size] pop-up menu.
Place the document over a blank sheet if the following is observed:
z Scanned image is not saved in the same size as the document (when [Automatic
detection] is specified in the [Paper size] pop-up menu of the [Carrier Sheet Settings]
window)
z There are shadows around the edges of the scanned image
z There are black lines around the scanned image of a uniquely shaped cutting
Blank sheet
344
Using the ScanSnap in Various Ways (for Mac OS users)
■ Long Page Scanning
Documents up to 863 mm (34 in.) in length can be scanned.
The following explains how to scan long pages.
1. Insert the document straight into the feeding section of the ScanSnap,
with the scanning side facing up.
The document is pulled in until it is set inside the ScanSnap.
Secure enough space where the
document exits the ScanSnap, and pick
up the document with your hands to
prevent it from falling off the unit where
the ScanSnap is placed on.
345
Using the ScanSnap in Various Ways (for Mac OS users)
2. Press the [Scan/Stop] button on the ScanSnap for three seconds or
longer until it flashes in blue.
Scanning starts.
When you scan the first page as a long page and continue scanning, the next document
is also scanned as long page.
z The error message below appears and long page scanning is disabled when
[Excellent] is selected in the [Image quality] pop-up menu in the [Scanning] tab of the
ScanSnap setup window.
z When you perform a long page scan, the setting for [Paper size] in the [Paper] tab of
the ScanSnap setup window automatically switches to [Automatic detection]. The
current settings are used for other scan settings.
346
Using the ScanSnap in Various Ways (for Mac OS users)
■ Saving Scanned Images in Multiple PDF Files
The ScanSnap is able to save scanned image in separate PDF files based on the specified
number of pages. For example, you can scan a batch of slips, and save each slip as a PDF
file.
To save image data in multiple PDF files, change the settings in the following procedure.
1. Select [Settings] from the ScanSnap Manager menu.
For details about the ScanSnap Manager menu, refer to "ScanSnap Manager Menu"
(page 224).
The ScanSnap setup window appears.
2. From the [File format] pop-up menu in the [File option] tab, select [PDF
(*.pdf)], and then click the [Option] button.
The [PDF file format option] window appears.
347
Using the ScanSnap in Various Ways (for Mac OS users)
3. Select [Generate one PDF file per (n) page(s)] and enter the number of
pages to split.
One PDF is created every time the number of pages specified here has been saved.
4. Click the [OK] button to close the [PDF file format option] window.
5. Click the [Apply] button in the ScanSnap setup window.
6. Click the [
] button in the upper left corner to close the ScanSnap
setup window.
7. Load the document in the ScanSnap.
For details about how to load documents, refer to "How to Load Documents" (page 30).
8. Press the [Scan/Stop] button on the ScanSnap to start scanning.
Load another document in the ScanSnap when you want to scan multiple sheets. Scanning
starts automatically when a document is loaded.
9. Press the [Scan/Stop] button on the ScanSnap to finish scanning.
One PDF file is created every time the number of pages specified in step 3. has been
scanned.
348
Using the ScanSnap in Various Ways (for Mac OS users)
■ Creating Searchable PDF Files
The ScanSnap is able to perform text recognition on a scanned image automatically and
create a searchable PDF file.
To create searchable PDF files, change the settings in the following procedure.
1. Select [Settings] from the ScanSnap Manager menu.
For details about the ScanSnap Manager menu, refer to "ScanSnap Manager Menu"
(page 224).
The ScanSnap setup window appears.
2. From the [File format] pop-up menu in the [File option] tab, select [PDF
(*.pdf)].
It is recommended that you select [Better] or [Best] for [Image quality] in the [Scanning] tab
in the ScanSnap setup window.
349
Using the ScanSnap in Various Ways (for Mac OS users)
3. Select the [Convert to Searchable PDF] checkbox.
The following message appears.
Click the [OK] button to close the window.
z Language
Select the language. English, French, German, Italian, Spanish, Russian, and
Portuguese can be selected.
z Target pages
Select [All pages] to perform text recognition for all pages and [First page] for just the
first page.
4. Click the [Apply] button.
5. Click the [
] button in the upper left corner to close the ScanSnap
setup window.
6. Load the document in the ScanSnap.
For details about how to load documents, refer to "How to Load Documents" (page 30).
350
Using the ScanSnap in Various Ways (for Mac OS users)
7. Press the [Scan/Stop] button on the ScanSnap to start scanning.
Load another document in the ScanSnap when you want to scan multiple sheets. Scanning
starts automatically when a document is loaded.
8. Press the [Scan/Stop] button on the ScanSnap to finish scanning.
Text recognition is performed on the scanned image and a searchable PDF file is
created.
z It may take extra time to process text recognition depending on your computer system
environment when you enable this setting in step 3.
z Scanned images of the following types of documents (characters) may not be recognized correctly.
In that case, better results in text recognition may be achieved by changing the setting
for [Color mode] or specifying a higher resolution in [Image quality].
- Documents including handwritten characters
- Documents with small characters scanned at a low resolution
- Skewed documents
- Documents written in languages other than the specified language
- Documents including texts written in italic characters
- Documents containing characters with superscripts/subscripts and complicated
mathematical expressions
- Documents with characters on an unevenly colored background
e.g. Shaded characters
- Documents with many decorated characters
e.g. Decorated characters (embossed/outlined)
- Documents with characters on a patterned background
e.g. Characters overlapping illustrations and diagrams
- Documents with many characters contacting underlines or borders
z It may take extra time to perform text recognition on the following documents:
- Documents with complex layouts
- Documents with information other than text
e.g. Text on a shaded background
351
Using the ScanSnap in Various Ways (for Mac OS users)
■ Automatically Setting Keywords for PDF Files
If the document is black & white, character strings (e.g. page heading, title) can be set as
keywords and used for a PDF file search.
Mark a character string to be set as a keyword with a water-based highlight pen so that the
character string is completely covered.
When you perform a scan, the marked character strings are recognized and set as keywords
for the PDF file.
Searchable PDF file
Sets text as a keyword for
the PDF file
Scan
Scan
Scan
Keyword
Image
Converts a character string in
a marked section into text
You can search for the file through
the set keyword
Scan
Mark black & white documents in the following way:
z Any regular highlight pen can be used.
The following shows the colors and thickness recommended for highlight pens:
Pink
Yellow
Blue
z Mark a straight line over a single character string.
z The supported range of a marked section is as follows:
Minimum : 3 mm (short side) × 10 mm (long side)
Maximum : 20mm (short side) × 150mm (long side)
z Use only one color per page for marking.
352
Green
Using the ScanSnap in Various Ways (for Mac OS users)
z Make sure to cover the entire character string when marking it.
Mark sections so that the entire section is evenly colored.
Good example:
Bad example 1:
(does not cover the entire section)
Bad example 2:
(unevenly colored)
z Do not mark more than ten sections per page.
z It is recommended that you use a blue or a green highlight pen for marking. When you use
colors such as pink or yellow for marking, the marked sections may not be recognized as
keywords.
z Use a blue highlight pen for documents with dark background colors such as
newspapers.Marked sections may not be detected when a color other than blue is used.
z For the following document types, marked sections cannot be recognized and set as
keywords:
- Color documents such as catalogues or pamphlets
- Documents in which two or more colors are used for marking
- Documents containing colors other than for marking (pens other than highlight pens are
used or the document is stained)
- Documents with too many marked sections on a single page
z The following types of marked character strings cannot be set as keywords:
- The size of marked section is outside the supported range
- The marking is irregular (e.g. skewed)
- Multiple marked sections are too close to each other
- The color of the highlight pen is too pale or the color has faded
z When you mark more than one character string, make sure to leave a gap of at least 5 mm
between the marked sections. Marked sections that are too close to each other may be
detected as one marked section.
z In the following case, character strings surrounding marked sections may be set as
keywords:
- Marked section overlaps the line above and below
z In the following cases, unmarked character strings may be set as keywords:
- Color documents such as catalogues or pamphlets
- Documents with color text, diagrams, pictures, tables and lines
- Documents containing sections framed by a highlight pen
- Stained documents
z Increase the resolution when you have trouble setting the keywords correctly.
z Keywords set for a PDF file can be checked [Document Properties] of Adobe Acrobat /
Adobe Reader or Preview [Inspector].
353
Using the ScanSnap in Various Ways (for Mac OS users)
Change the settings in the following procedure to automatically set keywords for PDF files.
1. Select [Settings] from the ScanSnap Manager menu.
For details about the ScanSnap Manager menu, refer to "ScanSnap Manager Menu"
(page 224).
The ScanSnap setup window appears.
2. From the [File format] pop-up menu in the [File option] tab, select [PDF
(*.pdf)].
It is recommended that you select [Better] or [Best] for [Image quality] in the [Scanning] tab
of the ScanSnap setup window.
354
Using the ScanSnap in Various Ways (for Mac OS users)
3. Select the [Set the marked text as a keyword for the PDF file] checkbox.
z Target marked sections
Select [First marked section] to perform text recognition and set a keyword for the
PDF file only for the character strings in the first marked section, and [All marked
sections] for all marked sections.
The following explanation is for when you select [First marked section]:
z Select this button to set a character string such as a title of a document as a
keyword for the PDF file.
Example: When only the title of a document is marked, the marked character
string is set as a keyword for the PDF file, and the PDF file becomes searchable
by the title character string.
z When multiple marked sections exist in line, the marked character string closest to
the top of the document is set as a keyword.
Example: In the following case, the character string in marked section B, which is
higher than marked section A, is set as a keyword.
Marked section A
Marked section B
z Language
Select the language. English, French, German, Italian, Spanish, Russian, and
Portuguese can be selected.
z Target pages
Select [First page] to perform text recognition and set a keyword for the PDF file only
for the first page, and [All pages] for all pages.
355
Using the ScanSnap in Various Ways (for Mac OS users)
4. Click the [Apply] button.
5. Click the [
] button in the upper left corner to close the ScanSnap
setup window.
6. Load the document in the ScanSnap.
For details about how to load documents, refer to "How to Load Documents" (page 30).
7. Press the [Scan/Stop] button on the ScanSnap to start scanning.
Load another document in the ScanSnap when you want to scan multiple sheets. Scanning
starts automatically when a document is loaded.
8. Press the [Scan/Stop] button on the ScanSnap to finish scanning.
Text recognition is performed on marked character strings and a PDF file is created
with the keywords added.
z It may take extra time to process text recognition depending on your computer system
environment when you enable this setting in step 3.
z Scanned images of the following types of documents (characters) may not be recognized correctly.
In that case, better results in text recognition may be achieved by specifying a higher
resolution in [Image quality].
- Documents including handwritten characters
- Documents with small characters scanned at a low resolution
- Skewed documents
- Documents written in languages other than the specified language
- Documents including texts written in italic characters
- Documents containing characters with superscripts/subscripts and complicated
mathematical expressions
- Documents with characters on an unevenly colored background
e.g. Shaded characters
- Documents with many decorated characters
e.g. Decorated characters (embossed/outlined)
- Documents with characters on a patterned background
e.g. Characters overlapping illustrations and diagrams
- Documents with many characters contacting underlines or borders
z It may take extra time to perform text recognition on the following documents:
- Documents with complex layouts
- Documents with information other than text
e.g. Text on a shaded background
z If the same character string is marked several times in the document, the same keyword
is added multiple times in the PDF file.
z Total length of all the keywords can be up to 255 characters.
z When you check keywords in Adobe Acrobat or Adobe Reader, the added keywords
may be displayed with a set of quotation marks (e.g. "ABC").
z For Mac OS X v10.4, keywords cannot be set for PDF files that are 500 MB or larger.
356
Troubleshooting
For details about how to resolve problems such as removing jammed documents, refer to
"Troubleshooting" in the ScanSnap Manager Help.
Select [Help]
[Troubleshooting] in the Right-Click Menu.
Select [Help]
[Troubleshooting] in the ScanSnap Manager menu.
357
Daily Care
This chapter explains about cleaning materials and how to clean the ScanSnap.
Cleaning Materials . . . . . . . . . . . . . . . . . . . . . . . . . . . . . . . . . . . . . . . . . . . . . . . . . . . 359
Cleaning the Outside of the ScanSnap . . . . . . . . . . . . . . . . . . . . . . . . . . . . . . . . . . . 360
Cleaning the Inside of the ScanSnap. . . . . . . . . . . . . . . . . . . . . . . . . . . . . . . . . . . . . 361
358
Cleaning Materials
Cleaning Materials
Cleaning materials and their part numbers are as below.
Product Name
Part No.
Unit
Note
Cleaner F1
PA03950-0352
1 bottle
Size: 100 ml
Cleaning Wipe (*1)
PA03950-0419
1 pack
24 packets
Commercially
available
-
-
PFU LIMITED
Lint-free dry cloth (*2)
*1 : Cleaning Wipes are wet sheets pre-moistened with Cleaner F1 which can be used instead of
cloths moistened with Cleaner F1.
*2 : Any lint-free cloth can be used.
To obtain these products, contact your FUJITSU dealer or an authorized FUJITSU scanner
service provider.
359
Cleaning the Outside of the ScanSnap
Cleaning the Outside of the ScanSnap
Clean the outside of the ScanSnap in the following procedure.
How to perform cleaning
1. Unplug the USB cable from the ScanSnap.
2. Clean the outside of the ScanSnap with a dry cloth, or a cloth moistened
with Cleaner F1/mild detergent.
z Never use paint thinner or any other organic solvents.
z Be careful not to get any moisture or water inside the scanner during cleaning.
z It may take a long time for Cleaner F1 to dry if an excessive amount is used. Moisten the
cloth with moderate quantity. Wipe off the cleaner completely to leave no residue on the
cleaned parts.
Mild detergent or
Cleaner F1
Cloth
Thinner
360
Cleaning the Inside of the ScanSnap
Cleaning the Inside of the ScanSnap
Scanning continuously may cause dust and paper dust to accumulate inside the ScanSnap
and result in scanning error.
As a guideline, the inside of the ScanSnap should be cleaned every 100 sheets scanned.
Note that this guideline varies depending on the types of documents you scan. For instance, it
may be necessary to clean the scanner more frequently when you scan documents on which
the toner is not sufficiently fused.
Clean the inside of the ScanSnap in the following procedure.
Check the number of sheets scanned in the following procedure.
Select [Help] [About ScanSnap Manager] [Detail] button in the Right-Click Menu to display
the [ScanSnap Manager - Scanner and driver information] dialog box, and then see [Total page
count].
Select [Help] [About ScanSnap Manager] [Detail] button in the ScanSnap Manager Menu
to display the [ScanSnap Manager - Scanner and driver information] window, and then see
[Total page count].
WARNING
z Before you perform cleaning, you must turn off the ScanSnap and unplug the USB cable to
avoid the risk of fire or electric shock.
z Do not use aerosol spray or spray that contains alcohol to clean the scanner. Dust blown
up by strong air from the spray may enter inside of the scanner which may cause scanner
failure or malfunction. Also note that sparks generated by static electricity may cause a fire.
361
Cleaning the Inside of the ScanSnap
How to perform cleaning
1. Unplug the USB cable from the ScanSnap.
2. Open the top cover and the output guide.
Top cover
Output guide
Feed guide
3. Clean the idler rollers and the glass with a cloth moistened with Cleaner
F1.
z Do not use water or mild detergent to clean the inside of the ScanSnap.
z It may take a long time for Cleaner F1 to dry if an excessive amount is used. Moisten
the cloth with moderate quantity.
Wipe off the cleaner completely to leave no residue on the cleaned parts.
Idler roller ( × 12)
Glass ( × 2)
z Glass (× 2, located on the top cover and its opposite side)
Gently wipe the dirt and dust off the surface of the glass sections.
z Idler roller (× 12, located on the top cover)
Gently wipe the dirt and dust off the rollers as you rotate them manually. Be careful
not to damage the surface of the rollers. Make sure that it is cleaned properly
because residue on the roller will affect the feeding performance.
362
Cleaning the Inside of the ScanSnap
4. Connect the USB cable to the ScanSnap and the computer, then press
the [Scan/Stop] button for three seconds with the top cover open.
The USB cable should be connected to the computer only for cleaning the feed roller
and the eject roller.
5. Clean the feed roller and the eject roller with a cloth moistened with
Cleaner F1.
z Do not use water or mild detergent to clean the inside of the ScanSnap.
z It may take a long time for Cleaner F1 to dry if an excessive amount is used. Moisten
the cloth with moderate quantity.
Wipe off the cleaner completely to leave no residue on the cleaned parts.
Eject roller ( × 1)
Feed roller ( × 1)
z Feed roller (× 1)
Press the [Scan/Stop] button to rotate the roller. Gently wipe the dirt off while taking
care not to damage the surface of the roller. Make sure that it is cleaned properly
because residue on the roller will affect the feeding performance.
363
Cleaning the Inside of the ScanSnap
z Eject roller (× 1)
Press the [Scan/Stop] button to rotate the roller. Gently wipe the dirt and dust off
while taking care not to damage the surface of the roller. Make sure that it is cleaned
properly because residue on the roller will affect the feeding performance.
If eject roller is difficult to clean, try cleaning it from the back while you keep the top
cover slightly open.
Eject roller ( × 1)
Pressing the [Scan/Stop] button seven times will rotate the feed roller and the eject roller
one revolution.
6. Close the top cover and the output guide.
Output guide
Top cover
Feed guide
It clicks when it returns to its original position.
Make sure that the top cover is completely closed. Otherwise, paper jams or other
feeding errors may occur.
364
Appendix
This appendix explains how to update ScanSnap Manager, how to uninstall the software,
setting items with/without the Quick Menu, how to purchase the Carrier Sheet and the
ScanSnap installation specifications.
Updating ScanSnap Manager . . . . . . . . . . . . . . . . . . . . . . . . . . . . . . . . . . . . . . . . . . 366
Uninstalling the Software . . . . . . . . . . . . . . . . . . . . . . . . . . . . . . . . . . . . . . . . . . . . . . 370
Setting Items With/Without the Quick Menu. . . . . . . . . . . . . . . . . . . . . . . . . . . . . . . . 376
Purchasing/Cleaning the Carrier Sheet . . . . . . . . . . . . . . . . . . . . . . . . . . . . . . . . . . . 380
Installation Specifications. . . . . . . . . . . . . . . . . . . . . . . . . . . . . . . . . . . . . . . . . . . . . . 382
365
Updating ScanSnap Manager
Updating ScanSnap Manager
Updates are released regularly in an effort to improve the usability and functionality of
ScanSnap Manager.
This section explains how to update ScanSnap Manager.
For details about updates of the software bundled with the ScanSnap, visit the following web
page:
http://scansnap.fujitsu.com
■ Updating in Windows
Update ScanSnap Manager in the following procedure.
We recommend that you run the update regularly.
z It is necessary to have a browser with Internet access to perform the update.
z Always log on as a user with Administrator privileges.
1. Select [Help]
[Online Update] from the Right-Click Menu.
For details about the Right-Click Menu, refer to "Right-Click Menu" (page 59).
A confirmation message appears.
You can also update ScanSnap Manager by selecting [Start] menu
[ScanSnap Manager] [Online Update].
[All Programs]
2. Click the [Yes] button.
If a later version of ScanSnap Manager (update) is available, a message confirming
the update appears.
366
Updating ScanSnap Manager
If the latest version of ScanSnap Manager is already installed, the message below
appears.
Click the [OK] button to close the message.
3. Click the [Yes] button.
The program is downloaded, and a confirmation message to start the installation
appears.
4. Click the [Install] button.
When you click the [Information] button, Internet Explorer which displays information about
the latest update for ScanSnap Manager opens.
Installation starts, and the ScanSnap Manager installer starts up.
Follow the instructions on the screen to continue with the installation.
367
Updating ScanSnap Manager
■ Updating in Mac OS
Update ScanSnap Manager in the following procedure.
We recommend that you run the update regularly.
It is necessary to have a web browser with Internet access to perform the update.
1. Select [Help]
[Online Update] from the ScanSnap Manager menu.
For details about the ScanSnap Manager menu, refer to "ScanSnap Manager Menu"
(page 224).
A confirmation message appears.
You can also update ScanSnap Manager by selecting:
z [Help] [Online Update] from the menu bar
z From Finder, [Applications] [ScanSnap] and double-clicking [Online Update].
2. Click the [Yes] button.
If a later version of ScanSnap Manager (update) is available, a message confirming
the update appears.
If the latest version of ScanSnap Manager is already installed, the message below
appears.
Click the [OK] button to close the message.
368
Updating ScanSnap Manager
3. Click the [Yes] button.
The program is downloaded, and a confirmation message to start the installation
appears.
4. Select [Quit] from the ScanSnap Manager menu to exit ScanSnap
Manager.
5. Click the [Install] button.
When you click the [Information] button, a web browser which displays information about
the latest update for ScanSnap Manager opens.
The ScanSnap Manager installer starts.
Follow the instructions on the screen to continue with installation.
369
Uninstalling the Software
Uninstalling the Software
This section explains how to uninstall the software bundled with the ScanSnap.
For details about installation, refer to "Installing the Software" (page 34).
■ Uninstalling in Windows
This part explains how to uninstall the following software:
z
z
z
z
z
z
ScanSnap Manager
ScanSnap Organizer
CardMinder
ABBYY FineReader for ScanSnap
Evernote for Windows
Scan to Microsoft SharePoint
The procedure is as follows.
1. Turn on the computer and log on as a user with Administrator privileges.
2. Exit all running software.
3. Select [Start] menu
[Control Panel]
[Programs]
[Programs and
Features].
The [Uninstall or change a program] dialog box appears with a list of currently
installed software.
370
Uninstalling the Software
4. Select the software to uninstall.
z To uninstall ScanSnap Manager
Select [ScanSnap Manager].
z To uninstall ScanSnap Organizer
Select [ScanSnap Organizer].
z To uninstall CardMinder
Select [CardMinder].
z To uninstall ABBYY FineReader for ScanSnap
Select [ABBYY FineReader for ScanSnap (TM) 4.1].
z To uninstall Evernote for Windows
Select [Evernote].
z To uninstall Scan to Microsoft SharePoint
Select [Scan to Microsoft SharePoint].
To uninstall more than one software, repeat steps 4. to 6. for each software.
5. Click the [Uninstall] button.
A confirmation message appears.
6.
Click the [Yes] button.
The software is uninstalled.
z Screen displays may vary slightly depending on the operating system that you are
using. In that case, follow the instructions by the operating system.
Example:
- [Programs and Features]
In Windows XP: [Add or Remove Programs]
- [Uninstall] button
In Windows XP: [Remove] button
z If you cannot successfully uninstall the following software, select [Manuals]
[Troubleshooting (installation)] in the [ScanSnap Setup] dialog box and refer to
Troubleshooting (installation).
- ScanSnap Manager
- ScanSnap Organizer
- CardMinder
371
Uninstalling the Software
■ Uninstalling in Mac OS
Uninstall ScanSnap Manager, ABBYY FineReader for ScanSnap, Cardiris and Evernote for
Mac in the following procedure.
z
z
z
z
ScanSnap Manager ( page 372)
ABBYY FineReader for ScanSnap (
Cardiris ( page 374)
Evernote for Mac ( page 375)
page 373)
ScanSnap Manager
1. Turn on the computer.
2. If ScanSnap Manager is running, exit ScanSnap Manager (select [Quit]
from the ScanSnap Manager menu).
3. If the ScanSnap Manager icon
ScanSnap Manager icon
still remains in the Dock, drag the
into the Trash.
4. Select [System Preferences] from the Apple (
) menu.
The [System Preferences] window appears.
5. Select [Accounts] in the [System Preferences] window.
The [Accounts] window appears.
6. Select the currently logged in user from the [My Account] pane in the
[Accounts] window.
7. Click [Login Items] in the [Accounts] window.
In the [Login Items] pane, a list of software that automatically start at login is
displayed.
8. Select [ScanSnap Manager] from the [Login Items] list.
9. Click the [—] button.
[ScanSnap Manager] is deleted from the [Login Items] list.
372
Uninstalling the Software
10.Close the [Accounts] window.
11.In a multi-user environment, every user must perform steps 2. to 10.
12.Log in as a user with Administrator privileges, then from Finder, select
[Applications]
Trash.
[ScanSnap], and drag the [ScanSnap] folder into the
For Mac OS X v.10.5/Mac OS X v10.4, also perform the following.
From the sidebar in Finder, select the [volume name]
[Library]
[ScanSnap Manager.pkg] into the Trash.
[Receipts], and drag
13.Empty the Trash.
The [ScanSnap Manager] folder is deleted.
ABBYY FineReader for ScanSnap
1. Turn on the computer and log in as a user with Administrator privileges.
2. Exit ABBYY FineReader for ScanSnap if it is running. (Select [Quit] from
the ABBYY FineReader for ScanSnap menu.)
3. From Finder, select [Applications]
[ABBYY FineReader for ScanSnap],
and drag the [ABBYY FineReader for ScanSnap] folder into the Trash.
For Mac OS X v.10.5/Mac OS X v10.4, also perform the following.
From the sidebar in Finder, select the [volume name]
[Library]
[ABBYY FineReader.pkg] into the Trash.
4. Empty the Trash.
The [ABBYY FineReader for ScanSnap] folder is deleted.
373
[Receipts], and drag
Uninstalling the Software
Cardiris
1. Turn on the computer and log in as a user with Administrator privileges.
2. Exit Cardiris if it is running (select [Quit] from the Cardiris menu).
3. Insert the Setup DVD-ROM into the DVD-ROM drive.
The [ScanSnap] window appears.
4. Scroll down and double-click the [Tool] folder
[Cardiris 3.6 for
ScanSnap].
The [Cardiris 3.6 for ScanSnap] window appears, displaying the [License] screen.
5. Scroll down and read the "License" to the end, and then click the
[Continue] button.
A confirmation message appears.
6. Click the [Agree] button.
The [Select Destination] screen appears.
7. Select the destination where "Cardiris" is installed and click the
[Continue] button.
The [Installation Type] screen appears.
8. Select [Uninstall] from the [Installation Type] pop-up menu, and click the
[Uninstall] button.
A confirmation message appears.
9. Click the [Continue] button.
The uninstallation is started.
The [Finish Up] screen appears.
374
Uninstalling the Software
10.Click the [Quit] button.
For Mac OS X v.10.5/Mac OS X v10.4, also perform the following.
From the sidebar in Finder, select the [volume name]
[Library]
[Cardiris.pkg] into the Trash.
[Receipts], and drag
11.Remove the Setup DVD-ROM from the DVD-ROM drive.
Evernote for Mac
1. Turn on the computer.
2. Exit Evernote if it is running (select [Quit] form the Evernote menu).
If the Evernote icon (
) is displayed on the right side of the menu bar, click the icon
and select [Quit] from the menu that appears.
3. From Finder, select [Applications]
folder into the Trash.
4. Empty the Trash.
The [Evernote] folder is deleted.
375
[Evernote], and drag the [Evernote]
Setting Items With/Without the Quick Menu
Setting Items With/Without the Quick Menu
Setting items that you can configure in the ScanSnap setup dialog box/window differ
depending on whether you are using the Quick Menu. You can select whether or not to use
the Quick Menu according to your preferences.
For details about setting items and default settings, refer to the ScanSnap Manager Help.
(OK: Available, NA: Not available)
Setting Items With/Without the Quick Menu
Setting Item
Profile
Application
Using the Quick Menu
Without Using the Quick Menu
Recommended
OK
NA
Small File
OK
NA
High Quality
OK
NA
Customize
OK
NA
Select a profile
NA
OK
Add Profile
NA
OK
Profile Management
NA
OK
NA(*)
OK
NA
OK
NA
OK
NA
OK
NA
OK
NA
OK
NA
OK
NA
OK
NA
OK
Application
None (Scan to File)
Adobe® Acrobat®
Adobe Acrobat Pro, Adobe
Acrobat Professional or Adobe
Acrobat Standard
Adobe® Reader®
Adobe Reader
CardMinder
ScanSnap Organizer
ABBYY Scan to Excel
Scan to Excel
ABBYY Scan to Word
Scan to Word
ABBYY Scan to PowerPoint(R)
376
Setting Items With/Without the Quick Menu
Setting Items With/Without the Quick Menu
Setting Item
Application
Using the Quick Menu
Without Using the Quick Menu
NA(*)
OK
NA
OK
Scan to Folder
NA
OK
Scan to E-mail
NA
OK
NA
OK
NA
OK
NA
OK
NA
OK
NA
OK
NA
OK
NA
OK
Scan to Evernote (Note)
NA
OK
Scan to Evernote (Document)
NA
OK
Scan to Google Docs(TM)
NA
Application
ABBYY Scan to Searchable PDF
Scan to Searchable PDF
Scan to Picture Folder
Scan to Print
Rack2-Filer
Scan to SharePoint
Preview
Cardiris
iPhoto
Save
OK
File Name Format
OK
Rename file after scanning
Scanning
OK
Image saving folder
NA
Image quality
OK
OK
Automatic resolution
OK
Normal (Color/Gray: 150 dpi,
B&W: 300 dpi)
OK
Better (Color/Gray: 200 dpi,
B&W: 400 dpi)
OK
Best (Color/Gray: 300 dpi, B&W:
600 dpi)
OK
Excellent (Color/Gray: 600 dpi,
B&W: 1200 dpi)
OK
Color mode
OK
Auto color detection
OK
Color
OK
Gray
OK
B&W
OK
NA
Color high compression
377
OK
Setting Items With/Without the Quick Menu
Setting Items With/Without the Quick Menu
Setting Item
Scanning
File option
Using the Quick Menu
Without Using the Quick Menu
Scanning side
OK
Simplex Scan (Single-sided)
OK
Continue scanning after current
scan is finished
OK
Option
OK
Brightness (Black and White
scanning only)
OK
Setting for text only document
OK
Allow automatic blank page
removal
OK
Correct skewed character strings
automatically
OK
Allow automatic image rotation
OK
File format
OK
PDF (*.pdf)
OK
JPEG (*.jpg)
OK
Set the marked text as a keyword
for the PDF file
OK
First marked section
OK
All marked sections
OK
Convert to Searchable PDF
OK
Language
OK
Target pages
OK
First page
OK
All pages
OK
Option
OK
Multipage PDF (whole batch in
one PDF)
OK
Generate one PDF file per (n)
page(s)
OK
NA
Set a password for PDF file
378
OK
Setting Items With/Without the Quick Menu
Setting Items With/Without the Quick Menu
Setting Item
Paper
Compression
Using the Quick Menu
Paper size
Without Using the Quick Menu
OK
Automatic detection
OK
A4 (210 × 297 mm)
OK
A5 (148 × 210 mm)
OK
A6 (105 × 148 mm)
OK
B5 (JIS) (182 × 257mm)
OK
B6 (JIS) (128 × 182mm)
OK
Post card (100 × 148 mm)
OK
Business card (90 × 55 mm, 55 ×
90 mm)
OK
Letter
(8.5 × 11 in. (216 × 279.4 mm))
OK
Legal
(8.5 × 14 in. (216 × 355.6 mm))
OK
Customize
OK
Carrier Sheet Settings
OK
Compression rate
OK
1
OK
2
OK
3
OK
4
OK
5
OK
*
: When using the Quick Menu, you can start an application to link with ScanSnap Manager from
the Quick Menu after scanning. Therefore, the [Application] tab is not displayed.
379
Purchasing/Cleaning the Carrier Sheet
Purchasing/Cleaning the Carrier Sheet
This section explains about how to purchase/clean the Carrier Sheet.
■ Purchasing the Carrier Sheet
The product name and part number of the Carrier Sheet are as follows.
Name
Quantity
ScanSnap Carrier Sheet
5 sheets
Part No.
PA03360-0013
The Carrier Sheet should be replaced approximately every 500 scans.
However, replace it if damage or dirt is noticeable.
To purchase the Carrier Sheet, contact your FUJITSU dealer or an authorized FUJITSU
scanner service provider.
380
Purchasing/Cleaning the Carrier Sheet
■ Cleaning the Carrier Sheet
As you keep using the Carrier Sheet, dirt and dust will accumulate on the surface and the
inside.
Clean the Carrier Sheet regularly because it may result in scanning errors.
How to perform cleaning
Gently wipe the dirt and dust off the surface and the inside of the Carrier Sheet with a cloth
moistened with Cleaner F1/mild detergent.
Do not use paint thinner or any other organic solvents.
Do not use force to rub against the Carrier Sheet because it may be damaged or deformed.
Be careful not to leave any crease on the Carrier Sheet.
After cleaning the inside of the Carrier Sheet with a cloth moistened with Cleaner F1/mild
detergent, make sure that it is completely dry before closing the Carrier Sheet.
z The Carrier Sheet should be replaced approximately every 500 scans.
For details about purchasing the Carrier Sheet, refer to Purchasing/Cleaning the Carrier
Sheet (page 380).
z
z
z
z
381
Installation Specifications
Installation Specifications
The following table summarizes the installation specifications of the ScanSnap.
Item
Specification
Outer dimensions (Width × Depth × Height)
Minimum: 273 × 47.5 × 34 (mm) / 10.7 × 1.9 × 1.3 (in.)
(when the feed guide is closed)
Maximum: 273 × 77 × 52 (mm) / 10.7 × 3 × 2 (in.)
(when the feed guide or the output guide is open)
Weight
350g (approx. 0.77 lb.)
Input power
Voltage
Power consumption
Temperature / humidity
allowable ranges
5V
During operation: 2.5 W or less
During standby: 1.0 W or less
Temperature
During operation: 5 to 35°C / 41 to 95°F
During standby: -20 to 60°C / -4 to 140 °F
During storage/transportation: -20 to 60°C / -4 to 140°F
Humidity
During operation: 20 to 80%
During standby: 8 to 95%
During storage/transportation: 8 to 95%
52 mm
(2 in.)
273 mm (10.7 in.)
77 mm (3 in.)
382
About Maintenance
Contact your FUJITSU scanner dealer or an authorized FUJITSU scanner service provider for
repairs on this product.
Do not perform repairs on this scanner.
383
Index
A
D
ABBYY FineReader for
ScanSnap ................................ 35, 38, 49
daily care
.......................................... 358
deleting profiles
Windows ....................................... 89
Mac OS ....................................... 253
actions
Windows ........................................97
Mac OS ........................................258
documents for scanning
....................... 27
allow automatic image rotation
Windows ......................................195
Mac OS ........................................334
E
automatic linkage
Windows ........................................90
Mac OS ........................................255
Evernote
Windows ....................................... 42
Mac OS ......................................... 54
................................. 35
Evernote for Windows .......................... 35
Evernote for Mac
C
exiting ScanSnap Manager
Windows ....................................... 74
Mac OS ....................................... 238
Cardiris .................................. 35, 49, 293
Address Book ...............................298
CardMinder ............................ 35, 38, 141
Carrier Sheet .....................................380
Windows ..............................197, 202
Mac OS ................................336, 341
feed guide ........................................... 19
Cleaner F1 .........................................359
feeding section
F
cleaning
Carrier Sheet ................................381
cleaning materials .........................359
inside of the ScanSnap ..................361
outside of the ScanSnap ................360
.................................... 19
G
generate one PDF file per (n) page(s)
Windows ..................................... 208
Mac OS ....................................... 347
...................................359
color high compression .......................189
Cleaning Wipe
H
configuring ScanSnap Manager
Windows ........................................75
Mac OS ........................................239
how to load documents
........................ 30
how to perform a scan
Windows ............................61, 63, 69
Mac OS ........................227, 228, 233
copy
Windows ......................................117
Mac OS ........................................276
correct skewed character strings
Windows ......................................192
Mac OS ........................................331
I
installation ........................................... 34
iPhoto ............................................... 301
384
Index
K
Right-Click Menu
keyword
Windows ..............................213, 215
Mac OS ................................352, 354
................................. 59
S
saving profiles
Windows ....................................... 82
Mac OS ....................................... 246
L
[Scan/Stop] button
Left-Click Menu ....................................60
............................... 19
M
Scan to E-mail
Windows ..............................107, 113
Mac OS ................................268, 272
marker
Windows ......................................213
Mac OS ........................................352
Scan to Evernote (Document)
Windows ..............................165, 167
Mac OS ................................307, 309
O
Scan to Evernote (Note) ..................... 314
Windows ..............................173, 175
Mac OS ................................314, 316
online update
Windows ......................................366
Mac OS ........................................368
Scan to Excel
Windows ..............................135, 137
Mac OS ................................287, 289
operating system
Windows ........................................21
Mac OS ..........................................23
Scan to Folder
Windows ................................99, 102
Mac OS ................................260, 263
......................................32
output guide .........................................19
operation flow
Scan to Google Docs
Windows ..............................180, 183
Mac OS ................................321, 324
P
Scan to Microsoft SharePoint ................ 35
Scan to Picture Folder .................126, 128
paper specifications ..............................27
Scan to PowerPoint(R) ................135, 137
print
Windows ......................................117
Mac OS ........................................276
Profile menu
Scan to Print
Windows ..............................119, 121
Mac OS ................................278, 280
......................................226
........................... 157
Scan to SharePoint ............................ 148
Scan to Rack2-Filer
Q
Scan to Word
Windows ..............................135, 137
Mac OS ................................287, 289
Quick Menu
Windows ........................................66
Mac OS ........................................231
scanning color document in black & white or
gray mode
Windows ..................................... 187
Mac OS ....................................... 328
R
........................................155
Rack2-Filer V5.0 Trial Version ...............35
Rack2-Filer
.............................. 16
ScanSnap Manager ............................. 35
Windows ..................................38, 58
Mac OS ..................................49, 223
ScanSnap features
renaming profiles
Windows ........................................87
Mac OS ........................................251
385
Index
ScanSnap Manager menu ...................224
......................35, 38
[ScanSnap Setup] dialog box ................36
ScanSnap setup dialog box .............78, 79
ScanSnap setup window .....................242
[ScanSnap] window ..............................48
ScanSnap’s communication status .........93
ScanSnap Organizer
setting keywords
Windows ......................................215
Mac OS ........................................354
shared folder
Windows ........................................98
Mac OS ........................................259
showing the scanning progress status
Windows ........................................95
Mac OS ........................................256
sleep mode ..........................................26
system requirements
Windows ........................................21
Mac OS ..........................................23
T
top cover
.............................................19
turning ON/OFF
ScanSnap ......................................25
U
uninstalling
Windows ......................................370
Mac OS ........................................372
updating
Windows ......................................366
Mac OS ........................................368
USB connector .....................................20
386
ScanSnap S1100
Operator’s Guide
P3PC-3252-01ENZ0
Issue date: October 2010
Issued by: PFU LIMITED
The contents of this manual are subject to change without notice.
PFU LIMITED assumes no liability for incidental or consequential damages arising
from the use of this product, and any claims by a third party.
z Copying of the contents of this manual, in whole or in part, as well as the scanner
applications is prohibited under the copyright law.
z
z

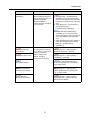
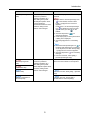
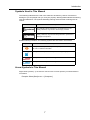


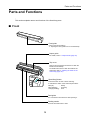

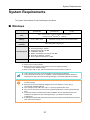

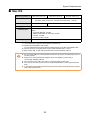

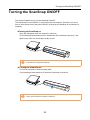

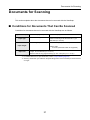


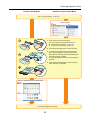

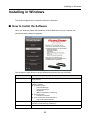

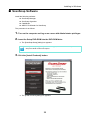
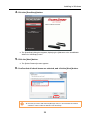
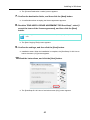


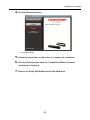


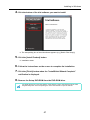
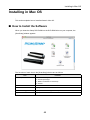

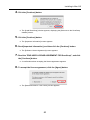
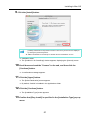
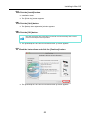
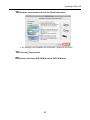

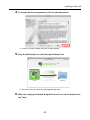

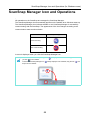
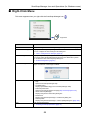


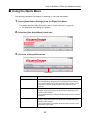
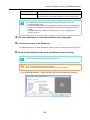

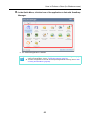
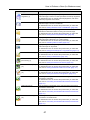
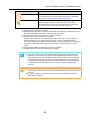
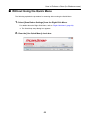

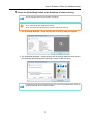


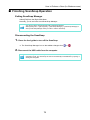
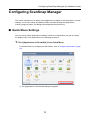
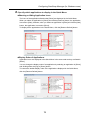
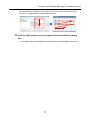
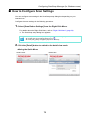
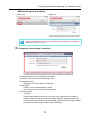
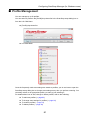

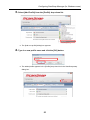

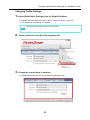

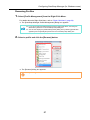
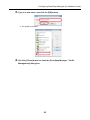
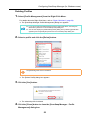


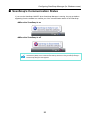
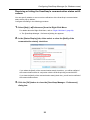
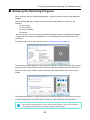
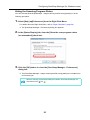


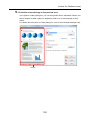
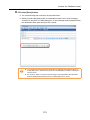
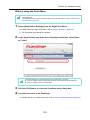
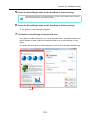
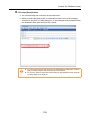


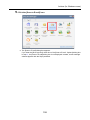
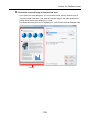


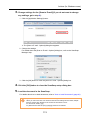
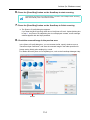
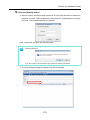


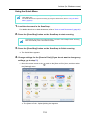
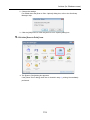
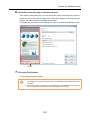


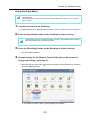
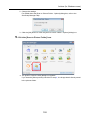
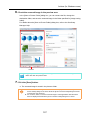


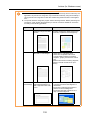
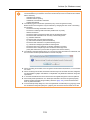
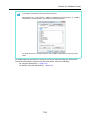

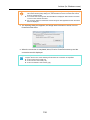

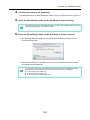

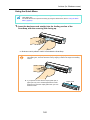
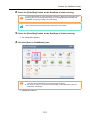


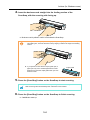

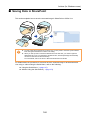


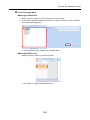
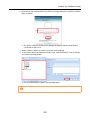

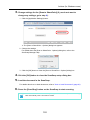
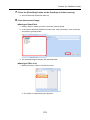

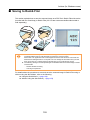

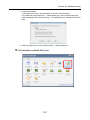

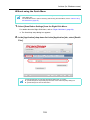
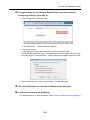


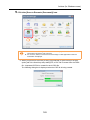
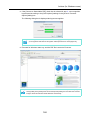
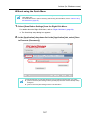
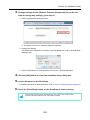


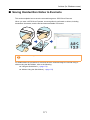
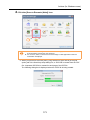

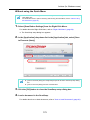

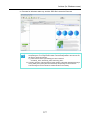


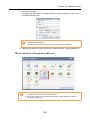
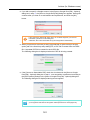

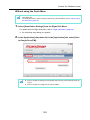
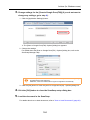

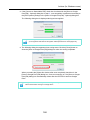
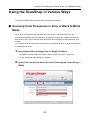
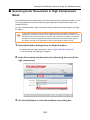
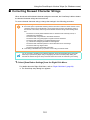


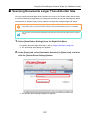
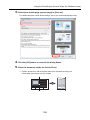
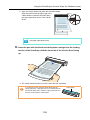

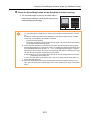

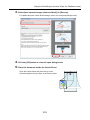

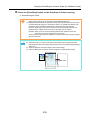


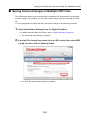
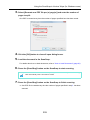


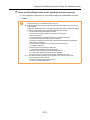
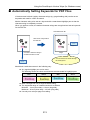
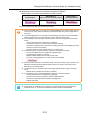

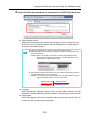
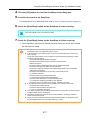
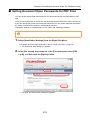

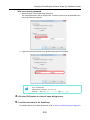

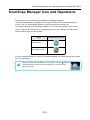
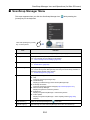


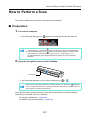
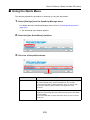
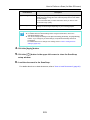
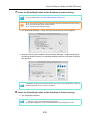
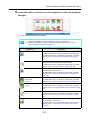
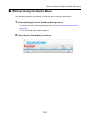

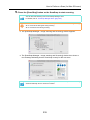
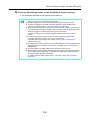
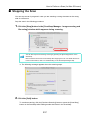
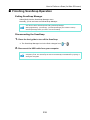
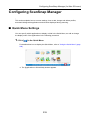
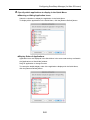
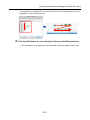


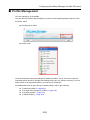
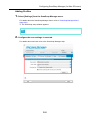

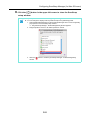
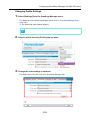


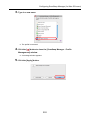
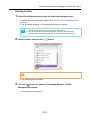

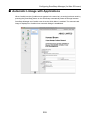
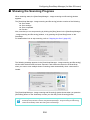


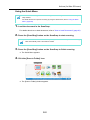


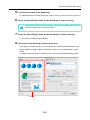
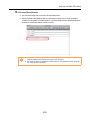
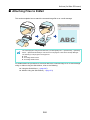
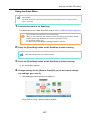
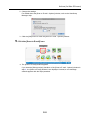
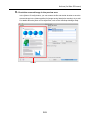


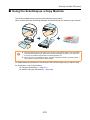

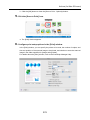

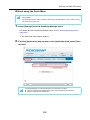
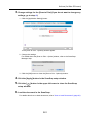
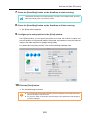
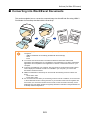

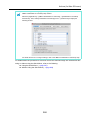
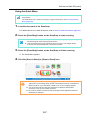
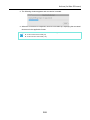
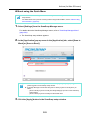
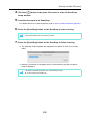

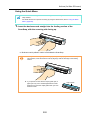
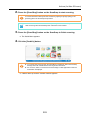


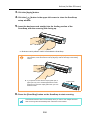
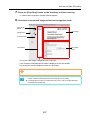
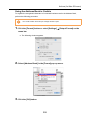


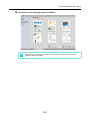
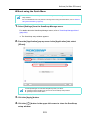


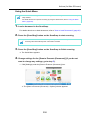
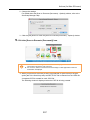
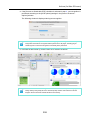
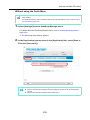
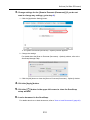
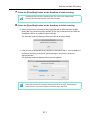
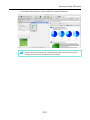


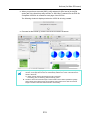
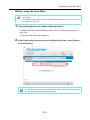
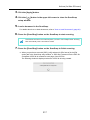

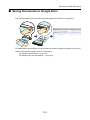

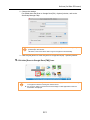
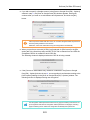


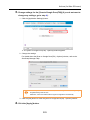
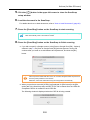
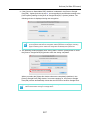

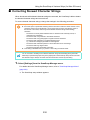


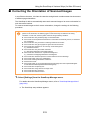
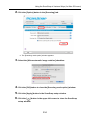

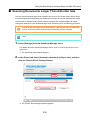


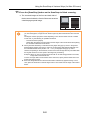
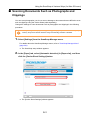


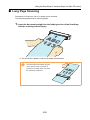
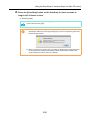

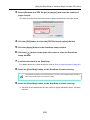


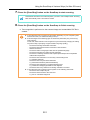

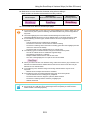


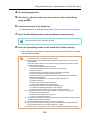


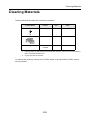
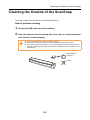


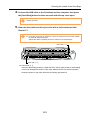

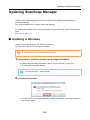


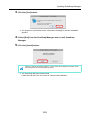


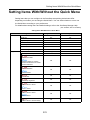
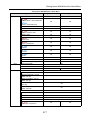

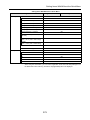
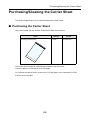
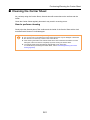


![6.Premere il tasto [Scan] di ScanSnap.](http://vs1.manualzilla.com/store/data/006124509_1-c373424b04faf23db72c3ba5efd11184-150x150.png)

![[Scan] button on the ScanSnap.](http://vs1.manualzilla.com/store/data/005658366_1-513fc66afaf683e0c3b25d8948918383-150x150.png)
![3. Clique no botão [Aplicar]](http://vs1.manualzilla.com/store/data/006085959_1-abc442ce88b6545b36fcdec1f957320c-150x150.png)
![3. Clique no botão [OK]](http://vs1.manualzilla.com/store/data/006085780_1-1e963248ed17cdf0be3b5a5218e98297-150x150.png)