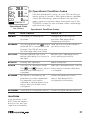
1
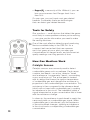
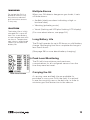
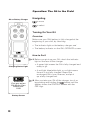
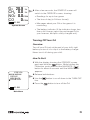
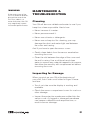
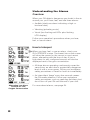
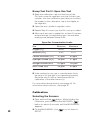
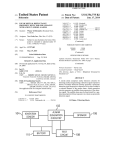
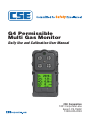
G4 Permissible
Multi Gas Monitor
Daily Use and Calibration User Manual
CSE Corporation
1001 Corporate Lane
Export, PA 15632
1-800-245-2224
2
CONTENTS
INTRODUCTION
5
SUMMARY
Knowledge That Could
Save Your Life
7
SAFETY GUIDELINES
9
ABOUT GAS DETECTION
Problem Gases
13
Tools for Safety
14
How Gas Monitors Work
14
G4 DESCRIPTION
At a Glance
17
Operation: The G4 in the Field
Navigating
20
Turning On Your G4
20
Turning Off Your G4
21
How to Read the OPERATE Screen 22
Sensors
23
Alarms
24
Sensor Status Codes
26
Operational Condition Codes
27
3
Operation: The G4 on the Bench
Battery Charging
28
Making Operating Adjustments
31
Sensors
37
Managing Peak Value
(MIN/MAX Gas Concentration) Data 45
Bump Testing
46
Calibration
52
MAINTENANCE &
TROUBLESHOOTING
Cleaning
61
Inspecting for Damage
61
Replacing the Sensor
Compartment Cover
62
QUICK GUIDE
Turning On Your G4
65
Turning Off Your G4
65
Understanding the Alarms
66
Bump Testing
67
Calibration
68
APPENDICES
4
Gas Interference
71
G4 Technical Specifications
72
INTRODUCTION
Safety for Miners:
a Mission and a Tradition.
Our family has a long history of hard work in
coal mines. Three generations have followed my
grandfather, Alexander Shearer, into the mining
industry since he came to the U.S.A. from Scotland
and headed for the West Virginia coal fields in the
early 1900s. That tradition has kept us committed to
developing new mine safety technologies for more
than 40 years.
The experiences we’ve gained in working alongside
miners have helped make our air-quality monitoring
devices the best in the business. That’s because
listening to the people who get their hands dirty, and
then creating innovative products that meet their
needs, is what we do.
Thanks for placing your trust in CSE. We’ll never
stop doing our best to live up to it.
Scott Shearer
Chairman and CEO
CSE Corporation
5
6
SUMMARY
Knowledge That
Could Save Your Life
Your G4 gas monitor can only warn you of danger if
you understand how it works—and what it’s telling
you. That’s a good reason to take this manual
seriously. Every word in it is based on experience in
the field, under conditions like the ones you’ll see on
your next shift.
Pay close attention to these pages. They’ll show you:
• Why gas monitors are important for safety
• How the G4 works
• How to use it
• How to test and calibrate it
• And how to take care of it so that it will perform
properly when you need it
Your life—or your buddy’s—could depend on what
you learn from this manual. So do your homework,
and stay safe.
7
8
SAFETY GUIDELINES
Key
! WARNING Indicates
an imminently hazardous
situation that, if not
avoided, could result in
death or serious injury.
! CAUTION Indicates
a potentially hazardous
situation that, if not
avoided, could result in
minor or moderate injury.
!WARNING Do not put the G4 in a pocket or orient it in
any way that can obstruct gas flow to the sensors.
!CAUTION The G4 is a gas monitor that is intended
to alert the user of potentially dangerous environmental
conditions. It may only be used for this purpose. Any other
use voids the product warranty and shifts all product liability
to the end user.
!WARNING Only use CSE approved replacement
sensors. Substitution of other sensors may result in
instrument failure that may or may not be detectable during
calibration and normal operation.
!WARNING Do not use the G4 in enriched oxygen
environments.
!WARNING Do not use the G4 if any sensor is
uncalibrated and displays the ‘UNC’ code or fails and
displays the ‘FAL’ code (during normal operation). Calibrate
or replace the sensor, and if the code still appears return to
CSE for diagnosis.
!WARNING Ensure that the sensor model in the G4
sensor configuration menu and on the sensor housing
match for each sensor position. Failure to do so may result
in improper instrument performance or instrument failure.
!WARNING Ensure that the sensor cover membrane is
free of dust and debris so as to not obstruct the gas path to
the sensors.
!WARNING Ensure that all alarms (vibration, visual, and
audible) are functional during the bump test. Failure to do
so may impede the ability of the user to be alerted when a
potentially hazardous environmental condition exists.
!WARNING Use only CSE approved calibration gas at
the concentrations indicated in this manual. Failure to do so
may lead to improper calibration and improper instrument
performance.
9
!WARNING If the outer case of the G4 is cracked or
broken, discontinue use of the G4. Dust, debris, or water
that enters the G4 may negatively impact instrument
performance.
!WARNING Only charge the G4 in fresh air. The G4
charger is not intrinsically safe (the device is not designed
with power-limiting circuitry to prevent an ignition of an
explosive methane-air atmosphere) and must be used in
approved areas only.
!WARNING Do not use the G4 in areas of low oxygen
levels (<10%) or where chemical solvents, silicones,
silicates, sulfur compounds, or compounds containing lead
are present. These compounds will impact the performance
of the methane sensor and cause false readings. Use
caution when using the G4 in the vicinity of all chemicals.
!WARNING Always calibrate the G4 according to the
directions in this manual, using the specified calibration
gas, gas regulator, and procedures. Failure to calibrate
properly can lead to improper instrument performance.
Sensors must be calibrated every 31 days at a minimum.
!WARNING Calibration must be performed by a person
familiar with this manual and only in accordance with the
procedures in this manual.
!CAUTION All sensors in the G4 must be bump tested or
calibrated before each use/shift or any time that an off-scale
reading or fault indicator is displayed. Bump testing or
calibrating is essential to ensuring that the G4 is functioning
within performance limits.
!CAUTION Bump testing is not and should not substitute
for a regular full calibration by a person familiar with this
manual.
!WARNING If a bump test fails, clean or replace the
sensor cover and perform a full calibration of the affected
sensor(s). Do not use the G4 if one or more sensors fails the
bump test and will not calibrate according to the procedures
in the manual.
!WARNING Withdraw immediately to fresh air if the
methane sensor goes in to over-range shutdown (OVR).
10
!CAUTION The battery life of a fully charged G4 is up
to 25 hours for a new battery at room temperature with no
alarms. Temperature, age, alarms, and charge status can all
affect the battery life.
!CAUTION If the low battery (LOW BATT) indicator
appears during a shift, alert your supervisor immediately.
!CAUTION Always treat alarms as a true indication of
atmospheric conditions. Never assume that G4 readings are
false positives. In the case of an alarm, always follow your
workplace procedures.
!CAUTION Gas concentrations may vary based on
location and activity. Always use caution even if the G4
does not indicate dangerous concentrations. Higher
concentrations may be present nearby.
!CAUTION With a methane alarm above 5% with
code OVR, do not turn off your G4 until you’re sure you are
in fresh air .
!CAUTION The methane sensor will shut down with a
methane alarm above 5% with code OVR. Do not try to
restart the methane sensor until you are sure you are in fresh
air. If you restart the sensor (by pressing the ON button),
and the methane around you is still above 5%, you may
damage the sensor.
!CAUTION After a shut down with code OVR, and only
when you are in the clear, report the latching alarm and OVR
shutdown to your foreman. Turn in your G4 for recalibration;
do not use it after an OVR shutdown until it has been
recalibrated.
!WARNING Dangerous gas levels can escalate without
warning. Most hazardous gases are odorless, and their
presence cannot be detected by human senses. Likewise,
your senses cannot detect a shortage of oxygen until it is
too late. Do not rely on your senses to warn you of gasrelated hazards.
!WARNING Setting alarm set points must be performed
by a person familiar with this manual and only in
accordance with the procedures in this manual.
!CAUTION Do not overtighten the retaining screw, as
doing so may cause damage to the case of the G4.
11
12
!CAUTION
Gas concentrations
may vary based on
location and activity.
Always use caution
even if the G4 does
not indicate dangerous
concentrations. Higher
concentrations may be
present nearby.
!WARNING
Dangerous gas levels
can escalate without
warning. Most hazardous
gases are odorless, and
their presence cannot
be detected by human
senses. Likewise, your
senses cannot detect
a shortage of oxygen
until it is too late. Do not
rely on your senses to
warn you of gas-related
hazards.
ABOUT GAS DETECTION
In the open air, you can usually depend on being
surrounded by a healthful mix of harmless nitrogen
(about 78%), necessary oxygen (about 21%), and
traces of a few other gases. But in an enclosed
space, too little of what you need (such as oxygen),
or too much of what you don’t (like toxic carbon
monoxide or methane) can put you in danger before
you know what’s happening.
Problem Gases
Human senses can’t detect:
• Carbon monoxide (CO), a normal product of fires and
burning fuel. In enclosed spaces, it can
accumulate quickly and become deadly. It
accumulates in the blood, depriving the brain and
heart of the oxygen necessary to function properly.
Danger level: 50 ppm or more.
• Hydrogen sulfide (H2S), which is found naturally as a
byproduct of decaying organic matter. It blocks
your body’s ability to use oxygen. Danger level:
10 ppm or more.
• Methane (CH4), which forms naturally in
underground pockets. It’s flammable and,
especially when combined with coal dust, highly
explosive. Danger level: 5 to 15%.
• Nitric oxide (NO), which is produced during
blasting and diesel engine operation. It can form
nitric acid in your lungs if you inhale it, and cause
long-term lung damage. Danger level: 25 ppm
or more.
• Nitrogen dioxide (NO2), also produced during
blasting and diesel engine operation. It can form
nitric acid in your lungs if you inhale it, and cause
long-term lung damage. Danger level: 5 ppm
or more.
13
• Oxygen (O2), a necessity of life. Without it, you can
lose consciousness fast. Danger level: Less
than 16%.
On your own, you can’t spot most gas-related
hazards. Fortunately, there are technologies
that can detect gas-related hazards.
Tools for Safety
Gas monitors — small devices that detect the gases
most likely to cause problems where you’re working
— can give you the information you need to make
life-saving decisions.
One of the most effective detection and monitoring
devices available today is the CSE G4. It’s a
compact, belt-carried unit that can measure
up to four gases at once, alert you when gas
concentrations hit danger levels, and document air
quality readings over long periods of time.
How Gas Monitors Work
Catalytic Sensors
Catalytic sensors are commonly used to detect
combustible gases such as methane. Each sensor
contains two beads – an active “detector” bead
and a reference “compensator” bead – surrounding
a very small wire coil. The active bead is treated
with a catalyst that lowers the ignition temperature
of combustible gas and changes the resistance in
proportion to the combustible gas concentration. This
resistance is then compared to the reference bead
(which will not react with combustible gas), creating
an imbalance in the circuit. The imbalance yields a
signal interpreted as a gas concentration that is linear
with the resistance change.
In clean air, the resistance in each bead is nearly the
same and yields no combustible gas signal. When
combustible gas is introduced, only the resistance
of the active bead changes, yielding an imbalance
in the circuit and a corresponding combustible gas
concentration.
14
Electrochemical Sensors
Electrochemical sensors are commonly used to
detect oxygen and toxic gases. An electrochemical
sensor works by reacting with the target gas
to produce a signal proportional to the gas
concentration. The gas passes through a small
opening to control the amount that enters the sensor
and reacts with the sensing electrode. The gas that
the sensor is designed to detect reacts with the
sensing electrode and essentially completes the
chemical reaction, causing an electrical current that
is interpreted as a gas concentration.
G4 Sensors
In the G4, the methane sensor is a catalytic sensor,
and all others (oxygen, carbon monoxide, hydrogen
sulfide, nitrogen dioxide, and nitric oxide) are
electrochemical. In the case of all of the sensors, the
signal is amplified and stabilized by the electronics,
which then feed the information to the display as a
gas concentration in percent by volume (%) or parts
per million (ppm).
15
16
G4 DESCRIPTION
!CAUTION
The G4 is a gas
monitor that is intended
to alert the user of
potentially dangerous
environmental
conditions. It may only
be used for this purpose.
Any other use voids the
product warranty and
shifts all product liability
to the end user.
At a Glance
The CSE G4 Permissible Multi Gas Monitor is a
personal safety device that automatically warns
you when any of up to four common gases reach
dangerous levels. In addition to multi-gas capability,
it features a backlit LCD display that lets you navigate
to operational and safety information; sound,
vibration, and light alarm signals; and a battery life
of up to 25 hours. All the information needed during
a normal shift appears on a single OPERATE screen.
Other display screens enable you to:
• Calibrate and configure the G4
• Read peak concentration levels
Visual Alarm LEDs
Audio Alarm Port
Oxygen Sensor
Toxic Sensor 1
Sensor Cover
Retaining Screw
Toxic Sensor 2
Methane Sensor
Sensor Cover
Display
Battery Life Indicator
ON Button
O2 20.9 %
CH4 0.0 %
NO2 0.0 PPM
CO
0 PPM
12:00
Time / Status Code
(alternating)
NAVIGATE Button
17
!WARNING
Multi Gas Capability
Do not use the G4
in enriched oxygen
environments.
The G4 can monitor as many as four gases
simultaneously. The standard setup includes sensors
for methane and oxygen, plus two open sensor ports
for the customer’s choice of:
• Carbon monoxide (CO)
• Hydrogen sulfide (H2S)
• Nitrogen dioxide (NO2)
• Nitric oxide (NO)
Navigation
The G4’s user interface is simple to use:
• Click or hold down the
• Click the
button to enter or select
button to move the cursor
• Follow a logical menu tree to reach any feature
or function
O2 20.9 %
CH4 0.0 %
NO2 0.0 PPM
CO
0 PPM
12:00
Operate Screen
18
OPERATE Mode
In OPERATE mode, the G4 display shows
concentrations of up to four gases on a single
screen, in real-time. The OPERATE screen also
reports the reasons for alarms, information on G4
operational conditions, and the time of day.
!WARNING
Multiple Alarms
Do not put the G4 in a
pocket or orient in any
way that can obstruct
gas flow to the sensors
in any way.
When your G4 detects dangerous gas levels, it sets
off three alarms:
• Audible (dual-tone alarm indicating a high- or
low-level alert)
• Vibrating (pulsating motor)
!CAUTION
The battery life of a fully
charged G4 is up to 25
hours for a new battery
at room temperature with
no alarms. Temperature,
age, alarms, and charge
status can all affect the
battery life.
• Visual (flashing red LED plus flashing LCD display)
(For more about alarms, see page 24.)
Long Battery Life
The G4 will operate for up to 25 hours on a full battery
charge. Recharging time from complete discharge is
less than 6 hours.
(See page 28 for more about battery charging.)
Peak Level Monitoring
The G4 will store minimum and maximum
concentrations for all configured sensors from the
time they were last reset.
Peak Level Screen
Carrying the G4
A carrying case and belt clip are available for
purchase to carry your G4 in the field. It is optimal
to use the carrying case or the belt clip, in order to
minimize gas flow obstruction to the sensors.
19
Operation: The G4 in the Field
G4 on Battery Charger
Navigating
to move
to select
Turning On Your G4
Overview
Make sure your G4’s battery is fully charged at the
beginning of your shift, by checking:
• The indicator light on the battery charger and
• The battery indicator on the G4’s OPERATE screen.
How to Do It
1Before you pick up your G4, check the indicator
light on the face of the charger.
Charging Status Light
• A green light means the G4 is fully charged and
ready to go.
• A red light, blue/white light, or no light means
the unit is not fully charged. Report the
uncharged G4 to your foreman, and pick
up a fully charged unit.
A000110
Corporation
G4 Multi Gas
Detector
V1.6
Startup Screen
20
2After you take your G4 off the charger, turn it on
by pushing and holding the
button until the
display shows the STARTUP screen with the
CSE logo.
O2 20.9 %
CH4 0.0 %
NO2 0.0 PPM
CO
0 PPM
12:00
Operate Screen
3After a few seconds, the STARTUP screen will
switch to the OPERATE screen, showing:
• Readings for up to four gases
• The time of day (in 24-hour format)
• Messages about your G4 or the gases it is
monitoring
• The battery indicator (If the indicator shows less
than a full charge, report the uncharged G4 to
your foreman, and pick a fully charged unit.)
Turning Off Your G4
Overview
Turn off your G4 only at the end of your shift, right
before you turn it in or clip it to the battery charger.
Never turn it off during your shift.
How To Do It
CSE G4
MAIN MENU
SETUP
OPERATE
TURN OFF
1With the display showing the OPERATE screen,
push and hold the
button. While holding the
ON button, push and hold the NAVIGATE (
)
button for about 3 seconds until the MAIN MENU
appears.
2Release both buttons.
3Use the
line.
4Press the
button to scroll down to the TURN OFF
button to turn off the G4.
12:00
Main Menu
21
O2 20.9 %
CH4 0.0 %
NO2 0.0 PPM
CO
0 PPM
12:00
Operate Screen
Reading the OPERATE Screen
Under normal working conditions, your G4’s display
will show the OPERATE screen. It gives you five kinds
of information:
• Which gases: Your G4 may have sensors for
up to four of the following gases:
O2 = Oxygen
CH4 = Methane
CO = Carbon monoxide
H2S = Hydrogen sulfide
NO = Nitric oxide
NO2 = Nitrogen dioxide
• How much: The concentration, by percentage
(%) or parts per million (ppm), of each gas in the
air around you. Safety and danger levels are
different for each gas because each one behaves
differently in the environment being monitored.
• What set off an alarm: Sensor status message
codes that tell you why an alarm has gone off.
• Overall status: Operational message codes that tell
you about your G4.
• Time of day: Digital clock showing hours and
minutes in 24-hour format.
This screen shows safe levels of oxygen (O2), carbon
monoxide (CO), and hydrogen sulfide (H2S), but
a dangerously high percentage of methane (CH4).
“OVR” means over-range—too high for the sensor to
read. That means extreme danger. Head for fresh air
as fast as you can.
22
!WARNING
Sensors
Do not use the G4 in
areas of low oxygen
levels (<10%) or where
chemical solvents,
silicones, silicates,
sulfur compounds, or
compounds containing
lead are present. These
compounds will impact
the performance of the
methane sensor and
cause false readings.
Use caution when using
the G4 in the vicinity of
all chemicals.
Behind the round openings on the face of your
G4 are positions for as many as four different gas
sensors. Each responds to a different gas. The
sensors on the left always measure oxygen (O2) and
methane (CH4). The G4 can be ordered with the
remaining positions (Toxic 1 and Toxic 2) configured
for any two of these gases: carbon monoxide (CO),
hydrogen sulfide (H2S), nitric oxide (NO), or nitrogen
dioxide (NO2).
NOTE:
Never install a sensor in a position that’s not
configured for it. For example, only an oxygen
sensor will operate in the oxygen position.
The NO2 sensor may only
be placed in the Toxic
1 sensor position, and
the NO sensor may only
be placed in the Toxic 2
position. Configuration
of a G4 with an NO
sensor requires special
factory setup of the
Toxic 2 sensor position
for dedicated use with
NO sensors. Once
configured for NO, Toxic
2 can no longer be used
with any other sensors.
While you work, the sensors feed information to the
electronics inside your G4. The G4 makes a record
of changing gas levels, and passes moment-bymoment information to the display on the face of
the G4. One look at the OPERATE screen will show
you what all four sensors are reporting about the air
around you.
(For more about sensor configuration, see page 37.)
Oxygen
O2
Toxic 1
CO, H2S, or NO2
Methane
CH4
Toxic 2
CO, H2S, or NO
23
!WARNING
Alarms
Withdraw immediately to
fresh air if the methane
sensor goes in to overrange shutdown (OVR).
The G4’s audible, visual, and vibrating alarms will
operate continuously when a sensor tells the G4
you’re in a dangerous gas concentration. The same
alarms will operate in shorter bursts when the G4
needs attention (see operational codes below).
When any sensor detects a dangerous gas level, it
will trigger all three alarms (audible, vibrating, and
visual).
• Check the OPERATING display to see which gas
set off the most recent alarm. You’ll see it next to
the gas concentration, as well as at the bottom of
the display alternating with the time of day.
Alarm Display
Low O2 Alarm
Methane Sensor
Over-Range Display
• For most alarms, follow your workplace procedures
for the gas concentration shown on your G4. All
alarms, with the exception of a CH4 concentration
above 5%, are “non-latching” — that is, they will
automatically reset when gas concentrations return
to non-alarm levels.
• For a methane (CH4) alarm reading at 5% or
above, the CH4 line on the display will show the
code OVR (over-range). Leave the area and
head for fresh air immediately. Because methane is
explosive and extremely dangerous, your G4
alarms will “latch” (continue to sound, vibrate, and
flash) until you reset the sensor. Do not turn off
or reset the sensor until you are sure that you are in
fresh air.
!WARNING
!CAUTION
Ensure that all alarms
(vibration, visual, and
audible) are functional
during the bump test.
Failure to do so may
impede the ability of the
user to be alerted when
a potentially hazardous
environmental condition
exists.
Always treat alarms
as a true indication of
atmospheric conditions.
Never assume that
G4 readings are false
positives. In the case
of an alarm, always
follow your workplace
procedures.
24
Methane Sensor
Failure Display
• The CH4 sensor shuts down in an over-range
(OVR) condition to prevent burnout. When you
are confident that the levels of CH4 have returned
below 5%, press the ON button to reset the sensor.
You will see the sensor status code FAL (fail) next
to the blank sensor concentration until the sensor
warms up. After it warms up, the sensor will return
to normal operation if the concentration is below
5%.
!CAUTION
With a methane alarm
above 5% with
code OVR, do not turn
off your G4 until you’re
sure you are in fresh air.
!CAUTION
With a methane alarm
above 5% with code
OVR, the methane
sensor will shut down.
Do not try to restart the
methane sensor until
you are sure you are in
fresh air. If you restart
the sensor (by pressing
the ON button), and the
methane around you is
still above 5%, you may
damage the sensor.
!CAUTION
When you are in
the clear, report the
latching alarm and
OVR shutdown to your
foreman. Turn in your
G4 for recalibration; do
not use it after an OVR
shutdown until it has
been recalibrated.
25
Sensor Status Codes
Sensor Status Code
O2 Low Alarm
Three-letter sensor status codes on the OPERATE
screen tell you what has set off an alarm. They
appear above the % or PPM marks for the gas that
caused the alarm. The most recent status code can
also be seen at the bottom of the display, alternating
with the time. Possible status codes are:
Sensor Status Codes
Display
What it Means
What to Do
UNC
Sensor Uncalibrated (G4 not
calibrated for this sensor) Calibrate the sensor (see page 52 for calibration instructions.)
FAL
Fail (Sensor is not working)
Follow workplace procedures
LOW
Low Alarm (Gas concentration exceeds low alarm setpoint) Follow workplace procedures (see page 34 for setpoint details.)
HGH
High Alarm (Gas concentration
exceeds high alarm setpoint) Follow workplace procedures (see page 34 for setpoint details.)
OVR
Over-range (Gas concentration
too high to measure)
Follow workplace procedures
UND
Under-range (Gas concentration Follow workplace procedures
too low to measure)
UNK
Device Error !WARNING
Do not use the G4 if any
sensor fails and displays
the ‘FAL’ code. Calibrate
or replace the sensor,
and if the code still
appears return to CSE
for diagnosis.
26
Stop using the G4 immediately and return to CSE for servicing
(See page 37 for more about sensors.)
O2 20.9 %
CH4 0.0 %
NO2 0.0 PPM
CO
0 PPM
LOW BATT
Operational Code
Low Battery
Operational Condition Codes
Like the dashboard in your car, your G4 can tell you
what’s going on inside it. Short alarm bursts (audible,
visual, and vibrating), spaced about five seconds
apart, mean you should check the lowest line of the
OPERATE screen for one of these codes, alternating
with the time of day:
Operational Condition Codes
Display
What it Means
What to Do
LOW BATT
The battery is running out
of power. Charge the G4 as soon as possible. See page 28 for charging instructions.
ON CHARGE
You have pressed the
button Take the G4 off of the charger if
while the G4 is connected to the you wish to turn it on.
charger. The G4 will show you
this message, then shut down.
SET CLOCK
You must set the G4’s clock
Set the clock. See page 33 for
before calibrating it or using it in clock-setting instructions.
the field.
NO SELECT
Nothing was selected.
IN CALIB
The G4 is in calibration mode.
Wait until calibration ends. The G4
The
and
buttons will not will prompt you when calibration
function until calibration is
is complete.
complete.
NO SENSOR
No sensor is installed for an
operation you have requested.
For example, you cannot
calibrate or set the alarms for a
sensor until you install it and
configure it.
Make a selection.
Install/configure the correct
sensor. See page 42 for
configuration procedure.
NO SENSORS There are no configured sensors. Install/configure desired sensors.
!CAUTION
If the low battery (LOW
BATT) indicator appears
during a shift, alert your
supervisor immediately.
27
Operation: The G4 on the Bench
The G4 needs almost no attention from the worker
who carries it. But, like any other advanced safety
device, it can only do its job if it gets proper care and
handling before and after a shift. This section will
show you how to charge the G4’s battery; configure
its display screens, sensors and alarm settings;
manage the peak value data it records; bump test it;
and calibrate it.
!WARNING
Battery Charging
Only charge the G4 in
fresh air. The G4 charger
is not intrinsically safe
(the device is not
designed with powerlimiting circuitry to
prevent an ignition of an
explosive methane-air
atmosphere) and must
be used in approved
areas only.
Overview
Charge the G4 only with the CSE battery charger.
It’s supplied with the G4 or available separately from
your CSE representative. The charger operates on
95–130 or 90–264 VAC, 50 or 60 Hz. depending
on the power supply model. Be sure to check
your power supply input voltage before using. A
completely discharged G4 will charge in about 6
hours, and a completely charged battery will power
the G4 for up to 25 hours. Follow your workplace
procedures for battery charging.
!NOTICE
The battery life of a fully
charged G4 is up to 25
hours for a new battery
at room temperature with
no alarms. Temperature,
age, alarms, and charge
status can all affect the
battery life.
28
What You’ll Need
• A G4 charger for each G4
• A power outlet (95–130 or 90–264 VAC,
50 or 60 Hz.) for each charger
• These instructions
Release Latch
Belt Clip Recess
Charging Contacts
Mounting Posts
Charging
Status Light
Charging the Unit
To connect the G4 to the charger, line up the
recesses on the back of the G4 with the charger’s
mounting posts and top latch. Press the center of the
G4 firmly until you hear it click into place. Disconnect
the G4 by lifting it away from the charger while
pressing down on the release latch.
29
Reading the Charging Indicator
The indicator light on the face of the charger just
below the brass contacts shows the charger’s status:
Charging Indicator
Color
What It Means
What To Do
Dark / Unlit Charger has no power source
Connect charger to 95–130 or
90–264 VAC outlet
Red (G4 not Charger has power source –
on charger) Ready to charge
Place G4 on charger to
begin charging
Red (G4 on
charger)
Check for one of these problems:
Fault — G4 is not charging for
one of the following reasons:
G4 outside allowable Gradually bring G4 to charging temperatureallowable temperature
temperature range (0°C–30°C)
G4 not correctly Remove G4, line up recesses
seated on charger and mounting posts, press firmly until you hear G4 click
into place
Charger connected Connect to 95–130 or 90–264
to wrong voltage VAC outlet
Charging contacts Remove G4, carefully clean
blocked by debris contacts on G4 and charger, place G4 back on charger
Blue/White G4 is charging normally
Allow G4 to continue charging
until indicator light is green
Green
G4 ready for use
30
Charging complete
Making Operating Adjustments
Overview
Your G4’s display gives you access to a menu of
screens that enable you to control its functions. This
section shows you how to adjust the contrast on
the display to fit user preferences or changing light
conditions; set the time and date; and raise or lower
alarm set points.
What You’ll Need
• An accurate watch, clock, or phone with time
display, for setting time and date
• Clear understanding of your workplace’s
policies and procedures for alarm levels and
record keeping
• These instructions
Contrast Adjustment: How To
Getting to the CONTRAST ADJUST Screen
CSE G4
MAIN MENU
SETUP
OPERATE
TURN OFF
1Push and hold the
button. While holding the
ON button, push and hold the NAVIGATE (
)
button for about 3 seconds until the MAIN MENU
appears.
2Click
to scroll to SETUP.
12:00
Main Menu
31
Denotes: See illustration below
3Press ON to open the SETUP MENU.
4
4Click
to scroll to CONFIGURE.
5Press
to open the CONFIGURE MENU.
6Click
to scroll to DISPLAY.
7Press
to open the DISPLAY MENU.
8Click
to scroll to CONTRAST.
9Press
screen.
to reach the CONTRAST ADJUST
6
CSE G4
SETUP MENU
MAIN MENU
CALIBRATE
CONFIGURE
CAL DATE
12:00
Setup Menu Screen
8
[Run Time]
CONFIGURE
SENSORS
TIME DATE
DISPLAY
ALARMS
BACK
12:00
Configure Menu Screen
Display Menu Screen
Adjusting the Contrast
1At the CONTRAST ADJUST screen, click
to
toggle between “+” and “– “. Adjust the contrast
by using the ON button to select “+” for more
contrast and “-” for less.
2When you reach your desired contrast, click
scroll to ACCEPT.
Contrast Adjust Screen
3Press
MENU.
to return to the DISPLAY CONTRAST
4Click
to scroll to BACK.
to
5Press
to return to the CONFIGURE MENU, and
then the MAIN MENU.
32
Denotes: See illustration below
Time and Date Adjustment: How To
Getting to the TIME DATE ADJUST screen
1Push and hold the
button. While holding the
ON button, push and hold the NAVIGATE (
)
button for about 3 seconds until the MAIN MENU
appears.
2
2Click
to scroll to SETUP.
3Press
to open the SETUP MENU.
4Click
to scroll to CONFIGURE.
5Press
to open the CONFIGURE MENU.
6Click
to scroll to TIME DATE.
7Press
to enter the TIME DATE ADJUST screen.
4
CSE G4
MAIN MENU
SETUP
OPERATE
TURN OFF
12:00
Main Menu
Date & Time
Adjust
12:00
08-23-2013
ACCEPT
BACK
12:00
Time & Date Adjust
Screen
6
CSE G4
SETUP MENU
MAIN MENU
CALIBRATE
CONFIGURE
CAL DATE
12:00
Setup Menu Screen
[Run Time]
CONFIGURE
SENSORS
TIME DATE
DISPLAY
ALARMS
BACK
12:00
Configure Menu Screen
Setting the Time and Date
to scroll to each digit of the date and
1Click
time that you need to change.
2Press
to advance that digit. It will move ahead
one unit for each press of the button.
3When the time and date are correct, click
scroll to ACCEPT or BACK.
to
4Press
to return to the CONFIGURE MENU, and
then the MAIN MENU.
33
!WARNING
Gas Alarm Set Point Adjustment: How To
Setting alarm set points
must be performed by
a person familiar with
this manual and only
in accordance with
the procedures in this
manual.
The standard alarm set points at your workplace may
be higher or lower than the factory default settings.
Set points should be adjusted only in fresh air. When
adjusting alarm set points, follow your workplace’s
safety policies.
Alarm Range Limits
All four sensor positions (one for each gas) have low
and high alarm set points. Each can be adjusted
within these ranges:
Alarm Range Limits
% O 2
% CH4
ppm CO ppm H2S ppm NO ppm NO2
Low Alarm16.0–21.0
0.5–1.5
10–505–1510–25
2.0–5.0
Range
Factory Default
19.01.035 10 253.0
Setpoint
High Alarm 21.0–23.0
1.5–2.250–999 15–25 25–755.0–10.0
Range
Factory Default23.0
Setpoint
2.0
100
15
25
5.0
Selecting a Gas Alarm
CSE G4
MAIN MENU
SETUP
OPERATE
TURN OFF
12:00
Main Menu
34
1Push and hold the
button. While holding the
ON button, push and hold the NAVIGATE (
)
button for about 3 seconds until the MAIN MENU
appears.
2Click
to scroll to SETUP.
3Press
to open the SETUP MENU.
Denotes: See illustration below
4Click
to scroll to CONFIGURE.
5Press
to open the CONFIGURE MENU.
6Click
to scroll to ALARMS.
7Press
to open the SELECT SENSOR ALARMS
TO SET screen.
You will see a list of sensors for the gases your G4
is configured to detect, with “NONE” in any position
that does not have a sensor installed.
8Click
to scroll to the gas for which you need to
change the set point.
9Press
to select the gas.
The LOW/HIGH adjustment screen will open,
showing the gas alarm you intend to change in the
upper-left corner.
4
6
CSE G4
SETUP MENU
MAIN MENU
CALIBRATE
CONFIGURE
CAL DATE
12:00
Setup Menu Screen
[Run Time]
CONFIGURE
SENSORS
TIME DATE
DISPLAY
ALARMS
BACK
12:00
Configure Menu Screen
8
Select Sensor
Alarms to set
O2
CH4
NO2
CO
BACK
12:00
Select Alarms Screen
35
Changing the Alarm Set Point
02
LOW
HIGH
19.5
23.0
ACCEPT
BACK
12:00
O2 Alarm
Setpoint Screen
1Click
BACK.
to scroll to LOW, HIGH, ACCEPT, or
2Press
to select your choice. You can change
the low set point alone, the high set point alone, or
both set points.
When you select LOW or HIGH, the adjustment
screen for that gas will appear, with the cursor on
the first digit of the current alarm set point.
3Press
to increase the first digit. To reduce the
first digit, keep pressing
until the count starts
again at the lowest limit.
4Click
to select the second digit, then press
to change it, as in Step 3.
5Click
press
to select the last digit (if applicable), then
to change it, as in Step 3.
Accepting the Changes
When you are finished changing the set points for
a gas:
1Click
to scroll to ACCEPT.
2Press
to return to the SELECT SENSOR
ALARMS TO SET screen.
3To change set points for other gas alarms. repeat
the steps shown in Selecting a Gas Alarm;
Changing the Alarm Set Point; and Accepting the
Changes, above.
Returning to the Main Menu
When you’re finished adjusting alarm ranges, click
to scroll to BACK, then press
to return to the
CONFIGURE MENU and then the MAIN MENU.
36
Sensors
Overview
This section explains how to work with the sensors on
your G4: how to open the sensor compartment, and
how to remove, replace, and configure them.
To avoid damaging sensitive electronics, always turn
the G4 off before removing the sensor cover. Never
remove or install sensors with the G4 powered up.
What You’ll Need
• All G4 units scheduled for sensor replacement,
powered off
• A 5/64” hex key wrench
• Replacement sensors
• Null sensors
• List of CSE sensor model numbers
• Cleaning gear (soft brush, clean water,
compressed air)
• Any log sheet or other record-keeping materials
your workplace requires
• These instructions
37
Opening the Sensor Compartment
1Before removing the sensor cover, clean all debris
from the sensor area. Be careful to clean the
slot between the edge of the cover and the unit’s
casing. Use a soft brush and water to remove any
material trapped in this space, then blow the area
dry with compressed air. Never use a sharp tool for
cleaning; you may damage the dust- and water tight seal between the cover and the casing. For
more on cleaning, see page 61.
2Turn the hex screw in the center of the cover
counterclockwise until it disengages. Pull the cover
straight up from the case. Never use a sharp tool
to pry the cover off; you may damage the dust- and
water-tight seal between the cover and casing.
Inspecting for Damage
The sensor compartment cover has three
components: the cover itself, the protective
membrane molded inside it, and the audio
alarm sound port.
1Check the cover for cracks or other damage.
2Inspect and clean the protective membrane. A
clogged membrane can hamper calibration
and response time. A torn membrane can result in
sensor damage. A damaged membrane can only
be replaced by replacing the entire sensor cover.
If you can’t remove debris on the outside of the
membrane with a soft brush, water, and a gentle
stream of air, replace the entire sensor cover.
3Inspect the audio alarm sound port. Make sure
none of the openings in it are blocked, and that the
sound tube behind the port is free of debris. For
more about damage inspection, see page 61.
38
NOTE:
Removing & Installing Sensors
Always replace a sensor
with the same model
sensor from CSE.
NOTE:
The process is the same for all six sensors, but only
certain sensors can be used in certain positions. See
Sensor Positions and Special Requirements, below.
1To remove a sensor, grasp it firmly with your fingers
and pull it straight up. Avoid twisting, which may
damage the sockets. Rocking the sensor gently
back and forth is OK.
Be sure that the
G4 is powered off
before removing or
installing sensors.
!WARNING
Only use CSE approved
replacement sensors.
Substitution of non-CSE
sensors may result
in instrument failure
that may or may not
be detectable during
calibration and normal
operation.
!WARNING
Ensure that the sensor
cover membrane is free
of dust and debris so as
to not obstruct the gas
path to the sensors.
!CAUTION
Do not overtighten the
retaining screw, as doing
so may cause damage
to the case of the G4.
2To install a sensor, notice the connector pin
openings inside the socket, then line up the
sensor’s connector pins with them before inserting
the sensor. Being careful not to damage the top
surface of the sensor or bend the pins, gently push
the sensor pins all the way into the sockets.
Replacing the Sensor Cover
1Inspect and (if necessary) replace the sensor
cover gasket. Be sure the round rib on the gasket
fits neatly into the recess on the sensor cover,
facing the sensors.
2Tighten the hex screw by hand until snug.
Getting the Right Sensor in the Right Position
Each sensor can only be used in the position(s)
configured to accept it. This diagram shows possible
sensor configurations for each sensor position.
Oxygen
O2
Toxic 1
CO, H2S, or NO2
Methane
CH4
Toxic 2
CO, H2S, or NO
39
Special Sensor Requirements
Methane (CH4 ) Sensor
• Install the methane sensor only in the
methane position.
Oxygen (O2 ) Sensor
• Install the oxygen sensor only in the
oxygen position.
Toxic Sensors (CO, H2S, NO2 , NO)
• Although they are the same size and shape,
the oxygen and toxic sensor positions are not
interchangeable.
• The G4 will not configure, calibrate, or operate
properly with an oxygen sensor in the Toxic 1 or
Toxic 2 position, or with a toxic sensor in the
oxygen position.
Nitrogen Dioxide (NO2 ) Sensor Position
• The nitrogen dioxide sensor can only be installed
in the Toxic 1 position.
Nitric Oxide (NO) Sensor Position
• The nitric oxide sensor can only be installed in the
Toxic 2 position.
• Factory setup: The nitric oxide sensor requires a
special factory configuration of the Toxic 2 position.
Once configured for NO, the Toxic 2 position
cannot be used with any other sensor.
40
Unused Sensor Positions
• When one or more sensor locations are not in use,
a null sensor must take the place of a functional
sensor, to maintain the water- and dust-tight seal
and protect the sensor socket.
• The unused position has no effect on calibration or
normal operation.
Model Numbers
• You will need the CSE model numbers to
configure the sensor position.
• Find the number on the sensor’s label.
• Before beginning the configuration process,
make a list of the CSE sensor model numbers
you’re working with.
• Each sensor model number you select on the
G4’s CONFIGURE screen must match the
sensor installed.
• Selecting the wrong sensor during sensor
configuration will cause a calibration failure.
41
Denotes: See illustration below
!WARNING
Configuring Sensor Positions
Ensure that the sensor
model in the G4 sensor
configuration menu and
on the sensor housing
match for each sensor
position. Failure to do so
may result in improper
instrument performance
or instrument failure.
Getting to the SENSOR TO CONFIGURE Screen
1Push and hold the
button. While holding the
ON button, push and hold the NAVIGATE (
)
button for about 3 seconds until the MAIN MENU
appears.
2Click
to scroll to SETUP.
3Press
to enter the SETUP MENU.
4Click
to scroll to CONFIGURE.
5Press
to open the CONFIGURE MENU.
6Press
again to select SENSORS. That will
take you to the SELECT SENSOR TO
CONFIGURE screen.
2
4
CSE G4
MAIN MENU
SETUP
OPERATE
TURN OFF
12:00
Main Menu
42
6
CSE G4
SETUP MENU
MAIN MENU
CALIBRATE
CONFIGURE
CAL DATE
12:00
Setup Menu Screen
[Run Time]
CONFIGURE
SENSORS
TIME DATE
DISPLAY
ALARMS
BACK
12:00
Configure Menu Screen
Denotes: See illustration below
Choosing a Sensor Position
1On the SELECT SENSOR TO CONFIGURE screen
you will see a four-line display:
OXYGEN
COMB (“Combustible”: methane)
TOXIC 1
TOXIC 2
NOTE:
The COMB position
cannot be selected, as it
may not be reconfigured.
2Click
to scroll to the sensor position you want
to configure.
3Press
to select the position. The screen will
show OXYGEN, TOXIC 1, or TOXIC 2, and the
CSE’s model number for the sensor installed in
that position.
4If no sensor is installed in this position, the screen
will show the word NONE. Be sure a null sensor is
installed in this position, if it is intentionally not in
use. Any position that does not have a functional
sensor must hold a null sensor and be configured
to say NONE.
2
3
Select Sensor
To Configure
OXYGEN
COMB
TOXIC 1
TOXIC 2
BACK
12:00
Select Sensor To
Configure Screen
Select
OXYGEN SENSOR
O2A2
ACCEPT
BACK
12:00
Select Oxygen Sensor
Screen
43
Selecting the Sensor Model Number
1For a list of the sensor models that would fit this
position, press
repeatedly until the sensor
number on your listed sensor appears.
2Assign this model number to the sensor position by
clicking
to scroll down to ACCEPT.
3Press
to accept the model number and return
the G4 to the SELECT SENSOR TO CONFIGURE
screen.
4Repeat steps 2 and 3 (above) for the remaining
sensor positions.
Exiting SENSOR CONFIGURATION
1After you configure your last sensor position, stay
on the SELECT SENSOR TO CONFIGURE screen
and click
to scroll to BACK.
NOTE:
Remember that any
positions you have
changed will stay in
alarm mode until the
G4 is calibrated. That
means the error code
UNC (uncalibrated
sensor) will show for
each sensor that was
configured. See page
52 for calibration
instructions.
44
2Press
to return to the CONFIGURATION MENU
Managing Peak Value
(MIN/MAX Gas Concentration) Data
Overview
The G4’s memory stores the lowest and highest
gas concentrations — the minimum and maximum
values — that each gas sensor has reported during
your shift. G4 saves this data, even when the unit is
powered down, until you manually clear it from the
G4’s memory or calibrate the unit. This section tells
you how to read and then clear this data.
What You’ll Need
• No special tools or materials
• Any log sheet or other record-keeping materials
your workplace requires
• These instructions
Reading MIN/MAX Values
1Leave the OPERATE screen and go to the MIN
MAX screen by pressing and holding
. The
minimum and maximum recorded values for all
sensors will replace the continuous gas
concentration measurements normally displayed
on the OPERATE screen.
Peak Level Screen
2Make a note of the MIN/MAX values.
3Release
to return to the OPERATE screen.
Clearing MIN/MAX Values
1Leave the OPERATE screen and go to the MIN
MAX screen by pressing and holding
.
2While holding
, press and hold
until the
MIN MAX values clear and the screen shows the
current readings.
3Release both buttons to return to the OPERATE
screen.
45
!CAUTION
Bump Testing
All sensors in the G4
must be bump tested or
calibrated before each
use/shift or any time
that an off-scale reading
or fault indicator is
displayed. Bump testing
or calibrating is essential
to ensuring that the G4
is functioning within
performance limits.
Overview
!CAUTION
Bump testing is not and
should not substitute for
a regular full calibration
by a person familiar with
this manual.
NOTE:
Clean, ambient air refers
to fresh air that you
are confident does not
contain contaminants.
46
Even a rugged and well designed safety device can
be damaged in a harsh environment. So workers and
operators know it’s essential to be sure gas monitors
are in good condition before they’re needed. And
that’s why every gas monitor should be bump tested
daily or before each shift. A bump test can uncover
problems such as:
• Sensors or electronics damaged by impact,
vibration, or water
• Sensor membranes or ports blocked by debris
• Sensors that have been contaminated by exposure
to the wrong gases
Bump testing is a two-part operation:
• First, you perform an offset test on all sensors by
exposing them to clean, ambient air or air from a
CSE Zero Air cylinder.
• Then you perform a span gas test, with samples of
the gases the G4 is set up to detect.
!WARNING
Pre-Bump Test Checklist
Use only CSE approved
calibration gas at the
concentrations indicated
in this manual. Failure
to do so may lead to
improper calibration and
improper instrument
performance.
Before you bump-test any G4, make sure that:
• At least two hours have passed since any new
oxygen or toxic gas sensors have been installed.
• The G4 is at room temperature (65–90° F).
• None of the sensors on the G4 have been stored
or used at less than 15% or more than 90% relative
humidity in the last 24 hours.
• The unit’s battery is fully charged.
• The unit’s time and date are set correctly. See page
33 for time and date information.
• None of the four sensor membranes (round
openings on the face of the G4) are obstructed.
NOTE:
Be sure to use the
CSE regulator that is
designed for a flow rate
of 0.5 L/min. It gives you
a flow rate of 0.5 L/min
no matter how wide you
open it.
TIP:
Cylinders that contain
more than one test gas
can save you time during
testing. You can order
two-, three-, or four-gas
mixtures containing
oxygen (O2 ), methane
(CH4 ), carbon monoxide
(CO), or hydrogen
sulfide (H2S).
Always purchase nitric
oxide (NO) and nitrogen
dioxide (NO2 ) in singlegas cylinders. Never
combine them with each
other or with any other
test gases. See page 48
for more information on
testing G4s with NO and
NO2 sensors.
• You can apply all test gases at a flow rate of
0.5 L/min.
• You have enough calibration gas on hand to bump
test all units.
Test Gas Specifications
You will need one or more of these test gases (one
for each sensor) to accurately check the G4’s span
gas calibration. Use only cylinders containing these
exact concentrations. Your CSE representative can
supply CSE-certified cylinders for maximum safety
and reliability.
Test Gas Specifications
GasMixture
Oxygen (O2)
20.9%, balance nitrogen
Methane (CH4)
2.5%, balance air
Carbon monoxide (CO)
50 ppm, balance air
Hydrogen sulfide (H2S)
25 ppm, balance air
Nitric oxide (NO)
25 ppm, balance nitrogen
Nitrogen dioxide (NO2)
10 ppm, balance air
47
Never Mix NO or NO2
Nitric oxide (NO) and nitrogen dioxide (NO2) sensors
must be tested separately because combining them
— or mixing them with test gases for other sensors —
may cause the G4 to fail a bump test or calibration.
NO and NO2 interact with each other and may cause
false readings.
• When your G4 is equipped with sensors for these
gases, you will have to make at least three test
runs: one for NO, one for NO2, and the last one for
O2 and CH4.
• NO and NO2 sensors will respond to H2S, and the
H2S sensor will respond to both NO and NO2,
giving you false readings. If your G4 is equipped
with either an NO or NO2 sensor and an H2S
sensor, allow all sensors to clear in zero air
between bump tests or calibrations.
48
Bump Test Part 1: Offset Gas
What You’ll Need
• Your G4, or all the G4s you’re responsible
for testing
• G4 calibration cap and calibration gas tubing
• Offset gas: Either a CSE Zero Air cylinder with
CSE 0.5 L/min regulator, or clean, ambient air
(For important information about calibration gases,
see page 47.)
• These instructions
Bump Test with Offset Gas
1Turn on the G4 and make sure the display shows
the OPERATE screen.
TIP:
Consider using Zero Air
if you are not confident
that the air in the testing
location is free of
contaminants.
NOTE:
Be sure to use the
CSE regulator that is
designed for a flow rate
of 0.5 L/min. It gives you
a flow rate of 0.5 L/min
no matter how wide you
open it.
2Snap the calibration cap onto the face of the G4,
and screw the regulator onto the Zero Air cylinder
Use the calibration gas tubing to connect the
nipple on the calibration cap to the nipple on the
regulator. (Skip Step 2 if you are using clean,
ambient air.)
3Open the regulator valve. Gas flow should be
0.5 L/min. (Skip Step 3 if you are using clean,
ambient air.)
4Apply Zero Air or clean, ambient air for a minimum
of 2 minutes.
!WARNING
If a bump test fails,
clean or replace the
sensor cover and
perform a full calibration
of the affected sensor(s).
Do not use the G4 if one
ore more sensors fails
the bump test and will
not calibrate according
to the procedures in the
manual.
49
!WARNING
Ensure that all alarms
(vibration, visual, and
audible) are functional
during the bump test.
Failure to do so may
impede the ability of the
user to be alerted when
a potentially hazardous
environmental condition
exists.
5After Zero Air or clean, ambient air is applied for at
least 2 minutes, check the G4 display. It will show
the gases this unit is set up to detect, and the
concentration of each gas in the clean air sample.
To pass the offset test, the gas concentration
readings, after 2 minutes, must be between these
limits:
Offset Gas Test Concentration Limits
Gas
MinimumMaximum
Oxygen (O2)
20.4%21.4%
Methane (CH4)
-0.1%0.1%
Carbon Monoxide (CO)
-3 ppm
3 ppm
Hydrogen Sulfide (H2S)
-2 ppm
2 ppm
Nitrogen Dioxide (NO2)
-0.5 ppm
0.5 ppm
-2 ppm
2 ppm
Nitric Oxide (NO)
If the reading for any gas is outside these limits,
the sensor for that gas is not operating properly.
Set aside any G4 with a failed bump test for
calibration of the failed sensor(s).
6Close the regulator valve and disconnect the
tubing if using a Zero Air cylinder.
Bump Test Part 2: Span Gases
What You’ll Need
• Your G4, or all the G4s you’re responsible for
testing
• G4 calibration cap and calibration gas tubing
• Span gases: CSE calibration gas cylinders to
match the sensors on your G4s (For important
information about calibration gases, see page 47.)
50
!WARNING
Bump Test with Span Gases
If a bump test fails, clean
or replace the sensor
cover and perform a
full calibration of the
affected sensor(s). Do
not use the G4 if one or
more sensors fails the
bump test and will not
calibrate according to
the procedures in the
manual.
1Ensure that the G4 still displays the OPERATE
screen.
2Snap the calibration cap onto the face of the
G4, and screw the regulator onto the first test gas
cylinder. Use the calibration gas tubing to connect
the nipple on the calibration cap to the nipple on
the regulator.
3Open the test cylinder’s regulator valve. Gas flow
should be 0.5 L/min.
4Apply gas from the first test cylinder for a minimum
of 2 minutes.
5Repeat Steps 2 through 4 for each gas the G4 is
set up to detect.
6After each test gas is applied for at least 2 minutes
check the G4 display. Each time you apply a span
gas, it will show its concentration in that sample.
To pass the span gas test, the gas concentration
readings, after 2 minutes, must be between
these limits:
Span Gas Concentration Limits
NOTE:
Be sure to use the
CSE regulator that is
designed for a flow rate
of 0.5 L/min. It gives you
a flow rate of 0.5 L/min
no matter how wide you
open it.
Gas
MinimumMaximum
Oxygen (O2)
20.4%21.4%
Methane (CH4)
2.3%2.7%
Carbon Monoxide (CO)
47 ppm
53 ppm
Hydrogen Sulfide (H2S)
23 ppm
27 ppm
Nitrogen Dioxide (NO2)
9.0 ppm
11.0 ppm
Nitric Oxide (NO)
20 ppm
30 ppm
7If the reading for any gas is outside these limits,
the sensor for that gas is not operating properly.
Set aside any G4 with a failed bump test for
calibration of the failed sensor(s).
For more about bump testing, see page 46. For
information about sensors, see page 37.
51
!WARNING
Calibration
Always calibrate
the G4 according to
the directions in this
manual, using the
specified calibration
gas, gas regulator, and
procedures. Failure
to calibrate properly
can lead to improper
instrument performance.
Sensors must be
calibrated every 31 days
at a minimum.
Overview
!WARNING
Calibration must be
performed by a person
familiar with this manual
and only in accordance
with the procedures in
this manual.
NOTE:
Clean, ambient air refers
to fresh air that you
are confident does not
contain contaminants.
52
As it comes from the manufacturer, your G4 is
calibrated so that the reading on its display gives
you an accurate report on the gases around it. That
means, for instance, that if the air contains 2.5%
methane, you will see “2.5%” next to “CH4. ” When
a bump test shows that it’s no longer giving a true
reading, it’s time to calibrate it again. And, even if
it’s working perfectly, the law requires that each gas
monitor be calibrated routinely every 31 days.
Like bump testing, calibrating the G4 is a two-part
operation:
• First, you do an offset calibration by exposing
each sensor to clean, ambient air or air from a
CSE Zero Air cylinder.
• Then you do a span calibration by exposing each
sensor to a known concentration of the gas that
sensor is designed to detect, and setting the G4 to
report that concentration accurately.
Pre-Calibration Checklist
Before you calibrate any G4, make sure that:
• At least two hours have passed since any new
oxygen or toxic gas sensors have been installed.
• The G4 is at room temperature (between 65° and
90° F.)
• None of the sensors on the G4 have been stored
or used at less than 15% or more than 90% relative
humidity in the previous 24 hours.
• The unit’s battery is fully charged.
• The unit’s clock and calendar are set correctly.
(See page 33, Setting Clock and Calendar.)
• None of the four sensor membranes (round
openings on the face of the G4) are obstructed.
• You have a regulator that can apply all test gases
at a flow rate of 0.5 liters per minute.
• You have enough calibration gas on hand to test all
units.
• You have enough time to perform a full calibration
of all configured sensors.
• You perform every step shown below, and
follow the instructions you see on the G4’s display.
53
Calibration Part 1: Offset Calibration
NOTE:
Be sure to use the
CSE regulator that is
designed for a flow rate
of 0.5 L/min. It gives you
a flow rate of 0.5 L/min
no matter how wide you
open it.
What You’ll Need
• Your G4, or all the G4s you’re responsible for
calibrating
• G4 Calibration Cap and calibration gas tubing
• Offset gas: Either a CSE Pure Air cylinder with
CSE 0.5 L/min regulator, or clean, ambient air (For
important information about calibration gases, see
page 47.)
• These instructions
A. Selecting the Sensors
CSE G4
MAIN MENU
SETUP
OPERATE
TURN OFF
12:00
Main Menu
54
1Push and hold the
button. While holding the
ON button, push and hold the NAVIGATE (
)
button for about 3 seconds until the MAIN MENU
appears.
2On the MAIN MENU, click
SETUP.
to scroll down to
3Press
to select SETUP. This will take you to the
SETUP MENU.
Denotes: See illustration below
4On the SETUP MENU, click
CALIBRATE.
to scroll down to
5Press
to reach the SELECT SENSORS screen.
This screen will show the gas sensors on this G4.
(See page 39 for information on changing the
sensors to detect different gases.)
6Click
to scroll to each sensor, pressing
select each one you wish to calibrate.
NOTE:
to
Nitrogen dioxide
(NO2 ) and nitric oxide
(NO) sensors must be
calibrated one at a time.
The G4 will not allow
you to select either of
these sensors at the
same time as any other
sensor. Selecting either
of these sensors deselects all others.
7When you have selected all desired sensors, click
to scroll to ACCEPT. Press
to open the
OFFSET CALIBRATION screen.
NOTE:
2Open the regulator valve. Gas flow should be
0.5 L/min. (Skip Step 2 if you are doing the offset
calibration in clean, ambient air.)
Be sure to use the
CSE regulator that is
designed for a flow rate
of 0.5 L/min. It gives you
a flow rate of 0.5 L/min
no matter how wide you
open it.
4
B. Calibrating with Offset Gas
1Snap the calibration cap onto the face of the G4,
and screw the regulator onto the Zero Air cylinder
Use the calibration gas tubing to connect the
nipple on the calibration cap to the nipple on the
regulator. (Skip Step 1 if you are using clean,
ambient air.)
5
CSE G4
SETUP MENU
MAIN MENU
CALIBRATE
CONFIGURE
CAL DATE
12:00
Setup Menu
6
Select Sensors
to Calibrate
O2
21.0 %
CH4 2.5 %
NO2
10 PPM
CO
50 PPM
ACCEPT
BACK
12:00
Select Sensors Screen
Select Sensors
to Calibrate
O2
21.0 %
CH4 2.5 %
NO2
10 PPM
CO
50 PPM
ACCEPT
BACK
12:00
Select Sensors Screen
55
Denotes: See illustration below
3Looking at the OFFSET CALIBRATION screen
on the G4’s display, click the
button to scroll
to NEXT.
4Press the
button to start the offset calibration
routine. You will see an onscreen timer countdown.
When the countdown reaches zero, the display will
show OFFSET RESULTS: “P” (pass) or “F” (fail) for
each sensor.
5If all sensors are marked “P”, go ahead with span
gas calibration.
NOTE:
Proceeding to span
calibration will only
calibrate sensors that
have passed offset
calibration.
NOTE:
Clicking NEXT after
offset calibration,
regardless of the results,
will enter the G4 into
span calibration for
those sensors that have
passed offset calibration.
3
If an “F” appears on the display next to a sensor,
it is malfunctioning or still out of calibration. Repeat
offset calibration by clicking the
button and
scrolling to REDO. This will take you back to the
OFFSET CALIBRATION screen.
If after a second offset calibration the “F” still
appears, set the unit aside and report to your
supervisor. Return the unit to CSE for service
if necessary.
Close the regulator valve and disconnect the
tubing if you are using a Zero Air cylinder.
4
OFFSET
O2
Apply ZERO gas
Select NEXT
when ready.
NEXT
BACK
12:00
Offset Calibration
Screen
56
5
OFFSET
RESULTS
O2
:P
CH4
:P
CO
:P
OFFSET
RESULTS
O2
:P
CH4
:F
CO
:P
NEXT
REDO
NEXT
REDO
12:00
Offset Results Screen
All Sensors Passed
12:00
Offset Results Screen
CH4 Sensor Failed
Calibration Part 2: Span Gases
What You’ll Need
• Your G4 or all the G4s you’re responsible for testing
(Only G4s showing “P” for all sensors after offset
calibration should proceed to span calibration.)
• CSE calibration cap and calibration tubing
supplied with G4
• Span gases: CSE calibration gas cylinders to
match the sensors on your G4s (For important
information about calibration gases, see page 47.)
• These instructions
(For a detailed pre-calibration checklist, see
page 53.)
OFFSET
RESULTS
O2
:P
CH4
:P
CO
:P
NEXT
REDO
12:00
Offset Results Screen
All Sensors Passed
Calibrating with Span Gases
1On the OFFSET RESULTS screen, scroll to NEXT
using the
button.
2Press the
button to advance to the SPAN
CALIBRATION screen.
3If you did not use a Zero Air cylinder for offset
calibration, snap the G4 calibration cap onto the
face of the G4.
4Make sure the regulator is screwed tightly to the
appropriate span gas cylinder that matches the
gases chosen for calibration.
5Connect the calibration cap nipple to the regulator
on the span gas cylinder using the calibration
gas tubing.
NOTE:
Be sure to use the
CSE regulator that is
designed for a flow rate
of 0.5 L/min. It gives you
a flow rate of 0.5 L/min
no matter how wide you
open it.
6Open the regulator valve. Gas flow should be
0.5 L/min.
57
Denotes: See illustration below
7Use the
button to scroll to NEXT.
8Press the
button to start the calibration routine.
You will see the onscreen timer countdown. When
the countdown reaches zero, the display will show
SPAN RESULTS: “P” (pass) or “F” (fail) for the
sensor you are testing.
If all sensors are marked “P”, the G4 is ready
for use.
If an “F “appears on the display next to a sensor,
it is malfunctioning or still out of calibration.
Repeat the calibration procedure. If a sensor or
sensors still show “F”, set the unit aside. Report
to your supervisor. Return to CSE for servicing
if necessary.
Repeat complete procedure until all sensors
are calibrated.
9Close the regulator valve and disconnect the
calibration cap.
When you have calibrated all sensors, press the
G4’s
button to select NEXT. Return to the
SETUP MENU, and then to the MAIN MENU.
For information about calibration, see page 52. For
information about sensors, see page 37.
7
8
SPAN
O2
Apply SPAN gas
Select NEXT
when ready.
NEXT
BACK
12:00
Span Calibration
Screen
58
SPAN
RESULTS
O2
:P
CH4
:P
CO
:P
NEXT
REDO
12:00
Span Results Screen
Cancelling or Restarting Calibration
You can cancel or restart calibration from any of five
screens on the green LCD display.
Just use the
button to scroll down to the menu
item you want, then select it by pressing the
button.
• From SELECT SENSORS TO CALIBRATE screen,
select BACK. (Returns you to the SETUP menu.)
• From OFFSET-APPLY ZERO GAS screen, select
BACK. (Returns you to SELECTED SENSORS TO
CALIBRATE screen.)
• From OFFSET RESULTS screen, select REDO.
(Returns you to OFFSET: APPLY ZERO GAS
screen.)
• From SPAN—APPLY SPAN GAS screen, select
BACK. (Returns you to SELECT SENSORS TO
CALIBRATE screen.)
• From SPAN RESULTS screen, select REDO.
(Returns you to OFFSET: APPLY ZERO GAS
screen.)
59
60
!WARNING
If the outer case of the
G4 is cracked or broken,
discontinue use of the
G4. Dust, debris, or
water that enters the G4
may negatively impact
instrument performance.
MAINTENANCE &
TROUBLESHOOTING
Cleaning
Your G4 will be more reliable and easier to use if you
keep it as clean as possible. Here’s how:
• Never immerse it in water.
• Never pressure-wash it.
• Never use solvents or detergents.
• Never use a sharp tool for cleaning; you may
damage the dust- and water-tight seal between
the cover and casing.
And if you have to open the sensor cover:
• Gently clean debris from the sensor area before
removing the cover.
• Clean the slot between the edge of the cover and
the unit’s casing. Use a soft brush and clean
water to remove any material trapped in this space,
then blow the area dry with compressed air before
removing the cover.
Inspecting for Damage
When you pick up your G4 at the beginning of
your shift, look it over on all sides for signs of wear
and tear.
• Turn it on to be sure the display is working and
readable.
• Check the sensor compartment cover for cracks or
other damage.
• Inspect the protective membrane molded into the
sensor cover. A clogged or damaged membrane
can hamper calibration and response time, or
result in sensor damage.
61
• Inspect the audio alarm sound port. Make sure
none of the 12 openings in it are blocked, and that
the sound tube behind the port is free of debris.
• Be sure your equipment belt is in good shape and
can securely hold your G4.
Replacing the Sensor
Compartment Cover
If your G4’s sensor compartment cover is damaged,
it’s not hard to replace.
What You’ll Need
• 5/64” hex key wrench
• Replacement sensor compartment cover
• Replacement sensor compartment gasket
• Cleaning gear (soft brush, clean water,
compressed air)
• These instructions
Opening the Sensor Compartment
1Clean the entire G4, removing loose debris from all
sides with a soft brush, water, and a gentle stream
of air.
2Remove the old sensor cover:
• Turn the hex screw in the cover’s center
counterclockwise until it disengages from the G4.
• Pull the cover straight up from the case. Never
use a sharp tool to pry the cover off; you may
damage the dust- and water-tight seal between
the cover and casing.
62
3Look for internal damage: The sensor
compartment cover has three components: the
cover itself, the protective membrane, and the
audio alarm sound port.
• Inspect the protective membrane molded into the
sensor cover. A clogged membrane can hamper
calibration and response time. A torn membrane
can result in sensor damage. Since the membrane
is molded into the sensor cover, a damaged
membrane can only be replaced by replacing the
entire sensor cover.
• Inspect the audio alarm sound port. Make sure
none of the openings in it are blocked, and that the
the sound tube behind the port is free of debris.
However, there is foam in the sound tube and the
tube must be replaced if it is absent.
• Inspect the gasket and replace if damaged. Be
sure the round rib on the new gasket fits neatly into
the sensor cover, facing the sensors.
4 Install a new sensor compartment cover:
!CAUTION
• Tighten the central hex screw by hand until snug.
Do not overtighten the
retaining screw, as doing
so may cause damage
to the case of the G4.
63
64
QUICK GUIDE
This section will introduce you to the basics of the
CSE G4 Multi Gas Monitor by showing you how to
turn it on and off, bump-test and calibrate it, and
understand its alarms. To stay safe and get the
most out of your G4, be sure to read this manual
completely before using your G4.
Turning On Your G4
1Make sure your G4’s battery is fully charged at the
beginning of your shift ensuring that the charge
indicator light on the front of the charger is green,
indicating that the docked G4 has a full charge.
2After you take your G4 off the charger, turn it on
by pushing and holding the
button until the
display shows the STARTUP screen with the
CSE logo.
NOTE:
Turning Off Your G4
Turn off your G4 only
at the end of your shift,
right before you turn it
in or clip it to the battery
charger. Never turn it off
during your shift.
1Push and hold the
button. While holding the
ON button, push and hold the NAVIGATE (
)
button for about 3 seconds until the MAIN MENU
appears.
CSE G4
MAIN MENU
SETUP
OPERATE
TURN OFF
2Release both buttons.
3Use the
line.
4Press the
button to scroll down to the TURN OFF
button to turn off the G4.
12:00
Main Menu
65
Understanding the Alarms
Overview
When your G4 detects dangerous gas levels in the air
around you, you’ll hear, feel, and see three alarms:
• Audible (dual-tone alarm indicating a high- or
low-level alert)
• Vibrating (pulsating motor)
• Visual (two flashing red LEDs plus flashing
LCD display)
Follow your operation’s procedures when you hear,
feel, or see an alarm.
How to Interpret
When you hear, feel, or see an alarm, check your
G4’s OPERATE screen. The lowest line on the screen
will show the reason for the current or most recent
alarm, alternating with the time of day. A low or
high alarm for any configured sensors will also be
displayed next to the gas concentration.
• All three alarms operating continuously mean the
same thing: an alert due to a potentially dangerous
level of one or more gases. Follow your workplace
safety procedures or head for fresh air immediately.
• An intermittent “beep” every few seconds means
the G4 needs attention. Follow your workplace
safety procedures, such as reporting the alarm, but
do not turn off your G4 until the end of your shift.
Alternating Low Alarm
Screens for Low
Oxygen Concentration
66
For more about alarms, see page 24.
Bump Testing
Bump Test Part 1: Offset Gas
NOTE:
Clean, ambient air refers
to fresh air that you
are confident does not
contain contaminants.
1Snap the calibration cap onto the face of the G4,
and screw the regulator onto the Zero Air cylinder
Use the calibration gas tubing to connect the
nipple on the calibration cap to the nipple on the
regulator. (Skip this step if you are using clean,
ambient air.)
2Apply Zero Air or clean, ambient air for a minimum
of 2 minutes.
3After Zero Air or clean, ambient air is applied for at
least 2 minutes, ensure that the gas concentration
readings are between these allowable limits:
Offset Gas Test Concentration Limits
Gas
MinimumMaximum
Oxygen (O2)
20.4%21.4%
Methane (CH4)
-0.1%0.1%
Carbon Monoxide (CO)
-3 ppm
3 ppm
Hydrogen Sulfide (H2S)
-2 ppm
2 ppm
Nitrogen Dioxide (NO2)
-0.5 ppm
0.5 ppm
-2 ppm
2 ppm
Nitric Oxide (NO)
4If the reading for any gas is outside these limits,
the sensor for that gas is not operating properly.
Set aside any G4 with a failed bump test for
calibration of the failed sensor(s).
67
Bump Test Part 2: Span Gas Test
1Snap the calibration cap onto the face of the
G4, and screw the regulator onto the first test gas
cylinder. Use the calibration gas tubing to connect
the nipple on the calibration cap to the nipple on
the regulator.
2Open the test cylinder’s regulator valve.
3Repeat Step 2 for each gas the G4 is set up to detect.
4After each test gas is applied for at least 2 minutes,
ensure that the corresponding gas concentration
readings are between these limits:
Span Gas Concentration Limits
Gas
MinimumMaximum
Oxygen (O2)
20.4%21.4%
Methane (CH4)
2.3%2.7%
Carbon Monoxide (CO)
47 ppm
53 ppm
Hydrogen Sulfide (H2S)
23 ppm
27 ppm
Nitrogen Dioxide (NO2)
9.0 ppm
11.0 ppm
Nitric Oxide (NO)
20 ppm
30 ppm
5If the reading for any gas is outside these limits,
the sensor for that gas is not operating properly.
Set aside any G4 with a failed bump test for
calibration of the failed sensor(s).
For more about bump testing, see page 46. For
information about sensors, see page 37.
Calibration
Selecting the Sensors
1Push and hold the
button. While holding the
ON button, push and hold the NAVIGATE (
)
button for about 3 seconds until the MAIN MENU
appears.
68
2On the MAIN MENU, click
SETUP.
to scroll down to
!WARNING
Calibration must be
performed by a person
familiar with this manual
and only in accordance
with the procedures in
this manual.
3Press
to select SETUP. This will take you to the
SETUP MENU.
4On the SETUP MENU, click
CALIBRATE.
to scroll down to
5Press
to reach the SELECT SENSORS screen.
This screen will show the gas sensors on this G4.
(See page 39 for information on changing the
sensors to detect different gases.)
6Click
to scroll to each sensor, pressing
select each one you wish to calibrate.
to
7When you have selected all desired sensors, click
to scroll to ACCEPT. Press
to open the
OFFSET CALIBRATION screen.
Calibration Part 1:
Calibrating with Offset Gas
NOTE:
Clean, ambient air refers
to fresh air that you
are confident does not
contain contaminants.
1Snap the calibration cap onto the face of the G4,
screw the regulator onto the Zero Air cylinder. Use
the calibration gas tubing to connect the nipple
on the calibration cap to the nipple on the regulator.
(Skip Step 1 if you are using clean, ambient air.)
2Open the regulator valve. Gas flow should be
0.5 L/min. (Skip Step 2 if you are doing the
offset calibration in clean, ambient air.)
3Scroll to NEXT and press the
button to start the
offset calibration routine. You will see an onscreen
timer countdown. When the countdown reaches
zero, the display will show OFFSET RESULTS: “P”
(pass) or “F” (fail) for each sensor.
4If all sensors are marked “P”, go ahead with span
gas calibration.
If an “F” appears on the display next to a sensor,
it is malfunctioning or still out of calibration. Repeat
offset calibration by clicking the
button and
scrolling to REDO. This will take you back to the
OFFSET CALIBRATION screen. If after a second
offset calibration the “F” still appears, set the unit
aside and report to your supervisor.
5Close the regulator valve and disconnect the
tubing if you are using a Zero Air cylinder.
69
Calibration Part 2:
Calibrating with Span Gas
1On the OFFSET RESULTS screen, scroll to NEXT
using the
button.
2Press the
button to advance to the SPAN
CALIBRATION screen
3If you did not use a Pure Air cylinder for offset
calibration, snap the G4 calibration cap onto the
face of the G4, screw the regulator tightly to
the appropriate span gas cylinder that matches
the gases chosen for calibration, and connect the
calibration gas tubing.
4Open the regulator valve. Gas flow should be
0.5 L/min.
5Use the
button to scroll to NEXT and press the
ON button to start the calibration routine. You
will see the onscreen timer countdown. When the
countdown reaches zero, the display will show
SPAN RESULTS: “P” (pass) or “F” (fail) for the
sensor(s) you are testing.
6Close the regulator valve and disconnect the
calibration cap.
If all sensors are marked “P”, the G4 is ready
for use.
If an “F “appears on the display next to a sensor,
it is malfunctioning or still out of calibration.
Repeat the calibration procedure. If a sensor or
sensors still show “F”, set the unit aside. Report
to your supervisor. Return to CSE for servicing
if necessary.
Repeat complete procedure until all sensors
are calibrated.
Quick Guide Conclusion
Use this Guide to get a general idea of how the G4
works. But, for safety, be sure to read everything in
this manual.
70
APPENDICES
Gas Interference
Although each gas sensor is designed to measure
only one “target” gas, small amounts of other gases
that reach it along with the target gas can damage
the sensor or interfere with its accuracy. That’s why
it’s important to use the G4 only to measure the gases
for which it is calibrated. The table below shows each
sensor’s approximate response to other gases at
the same concentration as the calibration gas. Gas
response percentages may vary by as much as 50%.
Gas Interference
Applied Gas
Calibration Gas
CO
H2SNONO2
CO
100% < 1.5% < 0.1% < 0.1%
H2S
< 0.1% 100% < 30% < -40%
NO
< 5%
< 4%
100% < 0.5%
NO2
< 0.1% < -20% < 5%
SO2
< 0.1% < 10%
H2
< 60% < 0.2% < 0.1%
CL
< 0.1% < -25% < 15% 100%
C2H4
< 25%
< 0.5
100%
< 3% < -2.5%
-
0%
< 0.1
71
G4 Technical Specifications
Physical Specifications
Dimensions (H x W x D)
6.3 x 3.1 x 1.9 inches (without belt clip)
Weight
16.2 oz (with belt clip)
Case
Rubberized anti-static and
shock absorbing overmold
Buttons
(on, enter/select),
(navigation)
Ingress Protection
Tested to IP 65
Display
2.25” LCD with green LED backlight
BatteryLithium-ion
Configurations
The G4 accepts 1 – 4 Sensors:
1. Oxygen (O2)
2. Combustible (CH4)
3. Toxic 1*
4. Toxic 2*
*Up to 2 of the following toxic sensors:
Carbon Monoxide (CO)
Hydrogen Sulfide (H2S)
Nitric Oxide (NO)
Nitrogen Dioxide (NO2)
Performance Specifications
Battery Run Time
Up to 25 hours
(room temperature)
Battery Charge Time
≤ 6 hours
Sensor Life (all sensors)
24 months minimum
Alarms
Visual – Dual LED
Audible
Vibrating
Calibration Gas
Concentrations Oxygen: 20.9%
Methane: 2.5%
Carbon Monoxide: 50 ppm
Hydrogen Sulfide: 25 ppm
Nitric Oxide: 25 ppm
Nitrogen Dioxide: 10 ppm
72
Operating Environment
Temperature Range
-20°C – 50°C (operating)
0°C – 30°C (charging)
Humidity Range
15% RH – 90% RH (continuous, non-condensing)
Pressure Range
800 – 1200 mbar
Sensor Specifications
Gas
Type
Measuring Resolution Accuracy t90 Response
Range (at time/Time (s, typical,
temperature
of calibration)
room temp.)
Oxygen Electrochemical
0–25%
0.1%
(O2)
± 0.5%
(at 19.5% O2)
20
± 1.0%
(< 19.0% O2)
Methane
Catalytic
0–5%
0.1%
(CH4)
Complies with
CFR 30 Part 22.7
for 0-4% CH4
± 0.5% at 5% CH4
Carbon Electrochemical 0–1000 ppm 1 ppm ±3 ppm or ±10%
Monoxide
(whichever is greater)
(CO)greater)
20
25
Hydrogen Electrochemical 0–100 ppm
1 ppm ±1 ppm or ±10%
55
Sulfide
(whichever is greater)
(H2S)
Nitric
Electrochemical 0–200 ppm
1 ppm ±2 ppm or ±10%
Oxide
(whichever is greater)
(NO)
25
Nitrogen Electrochemical 0–20 ppm 0.1 ppm ±0.5 ppm or ±20%
Dioxide
(whichever is greater)
(NO2)
40
Approval
MSHA Approval22-A110001-0
73
74
75
CSE Corporation
1001 Corporate Lane
Export, PA 15632
1-800-245-2224
UMG41E