1
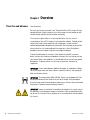
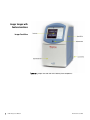
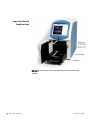
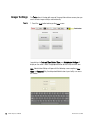
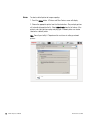
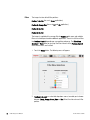
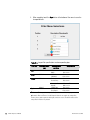
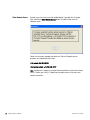
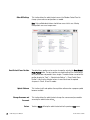
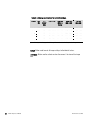
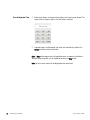
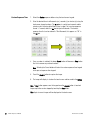
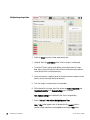
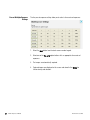
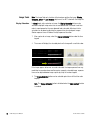
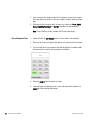
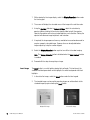
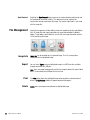
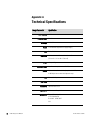
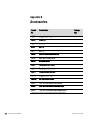
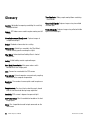
User Do cu men tatio n
Imager Manual
myECL™
Table of Contents
Chapter 1: Overview................................................................................................1
Thank You and Welcome Letter....................................................................1
Contacting Thermo Fisher Scientific........................................................2
Instrument Overview............................................................................................2
Included Accessories.........................................................................................2
Functionality.........................................................................................................3
MYECL Imager Acquisition Software.............................................................3
myImageAnalysis*
Software..............................................................................................4
Chapter 2: Imager........................................................................................................5
Installation Guidelines..........................................................................................5
Space Requirements..........................................................................................5
Electrical Requirements....................................................................................5
Environmental Requirements........................................................................6
Computer Requirements.................................................................................6
Instrument Images with Feature Locations..............................................7
Start Up............................................................................................................... 10
Shut Down......................................................................................................... 11
Optional USB Features....................................................................................... 12
Instrument Settings............................................................................................. 13
Tools..................................................................................................................... 13
Date and Time................................................................................................... 14
Printer.................................................................................................................. 15
Filters.................................................................................................................... 16
Administrator Settings...................................................................................... 18
Set Image Gallery Location.......................................................................... 18
Allow Remote Access..................................................................................... 19
Other Operating System (OS) Settings.................................................... 20
Reset Default Focus Position....................................................................... 20
Update Software.............................................................................................. 20
Change Username and Password.............................................................. 20
Return.................................................................................................................. 20
Chapter 3: Image Acquisition................................................................. 21
Imager Settings.......................................................................................................... 21
Camera Settings Available in Chemi, UV and Vis Modes................... 22
Settings Only Available in UV and Vis Modes........................................ 24
Chemiluminescence (Chemi) Mode...................................................... 25
Camera Settings............................................................................................... 25
Capture Settings.............................................................................................. 25
Single Image Acquisition............................................................................ 25
Pre-set Exposure Time................................................................................ 26
Custom Exposure Time............................................................................... 27
Multiple Image Acquisition......................................................................... 28
Pre-set Multiple Exposure Settings.............................................................. 29
User-defined Multiple Exposure Settings..................................................... 30
Image Tools........................................................................................................ 32
Display Saturation..................................................................................... 32
Invert Image.............................................................................................. 33
Auto Contrast............................................................................................ 33
Image Information..................................................................................... 33
Ultraviolet (UV) Mode........................................................................................ 34
Camera Settings............................................................................................... 34
Capture Settings.............................................................................................. 34
Image Acquisition...................................................................................... 34
Pre-set Exposure Time................................................................................ 35
Custom Exposure Time............................................................................... 36
Stop Image Acquisition.............................................................................. 37
Image Tools........................................................................................................ 37
Display Saturation..................................................................................... 37
Invert Image.............................................................................................. 38
Auto Contrast............................................................................................ 38
Visible (Vis) Mode.................................................................................................. 39
Camera Settings............................................................................................... 39
Image Acquisition–Transmitted Light.......................................................... 39
Image Acquisition–Reflected Light.............................................................. 39
Pre-set Exposure Time................................................................................ 40
Custom Exposure Time............................................................................... 41
Image Tools........................................................................................................ 41
Display Saturation..................................................................................... 41
Invert Image.............................................................................................. 42
Auto Contrast............................................................................................ 43
File Management................................................................................................... 43
Image Info.......................................................................................................... 43
Export................................................................................................................... 43
Print...................................................................................................................... 43
Delete................................................................................................................... 43
Image Information.......................................................................................... 44
Image Gallery.................................................................................................... 45
Image Viewing.......................................................................................... 45
Thumbnail................................................................................................ 45
File List..................................................................................................... 46
Search...................................................................................................... 46
Chapter 4: Maintenance................................................................................. 47
Cleaning the Imager and Sample Screens....................................... 47
LCD Touchscreen.................................................................................................... 47
Use of the Stylus..................................................................................................... 47
UV Transilluminator.............................................................................................. 48
Band Excision.................................................................................................... 48
Cleaning the Transilluminator..................................................................... 49
Replacement of Transilluminator Bulbs................................................... 49
Emission Filters........................................................................................................ 50
Changing Filters............................................................................................... 50
Appendix A: Technical Specifications........................................ 52
Appendix B: Accessories................................................................................ 53
Appendix C: Related Thermo Scientific Products.... 54
Glossary.................................................................................................................................... 55
Chapter 1
Thank You and Welcome
Overview
Dear Researcher:
We thank you for your investment in our Thermo Scientific MYECL Imager. We have
worked to design a highly functional, yet intuitive, imager that will provide you with
valuable images and data of high-resolution and quality.
This manual has been written as a concise guide for the start-up, use and
customization of your MYECL Imager unit and acquisition software. Detailed sections
covering the imager, image acquisition, file management, maintenance and
troubleshooting provide comprehensive information. We encourage you to read the
entire manual for a full understanding of the imager, but a Quick Start guide is
provided if you want to begin using your new imager immediately.
Thermo Scientific products are always at the forefront of scientific instrument
design, and we strive to design and produce instruments that can help you achieve
your research goals. Your feedback is a valuable tool that we use for future product
development, so please contact us if you have any questions, comments or
suggestions.
IMPORTANT Review and implement guidelines for proper set-up before installation.
Locate the imager away from water, solvents, corrosive materials, strong magnetic
fields and vibration sources.
IMPORTANT The imager weighs 65lbs (29.5kg). Please use two people to lift it by
grasping the bottom and the handle at the rear of the imager. Using two people,
place the imager onto the benchtop given proper space, electrical and environmental
requirements. Remove the outer packaging materials.
IMPORTANT Imager use outside of the workflows described in this manual may put
the operator at risk of dangerous exposure to electrical shock or radiated emissions.
Do not use this instrument for any purposes or in any configurations not described in
this manual.
1
MYECL
Imager User Manual
Thermo Fisher Scientific
Contacting Us
For technical or service assistance on the MYECL Imager:
•
•
U.S. Customers: 1-800-874-3723
Fax: 1-800-842-5007
•
International Customers: 1-815-968-0747
• Fax: 1-815-968-4736
Technical Support email for U.S. and international customers:
[email protected]
Technical Support email for European customers:
[email protected]
For more information about the Thermo Scientific Protein Biology product line,
please visit our website: www.thermoscientific.com/pierce
Imager Overview
Included Accessories
The MYECL Imager is designed to be a useful tool for the researcher needing intuitive
equipment and software with fast imaging capabilities.
Your imager purchase includes the following accessories (each quantity 1):
Thermo Scientific MYImageAnalysis Software – CD and User Manual
Chemiluminescence exposure screen
White light conversion screen
UV exposure screen
Imaging reference target
Quick start guide
USB memory device
Stylus
Stylus holder
Power cord with C13 connector
Optional items, including additional filters and UV bulbs (365nm), may be added to
the above list depending on the items ordered with the imager.
Note Upon receiving your imager, please verify you have received all of the items
listed above. Please contact Thermo Scientific Technical Support for assistance.
2
MYECL
Imager User Manual
Thermo Fisher Scientific
Functionality
MYECL
Imager
Acquisition Software
The MYECL Imager provides:
•
UV and white light illumination source for imaging of samples
•
Detailed images with varying resolution (1×1, 2×2, 3×3, 4×4 and 8×8 binning)
of chemiluminescent Western blots and electrophoresis gels
•
Low-noise, high-dynamic range CCD camera detection
•
Hardware and software optimized for image acquisition
•
One-touch image acquisition
•
Multiple image acquisition with pre-set and user-defined settings
•
Multitasking capability to review captured images while acquiring new images
Each imager arrives loaded with the MYECL Imager Acquisition Software. This
manual gives detailed information on using all software functions and modes.
The acquisition software allows you to acquire images using three different modes:
Chemiluminescence (Chemi) mode for image acquisition of self-emitting,
chemiluminescent light
Ultraviolet (UV) mode for image acquisition of UV-excited light
Visible (Vis) mode for image acquisition of LED and/or UV-converted white light
3
MYECL
Imager User Manual
Thermo Fisher Scientific
MYImageAnalysis™
Software
The MYImageAnalysis Software is supplied with the MYECL Imager as a vital tool for
extracting information from your captured images. The analysis software features:
•
Indentify lanes and bands automatically
•
View and compare up to six images simultaneously
•
Open multiple image formats (e.g., .tif, .jpeg, .png, etc.)
•
Export images and data reports directly to Microsoft™ Excel™, Word™ and
PowerPoint™ software for further analysis and presentations
•
Analyze molecular weight – determine the Rf and molecular weight of protein or
nucleic acid bands using installed or custom added molecular weight markers
•
Edit digital images – image editing tools include contrast adjustment, image
rotation, cropping, de-speckling, false color application and text annotation
•
Calculate sample purity automatically based on band and lane intensity
•
Perform lane profile densitometry
•
Quantitate bands or regions relatively or absolutely
Acquired images are saved and exported as .tif files, which can be directly opened in
the analysis software.
4
MYECL
Imager User Manual
Thermo Fisher Scientific
Chapter 2
Installation
Guidelines
Imager
IMPORTANT Review and implement guidelines for proper set-up before installation.
Locate the imager away from water, solvents, corrosive materials, strong magnetic
fields and vibration sources.
IMPORTANT The imager weighs 65lbs (29.5kg). Use two people to lift it by grasping
the bottom and the handle at the rear of the imager. Using two people, place the
imager onto the benchtop given proper space, electrical and environmental
requirements. Remove the outer and inner packaging materials.
Space Requirements
The imager requires a stable laboratory bench or table capable of supporting 65lbs
(29.5kg). Provide a minimum clearance of 3 inches (7.62cm) at the rear of the
imager to allow adequate ventilation for camera cooling and access to the power
cord and switch. In addition, allow sufficient space to open the front-facing imager
door to place sample within the imager. Refer to imager dimensions in Table 2-1.
Table 2-1. Imager dimensions.
Electrical Requirements
5
MYECL
Imager User Manual
Dimensions
Width
Inches
12.25
Centimeters
31.1
Depth
22
55.9
Height
21
53.3
A grounded circuit capable of delivering the appropriate current and voltage is
required for installation. Electrical requirements can be located on the imager label
on the rear panel of the imager and in Table 2-2. The imager electrical system will
adjust to the proper voltage for the respective country (Table 2-3). Connect the
imager power cord to the rear left side panel of the system and plug into a grounded
power outlet.
Thermo Fisher Scientific
Table 2-2. Imager electrical ratings.
Electrical Parameter
Supply Voltage (VAC)
Frequency (Hz)
Power Rating (W)
Fuse (power center)
Rating
120-240
50-60
120
T4AL, 250V, 4A
Table 2-3. Imager electrical requirements for major countries.
Region
US and Canada
Europe
UK
Japan
China
India
South Korea
Environmental
Requirements
Computer Requirements
Voltage
(VAC)
120
220
240
100
220
230
220
Frequency
(Hz)
60
50
50
50
50
50
60
Amps (A)
1.0
0.5
0.5
1.2
0.5
0.5
0.5
For optimal performance, maintain a constant laboratory temperature range of 1525°C (59-77°F) with relative humidity between 15-70%. To allow adequate camera
cooling, do not place the imager in direct sunlight.
The imager is operated by an integrated computer, which is accessed through the
touchscreen.
The MYImageAnalysis Software program is included with the imager purchase. To
run the MYImageAnalysis Software properly, workstations must meet the minimum
performance requirements listed in Table 2-4.
Table 2-4. Recommended computer requirements for
MYImageAnalysis Software.
Description
Recommended
Operating System
Windows 7, Vista*, or XP*
Processor
Pentium* 4 @ 2.4GHz
Memory (RAM)
512MB
Hard Drive
2GB
Screen Resolution
1280 × 1024†
†
Refer to the MYImageAnalysis Software User Manual for more information.
6
MYECL
Imager User Manual
Thermo Fisher Scientific
Imager Images with
Feature Locations
Imager Front View
Figure 2-1. Imager front and side views detailing main components.
7
MYECL
Imager User Manual
Thermo Fisher Scientific
Imager Front View with
Sample Door Open
Figure 2-2. Imager view with the sample door open and the transilluminator
extended.
8
MYECL
Imager User Manual
Thermo Fisher Scientific
Imager Rear View
Figure 2-3. Rear imager view.
9
MYECL
Imager User Manual
Thermo Fisher Scientific
Start Up
Hard Start Up
IMPORTANT Allow the imager to equilibrate for 20-30 minutes after each initial
hard power up. This ensures that the camera is optimally cooled before image
acquisition. Equilibration is not necessary if you have performed a soft shut down of
the imager.
To hard start the imager:
1. Turn on the hard power switch located at the bottom of the rear imager panel.
The hard power switch provides power to all of the imager components.
2. Turn on the soft power switch on the front of the imager. This switch activates
the internal computer, touchscreen and thermoelectric camera cooler.
3. The computer boots up and the touchcscreen displays an initial message with
an OK button and the message, “Thank you for selecting the Thermo Scientific
MYECL Imager. You are now ready to begin.” Touch the OK button to continue.
4. You will then be prompted to enter the current date, time and time zone. Upon
completion, the screen will automatically move to the default Chemi acquire
screen.
10
MYECL
Imager User Manual
Thermo Fisher Scientific
Soft Start Up
If the imager is powered down with a soft shut down, then a soft start up can be
done using the front, soft power switch. The soft power switch is the blue lighted,
round rocker switch located just above the front door and below the touchscreen.
This switch allows you to power down the imager computer and touchscreen, while
maintaining power to the camera cooling unit. This feature allows you to power
down the imager, but, once needed, quickly restart the imager without having to
wait for the camera temperature to re-equilibrate.
1. Turn on the front soft power switch. The computer restarts and the touchscreen
initiates with the default Chemi screen.
2. Begin normal operation of the imager.
Shut Down
Note For extended periods of inactivity, the imager can be hard powered off;
however, for typical daily use, optimal camera temperature, and best image quality,
avoid hard powering on and off the imager.
Hard Shut Down
Hard shut down is done with the hard power switch on the rear of the imager. This
turns off all power to the imager, including the computer and camera cooler.
1. Follow the Soft Shut Down procedure.
2. Turn off the hard power switch at the rear of the imager.
Soft Shut Down
Soft shut down is done using only the front soft power switch.
1. Save any current image analyses.
2. Safely remove any USB flash drives.
3. Turn off the soft power switch.
4. The computer and touchscreen will shut down and turn off. The fans will
continue running as needed. The camera cooler will remain powered and
continue to maintain the camera at the optimal -25°C.
5. The transilluminator and LEDs turn off.
11
MYECL
Imager User Manual
Thermo Fisher Scientific
USB Features
The three external USB ports on the right side of the imager can be used for flash
drives, which can be connected through any of the USB ports for easy file
management.
Note The Export button always exports files to the E:\ drive, which is automatically
the first additional drive connected to the imager. When connecting an external hard
drive to the imager, we recommend changing that drive label to a letter other than
C, D or E.
Figure 2-3. Location of upper USB port.
Figure 2-4. Location of lower USB ports.
12
MYECL
Imager User Manual
Thermo Fisher Scientific
Imager Settings
Tools
The Tools button in the top right corner of the acquisition software screen gives you
access to basic imager settings and functionality.
1. Touch the Tools button to bring up the Tools screen.
Tools button
Large buttons for Date and Time, Printer, Filters, and Administrator Settings will
display on the screen. Select the appropriate button to enter setup for each item.
Note Administrator Settings will open with the following screen requiring a User
Name and Password. Only the designated Administrator at your facility can access
this section.
13
MYECL
Imager User Manual
Thermo Fisher Scientific
Date and Time
To correct the date, time or time zone:
1. Touch the Date and Time button. A Windows clock and calendar will display.
2. Choose the correct settings as needed.
3. Select the Apply button, followed by the OK button to save the settings.
14
MYECL
Imager User Manual
Thermo Fisher Scientific
Printer
To select a default printer for imager exporting:
1. Touch the Printer button. A Printers and Other Devices screen will display.
2. Choose the appropriate printer from the listed selections. Plug-and-play printers
will automatically populate the list. Select Add a Printer from the left column if the
printer is not a local printer or plug-and-play type. A network printer can also be
selected as a default printer.
Note Consult your facility’s IT department for assistance in setting up network
printers.
15
MYECL
Imager User Manual
Thermo Fisher Scientific
Filters
The imager has four default filter positions:
Position 1: No filter (for use in Chemi applications)
Position 2: Orange filter (for use in UV and Vis applications)
Position 3: No filter
Position 4: No filter
The imager is supplied with an orange filter for Position 2, but green, red and blue
filters can also be purchased for additional applications. You can install these filters
into Positions 3 and 4, depending on your position preference. The Filter Menu
Selections in Tools allow you to assign the filters for each of the Positions 3 and 4
when different filters are installed.
1. Touch the Filters button. The following menu will appear:
2. Positions 2, 3 and 4 use selectable drop-down menus to enable you to choose
between Empty, Orange, Green, Blue and Red. Select the choice for each filter
position.
16
MYECL
Imager User Manual
Thermo Fisher Scientific
3. When complete, touch the Save button at the bottom of the menu to save the
changed defaults.
Table 2-4. Imager filter specifications and corresponding dyes.
Filter Color
Wavelength Range
(nm)
Blue
445-480
Green
515-560
Orange
545-630
Red
Compatible Dyes
and Stains
Sample Screen
DAPI
AMCA
SYBR* Green
SYBR Gold
Ethidium Bromide
Clear screen
Clear screen
Clear screen
Clear screen
Clear screen
Hoechst Blue§
Clear screen
Coomassie Blue
White screen†
Imperial*
White screen†
620-645
SYPRO* Ruby
Clear screen
Deep Purple*
Clear screen
§
With the MYECL Imager, the orange filter is optimal for Hoechst Blue imaging.
†
Coomassie Blue and Thermo Scientific Imperial Stains do not require the orange filter;
however, these stains require the white light conversion screen. UV and Vis modes use the
orange filter in Position 2 by default.
17
MYECL
Imager User Manual
Thermo Fisher Scientific
Administrator Settings
Users will typically not need to access Administrator Settings. Only the facility
administrator should have access to these functions through password access. The
default user name and password are myecl and 1234, respectively. To avoid
improper access, the designated administrator needs to change this username and
password once the imager is installed. To change the password, select the Change
User Name and Password button.
Set Image Gallery Location
The Set Image Gallery Location button allows the administrator to set up a default
pathway for saving acquired images. The imager has a default image gallery
location, “Computer – Local Disk (D:\) – Gallery”. The image gallery location can be
changed to another gallery folder (Gallery01 – Gallery04) in the Local Disk (D:\) or
you can use a network folder.
1. A folder menu will allow for selection of the appropriate location.
2. Select OK after choosing the appropriate storage location.
Note If the Viewing Gallery becomes slow, the administrator can change the image
saving location to a different folder to start a new gallery. Previously acquired
images will remain in the old gallery folder. The administrator needs to change the
image location back to the old folder to access these old images.
18
MYECL
Imager User Manual
Thermo Fisher Scientific
Allow Remote Access
Remote access for maintenance and troubleshooting is possible with the imager.
After selecting the Allow Remote Access button, the administrator views the
following screen:
Follow the instructions provided and contact our Technical Support team for
questions or to troubleshoot the imager.
U.S. contact: 800-874-3723
International contact: +1-815-968-0747
Note Remote access requires the imager to be connected to a network with internet
access. Contact your facility’s IT department regarding correct set up and use of
network connections.
19
MYECL
Imager User Manual
Thermo Fisher Scientific
Other OS Settings
This function allows the administrator to access the Windows Control Panel to
change system and user configurations as needed.
Note Only qualified administrators should have access to this area. Altering
configurations can cause imager errors.
Reset Default Focus Position
The default focus position can be reset or changed by selecting the Reset Default
Focus Position button. The focus position may need resetting if the current default
focus position does not provide in-focus images. The administrator can control this
position by going to “Tools” > “Administrator Settings” > “Reset Default Focus
Position” and using the slider bar to focus in or out to achieve the required
sharpness in Chemi, UV and Vis modes.
Update Software
This function installs and updates the acquisition software when a program update
becomes available.
Change Username and
Password
Return
20
MYECL
Imager User Manual
This function allows the administrator to change the username and password for
accessing the administrator settings.
Touching Return will bring the administrator back to the previous Tools menu.
Thermo Fisher Scientific
Chapter 3
Imager Settings
Image Acquisition
Upon powering up the imager, the MYECL Imager welcome screen will display.
Note If hard powered off, the thermoelectric camera cooler will NOT be at the ideal
temperature of -25°C. After powering up the imager, please allow 20-30 minutes
for the camera to cool to the optimal temperature.
21
MYECL
Imager User Manual
Thermo Fisher Scientific
Camera Settings
Available in Chemi, UV
and Vis Modes
Focus Icon for performing minimal focusing adjustments that may be needed as
varying object depths change.
Note An Imaging Reference Target is supplied with the imager. Use this target when
performing camera focusing.
Digital Zoom Icon for increasing or decreasing the camera zoom and centering the
image acquisition area.
Resolution/Sensitivity Icon for adjusting the camera image sensor’s degree of
response to light; the number of camera pixels used to capture an image.
The Resolution/Sensitivity selection allows for choosing among five different
sensitivities: 1×1 (far left setting), 2×2, 3×3 (middle, default setting), 4×4 and 8×8
(far right setting) binning. A selection of 1×1 binning provides you with minimum
sensitivity/maximum resolution, while a selection of 8×8 binning provides for
maximum sensitivity/minimum resolution. Table 3-1 provides multiple specifications
related to the varied binning sizes.
22
MYECL
Imager User Manual
Thermo Fisher Scientific
Table 3-1. Binning specifications for sensitivity settings.
Binning
Size
(kb)
DPI
(pixels/
inch)
Pixel × Pixel
Image size
(inches ×
inches)
Image size
(mm × mm)
Pixel size
(µm × µm)
1×1
8197
300
2048 × 2048
6.8 × 6.8
173.4 × 173.4
84.7 × 84.7
2×2
2050
300
1024 × 1024
3.4 × 3.4
86.7 × 86.7
84.7 × 84.7
3 × 3†
910
300
682 × 682
2.3 × 2.3
57.7 × 57.7
84.7 × 84.7
4×4
513
300
512 × 512
1.7 × 1.7
43.3 × 43.3
84.7 × 84.7
8×8
129
300
256 × 256
0.9 × 0.9
21.7 × 21.7
84.7 × 84.7
† 3 × 3 binning in 16-bit grayscale .tiff image files are the default settings for the imager.
Default Button used to reset all imager settings to their default values.
Live Image Button used to activate or close the camera’s live view of the image
area.
23
MYECL
Imager User Manual
Thermo Fisher Scientific
Settings Only Available in
UV and Vis Modes
Aperture Slider bar for adjusting the camera lens opening to control sensitivity and
depth of field. The aperture can be fully closed (far right position) or fully opened (far
left position) depending on the light sensitivity needed.
UV Light Button for turning on/off the transilluminator UV bulbs.
Filter Wheel Position Drop-down menu for moving the filter wheel position to switch
filters.
Note Filter Wheel Positions 2-4 can be set for different filter colors by accessing
Tools > Filters.
24
MYECL
Imager User Manual
Thermo Fisher Scientific
Chemiluminescence
(Chemi) Mode
Chemiluminescence (Chemi) Mode is the default mode. Chemi mode is used for the
capture of sample images using sample-emitted light. These images of the blot are
useful for imaging colorimetric molecular weight markers.
Camera Settings
Focus, Digital Zoom and Resolution/Sensitivity camera settings are available in
Chemi mode.
Capture Settings
1. Select the Chemi tab on the touchscreen.
Single Image Acquisition
2. (Optional) Select the Live Camera button if the live image is not displayed.
3. The white LED lights and live image display are activated. Open the imager
door, pull out the transilluminator and install the chemiluminescence exposure
screen (black) on the transilluminator glass.
4. Insert and center the sample on top of the chemiluminescence exposure screen
(black) using the live image display for reference.
5. Close the imager door.
6. While viewing the live image, adjust the settings for Focus, Digital Zoom and
Resolution/Sensitivity in the Camera Settings, if needed.
Note Camera Settings are available only with the live image display.
7. Select a Pre-set or Custom exposure time.
Note ChemiV images are captured and automatically saved to the Gallery; however,
they are not displayed in the image tab if Live Camera is not enabled before image
acquisition in Chemi mode. Saved ChemiV images can be displayed in Gallery mode
along with the Chemi images.
25
MYECL
Imager User Manual
Thermo Fisher Scientific
Pre-set Exposure Time
1. Select one of the pre-set exposure time buttons on the touchscreen keypad. The
imager takes an image as soon as the time button is touched.
2. Captured images are displayed on the screen and automatically stored in the
Gallery for further review and selection.
Note A Stop button appears over the keypad area once an exposure time button is
selected. Image acquisition can be stopped by touching the Stop button.
Note Up to six recent images will be displayed on the touchscreen.
26
MYECL
Imager User Manual
Thermo Fisher Scientific
Custom Exposure Time
1. Select the Custom exposure button using the touchscreen keypad.
2. Enter the desired time in milliseconds (ms), seconds (s) or minutes (m) using the
touchscreen keypad numbers. The m : s box is used to input seconds and/or
minutes and is active by default (box is gray in color). For a custom exposure
time of <1 second, select the ms box to input milliseconds. The shortest
exposure time that can be entered is 10 milliseconds; this appears as “10” in
the ms box.
3. Once a number is selected, the lower Cancel button will become a Clear button.
Use this to remove any entered numbers.
Note Selecting the Cancel button will return the custom exposure time keypad
to the pre-set exposure time keypad.
4. Touch the Acquire button to capture the image.
5. The image will display in a tab on the touchscreen and be saved to the Gallery.
Note A Stop button appears over the keypad once the Acquire button is touched.
Image acquisition can be stopped by touching the Stop button.
Note Up to six recent images will be displayed on the touchscreen.
27
MYECL
Imager User Manual
Thermo Fisher Scientific
Multiple Image Acquisition
1. Select the Chemi icon from the top mode settings tabs.
2. (Optional) Select the Live Camera button if the live image is not displayed.
3. The white LED lights and live image display are activated. Open the imager
door, pull out the transilluminator and install the chemiluminescence exposure
screen (black) on the transilluminator glass.
4. Insert and center the sample on top of the chemiluminescence exposure screen
(black) using the live image display for reference.
5. Once the sample is centered, close the imager door.
6. While viewing the live image, adjust the settings for Focus, Digital Zoom and
Resolution/Sensitivity in the Camera Settings menu, if needed.
Note Camera Settings are available only with the live image display.
7. Select a Pre-set or User-defined Multiple Exposure Time.
Note A Stop button appears over the keypad once the Acquire button is
touched. Image acquisition can be stopped by touching the Stop button.
28
MYECL
Imager User Manual
Thermo Fisher Scientific
Pre-set Multiple Exposure
Settings
The five pre-set exposure settings allow you to select a time series of exposures.
1. Select the Multi button from the touchscreen number keypad.
2. Select one of the Pre-set # option buttons with an appropriate time series of
exposures.
3. The images are automatically acquired.
4. Captured images are displayed on the screen and stored in the Gallery for
further viewing and selection.
29
MYECL
Imager User Manual
Thermo Fisher Scientific
User-defined Multiple Exposure
Settings
The User-defined Multiple Exposure settings allow you to set custom times in
situations where the pre-set exposure times do not meet your needs.
1. Select the Multi button from the touchscreen number keypad.
2. To create or edit the user-defined exposure time settings, select the Edit button
to highlight the five Exposure fields.
3. Choose one of the User # option buttons to highlight the set of cells for user
input.
4. Using the time keypad, input the desired time into each cell. Enter exposure
times in ascending or increasing increments with the shortest amount of time in
column 1 and the longest amount of time in column 5. The highlighted cell will
move to the right as each time is input.
5. The Total time is calculated and displayed as each new time is input into a cell.
6. When you are finished entering time, select the Save button (former Edit button)
in the top right corner of the table. This saves the User # time settings for
further uses. All five User # time settings are entered and saved the same way.
30
MYECL
Imager User Manual
Thermo Fisher Scientific
7. Touch the User # button to automatically capture the images.
8. Captured images are displayed on the touchscreen and stored in the Gallery for
further viewing and selection.
31
MYECL
Imager User Manual
Thermo Fisher Scientific
Image Tools
Display Saturation
Note The Image Tools only function while viewing or printing the image. Display
Saturation, Invert and Auto Contrast adjustments are NOT saved with the image file.
In Chemi mode, after capturing an image, the Display Saturation button can be
selected to highlight image areas that are considered to be saturated. A red falsecolor is superimposed on the areas deemed to be saturated. Adjustment to the
saturation can be done by adjusting the exposure time for subsequent images.
Shorter exposure times will reduce the light exposure/saturation.
1. After capture of an image, select the Display Saturation button under the time
keypad.
2. The screen will display the saturated pixels on the image with a red false-color.
If the image appears to be over- or under-saturated, the image exposure time may
need to be increased or decreased to acquire a properly saturated image. exposure
time can be adjusted before image capture by using the number keypad.
3. The Display Saturation button can be selected again to turn off the false-color
imaging.
Note The Display Saturation button is disabled when the Auto Contrast function
is enabled.
32
MYECL
Imager User Manual
Thermo Fisher Scientific
Invert Image
The Invert button is a useful tool for viewing faint gel bands. This tool inverts the
standard black background with white highlights to a white background with black
highlights or vice versa.
Original Chemi Image
Inverted Chemi Image
1. In the active live image or acquired image, select the Invert button under the
time keypad.
2. The inverted image can be used for acquiring images or switched back to the
standard image by again selecting the Invert button.
Auto Contrast
Selecting the Auto Contrast button increases the contrast between the signal and
the background to increase visibility.
Image Information
Information for each image is stored in a separate file together with the captured
image.
1. With the needed image on the screen, select the Image Info icon at the bottom
right of the screen.
2. A box appears with all of the relevant image information for that image. Beneath
the box is a keyboard for personal data input. Only the fields for File name, User,
Project and Notes can be modified.
3. Upon each image capture, the imager assigns a default name to the image file.
This image file name can be altered within the Image info screen.
33
MYECL
Imager User Manual
Thermo Fisher Scientific
Ultraviolet (UV) Mode
Ultraviolet (UV) mode is used for the capture of images using transmitted UV light.
CAUTION UV mode uses the UV lights in the transilluminator. Long-term exposure
to UV light can be harmful. Use the appropriate eye and skin personal protective
equipment (PPE) if there is any chance of exposure to the UV light.
Note The transilluminator UV light is initially on for 5 minutes. User input will then be
requested for further use of the UV light. If you do not select the “Keep UV on”
button after the initial 5 minutes, then the UV light will automatically turn off.
If the UV light is needed after opening the imager door, the white door peg can be
pulled out to turn on the UV bulbs. Appropriate PPE must be worn if performing this
operation. The white door peg returns to a normal position once the door is fully
closed.
Extended “UV on” position
Retracted “UV off” position
Camera Settings
UV mode uses the same functional Camera Settings as the Chemi mode, but adds
the camera setting functions for Aperture, UV Light and Filter Wheel Position.
Capture Settings
1. Select the UV tab on the touchscreen.
Image Acquisition
2. (Optional) Enable the UV button and select the Live Camera button if the live
image is not displayed.
3. Open the imager door and confirm that the UV light is off. The white LED lights
are activated once the door is opened. Pull out the transilluminator and place
the UV exposure screen (clear) on top of the transilluminator.
34
MYECL
Imager User Manual
Thermo Fisher Scientific
4. Insert and center the sample on top of the UV exposure screen (clear) using the
live image display for reference. Once the sample is centered, close the imager
door.
5. While viewing the live image, adjust the necessary settings for Focus, Digital
Zoom, Sensitivity/Resolution and Aperture to produce the desired image.
Note Camera Settings are only available with the live image display.
Pre-set Exposure Time
1. (Optional) Select the Live Camera button if the live image is not displayed.
2. Select one of the pre-set exposure time buttons using the touchscreen keypad.
3. The live image with the new exposure time will be displayed. If needed, modify
the exposure time using the pre-set exposure time buttons.
4. Select the Acquire button to acquire an image.
5. Captured images are displayed on the screen and automatically stored in the
Gallery for further viewing and selection.
35
MYECL
Imager User Manual
Thermo Fisher Scientific
Custom Exposure Time
1. Select the Custom exposure button using the touchscreen keypad.
2. Enter the desired time in milliseconds (ms), seconds (s) or minutes (m) using the
touchscreen keypad numbers. The m : s box is used to input seconds and/or
minutes and is active by default (box is gray in color). For a custom exposure
time of <1 second, select the ms box to input milliseconds. The shortest
exposure time that can be entered is 10 milliseconds; this appears as “10” in
the ms box.
Note The live image will NOT display the new Custom exposure time.
3. Select the Acquire button to acquire an image.
4. Captured images are displayed on the screen and automatically stored in the
Gallery for further viewing and selection.
36
MYECL
Imager User Manual
Thermo Fisher Scientific
Stop Image Acquisition
Upon touching the Acquire button, a Stop window appears over the keypad.
Selecting the Stop button will stop the current image acquisition exposure and return
the screen to the current session exposure settings.
Image Tools
Note The Image Tools only function while viewing or printing the image. Display
Saturation, Invert and Auto Contrast adjustments are NOT saved with the image file.
Display Saturation
In UV mode, while viewing the live image or after capturing an image, the Display
Saturation button can be selected to highlight the image pixels that are considered
to be saturated. A red false-color is superimposed on the pixels deemed to be
saturated. Adjustment to the saturation can be done by adjusting the Aperture
and/or exposure time for subsequent images. Shorter exposure times will reduce the
light exposure/saturation.
1. While viewing the live image display, select the Display Saturation button under
the time keypad.
2. The screen will display the saturated areas of the image with a red false-color.
3. While viewing the live image display, in Camera Settings, use the Aperture slider
bar to adjust the saturation by opening (moving slider to left) or closing (moving
slider to right) the aperture. Opening the aperture will increase image brightness
and saturation. Closing the aperture will decrease image brightness and
saturation.
4. If required, the image exposure time may need to be increased or decreased to
acquire a properly saturated image. Exposure time can be adjusted before
image capture by using the number keypad.
5. Select the Display Saturation button again to turn off the false-color imaging.
Note The Display Saturation button is disabled when the Auto Contrast function
is enabled.
6. Proceed with the steps for acquiring an image.
37
MYECL
Imager User Manual
Thermo Fisher Scientific
Invert Image
The Invert button is a useful tool for viewing faint gel bands. This tool inverts the
standard black background with white highlights to a white background with black
highlights.
Original UV Image
Inverted UV Image
1. In the active live image, select the Invert button from under the time keypad.
2. The inverted image can be switched back to the standard image by again
selecting the Invert button.
Auto Contrast
38
MYECL
Imager User Manual
Selecting the Auto Contrast button increases the contrast between the signal and
the background to increase visibility. This adjustment can be used only for
touchscreen viewing or printing of the image. The contrast adjustment is not saved
with the image file.
Thermo Fisher Scientific
Visible (Vis) Mode
Visible (Vis) mode is used for the capture of gel images using reflected and/or
transmitted light.
CAUTION Vis mode uses the UV lights from the transilluminator. Long-term
exposure to UV light can be harmful. Use the appropriate eye and skin PPE if there is
any chance of exposure to the UV light.
Note The transilluminator UV light is initially on for 5 minutes. User input will then be
requested for further use of the UV light. If you do not select the “Keep UV on”
button after the initial 5 minutes, then the UV light will automatically turn off.
Camera Settings
Vis mode uses the same functional camera settings as the UV mode.
Image Acquisition –
Transmitted Light
1. Select the Vis tab on the touchscreen. Changing to Vis mode automatically turns
on the UV lights within the transilluminator and the LEDs.
2. (Optional) Select the Live Camera button and enable the UV button if the live
image is not displayed and the transmitted light is off.
3. Open the imager door, confirm the UV light is off, pull out the transilluminator
and install the white light conversion screen on top of the transilluminator.
4. Insert and center the sample on top of the white light conversion screen using
the live image display for reference.
5. Once the sample is centered, close the imager door. The UV lights will turn on
and show as visible light transmitting through the white light conversion screen.
6. While viewing the live image, adjust the necessary settings for Focus, Digital
Zoom, Sensitivity/Resolution and Aperture to produce the desired image.
7. Select a Pre-set or Custom exposure time.
Image Acquisition –
Reflected Light
1. Select the Vis tab on the touchscreen. Changing to Vis mode automatically turns
on the UV lights within the transilluminator and the LEDs.
2. (Optional) Select the Live Camera button and enable the UV button if the live
image is not displayed.
39
MYECL
Imager User Manual
Thermo Fisher Scientific
3. Open the imager door, confirm that the UV lights are off, and install the white
light conversion screen on top of the transilluminator glass.
4. Insert and center the sample on top of the white light conversion screen using
the live image display for reference.
5. Once the sample is centered, close the imager door. The UV lights will turn on.
6. Select the UV light button on the right side of the screen to switch OFF the UV
lights. This produces only reflected light.
7. While viewing the live image display, adjust the camera settings for Focus,
Digital Zoom, Resolution/Sensitivity and Aperture to produce the desired image,
if needed.
8. Select a Pre-set or Custom exposure time.
Pre-set Exposure Time
1. Select one of the Pre-set exposure time buttons using the keypad.
2. Select the Acquire button to capture an image.
3. Captured images are displayed on the screen and automatically stored in the
Gallery for further viewing and selection.
Note A Stop button appears over the keypad once the Acquire button is
touched. Image acquisition can be stopped by touching the Stop button.
40
MYECL
Imager User Manual
Thermo Fisher Scientific
Custom Exposure Time
1. Select the Custom exposure button using the keypad.
2. Enter the desired time using the keypad numbers. The m : s box is used to input
seconds and/or minutes and is active by default (box is gray in color). For a
custom exposure time of <1 second, select the ms box to input milliseconds.
The shortest exposure time that can be entered is 10 milliseconds; this appears
as “10” in the ms box.
3. Once a value is entered into the Custom time field, the Acquire button will
become active. Select the Acquire button to capture an image.
4. Captured images are displayed on the screen and automatically stored in the
Gallery for further viewing and selection.
Note A Stop button appears over the keypad once the Acquire button is
touched. Image acquisition can be stopped by touching the Stop button.
41
MYECL
Image Tools
Note The Image Tools only function while viewing or printing the image. Display
Saturation, Invert and Auto Contrast adjustments are NOT saved with the image file.
Display Saturation
In Vis mode, while viewing the live image or after capturing an image, the Display
Saturation button can be selected to highlight live and captured pixels that are
considered to be saturated. A red false-color is superimposed on the pixels deemed
to be saturated. Adjustment to the saturation can be done by adjusting the Aperture
and/or exposure time for subsequent images. Shorter exposure times will reduce the
light exposure/saturation.
Imager User Manual
Thermo Fisher Scientific
1. While viewing the live image display, select the Display Saturation button under
the time keypad.
2. The screen will display the saturated areas of the image with a red false-color.
3. Using the Aperture slider bar in Camera Settings, adjust the saturation by
opening (moving slider to left) or closing (moving slider to right) the aperture.
Opening the aperture will increase image brightness and saturation. Closing the
aperture will decrease image brightness and saturation.
4. If required, the image exposure time may need to be increased or decreased to
acquire a properly saturated image. Exposure time can be adjusted before
image capture by using the number keypad.
5. Select the Display Saturation button again to turn off the false-color imaging.
Note The Display Saturation button is disabled when the Auto Contrast function
is enabled.
6. Proceed with the steps for acquiring an image.
Invert Image
The Invert button is a useful tool for viewing faint gel bands. This tool inverts the
standard black background with white highlights to a white background with black
highlights.
1. In the active live image, select the Invert button under the time keypad.
2. The inverted image can be used for acquiring images or switched back to the
standard image by again selecting the Invert button.
Original Vis Image
42
MYECL
Imager User Manual
Inverted Vis Image
Thermo Fisher Scientific
Auto Contrast
Selecting the Auto Contrast button increases the contrast between most bands and
the background to increase visibility. This adjustment can be used only for
touchscreen viewing or printing of the image. The contrast adjustment is not saved
with the image file.
File Management
Image file management includes editing image info, exporting, printing and deleting
files. All image files and image information are saved and exported in individual
folders. These folders contain both the .xml file with the image information and the
.tiff file containing the image.
Image Info
Export
Image Info can be selected for any captured image. This lists the acquisition
information for the highlighted image.
You can select Export and save highlighted images to a USB flash drive available
through connection to a USB port.
Note Users may need to momentarily wait for the imager to detect the external drive
once it is connected to the USB port for the first time.
Print
Delete
43
MYECL
Imager User Manual
The Print button allows the highlighted image to be printed to a selected external
printer. A Print Preview window will appear before printing begins.
Delete allows you to permanently delete the highlighted image.
Thermo Fisher Scientific
Image Information
Information for each captured image is stored in a separate file (image file
name.xml) together with the captured image.
1. With the captured image on the screen, select the Image Info icon at the bottom
right of the screen.
2. A box appears with all of the relevant image information for that image. Beneath
the box is a keyboard for inputting personal data into the open fields. Only the
fields for File name, User, Project and Notes can be modified.
3. After the capture of each image, the imager assigns a default name to the
image file. This image file name can be altered within the Acquisition
Information screen.
File name Image title (Imager generated or user-defined)
User Person using the MYECL Imager (User-defined)
Project Name of project (User-defined)
Notes Relevant notes pertaining to image or experiment (User-defined)
Exposure time Chosen exposure time for image
Mode Single or multi
Acquisition time Time of day image was taken
44
MYECL
Imager User Manual
Thermo Fisher Scientific
Acquisition date Date image was taken
Sensitivity/Resolution setting Binning used for image acquisition
Image Gallery
Image Viewing
The image gallery allows you to view and open multiple previously captured images
at one time.
1. Select the Gallery tab at the top of the touchscreen.
2. Click on the Browse button to open the gallery.
Thumbnail
45
MYECL
Imager User Manual
3. Thumbnail will display previously taken images. Images are separated into
sections of days, weeks, months and years. You can use the two right middle
arrow buttons or the vertical scrollbar to move and view between the sections. If
the current gallery contains images from more than 40 image acquisitions, the
profram will automatically create and move to a new gallery. Other galleries can
be accessed using the right Gallery arrow buttons.
Thermo Fisher Scientific
4. Choose an image or series of images by touching the images on the
touchscreen.
Note Before selecting an image, you can choose to view only the Chemi image
or both the Chemi and ChemiV images of the same sample by selecting the
Open ChemiV Image button at the bottom right of the Gallery screen. This
function is useful for establishing band locations in a Chemi image against
known protein weight markers in a ChemiV image.
Note Selecting one ChemiM image will open all of the images associated with
that specific multiple exposure. Up to six images, including ChemiV images, can
be selected and displayed at one time.
File List
Search
46
MYECL
Imager User Manual
The File List tab displays image information in a list format for ease of searching and
sorting. The list is sortable in eight different fields by selecting the appropriate
column heading: File Name, Date, Notes, Mode, Exposure, Project, User and
Resolution.
The Search tab allows you to search through the full gallery. Images can be
searched by File Name, Date, Notes, Project or User by entering the needed
information using the attached keyboard. The search results are displayed in the
Search Result window; the results listings are sortable by field.
Thermo Fisher Scientific
Chapter 4
Cleaning the Imager
and Sample Screens
Maintenance
IMPORTANT When using any cleaning products with the imager, consult the
appropriate material safety data sheet (MSDS) to confirm compatibility with the
imager and proper usage of the cleaning product.
Spray a soft cloth or paper towel with cleaning solution (e.g., general purpose
cleaner, isopropanol or 70% ethanol). Wipe the surface of the transilluminator, the
sample screens and the imager’s exterior housing.
LCD Touchscreen
Cleaning the Touchscreen
Use a pre-moistened LCD screen cleaning tissue to clean the surface of the
touchscreen.
IMPORTANT Use of ammonia-based cleaners to clean the touchscreen is NOT
recommended. Do not spray cleaner directly onto the LCD screen.
IMPORTANT Do not press hard while cleaning the screen. Do not leave excess
cleaning solution on the LCD screen as this may cause long-term damage.
Use of the Stylus
The stylus is recommended for interacting with the touchscreen. Use the tip of the
stylus to lightly tap the touchscreen for selection of menus, icons, and buttons.
Note Fingertips can be used for interaction with the touchscreen; however, the
stylus is easier to use with gloved hands and prevents fingerprints on the screen.
47
MYECL
Imager User Manual
Thermo Fisher Scientific
UV Transilluminator
Band Excision
CAUTION The UV transilluminator contains UV bulbs. Long-term exposure to UV
light can be harmful. Use the appropriate eye and skin personal protective
equipment (PPE) if there is any chance of exposure to the UV light.
1. Wearing UV-protective eyewear and clothing, open the imager door and slide
out the transilluminator.
2. Place the UV exposure screen (clear) on the transilluminator and place the gel
sample on top of the screen.
IMPORTANT Use of the UV exposure screen (clear) protects the transilluminator
from nicks and scratches as a result of excision.
3. In UV mode, select the UV button for the UV light. A message will appear asking
if you want to turn on the UV light with the door open. Select Yes.
4. The software then displays a reminder message requiring the appropriate PPE
and asks the user to pull out the white door peg.
Extended “UV on” position
Retracted “UV off” position
5. Excise the appropriate bands from the gel sample.
Note As a safety precaution, the UV light automatically turns off after five minutes.
With 30 seconds remaining, a message will appear on the touchscreen indicating
that the UV light will be turned off unless the “Keep UV on” button is selected.
48
MYECL
Imager User Manual
Thermo Fisher Scientific
6. When finished, turn off the UV light by pushing in the white door peg. Push the
transilluminator back into the imager. Alternatively, push the transilluminator back
into the imager and close the door, which automatically pushes the white door peg
back into place.
Cleaning the Transilluminator
Replacement of
Transilluminator Bulbs
Ensure the transilluminator surface is cool. Saturate a clean soft cloth or paper towel
with cleaning solution (e.g., general purpose cleaner, isopropanol or 70% ethanol).
Wipe the surface of the transilluminator.
Note To ensure uniform illumination, replace all six UV transilluminator bulbs, even
if only one bulb fails.
1. Shut down the imager and unplug the power cord.
2. Open the imager door and completely slide out the transilluminator. Ensure the
transilluminator is cool to touch.
3. Remove the four thumbscrews on the transilluminator coverplate.
4. Lift the coverplate to expose the bulbs. Use caution to avoid damaging the
electrical cord.
5. Remove the transilluminator bulbs by rotating ~90° counterclockwise until the
pins align with the bulb socket. A click will be heard when the bulb pins are
aligned. Lift the bulb up and out of the socket.
6. Insert the new transilluminator bulbs by sliding pins into the bulb socket and
rotating ~90° clockwise. A click will be heard when the bulb pins are set.
7. Repeat Steps 5 and 6 for the remaining five bulbs.
8. Replace all necessary components of the transilluminator and avoid damaging
the electrical cord. Replace and hand tighten the four thumbscrews.
9. Push the transilluminator back into the imager.
10. Plug the imager power cord back in and turn the system power on.
49
MYECL
Imager User Manual
Thermo Fisher Scientific
Emission Filters
Changing Filters
A variety of emission filters can be used in the imager. The appropriate filter choice
is dependent on the emission wavelength of the sample. Consult Table 2-4 in
Chapter 2 to confirm your filter choice.
The filter wheel allows for easy installation and removal by using threaded filters.
The filters are fragile, so use caution when handling and installing or removing.
IMPORTANT When installing filters, ensure that the filter threads are correctly
aligned with the filter wheel threads. Forcing a filter to screw in will result in cross
threading and damage to the filter wheel.
1. Turn off the system power.
2. Open the imager door and locate the filter wheel at the rear of the cabinet. Each
filter position is labeled with a red position number.
Position 1
Position 2
Position 3
Position 4
50
MYECL
Imager User Manual
Permanently empty for chemiluminescent imaging
Orange filter (default filter supplied with the imager)
Open for additional filter
Open for additional filter
Thermo Fisher Scientific
3. To install an emission filter, insert the threaded side of the filter into an open
port on the filter wheel. Turn clockwise to screw the filter in place until hand
tight.
4. To remove an emission filter, grasp the outer edge of the filter housing and turn
counterclockwise to unscrew and remove.
5. When filter installation/removal is complete, turn the system power on.
6. Update the filter settings in the Tools menu. See Chapter 2: Imager for
directions on changing the filter settings.
51
MYECL
Imager User Manual
Thermo Fisher Scientific
Appendix A
Technical Specifications
Imager Parameter
Specification
Power Maximum
120W
Frequency Range
50-60Hz
AC Voltage
Current
Fuse
Dimensions
Weight
Wavelength Range
Camera
Lens
52
MYECL
Imager User Manual
100-240V
1.2A maximum (dependent on supply voltage)
T4AL, 250V, 4A fuse
21 inches H × 12.25 inches W × 22 inches D
(53.3cm H × 31.1cm W × 55.9cm D)
65lbs (29.5kg)
Specific wavelengths between 370-700nm
High-resolution, thermoelectrically regulated at -25°C,
4.2MP digital camera with 16-bit dynamic range
50mm, f/0.95 aperture
Filter Wheel
4 position, motorized
Touchscreen
10.4 Inch LCD screen
Light Source
306nm trans-UV, epi-white
Manufacturer
Thermo Fisher Scientific
3747 N Meridian Rd
Rockford IL 61105-0117
USA
Thermo Fisher Scientific
Appendix B
Accessories
Product
No.
Product Name
Package
Size
62237†
MYImageAnalysis
62238†
Orange Filter
1 filter
62239
Green Filter
1 filter
62240
Red Filter
1 filter
62241
Blue Filter
1 filter
62242†
Chemiluminescence Exposure Screen
1 screen
62243†
White Light Conversion Screen
1 screen
62244†
UV Exposure Screen
1 screen
62255
Transilluminator Bulb, 365nm
1 bulb
62258†
Transilluminator Bulb, 306nm
1 bulb
62261†
Touchscreen Stylus and Holder
1 package
62267†
Imaging Reference Target
1 package
EW84857
One Year Extended Warranty
84858†
Power Cord/C13 Connector, North America
1 cord
84859†
Power Cord/C13 Connector, Continental Europe
1 cord
84860†
Power Cord/C13 Connector, United Kingdom/Ireland
1 cord
Software
1 CD
† Replacement part for accessory supplied with the MYECL Imager.
53
MYECL
Imager User Manual
Thermo Fisher Scientific
Appendix C
Related Thermo Scientific Products
54
MYECL
Imager User Manual
Product No.
Product Name
34087
SuperSignal* West Pico Chemiluminescent Substrate
34075
SuperSignal West Dura Extended Duration Substrate
34095
SuperSignal West Femto Maximum Sensitivity Substrate
46640
SuperSignal Western Blot Enhancer
32209
Pierce* ECL Western Blotting Substrate
32132
Pierce ECL Plus Western Blotting Substrate
24615
Imperial Protein Stain, 1L
88518
PVDF Transfer Membrane, 0.45µm, 26.5cm × 3.75m
88018
Nitrocellulose Membrane, 0.45µm, 30cm × 3.5m
88610
Western Blotting Filter Paper, extra thick, 8.5cm × 9cm
26616
PageRuler* Prestained Protein Ladder, 10-170kDa, 2 × 250µL
26619
PageRuler Plus Prestained Protein Ladder, 10-250kDa, 2 × 250µL
26614
PageRuler Unstained Protein Ladder, 10-200kDa, 2 × 250µL
26634
Spectra* Multicolor Broad Range Protein Ladder, 10-260kDa, 2 × 250µL
26625
Spectra Multicolor High Range Protein Ladder, 40-300kDa, 2 × 250µL
26628
Spectra Multicolor Low Range Protein Ladder, 1.7-40kDa, 250µL
26612
Pierce Prestained Protein Molecular Weight Marker
Thermo Fisher Scientific
Glossary
Aperture Adjustable lens opening controlling the sensitivity
and depth of field
Camera CCD video camera used to capture moving and still
images
Transilluminator Sliding sample work platform containing
the UV bulbs
Ultraviolet (UV) mode Captures images using transmitted
ultraviolet light
Visible (Vis) mode Captures images using reflected visible
light or transmitted light
Chemiluminescence (Chemi) mode Captures images of
sample-emitted light
Default Standard or home value for a setting
Emission filter Optical lens mounted in the Filter Wheel;
used for filtering specific wavelengths of light
Filter Wheel Automated wheel holding filters in front of
camera lens
Gallery Visible holding area for captured images
Hard (Main) Power Switch Main power rocker switch
located on the rear imager panel
Lens Camera lens mounted to the CCD camera
Plug-and-play External computer accessories only requiring
connection to the computer for operation
Resolution The number of camera pixels used to capture an
image
Sample screens The clear, black and white panels placed
over the transilluminator during image acquisition
Sensitivity CCD camera’s degree of response to light
Soft Power Switch Blue-lit round button located on the front
imager panel
Stylus Pen-shaped device used to input commands on the
touchscreen
55
MYECL
Imager User Manual
Thermo Fisher Scientific
thermoscientific.com/pierce
© 2012 Thermo Fisher Scientific Inc. All rights reserved. Windows, Windows 7, Windows Vista, Windows XP, Excel, PowerPoint and Word are registered
trademarks of Microsoft Corporation. SYBR and SYPRO are registered trademarks of Life Technologies Corporation. Deep Purple is a trademark of GE Healthcare
Limited UK. Pentium is a registered trademark of Intel Corporation. All other trademarks are the property of Thermo Fisher Scientific Inc. and its subsidiaries.
Specifications, terms and pricing are subject to change. Not all products are available in all countries. Please consult your local sales representative for details.
Life Science Research
Belgium and Europe,
the Middle East and Africa
Distributors
Tel: +32 53 85 71 84
The Netherlands
Tel: 076 50 31 880
Switzerland
Tel: 0800 56 31 40
France
Tel: 0 800 50 82 15
Germany
Tel: 0228 9125650
Email: [email protected]
thermoscientific.com/perbio
United Kingdom
Tel: 0800 252 185
For other regions, visit
thermoscientific.com/piercedistributors
2162390.0
United States
Tel: 815-968-0747 or 800-874-3723
Customer Assistance E-mail:
[email protected]
thermoscientific.com/pierce