1
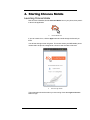
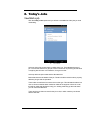
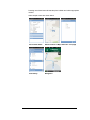
Chronos for Android 2014 Engineers’ Manual 1 Table of Contents 1. System Requirements............................................................................................... 4 Hardware / Software ............................................................................................................. 4 Further Information / Technical Support ................................................................................ 4 1. Introduction ............................................................................................................. 5 How to Use This Manual ........................................................................................................ 5 2. Get used to your Android device .............................................................................. 6 Hardware .............................................................................................................................. 6 3. Installing / Updating Chronos Mobile ...................................................................... 7 Google Play............................................................................................................................ 7 4. Starting Chronos Mobile ........................................................................................ 11 Launching Chronos Mobile................................................................................................... 11 5. Vehicle Check ......................................................................................................... 12 Overview ............................................................................................................................. 12 Page 1/2 .............................................................................................................................. 12 Page 3.................................................................................................................................. 12 6. Chronos Home Screen ............................................................................................ 14 Overview ............................................................................................................................. 14 Home Screen Options .......................................................................................................... 14 7. Taking a Break ....................................................................................................... 16 Overview ............................................................................................................................. 16 8. Today’s Jobs ........................................................................................................... 18 View/Start a job................................................................................................................... 18 Calling Tenants .................................................................................................................... 20 Starting a Job ....................................................................................................................... 22 Taking Pictures .................................................................................................................... 22 Starting a Job ....................................................................................................................... 23 Cancelled Voucher ............................................................................................................... 24 Tenant not at Home............................................................................................................. 26 Tenant is at home ................................................................................................................ 27 Risk Assessment .................................................................................................................. 29 Initial Gas Tightness Test ...................................................................................................... 30 Site Appliances .................................................................................................................... 32 9. Ordering Parts for an Appliance ............................................................................. 38 2 Overview ............................................................................................................................. 38 10. General / Electrical Vouchers .............................................................................. 41 Overview ............................................................................................................................. 41 Viewing the Voucher Details ................................................................................................ 41 Starting the Job.................................................................................................................... 42 11. Parts to Collect .................................................................................................... 43 Overview ............................................................................................................................. 43 12. My Schedule ....................................................................................................... 44 Overview ............................................................................................................................. 44 13. Searching Chronos .............................................................................................. 45 Overview ............................................................................................................................. 45 14. Company Forms .................................................................................................. 48 Overview ............................................................................................................................. 48 Checking Timesheets ........................................................................................................... 48 15. View Diagrams ................................................................................................... 51 Overview ............................................................................................................................. 51 16. Synchronise with Server ...................................................................................... 54 Overview ............................................................................................................................. 54 17. Current Location ................................................................................................. 55 Overview ............................................................................................................................. 55 18. Mapping ............................................................................................................. 56 Overview ............................................................................................................................. 56 19. OFTEC Forms ....................................................................................................... 57 Overview ............................................................................................................................. 57 CD10 (Installation) ............................................................................................................... 57 CD11 (Service)...................................................................................................................... 59 20. Survey Report ..................................................................................................... 63 Overview ............................................................................................................................. 63 3 1. System Requirements Hardware / Software Chronos Mobile works on Android devices with version 2.2 or later. It also works on tablet version 3.0 and above, though the screens are not optimised for those devices. Devices should have : Screens of at least 480 x 800 pixels SD Card (Required to hold the Chronos database and diagrams). Further Information / Technical Support Further information on Chronos Desktop can be obtained from GK Consulting Ltd. 4 1. Introduction Chronos is a fully integrated suite of applications that enables you to manage the gas installation, repair and servicing requirements of landlords. This manual explains the functions of the Android portion for engineer use. How to Use This Manual This documentation is written for those who will use the Chronos Desktop system. It assumes a basic knowledge of the Android Operating System. 5 2. Get used to your Android device Hardware Android devices should have hardware or software buttons for Back and Menu at the minimum. These are usually on the base of the device, so refer to the documentation that came with your device. Whenever the Back or Menu button is referred to in this menu, it means the above buttons. While using the Chronos application, you can use the Back button to move back to the previous screen. There may be times when this is disabled, but you will be notified if that is the case. 6 3. Installing / Updating Chronos Mobile Google Play The app is installed from Google Play (formerly known as the Android Market). There are other support files that need to be installed on your device, so your device will have been supplied pre-configured. Whenever a new version of the app is released your Android device will notify you and ask if you want to update it. The pace of development at present means that it’s likely that you will receive fairly frequent updates. The updating process is automated and none of your data will be changed. You cannot use Chronos while the update process is in progress. To setup a new Android device : Launch the Google Play store by clicking the icon. On older versions of Android, this was called the Market, so it you cannot find the Play Store icon use the Market one. 1 Search for Chronos Mobile by clicking the 2 Launching the Play Store Searching for Chronos Mobile From the list that‘s displayed, select it and on the next screen, click the Install button. 3 Selecting Chronos Mobile After it’s installed, the first time you run it you’ll see figure 4, asking you to download the initial databases. 7 4 Downloading System Files Select System Database and User Database as a minimum. If you want to install the diagrams, select the Install Diagrams option (this isn’t mandatory), but if you do this you should only download via WiFi as the file is over 200Mb in size. While the files are downloading, you’ll see the progress screen in figure 5. 5 Downloading System Files Progress 8 When the download has completed, you will see the preferences screen in figure 6. If Chronos closes after downloading the system files, you’ll need to manually restart it. When you restart, the next step is to login and go to the Management Options screen. When prompted for the code, enter the code you have provided with.Then select System followed by System Settings to get to the preferences screen. 6 Setup Preferences The first thing to do is enter the connection details for your server. In the Code text box, enter the setup code you are provided with (this is sent in a separate email). This will then automatically setup the server details. Chronos automatically backs up device data and purges any old items after a set period – usually 7 days for backup and 30 days for purge. However, you can set these to shorter or longer if required. If you don’t want this device to be tracked, you can also set the GPS Tracking options at the bottom of the screen (you may need to scroll down to see this in some devices). When you’re done, press the Save button and you’ll go to the Assign Device. Select the user from the list that appears - you’ll be asked to confirm this, and when that’s done you’ll be logged out of Chronos and the device is now set and assigned. 9 7 Assigning a Device to a User 10 4. Starting Chronos Mobile Launching Chronos Mobile Now Chronos is installed, find the Chronos Mobile icon on your phone, then press it to launch the application. 8 Chronos Mobile Icon If you can’t see the icon, click the Apps button and scroll through the list until you find it. You will see the login screen in figure 9. This screen shows your IMEI details, phone number and if the phone is assigned to a Chronos user the name of the user. 9 Chronos Login Screen This screen also shows the version you are running. Press the Login to Chronos button to login. 11 5. Vehicle Check Overview Each day that engineers log in to Chronos for the first time, engineers are required to complete a vehicle check. This ensures that they are not driving vehicles that are not roadworthy, and ensures that management are warned of any potential issues. Engineers are not able to proceed further into Chronos until this report is completed. Page 1/2 These pages display the vehicle details and the last recorded mileage of the vehicle. Engineers need to tick a box if the item is OK or leave it unchecked if it is not. 10 Vehicle Check Screens 1 and 2 Page 3 When the engineer has completed his vehicle checks, the last thing to do is to tick the box to indicate that they feel the vehicle is safe to use, then sign the box. They cannot continue to Chronos until they have ticked and signed the box. Otherwise, they are not able to use the vehicle and will have to contact the office for advice before proceeding. To reset the signature, press the button below the signature box. 12 11 Vehicle Check Page 3 13 6. Chronos Home Screen Overview Once logged in, you will see your home screen (figure 12). This screen lists the number of jobs you have outstanding (1 in this case). A similar number will appear after the Parts to Collect option if there are any parts to be collected. 12 Home Screen To scroll through the options, just use your finger to move the list. Once you see the option you want, press it with your finger to launch it. The options are discussed later in this section. At the top there is also a status icon. In this case it’s white, indicating that we are connected to the Internet. If this is blue, you will not be able to send and receive data. However, this will not affect your ability to complete jobs that are already synchronised to your device. Any completed jobs or other details will be queued until the device can connect to the Internet, and there is no need for you to do anything. Home Screen Options At the top right of the screen is the “Break” button. Engineers use this to take a break. This then sends the details back to the office, so they’re aware of which engineers are available. Each of these options are discussed in their own section later. This is an overview of the function of each option. 14 Today’s Jobs – The number in brackets indicates how many jobs you have outstanding. Click this to view and start your jobs. Parts to Collect – Click to view any parts you need to collect. Show My Schedule – View your schedule for past / future days. New Document – Create a manual job voucher or document. This list will expand over time to include other forms. Company Forms – This option will be expanded over time, but it is expected to be able to provide access to forms such as time sheets, holiday requests etc. Management Options – Various options for managing your device and for company managers to view performance and other details. View Diagrams – Allows you to view exploded parts diagrams for a range of appliances and identify parts on them. Synchronise with Server - Although Chronos generally sends and receives data in the background, you can use this option to force the device to synchronise its data. Current Location – Shows your current GPS location on a map. 15 7. Taking a Break Overview Engineers are entitled to statutory breaks, in addition to other times when an emergency break may be applicable. Chronos will record these details and send them to the server. Breaks can only be taken when the engineer is not currently carrying out a job. For this reason, the break button is only visible on the home screen. 13 Starting a Break Pressing the Break button on the home page displays the break dialogue above. If the engineer would like a reminder, they need to set the reminder time and tick the Remind Me tick box. Optionally, some text can be entered in the box at the bottom of the screen to notify the office of the reason for the break. These details are then sent back to the office, where staff will see at a glance in the Chronos Desktop software that they are on a break. 16 14 Break timer While a break is active, a timer screen will be displayed on the PDA. This will also automatically display again if they log out of Chronos, or on a new PDA if they are issued with one while they are on a break. If a timer has been set, the PDA will play the default ring tone at the appropriate time. The break can be cancelled at any time by pressing the Cancel button. 17 8. Today’s Jobs View/Start a job Click the Today’s Jobs option and you will see a scrollable list of the jobs you have outstanding. 15 Your Job List At the top right of the screen there is a white circle icon. This indicates the type of job. You can see that this is a gas job, but this could be an oil (OFTEC) job, electrical or anything else in future. In this instance, it’s a gas voucher. At the top left is the job number and the allocated time. Below that there are the details of the job. These include the tenant’s name, property address, job type and the job status. There is also a small note icon next to the voucher type. This indicates that there is a note on Chronos that has been marked as visible to the engineer. If there is a note, this will be visible and will flash to notify you. Clicking it will bring up the note where you can view it and dismiss it. There can be more than one note for the job or site, in which case they are shown with the date first. 18 16 Site / Voucher Note Clicking the job card brings up a menu of the options available to you for this voucher. To close the menu, either select and option or press the phone’s hardware “back” button. The options are listed in figure 17, and the next page shows the relevant screens. 17 Voucher Options 19 All Voucher Details – This gives you a more in-depth version of the job voucher. On this screen you can see the details you would normally see on the printed voucher. Show Location on Map – Shows the property on a Google Maps page. This is detailed in more depth in the Maps section. Show All Jobs on Map – As above, but shows every job for today on a map. Start Job – Takes you to the first page of the mobile job voucher. Site History - This displays a list of the last 10 visits to the property with the status. As with your own vouchers, you can drill down on these to see further details. Take Me There – Uses the phone’s built-in Google Navigation app to give you turn by turn directions to the property. Calling Tenants You can call tenants directly from Chronos. When in the job card screen, clicking the card to bring up the options menu now displays an extra item at the bottom – Call .. Clicking this menu item displays the screen in figure 18. This displays the home number, work number and finally the mobile number (denoted by the different icons). This layout may be different for each job, as if there is no number for the type it will just not be displayed. Similarly, if there are no numbers you will receive a message telling you so. 18 Calling Options 20 Pressing one of these items will start the phone’s dialler and call the appropriate number. Other sample screens are shown below. All Voucher Details Show Location on Map Start Job – First page Site History Navigation 21 Starting a Job When you start a job, you step through the job voucher one page at a time. Screens have been designed to allow the boxes you must complete to fit on one screen in portrait mode. When you fill in more text than the default, these will just resize and you might need to scroll up / down to see the other boxes. At the bottom of each screen is a Next button. When all mandatory boxes have been completed, you can click this to go to the next page of the voucher. If there are any boxes that haven’t been completed, you will receive a message asking you to correct it before proceeding. Taking Pictures Chronos now provides the facility to take pictures at any stage of the job and send these back to the office. At the top right of each job screen there is a camera button. Clicking this will bring up the device’s standard camera app. 19 Taking a Picture When you have taken your picture, the bottom of the screen will show 2 new buttons to save or discard the image. 20 Image Options If you discard the image, you will be returned to the camera where you can take another picture. If you have changed your mind, press your device’s back button to return to Chronos. 22 When you’re happy with the picture, press the Save button and you will be asked to provide a description for the image. 21 Image Description Starting a Job The first screen asks you to confirm whether the tenant is at home. Select the correct option and click the Next button. If you selected Yes, you will go to the next page of the voucher. 23 22 Starting a Job Cancelled Voucher If you select Cancelled, you will be asked to provide the reason for the cancellation. You can type directly into this box or, wherever you see the magnifying glass button, you can select from a pre-determined list. 23 Why has the Job been Cancelled ? 24 To select an item from this list, just select it and you will automatically be returned to the previous screen where the text will be inserted in the correct box. 24 Standard Cancellation Entries You can then amend the text if you wish after selecting a standard item. Once you have entered the reason for the cancellation, click the Next button and you will be asked if you left a card to notify the tenant. 25 Was a Card Left ? 25 Select Yes or No and click the Next button, then the cancellation details will be sent back to the office Tenant not at Home If the tenant is not at home, you need to decide whether the job can still be completed without them. If you select No you will be asked if you left a card just as in the Cancelled Voucher section. 26 Can Job be Completed ? If you are able to complete the job without the tenant at home, click the Yes option, then you will be asked to complete the details of the work you’ve carried out. 26 27 Job Can be Completed without Tenant Once again, you will be asked if you left a card for the tenant. Tenant is at home If the tenant is at home, the next screen asks you what type of voucher you are completing. These are: Appliance Fault System Fault Standard Service Select the type of Voucher and press Next. 27 28 Selecting Voucher Type The next screen asks you to check that there is a Gas and Electrical supply in the property before proceeding. 29 Does the Propery have the Required Services ? If either of these is not ticked, you will not be able to procced with the service and will instead see the warning screen. In this instance, you will need to press the Finish button to complete the voucher. 28 30 Cannot Continue If the tenant is at home and there is both Gas and Electricity in the property, you can proceed with the job. Risk Assessment The next step on a job is to make a Risk Assessment., Employees will need to ensure that they have carried out all elements required by the company, that they have checked that Occupant’s safety is OK and that no Asbestos Risk was identified. If there are any issues, they can be entered in the box as shown in figure 31. 29 31 Risk Assessment Declaration If any of the Risk Assessment items are not checked, the job cannot continue and you will see the screen in figure 32. 32 Cannot continue Initial Gas Tightness Test The first part of the service is to take the initial Gas Tightness test. On this screen you complete te details required. If no test is required, tick the box and the other items will be disabled, allowing you to proceed to the next page. 30 33 Initial Pressure Test 31 Site Appliances No matter what type of job was selected, Chronos always requests that you add at least one appliance for each property. Initially, this screen is blank as shown. To add an appliance, click the Add Appliance button, and you will see the first appliance screen. As with before, you can select from a pre-determined lookup list for the Location and Appliance Type boxes by clicking the button. In addition, on this screen you can use the standard set of manufacturers and appliances to select from. Click the Select from Existing Appliance List button to see the list displayed below This list is also used to select diagrams later, but for now just click the name of the manufacturer. To see more, use your finger to scroll up or down the list until you find the one you are looking for. When you select a manufacturer, the list then changes to display the appliances for that manufacturer. Select one and the details will automatically be added to the appliance details screen, saving you from some manual typing. 32 On the next page of the appliances screen, you set the owner and various other values. Click the arrow at the right of each drop down list for a list of the possible values, then click to select one. When the page is completed, you can click the Next button to move on. Complete the next screen as before and again click the Next button to carry on. . When you have completed all of the screens for an appliance, you’ll be returned to the Site Appliances screen. From here you can add further appliances, delete or edit existing appliances. To Add an appliance, click the Add Appliance button. To edit or delete an existing appliance, press appliance card for a pop up menu. When you have added all of the appliances for this property, click the Next button to continue with the service. 33 Next, complete the final Gas Tightness Test. 34 Final Gas Tightness Test When this is done, you will see the Smoke/CO2 Alarms list. 35 Smoke Alarms List Add the details for the smoke alarm (figure 36). 34 36 Adding a Smoke Alarm When you’ve added the alarm, it will appear in the list. 37 Smoke Alarm Added The pop up menu gives just one option here- Delete Alarm. After you’ve added all the Smoke/CO2 alarms in the property, you will be asked to provide details of the work completed. 35 38 Work Completed This is a free-form text box, where you just enter a description of the work you’ve completed. The next screen is similar and requests any other details that may be relevant. After that, the next screen allows you to capture up to date contact details from the tenant. These details are not mandatory, and will be useful in future. 39 Tenant Contact Details 36 When these details are sent back to the office, the tenant’s contact details will be updated. The final step is to sign the voucher and then hand the device to the tenant to sign. 40 Voucher Signatures Screen Signatures should be kept within the dotted border. If a mistake has been made, press the Reset button and the signature will be erased. When complete, click the Next button to proceed. The name is not mandatory, and is just used to identify the signatory in future. When both signatures have been entered, the job voucher is complete and you will be returned to your home screen. You will be asked to confirm that the job voucher has been completed before it is sent. Chronos will send the details to the server in the background. If there is no Internet connection, the details will be queued until they can be sent. This process continues even if Chronos is closed. 37 9. Ordering Parts for an Appliance Overview In the appliances screen, you can order parts for the selected appliance easily. 41 Appliance Menu Press the appliance to see the pop up menu, then select Order Part. This will display the screen in figure 42. From this screen you can manually enter a part, or click the Lookup button to see a list of parts that Chronos knows about. Note that on the Order Parts screen, you can also take pictures – so you could for example send back a picture of the part too. 38 42 Ordering Parts If there are any parts in the Chronos database, they will be displayed for you to press one to select it. 43 Selecting a Part When you have selected one, you will be returned to the previous screen. If you don’t want to select an item, press the back button on your PDA. 39 44 Part Details Completed You can also enter some extra text here – anything you need to record or let the office know about this part. When you are happy with the part you are ordering, press the Order button. You will be asked to confirm this, then the part will be ordered and you will be returned to the appliances screen. 45 Part Order Confirmation 40 10. General / Electrical Vouchers Overview As of March 2014, Chronos is now able to carry out vouchers for general works / electrical works. The workflow for both is the same, only the rates catalogue selected is different. The voucher type icon denotes the type : General Electrical Viewing the Voucher Details When you view the voucher details for this type of voucher, you’ll see the screen in figure46. 46 General / Electrical Voucher This shows the items on the voucher, the quantity and on the bottom line any notes the office have provided. 41 Starting the Job General / Electrical vouchers follow the same pattern as other vouchers initially. First, confirm if the tenant is at home and if not whether the job can be completed. Next, complete the standard Risk Assessment questions and assuming all is OK, you will see the screen in figure 47. 47 General / Electrical Voucher Completion Complete the quantity supplied, used or provided in the Qty Supplied box. Optionally enter any notes that need to go back with the voucher. Do this for each item, and when completed press the Next button. You will then be asked to complete the Work Completed and Other Details sections, as per all other job vouchers. Lastly, take any up to date contact details and then sign the voucher. The details will then be sent back to the office. 42 11. Parts to Collect Overview This functionality is not yet active. 43 12. My Schedule Overview The My Schedule option allows you to view your schedule for any past or future date. When you select it, you see the calendar selection dialogue shown below. 48 Your Schedule Use the arrows to change the date, then click the Set button to select the date. If you have no jobs for the selected date, you will be notified. Otherwise the job list will be displayed allowing you to view further details of jobs. 44 13. Searching Chronos Overview Chronos currently allows you to search and retrieve job voucher details. In future the search facility will be expanded to include other information Press the Search option and you will see a second screen showing which items you can search. At present, this is just Vouchers : 49 Find Vouchers Option The search vouchers screen is shown in figure 50. This replicates much of the functionality of the desktop version, allowing you to search for vouchers during a specific time period (which could be in the future, to show planned jobs), engineers / customer and other parameters. 45 50 Search Vouchers Screen Complete the search details and click the Find button. To reduce the amount of data transferred between the PDA and the server, a maximum of 50 results can be retrieved. If there are no search results or more than 50, you will be asked to refine your search. 51 Search Results If there are matching vouchers, they will be displayed in the results screen. The number in brackets at the top indicates the number of vouchers that were found. 46 From this screen, you can then access several functions by pressing the job card. These are displayed in a pop up menu, as shown in figure 52. 52 Search Pop Up Options 47 14. Company Forms Overview The Company Forms will be expanded in future releases, and will display a list of forms that an engineer can complete from a PDA. Checking Timesheets Engineers can check their time sheets from their PDA. To do this, select the Check Timesheet option. 53 Check Timesheet Option Chronos will then contact the server to retrieve details of the engineer’s time sheet. If no information is available, or the server cannot be contacted, an error message will be displayed. 48 54 Retrieving Time Sheet entries When time sheet data is received, it will be displayed as in figure 55 55 Time Sheet Entries Each entry shows the voucher number, address / description and customer. In addition it shows the started and finished times, taken from the PDA. The number in brackets is the total number of minutes spent at the property. 49 Engineers should scroll down through this list, ticking the box if they agree that the entry is correct. When finished, clicking the Next button displays the signature screen, where they sign the time sheet. There is also the option to add notes, which is where the engineer can inform the office of anything that isn’t on the time sheet. 56 Signing Time Sheet 50 15. View Diagrams Overview Chronos Mobile includes nearly 7,000 appliance images and exploded parts diagrams. These are on the SD card. This option allows you to view these diagrams and identify parts. These diagrams will be updated in future versions. 57 Selecting a Manufacturer To view a diagram, use the Manufacturer / Appliance selection screens detailed in previous sections. The main difference is that there is another screen allowing you to select individual diagrams. For some there may just be appliance details. For others there may be exploded views and even fault finding charts. Select one and it will be displayed. 51 58 Selecting an Image to View You can use the standard Android pinch to zoom and pan functions to move around the picture or further identify parts. 59 Viewing a Parts Diagram Press the Lookup button on the title bar to pop up a menu with a Find Part option. Enter the number from the diagram and Chronos will display the information for the part. 52 60 Finding a Part from the Diagram 61 Part Details Future versions of Chronos will allow you to order parts directly from the device. 53 16. Synchronise with Server Overview Chronos automatically synchronises its data with the server in the background. This process continues even when Chronos is closed, ensuring that all information is returned to the server as quickly and efficiently as possible. New jobs are received using “push” notifications. The device doesn’t need to stay connected to the server, and Chronos doesn’t even need to be running for new jobs to be received. When requested by the server, Chronos will wake and synchronise. Push notifications are sent by the server whenever a new job is allocated to the user, when a job is modified (such as being cancelled) or when a synchronisation is overdue – usually every two hours. 54 17. Current Location Overview The current location shows where you are according to your GPS receiver. See the mapping section for more details on using the map. 62 Current Location 55 18. Mapping Overview 63 Mapping Menu The mapping functionality in Chronos uses the built in Google Maps application. The initial display in a map screen is the standard map. Press the menu key on your device to see the pop up menu displayed in figure 63. Press one of the options or press the hardware “Back” key to close the menu. The options are : Standard – Standard map view. Toggle Traffic On/Off – Overlays coloured lines on the map to show current traffic information. Satellite – Overlays photographic information on the map. Hybrid – Displays both the satellite map and standard map at the same time. Find Address – This displays a screen where you can type an address or postcode to find. You can use the normal Android gestures to interact with the map – pinch to zoom in/out, pan around etc. 56 19. OFTEC Forms Overview Chronos can carry out oil servicing and installation, and completes the standard CD10/CD111 forms. Oil forms are deonoted by the OFTEC log in the jobs list : 64 OFTEC Jobs icon The first steps are the same as for gas, with the exception that the Mains Services screen displays the word “Oil Supply” instead of “Gas”. CD10 (Installation) The screens follow the CD10 layout closely. The details and information required are exactly the same, but the screens have been designed to be usable on a small PDA. The screens are all shown on the next couple of pages. 65 CD10 Oil Storage Details / Oil Supply System 57 66 Appliance Details / Flueing Arrangements 67 Air / Electrical and Control Details 58 68 System Details / Commissioning Once all the details are complete, the vouchers must be signed just as with Gas vouchers. CD11 (Service) Again, CD11 forms follow the same starting pattern as gas / CD10. i.e. Confirm the tenant is at home / the job can be completed, a Risk assessment is OK and that there is electricity / oil at the premises. From then on, again the screens follow the CD11 form as closely as possible. The screens are shown over the next couple of pages. 59 69 70 CD11 Checks / Appliance CD11 Call Type / Schedule 1-7 60 71 CD11 Schedule 8-14 / Comments 72 CD11 Test Results 61 73 Test results page 3 When the service screens are completed, the job must be signed by the engineer and the tenant. 62 20. Survey Report Overview Chronos can carry out survey reports on tablet devices only. Attempting to carry out a survey on a small screen PDA will display a message alerting the user instead. Surveys are displayed in the jobs screen with a tape measure icon : 74 Survey job icon The first screen displays information about the property and boiler. 75 Survey property / boiler information Next, you can add details for individual rooms. To add a room, press the button below the Complete Survey button. 76 Adding a room 63 77 Room details First, enter the dimensions of the room. As you do this, the details below the room dimensions are updated to show the area and the required BTU / Kw for the radiator. The BTU / Kw calculations are also affected by the number of outside walls and the height, which adds a weighing for rooms with ceilings above 3 metres tall. Chronos maintains a central list of radiator suppliers, which will be added to over time. These are used to suggest radiators that will be suitable for the room. To use this facility, you should have entered the room dimensions first so that Chronos knows the BTU / Kw requirements. To find a radiator, press the button to the right of the Proposed Radiator type : 78 Selecting a Standard Radiator This will display the screen in figure 79. 64 79 Standard Radiator List The top of the screen shows the required BTU, and in the next two boxes you can enter the tolerance you are able to allow. In the screen shown, we have allowed a tolerance of 100 BTU below and 100 BTU above our requirements. If you change the tolerances, you will then need to press the button to refresh the list. If you want to select one of the proposed radiators, press it and the details will automatically be added to the room. When you are happy with the details for this room, press the Save button at the bottom of the screen and you will be returned to the main survey screen. The new room will be displayed in the list, and you can continue adding more rooms as required. 65 80 Survey screen with room added To edit or delete a room from the survey, press and hold your finger on the required room, and a popup menu will appear. 81 Editing / Deleting a room Select the appropriate option – editing will take you to the screen in figure 77, where you can amend the details. When you have completed the survey, press the Complete Survey button. You will be asked to confirm, after which the survey will be returned to the office. 66