1
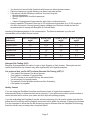
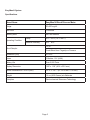
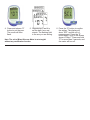
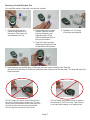
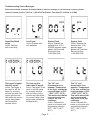
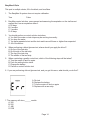
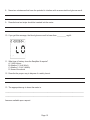
Long Term Care
Manual
EasyMax N Blood Glucose Monitoring System
This Manual is intended for facilities where point-of-care testing is
conducted by a healthcare professional. Please thoroughly read
the EasyMax N Owner’s Guide and all product instructions before
making use of this Manual.
EasyMax N Blood Glucose Monitoring System
Manufactured by:
EPS Bio Technology Corp.
No.8, R&D Road III, Hsinchu Science Park
Hsinchu, Taiwan 30077
Customer Service: 1-866-994-3345 (Toll Free)
(Mon-Fri 9:00 AM - 9:00 PM)
Introduction
This manual has been created for Healthcare professionals for the purposes of performing point-ofcare testing.
Caution: Please carefully read the User’s Manual and all product instructions before using this Long
Term Care Manual and administering blood glucose tests.
Summary of Contents:
• An outline of the EasyMax N Blood Glucose Monitoring System.
• Quality Control Method, including how to troubleshoot potential issues that may arise while
performing EasyMax N blood glucose tests.
• Training information for healthcare professionals
Intended Use:
The EasyMax N Glucose Monitoring System is intended for the quantitative measurement of
glucose in fresh capillary whole blood samples drawn from the fingertips or forearm. Testing is done
outside the body (In Vitro diagnostic use). It is indicated for use at home (over the counter [OTC]) by
persons with diabetes, or in clinical settings by healthcare professionals, as an aid to monitor the
effectiveness of diabetes control.
Questions?
If you have questions or need assistance, please call Customer Service toll-free at 1-866-994-3345
(Eastern Time, Mon-Fri 9:00 AM-9:00 PM). You can also visit www.oaktree-int.com for diabetes
management tools and product demonstrations.
Important Information About the EasyMax N System:
• EasyMax N blood glucose meter is designed and approved for testing fresh capillary blood from
fingertip and forearm. The meter is for outside the body (in vitro) use. It should not be used to
diagnose diabetes.
• Only use EasyMax N blood glucose meter with EasyMax Blood Glucose Test Strips. Using
other test strips will give inaccurate results.
• Testing is not valid for neonatal blood specimen.
• Do not disassemble the meter as this may cause damage to the components resulting in
incorrect reading. Disassembling the meter will also void the warranty.
• Always keep the meter clean and store it in a safe place. Protect the meter from direct sunlight
to ensure a longer lifespan.
• The system should be used at a temperature between 50°F-104°F (10°C - 40°C). Outside this
range, the system may get incorrect results.
• You should not store the meter and test strips in a car, bathroom, or refrigerator.
• Elevated levels of acetaminophen, uric acid, gentisica acid, levodopa, dopamine, ascorbic acid
and methyldopa may affect results.
• Remove batteries if the meter will not be used for one month or more.
• Do not touch the strips with wet hands.
• Do not use expired strips (the expiration date is shown on the bottle, and once opened the
strips have a 90 day shelf life).
• Do not bend, cut or twist the strips.
• Altitude up to 10,000 feet above sea level has no effect on readings.
• DO NOT reuse the test strips. The test strips are for single use only.
• Warning for potential biohazard: Healthcare professionals using this system on multiple patients
should be aware that all products or objects that come in contact with human blood, even after
cleaning, should be handled as if capable of transmitting viral disease.
Page 1
•
•
•
•
You should not test critically ill patients with home-use blood glucose meters.
Patients undergoing oxygen therapy may have inaccurate results.
If the patient has the following conditions, the result may fail:
• Severe dehydration
• Severe hypotension (low blood pressure)
• Shock
• A state of hypoglycemic-hyperosmolar state (with or without ketosis)
Lipemic samples: Cholesterol level up to 500 mg/dL and triglycerides up to 3,000 mg/dL do
not affect the results. Grossly lipemic patient samples have not been tested and are not
recommended for testing with EasyMax N Glucose Meter.
Interfering Substances depend on the concentration. The below substances up to the test
concentration will not affect the test results.
Interfering
Substance
Acetaminophen
Ascorbic Acid
Dopamine
Gentisic Acid
L-Dopa
Methyldopa
Uric Acid
Test Concentration
mg/dl
8
2.5
2
6
2
2
13
Bias at 50±5
mg/dl
10.2
11.8
4.3
7.8
3.8
5.2
7.6
% Bias at 250±5
mg/dl
6.5
-6.8
12.9
2.8
-1.2
-2.3
3.9
% Bias at 500±5
mg/dl
3.8
5.3
6.3
-4.3
-1.8
4.1
3.8
Alternate Site Testing (AST)
EasyMax N gives patients the option to test on their fingertip or their forearm. Blood glucose test
results obtained from the forearm may differ significantly from fingertip samples. It is preferred that you Do NOT perform Alternate Site Testing (AST) if:
• Your patient has frequent low blood glucose.
• Your patient is unaware of hypoglycemia.
• The AST results do not match the way the patient feels.
• You are testing for hyperglycemia.
• The patient’s routine glucose results are often fluctuating.
• If the patient is pregnant.
Quality Control
If you are using the EasyMax N and the result seems lower or higher than expected, it is
recommended that you repeat the test with a new strip. If you get the same result, please conduct a
control solution test to ensure your meter and test strips are working properly.
If you are evaluating the EasyMax N results and are comparing it to lab results, please note that the
patient should be fasting and the fingertip test should occur within five minutes of having blood drawn.
It is also important to know that the lab technology may be different than the EasyMax N technology;
therefore results may not always be a complete match.
Page 2
EasyMax N System
Specifications
Brand Name
EasyMax N Blood Glucose Meter
Range
20~600 mg/dL
Test Time
5 Seconds
Memory Sets
480 Test Results
Operating Condition
Temp.
500F~1040F (100C~400C)
Relative Humidity
R.H. < 90%
Blood Sample
0.6 µL
Fresh Blood from Fingertip or Forearm
Hematocrit (Hct)
30~55%
Power
2 Alkaline 1.5V (AAA)
Battery Life
Over 2,000 Tests
Display Dimension
1.60” x 1.30” (40.6 x 33.0 mm)
Device Dimension H x W x D (mm)
3.2” x 2” x 0.7” (81.3 x 50.89 x 17.8 mm)
Weight
1.6 oz (45.5 Grams) w/o Batteries
Principles
Electrochemical Biosensor Technology
Page 3
Caring for your Blood Glucose Meter in a LTC Setting
In order to prevent the growth of microorganism, make sure you cover all of the steps below.
1. Make sure
the meter is
off.
4. Wipe the surface of the
glucose meter including
the test strip port and
communication port after
each use. Be careful to
make sure no liquid goes
into either port. Wipe the
meter thoroughly; the
treated surface must
remain visibly wet for a
full 2 minutes to attain
complete disinfection.
2. Put on a pair of
protective gloves
before you start the
cleaning procedure
5. If you find any blood
stains on the device,
make sure you clean it
with caution.
Page 4
3. Sanitize the glucose
meter with any EPA
approved disinfectant
product that meets the
1:10 bleach solution.
6. Air dry the meter to
sanitize completely
before next use.
Chapter 1: Understanding Your Meter
The EasyMax N Blood Glucose Meter
M Button
To turn on the meter or read records.
S Button
To turn on the meter or go into Setting Mode.
EasyMax Test Strip
A. Blood Collection Area
B. Reaction Area
C. Hand Hold Area
D. Strip Insert Direction
Strip Slot
To insert test strip or check strip.
E. Electrode
Setting the Time and Date - First Time Use
1.
Press and hold the “S”
button until turning the
meter on. Press “S”
button and release to
enter setting mode.
2.
The time and date appear
on the display. The year
flashes at the center of the
display.
Page 5
3. Press “M” button to adjust
the year. Press and hold
“M” button to scroll faster.
4.
Press and release “S”
button to set the year.
The month will then
flash.
5.
Repeat step 3 and 4 to
set the date, hour and
minute. The flashing field
is the one you are setting.
Note: The unit of Blood Glucose Meter is set at mg/dL
without any modification function.
6. Press the “S” button to confirm
the setting. The display will
show “SCL” and the unit of
measurement. Press the “S”
button again, to go to the screen
shown in Step 1. Press and hold
“S” for more than 3 seconds, and
the meter will turn off.
Running a Control Solution Test
You need the meter, a test strip, and control solution
1.
Put a test strip into the
meter in the direction of the arrow. The meter will
automatically turn on.
2. Place the meter on a flat
surface.Take the control solution between your fingertips and roll the
solution back and forth to mix up the solution.
4. Squeeze out 1-2 drops of solution and discard.
3. Twist off control solution
bottle cap and wipe the tip
of the bottle with a tissue.
5. Now squeeze out another drop of solution onto the control solution cap. Take the
cap and touch the drop to the blood collection area at the end of the test strip. The strip will sip in the
control solution.
DO NOT apply the control solution directly from
the control solution bottle into the strip! This can
cause cross contamination with the enzyme from
the strip and the entire control solution bottle
will no longer be accurate on future tests.
DO NOT apply the control solution or capillary
whole blood on TOP of the strip. This will lead
to an inaccurate reading or no reading at all.
Page 7
8.
6.
When the meter beeps,
there is enough control
solution in the the strip.
The meter counts down
from 5 seconds and will
display the results. Do
not remove the strip yet.
Check if the reading falls
within the range printed
on the test strip bottle.
7.
Remove the test strip
and throw it away after
you have compared the
reading to the range
printed on the test strip
bottle.
Close the control
solution vial tightly. Wipe
the tip of the control cap
with a tissue to remove
any excess solution.
Expiration date.
This date applies to
unopened bottles only.
Once opened, the control
solution has a shelf life
of 90 days.
Understanding Control Solution Test Results
Important: Please follow your institution’s control solution testing regulations and procedures.
The label on your test strip bottle shows the acceptable ranges for the
Control Solution. The result you get should be inside this range. Make
sure you compare the result to the correct level of control.
When the control solution result is inside the range (See 1A) on the test
strip bottle, your test strips and your meter are working properly.
If your control solution result is not inside the acceptable range, here are
some things you can do to solve the problem:
Troubleshooting Checks
Action
Was the test strip exposed to open air for a
long period of time?
Repeat the control test with properly stored strips.
Was the test strip bottle capped tightly?
This will humidify strips inside. Replace the test
strips.
Is the control solution expired or
contaminated?
Replace with new control solution to check the
performance of the system.
Were test strips and control solutions stored in Repeat the control test with properly stored strips
cool, dry places?
and/or control solutions.
Did you follow the testing steps properly?
Read Chapter 2 in the manual “Control Solution
Testing” and test again. Stop using the meter if you
continue to obtain the inaccurate results. Call
Customer Service Toll-Free: 1-866-994-3345
(Eastern Time, Mon-Fri 9:00 am - 9:00 pm)
Page 8
Performing a Blood Glucose Test
Please adhere to your institution’s medical device handling and site preparation procedures.
3. Please wait at least 5
2. Put a test strip into the meter seconds until the intended
1. Wash your patient’s hands
in the direction of the arrow. area is dry and clean before
with soap and warm water.
Rinse and dry thoroughly. Your The meter will automatically sampling the blood.
turn on.
institution may require that
4. When the blood drop flashes
you use an alcohol prep pad.
on the display, obtain a drop
Please ensure that the test
of blood from fingertip, using
site is completely dry before
the safety lancet. (See
proceeding.
image above)
In a Long Term Care facility setting, we recommend that a safety lancet be used for each
individual blood glucose test. For demonstration purposes, we are using SteriLance™’s
Pressure Activated Safety Lancets.
1.
2.
3.
Carefully pull off the protective cap.
Push the lancet firmly onto the chosen site to fire.
Gently apply intermittent pressure near the puncture site to obtain the required blood volume.
EasyMax N system requires a small 0.6 microliter blood sample.
5.Touch the blood drop to the
tip of the transparent window
of the test strip. Do not put
blood on top of the strip. Be
sure to get enough blood on
the strip’s reaction zone.
Otherwise, an inaccurate
reading may result.
6.The meter will beep when
enough blood has entered
the strip’s reaction zone. The
result will appear on the
display after 5 seconds.
Page 9
7.
Discard the used safety lancet and test strip into an
appropriate sharps or
biohazard container.
Troubleshooting Screen Messages :
Please do not make treatment decisions based on an error message. If you have any concerns, please
contact Customer Service Toll-Free: 1-866-203-2761(Eastern Time, Mon-Fri 9:00 AM - 9:00 PM)
Humidified/Used
strips
Action: Replace
with a new strip.
Low Power
Action: Replace with
new batteries.
System Fault
Action: Replace the
batteries first. If 001
ERROR appears again,
please call Customer
Service toll-free
1-866-994-3345.
System Fault
Action: Replace the
batteries first. If Err
appears again,
please call Customer
Service toll-free
1-866-994-3345.
Test result is higher
than 600 mg/dL.
Action: Test again. If
the result is still the
same, try a control
solution test and if the
control solution test
falls within the correct
range, then please
take immediate
medical action.
The test result is
lower than 20 mg/dL.
Action: Test again. If the
result is still the same,
try a control solution
test and if the control
solution test falls within
the correct range, then
please take immediate
medical action.
The "Ht" and
thermometer icon
appears. Temperature
is too high, outside the
required range of 50°F
- 104°F (10°C - 40°C).
This alerts user that an
incorrect result may
occur if the test
continues.
Action: Relocate the
meter to a location with
temperature between
50°F - 104°F (10°C 40°C).
The "Lt" and
thermometer icon
appears. Temperature
is too low, outside the
required range of 50°F
- 104°F (10°C - 40°C).
This alerts users that
an incorrect result
may occur if the test
continues.
Action: Relocate the
meter to a location with
temperature between
50°F ~104°F (10°C 40°C).
Page 10
EasyMax N Blood Glucose Monitoring System
Training Information
for
Healthcare Professionals
Page 11
EasyMax N System Trainer Checklist
You may use the following checklist to assess the trainee’s ability to perform the following tasks.
1. Identifies the equipment used with the EasyMax N System.
EasyMax N Blood Glucose Monitor
EasyMax Blood Glucose Test Strips
EasyMax Control Solutions: Low, High, Normal
Safety Lancet
2. Blood Glucose Meter
Locates the serial number
Identifies the strip slot
Locates the on/off button
Locates the setting button
3. Blood Glucose Test Strip
Locates the expiration date (opened & unopened)
Checks the lot number
Identifies the blood collection area
Understands the correct strip insert direction
Locates the electrode end of test strip
Identifies the designated “hand hold” area
4. Demonstrates proper test strip use.
Only uses EasyMax N blood glucose meter with EasyMax blood glucose test strips
Runs a control solution test every time a new vial of test strips is opened
Keeps test strips in their original vial
Closes vial immediately after taking a test strip out, to eliminate the contamination of the
other test strips
Knows test strips are single use only. Do not re-use.
Records the date the test strip bottle is opened. Checks the “Expiration Date” on the test
strip bottle. The test strips are good for three months from the date the bottle is opened or
until the expiration date on the bottle, whichever comes first.
Stores the test strips between 35.6OF - 86OF. Do not freeze.
Follows proper disposal of used test strips according to your institution’s policy.
Page 12
5. Demonstration of blood glucose testing.
Demonstrates proper safety lancet technique when collecting blood sample
Understands the different sites that may be used with the meter
Demonstrates appropriate disposal of safety lancet in accordance with institution’s policy
Demonstrates the correct way to insert the test strip into meter
Understands symbols that appear on the meter screen and what, if any, corresponding
action
Demonstrates correct placement of blood on test strip
Records results as specified per your institution
Understands the protocool for inaccurate results (re-tests, control solution test,
troubleshoot)
Knows the actions to be taken when results are abnormally high or low
6. Quality Control
Performs a control solution test, and can explain why it should be done
Understands the dates listed on the control solution and how they apply to opened vs
unopened vials
Recognizes what it means when a control solution test result falls in the range listed on
the vial, and when the test result falls out of the range on the vial
7. Troubleshooting Guidelines
Understands the steps to follow when troubleshooting
Knows the warranty of meter
Knows how to handle defective meter, strips, etc. (next steps, manufacture customer
service\service phone number)
8. Proper Care
Understands how to maintain the meter
Locates proper storage
Demonstrates proper cleaning
Demonstrates proper battery installation
9. Documentation
Understands what information must be documented by law and what is required by your
institution.
Page 13
EasyMax N Quiz
This quiz is multiple choice, fill in the blank, and true/false.
1. The EasyMax N system does not require calibration.
True
False
2.
EasyMax control solution, once opened and assuming the expiration on the vial has not
expired first, has an expiration date of:
A.60 days
B.6 months
C.3 months
D.45 days
3.
You should perform a control solution test when:
A. You think the meter or test strips may be working incorrectly.
B.You drop the meter.
C. You have repeated a test and the test results are still lower or higher than expected.
D. All of the Above
4.
When performing a blood glucose test, where should you apply the blood?
A.On top of the test strip
B.On the side of the test strip
C.The tip of the test strip
D.The middle of the test strip
5.
When conducting a quality control test, which of the following steps will be taken?
A.Turn the meter off and on again.
B.Push the setting button twice.
C.Change the battery
D.Perform a control solution test
6. If you are performing a blood glucose test, and you get this error, what should you do first?
A.Re-test
B.Replace the battery
C.Turn the meter off and on again
D.Replace with a new strip
7. The memory will store ______ results.
A. 300
B. 250
C. 480
D.1000
Page 14
8. Name two substances that have the potential to interfere with an accurate blood glucose result.
9. Describe how test strips should be inserted into the meter.
10. If you get this message, the blood glucose result is lower than _________ mg/dL.
11. What type of battery does the EasyMax N require?
A. 3 Volt Lithium
B. Alkaline 1.5 Volt (AAA)
C. Alkaline 1.5 Volt, (AAAA)
D. None of the above
12. Describe the proper way to dispose of a safety lancet.
13. The appropriate way to clean the meter is:
________________________________________________________________________________
________________________________________________________________________________
Answers available upon request.
Page 15
EasyMax N Blood Glucose Quality Control Results Log
Facility Name:
Monitor #
Month/Year:
Results Reviewed by:
Date Time
Staff
Test Strip
Low Control
Normal Control
High Control
Action Taken
Performing
Lot#
Lot Range Result Lot Range Result Lot Range Result
Page 16