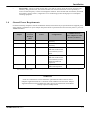
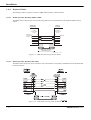
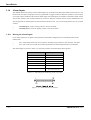
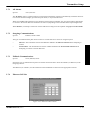
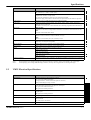
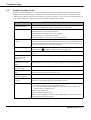
1
ADPRO
®
FastVu
TM
Digital Video and Audio
Transmission System
Installation & User Manual
Part No. 200709.06
Quick Reference
ADPRO FastVu Digital Video and Audio Transmission Systems
The ADPRO FastVu Digital Video and Audio Transmitter/Transceiver is an advanced, high performance digital video
and audio transmission system providing outstanding speed and quality for remote security and surveillance
applications. Models include a 20 camera Transceiver (switch configurable as a Receiver or as a Transmitter), a 10
camera rack-mountable Transmitter and a 10 camera wall-mount Transmitter.
Typical ADPRO FastVu Transmission Application
Figure A shows a typical application using the ADPRO FastVu system.
In a typical installation the FastVu can support connection to the following equipment:
•
20 cameras (CAM1 through CAM20) - Model 2020 only
or 10 camera model (CAM1 through CAM10) - Model 2010 or 3010
•
Telemetry Stations for PTZ camera control
•
Transparent RS-232 link for remotely located 3rd party equipment
•
1 composite monitor (MON1)
•
1 S-Video recording VCR (Model 2020 only)
•
20 (/10) external Alarm input devices (e.g panic button, door switch, PIR detector or glass break switch)
•
3 external output devices (e.g siren, strobe light, outdoor light or door lock mechanism) - or optionally 10
relay outputs for isolated electrical switching
•
10 Microphone inputs (via the VM22A Audio Switch)
•
10 Speakers
ADPRO FastVu, Issue 6
iii
Quick Reference
Figure A - Applications (rack mount model only shown)
iv
ADPRO FastVu, Issue 6
Quick Reference
Key Definitions
The AMK-300 Universal Keyboard is used to control the FastVu system and is normally connected to the Receiver.
When multiple FastVu Receivers are required to control a number of remote Transmitters, a single AMK-300
keyboard can be used to control all Receiver units.
The AMK-300 operating keys are divided into a number of areas as shown in Figure B.
Figure B - AMK-300 Operating keys
Keys and controls of the AMK-300 are divided into several logical groups: These groups are arranged for control of
the following feature sets:
•
•
•
•
•
•
•
•
Mode
Display
Equipment
Alarm Playback
System
Entry Selection
Menu Direction and Page
Camera (PTZ) Control.
The AMK-300 can be used with a number of ADPRO products and some keys may only be applicable to specific
types of equipment. The keys shown are those applicable to FastVu.
The following paragraphs describe the action caused by pressing the keys in the specified group. Actions caused by
simultaneously pressing both the Shift key and the specified key are also listed.
ADPRO FastVu, Issue 6
v
Quick Reference
Mode Keys
GLOBAL key
The Global key, is used to control the bi-directional audio feature.
ACCESS/SECURE key
The Access/Secure key is used to change the status of remote Transmitters. When set to Access the remote
site will not report alarm events with the exception of ‘No Video Alarms’ (if configured to do so). When set
to Secure, all alarm events are reported (if they have been configured to do so).
If the remote Transmitter has been set ‘locally’ to operate in Access (via a hardware input), this key will
have no effect. However, when the local hardware is switched back into the Secure state, the key becomes
usable again.
Equipment Keys
The key light is illuminated when pressed, providing a visual indication of key selection.
VST
VST key
The VST (Video Transmission and Storage) key is used when the AMK-300 is connected to a FastVu
chassis. If the keyboard does not recognise the connected equipment as a FastVu unit, then an audible error
signal will beep.
Display Modes
The monitor can display output from single or multiple cameras and the display keys select differnt modes of
operation.
Full Screen Display Key
The Full Screen Display key is used to display the current camera as a single, full screen.
Multi-Live Key
The Multi-Live key is used to display the video from multiple cameras in a variety of screen split formats.
The first press of the key sets the monitor to show a 4-way split with the ‘current’ camera in screen quadrant
#1. Pressing the key again will cycle the monitor display through all available formats. The formats are 4,
7, 10, 13 and 16-way.
vi
ADPRO FastVu, Issue 6
Quick Reference
Auto Sequence Key
The Auto Sequence key is used to sequence the (sequence enabled) cameras until stopped by the User.
System Keys
Some of the system keys are specific to the FastVu video transmission system and are detailed below.
?
STATUS
HELP
CTRL
CTRL
ISOL
ISOL
SPEED
SHIFT
CONNECT key
The Connect key is used to initiate a connection to, or disconnection from a remote site.
When FastVu is ‘OFFLINE’ and not connected to a remote system, the key will initiate the connection
process task. However, if the system is ‘on-line’ and is using a communications link, pressing the Connect
key will cause the controlling system to start a ‘disconnection’ task. The connection or disconnection menu
dialogue is displayed on the monitor.
CHASSIS key
The Chassis key is used for the selection of an individual Receiver chassis (unit) for control, when more
than one chassis is configured within the system. Once a Receiver chassis number has been set, it will
remain active regardless of any other operation, until changed again by the Chassis key.
FastVu systems can daisychain up to fourteen (14) Receivers. Select the required Receiver chassis number
<n> then press the Chassis key.
?
STATUS
STATUS key
The Status key is used to view the system’s ‘alarm input status’ on the monitor.
ADPRO FastVu, Issue 6
vii
Quick Reference
HELP
HELP key
The Help key is used to display the software version fitted to the unit. When ONLINE, the help message
gives both Receiver and Transmitter revision levels.
CONTROL ON key
The On key is used to initiate the systems’s control output dialog screen(s) OR, when used with a number
key, turn on one of the system’s three standard control outputs. When used in conjunction with an optional
ADPRO VM25 I/O Expander module, up to 10 control (relay) outputs may be used. The operational
parameters for the control outputs are set via the system setup menu.
The key is used with a Receiver only. Press a number key <1-3> followed by Ctrl On to switch on a control
output at the remote Transmitter.
CONTROL OFF key
The Off key is used to initiate the systems’s control output dialog screen(s) OR, when used with a number
key, turn off one of the system’s three standard control outputs (optional VM25 = 10). The operational
parameters for the control outputs are set via the system setup menu.
The key is used with a Receiver only. Press a number key <1-3> followed by Ctrl Off to switch off a control
output at the remote Transmitter.
AUDIO key
The Audio key is used to globally switch the system’s audio feature on/off, or to enable/disable audio
transmission in a particular direction.
When used alone, the Audio key controls audio transmission from the Transmitter to the Receiver. The
reverse direction is controlled by using the Shift
and Audio keys.
SHIFT
Bi-directional audio is toggled on or off by using the Global
ISOL
and Audio keys.
ALARM ISOLATED key
The Alarm Isolated key is used to temporarily isolate (disable) a particular alarm input while keeping other
alarm inputs active. The remote Transmitter must be connected for this key to operate.
ISOL
ALARM UN-ISOLATED key
The Alarm Un-Isolated key is used to remove the isolation set on a particular alarm input. The remote
Transmitter must be connected for this key to operate.
viii
ADPRO FastVu, Issue 6
Quick Reference
VIDEO QUALITY key
The Video Quality key is used toggle the video quality in the current display mode.
SPEED
•
Pressing the key once will toggle between ‘Normal Quality’ and ‘High Quality’ settings.
•
Pressing a value <1-8> and then the Video Quality key will select that particular quality level.
VIDEO SPEED key
Not available in current version.
CAMERA key
The Camera key is used to display a video input from a camera (channel) on the monitor. The Transmitter
must be ONLINE. Enter the desired channel number <1-20> followed by the Camera key. The key may
also be used to:
Manually step through all enabled channels in numerical order. The channels may be also displayed in
reverse order if the Shift
key held down while pressing the Camera key.
SHIFT
Manually step through all selected channels in the auto-sequence list for display on the monitor. The
Camera key is pressed without using any preceding channel numbers. The auto-sequence list may be
displayed in reverse order if the Shift
key is held down while pressing the Camera key.
SHIFT
SHIFT
SHIFT key
The Shift key is used in conjunction with other keys to provide either added functionality to the key, or to
provide an additional level of ‘security’ to an action. ‘Security’ in this instance is a way of forcing the
operator to press two keys simultaneously, thus preventing accidental entry of data by pressing only a single
key.
NEXT ALARM key
The Next Alarm key is used in enter the system’s ‘alarm event mode’ of operation. The oldest alarm is
shown first on the monitor if more than one alarm is present.
Use the Shift+Next Alarm to step and view in reverse order.
ALARM RESET key
The Alarm Reset key is used to clear the alarm event that is currently displayed on the monitor.
ADPRO FastVu, Issue 6
ix
Quick Reference
Programming Keys
The Programming keys consist of four cursor control keys, a move by page key, numeric keys <0> to <9>, the Clear,
Enter, Function and End keys.
PAGE
Figure C - Programming keys
SETUP
SETUP key
Allows entry and exit of Setup Mode.
FN (Function) key
Not available in current version.
END
END key
While in Setup Mode, the End key is used to save the current settings and exit to the previous menu.
x
ADPRO FastVu, Issue 6
Quick Reference
Camera Control Keys
The in-built 3-axis joystick operates the pan, tilt and zoom (PTZ) functions on the supported telemetry station
connected to a selected camera. The Camera Control keys are used to provide the additional functionality supported
by the particular Camera Station. These keys are functional regardless of the currently selected equipment type.
For all keys which require a preceding number, if a mistake is made when entering the number, correction is a matter
of ignoring any previous entry and typing a new two digit number ie. ‘0’ ‘6’ Delete.
The number of ‘Preset Positions’ and ‘Auxiliary Outputs’ is dependent on the telemetry station type. Refer to the
telemetry station manual for details.
Figure D - Camera (PTZ) keys
SAVE
PRESET
PRESET / SAVE key
The Preset key is used to move a PTZ camera to a preset position that has previously been saved using the
Save procedure (see below). It requires the operator to enter the desired preset number followed by the
Preset key.
Pressing the Shift SHIFT and Preset key saves the current settings in the telemetry station memory for the
currently selected camera. These preset positions can then be recalled.
To save a PTZ preset, move the camera to the required position then enter the desired preset number
followed by the simultaneous pressing of the Shift and Preset keys.
AUX ON key
The Aux On key is used to switch on an Auxiliary output of the currently selected telemetry station and
requires the operator to enter the desired auxiliary channel number followed by the Aux On key.
Example:
To switch on Aux Output #4 on Camera #3, press ‘3’ followed by the Camera key to
select the camera, then press ‘4’ followed by the Aux On key.
AUX OFF key
The Aux Off key is used to switch off an Auxiliary output of the currently selected telemetry station and
operates identically to the Aux On key.
ADPRO FastVu, Issue 6
xi
Quick Reference
WASH key
The Wash key is used to momentarily operate the telemetry station wash output. The relevant output
switches on while the Wash key is pressed (provided the feature is available on the telemetry station).
WIPE key
The Wipe key is used to momentarily operate the telemetry station wipe output. The relevant output
switches on while the Wipe key is pressed (provided the feature is available on the telemetry station).
IRIS OPEN/CLOSE key
For the currently selected camera, the Iris open or Iris close key opens or closes the len’s iris while the key
is being pressed (provided the feature is available on the telemetry station).
FOCUS NEAR/FAR key
For the currently selected camera, the Focus near or Focus far key adjusts the lens’ focus near or far
respectively while the key is being pressed (provided the feature is available on the telemetry station).
ZOOM WIDE/NARROW key
For the currently selected camera, the Zoom narrow or Zoom wide key zooms in or out of the camera scene
respectively while the key is being pressed (provided the feature is available on the telemetry station).
HOME key
The Home key is used to move the currently selected PTZ camera to preset position number 1 (provided the
feature is available on the telemetry station).
xii
ADPRO FastVu, Issue 6
Copyright & Tradename
Quick Statement
Reference
Copyright
The ADPRO FastVu hardware, firmware and accompanying written materials are subject to copyright. Unauthorised
copying of the firmware or the written materials is expressly forbidden.
You may be held legally responsible for any copyright infringement.
Tradename statement
ADPRO is a registered trademark of Vision Systems Limited.
The use of the words ‘ADPRO FastVu’ or ‘FastVu’ in this manual should always be read to mean:
‘ADPRO FastVu Digital Video and Audio Transceiver’
or
‘ADPRO FastVu Digital Video and Audio Transmitter’.
ADPRO FastVu, Issue 6
xiii
Liability
Quick Reference
Summary of Limitation of Liability for Vision Fire & Security.
This ADPRO Product must only be installed, configured and used strictly in accordance with the General Terms and
Conditions and the Installation and Setup Manual available from Vision Fire & Security Pty Ltd. You acknowledge
that you have read and agree to those terms and conditions.
You acknowledge that you have been provided with a reasonable opportunity to appraise the ADPRO Product and
have made your own independent assessment of the fitness or suitability of the ADPRO Product for your purpose. You
acknowledge that you have not relied on any oral or written information, representation or advice given by or on behalf
of Vision Fire & Security or its representatives.
Vision Fire & Security has no liability to you or any person for incidental or consequential loss, expense or damages
including, without limitation, loss of business, loss of profits or loss of data. You indemnify Vision Fire & Security
for any claim, amount or liability brought against Vision Fire & Security in connection with the ADPRO Product.
You expressly agree that you assume the entire risk as to the results and performance of the ADPRO Product resulting
from the configuration of the ADPRO Product. Vision Fire & Security does not warrant, guarantee or make any
representations, either expressly or implied, regarding the current or future use, or the results of the use, of the ADPRO
Product, with respect to its correctness, accuracy, reliability, completeness, interworking, functionality, currentness or
otherwise resulting from the configuration of the ADPRO Product.
To the full extent permitted by law, Vision Fire & Security expressly excludes all conditions, warranties and liability,
whether imposed or implied by statute or by rule of law or otherwise, which are not expressly set out in the General
Terms and Conditions.
To the extent permitted by law, your sole recourse for any defect of, damage to, or performance standard of the
ADPRO Product will be under the express warranties the General Terms and Conditions (if applicable) and Vision
Fire & Security will in no event be liable to pay any amount or damages resulting from or in connection with the
ADPRO Product.
To the extent by law that any limitation or exclusion can not apply, the total liability of Vision Fire & Security in
relation to the ADPRO Product is limited to:
(a)
(b)
in the case of services, the cost of having the services supplied again; or
in the case of goods, the lowest cost of replacing the goods, acquiring equivalent goods or having the goods
repaired.
To the extent permitted by law, Vision Fire & Security has no liability with respect to damage to or arising out of, or
the condition or performance of, the ADPRO Product resulting from negligence or improper use, storage, installation,
configuration or handling of the ADPRO Product (where 'improper' includes treatment other than in accordance with
the ADPRO Manual, these terms and conditions or the in formation provided at a training session); or accident,
unforeseeable circumstances or disaster; or modifications to the ADPRO Product other than in accordance with Vision
Fire & Security' instructions; or attachment of or interoperation with features, software or products not approved by
Vision Fire & Security in writing; or where the ADPRO Product has been serviced by persons not authorized by Vision
Fire & Security in writing to service the ADPRO Product.
Lightning or Related Voltage Surges
ADPRO equipment malfunction caused by lightning or related voltage surges is specifically exempted from Vision
Fire & Security warranty conditions.
Vision Fire & Security reserves the right as to final determination of whether or not an equipment malfunction was
caused by lightning or related voltage surges.
ADPRO FastVu, Issue 6
xv
Quick Warranty
Reference
You acknowledge that this is a summary of warranties and you have read and agree to the General Terms and
Conditions. Capitalised terms below are defined in the General Terms and Conditions.
Vision Fire & Security warrants that the ADPRO® Product will conform to its Specifications and perform its designed
function during the Warranty Period.
Vision Fire & Security also warrants that any component part of the ADPRO Product serviced or repaired by its
authorised service department will remain in good working order for a period of 24 (twenty-four) months from the date
of service. This warranty is only available on component parts of the ADPRO Product while the ADPRO Product is
less than 7 (seven) years old commencing on the start of the Warranty Period and only covers those component parts
of ADPRO Product serviced, repaired or replaced.
If you notify Vision Fire & Security that the ADPRO Product, or component part of the ADPRO Product, under the
warranty provided in clause 1.1 or 1.2 of these Conditions of use for the ADPRO Product, do not meet the Specification
or perform its designed function respectively, Vision Fire & Security will, at its option, either repair or replace the
ADPRO Product or its component parts at no additional charge.
Component parts and replacement ADPRO Products will be furnished on an exchange basis and will, at the option of
Vision Fire & Security either be new, equivalent to new or reconditioned. All replaced component parts and ADPRO
Products become the property of Vision Fire & Security.
Vision Fire & Security does not warrant, guarantee or make any representations, either expressly or implied, regarding
the current or future use, or the results of the use, of the ADPRO Product, with respect to its correctness, accuracy,
reliability, completeness, interworking, functionality, currentness or otherwise resulting from the configuration of the
ADPRO Product.
You acknowledge that no oral or written information, representation or advice given by or on behalf of Vision Fire &
Security or its representatives, other than as contained in the General Terms and Conditions, creates a warranty or in
any way increases the scope of these General Terms and Conditions, and you agree that you have not relied on any
such information, representation or advice.
The warranties contained in the General Terms and Conditions do not cover and, to the extent permitted by law, Vision
Fire & Security has no liability with respect to damage to or arising out of, or the condition or performance of, the
ADPRO Product resulting from negligence or improper use, storage, installation, configuration or handling of the
ADPRO Product (where 'improper' includes treatment other than in accordance with the ADPRO Manual, these terms
and conditions or the in formation provided at a training session); or accident, unforeseeable circumstances or disaster;
or modifications to the ADPRO Product other than in accordance with Vision Fire & Security' instructions; or
attachment of or interoperation with features, software or products not approved by Vision Fire & Security in writing;
or where the ADPRO Product has been serviced by persons not authorized by Vision Fire & Security in writing to
service the ADPRO Product.
ADPRO FastVu, Issue 6
xvii
Quick Reference
DECLARATION OF CONFORMITY
Manufacturer's Name:
Manufacturer's Address:
Vision Fire & Security Pty Ltd.
14 Park Way
Technology Park
Mawson Lakes SA 5095
Australia.
declares, that the product(s):
Product Name:
Model Number:
ADPRO FastVu Digital Video and Audio Transceiver
AFV-2020-TCVR
AFV-2010-TX
AFV-3010-TX
All
Product Options:
meet the Standards detailed below.
Declaration of Conformity
EMC Emissions
EN55022:1998 (CISPR 22:1997) / AS/NZS 3548:1995 + A1, A2 Class A Conducted
and radiated emissions.
EN 61000-3-2:1995 Current harmonic emissions.
EN 61000-3-3:1995 Voltage fluctuations and flicker.
FCC Part 15 Class A Conducted and radiated emissions.
EMC Immunity
EN 50130-4:1995 +A1 Alarm systems immunity.
ENV 50204:1996 Immunity to digital radio telephones radiated field.
Safety
IEC 60950:1991 +A1, A2, A3 & A4
EN 60950:1992 +A1, A2, A3, A4 & A11
when used with the supplied AC power adaptor.
Supplementary Information
The products listed comply with the requirements of the Low Voltage Directive 73/23/EEC (where applicable)
and the EMC Directive 89/336/EEC and carries the CE marking accordingly. The products were tested in a
typical configuration.
ADPRO FastVu, Issue 6
xix
Table of Contents
1.0
Installation ................................................................................................................................................................. 1-1
1.1
Minimum System Requirements ............................................................................................................ 1-3
1.2
Unpacking the ADPRO FastVu.............................................................................................................. 1-4
1.3
Physical Location ..................................................................................................................................... 1-4
1.4
General Power Requirements................................................................................................................. 1-5
1.4.1
Power Conditioners and Surge Arresters.................................................................................. 1-6
1.4.2
Interference Caused by Ground Loops ..................................................................................... 1-6
1.5
ADPRO FastVu Rear Panel Connections.............................................................................................. 1-7
1.5.1
Configuration Switch Settings .................................................................................................. 1-8
1.6
System Wiring Considerations ............................................................................................................... 1-9
1.6.1
Electromagnetic Compatibility (EMC) Issues and Instructions ............................................... 1-9
1.6.1.1
FCC Advice for Installers and Users in the United States....................................... 1-9
1.7
Mounting the ADPRO FastVu.............................................................................................................. 1-10
1.7.1
Rack Mounting ....................................................................................................................... 1-10
1.7.2
Wall Mounting........................................................................................................................ 1-10
1.8
AULT SW132/PW160 Power Supply Installation Instructions ........................................................ 1-11
1.9
Configuring FastVu 2020 as a Receiver or a Transmitter ................................................................. 1-12
1.10
Setting the Video Standard ................................................................................................................... 1-12
1.11
Keyboard Connection and Configuration ........................................................................................... 1-13
1.11.1
AMK-300 Configuration Switch ............................................................................................ 1-13
1.11.2
Keyboard Cables..................................................................................................................... 1-14
1.11.2.1 RS485 Operation, Maximum 1000m (3300ft)....................................................... 1-14
1.11.2.2 RS232 Operation, Maximum 15m (50ft)............................................................... 1-14
1.12
Using an External Control Device........................................................................................................ 1-15
1.13
Video Input Connections....................................................................................................................... 1-15
1.13.1
Video Input Requirements ...................................................................................................... 1-15
1.13.1.1 Maximum Camera Input Cable Length ................................................................. 1-16
1.14
Video Output (Monitor Output)........................................................................................................... 1-16
1.15
Connecting Communications Devices.................................................................................................. 1-16
1.15.1
PORT 1 ................................................................................................................................... 1-17
1.15.2
PORT 2 ................................................................................................................................... 1-17
1.15.3
NETWORK Port..................................................................................................................... 1-18
1.15.4
Network Port Pinout ............................................................................................................... 1-19
1.16
Transparent Data Port .......................................................................................................................... 1-19
1.17
Connecting PTZ Telemetry Stations.................................................................................................... 1-20
1.17.1
PTZ Port Setup........................................................................................................................ 1-20
1.18
Alarm Inputs .......................................................................................................................................... 1-22
1.18.1
Driving the Alarm Inputs........................................................................................................ 1-22
1.18.2
ADPRO VM25 FastVu I/O Expander (OPTION) .................................................................. 1-23
1.19
Control Outputs ..................................................................................................................................... 1-23
1.19.1
Connecting to the Control Outputs ......................................................................................... 1-23
1.19.2
ADPRO VM25 FastVu I/O Expander (OPTION) .................................................................. 1-24
1.20
Access/Secure Input............................................................................................................................... 1-24
1.21
General Relay Output ........................................................................................................................... 1-24
1.22
Audio Switch Connections .................................................................................................................... 1-25
1.22.1
Audio Interface ....................................................................................................................... 1-25
1.22.2
Audio Line Connection........................................................................................................... 1-26
1.22.3
Audio Level (Manual Microphone Gain Control) .................................................................. 1-26
1.23
Connection to the ADPRO Amux 20CDK........................................................................................... 1-26
2.0
Receiver Setup........................................................................................................................................................... 2-1
2.1
Hardware Required to Run Setup ......................................................................................................... 2-3
2.2
Power Up .................................................................................................................................................. 2-3
2.3
Entering Setup Menu............................................................................................................................... 2-4
2.4
Password Checking.................................................................................................................................. 2-4
ADPRO FastVu, Issue 6
Table of Contents
2.5
2.6
2.7
2.8
2.9
2.10
2.11
2.12
2.13
Leaving Setup........................................................................................................................................... 2-4
Setup Menus ............................................................................................................................................. 2-5
Using the Menu System ........................................................................................................................... 2-5
2.7.1
Fast Buttons .............................................................................................................................. 2-5
2.7.2
Alphanumeric Names ............................................................................................................... 2-6
Setup Menu Structure ............................................................................................................................. 2-6
System Details Menu ............................................................................................................................... 2-8
2.9.1
Passwords.................................................................................................................................. 2-8
2.9.1.1
Setup Password ........................................................................................................ 2-8
2.9.1.2
Alarm Password....................................................................................................... 2-8
2.9.2
User Language .......................................................................................................................... 2-9
Communications Menu ........................................................................................................................... 2-9
2.10.1
Ethernet Setup......................................................................................................................... 2-10
2.10.1.1 Local IP Address.................................................................................................... 2-10
2.10.1.2 Subnet Mask .......................................................................................................... 2-10
2.10.1.3 Default Gateway .................................................................................................... 2-10
2.10.2
Serial Comms Port Setup........................................................................................................ 2-11
2.10.2.1 Modem/TA Model ................................................................................................. 2-11
2.10.2.2 Line Type............................................................................................................... 2-11
2.10.2.3 Data Rate................................................................................................................ 2-11
2.10.2.4 Dial Time ............................................................................................................... 2-12
2.10.2.5 Answer Rings......................................................................................................... 2-12
2.10.2.6 Initialisation String ................................................................................................ 2-12
2.10.3
Advanced Serial Port Setup .................................................................................................... 2-13
2.10.3.1 Local IP Address.................................................................................................... 2-13
2.10.3.2 PPP Username........................................................................................................ 2-13
2.10.3.3 PPP Password ........................................................................................................ 2-13
2.10.3.4 Nominal Data Rate................................................................................................. 2-13
2.10.3.5 Enable PAP ............................................................................................................ 2-14
2.10.3.6 Secure Poll ............................................................................................................. 2-14
2.10.4
Advanced Setup - Base Port Number ..................................................................................... 2-14
Site List Setup......................................................................................................................................... 2-15
2.11.1
Site Name................................................................................................................................ 2-16
2.11.2
Site Password.......................................................................................................................... 2-16
2.11.3
Access Level ........................................................................................................................... 2-16
2.11.4
Use Ethernet............................................................................................................................ 2-16
2.11.4.1 IP Address.............................................................................................................. 2-16
2.11.5
Use Serial Comms .................................................................................................................. 2-17
2.11.5.1 Phone Number ....................................................................................................... 2-17
Video Setup............................................................................................................................................. 2-17
2.12.1
Normal Quality ....................................................................................................................... 2-18
2.12.2
High Quality ........................................................................................................................... 2-18
2.12.3
Changes Mode ........................................................................................................................ 2-19
2.12.4
PTZ Hold Time....................................................................................................................... 2-19
2.12.5
Monitor Setup ......................................................................................................................... 2-19
2.12.5.1 Status Bar On ......................................................................................................... 2-20
2.12.5.2 Camera Titles On ................................................................................................... 2-20
2.12.5.3 Time Date On......................................................................................................... 2-20
2.12.5.4 Date Format ........................................................................................................... 2-20
2.12.5.5 Monitor Type ......................................................................................................... 2-20
Audio Setup ............................................................................................................................................ 2-21
2.13.1
PTT Operation ........................................................................................................................ 2-21
2.13.1.1 Talk Only ............................................................................................................... 2-21
2.13.1.2 Listen Only ............................................................................................................ 2-22
2.13.1.3 Talk and Listen ...................................................................................................... 2-22
2.13.1.4 Intercom ................................................................................................................. 2-22
ADPRO FastVu, Issue 6
Table of Contents
2.14
2.15
3.0
2.13.2
Audio Input ............................................................................................................................. 2-22
2.13.3
Microphone Gain Operation ................................................................................................... 2-22
2.13.4
Audio Out Volume.................................................................................................................. 2-22
2.13.5
Echo Cancellation ................................................................................................................... 2-23
General Setup......................................................................................................................................... 2-23
2.14.1
General Relay ......................................................................................................................... 2-23
2.14.2
Alarm Beeper Operation......................................................................................................... 2-24
2.14.2.1 Alarm Beeper Timeout .......................................................................................... 2-24
2.14.3
Transparent Data Port Setup ................................................................................................... 2-24
2.14.3.1 Data Rate................................................................................................................ 2-25
2.14.3.2 Data Bits ................................................................................................................ 2-25
2.14.3.3 Stop Bits................................................................................................................. 2-25
2.14.3.4 Flow Control .......................................................................................................... 2-25
2.14.3.5 Parity...................................................................................................................... 2-26
2.14.3.6 DTR Operation ...................................................................................................... 2-26
2.14.4
Diagnostics.............................................................................................................................. 2-26
2.14.5
Upgrade................................................................................................................................... 2-26
Remote Transmitter .............................................................................................................................. 2-27
Transmitter Setup..................................................................................................................................................... 3-1
3.1
Power Up .................................................................................................................................................. 3-3
3.2
Access to the Setup Menu........................................................................................................................ 3-3
3.2.1
Local Setup ............................................................................................................................... 3-4
3.2.2
Remote Setup............................................................................................................................ 3-4
3.2.3
Local Setup Menu Access......................................................................................................... 3-4
3.2.3.1
Leaving Local Setup ................................................................................................ 3-5
3.2.4
Remote Setup Menu Access ..................................................................................................... 3-5
3.3
Setup Menus ............................................................................................................................................. 3-6
3.3.1
Using the Menu System ............................................................................................................ 3-6
3.3.2
Fast Buttons .............................................................................................................................. 3-7
3.3.3
Alphanumeric Names ............................................................................................................... 3-7
3.4
Setup Menu Structure ............................................................................................................................. 3-8
3.5
System Details ........................................................................................................................................ 3-10
3.5.1
Site Name................................................................................................................................ 3-10
3.5.2
CMS Password........................................................................................................................ 3-10
3.5.3
Observer Password ................................................................................................................. 3-10
3.5.4
Setup Password ....................................................................................................................... 3-11
3.5.5
User Language ........................................................................................................................ 3-11
3.5.6
Time and Date......................................................................................................................... 3-11
3.6
Communications Setup.......................................................................................................................... 3-12
3.6.1
Ethernet Setup......................................................................................................................... 3-12
3.6.1.1
Local Address ........................................................................................................ 3-13
3.6.1.2
Subnet Mask .......................................................................................................... 3-13
3.6.1.3 Default Gateway .................................................................................................... 3-13
3.6.1.4 Data Rate Throttle.................................................................................................. 3-13
3.6.2
Serial Comms Port Setup........................................................................................................ 3-14
3.6.2.1 Modem/TA Model ................................................................................................. 3-14
3.6.2.2 Line Type............................................................................................................... 3-14
3.6.2.3 Data Rate................................................................................................................ 3-14
3.6.2.4
Dial Time ............................................................................................................... 3-15
3.6.2.5 Answer Rings......................................................................................................... 3-15
3.6.2.6
Initialisation String ................................................................................................ 3-15
3.6.2.7 Advanced Setup - Serial Port................................................................................. 3-16
3.6.2.8
Local IP Address................................................................................................... 3-16
3.6.2.9 PPP Username........................................................................................................ 3-16
3.6.2.10 PPP Password ........................................................................................................ 3-16
3.6.2.11 Nominal Data Rate................................................................................................. 3-17
ADPRO FastVu, Issue 6
Table of Contents
3.7
3.8
3.9
3.10
3.11
3.12
3.6.2.12 Enable PAP ............................................................................................................ 3-17
3.6.2.13 Secure Poll ............................................................................................................. 3-17
3.6.3
Advanced Setup - Base Port Number ..................................................................................... 3-18
Call List................................................................................................................................................... 3-18
3.7.1
All Alarms............................................................................................................................... 3-19
3.7.2
Outgoing Communications ..................................................................................................... 3-19
3.7.3
Fallback Communications ...................................................................................................... 3-19
3.7.4
Ethernet Call List .................................................................................................................... 3-19
3.7.4.1 Connection Attempts ............................................................................................. 3-20
3.7.4.2 Connection Separation........................................................................................... 3-20
3.7.5
Serial Comms Call List........................................................................................................... 3-20
3.7.5.1
Dial Tries ............................................................................................................... 3-20
3.7.5.2 Call Separation....................................................................................................... 3-21
Video Setup............................................................................................................................................. 3-21
3.8.1
Camera Details........................................................................................................................ 3-21
3.8.1.1 Connected .............................................................................................................. 3-22
3.8.1.2 Camera Name ........................................................................................................ 3-22
3.8.1.3
Video Loss Detection............................................................................................. 3-22
3.8.1.4 Camera Station Attached ....................................................................................... 3-23
3.8.1.5
Monochrome (Black & White) Filter .................................................................... 3-23
3.8.1.6
Gain Control Mode ................................................................................................ 3-23
3.8.1.7 Manual Gain .......................................................................................................... 3-23
3.8.2
PTZ Operation Setup .............................................................................................................. 3-24
3.8.3
Monitor Setup ......................................................................................................................... 3-24
3.8.3.1
Camera Titles On ................................................................................................... 3-24
3.8.3.2
Time Date On......................................................................................................... 3-24
3.8.3.3 Monitor Type ......................................................................................................... 3-25
Video Sequence at Receiver Setup ....................................................................................................... 3-25
3.9.1
Dwell Time ............................................................................................................................. 3-25
3.9.2
Auto Sequence, Camera.......................................................................................................... 3-25
Alarm ...................................................................................................................................................... 3-26
3.10.1
Alarm Inputs ........................................................................................................................... 3-26
3.10.1.1 Alarm Input............................................................................................................ 3-27
3.10.1.2 Alarm Logic........................................................................................................... 3-27
3.10.1.3 Event Type............................................................................................................. 3-28
3.10.1.3.1 Alarm Event........................................................................................................... 3-28
3.10.1.3.2 Live Event.............................................................................................................. 3-28
3.10.1.4 Alarm Image Interval............................................................................................. 3-28
3.10.1.5 Pre-Alarm Image Interval ...................................................................................... 3-29
3.10.1.6 Pre-Alarm Images .................................................................................................. 3-29
3.10.1.7 Remaining Free Image Slots.................................................................................. 3-29
3.10.2
Entry/Exit Path........................................................................................................................ 3-29
3.10.2.1 Entry/Exit Delay .................................................................................................... 3-30
3.10.2.2 Entry Point ............................................................................................................. 3-30
3.10.2.3 Entry Path Zone (2 to 6) ........................................................................................ 3-31
3.10.3
VM25 External I/O Box ......................................................................................................... 3-31
3.10.3.1 VM25 External I/O Box Enable ............................................................................ 3-31
Audio Setup ............................................................................................................................................ 3-31
3.11.1
Audio Input ............................................................................................................................. 3-32
3.11.2
Microphone Gain Operation ................................................................................................... 3-32
3.11.3
Audio Out Volume.................................................................................................................. 3-32
3.11.4
Echo Cancellation ................................................................................................................... 3-32
General Setup......................................................................................................................................... 3-33
3.12.1
Control Outputs....................................................................................................................... 3-33
3.12.1.1 Output Name.......................................................................................................... 3-34
3.12.1.2 Offline Action ........................................................................................................ 3-34
ADPRO FastVu, Issue 6
Table of Contents
3.12.2
3.12.3
3.12.4
3.12.5
4.0
General Relay ......................................................................................................................... 3-34
Transparent Data Port Setup ................................................................................................... 3-35
3.12.3.1 Data Rate................................................................................................................ 3-35
3.12.3.2 Data Bits ................................................................................................................ 3-35
3.12.3.3 Stop Bits................................................................................................................. 3-35
3.12.3.4 Flow Control .......................................................................................................... 3-36
3.12.3.5 Parity...................................................................................................................... 3-36
3.12.3.6 DTR Operation ...................................................................................................... 3-36
Diagnostics.............................................................................................................................. 3-36
Upgrade................................................................................................................................... 3-36
Operation................................................................................................................................................................... 4-1
4.1
Glossary of Terms .................................................................................................................................... 4-3
4.2
Typical Configuration ............................................................................................................................. 4-4
4.3
Startup Monitor Display ......................................................................................................................... 4-5
4.3.1
Receiver .................................................................................................................................... 4-5
4.3.2
Transmitter................................................................................................................................ 4-5
4.4
Establishing a Communication Link...................................................................................................... 4-5
4.4.1
Using the AMK-300 Keyboard to Establish a Connection....................................................... 4-6
4.4.2
Using an External Control Device to Establish a Connection .................................................. 4-7
4.5
Terminating a Communication Link ..................................................................................................... 4-7
4.5.1
Using the AMK-300 Keyboard................................................................................................ 4-7
4.5.2
Using an External Control Device ........................................................................................... 4-8
4.6
Receiver On-Line Display ....................................................................................................................... 4-8
4.7
Transmitter Display................................................................................................................................. 4-9
4.8
Status Information ................................................................................................................................... 4-9
4.8.1
Alarm Input Status .................................................................................................................. 4-10
4.8.2
Control Output Status ............................................................................................................. 4-10
4.8.3
Software Status ....................................................................................................................... 4-11
4.9
Multi-Live Display Formats.................................................................................................................. 4-11
4.10
Auto Sequence Operation ..................................................................................................................... 4-11
4.11
Types of Alarm....................................................................................................................................... 4-12
4.11.1
CMS User Priority .................................................................................................................. 4-12
4.11.2
Post Alarms............................................................................................................................. 4-12
4.11.3
Pre Alarms .............................................................................................................................. 4-13
4.12
Viewing and Clearing Alarms .............................................................................................................. 4-14
4.12.1
Alarm Playback keys .............................................................................................................. 4-14
4.12.2
Post Alarm Status Bar............................................................................................................. 4-14
4.12.3
Pre Alarm Status Bar .............................................................................................................. 4-15
4.12.4
‘No Video’ Alarm................................................................................................................... 4-15
4.13
Clearing Alarms..................................................................................................................................... 4-16
4.14
Audio Operation .................................................................................................................................... 4-17
4.14.1
Talk and Listen Modes ........................................................................................................... 4-17
4.14.1.1 Talk ........................................................................................................................ 4-17
4.14.1.2 Listen ..................................................................................................................... 4-17
4.14.1.3 Talk and Listen ...................................................................................................... 4-17
4.14.1.4 Intercom ................................................................................................................. 4-18
4.14.2
Audio Shortcut Keys............................................................................................................... 4-18
4.15
PTZ Control ........................................................................................................................................... 4-18
4.15.1
Dynamic Pan and Tilt Speed Control ..................................................................................... 4-19
4.16
Using the Keyboard ............................................................................................................................... 4-19
4.16.1
Mode Keys.............................................................................................................................. 4-20
4.16.2
Equipment Keys...................................................................................................................... 4-20
4.16.3
System Keys ........................................................................................................................... 4-20
4.16.4
Selection Keys ........................................................................................................................ 4-23
4.17
Selecting a Camera ................................................................................................................................ 4-24
4.17.1
Current Camera....................................................................................................................... 4-24
ADPRO FastVu, Issue 6
Table of Contents
4.18
4.19
4.20
4.21
4.22
4.17.2
Camera Names........................................................................................................................ 4-24
Pan/Tilt/Zoom (PTZ) Control and Joystick ........................................................................................ 4-25
4.18.1
Using PTZ............................................................................................................................... 4-25
4.18.1.1 Camera Control Keys............................................................................................. 4-26
Control of ADPRO Amux ..................................................................................................................... 4-27
Monitor ................................................................................................................................................... 4-29
4.20.1
Display Modes ........................................................................................................................ 4-29
Alarm Operation.................................................................................................................................... 4-29
4.21.1
Alarms and Events .................................................................................................................. 4-29
4.21.1.1 Secure Mode .......................................................................................................... 4-30
4.21.1.2 Access Mode.......................................................................................................... 4-30
4.21.2
Alarm Reset ............................................................................................................................ 4-30
4.21.2.1 Single Alarm .......................................................................................................... 4-31
4.21.2.2 Multiple Alarms..................................................................................................... 4-31
External Equipment .............................................................................................................................. 4-32
5.0
Specifications............................................................................................................................................................. 5-1
5.1
ADPRO FastVu Version Specifications ................................................................................................. 5-3
5.2
FastVu Specifications .............................................................................................................................. 5-4
5.3
VM25 Electrical Specifications............................................................................................................... 5-7
5.4
AULT PW160 Specifications (per manufacturer’s data sheet) ........................................................... 5-8
5.5
AULT SW132 Specifications (per manufacturer’s data sheet) ........................................................... 5-9
6.0
Troubleshooting ........................................................................................................................................................ 6-1
6.1
Maintenance Philosophy ......................................................................................................................... 6-3
6.2
Power On and Self Test Routines........................................................................................................... 6-3
6.3
Fault Indicator ......................................................................................................................................... 6-3
6.4
Trouble Shooting Guide .......................................................................................................................... 6-4
6.5
Internal Links........................................................................................................................................... 6-5
6.5.1
Location of Internal Links ........................................................................................................ 6-5
6.5.2
Password Override.................................................................................................................... 6-6
6.5.3
Default Setup ............................................................................................................................ 6-6
6.6
Internal Battery Replacement ................................................................................................................ 6-6
List of Figures
Figure 1-1 - Minimum System Configuration ............................................................................................................................. 1-3
Figure 1-2 - FastVu rear panel connectors (20 channel shown at top and 10 channel below) .................................................... 1-7
Figure 1-3 - Configuration Switch Settings ................................................................................................................................. 1-8
Figure 1-4 - FastVu front panel for 19 inch rack mount models .............................................................................................. 1-10
Figure 1-5 - FastVu wall-mount cabinet showing overall dimensions ...................................................................................... 1-10
Figure 1-6 - Wall mount cabinet mounting dimensions ............................................................................................................ 1-11
Figure 1-7 - AMK-300 Keyboard Rear View............................................................................................................................ 1-13
Figure 1-8 - AMK-300 Configuration Switch settings .............................................................................................................. 1-13
Figure 1-9 - AMK-300 Connecting Cable for RS485 ............................................................................................................... 1-14
Figure 1-10 - AMK-300 Connecting Cable for RS232 ............................................................................................................. 1-14
Figure 1-11 - Typical RS485 connection to multiple telemetry stations................................................................................... 1-20
Figure 1-12 - PTZ port connections to the telemetry station ..................................................................................................... 1-21
Figure 1-13 - Pin Numbering of the PTZ port ........................................................................................................................... 1-21
Figure 1-14 - Alarm In Connector Pinouts ................................................................................................................................ 1-22
Figure 1-15 - Audio Connector Pinouts..................................................................................................................................... 1-25
Figure 1-16 - Connection of Amux to a FastVu Transmitter .................................................................................................... 1-27
Figure 2-1 - Password Entry Dialogue ........................................................................................................................................ 2-4
Figure 2-2 - Fast Button Numbers ............................................................................................................................................... 2-5
Figure 2-3 - Setup menu structure ............................................................................................................................................... 2-6
Figure 2-4 - FastVu Receiver menu structure.............................................................................................................................. 2-7
ADPRO FastVu, Issue 6
Table of Contents
Figure 2-5 - System Details menu ............................................................................................................................................... 2-8
Figure 2-6 - Setup Language options........................................................................................................................................... 2-9
Figure 2-7 - Communications menu ............................................................................................................................................ 2-9
Figure 2-8 - Ethernet Setup Menu ............................................................................................................................................. 2-10
Figure 2-9 - Serial Comms Port Setup Menu ............................................................................................................................ 2-11
Figure 2-10 - Advanced menu ................................................................................................................................................... 2-13
Figure 2-11 - Base Port menu .................................................................................................................................................... 2-14
Figure 2-12 - Site List Setup menu ............................................................................................................................................ 2-15
Figure 2-13 - Site Details Setup menu....................................................................................................................................... 2-15
Figure 2-14 - Video Options Setup menu .................................................................................................................................. 2-17
Figure 2-15 - Monitor Setup Menu............................................................................................................................................ 2-19
Figure 2-16 - Status Bar Display ............................................................................................................................................... 2-20
Figure 2-17 - Audio Setup menu ............................................................................................................................................... 2-21
Figure 2-18 - Receiver General Setup menu ............................................................................................................................. 2-23
Figure 2-19 - Alarm Beeper menu ............................................................................................................................................. 2-24
Figure 2-20 - Transparent Data Port Setup Menu...................................................................................................................... 2-25
Figure 2-21 - Upgrade Setup Menu ........................................................................................................................................... 2-26
Figure 2-22 - PC Connection Message ...................................................................................................................................... 2-27
Figure 2-23 - Message for Tx Setup Download ........................................................................................................................ 2-27
Figure 2-24 - Exit and Save Menu............................................................................................................................................. 2-27
Figure 2-25 - Message for Tx Setup Upload ............................................................................................................................. 2-27
Figure 3-1 - Password Entry Dialogue ........................................................................................................................................ 3-4
Figure 3-2 - Remote Access Message.......................................................................................................................................... 3-5
Figure 3-3 - Receiver’s Exit and Save Menu............................................................................................................................... 3-5
Figure 3-4 - Receiver Message for Transmitter Upload .............................................................................................................. 3-6
Figure 3-5 - Fast Button Numbers ............................................................................................................................................... 3-7
Figure 3-6 - FastVu Transmitter menu structure ......................................................................................................................... 3-9
Figure 3-7 - System Details Setup menu ................................................................................................................................... 3-10
Figure 3-8 - Setup Language options......................................................................................................................................... 3-11
Figure 3-9 - Date and Time Setup Menu ................................................................................................................................... 3-11
Figure 3-10 - Communications Setup menu .............................................................................................................................. 3-12
Figure 3-11 - Ethernet Setup Menu ........................................................................................................................................... 3-12
Figure 3-12 - Serial Comms Port Setup Menu .......................................................................................................................... 3-14
Figure 3-13 - Advanced Setup menu ......................................................................................................................................... 3-16
Figure 3-14 - Base Port menu .................................................................................................................................................... 3-18
Figure 3-15 - Call List Menu ..................................................................................................................................................... 3-18
Figure 3-16 - Ethernet Call List Menu....................................................................................................................................... 3-19
Figure 3-17 - Serial Comms Call List Menu ............................................................................................................................. 3-20
Figure 3-18 - Video setup menu ................................................................................................................................................ 3-21
Figure 3-19 - Camera List.......................................................................................................................................................... 3-21
Figure 3-20 - Camera #1 Details Setup Menu ........................................................................................................................... 3-22
Figure 3-21 - Camera Station Types Available ......................................................................................................................... 3-24
Figure 3-22 - Monitor Setup Menu............................................................................................................................................ 3-24
Figure 3-23 - Video Sequence Setup menu ............................................................................................................................... 3-25
Figure 3-24 - Alarm Inputs List ................................................................................................................................................. 3-26
Figure 3-25 - Alarm Inputs Setup Menu.................................................................................................................................... 3-27
Figure 3-26 - Entry/Exit Path menu........................................................................................................................................... 3-30
Figure 3-27 - Audio Setup menu ............................................................................................................................................... 3-31
Figure 3-28 - Control Output Setup Menu (Output #1 shown) ................................................................................................ 3-33
Figure 3-29 - General Relay menu ............................................................................................................................................ 3-34
Figure 3-30 - Transparent Data Port Setup Menu...................................................................................................................... 3-35
Figure 3-31 - Upgrade Setup Menu ........................................................................................................................................... 3-37
Figure 3-32 - PC Connection Message ...................................................................................................................................... 3-37
Figure 4-1 - Typical FastVu configuration .................................................................................................................................. 4-4
Figure 4-2 - Receiver's On-Line display (no video shown for clarity) ........................................................................................ 4-8
Figure 4-3 - Alarm Input Status display .................................................................................................................................... 4-10
ADPRO FastVu, Issue 6
Table of Contents
Figure 4-4 - Control Output Status display................................................................................................................................ 4-10
Figure 4-5 - Help key status message ........................................................................................................................................ 4-11
Figure 4-6 - Post-Alarm Sequence display ................................................................................................................................ 4-13
Figure 4-7 - Alarm Status Bar Details ....................................................................................................................................... 4-13
Figure 4-8 - Alarm Playback keys ............................................................................................................................................. 4-14
Figure 4-9 - Alarm Status Bar for Post Alarm Images .............................................................................................................. 4-14
Figure 4-10 - Display of ‘No Video’ Alarm from Camera #1................................................................................................... 4-15
Figure 4-11 - Alarm Option keys............................................................................................................................................... 4-16
Figure 4-12 - AMK-300 Keyboard layout ................................................................................................................................. 4-19
Figure 4-13 - Camera Control keys ........................................................................................................................................... 4-26
Figure 4-14 - Alarm Status icon ................................................................................................................................................ 4-31
Figure 6-1 - Location of Internal Links (viewed from inside the unit)........................................................................................ 6-5
List of Tables
Table 1-1 - 25-pin D connector pins .......................................................................................................................................... 1-17
Table 1-2 - 9-pin D connector pins ............................................................................................................................................ 1-17
Table 1-3 - Network Port pin outs ............................................................................................................................................ 1-19
Table 1-4 - Transparent Data Port pin outs............................................................................................................................... 1-19
Table 1-5 - Alarm Input pin numbering on the rear panel......................................................................................................... 1-22
Table 1-6 - Relationship of Control Keys at Receiver to Control Outputs at Transmitter ........................................................ 1-23
Table 1-7 - Audio Switch Functions and Pinouts ...................................................................................................................... 1-25
Table 2-1 - Quality Value versus Resolution............................................................................................................................. 2-18
Table 4-1 - Typical System Conditions ....................................................................................................................................... 4-9
Table 4-2 - Audio Key Options ................................................................................................................................................. 4-17
Table 4-3 - Shortcut Keys Between Audio Modes .................................................................................................................... 4-18
Table 4-4 - Relationship between key entry and Amux ‘setup’ mode ...................................................................................... 4-28
ADPRO FastVu, Issue 6
Safety
QuickProcedures
Reference
WARNING INFORMATION
Installations in the United States of America and Canada
For systems installed in the United States of America and Canada the following requirement is applicable:
All equipment installations are required to be in accordance with the National Electrical Code (NEC) ANSI/NFPA 70
and the Canadian Electrical Code (CEC) Part 1, CAN/CSA C22.1
Radio Interference
The FastVu complies with part 15 of the FCC Rules. Operation is subject to the following two conditions: (1) This
device may not cause harmful interference, and (2) this device must accept any interference received, including
interference that may cause undesired operation.
The FastVu complies with the electromagnetic emission limit requirements of AS/NZS 3548 and EN55022 Class A.
In a domestic environment this product may cause radio interference in which case the user may be required to take
adequate measures.
Static Discharge
ADPRO FastVu system components contain electrical parts that are susceptible to damage from static discharge.
Static voltages of one (1) to thirty (30) kilovolts are common in unprotected environments.
When installing or servicing ADPRO FastVu equipment, it is advisable to observe the following standard precautions
for handling electronic assemblies to reduce the risk of component damage:
•
Minimise handling of electronic assemblies and components,
•
Transport, temporarily arrange and store electronic components in recognised anti-static containers,
•
Discharge any static voltage from your body before handling electronic components or wear a grounded,
Safety-Standard Approved, anti-static wrist strap while handling components, and
•
Avoid handling electronic components in areas which have a floor or work-surface capable of generating a
static charge.
Internal Lithium Battery
WARNINGS
The ADPRO FastVu contains an internal lithium battery
There is danger of explosion if the battery is incorrectly replaced.
The battery can only be replaced by the Factory or
their Authorised Service Representative.
ADPRO FastVu, Issue 6
xxix
Safety Reference
Procedures
Quick
WARNINGS
Connection to Other Equipment
All interface ports on the FastVu must be only connected to other equipment or systems that
are Safety Extra Low Voltage (SELV) rated. Failure to do so will invalidate the electrical
safety approval and may cause injury or loss of life.
External Power Supply for ADPRO AMK-300 Keyboard
If using an external power supply with the ADPRO AMK-300 keyboard, the supply used must be a Safety Extra Low
Voltage (SELV) rated supply providing a limited power source which meets the requirements of IEC60950 or
equivalent.
xxx
ADPRO FastVu, Issue 6
1.0
1
Installation
Installation
1.1
Minimum System Requirements
A minimum ADPRO FastVu system is shown in Figure 1-1 and consists of:
•
two (2) FastVu units, one configured as a Transmitter (all models) and the other as a Receiver (FastVu
2020 only).
•
one (1) AMK-300 keyboard connected to the Receiver.
•
two (2) 10BaseT drop cables for use on a suitable Ethernet TCP/IP network OR, two (2) modems or ISDN
terminal adaptors (plus cables) suitable for use with dial-up or point-to-point telephone lines.
•
a monitor connected to the Receiver (either composite video or S-Video compatible).
•
one or more cameras, connected to the Transmitter.
Figure 1-1 - Minimum System Configuration
ADPRO FastVu, Issue 6
1-3
Installation
1.2
Unpacking the ADPRO FastVu
After unpacking the ADPRO FastVu, carefully check for any signs of damage. Any damage should be reported before
installation, to your supplier or to Vision Systems Limited directly. Check that the ADPRO FastVu packing carton
contains the following items:
1
1
1
ADPRO FastVu chassis
ADPRO FastVu Installation and User Manual
Accessory pack including the following parts:
1 Female 37-pin D connector and backshell (solder pins)
1 Female 15-pin D connector and backshell (solder pins)
1 Female 9-pin D connector and backshell (solder pins)
1 5-way screw terminal plug
1 2-way screw terminal plug (for power)
1 12V power supply adaptor and cable
For FastVu 3010, additional items are included:
Velcro strip (adhesive backed)
Velcro loop strip
Self-adhesive mounting blocks
Cable ties
Dome plugs (for cabinet holes)
1.3
Physical Location
The location of the ADPRO FastVu within the protected premises should be considered carefully and the following
notes are provided for guidance and to assist the decision process.
•
Physical Security - The ADPRO FastVu should be located where it will remain secure under all
conditions, even when the premises are open or occupied. The safest place would be a room (or cabinet)
with a lockable door. It should not be visible from outside the premises and not be accessible to occupant
or visitor tampering. Adequate ventilation is required.
WARNINGS
FastVu equipment and power adaptor must be used only in an INDOOR environment.
•
1-4
System Wiring - Ideally this position will be close to the centre of the site wiring. Excessive cable runs
will increase the installation cost, cause voltage drops, degrade signals, and offer greater scope for EMI/
RFI (electrical interference) induced faults, tampers, and false alarms. Wiring considerations should
include the following:
•
The largest wiring requirement is the coaxial camera cabling and the wiring to the alarm input
and output devices.
•
Mains power for the 12V power supply adaptor.
CAUTION: Ensure that all instructions included with the power supply adaptor are followed.
•
The system requires at least one video monitor for surveillance and system setup. Here, a further
cable (using RG-59 75-ohm coaxial cable or an S-Video cable) connection will be required.
ADPRO FastVu, Issue 6
Installation
•
1.4
Environment - Choose an inside location that is cool and dry. Do not mount the FastVu anywhere near
machinery that generates heat, toxic fumes and dust. Do not mount the FastVu in close proximity to
sources of radio frequency or other electromagnetic radiation. These include radio transmitters (both fixed
and portable), electric motors, refrigeration or air conditioning systems and high power or multiphase
switching equipment
General Power Requirements
For Electrical Safety compliance with the standard IEC 60950, FastVu must only be operated from the supplied power
supply adaptor. Should this AC power adaptor fail please obtain a replacement unit from Vision Systems or your local
ADPRO distributor.
AC Power
Adaptor
Limited Power
Source
AULT SW132
Output
Current
Rating at
50oC
1.2 A
AULT PW160
2.0 A
No
AULT PW160
2.0 A
No
AULT PW160
2.0 A
No
AULT PW160
2.0 A
No
Note 1:
Yes
Allowable
Configurations
FastVu 2020, 2010 or
3010 only.
FastVu 2020, 2010 or
3010 only.
Any FastVu unit with
AM-DTCT-2 Down the
Coax Telemetry board
fitted.
Any FastVu unit with
AM-DTCT-2 Down the
Coax Telemetry board
fitted and VM25 I/O
Expansion.
Any FastVu unit with
VM25 I/O Expansion.
Maximum Current
available from AC
Power Adaptor for other
devices (see Note 1)
None
0.8 A
0.7 A
0.4 A
0.5 A
Any other devices that are connected to the AC Power Adaptor must be suitable for connection to a Safety Extra Low Voltage (SELV) power supply that is
NOT a Limited Power Source (LPS).
WARNINGS
Under no circumstances can the VM22A be operated from either of the AC Power
Adaptors supplied with FastVu. Connection of the VM22A to the AC Power Adaptor
supplied with FastVu will invalidate the safety approval for both FastVu and VM22A
and may represent a safety hazard.
ADPRO FastVu, Issue 6
1-5
Installation
CAUTION
When powering other devices from the FastVu AC Power Adaptor do not exceed the
current available rating for other devices for any configuration as specified in the above
table. Exceeding this rating will cause the AC Power Adaptor ratings to be exceeded and
may cause it to overheat and shutdown.
Any AC supply used on the FastVu power supply adaptor should be:
•
Provided from a reliable electric supply company - typically this means that the power is not disconnected
(or lost) for any more than eight (8) hours at a time in any thirty six (36) hour period and infrequently in a
single year.
•
Provided from a supply bus within the protected premises that is not isolated at night (or out of hours) or
time switched. The supply should be free from voltage spikes or current surges (connected to high power
switching equipment or electric motors).
•
Supplied directly to the FastVu via circuits that cannot be switched off, intentionally or accidentally.
Always consider local regulations, standards, and guidelines for mains power connected systems.
1.4.1
Power Conditioners and Surge Arresters
The use of an Uninterruptable Power Supply (UPS) should be considered in situations where the mains power is
unreliable. A good UPS has the ability to remove interference, sags, and power surges that can cause false alarms,
equipment failure or even terminal damage. UPS's are used effectively on all major computer installations and the
microelectronics used in many video and alarm systems (including FastVu) are similar, both in their functionality, and
their susceptibility to ‘dirty’ mains power.
Power line conditioners or surge arresters can help prevent mains distortion of voltage, current, and frequency caused
by load switching, large electric motors, and lightning. These distortions can cause unreliable operation, false alarms,
and equipment failure, damage or even total destruction.
1.4.2
Interference Caused by Ground Loops
In some installations, where cameras or monitors are located at a distance from the FastVu rack, considerable ground
loop currents can be generated and may cause interference.
Supplying power to different components of the FastVu system may also cause ground loop currents. For example,
cameras, monitors and the FastVu chassis may receive power from different phases of a multi-phase supply. Wherever
possible, source power to all components of the system from a common phase of the supply.
Where ground loop currents cause a problem in an FastVu installation, the installer may reduce the effect by installing
a video isolation transformer on each video channel affected.
1-6
ADPRO FastVu, Issue 6
Installation
1.5
ADPRO FastVu Rear Panel Connections
All external connections to the ADPRO FastVu chassis are made via the rear panel, refer to Figure 1-2:
Figure 1-2 - FastVu rear panel connectors (20 channel shown at top and 10 channel below)
The connectors on the rear panel are arranged into a number of groups :
VIDEO IN
•
•
Video Inputs - (BNC-Female) - connect colour or black & white cameras or composite video
Video Terminations - (Dipswitch) - terminate the individual channel to either 75Ω (up) or highimpedence for a camera loop-thru connection (down)
VIDEO OUT
•
•
Video Out - (BNC - Female) - output for composite video monitor
S-video- (4-pin S-Video - Female) - Model 2020 only. Output for S-Video monitor or S-Video VCR
COMMUNICATIONS
•
•
•
Port 1 - (25-pin D - male) - Use for software upgrades
Port 2 - (9-pin D - Male) - V.28 output for a maximum 230Kbps data rate
Network - (RJ-45 - Female) - Ethernet 10baseT
INPUT/OUTPUT PORTS
•
Configuration - (Dipswitch) - configures the various ports and settings (refer to Figure 1-3)
•
Aux Port 1 - (9-pin D - Male) - For future use
•
Aux Port 2 - (9-pin D - Male) - For future use
•
Data - (9-pin D - Male) - RS232
•
PTZ - (9-pin D - Female) - RS485, for connection to camera stations. Protocol dependent on type
•
Keyboard - (9-pin D - Female) - RS485 (or RS232) for connection to AMK-300
ADPRO FastVu, Issue 6
1-7
Installation
AUDIO
Audio Adjust - (Screwdriver slot) - Trimpot for manual adjustment of microphone gain.
Manual Gain LEDs - Red and Green LED for visual indication of microphone gain level.
Audio Switcher - (15-pin D - Male) - supports the following input and output features:
•
General Alarm Relay output - N/O and N/C contacts.
•
Access/Secure Input to control the operational state of the unit.
•
Channel select outputs for remote control of audio multiplexer.
•
Press-To-Talk (PTT) input for audio direction control.
•
Output to Audio multiplexer.
Line In - (RCA - Female) - line input 6KΩ impedence.
Line Out - (RCA - Female) - output to line 600Ω impedence.
Audio - (5-pin - Male) - Local audio connection for microphone and speaker.
ALARM and CONTROL
The Alarm Inputs connector - (37-pin D - Male) connector supports a number of input and control features:
•
Twenty (20) external Alarm Inputs can be connected. (10 only on Model 2010 and Model 3010) Inputs can
be programmed (via a setup menu) to trigger an alarm on either open or closed contacts
•
Three (3) Control Outputs used with setup for operation as a Transmitter. Low power open drain transistor
outputs.
CHASSIS SELECT
Switch used to set the address of the FastVu when used in a multi-chassis configuration.
POWER
Connector for 12V input power from the power supply adaptor.
1.5.1
Configuration Switch Settings
Figure 1-3 - Configuration Switch Settings
1-8
ADPRO FastVu, Issue 6
Installation
1.6
System Wiring Considerations
1.6.1
Electromagnetic Compatibility (EMC) Issues and Instructions
When an ADPRO FastVu system is installed in accordance with the recommendations and procedures in this manual,
it will meet the EMC requirements of:
•
EN 55022 / AS3548 Class A, and FCC Part 15 Class A digital devices in respect to emissions, and
•
EN 50130-4-1 Alarm Systems Immunity.
To ensure EMC compliance for your system installation, make sure of the following:
•
CAT-5 Unshielded Twisted Pair (UTP) Data Cable is used for the Network port connection,
•
RG-59 coaxial 75ohm Video cable is used for all composite video connections and the cables are
terminated with 75 ohm BNC connectors,
•
4-pin mini-DIN S-Video compliant cables are used to connect to S-Video monitors and
•
Except for the Alarm Inputs, all other cabling is carried out with shielded (single or dual) twisted pair and
the shield itself, along with the associated drain wire, is terminated at the ADPRO FastVu with a
connection to the chassis. Also ensure that shields are not terminated (that is they must be trimmed and left
‘floating’) at the ‘device end’ (opposite end to the FastVu) of the cable run.
Note that the foil used in some shielded cable is only insulated on one side. Always check the foil shield with an ohmmeter and make sure that the conductive side is in contact with shield termination recommendations in this manual.
1.6.1.1
FCC Advice for Installers and Users in the United States
ADPRO FastVu equipment has been tested and found to comply with the limits for a Class A digital device, pursuant
to part 15 of the FCC Rules. These limits are designed to provide reasonable protection against harmful interference
in a residential installation. This equipment generates, uses and can radiate radio frequency energy and, if not installed
and used in accordance with the instructions, may cause harmful interference to radio communications. However, there
is no guarantee that interference will not occur in a particular installation.
If this equipment does cause harmful interference to radio or television reception, which can be determined by turning
the equipment off and on, the user is encouraged to try to correct the interference by one or more of the following
measures:
•
Reorient or relocate the receiving antenna.
•
Increase the separation between the equipment and receiver.
•
Connect the equipment into an outlet on a circuit different from that to which the receiver is connected.
•
Consult the dealer (or installer) or an experienced radio/TV technician for help.
WARNINGS
Changes or modifications not expressly approved by Vision Systems could void the user's
authority to operate this equipment.
ADPRO FastVu, Issue 6
1-9
Installation
1.7
Mounting the ADPRO FastVu
1.7.1
Rack Mounting
The FastVu 2020 and 2010 models are housed in a 2 U high chassis for mounting in a 19" rack as shown in Figure 14. To ensure long term electronic equipment reliability, it is advisable to:
•
mount the unit clear of other equipment which can dissipate large amounts of heat,
•
ensure adequate air flow (either convective or forced) between the unit and its surroundings,
•
mount the AC power supply adaptor in an area with adequate ventilation away from other heat sources.
Due to the internal dissipation in the FastVu, do not mount the AC power adaptor on top of the FastVu chassis.
Ensure that all the installation instructions provided with the AC power adaptor are followed (refer to Section 1.8).
ADPRO FastVu
®
TM
Digital Video & Audio Transmission System
Vision Systems
Power
Status
Figure 1-4 - FastVu front panel for 19 inch rack mount models
1.7.2
Wall Mounting
The FastVu 3010 Transmitter chassis is housed inside a wall-mountable cabinet as shown in Figure 1-5. The cabinet
is NOT weatherproof and is suitable only for internal building locations such as an interior wall.
Figure 1-5 - FastVu wall-mount cabinet showing overall dimensions
1 - 10
ADPRO FastVu, Issue 6
Installation
Figure 1-6 shows the dimensional detail for the mounting holes for the FastVu 3010 cabinet.
Figure 1-6 - Wall mount cabinet mounting dimensions
1.8
AULT SW132/PW160 Power Supply Installation Instructions
•
No user serviceable parts are inside. Locate the power supply near an area accessible to a properly
grounded outlet receptacle. The input power plug is the disconnect device to remove power. This product
is intended for indoor use only. This product is intended for continuous operation.
•
For North American power connection, select a power supply cord that is UL listed and CSA Certified 3 conductor, 18 AWG, terminated in a moulded on plug cap rated 125 V, 15 A, with a minimum length of
six feet.
•
For European connection, select a power supply cord that is internationally harmonized and marked
‘<HAR>’, 3 - conductor , 0.75 mm2 minimum cross sectional area, rated 300 V, with a PVC insulated
jacket. The cord must have a moulded on plug cap rated 250 V, 10 A.
NOTE
When used in conjunction with the optional ADPRO VM25 FastVu I/O Expander module,
the AULT SW132 Power supply must be upgraded to a AULT PW160 model
(ADPRO P/N 200886) to support the additional load and ensure continuing compliance with
safety requirements.
ADPRO FastVu, Issue 6
1 - 11
Installation
1.9
Configuring FastVu 2020 as a Receiver or a Transmitter
FastVu 2020 units can be set to operate as either a Receiver or as a Transmitter. FastVu 2010 and 3010 units are
dedicated Transmitters and cannot be changed.
The Configuration DIPswitch on each FastVu 2020 unit is set to define its operation as either a Receiver or a
Transmitter. Receivers are located at a central site and use the communications network (or link) to connect to remotely
located Transmitters.
•
FastVu 2020 - Switch #11 = ON for Receiver operation or Switch #11 = OFF for Transmitter operation.
When using FastVu 2010 and 3010, switch #11 has no function.
NOTE
To be configured correctly, this switch must be set BEFORE the unit is powered on.
1.10
Setting the Video Standard
FastVu can be set to operate using either CCIR (PAL) or RS170 (NTSC) video standards. Once a standard has been
selected, all video inputs, the Monitor output (Composite video) and the S-Video monitor output (on FastVu 2020
only) will be configured to use the same standard.
To set the required video standard, use the Configuration DIPswitch on the rear panel.
Configuration Switch # 12
ON = RS170/NTSC,
OFF = CCIR/PAL
NOTE
To be configured correctly, this switch must be set before power on.
1 - 12
ADPRO FastVu, Issue 6
Installation
1.11
Keyboard Connection and Configuration
Figure 1-7 - AMK-300 Keyboard Rear View
1.11.1
AMK-300 Configuration Switch
In the normal operating mode of the AMK-300, the Configuration switch settings must be set to control either a
Receiver or a Transmitter. Figure 1-8 shows the required switch settings for these modes. Note that new switch
positions are only recognised at power on.
Figure 1-8 - AMK-300 Configuration Switch settings
Default settings for the AMK-300 is for Switch#1 = ON, all other switches are OFF.
ADPRO FastVu, Issue 6
1 - 13
Installation
1.11.2
Keyboard Cables
The following cables are used to connect an AMK-300 keyboard to a FastVu chassis.
1.11.2.1
RS485 Operation, Maximum 1000m (3300ft)
The RS485 cable connection can be used when long distances are required between the keyboard and the FastVu
chassis.
FastVu
Chassis
AMK-300
Keyboard
COM1
Port connector
(male)
Balanced
Transmit/
Receive
Keyboard
Port connector
(male)
–
3
3
–
+
2
2
+
Ground
5
5
not used
4
9
Power
RS485
Ground
not used
9
9-pin, female,
D Connector
5
9
1
6
Power
9-pin, female,
D Connector
5
9
1
6
Cable end connectors
1000 metres (max)
amk300-RS485-generic-cable.cdr
Figure 1-9 - AMK-300 Connecting Cable for RS485
1.11.2.2
RS232 Operation, Maximum 15m (50ft)
The RS232 cable connection can be used when only a short distance (15m, 50ft) is needed between the keyboard and
the FastVu chassis.
Figure 1-10 - AMK-300 Connecting Cable for RS232
1 - 14
ADPRO FastVu, Issue 6
Installation
1.12
Using an External Control Device
When it is necessary for the FastVu to be controlled via an external control device, such as a PC or dedicated controller,
the Keyboard port can be used to connect this device. Control commands for the FastVu are issued by the external
control device using the ADPRO IEC (Inter Equipment Communication) instruction set.
The use and data structure of the IEC instruction set is detailed in the IEC Installation and User Guide (ADPRO Part
Number 300081).
Cable connection to the external control device is identical to that of the AMK-300 keyboard, as detailed previously
in Section 1.11.
1.13
Video Input Connections
Depending on the model, up to 20 video sources can be connected via the female BNC sockets and should generate a
1.0-volt peak to peak composite colour or black & white video signal when terminated with a 75-ohm load. A
combination of colour and black & white cameras can be used. No external camera or system synchronisation is
required.
To ensure high picture quality, each video input must be terminated either at the chassis itself or by other external
equipment. The Video Terminations Dipswitch on the rear panel allows individual channels to be terminated with 75ohm or left un-terminated, for example, when the video signal is looped out to other equipment such as a video monitor
or video multiplexer. The external equipment must provide the channel termination.
The default Dipswitch setting is Terminated.
WARNINGS
Installations in Lightning Prone Areas
In lightning prone areas, in-line coaxial lightning arresters should be used on the video cables.
The arresters should be installed at the cable entry of the building that houses the FastVu.
Cameras should also have suitable lightning protection rods installed as close to them as possible.
The use of fibre optics to provide electrical isolation on the video signals is strongly
recommended in high-risk areas.
1.13.1
Video Input Requirements
To ensure high quality images, the Transmitter must synchronise correctly to the incoming video signal for the selected
video standard. For synchronisation to occur the following conditions must be met:
•
the synchronisation pulse amplitude at each video input must be within the range of 0.2 to 0.4 volts,
•
the peak video amplitude with reference to the black level (ie. not including the synchronisation pulses) at
each Video Input must be within the range of 0.5 volt to 1.0 volt, and
•
for colour cameras, the minimum colour burst level at each video input must be at least 100 mV.
If the video level is low, cable compensators or video line drivers should be installed at the video source. They should
be adjusted to boost the video signal to within the voltage limits given above.
ADPRO FastVu, Issue 6
1 - 15
Installation
1.13.1.1
Maximum Camera Input Cable Length
The maximum cable length that can be used from a camera before cable compensators are required is dictated by the
desired quality of the video picture. Generally, the shorter the cable between the camera and the FastVu the better the
video picture quality.
Use the following information as a guide for RG59 type coaxial cable (75 ohm nominal impedence):
1.14
•
In a monochrome system, depending on the resolution required, the cable length should be restricted to
500 metres (1600 feet) before cable compensators are installed.
•
Signal degradation due to the coaxial cables characteristics has a far greater effect on colour video. In a
colour system, the coaxial cable length should be limited to 250 metres (800 feet) before cable
compensators are installed. Again the length is dependent on the required picture quality.
Video Output (Monitor Output)
Monitors can be colour or black and white, capable of receiving composite video signals via a 75 ohm BNC connector
on the rear panel. Monitors must match the desired TV standard set for the chassis, either PAL/CCIR or NTSC/RS170.
Also available on the FastVu 2020, is a S-Video output for connection to a suitable monitor or video recorder.
As well as Camera video and alarm information, the monitor is used to display Setup menus when programming the
system. The recommended screen size is a function of the distance from the operator to the screen, but typical
installations would use 14-21 inch monitors.
1.15
Connecting Communications Devices
FastVu provides a number of interfaces for connecting communications devices. These interfaces are available via the
Port 2 and Network connectors on the rear panel.
In general, there are three primary types of communication links available; dial-up, dedicated or network. Both dialup and dedicated can be broken further into either analogue (PSTN) or digital (ISDN), depending of the type of circuit
available at the site.
1 - 16
ADPRO FastVu, Issue 6
Installation
1.15.1
PORT 1
Port 1 can be used to upgrade the software for the FastVu chassis when connected directly to a computer or PC via a
null-modem cable link.
The 25-pin D connector pins are wired as shown in the Table 1-1 below:
PIN
SIGNAL
DESCRIPTION
PIN
SIGNAL
DESCRIPTION
1
SGND
Shield
14
TXD_B
Transmit Data (+)
2
TXD_A
Transmit Data (-)
15
SCT_A
DCE Transmit Clock (-)
3
RXD_A
Receive Data (-)
16
RXD_B
Receive Data (-)
4
RTS_A
Request to Send (-)
17
RXC_A
DCE Receive Clock (-)
5
CTS_A
Clear to Send (-)
18
LL_A
Local Loopback (-)
6
DSR_A
Data Set Ready (-)
19
RTS_B
Request to Send (+)
7
GND
Signal Ground
20
DTR_A
Data Terminal Ready
8
DCD_A
Carrier Detect (-)
21
RL_A
Remote Loopback (-)
9
RXC_B
DCE Receive Clock (+)
22
RI/DSR_B
10
DCD_B
Carrier Detect (+)
23
DTR_B
Data Terminal Ready (+)
Data Set Ready (+) - Also RI function
11
TXC_B
DTE Transmit Clock (+)
24
TXC_A
DTE Transmit Clock (-)
12
SCT_B
DCE Transmit Clock (+)
25
DSR_B
Data Set Ready (+)
13
CTS_B
Clear to Send (+)
Table 1-1 - 25-pin D connector pins
1.15.2
PORT 2
Port 2 is used to connect to modems and terminal adaptors to support PSTN and ISDN links at data rates up to
230Kbps. The 9-pin D connector pins are shown.
PIN
1
2
3
4
5
6
7
8
9
SIGNAL
DCD
RXD
TXD
DTR
GND
DSR
RTS
CTS
RI
DESCRIPTION
Carrier Detect
Receive Data
Transmit Data
Data Terminal Ready
Ground
Data Set Ready
Request to send
Clear to send
Ring Indicator
Table 1-2 - 9-pin D connector pins
ADPRO FastVu, Issue 6
1 - 17
Installation
1.15.3
NETWORK Port
Connection to an IEEE802.3 Ethernet Local Area Network is via the NETWORK port. FastVu supports connection
to 10baseT wiring systems.
A network address is required for correct operation over a network. Both the Transmitter and the Receiver units must
have a unique TCP/IP address (commonly known as the IP address). A number of IP addresses made need to be entered
to correctly identify the FastVu and its location on a network.
IP Address
The IP Address is used to identify each piece of equipment connected to the network. Each FastVu requires a unique
IP address. The assigned IP Address is defined in 4 fields, for example: 123.07.321.72 Each field may contain an
address element up to the value of 255.
Subnet Mask
Network devices communicate by using the subnet mask to determine whether the destination device is located on a
local or a remote network. The assigned Subnet Mask is defined in 4 fields, for example: 123.07.255.255 Each field
may contain an address element up to the value of 255.
Default Gateway
For communication with an FastVu located on another network, the local FastVu must be given the address of the route
to the other network. The default gateway is the address to which the local FastVu sends packets that are destined for
the other network.
NOTE
Before configuring FastVu for operation it is important that the IT or Network Manager
assigns an IP Address for use by the device. This address is required for correct network
operation. Addesses for the ‘subnet mask’ and the ‘gateway’ may also be required prior to
commencement of the installation procedure.
1 - 18
ADPRO FastVu, Issue 6
Installation
1.15.4
Network Port Pinout
The 8-pin RJ-45 Network port connector pinouts are shown below. Use Category 3, 4 or 5 cable when connecting to
a 10baseT wiring system or network hub, however Cat 5 cable is recommended for reliable and expandable data
transmission.
RJ-45 PIN
SIGNAL
1
2
3
4
5
6
7
8
Tx+
TxRx+
n/c
n/c
Rxn/c
n/c
Table 1-3 - Network Port pin outs
1.16
Transparent Data Port
FastVu allows the (transparent) operation of 3rd-party, RS232 based equipment via the Transparent Data Port D-type
connectors on the Receiver and the remote Transmitter at rates up to 57k2 bps.
The Transparent Data Port setup menus (under the General menu) in the Receiver and the Transmitter are used to
define the communication parameters required for this RS-232 link. The pinouts for the 9-pin male Transparent Data
Port are shown.
PIN
1
2
3
4
5
6
7
8
9
SIGNAL
DCD
RXD
TXD
DTR
GND
DSR
RTS
CTS
RI
DESCRIPTION
Carrier Detect
Receive Data
Transmit Data
Data Terminal Ready
Ground
Data Set Ready
Request to send
Clear to send
Ring Indicator
Table 1-4 - Transparent Data Port pin outs
ADPRO FastVu, Issue 6
1 - 19
Installation
1.17
Connecting PTZ Telemetry Stations
Telemetry stations used for the control of cameras with Pan/Tilt/Zoom (PTZ) hardware. They are connected to the
Transmitter and can be controlled by the joystick on the AMK-300 keyboard at the Receiver. Camera Stations can also
be controlled locally from a keyboard connected to the Transmitter.
FastVu supports up to twenty PTZ telemetry stations per chassis provided all of the stations operate with the same
communication protocol. Communication with the telemetry stations utilise RS485 ‘multi-drop’ signalling via the
‘PTZ’ port on the rear of the FastVu chassis.
FastVu Transmitter
PTZ
(2) +
Rx +
(3) -
Rx -
(5) GND
VIDEO OUT
Address 1
Rx +
VIDEO
IN
CAM 1
Rx -
CAM 2
VIDEO OUT
Address 2
CAM 20
Rx +
Rx VIDEO OUT
Address 20
NetVu-multi-PTZ-RS485.cdr
NOTE: The address selected for the Telemetry Station should
match the video input (camera) number of the FastVu
Figure 1-11 - Typical RS485 connection to multiple telemetry stations.
1.17.1
PTZ Port Setup
The following points are applicable to the PTZ port.
•
Telemetry stations are connected via a 9-pin D connector, marked ‘PTZ’.
•
RS485 control links allow cable lengths of up to 1000 metres.
•
Up to 20 (identical) telemetry stations can be connected to one FastVu.
Use the following guidelines when connecting and setting up a telemetry station.
1 - 20
•
The same brand and model of telemetry station must be used at a site if multiple units are to be used.
•
Set the address of the telemetry station to match the camera input to which the PTZ camera is connected.
•
Use shielded twisted pair cable for connection to the telemetry stations.
•
Connect the Transmit positive (TXD+ pin#2), Transmit negative (TXD- pin#3) and Ground terminal
(pin#5) of the PTZ port of the FastVu to the respective positive, negative and ground terminals of the
telemetry station as shown in Figure 1-12.
ADPRO FastVu, Issue 6
Installation
.
Telemetry Station
RS422/485 Port
Balanced
Receive
FastVu
PTZ Connector
(+)
2 (TXD+)
(-)
3 (TXD-)
5
Ground
Balanced
Transmit
(OPTIONAL
depending
on model)
Balanced
Transmit
Terminals
Ground
(+)
6 (RXD+)
(-)
7 (RXD-)
Balanced
Receive
Terminals
NetVu-PTZ-485.cdr
Figure 1-12 - PTZ port connections to the telemetry station
•
If applicable, make sure the last telemetry station connected to the link is terminated in 120 ohms.
•
With reference to the telemetry station manual;
i.
ii.
iii.
connect the pan/tilt head and the zoom lens, focus control and iris control (if applicable)
set the lens voltage, high speed PTZ settings, A/D converter for preset systems, homing preset
after the last operation plus any other settings in the telemetry station, and
make sure the telemetry station data speed is set to the recommended or default baud rate.
Figure 1-13 - Pin Numbering of the PTZ port
Telemetry station manufacturers provide a variety of models and features. FastVu provides PTZ control ability for a
number of popular models and where possible, supports the features provided by the manufacturer. Due to the number
of models available on the commercial market, details of connection and use for individual models have been provided
on the ADPRO web site.
.
ADPRO WEBSITE
For information regarding connection and features of specific telemetry station, see the Tech-Tips pages at
http://www.adpro.com.au
or contact yours nearest sales office for a paper copy
ADPRO FastVu, Issue 6
1 - 21
Installation
1.18
Alarm Inputs
The ADPRO FastVu has twenty external Alarm Inputs (ten for model 2010 and 3010). When a FastVu unit is in the
Secure state, the camera setup options can be programmed to trigger an alarm on detection of either a closed contact
or an open contact condition of the external Alarm Input. The Alarm Inputs are normally connected to alarm sensors
such as door switches, passive infrared detectors, microwave detectors, vibration sensors, electric field detectors etc.
The setup options for Alarm Inputs are described with reference to the ‘rest’ or non-alarm position of a set of switch
contacts:
1.18.1
•
Normally Open - needs a closing contact to activate an alarm
•
Normally Closed - needs an opening contact to activate an alarm
Driving the Alarm Inputs
For an alarm input to be recognised, the input device must hold a changed state for a minimum period of 100
milliseconds.
•
For a valid closed contact, the total resistance, including wiring resistance, must be below 150 ohms.
•
For a open contact to be valid the resistance presented at the Alarm Input must above 2,500 ohms.
The Alarm Inputs are shown in Table 1-5. Note that ground is not isolated from chassis ground.
Pin Function
37-way pin number
Alarm IN - 1 to 19
1 to 19
Alarm IN - 20
37
Control Output #1
20
Control Output #2
24
Control Output #3
28
Clock Sync input
32
Ground (0V)
21, 22, 23, 25, 26, 27, 29,
30, 31, 33, 34, 35, 36.
Table 1-5 - Alarm Input pin numbering on the rear panel
Figure 1-14 - Alarm In Connector Pinouts
1 - 22
ADPRO FastVu, Issue 6
Installation
1.18.2
ADPRO VM25 FastVu I/O Expander (OPTION)
When a FastVu Transmitter is connected to an optional VM25 FastVu I/O Expander, additional protection for the
Alarm Inputs is provided via tamper detection circuitry (BS8418 Compliant).
All twenty Alarm Inputs are supported for model 2020 (10 for model 2010 and 3010) and three 15-way screw
connectors are supplied to facilitate cable termination on the VM25. Alarm Inputs can be configured using the
following termination methods:
1)
2)
3)
4)
5)
6)
No End of Line (EOL) Normally Closed (NC),
No EOL Normally Open (NO),
Single EOL NC,
Single EOL NO,
Dual EOL NC,
Dual EOL NO.
For operation of the alarm inputs when the FastVu is fitted with an VM25 I/O Expander, refer to the ADPRO VM25
FastVu I/O Expander Installation Guide (ADPRO P/n 201279).
1.19
Control Outputs
Control Outputs are used to control external (third-party) equipment connected to the Transmitter at a remote site.
They provide the equivalent of a ‘switch’ that can be controlled from the Receiver’s keyboard at the central site. At
the Receiver, by selecting one of three Control Output numbers and pressing the Ctrl On or Ctrl Off keys, the Control
Outputs at the Transmitter will respond accordingly.
As standard, the ADPRO FastVu has three Control Outputs in the form of open-drain transistors. Table 1-6 shows the
logical relationship between the Ctrl On and Ctrl Off keys at the Receiver and the control outputs.
Key Pressed
Ctrl On
Ctrl Off
Control Output
Low Impedance to ground (<0.5ohms)
High Impedance to ground (>1 Mohm)
Table 1-6 - Relationship of Control Keys at Receiver to Control Outputs at Transmitter
The Control Outputs can be used to initiate control of equipment such as lights, sirens, gates and control equipment.
1.19.1
Connecting to the Control Outputs
The three Control Outputs are available via the 37-pin male D ‘Alarm In’ connection on the rear panel. Refer to
Table 1-5 for pin connections and signal specifications.
WARNING
For high power/voltage equipment, suitable interface circuitry must be used between
the Control Outputs and the equipment. The ADPRO VM25 FastVu I/O Expander is suitable for
this purpose.
ADPRO FastVu, Issue 6
1 - 23
Installation
1.19.2
ADPRO VM25 FastVu I/O Expander (OPTION)
When a FastVu Transmitter is connected to an optional VM25 FastVu I/O Expander, ten (10) relay based control
outputs are provided. Refer to the ADPRO VM25 FastVu I/O Expander Installation Guide (ADPRO P/N 201279).
NOTE
If power for the VM25 FastVu I/O Expander is required to be sourced from the same supply
as that of the FastVu (Transceiver or Transmitter) the power supply must be upgraded to an
AULT PW160 (ADPRO P/N 200886).
1.20
Access/Secure Input
By default, FastVu operation is in the Secure state and will respond to an Alarm Input trigger by raising an Alarm
condition. An Access/Secure input is provided to allow the Transmitter to be independently set into the Access state
of operation. This input is usually connected to an alarm panel or access control system. In the Access state, trigger
conditions on an Alarm Input do not raise an Alarm condition. For example, during business hours a remote site may
be placed into the Access state when it’s local security system is deactivated, but will revert to the Secure state after
hours.
The Access/Secure input is also used to set/reset any Entry or Exit delays programmed into the system.
When the Access/Secure input pin (located on Audio Switch connector, pin 5) is ‘open’ (or ‘high’), the FastVu
operates in the Secure state. Placing a ‘closed contact’ on the pin (ie shorting to Ground) switches the FastVu system
into the Access state.
NOTE
A FastVu Transmitter may also remotely be placed in the ACCESS state by a FastVu
Receiver or ADPRO Video Central (PC based Receiver). This action is independant of the
condition on Pin 5 (Access/Secure). However, when Pin 5 is switched from the ACCESS
state to the SECURE state, the Transmitter software will correctly reflect the Secure state
of the Transmitter.
1.21
General Relay Output
A Form C single pole changeover contact set is available on the Audio Switch connector (pins 4,11,12). If configured
to do so, the relay activates while the ADPRO FastVu has an alarm active. The contacts will remain in the changeover
condition until all alarms are reset. The relay may also be configured to activate whenever the unit is connected via a
network or data link to another FastVu unit. This feature may be used (for instance) to notify an alarm system when
FastVu activity is taking place.
1 - 24
ADPRO FastVu, Issue 6
Installation
1.22
Audio Switch Connections
There is a 15-pin ‘Audio Switch’ connector on the ADPRO FastVu. The functions available are compatible with the
and VM22A Audio Switchers.
Pin Function
Serial output for
Channel Number
Audio Signals
Press-To-Talk (PTT)
Access/Secure
Spare
General Alarm Relay
Ground
VCC
Signal
Pin
Specifications
Serial Clock
Serial Data
Serial Strobe
‘Alive’* see note
Audio Out (+)
14
7
15
8
1
Open drain output
32V maximum
100mA maximum
On impedence <0.5 ohm
Audio In (+)
2
Audio Common
PTT Input
Acc/Sec Input
unused
Common
N/O
N/C
Ground
Power
9
13
5
6
4
12
11
10
3
Output impedence >6K ohm
Nominal output level = 315mVrms
Input impedence >6K ohm
Nominal level = 10mVrms to 400mVrms
Audio Signal common
Contact Rating 1A at 32V
+5V
Table 1-7 - Audio Switch Functions and Pinouts
(*) Note: The “Alive “ output pin reflects the operation of the FastVu’s front panel LEDs. The output is a low impedence when the Green
LED is ON and a high impedence when the Red LED is ON.
Figure 1-15 - Audio Connector Pinouts
1.22.1
Audio Interface
Audio signals for direct connection to microphone and speaker(s) are connected to the FastVu via the ‘Audio’
connector (5-pins - refer to Figure 1-14) on the rear panel. Signals on each pin are shown below.
Signal
Pin
Specification
Microphone (+)
4
Microphone (-)
5
Shield
3
Differential impedence > 3K ohm
Single ended impedence > 6K ohm
Nominal signal level is
100uV rms to 10mV rms
Speaker (+)
2
Speaker (-)
1
ADPRO FastVu, Issue 6
1 watt (max) output into 8 ohm
Total harmonic distortion < 5%
1 - 25
Installation
1.22.2
Audio Line Connection
Audio line level signals are connected to the FastVu via the ‘Line In’ and ‘Line Out’ connectors on the rear panel.
Line Signal
Line IN - RCA connector
Line OUT - RCA connector
1.22.3
Specification
Input impedence > 6K ohm
Nominal level = 10mV rms to
400mV rms
Output impedence = 600 ohm
Nominal level = 315mV rms
Audio Level (Manual Microphone Gain Control)
A trimpot (marked Audio Level) is located on the rear panel. It is used in conjunction with the two audio LEDs
(located just above the trimpot) to manually set the microphone gain level when the AGC circuit is DISABLED via
the Setup menu.
The trimpot is turned clockwise to increase the microphone circuit gain. To set the gain level, talk normally into the
microphone at a distance of approximately 30cm (1ft) and adjust the trimpot until the RED LED just starts to light.
This is the maximum gain position. For optimum operation, back-off the trimpot slightly (anticlockwise) to ensure the
RED LED only flickers when loud voice levels are used at the microphone.
Note that microphone AGC is usually set to Disabled when the Intercom mode of operation is used. To optimise audio
quality and reduce the detrimental effects of audio feedback (such as whistling), Echo Cancellation and AGC
(Automatic Gain Control) cannot be used together. Refer to Section 2.13 for the Transceiver or Section 3.11 for the
Transmitter).
1.23
Connection to the ADPRO Amux 20CDK
The ADPRO Amux 20CDK is an Integrated Video Management System with an advanced 20-channel multiplexer.
FastVu systems can integrate with Amux to allow centralised control and viewing of up to 20 cameras and control of
PTZ telemetry stations connected to the Amux system.
Amux features such as ‘down-the-coax’ PTZ control of camera stations and Activity Detection can be used to provide
enhanced system operation for FastVu.
NOTE
1) In the Fast Scan PTZ setup menu, the camera station option must be selected
as ‘Amux IEC’.
2) Remote setup of the Amux can be achieved by connecting the Amux’s Monitor 1 output
to either Channel 10 (for 10 camera config) or Channel 20 of the FastVu Transmitter.
1 - 26
ADPRO FastVu, Issue 6
Installation
The following diagrams show the connections required for 10 channel (FastVu 2010 or 3010) or 20 channel (FastVu
2020) operation.
RS232
AMUX
Alarm Outputs
1
20 (10)
Video Inputs
1
20 (10)
MON 1*
Cameras may be
fixed or PTZ
Camera 1
Camera 20 (10)
FastVu 2020
(FastVu 2010 & 3010)
Modem
*
1
20
(1
10)
Alarm Inputs
Serial
Port
1
20
(1
10)
Video Inputs
FastVu
Transmitter
PTZ
Port
(RS485)
**
485/232
AMUX Monitor 1 output is connected to video channel 10 of FastVu in lieu of
camera 10 if remote setup is required.
** Use PTZ Port and a suitable RS485/232 converter.
10-channel connections (when using FastVu 2010 & 3010) are shown in (brackets)
FastVu-Amux 20-channel.cdr
Figure 1-16 - Connection of Amux to a FastVu Transmitter
Special Operational Procedures
When connected to a FastVu, a number of Amux operations need to be handled according to the following procedures:
Passwords
Passwords cannot be sent to the Amux when connected via FastVu and must be disabled in the Amux using local setup
from the Amux keyboard. To disable password checking, use the Setup menu to set the General -> Passwords option
to Disable. To make the new configuration active, use the Exit and Save option from the Setup menu.
Resetting Amux Alarms
To enable clearing of Amux alarms via FastVu, each Amux must have each connected camera’s ‘Alarm Reset’ option
set to Timed.
NOTE
The timed automatic reset option does not apply to a Video Loss alarm (described below).
ADPRO FastVu, Issue 6
1 - 27
Installation
‘No Video’ Alarms
When an Amux channel suffers a video loss, the Amux can (conditionally) generate a No Video alarm
condition (*Note 1).
To reset a video loss condition when connected via a FastVu:
1)
2)
Ensure the cause of the video loss is rectified
Enter and then exit Amux Setup mode (this will cause the video loss alarm to be reset).
or, if the cause of the video loss cannot be corrected, then
1)
2)
3)
4)
Enter the Amux Setup mode
Enter the Camera menu and select the faulty camera number
Set the Connected status to NO (this will remove the camera from the alarm list)
Exit Setup mode.
*Note 1: Within the Amux Setup menu, the unit can be conditionally set to ‘Alarm on Loss’ or ‘No Alarm’. Operational considerations or policies
for each site will dictate whether Amux video loss alarms are to be generated.
1 - 28
ADPRO FastVu, Issue 6
2.0
2
Receiver Setup
Receiver Setup
2.1
Hardware Required to Run Setup
A number of Setup menus are provided to quickly and easily configure the ADPRO FastVu for operation. The menus
and any associated stored parameters are held within non-volatile memory.
To view the Setup menu, a monitor connected to Video Out (or S-Video output) is needed. Ensure the monitor is
correctly connected, power is available and the unit is switched on.
There are two ways to access the Setup Menus.
2.2
•
The AMK-300 external keyboard. Plug the keyboard into the Keyboard port on the rear panel.
•
The VM87 Hand-Held Programmer. Plug the VM87 into the Keyboard port on the rear panel.
Power Up
The green Power and the red Status LEDs on the front panel are lit as soon as power is applied to the unit. The FastVu
immediately starts to perform internal tests to ensure both software and hardware integrity.
NOTE
Prior to power up, set the Configuration DIP switch on each FastVu 2020 unit to define its
operation as either a Receiver or a Transmitter. Set switch #11 to ‘ON’ for a Receiver, ‘OFF’
for a Transmitter.
A successful self-test ensures all diagnostic tests have been passed and to confirm this, the red Status LED goes off.
NOTE
The self-test function may take up to 45 seconds to complete. During this period, any
display on the monitor screen is not meaningful and should be ignored.
•
If the self-test fails, the red Status LED remains On.
•
If the power fails, the green Power LED will be Off.
If the diagnostic tests fail repeatedly, the user should note any details of the error and contact the ADPRO support
service or the local ADPRO supplier.
ADPRO FastVu, Issue 6
2-3
Receiver Setup
2.3
Entering Setup Menu
To use the setup menu, first ensure the FastVu unit has successfully completed the power up diagnostic tests.
SETUP
Press the Setup key on the AMK-300 to enter setup mode.
Password checking to the Setup Menu is either:
•
Disabled
when no password protection is required or
•
Enabled
requiring a password to be entered
Password checking is ‘Enabled or Disabled’ via the menu found in General Setup…/Passwords.
2.4
Password Checking
If password checking has been enabled, use the keyboard to enter the four-digit, numeric only password. The factory
default settings are:
Password checking = OFF
Password = 1111
If password checking has been enabled and an incorrect password is entered, the keyboard will double-beep and an
Invalid Password dialogue box will be displayed. If a password is lost or forgotten, refer to the Troubleshooting
Section of this manual for the correct procedure to override password checking.
•
•
CLEAR
to delete the incorrect entry
re-enter the correct password.
Figure 2-1 - Password Entry Dialogue
2.5
Leaving Setup
When changes to the setup parameters are completed, leaving the Setup menu will prompt the User to save the current
settings (including any changes that have been made).
NOTE
Exit from Setup may take up to 8 seconds. During this time the ‘FastVu Main Menu’
screen will be displayed. Do not power the unit down during this period.
2-4
ADPRO FastVu, Issue 6
Receiver Setup
Options available for any changes to Setup is either:
2.6
•
Save Local Settings and Exit
Changes are stored in the FastVu NVRAM permanent memory and
are immediately available for use
•
Exit Without Saving Local Settings
Changes are discarded and ‘last stored’ setting is used.
Setup Menus
The setup menus provide access to a number of sub-menus for configuration to suit individual site requirements.
Within each major group, all parameters associated with that group are available for configuration. Any previously
entered (or factory default) parameters are shown for review.
Parameters that are capable of being changed are altered by selecting ‘from a list’ or option, or by directly entering a
data value.
Once a parameter is altered, the user can exit from the setup mode and immediately use the new values.
2.7
Using the Menu System
The FastVu menu system is navigated by using the AMK-300 keyboard (or the VM87 Hand-Held Programmer):
To move between menu selections:
use the
keys.
To access a menu selection, use the
2.7.1
ENTER
key.
Fast Buttons
Next to some menu options, a number may be seen. The numbers are used as ‘Fast Buttons’. (In the example shown
in Figure 2-2, there are seven Fast Buttons.
Figure 2-2 - Fast Button Numbers
To ‘Fast Button’ a menu option, simply press the corresponding number on the keyboard.
ADPRO FastVu, Issue 6
2-5
Receiver Setup
2.7.2
Alphanumeric Names
For entry of alphanumeric names, (with both letters and numbers), a special virtual keyboard is used:
Use the following procedure to enter characters from the virtual keyboard.
2.8
•
Use
to highlight (blue background) the required letter or symbol.
•
Press
•
To enter a number into the name, simply press the corresponding number key on the keyboard.
•
To finish and accept the name on the assembly bar, highlight the Accept button or press
•
If a mistake is made, either:
ENTER
to place it on the ‘assembly bar’
•
use the Delete button to erase the last letter or symbol or
•
use the
CLEAR
END
key to erase All characters.
Setup Menu Structure
Programmable parameters are entered or altered via a menu-based system. The menu structure consists of a number
of levels and sub-menus. The applicability of some menu or sub-menu options can be affected by the setting(s) of other
options. Refer to Figure 2-4 for a diagram of the FastVu menu structure.
Figure 2-3 - Setup menu structure
Please refer to the pull-out Menu flow diagrams for a complete overview of the FastVu menu structure.
2-6
ADPRO FastVu, Issue 6
ADPRO FastVu, Issue 6
Select Yes/No (Check Box)
Enter Value (4 digits max.)
...Language
ALARM PASSWORD ENABLED
ALARM PASSWORD
USER LANGUAGE
COMMUNICATIONS
SITE LIST
VIDEO
AUDIO
GENERAL
REMOTE TRANSMITTER
2
3
4
5
6
7
2 ON 3 TIMED
Enter Value (0 to 99 seconds)
1 OFF
ALARM BEEPER TIMEOUT
ALARM BEEPER OPERATION
ALARM BEEPER
SYSTEM DETAILS
1
RECEIVER SETUP
SAVE SETTINGS BEFORE ENTERING UPGRADE MODE
ENTER UPGRADE WITHOUT SAVING
1
2
UPGRADE
UPGRADE
DIAGNOSTICS
TRANSPARENT DATA PORT
ALARM BEEPER
GENERAL RELAY
GENERAL
SEE TRANSMITTER
Enter Value (4 digits max.)
SETUP PASSWORD
Start Here
Select Yes/No (Check Box)
SETUP PASSWORD ENABLED
SYSTEM DETAILS
ALARM
CONNECTION
1
2
90 120
Enter 40 Characters (max)
DD-MM-YYYY
1 NONE
1 ALWAYS 2 ON CONNECT
PARITY
DTR OPERATION
Select Yes/No (Check Box)
2 ODD 3 EVEN
1 NO FLOW 2 H/W FLOW
Enter value (0, 1 or 2)
FLOW CONTROL
Enter value (7 or 8)
DATA BITS
DD-MMM-YYYY
STOP BITS
2
1
MONITOR
PTZ HOLD TIME
CHANGES MODE
MONITOR TYPE
DATE FORMAT
2
1
OVER SCANNING
UNDER SCANNING
Select Yes/No (Check Box)
Select Yes/No (Check Box)
TIME DATE ON
Select Yes/No (Check Box)
CAMERA TITLES ON
SELECT SITE #
STATUS BAR ON
MONITOR
Enter Value (0 to 99)
Select Yes/No (Check Box)
Enter Value (1 to 8)
HIGH QUALITY
POLL STRING
Enter Value (1 to 8)
Enter value (0 to 99)
Enter 40 Characters (max)
POLL INTERVAL
...Data Rate List
Select Yes/No (Check Box)
ENABLE PAP
NOMINAL DATA RATE
Enter 40 Characters (max)
PPP USERNAME
PPP PASSWORD
Enter IP (numeric only)
LOCAL IP ADDRESS
NORMAL QUALITY
VIDEO OPTIONS
BASE PORT NUMBER
ADVANCED
ADVANCED SETUP
Enter Value (40 characters max.)
60
INITIALISATION STRING
30
Enter Value (0 to 9)
...Data Rate List
SERIAL DIAGNOSTIC PORT
2 LEASED
...Line Speed List
1 DIAL
ANSWER RINGS
DIAL TIME
DATA RATE
LINE TYPE
MODEM/TA MODEL
DATA RATE
TRANSPARENT DATA PORT
Enter Value
(1024 to 65536)
Enter IP (numeric only)
DEFAULT GATEWAY
...Model List
Enter IP (numeric only)
SUBNET MASK
SERIAL COMMS PORT
ADVANCED SETUP
SERIAL COMMS PORT
Enter IP (numeric only)
ETHERNET
LOCAL IP ADDRESS
COMMUNICATIONS
ETHERNET
FastVu
Enter Value (0 to 9)
Select Yes/No (Check Box)
ECHO CANCELLATION
AUDIO OUT VOLUME
MICROPHONE GAIN OPERATION
AUDIO INPUT
PTT OPERATION
AUDIO
PHONE NUMBER
USE SERIAL COMMS
ACCESS LEVEL
IP ADDRESS
OBSERVER PRIVILEGES
CMS PRIVILEGES
3
2
1
3
2
1
4
3
2
1
MANUAL GAIN
HIGH LEVEL AGC
LOW LEVEL AGC
SWITCHER
LINE INPUT
MICROPHONE
INTERCOM
TALK & LISTEN
LISTEN ONLY
TALK ONLY
Enter (max. 40 digits)
Select Yes/No (Check Box)
2
1
Enter IP (numeric only)
Select Yes/No (Check Box)
Enter (max 8 characters - alpha-numeric)
USE ETHERNET
Enter (max. 20 characters - alpha-numeric)
SITE PASSWORD
SITE #n SETUP
SITE ID
FastVu Master Menu-Rx v2.05.cdr
LEGEND
Select option from menu
Enter a value
Use Check Box
RECEIVER MENU
Digital Video and Audio Transceiver
®
ADPRO
Receiver Setup
Figure 2-4 - FastVu Receiver menu structure
2-7
Receiver Setup
2.9
System Details Menu
The System Details menu is used to configure the FastVu password operation and User language option.
2.9.1
Passwords
To prevent unauthorised access to the FastVu functions, passwords can be selected and enabled.
Figure 2-5 - System Details menu
2.9.1.1
Setup Password
•
To enable the forced use of a Setup Password, highlight the checkbox and press Enter.
•
Enter the required Setup Password by using the keyboard pop up dialog box. Maximum 4 digits (no
letters).
When the Setup key is pressed on the AMK-300 keyboard, the following Enter Password screen is displayed on the
monitor. Without the correct password, the Setup Menu cannot be accessed.
2.9.1.2
Alarm Password
To prevent unauthorised access to isolate/unisolate alarms and remotely change the access/secure state of a connected
transmitter, a password can be used.
2-8
•
To enable the forced use of a Alarm Password, highlight the checkbox and press Enter.
•
Enter the required Alarm Password by using the keyboard pop up dialog box. Maximum 4 digits (no
letters).
ADPRO FastVu, Issue 6
Receiver Setup
2.9.2
User Language
The option to choose from a number of languages for display of Setup information is available.
Figure 2-6 - Setup Language options
Languages available include; English; English (US Spelling); German; French; Italian; Spanish; Portuguese;
Simplified Chinese and Korean.
2.10
Communications Menu
Access to the Communications configuration information is available via the Communications menu.
Figure 2-7 - Communications menu
ADPRO FastVu, Issue 6
2-9
Receiver Setup
2.10.1
Ethernet Setup
The Ethernet setup menu is used to configure the basic TCP/IP parameters required when using FastVu over a LAN
or WAN network connection.
Figure 2-8 - Ethernet Setup Menu
2.10.1.1
Local IP Address
Options: Default for Receiver = 172.30.0.3
The Local Address is used to identify the FastVu device as a TCP/IP host. Each FastVu unit requires a unique IP
(Internet Protocol) address. The address is divided into four (4) separate parts, each with a decimal range value from
0 to 255.
2.10.1.2
Subnet Mask
FastVu uses the subnet mask to determine whether the destination FastVu unit is located on a local or a remote
network.
Each logical IP Address has two parts: the Network ID and the Host ID. The Network ID identifies all hosts that are
on the same physical network and the Host ID identifies a specific host on the network.
The subnet mask is used to filter (mask) the portion of the IP Address that is common to the network and thus allow
individual hosts to be accessed.For example 172.30.255.255 is a valid subnet mask.
2.10.1.3
Default Gateway
For communication with a FastVu Receiver located on another network, the FastVu unit must be given the address of
the first host device on the route to the destination network (and visa versa). The default gateway is the address of the
host to which the FastVu sends packets that are destined for the remote network.
If a default gateway is not specified, communication is limited to the local network.
2 - 10
ADPRO FastVu, Issue 6
Receiver Setup
2.10.2
Serial Comms Port Setup
The Serial Comms Port option is used by FastVu to provide serial communications with other sites. This menu allows
the User to set the operating parameters of ‘Port 2’ to match with the model of modem or terminal adaptor used to
provide the link.
Figure 2-9 - Serial Comms Port Setup Menu
2.10.2.1
Modem/TA Model
Options:
See the Model List
Defines the model of the modem or terminal adapter connected to the Serial Comms port. Use the device’s user manual
to assist in setting the correct configuration to suit the FastVu Serial Comms port requirements.
Use the Direct Connect option when FastVu units are connected ‘back-to-back’ (wired directly) and no modem or TA
is used.
2.10.2.2
Line Type
Options:
Dial, Leased.
Set the Line Type option to Leased at both the Transmitter and Receiver if the system is connected via dedicated (or
leased) telephone lines or digital communication networks.
The Dialup option is used on a PSTN or digital network when no permanent connection between FastVu units exists.
2.10.2.3
Data Rate
Options:
External, 9600, 19200, 38400, 57600, 115200, 230400.
The Data Rate determines the data transfer type and data rate between the Fast Scan and the modem or communication
interface.
When connected to modems, FastVu is normally programmed for asynchronous data at a specific baud rate. Set the
Data Rate at the Transmitter and Receiver to the maximum rate which the modem can be programmed. It is commonly
referred as the DTE to DCE baud rate.
ADPRO FastVu, Issue 6
2 - 11
Receiver Setup
2.10.2.4
Dial Time
Options:
Wait for 30 seconds, 60 seconds, 90 seconds, 120 seconds
The Dial Time is the maximum time FastVu waits to establish a communication link after dialling. The Dial Time
starts from the instant the dial procedure is initiated. The time can be changed in 30-second increments. It is important
that the chosen value takes into account the time required to dial the number and the number of Answer Rings
programmed in the unit at the other end.
A typical value is 60 seconds for the dial network and 30 seconds for the ISDN network.
2.10.2.5
Answer Rings
Options:
0 to 9, (0 = Don’t Answer)
Both the Transmitter and Receiver can be programmed to either:
a.
b.
wait for a programmable number of rings from 1 to 9, in one ring increments, before answering an incoming
call, or
not answer any incoming calls (when set to 0).
For example, the Transmitter could be set to ‘Answer Rings = 0’ when the User does not want a Receiver looking at
a particular site unless called by the generation of an alarm. Generally the Answer Rings option would be set to 1 or 2
rings.
2.10.2.6
Initialisation String
This option is used to enter up to 40 additional Hayes AT command characters (in ASCII format) required to
automatically configure a modem or Hayes compatible RS232 terminal adaptor for a particular feature or setting.
Hayes AT commands are entered using the ‘keyboard’ entry screen that appears when the Initialisation String option
is selected. Note that the Hayes command prefix (‘AT’) does NOT have to be entered at the start of an Initialisation
String, as it is automatically prefixed to the string contents by FastVu.
2 - 12
ADPRO FastVu, Issue 6
Receiver Setup
2.10.3
Advanced Serial Port Setup
A number of advanced communications features are available including Point-to-Point Protocol (PPP) which is a
special type of IP (Internet Protocol) used for data transfer over serial comms links and Secure Poll, used for high level
security.
Figure 2-10 - Advanced menu
The options available are:
2.10.3.1
Local IP Address
Sets the IP Address of the FastVu Receiver for the PPP connection.
2.10.3.2
PPP Username
The Username (or Site Name) that will be used to contact this Receiver. It is only required when PAP is enabled by
either the Transmitter or Receiver system.
2.10.3.3
PPP Password
The Password to be used to access this Receiver. It is only required when PAP is enabled by either the Transmitter or
Receiver system.
2.10.3.4
Nominal Data Rate
Options:
Auto Detect, 8, 16, 32, 64, 128, 256, 512kbps, 1Mbps, 2Mbps
The Nominal Data Rate option is used by FastVu to maximise the data rate on the communication link. It does so by
setting the buffer size to suit the typical data rates to be expected. Note that the nominal data rate is different from the
Data Rate setting for the Modem /TA. This option helps Users provide consistency in the image transmission time of
the system, especially when the line quality of a communications link is unknown.
The Nominal Data Rate should be set to either auto detect or set to the known speed of the communications network.
For example, use the ‘128 kbps’ option when connected via a Basic Rate ISDN line.
ADPRO FastVu, Issue 6
2 - 13
Receiver Setup
2.10.3.5
Enable PAP
Use this checkbox to set (enable) Password Authentication Protocol. This will force the remote system to be
authenticated using PAP during the PPP negotiations. The valid username and password are defined by the fields of
PPP Username and PPP Password.
2.10.3.6
Secure Poll
Secure poll allows the FastVu to support a high-level security feature available in particular Modems and Terminal
Adaptors (TA). This feature establishes an off-line ‘heartbeat’ link between the modem (or TA) and the Receiver. The
link is initiated and held active by the FastVu sending (polling) a pre-defined message at a regular time interval.
The modem or TA monitors the status of the link and if the link is broken for any reason (no message received from
the FastVu), the exchange equipment is notified via an unsolicited error message. The client can then be informed so
that corrective action can be initiated.
Poll Interval
Options:
0 (= off) and 1 to 99 seconds.
The poll interval is used to specify the time (in seconds) between (repeated) sendings of the Poll String to the modem
or TA equipment. The default value = 0.
Poll String
Options:
Maximum 40 characters
The poll string command that is required by the modem or TA is entered via the on screen keyboard. The default value
= blank.
2.10.4
Advanced Setup - Base Port Number
Options:
<value> Range is 3000 to 30000
Defines the Base Port Number used for communications when connected to another third-party (non-FastVu) device.
Figure 2-11 - Base Port menu
2 - 14
ADPRO FastVu, Issue 6
Receiver Setup
The default value = 15000 and should be left at this value unless a conflict occurs due to network connection of other
third-party equipment.
WARNINGS
If the Base Port Number is changed, then all communicating systems must be changed to the
same value. Failure to do this on all communicating systems will result in communications
failure.
2.11
Site List Setup
Selecting the Site List option from the main Setup Menu displays the menu shown in Figure 2-12. The Site List menu
is used to establish and maintain the list of remote sites that the FastVu Receiver will use to establish connections.
Figure 2-12 - Site List Setup menu
To enter or edit details about a particular site, select the Site Name from the list. Use the
11 thru to 100.
Page key to select sites
A Site Details menu, as shown in Figure 2-13 will be displayed when a site is selected.
Figure 2-13 - Site Details Setup menu
ADPRO FastVu, Issue 6
2 - 15
Receiver Setup
2.11.1
Site Name
Options:
<site name - maximum 8 characters>
The Receiver can be programmed to connect to any one of the 100 sites in the Site List. Each site must have a unique
Site Name.
In operation, only a list of Site Names is displayed when the user selects the Connect option. The Site Name held in
the Receiver site list must match the associated Site Name programmed into the Transmitter.
2.11.2
Site Password
Options:
<site password - maximum 8 characters>
For a communication link to be established between the Transmitter and Receiver, the Receiver’s Site Password must
match exactly with the Transmitter’s Site Password. This includes all characters and numbers, including any spaces.
2.11.3
Access Level
Options:
2.11.4
CMS Privileges, Observer Privileges
CMS Privileges
Select this option when a CMS Password has been entered at a Transmitter. CMS
Privilege allows the display and resetting of alarms.
Observer Privileges
Used for viewing of live video and guard tours of remote sites. Does not allow
resetting of alarms, and will be disconnected when an alarm occurs.
Use Ethernet
Options:
Yes, No
When a FastVu Receiver connects to a Site, it can do so by using one of its two communications link alternatives, the
Ethernet or the Serial Comms Port. If the Use Ethernet option is enabled, connection to the remote site can be
attempted via the LAN/WAN.
To enable the Ethernet connection feature, select the Use Ethernet checkbox and press Enter.
2.11.4.1
IP Address
Options:
<IP Address>
The correct IP Address for the remote site must be entered. If the Use Ethernet checkbox is disabled, then the IP
Address input field is also disabled (greyed out).
2 - 16
ADPRO FastVu, Issue 6
Receiver Setup
2.11.5
Use Serial Comms
Options:
Yes, No
When a FastVu Receiver connects to a Site, it can do so by using one of its two communications link alternatives, the
Ethernet or the Serial Comms Port. If the Serial Comms option is enabled, connection to the remote site can be made
via the Port 2 connector on the rear panel.
2.11.5.1
Phone Number
Options:
<telephone number> maximum 40 digits
The correct telephone number for the remote site must be entered. If the Serial Comms checkbox is disabled, then the
Telephone Number input field is also disabled (greyed out).
Note 1 - Dial Pause: Some telephone systems require a digit to be dialled followed by a short pause to gain access to
an outside line. In such cases, the comma (,) in the character table is used to provide a pause between two digits in a
telephone number. The pause duration is dependent on the modem type but typically ranges from 2 to 5 seconds. Refer
to the modem manual for details.
Note 2 - Pulse/Tone Dialling: To make some modems force a tone or pulse dial string, place a ‘P’ (for Pulse) or ‘T’
(for Tone) in front of the phone number. For example ‘P83004400’ to force a pulse dial string. These additional
characters are required on occasions where there is no suitable AT command that the modem will recognise. Therefore,
the command must be set at the time of dialling.
2.12
Video Setup
Selecting Video Options setup menu displays the menu shown in Figure 2-14. The Video Options menu affects the
way images are presented on the monitor.
Figure 2-14 - Video Options Setup menu
ADPRO FastVu, Issue 6
2 - 17
Receiver Setup
2.12.1
Normal Quality
Options:
<normal picture quality> Range 1 to 8
The Normal Quality value determines the quality of the images observed on the Operator’s monitor during general
operations. The range is from 1 to 8, with 8 being the highest quality.
By default, FastVu will use the Normal Quality setting when a camera is selected. If the User chooses to change the
display quality (with the ‘Quality’ key
), then on completion of the current operation (for example, after using
PTZ) FastVu will again revert to the Normal Quality setting.
As the Quality level is set nearer to 1, the picture update rate reduces, while the image quality also reduces. Overall,
update times will be dependant on the bandwidth available on the Network or Serial Comms channel. The actual
Quality level selected will depend on what needs to be identified in the field of view of the cameras and the desired
picture update time. Refer to Table 2-1 for the image resolution of various quality levels.
Quality
value
PAL
Resolution
NTSC
Resolution
Quality
Displayed
1
176 x 144 pixel
176 x 120 pixel
Small image - v-low
2
176 x 144 pixel
176 x 120 pixel
Small image - low
3
352 x 288 pixel
352 x 240 pixel
Low
4
352 x 288 pixel
352 x 240 pixel
Medium
5
352 x 288 pixel
352 x 240 pixel
High
6
352 x 288 pixel
352 x 240 pixel
Very High
7
704 x 288 pixel
704 x 240 pixel
Very, Very High
8
704 x 576 pixel
704 x 480 pixel
Excellent
Table 2-1 - Quality Value versus Resolution
When alarm sequences are stored at the Transmitter, the actual image resolution of the stored alarm images is Quality
Level 7. The Quality Level requested by a user at the Receiver can be from 1-8 with the highest level reserved for live
viewing of images.
2.12.2
High Quality
Options:
<high picture quality> Range 1 to 8
The user can request images to be transmitted at a higher quality level, as set by the High Quality value. Image quality
can be switched between the Normal and High Quality values by pressing the Quality key
.
The High Quality range is from 1 to 8, with 1 being the lowest quality.
The High Quality option assists with identification of intruders by improving the displayed picture quality.
2 - 18
ADPRO FastVu, Issue 6
Receiver Setup
2.12.3
Changes Mode
Changes Mode determines whether the entire image or only changing portions of the image from a channel are
updated. The first image viewed from a channel is transmitted in its entirety. Subsequently, only the changing portions
of the image are transmitted. This can significantly reduce the picture update time depending on the proportion of the
image which changes. Note that at lower image quality levels, some motion ‘trails’ may be seen.
However, if the size of the object to be tracked is extremely small with respect to the field of view of the camera, then
Changes Mode should not be enabled.
To enable Changes Mode of operation, select the Changes Mode checkbox and press Enter.
2.12.4
PTZ Hold Time
Options:
<hold time in seconds> Value between 0 and 99 seconds
The PTZ Hold Time is used by the FastVu Receiver to determine the length of time the PTZ screen display will be
maintained after the last Pan, Tilt or Zoom operation is completed. The Hold Time value also applies when the focus
function is used. The Hold Time allows minor adjustments to be made to the PTZ camera position before the normal
screen is displayed.
The Hold Time is programmable from 0 to 99 seconds. It would generally be set from 2 to 5 seconds. When the Hold
Time is set to ‘0 seconds’ the system does not use the special PTZ display mode, allowing the system to fully utilize
a high speed (bandwidth) communications link.
2.12.5
Monitor Setup
The Monitor Setup menu configures the User’s preferred display settings on the FastVu monitor.
Figure 2-15 - Monitor Setup Menu
ADPRO FastVu, Issue 6
2 - 19
Receiver Setup
2.12.5.1
Status Bar On
Displays the status of the FastVu features such as the Site Name, current image quality, access/secure state and audio
state. Refer to Figure 2-16.
Figure 2-16 - Status Bar Display
To enable the display of the Status Bar, select the Status Bar On checkbox and press Enter.
2.12.5.2
Camera Titles On
To enable the display of Camera Titles, select the Camera Titles On checkbox and press Enter.
2.12.5.3
Time Date On
To enable the display of Time and Date information, select the Time Date On checkbox and press Enter.
2.12.5.4
Date Format
Options:
DD-MM-YYYY, DD-MMM-YYYY
When Time Date On has been enabled, the Time Date Format menu becomes active. The date, in the selected format,
is displayed on the monitor. Three options are available to set the system date format:
2.12.5.5
•
DD-MM-YYYY.
Format is day (1 to 31) - month (01 to 12) - year (4-digits)
•
DD-MMM-YYYY.
Format is day (1 to 31) - month (JAN to DEC) - year (4-digits)
Monitor Type
Options:
Under Scanning, Over Scanning
The Monitor Type allows the correct monitor scanning feature to be selected.
Over scanning monitors tend to have the edges of the picture display outside the visible area of the screen.
Underscanning monitors will display all picture edges within the visible area of the screen.
2 - 20
ADPRO FastVu, Issue 6
Receiver Setup
2.13
Audio Setup
Selecting Audio from the main Setup Menu displays the menu shown in Figure 2-17. The Audio menu configures the
FastVu audio channel features.
Figure 2-17 - Audio Setup menu
FastVu supports combined video and audio operation over communication links with a minimum data throughput of
14.4 kbps. This provides simultaneous video and audio operation, with an audio bandwidth of 300-3KHz, over
standard public switched telephone networks (PSTN) as well as high speed digital networks.
Although FastVu always passes audio at the maximum possible bandwidth, the overall audio quality will ultimately
depend on the quality of the microphones and speakers connected to the FastVu and the level of background noise in
the environment. Tests should always be performed with the desired audio equipment to obtain an understanding of
the audio performance.
2.13.1
PTT Operation
Options:
Talk Only, Listen Only, Talk and Listen, Intercom
This defines the type of Audio operation of the system and how a Push-To-Talk (PTT) switch (when it is connected ,
to the PTT input on the Receiver) will control the Audio operation.
The PTT input, located on Pin 13 of the ‘Audio Switch” connector, is ‘non-active’ when the input has an open contact.
(i.e no connection). When a closed contact is applied between the PTT input and Ground, the PTT switch is treated as
being ‘active’.
The options are as follows:
2.13.1.1
Talk Only
Enables audio from the Receiver to the Transmitter when the PTT switch is ‘active’ (closed contact). When activated,
the ‘microphone’ icon appears on the menu bar.
ADPRO FastVu, Issue 6
2 - 21
Receiver Setup
2.13.1.2
Listen Only
Enables audio from the Transmitter to the Receiver when the PTT switch is ‘active’ (closed contact). When activated,
the ‘speaker’ icon appears on the menu bar.
2.13.1.3
Talk and Listen
Audio is always enabled in both directions.
2.13.1.4
Intercom
Used in conjunction with the Audio key
on the keyboard.
When the Intercom option is selected via the menu and the Audio key is pressed, audio transmissions will be enabled
and audio will be sent in the direction defined by the current position of the PTT switch.
Pressing the Audio key again will turn off all audio.
2.13.2
Audio Input
Options:
Microphone Input, Line Input, Switcher
Select the type of audio input device connected to the FastVu unit. The Switcher option is used when the FastVu audio
is being selected (switched) via the VM22A or third-party audio switching unit.
2.13.3
Microphone Gain Operation
Options:
Low Level AGC, High Level AGC, Manual Gain
Select the type of Automatic Gain Control (AGC) used by FastVu to maintain a constant audio input range.
Low Level AGC is typically used in a more controlled noise environment, such as a Control Room or office, where
only a small amount of background noise is present. High Level AGC would be used where high levels of background
noise can be expected. Microphone locations such as car parks and street environs would probably use this option.
Manual gain should be used when the PTT ‘Intercom’ option is selected as it provides better control over audio where
echo cancellation cannot be used.
2.13.4
Audio Out Volume
Options:
<volume level>
Choose a volume level between 0 (lowest) and 9 (highest) to suit the operational environment.
2 - 22
ADPRO FastVu, Issue 6
Receiver Setup
2.13.5
Echo Cancellation
Options:
On, Off
This feature is used to diminish audio echoes when two-way conversations are taking place, especially when using a
‘speaker-phone’, where the microphone and speaker are in close proximity to each other. Echo cancellation is
performed by special software in the FastVu unit.
To enable the Echo Cancellation feature, select the Echo Cancellation checkbox and press Enter.
NOTE
Echo cancellation should not be used in conjunction with any AGC operation in the
FastVu unit, VM22A or third-party audio switcher.
2.14
General Setup
Figure 2-18 - Receiver General Setup menu
2.14.1
General Relay
Options:
Alarm, Connection
The General Relay can be set to become active when either an alarm is active or the FastVu is online. The General
Relay has a default to the ALARM option.
When activated, the contacts of the General Relay will changeover.
ADPRO FastVu, Issue 6
2 - 23
Receiver Setup
2.14.2
Alarm Beeper Operation
Options:
Off, On, Timed
Defines the method of operation of the AMK-300 keyboard beeper.
Figure 2-19 - Alarm Beeper menu
2.14.2.1
•
Off - The beeper is not used.
•
On - The beeper will sound when an alarm is received and will stop when the alarm is cleared.
•
Timed - The value set in the Alarm Beeper Timeout option is used.
Alarm Beeper Timeout
Options:
<period> 0 to 99
The Alarm Beeper Timeout option determines the time in seconds that the AMK-300 keyboard beeper sounds after
an alarm is triggered. The range is from 0 to 99 seconds, where 0 is used to disable the beeper.
NOTE
The beeper is restarted for the programmable period each time a new alarm appears in the
system.
2.14.3
Transparent Data Port Setup
FastVu allows the operation of 3rd-party RS-232 based equipment via the Transparent Data Port.
For example, a 3rd-party video matrix switcher needs to be controlled via its own proprietary RS-232 keyboard. Using
the Transparent Data Port, the keyboard is connected to the FastVu Receiver at a central site while the matrix switcher
is connected to the Transparent Data Port at the remote Transmitter. When the remote site is accessed via the FastVu
link connection, data from the keyboard is passed transparently to the matrix switcher for direct control of the unit.
2 - 24
ADPRO FastVu, Issue 6
Receiver Setup
The Transparent Data Port setup menu is used to configure the parameters required for the RS-232 link.
Figure 2-20 - Transparent Data Port Setup Menu
2.14.3.1
Data Rate
Options:
300, 600, 1200, 2400, 4800, 9600, 19200, 38400, 57600bps
The Data Rate determines the local data transfer rate between the RS232 interface and the connected equipment.
2.14.3.2
Data Bits
Options:
7, 8
Sets the number of Data Bits used to transfer data locally between the RS232 interface and the connected equipment.
It can be set to either 7 or 8 data bits.
2.14.3.3
Stop Bits
Options:
1, 2
Sets the number of Stop Bits used when transferring data locally between the RS232 interface and the connected
equipment. It can be set to either 1 or 2 stop bits.
2.14.3.4
Flow Control
Options:
No Flow Control, Hardware Flow Control
Enables Flow Control for transfer of data locally between the RS232 interface and the connected equipment. Hardware
handshaking (CTS, RTS) can be selected to be on or off.
When using the RS232 interface as a bi-directional link, setting the No Flow Control option causes FastVu to disregard
the RTS/CTS signalling lines.
ADPRO FastVu, Issue 6
2 - 25
Receiver Setup
2.14.3.5
Parity
Options:
No Parity, Odd Parity, Even Parity
Sets the Parity used when transferring data locally between the RS232 interface and the connected equipment.
2.14.3.6
DTR Operation
Options:
Always, On Connect
This option allows the User to control the operation of the Data Terminal Ready (DTR) signal of the RS-232 line to
best suit the intended operation of the 3rd-party equipment.
When set to Always, the DTR signal will be permanently asserted by the FastVu Transparent Data Port. The On
Connect option only asserts the DTR signal after connection between the FastVu Transmitter and Receiver is
established.
2.14.4
Diagnostics
This is a FACTORY set feature. DO NOT use or select this option unless instructed to do so by ADPRO Technical
Support personnel.
2.14.5
Upgrade
The software used by FastVu can be upgraded by transferring a new program from a PC using either Port 1 or the
Network Port on the rear of the FastVu unit. Details of the upgrade procedure are given in the ‘FastVu Software
Upgrade Booklet’ that accompanies the upgrade CD-ROM program.
NOTE
That the CONFIGURATION Dipswitch #10 must be set to the ON position when upgrading
via Port 1.
Before entering the software Upgrade process, the User is given the option of saving current setup information as
shown in Figure 2-21.
Figure 2-21 - Upgrade Setup Menu
2 - 26
•
Save Settings Before Entering Upgrade Mode - the current setup configuration is saved as a backup
•
Enter Upgrade Without Saving - no setup information is saved
ADPRO FastVu, Issue 6
Receiver Setup
When a selection has been made, the status message shown in Figure 2-22 is displayed.
Figure 2-22 - PC Connection Message
On completion of the software upgrade, FastVu automatically powers down / up for the new program to take effect.
2.15
Remote Transmitter
When a FastVu Receiver is connected to a Transmitter at a remote site (ie on-line to the site), the Remote Transmitter
option allows the User to remotely access the Transmitter’s Setup Menus.
Selecting the Remote Transmitter option will download the Transmitter’s current configuration to the Receiver for
display on the monitor. During the download processing a status message is displayed.
Figure 2-23 - Message for Tx Setup Download
The Transmitter setup menus can now be reviewed or edited by the User. When finished, the Transmitter settings can
be saved (or discarded) by selecting the appropriate option from the exit menu as shown in Figure 2-24.
Figure 2-24 - Exit and Save Menu
•
Save Remote Settings and Exit - the changes made are saved back into the Transmitter’s memory
•
Exit Without Saving Remote Settings - no changes are made, the Transmitter setup remains unchanged.
If the Save Remote Settings and Exit option is selected the changes are uploaded to the Transmitter and the status
message shown in Figure 2-25 is displayed.
Figure 2-25 - Message for Tx Setup Upload
On completion of the transfer, the new settings for the Transmitter can be used immediately.
ADPRO FastVu, Issue 6
2 - 27
3.0
3
Transmitter Setup
Transmitter Setup
3.1
Power Up
The green Power and the red Status LEDs on the front panel are lit as soon as power is applied to the unit. The FastVu
immediately starts to perform internal tests to ensure both software and hardware integrity.
NOTE
Prior to power up, set the Configuration DIP switch on each FastVu 2020 unit to define its
operation as either a Receiver or a Transmitter. Set switch #11 to ‘ON’ for a Receiver, ‘OFF’
for a Transmitter.
A successful self-test ensures all diagnostic tests have been passed and to confirm this, the red Status LED goes off.
NOTE
The self-test function may take up to 45 seconds to complete. During this period, any
display on the monitor screen is not meaningful and should be ignored.
•
If the self-test fails, the red Status LED remains ON.
•
If the power fails, the green Power LED will be OFF.
If the diagnostic tests fail repeatedly, the user should note any details of the error and contact the ADPRO support
service or the local ADPRO supplier.
3.2
Access to the Setup Menu
Setup menus are provided to quickly and easily configure the ADPRO FastVu Transmitter for operation. The menus
and any associated stored parameters are held within non-volatile memory.
There are two ways of accessing the Transmitter Setup Menus.
1)
Locally, by direct connection of an AMK-300 keyboard or VM87 Programmer to the FastVu Keyboard
Port.
2)
Remotely, by opening the menu from a FastVu Receiver or ADPRO Video Central when connected.
To operate the AMK-300 keyboard locally on a Transmitter unit, set the keyboard configuration Switch # 1 = OFF.
For local access and keyboard connection, refer to Section 1.0 for cable information and other keyboard configuration
settings.
ADPRO FastVu, Issue 6
3-3
Transmitter Setup
3.2.1
Local Setup
When the FastVu Transmitter is to be accessed locally, to view the Setup menu, a monitor must be connected to Video
Out (or S-Video) connector. Ensure the monitor is correctly connected, power is available and the unit is switched on.
There are two ways to access locally the Setup Menus.
3.2.2
•
The AMK-300 external keyboard. Plug the keyboard into the Keyboard port on the rear panel.
•
The VM87 Hand-Held Programmer. Plug the VM87 into the Keyboard port on the rear panel.
Remote Setup
A Transmitter may also be accessed from a FastVu Receiver or Video Central located away from the site. They must
be on-line to access the Transmitter’s Setup Menu. When the Receiver is used to configure the Transmitter, no monitor
is required at the Transmitter.
3.2.3
Local Setup Menu Access
To locally access the Setup menu, first ensure the FastVu unit has successfully completed the power up diagnostic
tests.
SETUP
Press the Setup key on the AMK-300 or VM87 to enter setup mode.
Password checking to the Setup Menu is either:
•
Disabled
when no password protection is required or
•
Enabled
requiring a password to be entered
If password checking has been enabled, use the keyboard to enter the four-digit, numeric only password.
The factory default password = 1111.
Figure 3-1 - Password Entry Dialogue
If password checking has been enabled and an incorrect password is entered, the keyboard will double-beep and an
Invalid Password dialogue box will be displayed. If a password is lost or forgotten, refer to the Troubleshooting
Section of this manual for the correct procedure to override password checking.
3-4
•
CLEAR
to delete the incorrect entry
•
re-enter the correct password.
ADPRO FastVu, Issue 6
Transmitter Setup
3.2.3.1
Leaving Local Setup
When changes to the setup parameters are completed, leaving the local Setup menu will prompt the User to save the
current settings (including any changes that have been made). Exit from Setup may take up to 8 seconds.
Options available for any changes to Setup is either:
3.2.4
•
Save Local Settings and Exit
Changes are stored in the FastVu NVRAM permanent memory and
are immediately available for use
•
Exit Without Saving Local Settings
Changes are discarded and ‘last stored’ setting is used.
Remote Setup Menu Access
When a Transmitter has successfully connected on-line to a FastVu Receiver, access to the Transmitter’s Setup Menus
is available via the Receiver. Changes can be made to the Transmitter Setup remotely and then reloaded and stored
back within the Transmitter’s memory.
When a FastVu Receiver is connected to a Transmitter (ie on-line to the site), the Receiver’s Remote Transmitter
option allows the User to remotely access the Transmitter’s Setup Menus.
Selecting the Receiver’s Remote Transmitter option will download the Transmitter’s current configuration to the
Receiver for display on the monitor. When the Transmitter is under remote menu control by a Receiver, a status
message is displayed on the local monitor connected to the Transmitter.
Figure 3-2 - Remote Access Message
The Transmitter setup menus can now be reviewed or edited at the Receiver. When finished, the Transmitter settings
can be saved (or discarded) by selecting the appropriate option from the Receiver’s exit menu as shown in Figure 3-3.
Figure 3-3 - Receiver’s Exit and Save Menu
ADPRO FastVu, Issue 6
3-5
Transmitter Setup
The Receiver options available are:
•
Save Remote Settings and Exit - the changes made are saved back into the Transmitter’s memory
•
Exit Without Saving Remote Settings - no changes are made, the Transmitter setup remains unchanged.
If the Save Remote Settings and Exit option is selected the changes are uploaded to the Transmitter and the status
message shown in Figure 3-4 is displayed at the Receiver.
Figure 3-4 - Receiver Message for Transmitter Upload
On completion of the transfer, the new settings for the Transmitter can be used immediately. At this point the Receiver
will still be in Setup mode and actions for saving the Local settings must be taken before the system can be used
operationally.
3.3
Setup Menus
The setup menus provide access to a number of sub-menus for configuration to suit individual site requirements.
Within each major group, all parameters associated with that group are available for configuration. Any previously
entered (or factory default) parameters are shown for review.
Parameters that are capable of being changed are altered by selecting from a list or option, or by directly entering a
data value.
Once a parameter is altered, the user can exit from the setup mode and immediately use the new values.
3.3.1
Using the Menu System
The FastVu menu system is navigated by using the AMK-300 keyboard or the VM87 Hand-Held Programmer:
To move between menu selections
use the
keys.
To access a menu selection,
use the
3-6
ENTER
key.
ADPRO FastVu, Issue 6
Transmitter Setup
3.3.2
Fast Buttons
Next to some menu options, a number may be seen. The numbers are used as Fast Buttons. (In the example shown in
Figure 3-5, there are seven Fast Buttons)
Figure 3-5 - Fast Button Numbers
To Fast Button a menu option, simply press the corresponding number on the keyboard.
3.3.3
Alphanumeric Names
For entry of alphanumeric names, (with both letters and numbers), a special Pop-up window is used:
Use the following procedure to enter characters from the virtual keyboard.
•
Use
to highlight (blue background) the required letter or symbol.
•
Press
•
To enter a number into the name, simply press the corresponding number key on the keyboard.
•
To finish and accept the name on the assembly bar, highlight the Accept button or press
•
If a mistake is made, either:
ENTER
to place it on the assembly bar
•
use the Delete button to erase the last letter or symbol or
•
use the
ADPRO FastVu, Issue 6
CLEAR
END
key to erase ALL characters.
3-7
Transmitter Setup
3.4
Setup Menu Structure
Programmable parameters are entered or altered via a menu-based system. The menu structure consists of a number
of levels and sub-menus. The applicability of some menu or sub-menu options can be affected by the setting(s) of other
options. Refer to Figure 3-6 for a diagram of the FastVu menu structure.
Access to the Setup Menu is available directly from the unit, or in the case of a remote Transmitter, the Setup menu
can be ‘downloaded’ and viewed from a central Receiver. This is very useful when access to a number of remotely
located Transmitters is required.
The Transmitter Setup menu is shown below:
Please refer to the Menu structure diagram for a complete overview of the FastVu menu structure.
3-8
ADPRO FastVu, Issue 6
Transmitter Setup
Figure 3-6 - FastVu Transmitter menu structure
ADPRO FastVu, Issue 6
3-9
Transmitter Setup
3.5
System Details
Selecting the System Details option from the main Setup Menu displays the menu shown below.
Figure 3-7 - System Details Setup menu
3.5.1
Site Name
Options:
<site name>
Each Transmitter must have a unique Site Name. Maximum site name length is 8 characters.
The site name programmed in the Transmitter must match the Site Name defined by an entry in a Receiver’s Site List.
3.5.2
CMS Password
Options:
<cms password> - maximum 8 characters
The CMS Password is used when the CMS User option is used (refer to Section 4.11.1).
3.5.3
Observer Password
Options:
<observer password> - maximum 8 characters
For general access, the Observer Password is used. The observer password programmed in the Transmitter must match
the Password defined by an entry in a Receiver’s Site List.
3 - 10
ADPRO FastVu, Issue 6
Transmitter Setup
3.5.4
Setup Password
To prevent unauthorised local access to the FastVu Setup Menus, a password can be set. When the Setup key is pressed
on the AMK-300 keyboard that is locally connected to the Transmitter or via the remote keyboard connected to a
Receiver, the following Enter Password screen is displayed on the monitor (refer to Figure 3-1). Without the correct
password, the Setup Menu cannot be accessed.
3.5.5
•
To enable the forced use of a Setup Password highlight the Setup Password Enable checkbox and press Enter.
•
Enter the required Setup Password by using the keyboard pop up dialog box. Maximum 4 digits (no letters).
User Language
When the Transmitter Setup menu is accessed locally, the option to choose from a number of languages for display of
Setup information is available. This option is Disabled if the menu is accessed via a remote Receiver.
Figure 3-8 - Setup Language options
3.5.6
Time and Date
To enable accurate tracking of the time that alarm or live video is being viewed (and possible recording by a VCR),
the time and date used by the Transmitter can be set (or reset).
Figure 3-9 - Date and Time Setup Menu
Enter the new Date and Time into the appropriate fields on the display. Use the keyboard to directly enter the number
fields and to select the appropriate month from the list.
The Accept Changes button is used to activate the new date and time in the Transmitter. When this button is clicked,
the new values will take effect and the menu will exit.
ADPRO FastVu, Issue 6
3 - 11
Transmitter Setup
NOTE
Exiting from the menu by using the End key on the keyboard will not activate the new
time/date.
3.6
Communications Setup
The Communications setup menu provides access to configuration information relating to the FastVu’s network and
data link features.
Figure 3-10 - Communications Setup menu
3.6.1
Ethernet Setup
The Ethernet setup menu is used to configure the basic TCP/IP parameters required when using FastVu over a LAN
or WAN network connection.
Figure 3-11 - Ethernet Setup Menu
3 - 12
ADPRO FastVu, Issue 6
Transmitter Setup
3.6.1.1
Local Address
Options:
Default for Transmitter = 172.30.0.2
The Local Address is used to identify the FastVu device as a TCP/IP host. Each FastVu unit requires a unique IP
(Internet Protocol) address. The address is divided into four (4) separate parts, each with a decimal range value from
0 to 255.
3.6.1.2
Subnet Mask
FastVu uses the subnet mask to determine whether the destination FastVu unit is located on a local or a remote
network.
Each logical IP Address has two parts: the NETWORK ID and the HOST ID. The Network ID identifies all hosts that
are on the same physical network and the Host ID identifies a specific host on the network.
The subnet mask is used to filter (mask) the portion of the IP Address that is common to the network and thus allow
individual hosts to be accessed. For example 172.30.255.255 is a valid subnet mask.
3.6.1.3
Default Gateway
For communication with a FastVu Receiver located on another network, the FastVu unit must be given the address of
the first host device on the route to the destination network (and visa versa). The default gateway is the address of the
host to which the FastVu sends packets that are destined for the remote network.
If a default gateway is not specified, communication is limited to the local network.
3.6.1.4
Data Rate Throttle
Options:
Off, 20, 32, 64, 128, 256, 512Kbps, 1Mbps, 2Mbps
The Data Rate Throttle provides the system with the ability to restrict the amount of Ethernet bandwidth it uses when
transmitting video data to the Receiver.
This option is useful if network contraints dictate that a restricted amount of bandwidth can only be used by certain
devices. Refer to the Network / System Administrator for further advice.
ADPRO FastVu, Issue 6
3 - 13
Transmitter Setup
3.6.2
Serial Comms Port Setup
The Serial Comms Port option is used by FastVu to provide serial communications with other sites. This menu allows
the User to set the operating parameters of ‘Port 2’ to match with the model of modem or terminal adaptor used to
provide the link.
Figure 3-12 - Serial Comms Port Setup Menu
3.6.2.1
Modem/TA Model
Options:
See the Model List
Defines the model of the modem or terminal adapter connected to the Serial Comms port. Use the device’s user manual
to assist in setting the correct configuration to suit the FastVu Serial Comms port requirements.
Use the Direct Connect option when FastVu units are connected ‘back-to-back’ (wired directly) and no modem or TA
is used.
3.6.2.2
Line Type
Options:
Dial, Leased.
Set the Line Type option to Leased at both the Transmitter (and Receiver) if the system is connected via dedicated (or
leased) telephone lines or digital communication networks.
The Dialup option is used on a PSTN or digital network when no permanent connection between FastVu units exists.
3.6.2.3
Data Rate
Options:
External, 9600, 19200, 38400, 57600, 115200, 230400
The Data Rate determines the data transfer type and data rate between FastVu and the modem or communication
interface.
When connected to modems, FastVu is normally programmed for asynchronous data at a specific data rate. Set the
Data Rate at the Transmitter (and Receiver) to the maximum rate which the modem can be programmed. It is
commonly referred as the DTE to DCE baud rate.
3 - 14
ADPRO FastVu, Issue 6
Transmitter Setup
3.6.2.4
Dial Time
Options:
Wait for 30 seconds, 60 seconds, 90 seconds, 120 seconds
The Dial Time is the maximum time FastVu waits to establish a communication link after dialling. The Dial Time
starts from the instant the dial procedure is initiated. The time can be changed in 30-second increments. It is important
that the chosen value takes into account the time required to dial the number and the number of Answer Rings
programmed in the unit at the other end.
A typical value is 60 seconds for the dial network and 30 seconds for the ISDN network.
3.6.2.5
Answer Rings
Options:
0 to 9, (0 = Don’t Answer)
The Transmitter can be programmed to either:
a.
b.
wait for a programmable number of rings from 1 to 9, in one ring increments, before answering an incoming
call, or
not answer any incoming calls (when set to 0).
For example, the Transmitter could be set to Answer Rings = 0 when the User does not want a Receiver looking at a
particular site unless called by the generation of an alarm. Generally the Answer Rings option would be set to 1 or 2
rings.
3.6.2.6
Initialisation String
This option is used to enter any additional Hayes AT commands (in ASCII format) required to automatically configure
a modem or Hayes compatible RS232 terminal adaptor for a particular feature or setting.
Hayes AT commands are entered using the keyboard entry screen that appears when the Initialisation String option
is selected. Note that the Hayes command prefix (‘AT’) does NOT have to be entered at the start of an Initialisation
String, as it is automatically prefixed to the string contents by FastVu.
ADPRO FastVu, Issue 6
3 - 15
Transmitter Setup
3.6.2.7
Advanced Setup - Serial Port
Figure 3-13 - Advanced Setup menu
3.6.2.8
Local IP Address
Sets the IP Address of the FastVu Transmitter.
IMPORTANT NOTE WHEN OPERATING WITH VIDEO CENTRAL GOLD
Video Central Gold software has the ability to dial and connect to more than one FastVu
Transmitter at the same time. To ensure correct operation with Video Central, all FastVu
Transmitters that are expected to be accessed simultaneously will need to have a different
Local IP Address configured.
3.6.2.9
PPP Username
The Username (or Site Name) that will be used to contact this Transmitter. It is only required when PAP is enabled
by either the Transmitter or Receiver system.
3.6.2.10
PPP Password
The Password to be used to access this Transmitter. It is only required when PAP is enabled by either the Transmitter
or Receiver system.
3 - 16
ADPRO FastVu, Issue 6
Transmitter Setup
3.6.2.11
Nominal Data Rate
Options:
Auto Detect, 8, 16, 32, 64, 128, 256, 512kbps, 1Mbps, 2Mbps
The Nominal Data Rate option is used by FastVu to maximise the data rate on the communication link. It is different
from the ‘Data Rate’ setting for the Modem /TA, in that FastVu attempts to send data at the nominal data rate specified
at all times. This option helps Users provide consistency in the image transmission time of the system, especially when
the line quality of a communications link is unknown.
The Nominal Data Rate should be set to either auto detect or set to the known speed of the communications network.
For example, use the ‘128 kbps’ option when connected via a Basic Rate ISDN line.
3.6.2.12
Enable PAP
Use this checkbox to set (enable) Password Authentication Protocol. This will force the remote system to be
authenticated using PAP during the PPP negotiations. The valid username and password are defined by the fields of
PPP Username and PPP Password.
3.6.2.13
Secure Poll
Secure poll allows the FastVu to support a high-level security feature available in particular Modems and Terminal
Adaptors. This feature establishes an off-line ‘heartbeat’ link between the modem (or TA) and the Transmitter. The
link is initiated and held active by the FastVu sending (polling) a pre-defined message at a regular time interval.
The modem or TA monitors the status of the link and if the link is broken for any reason, the exchange equipment is
notified via an unsolicited error message. The client can then be informed so that corrective action can be initiated.
Poll Interval
Options:
0 (= off) and 1 to 99 seconds.
The poll interval is used to specify the time (in seconds) between (repeated) sendings of the Poll String to the modem
or TA equipment. The default value = 0.
Poll String
Options:
Maximum 40 characters
The poll string command that is required by the modem or TA is entered via the on screen keyboard. The default value
= blank.
ADPRO FastVu, Issue 6
3 - 17
Transmitter Setup
3.6.3
Advanced Setup - Base Port Number
Options:
<value> Range is 3000 to 30000
Defines the Base Port Number used for communications when connected to another third-party (non-FastVu) device.
Figure 3-14 - Base Port menu
The default value = 15000 and should be left at this value unless a conflict occurs due to network connection of other
third-party equipment.
WARNINGS
If the Base Port Number is changed, then all communicating systems must be changed to the
same value. Failure to do this on all communicating systems will result in communications
failure.
3.7
Call List
The Call List option menu is used to establish both the method and details of the connection path to various FastVu
Receiver sites when an alarm is triggered. Selecting the Call List option displays the entry menu shown in Figure 3-15.
Figure 3-15 - Call List Menu
3 - 18
ADPRO FastVu, Issue 6
Transmitter Setup
3.7.1
All Alarms
Options:
Active, Inactive
The All Alarms option is a general control over the FastVu Transmitter’s ability to automatically send either Alarm or
Live Events status and images (pre-alarm and post-alarm) to any FastVu Receiver.
When set to Active and on detection of an alarm input, the FastVu Transmitter will store alarm images and attempt
to connect to the FastVu Receivers defined in its Call List (depending on the individual alarm input configuration).
When Inactive, no attempt at connection will be made and no images will be captured except for No Video alarms.
3.7.2
Outgoing Communications
Options:
Ethernet, Serial Comms
The type of communications path used to connect to a FastVu Receiver can be set using this option.
3.7.3
•
Ethernet - The Transmitter will use the addresses defined in the Ethernet Call List when attempting to
connect.
•
Serial Comms - The Transmitter will use the numbers defined in the Serial Comms Call List when
attempting to connect to FastVu Receivers
Fallback Communications
Options:
None, Ethernet, Serial
Selects the type of communications path to be used if connection fails to all of the numbers (or addresses) in the
Outgoing Call List.
The addresses (or numbers ) for either Ethernet or Serial fallback are entered via the appropriate Call List.
3.7.4
Ethernet Call List
Figure 3-16 - Ethernet Call List Menu
ADPRO FastVu, Issue 6
3 - 19
Transmitter Setup
3.7.4.1
Connection Attempts
Options:
<number of attempts> Range 1 to 5
Connection Attempts is defined as the number of times an IP Address in the Ethernet Call List is tried in order to
establish a communication link, before the next address in the list is tried. It is programmable from 1 to 5.
3.7.4.2
Connection Separation
Options:
<value in seconds> Range 0 to 99
Connection Separation is a time interval that the FastVu Transmitter waits between successive attempts to establish
a communication link. Connection Separation time starts from the end of the last attempt. The time interval can be set
in 1-second increments. It is important that the chosen value takes into account the time required to traverse the
network and associated routers, gateways etc.
NOTE
When all addresses in the IP list have been tried twice (using the number specified by
‘connection attempts’) and no successful connection has been made to any of the five IP
addresses, the Alarm Event is cleared.
3.7.5
Serial Comms Call List
Figure 3-17 - Serial Comms Call List Menu
3.7.5.1
Dial Tries
Options:
<number of attempts> 0, 1, 2, 3, 4, 5
Dial Tries is defined as the number of times a number in the Serial Comms Call List is dialled, in order to establish a
communication link, before the next number in the list is dialled. It is programmable from 0 to 5.
3 - 20
ADPRO FastVu, Issue 6
Transmitter Setup
3.7.5.2
Call Separation
Options:
<value in seconds> Range 5 to 300
Connection Separation is a time interval that the FastVu Transmitter waits between successive attempts to establish
a dial link. Connection Separation time starts from the end of the last attempt. The time interval can be set in 1-second
increments. It is important that the chosen value takes into account the time required to dial the number (tone/pulse)
and the number of Answer Rings programmed into the modem/TA at the other end.
NOTE
When all numbers in the call list have been tried twice (using the number specified by ‘dial
tries’) and no successful connection has been made to any of the five numbers, the Alarm
Event is cleared.
3.8
Video Setup
Figure 3-18 - Video setup menu
3.8.1
Camera Details
Selecting the Camera Details option displays the Camera List shown below. The list is used to select the camera to
be viewed or modified.
Figure 3-19 - Camera List
ADPRO FastVu, Issue 6
3 - 21
Transmitter Setup
Once a camera has been selected, the Camera Details menu is displayed. The menu is used to define the behaviour of
each individual camera connected to the FastVu Transmitter.
Figure 3-20 - Camera #1 Details Setup Menu
3.8.1.1
Connected
Options:
Display, Ignore
The checkbox defines whether this camera is to be enabled for display on the Transmitter. When enabled (checked),
other details about this camera can be modified.
To enable the use of a Camera, select the Connected checkbox and press Enter.
3.8.1.2
Camera Name
Options:
<camera name>
Enter the name to be associated with this camera. A maximum of 20 characters can be used. The name should be
entered using the ‘keyboard’ entry screen that appears when the Camera Name option is selected.
3.8.1.3
Video Loss Detection
Options:
Disabled, Enabled
When the Video Loss Detection option is set to Enabled, a no-video alarm will be raised for this camera if video sych
is lost.
The No Video Alarm procedure is identical to storing an alarm sequence, except that the message, No Video Alarm,
is displayed on the Receiver’s monitor.
3 - 22
ADPRO FastVu, Issue 6
Transmitter Setup
3.8.1.4
Camera Station Attached
Options:
Yes, No
This option alerts FastVu to the availability of a camera station being attached to one of the cameras. PTZ control
signals for an attached camera station will be directed through the FastVu PTZ Port for the camera station. To enable
the use of a Camera Station, select the checkbox and press Enter.
3.8.1.5
Monochrome (Black & White) Filter
Options:
Yes, No
This option alerts FastVu that this particular camera is monochrome only (black & white) and allows the FastVu
processing hardware to ‘sharpen’ the image by bypassing some of the colour filter processing it would otherwise
perform on the signal.
To enable the use of the Monochrome Filter option, select the checkbox and press Enter.
3.8.1.6
Gain Control Mode
Options:
Automatic, Manual
The gain of the selected camera can be controlled manually or set for automatic operation.
Manual Gain may be required when using cameras attached to camera stations. Choose the option required. If Manual
operation is selected, then the actual gain setting can be entered.
Explanatory Note
When both the FastVu and the camera station are powered up simultaneously (for example,
via the same power circuit), the camera station may take longer than the FastVu to complete
its power up diagnostics and initialisation tests. Under these conditions the FastVu will not
register the video input from the camera station and mark the channel as no video. When
video is subsequently available at the completion of the camera station power-up, the
displayed video may not be satisfactory. Using the manual gain option on these particular
video channels can overcome this problem.
3.8.1.7
Manual Gain
Options:
<value> Range 0 to 200
Set the manual gain level required by the selected camera.
ADPRO FastVu, Issue 6
3 - 23
Transmitter Setup
3.8.2
PTZ Operation Setup
The PTZ option selects the supported brands of PTZ telemetry station available for connection to cameras attached to
the FastVu Transmitter. Use the arrow or Page keys to view further models.
Figure 3-21 - Camera Station Types Available
Choose the No PTZ Support option if no remote PTZ equipment is installed.
3.8.3
Monitor Setup
The Monitor Setup menu configures the User’s preferred display settings on the FastVu monitor.
Figure 3-22 - Monitor Setup Menu
3.8.3.1
Camera Titles On
To enable the display of Camera Titles, select the Camera Titles On checkbox and press Enter.
3.8.3.2
Time Date On
To enable the display of Time and Date information, select the Time Date On checkbox and press Enter.
3 - 24
ADPRO FastVu, Issue 6
Transmitter Setup
3.8.3.3
Monitor Type
Options:
Under Scanning, Over Scanning
The Monitor Type allows the correct monitor scanning feature to be selected.
Over scanning monitors tend to have the edges of the picture display outside the visible area of the screen.
Underscanning monitors will display all picture edges within the visible area of the screen.
3.9
Video Sequence at Receiver Setup
Selecting the Video Sequence at Receiver setup menu displays the menu shown below. The Video Sequence menu
defines the sequence (order) that camera images are presented on the monitor attached to the Receiver.
Figure 3-23 - Video Sequence Setup menu
3.9.1
Dwell Time
Options:
<duration in seconds> Range 1 to 99
Dwell Time is used to control the timing (between cameras) at the Transmitter and takes effect when a Guard Tour is
selected at the Receiver.
The Dwell Time is common to all active channels and is defined as the duration a channel (camera) is displayed before
switching to the next active channel. It can be set from 1 to 99 seconds. If the dwell time expires, the FastVu will
continue to transmit the channel until the image has been updated before switching to the next active channel.
3.9.2
Auto Sequence, Camera
Options:
Display, Skip
For each (enabled) camera, press the Enter key to enable (or disable) the checkbox. This enables (or disables) a camera
for appearing in the auto sequence list.
ADPRO FastVu, Issue 6
3 - 25
Transmitter Setup
3.10
Alarm
The Alarm menu provide setup details for Alarm Inputs, Entry/Exit paths and the optional ADPRO VM25 FastVu
I/O Expander.
3.10.1
Alarm Inputs
The Alarm Inputs option provides the ability to define a number of parameters about the type and operation of the
alarm inputs connected to the FastVu Transmitter.
There are twenty alarm inputs (10 for a FastVu 2010 or 3010) and to view or modify details about a particular input,
first select the Alarm Input number from the displayed list.
Figure 3-24 - Alarm Inputs List
The Alarm Inputs Detail menu will be displayed as shown in Figure 3-25.
3 - 26
ADPRO FastVu, Issue 6
Transmitter Setup
Figure 3-25 - Alarm Inputs Setup Menu
3.10.1.1
Alarm Input
Options:
Disabled, Enabled
When programmed to Disabled, the Transmitter will ignore all activity on this Alarm Input.
When the Alarm Input Enabled option is programmed as Enabled, the FastVu Transmitter stores three images,
separated by a programmable period, each time an alarm is triggered at the Transmitter’s Alarm Input. If required, the
Transmitter then establishes a communication link with the Receiver. Each of the three images are transmitted and
displayed on the Receiver’s monitor in quad screen. This allows the User to clearly identify the event(s) that caused
the alarm and the subsequent events after the alarm.
The fourth quadrant is used to continually display images from the camera scene in alarm so that the User can view
any other events that are occurring in that scene. Each Transmitter can store up to six concurrent alarms consisting of
three images each.
3.10.1.2
Alarm Logic
Options:
No EOL - Normally Closed, No EOL - Normally Open
The FastVu Transmitter can be programmed to trigger an alarm and store video images from a channel when it detects:
•
normally closed contacts opening on alarm, or
•
normally open contacts closing on alarm
ADPRO VM25 FastVu I/O Expander
When an optional ADPRO VM25 FastVu I/O Expander unit is connected to the Transmitter (and enabled for
operation), a number of additional configurations are available. These optional wiring schemes provide the FastVu
with tamper detection and reporting capabilities.
Alarm Inputs can be configured using the following termination methods (BS8418 Compliant):
ADPRO FastVu, Issue 6
3 - 27
Transmitter Setup
1)
2)
3)
4)
5)
6)
No End of Line (EOL) Normally Closed (NC),
No EOL Normally Open (NO),
Single EOL NC,
Single EOL NO,
Dual EOL NC,
Dual EOL NO.
Terminations are achieved by configuring (at most) two resistors per alarm sensor.
3.10.1.3
Event Type
Options:
Alarm Event, Live Event
Event Type defines the way the Receiver will respond to an alarm input
3.10.1.3.1 Alarm Event
When set to the Alarm Event option, the Transmitter, on detection of an alarm input transition, will grab three video
images from the associated alarm camera and connect to the Receiver. The Receiver monitor will display a quad screen
image of the three post-alarm images. The fourth quadrant will display live images from the alarm camera.
3.10.1.3.2 Live Event
When set to the Live Event option, the Transmitter, on detection of an alarm input transition, will connect to the
Receiver. It will not grab any post alarm video images from the associated alarm camera.
At the Receiver, the monitor will display the images from the alarm camera in full screen mode.
This option is used in situations where only ‘notification’ is required,. For example, an alarm camera may monitor a
entry door or gate. When an alarm is activated (by say, a doorbell switch or infra-red detector), the Receiver will switch
immediately to that camera so that identification can take place.
3.10.1.4
Alarm Image Interval
Options:
0.5, 1, 1.5, 2, 2.5, 3, 6, 9 seconds.
This time value (in seconds) is used to set the interval between the three images grabbed when an alarm input transition
is detected by FastVu.
The choice of time interval will depend on the content of the alarm image scene and the anticipated speed of movement
of any subjects within the scene.
3 - 28
ADPRO FastVu, Issue 6
Transmitter Setup
3.10.1.5
Pre-Alarm Image Interval
Options:
0.5, 1, 1.5, 2, 2.5, 3, 6, 9 seconds.
This option sets the time interval, in seconds, between image captures. The valid range is from 0.5 to 9 seconds with
a default period of one second.
When storing the maximum number of images, this interval represents from 1.5 to 27 minutes of pre-alarm capturing.
3.10.1.6
Pre-Alarm Images
Options:
Zero, 9, 18, 36, 45, 60, 90, 180 images
This option defines the number of pre-alarm images that are to be stored in memory for THIS alarm input (channel)
number. Setting the value to zero effectively disables pre-alarm capture for this particular alarm input.
3.10.1.7
Remaining Free Image Slots
This is an information field providing the number of available memory slots available for pre-alarm image capture.
There is a total of 180 memory slots available.
The number displayed as the ‘Remaining Free Images Slots’ is the complement of the Pre-Alarm Image Acquisition
value, which defines the sum of all the currently allocated memory slots.
3.10.2
Entry/Exit Path
By specifying an Alarm Input as an Entry Point and other Alarm Inputs as an Entry/Exit Path Zones, users can define
the route used to enter or exit an area protected by the FastVu Transmitter.
Entry Path - Normal entry will cause an alarm from the sensor at the Entry Point. Alarms originating from the Entry
Point and Entry Path Zones are held as pending and then discarded if the system is placed into Access mode before the
Entry/Exit Path Delay expires. If the Entry/Exit Path Delay expires before the system is placed into Access mode, then
any Alarm Input will be processed immediately. Note that any other alarm that is not in the Entry Path Zones list, will
be processed immediately.
Exit Path - When the FastVu is ‘sealed’ (ie. set into the Secure mode), alarms from sensors in the Entry Path Zones
will occur as the route is used. These alarms are ignored until the end of the Entry/Exit Path Delay period. However,
any other Alarm that is not in the Entry Path Zones list, will be processed immediately.
ADPRO FastVu, Issue 6
3 - 29
Transmitter Setup
Figure 3-26 - Entry/Exit Path menu
3.10.2.1
Entry/Exit Delay
Options:
0 to 120 seconds
The Entry/Exit Delay defines the period of time that is available for a User to enter a Secure area and Disarm (turn off)
the system. Entry/Exit Delay is initiated by an Alarm Input that has been designated an Entry Point.
When FastVu is in the Secure mode, alarms from an Entry Point and Entry Path Zones will be recorded locally and
appropriate alarm images captured. If Access mode is not selected by the time the Entry/Exit Delay expires, these
alarms will be processed.
When a FastVu is placed into Secure mode (via the Access/Secure input), alarms from the Entry Path Zones are
ignored until the Entry/Exit Delay expires. All Alarm Inputs will then be processed normally. Any Alarm Input not in
the Entry Path Zones list, will be processed immediately
3.10.2.2
Entry Point
Options: Alarm Input number
Specifying an Alarm Input as an Entry Point means that an alarm on this zone will start the Entry/Exit Path Delay timer.
The alarm, along with any captured video images, is held as 'pending' and is discarded if the system is Disarmed before
the end of Entry/Exit Delay.
If the system is not Disarmed before the end of the Entry/Exit Path Delay, the alarm (along with any others generated
along the Entry Path Zones) will be reported as usual.
IMPORTANT NOTE
An Entry Point must be specified to activate the Entry/Exit Delay timer.
3 - 30
ADPRO FastVu, Issue 6
Transmitter Setup
3.10.2.3
Entry Path Zone (2 to 6)
Options:
Alarm Input number
To create a controlled route between an Entry Point and the location where the FastVu can be Disarmed, an list of
Entry Path Zones must be entered. An Entry Point must be specified first.
In addition to the Entry Point, up to five zones can be designated on the path for a total of six (6) zones.
Choose the Alarm Input number to be assigned to the Entry Path Zone (2..6).
3.10.3
VM25 External I/O Box
The ADPRO VM25 FastVu I/O Expander (ADPRO Part Number 201285) provides 10 relay contact sets for use with
a FastVu Transmitter. The changeover contacts are used to switch external circuits and equipment.
3.10.3.1
VM25 External I/O Box Enable
Options:
Disable, Enable
Use the VM25 External I/O Box Enable checkbox to allow operation of the VM25.
3.11
Audio Setup
Selecting Audio from the main Setup Menu displays the menu shown in Figure 3-27. The Audio menu configures the
FastVu audio channel features.
Figure 3-27 - Audio Setup menu
FastVu supports combined video and audio operation over communication links with a minimum data throughput of
14.4 kbps. This provides simultaneous video and audio operation, with an audio bandwidth of 300-3KHz, over
standard public switched telephone networks (PSTN) as well as high speed digital networks.
Although FastVu always passes audio at the maximum possible bandwidth, the overall audio quality will ultimately
depend on the quality of the microphones and speakers connected to the FastVu and the level of background noise in
the environment. Tests should always be performed with the desired audio equipment to obtain an understanding of
the audio performance.
ADPRO FastVu, Issue 6
3 - 31
Transmitter Setup
3.11.1
Audio Input
Options:
Microphone Input, Line Input, Switcher
Select the type of audio input device connected to the FastVu unit.
3.11.2
Microphone Gain Operation
Options:
Low Level AGC, High Level AGC, Manual Gain
Select the type of Automatic Gain Control (AGC) used by FastVu to maintain a constant audio input range.
Low Level AGC is typically used in a more controlled noise environment, such as a Control Room or office, where
only a small amount of background noise is present. High Level AGC would be used where high levels of background
noise can be expected. Microphone locations such as car parks and street environs would probably use this option.
Manual gain should be used when the PTT ‘Intercom’ option is selected as it provides better control over audio where
echo cancellation cannot be used.
3.11.3
Audio Out Volume
Options:
<volume level> Range 0 to 9
Choose a volume level between 0 (lowest) and 9 (highest) to suit the operational environment.
3.11.4
Echo Cancellation
Options:
On, Off
This feature is used to diminish audio echoes when two-way conversations are taking place, especially when using a
‘speaker-phone’, where the microphone and speaker are in close proximity to each other. Echo cancellation is
performed by special software in the FastVu unit.
To enable the Echo Cancellation feature, select the Echo Cancellation checkbox and press Enter.
3 - 32
ADPRO FastVu, Issue 6
Transmitter Setup
3.12
General Setup
3.12.1
Control Outputs
There are three Control Outputs available on a FastVu Transmitter (ten with a VM25 FastVu I/O Expander). The
outputs are used to generate a control signal for use by the inputs of third-party equipment at the remote site, for
example a boom gate controller or a floodlight control device.
To access the Control Outputs Setup menu, first select the number of the Output required <1, 2 or 3>.
Figure 3-28 - Control Output Setup Menu (Output #1 shown)
ADPRO FastVu, Issue 6
3 - 33
Transmitter Setup
3.12.1.1
Output Name
Options:
<name>
Enter the 20 character name to associate with this output.
3.12.1.2
Offline Action
Options:
Reset, Latch
Define the action of the Control Output circuit after the Ctrl keys
3.12.2
are pressed.
•
Reset:
After activation, the Control Output returns to its Normally Off state when the remote system is
disconnected.
•
Latch:
The Control Output changes state and stays in that state until the Ctrl key is pressed again, even
if the remote system is disconnected.
General Relay
Options:
Alarm, Connection
The General Relay can be set to become active when either an alarm is active or the FastVu is online. The General
Relay has a default to the ALARM option. When activated, the contacts of the General Relay will changeover.
Figure 3-29 - General Relay menu
3 - 34
ADPRO FastVu, Issue 6
Transmitter Setup
3.12.3
Transparent Data Port Setup
FastVu allows the operation of 3rd-party RS-232 based equipment via the Transparent Data Port.
For example, a 3rd-party video matrix switcher needs to be controlled via its own proprietary RS-232 keyboard. Using
the Transparent Data Port, the keyboard is connected to the FastVu Receiver at a central site while the matrix switcher
is connected to the Transparent Data Port at the remote Transmitter. When the remote site is accessed via the FastVu
link connection, data from the keyboard is passed transparently to the matrix switcher for direct control of the unit.
The Transparent Data Port setup menu is used to configure the parameters required for the RS-232 link.
Figure 3-30 - Transparent Data Port Setup Menu
3.12.3.1
Data Rate
Options:
300, 600, 1200, 2400, 4800, 9600, 19200, 38400, 57600bps
The Data Rate determines the local data transfer rate between the RS232 interface and the connected equipment.
3.12.3.2
Data Bits
Options:
7, 8
Sets the number of Data Bits used to transfer data locally between the RS232 interface and the connected equipment.
It can be set to either 7 or 8 data bits.
3.12.3.3
Stop Bits
Options:
1, 2
Sets the number of Stop Bits used when transferring data locally between the RS232 interface and the connected
equipment. It can be set to either 1 or 2 stop bits.
ADPRO FastVu, Issue 6
3 - 35
Transmitter Setup
3.12.3.4
Flow Control
Options:
No Flow Control, Hardware Flow Control
Sets the Flow Control used to transfer data locally between the RS232 interface and the connected equipment.
Hardware handshaking (CTS, RTS) can be selected to be on or off.
When using the RS232 interface as a bi-directional link, setting the No Flow Control option enables Ctrl S/Ctrl Q
characters generated by the external equipment to be sent across the communication link for direct software
handshaking between the equipment.
3.12.3.5
Parity
Options:
No Parity, Odd Parity, Even Parity
Sets the Parity used when transferring data locally between the RS232 interface and the connected equipment.
3.12.3.6
DTR Operation
Options:
Always, On Connect
This option allows the User to control the operation of the Data Terminal Ready (DTR) signal of the RS-232 line to
best suit the intended operation of the 3rd-party equipment.
When set to Always, the DTR signal will be permanently asserted by the FastVu Transparent Data Port. The On
Connect option only asserts the DTR signal after connection between the FastVu Transmitter and Receiver is
established.
3.12.4
Diagnostics
This option is for FACTORY use. Do not use or select this option unless directed to do so by ADPRO Technical
Support personnel.
3.12.5
Upgrade
Options:
Save Settings before Entering Upgrade Mode, Enter Upgrade without Saving
The software used by FastVu can be upgraded by transferring a new program from a PC using either Port 1 or the
Network Port on the rear of the FastVu unit. Details of the upgrade procedure are given in the ‘FastVu Software
Upgrade Booklet’ that accompanies the upgrade CD-ROM program.
NOTE
The CONFIGURATION Dipswitch #10 must be set to the ON position when upgrading via
Port 1.
3 - 36
ADPRO FastVu, Issue 6
Transmitter Setup
Before entering the software Upgrade process, the User is given the option of saving current setup information as
shown in Figure 3-31.
Figure 3-31 - Upgrade Setup Menu
•
Save Settings Before Entering Upgrade Mode - the current setup configuration is saved as a backup
•
Enter Upgrade Without Saving - no setup information is saved
When a selection has been made, the status message shown in Figure 3-32 is displayed.
Figure 3-32 - PC Connection Message
On completion of the software upgrade, the FastVu unit must be powered down / up for the new program to take effect.
ADPRO FastVu, Issue 6
3 - 37
4.0
4
Operation
Operation
This section describes the operation of the FastVu Digital Video and Audio Transmission System and gives guidance
for operating the FastVu after it has been installed and setup. The aim is for Users to understand the principles and
procedures needed to operate FastVu on a daily basis. Those needing information about installing or setting-up
FastVu are referred to the relevant Installation and Setup sections of this manual.
4.1
Glossary of Terms
Access State
A state of operation without triggering an alarm condition.
Alarm
Receipt of a ‘trigger’ signal from an external detector whilst the FastVu is in Secure mode.
Loss of video signal from a camera is also treated as an alarm and is reported in both
Access and Secure modes.
Alarm Camera
A camera connected to a FastVu that has associated with it a set of external detector
contacts. When these contacts are triggered the camera becomes an ‘alarm camera’ until
it is reset.
Auto Sequence
The ability for automatic sequential display of a selection of cameras on the monitor.
Camera Station
A device for controlling Pan/Tilt/Zoom ability on remotely located cameras.
Comms
Abbreviation for a serial or network data communication link.
Current Camera
One of twenty connected cameras that has been either manually or automatically selected
to be the primary camera to display. Keyboard or (non-global) system actions are
effective on the current camera only.
Cursor keys
The four arrow keys on the keyboard.
Down-the-Coax
The ability to send control signals (to a telemetry station) down the same coaxial cable
that is used to transmit video to the FastVu.
EOL
In reference to alarm input wiring, EOL is the ‘End of Line’.
Event
Receipt of a ‘trigger’ signal from an external detector whilst the FastVu is in Access
Mode.
Image
A video picture digitised to the selected resolution.
PTZ
The ability provided on a camera to allow it to be remotely controlled for azimuth (Pan)
and elevation (Tilt) movement to view different sectors around its location. Mechanical
control of the camera lens provides Zoom in and out. A telemetry station is needed to
provide these mechanical controls for a camera.
Parameter
A value or state that is used to set up the operation of a FastVu system.
Secure Mode
A state of operation that allows the system to automatically generate alarm responses. The
operator must acknowledge every alarm in Secure Mode.
Telemetry Station
A device used to provide remote, mechanical control of a camera. Refer camera station.
ADPRO FastVu, Issue 6
4-3
Operation
Trigger
4.2
A change on the alarm inputs from external detector or sensor ‘contacts’ causing a ‘close
to open’ or ‘open to close’ transition (or a logic low to high or logic high to low transition).
Typical Configuration
Figure 4-1 shows a typical FastVu configuration.
Figure 4-1 - Typical FastVu configuration
4-4
ADPRO FastVu, Issue 6
Operation
Alarm Inputs shown in Figure 4-1 can be configured for each camera with one detector or sensor per camera. FastVu
systems can be operated as soon as the units have been powered up and successfully passed the internal startup
diagnostic tests. There are two LED indicators on the front panel.
•
Power - Green light indicates that 12V DC has been applied to the unit.
•
Status - Red light will extinguish after successful completion of the startup diagnostic checks.
To provide the facility to independently monitor the status of the FastVu unit, a high/low contact pin is provided on
the Audio Switch connector (pin #8) on the rear panel (designated the alive signal). Refer to Section 1, Audio Switch
Connection, of this manual for more information.
If neither of these indicators is illuminated, refer to the Troubleshooting Section for possible causes.
4.3
Startup Monitor Display
When FastVu has completed the power up diagnostics, information will be available for display on the monitor output.
4.3.1
Receiver
The normal startup condition for the Receiver, when no communication link is established, is for the Offline to appear
at the bottom of the monitor screen, indicating that the Receiver is idle.
4.3.2
Transmitter
The normal startup condition for the Transmitter is for the monitor to auto sequence through and display all enabled
channels at one second intervals. If video is not detected on a particular channel, a No Video Alarm (if enabled) is
triggered and will remain active until cleared by the Receiver.
4.4
Establishing a Communication Link
For a FastVu system’s Transmitter to pass video and audio information to a Receiver, a communications link (or path)
first must be established. There is a variety of telecommunications link types that may be used for this purpose:
•
Network link - Use an Ethernet based Local Area Network (LAN) or Wide Area Network WAN)
•
Digital link - Either a point-to-point link (leased line) or a dial-up connection can be used with ISDN
•
Analogue link - Traditional telephone lines, either leased line or a dial-up, using the PSTN.
When connected to a leased line (either ISDN or PSTN), a communication link is dedicated between the Transmitter
and the Receiver. There is no need to dial make a connection as the circuit between the two FastVu units is permanent.
When connected to a Local Area Network (LAN) or the dial-up network (either ISDN or PSTN), a link will need to
be established by:
•
the Receiver requesting a connection to the Transmitter to view activity at the site, OR
•
the Transmitter requesting a connection to the Receiver when an alarm is triggered, OR
•
a ‘No Video’ alarm being generated at the Transmitter.
ADPRO FastVu, Issue 6
4-5
Operation
4.4.1
Using the AMK-300 Keyboard to Establish a Connection
To connect to a remote Transmitter using an AMK-300 keyboard attached to the Receiver, the procedure outlined
below should be followed.
a.
When the Offline is displayed, press the Connect key
sites (of a possible 100) are shown on the screen.
b.
Any one of 100 sites can be chosen. The Up/Down arrow keys move the cursor up or down the list, through
all 100 sites. Alternatively, pressing the Page key
moves through multiples of ten sites, a page at a
time.
Use
c.
SHIFT
to display the Site List. The first page of 10
to move backwards through the Site List pages.
Once the correct page is found, move the cursor to the required site using the Up/Down arrow keys.
Press the Enter key to establish a connection to the site. The Receiver uses the address or number that has
been programmed in the Site List menu.
Alternatively, while the Offline is displayed, the operator can select a numeric value between 1 and 99
(which represents the site to connect) followed by the Connect key. eg. to call ‘Site 25’ press the following
keys ‘2’ ‘5’
.
NOTE
If the site has been configured to use either an Ethernet port address OR a Serial Comms
phone number, the following Link Selection is displayed.
Select the appropriate link option using the Up/Down arrow keys and press Enter. Alternatively use the Fast button
number next to each option.
When the Transmitter answers and the Receiver password matches the Transmitter’s, a communication link is
established. A connection message followed by video from the Transmitter is displayed.
If the incorrect (or no) address or phone number are present, the following message appears on the screen.
4-6
ADPRO FastVu, Issue 6
Operation
If the Site Password does not match, an error message is displayed and the connection is terminated.
If the site is engaged or the connection request is unanswered, the Receiver will display No Answer by Offline when
the programmed Dial Time has elapsed.
If a device other than a FastVu Transmitter answers the call, a Connection not Successful message appears on the
screen and the link is terminated.
4.4.2
Using an External Control Device to Establish a Connection
To connect to a remote Transmitter using an External Control Device wired to the Receiver’s keyboard port, the
procedure outlined below should be followed. An External Control Device can be any device such as a PC or a thirdparty controller that communicates via the ADPRO IEC instruction set.
Refer to the Inter Equipment Communications (IEC) User Manual (Part Number 300081) for instruction details. Refer
to Section 1.12 for wiring details.
When establishing a connection via an External Control Device, the following details must be supplied:
•
Site Name
•
Site Password
•
User
•
Site Address
The Receiver can be polled to determine the connection status. Connection Failure messages can also be obtained in
this way.
4.5
Terminating a Communication Link
4.5.1
Using the AMK-300 Keyboard
Pressing the End key while the Receiver is establishing a link will terminate the connection immediately. After a link
is established, the Connect key is used to terminate a communication link. The following Disconnect Requested
message is displayed:
Press the Enter key to complete the link disconnection or press the Connect key a second time.
ADPRO FastVu, Issue 6
4-7
Operation
NOTE
If outstanding alarms are still in the Active Alarm List, then disconnection will not occur
and an error message will be displayed.
4.5.2
Using an External Control Device
To disconnect an existing connection, the IEC “Disconnect” command must be sent from the External Control Device.
The FastVu can be polled via the IEC port to determine if the disconnection was successful.
4.6
Receiver On-Line Display
Figure 4-2 shows the typical information presented on the Receiver’s monitor after a communication link with a
Transmitter has been established.
Figure 4-2 - Receiver's On-Line display (no video shown for clarity)
The information contained on the Receiver’s display may include:
4-8
Camera Number
Each of the cameras connected to the Transmitter are identified with a camera number. This
number is assigned by FastVu and is not user configurable.
Camera Name
A programmable camera identification of up to 20 characters. Each camera may be assigned a
unique name so that a user can easily identify the area being viewed.
Chassis Number
The number assigned to a FastVu chassis in a multi-chassis configuration. This number is
assigned via the FastVu ‘Chassis Select’ switch on the rear panel.
Site Name
A 20 character (max) Site Name to identify the location of the Transmitter. User configurable.
ADPRO FastVu, Issue 6
Operation
4.7
Time / Date
The time/date of the Transmitter when viewing live video or the time/date when the image was
stored for alarm images.
Speed
Not available in current version.
Video Quality
The video quality icon is displayed when the Video Quality key is used.
Audio
An speaker symbol is used when listening to activity at the remote site. The microphone symbol
(to represent ‘talk’) is used to indicate the PTT microphone switch is active.
Mode
Displays the open lock or closed lock (secure) icon depending on the current mode.
Transmitter Display
The Transmitter automatically sequences through and displays the programmed Display Channels at one second
intervals. If video is not detected on a particular channel, a No Video (if enabled) is triggered.
When the FastVu system is in operation, the basic system conditions and responses are described in Table 4-1.
CONDITION
TRANSMITTER
RECEIVER
No Alarms - No
Communications
Link
Monitor displays the camera outputs
in numerical sequence (full screen)
Monitor display is blank with
OFFLINE message showing
No Alarms - Comms
Link established by
Receiver
Monitor displays the camera outputs
in numerical sequence (full screen)
Displays live images from the
requested (current) camera in fullscreen mode or multiple cameras in
multi-split view.
Alarm Triggered - No
Communications
Link
Captures 3 post-alarm images and
starts Connection to the Receiver to
establish a Comms link
Alarm icon displayed and the 3 postalarm images are displayed along
with live video. Full screen display of
selected images can be made.
Table 4-1 - Typical System Conditions
4.8
Status Information
FastVu provides a number of Status information displays. The Receiver displays are used to review the current status
of the following:
•
Alarm Inputs
•
Control Outputs
•
Software Revision Level
ADPRO FastVu, Issue 6
4-9
Operation
4.8.1
Alarm Input Status
While the Transmitter is Online, pressing the Status key
?
STATUS
displays the information screen shown in Figure 4-3:
Figure 4-3 - Alarm Input Status display
Against each of the configured channel numbers, the Camera Name is displayed. Depending on the status of the
Alarm Input contacts, the small icon to the left of the channel number indicates the current condition. For example,
channel 1 (CAM1) is ‘Sealed’ and channel 3 (CAM3) is ‘Unsealed’ when an alarm condition is present, a Bell icon is
shown.
4.8.2
Control Output Status
While the Transmitter is Online, pressing the
keys will display the information shown in Figure 4-4:
Figure 4-4 - Control Output Status display
The status of the three control outputs at the Transmitter is indicated with a closed or open switch icon. To change the
condition of a control output:
•
Press the number of the Control Output <1, 2 or 3> then the appropriate key
to change.
The Output Control Status screen can remain in view will control outputs are changed.
NOTE
When a VM25 FastVu I/O Expander is fitted, ten control outputs will be available.
4 - 10
ADPRO FastVu, Issue 6
Operation
4.8.3
Software Status
Pressing the
HELP
key will display the Version number of the FastVu software.
Figure 4-5 - Help key status message
Figure 4-5 shows the status message when the system is in the ONLINE state, with the Receiver version shown at the
top of the message and the Transmitter version (at the connected Site) shown at the bottom.
If the system is Offline, the Transmitter software revision details are not shown. However, if the Transmitter Setup is
being access locally, pressing Help will display the software version on the local monitor.
4.9
Multi-Live Display Formats
Pressing the
Multi-Live key allows the simultaneously display of more than one camera output on the monitor.
Live video from multiple cameras can be shown in a variety of screen split formats. The first press of the key sets the
monitor to show a 4-way split with the current camera in screen quadrant #1. Pressing the key again will cycle the
monitor display through all available formats. The formats are 4, 7, 10, 13 and 16-way.
4.10
Auto Sequence Operation
The Auto Sequence feature enables selected channels to be automatically displayed at a programmed rate on the
Receiver’s monitor when it is Online to a Transmitter.
Pressing the Auto Sequence key
enables this feature. Each channel to be included in the auto sequence must
be enabled via the Video Sequence menu at the Transmitter. Channels are displayed and presented on the monitor in
a full screen format except when the Receiver has been set to operate in a ‘multi-live’ display format.
The first channel defined in the Video Sequence list is used as the ‘reference’ channel. If the Auto Sequence key is
pressed while the FastVu is in one of the Multi-Live display modes then the displayed video channels will be refreshed
to start with the reference channel first.
Auto Sequence operation is halted when the Auto Sequence key is pressed again or an Alarm is received when there
were previously no alarms in the Alarm List.
ADPRO FastVu, Issue 6
4 - 11
Operation
4.11
Types of Alarm
FastVu supports two types of alarm video capture, post alarm and pre-alarm. Individual channels can be set to respond
to either post alarm, pre-alarm or both. Alternatively the channel can be configured to ignore alarm inputs completely.
To use either or both types of alarm, the FastVu Transmitter must have the respective Alarm Input wired to a suitable
detection device.
4.11.1
CMS User Priority
To facilitate operation with Central Monitoring Station (CMS) systems, FastVu provides the ability to define a special
user category, a ‘CMS User’, to provide a priority connection to a remote Transmitter. Refer to Transmitter Setup and
‘System Details’ menu for information about setting the CMS User information.
When an alarm condition is generated at a Transmitter that is currently connected (on-line) to a Receiver, the
Transmitter will check to see if the connection has been initiated by a ‘CMS User’. If this is so, then event information
is uploaded. If the connected user is not a CMS User (ie. an Observer), then the Transmitter will send a warning
message to the Receiver (‘Disconnecting: Events Pending for CMS’) and then disconnect.
The Transmitter will then attempt to connect to the CMS User defined in its call list and upon successful connection,
upload the new event information to that Receiver.
4.11.2
Post Alarms
Post alarms are defined as the capture of a short sequence of individual video images after the alarm input has received
an external trigger.
Starting at the instant the alarm is triggered, the Transmitter stores three consecutive images, separated by a
programmable period (referred to as an alarm sequence), from the channel associated with the alarm input. A FastVu
Transmitter can store up to six alarm sequences from any of the alarm inputs.
When an alarm input is triggered the Transmitter will establish a communication link with the Receiver if it is not
already on-line (provided the Transmitter’s Call List Option of ‘All Alarms’ is set to ‘Active’). When an alarm is
received, the Receiver’s keyboard beeper sounds (provided it has been programmed to do so).
Each of the three images for the first alarm sequence are automatically displayed on the Receiver’s monitor in a quad
screen format as shown in Figure 4-6. The first image stored is displayed in quadrant one and the last image in quadrant
three. Quad format allows the user to clearly identify the event(s) that caused the alarm and the subsequent events after
the alarm. Quadrant 4 is used to continually display live images from the channel in alarm so that the user can view
any other events that are occurring.
4 - 12
ADPRO FastVu, Issue 6
Operation
Figure 4-6 - Post-Alarm Sequence display
Subsequent alarms are not automatically displayed but are indicated on the monitor’s status bar. The operator must
manually select these channels. The Alarm Status Bar details are shown in Figure 4-7.
First Alarm Received
from Channel #8
Number of Pre-Alarm Images Available on this Channel (if enabled)
Number of Post-Alarm Images Available on this Channel
Second Alarm Received from Channel (#4)
Third Alarm Received from Channel (#2)
8 (18/3) 4 2
Alarm is present
Figure 4-7 - Alarm Status Bar Details
4.11.3
Pre Alarms
Pre alarms are defined as the capture of a sequence of individual video images before the alarm input has received an
external trigger.
Capture of pre-alarm images is only active when the Transmitter is in the offline state.
When a channel is configured for pre-alarm, the FastVu software continuously captures video images and keeps them
in a memory store. Immediately an alarm is detected, FastVu stops capturing the video images from that channel,
ensuring what remains in the memory store is a visual record of events leading up to the time of the alarm.
ADPRO FastVu, Issue 6
4 - 13
Operation
4.12
Viewing and Clearing Alarms
Initially, a channel with an alarm sequence displays the post alarm images in quad screen format. To review a post
alarm or pre-alarm sequence(s), the Alarm Playback keys and the Alarm Action keys on the AMK-300 keyboard are
used.
4.12.1
Alarm Playback keys
The Alarm Playback keys allow the detailed viewing of an alarm sequence.
When an alarm is active and displayed on the Alarm Status bar of the Receiver, pressing the Play (Forward or Reverse)
or Fast Forward or Fast Reverse keys will place the Receiver into the Alarm Playback mode. Images can then be
reviewed in full screen mode, while stepping forwards, backwards or pausing.
Figure 4-8 - Alarm Playback keys
To return to the normal display operation, press the
4.12.2
Stop/Exit key.
Post Alarm Status Bar
When post alarms are received and displayed on the monitor using the Alarm Playback keys, the Alarm Status bar
provides details of the alarm image currently being displayed in full screen format on the monitor.
The Alarm Status bar shows post alarm images relative to the instant of the alarm trigger, ie. after the alarm event.
Replay Indicator icons
Play Forwards
Fast Foward
Play Reverse
Fast Reverse
Pause
Alarm Channel # 8
18 Pre-Alarm Images
3 Post-Alarm Images
Current image being displayed
indicated by light coloured spot.
Post-Alarm Image
Replay Bar
Pre-Alarm Image Replay Bar
Time Bar indicates the "relative" time period
moving away from the instant of the alarm
Time Bar indicates the "relative" time period
moving away from the instant of the alarm
Instant of Alarm
(indicated by
Alarm bell icon)
Figure 4-9 - Alarm Status Bar for Post Alarm Images
4 - 14
ADPRO FastVu, Issue 6
Operation
4.12.3
Pre Alarm Status Bar
When pre-alarms are received and displayed on the monitor using the Alarm Playback keys, the Alarm Status bar
provides details of the alarm image currently being displayed in full screen format on the monitor.
The Alarm Status bar shows pre-alarm images relative to the instant of the alarm trigger, ie. before the alarm event.
As there are usually also post alarm images associated with the Alarm event, the Alarm Status bar shows both prealarm and post alarm image positions on the time bar display.
Replay Indicator icons
Play Forwards
Fast Foward
Play Reverse
Fast Reverse
Pause
Alarm Channel # 8
18 Pre-Alarm Images
3 Post-Alarm Images
Current image being displayed
indicated by light coloured spot.
Post-Alarm Image
Replay Bar
Pre-Alarm Image Replay Bar
Time Bar indicates the "relative" time period
moving away from the instant of the alarm
Time Bar indicates the "relative" time period
moving away from the instant of the alarm
Instant of Alarm
(indicated by
Alarm bell icon)
4.12.4
‘No Video’ Alarm
If the ‘No Video’ Alarm option is enabled on a channel, the Transmitter can trigger a ‘No Video Alarm’ if a camera
cable is cut or the camera fails.
When the Transmitter does not detect a video signal on an enabled channel, the following occurs:
•
The Transmitter establishes a communication link, if not already on line to a Receiver.
•
At the Receiver, a quad alarm display with the message ‘No Video’ is displayed on the channel where
video was lost, and the keyboard beeper sounds (if configured to do so).
Figure 4-10 - Display of ‘No Video’ Alarm from Camera #1
ADPRO FastVu, Issue 6
4 - 15
Operation
To clear the ‘No Video’ Alarm, press the Alarm Reset key
while viewing the alarm channel.
If video is still not connected to the channel, the standard ‘No Video’ message then appears. Remember that ‘No
Video’ alarms must be cleared in order to terminate the communication link. While the camera or cable failure is being
repaired, the ‘No Video Alarm’ option should be disabled by accessing the ‘Video’ setup menu at the Transmitter.
NOTE
If a ‘no-video’ alarm is received after 6 previous alarms have already been received (but
not cleared), the alarm message will be displayed in Quadrant 4 of the screen.
4.13
Clearing Alarms
The Alarm Action keys allow a particular Alarm Sequence (from a multiple Alarm set) to be selected for review or
cleared from the Alarm List.
While viewing the respective channel and pressing the Alarm Reset key
‘No Video’ Alarms are cleared.
at the Receiver, Alarm Sequences and
This removes the channel number from the alarm status and re-allocates the video memory at the Transmitter for
further alarm image storage. The remaining channel numbers in the alarm status are re-positioned to indicate the
chronological order of the current active alarms.
SHIFT
Figure 4-11 - Alarm Option keys
To review another alarm in the Alarm List the Next Alarm key
is used to move down the list.
To move back to a previous alarm in the Alarm List press the Shift key as well as the Next Alarm key.
To exit from the Alarm Replay display screen without clearing the current Alarm, simply switch to another display
channel by pressing the Camera key.
Attempting to Disconnect from the Transmitter while an Alarm sequence is still active on the Alarm Status Bar will
result in a error message being displayed.
The message will display for approximately five seconds. To continue with the link disconnection, all alarms must be
cleared.
4 - 16
ADPRO FastVu, Issue 6
Operation
4.14
Audio Operation
FastVu allows the transmission of high quality, bi-directional audio simultaneously with the video between the
Transmitter and the Receiver. This feature enables a central monitoring station to use audio devices such as
microphones and speakers to ‘listen and talk’ during activities at the remote site.
Note that when very low speed communication links are used, the transmission of the audio channel may reduce the
video update rates. In this instance, it may be appropriate to use audio only when absolutely necessary.
4.14.1
Talk and Listen Modes
When audio operation has been configured and the equipment correctly wired, using the Audio key
variety of audio control features to be enabled or disabled, as defined by Table 4-2.
allows a
SHIFT
Table 4-2 - Audio Key Options
Using the Press-to-Talk (PTT) input at the Receiver enables the transmission of audio as defined by the audio mode
configured during Setup. While operating, an audio symbol (microphone or speaker) appears on the monitor status
line.
4.14.1.1
Talk
Enables audio from the Receiver to the Transmitter when the PTT switch is active (closed contact).
4.14.1.2
Listen
Enables audio from the Transmitter to the Receiver when the PTT switch is active (closed contact)
4.14.1.3
Talk and Listen
Audio is always enabled in both directions.
ADPRO FastVu, Issue 6
4 - 17
Operation
4.14.1.4
Intercom
Used in conjunction with the Audio key
on the keyboard. When the Intercom option is selected and the Audio
key is pressed, audio transmissions will be enabled and audio will be sent in the direction defined by the current
position of the PTT switch. Pressing the Audio key again will turn off all audio.
4.14.2
Audio Shortcut Keys
To switch between the various Audio modes, the keyboard keys can also be used as a shortcut as shown in Table 4-3.
Table 4-3 - Shortcut Keys Between Audio Modes
4.15
PTZ Control
The AMK-300 Keyboard is used to control cameras fitted with Pan/Tilt/Zoom (PTZ) functionality. For a complete
description of PTZ setup and operation, please refer to the AMK-300 User Manual and the installation section of this
manual for details of the telemetry station connection.
When connected via a limited bandwidth link and operating a PTZ equipped camera in either pan, tilt, zoom or iris
modes, the image being transmitted and displayed automatically reduces in size by 60% and drops to picture quality
‘1’. This gives a high update rate for the operator to accurately position the camera. The entire image is constantly
updated.
After releasing the joystick or a PTZ movement key (for example, the Iris key), the Receiver monitor retains the
reduced size PTZ display for the ‘PTZ Hold Time’, a programmable time period used to allow the Operator enough
time to make minor adjustments. Any activation of the joystick or a PTZ movement key will restart the PTZ Hold
Time. Following the expiration of the PTZ Hold Time, the screen returns to normal display mode.
4 - 18
ADPRO FastVu, Issue 6
Operation
4.15.1
Dynamic Pan and Tilt Speed Control
A number of telemetry stations have the capability to dynamically change the speed of their pan and tilt motors.
When utilising the AMK-300 Keyboard, the dynamic speed control is accomplished by moving the PTZ joystick. The
further the joystick is moved in the desired direction (for panning or tilting), the faster the PTZ camera will move.
4.16
Using the Keyboard
The ADPRO AMK-300 Keyboard is an external device connected to the FastVu system via a cable.
Figure 4-12 - AMK-300 Keyboard layout
Keys and controls of the AMK-300 are divided into several logical groups of keys: These groups are arranged for
control of the following feature sets:
•
•
•
•
•
•
•
•
Mode Keys
Display
Equipment
Alarm Playback
System Operation
Selection and Setup
Directional Control (and Setup Stepping)
Camera (PTZ) Control
The AMK-300 is a universal keyboard can be used with a number of ADPRO products and some keys may only be
applicable to specific types of equipment. The keys shown below are applicable to a FastVu system.
The following paragraphs describe the action caused by pressing the keys in the specified group. Actions caused by
simultaneously pressing both the Shift key and the specified key are also listed.
ADPRO FastVu, Issue 6
4 - 19
Operation
4.16.1
Mode Keys
GLOBAL key
The GLOBAL key, is used to control the bi-directional audio feature. When used in conjunction with the
Audio key, the PTT operation mode is switched (see Audio Operation section).
ACCESS/SECURE key
The Access/Secure key is used to change the status of remote Transmitters. When set to ACCESS the
remote site will not report (most) alarm events. When set to SECURE, all alarm events are reported (if they
have been configured to do so).
When a Reciever is connected to a remote Transmitter, the operator may change the Transmitter’s Arm/
Disarm status by pressing the Access/Secure key. The key is inoperative when the Receiver is not
connected to a site. Refer to Section 4.21
Note that if the Transmitters status is set to Access, via the Transmitter’s hardware (via the control pin on
the Audio Switch connector), then remote setting cannot be made from a Receiver.
When a system is placed in Secure mode, the key LED is illuminated for visual confirmation.
4.16.2
Equipment Keys
VST
VST key
The VST (Video Storage and Transmission) key is used when connected to a FastVu chassis. If the
keyboard cannot communicate with FastVu, then an audible error signal will be sounded.
The VST key LED is illuminated when connected to FastVu, providing visual confirmation of key selection. The key
must be active to allow communications with the FastVu chassis.
4.16.3
System Keys
Some system keys are specific to the FastVu video transmission system and are detailed below.
?
STATUS
HELP
HELP
CTRL
CTRL
ISOL
ISOL
SPEED
SHIFT
4 - 20
ADPRO FastVu, Issue 6
Operation
CONNECT key
The Connect key is used to initiate a connection to, or disconnection from a remote site.
When FastVu is ‘off-line’ and not connected to a remote system, pressing the Connect key will initiate the
connection process task. However, if the system is ‘on-line’ and is using a communications link, pressing
the Connect key will cause the controlling system to start it’s ‘disconnection’ task.
The connection (or disconnection) dialogue is displayed on the Monitor.
CHASSIS key
Not implemented at the Transmitter. When more than one Receiver chassis is configured (daisy-chained),
the Chassis key is used for the selection of an individual chassis (unit) for control, Once a chassis number
has been set, it will remain active regardless of any other operation, until changed again by the Chassis key.
FastVu systems can daisy chain up to five chassis.
Select the required chassis number <n> then press the Chassis key.
?
STATUS
STATUS key
The Status key is used to view the FastVu system’s ‘alarm input status’ on the Monitor.
HELP
HELP key
The Help key is used to display the software version fitted to the unit. When Online, the help message
gives both Receiver and Transmitter revision levels.
CONTROL ON key
The On key is used to initiate the systems’s control output dialog screen(s) OR, when used with a number
key (1,2 or 3), turn on one of the system’s three control outputs. The operational parameters for the control
outputs are set via the system setup menu.
The key is used with a Receiver only. Press a number key <1-3> followed by Ctrl On to switch on a control
output at the remote Transmitter.
CONTROL OFF key
The Off key is used to initiate the systems’s control output dialog screen(s) OR, when used with a number
key (1,2 or 3), turn off one of the system’s three control outputs. The operational parameters for the control
outputs are set via the system setup menu.
The key is used with a Receiver only. Press a number key <1-3> followed by Ctrl Off to switch off a control
output at the remote Transmitter.
ADPRO FastVu, Issue 6
4 - 21
Operation
AUDIO key
The Audio key is used to control the audio transmission features of FastVu.
When the Audio key is used in conjunction with the Global key, it will switch the system’s bi-directional
audio feature on, or if audio is currently on, it will turn the feature off.
When used alone, the Audio key controls audio transmission from the Transmitter to the Receiver and allow
audio operation when in the Intercom mode. The reverse direction is controlled by using the Shift and Audio
keys.
ISOL
ALARM ISOLATED key
The Alarm Isolated key is used to temporarily isolate (disable) a particular alarm input while keeping other
alarm inputs active. The remote Transmitter must be connected for this key to operate.
ISOL
ALARM UN-ISOLATED key
The Alarm Un-Isolated key is used to remove the isolation set on a particular alarm input. The remote
Transmitter must be connected for this key to operate.
VIDEO QUALITY key
The Video Quality key is used toggle the image quality of the current channel (between high and low levels)
or to select a new quality level.
High and Low video quality levels are preset using the Setup Menu.
SPEED
VIDEO SPEED key
Not available in current version.
CAMERA key
The Camera key is used to display a video input from a camera (channel) on the monitor. The operator
enters the desired channel number <1 to 20> followed by the Camera key. The key may also be used to
manually sequence the channels selected in the auto-sequence list for display on the monitor. This is
available only when Auto-sequence is active and there are no channels in alarm. The Camera key is pressed
without preceding channel numbers. The auto-sequence list may be displayed in reverse order if the Shift
key is pressed with the Camera key.
SHIFT
SHIFT key
This key is used in conjunction with other keys to provide either added functionality to the key, or to provide
an additional level of ‘security’ to an action. ‘Security’ in this instance is a way of forcing the operator to
press two keys simultaneously, thus preventing accidental entry of data by pressing only a single key.
4 - 22
ADPRO FastVu, Issue 6
Operation
NEXT ALARM key
The Next Alarm key is used in enter the system’s ‘alarm event mode’ of operation. The oldest alarm is
shown first on the monitor if more than one alarm is present.
ALARM RESET key
The Alarm Reset key is used to clear the alarm event that is currently displayed on the monitor.
4.16.4
Selection Keys
The Selection keys consist of the four cursor keys, the page key, numeric keys 0 to 9, clear, enter, function and end
keys.
PAGE
SETUP
SETUP key
Allows entry and exit of Setup Mode. The Setup menu may be protected by a Password. If Password
protection has been enabled, the correct Password will need to be entered using the digits keys <0-9>.
FN (Function) key
Not available in current version.
END
END key
While in Setup Mode, the End key is used to ‘back out’ or ‘move up’ the menu system and eventually
display the ‘Save current settings’ dialog box when exiting from the Setup menu system.
ADPRO FastVu, Issue 6
4 - 23
Operation
CLEAR
CLEAR key
Use the Clear key to clear out (blank) a parameter displayed in a selected dialogue box.
ENTER
ENTER key
The Enter key is used to select a desire option or input a parameter value (or character string) into a selected
dialogue box.
4.17
Selecting a Camera
FastVu accepts colour or black & white video camera or video line inputs. each video input is called a channel. Video
images have a corresponding camera (channel) number displayed in the top left-hand corner. Camera numbers are
assigned by the FastVu and follow the numbering of the Camera Input connector.
For example, if a camera is connected to the IN connector marked ‘8’ on the rear panel, FastVu would classify this
video as being from ‘Camera 8’.
4.17.1
Current Camera
To select a particular camera as the ‘current camera’, either:
Press
while observing the camera number on the monitor screen. Repeat pressing of this key will cycle through
all valid cameras connected to the current FastVu.
or
Press a number key
4.17.2
+
+
.
In this example Camera 18 is selected.
Camera Names
Each camera can also be identified with a meaningful text name. This name can be up to 20 characters long and will
appear on the image along with the camera number. The display of camera names is user programmable from the setup
menu.
If a Camera number is selected, but that channel is not setup as being ‘Connected’, then the keyboard will double-beep.
However, if the camera is connected no video is coming from the camera, then the screen display area will be blank
with a ‘No Video’ message. This will happen in any display format.
4 - 24
ADPRO FastVu, Issue 6
Operation
4.18
Pan/Tilt/Zoom (PTZ) Control and Joystick
The ability to remotely control the physical position of a camera lens and housing together with many functions
provided by a telemetry station is generically referred to as PTZ control. The FastVu keyboard provides an operator
with the ability control most features available on various telemetry station models such as;
•
Pan
Control of the horizontal (azimuth) direction that the camera lens is pointing at any
particular time. Position can be referenced to a ‘centre’ or ‘home’ position and the camera
panned (moved) either left or right of that position.
•
Tilt
Control of the vertical (elevation) angle that the camera lens is pointing at any particular
time. Tilt can be referenced to a ‘home’ position and the camera tilted (moved) either up or
down.
•
Zoom
Ability of a camera lens to change the physical position of its front lens to provide either
positive magnification (enlargement) or negative magnification (shrinkage) of an object or
scene.
•
Focus
Ability of a camera lens to change the relative position of its front lens to maintain the
visual clarity of an object or scene within its field of view.
•
Iris
Part of a camera lens that controls the amount of available light allowed to pass through the
lens.
•
Wash
A feature provided on a camera housing where a jet of clean water (or other solution) can be
sprayed onto the clear cover in front of the camera lens to remove dirt, dust or grime.
•
Wipe
A rubber wiper blade on the camera housing that is mechanically swept over the clear cover
in front of the camera lens to displace dirt, dust or grime. Normally used during or after a
wash.
Telemetry station manufacturers provide a variety of models and features. FastVu provides PTZ control ability for a
number of popular models and where possible, supports the features provided by the manufacturer.
Due to the number of models available on the commercial market, details of connection and use for individual models
are best provided on a dynamic display environment such as the ADPRO web site at http://www.adpro.com.au
4.18.1
Using PTZ
FastVu supports the use of up to twenty telemetry stations, one per camera. The communications protocol required to
control a specific telemetry station model:
•
Requires all connected stations to be of the same type.
•
May not have the ability to address all twenty stations.
Please refer to the Tech-Tip page on the ADPRO website http://www.adpro.com.au for the details of a particular
telemetry station model.
PTZ units are numbered to correspond with the camera that they control. To use a telemetry station, the particular
camera number must be selected as the ‘current camera’. To select a particular camera as the ‘current camera’, either:
Press
while observing the camera number on the monitor screen. Repeat pressing of this key will cycle through
all valid cameras connected to the current FastVu.
or
Press a number key
+
+
. In this example Camera 18 is selected.
The Camera Control keys and joystick are now operative.
ADPRO FastVu, Issue 6
4 - 25
Operation
4.18.1.1
Camera Control Keys
The Camera Control keys operate the pan, tilt and zoom (PTZ) functions on the currently selected camera (provided
a telemetry station is connected). The Camera Control keys are functional regardless of the currently selected
equipment type.
For all keys which require a preceding number, if a mistake is made when entering the number, correction is a matter
of ignoring any previous entry and typing a new two digit number.
The number of preset positions and Auxiliary outputs is dependent on the telemetry station type. Refer to the telemetry
station manual for details.
Figure 4-13 - Camera Control keys
HOME key
The Home key is used to move the currently selected PTZ camera to ‘preset position number 1’ (provided
the feature is available on the telemetry station)
SAVE
PRESET
.
PRESET / SAVE key
The Preset key is used to select a preset position that has previously been saved using the Save procedure
(see below). It requires the operator to enter the desired preset number <n>, followed by the Preset key.
Pressing the Shift and Preset key saves the current settings in the telemetry station memory for the currently
selected camera. These pre-positions can then be recalled.
To save a PTZ preset, move the camera to the required position then enter the desired preset number
followed by the simultaneous pressing of the Shift and Preset keys.
AUX ON key
The Aux On key is used to switch on an Auxiliary output of the currently selected telemetry station (if
present) and requires the operator to enter the desired auxiliary channel number followed by the Aux On
key.
Example:
4 - 26
To switch on Aux output 4 on camera 3, press ‘3’ followed by the Camera key to select
the camera, then press ‘4’ followed by the Aux On key.
ADPRO FastVu, Issue 6
Operation
AUX OFF key
The Aux Off key is used to switch off an Auxiliary output of the currently selected telemetry station (if
present) and operates identically to the Aux On key.
WASH key
The Wash key is used to momentarily operate the telemetry station ‘wash’ output. The relevant output
switches on while the Wash key is pressed.
“
WIPE key
The Wipe key is used to momentarily operate the telemetry station ‘wipe’ output. The relevant output
switches on while the Wipe key is pressed.
IRIS OPEN/CLOSE key
For the currently selected camera, the Iris Open or Iris Close key opens or closes the lens’ iris respectively
while the key is pressed (provided the feature is available on the telemetry station).
FOCUS NEAR/FAR key
For the currently selected camera, the Focus near or Focus far key adjusts the lens’ focus near or far
respectively while the key is pressed (provided the feature is available on the telemetry station)
.
ZOOM WIDE/NARROW key
For the currently selected camera, the Zoom narrow or Zoom wide key zooms in or out of the camera scene
respectively while the key is pressed (provided the feature is available on the telemetry station).
4.19
Control of ADPRO Amux
When ‘AMUX IEC’ is selected as the PTZ Camera Station type, the Amux Video Multiplexer will utilise its
‘operational’ mode to pass alarm and image information to the FastVu system. Should it be necessary to change any
of the Amux operational parameters, the Amux will need to be placed in ‘setup’ mode.
To use the Amux in Setup mode, the AMK-300 Keyboard has some of its keys re-assigned to allow the Amux Setup
menu to be accessed.
The key entries shown in Table 4-4 will control the Amux in the same way as a directly connected Amux external
keyboard.
To enter Amux Setup Mode, press
When the Amux is in ‘setup’ mode, the key functions are shown in Table 4-4.
ADPRO FastVu, Issue 6
4 - 27
Operation
Keys
Amux function (in Setup Mode)
Enter setup mode
Exit setup mode
+ digit
no action until digit entry key is pressed
<digit> entry
+
or
or
or
cursor up, down, left and right
Table 4-4 - Relationship between key entry and Amux ‘setup’ mode
To exit ‘setup’ mode of the Amux, the operator can either press ‘2’ ‘5’ ‘0’ ‘Aux off’, or alternatively, change the
current channel at the Receiver.
Any operation at the Receiver that causes a channel change at the Transmitter, will cause the Amux to exit ‘setup’
mode.
NOTE
If exiting Amux Setup via the normal Esc and Enter actions, the FastVu system will still
require a ‘250 aux off’ command to define to the system that the Amux is now back in
operational mode.
4 - 28
ADPRO FastVu, Issue 6
Operation
4.20
Monitor
FastVu supports a display monitor with either a composite video or S-Video input. Both outputs are independent and
allow two different monitors to display the same information (simultaneously). It is possible to have one of the monitor
outputs connected to a VCR unit while using the other output for a visual display.
4.20.1
Display Modes
The monitor can display output from single or multiple cameras and the display keys select differnt modes of
operation.
Full Screen Display Key
The Full Screen Display key is used to display the current camera as a single, full screen.
Multi-Live Key
The Multi-Live key is used to display the video from multiple cameras in a variety of screen split formats.
The first press of the key sets the monitor to show a 4-way split with the ‘current’ camera in screen quadrant
#1. Pressing the key again will cycle the monitor display through all available formats. The formats are 4,
7, 10, 13 and 16-way.
Auto Sequence Key
The Auto Sequence key is used to sequence the (sequence enabled) cameras until stopped by the User.
4.21
Alarm Operation
4.21.1
Alarms and Events
When the ADPRO FastVu is operational, external detectors (sensors) or loss of video signal from a camera (due to
failure or deliberate cutting) can generate an Alarm. How an Alarm is treated will depend on its user-programmed
options.
Each camera can have an external detection device associated with it. Examples of external detectors (sensors) are:
•
Door switches
•
Pressure mats
•
Passive Infra-Red (PIR) detectors
•
Panic buttons
•
Glass break switches
•
Vehicle loops
Detectors are normally located within the field of view of the associated camera and numbered the same. For example
a detector wired to Alarm Input 03 is treated as Camera 03. This ensures that an alarm generated by a detector will
be readily resolved by viewing its associated camera image.
ADPRO FastVu, Issue 6
4 - 29
Operation
FastVu can be made to operate in two different modes,
•
Secure Mode
•
Access Mode
The mode of operation is set by the voltage level applied to the Access/Secure input (Pin 5 of the Audio Switch
connector on the FastVu rear panel).
When a detector is triggered, the current mode determines the response taken.
4.21.1.1
Secure Mode
Secure mode is operational when the
icon is displayed on the monitor status bar.
In Secure mode, the FastVu system responds to an Alarm by:
4.21.1.2
•
Capturing 3x post-alarm images from the alarm camera in the Transmitter
•
Stopping pre-alarm image capture on the alarm channel (if enabled) in the Transmitter
•
Displaying the alarm icon on the status bar of the Receiver’s monitor (if enabled)
•
Switching the alarm camera to be the current camera
•
Switching the General Relay on (if enabled)
•
Commencing the Connection procedure to the selected Receiver at the central monitoring site, provided
this action has been enabled in the Setup menu for this camera (channel). This action will to establish an
on-line link for alarm processing by a central operator.
Access Mode
Access mode is operational when the
icon is displayed on the monitor status bar.
In Access mode, FastVu does not respond to an Alarm.
4.21.2
Alarm Reset
When operating in Secure Mode, all alarms must be reset before an on-line connection can be terminated.
The reset of an alarm(s) requires the operator to interact with the display provided on the Receiver’s monitor.
Alarms are active when the bell icon is displayed on the monitor status bar as shown in Figure 4-14.
4 - 30
ADPRO FastVu, Issue 6
Operation
First Alarm Received
from Channel #8
Number of Pre-Alarm Images Available on this Channel (if enabled)
Number of Post-Alarm Images Available on this Channel
Second Alarm Received from Channel (#4)
Third Alarm Received from Channel (#2)
8 (18/3) 4 2
Alarm is present
Figure 4-14 - Alarm Status icon
4.21.2.1
Single Alarm
To reset a single alarm on the current camera, press the next alarm
alarm status bar on the monitor. The operator may choose to:
•
Use the Reset Alarm key to reset the alarm, or
•
Press the
key. The alarm details will be shown on the
key to keep the alarm active
NOTE
Depending on the user-programmed selection, reset of an alarm may silence the keyboard
buzzer. Otherwise the keyboard buzzer will be silenced when there are no cameras left in
the alarm state.
4.21.2.2
Multiple Alarms
If more than one alarm is active, each alarm will need to be reset before an on-line connection can be terminated.
To move to the next alarm, press the
way as a single alarm.
Holding down
Hint:
SHIFT
while pressing
next alarm key. As each alarm is displayed, it can be treated in the same
. This will cycle through the alarm cameras in reverse order.
The keyboard can be used to shortcut an alarm reset by pressing the alarm camera number <1 to 20>
followed by the
key.
ADPRO FastVu, Issue 6
4 - 31
Operation
4.22
External Equipment
ADPRO FastVu has the capability of providing remote control of three items of equipment via the Control Output
connection on the rear panel of the remote Transmitter. Typical items of equipment include:
•
Sirens
•
Lights
•
Gate Latches
•
Boom Gates
To operate a Control Output (for example Output #1 connected to a light):
Press a number key
Press the number
+
+
to switch the light ON. Similarly,
to switch the light OFF.
These pieces of equipment are usually located within the field of view of a camera. This ensures that positive
identification of equipment action (such as a light) is simply made by viewing the camera image. By associating both
detectors and control equipment to an individual camera, security functions can be easily provided through the FastVu
system.
The Control Status display screen can be viewed by pressing one of the Ctrl keys (without a preceding number).
4 - 32
ADPRO FastVu, Issue 6
5.0
5
Specifications
Specifications
5.1
ADPRO FastVu Version Specifications
ADPRO FastVu is the latest product in the ADPRO product family providing remote site to central station
transmission and control of video, audio, pre-alarm, PTZ and control equipment signals. FastVu can be used with
Ethernet LAN/WAN networks, digital ISDN telephone lines and dial up or dedicated telephone lines. FastVu provides:
•
high quality colour or monochrome operation,
•
bi-directional high quality audio capability,
•
pre-alarm video capture and replay,
•
support of a wide range of PTZ (Pan/Tilt/Zoom) telemetry systems,
•
transparent control of remotely located equipment and systems,
•
external control via an optional ADPRO AMK-300 Keyboard and
•
integration with the Video Central PC based central monitor and control system.
•
English, English (US), German, French, Italian, Spanish and Portuguese language setup menus
The FastVu system consists of one or more Transmitters at the remote site and a Receiver at the monitoring site. The
FastVu 2020 unit is designed as a Transceiver and is configured via switches (accessible on the rear panel) to be either
a Transmitter or a Receiver unit.
Advanced image compression techniques ensure rapid transmission of high-resolution video images. After
transmission of the first image, the Transmitter can be programmed to send only the changing portions of the image.
This technique rapidly reduces the time to transmit consecutive images. The transmission rate is dependent on the
desired (user programmable) quality of the pictures required at the Receiver. FastVu features include:
•
•
•
•
•
•
•
•
•
•
•
•
•
•
•
•
•
•
•
•
•
•
•
•
Outstanding colour or monochrome picture quality.
Rapid picture updates in less than 1 second.
Storage and transmission of 3 post-alarm pictures from each of 6 alarms.
User programmable storage of up to 180 pre-alarm images.
Ability to ‘listen in’ and ‘talk to’ the activities occurring at the remote site.
Interface to Ethernet LAN/WAN, digital ISDN telephone lines or dial up or dedicated telephone lines.
Bi-directional (transparent) RS232 serial data link.
RS485/RS232 pan/tilt/zoom camera controller interface.
Able to control 10 audio inputs and outputs using VM22A Audio Switcher, or up to 100 audio inputs and
outputs using cascaded VM22A Audio Switchers.
All Transmitter functions (video, audio and control) accessible by ADPRO Video Central.
Remote control functions for contact controlled equipment (gates, lights).
Remote programming of the Transmitter parameters.
Auto Sequence feature enables camera scenes to be sequentially viewed automatically.
Support of a wide range of PTZ camera telemetry systems when using the AMK-300 Keyboard.
External access control input to enable or disable the triggering of alarms.
Camera or cable failure detection.
Industry standard video, alarm, control and communications interfaces.
On-screen site and camera identification, time and date of the alarm.
Automatic Transmitter connection on alarm.
Transmitter dialling with up to 100 preset numbers.
Transmitter Password protection to prevent unauthorised access.
Battery backed real time clock.
General relay output.
BS8418 compliant when used with VM25 FastVu I/O Expander.
ADPRO FastVu, Issue 6
5-3
Specifications
5.2
FastVu Specifications
Function
Video inputs
Description
20 BNC video channel inputs for Model 2020. 10 BNC inputs for Models 2010 and 3010
1 volt p/p video input, 75 ohm or high impedance (switchable).
Video input expansion options
Not available.
Colour / Monochrome Operation
Colour or monochrome. Individual channels can be dedicated as monochrome (B&W). Default
operation is for colour.
Video output
1 BNC composite video output designed to drive a 75-ohm load.
1 S-Video output, electrically isolated from composite circuit (Model 2020 only)
Video standard
Either PAL note 2 or NTSC (specified at time of order).
Colour Burst Lock Range
PAL 4.433619MHz ± 230Hz
Picture resolution *
PAL/CCIR:
704 x576 pixel (Quality 8)
704 x 288 pixel (Quality 7)
352 x 288 pixel (Quality 5 & 6)
352 x 288 pixel (Quality 3 & 4)
176 x 144 pixel (Quality 1 & 2)
NTSC 3.579545MHZ ± 179Hz
NTSC/RS170:
704 x 480 pixel (Quality 8)
704 x 240 pixel (Quality 7)
352 x 240 pixel (Quality 5 & 6)
352 x 120 pixel (Quality 3 & 4)
176 x 120 pixel (Quality 1 & 2)
Grey Scale Resolution
256.
Video Display modes on monitor
Receiver:
On-alarm - Quad screen or full screen review.
Live event - Full screen live video.
Non-alarm - Full screen, 4, 7, 10, 13 or 16 way split.
Transmitter:
Full screen Live.
Image storage on post-alarm
Stores three (3) images separated by a programmable period.
Up to six (6) alarms.
Image storage on pre-alarm
Stores up to 180 images, shared between the number of enabled channels (1ch=180, 20ch=9)
Stored alarm image resolution
Quality 1 to 8
Image storage delay for first alarm
0.2 seconds (maximum).
Minimum alarm contact duration
0.5 seconds
Image transmission
The first image transmission time is a function of the selected picture quality, scene complexity
and communication rates. Up to 25 picture updates per second for subsequent images depending
on scene changes and communication rates.
Transmitter / Receiver operation
Transceiver switch selectable to operate as a Transmitter or Receiver.
Alarm Inputs
Transmitter:
20 alarm/control contact sensing or logic level inputs (Model 2020).
10 inputs on Model 2010 and 3010.
Programmable to trigger an alarm on contact opening or closure.
All inputs have impedence >1K ohm and transient protection >20KV.
37 way D male connector.
Contact closed - logic low, 7 mA (maximum), 500 ohms (maximum).
Contact open - logic high, 12000 ohms (maximum).
Voltage input less than 0.8 V - logic low, 7 mA (maximum).
Voltage input between 3.5V and 5.0V - logic high.
5-4
ADPRO FastVu, Issue 6
Specifications
Function
Description
Input to Output delay
0.5 seconds (maximum), excluding modem delays.
Network Port
Ethernet 10BaseT compatible. Max data rate 10 Mbits / sec.
RJ-45 connector.
Serial Communication Interface
Asynchronous - 8 data bits, 1 stop bit, no parity, programmable data rate from 9600, 19200,
38400, 57600, 115200, 230400 bps.
Configured as a DTE device. The Hayes (AT) protocol is used if connected to the public telephone
dial network.
Synchronous - Reserved for future implementation.
9 pin male D connector.
Data (Transparent) Interface
Bi-directional (transparent) RS232 serial data link between the Transmitter and Receiver.
Configured as a DTE device.
Programmable baud rate from 300 600, 1200, 2400, 4800, 9600, 19200, 38400, 57600 bps.
Programmable number of data bits (7 or 8), stop bits (1 or 2), parity (odd, even, none), Flow
control via hardware handshaking (or Off).
9 pin male D connector.
Keyboard Interface
RS485 differential balanced input/output serial port
RS232 signalling interface switch selectable.
Maximum voltage range on either input line: -5 volts to +9 volts.
Maximum differential input voltage: +/- 12 volts.
9 pin Female D connector.
PTZ Interface
RS485 differential balanced input/output serial port
RS232 signalling interface switch selectable.
Maximum voltage range on either input line: -5 volts to +9 volts.
Maximum differential input voltage: +/- 12 volts.
9 pin Female D connector.
I/O Interfaces
General interfaces, available via Alarm Input connector, for:
Access/secure input at the Transmitter
‘Press to Talk’ input at the Transceiver
37 pin male D connector.
Audio Switch Interface
Audio In/Out to VM22A or third party Audio Switcher.
Bi-directional audio sent simultaneously with the video (full duplex).
Bandwidth: 300 Hz to 3.3 kHz.
Input impedance: >6Kohms. Input level: 10mV to 400mV RMS (nom)
Output impedance: >6K ohm. Output level: 315mV (nom)
Serial Output for Channel Number sequencing
Open drain outputs indicating the currently selected channel.
32V maximum, 100 mA maximum, output impedence <0.5 ohm
Refer to VM22A Audio Switcher manual for details of serial protocol.
General Output Relay
Form C, single pole changeover. Relay contact ratings: 1.0 amp, 32 volts.
Control Outputs - Transmitter (VM25 not fitted):
3 open drain Control Outputs controlled from the Receiver.
32V maximum, 100mA maximum, On impedence <0.5 ohm
When VM25 is fitted, control outputs at the Transmitter are replaced with those of the VM25
(refer to VM25 specifications).
Audio Interface
ADPRO FastVu, Issue 6
Direct connection for microphone and speaker via ‘Audio’ connector.
Microphone: Differential impedance >6 Kohm
Single-ended impedance >3 Kohm
Nominal signal level is 100uV to 10mV rms.
Speaker:
1 Watt (max) into 8 ohm load.
5-5
Specifications
Function
5-6
Description
Audio Line Interface
Line in/out via RCA connections.
Line In:
Input impedance >6 Kohm
Nominal signal level is 10mV to 400mV rms.
Line Out:
Output impedance is 600 ohm
Nominal level is 315mV rms.
Supported Telemetry Stations
Amux IEC
Baxall ZTX6
Baxall ZMX-9/16
Building Block Video BBV Rx100/200/300/400
COHU MPC Series Microprocessor Camera Control System
Conway Omega
Diamond CRX-500
Digital Sprite
Ernitec BDR 5XX Series.
GPS DCRX and DTMRX
Grundig FWE 51/52 Series.
Harris HT16D
JVC
Kalatel CyberDome
Kalatel KTD-12X Series
LiLin
Mark Mercer D250MPT-AF Meridian Domes
Molynx TRX250 Series
PACOM 2018 Series
Panasonic WV-CSR600/G
Panasonic 800CS
Pelco CX9750, SRD97P21-U and ERD97P21-U Series.
Pelco Coaxitron
Pelco Spectra Dome
Philips Autodome, GEN3 Autodome, TC8560 Series and TC8561A series
Sensormatic SpeedDome ULTRA
Sensormatic Controller
Siemens SCU 30X Series
Synectics.
VCL Camera Station
VICON Surveyor Mini Dome
Video Switch VR-1, VR-5, VXT Series
Unidex DRX-502A
Supported Modems and Terminal Adapters
Generic Modem
Generaic Terminal Adaptor
Generic X.21
Banksia ISDN Express
Codex 326X
Dataplex DPX225
Dynalink 1456VQE
ELSA 28.8TQV
ELSA ISDN/TLpro Terminal Adaptor
EICON Diva ISDN Terminal Adaptor
Hayes Accura 28.8K
Interlink Voidax
Microcom DeskPorte 28.8P
Microcom DeskPorte
Microcom DeskPorte Fast ES
UDS V.3229
US Robotics Sportster 28.8K
US Robotics Courier V.90
Scitec or Penril Datalink 14.4
TA440SP 64K
TA44-DP 128K
ADPRO FastVu, Issue 6
Specifications
Function
Power requirements
Description
AC Operation (with supplied AC Power Adapter)
100 - 240 VAC, 47 - 63 Hz, 15 Watts (max).
DC Operation
Regulated 12 volts DC, 1.2 amps (max).
1.3 amps with AM-DTCT-2 Down the Coax Telemetry board fitted.
NOTE: DC supply must be SELV rated and meet the requirements of IEC 60950 or equivalent.
System control
Operator control via AMK-300 keyboard or VM87 Programmer.
System setup
Languages available: English, English (US), German, French, Italian, Spanish, Portuguese,
Simplied Chinese and Korean.
Via multi level menu system. The Transmitter can be remotely programmed from the Receiver.
Construction
2010 and 2020:
Standard 19" rack mount, 2U high subrack to DIN4194. All cables are accessible from the rear.
3010
Unsealed wall mounted metal cabinet
Dimensions
2010 and 2020:
482mm (19")(W) x 88.8mm (3.5")(H) x 290mm (11.5")(L).
3010:
380mm (15") H x 370mm (14.5") W x 130mm (5.1") D.
Weight
Rackmount: 3 kilograms (6.5 pounds)
Wall mount: 4.5 kilograms (9.9 pounds)
EMC compliance
Refer to Declaration of Conformity at front of this manual.
Electrical safety
Refer to Declaration of Conformity at front of this manual.
Options
VM21 Relay card for mounting externally to the unit.
VM22A Audio Switcher.
VM23 Intercom Handset.
VM25 FastVu I/O Expander
VM87 Programmer
Operating conditions
* Note:
Note 1:
Note 2:
5.3
Operating temperature range 0-50 degC (32-122 degF). Humidity less than 90% non- condensing.
Picture qualities 2-8 are displayed as full screen images at the Receiver. Quality 1 images are displayed at 1/4 screen images.
When displaying colour images, FastVu displays 624 lines, and may cause a slight flicker on some digital displays.
VM25 Electrical Specifications
Function
Description
Relay Outputs
10 single pole form C relay changeover contacts.
2 x 15pin screw terminal connectors.
1 single pole form C contact (located on Spare I/O connector)
Relay contact ratings: 0.5 amp, 32 volts.
Alarm Inputs
20 inputs. Single or Dual EOL fully supervised.
Each Alarm Input corresponds to its respective Video Input.
2 x 15pin screw terminal connectors.
All inputs have transient protection.
Spare Inputs
1 x 15pin screw terminal connectors.
4 spare inputs.
All inputs have transient protection.
System Connection
37 way D type Connector for control signals and alarm status information.
Power Requirements
Regulated 12 Volts DC operation.
10-15 volts DC.
3.6 watts (max) at 12 volts DC.
Construction
Sealed printed circuit board with three key lock mounting holes for M3 screws.
ADPRO FastVu, Issue 6
5-7
Specifications
Function
Description
Dimensions
265mm (L) x 73mm (W) x 19.6mm (D)
Weight
425 grams
EMC compliance
EN55022:1998 (CISPR 22:1997) / AS/NZS 3548:1995 + A1, A2 Class A Conducted and radiated
emissions.
EN 61000-3-2:1995 Current harmonic emissions.
EN 61000-3-3:1995 Voltage fluctuations and flicker
FCC Part 15 Class A Conducted and radiated emissions.
EMC Immunity
EN 50130-4:1995 +A1 Alarm systems immunity.
Safety
IEC 60950:1991 +A1, A2, A3 & A4
EN 60950:1992 +A1, A2, A3, A4 & A11
when used with the supplied AC power adaptor.
Options
VM21 Relay Card for mounting externally to the unit.
VM22A Audio Switcher
VM23 Intercom Handset
Operating Conditions
5.4
Operating temperature range 0-50 degC (32-122 degF).
Humidity less than 90% non-condensing.
AULT PW160 Specifications (per manufacturer’s data sheet)
Function
Input
Description
Voltage: 100 - 240 V.
Line Frequency: 47-63 Hz.
Current: 1.2 A (max).
Protection: Internal primary current fuse; Inrush limiting.
Configuration: In Case IEC320-C320 with ground.
Output
Output Current: 2A @ 12V, 50oC.
Combined Line and Load: +/-1% excluding cord.
Voltabe Regulation Transient Response: 0.5 ms for 50% load change typical.
Holdup Time: 18 ms (min) @ 120 VAC.
Protection: Foldback overcurrent protection; Short circuit protection.
Cord and Connector: 6 ft, 2 conductor, 18 AWG, Ault #3 connector.
Safety Approvals
UL 1950; C-UL 22.2; TUV EN60950; MITI; Approved for Australia.
Electrical
Topology: Switching - fixed frequency flyback.
Dielectric Withstand: Meets the requirements of EN60950.
Leakage Current: Less than 750 mA at 127 VAC 50 Hz.
EMI: Complies with EMC Directives.
CE: Compliant.
Environmental
Operating Termperature: 0-50 degC (32-122 degF) with no derating.
Storage Temperature: -30-+85 degC.
Relative Humidity: 5% - 95% non-condensing.
Altitude: 0-10,000 feet.
Cooling: Convectional - non vented case.
Mechanical
Case and Dimensions: 104mm (4.20") (L) x 66mm (2.6") (W) x 37mm (1.45") (H) .
Case Material: Black 94V0 polycarbonate.
Weight: 285g (max) (10oz) excluding cord.
5-8
ADPRO FastVu, Issue 6
Specifications
5.5
AULT SW132 Specifications (per manufacturer’s data sheet)
Function
Input
Description
Voltage: 100 - 240 VAC -10%, +6%.
Line Frequency: 47-63 Hz.
Current: 0.4 A.
Protection: Internal primary current fuse; Inrush limiting.
Configuration: In Case IEC320-C320 with ground.
Output
Output Current: 1.2A @ 12V, 50oC.
Combined Line and Load: +/-1%.
Voltabe Regulation Transient Response: 0.5 ms for 50% load change typical.
Holdup Time: 18 ms (min) @ 120 VAC; 100 ms (min) @ 240 VAC.
Protection: Both Foldback overcurrent protection and short circuit protection.
Cord and Connector: 6 ft, 2 conductor, 18 AWG cord with Ault #3 connector.
Safety Approvals
UL 1950; CSA 22.2; TUV EN60950; MITI; SAA.
Electrical
Topology: Switching - fixed frequency flyback type.
Dielectric Withstand: Meets the requirements of EN60950.
Leakage Current: Meets the requirements of EN60950.
EMI: Complies with EMC Directives.
CE: Compliant.
Environmental
Operating Termperature: 5-50 degC (32-122 degF) with no derating.
Storage Temperature: -30-+85 degC.
Relative Humidity: 5% - 95% non-condensing.
Altitude: 0-10,000 feet.
Cooling: Convectional - non vented case.
Mechanical
Case and Dimensions: 107mm (4.20") (L) x 66mm (2.6") (W) x 37mm (1.46") (H) .
Case Material: Black 94V0 polycarbonate.
Weight: 285g (max) (10oz) excluding cord.
Due to Vision Systems' continuing research and development program, these specifications are subject to
alteration without notice.
ADPRO FastVu, Issue 6
5-9
6.0
6
Troubleshooting
Troubleshooting
6.1
Maintenance Philosophy
The user should never attempt to repair the ADPRO FastVu. Refer all servicing to qualified service personnel. Any
attempt to repair any part of the system will render the ADPRO FastVu warranty void.
During the warranty period, Vision Systems Limited will replace faulty units free of charge on an exchange basis (refer
to the Warranty conditions). Once the warranty has expired, faulty units should be returned to Vision Systems Limited
for repair or replacement.
6.2
Power On and Self Test Routines
When power is applied to the ADPRO FastVu, it will automatically perform a series of self-test routines to check the
microprocessor circuits. In addition, data integrity testing checks the various user programmable settings to see if any
data corruption has occurred.
The self-test function may take up to 30 seconds. On completion of power up testing, the red light on the front panel
will be illuminated and the status message cleared. The ADPRO FastVu is now ready to commence operation.
If the self-test fails, the unit performs the following actions:
•
The keyboard beeper sounds twice.
•
If the keyboard fails its own self-tests, it will beep four (4) times.
If the diagnostic tests fail repeatedly, the user should note the details of the error and contact the ADPRO support
service or the local ADPRO supplier.
6.3
Fault Indicator
The ADPRO FastVu continually checks that all microprocessor circuits are operating correctly and restarts itself if a
failure occurs. If an internal failure has occurred and restarting the unit does not correct the fault, the red indicator on
the front panel will illuminate. The faulty unit should be substituted with a replacement and returned to your supplier,
or Vision Systems Limited directly, to be repaired or replaced.
ADPRO FastVu, Issue 6
6-3
Troubleshooting
6.4
Trouble Shooting Guide
This guide has been prepared to overcome any difficulties that may arise during installation and operation of the
ADPRO FastVu. If satisfactory operation of the unit cannot be obtained using this guide in conjunction with the
installation and operating instructions of this manual, contact your supplier or Vision Systems Limited directly. The
serial number of the unit and the firmware version numbers should always be quoted.
SYMPTOM
CHECKS AND PROBABLE CAUSES
Front panel Power Light
does not illuminate
Check Main Power fuse on rear panel.
Check internal PCB Power and Earth Return fuses on main PCB.
No picture present
Check that the green power light is on. If not, check that input power to the
ADPRO FastVu is within the specifications.
Check that the video cables are correctly installed.
Check that power is connected to the monitor.
Check the brightness and contrast controls on the monitor.
Video is unstable on the
monitor
Check the horizontal and vertical controls on the monitor.
Check the video level from the camera into the Video Inputs of the ADPRO FastVu
is within the specifications. If the video level is too low, increase the video level by
using cable compensators or video line amplifiers.
Cannot enter Setup Mode
Check that the keyboard cable is correctly connected to the ‘Keyboard’ port.
Check that the VST VST key is selected and the key light is on.
Lost Setup Password
Refer to Internal Links - Password Override procedure in this Troubleshooting
section.
Picture present, no time,
date or camera ID
information
Check that the status lines are programmed to be displayed.
Loss of stored programmed Data may have been corrupted. If the ADPRO FastVu continually loses its stored
settings during a power
settings during a power failure, consult your supplier or Vision Systems directly.
failure
6-4
Restoring the default
Factory Settings
Refer to Internal Links - Default Setup procedure in this Troubleshooting section.
Clock displays question
marks
The internal battery has run flat. Reset the time. Have the battery replaced. Check
the internal battery link for the real time clock.
‘No Video’ Alarm is
constantly triggered
Check that all the Camera inputs have video connected.
PTZ controls are unusable
or erratic
Check that the correct telemetry station has been configured in the Setup Menu.
Check the wiring and shielding of the PTZ cable is correct.
Rolling Pictures
Check for secure connection of any loop-thru on the video input cables.
- use a direct connection to check if problem is fixed.
- use VDA (Video Distribution Amplifier) to boost signal levels if video levels
from the camera is found to be low.
Check camera output level.
Check all cables and connections.
Refer to Technical Bulletin (99/007) on the ADPRO Website for more information
regarding input level measurements.
ADPRO FastVu, Issue 6
Troubleshooting
ADPRO WEBSITE
www.adpro.com.au
or contact yours nearest sales office for a paper copy
6.5
Internal Links
When shipped from the factory the ADPRO FastVu has the following internal links fitted to the Connector PCB.
•
Link 1 - Password Override - Installed
•
Link 2 - Default Setup - Installed
•
Link 3 - Factory Test- Installed
•
Link 4 - Factory Test - Installed
To change the way ADPRO FastVu operates, a link must be REMOVED.
6.5.1
Location of Internal Links
Figure 6-1 - Location of Internal Links (viewed from inside the unit)
To gain access to the Internal Links, the top cover of the FastVu unit must be removed. To do this:
•
Remove the power connector from the rear of the unit.
•
Loosen the top cover of the chassis by unscrewing the two (2) countersunk holding screws.
•
Slide the top cover rearwards to gain access to the Connector PCB mounted on the rear.
After a link has been removed or replaced:
•
slide the top into position.
•
tighten the two screws.
•
restore power to the unit.
ADPRO FastVu, Issue 6
6-5
Troubleshooting
6.5.2
Password Override
Password checking for the Setup Menu is enabled by using the General Setup menu.
Lost or forgotten passwords? If the password used to access the Setup Menu has been lost or forgotten, password
checking can be temporarily disabled to allow access to the Setup Menu by REMOVING the Password Override link.
The General Setup menu can then be used to change the Setup Password to a new value. The link can then be replaced
for normal password entry operation.
6.5.3
Default Setup
If this link is REMOVED, the FastVu unit will reset ALL configuration fields and parameters (stored in internal
memory) to the Factory Default settings. Once a FastVu unit has been powered up with this link removed, new
configuration fields and parameters may be entered.
The Default Setup link must then be replaced before powering up again, otherwise all new entries will be lost and the
default settings used once more.
6.6
Internal Battery Replacement
Qualified personnel only must be used for replacement of the internal lithium battery.
WARNINGS
The ADPRO FastVu contains an internal lithium battery
There is danger of explosion if the battery is incorrectly replaced.
Replace only with the same or equivalent type recommended by the battery manufacturer.
Dispose of used batteries according to the battery manufacturer instructions.
6-6
ADPRO FastVu, Issue 6
INQUIRIES
AUSTRALIA
Vision Fire & Security
Private Bag 215
495 Blackburn Road
Mount Waverley Vic 3149
Australia
Telephone
+61 3 9211 7300
Facsimile
+61 3 9211 7202
Toll Free
1800 700 203
Technical Support 1800 554 664
THE AMERICAS
Vision Fire & Security
35 Pond Park Road
Hingham
Massachusetts 02043 USA
Telephone
+1 781 740 2223
Facsimile
+1 781 740 4433
Toll Free
800 229 4434
EUROPE & THE MIDDLE EAST
Vision Fire & Security
Vision House
Focus 31 Mark Road
Hemel Hempstead
Herts HP2 7BW UK
Telephone
+44 (0) 1442 242 330
Facsimile
+44 (0) 1442 249 327
WEB SITE
http://www.adpro.com.au
ADPRO FastVu, Issue 6