1
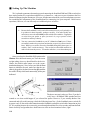
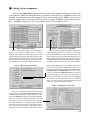
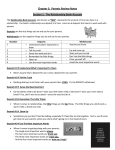
The ScanMark™ OMR
Here they are, the newest elements in Making the Grade’s integrated package of teacher productivity
tools—the ScanMark™ 2000 and 2500 Optical Mark Readers (OMR). It has been our good fortune to
work with Scantron Corporation for over ten years now, starting with the 1100, 1200, 1300, and 2100 series
and Grade Busters 1/2/3. As easy as it was to scan students’ multiple-choice answer sheets into the Apple
II, the ScanMark 2000 and 2500 set unparalleled new standards for user friendliness and machine-scored
testing within Windows classrooms. These marvelous devices are not only simpler to set up and operate than
any of their predecessors (they're truly “plug and play”)—they're completely portable as well! They don’t
have to be bolted to a table in the faculty workroom or welded to a cart in the media center, for
each weighs only 16.7 pounds and comes in its
own travel case. (This looks so much like a
bowling or ski boot bag that my students asked
if we were going on a field trip recently instead
of taking a scheduled monster test.) All of these
marvelous features go for naught, however, if
the devices don’t make your job easier or save
massive amounts of your precious time. Simply
put, colleagues, this the ScanMark 2000 and
2500 do with aplomb, not to mention genuine
concern for your departmental, building, or district hardware budgets.
SCANTRON CORPORATION
Take a close look and judge for yourself . . . .
http://www.scantron.com
117
■ Setting Up The Machine
We’re pleased to announce that setting up and connecting the ScanMark 2000 and 2500 to each of our
three testing-station PCs required no technical savvy whatsoever—and not even one visitation to the User
Manual accompanying the instrument. Of course, that document should be your first and primary resource
for assembling the components of the ScanMark and for connecting it to your computer. Based on our
experience, however, we can offer only two additional pieces of advice:
SETUP SUGGESTIONS
1.
Because the ScanMark is easily carried from room to room, you’ll probably set
it up and tear it down frequently, perhaps even daily. If so, make doubly sure
each time to secure the cable firmly to the backside of the machine. Fingernails
or coins from your pocket or purse just won’t do, so get yourself a little
screwdriver and keep it handy.
2.
You may connect the ScanMark to your PC’s Com 1 or Com 2 port. If these
are normally attached to your printer and modem, respectively,connect it to the
latter. Whenever we tried to access the ScanMark through the printer port, we
couldn’t “find” it with consistency. Then we had to reboot both machines to
make a fresh run at the process. Too much trouble here, so use the modem port.
Once you select the ScanMark 2000 option under
Window in the MtG main menu, you’ll see the screen
at right asking where we should look for the device.
(Notice the default radio button set to the recommended modem port.) Now, before you click the Next
button to initialize the unit, make sure that the machine is plugged in (A), that it is turned on (B), and that
the cable is firmly seated and connected (C) to the port
indicated.
k
ar
M
n
a
Sc
C
A
The above message is what you’ll see if you don’t
really have a ScanMark 2000 attached and just
wanted to see what would happen if you selected the option. However, if you actually do have one
connected and still see this message, check the following items first: (1) the ScanMark power switch, (2)
its power cord, (3) the serial cable connection on the ScanMark, and (4) the serial cable connection on your
PC. If everything seems to be set correctly, power down both machines for a few seconds, and launch afresh.
Static electricity and gremlins have been known to stifle our best intentions before, right?
B
118
A
■ Setting Up an Assignment
There are five simple steps which must be followed to score a Scantron assignment and enter it into
your gradebook. First, you must indicate the type of form used for the activity. Second, you must enter
pertinent setup information for the assignment, just as you normally would. Third, you must tell us
precisely which portion of the Scantron Form you wish us to grade. Fourth, you must scan the Answer
Key. And fifth, you must score all of your students’ sheets. That’s all there is to it!
Step 1: Selecting the Form
Step 2: Setting Up the Assignment
The list of forms above will grow over the years, no
doubt, as new sheets are designed and as we receive
feedback from teachers across the country. Do be careful
to differentiate among layout definitions for Side 1 Only
forms, Side 2 Only forms, and Sides 1 and 2 forms. Check
the range/position of items on your Answer Key before
your make the above selection, and all should be well.
You’ve probably noticed the Scantron button on the
assignment setup screen before, and at last it comes into
play. Keep in mind that if you access the machine-scoring
option from this screen, you should click that button before
entering setup info in the boxes. PC protocols necessitate
finding and initializing the ScanMark without “baggage,”
so nothing entered here before the click will be retained.
Step 3: Indicating Activity Range
This Scantron summary screen is similar to those you’ve
seen before, with a couple of significant exceptions. Notice the two numbers in the rectangles at left indicating the
First Question and Last Question of the activity. These
two items constitute the MtG Money Saver, for, depending upon the range of scores you wish to scan at any given
time, you can use ALL of a student’s answer sheet during
the course of a year. For the activity at left we’re evaluating
Items 1-35. The next time, we can focus upon Items 36-70
if we wish, thereby saving valuable paper.
Step 4: Scanning the Answer Key
Once you’ve denoted the specific items to be scanned
for this activity, click the Scan Answer Key button and
feed it through the machine. Please note that you may
leave items blank between the First and Last Questions,
but we will ask you to confirm the “anomaly” if we find
such gaps in your key. The sample activity at right had
five empty items (26-30, as a matter of fact); therefore,
the screen confirms only 30 active items between Questions 1 and 35. The assignment was assigned a value of
120 points, so each item will have an X-Factor of 4.000.
119
■ Scoring an Assignment
The final window in the ScanMark 2000
OMR process is a familiar old friend, the Random Entry Screen (at least we hope you’ve seen
this layout before). All you must do at this point
is press Enter, run your students’ answer sheets
through the machine, and check the screen to
see what each person received. (Worry not—
we can print the number of correct items on
each page, but read your ScanMark User Manual
to see exactly how that process works.) It is
uncommon, but distinctly possible, that a sheet
may jam going into the ScanMark or simply be
misread in the scanning process. In that case,
take a look at the suggestions below.
Step 5: Scanning Students’ Answer Sheets
The Control Panel of the ScanMark 2000
SCANNING TIPS
1. Be sure that the Ready Lamp (A) is on
before feeding your Answer Key and students’ sheets through the ScanMark. If at
any point the machine falls “off line,” we
recommend that you exit Making the Grade
and restart both machines. Remember,
gremlins abound!
2. Occasionally a sheet will fail to pass cleanly
through the ScanMark, becoming “locked
out” of the scanner. (If so, you’ll see the
Ready Lamp blinking rapidly.) When this
occurs, press the green End Button (B)
once and insert that page again.
After your last answer sheet has been fed
through the ScanMark, press the green End of
Batch Button again (or press Control + Period
on the PC keyboard) to bring the scanning
sequence to its conclusion. NOTE: If you
suddenly discover an ungraded answer sheet or
two lying around after pushing the End Button,
click Begin Scanning Sheets again and feed
the errant sheet(s) through. When you’re completely finished with the batch, please note the
summary line at screen bottom indicating how
many good, bad, and duplicate feeds occurred
during the session.
120
B
A
ScanMark Assignment Summary Screen
■ Scoring the Next Assignment
Here’s some fantastic news!
The ScanMark 2000 segment of Making the Grade enables (and encourages)
you to scan “retake and makeup” answer
sheets for a previously-entered assignment. In fact, once you’ve entered and
saved a Scantron record within a class
file, you’ll see the above message every time you access that program feature again. Please understand that
if you select Old Assignment here, you will not be able to rescan your Answer Sheet for that activity—
only student response sheets. If you had to alter the original key for that assignment, you must delete it
completely from your gradebook, and rescan the entire batch of sheets as a New Assignment. (Multiple
Answer Keys per assignment is just too much data for us to handle right now, given the memory constraints
of most PCs in the classroom today. Perhaps in a future version . . . .)
■ Printing A ScanMark Record
We know you’ve seen the ScanMark print options throughout the Student and Class Reports section
of Making the Grade, so we’ve included a few examples thereof for your examination below. All of the
information contained in these reports is stored within each class file. And it will remain there with other
student data to be printed whenever you wish—that is, until you enter and save your next Scantron
assignment. At that time, the next activity’s data will be written on top of that in the previous record, and
the latter will be lost forever. So, if you have plans to obtain hardcopy records of student performance for
any scanned-in assignment, be sure to do so before you record the next.
Student Scantron Reports with Answer Key
Class Scantron Analysis for Assignment 36
121
■ Scanner Preferences
Careful readers of this portion of the documentation may have noted (on page 122) that Making the
Grade “can print the number of correct items on each
page, but read your ScanMark User Manual to see
exactly how that process works.” Unfortunately, we
know all too well how difficult locating such a
document can be. (“Hey, has anyone seen the ScanMark User Guides? They were here in this drawer
last year, I think . . . .”) Therefore, the feature in
question can be found within Making the Grade itself
in the File menu under MtG Preferences and in Printing on scanner answer sheets. As seen in the screen above,
the program defaults to “No” when asked if you wish to print raw scores on student answer sheets. We chose this
position for two reasons: The scoring process is much quieter and less disruptive (if your machine is in the
classroom), and you will more than likely wish to use the same answer sheet again in the future. Because the
ScanMark usually prints raw score in the same position on each answer sheet, these numbers quickly become
unreadable, anyway.
122