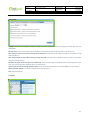
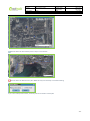
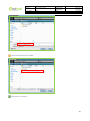
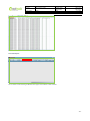
1
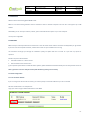
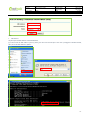
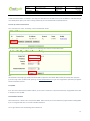
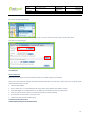
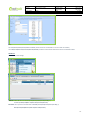
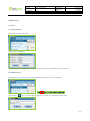
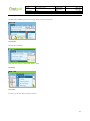
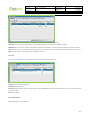
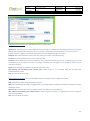
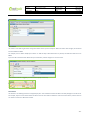
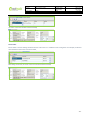
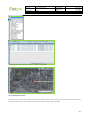
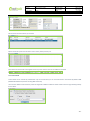
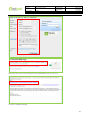
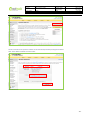
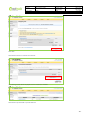
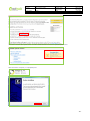
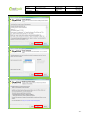
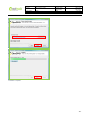
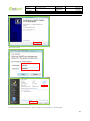
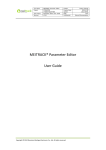
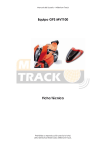
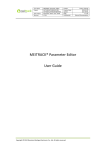
File Name: MEITRACK MS01 User Guide Creator: Project: GPS Tracking System Sub Project: Revision: MS01 V2.2 Creation Date: Update Date: Page: Confidential: Cavana Cheung 2009-12-24 2011-02-12 - 1 - of 39 External Documentation MEITRACK® MS01 User Guide -1- File Name: MEITRACK MS01 User Guide Creator: Project: GPS Tracking System Sub Project: Revision: MS01 V2.2 Creation Date: Update Date: Page: Confidential: Cavana Cheung 2009-12-24 2011-02-12 - 2 - of 39 External Documentation Contents 1 Introduction ..................................................................................................................................................................................... - 3 2 Installation ....................................................................................................................................................................................... - 3 2.1 Router Configuration ............................................................................................................................................................ - 3 2.1.1 Set Intranet IP Address ............................................................................................................................................... - 3 2.2.2 Set up a Service Port for the PC ................................................................................................................................. - 5 2.3 DynDNS ................................................................................................................................................................................. - 5 2.4 Install Net Framework........................................................................................................................................................... - 5 2.5 Installing and Configuring MS01 ........................................................................................................................................... - 6 2.5.1 Installing MS01........................................................................................................................................................... - 6 2.5.2 Run MS01 ................................................................................................................................................................... - 7 2.5.3 Set Communication Port ............................................................................................................................................ - 8 2.5.4 Add Device ................................................................................................................................................................. - 8 2.5.5 Show Device on the Map ......................................................................................................................................... - 10 3 MS01 Functions ............................................................................................................................................................................. - 11 3.1 System ................................................................................................................................................................................ - 11 3.1.1 Change Password ..................................................................................................................................................... - 11 3.1.2 Minimize to Tray....................................................................................................................................................... - 11 3.1.3 Change Skin.............................................................................................................................................................. - 12 3.1.4 Log Off...................................................................................................................................................................... - 12 3.2 Settings ............................................................................................................................................................................... - 12 3.2.1 Device ...................................................................................................................................................................... - 12 3.2.2 User .......................................................................................................................................................................... - 13 3.2.3 Communication........................................................................................................................................................ - 13 3.2.4 IO Customized .......................................................................................................................................................... - 15 3.2.5 Options .................................................................................................................................................................... - 17 3.3 Reports ............................................................................................................................................................................... - 17 3.3.1 History Report .......................................................................................................................................................... - 18 3.3.2 Alarm Report............................................................................................................................................................ - 21 3.3.3 Speed Report (Pie Chart).......................................................................................................................................... - 22 3.3.4 Speed Report (Line Chart) ........................................................................................................................................ - 23 3.3.5 Parking Report ......................................................................................................................................................... - 23 3.3.6 Distance Report........................................................................................................................................................ - 24 3.3.6 Sensor Report .......................................................................................................................................................... - 24 3.4 Help .................................................................................................................................................................................... - 24 3.4.1 Register .................................................................................................................................................................... - 24 3.4.2 Online Update .......................................................................................................................................................... - 25 3.4.3 About ....................................................................................................................................................................... - 26 3.5 MS01 Main Window ........................................................................................................................................................... - 26 3.5.1 Command Bar .......................................................................................................................................................... - 26 3.5.2 Status Bar ................................................................................................................................................................. - 26 3.5.3 Control Panel ........................................................................................................................................................... - 27 3.5.4 Device List ................................................................................................................................................................ - 28 3.5.5 Real-time Tracking.................................................................................................................................................... - 29 4 Annex: DynDNS .............................................................................................................................................................................. - 30 - -2- File Name: MEITRACK MS01 User Guide Creator: Project: GPS Tracking System Sub Project: Revision: MS01 V2.2 Creation Date: Update Date: Page: Confidential: Cavana Cheung 2009-12-24 2011-02-12 - 3 - of 39 External Documentation 1 Introduction Welcome to the GPS Tracking System MS01 Guide! MS01 is a PC based tracking software which is suitable for small or medium enterprises and end users and supports up to 500 trackers. With MS01, you can track your vehicles, children, pets and valuable assets anytime on your own computer. Thank you for using MS01 2 Installation MS01 is easy to install if you follow all the instructions in this document. Please read the document carefully before you get started. If you have a fix internet public IP address, it will be much easier for your installation and running. This document should get you through the installation quickly, but please feel free to contact us if you have any queries or questions. Software required under Windows: 1. Windows Installer 3.1 or above version 2. Net Framework 2.0 or above version If your operation system doesn’t include the above software, please download and install manually. You can also find them in the CD. Note: If you have a PC server with fix internet public IP address, please go to 2.4 directly. 2.1 Router Configuration 2.1.1 Set Intranet IP Address If you are using router for internet connection, you need to specify a reserved IP address for your PC on the LAN. We take TP-Link Router as an example here. Login your router and go to Address Reservation under DHCP. -3- File Name: MEITRACK MS01 User Guide Creator: Project: GPS Tracking System Sub Project: Revision: MS01 V2.2 Creation Date: Update Date: Page: Confidential: Cavana Cheung 2009-12-24 2011-02-12 - 4 - of 39 External Documentation Click ‘Add New’ and enter the MAC Address and Reserved IP Address and make Status ‘Enabled’. Click ‘Save’ when finished. Note: 1. MAC Address The format for the MAC Address is XX-XX-XX-XX-XX-XX. If you don’t know the MAC address of the PC, please go to Start->Run and the Open ‘cmd’. Enter ‘ipconfig/all’ in MS-DOS window, then you see the MAC Address as follows:- -4- 2. File Name: MEITRACK MS01 User Guide Creator: Project: GPS Tracking System Sub Project: Revision: MS01 V2.2 Creation Date: Update Date: Page: Confidential: Cavana Cheung 2009-12-24 2011-02-12 - 5 - of 39 External Documentation IP Address A valid reserved IP address is normally in the range from 192.168.1.2 to 192.168.1.254 or from 192.168.0.2 to 192.168.0.254 (for more details please refer to your router’s setting) and the one you enter should not be occupied by other PC. 2.2.2 Set up a Service Port for the PC Go to ‘Virtual Servers’ under ‘Forwarding’ and click the ‘Add New’ button. Enter Service Port and the Reserved IP Address in the following boxes and then click the Save button. Note: Port should be in the range of [1, 65536]. Port above 4000 is preferred as those below 4000 are likely occupied by other programs. If you are using router of other brands, please go to http://portforward.com/ to get more configuration information for different brands and models of routers. 2.3 DynDNS If you don’t have a fixed internet public IP address, you can point a hostname to a dynamic IP address by using DynDNS. Please refer to Chapter 4 Annex: DynDNS. 2.4 Install Net Framework Net Framework 2.0 or above version is required for MS01. Please confirm your PC has installed this program before installing MS01. If you are using Windows Vista, no need to install Net Framework. You can go to below link for downloading Net Framework 2.0 -5- File Name: MEITRACK MS01 User Guide Creator: Project: GPS Tracking System Sub Project: Revision: MS01 V2.2 Creation Date: Update Date: Page: Confidential: Cavana Cheung 2009-12-24 2011-02-12 - 6 - of 39 External Documentation http://www.microsoft.com/downloads/details.aspx?FamilyID=0856eacb-4362-4b0d-8edd-aab15c5e04f5&displaylang=en 2.5 Installing and Configuring MS01 2.5.1 Installing MS01 Run setup.exe Click the ‘Next’ button. Select a destination folder for MS01 and then click ‘Next’ till finished. -6- File Name: MEITRACK MS01 User Guide Creator: Project: GPS Tracking System Sub Project: Revision: MS01 V2.2 Creation Date: Update Date: Page: Confidential: Cavana Cheung 2009-12-24 2011-02-12 - 7 - of 39 External Documentation 2.5.2 Run MS01 Login ID: admin Password: 000000 Click ‘OK’ and MS01 is displayed as below: -7- File Name: MEITRACK MS01 User Guide Creator: Project: GPS Tracking System Sub Project: Revision: MS01 V2.2 Creation Date: Update Date: Page: Confidential: Cavana Cheung 2009-12-24 2011-02-12 - 8 - of 39 External Documentation 2.5.3 Set Communication Port Go to Communication under Settings. Enter the Port Number according to what you have preset in the router and click the ‘Stop’ button and then click ‘Start’. Click ‘Save’ to save the changes. 2.5.4 Add Device Device Configuration Please refer to user manual or GPS Tracker Parameter Editor to do GPRS settings for the tracker(s). Here are some instructions for setting by GPS Tracker Parameter Editor (for more information, please refer to the user guide of GPS Tracker Parameter Editor in the CD): 1. Check the box of GPRS. 2. Enter a Tracker ID. It is a unique GPRS ID for the tracker. Please assign different ID for different trackers. 3. Input APN, APN Account and APN Password. If no APN Account and Password, leave these boxes blank. 4. Input your public internet IP address or the domain (hostname) created by DynDNS. 5. Port should be the Service Port you set in the router. 6. Interval is the time interval for GPRS tracking. GT30i/GT60/VT300/VT310/VT400 MT80i/MT88/MVT100/MVT340/MVT380/MVT600 -8- File Name: MEITRACK MS01 User Guide Creator: Project: GPS Tracking System Sub Project: Revision: MS01 V2.2 Creation Date: Update Date: Page: Confidential: Cavana Cheung 2009-12-24 2011-02-12 - 9 - of 39 External Documentation Note: For GT30i/GT60/VT300/VT310/VT400 and MT80, Tracker ID can be created and it is not more than 14 numbers; For MT80i/MT88/MVT100/MVT340/MVT380/MVT600, Tracker ID is the tracker’s IMEI and is shown on Parameter Editor. Add Device Go to Device under Settings GPRS ID: Tracker ID set to the tracker (GT30i/GT60/VT300/VT310/VT400), or, The IMEI (MT80i/MT88/MVT100/MVT340/MVT380/MVT600) Password: User’s password and defaulted as 000000 (GT30i/GT60/VT300/VT310/VT400), or, 0000 (MT80i/MT88/MVT100/MVT340/MVT380/MVT600) -9- File Name: MEITRACK MS01 User Guide Creator: Project: GPS Tracking System Sub Project: Revision: MS01 V2.2 Creation Date: Update Date: Page: Confidential: Cavana Cheung 2009-12-24 2011-02-12 - 10 - of 39 External Documentation SIM Number: The phone number of the SIM card Type: Tracker’s model Name: Create a name for the tracker Click the ‘Save’ button and ‘Yes’ to save. 2.5.5 Show Device on the Map On the right side of MS01 main window, the devices added will be displayed under ‘Device List’. Click the ‘Refresh’ button to display new-added device(s). When each device is selected, its status will be displayed on the bottom of the main window and when you double click the device, it will be shown on the map center. - 10 - File Name: MEITRACK MS01 User Guide Creator: Project: GPS Tracking System Sub Project: Revision: MS01 V2.2 Creation Date: Update Date: Page: Confidential: Cavana Cheung 2009-12-24 2011-02-12 - 11 - of 39 External Documentation You can also see device’s alarms and connection status under the ‘Alarms’ tab and ‘Reports’ tab. 3 MS01 Functions 3.1 System 3.1.1 Change Password Click Change Password under System. Type your new password here. The default password is ‘000000’. Please change your password after login and remember your new password. 3.1.2 Minimize to Tray Click Minimize to Tray under System to minimize MS01 to the tray when you need to hide MS01. Double click the button on the tray, MS01 will request you to enter your password for safety purpose. - 11 - File Name: MEITRACK MS01 User Guide Creator: Project: GPS Tracking System Sub Project: Revision: MS01 V2.2 Creation Date: Update Date: Page: Confidential: Cavana Cheung 2009-12-24 2011-02-12 - 12 - of 39 External Documentation 3.1.3 Change Skin The default skin of MS01 is blue, you can change the skin in System>Change Skin. 3.1.4 Log Off Click Log Off to exit MS01. Note: New data cannot be received after MS01 is closed. 3.2 Settings 3.2.1 Device In Device, you can add, delete or edit your trackers. - 12 - File Name: MEITRACK MS01 User Guide Creator: Project: GPS Tracking System Sub Project: Revision: MS01 V2.2 Creation Date: Update Date: Page: Confidential: Cavana Cheung 2009-12-24 2011-02-12 - 13 - of 39 External Documentation GPRS ID: It is the tracker ID in digits you configured to your tracker or the IMEI of the tracker. Password: The user’s password for trackers to receive SMS commands and defaulted as ‘000000’ or ‘0000’. SIM Number: It is the phone number of the SIM card inserted in the tracker. It is strictly required for SMS tracking by using RT200. Type: Tracker’s type. It is important to select the right type of the tracker for full functioning of all GPRS commands for each tracker. Name: Create a name for your tracker to be displayed on the map. 3.2.2 User Click User under Settings for user management. You can add, delete and edit user here. Login ID: the user’s ID for MS01 login. Password: Login password. Permission: Administrator and User. Administrator can send GPRS/SMS commands and manage devices and users. User can only do tracking in MS01. Email: User’s email. 3.2.3 Communication Click Communication under Settings. - 13 - File Name: MEITRACK MS01 User Guide Creator: Project: GPS Tracking System Sub Project: Revision: MS01 V2.2 Creation Date: Update Date: Page: Confidential: Cavana Cheung 2009-12-24 2011-02-12 - 14 - of 39 External Documentation GPRS Communication Setting is to enable GPRS connection for GPRS tracking. Listening Port: A port for your PC to receive GPRS data and in the range of [1, 65536]. Port above 4000 is preferred as those below 4000 are likely occupied by other programs. If you are a LAN user, it should be the port that specified in the router for your PC. If no data is receive, suggest you use another port number and do the setting accordingly in your router. Stop/Start: After the Port Number is entered, click ‘Stop’ and then click ‘Start’ to activate this setting. Intranet IP: It is the IP specified to your PC in the router of the LAN. Internet IP: Internet Public IP. For internet connection via router, if the IP that assigned to your router is a fixed IP, then you can use this IP directly. If it is a temporary internet IP and changes occasionally, then we suggest you use DynDNS as stated in #2.3 for continuous connection. Get IP: Click Get IP to get the updated and show latest IP from your router. Open listening port automatically when software opens: Check this box. If it is unchecked, MS01 will not receive data automatically when it opens. Save: Click it to save all your settings. COM Communication Setting is used for RT200 (SMS modem) for tracking and tracker configuration via SMS. COM: the COM port number used for RT200 after connection. Open: Open the COM port for RT200. It is suggested that one specified USB port is appointed for RT200 to avoid frequent changes of COM port number. Refresh: If MS01 is already opened prior to RT200 connection, click ‘Refresh’ to refresh COM port. Open COM port automatically when software opens: If RT200 is regularly connected, it is suggested that this box is checked to avoid resetting for RT200. Save: Click it to save all the settings. - 14 - File Name: MEITRACK MS01 User Guide Creator: Project: GPS Tracking System Sub Project: Revision: MS01 V2.2 Creation Date: Update Date: Page: Confidential: Cavana Cheung 2009-12-24 2011-02-12 - 15 - of 39 External Documentation 3.2.4 IO Customized Alarm Define This function is for defining the status change of IO which means inputs and outputs. When the status of IO changes, the alarm will be sent to MS01 via GPRS. For example, we can define “SOS/Input 1 Active” as “SOS for Help”. When SOS button is pressed, the SOS alarm will be sent to MS01. Input 4 can be connected to ACC. When the input is activated, it means “Engine On.” and vice versa. When the above alarm is triggered, its status will be display on the map. Status Define This function is for defining the status of input/output ports. This information will be included in the data package sent to the server. For example, Input 5 can be used to detect the status of the car door. We can define the name as Car Door Status, and the status as ‘On’ when it is active and ‘Off’ when inactive. - 15 - File Name: MEITRACK MS01 User Guide Creator: Project: GPS Tracking System Sub Project: Revision: MS01 V2.2 Creation Date: Update Date: Page: Confidential: Cavana Cheung 2009-12-24 2011-02-12 - 16 - of 39 External Documentation The status on the main interface will show as below, Sensor Define Sensor define is used for defining calculation formula of the sensor. It is suitable for linear analog sensor. For example, the formula of the calculation of fuel sensor is shown as below, After adding the formula, the status on the main interface will show as below, - 16 - File Name: MEITRACK MS01 User Guide Creator: Project: GPS Tracking System Sub Project: Revision: MS01 V2.2 Creation Date: Update Date: Page: Confidential: Cavana Cheung 2009-12-24 2011-02-12 - 17 - of 39 External Documentation 3.2.5 Options Language: There are three languages available, i.e. English, Chinese and Spanish. Choose your language and click ‘Save’ and then restart MS01. No voice mode: There is a siren when an alarm message is received from the tracker. Check the box to turn off the siren. Show tracker location on map when receiving new incoming data: Check this box to update the tracker’s new location on map when new data is in. Show tracker location on map when receiving incoming alarm data: Check this box to update the tracker’s location on map when new alarm message comes in. Remember my login details and sign me in automatically: Check the box to login automatically without inputting password next time. If you need to login with a different login ID, uncheck this box. I want to save the tray icon settings, disable requests: Check this box to block reminder and minimize MS01 to the tray directly. Disable automatic upgrade: turn off auto-update and notice of new version. Save: Save above settings. 3.3 Reports - 17 - File Name: MEITRACK MS01 User Guide Creator: Project: GPS Tracking System Sub Project: Revision: MS01 V2.2 Creation Date: Update Date: Page: Confidential: Cavana Cheung 2009-12-24 2011-02-12 - 18 - of 39 External Documentation 3.3.1 History Report You can search history reports by Tracker ID or Name and choose a time range for the history. Click this button to refresh if any new device is added. Click this button to search history reports. You can double click each message to show the location directly on map in a new window. You can also use Ctrl or Shift to select more messages and to show then on map by right clicking the mouse. - 18 - File Name: MEITRACK MS01 User Guide Creator: Project: GPS Tracking System Sub Project: Revision: MS01 V2.2 Creation Date: Update Date: Page: Confidential: Cavana Cheung 2009-12-24 2011-02-12 - 19 - of 39 External Documentation : Click this button to draw all history trace on map in a new window. : Click this button to delete all history data. MS01 will ask you to do backup or not before deleting. If you choose ‘Backup before delete’, the history data can be saved to a backup file: - 19 - File Name: MEITRACK MS01 User Guide Creator: Project: GPS Tracking System Sub Project: Revision: MS01 V2.2 Creation Date: Update Date: Page: Confidential: Cavana Cheung 2009-12-24 2011-02-12 - 20 - of 39 External Documentation : Import the saved backup file into MS01. : Export history to an Excel file. - 20 - File Name: MEITRACK MS01 User Guide Creator: Project: GPS Tracking System Sub Project: Revision: MS01 V2.2 Creation Date: Update Date: Page: Confidential: Cavana Cheung 2009-12-24 2011-02-12 - 21 - of 39 External Documentation 3.3.2 Alarm Report You can search result according to different alarm types. Leave it blank to find all alarms. - 21 - File Name: MEITRACK MS01 User Guide Creator: Project: GPS Tracking System Sub Project: Revision: MS01 V2.2 Creation Date: Update Date: Page: Confidential: Cavana Cheung 2009-12-24 2011-02-12 - 22 - of 39 External Documentation Double click each alarm to show its location on map in a new window. 3.3.3 Speed Report (Pie Chart) Select a device and set the time range and then click the ‘Search’ button to start searching. The pie chart will show the proportion of speed during this period. This report is for monitoring the driver’s driving habit of speeding. - 22 - File Name: MEITRACK MS01 User Guide Creator: Project: GPS Tracking System Sub Project: Revision: MS01 V2.2 Creation Date: Update Date: Page: Confidential: Cavana Cheung 2009-12-24 2011-02-12 - 23 - of 39 External Documentation 3.3.4 Speed Report (Line Chart) Select a device and set the time range and then click ‘OK’ to start search. The line chart will show the speed during this period 3.3.5 Parking Report Select a device and set the time range. Then click “ ” to start search. This report shows the period of time of each parking. When the speed is lower than 10km/h for over 3 minutes, it will be reported as a parking. You can define the parking time with minimum 3 minutes for search. - 23 - File Name: MEITRACK MS01 User Guide Creator: Project: GPS Tracking System Sub Project: Revision: MS01 V2.2 Creation Date: Update Date: Page: Confidential: Cavana Cheung 2009-12-24 2011-02-12 - 24 - of 39 External Documentation 3.3.6 Distance Report Select a device and the time range. Then click “ ” to start search. This report shows the distance and the average speed between every two parking spots. Note: The parking spot is decided by the speed. When the speed is lower than 10km/h for over 3 minutes, it will be reported as a parking. 3.3.6 Sensor Report Select a device, sensor name and the time range. Then click “ ” to start search. See below an example of report for fuel sensor. The calculation of the fuel sensor can be defined under “Settings””IO Customized”. 3.4 Help 3.4.1 Register If your MS01 is not registered, it will show ‘Unregistered X Days Remaining’ on the title. Trial version can only be used for seven days. - 24 - File Name: MEITRACK MS01 User Guide Creator: Project: GPS Tracking System Sub Project: Revision: MS01 V2.2 Creation Date: Update Date: Page: Confidential: Cavana Cheung 2009-12-24 2011-02-12 - 25 - of 39 External Documentation Click Register under Help. Write down the PC code and send it back to us for getting the License Code. If the MS01 is already registered, the following window will be shown: 3.4.2 Online Update If a new version of MS01 is detected, the following window will pop up to ask you to update the software: Click ‘Yes’ to update. - 25 - File Name: MEITRACK MS01 User Guide Creator: Project: GPS Tracking System Sub Project: Revision: MS01 V2.2 Creation Date: Update Date: Page: Confidential: Cavana Cheung 2009-12-24 2011-02-12 - 26 - of 39 External Documentation MS01 will be close before update starts and you need to log in again after update complete. 3.4.3 About 3.5 MS01 Main Window 3.5.1 Command Bar Shortcuts for Change Password, Device, User, Communication Settings, Options, History Report and Alarm Report. Type manually latitude and longitude here for finding location. Note: Format: degrees/minutes/seconds. It’s the same format with the coordinates you receive by SMS. : Refresh the map. 3.5.2 Status Bar Status shows details of each location. - 26 - File Name: MEITRACK MS01 User Guide Creator: Project: GPS Tracking System Sub Project: Revision: MS01 V2.2 Creation Date: Update Date: Page: Confidential: Cavana Cheung 2009-12-24 2011-02-12 - 27 - of 39 External Documentation Alarms shows alarm information you received. Reports shows all reports from the device such as online, offline, location, etc. Status Bar shows the latitude and longitude of the map center and the status of the COM Port and GPRS. 3.5.3 Control Panel Control Panel can be accessed by administrator only. On Control Panel you can send commands to the trackers by GPRS or SMS (SMS Modem RT200 is required for sending SMS commands). There are two different communication protocols integrated in MS01 for different models. Please select the right model (protocol) for the device. - 27 - File Name: MEITRACK MS01 User Guide Creator: Project: GPS Tracking System Sub Project: Revision: MS01 V2.2 Creation Date: Update Date: Page: Confidential: Cavana Cheung 2009-12-24 2011-02-12 - 28 - of 39 External Documentation Note: Before sending commands, please select one or more devices (same protocol) under Device List. Please refer to user manual of each tracker for more details and descriptions of the GPRS and SMS commands. 3.5.4 Device List Icon Descriptions: : Select all devices. : Unselect all devices. : Refresh device list. : Save the device(s) you selected to a ‘group’ and to be used next time for sending commands for same devices. : Open the ‘group’ you saved. In Device List: Column 1: It will display an icon when there is new alarm coming in. In normal mode, a siren sound will be on for new alarms. - 28 - File Name: MEITRACK MS01 User Guide Creator: Project: GPS Tracking System Sub Project: Revision: MS01 V2.2 Creation Date: Update Date: Page: Confidential: Cavana Cheung 2009-12-24 2011-02-12 - 29 - of 39 External Documentation Click the icon to turn off the sound. Column 2: Selection Status Column 3: Tracker ID Column 4: Name of the device Column 5: Status of sending GPRS/SMS commands Column 6: If commands couldn’t be sent you, click ‘Retry’ button to resend the command. 3.5.5 Real-time Tracking On Device List, right click the mouse on each device to do real-time tracking on a new window. New location is continuously displayed on the map. For all models, where there is no GPS signal, the device can get location based on GSM station. As it is only GSM-assisted, the real location of the device would be somewhere inside the circle as the example shows below. - 29 - File Name: MEITRACK MS01 User Guide Creator: Project: GPS Tracking System Sub Project: Revision: MS01 V2.2 Creation Date: Update Date: Page: Confidential: Cavana Cheung 2009-12-24 2011-02-12 - 30 - of 39 External Documentation 4 Annex: DynDNS Please go to website: www.dyndns.com and create an account first as below picture shows: - 30 - File Name: MEITRACK MS01 User Guide Creator: Project: GPS Tracking System Sub Project: Revision: MS01 V2.2 Creation Date: Update Date: Page: Confidential: Cavana Cheung 2009-12-24 2011-02-12 - 31 - of 39 External Documentation Check your email to click on the confirmation link sent by DYNDNS to verify your account. Then log in in DynDNS’ homepage: - 31 - File Name: MEITRACK MS01 User Guide Creator: Project: GPS Tracking System Sub Project: Revision: MS01 V2.2 Creation Date: Update Date: Page: Confidential: Cavana Cheung 2009-12-24 2011-02-12 - 32 - of 39 External Documentation Click on ‘Service’ And then ‘Dynamic DNS’ - 32 - File Name: MEITRACK MS01 User Guide Creator: Project: GPS Tracking System Sub Project: Revision: MS01 V2.2 Creation Date: Update Date: Page: Confidential: Cavana Cheung 2009-12-24 2011-02-12 - 33 - of 39 External Documentation Click Dynamic DNS Free: Click ‘Get Started’ - 33 - File Name: MEITRACK MS01 User Guide Creator: Project: GPS Tracking System Sub Project: Revision: MS01 V2.2 Creation Date: Update Date: Page: Confidential: Cavana Cheung 2009-12-24 2011-02-12 - 34 - of 39 External Documentation Create a hostname and its postfix. IP address can be automatically created by clicking the link below. Note: This IP address should be set to the tracker. Click ‘Add To Cart’. - 34 - File Name: MEITRACK MS01 User Guide Creator: Project: GPS Tracking System Sub Project: Revision: MS01 V2.2 Creation Date: Update Date: Page: Confidential: Cavana Cheung 2009-12-24 2011-02-12 - 35 - of 39 External Documentation Click ‘Next’. Click ‘Activate Services’ to activate the hostname. The following window will be displayed once the hostname is activated. Click Services> Dynamic DNS-> Dynamic DNS Free - 35 - File Name: MEITRACK MS01 User Guide Creator: Project: GPS Tracking System Sub Project: Revision: MS01 V2.2 Creation Date: Update Date: Page: Confidential: Cavana Cheung 2009-12-24 2011-02-12 - 36 - of 39 External Documentation Then click on the link ‘ddns update clients’ and then ‘Download Now’ to download ‘DynDNS Update Clients’. When download is complete, run ‘DynUpSetup.exe’. - 36 - File Name: MEITRACK MS01 User Guide Creator: Project: GPS Tracking System Sub Project: Revision: MS01 V2.2 Creation Date: Update Date: Page: Confidential: Cavana Cheung 2009-12-24 2011-02-12 - 37 - of 39 External Documentation - 37 - File Name: MEITRACK MS01 User Guide Creator: Project: GPS Tracking System Sub Project: Revision: MS01 V2.2 Creation Date: Update Date: Page: Confidential: Cavana Cheung 2009-12-24 2011-02-12 - 38 - of 39 External Documentation Select a destination folder: Installation completes: - 38 - File Name: MEITRACK MS01 User Guide Creator: Project: GPS Tracking System Sub Project: Revision: MS01 V2.2 Creation Date: Update Date: Page: Confidential: Cavana Cheung 2009-12-24 2011-02-12 - 39 - of 39 External Documentation Click ‘Finish’ to log in. Click the OK button to minimize it to tray. If no data is received, click ‘Stop Updater’. When it changes into ‘Start Updater’, it will refresh DNS. - 39 -