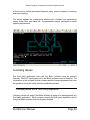
1
Blues 2006
User Manual
THIS DOCUMENT HAS BEEN PREPARED TO ASSIST CUSTOMERS IN
USING SOFTWARE AND HARDWARE.
NEWHART SYSTEMS
INCORPORATED WILL NOT BE LIABLE FOR DAMAGES TO CUSTOMERS
DUE TO ANY ERRORS CONTAINED IN THIS DOCUMENTATION, OR FOR
DAMAGES TO CUSTOMERS RESULTING FROM THE USE OF THIS
DOCUMENTATION AND ACCOMPANYING SOFTWARE AND HARDWARE.
BEFORE USING THIS PRODUCT WITH ANY LICENSED SOFTWARE, THE
CUSTOMER SHOULD CAREFULLY READ ITS LICENSE AGREEMENT TO
INSURE THAT IT WILL NOT VIOLATE ANY OF THE LICENSE TERMS OR
CONDITIONS.
COPYRIGHT (c) 2006 NEWHART SYSTEMS INCORPORATED. ALL RIGHTS
RESERVED. THIS MATERIAL MAY NOT BE REPRODUCED IN WHOLE OR IN
PART BY ANY MEANS WITHOUT WRITTEN PERMISSION.
For More Information Write:
Newhart Systems Inc.
P.O. Box 348
Barneveld, N.Y. 13304 USA
Tel. 315-896-4131
Fax. 315- 896 - 4548
Web. http:\\www.newhartsystems.com
CONTENTS
Introduction................................................................................... 1
Installation..................................................................................... 2
Initial Installation Procedure ................................................................... 3
Upgrading from a Previous Version of Blues 2006 ...................... 3
Upgrading from a Previous Version of Blues 2000 ...................... 4
Initial Install Requirements........................................................... 5
License Agreement...................................................................... 6
Selecting User Information .......................................................... 7
Installation Type........................................................................... 9
Adjusting .NET Security for Blues .......................................................... 9
ClickOnce Deployment ........................................................................... 10
ClickOnce Database Location ..................................................... 13
No Touch Deployment............................................................................ 13
No Touch Deployment Requirements.......................................... 14
IIS Configuration for No Touch Deployment ................................ 14
No Touch Deployment Operation ................................................ 15
Uninstalling ............................................................................................. 17
Graphical User Interface .............................................................. 17
Launching Emulation .............................................................................. 18
Command Line Arguments..................................................................... 19
The Manager Application ............................................................. 21
Using The Manager Window .................................................................. 21
File.......................................................................................................... 22
New Database….......................................................................... 23
Open Database… ........................................................................ 23
Close Database ........................................................................... 23
Delete Database .......................................................................... 23
Backup Database…..................................................................... 24
Restore Database… .................................................................... 24
Close............................................................................................ 24
Edit ......................................................................................................... 25
Groups.................................................................................................... 25
New Group… ............................................................................... 25
Delete Group ............................................................................... 26
Group Properties ......................................................................... 26
Users ...................................................................................................... 27
Global Options ............................................................................. 27
Use the Default user configuration when a Windows user has not been
configured .....................................................................................................................27
Generate email notification when unconfigured usage is attempted ..............................28
Send mail through SMTP server ...................................................................................28
Add Domain Users....................................................................... 28
New User ..................................................................................... 28
User Properties............................................................................ 28
Delete User.................................................................................. 30
Sessions................................................................................................. 30
Add Terminal Session.................................................................. 30
Add Printer Session... .................................................................. 30
Delete Session............................................................................. 31
Session Properties....................................................................... 31
Launch Session ........................................................................... 32
Copy Session Settings… ............................................................. 32
Terminal Emulation ...................................................................... 35
File.......................................................................................................... 35
Save Settings............................................................................... 35
Save Settings On Close............................................................... 36
Enable Printer Output .................................................................. 36
Print Screen ................................................................................. 36
Print Setup ................................................................................... 36
Print Font ..................................................................................... 36
Enable Print To Disk .................................................................... 37
Disk File... .................................................................................... 37
Append To File ............................................................................ 37
Close............................................................................................ 37
Exit............................................................................................... 37
Edit ......................................................................................................... 38
Cut ............................................................................................... 38
Copy ............................................................................................ 38
Append ........................................................................................ 39
Paste ........................................................................................... 39
Continue Paste ............................................................................ 39
Select All...................................................................................... 39
Clear ............................................................................................ 39
View Clipboard............................................................................. 40
View........................................................................................................ 41
Fonts… ........................................................................................ 41
Configure Cursor ......................................................................... 41
Upper Case.................................................................................. 42
Draw Line Through Zeros ............................................................ 42
Host Color Mapping ..................................................................... 42
Titlebar… ..................................................................................... 43
Menubar....................................................................................... 43
Toolbar ........................................................................................ 43
Button Bars... ............................................................................... 44
Statusbar ..................................................................................... 45
Settings .................................................................................................. 46
Enable Sound .............................................................................. 46
Notify When Minimized ................................................................ 46
Keyboard Mapping....................................................................... 47
Hot Spots… ................................................................................. 48
Type Ahead ................................................................................. 49
Mouse Configuration.................................................................... 49
Api Options .................................................................................. 50
Transfer .................................................................................................. 51
File Transfer Main Window.......................................................... 52
Transfer File Window................................................................... 53
Scheme Editor ............................................................................. 53
Host Protocol Type........................................................................................................53
File Transfer Application................................................................................................53
Additional Options .........................................................................................................54
File Transfer Method .....................................................................................................54
HOST / PC CODE PAGE ..............................................................................................54
FileType ........................................................................................................................55
File Creation..................................................................................................................55
Record End ...................................................................................................................55
Buffer Size ....................................................................................................................56
Record Length...............................................................................................................56
Block Size .....................................................................................................................56
Record Size ..................................................................................................................56
Space............................................................................................................................57
Comments ....................................................................................................................57
FTP Host Name ............................................................................................................57
FTP Port .......................................................................................................................57
FTP User Name ............................................................................................................57
FTP Time-outs ..............................................................................................................57
Batch Transfer Window ............................................................... 58
Portfolio Editor Window ............................................................... 58
History Window............................................................................ 58
File Transfer Messages ............................................................... 59
Connection ............................................................................................. 61
Connect….................................................................................... 61
Automatically connect when session is started .............................................................62
Automatically reconnect without prompting ...................................................................63
Enable TCP/IP Trace ....................................................................................................63
Disconnect from host after x minutes of inactivity..........................................................63
Pause between connect attempts .................................................................................63
Cycle through destination list x times before giving up ..................................................63
Edit Destination.............................................................................................................64
Emulation Type ...................................................................................................................64
Model Type .........................................................................................................................64
Host IP Address ..................................................................................................................65
Telnet Port ..........................................................................................................................65
Device Name ......................................................................................................................65
SSL and TLS Enabled ........................................................................................................66
Verify Server Certificate ......................................................................................................66
Send Client Certificate ........................................................................................................66
Prompt for AS/400 User name and password ....................................................................66
Current Library ....................................................................................................................67
Initial Menu..........................................................................................................................67
Starting Program.................................................................................................................67
Enable Keep-alives .............................................................................................................67
If Device is in use, increment it and try again .....................................................................67
Send Backspace as DEL key .............................................................................................67
Send Return key as CR LF .................................................................................................67
Disconnect ................................................................................... 68
Macro ..................................................................................................... 68
Record ......................................................................................... 69
Play.............................................................................................. 69
Stop ............................................................................................. 70
Edit .............................................................................................. 70
Delete .......................................................................................... 74
Options ........................................................................................ 74
Help ........................................................................................................ 75
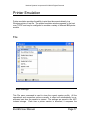
Printer Emulation.......................................................................... 77
File.......................................................................................................... 77
Save Settings............................................................................... 77
Save Settings On Close............................................................... 78
Enable Printer Output .................................................................. 78
Print Setup ................................................................................... 78
Setup….........................................................................................................................79
Fonts… .........................................................................................................................79
Close Printer After.........................................................................................................80
Print Direct To Port........................................................................................................80
Include Printer Escapes In Output.................................................................................80
Line Density ..................................................................................................................80
Character Density .........................................................................................................80
Strings File Name .........................................................................................................81
Margins .........................................................................................................................87
First Print Line...............................................................................................................87
Last Print Line ...............................................................................................................87
Lines Per Page .............................................................................................................87
Maximum Print Column.................................................................................................87
Space Between Lines....................................................................................................87
Space Between Characters...........................................................................................87
SCS Transparent Print Data..........................................................................................88
Hex Pass-Through Trigger Character............................................................................88
Wrap Text At Right Margin ............................................................................................88
Form Feed Without Space ............................................................................................88
Form feed at end of job .................................................................................................89
Auto newline at end of line ............................................................................................89
Additional newline at end of line ....................................................................................89
Newline at end of job.....................................................................................................89
Xlate SCS FF to CRLF ..................................................................................................89
Let Host Override these settings ...................................................................................90
Enable Print To Disk .................................................................... 90
Disk File… ................................................................................... 90
Close............................................................................................ 90
View........................................................................................................ 90
Titlebar… ..................................................................................... 91
Toolbar ........................................................................................ 91
Statusbar ..................................................................................... 91
Connection ............................................................................................. 91
Connect….................................................................................... 92
Disconnect ................................................................................... 92
Help ........................................................................................................ 92
Software Development Kit ........................................................... 93
What Is It ? ............................................................................................. 93
Licensing Issues ..................................................................................... 94
Packaging Blues with a Third Party Application........................... 94
Sample Project Usage............................................................................ 95
Adding Hostcontrol to an existing Visual Studio project ......................... 95
HostControl Class................................................................................... 100
Initialization .................................................................................. 101
Methods ....................................................................................... 102
BeginConnect ...............................................................................................................102
Close.............................................................................................................................103
ClosingWindow .............................................................................................................103
ConnectToDestination...................................................................................................104
DisconnectFromHost.....................................................................................................104
findDisplayText..............................................................................................................105
getDisplayText ..............................................................................................................105
keyText .........................................................................................................................106
keyTerminalKey ............................................................................................................106
Launch ..........................................................................................................................110
mnuMacroPlay ..............................................................................................................111
mnuMacroRecord..........................................................................................................111
mnuMacroStop..............................................................................................................111
PlayMacro .....................................................................................................................111
ReadConfiguration ........................................................................................................111
RecordMacro.................................................................................................................112
setIPAddress.................................................................................................................112
setIPPort .......................................................................................................................113
setCursor ......................................................................................................................113
Properties .................................................................................... 114
AppMenu.......................................................................................................................114
bHideTitle......................................................................................................................114
bHideMenu....................................................................................................................114
bTraceActive .................................................................................................................114
HostCodePage..............................................................................................................114
DATABASE...................................................................................................................115
EmulationType ..............................................................................................................115
foundTextOnRow ..........................................................................................................116
foundTextOnColumn .....................................................................................................116
IPAddress .....................................................................................................................117
IPPort............................................................................................................................118
ModelNumber................................................................................................................118
isMdiContainer ..............................................................................................................119
LANGUAGE ..................................................................................................................119
Message .......................................................................................................................119
PlayingMacroNow .........................................................................................................119
RecordingMacroNow.....................................................................................................119
SaveSettingsOnClose ...................................................................................................119
ScreenCols ...................................................................................................................120
ScreenRows..................................................................................................................120
SESSIONNUMBER.......................................................................................................121
Tag................................................................................................................................121
TitleBarText...................................................................................................................121
TraceActive ...................................................................................................................121
TraceFileName .............................................................................................................122
USERNAME..................................................................................................................122
Delegates, Events, and Handlers ................................................ 122
Threading......................................................................................................................123
evtCloseWindowEvent ..................................................................................................123
evtConnected ................................................................................................................123
evtKeyboardUnlocked ...................................................................................................124
evtLostConnection ........................................................................................................125
evtMacroFunctionCompleteEvent..................................................................................126
evtMenuChangeEvent ...................................................................................................126
evtScreenChange .........................................................................................................126
evtSelectedCompleted ..................................................................................................127
evtTerminalKeyPress ....................................................................................................129
evtTitleBarChangeEvent ...............................................................................................129
Newhart Systems Incorporated © 2006 All Rights Reserved
Introduction
Blues 2006 is a fully featured .NET application. We took our Blues 2000 product
and completely redesigned it to take full advantage of the Microsoft .NET
architecture. Because it is a 100% managed .NET application, you get features
like this:
ClickOnce and No Touch deployment – Simply browse to the Blues
installation folder and click on the link to install and run your emulation. No
need to visit each PC to install your emulation.
Secure Socket Layer (SSL and TLS) provide the highest encryption
available today.
Automatic Software upgrade - automatically done by the Microsoft
Common Language runtime and Internet Explorer. Simply install the new
version over the old one and the next time Blues is launched over the
network it is automatically upgraded.
Isolated Storage - Each users emulation settings are saved in the .NET
isolated storage space so that each users preferences follow them around
the network and remain safe.
Security – Blues 2006 runs inside the .NET “sandbox” so there is
complete control over what resources it may use. By limiting an applications
permission set, you can be assured that it can’t jeopardize operating system
stability or affect other installed software.
Virus hardening – Each Blues file is electronically signed and checked by
the Common Language Runtime when it is loaded into memory. This
prevents a virus from being able to attach itself to Blues 2006 and thus
hinders the spreading of the virus.
Blues 2006 provides an eloquent graphical unit interface for IBM 3270 and IBM
5250 terminal and printer emulation coupled with an administrative configuration
tool that controls emulation settings on a per user bases. Blues 2006 is a
Managed .NET application designed to run on Microsoft Windows 2000 or higher
operating systems.
Connection to the foreign host is done over the TCP/IP protocol with TN3270,
TN5250, and VT100 support. A variety of terminal and printer device types are
supported.
BLUES User Manual
Page:1
Newhart Systems Incorporated © 2006 All Rights Reserved
File transfer functionality includes IND$FILE to and from the CMS, VM, TSO,
ROSCO, and CICS as well as FTP. Build batch files to easily transfer regularly
transferred files easily.
Macro functionality lets you record sequences of screen activities and then
assign them to keystrokes, toolbar buttons, or mouse clicks.
Installation
Installation is a two-phase procedure, initial and subsequent. Initial involves
running the setup.exe program to copy the necessary files to a hard drive located
on a stand-alone pc, network file share, or Microsoft Internet Information Server.
Subsequent installation refers to networked pc installation,
“ClickOnce
Deployment”, or “No Touch Deployment” and is only required for multiple pc
installation and roll out. PCs that can access the folder or web site where the
initial installation has been done can run their emulation by simply pointing
Microsoft Internet Explorer to the folder, or by doing a Start/Run of the
appropriate application, this will be referred to as “No Touch Deployment”
throughout this manual. “ClickOnce Deployment” and “No Touch Deployment”
are automatically cached and version maintained by the Microsoft Common
Language Runtime.
Once the initial software installation has been done, the Blues Manager
application must be used to customize your environment. This involves, creating
a set of Blues user settings, each user setting contains one or more terminal and
printer sessions that provide the emulation. This configuration information is
kept in the Blues database. The Blues database contains the “Master”
configuration and is managed by the Blues Manager application. When an
operator saves their session settings from their emulation window, it is saved in
their isolated storage (a special .NET location in their file system). Each time an
operator launches their Blues emulation, the date and time of the users “master”
configuration is checked to see if has been changed. If the master configuration
has been changed, then the changes are merged with the settings in isolated
storage. This allows the Manager application to override any settings that an
operator may choose.
BLUES User Manual
Page:2
Newhart Systems Incorporated © 2006 All Rights Reserved
A special Blues user named “Default” is created during the initial software
installation and may be used for simple situations. More complex configurations
may need to be done in larger environments.
One other concept that must be understood for “No Touch Deployment” is the
.NET security model. Depending on where you launch Blues from, it will run
under a different security zone. The three zones are: My Computer, Intranet,
and Internet. Each security zone may be adjusted to allow a .NET application
specific rights. Some of these rights include using TCP/IP, accessing the hard
drive, printing, and accessing the registry. For Blues to run properly, it must be
trusted in the various zone(s) being used. The Blues software comes with a
separate Microsoft installer package called trustblues.msi that can be run to
adjust the security for the Blues software, see “Adjusting .NET Security for
Blues” for details on setting up security.
Initial Installation Procedure
Initial installation involves running the setup.exe program to copy the necessary
files to a hard drive located on a stand-alone pc, network file share, or Microsoft
Internet Information Server.
If “ClickOnce Deployment” or “No Touch
Deployment” are going to be used, then the Blues software must be copied to
either a network file share or to a PC running Microsoft Internet Information
Server. Software installation automatically detects if the Microsoft Internet
Information Server is present on the PC and if it is, creates a virtual directory
called Blues that users may browse to launch their emulation.
Upgrading from a Previous Version of Blues 2006
If you have a beta or trial version of Blues 2006 and you want to preserve your
configuration, then you will need to install the new version in the same folder that
it is in now. Follow these steps:
The first thing to do is use the Blues Manager applications File/Backup
feature to save your configuration (user sets, keyboard mappings, macros,
etc). This will save your settings in a zip file. Write down the name of the
folder where the software is installed. The default is Program Files\Blues.
BLUES User Manual
Page:3
Newhart Systems Incorporated © 2006 All Rights Reserved
Uninstall your old version by going to the Control Panel add/remove
programs window and select Blues 2006 to uninstall.
Follow the “initial Software Installation” instructions and make sure that
the installation folder is set to the same folder where the old product was
installed.
After initial installation, use the Blues Managers File/Restore feature to
restore all your settings from the backup zip file.
If you have installed other computers via the “No Touch Deployment” or the
“ClickOnce Deployment”, then these computers will be automatically updated
the next time they launch their emulation.
Upgrading from a Previous Version of Blues 2000
If you have a version of Blues 2000 and you want to preserve your configuration,
then you will need to install the new version in the same folder that it is in now.
Follow these steps:
The first thing to do is use the Blues Manager applications File/Backup
feature to save your configuration (user sets). This will save your database in
a zip file. Write down the name of the folder where the software is installed.
The default is Program Files\Blues.
Start a terminal session window and edit the keyboard mapping from the
settings menu. From this window you will see the folder that your keyboard
mappings are in, write the name of the folder down.
Uninstall your old version by going to the Control Panel add/remove
programs window and select Blues 2000 to uninstall. NOTE – when asked of
you want to delete your Blues database answer YES and when asked to
delete your blues private folder say NO.
Follow the “initial Software Installation” instructions and make sure that
the installation folder is set to the same folder where the old product was
installed.
After initial installation, use the Blues Managers File/Restore feature to
restore all your settings from the backup zip file.
Copy all the files from the Blues 2000 private folder to the new installation
folder.
BLUES User Manual
Page:4
Newhart Systems Incorporated © 2006 All Rights Reserved
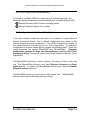
Initial Install Requirements
To be able to install and run Blues 2006, the following software components
must be previously installed:
Microsoft Windows 2000 or newer operating system.
Microsoft Internet Information Server 4.5 or newer (only required if No
Touch Deployment over Internet Explorer is going to be used).
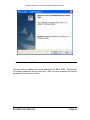
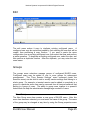
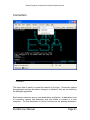
Place the Blues 2006 CD in your drive and wait a few seconds. The installation
program should automatically start.
If the installation program does not start, select Start from the task bar, then
select Run and enter d:\ setup.exe, where d is the drive number of your CD ROM
drive. Press the ENTER key and the installation program should be started.
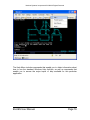
Once the installation has been started, the following window will be displayed:
BLUES User Manual
Page:5
Newhart Systems Incorporated © 2006 All Rights Reserved
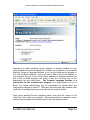
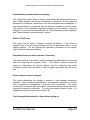
License Agreement
The next window displays the license agreement for Blues 2006. Please read
the license agreement before continuing. After you have accepted the license
agreement, press the next button.
BLUES User Manual
Page:6
Newhart Systems Incorporated © 2006 All Rights Reserved
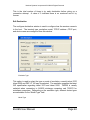
Selecting User Information
BLUES User Manual
Page:7
Newhart Systems Incorporated © 2006 All Rights Reserved
The Blues software may be installed for all users of the PC, or only for your self.
You may install the software for all users of the PC, and then configure Blues
uniquely. Each Windows user will be prompted for their unique settings when
they try to use any of the Blues applications for the first time.
BLUES User Manual
Page:8
Newhart Systems Incorporated © 2006 All Rights Reserved
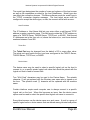
Installation Type
There are two types of installation; Complete, and Custom. Complete will install
all possible components. The Custom installation will allow you to select the
folder where the Blues software will be installed.
The software suite will now be copied from the installation media to your
computer. After the software has been copied, you be allowed to continue
setting up Blues by pressing the Finish button. The next step is to use the
Manager window to configure your emulation.
The first time Blues is launched after installation, the operator is prompted to
enter the connection parameters. The connection parameters determine what
type of emulation is to be used and the IP address of the host. For information
on these parameters, see the section “Edit Destination” in this manual.
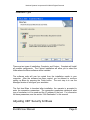
Adjusting .NET Security for Blues
BLUES User Manual
Page:9
Newhart Systems Incorporated © 2006 All Rights Reserved
One other concept that must be understood for “No Touch Deployment” is the
.NET security model. Depending on where you launch Blues from, it will run
under a different security zone. The three zones are: My Computer, Intranet,
and Internet. Each security zone may be adjusted to allow a .NET application
specific rights. Some of these rights include using TCP/IP, accessing the hard
drive, printing, and accessing the registry. For Blues to run properly, it must be
trusted in the various zone(s) being used. The Blues software comes with a
separate Microsoft installer package called trustblues.msi that can be run to
adjust the security for the Blues software.
If any type of security exception occurs while using the Blues software, then the
Blues software must be trusted.
Trusting Blues involves running the program trustblues.msi. This may be done
by either performing a Start/Run from windows of the file trustblues.msi, or by
clicking on the trust link of a user.htm file. The user.htm file contains a link to the
trustblues.msi file. Running the trustblues.msi file does not affect the trust
level for any other .NET application, only the Blues trust level is adjusted.
The security adjustment process does not accept any operator input and
completes without any notification. The security adjustment only needs to be
done once.
ClickOnce Deployment
ClickOnce deployment can only be performed after the initial software installation
has been done. The best use of the ClickOnce technology can be obtained by
first performing the initial software installation on a file server or web server, then
installing subsequent workstations over the ClickOnce technology thus saving
many man hours of installation, customization, and maintenance.
ClickOnce technology allows the Blues software to be installed on a computers
hard drive by running the Blues application manifest file from either a network
share or a web server. Once installed, a new shortcut is created under the
Start/Programs/Newhart Systems menu. Each time the Blues software is
launched from the menu, a version check is performed and if a new version
exists on the file share or web server it is automatically installed and then
BLUES User Manual
Page:10
Newhart Systems Incorporated © 2006 All Rights Reserved
started. The ClickOnce technology allows the Blues software to be installed and
the necessary run time privileges adjusted for the Blues software to allow it to
run properly.
Installation can be done without administrative privileges.
ClickOnce can be performed from any file server or web server. For information
on the ClickOnce technology see http://msdn.microsoft.com/clickonce.
The initial software installation creates a folder named ClickOnce under the
installation folder. This folder contains an index.htm file that is a web page used
to install the Blues over ClickOnce.
If the .NET framework is not installed on the computer doing the ClickOnce
installation, then the index.htm web page will appear slightly different and contain
a link to the Microsoft web site to install the framework. After the framework has
been installed, then the Blues software may be installed over ClickOnce.
BLUES User Manual
Page:11
Newhart Systems Incorporated © 2006 All Rights Reserved
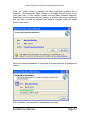
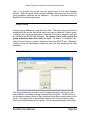
When the “Install” button is pressed, the Blues application manifest file is
executed. This causes the Blues software to be copied from the server to the
local hard drive, a new shortcut created and the Blues software executed.
Depending on the browser security settings, a window may popup confirming
that you want to install the software from Newhart Systems, press the Install
button if this occurs.
While the software installation is in progress a progress window is displayed as
follows:
After installation, the emulation is automatically launched.
BLUES User Manual
Page:12
Newhart Systems Incorporated © 2006 All Rights Reserved
ClickOnce Database Location
The Blues database contains the necessary configuration information for the
Blues software, as discussed earlier in this document. When the Blues
ClickOnce application is launched, if no DATABASE command line argument is
specified, then the software sniffs around the server that was used to install it
looking for a Blues database, if it finds one, it uses this database to configure
itself. If no database is found on the server, then a new one is created in the
same folder that the software has been installed in on the local hard drive. This
technique allows for a centralized database configuration if a database exists on
the web server in the original server path. For example if the Blues ClickOnce
application
was
installed
from
the
web
page
http://1.2.3.4/Blues2006/ClickOnce/index.htm, then if a database exists in either
the Blues2006 or ClickOnce folders on the server then it is used. Otherwise a
new one is created on the local hard drive, the first time the software is launched.
No Touch Deployment
“No Touch Deployment” allows a user to run their emulation by simply pointing
Microsoft Internet Explorer to the Blues folder/web site, or by doing a Start/Run
of the Blues.exe application.
“No Touch Deployment” does not involve the
traditional install process and is sometimes referred to as “Smart Client”
installation. “No Touch Deployment” automatically caches the Blues software.
The Microsoft Common Language Runtime automatically maintains version
checking.
The idea is to use the Blues Manager application to create the necessary
configuration for your enterprise, then, have each user Browse to the Blues
folder or web site and launch the Blues.exe application. Blues can be located on
a local hard drive, a file share point, or on a Microsoft Internet Information
Server. Blues is then administered from the Blues Manager application.
BLUES User Manual
Page:13
Newhart Systems Incorporated © 2006 All Rights Reserved
No Touch Deployment Requirements
To be able to run Blues 2006 from a web site or a network share point, the
following software components must be installed prior to launching Blues 2006:
Microsoft Windows 2000 or newer operating system.
Microsoft Internet Explorer 6.0 or newer.
IIS Configuration for No Touch Deployment
If the initial software installation was done on a computer running Microsoft
Internet Information Server, then a default configuration was added to the
Internet Information Server configuration. This default configuration consists of
two virtual directories that are used in No Touch deployment. No additional
configuration is required unless specific network requirements exist. These two
virtual directories are named “Blues2006” and “Blues2006dir”. Changing
configuration settings for these two directories may result in a No Touch
Deployment failure. Several IIS options must be set properly to allow No Touch
Deployment.
The Blues2006dir directory is used to discover the names of files on the web
site. The Blues2006dir directory must have Directory Browsing and Read
rights enabled. In addition the Blues2006dir directory must have the Enable
Default Document turned off.
The Blues2006 directory is used to launch the software from. The Blues2006
directory must have the following directory settings:
BLUES User Manual
Page:14
Newhart Systems Incorporated © 2006 All Rights Reserved
In addition, MIME types for .ini, .kbd, .pro, .key, .mac, .xfr, .xlt, .scm, .pfl, and .lu1
must all be set to “application/octet-stream”.
No Touch Deployment Operation
To install or run Blues via “No Touch Deployment”, simply browse to the file
share or web site that the initial installation was done on. For example: if you
installed Blues on a server running the Microsoft Internet Information Server
(IIS), then browse to http://website\blues\user.htm (where website is the ip
address of the IIS server). The following web page will be displayed
BLUES User Manual
Page:15
Newhart Systems Incorporated © 2006 All Rights Reserved
Depending on what operating system software is already installed on your
computer and the trust level already set for Blues, you may have to (a) install the
Microsoft Common Language Runtime, or (b) run the trustblues.msi program to
fully trust the Blues software. If your not sure if either of these are installed on
you computer, then go to the Control Panel add/remove programs window and
see if both of these programs are listed, if they are not, then click on the
appropriate link and install them. The Common Language Runtime is a
prerequisite for the trustblues.msi program. In a large network roll out of
Blues, the system administrator may be responsible for having these two
components installed on each PC. Microsoft and other third party vendors offer
solutions for installing these types of products from central locations.
Once you’re satisfied the two conditions above, then click the mouse on the
“click here” link to start your emulation. When the emulation is launched, a new
shortcut may be added to the desktop and or the Start program menu.
BLUES User Manual
Page:16
Newhart Systems Incorporated © 2006 All Rights Reserved
Uninstalling
To uninstall a “No Touch Deployed” computer, all that is needed is to delete any
shortcuts and remove the Blues trust. Shortcuts can be removed by right
clicking over them and selecting delete.
The Blues software and the Blues trust may be removed from the Control Panel
“Add/Remove Programs” icon. To properly remove the software you should
have administrative privileges and have all other windows closed. The uninstall
wizard will guide you through removing Blues from a PC.
Note – Removing the Blues software will also deactivate any “No Touch
Deployed” computers that share the software folder. If you want to
maintain a copy of the configuration files, then use the Blues Manager
File/Backup function to make a copy of your current configuration files.
Graphical User Interface
The Blues software provides a robust graphical user interface (GUI). Two
interfaces are included in the software, a single document interface (SDI) and a
multi document interface (MDI). The SDI interface provides a separate windows
application for each terminal or printer session. The MDI interface provides a
single window for all configured sessions; it has a “tabbed” dialog type of
appearance that allows switching between sessions with the mouse. Each
configured Blues user set may be configured from the Manager application to
appear as either SDI or MDI.
The Blues software contains four .NET Windows applications; Manager.exe,
Terminal.exe, Printer.exe, and Blues.exe. Each application can be optionally
started with command line arguments (see command line arguments later in this
section).
Manager.exe is SDI version of the Blues Manager application and provides the
customization and configuration of the product.
BLUES User Manual
Page:17
Newhart Systems Incorporated © 2006 All Rights Reserved
Terminal.exe is the SDI version of the terminal session. It provides the terminal
emulation and file transfer functionality.
Printer.exe is the SDI version of the printer session. It provides the printer
emulation functionality. The printer emulation connects to the midrange or
mainframe host and emulates an IBM terminal device on one side and connects
to any standard Windows printer or disk file on the other. When data is printed
to the emulated printer on the host, it is routed to the printer session over TCP/IP
and printed on your local or networked Windows printer.
Blues.exe is the MDI version of Blues. It provides the GUI for multiple terminal
and printer sessions as well as a manager window in the same Windows
application window.
Each menu item of a terminal and printer session may be optionally locked or
removed (see section describing the Manager Application). When a menu item
is locked, the operator may not change that particular feature, thus locking the
setting of that particular feature. When a particular menu item is removed, the
operator will not even see it. Complete menus may also be removed. For
example, the complete Macro menu may be removed so that the operator has
no macro functionality unless a macro has been assigned to a toolbar button,
mouse click, or keystroke.
Launching Emulation
Emulation is ultimately launched by the Blues.exe application.
Once Blues.exe has been run once, a new shortcut will appear on the users
desktop and or Start menu for subsequent launching of the product. If
Blues.exe is started without any command line arguments, then it will
query the Blues database looking for the currently signed on Windows user
to see if that user has a Blues configuration set, if so it launches that
configuration set. If the Windows user name is not configured in the Blues
database, then a search is done for the machine name and it is used if it is
found. If neither the Windows user nor the machine name is not found in the
Blues database, then either the “Default” user configuration set will be used, or
emulation will fail and an email message will be sent to an administrator notifying
them of the configuration problem.
BLUES User Manual
Page:18
Newhart Systems Incorporated © 2006 All Rights Reserved
If “No Touch Deployment” was used, then a shortcut was created on the users
desktop and or Start menu.
Once the shortcut has been added to the computer users desktop, launching the
product is done by double clicking on the Blues desktop shortcut or selecting
Blues from the Start menu.
Command Line Arguments
All four of the applications take the same command line arguments. Usually it is
not necessary to include any command line arguments as each Blues user may
be configured for the arguments. Arguments are only provided to override the
current value of the option defined by the Manager application. Each argument
takes the form “Name Value”, where Name is the name of an option and the
value follows with a space character separating them.
DATABASE – The DATABASE option defines where the Blues configuration
information is stored. The default value for this option is the same location that
the application was started from. This option may be either a valid folder/share
point, or a url on a web server. Example: “Terminal.exe DATABASE
http://myweb/Blues”
USERNAME – Optional user name from the set of possible Blues user names. If
no USERNAME option is used, then the Blues database is queried to see if the
Windows user is configured in Blues, if so that is the configuration that is used,
otherwise a user name of “Default” is used. Example: “Blues.exe USERNAME
Fred”
SESSION – Session number to run. When a Blues user set is configured from
the Manager application, each configured session is given a number from one up
to the last session configured. This option determines which session to run.
Example: “Terminal.exe SESSION 2”
LANGUAGE - Currently the Blues software can provide a graphic user interface
in two languages, English and German. The default is English. The possible
values for these languages are “US” and “GERMAN”. Example “Terminal.exe
LANGUAGE GERMAN”
BLUES User Manual
Page:19
Newhart Systems Incorporated © 2006 All Rights Reserved
BLUES User Manual
Page:20
Newhart Systems Incorporated © 2006 All Rights Reserved
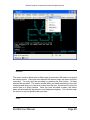
The Manager Application
The Manager application is used to configure the Blues software. This involves,
creating a set of Blues user settings. Each user setting contains one or more
terminal and printer sessions that provide the emulation. This configuration
information is kept in the Blues database. The Blues database contains the
“Master” configuration and is managed by the Blues Manager application. When
an operator saves their session settings from their emulation window, it is saved
in their isolated storage (a special .NET location in their file system). Each time
an operator launches their Blues emulation, the date and time of the users
“master” configuration is checked to see if it has been changed. If it has been
changed, then the changes are merged with the isolated storage version to
provide the correct set of settings. This allows the Manager application to
override any settings that an operator may choose.
Each Blues user may be given administrative privileges to use the Manager
application. Without this privilege, an operator may not use the Manager
application.
Some of the capabilities of the manager application include defining how many
emulation sessions each user has, what functionality each session offers the
user, backup of configuration files into a zip file, restoring configuration files from
a zip file, and maintaining the set of configured users and groups of users. Many
Windows users may share the same Blues user set, or each Windows user can
have their own unique configuration.
The Manager application may be launched in a separate window (manager.exe),
or appear within the multiple document interface application (Blues.exe, or
user.exe).
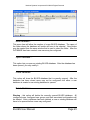
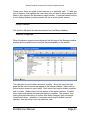
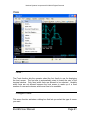
Using The Manager Window
BLUES User Manual
Page:21
Newhart Systems Incorporated © 2006 All Rights Reserved
The Manager window contains a menu bar that lets you perform such functions
as adding a user to the BLUES database, deleting a user and so on. Directly
under the menu bar is the tool bar. The tool bar lets you perform menu item
functions with the mouse. Under the tool bar are 2 window panes that me be
split in two by dragging the mouse over the splitter bar. The left most pane
contains a list of all configured users and user groups. The right most pane may
contain a list of the sessions configured groups, or configured users, depending
on what has been selected in the left window pane. And finally there is an area
on the bottom of the window that contains a line of help text. The help text will
display what a specific menu item or tool will perform. To display a tool’s help
line you need to position the mouse over the tool and the help line will appear.
To display the help line for a menu item you need to drop down the menu item
and highlight it with either the mouse or from the keyboard.
Whenever you select an item in the left pane, the right pane displays information
about that specific item.
File
The file menu is used to open, close, backup, and restore the DATABASE. In
addition the Manager is closed from the File menu. The following sections
describe what each menu item performs.
BLUES User Manual
Page:22
Newhart Systems Incorporated © 2006 All Rights Reserved
New Database…
This menu item will allow the creation of a new BLUES database. The name of
the folder where the database will reside will have to be selected. New folders
may be created from the same window that is used to select the folder. After the
DATABASE has been created, new users may be configured.
Open Database…
This option lets you open an existing BLUES database. After the database has
been opened, you may modify it.
Close Database
This option will close the BLUES database that is currently opened. After the
database has been closed users may not be configured until either a new
database is created or an existing database is opened.
Delete Database
Warning - this option will delete the currently opened BLUES database. All
configured users, configured user groups, and their associated configurations will
be deleted. After a database has been deleted, a new or existing database will
have to be opened before users may configured.
BLUES User Manual
Page:23
Newhart Systems Incorporated © 2006 All Rights Reserved
Before deleting the BLUES database, you may want to backup the database
for future reference. This is done from the File menu “Backup Database…” and
described in the following sections.
Backup Database…
This option will save the BLUES database. The BLUES database is compressed
into a single ZIP compatible file. The database should be periodically saved to
avoid loosing the BLUES database in the case of disk corruption.
Restore Database…
The restore database option will take an existing file created through the use of
the backup database function and restore it. After the database has been
restored, it will automatically be opened.
Close
This menu item is used to stop the Manager and return to the program manager.
BLUES User Manual
Page:24
Newhart Systems Incorporated © 2006 All Rights Reserved
Edit
The edit menu makes it easy to duplicate existing configured users. A
configured user may be copied and pasted by first selecting the user that will be
copied, then performing a copy function. If you want to paste the users
configuration over an existing configured user, then select that user and perform
a paste operation. To duplicate an existing configured user, select the user, and
then perform a duplicate function. After the duplicate, you may enter the new
users name.
Groups
The groups menu selections manage groups of configured BLUES users.
Configured users may be added to one or more groups for subsequent
management. The “Copy Session Settings” menu command (under the
Sessions menu) can be used to add or modify session settings that belong to a
whole group. For example: a terminal session can be added to everybody in a
group or a particular menu item can be removed from all terminal sessions that
belong to a group of users. The ability to group users together is a powerful
feature that can help the administrator manage large numbers of users.
New Group…
The New Group menu item creates a new group of BLUES users. After this
menu item has been selected, you must enter the name of the group. The name
of the group may be changed at any time by using the Group properties menu
BLUES User Manual
Page:25
Newhart Systems Incorporated © 2006 All Rights Reserved
item or by clocking the mouse over the group name in the main Manager
window. After the group name has been entered, press the enter key and the
group properties windows will be displayed. The group properties window is
described in the following sections.
Delete Group
Groups may be deleted by using this menu item. The group name must first be
selected with the mouse before this menu item may be selected. When a group
is deleted, only the group association is deleted, the actual configured users are
not deleted from the BLUES database. To remove a user from a group the
group properties menu item must be used. To delete a configured user,
select the user name you want to delete and press the DELETE key. Deleting a
configured user will automatically delete the user from any groups that the user
belongs to.
Group Properties
The group properties a window is used to change the name of the group, add
new members, and delete existing members from the group. The left portion of
the windows contains a listing of the configured users that currently belong to the
group. The right portion of the windows contains a list of the configured users
that do not currently belong to the group. The group name appears at the top of
BLUES User Manual
Page:26
Newhart Systems Incorporated © 2006 All Rights Reserved
the windows and may be changed as desired. To add a new member to the
group, simply select the user from the list and press the Add button. To remove
a member from the group, simply select the user from the group and press the
Remove button. One or more user names may be added or removed at once.
When the group contains the names of the configured users that are desired,
press the Ok button.
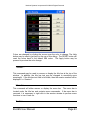
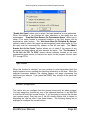
Users
The Users menu contains functions for adding, changing, and deleting users
from the database. The following sections describe each menu item.
Global Options
The global options consist of options to control if the “Default” user set should be
used for unconfigured users, if email messages should be sent when an
unconfigured user attempts to use Blues, and an email account that is used to
generate email alerts. These options are described below:
Use the Default user configuration when a Windows user has not been
configured
This option is used when emulation is launched without specifying a Blues user
name in the command line. When this occurs, Blues will query the Blues
BLUES User Manual
Page:27
Newhart Systems Incorporated © 2006 All Rights Reserved
database to see if the particular Windows user is configured, if they are not in the
Blues database, then this option determines if the Default user configuration
should be used.
Generate email notification when unconfigured usage is attempted
If this option is set and an unconfigured user attempts to launch Blues, then an
email notification message will be sent. The subject, body, from, and to fields of
the email message may be customized from the email account tab.
Send mail through SMTP server
This option must be set to a valid email server ip address. This is the email
account used to generate email notifications. The from and to fields may be
used to further customize the alert email messages.
Add Domain Users
This function allows for the quick configuration of existing Windows domain
users. This function will query Windows Directory Services for a list of valid
users in the selected Windows domain. The operator may then choose from a
variety of options to apply to the user(s). When the Ok button is pressed, the
selected domain users are added to the Blues database. Existing users will not
be overwritten without first being asked to do so.
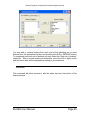
New User
This function will create a new Blues user set. Associated with each Blues user,
there are a set of options and settings that control that user’s emulation. For
details on these options, see the following section “User Properties”.
User Properties...
This menu item may be used to change the user name, administrative privilege,
password, and other options and settings associated with a user.
BLUES User Manual
Page:28
Newhart Systems Incorporated © 2006 All Rights Reserved
User Name – Each Blues user name must be a unique 20-character name. The
user name is case insensitive. Each user gets a user.exe and a user.htm file
created that may be used for No Touch Deployment from a network.
Password - The password is optional and only applies to users with
Administrative privileges. To be able to run the Manager window, a user must
have Administrative privileges. If a password is configured, then the Manager
window will prompt for a password when it is started.
Administrative privileges allowed – This option allows the user to use the
Manager application. Without this option enabled, the user may only use their
terminal and printer sessions and not the Manager window.
GUI Language – This option determines what native language the Blues
software is presented in. Currently, English and German may be selected.
GUI Interface – This option determines if each terminal and printer session is
launched in a separate window (SDI) or if they appear within the same window
(MDI).
BLUES User Manual
Page:29
Newhart Systems Incorporated © 2006 All Rights Reserved
Show shortcut on desktop – If this option is selected, then a desktop shortcut
will be created for the user. If this option is not selected, then any desktop
shortcut previously created for this user will be removed from the desktop.
Show shortcut on Start Menu – If this option is selected, then a Start menu
shortcut will be created for the user. If this option is not selected, then any Start
menu shortcut previously created for this user will be removed from the desktop.
Launch emulation at startup – If this option is selected, then Blues will
automatically be started when Windows is started or when the user signs on to
the Windows operating system.
Delete User
This function will delete a user and all the sessions for that user.
and user.htm files are also deleted.
The user.exe
Sessions
The Sessions menu provides you with a set of functions used to manage users
sessions. Before selecting any of these menu items you must first highlight the
name of the user that you want the menu item to take affect on. The following
sections are presented in the same order as they appear on the menu.
Add Terminal Session...
These menu items are used to add sessions to a particular user. To add any
type of session, first highlight the user name that you want to have assigned the
session, then perform the add session menu function. A terminal session will act
a host display window; a printer session will act as a host printer window.
Add Printer Session...
BLUES User Manual
Page:30
Newhart Systems Incorporated © 2006 All Rights Reserved
These menu items are used to add sessions to a particular user. To add any
type of session, first highlight the user name that you want to have assigned the
session, then perform the add session menu function. A terminal session will act
a host display window; a printer session will act as a host printer window.
Delete Session
This function will delete the selected session from the Blues database.
Session Properties
When the session properties are displayed, the left pane of the Manager window
displays all the possible menu functions that are available to the session.
The right pane is used to edit a session’s property. Along the top of the right
pane are the various menus that appear in the session window. Each menu is
further broken down into menu items. Each menu item may be hidden, enabled,
and or locked. Hidden menus do not appear in the session window. Enabled
menu items indicate that that particular option is enabled. The operator, thus
locking that particular option or options from being changed, may not change
locked menu items. In addition, a complete menu may be hidden from the
operator, thus removing it from the operators view.
BLUES User Manual
Page:31
Newhart Systems Incorporated © 2006 All Rights Reserved
To modify any session property, first, click on the menu item used to change the
property. A menu will be displayed that allows you to hide, enable, lock, or
modify the property.
For descriptions of each option, consult the section of this manual that describes
the particular session type being edited (terminal or printer).
Launch Session
This function will start the highlighted session. If the Manager window is being
run in single document mode, then a new window will be opened. If the Manager
is being operated in single document mode, then a new tab will be created for
the session.
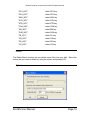
Copy Session Settings…
This menu item is a powerful feature that lets the administrator take some or all
session settings and copy those settings to other configured users. To use this
feature you must first select the configured session that contains the settings that
you want to copy to other users, then, choose the “Copy Session Settings…”
menu item. The selected session is known as the source session.
BLUES User Manual
Page:32
Newhart Systems Incorporated © 2006 All Rights Reserved
The “Options to include in copy” selection determines what settings will be
copied from the source session. One or more types of settings may be selected.
The “Copy complete session” checkbox may be used to copy the whole source
session to the designated configured user(s).
The “Users and or Group of users to copy options to” list contains a list of all
configured users and user groups. One or more users may be selected from the
list. Only the selected configured users and user groups will be affected by the
copy operation.
The “Prompt before making a change” option lets the administrator decide
whether or not to copy the settings into each selected configured user’s
session(s).
If the “Changes affect same session only” option is selected, then only sessions
of the same number for each selected user are affected. For example: if
SESSION1 (the first session) is the source session, then only the first session of
each selected user will be affected by the copy.
BLUES User Manual
Page:33
Newhart Systems Incorporated © 2006 All Rights Reserved
If the “Changes affect all sessions” is selected, then all of the selected
configured user’s sessions will be affected by the copy.
If “Create a new session” is selected, then a totally new session will be added to
each selected configured user or group of users. This option is a convenient
method of adding a terminal or printer session to a group of configured users.
BLUES User Manual
Page:34
Newhart Systems Incorporated © 2006 All Rights Reserved
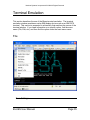
Terminal Emulation
This section describes the use of the Blues terminal emulation. The terminal
emulation window emulates a native IBM display device such as an IBM 3279
terminal. This section is presented in a hierarchy that matches the menus of the
terminal window. If you need information on a specific option, find the menu
name (File, Edit, etc.) and then find the option under the main menu name.
File
Save Settings
BLUES User Manual
Page:35
Newhart Systems Incorporated © 2006 All Rights Reserved
This File menu command is used to store the current session profile. All the
operational and connection options currently in effect will automatically be reactivated next time the session is started. The settings are saved in the .NET
isolated storage. Each time a terminal session is launched, it compares the
date/time of the isolated storage settings with the session settings in the Blues
database and uses the most recently saved version.
Save Settings On Close
This option may be enabled or disabled by selecting it. If it is enabled, then the
terminal session will automatically save its settings when it is closed.
Enable Printer Output
This feature lets you turn on and off printer output whenever a print function is
done. If this option is enabled, then this menu item will be checked. This option
pertains to a local print function caused by pressing the print screen key or print
screen menu item.
Print Screen
This option does an IBM local print screen key function to the currently selected
printer device, as defined in Print Setup.
Print Setup
This option allows you to select any printer currently installed under Windows as
the output device, or you may select a disk file as the output device.
Print Font
This option allows you to select the font that will be used when a local print
function is performed. You should select a font that lets you print the entire host
screen when you perform a local print.
BLUES User Manual
Page:36
Newhart Systems Incorporated © 2006 All Rights Reserved
Enable Print To Disk
This feature lets you turn on and off output to a disk file whenever a print
functions is done. If the print to disk feature is enabled, then this item will be
checked.
Disk File...
This menu item lets you select the name of the next print to disk file. If the
“Append To File” option has not been selected, then each time a print to disk is
done the name of the file is incremented by 1. I.e. print0001.dat will be
incremented to print0002.dat. Each local print function will cause a new disk file
to be created.
Append To File
This menu item selects if a new file will be created each time a local print is done
to a disk file. When this feature is selected, the local print data is appended to
the currently selected print file name. If this feature is not selected, then a new
file is created each time a local print is done.
Close
This File menu command allows you to close the BLUES 2006 terminal session
window.
Exit
This file menu command closes the multi document interface window, thus
closing any opened terminal and printer sessions.
BLUES User Manual
Page:37
Newhart Systems Incorporated © 2006 All Rights Reserved
Edit
Cut
This Edit menu command copies the currently selected area of the emulation
window to the clipboard, and erases it from the emulation window, if the data is
unprotected. See Mouse Controls for how to select a portion of the screen.
Copy
BLUES User Manual
Page:38
Newhart Systems Incorporated © 2006 All Rights Reserved
This Edit menu command copies the currently selected area of the emulation
window to the clipboard. See Mouse Controls for how to select a portion of the
screen.
Append
This Edit menu command appends the currently selected area of the emulation
window to the clipboard. See Mouse Controls for how to select a portion of the
screen.
Paste
This Edit menu command takes ANSII data only from the clipboard and enters it
at the current cursor location. If insert mode is active, then the data will be
inserted just as if it were being keyed in insert mode.
Continue Paste
This Edit menu command takes ANSII data from the clipboard and enters it at
the current cursor location. If insert mode is active, then the data will be inserted
just as if it were being keyed in insert mode. This function is only valid after a
Paste function completed by reaching the end of the screen.
Select All
This Edit menu command selects the entire emulation window (not counting the
status line) for any subsequent Cut, Copy, or Clear functions.
Clear
This Edit menu command erases the selected portion of the emulation window
without copying it to the clipboard. Only unprotected data is cleared. See
Mouse Controls for how to select a portion of the screen.
BLUES User Manual
Page:39
Newhart Systems Incorporated © 2006 All Rights Reserved
View Clipboard
This Edit menu command will display the windows clipboard.
BLUES User Manual
Page:40
Newhart Systems Incorporated © 2006 All Rights Reserved
View
Fonts…
The Fonts function lets the operator select the font family to use for displaying
the host screen. The font size is automatically sized to match the size of the
terminal window. Only fixed width fonts are allowed to be selected. Variable
width fonts are not allowed because the host screen is made up of a fixed
number of rows and columns, which must line to be readable.
Configure Cursor
This menu function activates a dialog box that lets you select the type of cursor
you want.
BLUES User Manual
Page:41
Newhart Systems Incorporated © 2006 All Rights Reserved
Upper Case
This option will cause the display characters to display in all upper case. The
actual data is still in upper and lower case as far as the host is concerned. This
feature may be useful with smaller window sizes since the uppercase characters
can be read easier.
Draw Line Through Zeros
This option enables or disables a line being drawn through all zero characters on
the host screen. This can be used to better destingqush zeros from the ‘o’
character.
Host Color Mapping
This menu command activates a dialog box that allows you to customize your
host color mappings. Each of the 8 host colors may be modified. Both the
foreground and background colors may be changed. In addition, the operator
information area's colors may be modified.
BLUES User Manual
Page:42
Newhart Systems Incorporated © 2006 All Rights Reserved
Colors are changed by clicking the mouse over the color to change. The Help
button may be used to get help on the use of this dialog. The RESET button will
reset the colors back to the default IBM colors. The Apply button may be
pressed to preview the color change.
Titlebar…
This command may be used to remove or display the title bar at the top of the
window. In addition, the title bar text may be changed to something more
meaningful. If the title bar text field is left blank, then the session number will be
displayed. I.e. Session1
Menubar
This command will either remove or display the menu bar. The menu bar is
located under the title bar and contains menu commands. If the menu bar is
removed, it is necessary to right click in the session window to perform menu
functions or turn it back on.
Toolbar
BLUES User Manual
Page:43
Newhart Systems Incorporated © 2006 All Rights Reserved
This function may be used to modify the contents of the toolbar and hide the
toolbar.
Individual toolbar buttons may be added or removed as desired. By turning off
the “Toolbar Enabled” option, the complete toolbar will be removed from the
session window.
Button Bars...
This menu function allows you to customize two rows of buttons that are located
under the tool bar and menu bar. The two rows of buttons may be removed or
displayed. In addition, any function key or MACRO may be placed on a specific
row. The following dialog allows you to customize the button bars:
BLUES User Manual
Page:44
Newhart Systems Incorporated © 2006 All Rights Reserved
You may add or remove buttons from each row by first selecting one or more
buttons from the appropriate list box and pressing the ADD or REMOVE button.
To completely remove a row of buttons you may select the "Hide row of buttons"
check box. After you have made your selections, press the OK or Apply button
and the button bars will be displayed according to your selections.
Statusbar
This command will either remove or add the status bar from the bottom of the
display window.
BLUES User Manual
Page:45
Newhart Systems Incorporated © 2006 All Rights Reserved
Settings
Enable Sound
This option lets you enable and disable the terminal alarm. The alarm is a short
beep sound that is heard whenever an error occurs or whenever the host
indicates that the alarm should be sounded.
Notify When Minimized
When activated, this feature will cause the terminal session to notify the operator
if the host screen changes while the terminal session is in the minimized state.
BLUES User Manual
Page:46
Newhart Systems Incorporated © 2006 All Rights Reserved
The operator will see a dialog box indicating that the screen has changed and be
allowed to either view the session or ignore the change.
Keyboard Mapping...
A keyboard file contains information about a particular keyboard type, and the
mapping of the keys. Keyboard mapping files are maintained in both the users
isolated storage and the Blues software folder so that each computer user may
have their own version of the file. If the keyboard mapping is changed from
the terminal session window, then it only affects the current operator, if it
is changed from the Manager window, then it will affect everyone who uses
the specific Blues user set.
The keyboard window contains a graphic representation of the computer
keyboard. If a key is clicked, then its mapping is displayed in the lower right of
the window. Each key is also listed on the bottom left to easily search for a
specific emulation key. To change a key mapping, highlight the key, then select
the new function from the list at the bottom right of the window.
BLUES User Manual
Page:47
Newhart Systems Incorporated © 2006 All Rights Reserved
The Host Code Page option is used to select the code page that the host
computer is running in. IBM has defined a different code page for each country.
Each code page contains the necessary characters for the language. To have
the keyboard function properly, the correct host code page must be selected.
Contact your mainframe administrator to determine what code page the host
computer is using.
Hot Spots…
This menu function enables you to configure how 'hot spots' function. A “hot
spot” is a word located on the host screen that is recognized by the BLUES
Display session as having a special meaning.
When hot spots are active, they can cause commands to be sent to the host by
positioning the mouse over a portion of the host screen and pressing the left
mouse button. For example, if the word CLEAR appears on the screen, you can
perform a CLEAR key by simply pointing the mouse cursor at the word CLEAR,
and clicking the left mouse button.
The characters in the command word on the screen can be in either upper or
lower case. The following hot spot command words are supported:
PF1 through PF24, PA1, PA2, and PA3, CLEAR, ENTER, PRINT, SYSREQ, F1
through F24
In addition, any macro that has been recorded will automatically become a hot
spot.
The following dialog box will be displayed when the Configure Hot Spots menu
item is selected:
BLUES User Manual
Page:48
Newhart Systems Incorporated © 2006 All Rights Reserved
“Enable Hot Spots” allows you to select if hot spot detection is to be performed.
When this feature is not selected all other selections in this dialog box are
meaningless. ‘Draw Hot Spot Buttons On Presentation Space” allows you to
select if hot spots located in protected locations of the host screen will be
displayed as push buttons. The “Hot Spots Must Be Delimited By Spaces”
option is used to select if hot spots can be recognized inside other words or if the
hot spot must be surrounded by spaces on the left and right. The “Macro
Names Act As Hot Spots” feature allows you to select if the names of any
previously recorded macros will also become hot spots. The “The Numbers 1
To 24 Ack As PF1 To PF24” feature allows numbers located on the host
presentation space screen to become hot spots for the program function keys
PF1 through PF24.
Type Ahead
When this function is selected, you can continue to enter keystrokes while the
display session is busy sending and receiving information to the host. When the
keyboard becomes enabled, the display session will begin processing the
keystrokes you entered. If you press the RESET key, all keys in the queue will
be purged.
Mouse Configuration
This option lets you configure how the mouse buttons will act when pressed.
You may assign any function key, any of the clipboard functions, or any MACRO
to both the left and right mouse buttons. If you are going to remove the title bar
(see system menu), then the use of the left mouse double click is limited to
displaying the title bar after it has been hidden. The following dialog box is
displayed to configure the mouse buttons:
BLUES User Manual
Page:49
Newhart Systems Incorporated © 2006 All Rights Reserved
Use the left mouse button to select your assignments.
Api Options
This menu function lets you customize how the display session will copy and
paste information to and from the clipboard.
BLUES User Manual
Page:50
Newhart Systems Incorporated © 2006 All Rights Reserved
The CR/LF AT END OF LINE option indicates that the session should add a
carriage return and line feed characters to the end of each line that is copies to
the clipboard and to each line that is give to a DDE client.
The Replace Spaces Between Words With A Tab option indicates that the
session should remove spaces between words and add a TAB character for the
removed spaces when coping to the clipboard or to a DDE client.
The Remove Leading Spaces On Each Line option indicates that the session
should remove all leading spaces from each line that is copies to the clipboard
and to a DDE client.
The Remove Trailing Spaces On Each Line option indicates that the session
should remove all ending spaces from each line that is copies to the clipboard
and to a DDE client.
The Copy Operator Information Too option lets you copy the operator
information area line into the clipboard and also to pass the operator information
area to a DDE client. The whole operator information area is passed.
If this option is selected when a paste function is done, then each new line of text
pasted into the terminal session will be pasted in the column where the cursor
was located when the paste was performed.
For example: If the cursor is in column 70 and a paste is done that contains 2
rows of text, then both rows of text will start in row 70.
The “Paste clipboard line in columns” option causes lines to be pasted starting
at the same column. For example: If 2 lines of information were copied into the
clipboard and a paste function was done with the cursor located in column 60 of
the terminal session window, then the first line would be pasted starting at
column 60 and the second line would be pasted on a subsequent line starting in
column 60.
Transfer
BLUES User Manual
Page:51
Newhart Systems Incorporated © 2006 All Rights Reserved
The Transfer menu may be used to either activate the file transfer window, or to
transfer an existing portfolio. A portfolio is one or more file transfers. Each file
transfer in a portfolio has a scheme associated with it. A scheme is a set of file
transfer options that dictates how the file is transferred (i.e. as a binary file or text
file etc.). Portfolios let you group file transfer operations so that you can transfer
a portfolio at a future date by simply selecting the portfolio name from the
Transfer Menu.
File Transfer Main Window
The file transfer main window contains five separate windows. Clicking the
mouse over the appropriate tab activates a particular window. The file transfer
window looks as follows:
BLUES User Manual
Page:52
Newhart Systems Incorporated © 2006 All Rights Reserved
The five windows consist of the Transfer file window, Scheme Editor window, the
Batch Transfer window, the Portfolio Editor window, and the History window.
The following sections describe each window.
Transfer File Window
The Transfer window allows that transfer of a single file. Files are transferred
based on a scheme. A scheme defines the methods, file formats, and host
operating system type. See Scheme Editor window for details on editing
schemes. A default set of schemes is installed with the software. To transfer a
file, selected the source file name, destination file name, and scheme name and
then press the send or receive button. A list of the last 20 file transfers is
maintained and may be accessed by pressing the Recent button. Once the file
transfer is started, the status of the transfer is displayed in the status box. A
history file is maintained and may be viewed from the History window.
To cancel a file transfer, you may press the cancel toolbar button or select
cancel from the Transfer menu.
Scheme Editor
Schemes may be created, edited, and deleted from the Scheme Editor window.
When editing a scheme, the following window is displayed:
Host Protocol Type
This option selects which host operating system you are connected to.
TSO - The host is running under TSO.
CMS - The host is running under CMS.
CICS - The host is running under CICS.
FTP - The host is a TCP/IP FTP host.
File Transfer Application
BLUES User Manual
Page:53
Newhart Systems Incorporated © 2006 All Rights Reserved
Allows you change the name of the file transfer program running on the host
computer. The default value is IND$FILE. This option is meaningless when
using FTP.
Additional Options
You may add extra options to the IND$FILE command sent to the host to start
the file transfer. These options are specific to each host.
File Transfer Method
Selects one of two methods of file transfer. Structured Field is usually faster
than buffered. This option is meaningless when using FTP.
HOST / PC CODE PAGE
This field lets you select the Host and PC code pages for text mode file transfer.
Each selection corresponds to a file in the installation directory. The file names
have 6 numbers in each name. The first 3 digits are used to identify the host
code page and the last three digits are used to select the PCs code page. A
code page defines what each of the possible 256 characters should be displayed
and printed as. IBM has defined many sets of different code pages. The first 2
letters of each selection is an abbreviation for the host country as follows:
US
-
United States
GR
-
Germany
FI
-
Finland
IT
-
Italy
SP
-
Spain
UK
-
England
FR
-
France
BG
-
Belgium
GK
-
Greek
BLUES User Manual
Page:54
Newhart Systems Incorporated © 2006 All Rights Reserved
Each code page translation file may be changed with any standard editor such
as edit.exe. Each line in the file represents a single character translation.
Before defining the File Specifications, you need to determine which transfer
environment the host computer uses - TSO, CMS, CICS, or FTP. Once you
make the Host System selection, file specification parameters, which do not
apply to your environment, will be grayed out. The File Specifications for the
different environments are discussed in their respective sections below.
FileType
TEXT MODE - During a send command from the local system, this command
option Set identifies a PC text file consisting of ASCII character codes This entry
directs the host to translate ASCII to EBCDIC code for storage on the host.
During a RECEIVE command from the host, this command option directs the
host program to translate the host's EBCDIC code into ASCII before transferring
the file to the local system. See CRLF.
BINARY MODE - This command tells the host not to make any changes to the
file during transfer. See NOCRLF.
File Creation
This option lets you select how a file that is received will be created.
APPEND - This command tells the host to add the data to the end of an existing
file. Be sure to specify this option when you are transferring data to an existing
file. If you do not specify APPEND and the file exists, the original file will be
deleted and replaced by the file you are transferring.
NEW Data replaces any existing file. If no file exists, one is created. For
files transferred to the host, one of the File Creation Options must be specified.
Record End
BLUES User Manual
Page:55
Newhart Systems Incorporated © 2006 All Rights Reserved
This option specifies how records are separated during the file transfer.
CRLF Records are separated with a Carriage Return and Line Feed when
sent to or received from the host.
NOCRLF - Carriage Returns and Line Feeds are neither added nor deleted. If
you choose BINARY, you must select this option.
Buffer Size
Allows customization of the size of structured field data that is sent and received
during structured field type of file transfers.
Record Length
This is an optional field. This field refers to the logical record length for the host
file. If this field is blank, the system will default to a logical record length of 80
characters.
Block Size
This refers to the block size of the host data set. It is the number of bytes in a
block of data. If you do not specify block size, the system defaults to the value of
the Logical Record Length.
Record Size
This is an optional field. The default value of this field is FIXED.
FIXED- specifies that a data set with a fixed record length is to be created.
VARIABLE - Specifies the creation of a data set containing variable length
records.
BLUES User Manual
Page:56
Newhart Systems Incorporated © 2006 All Rights Reserved
UNDEFINED - Refers to the creation of a data set containing an undefined
record length.
Space
Use this option to specify the amount of space to be allocated when creating a
new data set. When you enter SPACE in the file specifications, follow it by a
quantity. After the quantity, specify the kind of increment. If you do not specify
SPACE, the system defaults to the value of BLKSIZE.
Comments
The comments field contains any comments that you want to be assigned to the
host file when it is created.
FTP Host Name
The FTP host name determines which host the scheme may connect to. The
name may be either a TCPIP address like 111.222.333.444 or a valid server
name such as ftp.microsoft.com. The address or host name must be reachable
over the TCP/IP protocol stack.
FTP Port
The FTP port must match the port number configured at the host computer for
FTP. The industry standard default setting is 21.
FTP User Name
Each FTP host requires a user name and password to be able to access the
host. The industry standard “Anonymous” user name may be selected, or a
specific user name and password may be selected. Some FTP hosts require a
valid user name and password for FTP file transfers.
FTP Time-outs
BLUES User Manual
Page:57
Newhart Systems Incorporated © 2006 All Rights Reserved
The time out values determine when to assume an error has occurred during a
FTP host browse, or FTP file transfer operation. All time out values are in
seconds. The connect time out is used during the connection process and the
receive time out is used during FTP file transfers.
Batch Transfer Window
The Batch Transfer window is used to start a portfolio file transfer. To transfer a
portfolio of files, simply select the configured portfolio and press the Start button.
Use the Portfolio editor window to manage portfolios of file transfer operations.
Portfolio Editor Window
Portfolios are a way to organize batch file transfer functions. Portfolios can
make your life easier if you transfer the same files periodically. The portfolio
editor window is used to create, edit, delete, and save portfolios. A portfolio is
one or more file transfers. Each transfer in a portfolio consists of four options,
the direction, the source file name, the destination file name, and the scheme
name. Schemes may be customized, created, or deleted from the Scheme editor
window. Portfolios are executed from the Batch Transfer window.
Each line in the portfolio represents a file transfer. New lines may be added by
pressing the Add button. To delete a line, first highlight the line to be deleted
and then press the Delete button. To modify a line, highlight the line and then
press the Edit button.
History Window
The History window displays a history of file transfer operations. The history file
should be erased periodically to avoid having the history file from growing to
large.
BLUES User Manual
Page:58
Newhart Systems Incorporated © 2006 All Rights Reserved
There are three different history event types that may be viewed: (1) Information
events, (2) Error events, and (3) Successful Events. Information events are
general in nature and give information about when and what was transferred.
Error events occur when a file can’t be successfully transferred. Successful
events indicate when a file was successfully transferred and what the file size of
the transferred file was.
File Transfer Messages
While using file transfer, a variety of messages can appear on the screen.
These messages may contain status information or they may require a specific
response. Messages can originate from either the Blues software, or from the
host file transfer application. If the host file transfer application sends an error
message, then it will be displayed as “File Reansfer Failure : the message”,
where “the message” is replaced with the actual message. The following is a list
of messages generated by the Blues software.
File Transfer Complete : x bytes transfered.
This message displays when the file transfer operation has completed
successfully.
File Transfer Failure : invalid or unknown host response received !
File Transfer Failure : incorrect starting point : unrecognized screen.
File Transfer Failure : not connected to host.
Any of the above four messages indicates that the session is not in the correct
state for file transfer. The best starting point for the file transfer application is the
Ready prompt.
File Transfer Failure : host response timeout occured.
This message indicates that the host did not send an expected response or data
within a certain time limit.
BLUES User Manual
Page:59
Newhart Systems Incorporated © 2006 All Rights Reserved
File Transfer Failure : maximum retries exceeded.
This message appears when you attempt to SEND a file, and the host rejects the
data three consecutive times. The SEND operation is automatically canceled
after three SEND attempts. Check your command line format and parameters to
be sure they have been entered correctly. Retry the SEND command.
File Transfer Failure : host file allocation error.
File Transfer Failure : canceled by host.
These messages indicates that the file transfer was canceled due to an event at
the host or by the operator pressing the cancel button.
BLUES User Manual
Page:60
Newhart Systems Incorporated © 2006 All Rights Reserved
Connection
Connect…
This menu item is used to connect the session to the host. Connection options
are displayed and may be added, changed, or deleted if they are not locked by
the Manager application.
Each session can have one or more destinations configured. A destination is set
of connection options that determine how and where to connect to a host
computer. The first destination in the list is known as the primary destination.
BLUES User Manual
Page:61
Newhart Systems Incorporated © 2006 All Rights Reserved
The primary destination is the destination that will be used first after you start a
session. Alternate destinations can be configured to be automatically switched
to if the primary destination can’t be made or is lost. To add new destinations
you must press the New button. To remove a destination, you will have to select
the destination you want to delete and press the Delete Button.
The connection window contains a set of options that apply to all destinations
and a set of options for each destination. To edit a specific destination, select
the destination with the mouse and click on the Properties button.
Automatically connect when session is started
This option determines if the session automatically attempts to connect to the
primary destination when it is first started. If this option is not selected, then the
operator must manually connect to the host computer.
BLUES User Manual
Page:62
Newhart Systems Incorporated © 2006 All Rights Reserved
Automatically reconnect without prompting
This option takes affect when a session gets abnormally disconnected from a
host. When selected, the session will attempt to reconnect. If more than one
destination is configured, connection to the next destination will be attempted. If
only one destination is configured, then an attempt to connect to it will be done.
The amount of time between connection attempts and the number of times to
attempt to connect can be controlled with the “Pause between connect attempts”
and “Pause between connect attempts” options.
Enable TCP/IP Trace
This option can be used to diagnose emulation problems. If this option is
enabled, then a text file named sessionx.trc will be generated, where x is the
session number. The file contains the necessary information for our support
staff to properly diagnose problems.
Disconnect from host after x minutes of inactivity
This option defines if the session should automatically disconnect from the host
after not being used for a period of time. This option is useful to cause the
session to disconnect for security reasons, and for customers who lease
mainframe logical units and want to free up logical units when they are not in
use.
Pause between connect attempts
This option determines the number of seconds to wait between connection
attempts. Each configured destination is subsequently attempted to connect
until a connection is established, or the retry limit is exceeded. This option
controls the time interval that occurs after a connection attempt fails and the next
connection attempt is performed. To avoid unnecessary network traffic, it is
suggested to have this value set to at least 180.
Cycle through destination list x times before giving up
BLUES User Manual
Page:63
Newhart Systems Incorporated © 2006 All Rights Reserved
This is the total number of times to try each destination before giving up a
connection attempt. A value of 0 indicated there is no maximum and to try
forever.
Edit Destination
The configure destination window is used to configure how the session connects
to the host. The terminal type, emulation model, TCP/IP address ,CP/IP port,
and device name are configured from this window.
Emulation Type
This option is used to select the type or mode of emulation; currently telnet 3270
telnet 5250 and DEC VT100 may be selected. The emulation supports the latest
ISO specification regarding telnet 3270 and telnet 5250. TN5250 is usually
selected when connecting to AS/400 midrange computers and TN3270 for
mainframe computers. Depending on the emulation type, different device types
are selectable for the “Model Type” field.
Model Type
BLUES User Manual
Page:64
Newhart Systems Incorporated © 2006 All Rights Reserved
The model type determines the number of rows and columns of the host screen
as well as the capabilities provided by the host DataStream. Model type also
can affect the connection process. The Blues software sends the model type in
the TCP/IP connection negation message. The host telnet server must be
configured to accept the device type, or else, the connect will fail with an error.
Host IP Address
The IP Address or Host Name field lets you enter either a well-formed TCPIP
address or enter a symbolic name. This field must contain the TCPIP address or
name of a TN3270 Server, TN5250 Server, TCPIP host, or AS400. Well-formed
IP Addresses are in the form a.b.c.d, where the letters a,b,c, and d are decimal
numbers between 0 and 255.
Telnet Port
The Telnet Port may be changed from the default of 23 to some other value.
The telnet port must match the port you have configured at the TN3270 Server,
TN5250 Server, TCPIP host, or AS400.
Device Name
The device name may be used to select a specific logical unit on the host to
connect to, or a specific printer logical unit name that should be paired with the
logical unit that is used to connect with.
Two “Wild Card” characters may be used in the Device Name. The asterisk
character (*) will get replaced with the Windows user name who is signed on at
the time. The question mark (?) character will be replaced with the machine
name.
Certain situations require each computer user to always connect to a specific
logical unit on the host. When this becomes an issue, then the device name
option must be used to select the specific host logical unit name to connect to.
Some telnet servers use the device name as a pool name. A pool is a group of
specific logical units or device names that are shared among terminal and printer
BLUES User Manual
Page:65
Newhart Systems Incorporated © 2006 All Rights Reserved
session. If device pooling is being used, then enter the pool name to be used
during connection.
SSL and TLS Enabled
This option enables or disables the secure sockets TCP/IP protocols. When this
option is enabled, it is assumed that the host computer or telnet gateway that is
connected to is configured for encrypted conversations.
The secure
conversation is negotiated as part of the connection process. The highest level
of security that both parties agree on is used. The Blues emulator uses the .NET
framework secure sockets layer and therefore provides the highest level of
encryption available today.
Verify Server Certificate
This option is only available if the SSL/TLS option has been selected. As part of
the SSL/TLS negotiate, the server can be configured to send a certificate proving
the validity of the server. This certificate can then be verified by the Blues
emulator if this option is selected. If the server certificate fails to verify, the Blues
emulator will abort the conversation.
Send Client Certificate
This option is only available if the SSL/TLS option has been selected. As part of
the SSL/TLS negotiate, the Blues emulator can be send a certificate proving the
validity of the emulator. If this option is selected, you also must select the
certificate to send. Any currently installed certificate may be selected.
Prompt for AS/400 User name and password
This option determines if BLUES should present a sign on window and encrypt
the AS/400 user name and password. When this option is selected, BLUES will
encrypt the AS/400 user name and password before sending it to the AS/400. If
the AS/400 accepts the encrypted user name and password, the initial sign on
screen is bypassed and the main start up screen is displayed.
You may choose to not send the encrypted user name, in which case the AS/400
will be the first screen displayed by the AS/400.
BLUES User Manual
Page:66
Newhart Systems Incorporated © 2006 All Rights Reserved
Current Library
Initial Menu
Starting Program
The “Current Library”, “Initial Menu”, and “Starting Program” options may be used
to cause the AS/400 to configure the device name with these options. See the
appropriate AS/400 documentation for details on the meanings of these fields.
Enable Keep-alives
This option causes a special “Hello” No Operation (NOP) message to be sent to
the host every few minutes. The only importance of the message is keeping the
TCP/IP connection from being closed by underlying network settings. Some
networks are configured to automatically disconnect a TCP/IP connection when
no traffic is detected for a specified amount of time; this feature disables such a
feature.
If Device is in use, increment it and try again
This option is only meaningful when a specific device name has been
configured. If a specific device name is configured and this option is turned on,
then if a “device busy” error response is returned from the host, then Blues will
increment the device name and try to connect to that name. This continues until
a “not busy” condition is detected. This option can be used if many logical units
are configured on the host with names that are contiguous, like LU002, LU003,
LU004, etc. Many sessions can be configured with the device name of LU002
and when they connect each one will get the first available logical unit.
Send Backspace as DEL key
If this option is selected, then the delete (DEL) character is sent to the telnet
server as a result of pressing the backspace key. If this option is not set, then
the standard backspace (BS) character is sent to the telnet server.
Send Return key as CR LF
BLUES User Manual
Page:67
Newhart Systems Incorporated © 2006 All Rights Reserved
If this option is selected, then the a carrage return and line feed characters are
sent to the telnet server as a result of pressing the Return key. If this option is
not set, then the standard line feed (LF) character is sent to the telnet server.
Disconnect
This menu item will disconnect the session from the host.
Macro
The Macros menu lets you record, play, edit, and delete macro files. Macro files
are typically saved in your private directory. The Macro menu displays as
follows:
BLUES User Manual
Page:68
Newhart Systems Incorporated © 2006 All Rights Reserved
Record
This menu function allows you to either enter a new macro file name or re-record
an existing macro. Once you have selected the macro name, the macro will start
recording. You may stop the recording by pressing the Stop button. All keys
entered are recorded. The macro records when you send something to the host
computer and when you receive a screen from the host, this allows it to play the
macro back in a timely fashion. Once you have recorded a macro, the macro
name will automatically be placed in your keyboard mapping. You can then map
the macro to any key position that you want.
Play
BLUES User Manual
Page:69
Newhart Systems Incorporated © 2006 All Rights Reserved
To Play a macro you must first display the host screen that was present when
you first selected to record a macro. Once you select the macro name, the
macro will start playing back.
Stop
This menu item will stop a macro when a macro is in the process of being
recorded or played.
Edit
Macros may be edited and changed by selecting Edit Macro from the MACROS
menu item. Each line of the macro file contains a keyword followed by optional
parameters and values. Any keyword that ends with a colon (':') is considered a
placeholder label. Labels may be jumped to by a GOTO keyword. The following
list summarizes all macro keywords:
"DATA_KEYS Hello World"
- Normal ANSI text to be entered.
"PF1"
-PF1 or F1 function key.
"PF2"
-PF2 or F2 function key.
"PF3"
-PF3 or F3 function key.
"PF4"
-PF4 or F4 function key.
"PF5"
-PF5 or F5 function key.
"PF6"
-PF6 or F6 function key.
"PF7"
-PF7 or F7 function key.
"PF8"
-PF8 or F8 function key.
"PF9"
-PF9 or F9 function key.
"PF10"
-PF10 or F10 function key.
"PF11"
-PF11 or F11 function key.
"PF12"
-PF12 or F12 function key.
"PF13"
-PF13 or F13 function key.
"PF14"
-PF14 or F14 function key.
"PF15"
-PF15 or F15 function key.
BLUES User Manual
Page:70
Newhart Systems Incorporated © 2006 All Rights Reserved
"PF16"
-PF16 or F16 function key.
"PF17"
-PF17 or F17 function key.
"PF18"
-PF18 or F18 function key.
"PF19"
-PF19 or F19 function key.
"PF20"
-PF20 or F20 function key.
"PF21"
-PF21 or F21 function key.
"PF22"
-PF22 or F22 function key.
"PF23"
-PF23 or F23 function key.
"PF24"
-PF24 or F24 function key.
"PA1"
-PA1 key.
"PA2"
-PA2 key.
"PA3"
-PA3 key.
"ENTER"
-enter function key.
"SYS_REQ"
-sys request function key.
"TAB"
-tab key.
"BACKTAB"
-back tab key.
"NEWLINE"
-new line key.
"CLEAR"
-clear function key.
"ALT_CURSOR"
-alt cursor key.
"ATTN"
-attention key.
"CUR_SEL"
-cursor select key.
"DUP"
-dup key.
"ERASE_EOF"
-erase eof key.
"ERASE_INP"
-erase input key.
"FLD_MARK"
-field mark key.
"HOME"
-home key.
"CUR_LEFT"
-cursor left 1 key.
"CUR_LEFT2"
-cursor left 2 key.
"CUR_RIGHT"
-cursor right 1 key.
"CUR_RIGHT2"
-cursor right 2 key.
"RESET"
-reset key.
BLUES User Manual
Page:71
Newhart Systems Incorporated © 2006 All Rights Reserved
"KEYUP"
-cursor up key.
"KEYDOWN"
-cursor down key.
"BACKSPACE"
-backspace key.
"INSERT"
-insert key.
"DELETE"
-delete key.
"PRINT"
-print screen key.
"WAIT"
-receive 1 screen from the host
"DARK_KEYS ????"
-non-display keys.
"GOTO label"
-go to label.
"RUN command line"
-Start another program
"CUT_CLIP sr,sc,er,ec,tabs,crlf" -Cut to the clipboard. the parameters
are starting row, starting column, ending
row, ending column, a 1 if put tabs
between words, and a 1 if add carriage
returns and line feeds at line end.
"COPY_CLIP sr,sc,er,ec,tabs,crlf"
-Copy to the clipboard. the
parameters are starting row, starting
column, ending row, ending column, a 1
if put tabs between words, and a 1 if
add carriage returns and line feeds at
line end.
"PASTE_CLIP
-Paste from the clipboard.
"SEND pcfile host file
-Upload a file to the host.
"RECEIVE pcfile host file.
-Download a file from the host.
“FIELD_EXIT”
-5250 Field Exit key.
“FIELD_PLUS”
-5250 Field Plus key.
“FIELD_MINUS”
-5250 Field minus key.
“ROLL_UP”
-5250 Roll up key.
“ROLL_DOWN”
-5250 Roll down key.
BLUES User Manual
Page:72
Newhart Systems Incorporated © 2006 All Rights Reserved
“HELP”
-5250 Help key.
“HOST_PRINT”
-5250 Host Print Screen key.
"EXIT",
-close session window
"TIMEDWAIT x",
-wait x seconds
"ESCAPE_KEY",
-telnet escape key
"HOLD_KEY",
-telnet hold key
"BREAK_KEY",
-telnet break key
"COMPOSE_KEY",
-telnet compose key
"DO_KEY",
-telnet do key
"NULL_KEY",
-telnet null key
"PAGEUP_KEY",
-telnet page up key
"PAGEDOWN_KEY",
-telnet page down key
"REMOVE_KEY",
-telnet remove key
"END_KEY",
-telnet end key
"RETURN_KEY",
-telnet return key
"SOH_KEY",
-telnet SOH key
"STX_KEY",
-telnet STX key
"ETX_KEY",
-telnet ETX key
"EOT_KEY",
-telnet EOT key
"ENQ_KEY",
-telnet ENQ key
"ACK_KEY",
-telnet ACK key
"BEL_KEY",
-telnet BEL key
"HT_KEY",
-telnet HT key
"VT_KEY",
-telnet VT key
"FF_KEY",
-telnet FF key
"CR_KEY",
-telnet CR key
"SO_KEY",
-telnet SO key
"SI_KEY",
-telnet SI key
"DLE_KEY",
-telnet DLE key
"DC1_KEY",
-telnet DC1 key
"DC2_KEY",
-telnet DC2 key
BLUES User Manual
Page:73
Newhart Systems Incorporated © 2006 All Rights Reserved
"DC3_KEY",
-telnet DC3 key
"DC4_KEY",
-telnet DC4 key
"NAK_KEY",
-telnet NAK key
"SYN_KEY",
-telnet SYN key
"ETB_KEY",
-telnet ETB key
"CAN_KEY",
-telnet CAN key
"EM_KEY",
-telnet BM key
"SUB_KEY",
-telnet SUB key
"FS_KEY",
-telnet FS key
"GS_KEY",
-telnet GS key
"RS_KEY",
-telnet RS key
"US_KEY",
-telnet US key
Delete
The Delete Macro function lets you delete macro files from your disk. Select the
macro that you want to delete by using the mouse and pressing OK.
Options
BLUES User Manual
Page:74
Newhart Systems Incorporated © 2006 All Rights Reserved
The synchronize host application option determines how the terminal session
determines when the host has completely written the screen so that the next
macro line may be played. Some host applications may write data to the screen
a variable number of times after keyboard input. Two options exist for
determining when the host has completed writing the screen: (1) Count the
number of host screen updates or (2) wait for an elapsed amount of idle time.
During the record phase, the number of times that the host writes to the display
is counted and recorded into the macro. If you choose option 1 above, then as
the macro is played back is it assumed that the host will write to the screen the
same number of times before the macro continues to play after an enter action is
performed. In the second case above, a timer is started after the host updates
the screen and if this timer reaches the configurable time value and the keyboard
is enabled, then the macro will continue. When configuring the idle timer, it is
necessary to take into account the host response time and the speed of the
physical connection to the host.
The “Automatically play macro after connecting” option lets you select a macro
that will be played whenever a connection is made to the host.
Help
BLUES User Manual
Page:75
Newhart Systems Incorporated © 2006 All Rights Reserved
The Help Menu includes commands that enable you to obtain information about
how to use the standard Windows Help facilities, as well as commands that
enable you to access the major topics of help available for this particular
application.
BLUES User Manual
Page:76
Newhart Systems Incorporated © 2006 All Rights Reserved
Printer Emulation
Printer emulation provides the ability to print host documents directly to a
Windows printer or text file. The printer emulation window connects to the host
over TCP/IP and may be configured to emulate a variety of different IBM printer
models.
File
Save Settings
This File menu command is used to store the current session profile. All the
operational and connection options currently in effect will automatically be reactivated next time the session is started. The settings are saved in the .NET
isolated storage. Each time a printer session is launched, it compares the
BLUES User Manual
Page:77
Newhart Systems Incorporated © 2006 All Rights Reserved
date/time of the isolated storage settings with the session settings in the Blues
database and uses the most recently saved version.
Save Settings On Close
This option may be enabled or disabled by selecting it. If it is enabled, then the
terminal session will automatically save its settings when it is closed.
Enable Printer Output
This feature lets you turn on and off printer output whenever a print function is
done. If this option is enabled, then this menu item will be checked. This option
pertains to a local print function caused by pressing the print screen key or print
screen menu item.
Print Setup
This menu item displays a dialog box that lets you configure how a host print will
be printed.
BLUES User Manual
Page:78
Newhart Systems Incorporated © 2006 All Rights Reserved
Setup…
The printer selection and setup button allow the selection of a print device. The
print device receives the host output.
Fonts…
The Fonts button lets you select the font that you want to use for your host print.
The fonts dialog box lets you select any available printer fonts you have installed.
Once your font has been selected, the maximum print column, last print line, and
lines per page variables are automatically calculated for you.
BLUES User Manual
Page:79
Newhart Systems Incorporated © 2006 All Rights Reserved
Close Printer After
This option may be selected to cause the printer spooler or printer port to be
closed if no host data is received within the time period specified. This feature
may be necessary for LU type 3 printer output or for an LU type 1 printer that is
not configured for between bracket printer sharing at the host. If more data is
received after the time out was reached, the new data will be printed on the top
of a new page.
Print Direct To Port
This feature lets you bypass the windows print manager and print directly to a
port like LPT1. If you select this feature, you may configure printer strings to
customize your printer output. Another use for this feature is if your host print
output is already in print ready format, then the emulator will pass it directly to
the printer.
Include Printer Escapes In Output
When this option is selected, the escape sequences defined in the printer strings
file are added to the output port.
Line Density
This field is only visible when you have selected print directly to port. This field
specifies the number of lines per inch (LPI) to be printed. You may choose 4, 6,
or 8 lines per inch. The number selected will cause the appropriate printer string
to be sent to the print device at the start of a print job.
Character Density
This field is only visible when you have selected print directly to port. This field
specifies the number of characters per inch (CPI) to be printed. You may
choose between 6, 10, 12, 16.6, or 20 characters per inch. The number selected
BLUES User Manual
Page:80
Newhart Systems Incorporated © 2006 All Rights Reserved
will cause the appropriate printer string to be sent to the print device at the start
of a print job.
Strings File Name
This field is only visible when you have selected print directly to port. A printer
strings file contains escape sequences that are sent to the printer to perform
special printing functions. Creating a strings file is an advanced function and not
normally needed. A strings file is only needed if there is no other way of
configuring the printer to generate the correct page format.
NOTE TO HEWLETT-PACKARD LASERJET II USERS - If you are trying to
configure a HEWLETT-PACKARD LaserJet II printer or an HP II compatible,
then you should select the strings file named 'HPLJII.LU1' . This file is a sample
strings file for Hewlet Packard LaserJet compatible printers.
To perform the printer string configuration, you will need a copy of the manual
that came with your printer. In this manual, you will find a section that lists all of
the control strings that the printer will accept and what they do. These strings
are known as escape sequences. The printer string configuration process allows
you to supply the 3270 Printer program with the necessary escape sequences to
be able to translate the host's print data stream to your printer's escape
sequences.
Each printer string is preceded by a constant string that identifies it. Printer
control strings consist of hexadecimal bytes and variables. Each entry is
separated by a '-' character when it is displayed on the screen. Functions are
defined for operations that require variables to replace them before they are sent
to the output device. These variables are usually dependent upon the data
stream sent from the host and the type of printer you have. For example, the
host may want to set the top of page margin to row 5 and col 10. To do this the
3270 Printer program must know two things, (1) what escape sequence to use
and (2) how to send the value (row 5 col 10) to the printer.
BLUES User Manual
Page:81
Newhart Systems Incorporated © 2006 All Rights Reserved
The following lists contains all the possible PRINTER strings and their meanings:
FIRST INITIALIZATION STRING
This string is sent to the output device every time a new document is sent from
the host. It may be used to setup any default parameters you may want the
printer to take on, such as the default pitch.
SECOND INITIALIZATION STRING
This string is sent to the output device every time a new document is sent from
the host. It is provided in case the FIRST INITIALIZATION STRING was not long
enough to contain all the necessary information. It may be used to setup any
default parameters you may want the printer to take on, such as the default
pitch.
03 LINES PER INCH STRING
This string is sent to the output device whenever a command from the host is
received that indicates to set the lines per inch to 3.
04 LINES PER INCH STRING
This string is sent to the output device whenever a command from the host is
received that indicates to set the lines per inch to 4.
06 LINES PER INCH STRING
This string is sent to the output device whenever a command from the host is
received that indicates to set the lines per inch to 6.
08 LINES PER INCH STRING
This string is sent to the output device whenever a command from the host is
received that indicates to set the lines per inch to 8.
TOP MARGIN STRING
This string is sent to the output device when a command is received from the
host that causes the top margin to be changed.
BLUES User Manual
Page:82
Newhart Systems Incorporated © 2006 All Rights Reserved
BOTTOM MARGIN STRING
This string is sent to the output device when a command is received from the
host that causes the bottom margin to be changed.
LEFT MARGIN STRING
This string is sent to the output device when a command is received from the
host that causes the left margin to be changed.
RIGHT MARGIN STRING
This string is sent to the output device when a command is received from the
host that causes the right margin to be changed.
PAGE WIDTH STRING
This string is sent to the output device when a command is received from the
host that causes the page width to be changed.
HORIZONTAL FORMATTING STRING
This string is sent to the output device when a command is received from the
host that causes the left margin, right margin, or page width to change. This
string will be sent to the output device after the LEFT MARGIN, RIGHT MARGIN,
and PAGE WIDTH strings. Some printers require a separate escape sequence
to get the printer to activate the new margin settings.
HORIZONTAL SPACING CONSTANT
This printer specific is a decimal number that is used when host commands are
received from the host that contain horizontal formatting information. This
number is used as a multiplier for each host horizontal command. It may be
used to adjust the distance between characters on a line.
PAGE LENGTH STRING
This string is sent to the output device whenever a host command is received
that would change the page length.
BLUES User Manual
Page:83
Newhart Systems Incorporated © 2006 All Rights Reserved
VERTICAL FORMATTING STRING
This string is sent to the output device when a command is received from the
host that causes the top margin, bottom margin, or the page length to change.
This string will be sent to the output device after the TOP MARGIN, BOTTOM
MARGIN, and PAGE LENGTH strings. Some printers require a separate escape
sequence to get the printer to activate the new margin settings.
VERTICAL SPACING CONSTANT
This printer specific is a decimal number that is used when host commands are
received from the host that contain vertical formatting information. This number
is used as a multiplier for each host vertical command. It may be used to adjust
the distance between lines on a page.
START UNDERLINE STRING
This string is sent to the output device whenever a host command is received
that indicates to start underlining.
END UNDERLINE STRING
This string is sent to the output device whenever a host command is received
that indicates to end underlining.
RESET ATTRIBUTES STRING
This string is sent to the output device whenever a host command is received
that indicates to reset all printer attributes.
DEFAULT FONT STRING
This string is sent to the output device whenever a host command is received
that
Specifies to set the font back to its original setting.
FONT 1 STRING
This string is sent to the output device whenever a host command is received
that indicates to set the font to type number 1.
BLUES User Manual
Page:84
Newhart Systems Incorporated © 2006 All Rights Reserved
FONT 2 STRING
This string is sent to the output device whenever a host command is received
that indicates to set the font to type number 2.
FONT 3 STRING
This string is sent to the output device whenever a host command is received
that indicates to set the font to type number 3.
FONT 4 STRING
This string is sent to the output device whenever a host command is received
that indicates to set the font to type number 4.
FONT 5 STRING
This string is sent to the output device whenever a host command is received
that indicates to set the font to type number 5.
DEFAULT CHARACTERS PER INCH
This printer specific is a decimal number that selects the printers default
characters per inch. Whenever the printer emulator goes back to the default
characters per inch, this value determines which of the CHARS. PER INCH
strings are sent to the output device (see CHARS. PER INCH strings below).
CHARS. PER INCH (1 - 7) STRING
This string is sent to the output device whenever a host command is received
that indicates to set the characters per inch between 1 and 7.
CHARS. PER INCH (8 - 11) STRING
This string is sent to the output device whenever a host command is received
that indicates to set the characters per inch between 8 and 11.
CHARS. PER INCH (12 - 14) STRING
This string is sent to the output device whenever a host command is received
that indicates to set the characters per inch between 12 and 14.
BLUES User Manual
Page:85
Newhart Systems Incorporated © 2006 All Rights Reserved
CHARS. PER INCH (15 - 18) STRING
This string is sent to the output device whenever a host command is received
that indicates to set the characters per inch between 15 and 18.
CHARS. PER INCH (19 - 25) STRING
This string is sent to the output device whenever a host command is received
that indicates to set the characters per inch between 19 and 25.
DEFAULT LINES PER PAGE
This printer specific is a decimal number that indicates the number of lines on a
physical page.
There are six format variables kept by the LU1 SCS mode emulation program
that the host may change at any time. These variables may be included in the
strings in either an ASCII format or a binary format. These six variables may be
placed into output strings sent the print device. Variables are used to indicate to
insert the value of a particular variable in the output string. Variables are entered
as a string of characters in the following format "VaAb" or "VaBb". The value of
'a' is the number of the variable to insert into the printer output (as defined
below). The value 'A" is for ASCII and the 'B' is for BINARY. The value for 'b' is
the minimum number of characters to send to the output device or a 0 to send
the value without justification. The value for 'b' is used to right justify a value if
ASCII is selected and used to add to the value if binary is selected. For example
if you wanted to send the value for the right margin in ASCII and the host had set
the right margin at 132 and you entered "V3A0" then the string "132" would be
sent to the output device. If you entered the string "V3B0", then a single binary
character of 132 would be sent to the output device. If you entered a string of
"V3A5", then the string "00132" would be sent to the output device. The
following variables have been assigned the following numbers:
VARIABLE
VALUE
PAGE WIDTH1
1
LEFT MARGIN
2
RIGHT MARGIN
3
PAGE LENGTH
5
TOP MARGIN
6
BOTTOM MARGIN
7
BLUES User Manual
Page:86
Newhart Systems Incorporated © 2006 All Rights Reserved
Margins
Margins may be selected if the print directly to port feature has been disabled.
Margins are initially set to 0 but may be modified as needed.
First Print Line
This field specifies the top margin, or first line on a page to which output data
should be written. Any values greater that 1 will cause blank lines to be inserted
in the print out.
Last Print Line
This field specifies the bottom margin, or last line on a page to which output data
should be written. When the last print line is reached a form feed is performed.
Lines Per Page
This field specifies the total number of lines on a physical page.
Maximum Print Column
This field specifies the number of characters that can be printed on a line.
Space Between Lines
This field lets you modify the amount of space between printed lines. It is
primarily used to align pre-printed forms. By using the TEST button you can
experiment with the format of a printed page.
Space Between Characters
This field lets you modify the amount of space between printed characters. It is
primarily used to align pre-printed forms. By using the TEST button you can
experiment with the format of a printed page.
BLUES User Manual
Page:87
Newhart Systems Incorporated © 2006 All Rights Reserved
SCS Transparent Print Data
SCS type of printers can receive data from the host that has been designated as
transparent by the host. This option lets you select what the BLUES printer
session will do with the transparent data. The transparent data may be sent
directly to the print device (if you selected to print directly to the print port) or sent
directly to the printer by using a Windows PASSTHROUGH escape function. All
Windows print drivers do not support the PASSTHROUGH escape.
Hex Pass-Through Trigger Character
This option lets you select a special character or characters that will surround
special print ready data coming from the host. Every two bytes between the
trigger characters are converted from EBCDIC to ANSI, and then the ANSI
characters are assumed to be valid hexadecimal values and combined to
become a single hexadecimal character. The newly formed hexadecimal
character is then either sent directly to the print device (if you selected to print
directly to the print port) or sent directly to the printer by using a Windows
PASSTHROUGH escape function. All Windows drivers do not support the
PASSTHROUGH escape. The following DataStream could be sent from the
host to a HP II compatible printer to set the line spacing to 8 LPI. It is assumed
that you selected the logical not character as the trigger character, the logical not
character is sent as a hex 5f from the host.
HOST EBCDIC DATA STREAM
PRINTER
OUTPUT
TO
5F 5F F1 C2 F2 F6 F6 C3 F3 F8 F4 F4 5F
1B 26 6C 38 44
THE
Wrap Text At Right Margin
This lets you cause a new line to be automatically done whenever the right
margin is reached. If this feature is off and the host prints past the right margin,
then the information will be lost.
Form Feed Without Space
BLUES User Manual
Page:88
Newhart Systems Incorporated © 2006 All Rights Reserved
This field acts as a toggle switch. An X in this field turns the option on, and
means the printer should NOT advance one character position after a form feed.
The one space advance is provided when needed to conform to IBM printers.
Form feed at end of job
This field acts as a toggle switch. An X in this field turns the option on, and
means the printer should perform a form feed after printing each file. Some
laser printers require this feature to be able to cause the printer to actually print
the last page. If the host application does not place a form feed at the end of a
print job, then this feature should be used.
Auto newline at end of line
This field acts as a toggle switch. An X in this field turns the option on, and
means the printer should perform a newline function, i.e., carriage return (CR)
followed by line feed (LF), whenever a CR occurs at the maximum print column +
1.
Additional newline at end of line
This field acts as a toggle switch. An X in this field turns the option on, and
means the printer should perform two newline (NL) functions, whenever a NL
occurs at the maximum print column + 1.
Newline at end of job
This field acts as a toggle switch. An X in this field turns the option on, and
means the printer should perform a newline function after printing each file.
Xlate SCS FF to CRLF
This field acts as a toggle switch. An X in this field turns the option on, and
means the printer should treat a form feed (FF) received from the host as a
carriage return plus line feed (CRLF).
BLUES User Manual
Page:89
Newhart Systems Incorporated © 2006 All Rights Reserved
Let Host Override these settings
The host DataStream may contain formatting options that set the maximum print
position, the maximum print line, vertical tabs, the lines per inch, and the
characters per inch. When this option has been selected, the BLUES printer
emulator will use the values sent by the host and not the values have selected in
the print setup dialog box.
Enable Print To Disk
This menu item lets you enable and disable the print to disk feature. When
selected, each host print job is written to a new disk file. To select the disk file
name, see the following section. You may have both disk and printer output
enabled at the same time. This would cause a hard copy and a disk file to be
produced.
Disk File…
This menu item lets you select the name of the next print to disk file name. Each
host print is written to a new disk file. Disk files are incremented. I.e.
print0001.dat is incremented to print0002.dat.
Close
This menu item lets you end the printer emulation.
View
BLUES User Manual
Page:90
Newhart Systems Incorporated © 2006 All Rights Reserved
Titlebar…
This command may be used to remove or display the title bar at the top of the
window. In addition, the title bar text may be changed to something more
meaningful. If the title bar text field is left blank, then the session number will be
displayed. I.e. Session1
Toolbar
This command will display or hide the printer session toolbar.
Statusbar
This command will either remove or add the status bar from the bottom of the
display window.
Connection
BLUES User Manual
Page:91
Newhart Systems Incorporated © 2006 All Rights Reserved
The Connection Menu provides a command that enables you to connect or
disconnect to a host gateway.
Connect…
This option lets you connect to the host computer. For details on the operation
of the connect window, see the Terminal Connect section of this manual.
Disconnect
Help
The Help Menu includes commands that enable you to obtain information about
how to use the standard Windows Help facilities, as well as commands that
enable you to access the major topics of help available for this particular
application.
BLUES User Manual
Page:92
Newhart Systems Incorporated © 2006 All Rights Reserved
Software Development Kit
What Is It ?
The SDK (Software Development Kit) contains the necessary .NET components
to add IBM 3270 and IBM 5250 terminal emulation to any .NET application. The
Windows Forms control “HostControl” can be dropped into any .NET Windows
form to provide a managed .net terminal emulator. In addition to providing
standard terminal emulation, the hosting .NET application can use the rich set of
methods, properties, and events to automate overator entry, scrape screens,
present an entirly different Graphical interface of the host information, or
seamlessly integrate information from an IBM Mainframe or Midrange computer
with their custom application.
The SDK comes as part of the “Blues 2006 Client” and “Blues 2006 Developer”
products.
Blues 2006 may be used to create custom .NET applications that can have one
or more embedded Blues terminal sessions. Blues 2006 ships with a Windows
Forms control that can be dropped into any .NET application.
The control
provides a complete terminal emulation window that may be used to automate
operator activity as well as extend the functionality of the emulator. To use the
control, you must be experienced in creating .NET application and programming
in .NET. This chapter assumes that the reader be versed in both.
The Software Development Kit (SDK) includes two Microsoft Visual Studio .NET
2006 sample projects; one written in C# and the other in VB .NET.
The sample projects are installed under the SDK folder (defaults to Program
Files\Blues2006\sdk\VB and Program Files\Blues2006\sdk\c#). There are two
approaches to using the control; start with the sample project and add your new
functionality, or add the control to your existing application.
The file hostcontrol.dll contains the .NET Windows forms control used for
terminal emulation. This control contains a variety of properties, methods and
delegates that may be used to control the operation of a terminal session. Some
BLUES User Manual
Page:93
Newhart Systems Incorporated © 2006 All Rights Reserved
of the functions include automated keyboard entry, screen scraping, connecting,
and disconnecting.
The control appears as a rectangular window with a toolbar, host presentation
space, button bars, and status bar. Its appearance may be configured to match
specific requirements.
Licensing Issues
Any third party application that uses the Blues software must be properly
licensed. Each PC running any part of the Blues software must be licensed. For
information on the software license, please read the license agreement that must
be agreed to during the initial software installation process.
Packaging Blues with a Third Party Application
Licensing issues still apply if the Blues software is going to be packaged with any
third party application. Each computer running the third party application that is
using the Blues software must be properly licensed.
BLUES User Manual
Page:94
Newhart Systems Incorporated © 2006 All Rights Reserved
To package Blues with a third party application, first, install Blues on the
development PC, configure the session(s) from the Blues Manager window the
way you want them, develop the application and test it, and then include all the
files in the Blues folder with your application.
Sample Project Usage
To use the sample projects installed with Blues, Visual Studio .NET 2006 or the
.NET SDK must already be installed on the PC used for development. It is
suggested that a copy of all files in the appropriate sample folder be copied to a
new folder to preserve the sample for reference purposes. To build a project,
first start Visual Studio .NET 2006 and use the Open Project function and
browse to the project folder, and select the project to open. Once the project is
opened, you may have to adjust the location of the references to match the
folder where Blues is installed and adjust the location where the compiled
program is written to match the Blues folder.
Once you are able to build and run the project with no errors, then your ready to
add new functionality by using the methods, properties, and delegates of the
hostcontrol class.
Adding Hostcontrol to an existing Visual Studio project
Important
Before adding the control to an existing application it is important to
understand how the .NET runtime locates assemblies (.NET dll’s) that are
referenced by another application.
Typically all .NET dlls that an
application requires are located in either the same folder as the
application, or in the .NET Global Cache (GAC). We recommend either
copying all the files from the Blues 2006 installation folder (Program
Files\Blues2006) to the same folder that the hosting application is in, or by
adding
an
event
handler
for
the
System.AppDomain.CurrentDomain.AssemblyResolve event that loads the
Blues 2006 dlls from the installation folder as they are required. We do not
recommend puting the Blues 2006 dlls in the GAC, the Blues 2006 dll’s
BLUES User Manual
Page:95
Newhart Systems Incorporated © 2006 All Rights Reserved
assume that all necessary files required to use the control (translate table
files, keyboard mapping files, file transfer schemes, etc) are located in the
same folder as the dlls themselves. When a file is added to the GAC, it is
copied to a special Windows folder where it is loaded from, this causes the
control to fail because to necessary supporting files are not in the GAC
folder.
To add a terminal session control to your application from visual studio, follow
these steps:
1. Right click on the “References” tree in the Solution window and select
“Add Reference”. Browse to either the Program Files\Blues 2006 folder (if
leaving Blues 2006 product in its installation folder), or the the folder
where your exe is put when it is built (if copied all Blues 2006 files to the
application folder) and click on the file Hostcontrol.dll and press ok. Right
click on the new reference and select Properties. From the properties
window set the “Local Copy” property to false.
2. Open up the toolbox (View/Toolbox menu), click the right mouse button
over an unused area of the toolbox window and select “Add/Remove
Items…”. Browse to either the Program Files\Blues 2006 folder (if leaving
Blues 2006 product in its installation folder), or the the folder where your
exe is put when it is built (if copied all Blues 2006 files to the application
folder) and click on the file Hostcontrol.dll and press ok. This will create a
new tool at the end of the “Windows Forms” tab tools called
BluesTerminal.
3. Select the BluesTerminal tool and edit the form that you want the terminal
session on and click the mouse on the form. This will create a
Bluesterminal control that looks like a black rectangle. This is the area
where the terminal session will be visible (if the Visible property is true).
4. If the Blues 2006 product is going to be run from its installation folder, add
an event handler to the
System.AppDomain.CurrentDomain.AssemblyResolve as follows:
See Also http://support.microsoft.com/default.aspx?scid=kb;enus;837908#6
Visual C# .NET code
static void Main()
{
//
BLUES User Manual
Page:96
Newhart Systems Incorporated © 2006 All Rights Reserved
// Hook the ResolveEvent to allow loading of Blues
// assemblies from its installed location
//
System.AppDomain.CurrentDomain.AssemblyResolve +=new
ResolveEventHandler(CurrentDomain_AssemblyResolve);
Application.Run(new Form1());
}
private static System.Reflection.Assembly
CurrentDomain_AssemblyResolve(object sender, ResolveEventArgs args)
{
//
// Location where Blues software is installed
//
string BluesFolder = "C:\\Program Files\\Blues2006\\";
if(args.Name.StartsWith("HostControl"))
return(System.Reflection.Assembly.LoadFrom(BluesFolder +
"Hostcontrol.dll"));
else
if(args.Name.StartsWith("PS"))
return(System.Reflection.Assembly.LoadFrom(BluesFolder +
"PS.dll"));
else
if(args.Name.StartsWith("DS3270"))
return(System.Reflection.Assembly.LoadFrom(BluesFolder +
"DS3270.dll"));
else
if(args.Name.StartsWith("DS5250"))
return(System.Reflection.Assembly.LoadFrom(BluesFolder +
"DS5250.dll"));
else
if(args.Name.StartsWith("VW5250"))
return(System.Reflection.Assembly.LoadFrom(BluesFolder +
"VW5250.dll"));
else
if(args.Name.StartsWith("VW3270"))
return(System.Reflection.Assembly.LoadFrom(BluesFolder +
"VW3270.dll"));
else
if(args.Name.StartsWith("Dialogs"))
return(System.Reflection.Assembly.LoadFrom(BluesFolder +
"Dialogs.dll"));
else
if(args.Name.StartsWith("Licensing"))
return(System.Reflection.Assembly.LoadFrom(BluesFolder +
"Licensing.dll"));
else
if(args.Name.StartsWith("Xfer"))
BLUES User Manual
Page:97
Newhart Systems Incorporated © 2006 All Rights Reserved
return(System.Reflection.Assembly.LoadFrom(BluesFolder +
"Xfer.dll"));
else
if(args.Name.StartsWith("Macro"))
return(System.Reflection.Assembly.LoadFrom(BluesFolder +
"Macro.dll"));
else
if(args.Name.StartsWith("tn"))
return(System.Reflection.Assembly.LoadFrom(BluesFolder +
"tn.dll"));
else
if(args.Name.StartsWith("cbase"))
return(System.Reflection.Assembly.LoadFrom(BluesFolder +
"cbase.dll"));
if(args.Name.StartsWith("Enums"))
return(System.Reflection.Assembly.LoadFrom(BluesFolder +
"Enums.dll"));
else
if(args.Name.StartsWith("DES3"))
return(System.Reflection.Assembly.LoadFrom(BluesFolder +
"Des3.dll"));
else
if(args.Name.StartsWith("Xheo.Licensing"))
return(System.Reflection.Assembly.LoadFrom(BluesFolder +
"Xheo.Licensing.dll"));
else
if(args.Name.StartsWith("kcommon"))
return(System.Reflection.Assembly.LoadFrom(BluesFolder +
"kcommon.dll"));
else
if(args.Name.StartsWith("win32calls"))
return(System.Reflection.Assembly.LoadFrom(BluesFolder +
"win32calls.dll"));
else
if(args.Name.StartsWith("en"))
return(System.Reflection.Assembly.LoadFrom(BluesFolder +
"en.dll"));
else
if(args.Name.StartsWith("de"))
return(System.Reflection.Assembly.LoadFrom(BluesFolder +
"de.dll"));
return null;
}
Visual Basic .NET code
BLUES User Manual
Page:98
Newhart Systems Incorporated © 2006 All Rights Reserved
Public Sub New()
MyBase.New()
AddHandler AppDomain.CurrentDomain.AssemblyResolve, AddressOf
MyResolveEventHandler
'This call is required by the Windows Form Designer.
InitializeComponent()
'Add any initialization after the InitializeComponent() call
End Sub
Shared BluesFolder As String = "C:\\Program Files\\Blues2006\\"
Function MyResolveEventHandler(ByVal sender As Object, ByVal args As
ResolveEventArgs) As System.Reflection.Assembly
If (args.Name.StartsWith("HostControl")) Then
Return System.Reflection.Assembly.LoadFrom(BluesFolder
"Hostcontrol.dll")
ElseIf (args.Name.StartsWith("PS")) Then
Return System.Reflection.Assembly.LoadFrom(BluesFolder
"PS.dll")
ElseIf (args.Name.StartsWith("DS3270")) Then
Return System.Reflection.Assembly.LoadFrom(BluesFolder
"DS3270.dll")
ElseIf (args.Name.StartsWith("DS5250")) Then
Return System.Reflection.Assembly.LoadFrom(BluesFolder
"DS5250.dll")
ElseIf (args.Name.StartsWith("VW5250")) Then
Return System.Reflection.Assembly.LoadFrom(BluesFolder
"VW5250.dll")
ElseIf (args.Name.StartsWith("VW3270")) Then
Return System.Reflection.Assembly.LoadFrom(BluesFolder
"VW3270.dll")
ElseIf (args.Name.StartsWith("Licensing")) Then
Return System.Reflection.Assembly.LoadFrom(BluesFolder
"Licensing.dll")
ElseIf (args.Name.StartsWith("Xfer")) Then
Return System.Reflection.Assembly.LoadFrom(BluesFolder
"Xfer.dll")
ElseIf (args.Name.StartsWith("Macro")) Then
Return System.Reflection.Assembly.LoadFrom(BluesFolder
"Macro.dll")
ElseIf (args.Name.StartsWith("tn")) Then
Return System.Reflection.Assembly.LoadFrom(BluesFolder
"tn.dll")
ElseIf (args.Name.StartsWith("cbase")) Then
Return System.Reflection.Assembly.LoadFrom(BluesFolder
"cbase.dll")
ElseIf (args.Name.StartsWith("Enums")) Then
Return System.Reflection.Assembly.LoadFrom(BluesFolder
"Enums.dll")
ElseIf (args.Name.StartsWith("DES3")) Then
BLUES User Manual
+
+
+
+
+
+
+
+
+
+
+
+
Page:99
Newhart Systems Incorporated © 2006 All Rights Reserved
Return System.Reflection.Assembly.LoadFrom(BluesFolder
"DES3.dll")
ElseIf (args.Name.StartsWith("Xheo.Licensing")) Then
Return System.Reflection.Assembly.LoadFrom(BluesFolder
"Xheo.Licensing.dll")
ElseIf (args.Name.StartsWith("kcommon")) Then
Return System.Reflection.Assembly.LoadFrom(BluesFolder
"kcommon.dll")
ElseIf (args.Name.StartsWith("win32calls")) Then
Return System.Reflection.Assembly.LoadFrom(BluesFolder
"win32calls.dll")
ElseIf (args.Name.StartsWith("en")) Then
Return System.Reflection.Assembly.LoadFrom(BluesFolder
"en.dll")
ElseIf (args.Name.StartsWith("de")) Then
Return System.Reflection.Assembly.LoadFrom(BluesFolder
"de.dll")
+
+
+
+
+
+
End If
End Function 'MyResolveEventHandler
5. Locate and click on the “BluesTerminal” tool in the Visual Studio toolbox
under the “Windows Forms” tab. Open a form that will hold the terminal
session and click the mouse over the form. This will create a rectangle
control that will provide the emulation.
6. Add an event handler for the forms Load event and call the
Readconfiguration and Launch methods in the OnLoad event.
Visual C# .NET code
private void Form1_Load(object sender, System.EventArgs e)
{
this.bluesTerminal1.ReadConfiguration();
this.bluesTerminal1.Launch();
}
Visual Basic .NET code
Private Sub Form1_Load(ByVal sender As Object, ByVal e As
System.EventArgs) Handles MyBase.Load
BluesTerminal1.ReadConfiguration()
BluesTerminal1.Launch()
End Sub
HostControl Class
BLUES User Manual
Page:100
Newhart Systems Incorporated © 2006 All Rights Reserved
The HostControl.BluesTerminal class provides the interface to the terminal
emulation window. The class must be properly initialized before any host
interaction can take place. Each instance of the BluesTerminal class represents
an instance of a terminal emulator.
The class definition is as follows:
C#
private HostControl.BluesTerminal bluesTerminal1;
VB
Friend WithEvents BluesTerminal1 As HostControl. BluesTerminal
Initialization
Initialization consists of constructing an instance of the class, setting a few
properties, calling the ReadConfiguration method to configure the class, and
calling the Launch method to start the emulation. The Blues Manager window
must be used to first configure a session for the class to use. This allows for the
customization of the session, keyboard mappings, etc. Each instance of the
class is represented by a specific session configured with the Manager window.
Multiple instances of a class session are allowed. After initialization, any of the
methods, properties, or delegates may be used to control the terminal session,
consult the reference in this manual for details on each.
Initialization of the class looks as follows; consult the reference in this manual for
definitions of each method, property, and delegate.
C#
bluesTerminal1 = new HostControl.BluesTerminal();
if(!this.bluesTerminal1.ReadConfiguration())
{
BLUES User Manual
Page:101
Newhart Systems Incorporated © 2006 All Rights Reserved
// Configuration failed, view bluesTerminal1. Message
return;
}
if(!this.bluesTerminal1.Launch())
{
//Launch failed, view bluesTerminal1. Message
return;
}
VB
BluesTerminal1 = New HostControl.BluesTerminal
If Not BluesTerminal1.ReadConfiguration() Then
‘ Error view BluesTerminal1.Message
End If
If Not BluesTerminal1.Launch() Then
‘ Error view BluesTerminal1.Message
End If
Methods
Methods are functions that the application calls to have some type of function
performed. Any method that can take time to complete is asynchronous and
return immediately, when the method has been performed, the associated
delegate is called to notify the application of the outcome.
BeginConnect
This method starts the connection process. Before calling this method, set the
delegate evtConnected to be notified of the result. The connection process is
asynchronous. See the delegate evtConnected for details on determining the
outcome of the call.
C#
BLUES User Manual
Page:102
Newhart Systems Incorporated © 2006 All Rights Reserved
bluesTerminal1.evtConnectComplete += new
BluesTerminal.evtConnected(bluesTerminal1_evtConnectComplete);
bluesTerminal1.BeginConnect();
VB
BluesTerminal1.BeginConnect();
Close
This method closes the control and frees up any resources it may be using.
C#
BluesTerminal1.Close();
VB
BluesTerminal1.Close()
ClosingWindow
This method should be called when the application is about to close. This
method allows the terminal session to clean up any resources it may be using,
save its settings (if configured to Save Settings On Close), and disconnect from
the host.
C#
BluesTerminal1.ClosingWindow();
BLUES User Manual
Page:103
Newhart Systems Incorporated © 2006 All Rights Reserved
VB
BluesTerminal1. ClosingWindow ()
ConnectToDestination
This method causes the terminal session to start the connection process. Each
session may be configured for more that one host destination. This method may
be used to connect to a specific previously configured host destination. The
argument is a one based value indicating which host destination to attempt to
connect to.
C#
BluesTerminal1.ConnectToDestination (1);
VB
BluesTerminal1. ConnectToDestination (1)
DisconnectFromHost
This method will cause the terminal session disconnect the tcp/ip connect to the
host and enter “local” mode.
C#
BluesTerminal1.DisconectFromHost ();
VB
BluesTerminal1. DisconectFromHost ()
BLUES User Manual
Page:104
Newhart Systems Incorporated © 2006 All Rights Reserved
findDisplayText
This method is used to search for a string on the host screen. The arguments
include the string, the starting row and the starting column. The starting row and
column are one based numbers. The search is exhausted at the end of the
screen. If the string is found, true is returned, other false is returned. If the
string is found, the found foundTextOnRow and foundTextOnColumn properties
will contain the location of the string.
C#
If(BluesTerminal1.findDisplayText(“Login”,1,1))
{
// text was found at BluesTerminal1. foundTextOnRow,
// BluesTerminal1.foundTextOnColumn
}
VB
If (BluesTerminal1.findDisplayText("Login", 1, 1)) Then
REM text is located at
BluesTerminal1.foundTextOnRow,Bluesterminal1.foundTextOcColumn
End If
getDisplayText
This method obtains a copy of the host screen (scrapes the screen). Any portion
of the screen contents may be read. Arguments include the starting row,
column, and length. All argument values are one based.
C#
BLUES User Manual
Page:105
Newhart Systems Incorporated © 2006 All Rights Reserved
//
// scrape screen and take appropriate action
//
string Screen = BluesTerminal1.getDisplayText(1,1,
BluesTerminal1.ScreenRows * BluesTerminal1.ScreenCols);
VB
REM
REM scrape screen and take appropriate action
REM
Dim Screen As String
Screen = BluesTerminal1.getDisplayText(1, 1, BluesTerminal1.ScreenRows *
BluesTerminal1.ScreenCols)
keyText
This method is used to type a string of characters into the host screen. The
characters are entered starting at the current cursor address.
The return code is true for success and false for failure. A False return code
indicates that the either the host screen was busy receiving data from the host,
or that the cursor was located in a protected location of the screen.
C#
BluesTerminal1.keyText(“hello World”); //enter some text
VB
BluesTerminal1.keyText(“hello world”) REM enter some text
keyTerminalKey
This method is used to send a function key to the terminal session. Function
keys are special keys that cause a specific function to be performed by the
terminal session. Some function keys cause the terminal session to send
BLUES User Manual
Page:106
Newhart Systems Incorporated © 2006 All Rights Reserved
information to the host. When this happens, the application must wait for a
delegate such as the evtKeyboardUnlocked before any other keyboard
input is allowed.
Two prototypes of this function exist, one that takes a key code, and the other
that takes a text representation of the key. The dll Enums.dll contains an Enum
called KeyDefines that contains the integer values for the key codes. The
following table lists the possible values for the arguments:
Argument
KeyDefines.KEY_DUPLICATE or
“DUP” or
“DUPLICATE”
KeyDefines.PF1 or
“PF1” or “F1”
KeyDefines.PF2 or
“PF2” or “F2”
KeyDefines.PF3 or
“PF3” or “F3”
KeyDefines.PF4 or
“PF4” or “F4”
KeyDefines.PF5 or
“PF5” or “F5”
KeyDefines.PF6 or
“PF6” or “F6”
KeyDefiles.PF7 or
“PF7” or “F7”
KeyDefines.PF8 or
“PF8” or “F8”
KeyDefines.PF9 or
“PF9” or “F9”
KeyDefines.PF10 or
“PF10” or “F10”
KeyDefines.PF11 or
“PF11” or “F11”
KeyDefines.PF12 or
“PF12” or “F12”
KeyDefines.PF13 or
“PF13” or “F13”
KeyDefines.PF14 or
“PF14” or “F14”
KeyDefines.PF15 or
“PF15” or “F15”
BLUES User Manual
Function
3270 or 5250 Duplicate key
3270 or 5250 Function key 1
3270 or 5250 Function key 2
3270 or 5250 Function key 3
3270 or 5250 Function key 4
3270 or 5250 Function key 5
3270 or 5250 Function key 6
3270 or 5250 Function key 7
3270 or 5250 Function key 8
3270 or 5250 Function key 9
3270 or 5250 Function key 10
3270 or 5250 Function key 11
3270 or 5250 Function key 12
3270 or 5250 Function key 13
3270 or 5250 Function key 14
3270 or 5250 Function key 15
Page:107
Newhart Systems Incorporated © 2006 All Rights Reserved
KeyDefines.PF16 or
“PF16” or “F16”
KeyDefines.PF17 or
“PF17” or “F17”
KeyDefines.PF18 or
“PF18” or “F18”
KeyDefines.PF19 or
“PF19” or “F19”
KeyDefines.PF20 or
“PF20” or “F20”
KeyDefines.PF21 or
“PF21” or “F21”
KeyDefines.PF22 or
“PF22” or “F22”
KeyDefines.PF23 or
“PF23” or “F23”
KeyDefines.PF24 or
“PF24” or “F24”
KeyDefines.PA1 or
“PA1”
KeyDefines.PA2 or
“PA2”
KeyDefines.PA3 or
“PA3”
KeyDefines.ENTER or
“ENTER”
KeyDefiles.SYSREQ or
“SYS_REQ” or “SYSTEM REQUEST”
KeyDefines.TABFWD or
“TAB”
KeyDefines.BACKTAB or
“BACKTAB”
KeyDefines.NEWLINE or
“NEWLINE” or “NEW LINE”
KeyDefines.CLEAR or
“CLEAR”
KeyDefines.ALTCURSOR or
“ALT_CURSOR” or “ALTERNATE
CURSOR”
KeyDefines.ATTENTION or
“ATTENTION”
KeyDefines.CURSEL or
“CUR_SEL” or “CURSOR SELECT”
BLUES User Manual
3270 or 5250 Function key 16
3270 or 5250 Function key 17
3270 or 5250 Function key 18
3270 or 5250 Function key 19
3270 or 5250 Function key 20
3270 or 5250 Function key 21
3270 or 5250 Function key 22
3270 or 5250 Function key 24
3270 or 5250 Function key 24
3270 or 5250 PA 1 Function key
3270 or 5250 PA 2 Function key
3270 or 5250 PA 3 Function key
3270 or 5250 ENTER Function key
3270 or 5250 System Request
Function key
3270 or 5250 Tab forward Function key
3270 or 5250 Back TabFunction key
3270 or 5250 New LineFunction key
3270 or 5250 Clear Screen Function
key
3270 or 5250 Alternate Cursor
Function key
3270 or 5250 Attendtion Function key
3270 or 5250 Cursor Select Function
key
Page:108
Newhart Systems Incorporated © 2006 All Rights Reserved
KeyDefines.ERASFLD or
“ERASE_EOF” or “ERASE EOF”
KeyDefines.ERASINP or
“ERASE_INP” or “ERASE INPUT”
KeyDefines.FIELD_MARKER or
“FLD_MARK” or “FIELD MARK”
KeyDefines.CURHOME or
“HOME”
KeyDefines.CURLEFT or
“CUR_LEFT” or “CURSOR_LEFT”
KeyDefines.CURRIGHT or
“CUR_RIGHT” or “CURSOR RIGHT”
KeyDefines.RESETor
“RESET”
KeyDefines.CURUP or
“KEYUP” or “CURSOR UP”
KeyDefines.CURDOWN or
“KEYDOWN” or “CURSOR DOWN”
KeyDefines.BACKSPACE or
“BACKSPACE”
KeyDefines.INSERT or
“INSERT”
KeyDefines.DELCHAR or
“DELETE”
KeyDefines.PRINT or
“PRINT”
KeyDefines.FIELD_EXIT or
“FIELD_EXIT” or “FIELD EXIT”
KeyDefines.FIELD_PLUS or
“FIELD_PLUS” or “FIELD PLUS”
KeyDefines.FIELD_MINUS or
“FIELD_MINUS” or “FIELD MINUS”
KeyDefines.ROLL_UP or
“ROLL_UP” or “ROLL UP”
KeyDefines.ROLL_DOWN or
“ROLL_DOWN” or “ROLL DOWN”
KeyDefines.HELP or
“HELP”
KeyDefines.PRINT_5250 or
“HOST PRINT”
3270 or 5250 Erase to end of field
Function key
3270 or 5250 Erase Input Function key
3270 or 5250 Field Mark Function key
3270 or 5250 Home Function key
3270 or 5250 Cursor Left Function key
3270 or 5250 Cursor Right Function
key
3270 or 5250 Reset Function key
3270 or 5250 Cursor Up Function key
3270 or 5250 Cursor Down Function
key
3270 or 5250 Backspace Function key
3270 or 5250 Insert Function key
3270 or 5250 Delete Function key
3270 or 5250 Print screen Function key
5250 Field Exit Function key
5250 Field Plus Function key
5250 Field Minus Function key
5250 Roll Up Function key
5250 Roll Down Function key
5250 Help Function key
5250 Host Print Function key
C#
BLUES User Manual
Page:109
Newhart Systems Incorporated © 2006 All Rights Reserved
BluesTerminal1.keyTerminalKey(“ENTER”);
//send enter key
or
BluesTerminal1.keyTerminalKey(HostControl.KEYDefines.ENTER);
enter key
//send
VB
BluesTerminal1.keyTerminalKey(“ENTER”) REM send enter key
or
BluesTerminal1.keyTerminalKey(HostControl.KEYDefines.ENTER) REM send
enter key
Launch
The Launch method preps the session for use. If the initially connected property
is true, then the connection process is automatically started. Before calling this
method set the Delegate evtConnected, if connection results need to be acted
on.
The return code is true for success and false for failure. Inspect the Message
property to determine the cause of any failure.
C#
if (!this.bluesTerminal1.ReadConfiguration())
{
MessageBox.Show(this.bluesTerminal1.Message);
this.Close();
}
else
this.bluesTerminal1.Launch();
VB
BLUES User Manual
Page:110
Newhart Systems Incorporated © 2006 All Rights Reserved
If (BluesTerminal1.ReadConfiguration()) Then
BluesTerminal1.Launch()
Else
MessageBox.Show(BluesTerminal1.Message)
Close()
End If
mnuMacroPlay
This method will cause the play macro selection window to be displayed. The
operator will then be forced to select the name of the macro to play. When the
recording is complete, the evtMacroComplete delegate will be called.
mnuMacroRecord
This method is used to record a macro. The operator will be prompted for the
name of the macro to record.
When the recording is complete, the
evtMacroComplete delegate will be called.
mnuMacroStop
This method is used to stop either playing a macro or recording a macro. Calling
this method is only valid when a macro function is in progress.
PlayMacro
This method is used to play a specific macro file. The argument is the name of a
previously recorded macro. When the macro completes, the evtMacroComplete
delegate will be called to notify the application the macro has completed.
ReadConfiguration
The ReadConfiguration method forces the control to read the Blues database
and establish its configuration settings. Before calling this method, the
DATABASE, USERNAME, SESSIONNUMBER, LANGUAGE, and PRIVATEDIR
properties must be set.
BLUES User Manual
Page:111
Newhart Systems Incorporated © 2006 All Rights Reserved
The return code is true for success and false for failure. Inspect the Message
property to determine the cause of any failure.
C#
if (!this.bluesTerminal1.ReadConfiguration())
{
MessageBox.Show(this.bluesTerminal1.Message);
this.Close();
}
else
this.bluesTerminal1.Launch();
VB
If (BluesTerminal1.ReadConfiguration()) Then
BluesTerminal1.Launch()
Else
MessageBox.Show(BluesTerminal1.Message)
Close()
End If
RecordMacro
This method is used to record a macro. The input argument is the name of a
macro to record. If a previously recorded macro by the same name already
exists, then it will be overwritten. When the recording is complete, the
evtMacroComplete delegate will be called.
setIPAddress
This method is used to set the IP address for the session to connect to. The
argument is a well-formed TCP/IP address in either the form a.b.c.d, or a string
that is defined in a domain name server (like “localhost”). The terminal session
should not be connected at the time this method is called. An application can
dynamically connect to a host if the session is not configured for the
“Automatically Connect To Host” option and have the application set the ip
address, ip port, and call the BeginConnect method.
BLUES User Manual
Page:112
Newhart Systems Incorporated © 2006 All Rights Reserved
C#
bluesTerminal1.setIPAddress("11.22.33.44");
VB
bluesTerminal1.setIPAddress("11.22.33.44")
setIPPort
This method may be used to set the tcp/ip port number used to connect to that
host. The default value is for the telnet port is 23. The terminal session should
not be connected at the time this method is called. An application can
dynamically connect to a host if the session is not configured for the
“Automatically Connect To Host” option and have the application set the ip
address, ip port, and call the BeginConnect or ConnectToDestination method.
C#
bluesTerminal1.setIPPort("11.22.33.44");
VB
bluesTerminal1.setIPPort("11.22.33.44")
setCursor
This method may be used to set the input cursor to a specific row and column for
subsequent operator input or keyText method calls. The arguments are one
based values.
C#
BluesTerminal1.setCursor(2,5);
//set cursor to row 2 column 5
VB
BLUES User Manual
Page:113
Newhart Systems Incorporated © 2006 All Rights Reserved
BluesTerminal1.setCursor(2, 5) REM set cursor to row 2 column 5
Properties
AppMenu
This property contains the MainMenu for the session. The MainMenu is the
window menu that contains the session menu functions such as File, Edit,
Macro, etc. The MainMenu is build during the initial configuration of the session
and maintained by the HostControl class. If new macros are recorded or
deleted, then the MainMenu is adjusted accordingly.
bHideTitle
This property is true if the control is to hide the main title bar for the Windows
application. A value of false is the default and indicates that the title bar should
be visible.
bHideMenu
This property is true if the control is to hide the main menu bar for the Windows
application. A value of false is the default and indicates that the menu bar
should be visible.
bTraceActive
This property turns the trace option on and off. When this option is enabled, a
trace file named sessionx.trc is written, where x is the SESIONNUMBER
property. The trace file is a text file that contains information for problem
diagnosis.
HostCodePage
BLUES User Manual
Page:114
Newhart Systems Incorporated © 2006 All Rights Reserved
This property determines what code page the host computer is using to transmit
and receive screens of text in. This property will attempt to default to a
compatable host code page of the executing computers language settings.
This property may be set to any valid EBCDIC_HOST_CODE_PAGES value.
BluesTerminal. EBCDIC_HOST_CODE_PAGES enumeration.
See
C#
Host.HostCodePage = BluesTerminal.EBCDIC_HOST_CODE_PAGES.
Germany_273_with_Euro;
VB
Host.HostCodePage = BluesTerminal.EBCDIC_HOST_CODE_PAGES.
Germany_273_with_Euro
DATABASE
The DATABASE property is the folder where the Blues database of user is
located. The default value for this property is the same folder that the emulation
was launched from. This property may be either a standard Windows path or a
url if the Blues database resides on a web server.
EmulationType
This property determines the protocol type used for the TCPIP connection. The
TN3270 protocol is selected for TN3270 and TN3270E connections to
mainframe computers and TN5250 is selected for IBM AS400 connections. See
the enumerator HostControl.EMULATIONTYPES for valid values.
C#
BluesTerminal1.EmulationType = (int)HostControl.EMULATIONTYPES.TN5250; //TN3270 or
TN5250
BLUES User Manual
Page:115
Newhart Systems Incorporated © 2006 All Rights Reserved
VB
BluesTerminal1.EmulationType = HostControl.EMULATIONTYPES.TN5250
REM select emulation type based on your type of host computer
foundTextOnRow
This property contains the row that a string was found on. This property is only
valid after a successful findDisplayText or waitForDisplayString method has been
done. The property is 1 based and may range from 1 to the number of rows in
the host session screen.
C#
If(Host.FindDisplayText(“signon”,1,1))
//search screen for text
{
// inspect foundTextOnRow and foundTextOnColumn to see
// where it was found
if(Host.foundTextOnRow == 8 && Host.foundTextOnColumn == 10)
{
}
}
VB
If (Host.findDisplayText("signon", 1, 1)) Then
REM Inspect foundTextOnRow and foundTextOnColumn
REM properties
If (Host.foundTextOnRow = 2 And Host.foundTextOnColumn = 10) Then
End If
End If
foundTextOnColumn
This property contains the column that a string was found on. This property is
only valid after a successful findDisplayText or waitForDisplayString method has
BLUES User Manual
Page:116
Newhart Systems Incorporated © 2006 All Rights Reserved
been done. The property is 1 based and may range from 1 to the number of
columns in the host session screen.
C#
If(Host.FindDisplayText(“signon”,1,1))
//search screen for text
{
// inspect foundTextOnRow and foundTextOnColumn to see
// where it was found
if(Host.foundTextOnRow == 8 && Host.foundTextOnColumn == 10)
{
}
}
VB
If (Host.findDisplayText("signon", 1, 1)) Then
REM Inspect foundTextOnRow and foundTextOnColumn
REM properties
If (Host.foundTextOnRow = 2 And Host.foundTextOnColumn = 10) Then
End If
End If
IPAddress
This property is used to get or set the IP address for the session to connect to.
The argument is a well-formed TCP/IP address in either the form a.b.c.d, or a
string that is defined in a domain name server (like “localhost”). The terminal
session should not be connected at the time this method is called. An
application can dynamically connect to a host if the session is not configured for
the “Automatically Connect To Host” option and have the application set the ip
address, ip port, and call the BeginConnect method.
C#
Host.IPAddress = "217.110.154.85"; //IP address of the host
BLUES User Manual
Page:117
Newhart Systems Incorporated © 2006 All Rights Reserved
VB
Host.IPAddress = "217.110.154.85" REM IP address of the host
IPPort
This property may be used to set the tcp/ip port number used to connect to that
host. The default value is for the telnet port is 23. The terminal session should
not be connected at the time this method is called. An application can
dynamically connect to a host if the session is not configured for the
“Automatically Connect To Host” option and have the application set the ip
address, ip port, and call the BeginConnect or ConnectToDestination method.
C#
Host.IPPort = 23;
//default telnet port number is 23
VB
Host.IPPort = 23
REM default telnet port number is 23
ModelNumber
This property determines the type of IBM terminal that is emulated. Different
model types have different numbers of rows and columns. Each model type has
a default screen size and an alternate screen size. Either the default or alternate
screen size is active as any given instant and is controlled by the host
application. This means that the screen size can change at any time. The
ScreenRows and ScreenCols properties contain the current number of rows and
columns being used. See the enumerator BluesTerminal.MODELTYPE for the
valid values of this property.
C#
Host.ModelNumber = (int)MODELS.MODEL_2;
characters wide
BLUES User Manual
//default 24 lines by 80
Page:118
Newhart Systems Incorporated © 2006 All Rights Reserved
VB
Host.ModelNumber = HostControl.MODELS.MODEL_2
it determines the number of rows and columns
REM select model number,
isMdiContainer
This property informs the control if the controlling application is a multi document
MDI application or a single document SDI application. Depending on the value,
the menu system for the control is slightly different.
LANGUAGE
This property defines the native language that the control will present to the
operator. The possible values are “US” and “GERMAN”, for English and German
languages.
Message
This property contains an error message when an error occurs.
PlayingMacroNow
This property is true when a macro is being played.
RecordingMacroNow
This property is true when a macro is being recorded.
SaveSettingsOnClose
This property determines if the control should save its current settings before
closing. If isolated storage is being used, then the session settings are saved in
the users isolated storage.
BLUES User Manual
Page:119
Newhart Systems Incorporated © 2006 All Rights Reserved
ScreenCols
This property contains the number of columns on the host screen area.
C#
//
// scrape screen and take appropriate action
//
string Screen = Host.getDisplayText(1,1,Host.ScreenRows *
Host.ScreenCols);
VB
REM
REM scrape screen and take appropriate action
REM
Dim Screen As String
Screen = Host.getDisplayText(1, 1, Host.ScreenRows * Host.ScreenCols)
ScreenRows
This property contains the number of rows on the host screen area.
C#
//
// scrape screen and take appropriate action
//
string Screen = Host.getDisplayText(1,1,Host.ScreenRows *
Host.ScreenCols);
BLUES User Manual
Page:120
Newhart Systems Incorporated © 2006 All Rights Reserved
VB
REM
REM scrape screen and take appropriate action
REM
Dim Screen As String
Screen = Host.getDisplayText(1, 1, Host.ScreenRows * Host.ScreenCols)
SESSIONNUMBER
This property is the number of the session as configured by the Manager
window.
Tag
This is an application defines standard control tag that may be used by the
application to store information.
C#
Host.Tag = “My Special Tag”:
VB
Host.Tag = “My Special Tag”
TitleBarText
This property contains the string that is displayed to represent the session. If no
string is configured, then the value of this property will be Sessionx (where x is
the SESSIONNUMBER.
TraceActive
This property turns the trace option on and off. When this option is enabled, a
trace file with the name in the property TraceFileName will be created.
C#
BLUES User Manual
Page:121
Newhart Systems Incorporated © 2006 All Rights Reserved
Host.TraceActive = false;
//set to true to get a trace
VB
Host.TraceActive = False
generated
REM set to true to cause a trace file to be
TraceFileName
The name of the file to place tracing information into. This file is only created if
the TraceActive property is set to True.
C#
Host.TraceFileName = "C:\\TRACEFILE.TXT";
VB
Host.TraceFileName = "C:\\TRACEFILE.TXT"
USERNAME
This property defines the name of the Blues user as defines by the Blues
Manager window. The DATABASE, USERNAME, and SESSIONNUMBER
properties together define which session settings that the control uses.
This property is used during the ReadConfiguration and mnuFileSave methods
are called to access the correct configuration information for the control from the
Blues database.
Delegates, Events, and Handlers
BLUES User Manual
Page:122
Newhart Systems Incorporated © 2006 All Rights Reserved
Delegates are called by the HostControl class to inform the application of some
type of event. Most delegates return the class as the first argument to identify
the class that it came from and facilitate multiple concurrent VirtualHost
instances. This may be used to identify the control in the case that the
application has more than one control in the application.
Threading
Because the HostControl class uses the .NET Socket TCPIP class, it uses 2
threads for execution, the owners thread that constructed the VirtualHost class
and a TCPIP thread to asynchronously send and receive information to the host
computer. This means that when the VirtualHost fires an event back to the
application, it may be on either thread. Depending on what the application
wants to do, it may or may not have to switch to a safe thread. For example, A
Windows Forms application wanting to display something inside an
evtScreenChange event will have to switch to the main GUI thread before calling
the .NET framework to display the information. This is because the .NET
framework only allows painting the window in the main GUI thread. For more
information on threading in .NET application, see the Microsoft web site for a
number of technical documents.
It is important to call the HostControl.Close method when the application is done
using the class so that the TCPIP conection can be closed and the trhead freed
up. Failure to do this can cause exceptions to occur.
evtCloseWindowEvent
This delegate is fired when the operator selects the close window menu item. It
informs the application to close the session window.
evtConnected
This delegate is fired when the terminal control connect attempt is complete.
The ConnectedOk argument indicates the outcome of the connect attempt. If
the connection attempt fails, the Message property contains the error string.
C#
Host.evtConnectComplete +=new
BLUES User Manual
Page:123
Newhart Systems Incorporated © 2006 All Rights Reserved
HostControl.evtConnected(Host_evtConnectComplete);
.
.
.
/// <summary>
/// Connection attempt has completed
/// </summary>
/// <param name="Control"></param>
/// <param name="ConnectedOk"></param>
private void Host_evtConnectComplete(BluesTerminal Control, bool
ConnectedOk)
{
}
VB
AddHandler Host.evtConnectComplete, AddressOf Host_evtConnectComplete
.
.
.
Protected Sub Host_evtConnectComplete(ByVal Control As BluesTerminal,
ByVal Connected As Boolean)
End Sub
evtKeyboardUnlocked
This delegate is fired when the host application unlocks the keyboard. When a
screen is sent to the host, the keyboard becomes locked until the host
application unlocks it.
C#
Host.evtKeyboardUnlocked +=new
HostControl.BluesTerminal.evtevtKeyboardUnlocked(Host_evtKeyboardUnlocke
d);
BLUES User Manual
Page:124
Newhart Systems Incorporated © 2006 All Rights Reserved
.
.
.
.
/// <summary>
/// Keyboard has been unlocked
/// </summary>
/// <param name="Control"></param>
private void Host_evtKeyboardUnlocked(HostControl.BluesTerminal Control)
{
}
VB
AddHandler Host.evtKeyboardUnlocked, AddressOf Host_evtKeyboardUnlocked
.
.
.
Protected Sub Host_evtKeyboardUnlocked(ByVal Control As
HostControl.BluesTerminal)
End Sub
evtLostConnection
This delegate is fired when the terminal session connection is lost or the operator
selected to disconnect from the host.
C#
Host.evtDisconnected +=new
HostControl.evtLostConnection(Host_evtDisconnected);
.
.
.
.
/// <summary>
BLUES User Manual
Page:125
Newhart Systems Incorporated © 2006 All Rights Reserved
/// Disconnect from host has occured
/// </summary>
/// <param name="Control"></param>
private void Host_evtDisconnected(BluesTerminal Control)
{
}
VB
AddHandler Host.evtDisconnected, AddressOf Host_evtDisconnected
.
.
.
Protected Sub Host_evtDisconnected(ByVal Control As BluesTerminal)
End Sub
evtMacroFunctionCompleteEvent
This delegate is fired when a macro record or play has completed.
evtMenuChangeEvent
This delegate is fired when the operator selects to either display or hide the
application menu bar.
evtScreenChange
This delegate is fired when the host application has written to the session screen
area. It informs the application that the screen has changed.
C#
Host.evtScreenChanged += new
HostControl.BluesTerminal.evtScreenChange(Host_evtScreenChanged);
BLUES User Manual
Page:126
Newhart Systems Incorporated © 2006 All Rights Reserved
.
.
.
/// <summary>
/// Here the session screen has changed, retreive the screen contents
/// and parse the screen
/// </summary>
/// <param name="Control"></param>
private void Host_evtScreenChanged(HostControl.BluesTerminal Control)
{
//
// scrape screen and take appropriate action
//
string Screen = Host.getDisplayText(1,1,Host.ScreenRows *
Host.ScreenCols);
//
// ADD YOUR CODE HERE
//
// Parse screen, simulate keystrokes and wait for next screen
//
}
VB
AddHandler Host.evtScreenChanged, AddressOf Host_evtScreenChanged
.
.
.
Protected Sub Host_evtScreenChanged(ByVal Control As
HostControl.BluesTerminal)
REM
REM scrape screen and take appropriate action
REM
Dim Screen As String
Screen = Host.getDisplayText(1, 1, Host.ScreenRows * Host.ScreenCols)
REM
REM add your code here to automate keyboard entry and wait for next
screen
REM
End Sub
evtSelectedCompleted
BLUES User Manual
Page:127
Newhart Systems Incorporated © 2006 All Rights Reserved
This delegate is fired when the operator has finished highlighting part or all of the
host session window. (Selected a portion of the screen)
C#
Host.evtSelectedCompleted += new HostControl.BluesTerminal.
evtSelectedCompleted (Host_ evtSelectedCompleted);
.
.
.
/// <summary>
/// Here the session screen has changed, retreive the screen contents
/// and parse the screen
/// </summary>
/// <param name="Control"></param>
private void Host_ evtSelectedCompleted(HostControl.BluesTerminal
Control)
{
//
// scrape screen and take appropriate action
//
string Screen = Host.getDisplayText(1,1,Host.ScreenRows *
Host.ScreenCols);
//
// ADD YOUR CODE HERE
//
// Parse screen, simulate keystrokes and wait for next screen
//
}
VB
AddHandler Host. evtSelectedCompleted, AddressOf Host_
evtSelectedCompleted
.
.
.
Protected Sub Host_ evtSelectedCompleted (ByVal Control As
HostControl.BluesTerminal)
REM
REM scrape screen and take appropriate action
REM
BLUES User Manual
Page:128
Newhart Systems Incorporated © 2006 All Rights Reserved
Dim Screen As String
Screen = Host.getDisplayText(1, 1, Host.ScreenRows * Host.ScreenCols)
REM
REM add your code here to automate keyboard entry and wait for next
screen
REM
End Sub
evtTerminalKeyPress
This delegate is fired when the operator or the application has pressed one of
the terminal control keys such as ENTER, PF1, etc. The keycode argument will
contain one of the KeyDefines enumeration values.
KeyDefines is an
emunerator in the enums.dll file.
evtTitleBarChangeEvent
This delegate is fired when the operator selects to either display or hide the
application title bar.
BLUES User Manual
Page:129