1
BLUES 2000
User Manual
THIS DOCUMENT HAS BEEN PREPARED TO ASSIST CUSTOMERS IN USING SOFTWARE
AND HARDWARE. NEWHART SYSTEMS INCORPORATED WILL NOT BE LIABLE FOR
DAMAGES TO CUSTOMERS DUE TO ANY ERRORS CONTAINED IN THIS
DOCUMENTATION, OR FOR DAMAGES TO CUSTOMERS RESULTING FROM THE USE OF
THIS DOCUMENTATION AND ACCOMPANYING SOFTWARE AND HARDWARE.
BEFORE USING THIS PRODUCT WITH ANY LICENSED SOFTWARE, THE CUSTOMER
SHOULD CAREFULLY READ ITS LICENSE AGREEMENT TO INSURE THAT IT WILL NOT
VIOLATE ANY OF THE LICENSE TERMS OR CONDITIONS.
COPYRIGHT (c) 2000 NEWHART SYSTEMS INCORPORATED. ALL RIGHTS RESERVED.
THIS MATERIAL MAY NOT BE REPRODUCED IN WHOLE OR IN PART BY ANY MEANS
WITHOUT WRITTEN PERMISSION.
For More Information Write :
Newhart Systems Inc.
P.O. Box 348
Barneveld, N.Y. 13304 USA
Tel. 315-896-4131
Fax. 315- 896 - 4548
web. http:\\www.newhartsystems.com
CONTENTS
Introduction.....................................................................................1
Welcome to BLUES 2000............................................................................................... 1
What Is "BLUES 2000" ? ................................................................................... 1
Related Reading............................................................................................................. 2
Administration ................................................................................3
Overview......................................................................................................................... 3
The BLUES 2000 Database ........................................................................................... 3
Security........................................................................................................................... 3
Installation ......................................................................................5
Before You Begin ........................................................................................................... 5
Requirements ................................................................................................................. 5
Software Requirements For Microsoft NT SNA Server..................................... 6
Software Requirements For TN3270, TN3270E, DEC VT And TN5250 .......... 6
Software Requirements For Novell Netware SAA And IBM
Communications Server .................................................................................... 6
Software Requirements For Using The DLC Protocol ...................................... 7
Software Requirements For X.25 ...................................................................... 7
Deploying Blues 2000 with the Windows 2000 mmc ..................................................... 8
Step 1 – Copy Blues msi to a network share .................................................... 8
Step 2 - Create the Blues Group Policy ............................................................ 10
Step 3 - Create the Blues Organizational Unit .................................................. 13
Step 4 - Create a Blues group in the organizational unit .................................. 17
Step 5 - Assign members to the Blues group.................................................... 18
Initial Software Installation.............................................................................................. 21
License Agreement............................................................................................ 22
Selecting User Information ................................................................................ 23
Destination Folder Selection ............................................................................. 24
Installation Type ................................................................................................ 25
User Settings Wizard...................................................................................................... 26
Selecting a Blues User Name ........................................................................... 27
Selecting the Database Folder .......................................................................... 28
Selecting the Private Folder .............................................................................. 29
Finishing User Settings ..................................................................................... 30
Automated Installation .................................................................................................... 30
Networked PC Installation .............................................................................................. 37
Using NetworkSetup.msi ................................................................................... 37
Uninstalling .....................................................................................38
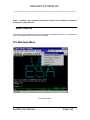
The Manager Application...............................................................39
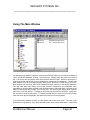
Using The Main Window ................................................................................................ 40
Network Neighborhood View.......................................................................................... 41
What Is Required To Configure A BLUES User ?.......................................................... 41
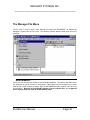
The Manager File Menu ................................................................................................. 42
New Database… ............................................................................................... 42
Open Database….............................................................................................. 43
Close Database ................................................................................................. 43
Delete Database................................................................................................ 43
Hot Backup Database ....................................................................................... 43
Backup Database… .......................................................................................... 44
Restore Database… .......................................................................................... 44
Import Microsoft SNA Server Configuration File…............................................ 44
Exit..................................................................................................................... 46
The Edit Menu ................................................................................................................ 47
The Users Menu ............................................................................................................. 48
The User Wizard................................................................................................ 48
Add Users.......................................................................................................... 50
Add Users Dialog .............................................................................................................50
Import Microsoft SNA Server User .................................................................... 50
Import Netware SAA or IBM Comm. Server User... .......................................... 51
Netware SAA or IBM Comm. Server Connection Method................................................52
Change User Name / Password........................................................................ 53
Delete User........................................................................................................ 53
Create Desktop Start Menu (Shortcuts) ............................................................ 54
Types Of Shortcuts...........................................................................................................56
Shortcut Locations ...........................................................................................................57
Registry Options...............................................................................................................58
Use Windows Logon Name As BLUES User Name........................................................ 58
Private Folder ................................................................................................................. 59
Language........................................................................................................................ 59
Building Installation Packages........................................................................... 59
Package Contents ............................................................................................................60
Package Delivery Options ................................................................................................61
The Groups Menu........................................................................................................... 62
New Group…..................................................................................................... 62
Delete Group ..................................................................................................... 62
Group Properties ............................................................................................... 63
The Sessions Menu........................................................................................................ 63
Add Terminal Session... .................................................................................... 64
Add Printer Session........................................................................................... 64
Window Title ................................................................................................................... 66
Model Type ..................................................................................................................... 66
Keyboard Style And Mapping ......................................................................................... 66
ANSI/EBCDIC Translate Table ....................................................................................... 67
Launchable ..................................................................................................................... 67
Allow Keyboard Changes................................................................................................ 68
Notify When Minimized ................................................................................................... 68
Enable Type Ahead ........................................................................................................ 68
Connection Parameters .................................................................................................. 68
Destination Type............................................................................................................. 69
LU Alias .......................................................................................................................... 69
Microsoft NT SNA Server LU Alias ................................................................................. 69
BLUES Connection LU Alias........................................................................................... 69
Netware SAA or IBM Comm. Server LU Alias................................................................. 70
TN3270E LU Alias .......................................................................................................... 70
TN3270, TN5250 and DEC IP Address Or Host Name................................................... 70
Enable Keep-Alives ........................................................................................................ 71
Security Options ............................................................................................................. 71
Conect Using Secure Socket Layer (SSL V3)............................................................. 71
Verify server certificate ............................................................................................... 72
Send client certificate to server................................................................................... 72
SLP Load Balancing ....................................................................................................... 72
TN5250 Session Settings ............................................................................................... 73
AS/400 User Name And Password Options................................................................ 73
AS/400 Device Options............................................................................................... 74
Line Printer Deamon Configuration................................................................................. 74
Accept print jobs from any IP address or host name .................................................. 75
LPD Printer Identification ............................................................................................ 75
DEC VT Advanced Options ............................................................................................ 77
VT Terminal Type ....................................................................................................... 77
Auto Wrap .................................................................................................................. 78
Local Echo.................................................................................................................. 78
Send Return As CRLF ................................................................................................ 78
Send Backspace as DEL Key..................................................................................... 78
Do Not Allow Connection Parameter Changes ............................................................... 78
Automatically Connect When Session is Started ............................................................ 78
Automatically connect to next destination without prompting .......................................... 78
Connect to next destination after x seconds of PU inactivity........................................... 79
Pause before next destination x seconds ....................................................................... 79
Try to complete the destination list x times ..................................................................... 79
Edit Destination .............................................................................................................. 79
Connection Name ........................................................................................................... 80
PU Name ........................................................................................................................ 80
Port Number ................................................................................................................... 80
LU Address..................................................................................................................... 80
Link Name ...................................................................................................................... 80
LU Group ........................................................................................................................ 81
Use Lu Group To Load Balance ..................................................................................... 81
SAA Logon Name ........................................................................................................... 81
SAA Password................................................................................................................ 81
Configure Session File Tab ..............................................................................................83
Save Settings On Session Close .................................................................................... 83
Enable Printer Output ..................................................................................................... 84
Use Windows Default Printer .......................................................................................... 84
Printer Selection ............................................................................................................. 84
Print Font Option ............................................................................................................ 84
Enable Print To Disk Option............................................................................................ 84
Print To Disk File Option................................................................................................. 84
Append To Disk File ....................................................................................................... 84
Configure Session View Tab ............................................................................................86
Start As........................................................................................................................... 86
Cursor............................................................................................................................. 87
Enable Hot Spots............................................................................................................ 87
Hot Spots Are Delimited By Spaces................................................................................ 87
Macro Names Act As Hot Spots ..................................................................................... 87
Numbers Act As Hot Spots ............................................................................................. 87
Customize Toolbar… ...................................................................................................... 88
Customize Keypad… ...................................................................................................... 88
Use True Type Font........................................................................................................ 88
Adjust Font Size To Window Size................................................................................... 88
Display In Upper Case .................................................................................................... 88
Select Font ..................................................................................................................... 88
Enable Titlebar ............................................................................................................... 89
Enable Menubar ............................................................................................................. 89
Enable Toolbar ............................................................................................................... 89
Enable Statusbar ............................................................................................................ 89
Configure Session Colors ................................................................................................90
How To Use The Color Dropper...................................................................................... 90
Mouse Configuration Options...........................................................................................91
Configuring The Mouse Buttons ..................................................................................... 91
Macro Configuration .........................................................................................................93
API Options ......................................................................................................................94
Short Name .................................................................................................................... 94
Automatically Connect To Gateway On HLLAPI Connect ............................................... 95
Automatically Start MS-DOS HLLAPI Redirector ............................................................ 95
Disconnect From Gateway After HLLAPI DISCONNECT................................................ 95
Start Session On CONNECT PS .................................................................................... 95
Close Session After HLLAPI DISCONNECT................................................................... 95
DDE SERVER NAME ..................................................................................................... 95
CR/LF AT END OF LINE ................................................................................................ 96
Replace Spaces Between Words With A Tab................................................................. 96
Remove Leading Spaces On Each Line ......................................................................... 96
Remove Trailing Spaces On Each Line .......................................................................... 96
Copy Operator Information Too ...................................................................................... 96
Paste In Columns ........................................................................................................... 96
Menus ................................................................................................................ 98
How To Remove A Menu Item .........................................................................................99
How To Apply Menu Changes..........................................................................................99
Properties ... ...................................................................................................... 99
Delete Session... ............................................................................................... 99
Copy Session Settings…................................................................................... 100
The Connections Menu .................................................................................................. 101
Add Host Connection... ..................................................................................... 102
Properties... ....................................................................................................... 102
The Connection Name .................................................................................................... 103
Sessions Connect Over TCP/IP...................................................................................... 103
Link Type ........................................................................................................................ 103
Node Id. .......................................................................................................................... 103
Hide Icon ........................................................................................................................ 104
Stop When Last Session Stopped .................................................................................. 104
Launchable Connection .................................................................................................. 104
Advanced 802.2 Options ..................................................................................................104
Remote Sap.................................................................................................................... 105
Remote Address ............................................................................................................. 105
Local Sap........................................................................................................................ 106
Xmit/ Rcv Frame Sizes ................................................................................................... 106
Xmit/Rcv Window Sizes.................................................................................................. 106
Applying 802.2 Options To Other Connections ................................................................106
Lu Assignment... ..............................................................................................................107
Modify Lu... ..................................................................................................................... 107
Assign Lu........................................................................................................................ 107
Netview Options.............................................................................................................. 109
NPDA Alerts ................................................................................................................... 109
Response Time Monitor ...................................................................................................110
Trace .............................................................................................................................. 110
Levels Of Tracing............................................................................................................ 110
X.25 ISDN Advanced Options ........................................................................... 111
X.25 Circuit Type..............................................................................................................111
X.25 Called Address ........................................................................................................111
X.25 Calling Address........................................................................................................112
X.25 Facilities ...................................................................................................................112
X.25 Channel Numbers ....................................................................................................112
Terminal Endpoint Id ........................................................................................................112
X.25 Window Sizes ..........................................................................................................112
X.25 Packet Size..............................................................................................................113
ISDN Adapter Options......................................................................................................113
Automatically Recover Lost Circuit ..................................................................................113
Call Request Retry Counter .............................................................................................113
Wait Between X.25 Call Requests ...................................................................................114
Delete Host Connection... ................................................................................. 114
Copy Connection Settings................................................................................. 115
The View Menu............................................................................................................... 116
View Microsoft NT SNA Server Resources....................................................... 117
View TCPIP Resources..................................................................................... 117
View DLC Resources ........................................................................................ 117
Concurrent Administrator Operation............................................................................... 117
Using Host Connections................................................................118
Stopping A Connection................................................................................................... 118
Display Emulation ..........................................................................119
Starting Emulation .......................................................................................................... 119
Basic Operation .............................................................................................................. 119
The Tool Bar ................................................................................................................... 119
The Status Bar................................................................................................................ 120
The Keypad .................................................................................................................... 120
Function Keys................................................................................................................. 120
The File Menu................................................................................................................. 121
Save Display Settings........................................................................................ 122
Save Settings On Close .................................................................................... 122
Enable (local) Print To Printer ........................................................................... 122
Print ................................................................................................................... 123
Print Setup ......................................................................................................... 123
Print Font ........................................................................................................... 123
Enable Print To Disk.......................................................................................... 123
Print To Disk File... ............................................................................................ 123
Append To File .................................................................................................. 123
EHLLAPI Trace.................................................................................................. 124
Exit Display Session .......................................................................................... 124
Exit And Close All Sessions .............................................................................. 124
The Edit Menu ................................................................................................................ 125
Cut ..................................................................................................................... 125
Copy .................................................................................................................. 126
Append .............................................................................................................. 126
Paste.................................................................................................................. 126
Select All............................................................................................................ 126
Clear .................................................................................................................. 126
View Clipboard .................................................................................................. 126
The View Menu............................................................................................................... 128
Fonts… .............................................................................................................. 128
Use True Type................................................................................................... 129
Adjust Font Size To Window Size ..................................................................... 129
Zoom Font Larger.............................................................................................. 129
Zoom Font Smaller ............................................................................................ 129
Upper Case ....................................................................................................... 129
Host Color Mapping........................................................................................... 130
Configure Keypad.............................................................................................. 130
Titlebar............................................................................................................... 131
Menubar ............................................................................................................ 131
Toolbar .............................................................................................................. 131
Statusbar ........................................................................................................... 132
The Settings Menu ......................................................................................................... 133
Configure Cursor ............................................................................................... 134
Enable Alarm... .................................................................................................. 134
Notify When Minimized...................................................................................... 134
Keyboard Mapping... ......................................................................................... 135
Configure Hot Spots .......................................................................................... 137
Type Ahead ....................................................................................................... 139
Mouse Configuration ......................................................................................... 139
Api Options ........................................................................................................ 140
The Transfer Menu ......................................................................................................... 142
File Transfer Main Window................................................................................ 143
The Portfolio Manager Window ........................................................................................143
Editing a portfolio ............................................................................................................ 144
Editing a scheme ............................................................................................................ 144
Program Name ............................................................................................................... 145
Options ........................................................................................................................... 145
File Transfer Mode.......................................................................................................... 145
HOST / PC CODE PAGE................................................................................................ 146
Host System ................................................................................................................... 146
File Creation ................................................................................................................... 147
Buffer Size ...................................................................................................................... 147
Record Separator ........................................................................................................... 147
Using File Transfer With TSO ......................................................................................... 148
File Transfer Options ...................................................................................................... 148
Host Data Set Name....................................................................................................... 148
Member Name ................................................................................................................ 148
Password Field ............................................................................................................... 149
Records Options ............................................................................................................. 149
SPACE ........................................................................................................................... 149
Using File Transfer With VM/CMS .................................................................................. 150
CMS File Type ................................................................................................................ 151
CMS File Mode ............................................................................................................... 151
LRECL ............................................................................................................................ 151
RECFM (F/V) .................................................................................................................. 151
Using File Transfer With CICS........................................................................................ 151
Path/File Name ............................................................................................................... 152
Host File Name ............................................................................................................... 152
Comments ...................................................................................................................... 152
Using File Transfer With FTP.......................................................................................... 152
FTP Host Name........................................................................................................ 153
FTP Port ................................................................................................................... 153
FTP User Name........................................................................................................ 153
FTP Home Directory ................................................................................................. 153
FTP Time-outs.......................................................................................................... 153
The Status Window ..........................................................................................................154
The PC Explorer Window .................................................................................................155
The Event Viewer Window ...............................................................................................155
File Transfer Messages .................................................................................................. 156
The Host Explorer Window...............................................................................................158
The Scheduler Window ....................................................................................................159
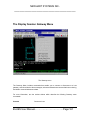
The Display Session Gateway Menu ............................................................................. 161
Connect ............................................................................................................. 162
Disconnect......................................................................................................... 162
Send Operator Alert........................................................................................... 162
Response Time Monitor Functionality............................................................... 162
Control Unit Parameters.................................................................................... 163
Link Level Statistics ........................................................................................... 163
X.25 Link Status ................................................................................................ 163
Dial - Call Button ..............................................................................................................163
Clear - Dial Button ............................................................................................. 164
Display Session SNA Trace Active ................................................................... 164
Display Session Link Trace Active ................................................................... 164
Display Session ‘Session’ Trace Active ............................................................ 164
Delete Trace File ............................................................................................... 165
The Windows Menu........................................................................................................ 165
The Macros Menu........................................................................................................... 166
Record Macro .................................................................................................... 167
Play Macro......................................................................................................... 167
Stop Macro ........................................................................................................ 167
Edit Macro ......................................................................................................... 167
Delete Macro ..................................................................................................... 171
Macro Options ................................................................................................... 172
Show Playback Window .................................................................................... 173
The Security Menu ......................................................................................................... 174
Change Password ............................................................................................. 174
The Display Session Help Menu .................................................................................... 175
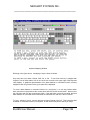
3270 Operator Information Area........................................................................ 175
5250 Operator Information Area........................................................................ 179
ActiveX Control Capabilities .........................................................181
What is the Blues ActiveX Control and How Does It Work? .......................................... 181
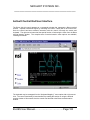
ActiveX Control End User Interface................................................................................ 183
VB Session ..................................................................................................................... 184
ActiveX Properties .......................................................................................................... 185
bAdjustFontToWindowSize ............................................................................... 186
bAppendToFile .................................................................................................. 186
bDisplayInUppercase ........................................................................................ 187
bEnableAlarm .................................................................................................... 187
bEnablePrintToDisk........................................................................................... 187
bEnablePrinterOutput ........................................................................................ 188
bHLLAPITraceOn .............................................................................................. 188
bIsConnected .................................................................................................... 189
bNotifyWhenMinimized...................................................................................... 189
bPlayingMacroNow............................................................................................ 189
bRecordingMacroNow....................................................................................... 190
bSaveOnClose .................................................................................................. 190
bToolbarVisible.................................................................................................. 191
bTypeAheadEnabled ......................................................................................... 191
bUseTrueTypeFont............................................................................................ 191
bViewMenubar................................................................................................... 192
bViewTitlebar..................................................................................................... 192
foundTextOnColumn ......................................................................................... 193
foundTextOnRow............................................................................................... 193
FTPPassword .................................................................................................... 193
FTPServerName................................................................................................ 194
FTPServerPort................................................................................................... 194
FTPUserName................................................................................................... 195
InitialWindowState ............................................................................................. 195
InstallOptions..................................................................................................... 195
InstallProgram ................................................................................................... 201
InstallationFile.................................................................................................... 201
SessionShortName............................................................................................ 202
Visible ................................................................................................................ 202
ActiveX Methods............................................................................................................. 203
CloseFileTransferWindow ................................................................................. 203
ConnectToDestination....................................................................................... 204
DisconnectFromHost......................................................................................... 205
EnumMacroNames............................................................................................ 205
EnumPortfolioNames......................................................................................... 206
findDisplayText .................................................................................................. 207
getCursorColumn .............................................................................................. 208
getCursorRow.................................................................................................... 208
getDisplayAnsiText............................................................................................ 209
getDislayColumns.............................................................................................. 210
getDisplayRows................................................................................................. 211
getEmulationType.............................................................................................. 212
GetSelectionEndColumn ................................................................................... 213
getSelectionEndRow ......................................................................................... 213
getSelectionStartColumn................................................................................... 214
getSelectionStartRow ........................................................................................ 215
GetWindowTitle ................................................................................................. 215
HideSession ...................................................................................................... 216
hllapi .................................................................................................................. 217
InstallBlues ........................................................................................................ 218
keyAnsiText ....................................................................................................... 218
keyTerminalKey................................................................................................. 219
mnuXY ............................................................................................................... 223
RunMacro .......................................................................................................... 226
setCursorLocation ............................................................................................. 226
ShowSession..................................................................................................... 227
StartPortfolioTransfer ........................................................................................ 228
StartReceivingFile ............................................................................................. 229
StartSendingFile ................................................................................................ 230
ViewSession ...................................................................................................... 230
waitForDisplayString.......................................................................................... 231
waitKeybaordEnabled ....................................................................................... 232
waitKeyboardEnabledDuration.......................................................................... 233
waitTimeInterval ................................................................................................ 234
ActiveX Events ............................................................................................................... 235
evtEnumMacroNamesProc ............................................................................... 235
evtScreenChanged............................................................................................ 236
evtEnumPortfolioNamesProc ............................................................................ 237
evtGotFocus ...................................................................................................... 237
evtSessionSwitched .......................................................................................... 238
evtSessionWindowHasClosed .......................................................................... 239
evtTransferComplete ......................................................................................... 240
evtmnuViewMenubar......................................................................................... 241
evtmnuViewStatusbar........................................................................................ 242
evtmnuViewTitlebar ........................................................................................... 243
evtmnuViewToolbar........................................................................................... 243
ActiveX Security Considerations .................................................................................... 244
Using Microsoft Front Page with Blues ActiveX Control ................................................ 246
Using Blues ActiveX Control for Emulation Deployment................................................ 269
What files are required to be in the installation source directory? .................... 269
Upgrading or modifying a deployed PC ............................................................ 270
EHLLAPI, WIN HLLAPI and MS-DOS HLLAPI...............................271
Application Access From A Windows Application .......................................................... 271
Application Access From An MS-DOS Box.................................................................... 271
Using SEND.EXE And RECEIVE.EXE From An MS-DOS Box ........................ 272
Using Entire Connection For Windows .......................................................................... 272
Developing New EHLLAPI Applications ......................................................................... 272
Developing New Applications With WIN HLLAPI ........................................................... 273
Using The EHLLAPI Trace Facility................................................................................. 274
Using DDE .......................................................................................274
Hot Links......................................................................................................................... 274
Customizing A DDE Conversation ................................................................................. 275
Using DDE To Execute A Macro .................................................................................... 276
Using DDE To Determine If The Session Is Busy.......................................................... 276
Printer Emulation............................................................................277
Starting Printer Sessions ................................................................................................ 277
Option Bar Pull Down Menus ......................................................................................... 278
The Printer Session File Menu ....................................................................................... 279
Save Settings .................................................................................................... 280
Save Settings On Close (printer sessions) ....................................................... 280
Print Setup (print sessions) ............................................................................... 280
Enable Print To Printer (print sessions) ...........................................................................280
Print Setup Menu Item......................................................................................................281
Printer Setup Button .........................................................................................................281
Printer Fonts.....................................................................................................................282
Close Printer After ............................................................................................................282
Print Directly To Port ........................................................................................................282
Include Printer Escapes In Output ...................................................................................282
Line Density......................................................................................................................282
Character Density.............................................................................................................283
Configure Strings..............................................................................................................283
Margins.............................................................................................................................289
First Print Line ..................................................................................................................289
Last Print Line ..................................................................................................................290
Lines Per Page.................................................................................................................290
Maximum Print Col. ..........................................................................................................290
Space Between Lines.......................................................................................................290
Space Between Characters..............................................................................................290
SCS Transparent Print Data.............................................................................................291
Hex Pass-Through Trigger Character ..............................................................................291
Wrap Text At Right Margin ...............................................................................................291
Form Feed Without Space ...............................................................................................291
Form feed at end of job ....................................................................................................292
Auto newline at end of line ...............................................................................................292
Additional newline at end of line.......................................................................................292
Newline at end of job........................................................................................................292
Xlate SCS FF to CRLF .....................................................................................................292
Let Host Override Page Setup .........................................................................................292
Band Output .....................................................................................................................293
Enable Print To Disk (printer sessions)............................................................. 293
Disk File (printer sessions) ................................................................................ 293
Save Jobs In BLUES Printer Queue ................................................................. 293
Spooled Jobs..................................................................................................... 293
Exit Printer Session ........................................................................................... 294
The Printer Session Gateway Menu............................................................................... 294
Connect Printer.................................................................................................. 294
Disconnect Printer ............................................................................................. 294
SNA Trace Active .............................................................................................. 294
Link Trace Active .............................................................................................. 294
Session Trace Active......................................................................................... 294
The Printer Session Windows Menu .............................................................................. 295
The Printer Session Help Menu ..................................................................................... 295
The Console ................................................................................................................... 296
3270 Printer Status......................................................................................................... 298
3270 Printer Keys ........................................................................................................... 298
Print Spool Manager.......................................................................298
Error Messages ..............................................................................300
NETBIOS ERROR CODES: ........................................................................................... 300
Undefined TCPIP Error Codes ....................................................................................... 303
Glossary ..........................................................................................305
NEWHART SYSTEMS INC.
_______________________________________________
Introduction
Welcome to BLUES 2000
As a user of BLUES 2000 you will enjoy the power of full-function terminal and printer emulation,
with the ease of use of a standard Windows application.
This manual assumes that you have some familiarity with the basics of both operating an IBM or
DEC type terminal, and working in a Windows environment. Please refer to the references listed
below under Related Reading if you feel you need additional information.
What Is "BLUES 2000" ?
BLUES 2000 is a set of software applications, that may be used for IBM 3270, IBM 5250, and
DEC VT emulation. BLUES 2000 may be customized to perform any of the following:
• An IBM 3274 emulation for the Microsoft desktop that acts as a gateway servicing PCs on a
LAN. It may be connected to an IBM host computer through the DLC or X.25 link protocols.
• A set of robust Windows applications that emulate IBM or DEC displays and printers. Blues
may be connected to Novell’s Netware For SAA, Microsoft’s NT SNA Server, a TCPIP host
(TN3270 or TN5250) or a telnet server supporting DEC VT emulation.
• A standalone IBM 3270 (PU and LU) emulation product for the Windows desktop that may
connect to either a host system or an upstream controller via the DLC or X.25 interfaces.
• A sophisticated administration tool that maintains a database of user’s of the BLUES product
and provides a centralized configuration capability. Some features include: a graphical end user
interface, the ability to import Netware For SAA user’s, the ability to import Microsoft NT SNA
Server user’s, the ability to configure hundreds of user’s sessions and connections from a single
user’s configuration.
BLUES User Manual………………………………Page:1
NEWHART SYSTEMS INC.
_______________________________________________
• MUCH MUCH more
The BLUES product can be used with or without a network operating system. When a networked
operating system is used, a centralized database located on a file server may contain
configuration options for all users of the product. A powerful administration tool manipulates the
database and gives administrative personnel the power of modifying configuration options from a
central site, restricting functionality on a per session basis, and allowing the configuration of
hundreds of PCs with a single mouse click.
The BLUES product offers standard application programming interfaces as well as a macro
scripting language that allows the automation of redundant tasks.
Related Reading
For additional information on 3278/9 type terminals, please refer to the user guides and detailed
component descriptions available through IBM. For additional information on host file transfer,
see the IBM host documentation for your system, TSO, CMS, or CICS.
For additional information on the Windows 3.1, Windows 95/98, and Windows NT environments,
please refer to the publications available through Microsoft.
For information about the design of Windows applications, see IBM Systems Application
Architecture, Common User Access, Advanced Interface Design Guide.
For additional information about writing Windows application programs that use the HLLAPI,
WINHLLAPI, and EHLLAPI interfaces, please refer to documentation available from IBM and
Microsoft.
BLUES User Manual………………………………Page:2
NEWHART SYSTEMS INC.
_______________________________________________
Administration
Overview
The BLUES 2000 application may be used in a PC network environment with many other users
sharing host gateway resources, or in a single user environment. The procedures used for
installation and configuration of this product are designed to be as convenient as possible for all
types of configurations. Please read the following sections carefully, so that you understand the
features that are best tailored to your environment.
Administration of the BLUES 2000 application basically consists of using the Manager program.
The Manager centralizes the functions needed to configure and maintain all BLUES 2000 users,
their host connections, and their sessions. Manager functions are provided to add and delete
users, add and delete host connections, add and delete sessions for users, define default option
settings on a per-session basis, and so on.
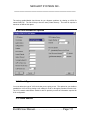
The BLUES 2000 Database
Configuration information is maintained in the BLUES “DATABASE” folder and is called the
'BLUES 2000 Database'. You will see this Database referred to often in the following sections.
Most Manager functions deal directly with the maintenance of this Database.
There are several methods of maintaining the Database, depending upon your particular
requirements. In a large network environment, it is recommended that the Database reside
on a network share point , and that an individual, designated 'the Administrator', coordinates
and defines all users, their host connections, and their sessions. In a single user environment,
the one user is also 'the Administrator'. It is also possible in a network environment for all, or
some, of the users have their own Database and as such administer their own separate
database's.
Security
BLUES User Manual………………………………Page:3
NEWHART SYSTEMS INC.
_______________________________________________
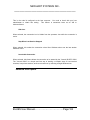
The term 'security' refers to the optional password protection. Password protection is available to
the Administrator to restrict access to the Manager program. Password protection is also
available to all users to restrict the use of their host sessions.
BLUES User Manual………………………………Page:4
NEWHART SYSTEMS INC.
_______________________________________________
Installation
Before You Begin
Before you install Blues 2000 it is very important to understand how the suite is divided into three
major pieces and how these pieces are related to each other. During the installation and
configuration of the suite, you will be prompted to select the locations where each piece should
be located. These three major pieces include, the software, the database, and a user’s private
folder. Each piece may be installed in a different folder (directory) or you may install all three in
the same folder. The software folder contains all of the software required to communicate with
the host computer, the database folder contains the configuration information, and the private
folder contains a user’s keyboard mapping files, macro files, and translation table files.
In a network environment, you must decide if you want to keep a single copy of the software
folder for every PC, if you want each PC to have its own software folder, or a combination of the
two. The major considerations here are if you want the extra network traffic of having the
software loaded into the PC over the network, is a file server always available to a PC that
requires emulation, and the disk space (about 16MB) required to store each copy of the software.
The considerations must be weighed against the ease of updating the software to newer versions
as they are made available. If your network can accommodate these considerations, then it is
recommended to use a single software folder.
The database folder contains the configuration for one or more Blues users. To appreciate the
full benefits of being able to configure and maintain Blues from a central location, you must
configure the database folder to be the same folder for all networked PCs.
A private folder exists for each Blues user. This allows each user to have unique keyboard
mappings, macro files, and translation tables.
The installation procedure must be performed at least once to install the Blues 2000 software
from the CD to a disk drive. If the Blues application is going to be started from a network drive or
network share, then you would first install the software from the CD onto the network share, then
subsequantly use the Blues NetworkSetup.msi application to set up a networked PC. This
technique may be used for ease of installing future upgrades and have a group of PCs sharing
the Blues software folder.
Requirements
BLUES User Manual………………………………Page:5
NEWHART SYSTEMS INC.
_______________________________________________
The BLUES 2000 product installation requires an IBM compatible PC with a hard disk drive or
network drive, a CD ROM drive, and one of the following Microsoft Windows operating systems:
(1) Microsoft Windows 95, (2) Microsoft Windows 98, or (3) Microsoft Windows NT 3.51 or above
(Server or Workstation), or (4) Microsoft Windows 2000 (any type).
Software Requirements For Microsoft NT SNA Server
To be able to connect to the Microsoft NT SNA Server, you must also install the Microsoft NT
Client Transport. The Client Transport must also be configured for your network operating
system. This is done with the NT Client Setup program. For more details, see the appropriate
Microsoft Documentation. In addition, you must be assigned a user name or know the name of a
group of users assigned with the NT SNA Manager program. Each user may be assigned
display and printer sessions. If you know the name that was assigned to you, then you may
browse for display and printer sessions assigned to you. In addition, you may import Microsoft
NT SNA Server sessions directly into the BLUES database from the BLUES Manager.
Software Requirements For TN3270, TN3270E, DEC VT And
TN5250
To be able to connect to a TN Server, host, or AS400 you will need to make sure that you have
TCPIP configured under network settings in the control panel.
The BLUES uses the Windows Socket interface. The Windows Socket interface must be version
1.1 or above. The BLUES uses a system DLL called WSOCK32.DLL. This dll must be in your
environment path and is normally installed in your system or system32 directory when you install
the Microsoft TCPIP protocol.
Software Requirements For Novell Netware SAA And IBM
Communications Server
BLUES can connect to either Netware SAA or IBM Communications Server over either Novell
IPX/SPX or over TCP/IP. Depending on which method you choose, different requirements exist.
To be able to connect over IPX/SPX, you must install the Client32 software from Novell. The
BLUES User Manual………………………………Page:6
NEWHART SYSTEMS INC.
_______________________________________________
Client32 software is available from Novell, it can be found on the Novell web page on the internet.
To be able to connect over TCP/IP, the only requirement is that the Microsoft TCP/IP protocol be
installed under the Network Settings Control Panel.
Software Requirements For Using The DLC Protocol
To be able to connect to a host via the DLC protocol, the workstation must have the DLC protocol
installed. This can be verified by checking the Network Settings in the control panel. In addition,
the DLC protocol must be bound to the network adapter that is to be used to connect to the host.
The DLC protocol may be bound to either a TOKEN RING adapter or to an ETHERNET adapter.
For more information on installing and configuring the DLC protocol consult the Microsoft
Documentation.
NOTE - The first releases of Windows 95 did not ship with the DLC protocol. If you have an early
release of Windows 95, then you should make sure that the Service Pack 1 is used to install the
32 bit DLC protocol.
Software Requirements For X.25
Blues supports X.25 over ISDN throught the CAPI interface. The CAPI interface is installed as
part of the ISDN hardware adapter installation. During installation of the hardware, the file
named capi2032.dll is copied into the Windows system folder, this is the dll that Blues used to
connect to the X.25 network.
BLUES User Manual………………………………Page:7
NEWHART SYSTEMS INC.
_______________________________________________
Deploying Blues 2000 with the Windows 2000 mmc
By using the Windows 2000 mmc application, the Blues software may be deployed to a Windows
user, a group of Windows users, a specific PC, or a group of PCs. If Blues is deployed to a user
or a group of users, the user(s) gains access to the Blues software by starting the "Launch Blues
Emulation" icon from the Windows taskbar. If Blues is deployed to a specific PC or a group of
PCs, the Blues software is automatically installed when the PC(s) are re-started.
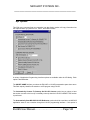
Deploying Blues from the mmc requires five steps be performed: (1) copy the blues msi file to a
network share, (2) use the mmc application to create a group policy, (3) use the mmc application
to create a Blues organizational unit, (4) create a new Blues group in the organizational unit, and
(5) assign one or more Windows users, Windows user group(s), or PCs to the Blues group.
Each Windows user or PC that is a member of the Blues group will then have a "Launch Blues
Emulation" shortcut available from the Windows task bar. The first time the user selects the
"Launch Blues Emulation" icon from the taskbar, the Blues software will automatically be installed
and started. If the user has not previously used Blues, then the Blues User Settings wizard will
be started to establish the Blues user settings (database folder, Blues user name, etc.). If no
Blues sessions have been configured for the user, then the Blues Manager application will
subsequantly be started and the Blues user wizard will guide them through the configuration
process. If an existing Blues database was selected from the User Settings wizard that contains
configured sessions for the user, then the Blues Manager application will not be started and the
configured Blues sessions will be started.
If a Blues database is created on a network share, then each user’s emulation settings can be
pre-configured with the Blues Manager. When this is done, the first time the User Settings wizard
is started, (following the software installation), the user need only select the share name for the
Blues database and the pre-configured session(s) will be launched.
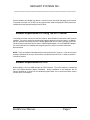
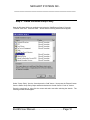
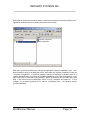
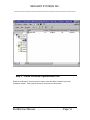
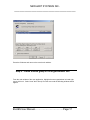
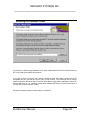
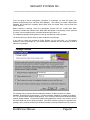
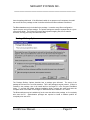
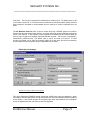
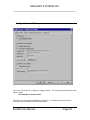
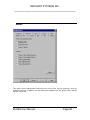
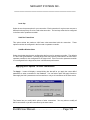
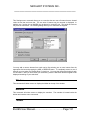
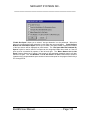
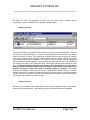
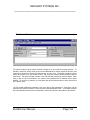
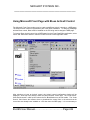
Step 1 – Copy Blues msi to a network share
Before using the mmc application, it is necessary to place one of the Blues 2000 msi files into a
network share point so that PCs attached to the network may access the msi file for automatic
installation. Blues 2000 has two msi files that may be deployed over mmc: (1) setup.msi, and (2)
networksetup.msi.
BLUES User Manual………………………………Page:8
NEWHART SYSTEMS INC.
_______________________________________________
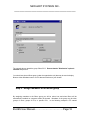
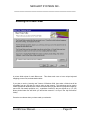
As described above in the “Before You Begin” section, Blues 2000 may be installed over the
networksetup.msi file for PCs that are attached to a network. This technique produces one
network share point that contains the Blues 2000 software and the software applications are
started from the network share point. When his technique is used, the standard setup.msi file
located on the Blues 2000 CD should first be used to install Blues 2000 into a network share
point. Following the installation, the networksetup.msi file will be located in the network share
point.
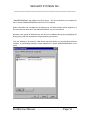
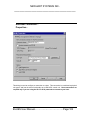
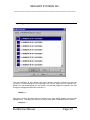
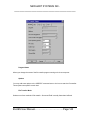
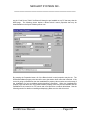
If the complete Blues 2000 product is to be installed over the mmc, then it is necessary to create
a network share point and copy the setup.msi file from the Blues 2000 CD to the network share
point so that the mmc application may access the software from networked PCs.
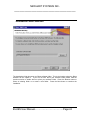
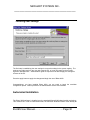
When the complete Blues 2000 product is deployed over mmc, the Blues 2000 software is
always installed on a target PC in the “Program Files\Blues” folder. When the networksetup.msi
file is used to deploy Blues 2000, the actual Blues software is not copied to the target pc, rather,
the Blues applications are started from the share point over the network.
BLUES User Manual………………………………Page:9
NEWHART SYSTEMS INC.
_______________________________________________
Step 2 - Create the Blues Group Policy
Start the Windows 2000 mmc application and select the "Add/Remove Snap-in" from the
"Console" menu item. Press the "Add..." button and the following window should appear:
Select "Group Policy" from the list and press the "Add" button. Next press the "Browse" button
from the Select Group Policy Object window and select the domain from the "Look in" list box.
Press the new button or right click the mouse and select new after selecting the domain. The
following window should appear:
BLUES User Manual………………………………Page:10
NEWHART SYSTEMS INC.
_______________________________________________
Edit the group policy name and press enter. In this example the group policy name was called
"Blues 2000 Policy". Press the Ok button and the following windows should appear:
BLUES User Manual………………………………Page:11
NEWHART SYSTEMS INC.
_______________________________________________
Now press the finish button and then press the close button and then the Ok button and the mmc
application should be back to the main window and look as follows:
Next open up the Blues 2000 policy and find the appropriate "Software installation" item. If the
Blues software is going to be deployed to PCs, then select the "Software Installation" under the
"Computer Configuration". If the Blues software is going to be deployed to Windows users or a
group of Windows users, then select the "Software Installation" under "User Configuration". Next
right mouse click on it and select "new package". Select the Blues msi from the share point (See
Step 1) and ensure that the deployment option is set to "Assigned" and press Ok. In this
example, we are deploying Blues to PCs and not to Windows users. The following window
should be displayed:
BLUES User Manual………………………………Page:12
NEWHART SYSTEMS INC.
_______________________________________________
Step 3 - Create the Blues Organizational Unit
Select the “add snap-in” from the mmc's Console menu and add the "Domain Users and
Computers" snapin. Then press Ok and return to the mmc's main window:
BLUES User Manual………………………………Page:13
NEWHART SYSTEMS INC.
_______________________________________________
Open up the Active Directory Users and Computers and highlight the domain where the
organizational unit will live and press the right mouse button to add a new organizational unit.
After the following window appears, enter the name of the new organizational unit. In this
example we chose "Blues PCs" as the organizational unit.
BLUES User Manual………………………………Page:14
NEWHART SYSTEMS INC.
_______________________________________________
From the main window of the mmc application, highlight the "Blues PCs" organizational unit and
edit the properties of the organizational unit. Press the "add" button under the Group Policy tab,
and then choose the Blues 2000 policy that was previously created.
BLUES User Manual………………………………Page:15
NEWHART SYSTEMS INC.
_______________________________________________
Press the Ok button and the following window should be displayed:
BLUES User Manual………………………………Page:16
NEWHART SYSTEMS INC.
_______________________________________________
Press the Ok button and return to the mmc's main window.
Step 4 - Create a Blues group in the organizational unit
From the main window of the mmc application, highlight the new organizational unit and right
mouse click on it. Select "new" then "Group" from the menu and the following window should
appear:
BLUES User Manual………………………………Page:17
NEWHART SYSTEMS INC.
_______________________________________________
The example above named the group “Blues PCs”. Ensure that the "Distribution" option is
selected and press ok.
You should now have a Blues group (under the organization unit) that may be used to deploy
Blues to either Windows users or to PCs that are members of your domain.
Step 5 - Assign members to the Blues group
By assigning members to the Blues group you will be select how and when Blues will be
automatically installed on computers within the domain. Members of the group may be other
groups of users, groups of PC,s or specific PCs. In the following example a PC named
BLUES User Manual………………………………Page:18
NEWHART SYSTEMS INC.
_______________________________________________
"2000PROFESSIONA" was added to the Blues group. This will cause Blues to be installed on
the PC named "2000PROFESSIONA" when the PC is re-started.
When a Windows user is assigned to the Blues group, the Blues software will be installed on a
PC when that user select the "Launch Blues Emulation" icon from the task bar.
Windows users, groups of Windows user, and PCs are all added to the group by highlighting the
Blues group (under the organizational unit) and editing its properties.
From the "Members" tab press the "add" button and select where you want the Blues software
installed. In the following example we have added the PC named "2000PROFESSIONA" to the
group.
BLUES User Manual………………………………Page:19
NEWHART SYSTEMS INC.
_______________________________________________
By deploying Blues in this way, it is possible to view which PCs in the doamin have Blues
installed. When a new version of Blues is released, you need only copy the new msi over the
existing msi on the network share and use the mmc to re-deploy the package. This will cause all
PCs that have been deployed with Blues to automatically be updated with the new release.
BLUES User Manual………………………………Page:20
NEWHART SYSTEMS INC.
_______________________________________________
Initial Software Installation
Now that you understand the three major pieces of the suite and have decided where you want to
install each piece, you are ready for installation. If you happen to be using Blues in conjunction
with the Microsoft NT SNA Server, you may want to install Blues from your NT Server PC.
When the Blues Manager is used on a PC that has the Microsoft NT SNA Server already
installed, it has the ability to import the complete Microsoft NT SNA Server configuration into the
Blues database.
Place the Blues 2000 CD in your drive and wait a few seconds. The installation program should
automatically start.
If the installation program does not start, select Start from the task bar, then select Run and enter
d:\ setup.exe, where d is the drive number of your CD ROM drive. Press the ENTER key and the
installation program should be started.
Once the installation has been started, the following window will be displayed:
BLUES User Manual………………………………Page:21
NEWHART SYSTEMS INC.
_______________________________________________
License Agreement
The next window displays the license agreement for Blues 2000. Please read the license
agreement before continuing. After you have accepted the license agreement, press the next
button.
BLUES User Manual………………………………Page:22
NEWHART SYSTEMS INC.
_______________________________________________
Selecting User Information
The Blues software may be installed for all users of the PC, or only for your self. You may install
the software for all users of the PC, then configure Blues uniquely. Each Windows user will be
prompted for their unique settings when they try to use any of the Blues applications for the first
time.
BLUES User Manual………………………………Page:23
NEWHART SYSTEMS INC.
_______________________________________________
Destination Folder Selection
The destination folder becomes you Blues software folder. This is the location where the Blues
software will be copied to. If you are not sure about your software folder please read the
previous section to decide where to place your software folder. Press the Browse button to
select an existing folder or to create a new folder. Press the Next button to continue the
installation.
BLUES User Manual………………………………Page:24
NEWHART SYSTEMS INC.
_______________________________________________
Installation Type
There are three types of installation; Typical, Complete, and Custom. Complete will install all
possible components. Typical will install most of the Blues software, however, it will not install
the HLLAPI toolkit. The HLLAPI toolkit is only needed if plan on developing software applications
that use the HLLAPI interface. The Custom installation will allow you to omit portions of the
software and documentation that you will not be using and is meant to be used by experienced
computer users only. The documentation consists in two formats, one in Microsoft Word For
Windows and one in Windows help file format. When the Microsoft Word For Windows versions
are installed, they are copied to the folders “Documentation” under the software folder. These
files may be viewed and printed with any standard word processor that supports the Microsoft
Word type of file.
The version of the User Manual in help file format may be viewed from any of the programs in the
software suite from the Help menu. The help file contains a table of contents that matches the
Word For Windows versions and lets you find out information very quickly.
BLUES User Manual………………………………Page:25
NEWHART SYSTEMS INC.
_______________________________________________
If you think that you want to read the entire User Manual, then it would be best to install the User
Manual(s) in Word Format. The Help file version is automatically installed as part of the software.
After selecting the appropriate version(s) of the suite you must press the Next button. If you
selected Custom type of installation, the features select window will let you select the individual
components you want to install.
The software suite will now be copied from the installation media to your computer. After the
software has been copied, you be allowed to continue setting up Blues by pressing the Next
button.
User Settings Wizard
After the software has been copied to your computer, the user settings wizard is automatically
started. The user settings wizard will also be started whenever any Blues application is started
by a new Windows user. Each Windows user must be set up to use Blues. The user settings
determine where Blues configuration information is stored, where the Blues private folder will
reside, and the Blues user name used to access a particular users configuration from the Blues
configuration database.
The Blues user settings wizard may be started at any time in the future to changes the settings.
To start the Blues user wizard from Windows, perform a Start/Run from the task bar of the
program “UserSettings.exe” located in the Blues software folder.
BLUES User Manual………………………………Page:26
NEWHART SYSTEMS INC.
_______________________________________________
Selecting a Blues User Name
The Blues user name is used as a key to access the Blues configuration database. This allows
the database to contain configuration information for multiple Windows users. You may either
select a specific Blues user name, or select to use your Windows sign-on name. When the
Windows sign-on name is used, then Blues emulation will obtain the name that was used during
the Windows sign-on procedure and use it as the key to access the Blues configuration
database.
BLUES User Manual………………………………Page:27
NEWHART SYSTEMS INC.
_______________________________________________
Selecting the Database Folder
If your plan is to have a single database for all users of Blues 2000, then select a folder that every
PC on the local area network has access to.
If you plan to use the “roaming user” feature of Windows 2000, then select a folder that will be
accessible from any PC that you may be using on the network. This technique can be used to
enable a particular Windows user to have the same Blues configuration regardless of which PC
they are signed on to. (I.e. the Blues configuration database will follow you around the network if
it is kept in the “My Documents” folder).
Press the next button when you have made your selection.
BLUES User Manual………………………………Page:28
NEWHART SYSTEMS INC.
_______________________________________________
Selecting the Private Folder
A private folder exists for each Blues user. This allows each user to have unique keyboard
mappings, macro files, and translation tables.
If you plan to use the “roaming user” feature of Windows 2000, then select a folder that will be
accessible from any PC that you may be using on the network. This technique can be used to
enable a particular Windows user to have the same Blues private data files (keyboard mappings,
macro files, file transfer portfolios, etc.) , regardless of which PC they are signed on to. (I.e. your
Blues private folder files will follow you around the network if it is kept in the “My Documents”
folder).
Press the next button when you have made your selection.
BLUES User Manual………………………………Page:29
NEWHART SYSTEMS INC.
_______________________________________________
Finishing User Settings
The final step is establishing the user settings is to save the settings in the system registry. The
settings may either apply for any user who uses the PC, or it may only apply to the currently
signed on Windows user. Administrative rights are required to be able to apply the settings for
all users of the PC.
Press the apply button to apply the changes and begin the use of Blues 2000.
Congratulations, you have installed Blues 2000, you are ready to begin the emulation
configuration phase. Please proceed to the Administration section of this booklet.
Automated Installation
The Blues 2000 software is installed over the standard Microsoft Windows Installer technology.
This means that in order to install Blues 2000, the Microsoft Windows Installer must already be
BLUES User Manual………………………………Page:30
NEWHART SYSTEMS INC.
_______________________________________________
installed on the PC. The Blues 2000 CD contains a setup.exe application that checks to see if
the Microsoft Windows Installer is already on the PC, if it is not, it will automatically be installed.
If the Microsoft Windows Installer has to be installed for the first time, then a system reboot is
required before the Blues 2000 software can be installed.
The Blues 2000 installation is contained in the setup.msi file. Whenever an .msi file is started or
run, it is passed to the Microsoft Windows Installer for execution. A typical installation is done
when the user starts or runs the setup.exe file from the CD or ZIP file. The setup.exe application
starts the Windows Installer and passes it the name of the .msi (setup.msi) file to install. It is
possible to start the installation from a command line or batch file such that additional command
line arguments determine how the installation is done. The Windows Installer application
(Msiexec.exe) can take many command line options that may be used to perform such things as
(1) install in quiet mode, (2) installation for everyone who uses the workstation or just yourself, (3)
set the folder where the software is installed, (4) set the folder where the Blues DATABASE is
located, (5) set the default Blues PRIVATE folder, and (6) set the Blues USERNAME. This
allows a system administrator to create a batch file that when executed, installs and preconfigures Blues 2000 for the workstation.
To start the Blues 2000 installation over the Windows Installer technology, the command line has
the following format:
Msiexec.exe [options] /I setup.msi [PROPERTY1=a] [PROPERTY2=b] …
Where arguments in brackets are optional, the options may be any valid Microsoft Installer
option, the msi file setup.msi is being installed, and optional properties may be set.
MSI Options
The following table describes the command-line options for this program.
Option
Parameters
Meaning
/I
Package|ProductCode
Installs or configures a product.
/f
[p|o|e|d|c|a|u|m|s|v]
Package|ProductCode
Repairs a product. This option ignores any
property values entered on the command line.
The default argument list for this option is
'pecms'. This option shares the same argument
list as the REINSTALLMODE property.
p - Reinstall only if file is missing
BLUES User Manual………………………………Page:31
NEWHART SYSTEMS INC.
_______________________________________________
o - Reinstall if file is missing or if an older version is
installed.
e - Reinstall if file is missing or an equal or older
version is installed.
d - Reinstall if file is missing or a different version is
installed.
c - Reinstall if file is missing or the stored checksum
doesn't match the calculated value. Only repairs files
that have msidbFileAttributesChecksum in the
Attributes column of the File table.
a - Force all files to be reinstalled.
u - Rewrite all required user specific registry entries.
m - Rewrite all required machine specific registry
entries.
s - Overwrite all existing shortcuts.
v - Run from source and re-cache the local package.
/a
Package
Administrative installation option. Installs a
product on the network.
/x
Package|ProductCode
Uninstalls a product.
/j
[u|m]Package
Advertises a product. This option ignores any
property values entered on the command line.
or
[u|m]Package /t Transform List
/L
u - Advertise to the current user.
m - Advertise to all users of machine.
or
g - Language ID
[u|m]Package /g LanguageID
t - Applies transform to advertised package.
[i|w|e|a|r|u|c|m|o|p|v|+|!]Logfile
Specifies path to log file and the flags indicate
which information to log.
i - Status messages
w - Non-fatal warnings
e - All error messages
BLUES User Manual………………………………Page:32
NEWHART SYSTEMS INC.
_______________________________________________
a - Start up of actions
r - Action-specific records
u - User requests
c - Initial UI parameters
m - Out-of-memory or fatal exit information
o - Out-of-disk-space messages
p - Terminal properties
v - Verbose output
+ - Append to existing file
! - Flush each line to the log
"*" - Wildcard, log all information except for the v
option. To include the v option, specify "/l*v".
/m
filename
Generates an SMS status .mif file. Must be used
with either the install (-i), remove (-x),
administrative installation (-a), or reinstall (-f)
options. The ISMIF32.DLL is installed as part of
SMS and must be on the path.
The fields of the status mif file are filled with the
following information:
Manufacturer - Author
Product - Revision Number
Version - Subject
Locale - Template
Serial Number - not set
Installation - set by ISMIF32.DLL to "DateTime"
InstallStatus - "Success" or "Failed"
Description - Error messages in the following order: 1)
Error messages generated by installer. 2) Resource
from Msi.dll if install could not commence or user
exit. 3) System error message file. 4) Formatted
BLUES User Manual………………………………Page:33
NEWHART SYSTEMS INC.
_______________________________________________
message: "Installer error %i", where %i is error
returned from Msi.dll
/p
PatchPackage
Applies a patch. To apply a patch to an installed
administrative image you must combine options
as follows:
/p <PatchPackage> /a <Package>
/q
n|b|r|f
Sets user interface level.
q , qn - No UI
qb - Basic UI
qr - Reduced UI with a modal dialog box displayed at
the end of the installation.
qf - Full UI with a modal dialog box displayed at the
end.
qn+ - No UI except for a modal dialog box displayed
at the end.
qb+ - Basic UI with a modal dialog box displayed at
the end. The modal box is not displayed if the user
cancels the installation.
qb- - Basic UI with no modal dialog boxes. Please
note that /qb+- is not a supported UI level.
Displays copyright information for the Windows
Installer.
/? or /h
/y
module
Calls the system API DllRegisterServer to selfregister modules passed in on the command line.
For example, msiexec /y my_file.dll.
This option is only used for registry information that
can't be added using the registry tables of the .msi file.
/z
module
Calls the system API DllUnRegisterServer to
unregister modules passed in on the command
line. For example, msiexec /z my_file.dll.
This option is only used for registry information that
can't be removed using the registry tables of the .msi
file.
BLUES User Manual………………………………Page:34
NEWHART SYSTEMS INC.
_______________________________________________
The options /i, /x, /f[p|o|e|d|c|a|u|m|s|v], /j[u|m], /a, /p, /y and /z should not be used
together. The one exception to this rule is that patching an administrative installation
requires using both /p and /a. The options /t and /g should only be used with /j. The
options /l and /q can be used with /i, /x, /f[p|o|e|d|c|a|u|m|s|v], /j[u|m], /a, and /p.
MSI Properties
The Blues 2000 installation package supports some special properties that enable custom
installations to be done without operator intervention. To specify a property, use the syntax
property=value.
Property
Value
Meaning
ALLUSERS
0 or 1
Set value to 1 to have the software installed for
all users of the PC, else it is installed only for
the current user.
COMMONDESKTOP YES or NO
If this value is set to YES, then the desktop shortcuts
are created for all users. This option should be set if
the ALLUSERS property has been set to 1.
INSTALLDIR
Folder name
May be used to set the folder where the
software will be installed. If this property is not
set, then the software will be installed in the
Progeam Files\Blues folder.
LANGUAGE
US or GERMAN
Selects the native language that the Blues
software will start in.
Blues Database folder
May be used to set the default Blues Database
folder. The Blues Database contains the necessary
configuration information for each Blues user. This
value may be set to a local drive, a redirected
network drive, or a network share name.
DBASE
PRIVATE
Blues Private folder
USERNAME
Blues User Name
May be used to set the default Blues Private folder.
Each Blues user has a Blues Private folder where
keyboard mappings, macros, and file transfer
settings are stored.
The Blues Database contains each users
configuration settings. The Blues user name is the
key to the database and provides a mapping from a
user name to a Blues configuration. The user name
BLUES User Manual………………………………Page:35
NEWHART SYSTEMS INC.
_______________________________________________
“*” is a special name called a wild card. When the
wild card name is specified and Blues emulation is
launched, then Blues will query the Windows
desktop to obtain the name of the user who is signed
on to Windows and use that name as the key into the
Blues database configuration.
Example
The following example will install the Blues software in a folder named c:\blues in quiet mode.
The Blues software will run in the English language. The wild user name is selected and the
Blues database resides on a network share. The private folder is set to a redirected network
drive that is unique for each user so that each user may customize their keyboard mapping and
record and play their own macros.
Msiexec.exe /qb /I d:\setup.msi INSTALLDIR=C:\Blues ALLUSERS=1 COMMONDESKTOP=1
USERNAME=* DBASE=\\server\Blues PRIVATE=P:\
This type of installation is usefull when the Blues Database is located in a central location and
every Windows user has a Blues user name configured. Simply run the above installation on a
workstation and Blues is ready for use, without any further configuration!
BLUES User Manual………………………………Page:36
NEWHART SYSTEMS INC.
_______________________________________________
Networked PC Installation
There are two techniques of installing Blues 2000 on a PC connected to a file server. One
technique is used when you want to keep a single copy of the Blues software on a network share,
and the second technique is used to keep a separate copy of the software folder on each PC.
Each technique may be accomplished through traditional methods of starting an installation
program on the PC, or may be done from the Windows 2000 Memory Management Console
(MMC) remotely.
If each PC in the network is to have a copy of the software to insure functionality even if the
network is down, then the “setup.msi” application described in the initial software installation
section above may be used at each PC. If a single copy of the software is going to be maintained
on a network share point then the setup application “NetworkSetup.msi” should be used. The
installation package “NetworkSetup.msi” is installed into the Blues software folder during initial
software installation.
Either msi file may be assigned to Windows users or to specific PCs and automatically installed
through the use of the Microsoft Windows 2000 server application MMC. For more details on the
MMC application, refer to the Microsoft documentation. If a Windows 2000 server is not
available, then either msi application may be started from a network share point or from the Blues
CD.
There are two other advanced features of the Blues Manager application that let you install PCs
with the Blues. One method may be used in a Windows NT/200 environment to remotely create
a Blues desktop on a networked PC through the use of a Windows NT/2000 service, and the
other involves creating a new Windows installation package that contains the Blues software,
Blues configuration, and instructions of how to install the package. These features are covered in
the Blues User Manual.
Using NetworkSetup.msi
This technique of installation assumes that you are keeping a single copy of the Blues 2000
software on a file server connected to the PC that you want to install. This technique will setup
the PC to use the software already installed on the file server. Before you can perform this type of
installation, you must have already completed the “First Time Installation”. See section above.
To start the setup process, select Start from the task bar, then select Run and enter
d:\Blues\Networksetup.msi, where d is the network drive number of where the Blues has already
been installed. D may also be the name of a network stare point. The installation program is
BLUES User Manual………………………………Page:37
NEWHART SYSTEMS INC.
_______________________________________________
very similar to the “First Time Installation” described above. The major difference is that there are
no selections of where to install the software since it is already installed.
Please refer to the previous sections for details in using the installation program.
Uninstalling
The Blues software may be removed from the Control Panels “Add/Remove Programs” icon. To
properly remove the software you should have administrative privileges and have all other
windows closed. The uninstall wizard will guide you through removing Blues from a PC. If the
uninstall is done from a PC that has the complete Blues product installed, then it will remove the
complete product. If the PC was installed as a network PC (see Networked PC Installation
above), with the NetworkSetup.msi program, then the Blues software will not be removed from
the network share point and only the files installed as part of the network setup process will be
removed.
BLUES User Manual………………………………Page:38
NEWHART SYSTEMS INC.
_______________________________________________
The Manager Application
The Manager is used to maintain the "BLUES 2000 Database" of users. The Manager can also
be used to assign an Administrator password, add a user, delete a user, and so on. The Manager
is used to configure BLUES 2000.
The software installation process added a shortcut for the Manager, use it to start the Manager
program.
When the BLUES was installed, a user named “Administrator” was automatically created. This
user is known as “The Administrator”. If the name or password of this user is changed, then the
Manager program will prompt for the user name and password when it is started. If the user
name remains “Administrator” with no password, then anyone may use the manager without
having to know the user name and password.
The first time you start the Manager from a new PC, you will be asked to enter a drive and path
for the "PRIVATE FOLDER". Each user should have a unique location to store macro's,
keyboard mappings, and translate table files. After you have selected the PRIVATE FOLDER, all
keyboard and translate table files will copied from your installation directory to your private folder.
If you are going to modify the keyboard and translate table files for more than 1 user, then
you should modify these files in the installation directory before you add each user so that
you will not have to modify these files each time you add a user.
BLUES User Manual………………………………Page:39
NEWHART SYSTEMS INC.
_______________________________________________
Using The Main Window
The Manager main window contains a menu bar that lets you perform such functions as adding a
user to the BLUES database, deleting a user and so on. Directly under the menu bar is the tool
bar. The tool bar lets you perform menu item functions with the mouse. Under the tool bar are 2
window panes that me be split in two by dragging the mouse over the splitter bar. The left most
pane contains a list of all configured users, user groups, Microsoft NT SNA Server resources,
DLC physical unit resources, and TCPIP resources that are currently in the BLUES database.
The right most pane may contain a list of the sessions, connections, and configured users,
depending on what has been selected in the left window pane. And finally there is an area on the
bottom of the window that contains a line of help text. The help text will display what a specific
menu item or tool will perform. To display a tool’s help line you need to position the mouse over
the tool and the help line will appear. To display the help line for a menu item you need to drop
down the menu item and highlight it with either the mouse or from the keyboard.
A configured user contains a picture of a little person next to the user’s name. The color of the
little person is significant, a green body indicates it’s the name of the administrator, a blue body
BLUES User Manual………………………………Page:40
NEWHART SYSTEMS INC.
_______________________________________________
indicates it’s the name of the user currently assigned (through the “make icons’ function) to the
PC you are on, a red body indicates that it’s a user that is not assigned to this PC and not the
administrator, and finally a blue/green body indicates that the user is assigned to this PC and is
also the administrator.
Whenever you select a different user name from the list, that user’s sessions and connections
are listed in the right window pane. A user’s sessions and connections are displayed with a
picture that gives you information about it. You may double click the mouse over a particular
session or connection and this will perform a “Change Session...” or ‘Change Connection...”
menu function.
Network Neighborhood View
The Network Neighborhood may be used to view the computers that have Microsoft Networking
installed. Three sets of network computers may be viewed, all computers, successfully installed
computers, and unsuccessfully installed computers. When one of these sets is opened, the
network is scanned and a list of computers are displayed. Only computers that are currently
powered on and connected to the LAN/WAN are displayed. By selecting a specific computer, a
BLUES administrator can see what version, if any, is currently installed, and other information
about the BLUES installation on that computer.
By placing the mouse pointer over a specific computer and pressing the right mouse button, the
“Create Desktop Shortcut(s)” function may be performed. The “Create Desktop Shortcut(s)”
function may be used to remotely install and configure the computer.
What Is Required To Configure A BLUES User ?
Before a specific user may communicate with a host system, the user must first be added to the
BLUES database. The Manager lets you add users four different ways, you may elect to copy an
existing user, import a Microsoft NT SNA Server user, import a Netware For SAA user, or import
the complete Microsoft NT SNA Server configuration file. All four methods produce a new user
and a number of display sessions, printer sessions, and host connections. Once a user has been
added, sessions and connections may be added and deleted as desired. After All connections
and sessions for a user have been configured, you MUST perform the “Create Desktop Start
Menu” function on that particular users PC and the user is ready to connect to a host computer.
BLUES User Manual………………………………Page:41
NEWHART SYSTEMS INC.
_______________________________________________
The Manager File Menu
The file menu is used to open, close, backup, and restore the DATABASE. In addition the
Manager is closed from the File menu. The following sections describe what each menu item
performs.
New Database…
This menu item will allow the creation of a new BLUES database. The name of the folder where
the database will reside will have to be selected. New folders may be created from the same
window that is used to select the folder. After the DATABASE has been created, new users may
be configured. Because the DATABASE consists of many separate files, it is suggested
that a separate folder be used as the DATABASE folder.
BLUES User Manual………………………………Page:42
NEWHART SYSTEMS INC.
_______________________________________________
Open Database…
This option lets you open an existing BLUES database. After the database has been opened,
you may modify it.
Close Database
This option will close the BLUES database that is currently opened. After the database has been
closed users may not be configured until either a new database is created or an existing
database is opened.
Delete Database
Warning - this option will delete the currently opened BLUES database. All configured users,
configured user groups, and their associated configurations will be deleted. After a database has
been deleted, a new or existing database will have to be opened before users may configured.
Before deleting the BLUES database, you may want to backup the database for future
reference. This is done from the File menu “Backup Database…” and described in the following
sections.
Hot Backup Database
Each Blues configuration database may have a duplicate database associated with it. The
duplicate database is known as a “Hot Backup Database”. When BLUES emulation is launched,
it will attempt to get it’s configuration information from the primary Blues database. If this fails,
then an attempt is made to get the configuration information from the Hot Backup Database. This
option is primarily designed for users who want to keep a centralized Blues database that
includes automatic redundancy of the database. By keeping the primary Blues database on one
file server and the Hot Backup database on another file server, Blues emulation will be able to
retrieve it’s configuration if either file server is running.
The Blues Manager application is used to configure and maintain the two sources of
configuration information. As you modify any Blues configuration information in the primary
database, the Hot Backup Database is automatically updated. The Blues Manager also contains
a synchronize function that ensures both databases contain the same configuration information.
BLUES User Manual………………………………Page:43
NEWHART SYSTEMS INC.
_______________________________________________
How do I add a Hot Backup Database to my existing configuration ?
The first thing to remember is that unless you want to have a centralized Blues database that
contains all your Blues users configurations, then it does not make sense to have a Hot Backup
database because you probably have the Blues configuration stored on a local hard drive that is
always available.
Once you have a Blues database stored on a server, then all you have to do is Open the
database with the Blues Manager, select “Hot Backup Database” from the File Menu, then either
browse for or enter the name of an EXISTING empty folder located on a second server where
you want the Hot Backup Database to reside, and press OK. This will copy your existing Blues
database to the new location. You must also ensure that the location of the Hot Backup
Database has the same privileges that the primary Blues database has.
To activate the feature at the workstation, Blues emulation must be started at least once using
the primary database.
Backup Database…
This option will save the BLUES database. The BLUES database is compressed into a single
ZIP compatible file. The database should be periodically saved to avoid loosing the BLUES
database in the case of disk corruption.
Restore Database…
The restore database option will take an existing file created through the use of the backup
database function and restore it. After the database has been restored, it will automatically be
opened.
Import Microsoft SNA Server Configuration File…
This menu option will read the entire Microsoft SNA Server configuration file and create BLUES
users, their terminal, and printer sessions. In addition, SNA Server groups will be added to the
BLUES User Manual………………………………Page:44
NEWHART SYSTEMS INC.
_______________________________________________
BLUES database to ease in maintaining users in the future. This menu item is only available
when the Manager is being used on the NT Server where the SNA Server has been
installed.
Overwrite existing BLUES sessions - when this option is selected, if a user that is configured in
the Microsoft SNA server is already in the BLUES database, then all existing BLUES sessions
configured for the user are deleted before any new sessions are added to the user.
Delete BLUES users not in SNA Server Configuration - when this option is selected, any
BLUES user(s) already configured that are not configured in the Microsoft SNA Server will be
removed from the BLUES database. This option lets you remove BLUES user(s) that have been
already removed from the Microsoft SNA Server configuration file.
Import SNA Server Pool Names - when this option is selected, any SNA Server pooled LU’s
assigned to user(s) will be added to the BLUES database.
Import Dedicated (non pooled) Display LUs - when this option is selected, any dedicated
display LU’s assigned to user(s) will be added to the BLUES database.
Import Printer LUs - when this option is selected, any printer LU’s assigned to user(s) will be
added to the BLUES database.
BLUES User Manual………………………………Page:45
NEWHART SYSTEMS INC.
_______________________________________________
After all selections have been made, press the OK button and import will take place. While the
import is being performed, the progress indicator will constantly be updated to reflect what is
being done.
Exit
This menu item is used to stop the Manager and return to the program manager.
BLUES User Manual………………………………Page:46
NEWHART SYSTEMS INC.
_______________________________________________
The Edit Menu
The edit menu makes it easy to duplicate existing configured users. A configured user may be
copied and pasted by first selecting the user that will be copied, then performing a copy function.
If you want to paste the users configuration over an existing configured user, then select that user
and perform a paste operation. To duplicate an existing configured user, select the user, then
perform a duplicate function. After the duplicate, you may enter the new users name.
BLUES User Manual………………………………Page:47
NEWHART SYSTEMS INC.
_______________________________________________
The Users Menu
The menu items under Users contains functions for adding, changing, and deleting users from
the database. In addition, you can change a users name and password, import a Netware For
SAA user, import a Microsoft NT SNA Server user, and create desktop shortcut(s). The following
sections describe each menu item.
The User Wizard
The first time that you start the Manager program, you will be asked if you would like to start the
user wizard. If you happen to be using the Blues Manager on a NT Server which has the
Microsoft NT SNA Server installed, then you will be asked if you want the Blues Manager to
import the complete SNA Server configuration. Importing the complete SNA Server configuration
greatly simplifies the configuration process by reading the SNA Server configuration file and
creating matching Blues user’s and their sessions. The configuration wizard may also be started
from the “Users” menu.
BLUES User Manual………………………………Page:48
NEWHART SYSTEMS INC.
_______________________________________________
The user wizard is a tool that simplifies the configuration procedure. The wizard will create a new
Blues user, the user’s configuration profiles, and the necessary desktop shortcut(s) for
connectivity to your host. The wizard will guide you through the configuration process with a
series of questions regarding your emulation requirements. You may select how the wizard
creates a new user from the following window:
If you choose to have the wizard import an existing Microsoft NT SNA Server user, or Netware
For SAA user, then you must have access to a Netware For SAA server or a NT SNA server.
The import process will cause the wizard to query the appropriate server(s) to obtain the number
and types of terminal and printer emulation that has been assigned to the Windows user name.
After the wizard has created the new Blues user, and a number of terminal and printer sessions
you will be asked if you would like to assign the new Blues user the PC that you are currently on.
If you choose yes, then a new Blues program group and program icons will be created. From
these new program icons, you may access your host or midrange computer. If you choose no,
then you may assign the user at a later time by using the “Create Desktop Shortcut(s)” menu item
of the manager application.
BLUES User Manual………………………………Page:49
NEWHART SYSTEMS INC.
_______________________________________________
Add Users...
Before selecting the Add Users... function, you may want to highlight an existing user that has a
similar configuration of sessions and connections to the user you want to add. The add users
dialog box looks as follows:
Add Users Dialog
The Add Users... function provides the administrator with the ability to configure large numbers
of users all at once or add just a single user. When a user is added, you may copy an existing
users profiles to the new user. By doing this you can configure many users with the push of a
button, then assign each user name to a PC later with the "Create Desktop Menu Shortcut(s)"
menu item. You may also use the Add Users... button to overwrite existing users profiles by
selecting the "Overwrite Existing Users" option.
When session profiles are copied from another user, each session that is copied is evaluated to
see what type of connection the session is configured for. If the session is configured for a
pooled address, then the address is not changed. However if the session is configured for a
dedicated address or a dedicated alias name, then the address is incremented and the LU alias
name is also incremented. If you are using Netware For SAA, you may want to name your LU
alias names (by using the CSCON program) in increasing order (like LU02, LU03 ...) so that you
can use the Add Users... button to configure all your users at once.
Import Microsoft SNA Server User
BLUES User Manual………………………………Page:50
NEWHART SYSTEMS INC.
_______________________________________________
This menu item only pertains to you if you are using the Microsoft NT SNA Server as a gateway
for BLUES sessions. This menu item is a convenient way of adding a user and all the users
sessions in one step. To use this feature you must first configure your Microsoft NT SNA Server
through the use of the Microsoft SNA Server Administrator program. Use the Microsoft
Administrator program to Assign 1 or more LU’s to the appropriate user. Once you have
configured the user and the user LU’s on the NT Server, you are ready to import the user into the
BLUES. In order to use this menu item you must have your NT Server started and located
somewhere on the local area network, in addition, you must have previously installed the
Microsoft NT SNA Client software on the PC. For more details on these items see the
appropriate Microsoft documentation. After selecting this menu item you may be asked for your
NT user name and password if you have not already signed on. After you have selected this
menu item the following dialog box will be displayed:
You must be signed on the NT Server with the name of the user that you want to import. If are
not signed on as that person, then select the “LOGON...” button and do so. After you are signed
on as the person to import, enter in the name that is going to be assigned as the BLUES user
name. You may now press the “IMPORT” button. This will cause the Administrator program to
query the NT SNA Server for all sessions that belong to the NT user you are signed on to the NT
SNA Server as and automatically create the appropriate sessions. After all sessions are created
you are returned back to the Manager main menu.
Import Netware SAA or IBM Comm. Server User...
This menu item only pertains if you are using Netware For SAA or IBM Communications Server
as a gateway for BLUES sessions. This menu item is a convenient way of adding a user and all
the users sessions in one step. To use this feature you must first configure your Netware For
SAA or IBM Communications Server. NOTE - If an LU is not assigned a specific user, then
any user may use the LU. This may cause you to automatically add sessions that you may
not want. In order to use this menu item you must have your Netware SAA or IBM Comm.
Server started and located somewhere on the network For more details on these items see the
appropriate Netware or IBM documentation.
After you have selected this menu item the
following dialog box will be displayed:
BLUES User Manual………………………………Page:51
NEWHART SYSTEMS INC.
_______________________________________________
Netware SAA or IBM Comm. Server Connection Method
BLUES may be connected to either Netware SAA or IBM Communications Servers over either
Novell IPX/SPX or TCP/IP. The “Connect To” selections determines which protocols are used to
gain access to the server. If IPX/SPX is selected, then the Novell Client32 product must installed
on the PC. If TCP/IP is selected, then the Microsoft TCP/IP protocol must be installed. Novell
Client32 is only required if the IPX/SPX protocol is going to be used.
When TCP/IP is being used, BLUES uses the Server Location Protocol (SLP) to find Netware
SAA and IBM Comm. Servers. The SLP protocol allows for three configuration options, scope,
DA timer, and SA Timer. Scopes are used to group servers, one or more servers may be
assigned to a scope through the appropriate configuration utilities of the server. By specifying a
scope, you may limit which servers LU’s are obtained from. If no scope is entered, then the
scope is said to be un-scoped and all servers will be queried. The two time out values are used
to determine how long BLUES will wait for replies from valid servers in the scope during the SLP
location process. For more information regarding these time outs, see SLP Load Balancing.
BLUES User Manual………………………………Page:52
NEWHART SYSTEMS INC.
_______________________________________________
You must enter the new name of the BLUES user that will be added to the BLUES database.
After you have entered the necessary information you may press the Import button. This will
cause the BLUES Manager to query all Netware SAA servers for sessions that may be accessed
by the Netware user you have selected. After All sessions have been found (THIS MAY TAKE A
FEW SECONDS) you are returned to the main menu with the new user name highlighted.
Change User Name / Password...
This menu item may be used to change the user name and password of whatever user name is
currently highlighted. Each user may optionally be assigned a password. If no password is
assigned, then the user will not be prompted for a password when the users sessions are started.
If the administrator’s user name is changed to anything other than “ADMIN”, then whenever the
BLUES Manager program is started it will require entry of the user name and optionally a
password.
NOTE - If you change a users name that has already been assigned to a PC through the
make icons function, then you must perform another make icons function after changing a
user name to assign the correct user name to the PC. If you are on the PC that was
previously assigned the old user name, then the BLUES Manager program will
automatically update the INI file as part of the change user name / password function.
Delete User
To delete a user (and thus delete all the sessions and connections for that user) first highlight the
name of the user with the mouse, then press the Delete key or use the menu item under the
Users menu. The administrator may not be deleted, however any sessions or connections that
the administrator may have configured may be deleted from the “sessions” and “connections”
menus.
BLUES User Manual………………………………Page:53
NEWHART SYSTEMS INC.
_______________________________________________
Create Desktop Start Menu (Shortcuts)
This window will delete the existing BLUES desktop shortcut(s) and create a new set of
shortcut(s).
In addition, you may also create a BLUES installation package. An installation package is a self
extracting Windows application that when run on another PC will completely install, configure,
and start emulation without any operator intervention. This may be used to distribute BLUES via
email, ActiveX, floppy diskette, CD rom, or over a browser.
In order to properly create the right number of terminal and printer sessions and to assign the
desktop to a specific BLUES user, the name of the BLUES configured user must be selected
before pressing the Ok button.
BLUES User Manual………………………………Page:54
NEWHART SYSTEMS INC.
_______________________________________________
When installing and configuring another computer, a useful technique is to select the “Create
Common Menu For All Users” and the “Associate Desktop Login As BLUES User” options. Then
create the BLUES database by configuring any Windows users who want to use BLUES 2000.
When this technique is used, Any Windows user may use BLUES 2000 from any installed PC
and get their individual BLUES settings from the BLUES database.i.e. when a user starts
emulation, the BLUES emulator will obtain the Windows sign on name and use it to access the
BLUES database for configuration information.
There are several different types of shortcuts. Each type of shortcut can be disabled from being
created. By disabling a type of shortcut a user may be restricted from having access to a
particular BLUES program. For example: by deactivating the Manager, a user will not have
access to the BLUES Manager application.
BLUES User Manual………………………………Page:55
NEWHART SYSTEMS INC.
_______________________________________________
Types Of Shortcuts
There are several different types of shortcuts. Each type of shortcut can be disabled from being
created. By disabling a type of shortcut a user may be restricted from having access to a
particular BLUES program. For example: by deactivating the Manager, a user will not have
access to the BLUES Manager application.
The Lanucher shortcut is used to start all host connections and sessions from a single shortcut.
When a user has more than one session configured, the Lanucher shortcut may be used to start
all configured session from a single shortcut.
A Session shortcut allows a user to start a specific terminal or printer session without having to
start all configured sessions.
A Connection shortcut represents a host physical unit connection and is only created when the
DLC protocol is being used to connect to the host computer.
The Readme shortcut allows you to read a file that contains last minute changes to the BLUES
product.
The Manager shortcut allows you to start the BLUES Manager application. You may want to
remove this to restrict users from being able to start the Manager.
The DOS HLLC Support shortcut is used to start a HLLAPI redirector that redirects HLLAPI
commands from MS-DOS applications to the BLUES Windows terminal sessions.
The Help shortcut may be used to view the BLUES online help system.
BLUES User Manual………………………………Page:56
NEWHART SYSTEMS INC.
_______________________________________________
Shortcut Locations
Shortcuts may be created in a variety of locations. Each location is discussed below:
Desktop Folder - This option creates a BLUES program group directly on the Windows desktop.
Once created, you may open the folder from the desktop by double clicking the mouse over the
folder. The folder will contain a program icon for each of the types of shortcuts that are selected
under shortcut types.
Launch From Desktop -This option causes a BLUES emulation launcher icon to appear directly
on the Windows desktop. When the BLUES launcher icon is double clicked with the mouse, all
configured terminal and printer sessions are started.
Launch At System Startup - This option causes a BLUES emulation launcher to be placed into
the Windows Startup folder so that each time the PC is started, all configured terminal and printer
sessions are started.
Start Menu - This option creates menu items directly in the Windows “Start” menu. Program
icons for each of the types of shortcuts that are selected under shortcut types are created.
Programs Menu - This option creates menu items directly in the Windows “Programs” menu.
Program icons for each of the types of shortcuts that are selected under shortcut types are
created.
BLUES User Manual………………………………Page:57
NEWHART SYSTEMS INC.
_______________________________________________
Registry Options
Each time BLUES emulation is started, the emulation needs to know where the BLUES database
is located, where the users private folder is located, the name of the BLUES configured user to
access the database, and the national language. This information is stored in the Windows
registry.
The Windows Registry contains two separate places for storing information,
HKEY_LOCAL_MACHINE and HKEY_CURRENT_USER. The Windows NT operating system
has the ability to have a different desktop for each Windows user. Each NT user has their own
copy of HKEY_CURRENT_USER and this copy can follow them around a LAN\WAN as they sign
on at a particular PC. Each PC has a unique HKEY_LOCAL_MACHINE set of parameters that is
tied to a physical PC. The checkbox “Create Common Menu For All Desktop Users”
determines if the BLUES information will be kept in the HKEY_LOCAL_MACHINE or in the
HKEY_CURENT_USER area. If you want to tie a BLUES configured user name to a PC and let
everybody who signs on to the PC to share that configuration, then select the “Create Common
Menu For All Desktop User” feature. If you want a particular Windows NT user to be able to sign
on to any PC on a LAN/WAN and have their own unique BLUES configuration, then you must
ensure that the private folder is located on a network drive and that you do not select the “Create
Common Menu For All Desktop User” feature. The Windows NT operating system can be
configured to restrict write access to the registry. It is imperative that write access to the
registry not be restricted while the Manager is attempting to write into it.
Use Windows Logon Name As BLUES User Name
This option enables the so called “wild user name” option of the BLUES. To properly utilize this
feature, each BLUES user name must match the user’s Windows logon name. When a BLUES
connection or session is started, it will obtain the Windows logon name and use it to access the
necessary configuration information from the BLUES database.
This option lets a user (including a Windows 95/98 User) sign on to any PC on the WAN/LAN and
automatically get the correct BLUES configuration for themselves.
Sessions are associated to a particular user based on the order that they appear in the BLUES
Manager. For example, if JOHN has 2 display and 1 printer sessions assigned to him in the
BLUES Administrator, and JOHN starts session1, the first display session profile will be used,
session2 will be the second display session profile, and session3 will be his printer session
profile.
If this method of using the Windows sign on name as the BLUES user name is used, then
the BLUES private directory should point to a network directory that is different for each
BLUES User Manual………………………………Page:58
NEWHART SYSTEMS INC.
_______________________________________________
user. For Example if R:\BLUES is mapped to a network drive and directory that is defined
to be a different location for each BLUES user, then each user’s keyboard mapping,
macros, and file transfer portfolios will automatically be available to the user regardless of
which PC the user is using.
Private Folder
Each BLUES user requires a private folder that contains keyboard mapping files, translation table
files, macro files, and file transfer portfolios. The BLUES Manager will check to see that the
private directory exists during the “Create Desktop Start Menu” function. If the directory does not
exist, or does not have any keyboard mapping files, then the Manager will create the directory
and copy existing keyboard mapping files and translation table files from the BLUES installation
folder into the private folder.
The private folder may contain environment variables that allow the private folder to be unique to
whom ever is signed on. When the emulator is started, if the private folder does not exist an
attempt will be made to create it.
Language
The Language setting allows the BLUES software to run in different languages. When the
software is used in a different language, all menu’s, message boxes, windows titles, etc. are
displayed in that language. Language translations are available from specific distributors in
various countries. You may contact product support to see if a particular language version exists.
Building Installation Packages
An installation package is a self-extracting Windows application that when run on another PC can
completely install, configure, and start emulation without any operator intervention. A package is
created by compressing all necessary software files, configuration files, and instructions on how
to deliver it into an installation program. When the program is run from Windows, it
uncompresses itself per the included instructions. The Blues ActiveX control may also be used
deploy and maintain the package.
A package may be used to distribute a pre-configured copy of Blues 2000 via email, ActiveX,
floppy diskette, CD-ROM, or over a browser. A package may also be used as a tool to upgrade
PCs with a newer software release of Blues 2000 while leaving their existing configuration
unchanged.
BLUES User Manual………………………………Page:59
NEWHART SYSTEMS INC.
_______________________________________________
If you are going to include configuration information in a package, you must first create your
desired configuration(s) from the Blues 2000 Manager. This means you create a Blues 2000
database that contains all necessary Blues 2000 users and create each users terminal and
printer sessions.
Before building a package, select the appropriate options from the “Create Start Menu
(Shortcuts)” window that indicate where Blues 2000 will appear on the desktop, which shortcuts
to create, common desktop option, associate Windows logon name, etc.
The installation package wizard guides you through the package creation process.
The wizard will let you decide what you want contained in the package.
If you select to create the package on floppy diskette, you will need from 1 to 10 formatted
diskettes to store the package on. The exact number of diskettes will vary depending on what is
placed in the package.
Package Contents
The package may include the Microsoft Windows Installer, the Blues software, the Blues
database, and the Blues private settings. The Blues software installation is located on the Blues
CD. To have the Blues software install properly, a PC must have the Microsoft Windows Installer
product already installed. The Microsoft Installer setup application comes in two versions, one for
Windows 95/98 and one for Windows nt/2000. If the Blues software is going to be included in the
package, then it must be decided if the Windows Installer is already installed on all PC’s that will
BLUES User Manual………………………………Page:60
NEWHART SYSTEMS INC.
_______________________________________________
have the package delivered. If the Windows Installer is not present on all computers, then add
the correct file to the package so that it is delivered before the Blues software is delivered.
The Blues database may be included in the package. It contains every Blues configuration
option except a user’s private settings. The private settings are stored in separate files in a given
users private folder. The Private files include the keyboard mapping files, the file transfer
schemes, and any previously recorded macro files.
Package Delivery Options
The Package Delivery Options describe how a package gets delivered. The name of the
package should end in the .exe file extension. This is the package that gets created. If Blues is
included in the package, then it will install itself on the target PC in the Program Files\Blues
folder. To override the default software installation folder, uncheck the option and enter the
complete name of the folder on the target PC where Blues will be installed. I.e. c:\blues
The Blues software may be installed only for the user who delivers the package, or for everybody
who uses the PC. Administrative privileges are required to install a software product for
everybody who uses a PC.
BLUES User Manual………………………………Page:61
NEWHART SYSTEMS INC.
_______________________________________________
The Deliver Package in Quite Mode” option may be selected to create a package that requires no
operator input during its delivery.
After excepting the licensing agreement, the package will be created. The necessary Windows
installer files, configuration files, and private settings files will be compressed into a single .exe
file.
For details on using ActiveX to deploy Blues Emulation, see the ActiveX section of this manual.
The Groups Menu
The groups menu selections manage groups of configured BLUES users. Configured users may
be added to one or more groups for subsequent management. The “Copy Session Settings”
menu command (under the Sessions menu) can be used to add or modify session settings that
belong to a whole group. For example: a terminal session can be added to everybody in a group
or a particular menu item can be removed from all terminal sessions that belong to a group of
users. The ability to group users together is a powerful feature that can help the administrator
manage large numbers of users.
New Group…
The New Group menu item creates a new group of BLUES users. After this menu item has been
selected, you must enter the name of the group. The name of the group may be changed at any
time by using the Group properties menu item or by clocking the mouse over the group name in
the main Manager window. After the group name has been entered, press the enter key and the
group properties windows will be displayed. The group properties window is described in the
following sections.
Delete Group
Groups may be deleted by using this menu item. The group name must first be selected with the
mouse before this menu item may be selected. A group may also be deleted by selecting the
group name with the mouse and pressing the DELETE key. When a group is deleted, only the
group association is deleted, the actual configured users are not deleted from the BLUES
database. To remove a user from a group the group properties menu item must be used.
To delete a configured user, select the user name you want to delete and press the DELETE key.
BLUES User Manual………………………………Page:62
NEWHART SYSTEMS INC.
_______________________________________________
Deleting a configured user will automatically delete the user from any groups that the user
belongs to.
Group Properties
The group properties windows is used to change the name of the group, add new members, and
delete existing members from the group. The left portion of the windows contains a listing of the
configured users that currently belong to the group. The right portion of the windows contains a
list of the configured users that do not currently belong to the group. The group name appears at
the top of the windows and may be changed as desired. To add a new member to the group,
simply select the user from the list and press the Add button. To remove a member from the
group, simply select the user from the group and press the Remove button. One or more user
names may be added or removed at once. When the group contains the names of the
configured users that is desired, press the Ok button.
The Sessions Menu
The sessions menu provides you with a set of functions used to manage a users sessions.
Before selecting any of these menu items you must first highlight the name of the user that you
want the menu item to take affect on. The following sections are presented in the same order as
they appear on the menu.
BLUES User Manual………………………………Page:63
NEWHART SYSTEMS INC.
_______________________________________________
Add Terminal Session...
Add Printer Session...
These three menu items are used to add sessions to a particular user. To add any type of
session, first highlight the user name that you want to have assigned the session, then perform
the add menu function. A terminal session will act a host display window, a printer session will
act as a host printer window.
The following dialog will be displayed to add a terminal session. The dialog for adding a printer
session contains a subset of the terminal dialog. The Printer dialog also contains configuration
options for host formatting and margins, for details on these options see the printer section of this
manual.
BLUES User Manual………………………………Page:64
NEWHART SYSTEMS INC.
_______________________________________________
When you add or change a session, you will be switched to an appropriate configuration window
which will allow you to define the default values for the session's key 'profile' parameters. The set
of all the connection and operational options selected for running a BLUES 2000 session is
known as the session's 'profile'. The session profile is broken down into several categories that
are represented by tabs at the top of the window. By selecting the appropriate tab you may
change a sessions profile.
The general tab offers options for configuring how the session is connected to the host, how the
keyboard mapping is configured and how information is translated to and from the host. The
following sections describe each option:
BLUES User Manual………………………………Page:65
NEWHART SYSTEMS INC.
_______________________________________________
Window Title
The window title field allows the customization of the session windows title bar. In addition, the
window title field will be displayed under the program’s icon or to the right of the program icon if
viewed from the Start menu.
If no name is entered in this field, then the default title of ‘BLUES Terminal’ or BLUES Printer’ will
be used.
Model Type
Specifies the default device model number, 2, 3, 4, or 5. Each model type has a different number
of lines and columns. The host computer may override this option.
Keyboard Style And Mapping
Allows you to select one of the BLUES 2000 product 'keyboard definition' files to map keystrokes
at the PC to data characters and command functions used for emulation, depending upon what
international language Windows will be running under at the PC, physical keyboard size, etc.
A keyboard definition file contains information about a particular keyboard type, and the mapping
of the keys. For example, the following base default keyboard definition files are provided with
BLUES 2000
usa84.kbd
-
USA 84-key keyboard
usa101.kbd
-
USA 101-key keyboard
usa101.vt.kbd -
USA 101-key keyboard for DEC VT emulation
usa122.kbd
-
USA 122-key keyboard
uk102.kbd
-
UK 102-key keyboard
sp102.kbd
-
Spanish 102-key keyboard
ger102.kbd
-
German 102 key keyboard
ger102.vt.kbd
-
German 102 key keyboard for DEC VT emulation
ger122.kbd
-
German 122 key keyboard
ger122.vt.kbd
-
German 122 key keyboard for DEC VT emulation
BLUES User Manual………………………………Page:66
NEWHART SYSTEMS INC.
_______________________________________________
greek101.kbd
-
Greek 101 key keyboard
fr102.kbd
-
French 102 key keyboard
it102.kbd
-
Italian 102 key keyboard
See Keyboard Mapping under The Settings Menu, in the Display Emulation section, for
instructions on how to re-define keystroke mappings within one of these keyboard definition files,
create a new keyboard definition file, etc.
ANSI/EBCDIC Translate Table
Allows you to select one of the BLUES 2000 product 'translation table' files for host to PC and PC
to host character code translations, depending upon what international language Windows will be
running under at the PC.
As of the current revision of this document, one of three base default translation table files is
used, as follows:
usa.xlt
-
USA, and all others not defined below
uk.xlt
-
UK
sp.xlt
-
Mexico, Spain, and Portugal
german.xlt
-
German
italy.xlt
-
Italian
spain.xlt
-
Spanish
fr295ans.xlt
-
French code page 295
greek423.xlt
-
Greek code page 423
greek875.xlt
-
Greek code page 875
Under special conditions, the translation tables found in these base default files can be changed
using a standard PC file editor, but this is rarely necessary.
Launchable
BLUES User Manual………………………………Page:67
NEWHART SYSTEMS INC.
_______________________________________________
When selected, this feature allows the session to be started by the "Launch BLUES" ICON. The
"Launch ICON" is a simple and fast way of starting a complex array of host terminal sessions,
host printer sessions, and host connections by selecting a single Windows Icon.
Allow Keyboard Changes
If the administrator does not want to allow the operator of the display session to modify the
keyboard file, then disable the "Allow Keyboard Changes" check box with the mouse.
Notify When Minimized
This option controls whether or not the terminal emulator will notify the operator when the host
screen has changed when the terminal window has been minimized.
Enable Type Ahead
Specifies whether the type ahead option will be enabled. Type ahead lets you type several host
screens ahead. Keyboard input is maintained in a 255 key queue that is maintained by the
display session.
Connection Parameters
Each session can have one or more destinations configured. A destination is set of connection
options that tell the session how and where to connect to your host computer. The first
destination in the list is known as the primary destination. The primary destination is the
destination that will be used first after you start a session. Alternate destinations can be
configured to be automatically switched to if the primary destination can not be made or is lost.
To add new destinations you must press the Add Dest button. To remove an alternate
destination, you will have to select the alternate destination you want to delete and press the
Delete Dest. Button. If you want to have the session automatically switch to an alternate
destination you will also have to select the Automatically connect to next destination without
prompting checkbox. The time between loosing or not establishing a connection and switching
to the next destination can be configured in the Pause between destinations option. This time
value is given in seconds and represents the time to wait between connect attempts. Each
session can also be configured to try to connect to all configured destinations a given number of
times before giving up. This is done by selecting the Try the complete destination list x before
failing option. If you select a value of 0 for this option, then the session will continue to attempt
to connect until it is successful or you close the session window.
BLUES User Manual………………………………Page:68
NEWHART SYSTEMS INC.
_______________________________________________
Destination Type
The BLUES 2000 product supports a number of vendors' communication gateways. Select the
gateway type to be used by clicking the mouse over the destination type field and selecing a type
from the popup menu.
LU Alias
The LU Alias specifies a particular host configured terminal device, or printer device, for your
session. The LU Alias may be changed by clicking twice with the mouse pointer over an existing
LU Alias.
The definition of LU Alias can vary, depending on the type of destination that is selected.
Microsoft NT SNA Server LU Alias
The LU Alias field my either be a specific LU name, a name of a pool of LU’s or may by a so
called “Wild LU”. Specific LU’s and LU pool names are the same names as those created with
the Microsoft NT SNA Server Manager program.
A “Wild LU” is selected by entering a single ‘*’ character in the LU Alias field. When a “Wild LU”
is selected, the BLUES software will query the SNA Server before it selects which LU to attempt
to connect to. Due to how the Microsoft NT SNA Server Manager gives permissions to users or
groups of users, the “Wild LU” can be used to insure that whomever is signed on to Windows will
connect to their LU or LU pool. In Addition, if an NT SNA Server LU name is changed or a NT
SNA Server user gets assigned to a different group by the Microsoft NT SNA Server
Manager, then the BLUES software will automatically connect to the right LU without
having to be configured.
When the “Wild LU” has been configured, the session selects which LU to use by first getting a
list of LU’s from the NT SNA Server that are assigned to the user currently signed on to the
Workstation. Each BLUES session will then select the LU from the list based on it’s order.
Display sessions are always first. If you had 2 terminal and 1 printer sessions configured in the
BLUES, then the first session would connect to the first terminal session in the list and the
second display session would connect to the second terminal session. The printer session would
connect to the first printer session in the list.
BLUES Connection LU Alias
BLUES User Manual………………………………Page:69
NEWHART SYSTEMS INC.
_______________________________________________
This name uniquely identifies an LU associated with a BLUES connection or may be a single ‘*’
to indicate a pooled LU. Only display sessions may be pooled LU’s.
An LU Alias may also be assigned to a session by configuring a BLUES connection and selecting
the LU Assignments tab.
Netware SAA or IBM Comm. Server LU Alias
If you are using Netware For SAA or IBM Communications Server, this is the name of the logical
unit defined in the gateway. A single ‘*’ indicates that you don’t care which LU to connect to. In
this case the first available LU is acquired when the session attempts to connect to the server.
When configuring the server, groups of LU’s can be given a “pool” name. When pooling is being
used, the LU POOL field contains the name of the pool to select an LU from.
When configuring Netware SAA and IBM Communications Server sessions, three major settings
determine which LU will be acquired: (1) Server Name or IP Address, (2) Link name, and (3) LU
name or LU pool name. Server permissions are also required for the specified LU to be
successfully acquired.
You must press the Advanced button and configure more Netware For SAA or IBM
Communications Server options to properly configure the LU session.
TN3270E LU Alias
The LU Alias in the TN3270 environment only has meaning if your TN3270 server supports
TN3270E. If your TN3270 Server supports TN3270E, then the LU Alias field is used during the
connection process to either associate a printer with a display session, or to specify a specific LU
or LU pool to use. As part of the TN3270E connection negoation process the LU Alias may be
used as the “Device-Type”.
You may select to not use the LU Alias, or Associate the LU Alias name with a printer session, or
use the LU Alias as a specific name or pool name by selecting how to use the LU Alias from the
list box under the Advanced options.
TN3270, TN5250 and DEC IP Address Or Host Name
BLUES User Manual………………………………Page:70
NEWHART SYSTEMS INC.
_______________________________________________
The IP Address or Host Name field lets you enter either a well formed TCPIP address or enter a
symbolic name. This field must contain the TCPIP address or name of a TN3270 Server,
TN5250 Server, TCPIP host, or AS400. Well formed IP Addresses are in the form a.b.c.d, where
the letters a,b,c, and d are decimal numbers between 0 and 255.
If you have already configured other LU’s for TCPIP, then you may use the Browse button to
select any address or name that you have already configured.
The Telnet Port may be changed from the default of 23 to some other value. The telnet port
must match the port you have configured at the TN3270 Server, TN5250 Server, TCPIP host, or
AS400.
Enable Keep-Alives
Keep-alive messages are packets that are sent and received to verify that a connection is still in
place. They add network traffic and may slow down the network as a whole. If keep-alives are
not enabled then the terminal or printer session may not become aware of loss in
communications until the next time a transmission is attempted.
Security Options
Security options enable the secure socket layer, which is know as SSL. SSL has become the
industry standard for providing security over TCP/IP connections. This feature is available when
connecting Blues through TN3270, TN5250, and DEC VT emulation. The host or server must
also support SSL Version 3 for security to function properly. When a Blues session connects
over SSL, the encryption method (cipher suite), server certificate (if any), and client certificate (if
any) are exchanged. The certificates are used by the server and the Blues session to verify that
the other party is not being impersonated.
When a Blues terminal or printer session is sending and receiving secure data, a small lock
symbol is displayed on the window status bar. When the operator double clicks on this lock
symbol, the details of the SSL connection will be displayed.
Conect Using Secure Socket Layer (SSL V3)
This checkbox should be checked to enable SSL. This option is only available if the version of
Blues contains the SSL software. If this option is not checked, then the SSL handshake is not
attempted and data transferred between Blues and the host is not encrypted.
BLUES User Manual………………………………Page:71
NEWHART SYSTEMS INC.
_______________________________________________
Verify server certificate
This option determines if the Blues session should attempt to verify the server certificate that it
received during the SSL handshake sequence. If this option is selected and the server certificate
fails to verify, a window displaying the cause and the certificate information will be displayed.
Send client certificate to server
Each Blues session can be configured to send an SSL certificate to the server during the SSL
handshake sequence. Certificate files must be copied or installed into the Blues software folder
before they may be selected for transmission. Certificate files must be in the Binary DER data
format. Servers typically provide a key utility that creates certificates and exports the certificate to
a DER file. Once the certificate has been exported, it must be copied into the Blues software
folder. Only certificate files that end with the ".der” file extention will be available to select.
The “Client Certificate” entry may be used to select any .der certificate file located in the Blues
software folder.
SLP Load Balancing
SLP load balancing my be used to locate Telnet servers belonging to a particular pool of LU’s
and connect to the least used server. When SLP Load Balancing is enabled, the TN3270 IP
address and port number are obtained dynamically during the connection process. The SLP
protocol is defined in the ISO RFC 2165 specification named “Service Location Protocol”. The
specific SLP definition for 3270 use is defined in the ISO specification named “TN3270E Service
Location and Session Balancing”.
When a Telnet server that supports SLP is configured, options exist for (1) a scope name, and
(2) one or more LU pool names. Scope names are optional, and if they exist, allow LU pool
names to be grouped. Each Scope may be comprised of 1 or more LU pool’s. Scopes are
typically used to separate LU pools by the same name that are located at different physical
locations and thus allow emulators to connect to LU’s that belong to a specific (scope) physical
location(s).
The DA Discovery time-out value is used to control how long a BLUES session will wait to
discover Directory Agents (DA’s) in a network. The discovery request is a multicast, and the
amount of time required to gather all DA responses vary depending on many factors. If there are
no DA’s in the network, this time-out value can be set to zero to indicate that no DA discovery is
BLUES User Manual………………………………Page:72
NEWHART SYSTEMS INC.
_______________________________________________
to be done. The time-out is expressed in milliseconds (1/1000 second). The default value is 100
or one tenth of a second. If Telnet servers are located over a wide area network (WAN), then this
value should be increased to accommodate the time required to receive responded over the
WAN.
The SA Multicast time-out value is used to control how long a BLUES session must wait to
discover the particular load on each server in a network without at least one DA that supports the
scope of the request. In this situation, these requests are multicast a BLUES session waits the
time-out value to gather the multiple responses that are returned. The time-out is expressed in
milliseconds (1/1000 second). The default value is 100 or one tenth of a second. If Telnet
servers are located over a wide area network (WAN), then this value should be increased to
accommodate the time required to receive responded over the WAN.
TN5250 Session Settings
AS/400 User Name And Password Options
This option determines if BLUES should encrypt the AS/400 user name and password. When
this option is selected, BLUES will encrypt the AS/400 user name and password before sending it
to the AS/400. If the AS/400 accepts the encrypted user name and password, the initial signon
screen is bypassed and the main start up screen is displayed.
BLUES User Manual………………………………Page:73
NEWHART SYSTEMS INC.
_______________________________________________
You may choose to not send the encrypted user name, in which case the AS/400 will be the first
screen displayed by the AS/400. When more than one session have been configured to connect
to the same IP address or DNS name, you may either choose to always prompt for the AS/400
user name and password, or you may choose to have BLUES only prompt for the user name and
password from the first session that attempts to connect, subsequent AS/400 connections will
use the same user name and password.
AS/400 Device Options
The device options determine which device on the AS/400 that BLUES will connect to. If the
device does not exist, it is automatically created on the AS/400 (providing permission has been
granted by the AS/400 administrator). Optionally, if a specific device is in use by another user,
BLUES can be configured to add 1 to the device name and try to connect to a new device name.
The session will keep adding 1 to the device name until the device name ends in 999 or until the
connect succeeds.
The “Current Library”, “Initial Menu”, and “Pgm. To Start” options may be selected to cause the
AS/400 to configure the device name with these options. See the appropriate AS/400
documentation for details on the meanings of these fields.
Printer sessions may be configured for the AS/400 Message Queue name and the AS/400
Message Queue Library. See the appropriate AS/400 documentation for details on the meanings
of these fields.
Line Printer Deamon Configuration
BLUES User Manual………………………………Page:74
NEWHART SYSTEMS INC.
_______________________________________________
Accept print jobs from any IP address or host name
This option is used to indicate if the printer session should accept print jobs from only a specific
host or accept print jobs from any host. When selected, any print job sent to the PCs printer
queue name (see ??? below) will be printed by the session. If this option is not selected, then the
printer session will only print requests from a specific IP address or host name. The IP address
or host name may be entered when this option is not selected. The IP Address or Host Name
field lets you enter either a well formed TCPIP address or enter a symbolic name. This field must
contain the TCPIP address or name of a Line Printer Requester (LPR), TCPIP host, or AS400.
Well formed IP Addresses are in the form a.b.c.d, where the letters a,b,c, and d are decimal
numbers between 0 and 255.
LPD Printer Identification
The identification parameters must uniquely identify the printer to any line printer requester (LPR)
that may want to print to it. Each printer session may be configured to receive print jobs
addressed to any printer queue name, or it may be configured to only accept print jobs for a
specific printer queue name. By configuring multiple BLUES LPD printer sessions, each one
having a different printer queue name or specific IP, you can determine which print jobs are
printed by which BLUES printer session.
BLUES User Manual………………………………Page:75
NEWHART SYSTEMS INC.
_______________________________________________
A BLUES LPD printer session can accept either the SCS datastream (from IBM
mainframe/midrange) or the binary ASCII datastream. Ascii data is sent directly to printer device
driver and is assumed to be print ready data which contains the necessary printer escape codes
to drive the printer. Jobs printed with SCS type, are translated from the EBCDIC code set to the
Ansi code set as described under the ANSI/EBCDIC Translate Table section of this manual.
When printing from an AS/400 host, it is best to configure the SCS datastream and specify the
following options in the sndtcpsplf AS/400 print command:
desttyp (*other)
transform (*no)
prtq (*queue name) - put in the name of the configured printer queue name.
rmtsys (*pcip) - replace with the remote PC name where BLUES printer is.
For more information on using the AS/400 sndtcpsplf consult IBM document sc-41-9875
(Transmission Control Protocol/Internet Protocol Guide).
The LPD port defines which TCP/IP port the BLUES line printer deamon will use. The line printer
deamon will constantly monitor this port, receiving any print job that may be sent to the port. The
standard LPD port is 515. If your host LPR configuration does not let you configure the LPD port,
then it will use port 515.
The trace feature may be activated for problem resolution, should one be encountered. When
this feature is activated, a trace file called “Port515.trc” (assuming the LPD port is 515) is
produced in the BLUES private folder. Trace files and problem reports may then be emailed to
us for problem resolution.
BLUES User Manual………………………………Page:76
NEWHART SYSTEMS INC.
_______________________________________________
DEC VT Advanced Options
The IP Address or Host Name field lets you enter either a well formed TCPIP address or enter a
symbolic name. This field must contain the TCPIP address or name of a telnet Server. Well
formed IP Addresses are in the form a.b.c.d, where the letters a,b,c, and d are decimal numbers
between 0 and 255.
If you have already configured other LU’s for TCPIP, then you may use the Browse button to
select any address or name that you have already configured.
The Telnet Port may be changed from the default of 23 to some other value. The telnet port
must match the port you have configured at the telnet Server.
VT Terminal Type
This option determines the model of DEC terminal emulation that the session will emulate. This
setting should match the TERMTYPE environment variable on the telnet server so that the VT
functions keys will function properly. Blues will notify the telnet server of this terminal type by
BLUES User Manual………………………………Page:77
NEWHART SYSTEMS INC.
_______________________________________________
sending the following strings to the server as part of the initial connection to the server: “VT-52”,
“VT-100”, and “VT-220”.
Auto Wrap
When this option is enabled, any text received that extends past the end of a line will wrapped to
the beginning of the next line.
Local Echo
When this option is selected, all keyboard entry is not only sent to the telnet server, it is also
echoed back to the terminal.
Send Return As CRLF
The return key may be configured to generate either a carriage return or a carriage return and
line feed character. When this option is selected, the return key will send a carriage return and a
line feed to the telnet server.
Send Backspace as DEL Key
The backspace key may be configured to either send the backspace code or the delete code to
the telnet server. When this option is selected and the backspace key is pressed, a delete code
is sent to the telnet server. When this option is selected, it usually causes the backspace key to
act destructively and erase the character located at the cursor location.
Do Not Allow Connection Parameter Changes
When this option is selected, the connection parameters may not be altered from either the
terminal or printer session window. This option lets an administrator lock a particular session’s
connection options so that the Blues user may not modify them.
Automatically Connect When Session is Started
Specifies whether or not this session should automatically establish connection to the host upon
being started.
Automatically connect to next destination without prompting
BLUES User Manual………………………………Page:78
NEWHART SYSTEMS INC.
_______________________________________________
This option may be used to have a session automatically try to connect to another destination
whenever a connection can not be established. If no other destination is configured, then the
session will try to connect to the primary destination again after a failed connection attempt. If
this option is not selected and a connection attempt fails, then the session will prompt the user for
the connection options before a connection attempt is done.
Connect to next destination after x seconds of PU inactivity
This option may be used to cause the session to disconnect and then reconnect to the next
destination (if one exists) or back to the primary destination when the session detects that the
physical unit that is it connected to is not active. A link failure on a server may cause a session to
become unusable. When this happens, it may be possible to connect to another server to gain
access to the host.
This option is also useful when using the Microsoft SNA Server with LU pooling and load
balancing. When more than one PU connection is configured in an SNA Server that is also using
LU pooling, then this option may be used to disconnect from the LU pool when the PU is inactive
(link failure), then reconnect to the same LU pool to gain host access. The SNA Server will
connect the session to the PU that is active and not to the one that is inactive.
Pause before next destination x seconds
This option is only valid when the “Automatically connect to next destination without prompting”
option is selected. This option determines how many seconds to wait before either trying to
connect to the primary destination or the next destination following a connection failure.
Try to complete the destination list x times
This option is only valid when the “Automatically connect to next destination without prompting”
option is selected. It determines how many time to try to connect to the host before giving up the
connection attempt. When this value is set to zero, then the session will continually try to connect
to a destination.
Edit Destination
The Edit button will let you configure the necessary options required for the session to connect to
a gateway. Depending on what type of connection you have specified, you will be prompted with
BLUES User Manual………………………………Page:79
NEWHART SYSTEMS INC.
_______________________________________________
the appropriate set of connection options. The following sections contain all possible advanced
options:
Connection Name
Specifies the name of the communications gateway as installed on your network. (Multiple
gateways may be installed on your network.) If you are using a NSI BLUES 2000 connection,
then select the same name that you configured for the host connection name. If you are using a
Harris or Lanier gateway, then enter the workgroup name here (usually SUPERNET). If you are
using Netware For SAA as the gateway type, then this is the name of the Novel file server where
the Netware For SAA is located. You may use the BROWSE button to look for Newhart Systems
Inc. and Novel types of gateways.
PU Name
This field is available when you have selected to connect to an Eicon Technology connection
type. This field is required and must match the name of a Eicon Technology “NODE NAME”.
This name will by assigned with the “ecsna config” Eicon configuration utility. For more details
you should consult your Eicon Technology manuals.
Port Number
This field is available when you have selected to connect to an Eicon Technology connection
type. This field is required and must match the port number assigned with the “eccard config”
utility. For more details you should consult your Eicon Technology manuals.
LU Address
This feature is only valid if you selected a BLUES connection or an Eicon Gateway connection
type. You may select either a dedicated Logical unit address or select pooled if you wish to
connect to a pool of lu's. By pressing the FIRST and NEXT buttons the Manager (BLUES
Connection Type ONLY) will automatically obtain either the first or next available logical unit
address that is not currently configured.
Link Name
BLUES User Manual………………………………Page:80
NEWHART SYSTEMS INC.
_______________________________________________
When connecting to Netware SAA or IBM Communications Server, this is the name of the link (or
Pyhsical Unit) configured at the server. You may either specify a specific link name or select to
use any available link name. When the “any available link” option is selected, BLUES will query
the SAA server for the name of a valid link to connect to.
LU Group
This option is only available if you selected Netware For SAA. If you are using POOLED LU's,
then enter the name of LU POOL that you defined with the Netware CSCON program. If you
leave this field blank, then no POOLING will be used when you connect to the SAA gateway.
Use Lu Group To Load Balance
This option is only available if you have selected Netware For SAA. Netware for SAA’s load
balancing option lets you assign logical unit host sessions to groups, these groups are called
pools. Pools may be scattered over many different SAA servers and over many different service
agents in these servers. The BLUES emulation software lets you take full advantage of the load
balancing features of SAA. You must be using Netware For SAA 2.0 or above, if you are not,
then DO NOT SELECT this option.
IMPORTANT - When using load balancing, the connection name and service agent name
fields are very important. If you want to load balance over all SAA servers then enter the
character “*” (asterisk) in the connection name field, if you want to load balance to a
specific SAA server ONLY, then enter the name of that SAA server in the connection name
field. If you want to load balance over all service agents associated with the connection
name field you selected, then enter the character “*” (asterisk) in the service agent name
field, if you want to load balance over a specific service agent name over the selected
connection name, then enter the name of that service agent in the service agent name
field.
SAA Logon Name
This option is only available if you selected Netware For SAA. This is the valid logon name you
are assigned at the Novel file server. This option is not required and is ignored, if the “Use
Current User Name/Password” option has been selected.
SAA Password
BLUES User Manual………………………………Page:81
NEWHART SYSTEMS INC.
_______________________________________________
This option is only available if you selected Netware For SAA. This is the valid password name
you are assigned at the Novel file server. This option is not required and is ignored, if the
“Use Current User Name/Password” option has been selected.
Use Current Name/Password
This feature lets you use your already active Netware user name and password when connecting
to the Netware For SAA gateway.
BLUES User Manual………………………………Page:82
NEWHART SYSTEMS INC.
_______________________________________________
Configure Session File Tab
This is the main dialog for configuring a Display session. The following sections describe each
option in detail.
Save Settings On Session Close
This option may be enabled or disabled by selecting it. If it is enabled, then when close is
selected, all current settings are saved in the profile.
BLUES User Manual………………………………Page:83
NEWHART SYSTEMS INC.
_______________________________________________
Enable Printer Output
This feature lets you turn on and off printer output whenever a print function is done. If the printer
is enabled, then this menu item will be checked.
Use Windows Default Printer
If this option is selected, the session will determine which printer to use by getting the name of
the default Windows printer from the Windows operating system.
Printer Selection
This allows you to select any printer currently installed as the print output device.
Print Font Option
This button allows you to select ant font that may be used to print to the currently selected printer.
You should always select the printer before selecting the printer font.
Enable Print To Disk Option
This feature lets you turn on and off output to a disk file whenever a print functions is done. If the
print to disk feature is enabled, then this item will be checked.
Print To Disk File Option
This lets you select the name of the next print to disk file. If the “Append To File” option has not
been selected, then each time a print to disk is done the name of the file is incremented by 1. i.e.
print0001.dat will be incremented to print0002.dat. Each local print function will cause a new disk
file to be created.
Append To Disk File
BLUES User Manual………………………………Page:84
NEWHART SYSTEMS INC.
_______________________________________________
This lets you select if a new file will be created each time a local print is done to a disk file. When
this feature is selected, the local print data is appended to the currently selected print file name.
If this feature is not selected, then a new file is created each time a local print is done.
BLUES User Manual………………………………Page:85
NEWHART SYSTEMS INC.
_______________________________________________
Configure Session View Tab
The view tab allows the configuration of the options that control how the session window is
viewed. These options include what font to use, the initial size of the window, and the host color
mapping. The following section describe each option.
Start As
BLUES User Manual………………………………Page:86
NEWHART SYSTEMS INC.
_______________________________________________
Allows you to select the initial size of the session window. If you select the hidden option, then
the display session will not be visible to the operator. The hidden option may be useful when you
are using a programming interface and you do not want the operator to see the display session
directly.
Cursor
This option lets you select the type of cursor that the session will display. You may select block,
single underline, double underline, and cross hair. The cross hair cursor will be displayed as two
lines, one vertical and one horizontal, intersecting at the cursor location.
Enable Hot Spots
Specifies whether to automatically detect hot spots. Hot spots are words on the display session
such as enter or pf1. When the mouse pointer is placed over these words, the operator may
press the left mouse button to perform the action. This option may also be further configured
from the display session window.
Hot Spots Are Delimited By Spaces
This option is used to determine if hot spots are detected inside other words. When this option is
selected, a hot spot must be separated by either spaces or nulls.
Macro Names Act As Hot Spots
This option determines if the names of previously recorded macros will act as hot spots.
Numbers Act As Hot Spots
This option determines if numbers on the host screen are to be considered as hot spots for the
PF keys. This means that the number 1 would be a hot spot for the PF1 key.
BLUES User Manual………………………………Page:87
NEWHART SYSTEMS INC.
_______________________________________________
Customize Toolbar…
Each session may be configured to display a toolbar. To add a button, simply select the button
from the “Available Available” list and press the Add button. To remove a button, simply select
the button from the “Tools Configured” list and press the Remove button.
Customize Keypad…
This option lets you decide what push buttons will be placed on each row of the keypad. By
selecting the tab associated with the row you can display what if any buttons are currently
assigned to that row of push buttons. You can add buttons to a row by selecting them from the
available buttons list box and pressing the Add button. You can remove buttons from the row by
selecting the them from the configured buttons list box and pressing the delete button.
Use True Type Font
If this option is selected, the display will use the true type fonts installed by windows to display the
host screen. If this option is not selected, then the host screen will be displayed using the
BLUES fonts.
Adjust Font Size To Window Size
This option specifies that the display session should automatically select the best size font based
on the size of the window. When this option has been selected, if the window size is changed,
the display session will attempt to get the best font size for the window size. If the font size does
not match the exact size required, then the display window will be sized to match the font.
Display In Upper Case
When this option has been selected, the host screen will be displayed in upper case. The host
screen image is still maintained by the emulator in both upper and lower case, however, the
screen is displayed in upper case only. This option is useful when using small window sizes.
Select Font
BLUES User Manual………………………………Page:88
NEWHART SYSTEMS INC.
_______________________________________________
This option will display the standard Windows font selection dialog if you have selected to use
True Type fonts. If you have selected not to use true type fonts, then a dialog will be displayed
that lets you select any of the BLUES fonts.
Enable Titlebar
The Titlebar is located at the top of each session window. It has a customizable text message
that identifies the session. If you do not want it to display, then turn off this feature. The default
value is enabled.
Enable Menubar
The Menubar is located at the top of each session window. It contains the session’s menu
selections. If you do not want it to display, then turn off this feature. The default value is
enabled.
Enable Toolbar
This checkbox lets you decide whether or not you want the session to have a tool bar. The tool
bar lets you perform the most used functions with a mouse.
Enable Statusbar
This checkbox lets you decide whether or not you want the session to have a status bar. The
status bar is display at the bottom of the window. It displays status information.
BLUES User Manual………………………………Page:89
NEWHART SYSTEMS INC.
_______________________________________________
Configure Session Colors
How To Use The Color Dropper
The Color Dialog lets you customize display session colors. The Colors dialog allows you to drag
and drop colors onto any of the host colors as well as the operator information area. You may
use the left mouse button to drag a foreground color onto any host color. You may use the right
mouse button to drag a background color onto any host color. By pressing the reset button you
may reset the color mapping back to the default IBM colors.
BLUES User Manual………………………………Page:90
NEWHART SYSTEMS INC.
_______________________________________________
Mouse Configuration Options
Mouse configuration assigns functionality to both the left and right mouse buttons.
Configuring The Mouse Buttons
Both the left and right mouse buttons may be configured to act as function keys, clipboard
functions, or may trigger a macro to be run. By selecting the desired function for each mouse
button you are assigning that function to the mouse.
BLUES User Manual………………………………Page:91
NEWHART SYSTEMS INC.
_______________________________________________
BLUES User Manual………………………………Page:92
NEWHART SYSTEMS INC.
_______________________________________________
Macro Configuration
For details on the macro configuration options see the Display Session section of this document.
BLUES User Manual………………………………Page:93
NEWHART SYSTEMS INC.
_______________________________________________
API Options
A variety of Application Programming Interface options are available under the API dialog. Each
option is defined below:
Short Name
BLUES User Manual………………………………Page:94
NEWHART SYSTEMS INC.
_______________________________________________
The SHORT NAME field lets you select the EHLLAPI or HLLAPI presentation space short name.
This field uniquely identifies the session to a API program using HLLAPI.
Automatically Connect To Gateway On HLLAPI Connect
This option lets you select to have the session connect to the host (if not already connected)
when the HLLAPI CONNECT PS function is performed.
Automatically Start MS-DOS HLLAPI Redirector
This option should be used when an MS-DOS application wants to use a session through the
HLLAPI programming interface. If this option is selected, then the session will automatically start
the HLLAPI redirector ICON (if it is not already started) so that MS-DOS programs can use
HLLAPI.
Disconnect From Gateway After HLLAPI DISCONNECT
This option lets you select to have the session disconnect from the gateway whenever a HLLAPI
DISCONNECT PS command is performed.
Start Session On CONNECT PS
This option lets you start the session from your HLLAPI program. If selected, once the first
HLLAPI CONNECT PS command is done, the session is started (if not already started).
Close Session After HLLAPI DISCONNECT
This option lets you automatically stop a session when a HLLAPI DISCONNECT PS function is
done.
DDE SERVER NAME
This option lets you change the name of the DDE server that the session is known as. Normally
this field is the name of the display session's program file. For more details on the DDE server
name, see the DDE section of this manual.
BLUES User Manual………………………………Page:95
NEWHART SYSTEMS INC.
_______________________________________________
CR/LF AT END OF LINE
This option indicates that the session should add a carriage return and line feed characters to the
end of each line that is copies to the clipboard and to each line that is given to a DDE client.
Replace Spaces Between Words With A Tab
This option indicates that the session should remove spaces between words and add a TAB
character for the removed spaces when copying to the clipboard or to a DDE client. This option
should be used if you want to copy columns of information onto Microsoft Excel.
Remove Leading Spaces On Each Line
This option indicates that the session should remove all leading spaces from each line that is
copies to the clipboard and to a DDE client.
Remove Trailing Spaces On Each Line
This option indicates that the session should remove all ending spaces from each line that is
copies to the clipboard and to a DDE client.
Copy Operator Information Too
This option lets you copy the operator information area line into the clipboard and also to pass
the operator information area to a DDE client. The whole operator information area is passed.
Paste In Columns
If this option is selected when a paste function is done, then each new line of text pasted into the
terminal session will be pasted in the column where the cursor was located when the paste was
performed.
BLUES User Manual………………………………Page:96
NEWHART SYSTEMS INC.
_______________________________________________
For example: If the cursor is in column 70 and a paste is done that contains 2 rows of text, then
both rows of text will start in row 70.
BLUES User Manual………………………………Page:97
NEWHART SYSTEMS INC.
_______________________________________________
Menus
This option lets the administrator restrict the use of any menu item by removing it from the
window’s menu bar. In addition, you may remove the complete menu bar, system menu, and title
bar from the window.
BLUES User Manual………………………………Page:98
NEWHART SYSTEMS INC.
_______________________________________________
How To Remove A Menu Item
To remove a menu item, select the tab where the menu item is located, then select the menu
item you want to remove.
How To Apply Menu Changes
After you have selected all of the menu’s that you want removed from the session, you may apply
these changes to other sessions. By pressing the Apply Menus... button you will be presented
with a dialog that lets you select what sessions to apply the menu changes to. You may select to
apply the changes to all sessions for the user you are currently configuring or you may apply the
changes to all sessions for all users.
Properties ...
This menu item lets you change the currently highlighted session. You may also double click the
mouse over the session on the main Manager menu to change a session. For details on each
option see the above section.
Delete Session...
This menu item will delete what ever session is currently highlighted on the main Manager menu.
You will be asked to verify if you really want to delete the session before it is deleted.
BLUES User Manual………………………………Page:99
NEWHART SYSTEMS INC.
_______________________________________________
Copy Session Settings…
This menu item is a powerful feature that lets the administrator take some or all session settings
and copy those settings to other configured users. To use this feature you must first select the
configured session that contains the settings that you want to copy to other users, then choose
the “Copy Session Settings…” menu item. The selected session is known as the source session.
The “What to copy” selection determines what settings will be copied from the source session.
One or more types of settings may be selected. The “Copy the complete session” checkbox may
be used to copy the whole source session to the designated configured user(s).
The “Who to copy” list contains a list of all configured users and user groups. One or more users
may be selected from the list. Only the selected configured users and user groups will be
affected by the copy operation.
The “Prompt before making a change” option lets the administrator decide whether or not to copy
the settings into each selected configured user’s session(s).
BLUES User Manual………………………………Page:100
NEWHART SYSTEMS INC.
_______________________________________________
If the “Changes affect same session only” option is selected, then only sessions of the same
number for each selected user are affected. For example: if SESSION1 (the first session) is the
source session, then only the first session of each selected user will be affected by the copy.
If the “Changes affect all sessions” is selected, then all of the selected configured user’s sessions
will be affected by the copy.
If “Create a new session” is selected, then a totally new session will be added to each selected
configured user or group of users. This option is a convenient method of adding a terminal or
printer session to a group of configured users.
The Connections Menu
The connections menu provides you with a set of functions used to manage host connections. If
you are using a third party gateway such as Netware For SAA, Microsoft NT SNA Server,
TN3270, TN5250, or IBM COMM. Server, then there is no need to configure any host
connections.
Host connections are known as physical units. You only need to configure host connections at
PCs that are going to directly connect to either a host or an upstream controller. Each user may
have up to 16 host connections.
The following sections are presented in the order that they appear in the connections menu.
BLUES User Manual………………………………Page:101
NEWHART SYSTEMS INC.
_______________________________________________
Add Host Connection...
Properties...
This dialog is used to configure a connection to a host. This connection is considered a physical
unit type 2 and has the same functionality as an IBM 3274 control unit. Host connections are
required only if you are using the DLC or X.25 protocols to connect to your host.
BLUES User Manual………………………………Page:102
NEWHART SYSTEMS INC.
_______________________________________________
The Connection Name
Specifies the 15 character name of the host connection. This is the name that 3270 display and
3270 printer sessions will connect to this host connection by. The name defaults to the users
name followed by the connection number. This name may be changed to anything you wish,
however, the name is case sensitive. This means that user0001:host1 is not the same as
USER0001:host1.
Sessions Connect Over TCP/IP
This feature lets you select how Blues display and printer sessions will connect to this
connection. If you choose to use TCP/IP, then you must configure an IP address and IP port that
are unique throughout your network. If the connection is only going to be used from the PC that
is being configured, then you do not need to enable TCP/IP. This option lets the Blues
connection act as a network gateway. PCs may connect over TCP/IP to the PC running the
connection to gain host access. If TCP/IP is enabled, then one or more display and printer
sessions must be configured as part of the connection. When a session connects over TCP/IP to
a Blues Connection, it has to be configured for (1) the Ip address where the connection is
running, (2) the IP port where the connection is running, (3) the Blues connection name, and (4)
an LU name that it wants to acquire.
The TCP/IP address can be either a DNS enabled name that can be obtained from Windows or
an IP address in the form a.b.c.d, where a b c and d are 3 digit numbers from 0 to 255. DNS
names are names like microsoft.com that are known throughout the network. If a DNS server is
not being used, the PC IP address can be determined from the control panel/network settings.
The TCP/IP port must be unique on the PC that the connection is started on. Available ports start
at 5000 and continue to 65534. If more than one Blues connection is going to be started at the
same time on the same PC and both be available over TCP/IP, then each must have a unique
TCP/IP port assigned to them.
Link Type
Select the method of connecting to the host computer. Such as X.25 over ISDN or token ring
DLC 802.2.
Node Id.
BLUES User Manual………………………………Page:103
NEWHART SYSTEMS INC.
_______________________________________________
This is the node id configured at the host computer. You need to check with your host
administrator to obtain this setting.
This feature is sometimes know as an XID or
blocknum/idnum.
Hide Icon
When selected, the connection icon is hidden from the operators view while the connection is
active.
Stop When Last Session Stopped
When selected, this makes the connection unload from Windows when ever the last session
detaches from it.
Launchable Connection
When selected, this feature allows the connection to be started by the "Launch BLUES" ICON.
The "Launch ICON" is a simple and fast way of starting a complex array of host terminal
sessions, host printer sessions, and host connections by selecting a single Windows Icon.
Advanced 802.2 Options
BLUES User Manual………………………………Page:104
NEWHART SYSTEMS INC.
_______________________________________________
This set of options define how to connect to either the upstream controller or to the front end
through an 802.2 type of physical link. The following sections discuss each option.
Remote Sap
Select The service access point of the front end or upstream controller. Obtain this from your host
administrator.
Remote Address
This is the 16 hexadecimal digits of the front end or the upstream controller. Obtain this from
your host administrator.
BLUES User Manual………………………………Page:105
NEWHART SYSTEMS INC.
_______________________________________________
Local Sap
Select the service access point for your connection. Each connection for a given user must use a
different local sap if they are to be used at the same time. The local sap must also be configured
in the front end or upstream controller.
Xmit/ Rcv Frame Sizes
This option selects the maximum LAN frame sizes associated with the connection.
options must also be configured in the front end or upstream controller.
These
Xmit/Rcv Window Sizes
Select the window sizes that are configured at the front end or upstream controller. The defaults
of 1 and 2 are typical defaults. Selecting larger sizes may improve performance if the front end or
upstream controller is also configured for the larger sizes. If the front end or upstream controller
is not configured for the larger sizes, then it will decrease performance.
Applying 802.2 Options To Other Connections
The Apply... button will display a second dialog box that will let you apply the current 808.2
parameters to other connections in the Database. You can further option the apply function to
either apply the 802.2 parameters to all connections or only to all connections of the same name.
This feature lets you modify 802.2 options of other connections. You may select to modify all
802.2 connections or just the connections by the same name.
BLUES User Manual………………………………Page:106
NEWHART SYSTEMS INC.
_______________________________________________
Lu Assignment...
This tab will display all 3270 display and printer sessions currently configured for this host
connection. From this dialog box you may assign LU’s to a pool, assign an LU to a specific user,
delete an LU that was assigned to a pool, delete a LU that was assigned to a specific user, and
change the settings associated with a specific LU.
Modify Lu...
This button will show the same dialog as does the menu item “Modify Session” from the main
Manager menu. This dialog will allow you to change many options associated with the session.
Assign Lu...
BLUES User Manual………………………………Page:107
NEWHART SYSTEMS INC.
_______________________________________________
This option will display a dialog box that will let you select a user to assign the LU to. You may
also add a new user by entering the new users name. You will also have to select the LU type as
being either a display session or a printer session.
BLUES User Manual………………………………Page:108
NEWHART SYSTEMS INC.
_______________________________________________
Netview Options
This dialog lets you configure Netview options.
NPDA Alerts
This feature lets you enable/disable host alert generation. If you enable it, then an operator may
send the host operator an alert from the 3270 display session. Also whenever the host
connection detects an abnormal event, it automatically generates an NPDA alert for Netview.
BLUES User Manual………………………………Page:109
NEWHART SYSTEMS INC.
_______________________________________________
Response Time Monitor
This option enables host retrieval of the response time monitor data. When selected, the host
may retrieve the statistics that the connection maintains for each session.
Trace
The tracing options enable or disable levels of tracing. When tracing is enabled, the connection
software traces data traffic between key software elements.
Levels Of Tracing
BLUES User Manual………………………………Page:110
NEWHART SYSTEMS INC.
_______________________________________________
The tracing enable/disable check boxes let you diagnose problems by viewing an ASCII file
named SNA.TRC. The file will be put into the users private directory. The trace file requires a
maximum of 5MB of disk space.
X.25 ISDN Advanced Options
X.25 Circuit Type
You must select the type of X.25 circuit that you are going to use. The options let you decide to
establish the X.25 circuit by placing a call, waiting for a call, or through a permanent virtual circuit.
The X.25 network administrator should be able to provide you with the information required for
X.25 configuration.
X.25 Called Address
BLUES User Manual………………………………Page:111
NEWHART SYSTEMS INC.
_______________________________________________
The Called Address is valid for switched types of circuits. When placing a call the called address
will be added to the X.25 call request packet. When waiting for an incoming call, the called
address will be matched with the called address field of the incoming call request to determine
which physical unit the call request is for. This field is entered in hexadecimal notation.
X.25 Calling Address
The calling address is only valid for switched outgoing circuit type. It is placed in the call request
packet. This field is entered in hexadecimal notation.
X.25 Facilities
The facilities field allows you to enter hexadecimal fields corresponding to extra facilities that may
be required by your x.25 network. All facilities must be entered in hex format. For a detailed list
of all possible facilities, consult your X25 network administrator.
X.25 Channel Numbers
Two types of X.25 channel numbers may be configured, (1) the PVC channel, and (2) the SVC
channel(s). When the circuit type of permanent has been selected, then the exact channel
number must be configured under the PVC channel number that matches the network
configuration assigned by the telephone company. When the circuit type is switched, then the
lowest and highest channel numbers must be configured. If a switched out circuit is selected,
then the lowest and highest outgoing channels are configured. If a switched in circuit is selected,
then the lowest and highest incoming channels are configured.
Terminal Endpoint Id
This field assigns a specific X.25 “number” to the Blues connection that is known as the TEI. The
TEI must match the configured number at the host. The valid range of TEI values is from 1 to 63.
X.25 Window Sizes
BLUES User Manual………………………………Page:112
NEWHART SYSTEMS INC.
_______________________________________________
The LAPD and receive windows sizes are used during data transmission to determine how many
packets may be sent and received without being acknowledged. When the window size is
reached, no more packets may be transmitted until an acknowledgment is received. The window
sized must be configured the same on both ends of the X.25 network to ensure adequate
throughput and proper network error recovery.
X.25 Packet Size
The packet size determines the largest packet that can be sent or received over the X.25
connection. SNA request/response units are broken down into X.25 packets no larger than the
configured size. This option must match the X.25 network or else X.25 circuits will be abruptly
broked whenever a packet exceeding the maximum network packet size is transmitted.
ISDN Adapter Options
The adapter numbers start at one. If there is more than one ISDN hardware adapter in the PC,
then each adapter will be assigned a unique number as part of the adapters installation process.
When more than one adapter is installed, insure that the Blues connection has the desired
hardware adapter number selected. The channel may either be the D channel or the B channel.
The Channel must match your X.25 network configuration.
Automatically Recover Lost Circuit
This option lets you determine what will happen when the X.25 circuit has been lost. If you select
it, then the software will automatically attempt to recover the circuit and thus re-activate the
physical unit and all logical units. It is also possible to re-activate the circuit through the “X.25
Link Status” menu item of a terminal session.
Call Request Retry Counter
This option is only available for the switched outgoing type of circuit. It determines how many call
request failures will occur before the software gives up attempting to establish the circuit.
BLUES User Manual………………………………Page:113
NEWHART SYSTEMS INC.
_______________________________________________
Wait Between X.25 Call Requests
This option lets you select the time between a call request failure and the time when another call
request will be attempted.
Delete Host Connection...
This menu item will let you delete a specific host connection from the BLUES database. You
must first select the host connection by highlighting it on the main menu. After selecting this
feature you will asked to verify that you want to delete the connection.
BLUES User Manual………………………………Page:114
NEWHART SYSTEMS INC.
_______________________________________________
Copy Connection Settings
This menu item is a powerful feature that lets the administrator take some or all connection
settings and copy those settings to other configured users. To use this feature you must first
select the configured connection that contains the settings that you want to copy to other users,
then choose the “Copy Connection Settings…” menu item. The selected connection is known as
the source connection.
The “What to copy” selection determines what settings will be copied from the source connection.
One or more types of settings may be selected. The “Copy the complete connection” checkbox
may be used to copy the whole source connection to the designated configured user(s).
The “Who to copy” list contains a list of all configured users and user groups. One or more users
may be selected from the list. Only the selected configured users and user groups will be
affected by the copy operation.
The “Prompt before making a change” option lets the administrator decide whether or not to copy
the settings into each selected configured user’s connection(s).
BLUES User Manual………………………………Page:115
NEWHART SYSTEMS INC.
_______________________________________________
If the “Changes affect same connection only” option is selected, then only connections of the
same number for each selected user are affected. For example: if the first connection is the
source connection, then only the first connection of each selected user will be affected by the
copy.
If the “Changes affect all connections” is selected, then all of the selected configured user’s
connections will be affected by the copy.
If “Create a new connection” is selected, then a totally new connection will be added to each
selected configured user or group of users. This option is a convenient method of adding a
connection to a group of configured users.
The View Menu
BLUES User Manual………………………………Page:116
NEWHART SYSTEMS INC.
_______________________________________________
The view menu may be used to show or hide the toolbar, the menu bar, the SNA Server resource
view, the TCPIP resource view, and the DLC resource view.
View Microsoft NT SNA Server Resources
When this item has been selected, a new list of information is displayed in the Managers main
window. This list displays all of the Microsoft NT SNA Server LU’s that are currently configured in
the BLUES database, and which user(s) have them configured. This option gives the
administrator another way to view the BLUES database and is useful in managing which
configured users are using which SNA Server resources.
View TCPIP Resources
When this item has been selected, a new list of information is displayed in the Managers main
window. This list displays all of the BLUES sessions that are currently configured for TN3270 or
TN5250, and which user(s) have them configured. This option gives the administrator another
way to view the BLUES database and is useful in managing which configured users are using
which TCPIP resources.
View DLC Resources
When this item has been selected, a new list of information is displayed in the Managers main
window. This list displays all of the BLUES connections that are currently configured for DLC,
and which user(s) have them configured. This option gives the administrator another way to view
the BLUES database and is useful in managing which configured users are using which DLC
resources.
Concurrent Administrator Operation
The administrator program can be used from any PC on a local area network. The Database is
automatically locked and unlocked when necessary to avoid concurrency issues.
BLUES User Manual………………………………Page:117
NEWHART SYSTEMS INC.
_______________________________________________
Using Host Connections
Each host connection that is configured causes a host connection shortcut to be created as part
of the Create Desktop Menu Shortcut(s) function in the Manager Program. Each host connection
icon represents a connection to a host computer. You may want to move the host icon(s) to the
windows StartUp group if you want the host connection to automatically be started when windows
is started. Or you may want to start it yourself whenever you want to use it. After a host
connection has been started, you may visually see if it is actively connected to the host by
viewing it's minimized icon. If the taskbar ICON has the blue ball moving, then the PU is
connected to the host. If the blue ball is not moving, then the PU is not connected to the host.
If you NOT have configured the host connection for “Sessions Connect Over TCP/IP” then
the host connection will be started automatically by the first display or printer session that
is configured to use it.
Stopping A Connection
To stop an active host connection, find the connection on the Windows task bar and right mouse
click over the icon. Then select the Close command from the popup menu. If any sessions are
connected you will be prompted to insure that you want to terminate the connection. This will
disconnect it from the host computer and free all resources that it acquired. If there was any
sessions connected to the host connection, then you will be asked to verify that you want to stop
the connection.
If you have selected to stop the host connection whenever the last session has terminated (see
configuring host connections), then the host connection will automatically terminate when you
stop all display and printer sessions that have previously used the connection.
BLUES User Manual………………………………Page:118
NEWHART SYSTEMS INC.
_______________________________________________
Display Emulation
Starting Emulation
You have three choices for how to start the BLUES 2000 Display application:
(1) Each BLUES 2000 display session has an icon in the BLUES 2000 user group. The icons for
these sessions appear with labels SESSION1, SESSION2, SESSION3, ... To start a display
session, simply select its icon from the BLUES 2000 group display as you would for any other
Windows application.
(2) Any session can be automatically started at Windows startup time by using the StartUp
Group feature of Windows. As for any other standard Windows application, use the mouse to
simply drag the icon for the session into the StartUp Group.
(3) You may start the session from the "Launch BLUES" icon. The Launch icon will start all
connections and sessions that are assigned to you PC (assuming you have not disabled the fast
start feature from the Manager program).
Basic Operation
You will find much similarity between operating the BLUES 2000 Display and other programs
under Windows. This is because these programs adhere to a Common User Access (CUA)
design, which is part of the Systems Application Architecture (SAA) standard. Special topics are
discussed, but it is beyond the scope of this manual to provide a complete tutorial on using
windows applications. Also, a basic familiarity with operating an IBM type terminal is assumed.
The Tool Bar
The tool bar is an area of the window that is right below the menu bar. The tool bar contains
buttons for the most used functions of host display emulation. All functions that are contained in
the tool bar are also contained in the menu bar. It is therefore not necessary to display the tool
bar. The Tool bar contains 6 groups of buttons, the 6 groups are for the File, Edit, Settings,
Macro, Gateway, and Help menu selections.
The tool bar contains buttons for the following
functions (from left to right in the picture above): local print function, send file to the host, receive
file from the host, copy to the clipboard, paste from the clipboard, edit the keyboard mapping, use
BLUES User Manual………………………………Page:119
NEWHART SYSTEMS INC.
_______________________________________________
true type fonts, configure host color mapping, configure mouse functions, record a macro, play a
macro, attach/detach from gateway, and help. For detailed use of each button on the tool bar see
the following sections under the appropriate menu item.
The Status Bar
The status bar is a small area located at the bottom of the window. The window contains help
information for all menu items. If you highlight a menu item, a small help text will appear in the
status bar for that menu item. Also the state of the num lock, caps lock, and scroll lock keys are
displayed on the status bar. The bar may be hidden or displayed as desired.
The Keypad
The keypad consists of 2 rows of push buttons located directly below the toolbar. Each row is
customizable. Each row may be eliminated or customized to contain any 3270 function key and
any previously recorded macro.
Function Keys
This product comes with specific keyboard mappings for various types of keyboards. The current
keyboard settings may be viewed by using the 'Keyboard Mapping' menu item. The keyboard
may be remapped as desired by using the "Keyboard Mapping" menu item, which is discussed
below.
BLUES User Manual………………………………Page:120
NEWHART SYSTEMS INC.
_______________________________________________
The File Menu
The File Menu
The File menu includes commands that enable you to modify your session profile, select a printer
device, perform local print functions, transfer files to and from the host computer,
activate/deactivate an EHLLAPI trace, and exit the BLUES 2000 Display application.
For more information, see the sections below which describe the following File menu commands:
Save Settings
Save the current profile now.
Save Settings on Close
Save all current settings when exiting.
BLUES User Manual………………………………Page:121
NEWHART SYSTEMS INC.
_______________________________________________
Enable Print To Printer
Use the printer for local print functions.
Print
Print screen.
Print Setup
Select the printer for local print functions.
Print Font
Select the font for local print functions.
Enable Print To Disk
When selected local prints will also we written to disk.
Disk File...
Select the next print disk file.
Append To File
Append to local print file.
Transfer Setup...
Customize File Transfer Parameters.
Upload File...
Send a file to the host.
Download File...
Receive a file from the host.
EHLLAPI Trace
Activate/deactivate EHLLAPI trace.
Exit
Exit program.
Exit And Stop All
Stop All active display and printer sessions.
Save Display Settings
This File menu command is used to store the current session profile. All the operational and
connection options currently in effect will automatically be re-activated next time the session is
started.
Save Settings On Close
This option may be enabled or disabled by selecting it. If it is enabled, then when close is
selected, all current settings are saved in the profile.
Enable (local) Print To Printer
This feature lets you turn on and off printer output whenever a print function is done. If the printer
is enabled, then this menu item will be checked.
BLUES User Manual………………………………Page:122
NEWHART SYSTEMS INC.
_______________________________________________
Print
This option does an IBM local print screen key function to the currently selected printer device, as
defined in Print Setup.
Print Setup
This option allows you to select any printer currently installed under Windows as the output
device, or you may select a disk file as the output device.
Print Font
This option allows you to select the font that will be used when a local print function is performed.
You should select a font that lets you print the entire host screen when you perform a local print.
Enable Print To Disk
This feature lets you turn on and off output to a disk file whenever a print functions is done. If the
print to disk feature is enabled, then this item will be checked.
Print To Disk File...
This menu item lets you select the name of the next print to disk file. If the “Append To File”
option has not been selected, then each time a print to disk is done the name of the file is
incremented by 1. i.e. print0001.dat will be incremented to print0002.dat. Each local print
function will cause a new disk file to be created.
Append To File
BLUES User Manual………………………………Page:123
NEWHART SYSTEMS INC.
_______________________________________________
This menu item lets you select if a new file will be created each time a local print is done to a disk
file. When this feature is selected, the local print data is appended to the currently selected print
file name. If this feature is not selected, then a new file is created each time a local print is done.
EHLLAPI Trace
This File menu command enables you to toggle the EHLLAPI trace option. Alternate clicks of the
mouse on the EHLLAPI trace menu item turn a check mark at the menu item on and off. When
the check mark is present, the EHLLAPI trace is active.
See the EHLLAPI section for a description of the industry standard EHLLAPI 'application program
interface' supported by the BLUES 2000 Display application. The EHLLAPI trace facility journals
all EHLLAPI command/response traffic between an application program and the display session
to a trace file. This trace may be useful for diagnostic purposes, or to facilitate application
program development.
When you activate the trace, a dialog box pops up so you may enter the name of a trace file that
you wish to be used to hold the journalized traffic. The default is ehllapi.trc in your BLUES 2000
Display install directory; but if you are working in a network with other BLUES 2000 Display
users, you probably want to use a distinct name for your trace file to prevent interference
between traces. In any case, if the file name you select exists, it will be re-created new, and old
data will be lost. The trace file is closed when you either deactivate the trace by clicking off the
check mark at the EHLLAPI Trace menu item, or you exit the BLUES 2000 Display application
(see Exit below).
The trace file is a standard ASCII file, and can be viewed using any standard PC file editor.
Exit Display Session
This File menu command allows you to exit the BLUES 2000 Display application, terminating the
Netbios session to the gateway if active.
Exit And Close All Sessions
BLUES User Manual………………………………Page:124
NEWHART SYSTEMS INC.
_______________________________________________
This file menu command lets you stop all display and printer sessions from one menu item
selection. All display and Printer sessions that are active on the associated PC are stopped.
The Edit Menu
The Edit menu includes commands that enable you to move text to and from the clipboard, to
delete text, and to undo a previous editing operation.
Cut
This Edit menu command copies the currently selected area of the emulation window to the
clipboard, and erases it from the emulation window, if the data is unprotected. See Mouse
Controls for how to select a portion of the screen.
BLUES User Manual………………………………Page:125
NEWHART SYSTEMS INC.
_______________________________________________
Copy
This Edit menu command copies the currently selected area of the emulation window to the
clipboard. See Mouse Controls for how to select a portion of the screen.
Append
This Edit menu command appends the currently selected area of the emulation window to the
clipboard. See Mouse Controls for how to select a portion of the screen.
Paste
This Edit menu command takes ANSII data only from the clipboard and enters it at the current
cursor location. If insert mode is active, then the data will be inserted just as if it were being
keyed in insert mode.
Select All
This Edit menu command selects the entire emulation window (not counting the status line) for
any subsequent Cut, Copy, or Clear functions.
Clear
This Edit menu command erases the selected portion of the emulation window without copying it
to the clipboard. Only unprotected data is cleared. See Mouse Controls for how to select a
portion of the screen.
View Clipboard
BLUES User Manual………………………………Page:126
NEWHART SYSTEMS INC.
_______________________________________________
This Edit menu command will display the windows clipboard.
BLUES User Manual………………………………Page:127
NEWHART SYSTEMS INC.
_______________________________________________
The View Menu
The View menu contains commands that determine how the host session is viewed. After
changing any of these options, it is best to perform a save settings function so that your changes
are recorded.
Fonts…
This Settings menu command activates a dialog box that allows you to specify a specific font to
use. There are two different dialogs that may be displayed. One for true type fonts and one for
BLUES fonts. If the USE TRUE TYPE setting is activated, then the standard windows font
selection dialog is displayed. If the USE TRUE TYPE setting is not selected, then the BLUES
font dialog is displayed. Once you have selected a font to use, the ADJUST FONT TO WINDOW
SIZE option is disabled.
BLUES User Manual………………………………Page:128
NEWHART SYSTEMS INC.
_______________________________________________
There may be cases (e.g., if you want a very small window size, but a large font to easily read
part of the screen and don't care if the rest gets clipped) when you may wish to specifically set a
fixed font size. In this case, you may select any fixed font size from the menu.
Use True Type
This Settings menu command allows you to select the Windows 3.1 standard Courier New True
Type font, instead of the BLUES 2000 product fonts described above under Fonts.
Adjust Font Size To Window Size
When this feature has been selected, as you size the terminal sessions window, the session will
select the best font to display the host screen in. When this feature is not selected, the terminal
emulator will always use the same font to display the host screen. When you perform a
"FONTS..." function this feature is automatically turned off so that the font you select will always
be used.
Zoom Font Larger
This option will select the next largest font and display the host screen in a larger font size.
Zoom Font Smaller
This option will select the next smallest font and display the host screen in a smaller font size.
Upper Case
This command will cause the display characters to display in all upper case. The actual data is
still in upper and lower case as far as the host is concerned. This feature may be useful with
smaller fonts since the uppercase characters display better in the smaller font sizes.
BLUES User Manual………………………………Page:129
NEWHART SYSTEMS INC.
_______________________________________________
Host Color Mapping
This Settings menu command activates a dialog box that allows you to customize your host color
mappings. Each of the 8 host colors may be modified. Both the foreground and background
colors may be changed. In addition, the operator information area's colors may be modified.
Colors are changed by dragging a color with the mouse and dropping the color on the fields in
the SESSION COLOR MAPPING section of the dialog box. The Help button may be used to get
help on the use of this dialog. The RESET button will reset the colors back to the default IBM
colors.
Configure Keypad...
BLUES User Manual………………………………Page:130
NEWHART SYSTEMS INC.
_______________________________________________
This Settings menu command allows you to customize the two rows of buttons that are located
under the tool bar and menu bar. The two rows of buttons may be removed or displayed. In
addition, any function key or MACRO may be placed on a specific row. The height of each row
may also be customized. The following dialog allows you to customize the keypad:
You may add or remove buttons from each row by first selecting one or more buttons from the
appropriate list box and pressing the ADD or REMOVE button. To completely remove a row of
buttons you may select the "Disable Row X" check box. You may also change the height of each
row of buttons. After you have made your selections, press the OK button and the keypad will be
displayed according to your selections.
Titlebar
This command will either remove or display the titlebar at the top of the window.
Menubar
This command will either remove or display the menubar. The menubar is located under the
titlebar and contains menu commands.
Toolbar
BLUES User Manual………………………………Page:131
NEWHART SYSTEMS INC.
_______________________________________________
This command will either remove or add the tool bar from the top of the display window.
Statusbar
This command will either remove or add the status bar from the bottom of the display window.
BLUES User Manual………………………………Page:132
NEWHART SYSTEMS INC.
_______________________________________________
The Settings Menu
The Settings menu includes commands that enable you to adjust the cursor type, sound,
keyboard type and mapping, and 3270 command entry options.
For more information, see the sections below which describe the following Settings menu
commands:
Cursor Type...
Adjust the cursor type and sound
Enable Alarm
Turns on and off the terminal beep.
Notify When Minimized
Notify operator when the screen changes when the
session is in the minimized state.
Keyboard Mapping
Keyboard type selection and mapping
Configure Hot Spots...
Configure how HOT SPOTS work.
BLUES User Manual………………………………Page:133
NEWHART SYSTEMS INC.
_______________________________________________
Type Ahead
Selects whether or not you can continue typing while
host screens are being received.
Mouse Configuration
This option lets you configure how the mouse buttons
will act when pressed.
Api Options
Controls how the session interfaces to other programs including
the clipboard.
Configure Cursor
This Settings menu command activates a dialog box that lets you select the type of cursor you
want.
There are currently four types of cursors, a single underline, a double underline, a blinking block,
and a cross hair.
Enable Alarm...
This option lets you enable and disable the terminal alarm. The alarm is a short beep sound that
is heard whenever an error occurs or whenever the host indicates that the alarm should be
sounded.
Notify When Minimized
When activated, this feature will cause the terminal session to notify the operator if the host
screen changes while the terminal session is in the minimized state. The operator will see a
dialog box indicating that the screen has changed and be allowed to either view the session or
ignore the change.
BLUES User Manual………………………………Page:134
NEWHART SYSTEMS INC.
_______________________________________________
Keyboard Mapping...
The File menu of the Keyboard Mapping utility is used to open a keyboard definition file (or 'key
file'), to save (or save as) the remapped key file, and to exit the utility. A keyboard definition file
contains information about a particular keyboard type, and the mapping of the keys. For
example, as of the current revision of this document, the following base default keyboard
definition files are provided with the BLUES 2000 Display application:
usa84.kbd
USA 84-key keyboard
usa101.kbd
USA 101-key keyboard
usa101.vt.kbd
USA 101-key keyboard telnet
usa122.kbd
USA 122-key keyboard
uk102.kbd
UK 102-key keyboard
sp102.kbd
Spanish 102-key keyboard
gr102.kbd
German 102-key keyboard
gr102.vt.kbd
German 102-key keyboard telnet
gr122.kbd
German 122-key keyboard
gr122.vt.kbd
German 122-key keyboard telnet
it102.kbd
Italian 102- key keyboard
greek102.kbd
Greek 102- key keyboard
sp102.kbd
Spanish 102- key keyboard
The keyboard type is displayed in the upper left corner when the keyboard utility is loaded. As
explained in Section 2 Administration, the default key file, e.g. usa101.kbd, is set at session
definition time. Therefore, e.g. '101 KEY USA', will be displayed in the upper left corner when
you load the keyboard utility. If you open a different key file, then this message will change
accordingly. Note that the keyboard type is fixed for a given key file - it is the mapping of the
keys supported within this type that you can change.
Whenever you open a key file by selecting Open from the keyboard utility's File menu, that key
file becomes the active one for your current session (as well as any key remapping you may do).
For example, to switch to the Spanish 102-key base default, open sp102.kbd, and then exit the
keyboard utility. Furthermore, to make this key file part of your user profile, select the main
File/Save menu command.
BLUES User Manual………………………………Page:135
NEWHART SYSTEMS INC.
_______________________________________________
Keyboard Mapping Window
Referring to the figure above, remapping of keys is done as follows:
Keys may have four states, Normal, Shift, Alt, or Ctrl. To see how each key is mapped with
respect to one of these states, click on one of the four controls in the upper right of the keyboard
utility display. A graphical representation of the data character or command function currently
mapped to each key position for the given state will be displayed.
To move a data character or command function to a new place, i.e. a new key position and/or
state, point the mouse pointer at the current place and click the left mouse button. Now move to
the new place and click the mouse button again. If the new place is currently occupied, then that
data character or command function becomes the 'selected' one, and can in turn be moved.
To 'copy', instead of 'move', use the right mouse button instead of the left. This leaves the data
character or command function in its old place, as well as the new place to which you map it.
BLUES User Manual………………………………Page:136
NEWHART SYSTEMS INC.
_______________________________________________
To clear a place, select it using either mouse button, and press the Del key.
(Note, a mouse is required to use the keyboard mapping utility.)
When your remapping is complete, use Save (or Save as) from the File menu of the keyboard
utility to preserve your changes, then select Exit to exit the utility.
Configure Hot Spots
This Settings menu command enables you to configure how 'hot spots' function. A “hot spot” is a
word located on the host screen that is recognized by the BLUES Display session as having a
special meaning.
When hot spots are active, they can cause commands to be sent to the host by positioning the
mouse over a portion of the host screen and pressing the left mouse button. For example, if the
word CLEAR appears on the screen, you can perform a CLEAR key by simply pointing the
mouse cursor at the word CLEAR, and clicking the left mouse button.
The characters in the command word on the screen can be in either upper or lower case. The
following hot spot command words are supported:
PF1 through PF24, PA1, PA2, and PA3,CLEAR, ENTER, PRINT, SYSREQ,
F1 through F24
In addition, any macro that has been recorded will automatically become a hot spot.
The following dialog box will be displayed when the Configure Hot Spots menu item is selected:
BLUES User Manual………………………………Page:137
NEWHART SYSTEMS INC.
_______________________________________________
“Enable Hot Spots” allows you to select if hot spot detection is to be performed. When this
feature is not selected all other selections in this dialog box are meaningless. ‘Draw Hot Spot
Buttons On Presentation Space” allows you to select if hot spots located in protected locations
of the host screen will be displayed as push buttons. The “Hot Spots Must Be Delimited By
Spaces” option is used to select if hot spots can be recognized inside other words or if the hot
spot must be surrounded by spaces on the left and right. The “Macro Names Act As Hot
Spots” feature allows you to select if the names of any previously recorded macro’s will also
become hot spots. The “The Numbers 1 To 24 Ack As PF1 To PF24” feature allows numbers
located on the host presentation space screen to become hot spots for the program function keys
PF1 through PF24.
BLUES User Manual………………………………Page:138
NEWHART SYSTEMS INC.
_______________________________________________
Type Ahead
When this function is selected, you can continue to enter keystrokes while the display session is
busy sending and receiving information to the host. When the keyboard becomes enabled, the
display session will begin processing the keystrokes you entered. If you press the RESET key,
all keys in the queue will be purged, A key queue of 255 keys may be entered ahead.
Mouse Configuration
This option lets you configure how the mouse buttons will act when pressed. You may assign
any function key, any of the clipboard functions, or any MACRO to both the left and right mouse
buttons. If you are going to remove the title bar (see system menu), then the use of the left
mouse double click is limited to displaying the title bar after it has been hidden. The following
dialog box is displayed to configure the mouse buttons:
Use the left mouse button to select your assignments. The terms SELECT, CUT, and COPY are
used for the clipboard functions.
BLUES User Manual………………………………Page:139
NEWHART SYSTEMS INC.
_______________________________________________
Api Options
This Edit menu command lets you customize how the display session will copy information into
the clipboard when you perform CUT, COPY, and DDE functions.
A variety of Application Programming Interface options are available under the API dialog. Each
option is defined below:
The SHORT NAME field lets you select the EHLLAPI or HLLAPI presentation space short name.
This field uniquely identifies the session to a API program using HLLAPI.
The Automatically Connect To Gateway On HLLAPI Connect option lets you select to have
the session connect to the host (if not already connect) when the HLLAPI CONNECT PS function
is performed.
The Automatically Start MS-DOS HLLAPI Redirector option should be used when an MS-DOS
application wants to use a session through the HLLAPI programming interface. If this option is
BLUES User Manual………………………………Page:140
NEWHART SYSTEMS INC.
_______________________________________________
selected, then the session will automatically start the HLLAPI redirector ICON (if it is not already
started) so that MS-DOS programs can use HLLAPI.
The Disconnect From Gateway After HLLAPI DISCONNECT option lets you select to have the
session disconnect from the gateway whenever a HLLAPI DISCONNECT PS command is
performed.
The Start Session On CONNECT PS option lets you start the session from your HLLAPI
program. If selected, once the first HLLAPI CONNECT PS command is done, the session is
started (if not already started).
The Close Session After HLLAPI DISCONNECT option lets you automatically stop a session
when a HLLAPI DISCONNECT PS function is done.
The DDE SERVER NAME option lets you change the name of the DDE server that the session is
known as. Normally this field is the name of the display session's program file.
The CR/LF AT END OF LINE option indicates that the session should add a carriage return and
line feed characters to the end of each line that is copies to the clipboard and to each line that is
give to a DDE client.
The Replace Spaces Between Words With A Tab option indicates that the session should
remove spaces between words and add a TAB character for the removed spaces when coping to
the clipboard or to a DDE client.
The Remove Leading Spaces On Each Line option indicates that the session should remove all
leading spaces from each line that is copies to the clipboard and to a DDE client.
The Remove Trailing Spaces On Each Line option indicates that the session should remove all
ending spaces from each line that is copies to the clipboard and to a DDE client.
The Copy Operator Information Too option lets you copy the operator information area line into
the clipboard and also to pass the operator information area to a DDE client. The whole operator
information area is passed.
If this option is selected when a paste function is done, then each new line of text pasted into the
terminal session will be pasted in the column where the cursor was located when the paste was
performed.
BLUES User Manual………………………………Page:141
NEWHART SYSTEMS INC.
_______________________________________________
For example: If the cursor is in column 70 and a paste is done that contains 2 rows of text, then
both rows of text will start in row 70.
The Transfer Menu
The Transfer menu may be used to either activate the file transfer window, or to transfer an
existing portfolio. A portfolio is one or more file transfers. Each file transfer in a portfolio has a
scheme associated with it. A scheme is a set of file transfer options that dicatates how the file is
transferred (i.e. as a binary file or text file etc.). Portfolios let you group file transfer operations
so that you can transfer a portfolio at a future date by simply selecing the portfolio name from the
Transfer Menu, selecing the portfolio name from the file transfer window, or by scheduling the
portfolio from the file transfer scheduler.
BLUES User Manual………………………………Page:142
NEWHART SYSTEMS INC.
_______________________________________________
File Transfer Main Window
The file transfer main window contains five separate windows. These windows may be
maximized inside the main window or arranged as desired in the file transfer main window. The
following picture depicts the default window arrangement:
The five windows consist of the status window, the portfolio window, the event viewer window,
the PC explorer window, and the scheduler window. The following sections describe each
window.
The Portfolio Manager Window
The portfolio window is used to create, edit, delete, and save portfolios. A portfolio is one or more
file transfers. Each transfer in a portfolio consists of five options, the direction, the CPU priority,
BLUES User Manual………………………………Page:143
NEWHART SYSTEMS INC.
_______________________________________________
the source file name, the destination file name, and the scheme name. Schemes may be
customized, created, or deleted from the portfolio manager window.
Editing a portfolio
The toolbar contains a drop down list box that lets you select any existing portfolios. Portfolios
are stored in your private directory. You may create new portfolios from either the “new” toolbar
button or from the File menu. If you already have a portfolio that is similar to the one you want to
create, then you can select the existing portfolio and then save the portfolio under the new name
(this does not delete the old portfolio). The direction of the file transfer may be changed by
double clicking the direction indicator. The source file and destination file names are modified by
first clicking the mouse in the desired file name, entering the changed, and pressing the enter
key. The portfolio manager supports drag and drop, this means that you may use the PC
Explorer window (discussed later) to find a file that you want to transfer, then drag it into a
portfolio and drop it in either the source or destination fields of a portfolio. The scheme
field may be changed by clicking the mouse over the scheme and selecting a scheme. To add or
delete a transfer from a portfolio, first select the transfer you want to delete, or select the transfer
that you want the new transfer to go after, then either press the add file to portfolio toolbar button,
or select the add row/delete row File menu item.
Editing a scheme
Schemes may be created, edited, and deleted from the portfolio manager window. Schemes are
stored in your private directory. When editing a scheme, the following window is displayed:
BLUES User Manual………………………………Page:144
NEWHART SYSTEMS INC.
_______________________________________________
Program Name
Allows you change the name of the file transfer program running on the host computer.
Options
You may add extra options to the IND$FILE command sent to the host to start the file transfer.
These options are specific to each host.
File Transfer Mode
Selects one of two methods of file transfer. Structured Field is usually faster than buffered.
BLUES User Manual………………………………Page:145
NEWHART SYSTEMS INC.
_______________________________________________
TEXT MODE - During a send command from the local system, this command option Set identifies
a PC text file consisting of ASCII character codes This entry directs the host to translate ASCII to
EBCDIC code for storage on the host. During a RECEIVE command from the host, this command
option directs the host program to translate the host's EBCDIC code into ASCII before
transferring the file to the local system. See CRLF.
BINARY MODE - This command tells the host not to make any changes to the file during transfer.
See NOCRLF.
HOST / PC CODE PAGE
This field lets you select the Host and PC code pages for text mode file transfer. Each selection
corresponds to a file in the installation directory. The file names have 6 numbers in each name.
The first 3 digits are used to identify the host code page and the last three digits are used to
select the PCs code page. A code page defines what each of the possible 256 character’s
should be displayed and printed as. IBM has defined many set’s of different code pages. The
first 2 letters of each selection is an abbreviation for the host country as follows:
US
-
United States
GR
-
Germany
FI
-
Finland
IT
-
Italy
SP
-
Spain
UK
-
England
FR
-
France
BG
-
Belgium
GK
-
Greek
Each code page translation file may be changed with any standard editor such as edit.exe. Each
line in the file represents a single character translation.
Host System
This option selects which host operating system you are connected to.
BLUES User Manual………………………………Page:146
NEWHART SYSTEMS INC.
_______________________________________________
TSO - The host is running under TSO.
CMS - The host is running under CMS.
CICS - The host is running under CICS.
FTP - The host is a TCP/IP FTP host.
Before defining the File Specifications, you need to determine which transfer environment the
host computer uses - TSO, CMS, CICS, or FTP. Once you make the Host System selection, file
specification parameters which do not apply to your environment will be grayed out. The File
Specifications for the different environments are discussed in their respective sections below.
File Creation
This option lets you select how a file that is received will be created.
APPEND - This command tells the host to add the data to the end of an existing file. Be sure to
specify this option when you are transferring data to an existing file. If you do not specify
APPEND and the file exists, the original file will be deleted and replaced by the file you are
transferring.
NEW - Data replaces any existing file. If no file exists, one is created. For files transferred to the
host, one of the File Creation Options must be specified.
Buffer Size
Allows customization of the size of structured field data that is sent and received during
structured field type of file transfers.
Record Separator
This option specifies how records are separated during the file transfer.
CRLF - Records are separated with a Carriage Return and Line Feed when sent to or received
from the host.
NOCRLF - Carriage Returns and Line Feeds are neither added nor deleted. If you choose
BINARY, you must select this option.
BLUES User Manual………………………………Page:147
NEWHART SYSTEMS INC.
_______________________________________________
Using File Transfer With TSO
This section explains how to send files to and receive files from a mainframe host computer
equipped with MVS/TSO file transfer software. This section also explains the file specifications
this environment uses.
Assuming you have initiated the LU2 session and accessed the host computer in the TSO
environment as described in the previous sections, select the TSO Host System option of the File
Transfer Parameter screen. File Specification parameters which do not apply to TSO will then be
grayed out on the screen.
Now you may enter your file specifications. The file specifications are listed and explained below.
Fields which must have entries are indicated as required fields.
File Transfer Options
The options field may be used to add additional options to the IND$FILE command that is sent to
the host to start the file transfer. These options are generally unique to a particular host.
Path/File Name
This is a required field. You specify the filename of the local file being transferred. You also
have the option to specify a device (A:, B:, C:, D:) or path name. If you do not specify a device,
the program defaults to the system's default drive. The naming conventions must conform to
standard DOS syntax.
Host Data Set Name
This is a required field. This field specifies the name of the host data set. (The TSO data set
name is similar to a directory name in DOS.)
Member Name
BLUES User Manual………………………………Page:148
NEWHART SYSTEMS INC.
_______________________________________________
This is a required field. The name of one of the members (files) in a partitioned data set (folder or
directory). The MVS/TSO data set must already exist.
Password Field
This is an optional field. A password is only required when a password is in effect for the
MVS/TSO data set.
Records Options
LRECL
This is an optional field. This field refers to the logical record length for the host file. If this field
is blank, the system will default to a logical record length of 80 characters.
BLKSIZE
Refers to the block size of the host data set. Equals the number of bytes in a block of data. If you
do not specify block size, the system defaults to the value of the Logical Record Length.
RECFM (F/V/U)
This is an optional field. The default value of this field is FIXED.
FIXED- Specifies that a data set with a fixed record length is to be created.
VARIABLE - Specifies the creation of a data set containing variable length records.
UNDEFINED - Refers to the creation of a data set containing an undefined record length.
SPACE
BLUES User Manual………………………………Page:149
NEWHART SYSTEMS INC.
_______________________________________________
Use this option to specify the amount of space to be allocated when creating a new data set.
When you enter SPACE in the file specifications, follow it by a quantity. After the quantity,
specify the kind of increment. If you do not specify SPACE, the system defaults to the value of
BLKSIZE.
Once you have made all your parameter selections, click on the OK button. The file transfer
session with the host will then begin and complete automatically. You may switch to another
window, if you wish, while the file transfer proceeds in the background.
Using File Transfer With VM/CMS
This section explains how to send files to and receive files from a mainframe host computer
equipped with VM/CMS (Virtual Machine/Conversational Monitor System) file transfer software.
This section also explains the file specifications this environment uses.
Assuming you have initiated the LU2 session and accessed the host computer in the VM/CMS
environment as described in previous sections, select the CMS Host System option of the File
Transfer Parameter screen. File Specification parameters which do not apply to CMS will then
be grayed out on the screen.
Now you may enter your file specifications. The file specifications are listed and explained below.
Fields which must have entries are indicated as required fields.
Path/File Name
This is a required field. You specify the filename of the local file being transferred. You also
have the option to specify a device (A:, B:, C:, D:) or path name. If you do not specify a device,
the program defaults to the system's default drive. The naming conventions must conform to
standard DOS syntax.
Host File Name
The name by which the file will be known when it is transferred to or from the host. This is a
required field.
BLUES User Manual………………………………Page:150
NEWHART SYSTEMS INC.
_______________________________________________
CMS File Type
Specifies the VM/CMS file type. The default for this field is BASIC. This is a required field.
CMS File Mode
Specifies the VM/CMS file mode. This is an optional field. If you do not specify the file mode, the
system uses the default value A1.
LRECL
Optional entry. For program or data files, the logical record length specifies the number of
characters per line. For word processing files, the logical record length refers to the width of the
longest formatted line. If LRECL is omitted, the system defaults to the record length of the
current file.
RECFM (F/V)
This is an optional field. The default value for this field is FIXED.
FIXED - specifies that a data set with a fixed record length is to be created.
VARIABLE - Refers to the creation of a data set containing variable length records.
Once you have made all your parameter selections, click on the OK button. The file transfer
session with the host will then begin and complete automatically. You may switch to another
window if you wish, while the file transfer proceeds in the background.
Using File Transfer With CICS
BLUES User Manual………………………………Page:151
NEWHART SYSTEMS INC.
_______________________________________________
This section explains how to send files to and receive files from a mainframe host computer that
uses the IBM CICS (Customer Information Control System) file transfer software. This section
also explains the file specifications the CICS environment uses.
Assuming you have initiated the LU2 session and accessed the host computer in the CICS
environment as described in previous sections, select the CICS Host System option of the File
Transfer Parameter screen. File Specification parameters which do not apply to CICS will then
be grayed out on the screen.
Now you may enter your file specifications. The file specifications are listed and explained below.
Fields which must have entries are indicated as required fields.
Path/File Name
This is a required field. You specify the filename of the local being transferred. You also have
the option to specify a device (A:, B:, C:, D:) or path name. If you do not specify a device, the
program defaults to the system's default drive. The naming conventions must conform to
standard DOS syntax.
Host File Name
The name by which the file will be known when it is transferred to or from the host. This is a
required field.
Comments
This is an optional entry. You add any notes or comments to the first record of the file.
Comments do not affect the execution of the commands entered.
Once you have made all your parameter selections, click on the OK button. The file transfer
session with the host will then begin and complete automatically. You may switch to another
window if you wish, while the file transfer proceeds in the background.
Using File Transfer With FTP
BLUES User Manual………………………………Page:152
NEWHART SYSTEMS INC.
_______________________________________________
The File Transfer Protocol (FTP) mode sends and receives both text and binary files to TCP/IP
hosts. These types of hosts include IBM 390’s, IBM AS400, DEC VAX, and Microsoft NT Server.
FTP may be used over intra/internet networks.
The FTP file transfer requires the Microsoft TCP/IP protocol to be installed, this is located on the
original Microsoft Windows 95/98, or Windows NT CDROM.
FTP Host Name
The FTP host name determines which host the scheme may connect to. The name may be
either a TCPIP address like 111.222.333.444 or a valid server name such as ftp.microsoft.com.
The address or host name must be reachable over the TCP/IP protocol stack.
FTP Port
The FTP port must match the port number configured at the host computer for FTP. The industry
standard default setting is 21.
FTP User Name
Each FTP host requires a user name and password to be able to access the host. The industry
standard “Anonymous” user name may be selected, or a specific user name and password may
be selected. Some FTP hosts require a valid user name and password for FTP file transfers.
FTP Home Directory
A FTP home directory may be selected. If no FTP directory is selected, then the host computer
will determine which directory will be the home directory. The directory name may contain subdirectories with either forward or backward slash(s) that represent a directory. Some hosts will
place the FTP in a home directory based on the FTP user name and password.
FTP Time-outs
The time out values determine when to assume an error has occurred during a FTP host browse,
or FTP file transfer operation. All time out values are in seconds. The connect time out is used
during the connection process and the receive time out is used during FTP file transfers.
BLUES User Manual………………………………Page:153
NEWHART SYSTEMS INC.
_______________________________________________
The Status Window
The status window may be used to transfer a single file or to transfer a complete portfolio. To
transfer a single file, simply enter the source and destination file names, select the scheme, and
press either the send or receive file toolbar button or menu item. To transfer a portfolio, simply
select the portfolio from the toolbar list box, and press the transfer portfolio toolbar button or
menu item. The status window contains a box that lists the progress of the file transfer. Each
entry in the list box is described in the section that describes the file transfer event viewer
window. To cancel a file transfer, you may press the cancel toolbar button or select cancel from
the Transfer menu.
The file transfer application maintains a list of the last 20 files transferred. These files may be
selected from either the toolbar or from the source and destination fields. The toolbar selection
will automatically select the source, destination, scheme and direction then start the file transfer.
BLUES User Manual………………………………Page:154
NEWHART SYSTEMS INC.
_______________________________________________
The PC Explorer Window
The PC Explorer window is split into two panes, the left pane is used to select a particular
location of a file, and the right pane displays all the files in that particular location. You may
adjust the panes by placing the mouse over the split, and dragging the mouse left or right.
The PC Explorer window is used to find a file that you may want to transfer. Once you have
found the file, you may drag and drop the file into the Portfolio Manager window for
subsequent transfer. The PC Explorer window is very similar to the Windows 95/98 and
Windows NT 4.0 Explorer. To find a file, first select the proper location from the left most list,
then find the file in the right list box. You may select different ways of viewing files. Files may be
listed as large icons, small icons, lists, and detailed. Detailed lists contain the files date/time,
size, and type.
The Event Viewer Window
BLUES User Manual………………………………Page:155
NEWHART SYSTEMS INC.
_______________________________________________
The event viewer window is used to view the event log. The event log contains information about
past file transfers. The event log is stored in the private directory. When the event log reaches
1MB in size, the event log is automatically erased.
There are four different event types that may be viewed: (1) Information events, (2) scheduler
events, (3) Error events, and (4) Successful Events. Information events are general in nature
and give information about when and what was transferred. Scheduler events indicate when and
what portfolios were scheduled for transfer. Error events occur when a file can not be
successfully transferred. Successful events indicate when a file was successfully transferred and
what the file size of the transferred file was.
By pressing the appropriate toolbar buttons you can select whether or not a particular event type
is displayed.
File Transfer Messages
While using file transfer, a variety of messages can appear on the screen. These messages may
contain status information or they may require a specific response. The following is a list of those
messages and their meanings.
FILE TRANSFER COMPLETE
This message displays when the file transfer operation has completed successfully.
OPERATOR INTERVENTION: FILE TRANSFER CANCELED
This message occurs when you interrupt and cancel a file transfer session.
TRANS13 SSCP SESSION IS NOT ACTIVATED:FILE TRANSFER CANCELED
LULU SESSION IS NOT BOUND: FILE TRANSFER CANCELED
LULU SESSION DOES NOT OWN THE SCREEN: FILE TRANSFER CANCELED
LU2 NOT IN CORRECT SCREEN: FILE TRANSFER CANCELED
BLUES User Manual………………………………Page:156
NEWHART SYSTEMS INC.
_______________________________________________
Any of the above four messages indicates that the LU2 session is not in the correct state for file
transfer, see the section above called 'PREPARING FOR A FILE TRANSFER SESSION'.
NO DATA SET READY: FILE TRANSFER CANCELED
TRANS11 LINK FAILURE WITH HOST: FILE TRANSFER CANCELED
Either of the above two messages indicates that the telephone connection to the host has been
lost.
TRANS10 HOST HAS NOT RESPONDED WITHIN TIME LIMIT
COMMUNICATION SEQUENCE WITH HOST DISRUPTED: FILE TRANSFER CANCELED
Either of the above two messages indicates that the host did not send an expected response or
data within a certain time limit. Check the status of the host for information that might explain the
problem.
RE-TRANSMISSION OVER 3 TIMES, FILE TRANSFER CANCELED
This message appears when you attempt to SEND a file, and the host rejects the data three
consecutive times. The SEND operation is automatically canceled after three SEND attempts.
Check your command line format and parameters to be sure they have been entered correctly.
Retry the SEND command.
LU2/API ATTACH ERROR: FILE TRANSFER CANCELED
NETWORK ERROR: FILE TRANSFER CANCELED
PU2AM ERROR: FILE TRANSFER CANCELED
FATAL ERROR - LU2 IS NOT ANSWERING: FILE TRANSFER CANCELED
BLUES User Manual………………………………Page:157
NEWHART SYSTEMS INC.
_______________________________________________
Any of the above four messages indicates that there is a local network configuration error which
needs to be resolved before file transfer can be accomplished.
SNA PROTOCOL ERROR: FILE TRANSFER CANCELED
This message indicates that there is a host communications protocol configuration error which
needs to be resolved before file transfer can be accomplished.
HOST DATA SET SPACE ALLOCATION PROBLEM: FILE TRANSFER CANCELED
HOST DATA SET OPEN ERROR: FILE TRANSFER CANCELED
HOST OPERATOR HAS CANCELED: FILE TRANSFER CANCELED
Any of the above three messages indicates that the file transfer was canceled due to an event at
host.
ENTER NUMERIC DATA ONLY INTO FIELDS LRECL OR BLKSIZE
COULD NOT CREATE THE PC FILE: FILE TRANSFER CANCELED
COULD NOT OPEN THE PC FILE: FILE TRANSFER CANCELED
A HOST DATA SET NAME WAS NOT ENTERED: FILE TRANSFER CANCELED
A HOST FILE NAME WAS NOT ENTERED: FILE TRANSFER CANCELED
A PC FILENAME WAS NOT ENTERED: FILE TRANSFER CANCELED
Any of the above six messages indicates a problem in the File Specifications entered for the file
transfer. Check the parameters, and retry the file transfer.
The Host Explorer Window
BLUES User Manual………………………………Page:158
NEWHART SYSTEMS INC.
_______________________________________________
The host explorer window may be used to obtain a list of file names that already exist on the host
computer. After a list of file names have been obtained, a host file can be dragged and dropped into a
portfolio source or destination file.
To obtain a list of host file names, select the correct host operating system from the menu or
toolbar. Next select the Query host menu or toolbar option. The query may be canceled by
selecting the cancel query menu item.
The Scheduler Window
BLUES User Manual………………………………Page:159
NEWHART SYSTEMS INC.
_______________________________________________
The scheduler window is used to schedule portfolios for regular transfer. Portfolios may be
scheduled by month, day of week, and time. Portfolios may be configured to automatically be
done or configured so that the operator is notified when a portfolio should be transferred.
The file transfer window must be started before a schedule will become active. If you have
activated a portfolio in a schedule, then the terminal window will automatically start the file
transfer window in a minimized state.
Every thirty seconds, the scheduler window will see if a portfolio should be scheduled.
Scheduling takes place if three conditions are met, (1) it is the correct month, (2) it is the correct
day, and (3) it is the correct time. The correct time is encountered when current time exceeds the
configured time and when the current time minus the last time that the portfolio was scheduled is
greater that 24 hours.
BLUES User Manual………………………………Page:160
NEWHART SYSTEMS INC.
_______________________________________________
The Display Session Gateway Menu
The Gateway menu
The Gateway Menu includes commands that enable you to connect or disconnect to a host
gateway, send host Netview alert messages, activate and deactivate communications monitoring,
and obtain communications trace data.
For more information, see the sections below which describe the following Gateway menu
commands:
Connect
Connect to host
BLUES User Manual………………………………Page:161
NEWHART SYSTEMS INC.
_______________________________________________
Disconnect
Disconnect from host
Send Operator Alert
Send host alert message
Response Time Monitor
Perform RTM function
Control Unit Parameters
Obtain CU parameters
Link Level Statistics
Obtain link level statistics
SNA Trace Active
Start/Stop SNA Req/Rsp trace
Link Trace Active
Start/Stop link level trace
X.25 Link Status
Display X.25 Link Level Statistics
Session Trace Active
Start/Stop PU2AM level trace
Delete Trace File
Inform the gateway connection to purge it's trace file.
Connect
This menu item will connect the session to the host.
Disconnect
This menu item will disconnect the session from the host.
Send Operator Alert
This Gateway menu command allows an authorized user to send an operator generated NPDA
alert to the host system.
Operator alerts can be either placed in a log file at the host, or sent directly to the host computer
operator.
Response Time Monitor Functionality
This Gateway menu command displays response time monitor information. This feature is only
available for connection types of BLUES and Microsoft NT SNA Server.
BLUES User Manual………………………………Page:162
NEWHART SYSTEMS INC.
_______________________________________________
The response time monitor display shows the response times for the addresses which are 3278/9
terminal devices, and also displays the counters and parameters associated with these timers.
The authorized operator may selectively reset counters for specific addresses.
Control Unit Parameters
This Gateway menu command is used to obtain a display of the currently active control unit
parameters. This feature is only available for connection type of BLUES.
The control unit information displayed pertains to the gateway to which you are connected, and
includes control unit type and control unit address, as well as link level parameters such as
encoding, speed, and protocol in use.
Link Level Statistics
This Gateway menu command is used to obtain a link level statistics displays.
A group of counters is displayed. The counters may indicate modem errors, a poor phone line, or
may just indicate all is well at the link level.
X.25 Link Status
This dialog box will display the status of an X.25 connection. This option is only available when
you using a connection that was configured for the X.25 link level protocol. The dialog contains
an area that will display the reason why the last virtual circuit was lost. In addition, the states of
the virtual circuit and physical unit are displayed.
Dial - Call Button
This button will either open a permanent or switched circuit and if Auto-sync has been configured,
it will call the remote host. This button may be used to re-activate a lost circuit.
BLUES User Manual………………………………Page:163
NEWHART SYSTEMS INC.
_______________________________________________
Clear - Dial Button
This button will disconnect the X.25 virtual circuit and hang up a physical connection. The
physical connection is only disconnected if no other connections (physical units) are using the
same physical link.
Display Session SNA Trace Active
The NSI trace facilities allow you to start and stop the trace from the gateway menu. All data is
recorded in the file "SESSIONx.TRC" in the private directory. The trace file is a standard ASCII
file that may be viewed or printed as desired. The trace feature is meant as a tool to help solve
possible problems in the communication to the host computer.
NOTE - enabling a trace degrades performance because of the additional overhead of
writing trace data to the disk.
Display Session Link Trace Active
The NSI trace facilities allow you to start and stop the trace from the gateway menu. All data is
recorded in the file "SESSIONx.TRC" in the private directory. The trace file is a standard ASCII
file that may be viewed or printed as desired. The trace feature is meant as a tool to help solve
possible problems in the communication to the host computer.
NOTE - enabling a trace degrades performance because of the additional overhead of
writing trace data to the disk.
Display Session ‘Session’ Trace Active
The NSI trace facilities allow you to start and stop the trace from the gateway menu. All data is
recorded in the file "SESSIONx.TRC" in the private directory. The trace file is a standard ASCII
file that may be viewed or printed as desired. The trace feature is meant as a tool to help solve
possible problems in the communication to the host computer.
BLUES User Manual………………………………Page:164
NEWHART SYSTEMS INC.
_______________________________________________
NOTE - enabling a trace degrades performance because of the additional overhead of
writing trace data to the disk.
Delete Trace File
This feature is only available when you are connected to a gateway connection. It will cause the
trace file associated with the connection to be deleted.
The Windows Menu
The Windows Menu
BLUES User Manual………………………………Page:165
NEWHART SYSTEMS INC.
_______________________________________________
The Windows Menu provides you a convenient way to quickly switch between session windows
when you are running multiple sessions. First select the Windows Menu. A list of your active
sessions will be displayed, e.g.,
SESSION1, SESSION2, and SESSION3
To switch to any session's window, click on the session item in the list.
The Macros Menu
The Macros menu lets you record, play, edit, and delete macro files. Macro files are typically
saved in your private directory. The Macro menu displays as follows:
BLUES User Manual………………………………Page:166
NEWHART SYSTEMS INC.
_______________________________________________
Record Macro
This menu function allows you to either enter a new macro file name or re-record an existing
macro. Once you have selected the macro name, the macro will start recording. During the
record function a dialog box will be displayed indicating that the macro is being recorded. You
may pause the recording by pressing the pause button or stop the record function by pressing the
STOP button. It is recommended that the first key you enter when recording a macro is the
HOME key. This will ensure that no matter where the cursor is located when you play the macro
back, the macro will play properly. All keys entered are recorded. The macro records when you
send something to the host computer and when you receive a screen from the host, this allows it
to play the macro back in a timely fashion. If you use a series of host screens in a circular
fashion, you can record a single set of host screens (with a pause when you need to enter in
specific information), then edit the macro and add a GOTO line in the macro. This will improve
productivity while accessing the same set of host screens by automating the process. See Edit
Macro for more details. Once you have recorded a macro, the macro name will automatically be
placed in your keyboard mapping. You can then map the macro to any key position that you
want.
Play Macro
To Play a macro you must first display the host screen that was present when you first selected
to record a macro. Once you select the macro name, the macro will start playing back. If you
recorded any pauses then the macro will pause when one is encountered. To cause the macro
to start playing after a pause has been encountered, press resume. When the macro has
finished playing, then the play dialog box will automatically disappear.
Stop Macro
This menu item will stop a macro when a macro is in the process of being played.
Edit Macro
Macros may be edited and changed by selecting Edit Macro from the MACROS menu item.
Each line of the macro file contains a keyword followed by optional parameters and values. Any
BLUES User Manual………………………………Page:167
NEWHART SYSTEMS INC.
_______________________________________________
keyword that ends with a semicolon (':') is considered a place holder label. Labels may be
jumped to by a GOTO keyword. The following list summarizes all macro keywords:
"DATA_KEYS Hello World"
- Normal ANSI text to be entered.
"PF1"
-PF1 or F1 function key.
"PF2"
-PF2 or F2 function key.
"PF3"
-PF3 or F3 function key.
"PF4"
-PF4 or F4 function key.
"PF5"
-PF5 or F5 function key.
"PF6"
-PF6 or F6 function key.
"PF7"
-PF7 or F7 function key.
"PF8"
-PF8 or F8 function key.
"PF9"
-PF9 or F9 function key.
"PF10"
-PF10 or F10 function key.
"PF11"
-PF11 or F11 function key.
"PF12"
-PF12 or F12 function key.
"PF13"
-PF13 or F13 function key.
"PF14"
-PF14 or F14 function key.
"PF15"
-PF15 or F15 function key.
"PF16"
-PF16 or F16 function key.
"PF17"
-PF17 or F17 function key.
"PF18"
-PF18 or F18 function key.
"PF19"
-PF19 or F19 function key.
"PF20"
-PF20 or F20 function key.
"PF21"
-PF21 or F21 function key.
"PF22"
-PF22 or F22 function key.
"PF23"
-PF23 or F23 function key.
"PF24"
-PF24 or F24 function key.
"PA1"
-PA1 key.
"PA2"
-PA2 key.
"PA3"
-PA3 key.
"ENTER"
-enter function key.
BLUES User Manual………………………………Page:168
NEWHART SYSTEMS INC.
_______________________________________________
"SYS_REQ"
-sys request function key.
"TAB"
-tab key.
"BACKTAB"
-back tab key.
"NEWLINE"
-new line key.
"CLEAR"
-clear function key.
"ALT_CURSOR"
-alt cursor key.
"ATTN"
-attention key.
"CUR_SEL"
-cursor select key.
"DUP"
-dup key.
"ERASE_EOF"
-erase eof key.
"ERASE_INP"
-erase input key.
"FLD_MARK"
-field mark key.
"HOME"
-home key.
"CUR_LEFT"
-cursor left 1 key.
"CUR_LEFT2"
-cursor left 2 key.
"CUR_RIGHT"
-cursor right 1 key.
"CUR_RIGHT2"
-cursor right 2 key.
"RESET"
-reset key.
"KEYUP"
-cursor up key.
"KEYDOWN"
-cursor down key.
"BACKSPACE"
-backspace key.
"INSERT"
-insert key.
"DELETE"
-delete key.
"PRINT"
-print screen key.
"WAIT"
-receive 1 screen from the host
"PAUSE"
-pause a playback
"DARK_KEYS ????"
-non-display keys.
"GOTO label"
-go to label.
"RUN command line"
-Start another program
"CUT_CLIP sr,sc,er,ec,tabs,crlf"
-Cut to the clipboard. the parameters
are starting row, starting column, ending
row, ending column, a 1 if put tabs
BLUES User Manual………………………………Page:169
NEWHART SYSTEMS INC.
_______________________________________________
between words, and a 1 if add carriage
returns and line feeds at line end.
"COPY_CLIP sr,sc,er,ec,tabs,crlf"
-Copy to the clipboard. the
parameters are starting row, starting
column, ending row, ending column, a 1
if put tabs between words, and a 1 if add
carriage returns and line feeds at line end.
"PASTE_CLIP
-Paste from the clipboard.
"SEND pcfile host file
-Upload a file to the host.
"RECEIVE pcfile host file.
-Download a file from the host.
“FIELD_EXIT”
-5250 Field Exit key.
“FIELD_PLUS”
-5250 Field Plus key.
“FIELD_MINUS”
-5250 Field minus key.
“ROLL_UP”
-5250 Roll up key.
“ROLL_DOWN”
-5250 Roll down key.
“HELP”
-5250 Help key.
“HOST_PRINT”
-5250 Host Print Screen key.
"EXIT",
-close session window
"TIMEDWAIT x",
-wait x seconds
"ESCAPE_KEY",
-telnet escape key
"HOLD_KEY",
-telnet hold key
"BREAK_KEY",
-telnet break key
"COMPOSE_KEY",
-telnet compose key
"DO_KEY",
-telnet do key
"NULL_KEY",
-telnet null key
"PAGEUP_KEY",
-telnet page up key
"PAGEDOWN_KEY",
-telnet page down key
"REMOVE_KEY",
-telnet remove key
"END_KEY",
-telnet end key
"RETURN_KEY",
-telnet return key
"SOH_KEY",
-telnet SOH key
"STX_KEY",
-telnet STX key
BLUES User Manual………………………………Page:170
NEWHART SYSTEMS INC.
_______________________________________________
"ETX_KEY",
-telnet ETX key
"EOT_KEY",
-telnet EOT key
"ENQ_KEY",
-telnet ENQ key
"ACK_KEY",
-telnet ACK key
"BEL_KEY",
-telnet BEL key
"HT_KEY",
-telnet HT key
"VT_KEY",
-telnet VT key
"FF_KEY",
-telnet FF key
"CR_KEY",
-telnet CR key
"SO_KEY",
-telnet SO key
"SI_KEY",
-telnet SI key
"DLE_KEY",
-telnet DLE key
"DC1_KEY",
-telnet DC1 key
"DC2_KEY",
-telnet DC2 key
"DC3_KEY",
-telnet DC3 key
"DC4_KEY",
-telnet DC4 key
"NAK_KEY",
-telnet NAK key
"SYN_KEY",
-telnet SYN key
"ETB_KEY",
-telnet ETB key
"CAN_KEY",
-telnet CAN key
"EM_KEY",
-telnet BM key
"SUB_KEY",
-telnet SUB key
"FS_KEY",
-telnet FS key
"GS_KEY",
-telnet GS key
"RS_KEY",
-telnet RS key
"US_KEY",
-telnet US key
Delete Macro
BLUES User Manual………………………………Page:171
NEWHART SYSTEMS INC.
_______________________________________________
The Delete Macro function lets you delete macro files from your disk. Select the macro that you
wand to delete by using the mouse and pressing OK.
Macro Options
The “Show Playback Window” option either enables or disables a small window that may be
displayed while a macro is being played. The playback window displays each macro line as it is
being played. In addition, the playback window has push buttons for stopping, pausing, and
resuming the macro.
The synchronize host application option determines how the terminal session determines when
the host has completely written the screen so that the next macro line may be played. Some host
applications may write data to the screen a variable number of times after keyboard input. Two
options exist for determining when the host has completed writing the screen: (1) Count the
number of host screen updates or (2) wait for an elapsed amount of idle time. During the record
phase, the number of times that the host writes to the display is counted and recorded into the
macro. If you choose option 1 above, then as the macro is played back is it assumed that the
host will write to the screen the same number of times before the macro continues to play after
an enter action is performed. In the second case above, a timer is started after the host updates
BLUES User Manual………………………………Page:172
NEWHART SYSTEMS INC.
_______________________________________________
the screen and if this timer reaches the configurable time value and the keyboard is enabled,
then the macro will continue. When configuring the idle timer, it is necessary to take into account
the host response time and the speed of the physical connection to the host.
The Startup Macro lets you select a macro that will be played whenever you start the terminal
session. In order to activate the startup macro, you MUST have the "Play Macro At Startup"
checkbox selected.
Show Playback Window
The playback window is a small window that lets the operator see each line in the macro file as it
is played back. This feature is useful in determining when something is wrong with a macro file.
BLUES User Manual………………………………Page:173
NEWHART SYSTEMS INC.
_______________________________________________
The Security Menu
The Security Menu
Change Password
The Security Menu provides you with a means of assigning a user password, which will restrict
use of your BLUES 2000 user name and sessions. First select the Security Menu, and then click
on the Change Password menu item. Follow the directions provided by the prompts to enter a
new, or change an existing, password. Once you assign a password, every subsequent load of
one of your sessions will be guarded by a query for your password.
BLUES User Manual………………………………Page:174
NEWHART SYSTEMS INC.
_______________________________________________
The Display Session Help Menu
The Help Menu
The Help Menu includes commands that enable you to obtain information about how to use the
standard Windows Help facilities, as well as commands that enable you to access the major
topics of help available for this particular application.
3270 Operator Information Area
BLUES User Manual………………………………Page:175
NEWHART SYSTEMS INC.
_______________________________________________
The 3278/9 status line, sometimes called the 'operator information area', may be displayed on
either the top line of the BLUES 2000 Display application screen or the bottom line. It contains
information regarding the state of the host mainframe connection, as well as screen format
information.
3270 Cu Type
column 1
This location always displays the number 4 in a box. If the window size has been reduced, then
the 4 may not be boxed.
3270 Protocol Type
column 2
This field displays the capital B with the underline indicating that the host protocol is SNA.
Screen Ownership field:
columns 3
?
Indicates that the 3270 display screen is unowned by any host application.
boxed little man
Indicates that the screen is owned by the System Services Control Point. This is usually
displayed during the logon process and while switching between host applications.
Square Box
Indicates that the screen is owned by a host application.
Input Inhibit field:
columns 9 - 18
X CLOCK
BLUES User Manual………………………………Page:176
NEWHART SYSTEMS INC.
_______________________________________________
Terminal wait, the mainframe is sending something to the LU2, or another operation has the
keyboard locked.
X SYSTEM
System wait, the mainframe is sending something to the 3270 display, or another operation has
the keyboard locked.
X -F
Minus function, this indicates that the operator has depressed an invalid key. Press RESET key
to continue.
X <- ->
Go elsewhere, this message is displayed when the operator has attempted to enter some data in
a protected area of the screen.
X>
This message is displayed when the operator has attempted to insert a character into a field that
is already full.
X PROGXYZ
This message is displayed when a program check XYZ has been detected.
--__5XY
Communications Check XY, where XY is as follows:
501
Not connected to the gateway.
504
BLUES User Manual………………………………Page:177
NEWHART SYSTEMS INC.
_______________________________________________
The control unit is disconnected from the link.
For an SDLC link, this message is displayed when the RS-232 dataset ready
signal
is not present. This indicates that the cable is not connected, the
modem is powered off,
or that the telephone connection to the host is not
connected.
For a Token Ring DLC, this message is displayed when the DLC driver cannot locate
the upstream controller. the upstream controller may be powered off,
or may be configured
wrong.
510
The Physical Unit has not been activated by the host
520
For an SDLC link, this message indicates that the host computer has not
transmitted an SDLC frame to the gateway in over 20 seconds.
For a Token Ring DLC, this message indicates that the DLC driver does not
network session with the upstream controller yet, i.e., not SABME'd yet.
Insert Mode field:
have a
column 20
^
This indicates that the 3270 display is in insert mode.
Row and Column field:
columns 22 - 27
AB:CDE
This is the row and column of the cursor location; ab is the row number, and cde is the column
number.
Date And Time
columns 35 - 49
BLUES User Manual………………………………Page:178
NEWHART SYSTEMS INC.
_______________________________________________
This field displays the current date and time.
Connection Name
columns 54 - 68
This field displays the name of the host connection that is currently configured. The name of the
Netware file server and service agent are displayed when the Netware For SAA type of
connection has been configured.
Lu Alias field:
columns 70 - 78
This field contains the user name associated with the host-configured 3270 display being used
for this session.
LU Address
columns 79 - 80
When the terminal is connected to a gateway this field displays the hexadecimal value of the
logical unit address configured at the host.
5250 Operator Information Area
The operator information area of the display emulation window is active when a display session
has been configured for 5250 emulation mode. The 5250 operator information area contains the
status indicators. In addiotion, the operator information area contains the TCPIP address of the
host.
The 5250 operator information area is broken down into the following fields:
Cursor Row And Column
columns 4-9
This is the row and column of the cursor location; ab is the row number, and cde is the column
number. i.e. 01:050 is row 1 column 50.
System Available
columns 21 -22
BLUES User Manual………………………………Page:179
NEWHART SYSTEMS INC.
_______________________________________________
This field contains the two characters ‘SA’. This field indicates if the AS400 is available for use or
not. If the characters appear in reverse video, then the AS400 system is available and the
BLUES session is connected to it.
Message Waiting
columns 26 -27
This field contains the two characters ‘MW’. This field indicates if the AS400 has a message
waiting for the display session. If the characters appear in reverse video, then the AS400 system
has a message waiting and the operator should retrieve it.
Keyboard Shift
columns 31 -32
This field contains the two characters ‘KS’. This field indicates is the keyboard shift key is down.
If the characters appear in reverse video, then the keyboard is in shift mode.
Insert Mode
columns 36 -37
This field contains the two characters ‘IM’. This field indicates if insert mode is active. If the
characters appear in reverse video, then insert mode is active.
Input Inhibit
columns 41 -42
This field contains the two characters ‘II’. This field indicates if display session is waiting for
some information to come from the AS400. If the characters appear in reverse video, then the
AS400 system has control of the display session and the keyboard is locked.
TCPIP Host Address
columns 53 - 80
This field contains the TCPIP address or the DNS name of the host that the session is connecting
to.
BLUES User Manual………………………………Page:180
NEWHART SYSTEMS INC.
_______________________________________________
ActiveX Control Capabilities
The Blues product automatically installs an ActiveX control that provides ActiveX container
applications such as Microsoft Internet Explorer with a fully functional 3270, 5250, or DEC VT
terminal session(s). The control may be used to insert one or more host sessions into a Web
page. When the Web page is displayed, the Blues session(s) appears inside the browser and
are fully functional from the browser. The control may also be used by third party vendors that
require access to host programs through a seamless interface that is contained in their
application. In addition to providing the emulation capabilities, the third party application may
automate any operator activity through the use of the control’s methods, properties, and events.
The Blues ActiveX control may also be used to distribute Blues over a network and subsequently
be used to upgrade and maintain PC’s with newer versions of the Blues software. By inserting
the ActiveX control on a WEB page, user’s can automatically have a pre-configured copy of
Blues installed on their PC by merely visiting the WEB page. A network administrator can install
Blues on their PC, configure and customize Blues to match their user’s needs, build a Blues
installation package with the Blues Manager application and then deploy the package over the
ActiveX control. The Blues ActiveX control contains a set of properties that describe the name
and location of a Blues installation file. The location may be on a network share or on an FTP
server. The ActiveX control automatically detects when Blues is not installed on a PC or when a
newer version of the Blues installation file exists and installs Blues on a PC when the WEB page
is viewed. The installation file may be the standard Blues installation file, or it can be a package
created by the Blues Manager that contains not only the Blues installation file, but also contains
all the necessary configuration files, keyboard mappings, file transfer settings, etc that are
required to connect to one or more host computers.
The Blues product can install a sample Microsoft Visual Basic 6.0 project that uses the Blues
activeX control to emulate the standard Blues terminal session window. This feature is named
VB Session and is installed under the Blues\sdk\VBSession folder. This feature allows a visual
basic programmer to be able to completely customze and automate any Blues terminal session.
What is the Blues ActiveX Control and How Does It
Work?
An ActiveX control is a file that provides an application program with some type of functionality.
The ActiveX control and the application program “talk” to each other over a standard Microsoft
language called “Object Linking and Embedding” OLE. The ActiveX control registers itself into
BLUES User Manual………………………………Page:181
NEWHART SYSTEMS INC.
_______________________________________________
the Windows operating system during product installation.
ActiveX container application may use its features.
After installation, any standard
Applications such as the Microsoft Internet Explorer automatically check to see if a control is
present on a PC when a WEB page that has the control is viewed. If the control is not present,
the control is downloaded from an ftp server and started. The ftp server name or IP address is
contained in the HTML associated with the WEB page. If an installation file is associated with the
Blues ActiveX control, then each time the Blues ActiveX control is started, it checks to see if
Blues is installed on the PC. If Blues is not installed, it downloads and executes the installation
file thus making Blues available to itself and the PC is it installed on. Once Blues has been
installed in this manner, the ActiveX control checks the date and time of the file that it last
installed against the current version of the file and if a newer files exists, it executes the newer
version and upgrades the PC automatically.
The Blues ActiveX control (BluesSession.ocx) provides a complete graphical end user interface
to one or more Blues terminal sessions. The Blues terminal sessions run independently of the
ActiveX control and may be configured to run hidden so that the operator only interacts with the
control for host access and not with the actual terminal session window.
The Blues ActiveX control hooks into a configured Blues terminal session to provide the container
application with the required functionality. This allows an application like Internet Explorer to use
the ActiveX control in one web page, go to another web page, and then go back to the web page
with the ActiveX control without loosing their place in a host session. I.e. when the operator goes
to any web page containing the control, they can use the Blues session without having to sign off
and sign on to the host each time.
BLUES User Manual………………………………Page:182
NEWHART SYSTEMS INC.
_______________________________________________
ActiveX Control End User Interface
The Blues ActiveX control appears as a rectangular window that represents a Blues terminal
session. Operator interaction begins by activating the control, usually with a left mouse click.
Once the control has been activated, interaction with the control is through the mouse and
keyboard. The right mouse button has the special function of activating the menu from the Blues
terminal session window. The complete sets of terminal session menu options are available,
including file transfer.
The keyboard may be remapped from the “Keyboard Mapping’’” menu option with a right mouse
click. The control functionality is best described by reading the section on using the terminal
session window of this manual since the control acts identical to the Blues terminal session
window.
BLUES User Manual………………………………Page:183
NEWHART SYSTEMS INC.
_______________________________________________
VB Session
VB Session is a Microsoft Visual Basic 6.0 project that emulates the Blues terminal session by
using the Blues activex control. The project may be used to customize and replace the standard
Blues terminal window, or it may be used to write customized VB applications that perform
automated operator entry or screen scraping. VB Session is installed from the Blues CD and is
installed into the Blues\sdk\VBSession folder.
If an existing VB application needs access to terminal emulation, then the Blues AcviveX control
can be dropped into any existing or new VB form by pressing the CTRL+X keys and selecting the
Blues ActiveX control from the list of controls installed. In this case, the VB Session project may
be used as a reference when questions arise in regard to the controls methods, properties, and
events.
To be able to take advantage of the VB Session sample program, you will have to have the
Microsoft Visual Basic product (6.0 or above) installed on the PC where the custom applications
will be created.
Once the VB project has been opened from the Blues\sdk\VBSession folder, the main window
will display the main form for the project as follows:
BLUES User Manual………………………………Page:184
NEWHART SYSTEMS INC.
_______________________________________________
The main form contains a Blues ActiveX control that provides the terminal emulation. The project
has a title bar, menu bar, toolbar, and status bar that are identical to the Blues terminal session
window.
A VB programmer can add, delete, or change the functionality of the terminal window by using
any of the properties, methods, and events that are part of the Blues ActiveX control. In addition,
the VB programmer has the complete capabilities of the Microsoft Visual Basic product for
creating robust applications.
The Blues help file (blues32.hlp) contains help for each property, method, and event. While
using the Microsoft Visual Basic editor, if the cursor is placed over a Blues method, property, or
event and the F1 key is pressed, then the associated help topic will be displayed. Each topic
includes the format of the topic and an example of how to use it.
ActiveX Properties
BLUES User Manual………………………………Page:185
NEWHART SYSTEMS INC.
_______________________________________________
Each Blues ActiveX control has a set of properties that may be set or read from its respective
container application. The properties govern what the control looks like and if software
installation has been activated as part of its functionality. These properties may be set from the
HTML source code of a WEB page so that when the WEB page is viewed, the Blues ActiveX
control has the correct properties. Each property may also be read or changed from Visual Basic
through the control. These properties are described below:
bAdjustFontToWindowSize
This property is either true or false. When it is true, the control will select the largest possible font
size that allows the whole host screen to be displayed. When a specific font is choosen by an
operator, this property is automatically set to false so that the specific font is displayed. This
property is stored in the Blues database. It may be changed from the terminal session window,
from the Blues Manager application, or programatically.
Visual Basic Example
if (BluesSession1.bAdjustFontToWindowSize = True) Then
‘ the option is on
Else
‘ the option is off
End if
bAppendToFile
This property is either true or false. If it is true, and a mnuFilePrintScreen method is performed,
then the screen contents will be added to the end of the print file. This property in only
meaningful when the bEnablePrintToDisk property is True. This property is stored in the Blues
database. It may be changed from the terminal session window, from the Blues Manager
application, or programatically.
Visual Basic Example
if (BluesSession1.bAppendToFile = True) Then
BLUES User Manual………………………………Page:186
NEWHART SYSTEMS INC.
_______________________________________________
‘‘ the option is on
Else
‘‘ the option is off
‘End if
bDisplayInUppercase
This property is either true or false. When it is true, the control will display the host screen in all
uppercase characters. This feature is beneficial when the control is sizes less than 640X480 and
makes the host screen easier to read. This property is stored in the Blues database. It may be
changed from the terminal session window, from the Blues Manager application, or
programatically.
Visual Basic Example
‘ turn on the option
BluesSession1.bDisplayInUpperCase = True
bEnableAlarm
This property is either true or false. When it is true, the control will play a beep sound when the
host sends the appropriate sequence. If this feature is off, then the control operates in silent
mode. This property is stored in the Blues database. It may be changed from the terminal
session window, from the Blues Manager application, or programatically.
Visual Basic Example
‘ turn on the option
BluesSession1.bEnableAlarm = True
bEnablePrintToDisk
This property is either true or false. When it is true, the control will print to the specified disk file
when a screen print is performed. This property is stored in the Blues database. It may be
changed from the terminal session window, from the Blues Manager application, or
BLUES User Manual………………………………Page:187
NEWHART SYSTEMS INC.
_______________________________________________
programatically. The bAppendToFile property determines if the screen is added to the end of the
print file or is the file is created new
Visual Basic Example
‘ turn on the option
BluesSession1.bEnablePrintToDisk = True
‘ print to the disk file
BluesSession1.mnuFilePrintScreen
bEnablePrinterOutput
This property is either true or false. When it is true, the control will print to the specified printer
when a screen print is performed. This property is stored in the Blues database. It may be
changed from the terminal session window, from the Blues Manager application, or
programatically.
Visual Basic Example
‘ turn on the option
BluesSession1.bEnablePrinterOutput = True
‘ print the host screen
BluesSession1.mnuFilePrintScreen
bHLLAPITraceOn
This property indicates if the HLLAPI trace is active. Its value is either true or false. If this
property is set to true, then the open file window will be displayed to select the name of the file to
trace the hllapi api into.
Visual Basic Example
‘ turn on the option
BluesSession1.bHLLAPITraceOn = True
BLUES User Manual………………………………Page:188
NEWHART SYSTEMS INC.
_______________________________________________
bIsConnected
This property may be compared to determine is the Blues session is currently connected to a
host. If it has a value of True, then the session is connected, else it is not.
Visual Basic Example
‘ see is session is connected to a host computer
if (BluesSession1.bIsConnected = True) Then
‘ it is connected
Else
‘ it is not connected
End If
bNotifyWhenMinimized
This property is either true or false. If it is set to true and the Blues terminal session window is
minimized and receives something from the host computer, then a notification window is
displayed to the operator to indicate that the host has changes the screen.
Visual Basic Example
‘ turn on the option
BluesSession1.bNotifyWhenMinimized = True
bPlayingMacroNow
This property may be checked to determine if a macro is currently being played. If its value is
true, then a macro is currently being played.
Visual Basic Example
BLUES User Manual………………………………Page:189
NEWHART SYSTEMS INC.
_______________________________________________
‘ see if session is playing a macro
if (BluesSession1.bPlayingMacroNow = True) Then
‘ it is playing a macro now
Else
‘ it is not playing a macro now
End If
bRecordingMacroNow
This property may be checked to determine if a macro is currently being recorded. If its value is
true, then a macro is currently being recorded.
Visual Basic Example
‘ see if session is recording a macro
if (BluesSession1.bRecordingMacroNow = True) Then
‘ it is recording a macro now
Else
‘ it is not recording a macro now
End If
bSaveOnClose
This property is either true or false. When it is true, the Blues session will save its current
settings in the Blues database whenever it is closed This property is stored in the Blues
database. It may be changed from the terminal session window, from the Blues Manager
application, or programatically.
Visual Basic Example
‘ turn on the option
BluesSession1.bSaveOnClose = True
BLUES User Manual………………………………Page:190
NEWHART SYSTEMS INC.
_______________________________________________
bToolbarVisible
This property is either true or false. When it is true, the Blues session will display its standard
toolbar on the top of the window. This property is stored in the Blues database. It may be
changed from the terminal session window, from the Blues Manager application, or
programatically.
Visual Basic Example
‘ turn off the toolbar
BluesSession1.bToolbarVisable = False
bTypeAheadEnabled
This property is either true or false. When it is true, the type ahead feature is enabled. Type
ahead is the ability to enter keys while the terminal session is receiving data from the host.
Keystrokes are queued up until the keyboard is enabled. This property is stored in the Blues
database. It may be changed from the terminal session window, from the Blues Manager
application, or programatically.
Visual Basic Example
‘ turn off type ahead
BluesSession1.bTypeAheadEnabled = False
bUseTrueTypeFont
This property is either true or false. When it is true, the ActiveX control displays the host screen
with a true type font. If it is false, then the host screen is displayed in the Blues screen font. This
BLUES User Manual………………………………Page:191
NEWHART SYSTEMS INC.
_______________________________________________
property is stored in the Blues database. It may be changed from the terminal session window,
from the Blues Manager application, or programatically.
Visual Basic Example
‘ turn on True Type fonts
BluesSession1.bTrueTypeFont = True
bViewMenubar
This property is either true or false. When it is true, the Blues Session displays the standard
menu on the top of its window This property is stored in the Blues database. It may be changed
from the terminal session window, from the Blues Manager application, or programatically.
Visual Basic Example
‘ remove the menu bar
BluesSession1.bViewMenubar = False
bViewTitlebar
This property is either true or false. When it is true, the Blues Session displays the standard
titlebar on the top of its window This property is stored in the Blues database. It may be changed
from the terminal session window, from the Blues Manager application, or programatically.
Visual Basic Example
‘ remove the titlebar
BluesSession1.bViewTitlebar = False
BLUES User Manual………………………………Page:192
NEWHART SYSTEMS INC.
_______________________________________________
foundTextOnColumn
This property contains the column that a string was found on. This property is only valid after a
successful findDisplayText or waitForDisplayString method has been done. The property is 1
based and may range from 1 to the number of columns in the host session screen.
Visual Basic Example
if(BluesSession1.findDisplayString(“RUNNING”,1,1)) Then
‘ foundTextOnColumn contains the column of the string
Else
‘string is not on screen
End If
foundTextOnRow
This property contains the row that a string was found on. This property is only valid after a
successful findDisplayText or waitForDisplayString method has been done. The property is 1
based and may range from 1 to the number of rows in the host session screen.
Visual Basic Example
if(BluesSession1.findDisplayString(“RUNNING”,1,1)) Then
‘ foundTextOnRow contains the row of the string
Else
‘string is not on screen
End If
FTPPassword
BLUES User Manual………………………………Page:193
NEWHART SYSTEMS INC.
_______________________________________________
FTPPassword may be used to specify an FTP password associated with the FTPUserName
property value. Some ftp sites require the name and password of a valid user to be used in the
file transfer. If the InstallationFile property value is blank, then this field has no meaning.
Visual Basic Example
BluesSession1.FTPPassword = “mypassword”
FTPServerName
FTPServerName specifies the optional name or IP address of an ftp server where the
InstallFileName property value resides. If this option is left blank, then it is assumed that the
InstallFileName field contains the name of a file located on a hard drive or a network share/file
server. If the InstallationFile property value is blank, then this field has no meaning.
Visual Basic Example
BluesSession1.FTPServerName = “www.newhartsystems.com”
FTPServerPort
FTPServerPort may be used to specify the ftp port that the FTPServerName property value is
listening on for file transfers. If no value is specified, then port 21 is used. Port 21 is the standard
FTP port for transferring files. If the InstallationFile property value is blank, then this field has no
meaning.
Visual Basic Example
BluesSession1.FTPServerPort = 21
BLUES User Manual………………………………Page:194
NEWHART SYSTEMS INC.
_______________________________________________
FTPUserName
FTPUserName may be used to specify an FTP user name. Some ftp sites require the name of a
valid user to be used in the file transfer. If FTPUserName is not specifies, then the file transfer is
done anonymously. If the InstallationFile property value is blank, then this field has no meaning.
Visual Basic Example
BluesSession1.FTPUserName = “Earl”
InitialWindowState
The initial window state determines how the standard Blues session is configured to be displayed
when it is first started. It has the following meanings:
0 - Normal window
1- Maximized window
2 - Minimized window
3 - Hidden window
4 - Previous size and location
Visual Basic Example
if (BluesSession1.InitialWindowState = 0) Then
‘ window starts maximized
InstallOptions
The Blues 2000 installation is contained in the setup.msi file. Whenever an .msi file is started or
run, it is passed to the Microsoft Windows Installer for execution. A typical installation is done
BLUES User Manual………………………………Page:195
NEWHART SYSTEMS INC.
_______________________________________________
when the user starts or runs the setup.exe file from the CD or ZIP file. The setup.exe application
starts the Windows Installer and passes it the name of the .msi (setup.msi) file to install. It is
possible to start the installation from a command line or batch file such that additional command
line arguments determine how the installation is done. The Windows Installer application
(Msiexec.exe) can take many command line options that may be used to perform such things as
(1) install in quiet mode, (2) installation for everyone who uses the workstation or just yourself, (3)
set the folder where the software is installed, (4) set the folder where the Blues DATABASE is
located, (5) set the default Blues PRIVATE folder, and (6) set the Blues USERNAME. This
allows a system administrator to create a batch file that when executed, installs and preconfigures Blues 2000 for the workstation.
To start the Blues 2000 installation over the Windows Installer technology, the command line has
the following format:
Msiexec.exe [options] /I setup.msi [PROPERTY1=a] [PROPERTY2=b] …
Where arguments in brackets are optional, the options may be any valid Microsoft Installer
option, the msi file setup.msi is being installed, and optional properties may be set.
MSI Options
The following table describes the command-line options for this program.
Option
Parameters
Meaning
/I
Package|ProductCode
Installs or configures a product.
/f
[p|o|e|d|c|a|u|m|s|v]
Package|ProductCode
Repairs a product. This option ignores any
property values entered on the command line.
The default argument list for this option is
'pecms'. This option shares the same argument
list as the REINSTALLMODE property.
p - Reinstall only if file is missing
o - Reinstall if file is missing or if an older version is
installed.
e - Reinstall if file is missing or an equal or older
version is installed.
d - Reinstall if file is missing or a different version is
installed.
BLUES User Manual………………………………Page:196
NEWHART SYSTEMS INC.
_______________________________________________
c - Reinstall if file is missing or the stored checksum
doesn't match the calculated value. Only repairs files
that have msidbFileAttributesChecksum in the
Attributes column of the File table.
a - Force all files to be reinstalled.
u - Rewrite all required user specific registry entries.
m - Rewrite all required machine specific registry
entries.
s - Overwrite all existing shortcuts.
v - Run from source and re-cache the local package.
/a
Package
Administrative installation option. Installs a
product on the network.
/x
Package|ProductCode
Uninstalls a product.
/j
[u|m]Package
Advertises a product. This option ignores any
property values entered on the command line.
or
[u|m]Package /t Transform List
/L
u - Advertise to the current user.
m - Advertise to all users of machine.
or
g - Language ID
[u|m]Package /g LanguageID
t - Applies transform to advertised package.
[i|w|e|a|r|u|c|m|o|p|v|+|!]Logfile
Specifies path to log file and the flags indicate
which information to log.
i - Status messages
w - Non-fatal warnings
e - All error messages
a - Start up of actions
r - Action-specific records
u - User requests
c - Initial UI parameters
m - Out-of-memory or fatal exit information
BLUES User Manual………………………………Page:197
NEWHART SYSTEMS INC.
_______________________________________________
o - Out-of-disk-space messages
p - Terminal properties
v - Verbose output
+ - Append to existing file
! - Flush each line to the log
"*" - Wildcard, log all information except for the v
option. To include the v option, specify "/l*v".
/m
filename
Generates an SMS status .mif file. Must be used
with either the install (-i), remove (-x),
administrative installation (-a), or reinstall (-f)
options. The ISMIF32.DLL is installed as part of
SMS and must be on the path.
The fields of the status mif file are filled with the
following information:
Manufacturer - Author
Product - Revision Number
Version - Subject
Locale - Template
Serial Number - not set
Installation - set by ISMIF32.DLL to "DateTime"
InstallStatus - "Success" or "Failed"
Description - Error messages in the following order: 1)
Error messages generated by installer. 2) Resource
from Msi.dll if install could not commence or user
exit. 3) System error message file. 4) Formatted
message: "Installer error %i", where %i is error
returned from Msi.dll
/p
PatchPackage
Applies a patch. To apply a patch to an installed
administrative image you must combine options
as follows:
/p <PatchPackage> /a <Package>
/q
n|b|r|f
Sets user interface level.
BLUES User Manual………………………………Page:198
NEWHART SYSTEMS INC.
_______________________________________________
q , qn - No UI
qb - Basic UI
qr - Reduced UI with a modal dialog box displayed at
the end of the installation.
qf - Full UI with a modal dialog box displayed at the
end.
qn+ - No UI except for a modal dialog box displayed
at the end.
qb+ - Basic UI with a modal dialog box displayed at
the end. The modal box is not displayed if the user
cancels the installation.
qb- - Basic UI with no modal dialog boxes. Please
note that /qb+- is not a supported UI level.
Displays copyright information for the Windows
Installer.
/? or /h
/y
module
Calls the system API DllRegisterServer to selfregister modules passed in on the command line.
For example, msiexec /y my_file.dll.
This option is only used for registry information that
can't be added using the registry tables of the .msi file.
/z
module
Calls the system API DllUnRegisterServer to
unregister modules passed in on the command
line. For example, msiexec /z my_file.dll.
This option is only used for registry information that
can't be removed using the registry tables of the .msi
file.
The options /i, /x, /f[p|o|e|d|c|a|u|m|s|v], /j[u|m], /a, /p, /y and /z should not be used
together. The one exception to this rule is that patching an administrative installation
requires using both /p and /a. The options /t and /g should only be used with /j. The
options /l and /q can be used with /i, /x, /f[p|o|e|d|c|a|u|m|s|v], /j[u|m], /a, and /p.
MSI Properties
BLUES User Manual………………………………Page:199
NEWHART SYSTEMS INC.
_______________________________________________
The Blues 2000 installation package supports some special properties that enable custom
installations to be done without operator intervention. To specify a property, use the syntax
property=value.
Property
Value
Meaning
ALLUSERS
0 or 1
Set value to 1 to have the software installed for
all users of the PC, else it is installed only for
the current user.
COMMONDESKTOP YES or NO
If this value is set to YES, then the desktop shortcuts
are created for all users. This option should be set if
the ALLUSERS property has been set to 1.
INSTALLDIR
Folder name
May be used to set the folder where the
software will be installed. If this property is not
set, then the software will be installed in the
Progeam Files\Blues folder.
LANGUAGE
US or GERMAN
Selects the native language that the Blues
software will start in.
Blues Database folder
May be used to set the default Blues Database
folder. The Blues Database contains the necessary
configuration information for each Blues user. This
value may be set to a local drive, a redirected
network drive, or a network share name.
DBASE
PRIVATE
Blues Private folder
USERNAME
Blues User Name
May be used to set the default Blues Private folder.
Each Blues user has a Blues Private folder where
keyboard mappings, macros, and file transfer
settings are stored.
The Blues Database contains each users
configuration settings. The Blues user name is the
key to the database and provides a mapping from a
user name to a Blues configuration. The user name
“*” is a special name called a wild card. When the
wild card name is specified and Blues emulation is
launched, then Blues will query the Windows
desktop to obtain the name of the user who is signed
on to Windows and use that name as the key into the
Blues database configuration.
BLUES User Manual………………………………Page:200
NEWHART SYSTEMS INC.
_______________________________________________
Example
The following example will install the Blues software in quiet mode in a folder named c:\blues in
quiet mode. The Blues software will run in the English language. The wild user name is selected
and the Blues database resides on a network share. The private folder is set to a redirected
network drive that is unique for each user so that each user may customize their keyboard
mapping and record and play their own macros.
Msiexec.exe /qb /I d:\setup.msi INSTALLDIR=C:\Blues ALLUSERS=1 COMMONDESKTOP=1
USERNAME=* DBASE=\\server\Blues PRIVATE=P:\
Visual Basic Example
BluesSession1.InstallOptions = “ALLUSERS=1 INSTALLDIR=C:\Blues”
InstallProgram
InstallProgram may be set to “Msiexec.exe” to inform the control that the InstallationFile property
contains the name of a Windows installer msi file. When InstallProgram is set to “Msiexec.exe”,
the InstallOptions property value may specify program arguments to pass to the Msiexec.exe
application. If InstallFileName is left blank, then the InstallProgram property value is executed
without command line arguments. See InstallOptions property for more details.
Visual Basic Example
BluesSession1.InstallProgram = “Msiexec.exe”
BluesSession1.InstallationFile = “x:\setup.msi”
InstallationFile
The InstallationFile property contains the name of a Blues installation file. The InstallationFile
may contain the name of a file on a network share, the name of a file on an ftp server, or may be
left blank to represent that the control is not to perform software installation and maintenance.
When a file name is set, it is assumed that the file is (A): the standard Windows installer file for
Blues that is located on the Blues CD called setup.msi or Networksetup.msi, or (B) the name of a
Blues package (.exe) that was created from the Blues Manager application.
If the
BLUES User Manual………………………………Page:201
NEWHART SYSTEMS INC.
_______________________________________________
FTPServerName property value is also set, then the file is assumed to be located on an ftp server
and is downloaded to a temporary file before it is executed.
If the InstallationFile is a Windows installer msi file, then the InstallProgram property value should
also be set to “Msiexec.exe”. This is the name of the Microsoft installer executable that would
install the msi file. See InstallProgram for more details on msi file execution.
Visual Basic Example
BluesSession1.InstallProgram = “Msiexec.exe”
BluesSession1.InstallationFile = “x:\setup.msi”
SessionShortName
SessionShortName is a single character that defines which Blues session the control will
associate itself with. Each Blues session is configured with a Session Short Name. Session
short names begin with session A and end with session Z. When the SessionShortName is
changed, the control will switch to the associated Blues session. If that particular session has not
been started, the control will automatically start the session. The control may also be forced to
another session with a right mouse click over the control and selecting one of the configured
Blues sessions.
Visual Basic Example
BluesSession1.SessionShortName = “A”
Visible
This property is either true or false. If it is false, then the control is hidden from view. If this
property is true, then the control is visible.
BLUES User Manual………………………………Page:202
NEWHART SYSTEMS INC.
_______________________________________________
Visual Basic Example
BluesSession1.Visible = False ‘hide the control
ActiveX Methods
Methods are another name for functions that may be called by a container application to get
properties, set properties, or to perform some type of function that is contained in the control.
The Blues methods include a method to get or set any of its properties, install Blues, perform a
standard HLLAPI API call, enter keys, read the screen, etc. HLLAPI is an abbreviation for High
Level Language Application Programming Interface. HLLAPI is a standard defined by IBM and
provides a standard interface to automate any activity that an operator would perform on a
terminal session. HLLAPI may be used to read the host screen, enter keystrokes into the host
screen, send PF keys, transfer files, etc. For more information on HLLAPI or WINHLLAPI,
contact IBM directly. A method exists for every menu option in the standard Blues terminal
session window. I.e.File\Print Screen. This gives the container application access to the
complete set of functionality contained in the terminal session.
CloseFileTransferWindow
Syntax:
void objectname.CloseFileTransferWindow
Return value:
none
Description:
BLUES User Manual………………………………Page:203
NEWHART SYSTEMS INC.
_______________________________________________
This method will close the file transfer window if it is open. Only the file transfer window
associated with currenly connected session. If more than one Blues session have file transfer
windows opened, then only the one associated with control is closed.
Visual Basic Example:
BluesSession1.CloseFileTransferWindow
ConnectToDestination
Syntax:
bool objectname.ConnectToDestination(DestinationNumber as long)
Return value:
True(1) - connection successful
False(0) - connection failed
Description:
This method will connect the associated session to a host using the specified destination. Each
session can be configured for multiple host destinations. The destinations are numbered starting
at 1 in the order they appear when configuring the destination in either the terminal session or the
Blues Manager application.
Visual Basic Example:
if(BluesSession1.ConnectToDestination(1)) Then
‘ successful
Else
BLUES User Manual………………………………Page:204
NEWHART SYSTEMS INC.
_______________________________________________
‘ failed
End if
DisconnectFromHost
Syntax:
bool objectname.DisconnectFromHost
Return value:
True(1) - disconnect successful
False(0) - disconnect failed, session was not connected
Description:
This method will disconnect the associated session from a host. This method has the same
functionality as the mnuGatewayDisconnect method.
Visual Basic Example:
if(BluesSession1.DisconnectFromHost) Then
‘ successful
Else
‘ failed
End if
EnumMacroNames
BLUES User Manual………………………………Page:205
NEWHART SYSTEMS INC.
_______________________________________________
Syntax:
void objectname.EnumMacroNames
Return value:
none
Description:
This method will enumerate all valid macro names by calling the evtEnumMacroNamesProc
event. The evtEnumMacroNamesProc event procedure is called once for each macro that is
stored in the Blues private folder. The names of the returned macros may then be used in calls
to the RunMacro method.
Visual Basic Example:
BluesSession1.EnumMacroNames
EnumPortfolioNames
Syntax:
void objectname.EnumPortfolioNames
Return value:
none
BLUES User Manual………………………………Page:206
NEWHART SYSTEMS INC.
_______________________________________________
Description:
This method will enumerate all valid file transfer portfolio names by calling the
evtEnumPortfolioNamesProc event. The evtEnumPortfolioNamesProc event procedure is called
once for each file transfer portfolio that is stored in the Blues private folder. The names of the
returned porfolios may then be used in calls to the StartPortfolioTransfer method.
Visual Basic Example:
BluesSession1.EnumPortfolioNames
findDisplayText
Syntax:
bool objectname.findDisplayText(strAnsiTextToFind As String,StartingRow As
Long,StartingColumn As Long)
Return value:
True - Text found at properties foundTextOnRow and foundTextOnColumn
False - Text is not on host screen.
Description:
This method may be used to determine if a particular string is being displayed on the host screen.
The string is an Ansi string. The starting row and column determine where the search starts.
The search is performed from the starting row and column to the end of the host screen. If the
text is found, then the properties foundTextOnRow and foundTextOnColumn contain its location.
The Search string is case sensitive. i.e. “RUNNING” is not the same as “running”
BLUES User Manual………………………………Page:207
NEWHART SYSTEMS INC.
_______________________________________________
Visual Basic Example:
if (BluesSession1.findDisplayText(“RUNNING”,1,1)) Then
‘the word running is on the screen, the properties
‘foundTextOnRow and foundTextOnColumn contain
‘the location
End If
getCursorColumn
Syntax:
long objectname.GetCursorColumn
Return value:
long - the column where the cursor is located in the host session screen
Description:
This method may be used to determine what column the cursor is located in on the host session
Visual Basic Example:
CursorColumn = BluesSession1.getCursorColumn
getCursorRow
BLUES User Manual………………………………Page:208
NEWHART SYSTEMS INC.
_______________________________________________
Syntax:
long objectname.GetCursorRow
Return value:
long - the row where the cursor is located in the host session screen
Description:
This method may be used to determine what row the cursor is located in on the host session
Visual Basic Example:
CursorRow = BluesSession1.getCursorRow
getDisplayAnsiText
Syntax:
string objectname.GetDisplayText(StartingRowNumber As long,StartingColumnNumber
As Long,Length As Long)
Return value:
BLUES User Manual………………………………Page:209
NEWHART SYSTEMS INC.
_______________________________________________
String with the Ansi text from the host screen
Description:
This method may be used to copy text from the host session to a buffer in the container
application. Text is returned starting at the row and column specified. The length argument
specifies the amount of text to copy. The text is returned in the Ansi character set.
Visual Basic Example:
Dim Screen As String
‘ Readn whole screen 24 rows by 80 columns
Screen = BluesSession1.getDisplayText(1,1,1920)
‘
‘ Screen now contains a copy of the host screen
getDislayColumns
Syntax:
long objectname.GetDisplayColumns
Return value:
long - the number of columns in the host session screen
BLUES User Manual………………………………Page:210
NEWHART SYSTEMS INC.
_______________________________________________
Description:
This method may be used to determine how many columns are on the host session screen.
Visual Basic Example:
Columns = BluesSession1.getDisplayColumns
getDisplayRows
Syntax:
long objectname.GetDisplayRows
Return value:
long - the number of rows in the host session screen
Description:
This method may be used to determine how many rows are on the host session screen.
Visual Basic Example:
BLUES User Manual………………………………Page:211
NEWHART SYSTEMS INC.
_______________________________________________
Rows = BluesSession1.getDisplayRows
getEmulationType
Syntax:
long objectname.getEmulationType
Return value:
long - the emulation type of the host session
0 - 3270 terminal emulation
1 - 5250 terminal emulation
2 - DEC VT terminal emulation
Description:
This method may be used to determine what emulation mode the Blues session is currently in.
Visual Basic Example:
if(BluesSession1.getEmulationType = 0) Then
‘3270 emulation
End If
BLUES User Manual………………………………Page:212
NEWHART SYSTEMS INC.
_______________________________________________
GetSelectionEndColumn
Syntax:
long objectname.getSelectionEndColumn
Return value:
long - the ending column number of the last selected area.
Description:
This method may be used to determine the ending column number of the last selected area of
the session. The ending row and ending column determine the bottom right corner of the last
mouse selection. A mouse selection is done to highlight an area of the terminal screen for
subsequant cut/copy/paste operations.
Visual Basic Example
EndingCol = BluesSession1.getSelectionEndColumn
getSelectionEndRow
Syntax:
long objectname.getSelectionEndRow
Return value:
BLUES User Manual………………………………Page:213
NEWHART SYSTEMS INC.
_______________________________________________
long - the ending row number of the last selected area.
Description:
This method may be used to determine the ending row number of the last selected area of the
session. The ending row and ending column determine the bottom right corner of the last mouse
selection. A mouse selection is done to highlight an area of the terminal screen for subsequant
cut/copy/paste operations.
getSelectionStartColumn
Syntax:
long objectname.getSelectionStartColumn
Return value:
long - the starting column number of the last selected area.
Description:
This method may be used to determine the starting column number of the last selected area of
the session. The starting row and starting column determine the top left corner of the last mouse
selection. A mouse selection is done to highlight an area of the terminal screen for subsequant
cut/copy/paste operations.
Visual Basic Example
StartingCol = BluesSession1.getSelectionStartColumn
BLUES User Manual………………………………Page:214
NEWHART SYSTEMS INC.
_______________________________________________
getSelectionStartRow
Syntax:
long objectname.getSelectionStartRow
Return value:
long - the starting row number of the last selected area.
Description:
This method may be used to determine the starting row number of the last selected area of the
session. The starting row and starting column determine the top left corner of the last mouse
selection. A mouse selection is done to highlight an area of the terminal screen for subsequant
cut/copy/paste operations.
Visual Basic Example
StartingRow = BluesSession1.getSelectionStartRow
GetWindowTitle
Syntax:
string objectname.GetWindowTitle
Return value:
BLUES User Manual………………………………Page:215
NEWHART SYSTEMS INC.
_______________________________________________
String with the title of the associated Blues session. The title is configurable from the
Blues Manager Application and can be used to identify which session the control is associated
with.
Description:
This method may be used to obtain the window title of the Blues terminal session that the control
is associated with.
Visual Basic Example:
Dim Title As String
Title = BluesSession1.GetWindowTitle
HideSession
Syntax:
void objectname.HideSession
Return value:
none
Description:
This method may be used to hide the Blues terminal session window associated with the control.
The ShowSession method may also be called to re-display the Blues terminal session window.
BLUES User Manual………………………………Page:216
NEWHART SYSTEMS INC.
_______________________________________________
Visual Basic Example:
BluesSession1.HideWindow
hllapi
Syntax:
long objectname.hllapi(Function As Long,hllapistring As String,Length As Long)
Return value:
HLLAPI or EHLLAPI return code
Description:
The hllapi method may be used to perform any standard IBM Hllapi call. This method takes three
arguments as input and returns a return code. The three arguments are the function code, the
string, and the length. The function code is a standard hllapi function, for example a
CONNECTPS command is a binay 1 and a DISCONNECTPS is a binary 2. The string contains
whatever options or return values that coorispond to the specific function being performed, for
example, the string would contain a A if a CONNECTPS was being performed to connect to
presentation space (sessionshortname) A. The length field contains the length of the string
argument. The return code is the return code from the hllapi api call.
Visual Basic Example:
‘
‘ Connect to Session
BLUES User Manual………………………………Page:217
NEWHART SYSTEMS INC.
_______________________________________________
if(BluesSession1.hllapi(1,”A”,1) = 0) Then
‘ session is connected
End If
InstallBlues
Syntax:
long objectname.InstallBlues
Return value:
True - Installation is in progress
False - Installation was not started
Description:
This method may be used to install the Blues software. Prior to calling this method, the
InstallationFile property must be set the name of an installation file. The FTPServerName,
FTPUserName, FTPPassword, InstallOptions, and InstallProgram properties determine where
and how to install the software.
Visual Basic Example:
BluesSession1.InstallBlues
keyAnsiText
Syntax:
bool objectname.keyAnsiText(strText As String)
BLUES User Manual………………………………Page:218
NEWHART SYSTEMS INC.
_______________________________________________
Return value:
True - Text entered without error
False - Text could not be entered
Description:
This method is used to copy/enter text into the host screen. The text is entered into the terminal
session as if an operator had entered the text from the keyboard. This is the main text entry
method. The keyTerminalKey method may be used to enter any type of special emulation key
such as ENTER, PF1, Field Exit, DC1, etc.
Visual Basic Example:
BluesSession1.keyAnsiText(“myname”)
BluesSession1.keyTerminalKey(“TAB FORWARD”);
BluesSession1.keyAnsiText(“password”)
BluesSession1.keyTerminalKey(“ENTER”);
keyTerminalKey
Syntax:
bool objectname.keyTerminalKey(strKeyName As String)
Return value:
True - Key entered without error
False - Key could not be entered
BLUES User Manual………………………………Page:219
NEWHART SYSTEMS INC.
_______________________________________________
Description:
This method is used to enter a special emulation key into the Blues session. The keyAnsiText
method may be used to enter normal text into the session. The argument is a string that
represents the desired key. The following table illustrates the names of all valid keys:
Key Name
3270 Function
5250 Function
DEC VT Function
ENTER
ENTER
ENTER
ENTER
PF1
PF1
F1
F1
PF2
PF2
F2
F2
PF3
PF3
F3
F3
PF4
PF4
F4
F4
PF5
PF5
F5
F5
PF6
PF6
F6
F6
PF7
PF7
F7
F7
PF8
PF8
F8
F8
PF9
PF9
F9
F9
PF10
PF10
F10
F10
PF11
PF11
F11
F11
PF12
PF12
F12
F12
PF13
PF13
F13
F13
PF14
PF14
F14
F14
PF15
PF15
F15
F15
PF16
PF16
F16
F16
PF17
FP17
F17
F17
PF18
PF18
F18
F18
PF19
PF19
F19
F19
PF20
PF20
F20
F20
PF21
PF21
PF22
PF22
PF23
PF23
BLUES User Manual………………………………Page:220
NEWHART SYSTEMS INC.
_______________________________________________
PF24
PF24
PA1
PA1
PA1
PA2
PA2
PA2
PA3
PA3
PA3
SYSTEM REQUEST
SYSTEM REQUEST
`SYSTEM REQUEST
TAB
TAB forward
TAB forward
TAB forward
BACKTAB
TAB back
TAB back
TAB back
NEW LINE
NEW LINE
NEW LINE
NEW LINE
CLEAR
CLEAR
CLEAR
CLEAR
ALTERNATE
CURSOR
ALTERNATE
CURSOR
ALTERNATE
CURSOR
ALTERNATE
CURSOR
ATTENTION
ATTENTION
ATTENTION
CURSOR SELECT
CURSOR SELECT
CURSOR SELECT
DUPLICATE
DUPLICATE
DUPLICATE
ERASE EOF
ERASE EOF
ERASE EOF
ERASE INPUT
ERASE INPUT
ERASE INPUT
FIELD MARK
FIELD MARK
FIELD MARK
HOME
HOME
HOME
FIELD PLUS
FIELD PLUS
FIELD MINUS
FIELD MINUS
ROLL UP
ROLL UP
ROLL DOWN
ROLL DOWN
HELP
HELP
HOST PRINT
HOST PRINT
HOME
BREAK
BREAK
ESCAPE
ESCAPE
HOLD
HOLD
COMPOSE
COMPOSE
DO
DO
NULL
NULL
PAGE UP
PAGE UP
BLUES User Manual………………………………Page:221
NEWHART SYSTEMS INC.
_______________________________________________
PAGE DOWN
PAGE DOWN
REMOVE
REMOVE
END
END
RETURN
RETURN
SOH
SOH
STX
STX
ETX
ETX
EOT
EOT
ACK
ACK
BEL
BEL
HT
HT
VT
VT
FF
FF
CR
CR
SO
SO
SI
SI
DLE
DLE
DC1
DC1
DC2
DC2
DC3
DC3
DC4
DC4
NAK
NAK
SYN
SYN
ETB
ETB
CAN
CAN
EM
EM
SUB
SUB
FS
FS
GS
GS
RS
RS
US
US
BLUES User Manual………………………………Page:222
NEWHART SYSTEMS INC.
_______________________________________________
Visual Basic Example:
BluesSession1.keyAnsiText(“myname”)
BluesSession1.keyTerminalKey(“TAB FORWARD”);
BluesSession1.keyAnsiText(“password”)
BluesSession1.keyTerminalKey(“ENTER”);
mnuXY
Syntax:
bool objectname.mnuXY
X = menu name, Y = menu item name
Return value:
True - Menu command performed
False - Menu command was not performed
Description:
Each menu item in the Blues terminal session window may be performed through a method.
These methods all begin with the letters mnu, followed by the name of the menu, followed by the
name of the menu item. For Example: If you wanted to print the host screen, the method is
named mnuFilePrintScreen. Consult the terminal session documentation to find out what each
method does. The following list of methods are supported by the Blues activeX control.
BLUES User Manual………………………………Page:223
NEWHART SYSTEMS INC.
_______________________________________________
mnuEditAppend
mnuEditClear
mnuEditCopy
mnuEditCut
mnuEditPaste
mnuEditSelectAll
mnuEditViewClipboard
mnuFileAppendToFile
mnuFileDiskFile
mnuFileEHLLAPITrace
mnuFileEnablePrintToDisk
mnuFileEnablePrinterOutput
mnuFileExit
mnuFileExitAndCloseSessions
mnuFilePrintFont
mnuFilePrintScreen
mnuFilePrintSetup
mnuFileSaveSettings
mnuFileSaveSettingsOnClose
mnuGatewayConnect
mnuGatewayDisconnect
mnuHelpDisplaySessionHelp
mnuHelpIndex
mnuHelpManagerHelp
mnuHelpManualHelp
mnuHelpPrinterSessionHelp
mnuMacroDelete
BLUES User Manual………………………………Page:224
NEWHART SYSTEMS INC.
_______________________________________________
mnuMacroEdit
mnuMacroOptions
mnuMacroPlay
mnuMacroRecord
mnuMacroStopMacro
mnuSettingsApiOptions
mnuSettingsConfigureCursor
mnuSettingsConfigureHotspots
mnuSettingsConfigureKeyboard
mnuSettingsEnableAlarm
mnuSettingsMouseConfiguration
mnuSettingsNotifyWhenMinimized
mnuSettingsTypeAhead
mnuTransferFiles
mnuViewAdjustFontToWindowSize
mnuViewFonts
mnuViewHostColorMapping
mnuViewMenubar
mnuViewStatusbar
mnuViewTitlebar
mnuViewToolbar
mnuViewUpperCase
mnuViewUseTrueTypeFonts
mnuViewZoomFontSmaller
mnuZoomFontLarger
Visual Basic Example:
BLUES User Manual………………………………Page:225
NEWHART SYSTEMS INC.
_______________________________________________
BluesSession1.mnuFilePrintScreen
‘print the screen
RunMacro
Syntax:
bool objectname.RunMacro(strMacroName As String)
Return value:
True - Macro was started
False - Macro could not be started
Description:
This method is used to execute a pre-recorded Blues macro. The EnumMacroNames method
may be used to acquire the names of all existing macro files. The bPlayingMacroNow property
may be used to determine when the macro completes.
Visual Basic Example
if(BluesSession1.RunMacro(“Logon”) = True) Then
‘ macro is running
End If
setCursorLocation
Syntax:
BLUES User Manual………………………………Page:226
NEWHART SYSTEMS INC.
_______________________________________________
bool objectname.setCursorLocation(RowNumber,ColumnNumber)
Return value:
True - Success
False -Failure
Description:
This method is used to move the cursor of the host session to a specified location. This method
should not be used in DEC VT mode, because to host will loose track of where the cursor is
currently located. The keyTerminalKey method may be used to move the cursor to the desired
location.
Visual Basic Example
if(BluesSession1.setCursorLocation(1,1) = True) Then
‘ cursor is home
End If
ShowSession
Syntax:
bool objectname.ShowSession()
Return value:
True - Success
False -Failure
BLUES User Manual………………………………Page:227
NEWHART SYSTEMS INC.
_______________________________________________
Description:
This method is used to bring the Blues terminal session associated with the control to the
foreground and activate the window.
Visual Basic Example
if(BluesSession1.ShowWindow = True) Then
‘ Blues session is now the active window
End If
StartPortfolioTransfer
Syntax:
bool objectname.StartPortfolioTransfer(strPortfolioName As String)
Return value:
True - File transfer process has been started, evtTransferComplete event will inform
application of the file transfer results
False -File transfer could not be started
Description:
This method is used to transfer a portfolio. Portfolios are built with the Blues file transfer
application and contain one or more file transfer operations. The container application will be
notified when the file transfer completes by the evtTransferComplete event.
The
EnumPortfolioNames method may be called to get the names of all available portfolios. The
Blues file transfer application can be used to view the file transfer event log for details regarding
failures.
BLUES User Manual………………………………Page:228
NEWHART SYSTEMS INC.
_______________________________________________
Visual Basic Example
if(BluesSession1.StartPortfolioTransfer(“DailyInventory” = True) Then
‘ Blues session is now transfering the portfolio
End If
StartReceivingFile
Syntax:
bool objectname.StartReceivingFile(strSourceFileName As
String,strDestinationFileName As String,strSchemeName As String)
Return value:
True - File transfer process has been started, evtTransferComplete event will inform
application of the file transfer results
False -File transfer could not be started
Description:
This method is used to transfer a file from a host to a PC. The container application will be
notified when the file transfer completes by the evtTransferComplete event. The scheme name
must match a Blues file transfer scheme. File transfer schemes can be created, changed, and
deleted with the Blues file transfer application. The Blues file transfer application can be used to
view the file transfer event log for details regarding failures.
Visual Basic Example
if(BluesSession1.StartReceivingFile(“dailychanges”,”c:\temp\dailychanges”, “tso_bin” = True)
Then
BLUES User Manual………………………………Page:229
NEWHART SYSTEMS INC.
_______________________________________________
‘ Blues session is now transfering the file
End If
StartSendingFile
Syntax:
bool objectname.StartSendingFile(strSourceFileName As String,strDestinationFileName
As String,strSchemeName As String)
Return value:
True - File transfer process has been started, evtTransferComplete event will inform
application of the file transfer results
False -File transfer could not be started
Description:
This method is used to transfer a file from a PC to a host. The container application will be
notified when the file transfer completes by the evtTransferComplete event. The scheme name
must match a Blues file transfer scheme. File transfer schemes can be created, changed, and
deleted with the Blues file transfer application. The Blues file transfer application can be used to
view the file transfer event log for details regarding failures.
Visual Basic Example
if(BluesSession1.StartSendingFile(”c:\temp\dailychanges”,“dailychanges”, “tso_bin” = True) Then
‘ Blues session is now transfering the file
End If
ViewSession
BLUES User Manual………………………………Page:230
NEWHART SYSTEMS INC.
_______________________________________________
Syntax:
bool objectname.ViewSession(strSessionName As String)
Return value:
True - Success
False -Failure
Description:
This method is used to associate the activeX control with a specific Blues session. Blues
sessions are configured with the Blues Manager application and are numbered starting at 1. The
name of the first one is SESSION1. The first session would be the first session as it appears in
the Blues manager application window. After the Blues session has been associated with the
control, the control will become fully functional.
Visual Basic Example
if(BluesSession1.ViewSession(”SESSION1” = True) Then
‘ Blues session is now associated with control
End If
waitForDisplayString
Syntax:
bool objectname.waitForDisplayString(strAnsiString As String,Timeout As Long,Row As
Long,Column As Long)
Return value:
BLUES User Manual………………………………Page:231
NEWHART SYSTEMS INC.
_______________________________________________
True - String is being displayed on the session
False -Failure, timeout occured
Description:
This method is used to wait until a string of text is present on the terminal session. The text string
argument is an Ansi string. The timeout value is in seconds. The row and column may be set to
zero to indicate to look for the string on the entire screen. If the row and column are not zero,
then the string must appear at the exact row and column for a successful return code. Upon
successful completion the foundTextRow and foundTextColumn properties contain the exact
location where the string was found.
Visual Basic Example
if(BluesSession1.waitForDisplayString(”RUNNING”,10,0,0) = True) Then
‘ the word RUNNING appears on the screen.
End If
waitKeybaordEnabled
Syntax:
bool objectname.waitForKeyboardEnabled(Timeout As Long)
Return value:
True - Keyboard enabled
False -Failure, timeout occured
BLUES User Manual………………………………Page:232
NEWHART SYSTEMS INC.
_______________________________________________
Description:
This method is used to wait until the Blues session associated with the control has the keyboard
enabled. When the host is sending information to the session and when the session is sending
incormation to the host the keyboard is locked. The waitKeyboardEnabledDuration method may
also be used to wait for the keyboard to be enabled for a specified time interval.
Visual Basic Example
if(BluesSession1.waitForKeyboardEnabled(10) = True) Then
‘ keyboard is enabled.
End If
waitKeyboardEnabledDuration
Syntax:
bool objectname.waitKeyboardEnabledDuration(MinimumTimeEnabled As Long,Timeout
As Long)
Return value:
True - Keyboard has been enabled for atleast MinimumTimeEnabled argument
False -Failure, timeout occured
Description:
This method is used to wait until the Blues session associated with the control has the keyboard
enabled. The Minimum time value is in 1/1000 of a second and specifies how long the keyboard
must be enabled without being disabled. When the host is sending information to the session
BLUES User Manual………………………………Page:233
NEWHART SYSTEMS INC.
_______________________________________________
and when the session is sending incormation to the host the keyboard is locked. The
waitKeyboardEnabled method may also be used to wait for the keyboard to be enabled for a
specified time interval.
Visual Basic Example
if(BluesSession1.waitForKeyboardEnabled(10) = True) Then
‘ keyboard has been enabled for atleast 1/2 a second (500ms).
End If
waitTimeInterval
Syntax:
void objectname.waitTimeInterval(Timeout As Long)
Return value:
none
Description:
This method is used to wait a specified number of seconds.
Visual Basic Example
BluesSession1.waitTimeInterval(10)
‘ 10 seconds have elasped
BLUES User Manual………………………………Page:234
NEWHART SYSTEMS INC.
_______________________________________________
ActiveX Events
An event is a procedure in the container application (your VB application) that gets called when a
unique event occurs. When the Blues activex control want to inform the container application of
an event, a event procedure is called.
evtEnumMacroNamesProc
Syntax:
void objectname.evtEnumMacroNamesProc(LPCSTR strMacroName)
Return value:
none
Description:
This event will be called as a result of the evtEnumMacroNames Method.
The
evtEnumMacroNamesProc event procedure is called once for each macro that is stored in the
Blues private folder. The names of the returned macros may then be used in calls to the
RunMacro method.
Visual Basic Example:
Private Sub BluesSession1_evtEnumMacroNames(ByVal strMacroName As String)
BLUES User Manual………………………………Page:235
NEWHART SYSTEMS INC.
_______________________________________________
‘
‘ save macro name
‘
End Sub
evtScreenChanged
Syntax:
void objectname.ScreenChanged(LPCSTR strStatusBarText)
Return value:
none
Description:
This event will be called whenever the host screen has been changed. If any part of the host
screen changes (including the operator information area), then this event gets called. The
argument passed is an Ansi string that contains the same string that is being displayed in the
Blues terminal session window’s status bar. i.e. “LU is active, SSCP is active, etc”.
Visual Basic Example:
Private Sub BluesSession1_evtScreenChanged(ByVal strStatusbarText As String)
‘
‘ perform some type of processing based on what host application has painted on the screen
‘
End Sub
BLUES User Manual………………………………Page:236
NEWHART SYSTEMS INC.
_______________________________________________
evtEnumPortfolioNamesProc
Syntax:
void objectname.evtEnumPortfolioNamesProc(LPCSTR strPortfolioName)
Return value:
none
Description:
This event will be called as a result of the evtEnumPortfolioNames Method.
The
evtEnumPortfolioNamesProc event procedure is called once for each file transfer portfolio that is
stored in the Blues private folder. The names of the returned porfolios may then be used in calls
to the StartPortfolioTransfer method.
Visual Basic Example:
Private Sub BluesSession1_evtEnumPortfolioNames(ByVal strPortfolioName As String)
‘
‘ save Portfolio name
‘
End Sub
evtGotFocus
Syntax:
void objectname.evtGotFocus()
BLUES User Manual………………………………Page:237
NEWHART SYSTEMS INC.
_______________________________________________
Return value:
none
Description:
This event will be called whenever form that contains the activeX control receives the input focus.
When a form has the input focus, the operator may interact with it with the keyboard and mouse.
Visual Basic Example:
Private Sub BluesSession1_evtGotFocus()
‘
‘ perform some type of processing to make the window ready for the operator
‘
End Sub
evtSessionSwitched
Syntax:
void objectname.evtSessionSwitched()
Return value:
none
Description:
This event will be called whenever the control gets switched from one Blues Session to another.
This happens when the operator right mouse clicks on the control and selects a different session.
BLUES User Manual………………………………Page:238
NEWHART SYSTEMS INC.
_______________________________________________
This event gives the container application a chance to do what ever processing is required when
a session is changed. The control will display the new sessions host screen.
Visual Basic Example:
Private Sub BluesSession1_evtSessionSwitched()
‘
‘ perform some type of processing to make the window ready for the operator
‘
End Sub
evtSessionWindowHasClosed
Syntax:
void objectname.evtWindowHasClosed()
Return value:
none
Description:
This event will be called whenever the Blues session associated with the control has been
closed. This happens when the operator right mouse clicks on the control and selects the exit
menu or the exit and close all sessions menu. This informs the container application that the
session is no longer available.
Visual Basic Example:
Private Sub BluesSession1_evtWindowHasClosed()
BLUES User Manual………………………………Page:239
NEWHART SYSTEMS INC.
_______________________________________________
‘
‘end VB application too
‘
End
End Sub
evtTransferComplete
Syntax:
void objectname.evtTransferComplete(long Successful)
Return value:
none
Description:
This event will be called as a result of one of three methods having being called,
StartSendingFile, StartReceivingFile, or TransferPortfolio. This informs the container application
of the success or failure of a file transfer.
If the transfer failed, the file transfer event log may be viewed to determine the reason for the
failure.
If the input value is non-zero, then the file transfer completed successfully.
Visual Basic Example:
Private Sub BluesSession1_evtTransferComplete(ByVal Success As long)
BLUES User Manual………………………………Page:240
NEWHART SYSTEMS INC.
_______________________________________________
if(Success != 0) Then
‘ failed
Else
‘ok
End If
End Sub
evtmnuViewMenubar
Syntax:
void objectname.evtViewMenubar()
Return value:
none
Description:
This event will be called whenever the control process the View Menubar menu command. This
takes place if an operator performs a right mouse click in the control and then selects the View
Menubar menu item. This event is designed to keep the container application informed and
optionally let the container application remove its menubar.
Visual Basic Example:
Private Sub BluesSession1_evtViewMenubar()
‘
‘remove application menu bar if desired
BLUES User Manual………………………………Page:241
NEWHART SYSTEMS INC.
_______________________________________________
‘
End Sub
evtmnuViewStatusbar
Syntax:
void objectname.evtViewStatusbar()
Return value:
none
Description:
This event will be called whenever the control process the View Statusbar menu command. This
takes place if an operator performs a right mouse click in the control and then selects the View
Statusbar menu item. This event is designed to keep the container application informed and
optionally let the container application remove its statusbar.
Visual Basic Example:
Private Sub BluesSession1_evtViewViewStatusbar()
‘
‘remove application status bar if desired
‘
End Sub
BLUES User Manual………………………………Page:242
NEWHART SYSTEMS INC.
_______________________________________________
evtmnuViewTitlebar
Syntax:
void objectname.evtViewTitlebar()
Return value:
none
Description:
This event will be called whenever the control process the View Titlebar menu command. This
takes place if an operator performs a right mouse click in the control and then selects the View
Titlebar menu item. This event is designed to keep the container application informed and
optionally let the container application remove its titlebar.
Visual Basic Example:
Private Sub BluesSession1_evtViewViewTitlebar()
‘
‘remove application titlebar if desired
‘
End Sub
evtmnuViewToolbar
Syntax:
BLUES User Manual………………………………Page:243
NEWHART SYSTEMS INC.
_______________________________________________
void objectname.evtViewToolbar()
Return value:
none
Description:
This event will be called whenever the control process the View Toolbar menu command. This
takes place if an operator performs a right mouse click in the control and then selects the View
Toolbar menu item. This event is designed to keep the container application informed and
optionally let the container application remove its Toolbar.
Visual Basic Example:
Private Sub BluesSession1_evtViewViewToolbar()
‘
‘remove application Toolbar if desired
‘
End Sub
ActiveX Security Considerations
Since an ActiveX control has all the capabilities of any standard program that may be started
from Windows is has been a source of concern for possible virus contamination. Since the
Microsoft Internet Explorer will automatically download an ActiveX control and run it, Microsoft
has the ability to configure the Internet Explorer with different levels of security which control if
and when ActiveX controls may be used. An ActiveX control may be “signed” by a certificate
authority. To sign an ActiveX control, the control is imbedded with a certificate that is encrypted
BLUES User Manual………………………………Page:244
NEWHART SYSTEMS INC.
_______________________________________________
and must be decrypted and verified before the browser will let the ActiveX control be downloaded
or used. The Blues ActiveX control is signed by Verisign and may be verified before it is used.
The first time that a browser uses a signed ActiveX control, the operator is prompted to verify that
they trust the company who signed the control. The Blues ActiveX control is signed by Newhart
Systems Incorporated. By signing the control, Newhart Systems Incorporated is verifying that the
control will not maliciously harm or destroy any information stored on the computer and is safe to
use.
To be able to use the Blues ActiveX control there needs to exist a trust relationship between
Newhart Systems Incorporated and its customers. Once this has been established, then the
technology associated with signing and verifying a control ensure that no other party has
tampered with the control and that the control is safe.
BLUES User Manual………………………………Page:245
NEWHART SYSTEMS INC.
_______________________________________________
Using Microsoft Front Page with Blues ActiveX Control
The Microsoft Front Page product may be used to add Blues ActiveX controls to a WEB page.
The Blues ActiveX control is registered as part of the Blues installation. To design a WEB page
with the Blues control, Blues must be installed on the PC being used to design the WEB page.
To insert a Blues ActiveX control into a WEB page from the Front Page Editor application, select
Insert” and “Advanced” and then “ActiveX Control” from the Front Page Editor menu.
After selecting to insert an ActiveX control, the ActiveX control configuration window will be
displayed. At the top of the window, select the “Blues Session” control type. The “Code Source”
field should contain a valid ftp URL where the file BluesSession.ocx should reside. The “Code
Source” field informs the browser where to download the control from in the advent that the
control has not already been installed on a PC that views the WEB page. It is not necessary to
BLUES User Manual………………………………Page:246
NEWHART SYSTEMS INC.
_______________________________________________
set the “Code Source” field if the Blues will always be pre-installed on any PC that may view the
WEB page. The following picture depicts a Blues ActiveX control properties that may be
downloaded from the ftp site called myserver.com.
By pressing the Properties button, all of the Blues ActiveX control properties may be set. The
SessionShortName property value should be set to the session short name that is desired. If the
control is going to install Blues, then the InstallationFile property value must be set to the name of
the installation file (see preceding section-describing properties). When the InstallationFile
property value has been set, the FTPServerName property value may be used indicate that the
InstallationFile is located on an FTP server and not a hard drive or network drive/share. See the
following section for details on installing and deploying Blues over the ActiveX control.
BLUES User Manual………………………………Page:247
NEWHART SYSTEMS INC.
_______________________________________________
In this example, the following HTML source code was produced by the Front-Page Editor
application:
BLUES User Manual………………………………Page:248
NEWHART SYSTEMS INC.
_______________________________________________
<html>
BLUES User Manual………………………………Page:249
NEWHART SYSTEMS INC.
_______________________________________________
BLUES User Manual………………………………Page:250
NEWHART SYSTEMS INC.
_______________________________________________
BLUES User Manual………………………………Page:251
NEWHART SYSTEMS INC.
_______________________________________________
BLUES User Manual………………………………Page:252
NEWHART SYSTEMS INC.
_______________________________________________
<head>
BLUES User Manual………………………………Page:253
NEWHART SYSTEMS INC.
_______________________________________________
BLUES User Manual………………………………Page:254
NEWHART SYSTEMS INC.
_______________________________________________
<title>New Page 1</title>
BLUES User Manual………………………………Page:255
NEWHART SYSTEMS INC.
_______________________________________________
BLUES User Manual………………………………Page:256
NEWHART SYSTEMS INC.
_______________________________________________
</head>
BLUES User Manual………………………………Page:257
NEWHART SYSTEMS INC.
_______________________________________________
BLUES User Manual………………………………Page:258
NEWHART SYSTEMS INC.
_______________________________________________
BLUES User Manual………………………………Page:259
NEWHART SYSTEMS INC.
_______________________________________________
BLUES User Manual………………………………Page:260
NEWHART SYSTEMS INC.
_______________________________________________
<body>
BLUES User Manual………………………………Page:261
NEWHART SYSTEMS INC.
_______________________________________________
BLUES User Manual………………………………Page:262
NEWHART SYSTEMS INC.
_______________________________________________
BLUES User Manual………………………………Page:263
NEWHART SYSTEMS INC.
_______________________________________________
BLUES User Manual………………………………Page:264
NEWHART SYSTEMS INC.
_______________________________________________
<p>
BLUES User Manual………………………………Page:265
NEWHART SYSTEMS INC.
_______________________________________________
BLUES User Manual………………………………Page:266
NEWHART SYSTEMS INC.
_______________________________________________
<object codebase="ftp://myserver.com/BluesSession.ocx"
BLUES User Manual………………………………Page:267
NEWHART SYSTEMS INC.
_______________________________________________
BLUES User Manual………………………………Page:268
NEWHART SYSTEMS INC.
_______________________________________________
classid="clsid:694BE330-1784-11D4-9232-00A0C9BBD624" width="349"
height="215">
<param name="_Version" value="65536">
<param name="_ExtentX" value="2646">
<param name="_ExtentY" value="1341">
<param name="_StockProps" value="0">
<param name="InstallationFile" value="package.exe">
<param name="SessionShortName" value="A">
<param name="FTPServerName" value="myserver.com">
</object>
</p>
<p> </p>
</body>
</html>
Using Blues ActiveX Control for Emulation Deployment
Using the Blues ActiveX control for emulation deployment has several distinct advantages. The
most important of which, is the ease of installation. Blues may be installed on a large number of
workstations without having an engineer visit each PC. This can save a great deal of time and
money. The second most important reason is ease of Blues software maintenance. The
workstations that were previously installed over the control may be upgraded or configured
differently by creating a new installation package with the desired changes or upgrades and
having an operator visit the WEB page that contains the Blues control again. The standard Blues
installation file from the Blues CD may be deployed or a customized package may be created
from the Blues Manager application that contains any combination of the Blues software, Blues
configuration files, and Blues private settings files (keyboard mappings, translation tables, etc.).
What files are required to be in the installation source
directory?
The installation source directory may either be a network drive, or an FTP server. In either case,
a few files must be copied to the location so that the Blues ActiveX control has access to them for
installation and maintenance.
The Blues ActiveX control property “InstallationFile” specifies the name of a file that is used for
the installation and therefore must me copyied to the source installation directory. The
InstallationFile name may contain a complete path if desired. If the complete path is specified,
then the remaining files must also be located in the same path sub directory.
The Blues software installation is provided in the form of a Windows installer msi file. To be able
to execute such a file, the Microsoft Windows Installer service must be previously installed on a
BLUES User Manual………………………………Page:269
NEWHART SYSTEMS INC.
_______________________________________________
PC. Microsoft distributes two separate installation files for the Windows Installer Service, one for
Windows 95/98 PC’s and one for Windows NT/2000 PC’s. Both of these files are located on the
Blues CD, the file instmsi.exe if for Windows 95/98 and the file instmsiw.exe is for Windows
NT/2000. These two files should be copied to the installation source directory if any PC that is
going to have Blues installed over the ActiveX control does not have the Windows Installer
service already installed. The Blues ActiveX control will determine if the Windows Installer
service is present on a PC before executing the InstallationFile. If the Installer service is not
present on the PC, the control will download (if FTP server directory) and execute the Microsoft
Windows Installer setup program before executing the Blues InstallationFile.
Upgrading or modifying a deployed PC
Each time the Blues ActiveX control is activated (from a WEB page container application), it
compares the date and time of the InstallationFile property file that is either on a network
share/server or FTP server with the date and time of the file that it used to install Blues. If a new
version exists, then the newer file is executed. The new installation file may contain a new copy
of the Blues software, new configuration files, and or Blues private settings files such as
keyboard mappings.
This deployment technique allows PC’s that have Blues installed to be upgraded or changed by
placing a new installation file on a server and letting users visit a WEB site or run a custom
application that contains the control.
BLUES User Manual………………………………Page:270
NEWHART SYSTEMS INC.
_______________________________________________
EHLLAPI, WIN HLLAPI and MS-DOS HLLAPI
The BLUES 2000 Display application supports the industry standard Emulator High-Level
Language Application Programming Interfaces EHLLAPI, HLLAPI and WIN HLLAPI. The WIN
HLLAPI interface is “Windows Compliant”. It is beyond the scope of this manual to give a
complete description of EHLLAPI, HLLAPI or WIN HLLAPI. These interfaces are provided in two
Windows Dynamic Link Libraries (DLL’s), HLLAPI.DLL and WHLLAPI.DLL. However, enough
information is provided so that existing EHLLAPI, HLLAPI or WIN HLLAPI application program
can be connected through the BLUES 2000 application, and so that experienced programmers
can develop new programs that use these functions.
Application Access From A Windows Application
EHLLAPI, HLLAPI and WIN HLLAPI are installed automatically along with the rest of the BLUES
2000 Display software, so there are no extra installation steps needed to begin using it.
To run an already existing EHLLAPI application, configure 1, 2, 3, etc., (up to a maximum of 16)
LU2's, with correct presentation space short names a, b, c, etc. (The presentation space short
name is configured using Connections under the Gateway menu pull down.)
You may either start the BLUES 2000 emulation before or after the client application. If you start
your client first, then the directory where the BLUES 2000 software has been installed should be
in the MS-DOS PATH statement in your autoexec.bat file. If you start the BLUES 2000 emulation
first, then the interfaces are automatically made available to the client program.
The application should then run as is with no changes.
Application Access From An MS-DOS Box
In order to be able to use HLLAPI from a MS-DOS box you must start the "DOS HLLC
SUPPORT" program. The program icon gets created for you as part of the Make Icons function
of the Administrator program. In addition, you system.ini file was modified when you installed the
BLUES 2000 product to load a windows virtual device called VHLLAPI.386". This virtual device
routs DOS HLLC (int 7f) calls to the BLUES 2000 product. Through this technique, you may have
BLUES User Manual………………………………Page:271
NEWHART SYSTEMS INC.
_______________________________________________
more that one MS-DOS HLLAPI program concurrently running as long as they are in separate
MS-DOS boxes.
Since a virtual device is used, windows must be in 386 enhanced mode to have this feature
available. In addition, the HLLAPI LIB MUST perform a software interrupt to perform the HLLAPI
function.
Using SEND.EXE And RECEIVE.EXE From An MS-DOS Box
The BLUES software comes with SPECIAL MS-DOS SEND.EXE and RECEIVE.EXE programs.
These programs use the HLLAPI interface to send and receive files from an MS-DOS box. The
command line options are standard for file transfer programs. In order to use these programs
you MUST have the MS-DOS HLLAPI redirecter started under windows (see preceding section).
Examples:
send C:\sendfile A:hostfile
receive C:\rcvfile A:hostfile
(send c:\sendfile to host file “hostfile”)
(receive host file “hostfile” to c:\rcvfile)
If you do not have the BLUES installation assigned in your PATH statement in your autoexec.bat
file, then you must enter the complete path for the SEND.EXE or RECEIVE.EXE program.
Example C:\blues\send c:\sendfile A:hostfile
Using Entire Connection For Windows
The Entire Connection windows product must first be installed. During the installation process
you must select the EHLLAPI/HLLAPI connection type. In addition the following line must be in
the Natural Connection configuration file "CONFIG.NC":
ENV
HLLAPI
HLLAPI,HLLAPI
Developing New EHLLAPI Applications
To develop a new C Language application using the EHLLAPI functions as defined in the
EHLLAPI reference manual, C programmers need to insert the following prototype statement in
their source files:
BLUES User Manual………………………………Page:272
NEWHART SYSTEMS INC.
_______________________________________________
void far PASCAL HLLAPI(int far *fcode, char far *string,
*len, int far *retc);
int far
Then an implicit import is performed by listing the import library HLLAPI.LIB on the linker
command line for the application. (HLLAPI.LIB is a Microsoft C 6.0 Lib, for the EHLLAPI DLL)
BASIC and PASCAL programmers can also use the EHLLAPI functions. No import library is
provided for these programming languages, so an explicit import has to be done by listing the
HLLAPI routine in the IMPORTS section of the application's module definition file, as follows:
IMPORTS
HLLAPI.HLLAPI
Developing New Applications With WIN HLLAPI
To develop a new C Language application using the WIN HLLAPI functions as defined in the WIN
HLLAPI reference manual from Microsoft, C programmers need to either use the WHLLAPI.LIB
library during the build of the application or place EXPORT statements in the application .DEF
file, or dynamically load the WHLLAPI.DLL file from the application. The Following entry points
are supported:
int far PASCAL WinHllapiStartup(WORD,LPWHLLAPIDATA);
void far PASCAL WinHLLAPI(WORD far *, LPSTR ,WORD far *,WORD far *);
HANDLE far PASCAL WinHLLAPIAsync(HWND,WORD far *,LPSTR,WORD far *,
WORD far *);
BOOL far PASCAL WinHllapiCleanup(void);
BOOL far PASCAL WinHllapiIsBlocking(void);
BLUES User Manual………………………………Page:273
NEWHART SYSTEMS INC.
_______________________________________________
int far PASCAL WinHllapiCancelAsyncRequest(HANDLE,WORD);
int far PASCAL WInHllapiCancelBlockingCall(void);
FARPROC far PASCAL WinHllapiSetBlockingHook(FARPROC);
BOOL far PASCAL WinHllapiUnhookBlockingHook(void);
Then an implicit import is performed by listing the import library WHLLAPI.LIB on the linker
command line for the application. (WHLLAPI.LIB is a Microsoft C 6.0 Lib, for the WHLLAPI DLL)
BASIC and PASCAL programmers can also use the WHLLAPI functions. No import library is
provided for these programming languages, so an explicit import has to be done by listing the
WHLLAPI routine in the IMPORTS section of the application's module definition file.
Using The EHLLAPI Trace Facility
Each terminal session has file menu item that allows all EHLLAPI and HLLAPI functions to be
traced to an ASCII file. For details on starting and stopping the trace, see the DISPLAY
EMULATION section of this manual.
Using DDE
Host display sessions may act a DDE servers. Each session may support up to 16 concurrent
DDE conversations. Each conversation associates a part or all of the host screen with the client.
Hot Links
Concurrent HOT-LINKS provide a DDE client with the ability to be notified whenever a certain
host screen is modified. To setup a DDE conversation with another application, perform the
following steps:
BLUES User Manual………………………………Page:274
NEWHART SYSTEMS INC.
_______________________________________________
(1) Select the portion of the host screen (or the whole host presentation space) with the mouse.
(2) Select the Copy function from the Edit menu.
(3) From the Client application, select paste special. Now you have a hot link DDE conversation.
Any time the host screen changes, the client will be presented with the new screen. If the client
does not have a paste link function, it may allow you to enter in the a program name, file name,
and topic. If so, see the following section on what these variables are used for.
Customizing A DDE Conversation
There are three fields that are used to establish a DDE conversation, (a) A program name, (b) a
file name, and (c) a topic name. The 3270 Windows Display session uses these fields as follows:
PROGRAM NAME
This is the name of the program. i.e. "WSLU2". It is the name of the DDE server. This name
may be modified by the admin.exe program under API.
FILE NAME
This is the name of the session i.e. "SESSION1".
TOPIC
The topic field is used to determine the portion of the host display screen that the server will send
to the client.
It is in the following format:"RaCb:CcCd:[string]". The topic selects a starting
row/column and ending row column of the host display session that the emulator will pass the
client. This allows the topic to select either part or all of the emulators screen as the data
associated with the DDE conversation. Ex R0C0:R23C79 -select all 24X80 positions on the
screen. The options string value can be any ANSI string, when there is a
string
configured, that string must be displayed on the host screen in order for the DDE data to be
passed to the client. This string is used to recognize a specific host screen.
The Settings
under the Edit menu's Clipboard Options also affect the format of the data passed from the
emulator to the client application.
BLUES User Manual………………………………Page:275
NEWHART SYSTEMS INC.
_______________________________________________
Using DDE To Execute A Macro
The DDE EXECUTE command may be issued to cause the display session to perform a macro.
The name of the macro must be given in the execute without the path or the file extention. i.e. A
DDE execute of “LOGON” will execute the macro named LOGON.MAC in the user’s BLUES
private directory. The macro name can not be “IS_BUSY”. (see following section)
Using DDE To Determine If The Session Is Busy
The DDE EXECUTE command may be issued to see if the display session is busy. The display
session is busy when it is executing a macro, or waiting for the host to enable the keyboard. The
execute string must be “IS_BUSY”. If the Execute fails then the display session is not busy.
BLUES User Manual………………………………Page:276
NEWHART SYSTEMS INC.
_______________________________________________
Printer Emulation
The BLUES 2000 Printer product actually comprises two distinct emulation's; one for LU1 SCS
data stream printing, and one for LU3 DSC data stream printing. Unless otherwise stated, all the
information presented in this manual applies to both forms of emulation.
Starting Printer Sessions
You have two choices for how to load the BLUES 2000 Printer application:
Once you have loaded a BLUES 2000 Printer session, you can easily update the session's profile
for any different connection or operational options you wish, as explained throughout this section,
and in the Customizing Your Printer section.
You will find much similarity between operating the BLUES 2000 Printer and other programs
under Windows 3.1. This is because these programs adhere to a Common User Access (CUA)
design, which is part of the Systems Application Architecture (SAA) standard. Special topics are
discussed, but it is beyond the scope of this manual to provide a complete tutorial on using
windows applications. Also, a basic familiarity with operating a 3287 type terminal is assumed.
Please see the Related Reading Section if needed.
Once a printer emulator has been started, the following window will appear as the main window
of the printer. The main window is meant to look and feel like a real IBM printer.
BLUES User Manual………………………………Page:277
NEWHART SYSTEMS INC.
_______________________________________________
The main window contains a control panel at the top, a operator information area, and two
buttons. The operator information area contains a subset of the information on the terminal
session’s operator information. For more information on the operator information area see the
appropriate section of this manual.
Option Bar Pull Down Menus
The BLUES 2000 Printer application provides standard 3287 printer features, and several
enhancements, in the convenient form of Windows option bar pull down menus. The functions
provided in each of the menus will be explained in the following sections.
BLUES User Manual………………………………Page:278
NEWHART SYSTEMS INC.
_______________________________________________
The Printer Session File Menu
The File menu includes commands that enable you to modify your user profile, select printer
devices, and exit the BLUES 2000 Printer application.
For more information, see the sections below which describe the following File menu commands:
Save Settings
Save current profile
Save Settings On Close
Save All settings whenever the emulator is terminated
Enable Print To Printer
When selected, this turns on printer output from the
host.
Print Setup
Printer selection and page setup
Enable Print To Disk
When selected, this turns on printer output to a disk
file.
Disk File
Selects the name of the next print to disk file
Append To File
Add each host print to the end of the file.
Include Escape Sequences Add printer strings to the output.
Save Jobs In Printer Queue
Keep copies of printed jobs in the BLUES printer queue
Spooled Jobs...
Display the BLUES printer manager application
BLUES User Manual………………………………Page:279
NEWHART SYSTEMS INC.
_______________________________________________
Exit
Exit program
Exit And Close All Sessions Close all 3270 session Windows
Save Settings
This File menu command is used to store the current session profile. All the operational and
connection options currently in effect will automatically be re-activated next time the session is
started.
Save Settings On Close (printer sessions)
This File menu command is used to indicate that the emulator should automatically save all
session parameters just prior to exiting the program.
Print Setup (print sessions)
This menu item displays a dialog box that lets you configure how a host print will be printed. The
following section gives a description of each option.
Enable Print To Printer (print sessions)
This feature lets you enable and disable printer output. If it's enabled, then when a host print is
performed the output will be written to the printer. You may want to only print host files to a disk
file, if so, then disable this feature.
BLUES User Manual………………………………Page:280
NEWHART SYSTEMS INC.
_______________________________________________
Print Setup Menu Item
Printer Setup Button
The printer selection and setup button allow the selection of a print device. The
print device receives the host output.
BLUES User Manual………………………………Page:281
NEWHART SYSTEMS INC.
_______________________________________________
Printer Fonts
The Fonts button lets you select the font that you want to use for your host print. The fonts dialog
box lets you select any available printer fonts you have installed. Once your font has been
selected, the maximum print column, last print line, and lines per page variables are automatically
calculated for you.
Close Printer After
This option may be selected to cause the printer spoler or printer port to be closed if no host data
is received within the time period specified. This feature may be necessary for LU type 3 printer
output or for an LU type 1 printer that is not configured for between bracket printer sharing at the
host. If more data is received after the time out was reached, the new data will be printed on the
top of a new page.
Print Directly To Port
This feature lets you bypass the windows print manager and print directly to a port like LPT1. If
you select this feature, you may configure printer strings to customize your printer output.
Another use for this feature is if your host print output is already in print ready format, then the
emulator will pass it directly to the printer.
Include Printer Escapes In Output
When this option is selected, the escape sequences defined in the printer strings file are added to
the output port.
Line Density
This field is only visible when you have selected print directly to port. This field specifies the
number of lines per inch (LPI) to be printed. You may choose 4, 6, or 8 lines per inch. The
number selected will cause the appropriate printer string to be sent to the print device at the start
of a print job.
BLUES User Manual………………………………Page:282
NEWHART SYSTEMS INC.
_______________________________________________
Character Density
This field is only visible when you have selected print directly to port. This field specifies the
number of characters per inch (CPI) to be printed. You may choose between 6, 10, 12, 16.6, or
20 characters per inch. The number selected will cause the appropriate printer string to be sent
to the print device at the start of a print job.
Configure Strings
This field is only visible when you have selected print directly to port. This area of the Printer
Defaults dialogue box displays, and allows you to change the GENFILE name. The genfile
contains encoded printer control strings, or 'Escape sequences', which enable you to condition
the printer output for any brand of physical printer you have purchased for use with your PC. The
genfile name is part of the profile, and the genfile is loaded and parsed automatically when the
3270 Printer application is started. Both SCS and DSC modes of printer emulation allow sending
specific initialization strings to your physical printer. SCS mode also provides additional control
strings which allow the host program to dynamically change such things as margins, fonts, etc. If
you do not specify a genfile, then your printer emulation will still print host files, however
you will not see any special print operations such as margins and fonts be changed. If
you host is sending print ready data, then do not select a genfile.
NOTE TO HEWLETT-PACKARD LASERJET II USERS - If you are trying to configure a
HEWLETT-PACKARD Laserjet II printer or an HP II compatible, then you should select the
genfile named 'HPLJII.LU1'
To access the procedures which allow you to define the various control strings for your particular
physical printer, select Configure strings >>..., once you have verified the GENFILE name field
is correct. The details of how to configure control strings are presented in the following
paragraphs.
To perform the printer string configuration, you will need a copy of the manual that came with
your printer. In this manual, you will find a section that lists all of the control strings that the
printer will accept and what they do. These strings are known as escape sequences. The printer
string configuration process allows you to supply the 3270 Printer program with the necessary
escape sequences to be able to translate the host's print data stream to your printer's escape
sequences. Once you have selected Configure strings......, the windows NOTEPAD program is
started. For details on how to operate the NOTEPAD program see the appropriate Windows
documentation. The window should look as follows:
BLUES User Manual………………………………Page:283
NEWHART SYSTEMS INC.
_______________________________________________
BLUES User Manual………………………………Page:284
NEWHART SYSTEMS INC.
_______________________________________________
Each printer string is preceded by a constant ASCII string that identifies it. Printer control strings
consist of hexadecimal bytes and variables. Each entry is separated by a '-' character when it is
displayed on the screen. Functions are defined for operations that require variables to replace
them before they are sent to the output device. These variables are usually dependent upon the
data stream sent from the host and the type of printer you have. For example, the host may want
to set the top of page margin to row 5 and col 10. To do this the 3270 Printer program must know
two things, (1) what escape sequence to use and (2) how to send the value (row 5 col 10) to the
printer.
The following lists contains all the possible PRINTER strings and their meanings:
FIRST INITIALIZATION STRING
This string is sent to the output device every time a new document is sent from the host. It may
be used to setup any default parameters you may want the printer to take on, such as the default
pitch.
SECOND INITIALIZATION STRING
This string is sent to the output device every time a new document is sent from the host. It is
provided in case the FIRST INITIALIZATION STRING was not long enough to contain all the
necessary information. It may be used to setup any default parameters you may want the
printer to take on, such as the default pitch.
03 LINES PER INCH STRING
This string is sent to the output device whenever a command from the host is received that
indicates to set the lines per inch to 3.
04 LINES PER INCH STRING
This string is sent to the output device whenever a command from the host is received that
indicates to set the lines per inch to 4.
06 LINES PER INCH STRING
This string is sent to the output device whenever a command from the host is received that
indicates to set the lines per inch to 6.
08 LINES PER INCH STRING
This string is sent to the output device whenever a command from the host is received that
indicates to set the lines per inch to 8.
BLUES User Manual………………………………Page:285
NEWHART SYSTEMS INC.
_______________________________________________
TOP MARGIN STRING
This string is sent to the output device when a command is received from the host that causes
the top margin to be changed.
BOTTOM MARGIN STRING
This string is sent to the output device when a command is received from the host that causes
the bottom margin to be changed.
LEFT MARGIN STRING
This string is sent to the output device when a command is received from the host that causes
the left margin to be changed.
RIGHT MARGIN STRING
This string is sent to the output device when a command is received from the host that causes
the right margin to be changed.
PAGE WIDTH STRING
This string is sent to the output device when a command is received from the host that causes
the page width to be changed.
HORIZONTAL FORMATTING STRING
This string is sent to the output device when a command is received from the host that causes
the left margin, right margin, or page width to change. This string will be sent to the output device
after the LEFT MARGIN, RIGHT MARGIN, and PAGE WIDTH strings. Some printers require a
separate escape sequence to get the printer to activate the new margin settings.
HORIZONTAL SPACING CONSTANT
This printer specific is a decimal number that is used when host commands are received from the
host that contain horizontal formatting information. This number is used as a multiplier for each
host horizontal command. It may be used to adjust the distance between characters on a line.
PAGE LENGTH STRING
This string is sent to the output device whenever a host command is received that would change
the page length.
BLUES User Manual………………………………Page:286
NEWHART SYSTEMS INC.
_______________________________________________
VERTICAL FORMATTING STRING
This string is sent to the output device when a command is received from the host that causes
the top margin, bottom margin, or the page length to change. This string will be sent to the output
device after the TOP MARGIN, BOTTOM MARGIN, and PAGE LENGTH strings. Some printers
require a separate escape sequence to get the printer to activate the new margin settings.
VERTICAL SPACING CONSTANT
This printer specific is a decimal number that is used when host commands are received from the
host that contain vertical formatting information. This number is used as a multiplier for each host
vertical command. It may be used to adjust the distance between lines on a page.
START UNDERLINE STRING
This string is sent to the output device whenever a host command is received that indicates to
start underlining.
END UNDERLINE STRING
This string is sent to the output device whenever a host command is received that indicates to
end underlining.
RESET ATTRIBUTES STRING
This string is sent to the output device whenever a host command is received that indicates to
reset all printer attributes.
DEFAULT FONT STRING
This string is sent to the output device whenever a host command is received that
specifies to set the font back to its original setting.
FONT 1 STRING
This string is sent to the output device whenever a host command is received that indicates to set
the font to type number 1.
FONT 2 STRING
This string is sent to the output device whenever a host command is received that indicates to set
the font to type number 2.
BLUES User Manual………………………………Page:287
NEWHART SYSTEMS INC.
_______________________________________________
FONT 3 STRING
This string is sent to the output device whenever a host command is received that indicates to set
the font to type number 3.
FONT 4 STRING
This string is sent to the output device whenever a host command is received that indicates to set
the font to type number 4.
FONT 5 STRING
This string is sent to the output device whenever a host command is received that indicates to set
the font to type number 5.
DEFAULT CHARACTERS PER INCH
This printer specific is a decimal number that selects the printer's default characters per inch.
The host printer emulation software performs a range check value on this number to determine
which CHARS PER INCH string to send to the output device when the host command is
received which indicates to reset the characters per inch to their default setting.
CHARS. PER INCH (1 - 7) STRING
This string is sent to the output device whenever a host command is received that indicates to set
the characters per inch between 1 and 7.
CHARS. PER INCH (8 - 11) STRING
This string is sent to the output device whenever a host command is received that indicates to set
the characters per inch between 8 and 11.
CHARS. PER INCH (12 - 14) STRING
This string is sent to the output device whenever a host command is received that indicates to set
the characters per inch between 12 and 14.
CHARS. PER INCH (15 - 18) STRING
This string is sent to the output device whenever a host command is received that indicates to set
the characters per inch between 15 and 18.
BLUES User Manual………………………………Page:288
NEWHART SYSTEMS INC.
_______________________________________________
CHARS. PER INCH (19 - 25) STRING
This string is sent to the output device whenever a host command is received that indicates to set
the characters per inch between 19 and 25.
DEFAULT LINES PER PAGE
This printer specific is a decimal number that indicates the number of lines on a physical page.
There are six format variables kept by the LU1 SCS mode emulation program that the host may
change at any time. These variables may be included in the strings in either an ASCII format or a
binary format. These six variables may be placed into output strings sent the print device.
Variables are used to indicate to insert the value of a particular variable in the output string.
Variables are entered as a string of characters in the following format "VaAb" or "VaBb". The
value of 'a' is the number of the variable to insert into the printer output (as defined below). The
value 'A" is for ASCII and the 'B' is for BINARY. The value for 'b' is the minimum number of
characters to send to the output device or a 0 to send the value without justification. The value
for 'b' is used to right justify a value if ASCII is selected and used to add to the value if binary is
selected. For example if you wanted to send the value for the right margin in ASCII and the host
had set the right margin at 132 and you entered "V3A0" then the string "132" would be sent to the
output device. If you entered the string "V3B0", then a single binary character of 132 would be
sent to the output device. If you entered a string of "V3A5", then the string "00132" would be sent
to the output device. The following variables have been assigned the following numbers:
VARIABLE
VALUE
PAGE WIDTH1
1
LEFT MARGIN
2
RIGHT MARGIN
3
PAGE LENGTH
5
TOP MARGIN
6
BOTTOM MARGIN
7
Margins
Margins may be selected if the print directly to port feature has been disabled. Margins are
initially set to 0 but may be modified as needed.
First Print Line
BLUES User Manual………………………………Page:289
NEWHART SYSTEMS INC.
_______________________________________________
This field specifies the top margin, or first line on a page to which output data should be written.
Any values greater that 1 will cause blank lines to be inserted in the print out.
Last Print Line
This field specifies the bottom margin, or last line on a page to which output data should be
written. When the last print line is reached a form feed is performed.
Lines Per Page
This field specifies the total number of lines on a physical page.
Maximum Print Col.
This field specifies the number of characters which can be printed on a line.
Space Between Lines
This field lets you modify the amount of space between printed lines. It is primarily used to align
pre-printed forms. By using the TEST button you can experiment with the format of a printed
page.
Space Between Characters
This field lets you modify the amount of space between printed characters. It is primarily used to
align pre-printed forms. By using the TEST button you can experiment with the format of a
printed page.
BLUES User Manual………………………………Page:290
NEWHART SYSTEMS INC.
_______________________________________________
SCS Transparent Print Data
SCS type of printers can receive data from the host that has been designated as transparent by
the host. This option lets you select what the BLUES printer session will do with the transparent
data. The transparent data may be sent directly to the print device (if you selected to print directly
to the print port) or sent directly to the printer by using a Windows PASSTHROUGH escape
function. The PASSTHROUGH escape is not supported by all Windows drivers.
Hex Pass-Through Trigger Character
This option lets you select a special character or characters that will surround special print ready
data coming from the host. Every two bytes between the trigger characters are converted from
EBCDIC to ANSI, then the ANSI characters are assumed to be valid hexadecimal values and
combined to become a single hexadecimal character. The newly formed hexadecimal character
is then either sent directly to the print device (if you selected to print directly to the print port) or
sent directly to the printer by using a Windows PASSTHROUGH escape function. The
PASSTHROUGH escape is not supported by all Windows drivers. The following datastream
could be sent from the host to a HP II compatible printer to set the line spacing to 8 LPI. It is
assumed that you selected the logical not character as the trigger character, the logical not
character is sent as a hex 5f from the host.
HOST EBCDIC DATA STREAM
OUTPUT TO THE PRINTER
5F 5F F1 C2 F2 F6 F6 C3 F3 F8 F4 F4 5F
1B 26 6C 38 44
Wrap Text At Right Margin
This lets you cause a new line to be automatically done whenever the right margin is reached. If
this feature is off and the host prints past the right margin, then the information will be lost.
Form Feed Without Space
This field acts as a toggle switch. An X in this field turns the option on, and means the printer
should NOT advance one character position after a form feed. The one space advance is
provided when needed to conform to IBM printers.
BLUES User Manual………………………………Page:291
NEWHART SYSTEMS INC.
_______________________________________________
Form feed at end of job
This field acts as a toggle switch. An X in this field turns the option on, and means the printer
should perform a form feed after printing each file. Some laser printers require this feature to be
able to cause the printer to actually print the last page. If the host application does not place a
form feed at the end of a print job, then this feature should be used.
Auto newline at end of line
This field acts as a toggle switch. An X in this field turns the option on, and means the printer
should perform a newline function, i.e., carriage return (CR) followed by line feed (LF), whenever
a CR occurs at the maximum print column + 1.
Additional newline at end of line
This field acts as a toggle switch. An X in this field turns the option on, and means the printer
should perform two newline (NL) functions , whenever a NL occurs at the maximum print column
+ 1.
Newline at end of job
This field acts as a toggle switch. An X in this field turns the option on, and means the printer
should perform a newline function after printing each file.
Xlate SCS FF to CRLF
This field acts as a toggle switch. An X in this field turns the option on, and means the printer
should treat a form feed (FF) received from the host as a carriage return plus line feed (CRLF).
Let Host Override Page Setup
BLUES User Manual………………………………Page:292
NEWHART SYSTEMS INC.
_______________________________________________
The host datastream may contain formatting options that set the maximum print position, the
maximum print line, vertical tabs, the lines per inch, and the characters per inch. When this
option has been selected, the BLUES printer emulator will use the values sent by the host and
not the values have selected in the print setup dialog box.
Band Output
This option determines if the BLUES emulator should perform print banding. Print banding is a
technique of breaking up a page into bands. Each band is then printed by the BLUES emulator.
Print banding is faster because the Windows print system does not have to wait for a complete
page before it sends data to the printer. NOTE - if you are using either SCS Transparent Print
or Hex Pass-through, then this feature is normally required.
Enable Print To Disk (printer sessions)
This menu item lets you enable and disable the print to disk feature. When selected, each host
print job is written to a new disk file. To select the disk file name, see the following section. You
may have both disk and printer output enabled at the same time. This would cause a hard copy
and a disk file to be produced.
Disk File (printer sessions)
This menu item lets you select the name of the next print to disk file name. Each host print is
written to a new disk file. Disk files are incremented. i.e. print0001.dat is incremented to
print0002.dat.
Save Jobs In BLUES Printer Queue
When this option is selected, each job that is printed gets saved in a queue of print jobs. The
BLUES printer queue is maintained by the BLUES Print Manager application. Queued print jobs
may be saved for subsequant re-printing. See the section on BLUES Print Manager for more
information on the BLUES print queue.
Spooled Jobs...
BLUES User Manual………………………………Page:293
NEWHART SYSTEMS INC.
_______________________________________________
Select this menu item to display the BLUES Print Manger application. See the section on BLUES
Print Manager for more information on the BLUES print queue.
Exit Printer Session
This menu item lets you end the printer emulation.
The Printer Session Gateway Menu
The Gateway Menu provides a command that enables you to connect or disconnect to a host
gateway.
Connect Printer
This option lets you connect to the host computer.
Disconnect Printer
This option will disconnect the printer from the host.
SNA Trace Active
Link Trace Active
Session Trace Active
The NSI trace facilities allow you to start and stop the trace from the gateway menu. All data is
recorded in the file "SESSIONx.TRC" in the private directory. The trace file is a standard ASCII
file that may be viewed or printed as desired. The trace feature is meant as a tool to help solve
possible problems in the communication to the host computer.
NOTE - enabling a trace degrades performance because of the additional overhead of
writing trace the data to disk.
BLUES User Manual………………………………Page:294
NEWHART SYSTEMS INC.
_______________________________________________
The Printer Session Windows Menu
The Windows Menu provides you a convenient way to quickly switch between session windows
when you are running multiple sessions. First select the Windows Menu. A list of your active
sessions will be displayed, e.g.,
SESSION1
SESSION2
SESSION3
To switch to any session's window, click on the session item in the list.
The Printer Session Help Menu
The Help Menu includes commands that enable you to obtain information about how to use the
standard Windows Help facilities, as well as commands that enable you to access the major
topics of help available for this particular application.
BLUES User Manual………………………………Page:295
NEWHART SYSTEMS INC.
_______________________________________________
The Console
The BLUES 2000 Printer application console is a window which simulates the status indicators
and control panel of a 3287 type printer.
All the indicators and controls, their locations on the console, and their uses are listed below:
On-line/Off-line:
middle left
This control works like the on-line/off-line control available on printer control panels.
Place the printer in Off-line/(Hold) mode when you wish to hold off receiving data from the host .
This may be necessary while you make a local adjustment at the printer, or change some printer
output parameters.
Place the printer in Ready mode when you are prepared to begin receiving and outputting host
data to the printer.
Formfeed:
middle
This control works like the formfeed control available on printer control panels. Selecting this
field causes a formfeed command to be sent to the printer output device.
BLUES User Manual………………………………Page:296
NEWHART SYSTEMS INC.
_______________________________________________
Test:
middle
This control works like the test control available on many printer control panels. Selecting this
field causes a test file to be sent to the printer output device. The test file data is pre-set, and
verifies the setup and capabilities of the physical printer.
PA1:
middle
This control works like the PA1 key available in 3287 type printers operating in SCS mode.
Selecting this field causes a PA1 key sequence to be sent to the host.
PA2:
middle
This control works like the PA2 key available in 3287 type printers operating in SCS mode.
Selecting this field causes a PA2 key sequence to be sent to the host.
Spacing:
middle right
This control works independent of other page formatting parameters in effect, and allows you to
select between Single and Double spacing of the lines of output printer data.
Reset:
lower left
Selecting this field causes print parameters to be reset to their default values, and causes a host
notify message to be sent to the host indicating that the 3270 Printer application has been reset,
and is ready to begin receiving data.
Cancel Print:
lower middle
This control works like the Cancel Print key available in 3287 type printers operating in SCS
mode. Selecting this field causes a Cancel Print key sequence to be sent to the host.
BLUES User Manual………………………………Page:297
NEWHART SYSTEMS INC.
_______________________________________________
RePrint:
lower middle
This control works like the RePrint key available in 3287 type printers operating in SCS mode.
Selecting this field causes a RePrint key sequence to be sent to the host.
Case:
lower right
This control works independent of other page formatting parameters in effect, and allows you to
select Upper only as the case for all alphabetic output printer data.
3270 Printer Status
The printer status indicators simulated on the 3270 Printer console window function as their
counterparts on the 3287 type printer console. All the status indicators, their locations on the
simulated console, and their uses, are in this manual.
3270 Printer Keys
The printer keys, or, rather, the simulated control panel buttons on the 3270 Printer console
window, function as their counterparts on the 3287 type printer console. All the controls, their
locations on the simulated console, and their uses, are explained in this manual.
Print Spool Manager
The Print Spool Manager maintains all spooled BLUES print jobs. Spooled print jobs are kept in
the Windows temporary folder. Spooled jobs may be automatically removed from the spooler
after a configurable number of days have elapsed.
The main window of the Print Spool Manager allows an operator to re-print jobs, delete jobs, and
select how many days, if any, must elapse before spooled jobs are deleted. One or more jobs
may be selected with the mouse and cursor arrow keys. Jobs are displayed in chronological
order from oldest to newest.
When a job is re-printed, the associated BLUES printer session reads the spool file and prints the
file using it’s current printer settings. Thus a print job can be altered by first changing one or
BLUES User Manual………………………………Page:298
NEWHART SYSTEMS INC.
_______________________________________________
more printer settings in the BLUES printer session, then submitting a spooled file to be re-printed.
For example: if a different printer than was used to originally print the job is selected in the
BLUES printer session and a job is submitted to be re-printed then the print job will be printed on
the newly selected printer.
BLUES User Manual………………………………Page:299
NEWHART SYSTEMS INC.
_______________________________________________
Error Messages
NETWORK, and PU2AM Error Messages
The BLUES 2000 application displays a STOP dialog box when a NETWORK error, or PU2AM
error message occurs. These errors should rarely, if ever, occur.
Each of these message types ends with a four digit hex field:
XX XX
For NETWORK error and PU2AM error messages, the first two hex digits represent the
command the application was attempting, and the second two hex digits represent the error
status the application received. Please refer to the network and PU2AM documentation to
interpret those error codes, or consult NSI support personnel if necessary.
NETBIOS ERROR CODES:
During the operation of the BLUES 2000 application, a NETBIOS network error may cause a
temporary failure of its use. These errors may occur for a variety of reasons, such as, the SNA
gateway software is not running, or somebody disconnected a network cable, or there is a
configuration error. The following table lists the hexadecimal codes for all possible NETBIOS
errors, and their meanings.
01
Send size too large.
03
Illegal ncb command value.
BLUES User Manual………………………………Page:300
NEWHART SYSTEMS INC.
_______________________________________________
05
NCB command timed out.
06
Partial nb received.
08
Illegal LSN.
09
Insufficient resources for session.
0A
Session normally closed.
0B
Command Canceled.
0D
Dup name in local table.
0E
Local name table full.
0F
Name still has sessions.
11
Local session table full.
12
BLUES User Manual………………………………Page:301
NEWHART SYSTEMS INC.
_______________________________________________
No listen for my Call.
13
Illegal name number.
14
No answer to my call.
15
Name not found.
16
Name in use on remote host.
17
Name deleted.
18
Session ended abnormally.
19
Name conflict detected.
1A
Incompatible remote devices.
21
Interface busy.
22
Too many commands outstanding.
BLUES User Manual………………………………Page:302
NEWHART SYSTEMS INC.
_______________________________________________
23
Invalid network adapter number.
24
Tried to cancel, already posted.
26
Tried to cancel, not valid.
Undefined TCPIP Error Codes
The following errors are defined by Windows Sockets. The meaning of each depends on what
vendor provided the Windows sockets. The following error may also be researched by consulting
Berkly Sockets documentation.
WSAEINTR
100004
WSAEBADF
100009
WSAEACCES
100013
WSAEFAULT
100014
WSAEINVAL
100022
WSAEMFILE
100024
WSAEWOULDBLOCK
100035
WSAEINPROGRESS
100036
WSAEALREADY
100037
WSAENOTSOCK
100038
WSAEDESTADDRREQ
100039
WSAEMSGSIZE
100040
WSAEPROTOTYPE
100041
WSAENOPROTOOPT
100042
BLUES User Manual………………………………Page:303
NEWHART SYSTEMS INC.
_______________________________________________
WSAEPROTONOSUPPORT
100043
WSAESOCKTNOSUPPORT
100044
WSAEOPNOTSUPP
100045
WSAEPFNOSUPPORT
100046
WSAEAFNOSUPPORT
100047
WSAEADDRINUSE
100048
WSAEADDRNOTAVAIL
100049
WSAENETDOWN
100050
WSAENETUNREACH
100051
WSAENETRESET
100052
WSAECONNABORTED
100053
WSAECONNRESET
100054
WSAENOBUFS
100055
WSAEISCONN
100056
WSAENOTCONN
100057
WSAESHUTDOWN
100058
WSAETOOMANYREFS
100059
WSAETIMEDOUT
100060
WSAECONNREFUSED
100061
WSAELOOP
100062
WSAENAMETOOLONG
100063
WSAEHOSTDOWN
100064
WSAEHOSTUNREACH
100065
WSAENOTEMPTY
100066
WSAEPROCLIM
100067
WSAEUSERS
100068
WSAEDQUOT
100069
WSAESTALE
100070
WSAEREMOTE
100071
WSASYSNOTREADY
100091
WSAVERNOTSUPPORTED
100092
BLUES User Manual………………………………Page:304
NEWHART SYSTEMS INC.
_______________________________________________
WSANOTINITIALISED
100093
WSAEDISCON
100101
Glossary
API
Application Program Interface. This is a method by which an application program can gain
access to the screen data, translate tables, and keyboard, as well as higher level control
functions, of the 3270 display application.
See the EHLLAPI section for a description of the industry standard EHLLAPI 'application program
interface' supported by the BLUES 2000 Display application.
ASCII
ASCII is the standard code set used to represent data in the PC environment.
Clipboard
The clipboard is a standard Windows feature which provides an external temporary storage area,
and enables data to be cut and pasted between applications windows. LU2 screen data can be
moved to and from the clipboard to allow exchange with other programs.
EBCDIC
EBCDIC is the standard code set used to represent data in the IBM 3270 environment.
EHLLAPI
BLUES User Manual………………………………Page:305
NEWHART SYSTEMS INC.
_______________________________________________
See API above.
LU1, LU2, LU3
LU2 is an acronym for 'Logical Unit Type 2'. The IBM 3270 Keyboard/Display terminals are
Logical Unit Type 2's under IBM's System Network Architecture (SNA), and are commonly
referred to as LU2's. A 3270 Printer may be either a Logical Unit Type 1, LU1, or Logical Unit
Type 3, LU3, depending upon the type of host data stream supported.
Netbios
Netbios is the name given to the standard user session and presentation network levels used to
connect PCs together.
NPDA
Network Problem Determination Application. The PCNET 3270 product is designed to work with
this IBM host application, which is used to isolate any problems that may be occurring on the
SNA network.
SNA
SNA is an acronym for IBM's 'System Network Architecture'. SNA is the overall communications
environment under which the BLUES 2000 Display operates.
BLUES User Manual………………………………Page:306