1
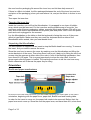
The Mountbatten Brailler
User Training for the New User
A training session based on this outline will take about two hours.
It is designed for the first training session for an individual user of the Mountbatten Brailler,
or where the user is a young child, that child's parents or teacher. It should take place
when the Mountbatten is first delivered where possible.
The content in this training guide is designed to be read by trainers. Where particular items
have been spelled out in detail, the detail is for the trainer; the trainer can then choose the
terms and methods they use to explain the Mountbatten to the user. In some sections the
actual methods of doing tasks are not given in detail – these details can be found in the
User Manual.
Once the content is familiar to the trainer, it should be possible to use the Contents as a
guide to the session without referring to the rest of the guide.
Some pictures and diagrams are included to help with names and terminology. More
pictures can be found in the Mountbatten User Manual.
You will notice that Battery Care is covered twice – this is very important for the user, and
can't be stressed too strongly.
If you are delivering a Mimic with the Mountbatten, make sure it has batteries installed
before you begin showing the user how to use it.
Contents
Equipment required................................................................................................................2
Unpacking the box.................................................................................................................2
Opening the outer box...................................................................................................2
Opening the inner box...................................................................................................3
Unpacking the Mountbatten..........................................................................................3
Orientation..............................................................................................................................3
Braille and paper mechanisms......................................................................................3
Keyboard.......................................................................................................................4
Around the Mountbatten case.......................................................................................5
Ports..........................................................................................................................5
Battery care...................................................................................................................6
Loading paper........................................................................................................................6
Switching on...........................................................................................................................7
Writing Braille.........................................................................................................................7
Writing and Word Wrap.................................................................................................7
Writing and hyphenation................................................................................................7
Correcting Errors...........................................................................................................7
Moving around the page................................................................................................8
Removing paper from the Mountbatten.........................................................................8
Connecting the Mimic and external keyboard........................................................................8
Page 1 of 12
Display on the Mimic.................................................................................................8
Braille from the external keyboard............................................................................9
Modes in the Mountbatten.....................................................................................................9
Mountbatten Commands........................................................................................................9
Commands in Learn Mode............................................................................................9
Graphics....................................................................................................................9
Word Wrap..............................................................................................................10
Formatting the page................................................................................................10
Commands in Advanced Mode...................................................................................10
Translating external keyboard entry........................................................................10
Connecting to a PC..............................................................................................................10
Writing in memory.................................................................................................................11
Using the Editor....................................................................................................................11
Using the Calculator.............................................................................................................11
Battery Care.........................................................................................................................11
Storing the packaging...........................................................................................................11
Equipment required
●
Mountbatten, still packed in its box, but with the battery fully charged;
●
Mimic;
●
Batteries for Mimic and screwdriver to install batteries;
●
PC keyboard.
Unpacking the box
Always include the user in unpacking the Mountbatten from its box so they will know about
everything that has arrived, as well as how to re-pack the Mountbatten if it has to be
returned for update or repair.
Opening the outer box
On the top of the contents are two packets:
● The first contains the print manual and a CD with software; you can put these aside
for the moment.
The second is a starter pack of paper to be used in the Mountbatten.
Explain that the Mountbatten works best with standard 80-gram paper, as noted on the
pack; remind your user that this is much cheaper and easier to find than Braille paper, and
that the dots are good and will last quite well.
●
Explain that you will be installing the software for them and that when you do, you will
show them what it does.
Once the packets are out of the way, you will find the power pack and power cord for the
Mountbatten, as well as the USB connection cable supplied with the MB. The USB cable
might have moved under the inner box; in that case, you can tell the user about it and
show them after you lift out the packaging. Put the USB cable to one side, but keep the
power pack close by. Then you can lift out the packaging with the inner box inside it; show
Page 2 of 12
the user how the packaging fits around the inner box, and let them help remove it.
If there is a Mimic included, it will be packaged between the end of the inner box and one
end-piece of the packaging; show your user where it is, and put the Mimic in its box to one
side.
Then open the inner box.
Opening the inner box
Inside the inner box you will find the Mountbatten. It is wrapped in one layer of bubblewrap, which must be removed. Put the inner box and the bubble-wrap to one side. You
now have a pile of boxes, packaging, cables, manuals, Mimic and software CDs off to one
side, and on the table a Mountbatten and its power pack and power cord. Leave the power
pack and cord unplugged for the moment.
Lay the Mountbatten on the table so that the keyboard is facing the user as if they were
about to type Braille. Make sure they can reach the keyboard and the sides of the
Mountbatten while seated; take your seat beside them.
Unpacking the Mountbatten
The Mountbatten is shipped with an insert to stop the Braille head from moving. To remove
the insert, first you need to remove the cover.
Show the user how to remove the cover by reaching over the Mountbatten and lifting the
centre back strut of the cover. Then show them how to put it back on by fitting the two front
corners into the grooves at either side of the ruler in front of the Brailling mechanism; then
have them lift it off again. This is a good opportunity to show the ruler itself; it can be
shown again after the paper is loaded. The markings are there to tell the user how many
Braille characters will fit across the paper they're using.
Orientation
Braille and paper mechanisms
Once the cover has been removed, you can make removing the insert part of the user's
orientation, beginning with the paper lever, paper bail, Braille head and reading table.
In order for the insert to come out, the paper bail needs to be removed. Before that, the
paper lever must come up. Show the user the paper lever, and have them lift it; show them
Page 3 of 12
how the paper grip wheels lift on both sides, and have them lift and lower the lever a
couple of times.
Show the user the margin adjusters, left and right; make sure they understand that the left
one will not move at all, and that the right one will slide only when the paper lever is raised.
Make sure the right margin adjuster is all the way to the right before removing the paper
bail.
Then show the user the spring-loaded end of the paper bail, and have them move the
spring to the right so that the end of the bail comes out of the left margin adjuster; then the
right end of the bail can be pulled free of the right adjuster.
Explain that the paper bail is not necessary for daily use, and that it actually impedes
reading; it is included so that continuous (fan-fold) paper can be used for embossing.
Now raise the paper lever and remove the insert by pulling it towards the back of the
Mountbatten.
Once the insert is removed, the user can explore the Braille head and the reading table
(the flat silver area behind the Braille head). Make sure they know not to move the Braille
head by hand; and show them that there are two straight edges on the reading table, one
being the back edge and the other, closer to the keyboard, at the front edge of the groove,
where they will be able to line up the top of their paper to make sure their Braille is in
straight lines.
Show the user the paper advance knob; tell them that they will only ever use this - if they
use it at all - when they first load a sheet, and that the Mountbatten will move the paper for
them the rest of the time.
Keyboard
The next part of orientation is the keyboard. All the keys have names, and its important to
use the same name for each key every time you refer to it, to help the user to remember.
There are two keys whose names can be confusing. These are the Left function and Right
function keys; when the Mountbatten is first used, these are programmed to be Tab (on the
left) and Back Tab (on the right). Your user might never want to re-program these keys, but
it's a good idea to tell them that it can be done, and to explain how the name in the manual
Page 4 of 12
comes about. After that, you can refer to them as Tab and Back Tab.
When you begin the user with writing Braille, you will go through the keys again; it can take
several repetitions before the user remembers all the keys and what they do.
When you are going through this part of the orientation, the Command Key will be turned
off. Explain that the Enter key is a partner to the Command key, and not used for anything
else; explain the difference between what the Enter key does and what the New Line key
does.
Show the user the different shape and feel of the Braille keys, so that they can tell they're
on the correct keys and not pressing the Command key by mistake.
The Command key is round, smooth and has no ridge on the edge. The Braille keys are
long, smooth and have a ridge on the edge. The Backspace and Enter keys are long, have
ridges along the edge and also have ridges across. The New Line and Space keys are
long sideways, smooth and have no ridges. The Function keys (Tab and Back Tab) are
round, smooth and have no ridges.
When the Mountbatten is turned on, the keys will speak what they do as they are pressed.
Around the Mountbatten case
Begin your tour of the rest of the Mountbatten at the front left and move right. If the user
presses the "on" switch, have them turn it off again so you can complete the tour.
"On" switch: if the user forgets which way to press it, there's a small tactile diagram and
some Braille on the base of the Mountbatten. Stand the Mountbatten on its back so the
user can find this diagram and Braille and read it. Then put the Mountbatten flat on the
table again.
Next to the "on" switch is a keyboard port for special keyboards. This port is very seldom
used, but it's there in case it's needed - it's good to say something about it, even if the user
doesn't need it.
After the special keyboard port is the volume wheel. Show the user how they can move it
back and forth with their thumb; have them finish with it more or less in the middle, so that
they'll be able to hear the speech when the Mountbatten is switched on.
In the centre of the front of the Mountbatten is the carrying handle.
Ports
When you are showing the ports, if you have time, it can be helpful to try plugging in the
USB cable that comes with the Mountbatten; if you don't have time, leave that until you are
ready to teach the use of the cable or connection.
First show the user the two ports on the right side of the Mountbatten.
Going from front to back, the first port is the USB port; explain that this is not the same as
the USB port on the computer, but is a "B" port, the kind they'd find on a printer, and that's
why they need to use the supplied USB cable.
The second port is the Mimic port. This is one of two serial ports, but it's important to
remember it as the Mimic port; this is where the Mountbatten looks to see whether the
Mimic is connected.
Page 5 of 12
The next set of ports is at the back of the Mountbatten. Begin at the right-hand end. If your
user isn't able to reach around the Mountbatten, turn it around so that the back is facing
the user, but begin at the same end – with the keyboard port.
The keyboard port is a small PS/2 port, and can be hard to find because it is set flush with
the case.
The middle port is a parallel port, for connecting a printer to the Mountbatten; then there's
a second serial port, which can be used for connecting to a computer instead of USB,
depending on what ports are available on the computer.
The last part of orientation is the right-hand side of the Mountbatten, which has the
earphone socket to the rear, and two power sockets toward the front.
The earphone socket takes a standard 3.5 mm headphone jack, so any headphones the
user already has with this sized jack should fit.
The two power sockets are of different sizes. The large socket is used for the power pack
supplied with the Mountbatten; the small one can be used for charging the Mountbatten
from a DC source like the one in a car.
Battery care
It's very important to stress the need for battery care. Take some time to do it here; have
the user plug the power pack into the Mountbatten socket, and plug the charger into the
mains power.
Discuss with the user or their parents or teacher where the Mountbatten is going to be
charged; it's important that they find a permanent, safe place near a power outlet to charge
the Mountbatten every night. Let them know that the Mountbatten will work all day long on
battery, but that they must charge it overnight every single night without fail. You cannot
state this too strongly!
Once you have covered this, if you're sure that the Mountbatten has enough charge for the
full training session, you can unplug the power and use battery for the training.
Loading paper
There are two ways to load paper; from the top and from the rear. Show the user both
ways. Most young users prefer the second method, loading from the rear; let your user try
both ways a few times until they find the way they prefer. The methods are explained in the
User Manual, with pictures; make sure you are able to use them both yourself, without
looking, before you try to teach a user.
Step 1 in loading paper: raise the paper lever! Make sure it stays up until paper loading is
complete.
Once the paper is more or less in place, by whichever method, show the user how to do
the following things, and let them practice:
1. slip the left-hand edge of the paper under the paper grip wheel at the far left;
2. bring the right margin adjuster in towards the paper, and make sure the paper is
under the wheel but over the base of the margin adjuster. You can show the user
how to hold the paper against the roller
Page 6 of 12
3. line the top edge of the paper up with the straight edge at the far side of the reading
table.
Once these three things are done, they can lower the paper lever, and use the paper
advance knob to move the top of the sheet to a good place – in line with the groove in the
reading table gives enough top margin without wasting a lot of paper.
Make sure that your user understands that the Mountbatten needs paper to be loaded
before it can do anything; if they try to type without paper, the Mountbatten will say "out of
paper".
Switching on
Finally ready to switch on properly! Let the user press the switch, and listen to what the
Mountbatten says and watch what it does; go through it with them, and then let them
switch on again.
1. Mountbatten says "hello" (or "g'day", or whatever it says in your language);
2. Mountbatten says "charging" or "not charging" depending on whether it's connected
to power;
3. Mountbatten says "learn mode" or "advanced mode" depending on which one it's in;
4. If in Learn Mode, Mountbatten says "Mimic Not Found" if the Mimic isn't connected.
5. The Braille head moves across to the right and then back again, doing a Margin
Search to see how wide the paper is.
Let the user do the switch-on with their hand resting lightly on the Braille head so they can
see that it does move, and it doesn't bite.
This is also a good time to show them that the head will do a margin search when they put
in new paper – let them lift and lower the paper lever so they can try it for themselves.
Writing Braille
Writing and Word Wrap
Let your user write a few words using the keyboard. Although they will hear a soft beep
when they near the end of the line, ask them to keep writing, so that the Mountbatten
wraps to the next line; then you can explain what has happened.
Writing and hyphenation
If the user is writing long words that won't fit on the line, the Mountbatten will hyphenate
the word automatically. There is a command to turn this off; tell the user about this, and
say that you will cover this in a few minutes' time.
Correcting Errors
Show the simple error-correction first: backspace + space to erase an unwanted character,
and then backspace + character to replace an unwanted character. Let your user play with
this a couple of times.
Page 7 of 12
Moving around the page
Show the full range of keystrokes for movement:
New Line +Space
Move down the page in the same column
New Line + Backspace
Move up the page in the same column
Left Function Key
Tab
Right Function Key
Back Tab
Space
Move one position right
Backspace
Move one position left
Once you have worked through these keystrokes, look at error correction again, showing
the user how to correct an error on an earlier line.
Show the user that pressing Backspace or Back Tab when the head is at the left-most
position will cause the Mountbatten to say "left margin", meaning that it's not possible to go
any further left.
Show the user also that they can use the tactile Braille Ruler to find out the relative
horizontal position of the Braille head on the page.
Removing paper from the Mountbatten
Many young users will find this the easiest way to remove paper without tearing:
New Line + Enter
Page Eject
This command works without lifting the paper lever; if the user wants to remove the paper
manually, they must lift the paper lever first.
Connecting the Mimic and external keyboard
Before connecting the Mimic and the keyboard, turn the Mountbatten off; explain to the
user that the Mountbatten will look for these two devices at switch-on.
In Learn Mode, the Mountbatten will find the Mimic even when the Mountbatten is on, so
long as the Mimic is connected first and then switched on; however, if the keyboard is
connected when the Mountbatten is already on, you will need to press a key once or twice
to alert the Mountbatten that it's there. If you press space on the external keyboard, it won't
cause any problems; however, if you press a letter key more than once, it can then write
Braille on the paper.
Connect the Mimic and switch it on, and connect the keyboard. Then switch the
Mountbatten on.
Display on the Mimic
This is self-explanatory; what is typed on the Braille keyboard appears on the Mimic
screen as text. Show the user or teacher how to clear the display, and how to use the
buttons on the Mimic to scroll through the text.
Page 8 of 12
Braille from the external keyboard
Explain to the user that text entered at the keyboard in Learn Mode will not be translated;
this means that numbers will not have the number sign, and some letters and
combinations will not be brailled correctly. To show what to do about this, you need to take
them through the following sections.
Modes in the Mountbatten
There are two modes: Learn Mode and Advanced Mode. The Mountbatten arrives from the
factory in Learn Mode.
From the manual:
Learn Mode provides a simple and friendly starting point. It is ideal
for the young braille learner. In Learn Mode your Mountbatten is a
braille writer only.
Note: the command key is disabled in Learn Mode
Advanced Mode enables you to use all the Advanced features of
your Mountbatten, such as braille translation, use of a PC keyboard,
printers, and communication with other devices such as note-takers
and computers.
To change from Learn Mode to Advanced mode requires a command: ADV.
Mountbatten Commands
To use the commands, first the Command Key has to be turned on:
The Mountbatten will say: "Command On". After this, the Command key is active. To turn
commands off again, press the same keys; the Mountbatten will say "Command Off".
Commands in Learn Mode
Graphics
To begin showing commands, use the Graphics Mode first: GF. Show your user the
sequence for entering a command: Command Key, type the command, Enter Key. Have
the user type a line of "c" (Dots 1 and 4) and show them how the spaces between letters
have disappeared. Now have them turn Graphics back off using the same sequence, and
type another line of "c", so they can see the difference.
Page 9 of 12
Word Wrap
The command for Word Wrap is the one to use so that when a word won't fit on the line,
instead of breaking the word with a hyphen, Mountbatten will move to the next line before
embossing it.
Word Wrap also has some extra benefits: because the word isn't embossed until after
space is pressed, it's easier to hear the speech as the user types each Braille letter.
This command is easy to remember: WW. To turn Word Wrap on and off, press Command,
type WW and press Enter.
Formatting the page
The user might like to know about Centring (CE), Right Align (RA) and Line Spacing (LS
space n.n), depending on their stage of Braille learning. CE and RA are toggle commands,
which when entered turn the facility on or off, depending on its state before the command
was entered.
Commands in Advanced Mode
Before using the commands reserved for Advanced Mode, the user needs to know about
ADV to go in and out of Advanced Mode. When the command key is active, press
Command, a, d, v, Enter; Mountbatten will say "advanced mode".
Translating external keyboard entry
To enable translated Braille to be typed in from the external keyboard, Forward Translation
must be turned on. First go in to Advanced Mode and then enter the command FE to turn
translation on: Command, f, e, Enter. The Mountbatten will say "on". Once forward
translation is on, anything typed at the external keyboard will be translated.
Show your user that text will not be brailled immediately, because the Mountbatten needs
to accumulate enough text to translate it accurately; it saves up 80 characters and then
translates it and sends it to be Brailled all at once. If there is less than 80 characters, press
Enter twice on the external keyboard, to have the Mountbatten complete the translation
and emboss the result.
FE always uses contracted Braille, if your Braille code has a contracted version (such as
English). If contracted Braille isn't required, then you can use a second command, FB, to
set forward translation to Basic mode; when FB is active as well as FE, each word typed at
the external keyboard is translated and embossed each time space is pressed.
For FB to be active, FE must be turned on; for FE to be on, you must be in Advanced
Mode. So, you can turn everything off by simply returning to Learn Mode using ADV.
Other commands available in Advanced mode can be found in the User Manual.
Connecting to a PC
This involves installing MB-Comm on the user's computer, and showing a parent or
teacher how to use it; this is covered in a separate section.
Page 10 of 12
Writing in memory
If your user is ready for this level of complexity, you can show them how to use the BEGIN,
END and APPEND commands, and the EMB command to emboss the file they've saved.
You should go through the naming of files and the DIR command to complete this section.
Using the Editor
If the user understands writing in memory and using files, you can begin teaching the
editor; you might start by opening a file that has been saved using BEGIN and END.
The first things to teach about the editor are file-related. Make sure your user knows that
they can save separate files in memory and recall them when they need to - and that they
must all have different names! Make sure they understand what will happen if they save a
new file over an old one.
The next steps involve moving around in the text. With the Mountbatten it is possible to
relate these movements back to the hard-copy page.
Make sure you explain about the difference between Insert and Overwrite; the
Mountbatten editor is in Insert mode by default. Have the user type something and go back
through the text to show that it was inserted.
The next step is to show how text can be corrected.
The final step is to show how to save the file, and to make sure the user knows to save
their work often!
If time permits you can go through the Editor menus and explain what each thing does,
and touch on using Blocks.
Using the Calculator
There are two calculators in the Mountbatten: Simple and Scientific. Unless your user
really needs the scientific calculator immediately, you can concentrate on the Simple
calculator. In Advanced Mode, use O-chord M (Option M) to go into the Simple calculator.
Begin with entering calculations and listening to the results; go on to printing the equation,
and then to copying and pasting the equation into the editor.
Battery Care
Show your user how to check the battery: press Space + New Line + Dot 1 + Dot 2.
Mountbatten will say "Battery OK" if there is a good charge. It will also tell the user whether
or not the power is connected.
Remind your user to charge the battery every day; to check that the power is turned on
and that the Mountbatten says "charging" when it is plugged in – it will do that even if the
Mountbatten is turned off.
If the battery is low, the Mountbatten will say so; it is then time to plug into power. Let your
user know this, so that they can make sure they are able to connect to power if necessary.
Storing the packaging
It's very, very important that your user does not throw the Mountbatten box and packaging
Page 11 of 12
away. So encourage the user to store anything they're not using - the CDs once the
software is installed, any cables they're not using, the paper bail – in the Mountbatten box
with the inner box and the packaging, and find a safe place for it. Before you leave, help
them to put it all together neatly so that it's easier to store.
Page 12 of 12