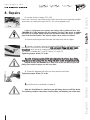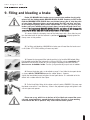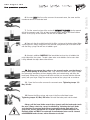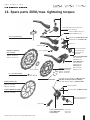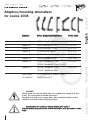
1
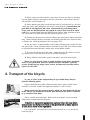
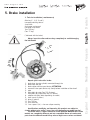
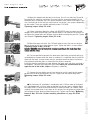
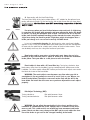
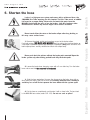
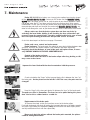
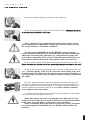
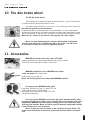
DISC BRAKES
English
WORKSHOP 2008
THE PASSION P
EOPLE
Our disc brake range – recommended use
Gustav M
Marta SL 203 / 203
Gustav M
Marta SL 203 / 203
Marta SL 180 / 180
Marta SL 180 / 180
Marta SL 160 / 160
Marta SL 160 / 160
Marta 180 / 180
Marta 160 / 160
Marta 180 / 180
Marta 160 / 160
Louise 203 / 203
Louise 203 / 203
Louise 180 / 180
Louise 180 / 180
Louise 160 / 160
Louise 160 / 160
Julie 210 / 190
Julie 210 / 190
Julie 180 / 180
Julie 180 / 160
Ground contact isn’t that
important to you. There
is (almost), no terrain
where a Freerider won’t
go. Tough and stable
components are a must
have. Here they are.
There are bikers out there
for whom uphill is just a
means to an end. The
You’re an all-rounder. You
love long and sweeping
trails, up as well as down.
downhill fun is having
absolute priority for them.
With lots of travel and
robust components the
The optimum mix of light
weight and stability is
the hall mark of your
All-Mountain components
meant for a broad spectrum of use.
Enduros must cope with
technically hairy downhills
and bikepark weekends.
Mile after mile over the
dusty trails as well as
hard fast tarmac. On
every ride your bike
should be the epitome
of uncomplicated – and
naturally the parts for
your Touring adventures
shouldn’t cost the earth.
Race-orientated means
for us the minimum
weight that is technically
possible. Every gram
extra weight can be the
decisive factor between
winning or losing for you,
the X-country maniac.
2
www.magura.com
4
2. Safety instructions before the first ride
5
3. Safety instructions before every ride
5-6
4. Transport of the bicycle
6
5. Brake installation
7-10
6. Shorten the hose
11-12
7. Maintenance/Brake pad change
13-14
8. Repairs
10. The disc brake wheel
18
11. Accessories
18
12. Trouble Shooting
19
13. Warranty
19
20-21
WARNING:
This symbol means possible danger for your health and even life if you do not follow
the instructions given resp. if the necessary safety measures are not followed.
ATTENTION:
This symbol warns you of inappropriate handling that might cause heavy damage to
the material and/ or the environment.
Español
NOTE:
This symbol is giving you additional information about the general handling of the
product or gives hints to paragraphs of this manual which have to be read carefully.
Nederlands
14. Spare parts exploded view/Tuning adaptors
Français
16-17
Italiano
9. Bleeding and Filling
15
English
1. Introduction
Deutsch
Table of contents
3
www.magura.com
1. Welcome to the Passion People!
Brake lever (master cylinder)
MAGURA Louise®
Congratulations! You have purchased a
fully hydraulic MAGURA disc brake proudly „Made in Germany“. You will be enthusiastic about the awesome braking power
and the very little maintenance that is
necessary on our stoppers. Good to
know that you are not alone, millions of
users worldwide rely on them and every
day we’re becoming more!!
Brake caliper and rotor
MAGURA Louise®
On the fully hydraulic MAGURA disc brake system MAGURA Louise the braking force
is transmitted to the braking surface by a mineral oil column. The movement of the lever
blade moves a piston, which is integrated in the brake lever (master cylinder). The
piston pushes the mineral oil column through the brake hose in the direction of the
brake caliper, where two pistons, on which the brake pads are fixed, are pushed out.
The friction between the brake pads and the rotor is slowing down the bicycle and
causes a heating of both the rotor and the brake caliper.
Never touch either the rotor or the brake caliper after long braking as this
may cause serious burns.
You will be pleased to find out that the MAGURA Louise disc brakes offer a superior
braking power even with little hand force applied, no matter what the weather conditions
should be. Particularly in wet weather conditions disc brakes are much more responsive
than rim brakes and transmit their enormous power shortly after activating the brake
lever.
Disc brakes do not cause a wear of your rims. In case of insufficient mounting conditions they might however cause a squealing noise during braking, mainly in wet weather
conditions.
This manual contains important information about the safe installation,
operation and maintenance of your MAGURA disc brake. We urge you to read
it carefully, become familiar with its contents and follow our recommendations
to help make your new braking experience enjoyable and trouble free.
Although the Louise disc brake system is relatively simple you should not
overestimate your technical skills! We therefore advise you to leave the following works to a trained technician of a professional bike shop.
In case of any further questions or problems we warmly recommend to visit our
website www.magura.com where you will always find the newest and hottest tips about
all our products and free online help in the forum. You can also download there this
manual in a convenient A4 format. Stay tuned with the Passion People!
Thank you for your confidence in our products, enjoy your ride and your
new MAGURA disc stoppers!
Happy trails!
4
www.magura.com
4. In case of extreme riding conditions (total weight of bike plus rider
over 100 kg/220 lbs. and/or a gradient of more than 15 %) always use both
brakes simultaneously to brake your bike down. Avoid constant braking on
long descents as this might cause overheating and total failure of the system.
5. Use the brakes according to the user chart on page 2 of this manual.
Any misuse might cause heavy accidents with fatal injuries for you and others!
6. Are you familiar with the other components on your bike such as shifting, clipless
pedals and suspension units? Always train the perfect handling of your bike in a safe
area before using it in the public traffic. Consult the user’s manual of your bike to learn
more about this.
7. For your own safety always wear a helmet when you ride a bicycle. Make sure as
well that your clothing and footwear are suitable.
3. Before every ride or after a crash
English
3. New brakes and new rotors or brake pads must always be run in by
breaking at least 30 times from a speed of 30 km/h to achieve the maximum
brake power. Take your bike to a safe place to run in the brake.
Français
2. Check whether you activate the front brake with the brake lever, which
you are used to braking on the front. If ever this is not the case you will have to
train your new setup because any unintended braking might cause an accident
with possible serious injury! Make change the hose connection by a trained
technician in case of any doubts.
Further hints concerning the swapping of the brake hose see page 11 onwards.
Nederlands
1. Are you already familiar with hydraulic disc brakes? Our brakes might be much
more powerful than the stoppers on which you relied so far.
Take your bicycle to a safe area to learn the proper braking technique and operation
of your new brakes and your bike.
Deutsch
2. Before the first ride
Incorrectly installed quick release skewers might cause the fixed items to
get loose. Serious falls with heavy bodily injury might be the result!!
2. Always make sure that the brake lever pressure is o.k. by pulling the lever blade
and ensuring that full braking performance is achieved before the lever blade touches
the handlebars. If this is not the case, pull the lever blade several times (pump) until the
brake pads touch the rotor.
In case, of changing pressure points during a ride you might have air in the brake
system. See hints about filling and bleeding from on pages 16/17.
5
Español
1. Always make sure that the quick release skewers of your wheels and seat post
are correctly mounted and closed.
Italiano
always check carefully the following points:
www.magura.com
3. Always make sure that the brake system does not have any leaks by activating
the lever blade, holding it and checking the hose connections and reservoir cover for
eventual leaks. (Also see page 12)
4. Always protect your rotors and brake pads from oil and lubricants (e.g. by lubricating your chain). Avoid detergents and soap on the brake pads. Contaminating the
pads with oil and lubricants will cause a permanent loss of braking power.
Those pads are definitely killed and cannot be saved. They have to be replaced! Clean a contaminated rotor with MAGURA brake cleaner, warm dishwater or alcohol. See further hints about the brake pad change on pages 13/14.
5. Release your brake lever and check whether your wheel moves freely and without
drag. Check eventually whether the wheels are correctly mounted and if the quick release skewers are sufficiently tightened. (Also see pages 8-10)
6. Are your tires in a good condition, and are they sufficiently pressurized? Test this
with your fingers. Lift up your bike and turn the wheels of your bike. An insufficient rotation might be due to damaged tires, broken axles and/or broken spokes.
7. Pick up your bike and let it drop from a moderate height. Be careful in case of
any rattling noise. Check the bearings and all screwed connections.
8. Always follow the instructions given in the owner’s manual of your bicycle.
Never use your bicycle if ever a proper function of the points mentioned
above is not guaranteed. Consult a professional bike mechanic if you feel
unsure. A faulty bicycle might cause serious accidents with possible serious
injuries for the rider!
4. Transport of the bicycle
In case of a disc brake equipped bicycle you should always keep in
mind the following points:
Never activate the lever blade without the brake pads in place and the wheels
mounted. In case this should have happened see page 11 of this manual.
Never throw away the transport device, which has been delivered with the
brake. Always clip it between the brake pads whenever the wheel is removed
(e.g. transport of the bike).
Always carefully removed wheels. Make sure that the rotors are not damaged,
deformed or contaminated with lubricants.
If the bike is transpor ted upside-down squeeze before the lever blade,
hold pressure and fix the lever blade in this position with a r ubber band or
a cable tie as shown on the right photo.
For a transport in an aircraft you can leave your brake as it is, e.g. you do not
have to empty it.
6
www.magura.com
Allen key 2*, (2,5, 3) and 5
transport/mounting device*
sharp knife
8 mm open end wrench
flat blade screw driver
Torx T25 key*
(Torx T7 key)
(*delivered with the brake)
Always insert the allen and torx keys completely to avoid damaging
the bolt heads!
1
English
1. Tools for installation (+maintenance)
Deutsch
5. Brake installation
10
2
12
8
Français
9
3
11
5
Unpack your Louise disc brake:
1.
2.
3.
4.
5.
6.
7.
8.
9.
10.
11.
12.
13.
7
brake lever (master cylinder) connected through the
brake hose with the
brake caliper with transport device; ATTENTION:
remove the transport device only shortly before installation of the wheel!
rotor
fitting bolts for rotor Torx T25 (6 pieces)
fitting bolts for caliper Allen key 5 (2 pieces)
adaptor with fitting bolts (depending on model)
hose inserts (2 pieces)
olives (2 pieces)
Torx T25 key
2mm Allen key
1 mm spacers (2x) --> for rear caliper mounting
Specifications modifying and improving this product are subject to
change without prior notice. Specs may vary depending on model version!
The brake levers, calipers and hoses of the different MAGURA disc brake
models are completely different and not compatible! Never mix and match
parts from the different models! Any misuse might cause serious accidents!
Italiano
7
Español
13
Nederlands
6
www.magura.com
The brake levers, calipers and hoses of the different MAGURA disc brake
models are completely different and not compatible! Never mix and match
parts from the different models! Any misuse might cause serious accidents!
MAGURA manufacturers these braking systems according to the valid standards and
based on profound product tests. Because of the large variety of forks and frames available on the market it is impossible for MAGURA to test all possible combinations. If you
mount any of our brake systems always make sure that the brakes are in conformity
with the bicycle.
Disc brake calipers can generate a lot of heat during extreme riding conditions. The resulting heat transfer from the caliper to the fork and/or frame can
have a negative influence on the mechanical characteristics of both the fork
and/or the frame.
Insufficient heat transfer from the brake caliper to the frame and the fork,
caused by fork and or frame components having low heat transfer characteristics (e.g. carbon rear triangles) can cause the brake to overheat, with the possibility of a total failure of the brake system. This can cause serious personal
injury to yourself and/or others.
With respect to product liability we remind all our users that any manufacturer (also: bike mechanic or end consumer!) is responsible for the correct function of the complete bicycle in this context. Improper combinations and insufficient installation might cause damage and serious accidents!
2. Mount the brake lever to the handlebar with a 5 mm allen key. Tightening torque 4 Nm/ 34 in.lbs
Hint: Tighten the brake lever so that it can still rotate around the handlebar in case of
a crash. This old motocross trick will reduce considerably the risk of a damaged brake
lever and the costly consequences.
The MAGURA disc brake Louise is compatible with frames and forks which
meet the International Standard (IS) and for Postmount (PM) as well. Depending
on the mounting standard and/or rotor size adaptors are used for a proper
installation (cf. page 21). Never mount the brakes with adapters or brackets
from other manufacturers! All warranty will be void in case of any misuse! Use
only direct mounting parts from MAGURA or the frame or fork’s manufacturer!
Make sure that the caliper fitting eyelets on your frame or fork are free of any paint,
powder coating or burrs. (arrows). If this is not the case you should contact your dealer
who is able to care for the absolutely necessary even surface with the help of the
MAGURA Gnann-o-mat disc optimizer tool (also see page 10).
ATTENTION: The facing of suspension fork lower legs made of magnesium
might be dangerous because of corrosion! Always follow the safety instructions
given by the respective manufacturer! Always make sure after having treated
the disc brake mounts that these are protected against corrosion by using an
appropriate protective paint.
8
6. The transport device prevents the brake pads from being pushed out too far by
unintended lever squeeze when the wheel is removed. It is impossible then to install the
wheel with the rotor. So never throw away the transport device but keep it and always
clip it between the brake pads as shown when the wheel is removed.
Install the wheel by positioning the rotor between the brake pads and fixing the wheel in
the dropouts. Close the quick release of your wheel which you should mount on the
opposite side of the brake caliper and tighten it sufficiently.
7. Squeeze the lever blade several times (pump) to push the pads to their proper
position until the lever feel becomes very firm. Tighten now the caliper fitting bolts.
Tightening torque: 6 Nm/ 51 in.lbs.
English
Español
8. For Postmount 6” installation in combination with a 160mm rotor or Postmount
8” in combination with a 203mm rotor on the front you do not need an adaptor. Mount
the caliper DIRECTLY onto the fork with MOUNTED wheel and rotor. For a better understanding the mounted wheel is not shown on this picture. Do not tighten the caliper bolts
yet! Squeeze the lever blade and keep the pressure. Tighten now the bolts. Tightening
torque: 6 Nm/ 51 in.lbs. Further mounting alternatives cf. page 21 of this
manual.
Français
5. Mount the rotor with the 6 Torx T25 bolts onto the hub. Use only new original
bolts or thread lock if you use the old ones again. Tighten the bolts in a cross pattern.
Tightening torque: 4 Nm/ 34 in.lbs.
Install a MAGURA rotor in Centerlock version according to the tech sheet that
comes with the rotor.
Nederlands
4. Caliper installation: Mount the caliper with MOUNTED wheel and rotor onto the
adaptor. For a better understanding the mounted wheel is not shown on this picture. Do
not tighten the caliper bolts yet! Squeeze the lever blade and keep the pressure. Tighten
now the bolts. Tightening torque: 6 Nm/ 51 in.lbs.
Italiano
3. Mount the adaptor onto the fork or the frame. Use a 5 mm allen key. Please follow carefully the mounting instructions that come with the respective adaptor! On the
rearbrake you must position the 1mm spacers between frame mounts and caliper. If you
use a thru-axle hub on the front you might have to use thicker 3 mm spacers (depending
on fork model). These are available separately (code: 0720 829).
Tightening torque: 6 Nm/ 51 in.lbs.
Deutsch
www.magura.com
9
www.magura.com
9. Hose routing with the Heat Eater fitting.
The Heat Eater fitting of the Louise caliper allows a 45° rotation for the optimum hose
routing without using tools. Fix the hose on the fork and/or frame after you have found
the ideal position, the Heat Eater must NOT move during compression of the fork
and/or frame!
Do not worry when you hear friction between rotor and pads. A slight drag
is normal on disc brakes with automatic pad wear adjustment during the breakin period. This drag will disappear after a while. The reason for this is that the
brake pads find their optimum working position towards the rotor, only after a
slight wear during the break-in period. Slight drag might also happen after a
brake pad change or in case of an incorrectly installed wheel.
In case of a constantly dragging disc brake causing noise your frame is badly
aligned. In such a case you should contact your dealer who can care with the MAGURA
Gnann-o-mat disc optimizer for a totally even surface of the disc brake mounts. These
are absolutely necessary for a drag free function of your brake.
New brakes and/or new rotors or brake pads must always be run in by
breaking at least 30 times from a speed of 30 km/h to achieve the maximum
brake power. Take your bike to a safe place to run in the brake.
Reach adjust is done with a 2,5 mm Allen key. Turning key clockwise: lever
blade moves away from the handlebar, turning counterclockwise: blade moves to the
handlebar. On Louise models without BAT feature you find the reach adjust screw under
the black dust cover of the lever blade.
WARNING: The reach adjust screw becomes very firm when you risk to
overtighten it. Do not continue to screw it in/ out in such a case. Misuse can
lead to brake failure! The adjust screw must not be flush wih the drill in the
lever blade. Re-install the dust cover once you have adjusted the reach adjust
properly.
Bite Adjust Technology (BAT):
Turning clockwise:
Turning counterclockwise:
Bite point becomes firmer
Bite point becomes softer.
WARNING: Do not adjust the reach adjust in the closest position to the
handlebar in combination with a BAT adjuster that is screwed in to the maximum as well. This could result in an unsufficient lever movement and brake
power. Check out after every change of the BAT and/or reach adjust the function of the brake to get used to the changed handling of the brake.
10
www.magura.com
Never push back the pistons without the brake pads mounted! Open the
brake system only after having pushed back fully the brake pads.
2. Loosen the brake lever clamping screw with a 5 mm allen key. Turn the brake
lever and ensure that the reser voir is horizontal.
3. Slide the hose protection. Unscrew the sleeve nut on the brake lever with an
8mm open-end wrench and pull the hose out carefully. Hold the hose carefully to
avoid any loss of oil! Do not squeeze the lever blade with the system open!
English
Español
4. Put the hose on a workbench and shorten it with a sharp knife. The best tool
is the MAGURA hose cutter (code 0321 233). Do not use saws or pliers!
Français
1. Remove the wheel so that you have free access to the brake caliper.
Push both pistons with brake pads mounted back by putting the transport device or
a flat blade screwdriver into the gap. Move the screwdriver slowly back and forth until
both caliper pistons are fully retracted and flush with caliper body.
Nederlands
Never touch either the rotor or the brake caliper after long braking as
this may cause serious burns.
Italiano
Louise is a high-pressure system and comes with a reinforced hose, the
„MAGURA Disc Tube“ wearing also this imprint. The Disc Tube needs an additional insert for a proper fitting. Never mix and match the parts from the
MAGURA Louise with the ones of our rim brakes, Julie disc brake or other
manufacturers’ brakes! Any misuse might cause serious accidents!
Deutsch
6. Shorten the hose
11
www.magura.com
Hint: Hold the hose carefully so that it cannot snap away! Cut the
hose squarely! The sleeve nut can be re-used. The olive and the insert
cannot be reused and must be replaced!
5. Press by hand a new insert into the hose until it is fully seated. Clamp the hose
into the groove of the mounting device as shown...
6. ...or clamp the mounting device as shown into a vice and hammer the insert
carefully into the hose. If your frame is not equipped for routing hydraulic lines you
should now mount the hose fitting kit for your rear brake according to the instructions
that are included in the kit.
7. Slide on the sleeve nut and a new olive onto the hose. Push the hose with the
sleeve nut and the new olive fully into the brake lever and tighten the sleeve nut with
an 8 mm open-end wrench. Tightening torque: 4 Nm/34 in.lbs.
8. Always check for correct installation by pulling on the hose. Make
sure that the system has no leaks. Squeeze the lever blade, hold pressure
and check hose connections and the reservoir cover for eventual leaks.
Squeeze the lever blade several times (pump) to push the pads to their
proper position until the lever feel becomes very firm. If you cannot realize
this, bleed the brake (see page 16 onwards).
12
www.magura.com
Control of the brake pad wear
Never touch either the rotor or the brake caliper after long braking as this
may cause serious burns.
Squeeze the lever blade with the wheel mounted an hold the pressure.
Check out whether the “finger” of the transport device fits in-between the “ears” of
the brake pads. On the picture on the left this is NOT the case, the pads must be
changed!
Here the “finger” of the transport device fits between the “ears” of the brake pads.
The pads are still o.k. Remember: The lever has to be pulled during this procedure. Use for this a rubber band or a cable tie.
Replacement of the brake pads
1. Remove the wheel so that you have free access to the brake caliper.
Push both brake pads fully back by putting the transport device or a flat blade screwdriver into the gap. Move the screwdriver slowly back and forth until both caliper pistons
are fully retracted and flush with the caliper body.
13
Never push back the pistons without the brake pads mounted, the pistons
could be damaged otherwise.
English
Français
Brake pads: wear, control and replacement
Brake pad wear: The brake pads are subject to wear due to friction between rotor
and pads. All Louise disc brakes feature a fully automatic pad wear adjustment.
Regularly check the thickness of your brake pads and replace them, if necessary! CHANGE ALWAYS BOTH PADS SIMULTANEOUSLY!
Nederlands
As to hints about repairs of the hose see page 15 onwards.
Italiano
Always make sure that the brake system does not have any leaks by
activating the lever blade, holding it and checking the hose connections and
reservoir cover for eventual leaks. Consult a trained technician in case of leaks
that cause poor braking performance with possible serious accidents!
Español
Brake Oil: MAGURA disc brakes use a transmission medium low viscosity mineral
oil, the MAGURA ROYAL BLOOD. Contrary to DOT brake fluid the MAGURA ROYAL
BLOOD does not irritate human skin or strip the paint of your frame. Moreover it does
not absorb water like DOT and does not have to be changed regularly. What sounds
unbelievable is a fact: you can use your brakes over years without having to touch them
(except brake pad check and change!) Use exclusively MAGURA ROYAL BLOOD, any
other oil will damage the seals of your brake what will result in total failure of the brake!
Deutsch
7. Maintenance
www.magura.com
2. Remove the brake pad fitting screw with a 2mm allen key.
3. Pull out the brake pads. Their „ears“ make this very easy. Minimum thickness
of a brake pad plus holder is 2,5 mm.
Never squeeze the lever blade without the brake pads in place and the
wheel mounted! If this happened by accident push back the pistons by using
the transport device or a flat blade screwdriver.
Use only genuine MAGURA brake pads! MAGURA cannot guarantee a
correct function of the brake if you use brake pads from other manufacturers,
which were not tested! Using other pads (e.g. sinterized ones!) might cause
poor braking, overheating of the system and resulting total brake failure causing serious accidents! All warranty claims will be void in case of misuse!
4. Clean on the occasion of the brake pad change, the brake body with a clean rag.
Make sure that the friction side of the new brake pads points towards the rotor.
5. Secure the new pads with the fitting screw, a new one is delivered with the new
pads. Tightening torque: 1 Nm/ 9 in.lbs. Check the correct fitting of the pads
by pulling them. The fitting bolt of the pads has to be correctly installed e.g. it
has to go through the drills of the pad holders and then correctly screwed into
the caliper.
6. Check, whether the pistons are fully pushed back and whether the pads are
flush with the caliper body. Push the brake pads back with the transport device or a
flat blade screwdriver as described on page 11. Re-install the wheel and check for a
correctly tightened quick release skewer of the wheel which should be mounted
on the opposite side of the caliper.
7. Squeeze the lever blade several times (pump) to push the pads to their proper
position until the lever feel becomes very firm.
New brakes and/or new rotors or brake pads must always be run in by
braking at least 30 times from a speed of 30 km/h to achieve the maximum
brake power. Take your bike to a safe place to run in the brake.
Never contaminate brake pads with oil or grease this causing permanent
loss of brake power! Contaminated pads are definitely killed and must be
replaced!
14
www.magura.com
2. Prepare a new hose: Use only the reinforced MAGURA Disc Tube (wearing also
this imprint). One end of this hose comes with a pressed fitting with blue loctite
threadlock, which has to be screwed into the Heat Eater as described above.
The hose is available with 0° and 90° fittings (c.f. page 20)
Tightening torque: 6 Nm/ 51 in.lbs.
Use with all Louise models 2008 with adjustable Heat Eater hose fitting
only the hose that comes with the fitting with blue loctite threadlock (ar row!).
NEVER shorten the MAGURA Disc Tube hose at the end with the pressed
fitting! You could no longer use this hose then.
3. Tighten the prepared end of the new hose onto the Heat Eater.
Tightening torque: 6 Nm/ 51 in.lbs.
English
1. Remove the damaged hose from both the brake lever and the caliper.
Français
Louise is a high-pressure systems and comes with a reinforced hose, the
„MAGURA Disc Tube“ wearing also this imprint. The Disc Tube needs an additional insert for a proper fitting. Never mix and match either the hoses or other
parts from the two models. Any misuse might cause serious accidents!
Nederlands
Disc brake service kit (code: 0721 294)
Don’t panic if the hose snaps! With the disc brake service kit and a separately available
spare hose (see spare parts pages 20/21), this can be repaired easily.
Deutsch
8. Repairs
Español
After the installation of a new hose you will always have to refill the brake.
The following chapter 9 describes how the filling and bleeding has to be done.
Italiano
4. Install the hose as described in chapter 6.
15
www.magura.com
9. Filling and bleeding a brake
Brake Oil: MAGURA disc brakes use as transmission medium low viscosity
mineral oil, the biodegradable MAGURA ROYAL BLOOD. Contrary to DOT brake
fluid the MAGURA ROYAL BLOOD does not irritate human skin or strip the paint
of your frame. Moreover it does not absorb water like DOT and does not have
to be changed regularly. What sounds unbelievable is a fact: you can use your
brakes over years without having to touch them (except brake pad check and
change!) Use exclusively MAGURA ROYAL BLOOD, any other oil will damage the
seals of your brake what will result in total failure of the brake!
1. Loosen slightly the clamping screw of the brake lever with a 5mm allen key and
turn the brake lever so that the reservoir is positioned horizontal. Slightly tighten the
clamp screw in that position.
2. For filling and bleeding a MAGURA disc brake you will need the disc brake service kit (Code: 0721 294) including all necessary tools.
3. Prepare the transparent filler tube by pushing in by hand the M6 barbed fitting.
Put the other end of the filler tube on the syringe and fill the syringe completely with
MAGURA ROYAL BLOOD mineral oil. Fill the syringe completely and make sure that
there are no air bubbles inside. Turn the syringe eventually to push out air bubbles.
4. Remove the brake pads as described on page 14 and slide the transport device
as shown with its THICK END between the caliper pistons. Squeeze
slightly the lever blade (pump) to tighten the transport device. It is advisable to fix the
device with a rubber band on the caliper.
5. Fix the Heat Eater fitting of the caliper so that it points UPWARDS!. IUnscrew now
the bleed screw with a 5 mm allen key. Screw in the prepared syringe and tighten it with
a 8 mm open end spanner.
Place now a rag, which has to be free of oil or lubricants around the reservoir and, more important, around the brake caliper. Care for a clean working
environment! No dirt or particles may come into the brake system!
16
9. Actuate in addition CAREFULLY the lever blade to chase tiny air bubbles that
might hide within the system. The job is done when no air bubbles can be seen after
having followed the steps above several times.
10 . Before you remove the syringe on the reservoir make sure that there is
only a small quantity of oil inside. Place a rag around the brake lever and the caliper
thus preventing overflowing oil from dropping down and contaminating and killing the
brake pads. Remove the syringe and close the end that was inserted into the reservoir
quickly with your finger. Empty the remaining content of the syringe into an container.
17
12. Remove the filling syringe and screw in the 5mm allen bleed screw.
Tightening torque: 2,5 Nm/ 22 in.lbs. Re-install the brake pads and the wheel.
Italiano
Always pull the lever blade several times (pump) until the brake pads touch
the rotor. Always check for correct installation by activating the lever blade
and checking for eventual leaks.Never contaminate brake pads with oil or
grease this causing permanent loss of brake power! Contaminated pads are
definitely killed and MUST be replaced! A contaminated rotor can be cleaned
with MAGURA brake cleaner, warm dishwater or alcohol.
Español
11. Close the 2mm allen screw on the reservoir cover. Tightening torque 1,0
Nm/ 9 in.lbs
English
8. Now suck the oil carefully back with the filling syringe on the brake caliper. Make
sure that there is always enough oil in the reservoir syringe when you suck back the oil
with the filling syringe! You will see air bubbles again.
Français
7. Put the second syringe of the service kit WITHOUT PLUNGER into the opened
drill of the reservoir cover. Push oil from the brake caliper upwards until the oil column
arrives in the syring on the reservoir. You will see air bubbles now.
Nederlands
6. Unscrew ONLY the 2mm allen screw on the reservoir cover, the cover and the
membrane remain on the brake lever!
Deutsch
www.magura.com
www.magura.com
10. The disc brake wheel
The XC disc brake wheel
There already exists enough literature concerning wheels, so just a few tips how
a well-built X-country disc brake wheel has to be.
Use spokes with a diameter of 2 mm (arc)/ 1,8 mm which you cross three times.
No radial lacing with disc brake wheels!
Head-inside-spokes (=arc-outside-spokes have to be pulled, i.e. these spokes point
forward on the front wheel; on the back wheel these spokes point forward on the rotor
side and backwards on the drive side. All spokes have to be stressed equally and high.
Mount the q/r skewer of the wheel on the opposite side of the caliper!
Never use ultra lightweight quick releases with titanium or aluminum
axles for your wheel sets in combination with a disc brake. You will not be
in a position to realize the necessary tightening torque!
11. Accessories
MAGURA disc brake service kit, code: 0721 294
contains everything that you need for bleeding and repairing a brake.
ATTENTION: the kit does NOT include a spare hose!
MAGURA braided hose for all MAGURA disc brakes
easily shortened with a cable cutter
Order codes see on page 20.
Watch out for the genuine hose with yellow MAGURA marker!!
Use only genuine MAGURA brake pads!
brake pads Performance Type 6.1 code 0722 418
series pad for maximum brake power.
brake pads Endurance Type 6.2 code 0722 419
with optimized longevity.
Use only genuine MAGURA accessories! Any parts manufactured by other
manufacturers like lever blades, hoses or brake pads have not been tested and
approved by MAGURA and consequently nothing can be said about their short
and long-term function. Never use those parts! All warranty and product liability
claims will be void in case of misuse!
Never change the paint, the finish or the consistence of your brake. This
might cause total failure of the whole system with possible serious consequences!
18
www.magura.com
break in brake (page 5)
oil/lubricants on rotor
and/or pads
clean rotor with MAGURA
brake cleaner, warm dish
water or alcool. Replace
contaminated pads!
air in the system
Bleed brake (page 16)
Correct transport (page 6)
Check hose connections and
hose for leaks. Replace
hose if necessary (page 16)
leaking system
Squealing brake
badly aligned frame
Contaminated brake pads
carelessness
Contaminated rotor
carelessness
Wheel cannot be mounted
Lever blade was pulled with push back the brake pads
removed wheel
with transport device or a
flat screwdriver (page 11)
Rattling noise and rough
deceleration
Leaking hose or brake
align brake caliper correctly
(page 9)
paint/powder coating on
remove any paint or powder
disc mounts
coating and care for an even
contact surface without
burrs (page 8/9)
wheel q/r skewer insuffiincrease tightening; mount
ciently tightened
q/r skewer on opposite
Insufficiently tightened wheel side of caliper; care for
spokes
evenly spoked wheel
brake pads worn, holder of
pads is wearing and damaging the rotor
change brake pads
clean rotor with MAGURA
brake cleaner, warm dish
water or alcohol
brake pad change (page 13)
accident, incorrect installati- change hose or defective
on
brake lever/caliper (page
15)
13. Warranty
MAGURA is giving a 5-year leak proof warranty on brake levers (master
cylinder) and brake calipers.
Watch out for the red info sheet in the middle of this manual!
19
English
brake not run in
Français
not enough brake power
no pressure point
Nederlands
solution
Italiano
reason
Español
problem
Deutsch
12. Trouble shooting
www.magura.com
14. Spare parts 2008/max. tightening torques
0722 533 Repair kit lever blade (1x)
(lever blade not included!)
0722 525 BAT Carbon (1x)
0722 526 BAT Alu (1x)
0720 847 Torx T7 key
(10x) 0721 000 0.6 Nm/5 in.lbs
(10x) 0721 532 1 Nm/9 in.lbs
0721 531
0722 527 (1x)
0722 534 titanium
0722 535 silver
0722 536 noir
with bolt
0721 778 (10x)
Ventidisc/Centerlock
incl. Lockring
203 mm 0722 572
180 mm 0722 571
160 mm 0722 570
Ventidisc 6-holes (IS)
203 mm 0722 569
180 mm 0722 568
160 mm 0722 567
0722 416 (1x)
0721 204 Torx T25 key
0721 057 (6x) 4 Nm34 in.lbs.
SL Rotor 6 holes (IS)
203 mm 0722 332
180 mm 0721 456
160 mm 0721 455
Louise Carbon/titanium
left 0722 520
right 0722 519
Louise BAT/silver
left 0722 522
right 0722 521
Louise/black
lleft 0722 524
right 0722 523
0722 636 Standard 2500 mm 6 Nm/51 in.lbs
(with blue Loctite threadlock on fitting!)
0721 641 Braided 2500 mm 6 Nm/51 in.lbs
0722 421 (10x)
SL Rotor Rohloff Speedhub
180 mm 0721 931
160 mm 0721 930
10 x 0722 421 2.5 Nm/22 in.lbs
0722 418 Performance
0722 419 Endurance
0721 314
Louise Carbon/tianium 0722 528
Louise BAT/silver
0722 529
Louise/black
0722 530
Specifications are subject to change without prior notice!
20
www.magura.com
Rotor diameter/Installation
Order code
Adaptor 5
203/Int. Standard 6" Front
0722 321
Adaptor 6
180/Postmount 6" Front
0722 322
Adaptor 7
203/Postmount 6" Front
0722 323
Adaptor 8
203/Rockshox Boxxer
0722 324
Adaptor 9
203/Int. Standard Rear
0722 325
Adaptor 10
180/Int. Standard Rear
0722 424
Adaptor 11
160/Int. Standard 6" Front
0722 425
Français
Adaptor
English
Deutsch
Adaptors/mounting alternatives
for Louise 2008
0722 426
160/Int. Standard 6 Rear
Direct Mount
203/Postmount 8” (Wotan, Travis...)
(no adaptor!)
160/Postmount 6”
WARNING!
Always make sure, that the fixing bolts are screwed in to a depth of at least
8 mm. This corresponds to around 8 full turns!
Should this not be the case, longer bolts, with a minimum hardness of 8.8
should be used and secured using blue Loctite.
Specifications are subejct to change without prior notice !
Visit our website magura.com for fur ther infor mation, tech tips and free online
help!!
21
Italiano
180/Int. Standard 6" Front
Español
Adaptor 12
Nederlands
203/Int. Standard 8" Front (Fox 40)
MAGURA PARTNERS AND
SERVICE CENTERS WORLDWIDE
Austria
MAGURA Bike Parts Austria
phone +49-7333-9626-13
fax +49-7333-9626-17
[email protected]
Service
[email protected]
Belgium | Vlaanderen
> Sales:
MAGURA Bike Parts
Benelux
phone +49-7333-9626-25
fax +49-7333-9626-17
[email protected]
> MAGURA Tech Support
Benelux
phone +31-653251836
fax +31-842208241
maguratechsupportbenelux
@beebikes.com
> Belgium | Wallonie
Sales:
MAGURA Bike Parts
Benelux
phone +49-7333-9626-42
fax +49-7333-9626-17
[email protected]
> MAGURA Service Center
France
phone +49-7333-9626-43
fax +49-7333-9626-17
[email protected]
Canada
Orange Sport Supply Inc.
phone 604-990-5110
fax 604-990-5884
[email protected]
© MAGURA 2007
All rights reserved
Printed in Germany
0689 665, 07.2007
THE PASSION P
Czech Republic
Pell’s
phone +420-545242631
fax +420-545242634
[email protected]
Hungary
Mali Bicycle Technology
phone 01-4207563
fax 01-4205321
[email protected]
Denmark
Borandia APS
phone 47-107172
fax 47-107066
[email protected]
Ireland
Beara Bike Trading
phone 064-89134
fax 064-41334
[email protected]
Finland
Best Brakes Ky
phone 050-591 5863
fax 019-388485
[email protected]
Israel
Toy House
phone +972-26718282
fax +972-26724521
[email protected]
France
> MAGURA Bike Parts France
phone +49-7333-9626-42
fax +49-7333-9626-17
[email protected]
> MAGURA Service Center
France
phone +49-7333-9626-43
fax +49-7333-9626-17
[email protected]
Italy
Areab
phone 0438-435550
fax 0438-439847
[email protected]
Japan
MC International
phone 06-6536-0901
fax 06-6536-0907
[email protected]
Luxemburg
> Sales:
Great Britain
> MAGURA Bike Parts UK Ltd.
MAGURA Bike Parts
phone +49-7333-9626-29
Benelux
fax +49-7333-9626-17
phone +49-7333-9626-42
[email protected]
fax +49-7333-9626-17
> MAGURA Service Center UK
s.toulat@maguraphone 01530-837195
bikeparts.de
> MAGURA Service Center
fax 01530-811286
France
[email protected]
phone +49-7333-9626-43
Greece
fax +49-7333-9626-17
Nikos Maniatopoulos
s.revillet@maguraphone 2610-993-045
bikeparts.de
fax 2610-990-424
Netherlands
[email protected]
> Sales:
MAGURA Bike Parts
Hong Kong
Benelux
MAGURA ASIA Inc.
phone +49-7333-9626-25
phone +886-4-23283739
fax +49-7333-9626-17
fax +886-4-23283734
e.vandepol@[email protected]
bikeparts.de
>
MAGURA Tech Support
Benelux
phone +31-653251836
fax +31-842208241
maguratechsupportbenelux
@beebikes.com
Norway
Botolfsen
phone 022-630610
fax 022-970662
[email protected]
Poland
Polsport
phone +48-34-3660456
fax +48-34-3660456
[email protected]
Portugal
LPL-Artigos Desportivos
phone 021-4835354
fax 021-4835362
[email protected]
Russia
Chainpower
phone +7-4956850912
fax +7-4953034468
[email protected]
Singapore
MAGURA ASIA Inc.
phone +886-4-23283739
fax +886-4-23283734
[email protected]
Slowenia
Maraton D.O.O.
phone +386-74990870
fax +386-74990872
[email protected]
Slowakia
AGF Invest s.r.o.
phone 02-62859549
fax 02-62859052
[email protected]
South Africa
Cycles Africa
phone 011-678-1548
fax 011-678-1548
[email protected]
EOPLE
Deutschland | MA
GURA Bike Par ts Gm
bH + Co. KG | Heinr
Hotline | Helpdesk
ich-Kahn-Straße 24
| Phone 09001-64
| D-89150 Laichinge
8124* | Fax 07333
*(41 ct. pro Minute
n | info@magura-bik
-962651 | ser vice@
, täglich 09.00 – 12.
eparts.de
magura.de
00 h, 12.30 – 15.15
www.magura.com
h)
South Corea
MBS Corporation
phone +82-55-265-9415
fax +82-55-265-9419
[email protected]
Spain
> SAT MAGURA: Bicisport
Sólo para reparaciones y
servicio!
phone 93-3404480
fax 93-3404480
> Bicicletas Monty
phone 93-6667111
fax 93-6667112
[email protected]
> Casa Masferrer
phone 93-8463444
fax 93-8465355
[email protected]
> Comet
phone 943-331393
fax 943-551407
[email protected]
> Representaciones
Spinola & Perez
phone 619-702946
fax 93-2317731
[email protected]
Sweden
Jaguarverken AB
phone 060-669800
fax 060-669809
[email protected]
Switzerland
Intercycle
phone +41-9266511
fax +41-9266355
[email protected]
> Amsler & Co.
phone 052-6473636
fax 052-6473637
[email protected]
>
Taiwan
MAGURA ASIA Inc.
phone 04-23283739
fax 04-23283734
[email protected]
USA
MAGURA USA
phone 6183952200
fax 6183954711
[email protected]
www.magurausa.com
Apollo 11 | Germany
Australia
Steve Cramer Products
phone 03-95871466
fax 03-95872018
sales@stevecramerproducts.
com.au