1
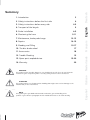
THE PASSION PEOPLE
www.magura.com
Español
Italiano
Nederlands
Français
English
WORKSHOP 2011
Deutsch
Our disc brake range | recommended use
Ground contact
isn’t that important
to you. There is
(almost), no terrain
where a Freerider
won’t go. Tough and
stable components
are amust have.
Here they are.
FREERIDE
Gustav M
There are bikers out
therefor whom
uphill is just a
means to an end.
The downhill fun is
having absolute
priority for them.
With lots of travel
and robust components the Enduros
must cope with
technically hairy
downhills and bikepark weekends..
ENDURO
You’re an all-rounder. You love long
and sweeping trails,
up as well as down.
The optimummix of
light weight and
stability is the hall
mark of your
AllMountain components meant for
abroad spectrum of
use.
ALL MOUNTAIN
Mile after mile over
the dusty trails as
well ashard fast tarmac. On every ride
your bike shouldbe
the epitome of
uncomplicated –
and naturally the
parts for your Xcountry adventures
shouldn’t cost the
earth.
X-COUNTRY
XC RACE
Gustav M
Marta SL Magnesium 203/203
Marta SL Magnesium 203/203
Marta SL Magnesium 180/180
Marta SL Magnesium 180/180
Marta SL Magnesium 160/160
Marta SL Magnesium 160/160
Marta SL 203/203
Marta SL 203/203
Marta SL 180/180
Marta SL 180/180
Marta SL 160/160
Marta SL 160/160
Marta 203/203
Marta 203/203
Marta 180/180
Marta 180/180
Marta 160/160
Louise 203/203
Race-orientated
means for us the
minimum weight
that is technically
possible. Every
gram extra weight
can be the decisive
factor between winning or losing for
you, the racer
maniac.
Marta 160/160
Louise 203/203
Louise 180/180
Louise 180/180
Louise 160/160
Julie HP 203/203
Julie HP 180/180
Julie HP 160/160
Louise 160/160
Julie HP 203/203
Julie HP 180/180
Julie HP 160/160
Specifications subject to change without prior notice
THE PASSION PEOPLE
www.magura.com
2
1. Introduction
3
2. Safety instructions before the first ride
4
6. Shortening the hose
6-9
9-11
7. Maintenance, brake pad change
12-13
8. Repairs
14-15
9. Bleeding and Filling
15-17
10. The disc brake wheel
17
11. Accessories
18
12. Trouble Shooting
19
13. Spare parts exploded view
19-20
14. Warranty
WARNING:
This symbol means possible danger for your health and even life if you do not follow the
instructions given respectively if the necessary safety measures are not followed.
ATTENTION:
This symbol warns you of inappropriate handling that might cause serious damage to the
material and/or the environment.
NOTE:
This symbol gives you additional information about the general handling of the
product or gives hints to paragraphs in this manual which have to be read carefully.
2
20
Français
5. Brake installation
Nederlands
5
Italiano
4. Transport of the bicycle
English
4-5
Español
3. Safety instructions before every ride
Deutsch
Summary
1. Welcome to the Passion People!
Brake lever (master cylinder)
MAGURA Gustav M
Congratulations! You have purchased a fully
hydraulic MAGURA disc brake proudly
„Made in Germany“. You will be amazed at
the awesome braking power and the minimum amount of maintenance that is necessary on our stoppers. Good to know that
you are not alone, millions of riders worldwide rely on them and every day our numbers are increasing.
Brake caliper and rotor MAGURA Gustav M
On the fully hydraulic MAGURA disc brake system Gustav M the braking force is transmitted to the braking surface by a mineral oil column. The movement of the lever blade
moves a piston, which is integrated in the brake lever (master cylinder). The piston pushes
the mineral oil column through the brake hose in the direction of the brake calliper, where
two pistons, sitting one beside the other, on which the outer brake pad is fixed, are pushed
out. Once the outer pad touches the rotor the caliper is moved horizontally outwards on two
guides (floating design), and presses also the inner pad against the rotor. The friction between the brake pads and the rotor slows down the bicycle and causes both the rotor and
the brake caliper to heat up.
Never touch either the rotor or the brake caliper after long braking as this may
cause serious burns
You will be pleased to find out that the MAGURA Gustav M disc brake offers a superior
braking power even with little hand force applied, no matter what the weather conditions
should be. Particularly in wet weather conditions disc brakes are much more responsive
than rim brakes and transmit their enormous power shortly after activating the brake lever.
Disc brakes do not cause a wear of your rims. In case of insufficient mounting conditions
they might however cause a squealing noise during braking, mainly in wet weather conditions.
This manual contains important information about the safe installation,
operation and maintenance of your MAGURA disc brake. We urge you to read
it carefully, become familiar with its contents and follow our recommendations to
help make your new braking experience enjoyable and trouble free.
Although the Gustav M disc brake system is relatively simple you should not
overestimate your technical skills! We therefore advise you to leave the
following operations to a trained technician of a professional bike shop.
This manual is part of the product. Do not hand over the product to third parties
without this manual. Technical specs are subject to change without prior notice.
Should there be any further questions or problems we warmly recommend that you visit
our website www.magura.com where you will always find the newest and hottest tips about
all our products. On magura.com you can also download this manual in a convenient A4 format. Stay tuned with the Passion People!
Thank you for your confidence in our products, enjoy your ride and your new MAGURA disc stoppers!
Happy trails!
THE PASSION PEOPLE
www.magura.com
3
4. While riding in extreme riding conditions (total weight of bike plus rider
over 100 kg and/ or a gradient of more than 15 %) always use both brakes simultaneously to slow your bike down.
5. Are you familiar with the other components on your bike such as gears, clipless
pedals and suspension units? Always practise using your bike in a safe area to improve your
handling abilities before using it on the road. Consult the user’s manual of your bike to learn
more about this.
6. For your own safety always wear a helmet when you ride a bicycle. Make sure as well
that you wear the suitable clothing and footwear.
English
3. New brakes and new rotors or brake pads must always be run in by
braking at least 30 times from a speed of 30 km/h to achieve the maximum brake
power. Take your bike to a safe place to run in the brake.
Français
2. Check that the front brake is still actuated by the lever on the side you are
used to braking with. Should this not be the case you will have to train to your new
setup otherwise any unintended front wheel manoeuvre may cause an accident leading to possible serious injury! if in doubt get a trained technician to swap the hoses.
For further hints concerning swapping of the brake hose see page 10 onwards.
Nederlands
1. Are you already familiar with hydraulic disc brakes? Our brakes might be much more
powerful than the stoppers on which you relied so far.
Take your bicycle to a safe area to learn the proper braking technique and operation of
your new brakes and your bike.
Deutsch
2. Before the first ride
always check carefully the following points:
1. Always make sure that the quick release skewers of your wheels and seat post are
correctly mounted and closed.
Italiano
3. Before every ride
2. Always make sure that the brake lever pressure is o.k. by pulling he lever blade and
ensuring that full braking performance is achieved before the lever blade touches the handlebars. If this is not the case, pull the lever blade several times (pump), until the brake pads
touch the rotor. Changing pressure points during a ride might be the result of having air in
the brake system. See hints about about filling and bleeding on page 15.
4
Español
Incorrectly installed quick release skewers might cause the fixed items to become loose. Serious accidents with severy injury might result!!
3. Always make sure that the brake system does not have any leaks by activating the
lever blade, holding it and checking the hose connections and reservoir cover for eventual
leaks. (Also see page 14)
4. Always protect your rotors and brake pads from oil and lubricants (e.g. by
lubricating your chain). Avoid detergents and soap on the brake pads. Contaminating the
pads with oil and lubricants will cause a permanent loss of braking
power. Such contaminated pads can no longer be used and should be replaced!
Clean a contaminated rotor with dishwater or alcohol.
See further hints about changing the brake pad change on page 12.
5. Release your brake lever and check whether your wheel moves freely and with-out
drag. Check eventually whether the wheels are correctly mounted and if the quick release
skewers are tightened sufficiently. (Also see pages 8-9)
6. Are your tires in a good condition, and have they enough air pressure? Test
this with your fingers. Lift up your bike and turn the wheels of your bike. An insufficient rotation might be due to damaged tires, broken axles and/or broken spokes.
7. Pick up your bike and let it drop from a moderate height. Listen for any rattling noises. If any are heard check the bearings and all screwed connections.
8. Always follow the instructions given in the owner’s manual of your bicycle.
Never use your bicycle if any of the points mentioned above relate to
your bicycle. Consult a professional bike mechanic if you feel unsure about this. A
faulty bicycle may result in serious accidents with possible fatal
injuries to the rider!
4. Transport of the bicycle
In case of a disc brake equipped bicycle you should always keep in mind the following points:
Never activate the lever blade without the brake pads in place and the wheels,
with discs, mounted. In case this should have happened see page 10 of this manual.
Never throw away the transport device, which has been delivered with the brake.
Always clip it between the brake pads whenever the wheel is removed (e.g. transport
of the bike).
Always remove carefully the wheels. Make sure that the rotors are not damaged, deformed or contaminated with lubricants.
If the bike is transported upside-down squeeze the lever blade before,
hold pressure and fix the lever blade in this position with a rubber band or
a cable tie.
During transport in an aircraft you can leave your brake as it is, e.g. you do not
have to empty it.
THE PASSION PEOPLE
www.magura.com
5
5. Brake installation
Allen key (2*,3) and 5
transport/ mounting device*
sharp knife
8 mm open end wrench
flat blade screw driver
Torx T25 key*
(Torx T7 key)
(*delivered with the brake)
Always insert the allen and torx keys completely to avoid
damaging the bolt heads.
English
Deutsch
1. Tools for installation (+maintenance)
7
3
2
8
Français
12
9
10
11
13
1.
2.
3.
4.
5.
6.
7.
8.
9.
10.
11.
12.
13.
Unpack your Gustav M disc brake:
brake lever (master cylinder) connected through the
brake hose with the
brake calliper with transport device
calliper holder with fitting bolt
ATTENTION: remove transport device only shortly before installation
of the wheel!
rotor
fitting bolts for caliper Allen key 5 (2 pieces)
fitting bolts for rotor Torx key T25 (6 pieces)
0,2 mm spacers (8 pieces)
hose inserts (2 pieces)
olives (2 pieces)
Torx T25 key
Allen key 2
Specifications modifying and improving this product are subject to
change without prior notice!
6
Italiano
5
Español
6
Nederlands
4
1
The brake levers, calipers and hoses of the different MAGURA disc brake models
are completely different and not compatible! Never mix and match parts from the different models! Any misuse might cause serious accidents!
MAGURA manufactures these braking systems according to the valid standards and
make many rigorous product tests. Because of the large variety of forks and frames available
on the market it is impossible for MAGURA to test all possible combinations.
If you mount any of our brake systems always make sure that the brakes are in conformity with the bicycle.
Disc brake calipers can generate a lot of heat during extreme riding con-ditions.
The resulting heat transfer from the caliper to the fork and/ or frame can have a
negative influence on the mechanical characteristics of both the fork and/ or the
frame.
Insufficient heat transfer from the brake caliper to the frame and the fork, caused by fork and or frame components having low heat transfer characteristics (e.g.
carbon rear triangles) can cause the brake to overheat, with the possibility of a total
failure of the brake system. This can cause serious personal injury to yourself and/
or others.
With respect to product liability we remind all our users that any manufacturer
(also: bike mechanic or end consumer!) is responsible for the correct
function of the complete bicycle in this context. Improper combinations and insufficient installation can cause damage and serious accidents!
2. Mount the brake lever to the handlebar with a 5 mm allen key. Tightening
torque 4 Nm/ 34 in.lbs
Hint: Tighten the brake lever so that it can still rotate around the handlebar in case
of a crash. This old motocross trick will reduce considerably the risk of a damaged brake
lever.
The MAGURA disc brake Gustav M is available in different versions for frames
and forks which meet the International Standard (IS). We also offer front brake versions with special caliper holders for the Manitou Postmount (PM) and others (see
exploded view on page 21!). Never mount the brakes with adapters or brackets from
other manufacturers! All warranty will be void in case of any misuse! Use only direct
mounting parts from MAGURA or the frame or fork’s manufacturer!
Make sure that the caliper fitting eyelets on your frame or fork are free of any paint,
powder coating or burrs. (arrows). If this is not the case you should contact your dealer who
is able to care for the absolutely necessary even surface with the help of the
MAGURA Gnann-o-mat disc optimizer tool (also see page 9).
ATTENTION: The treatment of suspension fork lower legs made of magnesium might
be dangerous because of corrosion! Always follow the safety instructions given by
the respective manufacturer! Always make sure after having treated the disc brake
mounts that these are protected against corrosion by using an appropriate protective paint.
THE PASSION PEOPLE
www.magura.com
7
6. If you use a thru-axle hub you must use thicker 3 mm spacers. These are available
separately (code: 0720 829). If necessary you might have to use additional 0,2 mm spacers
for a clean and drag free positioning of the caliper.
7. Mount the rotor with the 6 Torx T25 bolts onto the hub. Watch out for the correct
rotation direction of the rotor (laser arrow). Use only new original bolts or thread lock if you
use old bolts. Tighten the bolts in a crossed pattern! Tightening torque: 4 Nm/ 34
in.lbs.
Deutsch
English
5. Very often frames are not well enough aligned to ensure a drag free mounting of the
brakes. You may then have to use the 0,2mm spacers, which you should install as shown by
the arrows between fitting eyelets and brake caliper.
Français
4. The Gustav M disc brake is available in different versions for different mounting alternatives. The caliper is alwalys the same, whereas the caliper holder differs. All caliper holders are also available as separate spares, c.f. spare parts list on page 21.
Nederlands
3. Mount the caliper holder on the caliper with a 3 mm Allen key. Please follow carefully
the mounting instructions that come with the respective caliper holder! Tightening torque:
3 Nm/ 26 in.lbs. Mount now the caliper onto the fork or the frame. Use a 5 mm allen key.
Tightening torque: 6 Nm/ 51 in.lbs.
The transport device prevents the brake pads from being pushed out too far by
unintended lever squeeze. It is impossible then to install the wheel with the rotor. So
never throw away the transport device! Keep it and always clip it between the brake
pads when the wheel is removed.
8
Español
Italiano
8. Remove the transport device shortly before installing the wheel.
Install the wheel by positioning the rotor between the brake pads and fixing the wheel
in the dropouts. Close the quick release of your wheel which you should mount on the
opposite side of the brake calliper and tighten it sufficiently. As to thru-axle hubs or
wheels consult the manual of the respective fork manufacturer.
Squeeze the lever blade several times (pump) to push the pads to their proper position
until the lever feel becomes very firm.
9. Correctly mounted disc brake wheel.
Provided that the installation of the brake caliper has been done correctly, there will be no
drag between rotor and pads. If ever this is not the case re-position the caliper with the 0,2
mm spacers. ATTENTION: The gap of the caliper holder has to be positioned correctly with
regard to the rotor.The caliper holder must neither touch the rotor nor cause a dragging
noise (see picture here on the left!). Thanks to the floating principle of the caliper on the
caliper holder the caliper will be positioned automatically in the correct position!
Do not worry when you hear friction between rotor and pads! A slight drag is
normal during the break-in period. This does not influence the function and the
power of your disc brake. Nevertheless your wheel should spin freely at least ten
times after being pushed by hand. Note: a slight drag might also happen after a
brake pad change or in case of an incorrectly installed wheel.
In the case of a constantly dragging disc brake causing noise your frame or fork
could be miss-aligned. In such a case you should contact your dealer who can care to this
with the MAGURA Gnann-o-mat disc optimizer for a totally even surface of the disc brake
mounts. These are absolutely necessary for a drag free function of your brake.
New brakes and/or new rotors or brake pads must always be run in by
braking at least 30 times from a speed of 30 km/h to achieve the maximum brake
power. Take your bike to a safe place to run in the brake.
Reach adjust is done with a 2 mm Allen key. Turning key clockwise: lever
blade moves away from the handlebar, turning counterclockwise: blade moves to the handlebar.
THE PASSION PEOPLE
www.magura.com
9
The brake system should only be opened after having squeezed the transport
device as described above!
2. Loosen the brake lever clamping screw with a 5 mm allen key. Turn the brake lever
and ensure that the reservoir is horizontal.
3. Slide the hose protection. Unscrew the sleeve nut on the brake lever with an
8 mm open-end wrench and pull the hose out carefully. Hold the hose carefully to avoid
any loss of oil! Do not squeeze the lever blade with the system open!
English
Español
4. Put the hose on a workbench and shorten it with a sharp knife. The best tool is the
MAGURA cutter (code 0321 233). Do not use saws or pliers!
Français
1. Remove the wheel so that you have free access to the brake caliper.
Put the transport device between the brake pads and pump with the lever blade until you
have a firm feel. This squeezes the transport device firmly.
Nederlands
Never touch either the rotor or the brake caliper after long braking as this may
cause serious burns.
Italiano
Gustav M is a high-pressure system and comes with a reinforced hose, the
„MAGURA Disc Tube“ which will show this label. The Disc Tube needs an additional
insert for a proper fitting. Never mix and match either the hoses or other parts from
the other MAGURA disc brake models! Any misuse might cause serious accidents!
Deutsch
6. Shorten the hose
10
Hold the hose carefully so that it cannot snap away (arrow)! Cut the hose squarely! The sleeve nut can be re-used. The olive and the insert cannot be
reused and must be replaced!
5. Press manually a new insert into the hose until it is fully seated. Clamp the hose
into the groove of the mounting device as shown...
6. ...or clamp the mounting device as shown into a vice and hammer the insert
carefully into the hose. If your frame is not equipped for routing hydraulic hoses you should
now mount the hose fitting kit for your rear brake according to the instructions that are
included in the kit.
7. Slide on the sleeve nut and a new olive onto the hose. Push the hose with the sleeve
nut and the new olive fully into the brake lever and tighten the sleeve nut with
an 8 mm open-end wrench. Tightening torque: 4 Nm/ 34 in.lbs.
8. Always check for correct installation by pulling on the hose. Make sure that
the system has no leaks. Squeeze the lever blade, hold pressure and check hose
connections and the reservoir cover for eventual leaks.
Squeeze the lever blade several times (pump) to push the pads to their proper
position until the lever feel becomes very firm. If you cannot realize this, bleed the
brake (see page 15 onwards).
THE PASSION PEOPLE
www.magura.com
11
Brake pad wear: The brake pads are subject to wear due to friction between
rotor and pads. The Marta disc brake features a fully automatic pad wear adjustment.
Regularly check the thickness of your brake pads and replace them, if necessary!
Control and replacement of the brake pads
Never touch either the rotor or the brake caliper after long braking as this may
cause serious burns.
1. Remove the wheel so that you have free access to the brake caliper.
Dismount the caliper from the caliper holder by unscrewing the 3 mm Allen screw and slide
off the caliper.
2. Push fully back the two pistons by placing large water pump pliers on both sides of
the brake pads (arrows!). Use a rag to avoid surface damages of the caliper body.
Never push back the pistons without the brake pads mounted!
English
Brake pads: wear, control and replacement
Français
As to hints about repairs of the hose see page 14 onwards..
Nederlands
Always make sure that the brake system does not have any leaks by activating
the lever blade, holding it and checking the hose connections and reservoir cover for
eventual leaks. Consult a trained technician in case of leaks. Leaks cause poor braking performance with possible serious accidents!
Italiano
Brake Oil: MAGURA disc brakes use as transmission medium low viscosity mineral oil,
the biodegradable MAGURA ROYAL BLOOD. Contrary to DOT brake fluid the
MAGURA ROYAL BLOOD does not irritate human skin or strip the paint of your frame.
Moreover it does not absorb water like DOT and does not have to be changed regularly.
What sounds unbelievable is a fact: you can use your brakes over years without having to
touch them (except brake pad check and change!)
Deutsch
7. Maintenance, brake pad change
4. Pull out the brake pads. Clean the pads with a dry rag that is free of oil and
grease.
12
Español
3. Remove the brake pad fitting screw with a 2 mm allen key.
Never squeeze the lever blade without the brake pads in place and the wheel
mounted! If this happened by accident push back the pistons with mounted brake
pads by using the transport device or a flat blade screwdriver.
5. Minimum thickness of a brake pad including the holder is 2,5 mm. Use only genuine MAGURA brake pads!!
Tip: check the pad wear with the groove of the transport device. Pad does NOT
fit to the groove (picture): o.k.! Pad does fit to the groove:
change the pads!
Use only genuine MAGURA brake pads! MAGURA cannot guarantee a correct function of the brake if you use brake pads from other manufacturers, which were not
tested. Using other pads might cause poor braking and cause heavy bodily injury! All
warranty claims will be void in case of misuse!
6. Clean on the occasion of the brake pad change the brake body with a clean rag.
7. Mount the new brake pads. Make sure that the heat plugs are correctly mounted
in the pistons (picture!). Clamp the spring (separating the pads) between the new brake
pads, position them in the caliper and mount the fitting screw. Tightening torque of the
fitting screw: 1 Nm/ 9 in.lbs. Make sure that the friction side of the new brake pads
points towards the rotor Check after installation the correct fitting of the pads by pulling them.
8. Slide the caliper onto the caliper holder and tighten the 3mm allen screw Tightening
torque of the fitting screw: 3 Nm/ 26 in.lbs.. Re-install the wheel and check for a correctly tightened quick release skewer of the wheel that should be mounted on the opposite side of the caliper.
9. Squeeze the lever blade several times (pump) to push the pads to their proper position until the lever feel becomes very firm.
New brakes and/ or new rotors or brake pads must always be run in by braking
at least 30 times from a speed of 30 km/h to achieve the maximum brake power.
Take your bike to a safe place to run in the brake.
Never contaminate brake pads with oil or grease this causing permanent loss of
brake power! Contaminated pads are definitely killed and have to be
replaced at any rate!
THE PASSION PEOPLE
www.magura.com
13
b) 0°
2. Prepare a new hose: Use only the reinforced „MAGURA Disc Tube“ hose!
One end this hose comes with a pressed fitting (90° or 0°), which has to be screwed into
the caliper as described above. Tightening torque: 6 Nm/ 51 in.lbs.
Never shorten this hose at the end with the pressed fitting! You could no longer
use the hose then.
3. Tighten the prepared end of the new hose with 0° fitting onto the caliper.
Tightening torque: 6 Nm/ 51 in.lbs.
4. Hose with a 90° fitting: do not forget the washer between bolthead and fitting
(arrow!).
5. Mount the brake hose as described in chapter 6.
After the installation of a new hose you will always have to refill the brake. The
following chapter 9 describes how the filling has to be done.
14
English
Français
a) 90°
Nederlands
1. Remove the damaged hose from both the brake lever and the caliper. Cut off the barbed adapter (caliper connection) with a sharp knife. Slide both the sleeve nut and hose protector on the other side. All mentioned parts can be re-used. Throw away the damaged
hose.
Italiano
The Gustav M is a high-pressure system and comes with a reinforced hose, the
„MAGURA Disc Tube“ which will show this label. The Disc Tube needs an additional
insert for a proper fitting. Never mix and match either the hoses or other parts from
the other MAGURA disc brake models! Any misuse might cause serious accidents!
Español
Disc brake service kit (code: 0721 294)
Don’t panic if the hose snaps! With the disc brake service kit and a separately available
spare hose (see spare parts pages 21/22), this can be repaired easily.
Deutsch
8. Repairs
9. Filling and bleeding a brake
Brake oil: MAGURA disc brakes use as transmission medium low viscosity mineral oil, the biodegradable MAGURA ROYAL BLOOD. Contrary to DOT brake fluid the
MAGURA ROYAL BLOOD does not irritate human skin or strip the paint of your frame.
Moreover it does not absorb water like DOT and does not have to be changed regularly. What sounds unbelievable is a fact: you can use your brakes over years without
having to touch them (except brake pad change!)
1. Loosen slightly the clamping screw of the brake lever with a 5 mm allen key and turn
the brake lever so that the reservoir is positioned horizontal. Slightly tighten the clamp
screw in that position.
2. For filling and bleeding a MAGURA disc brake you will need the disc brake service kit
(Code: 0721 294) including all necessary tools.
3. Prepare the transparent filler tube by pushing in by hand the M6 barbed fitting on
which you have mounted an O--ring before. Put the other end of the filler tube on the syringe and fill the syringe completely with MAGURA ROYAL BLOOD mineral oil. Fill the syringe
completely and make sure that there are no air bubbles inside. Turn the syringe eventually
to push out air bubbles.
4. Remove the brake pads and the heatplugs as described on page 12 and slide the
transport device as shown with its THICK END between the caliper pistons. Squeeze slightly the lever blade (pump) to tighten the transport device.
Only use the YELLOW transport device for this procedure, the formerly used
black one is not suitable for this work!
5. Fix the caliper so that the hose connection is at the highest point of the caliper (hose
has to be positioned vertically!). It might be necessary that you have to unscrew a caliper
holder fitting bolt to realize this properly (e.g. on rearbrakes!) Unscrew bleeding screw with
a 5 mm Allen key. Screw in the prepared syringe and tighten it with a 8 mm open end spanner.
Place now a rag, which has to be free of oil or lubricants around the reservoir
and, more important, around the brake caliper. Care for a clean working environment!
No dirt or particles may come into the brake system!
THE PASSION PEOPLE
www.magura.com
15
10. Replace the cover with the membrane onto the reservoir. Oil will spill during this
procedure therefore do not forget to place a rag around the brake lever! Tighten the cover
screw until the cover is flush with the reservoir. Use only the original Torx T7 screws! Any
other screw will lead to leaks, damages and failure of the whole system! Tightening
torque 0,6 Nm/ 5 in.lbs
11. Remove the syringe and screw in the 5mm allen bleeding screw.
Tightening torque: 6 Nm/ 51 in.lbs. Remove the transport device, re-install the heatplugs,
brake pads mount the caliper on the caliper holder, the the wheel - that’s it!
Always pull the lever blade several times (pump) until the brake pads touch the
rotor.
Always check for correct installation by activating the lever blade and checking
for eventual leaks.
Never contaminate brake pads with oil or grease this causing permanent loss of
brake power! Contaminated pads can no longer be used and should be replaced! A
contaminated rotor can be cleaned with MAGURA disc cleaner, warm dishwater or
alcohol.
16
Deutsch
English
Français
9. The reservoir has to be full to the top before replacing the membrane and the cover.
Nederlands
8. Use the second syringe to suck any overflowing oil. The rag around the brake lever
and the caliper prevents overflowing oil from dropping down and contaminating and killing
the brake pads. Push the complete contents of the filling syringe through the system.
Italiano
7. Press the MAGURA ROYAL BLOOD oil through the system. Use a second syringe to
suck any overflowing oil at the reservoir. Then pull the filler syringe to suck oil back. Repeat
procedure 3-4 times and actuate CAREFULLY the lever blade simultaneously. Make sure
that there is always enough oil in the reservoir when you suck the oil with the filling
syringe.
Español
6. Unscrew the Torx T7 reservoir cover screws and remove the cover with the membrane sitting below. Begin to slowly press the oil contents of the filling syringe through the
system until no further air bubbles can be seen.
10. The disc brake wheel
The downhill disc brake wheel
There already exists enough literature concerning wheels, so just a few tips how
a well-built downhill disc brake wheel has to be.
Use spokes with a diameter of 2,34 mm (arc)/ 2,0 mm (e.g. DT ALPINE) which
you cross three times.
No radial lacing with disc brake wheels!
Head-inside-spokes (=arc-outside-spokes have to be pulled, i.e. these spokes point
forward on the front wheel; on the back wheel these spokes point forward on the rotor side
and backwards on the drive side. All spokes have to be stressed equally and high. Mount
the quick release of the wheel on the opposite side of the caliper!
Never use ultra lightweight quick releases with titanium or aluminum axles for
your wheel sets in combination with a disc brake. You will not be in a position to realize the necessary tightening torque!
11. Accessories
MAGURA disc brake service kit, code: 0721 294
contains everything that you need for bleeding and repairing a brake. ATTENTION:
the kit does NOT include a spare hose!
MAGURA braided hose for all MAGURA disc brakes easily shortened with a cable
cutter,
1700 mm
2500 mm
0° fitting:
code 0721 203
code 0721 386
90° fitting:
code 0721 337
code 0721 641
Watch out for the genuine hose with yellow MAGURA marker!!
Use only genuine MAGURA brake pads!
brake pads Gustav M ENDURANCE Type 1.2
series pad with optimized longevity
code 0721 018
Use only genuine MAGURA accessories! Any parts manufactured by other
manufacturers like lever blades, hoses or brake pads have not been tested and
approved by MAGURA and consequently nothing can be said about their short and
long-term function. Never use those parts! All warranty and product liability claims
will be void in case of misuse!
Never change the paint, the finish or the consistence of your brake. This might
cause total failure of the whole system with possible serious injury!
THE PASSION PEOPLE
www.magura.com
17
break in the brake (page 4)
oil/lubricants on rotor and/or clean the rotor with MAGURA
pads
Disc cleaner, warm dishwater
or alcohol replace contaminated brake pads
air in the system
bleeding the brake (page 15)
correct transport (page 5)
leaking systems
Check hose connections and
hose for leaks; replace hose if
necessary (pages 14/15)
Squealing brake
badly aligned frame
Paint/ powder coating on
fitting eyelets
Wheel q/r skewer insufficiently tightened
Insufficiently tightened
wheel spokes
align brake caliper with
0,2 mm spacers (page 9)
remove any paint or powder
coating and care for an even
contact surface without burrs.
(page 7)
Increase tightening of q/r
skewer and mount it on
opposite side of caliper.
check for an evenly spoked
wheel with high spoke
tension
contaminated brake pads
carelessness
brake pads must be changed
contaminated rotor
carelessness
clean rotor with MAGURA disc
cleaner, dish water or alcohol
wheel cannot be mounted
Lever blade was pulled with
removed wheel
Push back the brake pads
with transport device or a flat
blade screwdriver. (page 12)
rattling noise and rough dece- brake pads worn, holder of
leration
pads is wearing the rotor
brake pad change (page 12)
leaking hose or brake
change hose or defective
brake lever or caliper (page
14)
accident, incorrect
installation
You will find further tips on our website www.magura.com in the FAQ
section!! Stay tuned.
18
English
brake was not run it
Français
not enough brake power
no pressure point
Nederlands
solution
Italiano
reason
Español
problem
Deutsch
12. Trouble Shooting
13. Spare parts 2010/max. tightening torques
0721 000 (10x), 0,6 Nm/5 in.lbs
0720 927 (2x)
0720 958
4-Finger
0721 318 (2x)
2-Finger
0721 317 (2x)
0720 918 (10x), max. 4 Nm/34 in.lbs.
left: 0721 657
right: 0721 658
0720 825 (10x)
0720 916 (20x)
0720 446 (10x), 4 Nm/34 in.lbs.
0720 405 (10x)
standard hose 90°
0720 824 (250 cm)
braided hose 90°
0721 641 (250 cm)
0720 829 (10x)
3 mm Spacer
(for thru-axle hub)
0721 057, 6 Nm/51 in.lbs
0720 849 (10x), 6 Nm/51 in.lbs.
0720 424 (20x)
standard hose 0°
0720 636 (250 cm), 6 Nm/51 in.lbs.
braided hose 0°
0721 386 (250 cm), 6 Nm/ 51 in.lbs.
0720 917 (0,2 mm spacer), 20x
0720 848 (10x), 6 Nm/ 51 in.lbs.
0721 359 (10x), 3 Nm/ 26 in.lbs.
0721 041 (2x)
heat plugs
0721 018 TYPE 1.2 Endurance
0720 828 (10x), 1 Nm/9 in.lbs.
0721 205
Specifications are subject to change without prior notice!
THE PASSION PEOPLE
www.magura.com
(6x) 4 Nm/34 in.lbs.
0721 057
Torx T25 key
0721 204
0721659
(caliper with pads)
0721 041 (2x)
heat plugs
0721205
*WARNING!
Always make sure, that the fixing bolts are screwed in to a depth of
at least 8 mm. This corresponds to around 8 full turns!
Should this not be the case, longer bolts, with a minimum hardness
of 8.8 should be used and secured using blue Loctite.
14. Warranty
MAGURA is giving a 5 year leakproof warranty on brake levers (master
cylinder) and brake calipers. Watch out for the red info sheet in the middle of this manual!
Deutsch
English
0721 649
0721 830
0721 455
0721 649
Français
SL-rotors
front Ø 190 mm
front Ø 210 mm
rear Ø 160 mm
rear Ø 190 mm
0721 211
0721 395
Nederlands
caliper holder rear*
Int. Standard, 160mm/6”
Int. Standard, 190mm/7”
Italiano
0721 210
0721 212
0721 379
0721 395
0721 644
0721 645
0721 604
0722 267
0721 996
Español
caliper holder front*
Int. Standard 6”, 190mm/7,5”
Rockshox Boxxer, 190mm/7,5”
Manitou Postmount 6”, 190/7,5”
Int. Standard 6”, 210mm/8”
Rockshox Boxxer, 210mm/8”
Manitou Postmont 6”, 210mm/8”
Marzocchi Monster, 210mm/8”
Postmount 8”, 210mm/8” (Wotan, Travis, Totem)
Fox 40, 210mm
20
> SIE FINDEN UNSERE WELTWEITEN HANDELSPARTNER
UND SERVICE CENTER AUF MAGURA.COM!
> CHECK OUT OUR WORLDWIDE PARTNERS AND
SERVICE CENTERS ON MAGURA.COM!
Deutschland
MAGURA Bike Parts
GmbH + Co. KG
Heinrich-Kahn-Strasse 24
89150 Laichingen
phone +49 (0)7333 9626-0
fax + 49 (0)7333 9626-17
[email protected]
Asia
MAGURA Asia Limited Co.
No. 160, Sec. 1, Chang-an Road
Shi-Tun District
40743 Taichung City, Taiwan
phone +886 4 2316 3388
fax +886 (04) 2315 4030
[email protected]
USA
MAGURA USA
724 West Clem
62450 Olney, Illinois
phone 6183952200
fax 6183954711
magura@
magurausa.com
© MAGURA 2010
All rights reserved
Printed in Germany
0689 724, 07.2010
THE PASSION PEO
PLE
Deutschland | MA
GURA Bike Parts Gm
bH + Co. KG | Heinr
Hotline | Helpdesk
ich-Kahn-Straße 24
| Phone 09001-648
| D-89150 Laichinge
124* | Fax 07333-9
*(41 ct. pro Minute
n | info@magura-bik
62651 | service@
, täglich 09.00 – 12
eparts.de
magura.de
.00 h, 12.30 – 15.15
www.magura.com
h)
THE PASSION PEOPLE
www.magura.com