1
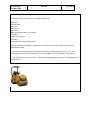
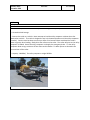
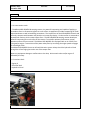
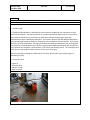
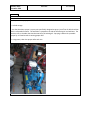
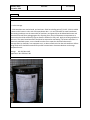
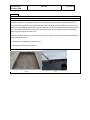
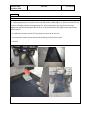
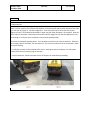
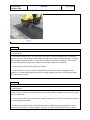
STANDARD
ANSWERS
FOR
PAVING
SA-CS114 / DECEMBER 2010
Effective date:
December 2010
PAVING
SA-CS114
100.1
Define the type of asphalt mix used at USD
http://www.industrialresourcescouncil.org/Applications/HotMixAsphaltPavement/tabid/378/Default.as
px
http://en.wikipedia.org/wiki/Asphalt_concrete
USD uses conventional hot mix asphalt. A dense grade hot mix is composed of an asphalt cement binder
and a well or continuously graded aggregate. Consists of mixes containing an aggregate sizes ranging
from 1/2 inch to 3/4 inch. This material makes up the bulk of hot mix material used in the United States.
USD also uses cold patch asphalt. Produced by emulsifying the asphalt in water with (essentially) soap
prior to mixing with the aggregate. While in its emulsified state the asphalt is less viscous and the
mixture is easy to work and compact. The emulsion will break after enough water evaporates and the
cold mix will, ideally, take on the properties of cold hot mix asphalt.
100.2
Discuss the hazards working around hot mix asphalt
Best Practices
Hot mix asphalt temperatures range from 275 to 325 degrees when at the quarry. This is capable of
severely burning a person, even through normal clothing. The hot mix contains oils that are sticky and
can adhere to skin, clothes and equipment.
200.1.1
Asphalt Rake (Lute)
Best Practices
b. The Asphalt Rake has unique "shark" teeth for precision grading of materials.
Most rakes are of lightweight construction to reduce fatigue. Used to level asphalt.
Use grading edge of rake to sift material, then smooth and level with one pass using opposite side of
rake.
Effective date:
December 2010
PAVING
SA-CS114
200.1.2
Torch Kit with Gas
Best Practices
a. There are many models and makes available. Examples are MAPP GAS and propane. Each comes in
16oz containers that are purchased from a local hardware store.
c. The propane torch has a self-igniter. The CSW lights the torch and then heats the tools that are
covered in hardened asphalt. Once the asphalt is soft, use a paint scraper to get the asphalt off the tool.
200.1.3
Sand
Best Practices
c. Sand is poured on the joints between the existing AC surface and the old AC surface on top of the oil.
This is done to fill-in voids and keeps the oil from adhering to the tires of vehicles.
Effective date:
December 2010
PAVING
SA-CS114
200.2
Asphalt
Reference
http://www.industrialresourcescouncil.org/Applications/HotMixAsphaltPavement/tabid/378/Default.as
px
a. Typically, USD uses 1/2" asphalt. At times, only 3/4" asphalt with fines is available and okay to use.
b. Asphalt concrete pavement (AC), refers to the bound layers of a flexible pavement structure. For
most applications, A.C. is a mixture of coarse and fine aggregate, and asphalt binder.
AC is mixed, spread and compacted at elevated temperatures. AC is the primary placement method for
roads and interstates. The AC is typically applied in 4-8 inch thick layers, with the lower layers acting to
support the top layer, known as the surface or friction course. The aggregates in the lower layers are
chosen to prevent rutting and failure, while the aggregates in the surface course are chosen for their
friction properties and durability. There are a number of recycled materials with properties that make
them excellent coarse or fine aggregates, or binder additives for asphalt concrete.
Effective date:
December 2010
PAVING
SA-CS114
200.3
Construction Trucks
Best Practices
a. Equipment ID – 022 Type – 1995 Ford CF7000 (Construction Truck)
Equipment ID – 054 & 055 Type – 2001 Ford F-550 (Construction Truck)
b. Vehicle 22 is a truck used for general construction projects, which include paving. The vehicle is
equipped with: a water tank, compressor, generator,60lb & 90lb jackhammers, water pump, hydraulic
pump, a Hydraulic Chain Saw, dump bed, boom, tools and gads for pneumatic tools. There are
compartments for hand tools, concrete and power tools.
Vehicles 54 & 55 are trucks used for general construction projects, which include paving. The vehicles
are identical construction trucks equipped with: a water tank, compressor, generator, concrete bins,
water pump, dump bed, gads for pneumatic tools and pneumatic tools: 60lb & 90lb jackhammers and
chipper. There are compartments for hand tools, concrete and power tools.
C. Oil and fuel are checked prior to being taken out into the field for all the construction trucks.
Inventory of tools and materials are verified before leaving yard.
Effective date:
December 2010
PAVING
SA-CS114
200.4
Utility Compactor (AKA Roller)
a. Caterpillar CB24 Utility Compactor, Caterpillar Corp., 2009
a. Caterpillar Utility Compactor, CB24 Operating weight is 5952lbs. Drum width is 4’ 11”.
b. Covered vehicle storage.
c. The utility compactor is a gas driven, self-propelled vibratory compactor used to compact AC. The
utility compactor has a water reservoir, which is used to continually apply water to the surface of the
drums to prevent the Hot AC from sticking to the drums. The water also cools the top surface of the AC.
Too much water can crack the surface of the new pavement, not enough causes sticking to the drum.
To start the utility compactor, open the vandalism guard, put the propel control lever in NEUTRAL, push
the parking brake knob downward, move the throttle control downward to the IDLE position, turn the
key to the ON position, wait until the preheater light indicator turns OFF, and then turn the key to the
START position. Release the key once the engine starts. If the engine fails to start, return the key to the
OFF position before trying to restart. Return the throttle control to the IDLE position when shutting the
utility compactor down. Let a cold engine warm up for fifteen minutes prior to use. Movement is
controlled by the propel control lever. When the lever is pushed forward the utility compactor will
move forward. When the lever is pushed backwards, the utility compactor will move backwards.
Neutral is the center position. The operator controls the speed of the utility compactor by adjusting the
throttle control from medium to high positions. Use medium throttle for lower vibration and high
throttle for high vibration. The throttle control is held in place by a detent. The throttle control is not
an incremental control. One of three positions must be chosen. Maintain a slow RPM for the first
minute of operation. After verifying that everyone is out of the way, the operator can start rolling.
The operator should verify that nobody is in the path of travel each pass.
The vibration control button is located on the left side of the operating panel. Depressing the button
to the left will turn on the vibratory system for the front and rear drums. Depressing the button to the
right will turn on the vibratory system for the front drum only. Vibration is used to increase
compaction. When operating on asphalt, to keep surface smooth, turn vibration off before stopping the
roller.
Do not attempt to engage the forward or reverse lever unless the engine is running.
Water spray controls are located on the left side of the operating panel. Moving the switch to the left
will activate the intermittent water spray system. Moving the switch to the right will activate the
continuous water spray system. Off is the middle position. The front and rear drums need to be wet to
prevent asphalt from sticking to the drum. Use only when actually compacting asphalt.
Front and rear water supplies may be individually regulated.
When the control lever is in the neutral position (regardless whether the engine is running), the unit is
Effective date:
December 2010
PAVING
SA-CS114
automatically locked from free-wheeling
d. Conduct a walk-around before use. Check the following:
Engine Oil
Hydraulic fluid
Fuel lines
Fuel levels
Water level
Water spray nozzles are clear of debris
Safety belt
Scraper bars are clean
Air cleaner
Proper operation of the brake system
Report any equipment damage or malfunction to the shop. Write a work order and/or tag-out if
directed by the shop.
e. It is recommended that the utility compactor be used for patches that are 5’ X 10’ or less. For
patches larger than 5' X 10', check with your coach or manager concerning rentals of large rollers.
F. The utility compactor does not start. Water is not being supplied to the rollers. The RPM cannot be
controlled/vary.
Effective date:
December 2010
PAVING
SA-CS114
200.5
Utility Trailer
Best Practices
a. Four wheeled, Towmaster tilt-trailer capable of hauling the utility compactor.
b. Covered Vehicle Storage.
c. Connect the trailer to a vehicle. Never attempt to load the utility compactor without the trailer
attached to a vehicle. The trailer is designed to stay in the lowered position until the utility compactor
is loaded. Caution must be taken to ensure you have a firm base and have considered the trailers
center of gravity when loading. Slowly drive the roller onto the trailer. The trailer will pivot as the utility
compactor is loaded. Secure the utility compactor and apply the emergency brake. Tie the utility
compactor down using a minimum of four chains and tie-downs. Tie down points are located in the
front and rear of the trailer.
e. Capacity: 16000lbs). The utility compactor weighs 5952lbs.
Effective date:
December 2010
PAVING
SA-CS114
200.6
Tamping Rammer
a. Mikasa MTX-80 User Manual, MultiQuip, Revision 3, 1/4/08.
a. Mikasa MTX-80. #316, #317, #302.
b. On construction trucks.
c. The Mikasa MTX-80/MTX-90 tamping rammer is a powerful compacting tool capable of applying a
tremendous force in consecutive impacts to a soil surface. Its applications include compacting for roads
and embankments as well as backfilling excavations. The impact force of the MTX-80/MTX-90 levels and
uniformly compacts voids between soil particles to increase dry density. Circular motion is converted to
perpendicular motion, which creates impact force. The MTX-80/MTX-90 tamping rammer develops a
powerful compacting force at the foot of the rammer. To maintain optimum performance, proper
operation and service are essential. The Mikasa MTX-80/MTX-90 is equipped with an air cooled, fourcycle gasoline engine. Transmission of the power takes place by increasing the engine speed to engage
the centrifugal clutch.
The Mikasa MTX-80/MTX-90 uses an oil bath lubrication system. Always check the hydraulic oil level
through the oil level sight glass at the rear of the tamper foot.
Report any equipment damage or malfunction to the shop. Write a work order and/or tag-out if
directed by the shop.
D. CS workers check:
- Engine oil
- Check fuel level
- Hydraulic oil level
Effective date:
December 2010
PAVING
SA-CS114
200.7
One-Way Plate Compactor
a. Mikasa Series MVC-80VH Users Manual, MultiQuip, Revision 2, 11/9/07
a. We have three Mikasa MVC-80VHW. Equipment numbers: #298, #299, #318,
b. Locked storage.
c. The Mikasa MVC-80VHW is a walk behind, plate compactor designed for the compaction of sand,
mixed soils and asphalt. This plate compactor is a compacting tool that applies a force in consecutive
high frequency vibrations to a soil surface. Its applications include compacting for roads and
embankments as well as backfilling excavations. The vibratory plates of the MVC-80VH/VHW produce
low amplitude high frequency vibrations, designed to compact granular soils and asphalt. The resulting
vibrations cause forward motion. The engine and handle are vibration isolated from the vibrating plate.
The compactor's vibrating plate has a frequency range between 5600 vpm (vibrations per minute). The
travel speed of the compactor is approximately 72 ft./minute (22 meters/minute). The compactor has a
water reservoir that supplies water so the AC will not stick to the plate.
Report any equipment damage or malfunction to the shop. Write a work order and/or tag-out if
directed by the shop.
D. CS workers check:
-
Engine oil
Check fuel level
Vibrator oil level
Water reservoir
Effective date:
December 2010
PAVING
SA-CS114
200.8
Emulsion Sprayer
Best practice
a. #280, Portable Spray System 5.5
b. Locked storage.
c. An oiler/emulsion sprayer is a spray unit specifically designed to spray a jet of fine oil called emulsion
which is suspended in water. The emulsion is sprayed on the side of the existing AC and sub-base. The
emulsion acts as a bonder that ties the new AC to the existing AC. Spraying is done with a portable
sprayer by a CS worker who is wearing proper PPE.
D. Using water, clean the sprayer after each use.
Effective date:
December 2010
PAVING
SA-CS114
200.9
SS1H Emulsion Oil
Best practice
a. Tack Oil
b. Locker storage.
c. SS1H emulsions are used to bond, seal and coat. SS1H has a boiling point (F): 212ºF. SS1H is soluble
in water and is brown in color with a faint petroleum odor. It is non-flammable in water-based state.
Slow setting emulsions are the most stable of emulsions, and generally can be diluted with water and
mixed with mineral fillers and aggregates For all paving uses, the air and pavement temperatures at
construction should be sufficiently high to allow the emulsion to fully cure. Apply to existing asphalt as a
tack coat. The water-based emulsion should not be exposed to overheating. The anionic emulsion is a
chemically stabilized system, so care should be taken not to upset the chemical balance with
contamination by chemicals, over-exposure to air, or adverse mechanical or thermal conditions. Before
being filled, tanks should be examined for possible contaminants. Recommended use and storage
temperatures are:
Storage
Min 50F Max 140F
Application Min 50F Max 130F
Effective date:
December 2010
PAVING
SA-CS114
300.1
Post no parking signs
Best Practices
a. Planner/Scheduler assigns task to a CSW. CSW will obtain address of repair, no parking signs for the
city, stakes, barricades, hammer and staple gun.
At site, verify the address and USA markings. Fill out the sign with the date(s) that no parking will be
enforced. Place the signs in a manner that will maximize the work area for the repair crew. Post signs
with stakes or barricades.
Call the Planner/Scheduler to let them know that no parking signs have been posted and the repair can
be scheduled. Ensure signage is posted at least 48 hours before the paving job is scheduled to be done.
Check the signage at least every 24 hours to ensure it is still there and visible.
b. In order to legally tow a vehicle, this signage procedure must be followed.
300.2
Order asphalt
Best Practices
a. Planner/Scheduler calls A.C. plant to see if A.C. is available. CS Lead Worker tells crew what type and
how much to get. Crew places order when he or she arrive at A.C. plant.
b. To obtain the right type and amount of A.C. If you do not place the order, the A.C. may not be
available the day you need it.
c. Planner/Scheduler and Crew Lead must communicate their expectation on what, how much, when
and who. This is done via phone, email or verbally.
Effective date:
December 2010
PAVING
SA-CS114
300.3
Obtain asphalt
Best Practices
a. - CS Lead Worker or crewmember takes dump truck to A.C. plant.
- Place order and weigh dump truck on scale.
- Soap bed of dump truck.
- Drive under hopper till hopper operator signals driver to stop.
- Wait until asphalt is placed in dump truck.
- Weigh dump truck with load.
- Pick up receipt.
- Place tarp on the load for transport.
- Transport load to jobsite.
b. Asphalt is obtained in a safe and efficient manner.
c. Control and coordination is needed between A.C. operators, crew lead, crewmember and scale
person.
d. Phone and in-person.
e. Driver must wear hard hart while in plant area. The driver must remain in the truck with windows up
during the loading process. After loading, check that the truck is not overloaded. Remove loose
material and cover with tarp.
300.4
Call inspector
Best Practices
a. Planner/Scheduler calls inspector the day before the work is to begin and informs the inspector when
and where we are paving. The contact information for this is found on the city permit.
Relays any important information from the inspector to the lead CSW.
Effective date:
December 2010
PAVING
SA-CS114
300.5
Conduct equipment and vehicle pre-checks
a. Official Driver's Vehicle Inspection Report, J.J. Keller & Associates, 01/96
b. Best practices
a. Complete a Driver's Vehicle Inspection Report. In addition, check Truck #54 and/or #55 have paving
materials. Check for SS1H Oil, rakes, play sand paint rollers, thermometer and oil sprayer.
Check Truck # 71 and/or #72. Check for the asphalt roller or tamping rammer.
d. Crew Leader informs CSW which equipment to take with them.
e. Never lift heavy objects alone. Ask for help.
300.6
Setup traffic control
a. Work Area Traffic Control Handbook, APWA, 2009 Edition
a. Setup traffic control in accordance with the WATCH handbook.
b. The crew must be able to safely complete the paving job.
c. Maintain communication between all crew members when controlling the flow of traffic. Ensure the
flagger understands when they should stop traffic and then allow traffic to proceed.
d. Verbal or radio communications.
e. Follow the safety precautions covered in the WATCH handbook.
Effective date:
December 2010
PAVING
SA-CS114
300.7
Oil the trench
Best practices
a. Remove the plate if present. Start with a trench that has been dug out to the appropriate depth and
compacted (Figure 1). Using either the paint roller or the oil sprayer, coat the base and walls of the
trench with SS1H (Figure 2). The SS1H will change color from brown to black. When it turns black, the
water has evaporated and the surface is set and ready for A.C. This is normally done after the first lift of
A.C. If this is done before the first lift of AC, the tamping rammer will remove the oil from the edges,
requiring you to reapply the coat of oil.
Not all cities require the base to be coated, just the walls. Always check a city’s standard specifications
before coating the trench.
b. It bonds the new asphalt to the existing A.C.
e. Wear gloves while using the SS1H oil.
Effective date:
December 2010
PAVING
SA-CS114
300.8
Conduct first and second lift of A.C.
Best practices
a. Dump a 6" - 12" lift of asphalt into the trench (Figure 1). Using an asphalt rake, level the A.C. (Figure
2). Using tamping rammer, compact the AC until the surface is hard (Figure 3). Allow the surface to cool
to 225 to 250 degrees before starting another lift. Verify temperature by using the thermometer.
Repeat this step until reaching the final lift of AC. If prior lift becomes cold, apply a tack coat of SS1H
before next lift.
b. It's difficult to compact a thick lift if you dump too much AC at one time.
c. Crew members need to pay attention when dumping the AC into the trench.
e. Use PPE.
Effective date:
December 2010
PAVING
SA-CS114
300.9
Conduct final lift of AC
Best practices
a. Dump your final lift. Take a temperature reading of the existing hot AC to final grade (100 to 200
degrees). To obtain the goal of a compacted thickness of 2", the un-compacted mix must be about 2
and 1/2" thick. Dense graded asphalt mix typically compacts at a rate of 1/4" per an inch of height. If
prior lift becomes cold, apply a tack coat of SS1H before next lift.
b. To obtain a level surface to the existing AC.
300.10
Rake the final lift
Best practices
a. Try to rake all the big rock out of your final lift leaving the fines. Level the surface until you achieve
the proper un-compacted height. Pinch the edges on all sides from the existing AC, inward 2" at a 45
degree angle. Give it a nice taper (Figure 1). Fill in any holes or low spots with more AC. Rake off all
excess AC from high spots.
b. To obtain a level surface to match the existing AC.
Effective date:
December 2010
PAVING
SA-CS114
300.11
Compact AC
a. Best practices
a. Your first pass with the utility compactor will be on the outer edges width-wise, in the direction of
traffic. Ensure at least 1/2 to 1/8 the roller width is on the existing AC and the other portion of the roller
is on the new AC (Figure 1). Do all the edges first. Then work your way to the center of the patch
(Figures 2 and 3). Go forwards and backward. Never stop the utility compactor on the patch. Once the
outer sides are complete, a CSW using a shovel will clean the edge of any AC that has spilled over onto
the existing AC. Drive the utility compactor at the slowest speed possible.
Care must be used when applying water. Turn the water on when the AC sticks to the drum. When the
AC no longer sticks to the drum, turn the water off. This ensures you do not use too much water, which
can cause cracking.
b. It will give a smooth surface without roller marks. Keeping the utility compactor at a slow speed
lessens the chance of creating a high or low spot.
e. Ensure coworkers, shovels and rakes are out of the path of travel before proceeding.
Effective date:
December 2010
PAVING
SA-CS114
300.12
Conduct 2nd compaction
a. Best practices
a. Overlap the existing AC by 6" and work across the trench. On each succeeding pass, overlap your
previous pass by 6". Go forwards and backwards on each pass. Ensure the utility compactor is moving
with and against the flow of traffic. Use the vibratory switch on the utility compactor. Cross roll the
trench to help remove any high spots. Never stop the utility compactor on the patch.
b. It will provide an even surface without roller marks.
c. Pay attention to the utility compactor speed while passing over the patch. Keeping the utility
compactor at a slow speed lessens the chance of creating a high or low spot. Use of too much water
will lead to cracks in the AC.
300.13
Conduct final roll over patch
a. Best practices
a. Continue to roll the patch in the direction of traffic until it is even with existing AC and the patch is
smooth. Do not roll the patch if the temperature of the AC is below 175 degrees. Do not leave any part
of the new patch low.
b. Get the approval of the city that the patch is within specifications. If you do not properly roll out the
AC, the patch will break down.
c. Pay attention to how the roller is driving over the patch. Keeping the utility compactor at a slow
speed lessens the chance of creating a high or low spot. Use of too much water will cracks in the AC.
Effective date:
December 2010
PAVING
SA-CS114
300.14
Oil the edges
Best practices
a. Roll all seams with a paint roller coated with SS1H. Apply a medium to heavy layer of sand over the
wet SS1H. Apply it lightly over the rest of the patch. Use a broom to work the sand into the oil and AC.
b. The SS1H seals the seam between the cold and hot AC. Sand fills in any voids that were left around
the outer edge.
300.15
Install a Cold Patch
Best practices
a. Dump the cold patch in the desired hole and fill it about 2” above grade. Do not pour to grade,
always pour the cold patch above grade. Compact the cold patch with a plate compactor or wheel roll it
with a truck tire.
b. The cold patch will compact anywhere from 2 – 5”, depending on the size of the hole you are filling.
This is why you mound the cold patch slightly above grade. This makes the cold patch stick together and
prevents it from getting pushed out by traffic.
300.16
Pave Around a Manhole
Best practices
a. You would want to jack hammer a 12” wide and 2” depth trench around the manhole casting with a
minimum of 1” in depth. Apply SS1H oil around the existing AC. Dump a desired amount of AC around
the manhole to be just about ¾” above grade or casting. Smooth the surface. Use a plate compactor to
compact the AC going in continuous circles around the manhole casting working the AC into any voids
and removing any bumps. Start with two passes around the edges and then two passes around the
entire patch. Clean the rim and lid of the casting when done paving. Apply SS1H around the edge
between the new and old AC to seal it and then cover with sand.
b. Going 12” wide and 2” deep will give you a good solid patch. SS1H helps bond the new AC to the old
surface. Going in a circle with the plate compactor help uniform the AC since that’s the design you’re
paving. Cleaning the rim and lid of the casting after paving makes it easier to clean/remove while still
hot.
c. Being able to maneuver the plate compactor around the way you want to go.
Effective date:
December 2010
PAVING
SA-CS114
300.17
Stow equipment and remove traffic control
Best Practices
a. Allow the temperature to reach 160 degrees or less. If the AC is not ready for traffic, cone the area
off and return when it is.
Clean all tools and equipment.
b. Opening the road too soon could create a divot mark on the patch.
Marking the patch with cones allows the crew to move on to other tasks or not take over-time waiting
for the patch to cool and keeps traffic off the patch.