1
TruSight™ One Sequencing Panel
Library Preparation Guide
FOR RESEARCH USE ONLY
ILLUMINA PROPRIETARY
Catalog # FC-141-9001DOC
Part # 15046431 Rev. A
October 2013
This document and its contents are proprietary to Illumina, Inc. and its affiliates ("Illumina"), and are intended solely for the contractual use of
its customer in connection with the use of the product(s) described herein and for no other purpose. This document and its contents shall not
be used or distributed for any other purpose and/or otherwise communicated, disclosed, or reproduced in any way whatsoever without the
prior written consent of Illumina. Illumina does not convey any license under its patent, trademark, copyright, or common-law rights nor
similar rights of any third parties by this document.
The instructions in this document must be strictly and explicitly followed by qualified and properly trained personnel in order to ensure the
proper and safe use of the product(s) described herein. All of the contents of this document must be fully read and understood prior to using
such product(s).
FAILURE TO COMPLETELY READ AND EXPLICITLY FOLLOW ALL OF THE INSTRUCTIONS CONTAINED HEREIN MAY RESULT IN
DAMAGE TO THE PRODUCT(S), INJURY TO PERSONS, INCLUDING TO USERS OR OTHERS, AND DAMAGE TO OTHER PROPERTY.
ILLUMINA DOES NOT ASSUME ANY LIABILITY ARISING OUT OF THE IMPROPER USE OF THE PRODUCT(S) DESCRIBED HEREIN
(INCLUDING PARTS THEREOF OR SOFTWARE) OR ANY USE OF SUCH PRODUCT(S) OUTSIDE THE SCOPE OF THE EXPRESS
WRITTEN LICENSES OR PERMISSIONS GRANTED BY ILLUMINA IN CONNECTION WITH CUSTOMER'S ACQUISITION OF SUCH
PRODUCT(S).
FOR RESEARCH USE ONLY
© 2013 Illumina, Inc. All rights reserved.
Illumina, IlluminaDx, BaseSpace, BeadArray, BeadXpress, cBot, CSPro, DASL, DesignStudio, Eco, GAIIx, Genetic Energy, Genome
Analyzer, GenomeStudio, GoldenGate, HiScan, HiSeq, Infinium, iSelect, MiSeq, Nextera, NuPCR, SeqMonitor, Solexa, TruSeq,
TruSight, VeraCode, the pumpkin orange color, and the Genetic Energy streaming bases design are trademarks or registered trademarks of
Illumina, Inc. All other brands and names contained herein are the property of their respective owners.
ii
Part # 15046431 Rev. A
Read Before Using this Product
This Product, and its use and disposition, is subject to the following terms and conditions. If Purchaser does not agree to these
terms and conditions then Purchaser is not authorized by Illumina to use this Product and Purchaser must not use this Product.
1
Definitions. "Application Specific IP" means Illumina owned or controlled intellectual property rights that pertain to
this Product (and use thereof) only with regard to specific field(s) or specific application(s). Application Specific IP
excludes all Illumina owned or controlled intellectual property that cover aspects or features of this Product (or use
thereof) that are common to this Product in all possible applications and all possible fields of use (the "Core IP").
Application Specific IP and Core IP are separate, non-overlapping, subsets of all Illumina owned or controlled intellectual
property. By way of non-limiting example, Illumina intellectual property rights for specific diagnostic methods, for
specific forensic methods, or for specific nucleic acid biomarkers, sequences, or combinations of biomarkers or
sequences are examples of Application Specific IP. "Consumable(s)" means Illumina branded reagents and consumable
items that are intended by Illumina for use with, and are to be consumed through the use of, Hardware.
"Documentation" means Illumina's user manual for this Product, including without limitation, package inserts, and any
other documentation that accompany this Product or that are referenced by the Product or in the packaging for the Product
in effect on the date of shipment from Illumina. Documentation includes this document. "Hardware" means Illumina
branded instruments, accessories or peripherals. "Illumina" means Illumina, Inc. or an Illumina affiliate, as applicable.
"Product" means the product that this document accompanies (e.g., Hardware, Consumables, or Software). "Purchaser"
is the person or entity that rightfully and legally acquires this Product from Illumina or an Illumina authorized dealer.
"Software" means Illumina branded software (e.g., Hardware operating software, data analysis software). All Software is
licensed and not sold and may be subject to additional terms found in the Software's end user license agreement.
"Specifications" means Illumina's written specifications for this Product in effect on the date that the Product ships from
Illumina.
2
Research Use Only Rights. Subject to these terms and conditions and unless otherwise agreed upon in writing by an
officer of Illumina, Purchaser is granted only a non-exclusive, non-transferable, personal, non-sublicensable right under
Illumina's Core IP, in existence on the date that this Product ships from Illumina, solely to use this Product in Purchaser's
facility for Purchaser's internal research purposes (which includes research services provided to third parties) and solely
in accordance with this Product's Documentation, but specifically excluding any use that (a) would require rights or a
license from Illumina to Application Specific IP, (b) is a re-use of a previously used Consumable, (c) is the disassembling,
reverse-engineering, reverse-compiling, or reverse-assembling of this Product, (d) is the separation, extraction, or
isolation of components of this Product or other unauthorized analysis of this Product, (e) gains access to or determines
the methods of operation of this Product, (f) is the use of non-Illumina reagent/consumables with Illumina's Hardware
(does not apply if the Specifications or Documentation state otherwise), or (g) is the transfer to a third-party of, or sublicensing of, Software or any third-party software. All Software, whether provided separately, installed on, or embedded
in a Product, is licensed to Purchaser and not sold. Except as expressly stated in this Section, no right or license under
any of Illumina's intellectual property rights is or are granted expressly, by implication, or by estoppel.
Purchaser is solely responsible for determining whether Purchaser has all intellectual property rights that are
necessary for Purchaser's intended uses of this Product, including without limitation, any rights from third
parties or rights to Application Specific IP. Illumina makes no guarantee or warranty that purchaser's specific
intended uses will not infringe the intellectual property rights of a third party or Application Specific IP.
3
Regulatory. This Product has not been approved, cleared, or licensed by the United States Food and Drug
Administration or any other regulatory entity whether foreign or domestic for any specific intended use, whether
research, commercial, diagnostic, or otherwise. This Product is labeled For Research Use Only. Purchaser must ensure it
has any regulatory approvals that are necessary for Purchaser's intended uses of this Product.
TruSight One Library Preparation Guide
iii
4
Unauthorized Uses. Purchaser agrees: (a) to use each Consumable only one time, and (b) to use only Illumina
consumables/reagents with Illumina Hardware. The limitations in (a)-(b) do not apply if the Documentation or
Specifications for this Product state otherwise. Purchaser agrees not to, nor authorize any third party to, engage in any of
the following activities: (i) disassemble, reverse-engineer, reverse-compile, or reverse-assemble the Product, (ii) separate,
extract, or isolate components of this Product or subject this Product or components thereof to any analysis not expressly
authorized in this Product's Documentation, (iii) gain access to or attempt to determine the methods of operation of this
Product, or (iv) transfer to a third-party, or grant a sublicense, to any Software or any third-party software. Purchaser
further agrees that the contents of and methods of operation of this Product are proprietary to Illumina and this Product
contains or embodies trade secrets of Illumina. The conditions and restrictions found in these terms and conditions are
bargained for conditions of sale and therefore control the sale of and use of this Product by Purchaser.
5
Limited Liability. TO THE EXTENT PERMITTED BY LAW, IN NO EVENT SHALL ILLUMINA OR ITS
SUPPLIERS BE LIABLE TO PURCHASER OR ANY THIRD PARTY FOR COSTS OF PROCUREMENT OF
SUBSTITUTE PRODUCTS OR SERVICES, LOST PROFITS, DATA OR BUSINESS, OR FOR ANY INDIRECT,
SPECIAL, INCIDENTAL, EXEMPLARY, CONSEQUENTIAL, OR PUNITIVE DAMAGES OF ANY KIND ARISING
OUT OF OR IN CONNECTION WITH, WITHOUT LIMITATION, THE SALE OF THIS PRODUCT, ITS USE,
ILLUMINA'S PERFORMANCE HEREUNDER OR ANY OF THESE TERMS AND CONDITIONS, HOWEVER
ARISING OR CAUSED AND ON ANY THEORY OF LIABILITY (WHETHER IN CONTRACT, TORT
(INCLUDING NEGLIGENCE), STRICT LIABILITY OR OTHERWISE).
6
ILLUMINA'S TOTAL AND CUMULATIVE LIABILITY TO PURCHASER OR ANY THIRD PARTY ARISING OUT
OF OR IN CONNECTION WITH THESE TERMS AND CONDITIONS, INCLUDING WITHOUT LIMITATION,
THIS PRODUCT (INCLUDING USE THEREOF) AND ILLUMINA'S PERFORMANCE HEREUNDER, WHETHER
IN CONTRACT, TORT (INCLUDING NEGLIGENCE), STRICT LIABILITY OR OTHERWISE, SHALL IN NO
EVENT EXCEED THE AMOUNT PAID TO ILLUMINA FOR THIS PRODUCT.
7
Limitations on Illumina Provided Warranties. TO THE EXTENT PERMITTED BY LAW AND SUBJECT TO THE
EXPRESS PRODUCT WARRANTY MADE HEREIN ILLUMINA MAKES NO (AND EXPRESSLY DISCLAIMS
ALL) WARRANTIES, EXPRESS, IMPLIED OR STATUTORY, WITH RESPECT TO THIS PRODUCT,
INCLUDING WITHOUT LIMITATION, ANY IMPLIED WARRANTY OF MERCHANTABILITY, FITNESS FOR A
PARTICULAR PURPOSE, NONINFRINGEMENT, OR ARISING FROM COURSE OF PERFORMANCE,
DEALING, USAGE OR TRADE. WITHOUT LIMITING THE GENERALITY OF THE FOREGOING, ILLUMINA
MAKES NO CLAIM, REPRESENTATION, OR WARRANTY OF ANY KIND AS TO THE UTILITY OF THIS
PRODUCT FOR PURCHASER'S INTENDED USES.
8
Product Warranty. All warranties are personal to the Purchaser and may not be transferred or assigned to a third-party,
including an affiliate of Purchaser. All warranties are facility specific and do not transfer if the Product is moved to
another facility of Purchaser, unless Illumina conducts such move.
a
Warranty for Consumables. Illumina warrants that Consumables, other than custom Consumables, will conform to
their Specifications until the later of (i) 3 months from the date of shipment from Illumina, and (ii) any expiration
date or the end of the shelf-life pre-printed on such Consumable by Illumina, but in no event later than 12 months
from the date of shipment. With respect to custom Consumables (i.e., Consumables made to specifications or
designs made by Purchaser or provided to Illumina by, or on behalf of, Purchaser), Illumina only warrants that the
custom Consumables will be made and tested in accordance with Illumina's standard manufacturing and quality
control processes. Illumina makes no warranty that custom Consumables will work as intended by Purchaser or for
Purchaser's intended uses.
b
Warranty for Hardware. Illumina warrants that Hardware, other than Upgraded Components, will conform to its
Specifications for a period of 12 months after its shipment date from Illumina unless the Hardware includes Illumina
provided installation in which case the warranty period begins on the date of installation or 30 days after the date it
was delivered, whichever occurs first ("Base Hardware Warranty"). "Upgraded Components" means Illumina
iv
Part # 15046431 Rev. A
c
d
e
f
9
provided components, modifications, or enhancements to Hardware that was previously acquired by Purchaser.
Illumina warrants that Upgraded Components will conform to their Specifications for a period of 90 days from the
date the Upgraded Components are installed. Upgraded Components do not extend the warranty for the Hardware
unless the upgrade was conducted by Illumina at Illumina's facilities in which case the upgraded Hardware shipped
to Purchaser comes with a Base Hardware Warranty.
Exclusions from Warranty Coverage. The foregoing warranties do not apply to the extent a non-conformance is
due to (i) abuse, misuse, neglect, negligence, accident, improper storage, or use contrary to the Documentation or
Specifications, (ii) improper handling, installation, maintenance, or repair (other than if performed by Illumina's
personnel), (iii) unauthorized alterations, (iv) Force Majeure events, or (v) use with a third party's good not provided
by Illumina (unless the Product's Documentation or Specifications expressly state such third party's good is for use
with the Product).
Procedure for Warranty Coverage. In order to be eligible for repair or replacement under this warranty Purchaser
must (i) promptly contact Illumina's support department to report the non-conformance, (ii) cooperate with Illumina
in confirming or diagnosing the non-conformance, and (iii) return this Product, transportation charges prepaid to
Illumina following Illumina's instructions or, if agreed by Illumina and Purchaser, grant Illumina's authorized repair
personnel access to this Product in order to confirm the non-conformance and make repairs.
Sole Remedy under Warranty. Illumina will, at its option, repair or replace non-conforming Product that it
confirms is covered by this warranty. Repaired or replaced Consumables come with a 30-day warranty. Hardware
may be repaired or replaced with functionally equivalent, reconditioned, or new Hardware or components (if only a
component of Hardware is non-conforming). If the Hardware is replaced in its entirety, the warranty period for the
replacement is 90 days from the date of shipment or the remaining period on the original Hardware warranty,
whichever is shorter. If only a component is being repaired or replaced, the warranty period for such component is
90 days from the date of shipment or the remaining period on the original Hardware warranty, whichever ends later.
The preceding states Purchaser's sole remedy and Illumina's sole obligations under the warranty provided
hereunder.
Third-Party Goods and Warranty. Illumina has no warranty obligations with respect to any goods originating
from a third party and supplied to Purchaser hereunder. Third-party goods are those that are labeled or branded
with a third-party's name. The warranty for third-party goods, if any, is provided by the original manufacturer.
Upon written request Illumina will attempt to pass through any such warranty to Purchaser.
Indemnification.
a
Infringement Indemnification by Illumina. Subject to these terms and conditions, including without limitation,
the Exclusions to Illumina's Indemnification Obligations (Section 9(b) below), the Conditions to Indemnification
Obligations (Section 9(d) below), Illumina shall (i) defend, indemnify and hold harmless Purchaser against any
third-party claim or action alleging that this Product when used for research use purposes, in accordance with these
terms and conditions, and in accordance with this Product's Documentation and Specifications infringes the valid
and enforceable intellectual property rights of a third party, and (ii) pay all settlements entered into, and all final
judgments and costs (including reasonable attorneys' fees) awarded against Purchaser in connection with such
infringement claim. If this Product or any part thereof, becomes, or in Illumina's opinion may become, the subject of
an infringement claim, Illumina shall have the right, at its option, to (A) procure for Purchaser the right to continue
using this Product, (B) modify or replace this Product with a substantially equivalent non-infringing substitute, or
(C) require the return of this Product and terminate the rights, license, and any other permissions provided to
Purchaser with respect this Product and refund to Purchaser the depreciated value (as shown in Purchaser's official
records) of the returned Product at the time of such return; provided that, no refund will be given for used-up or
expired Consumables. This Section states the entire liability of Illumina for any infringement of third party
intellectual property rights.
b
Exclusions to Illumina Indemnification Obligations. Illumina has no obligation to defend, indemnify or hold
harmless Purchaser for any Illumina Infringement Claim to the extent such infringement arises from: (i) the use of
TruSight One Library Preparation Guide
v
c
d
e
vi
this Product in any manner or for any purpose outside the scope of research use purposes, (ii) the use of this Product
in any manner not in accordance with its Specifications, its Documentation, the rights expressly granted to Purchaser
hereunder, or any breach by Purchaser of these terms and conditions, (iii) the use of this Product in combination
with any other products, materials, or services not supplied by Illumina, (iv) the use of this Product to perform any
assay or other process not supplied by Illumina, or (v) Illumina's compliance with specifications or instructions for
this Product furnished by, or on behalf of, Purchaser (each of (i) – (v), is referred to as an "Excluded Claim").
Indemnification by Purchaser. Purchaser shall defend, indemnify and hold harmless Illumina, its affiliates, their
non-affiliate collaborators and development partners that contributed to the development of this Product, and their
respective officers, directors, representatives and employees against any claims, liabilities, damages, fines, penalties,
causes of action, and losses of any and every kind, including without limitation, personal injury or death claims, and
infringement of a third party's intellectual property rights, resulting from, relating to, or arising out of (i) Purchaser's
breach of any of these terms and conditions, (ii) Purchaser's use of this Product outside of the scope of research use
purposes, (iii) any use of this Product not in accordance with this Product's Specifications or Documentation, or (iv)
any Excluded Claim.
Conditions to Indemnification Obligations. The parties' indemnification obligations are conditioned upon the
party seeking indemnification (i) promptly notifying the other party in writing of such claim or action, (ii) giving the
other party exclusive control and authority over the defense and settlement of such claim or action, (iii) not admitting
infringement of any intellectual property right without prior written consent of the other party, (iv) not entering into
any settlement or compromise of any such claim or action without the other party's prior written consent, and (v)
providing reasonable assistance to the other party in the defense of the claim or action; provided that, the party
reimburses the indemnified party for its reasonable out-of-pocket expenses incurred in providing such assistance.
Third-Party Goods and Indemnification. Illumina has no indemnification obligations with respect to any goods
originating from a third party and supplied to Purchaser. Third-party goods are those that are labeled or branded
with a third-party's name. Purchaser's indemnification rights, if any, with respect to third party goods shall be
pursuant to the original manufacturer's or licensor's indemnity. Upon written request Illumina will attempt to pass
through such indemnity, if any, to Purchaser.
Part # 15046431 Rev. A
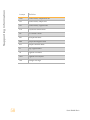
Revision History
Revision History
Part #
Revision
Date
15046433
A
October 2013
TruSight One Library Preparation Guide
Description of Change
Initial Release
vii
Table of Contents
Revision History
Table of Contents
Chapter 1 Overview
Introduction
DNA Input Recommendations
Critical Steps for Successful Enrichment and Coverage
Additional Resources
Chapter 2 Protocol
Introduction
Library Prep Workflow
Tagment Genomic DNA
Clean Up Tagmented DNA
First PCR Amplification
First PCR Clean Up
First Hybridization
First Capture
Second Hybridization
Second Capture
Capture Sample Clean Up
Second PCR Amplification
Second PCR Clean Up
Validate Library
Preparing Your Libraries for Sequencing on a MiSeq
Sequence Library
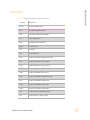
Appendix A Supporting Information
Introduction
Acronyms
Alternative Thermal Cycler Steps for Successful Enrichment
Kit Contents
Consumables and Equipment
Index Sequences
Technical Assistance
TruSight One Library Preparation Guide
vii
viii
1
2
3
4
5
7
8
9
10
13
16
20
25
29
34
36
41
44
46
49
52
54
55
56
57
59
60
65
69
71
viii
ix
Part # 15046431 Rev. A
Chapter 1 Overview
Introduction
DNA Input Recommendations
Critical Steps for Successful Enrichment and Coverage
Additional Resources
TruSight One Library Preparation Guide
2
3
4
5
1
Chapter 1
Overview
Overview
Introduction
This protocol explains how to prepare up to 36 indexed, paired-end libraries, followed by
enrichment using the TruSight One™ Sequencing Panel and reagents provided in an
Illumina TruSight One Sequencing Panel kit. The goal of this protocol is to fragment and
add adapter sequences onto template DNA to generate indexed libraries that can be carried
through enrichment for targeted resequencing applications.
The TruSight One Sequencing Panel protocol offers:
} Fast and easy sample preparation
• Prepare up to 36 enriched libraries in approximately 1.5 days, with approximately
5 hours of hands-on time
• High throughput, automation-friendly procedures with no fragmentation
bottlenecks
} Low DNA input and excellent data quality
• Excellent data quality with low input of 50 ng
• Access precious samples with no affect on performance
• Ability to archive samples for subsequent analysis
} High enrichment rates, low duplicates, and exceptional coverage uniformity
• Efficient use of sequencing
• Reliable variant calling
• Reduced hands-on time with the most cost-effective, high-throughput workflow
2
Part # 15046431 Rev. A
TruSight One library preparation uses an enzymatic DNA fragmentation step and thus can
be more sensitive to DNA input compared to mechanical fragmentation methods. The
ultimate success of enrichment strongly depends on using an accurately quantified amount
of input DNA. Therefore, accurate quantitation of the gDNA is essential.
Illumina recommends quantifying the starting gDNA using a fluorometric-based method
specific for double-stranded DNA (dsDNA) and running samples in triplicate to obtain
more confident measurements. Methods that measure total nucleic acid content (e.g.
nanodrop or other UV absorbance methods) should be avoided because common
contaminants such as ssDNA, RNA, and oligos are not substrates for the TruSight One
Sequencing Panel.
The TruSight One protocol has been optimized for 50 ng of total gDNA. A higher mass
input of gDNA may result in incomplete tagmentation and larger insert sizes, which can
impact enrichment performance. Conversely, a low mass input of gDNA or low quality
gDNA in the tagmentation reaction may generate smaller than expected insert sizes, which
can be lost during subsequent clean-up steps resulting in lower diversity.
To minimize gDNA sample input variability into the tagmentation step, Illumina strongly
recommends a two-step method of gDNA normalization. After the initial quantification,
gDNA samples are first normalized to 10 ng/µl. Samples are then re-quantified using a
similar fluorometric-based method and normalized to a final 5 ng/ul.
TruSight One Library Preparation Guide
3
DNA Input Recommendations
DNA Input Recommendations
Overview
Critical Steps for Successful Enrichment and Coverage
To ensure robust performance from the TruSight One Sequencing Panel, Illumina
recommends using a microheating system with a MIDI plate insert for the Enrichment
Wash steps. The Enrichment Wash steps reduce non-specific DNA binding and require that
samples are maintained at the indicated temperature. Too low or too high temperatures can
result in lower percent enrichments and decreased yields. If a microheating system is not
available, a thermal cycler can be used with some modifications. See Alternative Thermal
Cycler Steps for Successful Enrichment on page 59 for instructions using a thermal cycler.
Obtaining Desired Reads Per Sample:
The number of resulting reads for each sample of a pool are dependent on the following
factors:
} Accurate quantification of tagmented samples before pooling for enrichment. Inaccurate
quantification can lead to uneven pooling between samples in the enrichment and can
result in less than expected reads for a given sample.
} Accurate quantification of final enriched library pools. Illumina recommends using the
same dilution of final library for both quantification and clustering. Inaccurate
quantification can result in lower than targeted cluster densities, less reads passing
filter and/or inefficient demultiplexing if overclustered. Illumina recommends targeting
1200k-1400k clusters/mm2 (raw density) on MiSeq v3® runs, though the optimal
cluster density can vary between instruments.
4
Part # 15046431 Rev. A
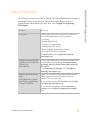
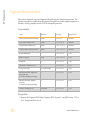
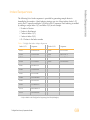
The following resources are available for TruSight One Sequencing Panel protocol guidance
and sample tracking. Access these and other resources on the Illumina website at
support.illumina.com/sequencing/kits.ilmn. Then, select TruSight One Sequencing
Panel Support.
Resource
Description
Best Practices
Provides best practices specific to this protocol. Review this
before starting sample preparation. Topics include:
• Consistency
• Handling Magnetic Beads
• Avoiding Cross-Contamination
• Washing During SPB Clean-Up
• Freeze/thawing for Small Number of Samples
• Preventing PCR Product Contamination
Click Best Practices on the TruSight One Sequencing
Panel Support page.
TruSight One Sequencing Panel
Experienced User Card and Lab
Tracking Form
(part # 15046433)
Provides protocol instructions, but with less detail than what is
provided in this user guide. New or less experienced users
are strongly advised to follow this user guide and not the
EUC and LTF.
Click Documentation & Literature on the TruSight One
Sequencing Panel Support page.
Illumina Experiement Manager
(IEM)
IEM TruSight One or TruSight
Rapid Capture Quick Reference
Card (part # 15048138)
Enables you to create and edit appropriate sample sheets for
Illumina sequencers and analysis software and record
parameters for your sample plate.
To download the software, click Downloads on the TruSight
One Sequencing Panel Support page.
To download the documentation, click Documentation &
Literature on the TruSight One Sequencing Panel Support
page.
TruSight One Library Preparation Guide
5
Additional Resources
Additional Resources
6
Part # 15046431 Rev. A
Chapter 2 Protocol
Introduction
Library Prep Workflow
Tagment Genomic DNA
Clean Up Tagmented DNA
First PCR Amplification
First PCR Clean Up
First Hybridization
First Capture
Second Hybridization
Second Capture
Capture Sample Clean Up
Second PCR Amplification
Second PCR Clean Up
Validate Library
Preparing Your Libraries for Sequencing on a MiSeq
Sequence Library
TruSight One Library Preparation Guide
8
9
10
13
16
20
25
29
34
36
41
44
46
49
52
54
7
Chapter 2
Protocol
Protocol
Introduction
This chapter describes the TruSight One protocol.
} Review Best Practices before proceeding. See Additional Resources on page 5 for
information on how to access TruSight One Sequencing Panel Best Practices on the
Illumina website.
} Follow the protocols in the order shown, using the specified volumes and incubation
parameters.
} If you are pooling, record information about your samples before beginning library
preparation for later use in data analysis.
• Use IEM to create and edit well formed sample sheets for Illumina sequencers and
analysis software. Detailed procedures on how to create a sample sheet for the
TruSight One Sequencing Panel are available in an IEM quick reference card. See
Additional Resources on page 5 for information on how to download IEM software
and TruSight One appropriate IEM documentation from the Illumina website.
• Each column should contain a common index. This will facilitate pipetting
operations when dispensing indexed adapters and pooling indexed libraries later
in the protocol.
8
Part # 15046431 Rev. A
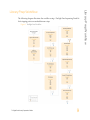
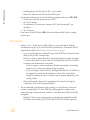
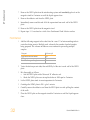
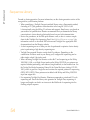
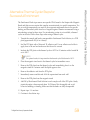
The following diagram illustrates the workflow using a TruSight One Sequencing Panel kit.
Safe stopping points are marked between steps.
Figure 1 TruSight One Workflow
TruSight One Library Preparation Guide
9
Library Prep Workflow
Library Prep Workflow
Protocol
Tagment Genomic DNA
This process tagments (tags and fragments) the gDNA by the Nextera transposome. The
Nextera transposome simultaneously fragments the gDNA and adds adapter sequences to
the ends, allowing amplification by PCR in subsequent processes.
Consumables
Item
Quantity
Storage
Supplied By
Sample Purification Beads (SPB)
1 tube
2°C to 8°C
Illumina
Stop Tagment Buffer (ST)
1 tube
15°C to 30°C
Illumina
Tagment DNA Buffer (TD)
1 tube
-15°C to -25°C
Illumina
Tagment DNA Enzyme (TDE1)
1 tube
-15°C to -25°C
Illumina
96-well MIDI plate
1
15°C to 30°C
User
gDNA (5 ng/µl)
50 ng
-15°C to -25°C
User
Ice bucket
1
15°C to 30°C
User
Microseal 'B' adhesive seals
2
15°C to 30°C
User
PCR-grade water
10 µl per sample
15°C to 30°C
User
RNase/DNase-free eight-tube
strips and caps
(for multi-sample processing)
3
15°C to 30°C
User
RNase/DNase-free reagent
reservoir
(for multi-sample processing)
1
15°C to 30°C
User
Tris-HCl 10 mM, pH 8.5
As needed
15°C to 30°C
User
Preparation
} Remove the Tagment DNA Buffer, Tagment DNA Enzyme 1, and gDNA from -15°C to
-25°C storage and thaw on ice.
10
Part # 15046431 Rev. A
}
}
}
}
}
}
WARNING
Allowing the Tagment DNA Enzyme 1 to warm up to room temperature might result in
decreased activity.
Procedure
NOTE
Make sure that the reaction is assembled in the order described for optimal kit performance.
It is not necessary to assemble the reaction on ice.
1
Perform the following steps to normalize your gDNA samples:
a Quantify your gDNA samples using a fluorometric method such as QuantiFluor or
Qubit.
b Normalize your gDNA samples in Tris-HCl 10 mM, pH 8.5 to 10 ng/µl.
c Requantify the 10 ng/µl normalized sample using the same fluorometric
quantification method.
d Based on the quantification, further dilute your gDNA samples in Tris-HCl 10 mM,
pH 8.5 to a final volume of 10 µl at 5 ng/µl (50 ng total).
TruSight One Library Preparation Guide
11
Tagment Genomic DNA
}
• After thawing, make sure that all reagents are adequately mixed. Gently invert the
tubes 3–5 times, followed by a brief spin in a microcentrifuge.
Remove the Sample Purification Beads from 2°C to 8°C storage and let stand to bring to
room temperature.
Make sure that the Stop Tagment Buffer has no precipitate. If there is precipitate, vortex
until all particulates are resuspended.
For multi-sample processing:
• Use a multichannel pipette.
• Distribute the Stop Tagment Buffer, Tagment DNA Buffer, and Tagment DNA
Enzyme 1 into separate eight-tube strips, dispensing equal volumes into each of the
wells.
• Pour the Sample Purification Beads into a multichannel reagent reservoir.
Place a MIDI plate insert on the microheating system.
Pre-heat the microheating system to 58°C.
Label a new 96-well MIDI plate NLT (Nextera Library Tagment) with a smudge
resistant pen.
Use the Illumina Experiment Manager to determine the index primers to be used. For
more information on IEM, see Additional Resources on page 5.
Protocol
2
Add 10 µl gDNA at 5 ng/µl (50 ng total) to each well of the new 96-well MIDI plate
labeled NLT.
3
Add 25 µl Tagment DNA Buffer to each well of the NLT plate.
4
Add 5 µl Tagment DNA Enzyme 1 to each well of the NLT plate.
5
Add 10 µl PCR-grade water to each well of the NLT plate.
6
Mix thoroughly as follows:
a Seal the NLT plate with a Microseal ‘B’ adhesive seal.
b Shake the NLT plate on a microplate shaker at 1800 rpm for 1 minute.
7
Centrifuge the NLT plate to 280 × g for 1 minute.
8
Place the sealed NLT plate on the pre-heated microheating system. Close the lid and
incubate at 58°C for 10 minutes.
9
Remove the NLT plate from the microheating system.
10 Remove the adhesive seal from the NLT plate.
11 Add 15 µl Stop Tagment Buffer to each well of the NLT plate.
12 Mix thoroughly as follows:
a Seal the NLT plate with a Microseal ‘B’ adhesive seal.
b Shake the NLT plate on a microplate shaker at 1800 rpm for 1 minute.
13 Centrifuge the NLT plate to 280 × g for 1 minute.
14 Incubate the NLT plate at room temperature for 4 minutes.
15 Proceed to Clean Up Tagmented DNA on page 13.
12
Part # 15046431 Rev. A
This process purifies the tagmented DNA from the Nextera transposome. It is critical,
because the Nextera transposome can bind tightly to DNA ends and interfere with
downstream processes when it is not removed.
Consumables
Item
Quantity
Storage
Supplied By
Resuspension Buffer (RSB)
1 tube
-15°C to -25°C
Illumina
Sample Purification Beads (SPB)
1 tube
2°C to 8°C
Illumina
96-well hard-shell plate (HSP)
1
15°C to 30°C
User
Freshly prepared 80% ethanol
(EtOH)
400 µl per sample
15°C to 30°C
User
Microseal 'B' adhesive seals
2
15°C to 30°C
User
RNase/DNase-free reagent
reservoirs
(for multi-sample processing)
3
15°C to 30°C
User
Preparation
} Remove the Resuspension Buffer from -15°C to -25°C storage and thaw at room
temperature.
NOTE
The Resuspension Buffer can be stored at 2°C to 8°C after the initial thaw.
} Review Best Practices for Handling Magnetic Beads. See Additional Resources on page 5
for information on how to access TruSight One Best Practices on the Illumina website.
} Make sure that the Sample Purification Beads are at room temperature.
} For multi-sample processing:
• Use a multichannel pipette.
• Pour the Resuspension Buffer, Sample Purification Beads, and 80% EtOH into
separate multichannel reagent reservoirs.
TruSight One Library Preparation Guide
13
Clean Up Tagmented DNA
Clean Up Tagmented DNA
Protocol
} Label a new 96-well HSP plate NLA (Nextera Library Amplification) with a smudge
resistant pen.
Procedure
1
Remove the adhesive seal from the NLT plate.
2
Vortex the room temperature Sample Purification Beads until they are well dispersed.
NOTE
Keep the Sample Purification Beads tube at room temperature for later use in the
protocol.
3
Add 65 µl well-resuspended Sample Purification Beads to each well of the NLT plate.
4
Mix thoroughly as follows:
a Seal the NLT plate with a Microseal ‘B’ adhesive seal.
b Shake the NLT plate on a microplate shaker at 1800 rpm for 1 minute.
5
Incubate the NLT plate at room temperature for 8 minutes.
6
Centrifuge the NLT plate to 280 × g for 1 minute.
7
Remove the adhesive seal from the NLT plate.
8
Place the plate on the magnetic stand for 2 minutes or until the liquid appears clear.
9
Using a 200 µl single channel or multichannel pipette set to 130 µl, remove and
discard all of the supernatant from each well of the NLT plate.
NOTE
Leave the NLT plate on the magnetic stand while performing the following 80% EtOH
wash steps (10–12).
10 With the NLT plate on the magnetic stand, slowly add 200 µl freshly prepared
80% EtOH to each well without disturbing the beads. Incubate the plate at room
temperature for 30 seconds.
11 Remove and discard the 80% EtOH from each well of the NLT plate.
12 Repeat steps 10 and 11 one time for a total of two 80% EtOH washes.
13 Using a 20 µl single channel or multichannel pipette, remove any remaining
80% EtOH from each well of the NLT plate without disturbing the beads.
14
Part # 15046431 Rev. A
15 Remove the NLT plate from the magnetic stand.
16 Add 22.5 µl Resuspension Buffer to each well of the NLT plate. Do not touch the beads
with the pipette tips.
17 Mix thoroughly as follows:
a Seal the NLT plate with a Microseal ‘B’ adhesive seal.
b Shake the NLT plate on a microplate shaker at 1800 rpm for 1 minute
18 Incubate the NLT plate at room temperature for 2 minutes.
19 Centrifuge the NLT plate to 280 × g for 1 minute.
20 Place the NLT plate on the magnetic stand for 2 minutes or until the liquid appears
clear.
21 Remove the adhesive seal from the NLT plate.
22 Transfer 20 µl of clear supernatant from each well of the NLT plate to the
corresponding well of the new HSP plate labeled NLA. Take care not to disturb the
beads.
NOTE
Illumina recommends using a 20 µl single channel or multichannel pipette set to 10 µl to
perform two consecutive transfers of 10 µl. This technique reduces sample loss by
making sure that all of the liquid is transferred without disturbing the beads.
TruSight One Library Preparation Guide
15
Clean Up Tagmented DNA
14 With the NLT plate on the magnetic stand, incubate the plate at room temperature for
10 minutes to dry.
Protocol
First PCR Amplification
This process amplifies the purified tagmented DNA via a 10-cycle PCR program. It also
adds index 1 (i7) and index 2 (i5) sequences needed for sequencing, as well as common
adapters (P5 and P7) required for cluster generation and sequencing. It is critical to use the
full amount of recommended input DNA. It is imperative that no extra cycles are added to
the PCR process, to ensure the generation of libraries that produce high-quality sequencing
results.
Consumables
16
Item
Quantity
Storage
Supplied By
Index 1 primers
(i7, N701–N712)
1 tube each index
-15°C to -25°C
Illumina
Index 1 Tube Caps, Orange
1 per Index 1 primer
tube
15°C to 30°C
Illumina
Index 2 primers (i5, E502–E505)
1 tube each index
-15°C to -25°C
Illumina
Index 2 Tube Caps, White
1 per Index 2 primer
tube
15°C to 30°C
Illumina
Nextera Library Amplification
Mix (NLM)
1 tube
-15°C to -25°C
Illumina
1.7 ml microcentrifuge tubes
1 per index primer
tube
15°C to 30°C
User
Microseal 'A' film
1
15°C to 30°C
User
Microseal 'B' adhesive seal
1
15°C to 30°C
User
RNase/DNase-free eight-tube
strips and caps
(for multi-sample processing)
1
15°C to 30°C
User
[Optional] TruSeq® Index Plate
Fixture Kit
1
15°C to 30°C
User
Part # 15046431 Rev. A
} Remove the Nextera Library Amplification Mix from -15°C to -25°C storage and thaw
on ice.
} Remove the following from -15°C to -25°C storage and thaw at room temperature:
• Index 1 primers (i7, N7xx) (only remove primers being used)
• Index 2 primers (i5, E5xx) (only remove primers being used)
NOTE
TruSight One Sequencing Panel kits are designed to work only with Index 2 primers with the
"E" prefix. Do not use Index 2 primers from other sample prep kits.
} For multi-sample processing:
• Use a multichannel pipette.
• Dispense the Nextera Library Amplification Mix in equal volumes into each of the
wells of an eight-tube strip.
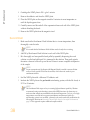
} Pre-program the thermal cycler with the following program and save as NLM AMP:
• Choose the pre-heat lid option and set to 100°C
• 72°C for 3 minutes
• 98°C for 30 seconds
• 10 cycles of:
— 98°C for 10 seconds
— 60°C for 30 seconds
— 72°C for 30 seconds
• 72°C for 5 minutes
• Hold at 10°C
NOTE
Illumina has optimized the number of recommended PCR cycles for enrichment assays
based on the level of pre-enrichment sample pooling and the size of the oligonucleotide set.
Do not add or reduce the cycles of PCR, as it can compromise data quality.
Setup Index Primers
1
Vortex the index primer tubes for 5 seconds.
2
Centrifuge the index primer tubes to 600 × g for 5 seconds. Use empty 1.7 ml
microcentrifuge tubes as tube adapters for the microcentrifuge.
TruSight One Library Preparation Guide
17
First PCR Amplification
Preparation
Protocol
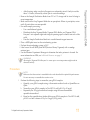
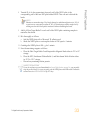
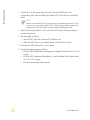
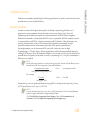
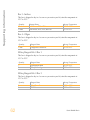
3
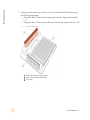
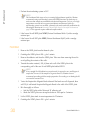
Arrange the index primers in a rack on ice (i.e. the TruSeq Index Plate Fixture) using
the following arrangement:
a Arrange the Index 1 Primer tubes (orange caps) vertically, aligned with columns
1-12.
b Arrange the Index 2 Primer tubes (white caps) horizontally, aligned with rows A-H.
Figure 2 Index Plate Fixture
A
B
C
18
Index 1 Primer tubes (orange caps)
Index 2 Primer tubes (white caps)
NLA plate
Part # 15046431 Rev. A
NOTE
When pooling libraries before enrichment with the 9 sample kit, it is recommended to pool
libraries so all Index 1 (i7) indices are unique. Choose Index 1 and Index 2 primers for PCR
accordingly. For pooling 3 samples in one enrichment for sequencing on a MiSeq, Illumina
recommends using Index 1 Primers N701, N705, and N709, along with either Index 2 Primer
for all three samples. For pooling with the 36 sample kit make sure that each sample has a
unique combination of Index 1 and Index 2 sequences.
1
Add 5 µl Index 1 primer to each well of the NLA plate.
2
Add 5 µl Index 2 primer to each well of the NLA plate.
3
Add 20 µl Nextera Library Amplification Mix to each well of the NLA plate.
4
Mix thoroughly as follows:
a Seal the NLA plate with a Microseal ‘A’ film.
b Shake the NLA plate on a microplate shaker at 1200 rpm for 1 minute
5
Centrifuge the NLA plate to 280 × g for 1 minute.
6
Place the sealed NLA plate on the pre-programmed thermal cycler. Close the lid, then
select and run the NLM AMP program using a heated lid.
SAFE STOPPING POINT
If you do not plan to proceed immediately to First PCR Clean Up on page 20, the NLA plate
can remain on the thermocycler overnight. If you are stopping, replace the Microseal 'A' with
a Microseal 'B' adhesive seal and store the NLA plate at 2°C to 8°C for up to two days.
TruSight One Library Preparation Guide
19
First PCR Amplification
Procedure
Protocol
First PCR Clean Up
This process uses Sample Purification Beads to purify the library DNA and remove
unwanted products.
Consumables
Item
Quantity
Storage
Supplied By
Resuspension Buffer (RSB)
1 tube
2°C to 8°C
Illumina
Sample Purification Beads (SPB)
1 tube
2°C to 8°C
Illumina
96-well HSP plate
1
15°C to 30°C
User
96-well MIDI plate
1
15°C to 30°C
User
Freshly prepared 80% ethanol
(EtOH)
400 µl per sample
15°C to 30°C
User
Microseal 'B' adhesive seals
3
15°C to 30°C
User
RNase/DNase-free reagent
reservoirs
(for multi-sample processing)
3
15°C to 30°C
User
Preparation
} Review Best Practices for Handling Magnetic Beads. See Additional Resources on page 5
for information on how to access TruSight One Best Practices on the Illumina website.
} Make sure that the Resuspension Buffer and Sample Purification Beads are at room
temperature.
} For multi-sample processing:
• Use a multichannel pipette.
• Pour the Resuspension Buffer, Sample Purification Beads, and 80% EtOH into
separate multichannel reagent reservoirs.
} Label a new 96-well MIDI plate NLC (Nextera Library Clean Up) with a smudge
resistant pen.
20
Part # 15046431 Rev. A
Procedure
1
Remove the NLA plate from the thermocycler and centrifuge to 280 × g for 1 minute.
2
Remove the adhesive seal from the NLA plate.
3
Transfer 50 µl of clear supernatant from each well of the NLA plate to the
corresponding well of the new 96-well MIDI plate labeled NLC.
4
Vortex the Sample Purification Beads until the beads are well dispersed.
5
Add 90 µl well-resuspended Sample Purification Beads to each well of the NLC plate.
6
Mix thoroughly as follows:
a Seal the NLC plate with a Microseal ‘B’ adhesive seal.
b Shake the NLC plate on a microplate shaker at 1800 rpm for 1 minute.
7
Incubate the NLC plate at room temperature for 10 minutes.
8
Centrifuge the NLC plate to 280 × g for 1 minute.
9
Remove the adhesive seal from the NLC plate.
10 Place the NLC plate on the magnetic stand for 2 minutes or until the liquid appears
clear.
11 Using a 200 µl single channel or multichannel pipette set to 140 µl, remove and
discard all of the supernatant from each well of the NLC plate.
NOTE
Leave the NLC plate on the magnetic stand while performing the following 80% EtOH
wash steps (12–14).
12 With the NLC plate on the magnetic stand, slowly add 200 µl freshly prepared 80%
EtOH to each well without disturbing the beads. Incubate at room temperature for 30
seconds.
13 Remove and discard the 80% EtOH from each well of the NLC plate.
14 Repeat steps 12 and 13 one time for a total of two 80% EtOH washes.
15 Using a 20 µl single channel or multichannel pipette, remove any remaining
80% EtOH from each well of the NLC plate without disturbing the beads.
TruSight One Library Preparation Guide
21
First PCR Clean Up
} Label a new 96-well HSP plate NLS (Nextera Library Sample) with a smudge resistant
pen.
Protocol
16 Let the NLC plate stand at room temperature for 10 minutes to dry on the magnetic
stand.
17 Remove the NLC plate from the magnetic stand.
18 Add 27.5 µl Resuspension Buffer to each well of the NLC plate. Do not touch the beads
with the pipette tips.
19 Mix thoroughly as follows:
a Seal the NLC plate with a Microseal ‘B’ adhesive seal.
b Shake the NLC plate on a microplate shaker at 1800 rpm for 1 minute.
20 Incubate the NLC plate at room temperature for 2 minutes.
21 Centrifuge the NLC plate to 280 × g for 1 minute.
22 Remove the adhesive seal from the NLC plate.
23 Place the NLC plate on the magnetic stand for 2 minutes or until the liquid appears
clear.
24 Transfer 25 µl of clear supernatant from each well of the NLC plate to the
corresponding well of the new HSP plate labeled NLS. Take care not to disturb the
beads.
NOTE
Illumina recommends using a 20 µl single channel or multichannel pipette set to 12.5 µl
to perform two consecutive transfers of 12.5 µl. This technique reduces sample loss by
making sure that all of the liquid is transferred without disturbing the beads.
25 Quantify the library in the NLS plate using a fluorometric quantification method that
uses dsDNA binding dyes.
NOTE
Accurate library quantification is needed to achieve even pooling for enrichment.
Inaccurate quantitation and pooling can result in higher representation of some samples
compared to others in the same pool.
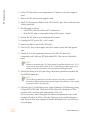
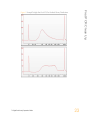
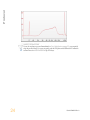
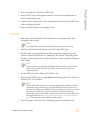
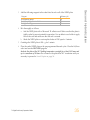
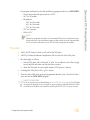
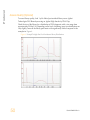
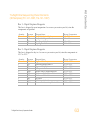
26 [Optional] Load 1 µl of the library on an Agilent Technologies 2100 Bioanalyzer using
an Agilent DNA 1000 Chip. Check the size of the library for a distribution of DNA
fragments with a size range from approximately 300 bp–1 kb.
It is not necessary to have a sharp peak, but rather more important that most of the
fragments fall within the 300 bp–1 kb range. The traces can be variable from prep to
prep. The traces show some examples of possible distributions, but is not inclusive of
successful preps.
22
Part # 15046431 Rev. A
First PCR Clean Up
Figure 3 Example TruSight One Post-PCR, Pre-Enriched Library Distributions
TruSight One Library Preparation Guide
23
Protocol
SAFE STOPPING POINT
If you do not plan to proceed immediately to First Hybridization on page 25, you can safely
stop the protocol here. If you are stopping, seal the NLS plate with a Microseal ‘B’ adhesive
seal and store it at -15°C to -25°C for up to 14 days.
24
Part # 15046431 Rev. A
This process mixes the DNA library with capture probes to targeted regions of interest. The
recommended hybridization time makes sure that targeted regions bind to the capture
probes thoroughly. This process also describes how to combine multiple libraries with
different indices into a single pool before enrichment.
Consumables
Item
Quantity
Storage
Supplied By
TruSight One Oligos (TOO)
1 tube
-15°C to -25°C
Illumina
Enrichment Hybridization
Buffer (EHB)
1 tube
-15°C to -25°C
Illumina
96-well HSP plate
1
15°C to 30°C
User
[Optional] Amicon Ultra-0.5
centrifugal filter unit
(0.5 ml, 30 kDa)
1 per pooled sample
15°C to 30°C
User
Microseal 'B' adhesive seal
1
15°C to 30°C
User
RNase/DNase-free eight-tube
strips and caps
(for multi-sample processing)
2
15°C to 30°C
User
Preparation
} Remove the following from -15°C to -25°C storage and thaw them at room temperature:
• Enrichment Hybridization Buffer
• TruSight One Oligos
} For multi-sample processing:
• Use a multichannel pipette.
• Distribute the TruSight One Oligos and Enrichment Hybridization Buffer into
separate eight-tube strips, dispensing equal volumes into each of the wells.
} Remove the NLS plate from -15° to -25°C storage, if it was stored at the conclusion of
First PCR Clean Up and thaw on ice.
TruSight One Library Preparation Guide
25
First Hybridization
First Hybridization
Protocol
• Centrifuge the thawed NLS plate to 280 × g for 1 minute.
• Remove the adhesive seal from the thawed NLS plate.
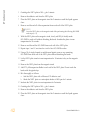
} Pre-program the thermal cycler with the following program and save as NRC HYB:
a Choose the pre-heat lid option and set to 100°C
b 95°C for 10 minutes
c 18 incubations of 1 minute each, starting at 94°C, then decreasing 2°C per
incubation
d 58°C for forever
} Label a new 96-well HSP plate NEH1 (Nextera Enrichment Hyb 1) with a smudge
resistant pen.
Pool Libraries
26
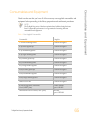
1
Reference Table 1 for the amount of DNA library to use for enrichment. Illumina
recommends using 500 ng of each DNA library, quantified by a fluorometric dsDNA
quantification method. See DNA Input Recommendations on page 3.
• If you are pooling libraries, combine 500 ng of each DNA library. Ensure that each
library in the pool has a unique index.
• If the total volume is greater than 40 µl, concentrate the pooled sample. Use either
a vacuum concentrator or Amicon Ultra-0.5 centrifugal filter unit (0.5 ml, 30 kDa)
according to the manufacturer's instructions.
— If you are using a vacuum concentrator, Illumina recommends concentrating
samples with a no heat and medium drying rate setting.
— If you are using an Amicon Ultra-0.5 centrifugal filter unit (0.5 ml, 30 kDa), it is
not required to pre-rinse the device before use. Most of the volume filters
through in 5 minutes, but up to 30 minutes can be required, depending on the
starting volume.
• If the pooled sample volume after concentrating is less than 40 µl, bring the
volume up to 40 µl with Resuspension Buffer.
2
The recommended pre-enrichment pooling strategy is to pool libraries so that each
contains a unique Index 1/i7 index. With this pooling approach, samples can be
sequenced using a single index read workflow, as described in the HiSeq® and GAIIx
user guides.
• If Index1/i7 indices are not unique, make sure that libraries with different Index
2/i5 indices are included (e.g. N703/E503 and N703/E504). With this approach,
Part # 15046431 Rev. A
Table 1 DNA Libraries for Enrichment
Library Pool
Complexity
Total DNA Library
Mass (ng)
1-plex
500
2-plex
1000
3-plex
1500
4-plex
2000
5-plex
2500
6-plex
3000
7-plex
3500
8-plex
4000
9-plex
4500
10-plex
5000
11-plex
5500
12-plex
6000
NOTE
The 9 sample TruSight One kit is intended to support 3 samples per enrichment. The 36
sample TruSight One kit can support up to 12 samples per enrichment.
TruSight One Library Preparation Guide
27
First Hybridization
sequence samples using a dual index read workflow, as described in the HiSeq and
GAIIx user guides.
Protocol
Procedure
1
Thoroughly vortex the Enrichment Hybridization Buffer tube until the solution is
completely resuspended. Visually make sure that no crystal structures are present.
NOTE
If crystals and cloudiness are observed, vortex the Enrichment Hybridization Buffer tube
until it appears clear.
2
Add the following reagents in the order listed to each well of the new 96-well HSP
plate labeled NEH1:
Reagent
DNA library sample or library pool from NLS plate
Enrichment Hybridization Buffer
TruSight One Oligos
Total Volume per Sample
28
Volume (µl)
40
50
10
100
3
Mix thoroughly as follows:
a Seal the NEH1 plate with a Microseal ‘B’ adhesive seal. Make sure that the plate is
tightly sealed to prevent potential evaporation. Use an adhesive seal roller to apply
force to the seal and make sure that the seal is secured.
b Shake the NEH1 plate on a microplate shaker at 1200 rpm for 1 minute.
4
Centrifuge the NEH1 plate to 280 × g for 1 minute.
5
Place the sealed NEH1 plate on the pre-programmed thermal cycler. Close the lid, then
select and run the NRC HYB program.
Incubate the plate at the 58°C holding temperature for at least 90 minutes and up to a
maximum of 24 hours. Do not remove the plate from 58°C incubation until you are
ready to proceed to First Capture on page 29.
Part # 15046431 Rev. A
This process uses streptavidin beads to capture probes hybridized to the targeted regions of
interest. Two heated wash procedures remove non-specific binding from the beads. The
enriched library is then eluted from the beads and prepared for a second round of
hybridization. The use of the correct equipment and temperatures is needed to ensure
removal of non-specific DNA as well as retention of the target regions.
Consumables
Item
Quantity
Storage
Supplied By
2N NaOH (HP3)
1 tube
-15°C to -25°C
Illumina
Elute Target Buffer 2 (ET2)
1 tube
2°C to 8°C
Illumina
Enrichment Elution Buffer 1 (EE1)
1 tube
-15°C to -25°C
Illumina
Enrichment Wash Solution (EWS)
1 tube
-15°C to -25°C
Illumina
Streptavidin Magnetic Beads (SMB)
1 tube
2°C to 8°C
Illumina
1.7 ml microcentrifuge tube
1
15°C to 30°C
User
96-well HSP plate
1
15°C to 30°C
User
96-well MIDI plate
1
15°C to 30°C
User
Microseal 'B' adhesive seals
6
15°C to 30°C
User
Preparation
} Remove the HP3, Enrichment Elution Buffer 1, and Enrichment Wash Solution from
-15°C to -25°C storage and thaw at room temperature.
} Remove the Elute Target Buffer 2 and Streptavidin Magnetic Beads from 2°C to 8°C
storage and let stand at room temperature.
NOTE
Make sure that you use the Streptavidin Magnetic Beads (2 ml tube) and not the Sample
Purification Beads (15 ml tube) for this procedure.
TruSight One Library Preparation Guide
29
First Capture
First Capture
Protocol
} Pre-heat the microheating system to 50°C.
NOTE
The Enrichment Wash steps are key to ensuring high enrichment specificity. Illumina
recommends using a microheating system with a MIDI plate insert for these steps to
make sure that samples are maintained at the desired temperature. Too low or too high
temperatures can result in lower percent enrichments and decreased yields. If a
microheating system is not available, a thermal cycler can be used with modifications by
following the directions in Alternative Thermal Cycler Steps for Successful Enrichment on
page 59. This approach requires additional sample transfers.
} Label a new 96-well MIDI plate NEW1 (Nextera Enrichment Wash 1) with a smudge
resistant pen.
} Label a new 96-well HSP plate NEH2 (Nextera Enrichment Hyb 2) with a smudge
resistant pen.
First Bind
1
Remove the NEH1 plate from the thermal cycler.
2
Centrifuge the NEH1 plate to 280 × g for 1 minute.
3
Remove the adhesive seal from the NEH1 plate. Take care when removing the seal to
avoid spilling the contents of the wells.
4
Transfer the entire contents (~100 µl) from each well of the NEH1 plate to the
corresponding well of the new 96-well MIDI plate labeled NEW1.
NOTE
If an overnight First Hybridization was performed, it is normal to see a small degree of
sample loss. However, if the sample loss is greater than 15%, Illumina does not
recommend proceeding with the sample preparation. Poor sealing or not heating the lid
can cause this amount of loss.
30
5
Vortex the Streptavidin Magnetic Beads tube until the beads are well dispersed, then
add 250 µl well-mixed Streptavidin Magnetic Beads to the wells of the NEW1 plate.
6
Mix thoroughly as follows:
a Seal the NEW1 plate with a Microseal ‘B’ adhesive seal.
b Shake the NEW1 plate on a microplate shaker at 1200 rpm for 5 minutes.
7
Let the NEW1 plate stand at room temperature for 25 minutes.
8
Centrifuge the NEW1 plate to 280 × g for 1 minute.
Part # 15046431 Rev. A
Remove the adhesive seal from the NEW1 plate.
10 Place the NEW1 plate on the magnetic stand for 2 minutes at room temperature or
until the liquid appears clear.
11 Carefully remove and discard all of the supernatant from each well of the NEW1 plate
without disturbing the beads.
12 Remove the NEW1 plate from the magnetic stand.
First Wash
1
Make sure that the Enrichment Wash Solution tube is at room temperature, then
thoroughly vortex the tube.
NOTE
It is normal that the Enrichment Wash Solution can be cloudy after vortexing.
2
Add 200 µl Enrichment Wash Solution to each well of the NEW1 plate.
3
Mix thoroughly and resuspend the bead pellet by repeatedly dispensing the wash
solution over the bead pellet until it is immersed in the solution. Then gently pipette
the entire volume of each well up and down 10 times to ensure complete resuspension
of the sample.
NOTE
Proper resuspension of the Streptavidin Magnetic Beads is needed to ensure efficient
removal of non-specific DNA from the reaction, which otherwise results in poor
enrichment statistics.
4
Seal the NEW1 plate with a Microseal ‘B’ adhesive seal.
5
Place the sealed NEW1 plate on the pre-heated microheating system. Close the lid and
incubate at 50°C for 30 minutes.
NOTE
The Enrichment Wash steps are key to ensuring high enrichment specificity. Illumina
recommends using a microheating system with a MIDI plate insert for these steps to
make sure that samples are maintained at the desired temperature. Too low or too high
temperatures can result in lower percent enrichments and decreased yields. If a
microheating system is not available, a thermal cycler can be used with modifications by
following the directions in Alternative Thermal Cycler Steps for Successful Enrichment on
page 59. This approach requires additional sample transfers.
6
Place the magnetic stand next to the microheating system for immediate access.
TruSight One Library Preparation Guide
31
First Capture
9
Protocol
7
Remove the NEW1 plate from the microheating system and immediately place it on the
magnetic stand for 2 minutes or until the liquid appears clear.
8
Remove the adhesive seal from the NEW1 plate.
9
Immediately remove and discard all of the supernatant from each well of the NEW1
plate.
10 Remove the NEW1 plate from the magnetic stand.
11 Repeat steps 2–10 one time for a total of two Enrichment Wash Solution washes.
First Elution
1
Add the following reagents in the order listed in a new 1.7 ml microcentrifuge tube to
create the elution pre-mix. Multiply each volume by the number of pooled samples
being prepared. The volumes include an excess amount for processing multiple
samples.
Reagent
Enrichment Elution Buffer 1
HP3
Total Volume per Sample
32
Volume (µl)
28.5
1.5
30
2
Vortex the elution pre-mix tube, then add 23.5 µl of the mix to each well of the NEW1
plate.
3
Mix thoroughly as follows:
a Seal the NEW1 plate with a Microseal ‘B’ adhesive seal.
b Shake the NEW1 plate on a microplate shaker at 1800 rpm for 2 minutes.
4
Let the NEW1 plate stand at room temperature for 2 minutes.
5
Centrifuge the NEW1 plate to 280 × g for 1 minute.
6
Carefully remove the adhesive seal from the NEW1 plate to avoid spilling the contents
of the wells.
7
Place the NEW1 plate on the magnetic stand for 2 minutes or until the liquid appears
clear.
Part # 15046431 Rev. A
Transfer 21 µl of clear supernatant from each well of the NEW1 plate to the
corresponding well of the new HSP plate labeled NEH2. Take care not to disturb the
beads.
NOTE
Illumina recommends using a 20 µl single channel or multichannel pipette set to 10.5 µl
to perform two consecutive transfers of 10.5 µl. This technique reduces sample loss by
making sure that all of the liquid is transferred without disturbing the beads.
9
Add 4 µl Elute Target Buffer 2 to each well of the NEH2 plate containing samples to
neutralize the elution.
10 Mix thoroughly as follows:
a Seal the NEH2 plate with a Microseal ‘B’ adhesive seal.
b Shake the NEH2 plate on a microplate shaker at 1200 rpm for 1 minute.
11 Centrifuge the NEH2 plate to 280 × g for 1 minute.
12 Store the remaining reagents as follows:
a Place the Elute Target Buffer 2 and Streptavidin Magnetic Beads tubes in 2°C to 8°C
storage.
b Place the HP3, Enrichment Elution Buffer 1, and Enrichment Wash Solution tubes
in -15°C to -25°C storage.
c Discard any remaining elution pre-mix.
SAFE STOPPING POINT
If you do not plan to proceed immediately to Second Hybridization on page 34, you can safely
stop the protocol here. If you are stopping, seal the NEH2 plate with a Microseal ‘B’ adhesive
seal and store it at -15°C to -25°C for up to 7 days.
TruSight One Library Preparation Guide
33
First Capture
8
Protocol
Second Hybridization
This process combines the eluted DNA library from the first enrichment round with
additional capture probes to targeted regions of interest. This second hybridization is
required to ensure high specificity of the captured regions.
Consumables
Item
Quantity
Storage
Supplied By
TruSight One Oligos (TOO)
1 tube
-15°C to -25°C
Illumina
Enrichment Hybridization
Buffer (EHB)
1 tube
-15°C to -25°C
Illumina
Resuspension Buffer (RSB)
1 tube
2°C to 8°C
Illumina
Microseal 'B' adhesive seal
1
15°C to 30°C
User
Preparation
} Remove the following from -15°C to -25°C storage and thaw them at room temperature:
• Enrichment Hybridization Buffer
• TruSight One Oligos
} Make sure that the Resuspension Buffer is at room temperature.
} Remove the NEH2 plate from -15°C to -25°C storage, if it was stored at the conclusion
of First Capture and thaw on ice.
• Centrifuge the thawed NEH2 plate to 280 × g for 1 minute.
Procedure
1
Thoroughly vortex the Enrichment Hybridization Buffer tube until the solution is
completely resuspended. Visually make sure that no crystal structures are present.
NOTE
If crystals and cloudiness are observed, vortex the Enrichment
Hybridization Buffer tube until it appears clear.
2
34
Remove the adhesive seal from the NEH2 plate.
Part # 15046431 Rev. A
Add the following reagents in the order listed to each well of the NEH2 plate:
Reagent
Resuspension Buffer
Enrichment Hybridization Buffer
TruSight One Oligos
Volume (µl)
15
50
10
4
Mix thoroughly as follows:
a Seal the NEH2 plate with a Microseal ‘B’ adhesive seal. Make sure that the plate is
tightly sealed to prevent potential evaporation. Use an adhesive seal roller to apply
force to the seal and make sure that the seal is secured.
b Shake the NEH2 plate on a microplate shaker at 1200 rpm for 1 minute
5
Centrifuge the NEH2 plate to 280 × g for 1 minute.
6
Place the sealed NEH2 plate on the pre-programmed thermal cycler. Close the lid, then
select and run the NRC HYB program.
Incubate the plate at the 58°C holding temperature overnight for at least 14.5 hours and
up to a maximum of 24 hours. Do not remove the plate from 58°C incubation until you
are ready to proceed to Second Capture on page 36.
TruSight One Library Preparation Guide
35
Second Hybridization
3
Protocol
Second Capture
This process uses streptavidin beads to capture probes hybridized to the targeted regions of
interest. Two heated wash procedures remove non-specific binding from the beads. The
enriched library is then eluted from the beads and prepared for sequencing. The use of the
correct equipment and temperatures is needed to ensure removal of non-specific DNA as
well as retention of the target regions.
NOTE
These procedures are similar to the First Capture on page 29.
Consumables
Item
Quantity
Storage
Supplied By
2N NaOH (HP3)
1 tube
-15°C to -25°C
Illumina
Elute Target Buffer 2 (ET2)
1 tube
2°C to 8°C
Illumina
Enrichment Elution Buffer 1 (EE1)
1 tube
-15°C to -25°C
Illumina
Enrichment Wash Solution (EWS)
1 tube
-15°C to -25°C
Illumina
Streptavidin Magnetic Beads (SMB)
1 tube
2°C to 8°C
Illumina
1.7 ml microcentrifuge tube
1
15°C to 30°C
User
96-well MIDI plates
2
15°C to 30°C
User
Microseal 'B' adhesive seals
6
15°C to 30°C
User
Preparation
} Remove the HP3, Enrichment Elution Buffer 1, and Enrichment Wash Solution from
-15°C to -25°C storage and thaw at room temperature.
} Remove the Elute Target Buffer 2 and Streptavidin Magnetic Beads from 2°C to 8°C
storage and let stand at room temperature.
36
Part # 15046431 Rev. A
} Pre-heat the microheating system to 50°C.
NOTE
The Enrichment Wash steps are key to ensuring high enrichment specificity. Illumina
recommends using a microheating system with a MIDI plate insert for these steps to
make sure that samples are maintained at the desired temperature. Too low or too high
temperatures can result in lower percent enrichments and decreased yields. If a
microheating system is not available, a thermal cycler can be used with modifications by
following the directions in Alternative Thermal Cycler Steps for Successful Enrichment on
page 59. This approach requires additional sample transfers.
} Label a new 96-well MIDI plate NEW2 (Nextera Enrichment Wash 2) with a smudge
resistant pen.
} Label a new 96-well MIDI plate NEC1 (Nextera Enriched Clean Up 1) with a smudge
resistant pen.
Second Bind
1
Remove the NEH2 plate from the thermal cycler.
2
Centrifuge the room temperature NEH2 plate to 280 × g for 1 minute.
3
Remove the adhesive seal from the NEH2 plate. Take care when removing the seal to
avoid spilling the contents of the wells.
4
Transfer the entire contents (~100 µl) from each well of the NEH2 plate to the
corresponding well of the new 96-well MIDI plate labeled NEW2.
NOTE
It is normal to see a small degree of sample loss after overnight hybridization. However,
if the sample loss is greater than 15%, Illumina does not recommend proceeding with
the sample preparation. Poor sealing or not heating the lid can cause this amount of loss.
5
Vortex the Streptavidin Magnetic Beads tube until the beads are well dispersed, then
add 250 µl well-mixed Streptavidin Magnetic Beads to the wells of the NEW2 plate.
6
Mix thoroughly as follows:
a Seal the NEW2 plate with a Microseal ‘B’ adhesive seal.
b Shake the NEW2 plate on a microplate shaker at 1200 rpm for 5 minutes
7
Let the NEW2 plate stand at room temperature for 25 minutes.
TruSight One Library Preparation Guide
37
Second Capture
NOTE
Make sure that you use the Streptavidin Magnetic Beads (2 ml tube) and not the Sample
Purification Beads (15 ml tube) for this procedure.
Protocol
8
Centrifuge the NEW2 plate to 280 × g for 1 minute.
9
Remove the adhesive seal from the NEW2 plate.
10 Place the NEW2 plate on the magnetic stand for 2 minutes at room temperature or
until the liquid appears clear.
11 Carefully remove and discard all of the supernatant from each well of the NEW2 plate
without disturbing the beads.
12 Remove the NEW2 plate from the magnetic stand.
Second Wash
1
Make sure that the Enrichment Wash Solution tube is at room temperature, then
thoroughly vortex the tube.
NOTE
It is normal that the Enrichment Wash Solution can be cloudy after vortexing.
2
Add 200 µl Enrichment Wash Solution to each well of the NEW2 plate.
3
Mix thoroughly and resuspend the bead pellet by repeatedly dispensing the wash
solution over the bead pellet until it is immersed in the solution. Then gently pipette
the entire volume of each well up and down 10 times to ensure complete resuspension
of the sample.
NOTE
Proper resuspension of the Streptavidin Magnetic Beads is needed to ensure efficient
removal of non-specific DNA from the reaction, which otherwise results in poor
enrichment statistics.
4
Seal the NEW2 plate with a Microseal ‘B’ adhesive seal.
5
Incubate the NEW2 plate on the pre-heated microheating system, with the lid closed, at
50°C for 30 minutes.
NOTE
The Enrichment Wash steps are key to ensuring high enrichment specificity. Illumina
recommends using a microheating system with a MIDI plate insert for these steps to
make sure that samples are maintained at the desired temperature. Too low or too high
temperatures can result in lower percent enrichments and decreased yields. If a
microheating system is not available, a thermal cycler can be used with modifications by
following the directions in Alternative Thermal Cycler Steps for Successful Enrichment on
page 59. This approach requires additional sample transfers.
38
Part # 15046431 Rev. A
Place the magnetic stand next to the microheating system for immediate access.
7
Remove the NEW2 plate from the microheating system and immediately place it on the
magnetic stand for 2 minutes or until the liquid appears clear.
8
Remove the adhesive seal from the NEW2 plate.
9
Immediately remove and discard all of the supernatant from each well of the NEW2
plate.
10 Remove the NEW2 plate from the magnetic stand.
11 Repeat steps 2–10 one time for a total of two Enrichment Wash Solution washes.
Second Elution
1
Add the following reagents in the order listed in a new 1.7 ml microcentrifuge tube to
create the elution pre-mix. Multiply each volume by the number of pooled samples
being prepared. The volumes include an excess amount for processing multiple
samples.
Reagent
Enrichment Elution Buffer 1
HP3
Total Volume per Sample
Volume (µl)
28.5
1.5
30
2
Vortex the elution pre-mix tube, then add 23.5 µl of the mix to each well of the NEW2
plate.
3
Mix thoroughly as follows:
a Seal the NEW2 plate with a Microseal ‘B’ adhesive seal.
b Shake the NEW2 plate on a microplate shaker at 1800 rpm for 2 minutes.
4
Let the NEW2 plate stand at room temperature for 2 minutes.
5
Centrifuge the NEW2 plate to 280 × g for 1 minute.
6
Carefully remove the adhesive seal from the NEW2 plate to avoid spilling the contents
of the wells.
7
Place the NEW2 plate on the magnetic stand for 2 minutes or until the liquid appears
clear.
TruSight One Library Preparation Guide
39
Second Capture
6
Protocol
8
Transfer 21 µl of clear supernatant from each well of the NEW2 plate to the
corresponding well of the new MIDI plate labeled NEC1. Take care not to disturb the
beads.
NOTE
Illumina recommends using a 20 µl single channel or multichannel pipette set to 10.5 µl
to perform two consecutive transfers of 10.5 µl. This technique reduces sample loss by
making sure that all of the liquid is transferred without disturbing the beads.
9
Add 4 µl Elute Target Buffer 2 to each well of the NEC1 plate containing samples to
neutralize the elution.
10 Mix thoroughly as follows:
a Seal the NEC1 plate with a Microseal ‘B’ adhesive seal.
b Shake the NEC1 plate on a microplate shaker at 1800 rpm for 1 minute.
11 Centrifuge the NEC1 plate to 280 × g for 1 minute.
12 Store the remaining reagents as follows:
a Place the Elute Target Buffer 2 and Streptavidin Magnetic Beads tubes in 2°C to 8°C
storage.
b Place the HP3, Enrichment Elution Buffer 1, and Enrichment Wash Solution tubes
in -15°C to -25°C storage.
c Discard any remaining elution pre-mix.
40
Part # 15046431 Rev. A
This process uses Sample Purification Beads to purify the captured library before PCR
amplification.
Consumables
Item
Quantity
Storage
Supplied By
Resuspension Buffer (RSB)
1 tube
2°C to 8°C
Illumina
Sample Purification Beads (SPB)
1 tube
2°C to 8°C
Illumina
96-well HSP plate
1
15°C to 30°C
User
Freshly prepared 80% ethanol
(EtOH)
400 µl per sample
15°C to 30°C
User
Microseal 'B' adhesive seals
3
15°C to 30°C
User
Preparation
} Review Best Practices for Handling Magnetic Beads. See Additional Resources on page 5 for
information on how to access TruSight One Best Practices on the Illumina website.
} Make sure that the Resuspension Buffer and Sample Purification Beads are at room
temperature.
} Label a new 96-well HSP plate NEA (Nextera Enrichment Amplification) with a
smudge resistant pen.
Procedure
1
Remove the adhesive seal from the NEC1 plate.
2
Vortex the Sample Purification Beads tube until the beads are well dispersed, then add
45 µl well-mixed Sample Purification Beads to each well of the NEC1 plate.
3
Mix thoroughly as follows:
a Seal the NEC1 plate with a Microseal ‘B’ adhesive seal.
b Shake the NEC1 plate on a microplate shaker at 1800 rpm for 1 minute.
4
Incubate the NEC1 plate at room temperature for 10 minutes.
TruSight One Library Preparation Guide
41
Capture Sample Clean Up
Capture Sample Clean Up
Protocol
5
Centrifuge the NEC1 plate to 280 × g for 1 minute.
6
Remove the adhesive seal from the NEC1 plate.
7
Place the NEC1 plate on the magnetic stand for 2 minutes or until the liquid appears
clear.
8
Remove and discard all of the supernatant from each well of the NEC1 plate.
NOTE
Leave the NEC1 plate on the magnetic stand while performing the following 80% EtOH
wash steps (9–11).
9
With the NEC1 plate on the magnetic stand, slowly add 200 µl freshly made
80% EtOH to each well without disturbing the beads. Incubate the plate at room
temperature for 30 seconds.
10 Remove and discard the 80% EtOH from each well of the NEC1 plate.
11 Repeat steps 9 and 10 one time for a total of two 80% EtOH washes.
12 Using a 20 µl single channel or multichannel pipette, remove any remaining
80% EtOH from each well of the NEC1 plate without disturbing the beads.
13 Let the NEC1 plate stand at room temperature for 10 minutes to dry on the magnetic
stand.
14 Remove the NEC1 plate from the magnetic stand.
15 Add 27.5 µl Resuspension Buffer to each well of the NEC1 plate. Do not touch the
beads with the pipette tips.
16 Mix thoroughly as follows:
a Seal the NEC1 plate with a Microseal ‘B’ adhesive seal.
b Shake the NEC1 plate on a microplate shaker at 1800 rpm for 1 minute.
17 Incubate the NEC1 plate at room temperature for 2 minutes.
18 Centrifuge the NEC1 plate to 280 × g for 1 minute.
19 Remove the adhesive seal from the NEC1 plate.
20 Place the NEC1 plate on the magnetic stand for 2 minutes or until the liquid appears
clear.
42
Part # 15046431 Rev. A
NOTE
Illumina recommends using a 20 µl single channel or multichannel pipette set to 12.5 µl
to perform two consecutive transfers of 12.5 µl. This technique reduces sample loss by
making sure that all of the liquid is transferred without disturbing the beads.
SAFE STOPPING POINT
If you do not plan to proceed immediately to Second PCR Amplification on page 44, you can
safely stop the protocol here. If you are stopping, seal the NEA plate with a Microseal ‘B’
adhesive seal and store it at -15°C to -25°C for up to 7 days.
TruSight One Library Preparation Guide
43
Capture Sample Clean Up
21 Transfer 25 µl of clear supernatant from each well of the NEC1 plate to the
corresponding well of the new HSP plate labeled NEA. Take care not to disturb the
beads.
Protocol
Second PCR Amplification
This process amplifies the captured library via a 10-cycle PCR program. It is critical to use
the full amount of recommended input DNA and not add extra PCR cycles to ensure
libraries produce high-quality sequencing results.
Consumables
Item
Quantity
Storage
Supplied By
Nextera Enrichment
Amplification Mix (NEM)
1 tube
-15°C to -25°C
Illumina
PCR Primer Cocktail (PPC)
1 tube
-15°C to -25°C
Illumina
Microseal 'A' film
1
15°C to 30°C
User
Microseal 'B' adhesive seal
1
15°C to 30°C
User
Preparation
} Remove the Nextera Enrichment Amplification Mix and PCR Primer Cocktail from
-15°C to -25°C storage and thaw on ice.
• Briefly centrifuge the thawed Nextera Enrichment Amplification Mix and PCR
Primer Cocktail tubes for 5 seconds.
NOTE
If you do not intend to consume the Nextera Enrichment Amplification Mix and PCR
Primer Cocktail in one use, dispense the reagents into single use aliquots. Freeze the
aliquots in order to avoid repeated freeze thaw cycles.
} Remove the NEA plate from -15°C to -25°C storage, if it was stored at the conclusion of
Second Capture and thaw on ice.
• Centrifuge the thawed NEA plate to 280 × g for 1 minute.
• Remove the adhesive seal from the thawed NEA plate.
44
Part # 15046431 Rev. A
NOTE
Illumina has optimized the number of recommended PCR cycles for enrichment assays
based on the level of pre-enrichment sample pooling and the size of the oligonucleotide
set. Do not add or reduce the cycles of PCR, as it may compromise data quality.
Procedure
1
Add 5 µl PCR Primer Cocktail to each well of the NEA plate.
2
Add 20 µl Nextera Enrichment Amplification Mix to each well of the NEA plate.
3
Mix thoroughly as follows:
a Seal the NEA plate with a Microseal ‘A’ film. Use an adhesive seal roller to apply
force to the film and make sure that the film is secured.
b Shake the NEA plate on a microplate shaker at 1200 rpm for 1 minute
4
Centrifuge the NEA plate to 280 × g for 1 minute.
5
Place the sealed NEA plate on the pre-programmed thermal cycler. Close the lid, then
select and run the NEM AMP10 program.
SAFE STOPPING POINT
If you do not plan to proceed immediately to Second PCR Clean Up on page 46, the NEA plate
can remain on the thermocycler overnight. If you are stopping, replace the Microseal 'A' film
with a Microseal 'B' adhesive seal and store the NEA plate at 2°C to 8°C for up to two days.
TruSight One Library Preparation Guide
45
Second PCR Amplification
} Pre-program the thermal cycler with the following program and save as NEM AMP10:
• Choose the pre-heat lid option and set to 100°C
• 98°C for 30 seconds
• 10 cycles of:
— 98°C for 10 seconds
— 60°C for 30 seconds
— 72°C for 30 seconds
• 72°C for 5 minutes
• Hold at 10°C
Protocol
Second PCR Clean Up
This process uses Sample Purification Beads to purify the enriched library and remove
unwanted products.
Consumables
Item
Quantity
Storage
Supplied By
Resuspension Buffer (RSB)
1 tube
2°C to 8°C
Illumina
Sample Purification Beads (SPB)
1 tube
2°C to 8°C
Illumina
96-well HSP plate
1
15°C to 30°C
User
96-well MIDI plate
1
15°C to 30°C
User
Freshly prepared 80% ethanol
(EtOH)
400 µl per sample
15°C to 30°C
User
Microseal 'B' adhesive seals
3
15°C to 30°C
User
Preparation
} Review Best Practices for Handling Magnetic Beads. See Additional Resources on page 5
for information on how to access TruSight One Best Practices on the Illumina website.
} Make sure that the Resuspension Buffer and Sample Purification Beads are at room
temperature.
} Remove the NEA plate from 2°C to 8°C storage, if it was stored at the conclusion of
Second PCR Amplification and let stand to bring to room temperature.
} Label a new 96-well MIDI plate NEC2 (Nextera Enriched Clean Up 2) with a smudge
resistant pen.
} Label a new 96-well HSP plate NES (Nextera Enrichment Sample) with a smudge
resistant pen.
46
Part # 15046431 Rev. A
1
Centrifuge the NEA plate to 280 × g for 1 minute.
2
Remove the adhesive seal from the NEA plate.
3
Transfer the entire contents from each well of the NEA plate to the corresponding well
of the new 96-well MIDI plate labeled NEC2.
4
Vortex the Sample Purification Beads until the beads are well dispersed.
5
Add 90 µl well-mixed Sample Purification Beads to each well of the NEC2 plate
containing 50 µl of PCR amplified library.
6
Mix thoroughly as follows:
a Seal the NEC2 plate with a Microseal ‘B’ adhesive seal.
b Shake the NEC2 plate on a microplate shaker at 1800 rpm for 1 minute.
7
Incubate the NEC2 plate at room temperature for 10 minutes.
8
Centrifuge the NEC2 plate to 280 × g for 1 minute.
9
Remove the adhesive seal from the NEC2 plate.
10 Place the NEC2 plate on the magnetic stand at room temperature for 2 minutes or until
the liquid appears clear.
11 Carefully remove and discard all of the supernatant from each well of the NEC2 plate.
NOTE
Leave the NEC2 plate on the magnetic stand while performing the following 80% EtOH
wash steps (12–14).
12 With the NEC2 plate on the magnetic stand, slowly add 200 µl freshly prepared
80% EtOH to each well without disturbing the beads. Incubate the plate at room
temperature for 30 seconds.
13 Remove and discard the 80% EtOH from each well of the NEC2 plate.
14 Repeat steps 12–13 one time for a total of two 80% EtOH washes.
15 Using a 20 µl single channel or multichannel pipette, remove any remaining
80% EtOH from each well of the NEC2 plate without disturbing the beads.
16 Let the NEC2 plate stand at room temperature for 10 minutes to dry on the magnetic
stand.
TruSight One Library Preparation Guide
47
Second PCR Clean Up
Procedure
Protocol
17 Remove the NEC2 plate from the magnetic stand.
18 Add 32.5 µl Resuspension Buffer to each well of the NEC2 plate. Do not touch the
beads with the pipette tips.
19 Mix thoroughly as follows:
a Seal the NEC2 plate with a Microseal ‘B’ adhesive seal.
b Shake the NEC2 plate on a microplate shaker at 1800 rpm for 1 minute.
20 Incubate the NEC2 plate at room temperature for 2 minutes.
21 Centrifuge the NEC2 plate to 280 × g for 1 minute.
22 Remove the adhesive seal from the NEC2 plate.
23 Place the NEC2 plate on the magnetic stand for 2 minutes or until the liquid appears
clear.
24 Transfer 30 µl of clear supernatant from each well of the NEC2 plate to the
corresponding well of the new HSP plate labeled NES. Take care not to disturb the
beads.
NOTE
Illumina recommends using a 20 µl single channel or multichannel pipette set to 15 µl to
perform two consecutive transfers of 15 µl. This technique reduces sample loss by
making sure that all of the liquid is transferred without disturbing the beads.
25 Seal the NES plate with a Microseal ‘B’ adhesive seal.
SAFE STOPPING POINT
If you do not plan to proceed immediately to Validate Library on page 49, store the sealed
NES plate at -15°C to -25°C for up to 7 days. If the plate is stored for more than 7 days,
requantify your library to guarantee the accuracy of your enrichment results.
48
Part # 15046431 Rev. A
Illumina recommends performing the following procedures for quality control analysis and
quantification of your enriched library.
Quantify Libraries
In order to achieve the highest data quality on Illumina sequencing platforms, it is
important to create optimum cluster densities across every lane of every flow cell.
Optimizing cluster densities requires accurate quantitation of DNA library templates.
Illumina recommends a fluorometric dsDNA assay to quantitate dsDNA samples, because
it can quantitate small DNA volumes and measure DNA directly. Other techniques can
pick up contamination such as RNA and proteins. Illumina recommends using a
spectrofluorometer, because fluorometry provides DNA-specific quantification.
Spectrophotometry can also measure RNA and yield values that are too high.
If quantifying a 3–12-plex library, before quantification dilute the post-enriched library by
adding 2 µl library to 28 µl Resuspension Buffer in a new tube or well. Use this dilution for
quantification and quality assessment as well as sequencing. For 1 or 2-plex enrichments a
dilution is not needed.
NOTE
Use the following formula to convert from ng/µl to nM. Assume a 650 bp library size or
calculate based on the average size of the enriched library:
(concentration in ng/µl)
(660 g/mol *average library size)
x 10^6
= concentration in nM
x 10^6
= 34.9 nM
For example:
15 ng/µl)
(660 g/mol *650)
Alternatively, you can quantitate libraries using qPCR according to the Sequencing Library
qPCR Quantification Guide (part # 11322363).
NOTE
You can download the Sequencing Library qPCR Quantification Guide from the Illumina
website at support.illumina.com/sequencing/kits.ilmn.
Click TruSight One Sequencing Panel Support. Then click Documentation &
Literature on the TruSight One Sequencing Panel Support page.
TruSight One Library Preparation Guide
49
Validate Library
Validate Library
Protocol
Assess Quality [Optional]
To assess library quality, load 1 µl of diluted post-enriched library on an Agilent
Technologies 2100 Bioanalyzer using an Agilent High Sensitivity DNA Chip.
Check the size of the library for a distribution of DNA fragments with a size range from
approximately 200 bp–1 kb. Depending on the level of indexing, insert size distribution can
vary slightly, however the library peak must not be significantly shifted compared to the
examples in Figure 4.
Figure 4 Example TruSight One Post-Enrichment Library Distributions
50
Part # 15046431 Rev. A
Validate Library
NOTE
The blue lines indicate the boundaries that were manually created to determine average
library size. In the first example, a second minor peak at ~2000 bp is visible. Do not
include this in the determination of average library size. The presence of these larger
fragments does not affect downstream clustering and sequencing of your enriched
library.
TruSight One Library Preparation Guide
51
Protocol
Preparing Your Libraries for Sequencing on a MiSeq
Illumina recommends using the following protocol to achieve optimal cluster density when
sequencing a TruSight One library on a MiSeq®. Optimization of loading concentrations
may be necessary to achieve desired cluster densities.
Consumables
Item
Quantity
Storage
Supplied By
Hybridization Buffer (HT1)
1 tube
-15°C to -30°C
Illumina
2N NaOH (HP3)
1 tube
-15°C to -30°C
User
PCR-grade water
-15°C to -30°C
User
PhiX (Optional)
-15°C to -30°C
User
Prepare a Fresh Dilution of NaOH
1
Dilute the post-enriched dilution that was used for fluorometric quantification to a final
concentration of 1.25 nM using RSB buffer. 10 µl of diluted material is needed per
MiSeq cartridge. Try to use a minimum of 4 µl of library to ensure aspirating the
appropriate volumes.
NOTE
Following this protocol achieves a final concentration of 12.5 pM of library loaded onto
the MiSeq by creating a post enriched dilution of 1.25 nM. If an 8 pM final concentration
is desired, dilute the post enriched dilution to a final concentration of 0.8 nM.
Alternatively, if a 10.0 pM final concentration is desired, dilute the post enriched dilution
to a final concentration of 1.0 nM.
52
2
Prepare a fresh 0.1N NaOH solution using HP3 by taking 10 µl HP3 + 190 µl water.
3
Combine 10 µl of 1.25 nM library + 10 µl 0.1N NaOH and mix well.
4
Incubate the sample at room temp for 5 minutes.
5
Following incubation, add 980 µl HT1 and mix well by vortexing.
6
Place the denatured DNA on ice until you are ready to load into the MiSeq cartridge.
Part # 15046431 Rev. A
Load the entire sample onto the MiSeq cartridge and move forward with sequencing.
TruSight One Library Preparation Guide
53
Preparing Your Libraries for Sequencing on a
7
Protocol
Sequence Library
Proceed to cluster generation. For more information, see the cluster generation section of the
user guide for your Illumina platform.
} When quantifying a TruSight One post-enriched library using a fluorometric method,
clustering at 12.5 pM generates cluster densities in the range of 1,200 k–1,400
k clusters/mm2 using the MiSeq V3 software and reagents. Results may vary based on
your method of quantification. Illumina recommends that you determine the library
concentration to cluster density relationship based on your lab instrumentation.
} Review the procedures, in the IEM quick reference card, on how to create a sample
sheet for the TruSight One Sequencing Panel. See Additional Resources on page 5 for
information on how to download IEM software and TruSight One appropriate IEM
documentation from the Illumina website.
} A short sequencing run on a MiSeq can also be performed to optimize cluster density
prior to performing a high density sequencing run.
} TruSight One prepared libraries contain dual 8 bp indexes. Depending on the
combination of indexes used in your library pool, configure the sequencing run for
either single or dual 8 bp index reads.
} When clustering TruSight One libraries on the cBot™ and sequencing on the HiSeq
1000/2000, GAIIx, or in High Output mode on the HiSeq 1500/2500, new primers are
required whether performing a non-indexed, single-indexed, or dual-indexed run. Use
the TruSeq Dual Index Sequencing Primer Kit for Paired End runs (catalog # PE-1211003), which is good for a single run and contains the required primers for sequencing
(HP10, HP11, HP12). These primers are included with MiSeq and HiSeq 1500/2500
rapid run reagent kits.
} For sequencing TruSight One libraries, Illumina recommends a paired-end 151-cycle
sequencing run. Due to the library sizes generated in TruSight One, sequencing at
longer read lengths can lead to an increase in the likelihood of sequencing into the
flanking adapter sequence.
54
Part # 15046431 Rev. A
Appendix A Supporting Information
Introduction
Acronyms
Alternative Thermal Cycler Steps for Successful Enrichment
Kit Contents
Consumables and Equipment
Index Sequences
TruSight One Library Preparation Guide
56
57
59
60
65
69
55
Appendix A
Supporting Information
Supporting Information
Introduction
The protocols described in this guide assume that you have reviewed the contents of this
appendix, confirmed your kit contents, and obtained all of the requisite consumables and
equipment.
56
Part # 15046431 Rev. A
Acronyms
Acronyms
Table 2 TruSight One Sequencing Panel Acronyms
Acronym
Definition
dsDNA
Double-stranded DNA
EE1
Enrichment Elution Buffer 1
EHB
Enrichment Hybridization Buffer
ET2
Elute Target Buffer 2
EWS
Enrichment Wash Solution
gDNA
Genomic DNA
HP3
2N NaOH
HSP
Hard Shell Plate
NEA
Nextera Enrichment Amplification Plate
NEC1
Nextera Enriched Clean Up Plate 1
NEC2
Nextera Enriched Clean Up Plate 2
NEH1
Nextera Enrichment Hyb Plate 1
NEH2
Nextera Enrichment Hyb Plate 2
NEM
Nextera Enrichment Amplification Mix
NES
Nextera Enrichment Sample Plate
NEW1
Nextera Enrichment Wash Plate 1
NEW2
Nextera Enrichment Wash Plate 2
NLA
Nextera Library Amplification Plate
NLC
Nextera Library Clean Up Plate
TruSight One Library Preparation Guide
57
Supporting Information
58
Acronym
Definition
NLM
Nextera Library Amplification Mix
NLS
Nextera Library Sample Plate
NLT
Nextera Library Tagment Plate
PCR
Polymerase Chain Reaction
PPC
PCR Primer Cocktail
RSB
Resuspension Buffer
SMB
Streptavidin Magnetic Beads
SPB
Sample Purification Beads
ST
Stop Tagment Buffer
TD
Tagment DNA Buffer
TDE1
Tagment DNA Enzyme 1
TOO
TruSight One Oligos
Part # 15046431 Rev. A
The Enrichment Wash steps remove non-specific DNA bound to the Streptavidin Magnetic
Beads and their success require that samples are maintained at a specific temperature. Too
low or too high temperatures can result in lower percent enrichments due to non-specific
binding, and decreased yields from loss of targeted regions. Illumina recommends using a
microheating system for these steps. If a microheating system is not available, a thermal
cycler can be used. Follow these steps when using a thermal cycler.
1
Transfer the sample and beads, resuspended in Enrichment Wash Solution, to a PCR
plate (approximate 200 µl in volume).
2
Seal the PCR plate with a Microseal ‘B’ adhesive seal. Use an adhesive seal roller to
apply force to the seal and make sure that the seal is secured.
3
Incubate the PCR plate on the thermal cycler at 42°C for 30 minutes with a heated lid
set to 100°C.
NOTE
For optimal results, it is important that the thermal cycler lid is heated to 100°C.
4
Place the magnetic stand next to the thermal cycler for immediate access.
5
Remove the PCR plate from the thermal cycler and immediately place it on the
magnetic stand for 2 minutes until the liquid appears clear.
6
Remove the adhesive seal from the PCR plate.
7
Immediately remove and discard all of the supernatant from each well.
8
Remove the PCR plate from the magnetic stand.
9
Add 200 µl Enrichment Wash Solution to each sample well of the PCR plate. Gently
pipette the entire volume up and down 10–20 times. Mix thoroughly and avoid
excessive bubbling or foaming. Make sure that the beads are fully resuspended.
10 Repeat steps 2–8 one time.
11 Continue to the elution step.
TruSight One Library Preparation Guide
59
Alternative Thermal Cycler Steps for
Alternative Thermal Cycler Steps for
Successful Enrichment
Supporting Information
Kit Contents
Check to make sure that you have all of the reagents identified in this section before
proceeding to the library preparation procedures. TruSight One Sequencing Panel kits are
available in the following configurations.
Table 3 TruSight One Sequencing Panel Kits
Kit Name
Catalog #
*TG Catalog #
TruSight One Sequencing Panel (9 Samples)
FC-141-1006
TG-141-1006
TruSight One Sequencing Panel (36 Samples)
FC-141-1007
TG-141-1007
NOTE
*TG-labeled consumables include features intended to help reduce the frequency of
revalidation. They are available only under supply agreement and require you to
provide a binding forecast. Please contact your account manager for more
information.
Note regarding biomarker patents and other patents unique to specific uses of
products.
Some genomic variants, including some nucleic acid sequences, and their use in
specific applications may be protected by patents. Customers are advised to determine
whether they are required to obtain licenses from the party that owns or controls such
patents in order to use the product in customer's specific application.
60
Part # 15046431 Rev. A
Kit Contents
TruSight One Sequencing Panel Contents
(9 Samples) (FC-141-1006, TG-141-1006)
Box 1 - Rapid Capture Reagents
This box is shipped at room temperature. As soon as you receive your kit, store the
components as specified.
Quantity
1
2
1
1
Acronym
SPB
SMB
ET2
ST
Reagent Name
Sample Purification Beads
Streptavidin Magnetic Beads
Elute Target Buffer 2
Stop Tagment Buffer
Storage Temperature
2°C to 8°C
2°C to 8°C
2°C to 8°C
15°C to 30°C
Box 2 - Rapid Capture Reagents
This box is shipped on dry ice. As soon as you receive your kit, store the components at
-15°C to -25°C.
Quantity
1
1
1
1
1
1
1
1
1
2
Acronym
TDE1
EE1
TD
RSB
NLM
EHB
EWS
HP3
PPC
NEM
TruSight One Library Preparation Guide
Reagent Name
Tagment DNA Enzyme
Enrichment Elution Buffer 1
Tagment DNA Buffer
Resuspension Buffer
Nextera Library Amplification Mix
Enrichment Hybridization Buffer
Enrichment Wash Solution
2N NaOH
PCR Primer Cocktail
Nextera Enrichment Amplification Mix
Storage Temperature
-15°C to -25°C
-15°C to -25°C
-15°C to -25°C
-15°C to -25°C
-15°C to -25°C
-15°C to -25°C
-15°C to -25°C
-15°C to -25°C
-15°C to -25°C
-15°C to -25°C
61
Supporting Information
Box 3 - Indices
This box is shipped on dry ice. As soon as you receive your kit, store the components at
-15°C to -25°C.
Quantity
1 tube
1 tubes
Reagent Name
Index Primer, E503 to E504
Index Primer, N701, N705, and N709
Storage Temperature
-15°C to -25°C
-15°C to -25°C
Box 4 - Oligos
This box is shipped on dry ice. As soon as you receive your kit, store the components at
-15°C to -25°C.
Quantity
1 tube
Reagent Name
TruSight One Content Set
Storage Temperature
-15°C to -25°C
MiSeq Reagent Kit v3 Box 1
This box is shipped on dry ice. As soon as you receive your kit, store the components at
-15°C to -25°C.
Quantity
3
3
Reagent Name
Hybridization Buffer
MiSeq V3 Cartridge
Storage Temperature
-15°C to -25°C
-15°C to -25°C
MiSeq Reagent Kit v3 Box 2
This box is shipped on dry ice. As soon as you receive your kit, store the components at
-15°C to -25°C.
Quantity
3
3
62
Reagent Name
MiSeq Flowcell
PR2 Bottle
Storage Temperature
-15°C to -25°C
-15°C to -25°C
Part # 15046431 Rev. A
Kit Contents
TruSight One Sequencing Panel Contents
(36 Samples) (FC-141-1007, TG-141-1007)
Box 1 - Rapid Capture Reagents
This box is shipped at room temperature. As soon as you receive your kit, store the
components as specified.
Quantity
2
2
1
1
Acronym
SPB
SMB
ET2
ST
Reagent Name
Sample Purification Beads
Streptavidin Magnetic Beads
Elute Target Buffer 2
Stop Tagment Buffer
Storage Temperature
2°C to 8°C
2°C to 8°C
2°C to 8°C
15°C to 30°C
Box 2 - Rapid Capture Reagents
This box is shipped on dry ice. As soon as you receive your kit, store the components at
-15°C to -25°C.
Quantity
2
1
1
1
2
1
1
1
1
2
Acronym
TDE1
EE1
TD
RSB
NLM
EHB
EWS
HP3
PPC
NEM
TruSight One Library Preparation Guide
Reagent Name
Tagment DNA Enzyme
Enrichment Elution Buffer 1
Tagment DNA Buffer
Resuspension Buffer
Nextera Library Amplification Mix
Enrichment Hybridization Buffer
Enrichment Wash Solution
2N NaOH
PCR Primer Cocktail
Nextera Enrichment Amplification Mix
Storage Temperature
-15°C to -25°C
-15°C to -25°C
-15°C to -25°C
-15°C to -25°C
-15°C to -25°C
-15°C to -25°C
-15°C to -25°C
-15°C to -25°C
-15°C to -25°C
-15°C to -25°C
63
Supporting Information
Box 3 - Indices
This box is shipped on dry ice. As soon as you receive your kit, store the components at
-15°C to -25°C.
Quantity
1 tube
2 tubes
Reagent Name
Index Primer, E502 to E505
Index Primer, N701 to N712
Storage Temperature
-15°C to -25°C
-15°C to -25°C
Box 4 - Oligos
This box is shipped on dry ice. As soon as you receive your kit, store the components at
-15°C to -25°C.
Quantity
1 tube
64
Reagent Name
TruSight One Content Set
Storage Temperature
-15°C to -25°C
Part # 15046431 Rev. A
Check to make sure that you have all of the necessary user-supplied consumables and
equipment before proceeding to the library preparation and enrichment procedures.
NOTE
The TruSight One protocol has been optimized and validated using the items
listed. Comparable performance is not guaranteed when using alternate
consumables and equipment.
Table 4 User-Supplied Consumables
Consumable
Supplier
1.7 ml microcentrifuge tubes
General lab supplier
20 µl barrier pipette tips
General lab supplier
20 µl multichannel pipettes
General lab supplier
20 µl single channel pipettes
General lab supplier
200 µl barrier pipette tips
General lab supplier
200 µl multichannel pipettes
General lab supplier
200 µl single channel pipettes
General lab supplier
1000 µl barrier pipette tips
General lab supplier
1000 µl multichannel pipettes
General lab supplier
1000 µl single channel pipettes
General lab supplier
Adhesive seal roller
General lab supplier
96-well storage plates, round well,
0.8 ml (“MIDI” plate)
Fisher Scientific,
part # AB-0859
Hard-Shell 96-well PCR Plates (“HSP” plate)
Bio-Rad,
part # HSP-9601
TruSight One Library Preparation Guide
65
Consumables and Equipment
Consumables and Equipment
Supporting Information
Consumable
Supplier
[Optional] Amicon Ultra-0.5 centrifugal filter unit (0.5
ml, 30 kDa)
Note: Used to concentrate a pooled library. Another
option is to use a vacuum concentrator.
Millipore,
part # UFC503008
Ethanol 200 proof (absolute)
for molecular biology (500 ml)
Sigma-Aldrich,
part # E7023
Microseal ‘A’ film
Bio-Rad,
part # MSA-5001
Microseal ‘B’ adhesive seals
Bio-Rad,
part # MSB-1001
RNase/DNase-free eight-tube strips and caps
General lab supplier
RNase/DNase-free multichannel reagent reservoirs,
disposable
VWR,
part # 89094-658
Tris-HCl 10 mM, pH 8.5
General lab supplier
[Optional] TruSeq Index Plate Fixture Kit
Note: Recommended for setting up indexed PCR
primers. This part is reusable.
Illumina, catalog #
FC-130-1005
PCR-grade water
General lab supplier
Table 5 User-Supplied Equipment
66
Equipment
Supplier
[Optional] 2100 Bioanalyzer Desktop System
Agilent,
part # G2940CA
[Optional] DNA 1000 Chip
Agilent,
part # 5067-1504
[Optional] High Sensitivity DNA Chip
Agilent,
part # 4067-4626
Part # 15046431 Rev. A
Supplier
DNA Engine Multi-Bay Thermal Cycler
See Thermal Cyclers on page 68.
Bio-Rad,
part # PTC-0240G or
PTC-0220G,
with Alpha Unit,
part # ALS-1296GC
High-Speed Microplate Shaker
VWR, catalog # • 13500-890
(110 V/120 V) or
• 14216-214 (230 V)
Magnetic stand-96
Life Technologies,
part # AM10027
Microcentrifuge
General lab supplier
Microheating System-SciGene TruTemp Heating System
Illumina, catalog #
• SC-60-503 (115 V)
or
• SC-60-504 (220 V)
Microplate centrifuge
General lab supplier
MIDI plate insert for microheating system
Illumina, catalog #
BD-60-601
Fluorometric quantitation with dsDNA binding dye reagents
General lab supplier
[Optional] Vacuum concentrator
Note: Used to concentrate a pooled library. Another option is to use
Amicon Ultra-0.5 centrifugal filter units.
General lab supplier
Vortexer
General lab supplier
TruSight One Library Preparation Guide
67
Consumables and Equipment
Equipment
Supporting Information
Thermal Cyclers
The following table lists the recommended settings for the Illumina recommended thermal
cycler, as well as other comparable models. If your lab has a thermal cycler that is not
listed, validate the thermal cycler before performing the TruSight One protocol.
68
Thermal Cycler
Temp Mode
Lid Temp
Vessel Type
Bio-Rad DNA Engine
Tetrad 2
Calculated
Heated, Constant
at 100°C
Polypropylene plates
and tubes
MJ Research DNA
Engine Tetrad
Calculated
Heated
Plate
Eppendorf Mastercycler
Pro S
Gradient S,
Simulated Tube
Heated
Plate
Part # 15046431 Rev. A
The following list of index sequences is provided for generating sample sheets to
demultiplex the samples. A dual indexing strategy uses two 8 base indices, Index 1 (i7)
next to the P7 sequence and Index 2 (i5) next to the P5 sequence. Dual indexing is enabled
by adding a unique Index 1 (i7) and Index 2 (i5) to each sample.
} N refers to Nextera
} E refers to Enrichment
} 7 refers to Index 1 (i7)
} 5 refers to Index 2 (i5)
} 01–12 refers to the Index number
Table 6 TruSight One Index Adapter Sequences
Index 1 (i7)
Sequence
Index 2 (i5)
Sequence
N701
TAAGGCGA
E502*
CTCTCTAT
N702*
CGTACTAG
E503
TATCCTCT
N703*
AGGCAGAA
E504
AGAGTAGA
N704*
TCCTGAGC
E505*
GTAAGGAG
N705
GGACTCCT
N706*
TAGGCATG
N707*
CTCTCTAC
N708*
CAGAGAGG
N709
GCTACGCT
N710*
CGAGGCTG
N711*
AAGAGGCA
N712*
GTAGAGGA
* Only available in the TruSight One Sequencing Panel Kit (36 Samples).
TruSight One Library Preparation Guide
69
Index Sequences
Index Sequences
Supporting Information
NOTE
The E500 series Index 2 (i5) sequences in the TruSight One kits are identical to S500
series Index 2 (i5) sequences in other kits. However, the Index 2 (i5) adapters are not
interchangeable across kits.
70
Part # 15046431 Rev. A
Technical Assistance
Technical Assistance
For technical assistance, contact Illumina Technical Support.
Table 7 Illumina General Contact Information
Illumina Website
Email
www.illumina.com
[email protected]
Table 8 Illumina Customer Support Telephone Numbers
Region
Contact Number
Region
North America
1.800.809.4566
Italy
Austria
0800.296575
Netherlands
Belgium
0800.81102
Norway
Denmark
80882346
Spain
Finland
0800.918363
Sweden
France
0800.911850
Switzerland
Germany
0800.180.8994
United Kingdom
Ireland
1.800.812949
Other countries
Contact Number
800.874909
0800.0223859
800.16836
900.812168
020790181
0800.563118
0800.917.0041
+44.1799.534000
MSDSs
Material safety data sheets (MSDSs) are available on the Illumina website at
www.illumina.com/msds.
Product Documentation
Product documentation in PDF is available for download from the Illumina website. Go
to www.illumina.com/support, select a product, then click Documentation & Literature.
TruSight One Library Preparation Guide
71
Illumina
San Diego, California 92122 U.S.A.
+1.800.809.ILMN (4566)
+1.858.202.4566 (outside North America)
[email protected]
www.illumina.com