1
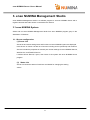
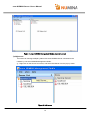
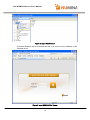
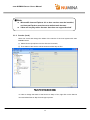
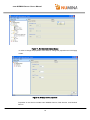
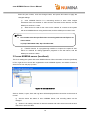
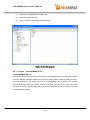
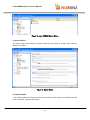
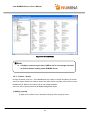
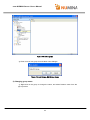
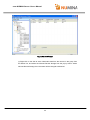
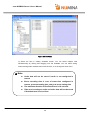
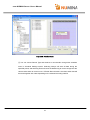
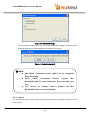
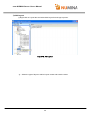
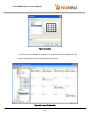
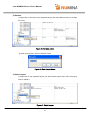
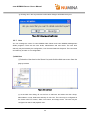
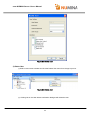
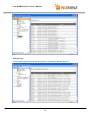
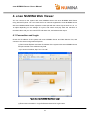
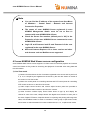
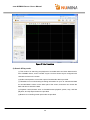
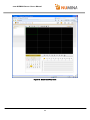
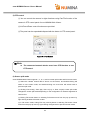
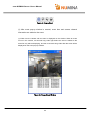
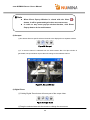
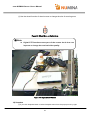
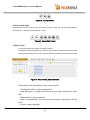
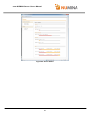
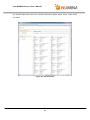
eneo NUMINA Server: User’s Manual
eneo NUMINA
Server
User’s Manual
eneo NUMINA Server version 1.2.6 and later
Manual version 1.2
1
eneo NUMINA Server: User’s Manual
Contents
1. INTRODUCTION............................................................................................ 8
1.1 About eneo NUMINA Server ...............................................................................................................8
1.2 System Requirements ...........................................................................................................................8
1.3 MAIN FUNCTIONS ...................................................................................... 8
1.4 Devices ...................................................................................................................................................9
1.5 Revision History ...................................................................................................................................9
2. INSTALLATION............................................................................................ 10
3. ENEO NUMINA MANAGEMENT STUDIO .................................................. 11
3.1 eneo NUMINA System ....................................................................................................................... 11
3.1.1 Screen configuration.................................................................................................................... 11
3.1.2
Service (local) ............................................................................................................................17
3.2 eneo NUMINA server (localhost) ......................................................................................................19
3.2.1
Service – eneo NUMINA server...............................................................................................20
3.2.2
Section - Group .........................................................................................................................22
3.2.3
localhost – Section – Group – Cameras ..................................................................................25
3.2.4
HDD ...........................................................................................................................................31
3.2.5
Schedule.....................................................................................................................................35
3.2.6
Layout........................................................................................................................................38
3.2.7 User ............................................................................................................................................42
3.2.8
Log .............................................................................................................................................45
4. ENEO NUMINA WEB VIEWER.................................................................... 47
4.1 Connection and Login ........................................................................................................................47
4.2 eneo NUMINA Web Viewer screen configuration ...........................................................................48
2
eneo NUMINA Server: User’s Manual
4.3 Live View.............................................................................................................................................51
4.4 Search & Play .....................................................................................................................................60
4.5 Server Status .......................................................................................................................................66
5. CLIP VIEWER .............................................................................................. 71
5.1 Clip Viewer..........................................................................................................................................71
5.2 Time-line Progress Bar.......................................................................................................................71
5.3 Playback Controls ..............................................................................................................................72
5.4 Digital Zoom .......................................................................................................................................72
5.5 Snapshot and Print .............................................................................................................................73
5.6 Clip / AVI Exporting...........................................................................................................................74
5.7 Speed Control......................................................................................................................................75
5.8 Split modes ..........................................................................................................................................75
3
eneo NUMINA Server: User’s Manual
Figures
FIGURE 1. ENEO NUMINA MANAGEMENT STUDIO EXECUTION SCREEN................................12
FIGURE 2. ADD SERVER ........................................................................................................................12
FIGURE 3 SERVER INFORMATION ......................................................................................................13
FIGURE 4. SERVER PROPERTIES .........................................................................................................14
FIGURE 5. CONNECT SERVER..............................................................................................................14
FIGURE 6. DELETE SERVER..................................................................................................................15
FIGURE 7. DELETE SERVER CONFIRMATION...................................................................................15
FIGURE 8. OPEN WEB BROWSER ........................................................................................................16
FIGURE 9. ENEO NUMINA WEB VIEWER...........................................................................................16
FIGURE 10. SERVICE (LOCAL) STATUS ..............................................................................................17
FIGURE 11. SERVICE (LOCAL) STATUS CHANGE.............................................................................18
FIGURE 12. CHANGE SERVER PROPERTIES......................................................................................18
FIGURE 13. CONNECT TO SERVER......................................................................................................19
FIGURE 14. CONNECT TO SERVER......................................................................................................20
FIGURE 15. ENEO NUMINA SERVER STATUS....................................................................................21
FIGURE 16. SERVER STATUS ................................................................................................................21
FIGURE 17. CAMERA STATUS ..............................................................................................................22
FIGURE 18. ADD A GROUP ....................................................................................................................23
FIGURE 19. ADD GROUP - EDIT GROUP NAME.................................................................................23
FIGURE 20. RENAME GROUP ...............................................................................................................24
FIGURE 21. RENAME GROUP - EDIT GROUP NAME ........................................................................24
FIGURE 22. DELETE GROUP .................................................................................................................24
FIGURE 23. DISCOVRY/ADD CAMERAS.............................................................................................25
FIGURE 24. DISCOVERY/ADD CAMERAS ..........................................................................................26
FIGURE 25. ADD/MODIFY CAMERAS .................................................................................................27
FIGURE 26. ASSIGN NEW IP ADDRESS ...............................................................................................28
FIGURE 27. ASSIGN IP ADDRESS .........................................................................................................28
FIGURE 28. MODIFY CAMERA INFORMATION.................................................................................29
FIGURE 29. DELETE CAMERA..............................................................................................................29
FIGURE 30. DELETE CONFIRMATION.................................................................................................30
FIGURE 31. SETUP CAMERA.................................................................................................................31
FIGURE 32. HDD STATUS.......................................................................................................................32
FIGURE 33. ALLOCATE RECORD STORAGE......................................................................................33
FIGURE 34. DEALLOCATE RECORD STORAGE ................................................................................33
4
eneo NUMINA Server: User’s Manual
FIGURE 35. DEALLOCATE RECORD STORAGE CONFIRMATION .................................................34
FIGURE 36. REALLOCATE RECORD STORAGE.................................................................................34
FIGURE 37. REALLOCATE RECORD STORAGE CONFIRMATION..................................................35
FIGURE 38. SCHEDULE..........................................................................................................................36
FIGURE 39. NEW SCHEDULE................................................................................................................37
FIGURE 40. SCHEDULE SETTINGS ......................................................................................................38
FIGURE 41. SCHEDULE APPLY ALL ....................................................................................................38
FIGURE 42. ADD LAYOUT .....................................................................................................................39
FIGURE 43. LAYOUT...............................................................................................................................40
FIGURE 44. LAYOUT CONFIGURATION .............................................................................................40
FIGURE 45. RENAME LAYOUT.............................................................................................................41
FIGURE 46. ENTER LAYOUT NAME ....................................................................................................41
FIGURE 47. DELETE LAYOUT...............................................................................................................41
FIGURE 48. DELETE LAYOUT CONFIRMATION................................................................................42
FIGURE 49. ADD USER ...........................................................................................................................42
FIGURE 50. ADD USER AND SELECT PERMISSIONS .......................................................................43
FIGURE 51. MODIFY USER....................................................................................................................43
FIGURE 52. MODIFY USER....................................................................................................................44
FIGURE 53. DELETE USER ....................................................................................................................44
FIGURE 54. DELETE USER CONFIRMATION .....................................................................................45
FIGURE 55. LOG ......................................................................................................................................45
FIGURE 56. ENEO NUMINA WEB VIEWER LOGIN ...........................................................................47
FIGURE 57. LIVE VIEW MODE..............................................................................................................49
FIGURE 58. SEARCH AND PLAY MODE ..............................................................................................50
FIGURE 59. ALARM OUT CONTROL....................................................................................................52
FIGURE 60. AUDIO CONTROL ..............................................................................................................52
FIGURE 61. PTZ CONTROL....................................................................................................................53
FIGURE 62. SCREEN SPLIT CONTROL ................................................................................................54
FIGURE 63. CHANNEL REMOVAL FROM SPLIT MODE ...................................................................54
FIGURE 64. POPUP EVENT ....................................................................................................................55
FIGURE 65. POPUP EVENT WINDOW ..................................................................................................55
FIGURE 66. HOT SPOT............................................................................................................................56
FIGURE 67. HOT SPOT WINDOW .........................................................................................................56
FIGURE 68. DIGITAL ZOOM ..................................................................................................................56
FIGURE 69. WHEEL MOVE ON DIGITAL ZOOM ................................................................................57
FIGURE 70. DIGITAL ZOOM WINDOW................................................................................................57
5
eneo NUMINA Server: User’s Manual
FIGURE 71. SNAPSHOT/PRINT .............................................................................................................58
FIGURE 72. SNAPSHOT/PRINT .............................................................................................................58
FIGURE 73. FREEZE ................................................................................................................................59
FIGURE 74. ASPECT RATIO ...................................................................................................................59
FIGURE 75. DATE/TIME SEARCH & PLAY..........................................................................................61
FIGURE 76. EVENT SEARCH.................................................................................................................61
FIGURE 77. EVENT SEARCH.................................................................................................................62
FIGURE 78. EVENT SEARCH.................................................................................................................63
FIGURE 79. FUNCTION BOTTONS .......................................................................................................64
FIGURE 80. SCREEN SPLIT CONTROL ................................................................................................64
FIGURE 81. PLAY CONTROLS, DATE/TIME TABLE ..........................................................................64
FIGURE 82. PLAYBACK CONTROLS....................................................................................................65
FIGURE 83. CLIP COPY ..........................................................................................................................65
FIGURE 84. MAKE CLIP FILE ................................................................................................................66
FIGURE 85. SERVER STATUS ................................................................................................................66
FIGURE 86. SERVER STATUS.............................................................................................................67
FIGURE 87. CAMERA STATUS ............................................................................................................68
FIGURE 88. SYSTEM LOG ...................................................................................................................69
FIGURE 89. EVENT LOG ........................................................................................................................70
FIGURE 90. CLIP VIEWER......................................................................................................................71
FIGURE 91. TIME-LINE PROGRESS BAR CONTROL.........................................................................72
FIGURE 92. DIGITAL ZOOM IN CLIP VIEWER ...................................................................................73
FIGURE 93. SNAPSHOT AND PRINT IMAGE IN THE CLIP VIEWER...............................................74
FIGURE 94. CLIP/AVI EXPORTER .........................................................................................................75
FIGURE 95. SPEED CONTROL PROGRESS BAR.................................................................................75
6
eneo NUMINA Server: User’s Manual
Tables
TABLE 1. REVISION HISTORY................................................................................................................9
TABLE 2. ERROR CODES .......................................................................................................................69
TABLE 3. PLAYBACK CONTROLS IN CLIP VIEWER ........................................................................72
7
eneo NUMINA Server: User’s Manual
1. INTRODUCTION
1.1 About eneo NUMINA Server
eneo NUMINA Server software is a program that searches audio, video, and image
transmission network devices (IP camera, video server, etc.) connected to the network,
connects them, and saves the transmitted audio and video data onto the hard disk of the system
where the software is installed. It can save up to 64 channels.
Saved audio and video data can be played back using Internet Explorer and eneo NUMINA
Web Viewer, and users can play the audio and video data from the connected network devices
in real time. Users can search and view recorded video and view live video of up to 16 channels
with eneo NUMINA Web Viewer.
Users can adjust the system settings including audio and video settings of network devices,
peripheral device settings and network settings.
Other systems with eneo NUMINA Server software can be connected.
1.2 System Requirements
♦
CPU
Intel® CoreTM 2 Duo Processor or higher
♦
RAM
1GB or larger
♦
Network
Ethernet (100 Mbit or higher)
♦
Graphics Adapter
AGP or PCI-Express, 1024x768 or higher
♦
Hard Disk Space
over 10 GB free
♦
Operating System
Microsoft® Windows® XP or later
♦
Software
Microsoft DirectX 9.0 or newer
♦
Web
Internet Explorer 6.0 or later
1.3 Main Functions
-
Save audio and video data from network camera connected to the security
system
-
Save up to 64 channels of audio and video data simultaneously
-
Save schedules
-
Assign camera group among network devices
-
Network device settings
-
Saved data search and playback with eneo NUMINA Web Viewer
-
Screen output split mode (Layout) configuration and saving
8
eneo NUMINA Server: User’s Manual
-
User management
-
System log management
-
Event log management
-
Event pop-up screen
-
Digital zoom
-
PTZ control
-
Bidirectional audio
-
Various screen split mode (1, 4, 8, 16 split, Full-screen)
-
Alarm Out control
-
Search by date/hours
-
Playback control
-
Clip Export
-
Snapshot/Print
1.4 Devices
The eneo NUMINA recording server supports not only own camera models but also
ONVIF(Open Network Video Interface Forum) models.
The ONVIF conformant devices are list in the ONVIF web site (http://www.onvif.org)
1.5 Revision History
This document might be changed to support new and updated features of the software and
devices.
Table 1. Revision History
Version
Date
Comment
eneo NUMINA version
1.0
2009-Nov-30
Initial version
1.2
1.1
2010-Jan-06
Clip Viewer
1.2.3
1.2
2010-Jun-14
ONVIF conformant devices
1.2.5
9
eneo NUMINA Server: User’s Manual
2. Installation
1)
Insert the software CD into the CD-ROM drive of the PC, or run the installation
program (Setup-NUMINA.exe) directly.
2)
When the software installation wizard runs, click [Next] button and follow the
wizard guide to install the program.
3)
eneo NUMINA Management Studio runs automatically when the program installation is
completed
10
eneo NUMINA Server: User’s Manual
3. eneo NUMINA Management Studio
eneo NUMINA Management Studio is a software program to set eneo NUMINA Server and to
register cameras and video servers connected to the network.
3.1 eneo NUMINA System
Select and run eneo NUMINA Management Studio from eneo NUMINA program group in the
Start Menu of Windows.
3.1.1 Screen configuration
(1) Server List
Server list and server setting items and functions of eneo NUMINA System are displayed.
Items shown on Server List are list of servers including service (localhost) and localhost.
Service includes the properties of network port number settings for eneo NUMINA Service,
Web Service, and FastCGI Service.
Localhost shows Record, Layout, User items of the system with eneo NUMINA Server
program.
(2)
Status List
Server List shows the status of each item and details for changing the setting
values.
11
eneo NUMINA Server: User’s Manual
Figure 1. eneo NUMINA Management Studio execution screen
1) Add server
The users can manage multiple systems with eneo NUMINA Server connected to the
network by one eneo NUMINA Management Studio.
① Right-click on the Server List screen, and select Add Server from the pop-up menu.
Figure 2. Add server
12
eneo NUMINA Server: User’s Manual
② Enter the eneo NUMINA System server information from the Server Information
screen. Enter IP address for Server Name, port number to connect to Internet for Server
Port, and user name and password for Login Name/Password. If Save Password
checkbox is checked and user name and password are correct, then it is not necessary to
enter user Name and Password when connecting next time. Registered server name
means the name of Server shown in the Server List. Users can add additional comments
in the Description for convenience.
Figure 3 Server Information
; Note
z
Enter IP address for the Server Name of the server.
ex) 192.168.90.4
2) Server Properties
Users can change the properties of the registered servers.
① Right-click on the registered server items (including localhost) in the Server List, and
select Properties from the pop-up menu.
13
eneo NUMINA Server: User’s Manual
Figure 4. Server Properties
② Change the properties of the connected server from the Server Information
screen.
3) Connect to server
Users can connect to the server to change or check the setting information of the
eneo NUMINA Server registered in the Server List.
① Right-click on the server item registered in the Server List, and select Connect
to server menu from the pop-up menu.
Figure 5. Connect server
② Service, Section, Layout, User, and Log items will be shown below the
selected server when the server is connected normally.
4) Delete
Users can delete the servers from the Server List when there is no longer a need to
manage the eneo NUMINA Server registered in the Server List.
14
eneo NUMINA Server: User’s Manual
① Right-click on the eneo NUMINA Server to delete from the Server List, and select
Delete menu from the pop-up screen.
Figure 6. Delete server
② Clicking Yes from eneo NUMINA Server delete confirmation dialogue will remove the
eneo NUMINA Server.
Figure 7. Delete server confirmation
5) Web
Users can search and playback the recorded video in real time with eneo NUMINA Web
Viewer after connecting with Internet Explorer.
① Right-click on the eneo NUMINA Server to connect to the web from the Server List
screen and select Web menu from the pop-up menu.
15
eneo NUMINA Server: User’s Manual
Figure 8. Open Web Browser
② Internet Explorer will be launched and will try to connect to the address of the
selected server.
Figure 9. eneo NUMINA Web Viewer
16
eneo NUMINA Server: User’s Manual
; Note
z
Microsoft® Internet Explorer 6.0 or later version must be installed,
and Internet Explorer must bet set to default web browser.
z
3.1.2
Video will not play with a browser that does not support ActiveX.
Service (local)
Users can check and change the status of the service of the local system with eneo
NUMINA Server.
① Select Service (local) item from the Service List screen,
② Then status of the Service will be shown as either Stop or Run.
Figure 10. Service (local) status
In order to change the status of the Service to Stop or Run, right-click on the Service
item and select Start or Stop from the pop-up menu.
17
eneo NUMINA Server: User’s Manual
Figure 11. Service (local) status change
In order to change the properties of the Service, change the properties and click Apply
button.
Figure 12. Change server properties
Properties of the Service include eneo NUMINA Service, Web Service, and FastCGI
Service.
18
eneo NUMINA Server: User’s Manual
Enter the port number, click the Change button, and press OK button to apply the
changed settings.
①
eneo NUMINA Service is a connecting service to store video images
transmitted from the cameras or video servers connected to the network, and the
default port number is 11440.
②
Web Service is used for the users on the network to connect to the system
with eneo NUMINA Server using web browser, and the default port number is 88.
; Note
z
Port number must be specified when connecting with Internet Explorer as
shown below.
ex) http://192.168.90.4:88/, http://localhost:88/
③
FastCGI Service is a programming interface to improve the speed of CGI,
which is a method for calling application programs in the web server, and the
default port number is 5055.
3.2 eneo NUMINA server (localhost)
This is for setting the system with eneo NUMINA Server. When the status of Service (localhost)
is Run, right-click on Server item registered to eneo NUMINA System, and select Connect to
server menu from the pop-up menu.
Figure 13. Connect to server
Service, Section, Layout, User and Log items will be displayed when connection to the server is
normal.
①
Service shows the status of eneo NUMINA Server, and recording status can be
changed.
②
Section is for setting channels of network cameras and video servers as well as hard-
disk drive to store the video.
19
eneo NUMINA Server: User’s Manual
③
Layout is for configuring screen split mode.
④
User is for registering users.
⑤
Log is for checking system logs and event logs.
Figure 14. Connect to server
3.2.1
Service – eneo NUMINA server
1) eneo NUMINA Server
There are three sub items under the Service item. eneo NUMINA Server item shows the status
of server, Started or Stopped. There are 4 options of status, Start All, Stop All, Start Recording,
and Stop Recording. The Major functions of eneo NUMINA are recording and relaying
multimedia streams from the network devices. The Start All menu is for setting the both
functions as running. The Start Recording menu is for setting the recording function as running
and disabling the relaying.
20
eneo NUMINA Server: User’s Manual
Figure 15. eneo NUMINA Server Status
2) Server Status
The Server Status item shows the system information and status of usages, CPU, Memory,
Network and HDDs.
Figure 16. Server Status
3) Camera Status
The Camera Status item shows the camera information, Model, Name, IP address and video
codec, resolution, framerate and bitrate.
21
eneo NUMINA Server: User’s Manual
Figure 17. Camera Status
; Note
z
Configure camera to get video, HDD to store, and storage schedule
in Section before starting eneo NUMINA Server
3.2.2
Section - Group
Change the status of Service – eneo NUMINA Server to Stop to change the settings in Section.
Users can select channels of network camera and video server to get the video to store in eneo
NUMINA server, HDD to store video, and set the storage schedule.
Users can set two groups with eneo NUMINA Management Studio.
1) Adding a group
① Right-click on Section item, and select Add group from the pop-up menu.
22
eneo NUMINA Server: User’s Manual
Figure 18. Add a group
② Enter name of new group from the New name dialogue.
Figure 19. Add Group - Edit Group Name
2) Changing group name
① Right-click on the group to change the name, and select Rename menu from the
pop-up screen.
23
eneo NUMINA Server: User’s Manual
Figure 20. Rename Group
② Enter new name of the group in the Rename dialogue, and click OK button.
Figure 21. Rename Group - Edit Group Name
3) Deleting a group
Right-click on the group to delete, and select Delete group menu from the pop-up screen
Figure 22. Delete Group
24
eneo NUMINA Server: User’s Manual
3.2.3
localhost – Section – Group – Cameras
Up to 32 video channels can be registered in a group.
1) Registering a camera
① Right-click on Cameras item in group, and select Discovery/Add menu from the
pop-up menu.
Figure 23. Discovry/Add Cameras
② From the Discovery/Add screen, search the cameras and video servers
connected to the network either manually or automatically, enter the information, and
click the Save button.
③ From the Add tab screen, enter Name and IP Address in Camera Information and
select Connection (TCP/UDP). Enter User, Password, HTTP(S) port number in Login
Information. Select whether to enable https connection in Enable HTTPS.
25
eneo NUMINA Server: User’s Manual
Figure 24. Discovery/Add Cameras
; Note
z
Enter Camera Information accurately.
z
IPv6 is not supported. Enter the address in IPv4 format as below.
ex) 192.168.90.123
z
It is recommended to register with user information with
administrator privilege in Login Information since peripheral
devices such as PTZ and alarm out are controlled through
NUMINA Server.
④ When Discovery tab is selected, devices connected to the network are
searched and details of network cameras video servers such as name, channel
number, IP address, MAC address, Model, and Firmware version information
are displayed. Select the camera channel to manage with eneo NUMINA Server
system and click Save button. Cameras with
channel is not registered.
26
icon means that the camera
eneo NUMINA Server: User’s Manual
Figure 25. Add/Modify Cameras
; Note
z
When you cannot add a camera in Discovery, check the
following.
1. Set the Network address again if connection fails with
Network IP Address.
2. Enter User Name and Password again if Login Information is
different from default settings in User Information entry
screen.
3. Check the port number if port forwarding is used.
2) Change IP address in discovery
You can change the network IP address of the detected network device from Discovery screen.
① Right-click on the camera in the list, and select Assign new IP address menu from
the pop-up menu.
27
eneo NUMINA Server: User’s Manual
Figure 26. Assign new IP address
② Enter new IP address from Assign IP address screen and click Assign button.
Figure 27. Assign IP Address
3) Change camera information
You can change the information of the registered camera.
① Select Add tab, and select the camera to change the setting from the camera tree
screen.
② Camera Information and User Information items of the selected camera will be
displayed.
③ Modify items and click the Modify button.
28
eneo NUMINA Server: User’s Manual
Figure 28. Modify Camera Information
④ Click the Close button to finish the camera setting.
4) Delete camera
① Right-click on the camera to delete and select Delete menu.
Figure 29. Delete Camera
29
eneo NUMINA Server: User’s Manual
② Clicking Yes in the delete confirmation dialogue will delete the registered camera
information.
Figure 30. Delete Confirmation
; Note
z
You must change the status of eneo NUMINA server to Stop
since you cannot delete the camera when the status is Start.
z
When a camera is deleted, it will disappear from Layout
setting as well.
z
As all saved files are deleted when camera is deleted, back
up the files before deleting the camera if you want to save
them. The files are in the folder NautilusDB\<MAC address of
the system > of the disk.
ex) D:\NautilusDB\0007D801E0C5_0
5) Setup camera
You can change or check the settings of registered camera through the web.
① Right-click on the camera that you to change or check the settings, and select Setup
menu from the pop-up menu.
30
eneo NUMINA Server: User’s Manual
Figure 31. Setup Camera
② You can change the settings of the selected camera through web service.
3.2.4
HDD
You can assign a hard-disk drive for saving the channel assigned to the camera
1) HDD allocation
① Select HDD items in group will display HDD connected to the system in Status List.
Disk drive, total capacity, available space, and used space are displayed in Status List,
and usage of HDD is shown as Allocated, Invalid Record, or Not.
- Allocated: Disk set to save video/audio data
- Not: Disk not set to save video/audio data
- Invalid Record: Disk is set to save video/audio data but the files cannot be saved due
to some problems in the disk, and the disk can be used after running Allocate or
Reallocate.
31
eneo NUMINA Server: User’s Manual
Figure 32. HDD Status
② Right-click on the disk to save video/audio data from the camera in the group from
the Status List, and select the Allocate Record Storage from the pop-up menu. Select
Allocate Record Storage, then the status will be changed to Allocated.
32
eneo NUMINA Server: User’s Manual
Figure 33. Allocate Record Storage
③ You can select the method of using the disk in HDD Usage.
- When set to Once, recording will stop when there is no more free space.
- When set to Overwrite, earliest recorded files will be overwritten and
recording
continues when there is no more free space.
2) Deallocate Record Storage
① In order to stop using the HDD for storage space, right-click on the Allocated HDD,
and select Deallocate Record Storage menu from the pop-up menu.
Figure 34. Deallocate Record Storage
33
eneo NUMINA Server: User’s Manual
② Selecting Yes from the delete confirmation dialogue will change the HDD Status to
Not, and all audio/video data on the disk will be erased.
Figure 35. Deallocate Record Storage Confirmation
; Note
z
You must change the status of eneo NUMINA server to Stop
since you cannot delete the camera when the status is Start.
z
As all data stored in the disk will be erased when HDD
Remove is selected, back up the files in NautilusDB before
deleting the camera if you want to save them.
ex) D:\NautilusDB
3) Reallocate
① You can use the Reallocate menu to delete the saved files in HDD to secure more
free space. Right-click on the Allocated disk drive in HDD Status List, and select
Reallocate menu from the pop-up menu.
Figure 36. Reallocate Record Storage
② Selecting Yes in initialization confirmation dialogue will delete the files saved
34
eneo NUMINA Server: User’s Manual
on the disk.
Figure 37. Reallocate Record Storage Confirmation
; Note
z
Eneo NUMINA server can use USB external hard-disk drive,
but the data sent from network camera or video server cannot
be saved normally if the USB device is removed during the
operation. Stop eneo NUMINA server program when you
remove or insert the device while using USB external hard-
3.2.5
Schedule
You can set the channel-saving method configured in Cameras to Event saving or Normal
saving depending on the Schedule setting. Event saving saves the video from the camera
during the event periods including pre-event period (up to 30 sec) and post-event period (up to
30 sec) when an event occurs within the specified period, and Normal saving saves all data
during the period specified by the Scheduler. Weekly scheduling is supported.
1) Schedule setting
① Select Schedule items in group. Select the camera to set the schedule from the
camera list in the group.
35
eneo NUMINA Server: User’s Manual
Figure 38. Schedule
② Select the time in weekly Schedule screen. You can select multiple cells
simultaneously by clicking and dragging over the timetable. You can select saving
method through New schedule menu with left-click, or no saving with Clear menu.
; Note
z
Audio data will not be saved if audio is not configured in
camera
z
Event recording time is sum of event time configured in
camera, pre-event setting time, and post-event setting time.
z
The maximum duration of Pre/Post-Event is 30 seconds.
z
Take care in setting as audio and video data will not be saved
if Schedule item is set to Clear.
36
eneo NUMINA Server: User’s Manual
Figure 39. New Schedule
③ You can choose Record Type and whether to record audio through New schedule
menu in Schedule Settings screen. Selecting Always will save all data during the
specified period, and selecting Event will save the data during an event configured if the
camera exists when an event occurs. If Enable Record Audio is checked, audio data will
be saved together with video depending on the selected recording method.
37
eneo NUMINA Server: User’s Manual
Figure 40. Schedule Settings
④ Click Apply All button and click Yes in the confirmation dialogue, and the current
Schedule setting items will be applied to all cameras in the group.
Figure 41. Schedule Apply All
; Note
z
The ONVIF conformant devices MUST not be configured
Event Recording.
z
Some
ONVIF
conformant
devices
support
WS-
BaseNotification for event notification. But some others are
not.
z
This
version
of
software
doesn’t
support
the
WS-
BaseNotification for event notification.
3.2.6
Layout
You can choose various screen split mode (4/8/13/16) and set the camera channels for each
screen mode.
38
eneo NUMINA Server: User’s Manual
1) Add Layout
① Right-click on Layout item and select Add Layout from the pop-up menu.
Figure 42. Add Layout
② Select the type of layout to add to Layout screen and enter the name.
39
eneo NUMINA Server: User’s Manual
Figure 43. Layout
③ Select the Layout added to Layout items, select the camera registered to the
group, and drag and drop it to the desired screen area.
Figure 44. Layout Configuration
40
eneo NUMINA Server: User’s Manual
2) Rename
① Right-click on the name of the registered layout and select Rename menu to change
the name.
Figure 45. Rename Layout
② Enter name of new Layout in Rename screen.
Figure 46. Enter Layout Name
3) Delete Layout
① Right-click on the registered layout and select Delete layout menu from the pop-up
menu to delete it.
Figure 47. Delete Layout
41
eneo NUMINA Server: User’s Manual
② Clicking Yes in the Layout delete confirmation dialogue will delete the layout.
Figure 48. Delete Layout Confirmation
3.2.7
User
You can manage the users of eneo NUMINA Web Viewer and eneo NUMINA Management
Studio programs. There are two user levels, administrator and user levels. The user level
authority may be limited by the configuration, Live View and Search & Playback. The user name
and authority of admin is not configurable.
1) Add User
① Select the User item in the Server List, and click the Add user menu from the
pop-up screen.
Figure 49. Add User
② At the Add User dialog, fill out the form to add user and select the User Group,
administrator or user. Select the authority of new user. The user may be configured as
live viewer with PTZ control, Alarm Out control, and Popup event. The user may be
configured as search and playback user.
42
eneo NUMINA Server: User’s Manual
Figure 50. Add User and Select Permissions
2) Modify User
① Select a user to modify in the User List and click the Modify User menu from the popup menu.
Figure 51. Modify User
② Modify the user information. In the case of ‘admin’, It is available to be changed the
password. And select the OK button to save.
43
eneo NUMINA Server: User’s Manual
Figure 52. Modify User
3) Delete User
① Select a user name to delete and click the Delete User menu from the pop-up menu.
Figure 53. Delete User
② Clicking Yes in the User delete confirmation dialogue will delete the user.
44
eneo NUMINA Server: User’s Manual
Figure 54. Delete User Confirmation
; Note
z
Default Name and Password of the user of eneo NUMINA
Server program is ‘admin’.
z
Check whether CAPLOCK is on or not as name and password
are case sensitive.
z
User registration procedure may be different or only ‘admin’
setting is available depending on the version.
3.2.8
Log
You can manage the system log for the system with eneo NUMINA Server program and
connection with network camera system and event log that records the changes in settings
through eneo NUMINA Management Studio.
Figure 55. Log
1) System Log
The System item under the Log shows the system logs, Information, Warning and Error which
happened in the eneo NUMINA Server System.
45
eneo NUMINA Server: User’s Manual
2) Event Log
The Event item under the Log shows the event logs, Information, Warning and Error.
46
eneo NUMINA Server: User’s Manual
4. eneo NUMINA Web Viewer
You can connect to the system with eneo NUMINA Server with eneo NUMINA Web Viewer
using Internet Explorer. You can check the list of cameras registered to eneo NUMINA Server
with eneo NUMINA Web Viewer, adjust the screen split with the various Layout such as 4, 8, 13,
16 splits depending on the settings of Layout, and search and play back the real-time or
recorded video. And you can control PTZ and Alarm Out, and select audio output.
4.1 Connection and Login
Check the IP address of the system with eneo NUMINA Server and Web Service Port, and
connect to the server using Internet Explorer.
① Run Internet Explorer and enter IP address of the system with eneo NUMINA Server
and port number in the address entry field.
ex) to access localhost, http://127.0.0.1:88/
Figure 56. eneo NUMINA Web Viewer Login
② Enter user information in Login ID/Password and click Login button.
47
eneo NUMINA Server: User’s Manual
; Note
z
You can find the IP address of the system from Start Menu
of Windows - Control Panel - Network and Internet
Connection Properties.
z
The status of eneo NUMINA Server registered in eneo
NUMINA Management Studio must be set to Run to
connect with eneo NUMINA Web Viewer.
z
Check the Server Port number (default port is ‘88’) in the
Properties of the eneo NUMINA Server connected to eneo
NUMINA Web Viewer.
z
Login ID and Password and ID and Password of the user
registered in the eneo NUMINA Server.
z
Microsoft Internet Explorer 6.0 or lower version and other
web browser such as Mozilla are not supported.
4.2 eneo NUMINA Web Viewer screen configuration
eneo NUMINA Web Viewer screen supports Live View mode for real-time playback and camera
control and Search & Play mode for searching and playback of recorded video using date and
time information.
1) Live View mode
① Camera List that shows the list of cameras registered to the server and Layout list of
4, 8, 13, or 16 split Layout registered to the server by the user are shown on the left of
the screen in Live View mode.
② Alarm Out control panel for controlling cameras and PTZ control panel for controlling
PTZ control are shown on the left of the screen.
③ Audio output control function and volume adjust function panel are provided to
control bidirectional audio transfer to and from the camera.
④ Other functions include Popup Event Viewer button to pop up and display the
channel in case of an event, Hotspot button with digital zoom function to zoom part of
the video, Digital PTZ button, Snapshot button for capturing and printing still image from
video, Previous/Next button to switch to cameras in other group in split-screen mode,
and a button to switch between full-screen model and 2x2, 8, 13, 16 split-screen mode.
48
eneo NUMINA Server: User’s Manual
Figure 57. Live View Mode
2) Search & Play mode
① This mode is for searching and playback of recorded audio and video data saved in
eneo NUMINA Server, and it includes Layout List that shows Layout configured with
channels to show on the screen.
② Audio control panel to control the output of saved audio data is provided.
③ Timetable in hour units showing recording information for up to 16 channels and date
for recorded data is shown on the lower part of the screen, and users can choose the
date and time to search the data.
④ Playback control buttons such as forward/reverse playback, pause, stop, and fast
playback, and Clip Export button are provided.
⑤ Buttons for controlling screen split mode are provided.
49
eneo NUMINA Server: User’s Manual
Figure 58. Search and Play Mode
50
eneo NUMINA Server: User’s Manual
; Note
z
eneo NUMINA Web Viewer is a 16 channel Live View/Search
& Play Viewer that requires ActiveX installation. Connect to
eneo NUMINA Server and follow the Active X installation
related instructions under the Internet Explorer tool screen.
z
Screen configuration may be different depending on the
settings of Internet Explorer.
4.3 Live View
1) Camera List
① Right-click on the camera items in the camera list, and drag it into the screen
to display the real-time video.
② The playback screen displays name of camera, date, time, and received data
size on the screen.
③ Panel can be expanded/collapsed with the button in Camera List Panel.
2) Layout List
① Left-click on Layout item in screen split mode configuration (Layout) defined
by the user, and drag it onto the screen to display the video with the
configuration of Layout in real time.
② The playback screen displays name of camera, date, time, and data size on
the screen.
③ Panel can be expanded/collapsed with the button in Layout List panel.
3) Alarm out control
51
eneo NUMINA Server: User’s Manual
① You can select the camera channel from the screen and control ON/OFF
from Alarm out control panel.
Figure 59. Alarm Out Control
; Note
z
Alarm control function of the network device must be
configured to control Alarm out control.
4) Audio in/out control
① Select the camera channel from the screen, select mute on/off, and adjust the
volume level from Audio out control panel to adjust the volume of the audio sent from
the camera.
② Select the camera channel, select mute on/off, and adjust the volume level in Audio
in control panel to send the audio from the microphone connected to the system to the
camera.
Figure 60. Audio Control
; Note
z
In order to send or receive audio data, speaker and
microphone must be connected to the system, and mute
function in recording and playback in Windows volume
control must be off.
z
Bidirectional
audio
may
not
configuration of network devices.
52
work
depending
on
the
eneo NUMINA Server: User’s Manual
5) PTZ control
① You can control the camera in eight directions using Pan/Tile function of the
camera in PTZ control panel of eneo NUMINA Web Viewer.
② Iris/Focus/Zoom control functions are provided.
③ The panel can be expanded/collapsed with the button in PTZ control panel.
Figure 61. PTZ Control
; Note
z
The connected network device must have PTZ function to use
PTZ control.
6) Screen split mode
eneo NUMINA Web Viewer supports 1, 4, 8, 13, and 16 screen split mode and full-screen mode.
① Select the camera channel that is shown on the screen, and double-clicking will
switch to one screen mode, and double-clicking one more time will switch back to
previous split mode.
② Clicking View 2x2(4), View 8(8), View 13(13), or View 4x4(16) screen split mode
changes the screen split mode depending on the configuration of cameras registered in
Camera List.
③ Clicking Full-screen button or selecting Full-screen menu from the pop up menu by
right-clicking enables full-screen model.
④ In full-screen mode, hitting ESC key with keyboard or selecting Full-screen Close
menu from the pop-up menu by right-clicking changes back to previous screen mode.
53
eneo NUMINA Server: User’s Manual
⑤ Clicking Previous/Next button in split-screen mode changes the selected channel,
and it plays video on the screen by grouping cameras registered in Camera List while
maintaining the current split mode.
Figure 62. Screen Split Control
⑥ Right-click on the screen channel and select Remove button from the pop-up menu
to remove the selected channel from the current split mode.
Figure 63. Channel Removal From Split Mode
7) Popup Event
① When event pop-up window function is activated and motion or other events
occur from the connected sensors in the network devices, a window that
displays the video from the channel with event is generated.
54
eneo NUMINA Server: User’s Manual
Figure 64. Popup Event
② After event pop-up window is created, event time and camera channel
information are added to the event.
③ Video from the camera with an event is displayed on the window. When an event
occurs in the camera, 30 seconds long video right before the event is added to the
event list only without displaying, and the 30 seconds long video after the event will be
displayed on the event pop-up window.
Figure 65. Popup Event Window
55
eneo NUMINA Server: User’s Manual
; Note
z
When Event Pop-up Window is closed with the Close (
button, it will be generated again when an event occurs.
z
In order to stop event pop-up window function, click Event
)
Pop-up button in the web browser.
8) Hot spot
① Hot button allows a specific selected channel to be displayed on a separate window.
Figure 66. Hot spot
② If a camera channel is selected from the web browser after Hot Spot window is
generated, Hot Spot window output video will change to the selected channel.
Figure 67. Hot spot Window
9) Digital Zoom
① Clicking Digital Zoom button will zoom part of the output video.
Figure 68. Digital Zoom
② Drag the selected area with the mouse to change the zoom area.
56
eneo NUMINA Server: User’s Manual
③ Use the wheel function of wheel mouse to change the size of zooming area.
Figure 69. Wheel Move on Digital Zoom
; Note
z
Digital PTZ function zooms part of the screen but it does not
improve or change the received video quality.
Figure 70. Digital Zoom Window
10) Snapshot
① If you click Snapshot button or select Snapshot menu from the pop-up menu by right-
57
eneo NUMINA Server: User’s Manual
clicking on the channel in the screen, you can save the video of the selected channel
into image file or print the image.
Figure 71. Snapshot/Print
② Original resolution of the image is displayed on the Snapshot window title, and
clicking on Original button will change the image to the original resolution.
③ Click the Print button to print with the printer connected to the system.
④ Click the Save button to save into JEPG file.
Figure 72. Snapshot/Print
11) Freeze
① Right-click on the channel to freeze the video output on the screen, and select
Freeze menu from the pop-up menu.
② To resume the frozen video, uncheck the Freeze function from the pop-up menu
using the same method as above.
58
eneo NUMINA Server: User’s Manual
Figure 73. Freeze
12) Aspect Ratio
① In order to make the output on the screen proportional to the size of the video
encoded by IP camera or video server, right-click on the channel in the screen and click
Aspect ratio button from the pop-up menu.
② In order to make the output video fill the screen, uncheck Aspect ratio menu from the
pop-up menu using the same method as above.
Figure 74. Aspect Ratio
13) Filter – Deinterlace
① Right-click on the channel encoded in interlaced type and select Deinterlace
of Filter from the pop-up menu to produce smoother video.
② To disable the Deinterlace function, uncheck Deinterlace menu of Filter using
59
eneo NUMINA Server: User’s Manual
the same method as above.
; Note
z
Deinterlace function improves the quality of only the video
encoded in interlaced type, the video quality may depend on
the amount or direction of the motion of image.
z
Deinterlace function does not affect the quality of saved
video.
4.4 Search & Play
1) Date/Time Search & Play
① From the Layout List defined by the user, right-click on Layout item to drag it
into the screen for displaying the video, then video files saved in the format of
Layout configuration will be searched and shown on the corresponding date.
② Select the saved date from the calendar, then the timetable shows the time
of the saved video. Select the video shown in the timetable and press Play
button in playback control buttons to play the saved video.
③ Click the buttons in Layout List panel to expand or collapse the panel.
60
eneo NUMINA Server: User’s Manual
Figure 75. Date/Time Search & Play
2) Event Search
① From the Layout List (screen split mode configuration) defined by the user,
right-click on Layout item and drag it into the screen for displaying the video,
then video files saved in the format of Layout configuration will be searched and
shown on the corresponding date.
② Select Search Event button to search and playback by date/time or event
type from the events generated from the cameras included in the selected
layout.
Figure 76. Event Search
61
eneo NUMINA Server: User’s Manual
③ When First/Last check box is checked in Event Search screen, all events recorded in
eneo NUMINA server will be searched. When First/Last is unchecked and Today, 3
Days, Week, or Month is selected, the range of searching event log will be limited to
today, last three days, last one week, and last one month from today, or users can
change the searching range with a specified date and time. Alarm In or Motion can be
selected for the type of event to search.
④ Users can select the device to search the event from the list and change the range of
searching.
⑤ When the search condition is set and Search button is clicked, the search result will
be shown on the screen. If there is no event that meets the condition then a message
box indicating no event will be displayed. If there is an event that meets the condition,
the search result will be shown on the screen for each camera.
Figure 77. Event Search
⑥ Events on a camera are shown under the camera tab in the Event Search result
screen, and the result of a search event is displayed as a list by event type and event
time. Up to 20 searched events are shown on one page and users can navigate to
different pages.
⑦ Date and time of the calendar will be changed to the time when the event occurred
and the saved video will be played back if you select and double-click the searched
62
eneo NUMINA Server: User’s Manual
event from the list.
⑧ You can move to the previous search screen if you select Back button in Event
Search result screen.
Figure 78. Event Search
3) Hot spot, Digital Zoom, Snapshot
Hot spot, Digital Zoom, and Snapshot functions are the same as in Live view mode. (Refer to
4.3. (8)~(10))
63
eneo NUMINA Server: User’s Manual
Figure 79. Function Bottons
4) Screen split mode
The functions of Previous, Next, View 2x2, View 8, View 13, View 4x4, and Full-screen buttons
are same as in Live view mode. (Refer to 4.3.(6))
Figure 80. Screen Split Control
5) Play Control
① Time information of the video to display is shown.
② Calendar showing the date of the video to play, time line in 24H format, and the table
showing the recording status of each channel with the resolution of minute are provided.
Figure 81. Play Controls, Date/Time Table
③Following are the descriptions of play control buttons.
- Fast Backward Play: to play backward fast
- Step Backward: to display and advance by one frame backward for each
click
- Backward Play: to play backward
- Stop: to stop playback. The mode will be changed to initial Search & Play
mode.
- Pause: to pause playback.
64
eneo NUMINA Server: User’s Manual
- Play: to play forward
- Step Forward: to display and advance by one frame forward for each click
- Fast Forward Play: to play forward fast
Figure 82. Playback Controls
④ Clicking the Make Clip File button will save the files into the local system as
exe files.
Figure 83. Clip Copy
⑤ Enter Start/End time in Make Clip File and select the channel to save into the
local system. You can check the required capacity by clicking Estimation button.
Click the Save button and enter the name of folder and file to save.
; Note
z
The capacity shown when clicking Estimation button from
Make Clip File screen may not be the same as the actual size
of the saved file.
z
Clicking Close button while saving will not delete the saved
file.
z
Continue Loading is not supported.
65
eneo NUMINA Server: User’s Manual
Figure 84. Make Clip File
4.5 Server Status
There is the Server Status menu for checking the server information and Logs.
Click the Server Status menu button on the top.
Figure 85. Server Status
1) Server Information
There are two sub items, Server Status and Camera Status. The Server Status item shows the
CPU, Memory, Network and Disk usages.
66
eneo NUMINA Server: User’s Manual
Figure 86. Server Status
67
eneo NUMINA Server: User’s Manual
The Camera Status item shows the cameras information, Model, Name, Active, Video Codec
and others.
Figure 87. Camera Status
68
eneo NUMINA Server: User’s Manual
2) Log
There are two sub items, System Log and Event Log The System Log item shows the system
logs, Information, Warning, and Error.
Figure 88. System Log
The Event Log item shows the Information, Warning, and Errors.
Table 2. Error Codes
Error Code
Description
1
No video stream during 6 seconds after requesting
2
Disconnected from the server or camera
3
No response keep-alive from camera
4
Socket error
5
Connection failure
69
eneo NUMINA Server: User’s Manual
Figure 89. Event Log
70
eneo NUMINA Server: User’s Manual
5. Clip Viewer
The Clip Viewer is the exported file player. There are playback controls, digital zoom, snapshot
and print, Clip/AVI exporting, and split controls (1, 4, and 16-split mode). The function and user
interface are dependant on the clip viewer version.
Figure 90. Clip Viewer
5.1 Clip Viewer
The Clip viewer is consisted of screens and control panel. The control panel has recorded time
of the file, time-line progress bar, playback controls, function buttons (digital zoom, snapshot
and print, and clip/AVI exporter), speed control progress bar, and split controls (1, 4 and 16-split
mode)
5.2 Time-line Progress Bar
The time-line progress bar shows the current position in the file. And if the time thumb is moved
71
eneo NUMINA Server: User’s Manual
in the time-line by dragging, the viewer shows the video frames of that time. The time thumb
would be moved by second.
Figure 91. Time-line Progress Bar Control
5.3 Playback Controls
There are playback controls. The step by step (frame by frame) operations are enabled in 1-split
mode.
Table 3. Playback Controls in Clip Viewer
Move to the begging of the file
Fast reverse play (skipped I-frames)
Reverse play (I-frame based)
Reverse play by step (frame by frame)
It is enabled in 1 split mode
Stop and close playback mode
Pause play
Forward play with normal speed
Forward play by step (frame by frame)
It is enabled in 1 split mode
Fast forward play (I-frame based)
Move to the end of the file
5.4 Digital Zoom
It is the same function of 4.5.3 Digital zoom.
72
eneo NUMINA Server: User’s Manual
① Click the Digital Zoom button (
) in the control panel.
② Select the region to zoom in by drawing a rectangle on the screen. The region is able to be
moved by dragging the rectangle in the original screen viewer. And the region is able to be
scaled by the mouse wheel operation.
Figure 92. Digital Zoom in Clip Viewer
5.5 Snapshot and Print
The displaying screen is able to be saved as JPEG file format and printed.
① Click the Snapshot and print button (
) in the control panel.
② The Original button is to display the captured image as original size. The Print button is to
print the current image. The Save button is to save the image as JPEG file.
73
eneo NUMINA Server: User’s Manual
Figure 93. Snapshot and Print Image in the Clip Viewer
5.6 Clip / AVI Exporting
Each video stream is able to be exported as AVI file format or Clip viewer type.
① Click the Clip/AVI Exporter button (
) in the control panel.
② The Clip/AVI Exporter shows the recorded time of the file. Select the time range to export
using From and To. The file name is generated automatically by the file name, channel and time
range.
③ Select the channel to be exported by checking the number. The All button is to select or
deselect all available channels in the file.
④ Select the destination folder to be exported by clicking the Destination button or Editing the
directory path directly.
⑤ Check the to AVI button to export as AVI file. Otherwise the exporting file format is clip viewer
(exe). The AVI file is generated by channel as one file. The Clip viewer file is generated as one
file no matter how many channels are selected.
⑥ Press the Export button to start exporting.
74
eneo NUMINA Server: User’s Manual
Figure 94. Clip/AVI Exporter
5.7 Speed Control
The Speed Control is to determine the file reading time interval in playback. There are 5 steps of
interval. The speed is not absolute time value. It is dependant on the recorded channels, frame
rate and system performance for decoding and displaying. The left side is slower and the right
side is faster.
Figure 95. Speed Control Progress Bar
5.8 Split modes
There are split mode buttons (
, 1, 2x2(4), 4x4(16)-split mode). By clicking
the split mode button, the split mode would be changed including selected channel. If you select
channel number 6 in 16-split mode, and click the 4-split mode, then the channel 5, 6, 7 and 8
would be displayed.
75
eneo NUMINA Server: User’s Manual
eneo® is a registered trademark of Videor E. Hartig GmbH
Exclusive distribution through specialised trade channels only.
Videor E. Hartig GmbH
Carl-Zeiss-Straße 8 · 63322 Rödermark, Germany
Tel. +49 (0) 6074 / 888-0 · Fax +49 (0) 6074 / 888-100
Technical changes reserved.
© Copyright by Videor E. Hartig GmbH 10/2010
www.videor.com
76