1
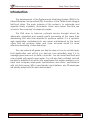
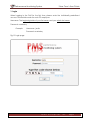
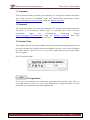
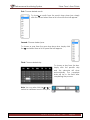
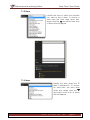
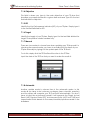
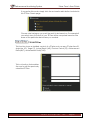
Taters Enterprises, Incorporated
User Manual
Performance Monitoring System
Store Crew’s User Guide
Performance Monitoring System
Store Crew’s User Guide
Acknowledgements
Many people have contributed in producing the Performance Monitoring
System. In particular, here are the people/ team(s) that helped bring this project
to a success: Taters employees, Team Seven (a development team from Asia
Pacific College), Ms. Elena de Castro (TEI’s Management Information System
Manager and industry professor).
Copyright Notice
All rights reserved ® 2009
System Support
For Email support regarding the Performance Monitoring System, send Email to
[email protected].
Contact Information
Taters Enterprises, Inc.
Suites 2002-2005 Cityland, Pasong Tamo Tower
2210 Chino Roces Avenue., Makati City
Tel.: 757-2053
817-1138
Fax: 757-2054
Web: www.tatersgroup.com
Mail: [email protected]
Taters Enterprises, Inc.
Page 2
Performance Monitoring System
Store Crew’s User Guide
Table of Contents
Introduction ...............................................................................................................................8
1. Login ......................................................................................................................................9
1.1 Username .......................................................................................................................10
1.2 Password ........................................................................................................................10
1.3 Security Code ................................................................................................................10
1.4 Login button...................................................................................................................10
2. PMS User Interface ..............................................................................................................13
2.1 TEI Logo ..........................................................................................................................13
2.2 Personal Information Box ..............................................................................................13
2.2.1 Edit Account Info ............................................................................................................ 13
2.3 Upload Photo ................................................................................................................15
2.4 Logout ............................................................................................................................15
3. PMS Home Page .................................................................................................................16
3.1 Announcements ............................................................................................................17
3.2 Notes ..............................................................................................................................17
3.2.1 Add New ........................................................................................................................... 18
3.2.2 Post Until ............................................................................................................................ 18
3.2.3 Note Status ....................................................................................................................... 18
3.2.4 Add .................................................................................................................................... 19
3.2.5 Delete ................................................................................................................................ 20
3.2.6 Update .............................................................................................................................. 20
3.3 Unverified Checklist ......................................................................................................21
3.4 Unverified Supplier Checklist ........................................................................................22
3.5 Suggestion To Approve .................................................................................................23
4. Checklist ..............................................................................................................................24
4.1 Answer ............................................................................................................................24
4.1.1 Checklist Area.................................................................................................................. 25
4.1.2 Checklist Name ............................................................................................................... 25
4.1.3 Store Selection ................................................................................................................. 26
Taters Enterprises, Inc.
Page 3
Performance Monitoring System
Store Crew’s User Guide
4.1.4 Checklist Deviations........................................................................................................ 26
4.1.5 Person Responsible ......................................................................................................... 26
4.1.6 Remarks ............................................................................................................................. 27
4.2 Amnesty .........................................................................................................................27
5. Chart ....................................................................................................................................27
5.1 One Date .......................................................................................................................27
5.1.1 Date ................................................................................................................................... 27
5.1.2 Store ................................................................................................................................... 29
5.1.3 Checklist ............................................................................................................................ 29
5.1.4 Graph/Chart .................................................................................................................... 30
5.2 Date Range ...................................................................................................................30
5.2.1 Date Range ...................................................................................................................... 30
5.2.2 Store ................................................................................................................................... 32
5.2.3 Checklist ............................................................................................................................ 32
5.2.4 Graph/Chart .................................................................................................................... 32
6. Supplier ................................................................................................................................33
6.1 Checklist .........................................................................................................................33
6.1.1 Answer ............................................................................................................................... 33
6.1.1.1 Checklist Area........................................................................................................... 34
6.1.1.2 Checklist Name ........................................................................................................ 34
6.1.1.3 Store Selection .......................................................................................................... 34
6.1.1.4 Supplier Selection ..................................................................................................... 35
6.1.1.5 Checklist Deviations ................................................................................................ 35
6.1.1.6 Remarks ...................................................................................................................... 35
6.1.2 Verify .................................................................................................................................. 35
6.1.2.1 Checklist Area........................................................................................................... 36
6.1.2.2 Checklist Name ........................................................................................................ 36
6.1.2.3 Prepared By ............................................................................................................... 36
6.1.2.4 Checklist Deviations ................................................................................................ 36
6.1.3 Verified .............................................................................................................................. 37
6.1.4 Amnesty ............................................................................................................................ 37
Taters Enterprises, Inc.
Page 4
Performance Monitoring System
Store Crew’s User Guide
6.2 Chart ..............................................................................................................................37
6.2.1 One Date .......................................................................................................................... 37
6.2.1.1 Date ............................................................................................................................ 38
6.2.1.2 Store ............................................................................................................................ 39
6.2.1.3 Supplier Selection ..................................................................................................... 39
6.2.1.4 Graph/Chart ............................................................................................................. 40
6.2.2 Date Range ...................................................................................................................... 40
6.2.2.1 Date Range ............................................................................................................... 40
6.2.2.2 Store ............................................................................................................................ 42
6.2.2.3 Supplier Selection ..................................................................................................... 42
6.2.2.4 Graph/Chart ............................................................................................................. 42
7. TE Plan ..................................................................................................................................43
7.1 Create new TE Plan .......................................................................................................43
7.1.1 Date ................................................................................................................................... 43
7.1.2 Store ................................................................................................................................... 45
7.1.3 Area ................................................................................................................................... 45
7.1.4 Objective .......................................................................................................................... 46
7.1.5 KPI ....................................................................................................................................... 46
7.1.6 Target ................................................................................................................................. 46
7.1.7 Manual .............................................................................................................................. 46
7.1.8 Automatic ......................................................................................................................... 46
7.2 Edit TE Plan .....................................................................................................................47
7 View TE Plan ......................................................................................................................48
7.2.1 Date ................................................................................................................................... 48
7.2.2 Store ..................................................................................................................................... 50
8. Suggestion ...........................................................................................................................51
8.1 Compose .......................................................................................................................51
8.1.1 Area ................................................................................................................................... 51
8.1.2 Store ................................................................................................................................... 51
8.1.3 Subject............................................................................................................................... 51
8.1.4 Suggestion ........................................................................................................................ 51
Taters Enterprises, Inc.
Page 5
Performance Monitoring System
Store Crew’s User Guide
8.2 Approve List ...................................................................................................................52
9. Help ......................................................................................................................................52
10. Frequently Asked Questions .............................................................................................52
10.1 How do I create an account? ...................................................................................52
10.2 What if the year I need is not in the calendar? ........................................................52
10.3 Why does the calendar keep closing immediately while I am not finished
selecting the correct date that I need? ...........................................................................52
10.4 How can I export a table?..........................................................................................53
10.5 How can I export reports with graphs or charts? ......................................................54
10.6 When I’m using the browser, how can I zoom in and out while viewing the
PMS?........................................................................................................................................54
Taters Enterprises, Inc.
Page 6
Performance Monitoring System
Store Crew’s User Guide
Table of Figures
Fig. 01 login page ............................................................................................................................... 9
Fig. 02 security image ...................................................................................................................... 10
Fig. 03 login error message ............................................................................................................. 11
Fig. 04 login error message 2.......................................................................................................... 11
Fig. 05 PMS home page .................................................................................................................. 12
Fig. 06 personal information box ................................................................................................... 13
Fig. 07 edit account info ................................................................................................................. 14
Fig. 08 notes area ............................................................................................................................. 17
Fig. 09 status ...................................................................................................................................... 18
Fig. 10 sample radio buttons .......................................................................................................... 18
Fig. 11 sample of note posted ....................................................................................................... 19
Fig. 12 answer checklist................................................................................................................... 24
Fig. 13 calendar (one date)........................................................................................................... 28
Fig. 14 calendar (date range) ....................................................................................................... 30
Fig. 15 calendar (one date) ........................................................................................................... 38
Fig. 16 calendar (date range) ....................................................................................................... 40
Fig. 17 TE Plan Create ...................................................................................................................... 43
Fig. 18 calendar (TE Plan create) .................................................................................................. 43
Fig. 19 TE Plan list ............................................................................................................................... 48
Fig. 20 TE Plan view........................................................................................................................... 48
Fig. 21 calendar (TE Plan view) ...................................................................................................... 48
Fig. 22 compose suggestion .......................................................................................................... 51
Fig. 23 approved suggestion list .................................................................................................... 52
Taters Enterprises, Inc.
Page 7
Performance Monitoring System
Store Crew’s User Guide
Introduction
The development of the Performance Monitoring System (PMS) is for
Taters Enterprise, Incorporated (TEI), franchisor of the Taters Snack League
fast-food chain. The main purpose of this system is to automate and
organize timely checklists, documents, forms, and various files that are
crucial to the company’s business processes.
The PMS aims to improve customer service brought about by
adequate, organized and speedy results processing at the same time
decreasing cost and time required to produce reports. It is a dynamic
web application centralized into one server administered by the head
office that will produce faster and more accurate results for more
effective monitoring of store branches.
This user manual will guide you step by step on how to use this newly
built application and will let you discover how incredibly easy it is to
manage great amounts of data in minutes. You will never feel tired and
over worked with reports ever again. You will also feel confident and will
be able to establish trust within your employees; this system enables you to
track and compare employees’ performance and stores’ performance
with just clicks away. With a very friendly user interface, any TEI employee
will quickly adapt with this new environment.
Taters Enterprises, Inc.
Page 8
Performance Monitoring System
Store Crew’s User Guide
1. Login
When logging in the PMS for the first time, please enter the individually predefined
account credentials made for each TEI employee.
Username: The beginning letter of your first name and your whole last name.
Password: masterkey
Example:
Username: javila
Password: masterkey
Fig. 01 login page
Taters Enterprises, Inc.
Page 9
Performance Monitoring System
Store Crew’s User Guide
1.1 Username
This is the field where you enter your username. To change the default username
and other account credentials, login the Performance Monitoring System
(http://tatersgroup.com/pms2/lib) using the default username.
1.2 Password
This is the field where you enter your password. To change the default password
(minimum of 8 characters: letters and/ or numbers) and other account
credentials,
login
the
Performance
Monitoring
System
(http://tatersgroup.com/pms2/lib) using the default password, and then
proceed editing your pre registered account.
1.3 Security Code
This image protects the system against bots by generating and grading tests that
humans can pass but current computer programs cannot. If you cannot interpret
the code shown, click the Reload Image link to generate a new security code
then try again.
Fig. 02 security image
1.4 Login button
Once you have entered your username, password and security code, click on
the Login button to sign in. If you have entered the wrong username or/ and
password, you will see an error message like this:
Taters Enterprises, Inc.
Page 10
Performance Monitoring System
Store Crew’s User Guide
Fig. 03 login error message
If you have left a blank field, you will see an error message like this:
Fig. 04 login error message 2
When you have entered the login information correctly, the system will redirect
you to the Performance Monitoring System’s home page:
Taters Enterprises, Inc.
Page 11
Performance Monitoring System
Store Crew’s User Guide
Fig. 05 PMS home page
Taters Enterprises, Inc.
Page 12
Performance Monitoring System
Store Crew’s User Guide
2. PMS User Interface
2.1 TEI Logo
The TEI logo in the upper left portion of the page placed as a part of the header
is a link to the home page. You can click this anytime you want to go back to
the index page.
2.2 Personal Information Box
Next to the TEI logo, you will see an area where your registered name, role and
store assignment are displayed. The information is significant and should
correspond to your own. Your access to certain menus is restricted, depending
on what role you are registered as.
Fig. 06 personal information box
2.2.1 Edit Account Info
This is where you edit your account credentials and personal details. The
street, barangay, and city have default values; do not forget to change
them. Before submitting, a security image is once again required.
Taters Enterprises, Inc.
Page 13
Performance Monitoring System
Store Crew’s User Guide
Fig. 07 edit account info
Taters Enterprises, Inc.
Page 14
Performance Monitoring System
Store Crew’s User Guide
2.3 Upload Photo
If you want to change the default photo in your account, simply click on
the Upload Photo button located in the Personal Information Box.
The maximum size of the picture you can upload is 3MB and only certain
file formats are allowed such as jpeg, gif, png, bmp, ico, and tif.
When the “File Upload” window appears, browse for the picture you wish
to upload as your photo. After locating the correct path of your picture,
simply click the
button to go back to the page; this will now
contain the directory where your desired photo is stored. Click the
button or
button if you want to exit.
2.4 Logout
After using the Performance Monitoring System, you can logout from the
system by simply clicking the Logout button. After clicking the Logout
button, a message saying, “You’ve been logged out” will appear
confirming that your attempt of logging out was successful.
Taters Enterprises, Inc.
Page 15
Performance Monitoring System
Store Crew’s User Guide
3. PMS Home Page
Taters Enterprises, Inc.
Page 16
Performance Monitoring System
Store Crew’s User Guide
The home page displays mainly two categories that serve as notices to Taters
employees: the announcements and notes. Details about those categories are
as follows:
3.1 Announcements
Announcements are messages that high level employees want to direct to
certain store branches regarding business matters. Taters HR Personnel and
Executives are the only levels authorized to post announcements.
Store name of which the message is for, announcement id, username of the
employee who posted, date posted, and message, are included as parts of
each announcement.
3.2 Notes
Notes are specially built for task assigning and serve as reminders for store crews
of the same store. Your note is only viewable by employees with the same store
assignment as you.
Fig. 08 notes area
Taters Enterprises, Inc.
Page 17
Performance Monitoring System
Store Crew’s User Guide
Parts of the Note section
3.2.1 Add New
This is the area where you type in the content of your note. There is no limit to the
length of the note that can be posted, nor is there character restrictions applied.
3.2.2 Post Until
This area determines how long you want your note posted in the accounts of
your co branch employees. Just click the empty Post Until text field for the pop
up calendar to appear. Choose a month, year, and day of the desired note
expiry. The date will automatically be reflected once you have finished
choosing.
Note:
Make sure that the date you choose is
the present or future date. An incorrect
choice will produce an error message
after submitting the note.
3.2.3 Note Status
Status describes the progress of the note/task you want to post. The task may
belong under two states, completed or in progress. However if the note is not a
task and does not relate to any state, you can opt for N/A (Not Applicable).
Fig. 09 status
Adding, Deleting, and Updating Notes
Fig. 10 sample radio buttons
not selected
selected
There are round buttons above each posted message in the notes list called
radio buttons. Beside the radio buttons are the note id and the date of which the
note will stay posted. There are other parts in the notes area that you should be
familiar about:
Taters Enterprises, Inc.
Page 18
Performance Monitoring System
Store Crew’s User Guide
Fig. 11 sample of note posted
3.2.4 Add
After completing all the required
fields, click Add button.
The
note will be posted after the
page loads.
Taters Enterprises, Inc.
Page 19
Performance Monitoring System
Store Crew’s User Guide
3.2.5 Delete
Click the delete radio button
above the message you want to
delete and click on the Delete
button located at the end part of
the Notes area.
3.2.6 Update
Click the update radio button
above the message you want to
update and click on the Update
button located at the end part of
the Notes area.
Taters Enterprises, Inc.
Page 20
Performance Monitoring System
Store Crew’s User Guide
3.3 Unverified Checklist
Below the announcements and notes are the list of unverified checklists. This can
assist you to determine easily what checklists need to be verified.
Taters Enterprises, Inc.
Page 21
Performance Monitoring System
Store Crew’s User Guide
3.4 Unverified Supplier Checklist
Below the list of unverified checklists are the list of unverified supplier checklists.
This can assist you to determine easily what supplier checklists need to be
verified.
Taters Enterprises, Inc.
Page 22
Performance Monitoring System
Store Crew’s User Guide
3.5 Suggestion To Approve
Below the list of unverified supplier checklists are the list of unapproved
suggestions. This can assist you to determine easily what suggestions need to be
approved.
Taters Enterprises, Inc.
Page 23
Performance Monitoring System
Store Crew’s User Guide
4. Checklist
4.1 Answer
Fig. 12 answer checklist
Taters Enterprises, Inc.
Page 24
Performance Monitoring System
Store Crew’s User Guide
Notes:
If the checklist does not have any deviations, proceed to the
bottom part of the page and click the checkbox that says, “Please
check here if there is no deviation”.
If you continue to submit the checklist without doing so, it will be
disregarded by the system. The PMS only recognizes checklists with
at least one deviation or the checklists where the no-deviation
check box is marked.
4.1.1 Checklist Area
Checklists are categorized according to areas where they are used. First,
choose the area of the checklist you want to answer by clicking the radio
button beside every area code (areaCode). Click the
button once you are ready to proceed.
4.1.2 Checklist Name
Taters Enterprises, Inc.
Page 25
Performance Monitoring System
Store Crew’s User Guide
After selecting an area, choose the name of the checklist you want to
verify by clicking the radio button beside every checklist name
(checklistName). Click the
proceed.
button once you are ready to
4.1.3 Store Selection
Before beginning to answer the checklist, select
which store the checklist is intended for. To
choose a store from the store drop down box,
simply click the
and select from a list of stores
that will appear.
4.1.4 Checklist Deviations
Questions are marked checked by default. Simply click on the check(
to mark it as a deviation. Under the Select column, click on the
mark it an
and click
button.
4.1.5 Person Responsible
You can determine the person responsible for a
deviation by choosing his/her name from the drop
down box under the Person Responsible column. To
choose the name of an employee from the Person
Responsible drop down box, simply click the
and
select from a list of employees that will appear.
Employees that are registered in the PMS and
belong in your store are the only ones listed in the
Person Responsible.
Taters Enterprises, Inc.
Page 26
)
to
Performance Monitoring System
Store Crew’s User Guide
4.1.6 Remarks
Creating a remark is optional. If you want to
leave a comment regarding the deviated
question in the checklist, simply type in your
remark in the field under the Remarks column. Click the Submit button
once you are finished.
4.2 Amnesty
A function that enables the user to
presently answer checklists from a previous
date; this serves as a form of grant for the
employees that missed/failed to accomplish
the checklist intended for a specific date.
A calendar will appear in the upper part of
the checklist. Use this to choose the date
according to when you have missed
answering a checklist. After determining
the date, you may proceed to answer and
submit the checklist in the usual manner.
5. Chart
This function lets you view a specified checklist in chart/graphic form. This will
show a visual evaluation of deviations that reflect employee/store performance.
5.1 One Date
This is called such because you have to provide one date, the date the checklist
was accomplished. Also, you have to select the store branch, and checklist
name that you want to view.
5.1.1 Date
Identify the date of the checklist you want to view in chart/graphic form.
Simply click inside the Date field and a dynamic calendar will appear
availing dates to choose from.
Taters Enterprises, Inc.
Page 27
Performance Monitoring System
Store Crew’s User Guide
Fig. 13 calendar (one date)
First: Choose desired month
To choose a month from the month drop down box, simply
click the
and select from a list of months that will appear.
Second: Choose desired year
To choose a year from the year drop down box, simply click
the
and select from a list of years that will appear.
Taters Enterprises, Inc.
Page 28
Performance Monitoring System
Store Crew’s User Guide
Third: Choose desired day
To choose a day from the box,
simply click the specific day and
the
calendar
will
close
automatically.
The complete
date will be in the text field after
completing the process.
Note: You can also click the or to
switch to a different month and year.
5.1.2 Store
Identify the store of which the checklist you
want to view is from. To choose a store from
the store drop down box, simply click the
and select from a list of stores that will appear.
5.1.3 Checklist
Identify the checklist of the
chart/graph you want to
view. To choose a name of
the checklist from the
checklist drop down box,
simply click the
and
select from a list of names
that will appear.
Taters Enterprises, Inc.
Page 29
Performance Monitoring System
Store Crew’s User Guide
5.1.4 Graph/Chart
You can select from a list of
different graphs/charts by simply
clicking on the corresponding
checkbox beside each type. You
can choose any/all types of
graphs/charts you desire to view.
5.2 Date Range
This is called such because you have to provide a range of dates; the start and
end date when checklist was accomplished. In addition, you have to select the
store branch, and checklist name that you want to view.
5.2.1 Date Range
Identify the date range (date from and date to) of the checklist you want
to view in chart/graph form. Simply click inside the From and To date fields
and a dynamic calendar will appear availing dates to choose from.
Fig. 14 calendar (date range)
Taters Enterprises, Inc.
Page 30
Performance Monitoring System
Store Crew’s User Guide
First: Choose desired month
To choose a month from the month drop down box, simply
click the
and select from a list of months that will appear.
Second: Choose desired year
To choose a year from the year drop down box, simply click
the
and select from a list of years that will appear.
Third: Choose desired day
To choose a day from the box,
simply click the specific day
and the calendar will close
automatically. The complete
date will be in the field after
completing the process.
Note: You can also click the
or
to switch to a different month and
year.
Taters Enterprises, Inc.
Page 31
Performance Monitoring System
Store Crew’s User Guide
5.2.2 Store
Identify the store of which the checklist
you want to view is from. To choose a
store from the store drop down box,
simply click the
and select from a list
of stores that will appear.
5.2.3 Checklist
Identify the checklist
of the chart/graph
you want to view. To
choose a name of the
checklist from the
checklist drop down
box, simply click the
and select from a
list of names that will
appear.
5.2.4 Graph/Chart
You can select from a list of
different graphs/charts by
simply
clicking
on
the
corresponding
checkbox
beside each type. You can
choose any/all types of
graphs/charts you desire to
view.
Taters Enterprises, Inc.
Page 32
Performance Monitoring System
Store Crew’s User Guide
6. Supplier
6.1 Checklist
6.1.1 Answer
Taters Enterprises, Inc.
Page 33
Performance Monitoring System
Store Crew’s User Guide
Notes:
If the checklist does not have any deviations, proceed to the
bottom part of the page and click the checkbox that says, “Please
check here if there is no deviation”.
If you continue to submit the checklist without doing so, it will be
disregarded by the system. The PMS only recognizes checklists with
at least one deviation or the checklists where the no-deviation
check box is marked.
6.1.1.1 Checklist Area
Checklists are categorized according to areas where they are
used.
First, choose the area of the checklist you want to answer by clicking the
radio button beside every area code (areaCode). Click the
button once you are ready to proceed.
6.1.1.2 Checklist Name
After selecting an area, choose the name of the checklist you
want to verify by clicking the radio button beside every
checklist name (checklistName). Click the
once you are ready to proceed.
button
6.1.1.3 Store Selection
Before
beginning
to
answer
the
checklist,
select
which
store
the
checklist is intended for. To choose a
store from the store drop down box,
simply click the
and select from a
list of stores that will appear.
Taters Enterprises, Inc.
Page 34
Performance Monitoring System
Store Crew’s User Guide
6.1.1.4 Supplier Selection
After selecting the store, To choose a
supplier from the supplier drop down
box, simply click the
and select
from a list of supplier that will appear.
6.1.1.5 Checklist Deviations
Questions are marked checked by default. Simply click on the
check( ) to mark it as a deviation. Under the Select column, click
on the
to mark it an
and click
button.
6.1.1.6 Remarks
Creating a remark is optional. If you want
to leave a comment regarding the
deviated question in the checklist, simply
type in your remark in the field under the Remarks column. Click the
Submit button once you are finished.
6.1.2 Verify
Taters Enterprises, Inc.
Page 35
Performance Monitoring System
Store Crew’s User Guide
6.1.2.1 Checklist Area
Checklists are categorized according to areas where they are
used. First, choose the area of the checklist you want to
answer by clicking the radio button beside every area code
(areaCode). Click the
to proceed.
button once you are
ready
6.1.2.2 Checklist Name
After selecting an area, choose the name of the checklist you
want to verify by clicking the radio button beside every
checklist name (checklistName). Click the
once you are ready to proceed.
button
6.1.2.3 Prepared By
After selecting what checklist you want to verify, choose the name
of the employee who prepared it by clicking the radio
button
beside every survey id (surveyID). Click the
button once you are ready to proceed.
6.1.2.4 Checklist Deviations
Questions that were marked as deviations will now be listed. Simply
click on the
if you have verified that a question was wrongly
deviated. Under the Select column, click on the
to turn it into a
; this means that that question was not supposed to be a
deviation. Click the Update Deviation once you are finished.
Taters Enterprises, Inc.
Page 36
Performance Monitoring System
Store Crew’s User Guide
6.1.3 Verified
This section displays the lists of Accomplished Checklists and Deviations in
different categories.
6.1.4 Amnesty
A function that enables the user to
presently answer checklists from a
previous date; this serves as a form
of grant for the employees that
missed/failed to accomplish the
checklist intended for a specific date.
A calendar will appear in the upper
part of the checklist. Use this to choose
the date according to when you have
missed answering a checklist. After
determining the date, you may
proceed to answer and submit the
checklist in the usual manner.
6.2 Chart
This function lets you view a specified checklist in chart/graphic form. This will
show a visual evaluation of deviations that reflect employee/store performance.
6.2.1 One Date
This is called such because you have to provide one date, the date
the checklist was accomplished. Also, you have to select the store
branch, and checklist name that you want to view.
Taters Enterprises, Inc.
Page 37
Performance Monitoring System
Store Crew’s User Guide
6.2.1.1 Date
Identify the date of the checklist you want to view in chart/graphic
form. Simply click inside the Date field and a dynamic calendar will
appear availing dates to choose from.
Fig. 15 calendar (one date)
First: Choose desired month
To choose a month from the month drop down box,
simply click the
and select from a list of months that
will appear.
Second: Choose desired year
To choose a year from the year drop down box, simply
click the
and select from a list of years that will
appear.
Taters Enterprises, Inc.
Page 38
Performance Monitoring System
Store Crew’s User Guide
Third: Choose desired day
To choose a day from the
box, simply click the
specific day and the
calendar
will
close
automatically.
The
complete date will be in
the
text
field
after
completing the process.
Note: You can also click the
or to switch to a different
month and year.
6.2.1.2 Store
Identify the store of which the
checklist you want to view is
from. To choose a store from
the store drop down box, simply
click the
and select from a
list of stores that will appear.
6.2.1.3 Supplier Selection
After selecting the store, To choose a supplier
from the supplier drop down box, simply click the
and select from a list of supplier that will appear.
Taters Enterprises, Inc.
Page 39
Performance Monitoring System
Store Crew’s User Guide
6.2.1.4 Graph/Chart
You can select from a
list of different
graphs/charts by
simply clicking on the
corresponding
checkbox beside
each type. You can
choose any/all types of graphs/charts you desire to view.
6.2.2 Date Range
This is called such because you have to provide a range of dates; the
start and end date when checklist was accomplished. In
addition, you
have to select the store branch, and checklist name that you want to
view.
6.2.2.1 Date Range
Identify the date range (date from and date to) of the checklist you want
to view in chart/graph form. Simply click inside the From and To date fields
and a dynamic calendar will appear availing dates to choose from.
Fig. 16 calendar (date range)
Taters Enterprises, Inc.
Page 40
Performance Monitoring System
Store Crew’s User Guide
First: Choose desired month
To choose a month from the month drop down box, simply
click the
and select from a list of months that will appear.
Second: Choose desired year
To choose a year from the year drop down box, simply click
the
and select from a list of years that will appear.
Third: Choose desired day
To choose a day from the box,
simply click the specific day
and the calendar will close
automatically. The complete
date will be in the field after
completing the process.
Note: You can also click the
or
to switch to a different month and
year.
Taters Enterprises, Inc.
Page 41
Performance Monitoring System
Store Crew’s User Guide
6.2.2.2 Store
Identify the store of which the checklist
you want to view is from. To choose a
store from the store drop down box,
simply click the
and select from a list
of stores that will appear.
6.2.2.3 Supplier Selection
After selecting the store, To choose a
supplier from the supplier drop down box,
simply click the and select from a list of
supplier that will appear.
6.2.2.4 Graph/Chart
You can select from
a list of different
graphs/charts
by
simply clicking on the
corresponding
checkbox beside each
type. You can choose
any/all types of graphs/charts you desire to view.
Taters Enterprises, Inc.
Page 42
Performance Monitoring System
Store Crew’s User Guide
7. TE Plan
Identify the store you want to create, edit, or view a TE Plan. To choose a store from the
store drop down box, simply click the
and select from a list of stores that will appear,
and then click the Submit button.
7.1 Create new TE Plan
This function enables you to create a TE plan by simply selecting the appropriate
dates (date from, date to) and store branch of your plan. When the date range
entered is correct, select the area, type in the objective, KPI and target of your
TE plan.
Fig. 17 TE Plan Create
7.1.1 Date
Identify the date range (date from and date to) of the TE plan you want
to evaluate. Simply click inside the From and To Date fields and a
dynamic calendar will appear availing dates to choose from.
Fig. 18 calendar (TE Plan create)
Taters Enterprises, Inc.
Page 43
Performance Monitoring System
Store Crew’s User Guide
First: Choose desired month
To choose a month from the month drop down box, simply
click the
and select from a list of months that will appear.
Second: Choose desired year
To choose a year from the year drop down box, simply click
the
and select from a list of years that will appear.
Third: Choose desired day
To choose a day from the box,
simply click the specific day
and the calendar will close
automatically. The complete
date will be in the field after
completing the process.
Note: You can also click the or to
switch to a different month and year.
Taters Enterprises, Inc.
Page 44
Performance Monitoring System
Store Crew’s User Guide
7.1.2 Store
Identify the store of which the checklist
you want to view is from. To choose a
store from the store drop down box,
simply click the
and select from a list
of stores that will appear.
7.1.3 Area
Identify the area where the TE
plan is intended for. To choose
an area from the area drop
down box, simply click the
and select from a list of areas
that will appear.
Taters Enterprises, Inc.
Page 45
Performance Monitoring System
Store Crew’s User Guide
7.1.4 Objective
This field is where you type in the main objective of your TE plan that
describes your expected result in a given time and area. Type it in the text
field allotted for objective.
7.1.5 KPI
Identify the Key Performance Indicator (KPI) of your TE plan. Simply type it
in the text field allotted for KPI.
7.1.6 Target
Identify the target of your TE plan. Simply type it in the text field allotted for
target. Enter positive wholes numbers only.
7.1.7 Manual
There are two modes to choose from when updating your TE plan result. In
choosing the manual mode, you have to actually input the result of your
TE plan manually by typing it in the update part of the TE Result.
To do this, simply click the TE Plan Result function in the TE Plan.
Input the date of the TE Plan that you want to make the result of.
7.1.8 Automatic
Another update mode to choose from is the automatic mode. In this
mode all you have to do is choose a category (area, checklist, question)
and the system will compute your TE Plan result automatically. You don’t
have to input the actual result yourself, it will compute the Target, Actual
Result (AR), Previous Period (PP), Achievement Ratio (AR/T and T/AR) and
Improvement Ratio based on the areas/checklists/questions saved in the
database.
Taters Enterprises, Inc.
Page 46
Performance Monitoring System
Store Crew’s User Guide
If you prefer this mode, simply click the automatic radio button included in
the TE Plan Create page.
Choose what category you want the result to be based on. For example if
you select Area, the result of your TE Plan will be computed based on the
areas of the particular date frame you created.
7.2 Edit TE Plan
This function shows a detailed content of a TE plan such as area, TE plan item ID,
objective, KPI, Target (T), Actual Result (AR), Previous Period (PP), Achievement
Ratio(AR/T), Achievement Ratio(T/AR).
This is a function that enables
the user to edit the previously
submitted TE Plan.
Taters Enterprises, Inc.
Page 47
Performance Monitoring System
Store Crew’s User Guide
7.3 View TE Plan
This function enables you to view a TE plan by simply selecting the appropriate
dates (date from, date to) and store branch of your plan. When the date range
entered is correct, a list of TE plans will appear. Select the TE plan you want to
view and then click
button.
Fig. 19 TE Plan list
Fig. 20 TE Plan view
7.3.1 Date
Identify the date range (date from and date to) of the TE plan you want
to evaluate. Simply click inside the From and To Date fields and a
dynamic calendar will appear availing dates to choose from.
Fig. 21 calendar (TE Plan view)
Taters Enterprises, Inc.
Page 48
Performance Monitoring System
Store Crew’s User Guide
First: Choose desired month
To choose a month from the month drop down box, simply
click the
and select from a list of months that will appear.
Second: Choose desired year
To choose a year from the year drop down box, simply click
the
and select from a list of years that will appear.
Third: Choose desired day
To choose a day from the box,
simply click the specific day
and the calendar will close
automatically. The complete
date will be in the field after
completing the process.
Note: You can also click the or to
switch to a different month and year.
Taters Enterprises, Inc.
Page 49
Performance Monitoring System
Store Crew’s User Guide
7.3.2 Store
Identify the store of which the checklist
you want to view is from. To choose a
store from the store drop down box,
simply click the
and select from a list
of stores that will appear.
To choose a store from the list, simply click the
stores that will appear.
and select from a list of
When the date range entered is correct, a list of TE plans will appear.
Select the TE plan you want to view and then click
Taters Enterprises, Inc.
button.
Page 50
Performance Monitoring System
Store Crew’s User Guide
8. Suggestion
8.1 Compose
Fig. 22 compose suggestion
8.1.1 Area
Select an area of which the suggestion is intended for.
8.1.2 Store
Select a store of which the suggestion is intended for.
8.1.3 Subject
Think of a title that best suits your suggestion. Click Submit button
when the process is complete.
8.1.4 Suggestion
Type the content of your suggestion here
Taters Enterprises, Inc.
Page 51
Performance Monitoring System
Store Crew’s User Guide
8.2 Approve List
Select the area of the approved suggestion you want to view, and then click
Show Suggestion(s). To go back to the home page click Back button.
Fig. 23 approved suggestion list
9. Help
This is a link to user manual of the PMS. Simply click this icon and you will be redirected
to the user manual. The user manual is a complete instructional guide that is available
for easy access.
10. Frequently Asked Questions
10.1 How do I create an account?
If you are a legitimate employee of Taters Enterprises Incorporation, you will be
registered an account by the hr manager from the head office. Just use the
standard username and password to be able to login successfully.
10.2 What if the year I need is not in the calendar?
If the span of years allowed in the first click of the dynamic calendar is
insufficient, just click the highest/lowest year available. The drop down box will
close containing the year you clicked. Click the year drop down box again and
the year higher/lower than the last you chose will be available.
10.3 Why does the calendar keep closing immediately while I am not
finished selecting the correct date that I need?
Taters Enterprises, Inc.
Page 52
Performance Monitoring System
Store Crew’s User Guide
Be sure to answer in correct order. Choose the month, year and day
respectively. Click here for more information about the calendar.
10.4 How can I export a table?
Highlight from the top center of the table downwards.
Press the right button of your mouse and
click Copy
Or Ctrl+C on your keyboard
Then open Microsoft Office Excel (
)
Taters Enterprises, Inc.
Page 53
Performance Monitoring System
Store Crew’s User Guide
Press the right button of your mouse and
click Paste
Or Ctrl+V on your keyboard
10.5 How can I export reports with graphs or charts?
Go to the page where your desired graph or chart is shown. Click anywhere on
that page, then on your keyboard, click PrtSc (print screen).
Open Paint (
) and press the right
button of your mouse
Or Ctrl+V on your keyboard
Then click File then Save or Ctrl+S. Choose the location where you want to save
your file, then click Save. You will find your graph in the location where you
saved it, now you can apply it to any of your reports.
10.6 When I’m using the browser, how can I zoom in and out
viewing the PMS?
while
When the browser is open and you are viewing the PMS, press Ctrl + to zoom in or
Ctrl – to zoom out.
Taters Enterprises, Inc.
Page 54