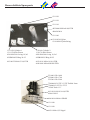
1
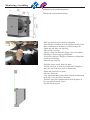
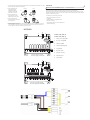
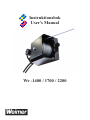
Instruktionsbok User’s Manual We -1400 / 1700 / 2200 Introduction The hydraulic winch WE-1400,1700,2200 are assembled on a crane.The winch is controlled with a control lever on the carriage and by radio. We thank you for the purchase of this hydraulic winch and hope that you will be fully satisfied with the product. Manufacturer: Weimer Hydraulik ab Råskog 575 91 Eksjö, Sweden Telephon: +46-381-710 10 Fax: +46-381-711 44 E-mail [email protected] The present manual contains guidelines for maintenance of the hydraulic winch. Before operating the winch read this manual and make sure that you have understood the principles of operation of the product. The manual describes assembly, maintenance and servicing of the device. Follow this manual to ensure reliable and faultless operation and continuance of validity of the manufacturer’s guarantee. For extensive maintenance or repair works contact your retailer or Weimer Hydraulik ab. We preserve the right to introduce changes without giving an advance notice. We hope that you will be completely satisfied with your new hydraulic winch. Confirmation of correspondence to EU requirements, EC Declaration Weimer Hydraulik ab Råskog, 575 91 Eksjö, Sweden declare under our sole responsibility that the product Hydraulwinch We-1400 / We-1700 / We-2200 without or with radio device to which this declaration relates is in conformity with the Machinery Directive 89/392 as amended by the EC Directive 91/368. Eksjö 2010-04-06 Delivery Urban Johansson Managing Director Weimer Hydraulik ab Check the delivery so that all parts are provided with mounting Winch without tubes and valve Winch with manuel valve Winch part Winch part Mounting iron with brackets Mounting iron with brackets Wire 6mm a 40m alt 8mm a 35m Wire 6mm a 40m alt 8mm a 35m Snatch block Snatch block 2 pcs 3/8” tubes Manuel valve Adapters and a plate 2 pcs 1/2” tubes Technical specification Drawing force at 175 bar Wire speed at 40L/min Wire with hook Weight We-1400 1 400 kp 0,45 m/sec 6 mm / 40 m 45 kg Winch with radio device Winch part Mounting iron with brackets Wire 6mm a 40m alt 8mm a 35m Snatch block 2 pcs 3/8” tubes Elektric valve Adapter and a plate 3 pcs 1/2” tubes Radio device We-1700 1 700 kp 0,36 m/sec 8 mm / 35 m 45 kg We-2200 2 200 kp 0,29 m/sec 8 mm / 35 m 45 kg Safety information Read the manual before operating the winch Riskzon of winching is 50 m Operating the winch always mind the hazard of capsizing. To achieve better stability, use supports and position the crane correctly. Before operating the winch and during operation keep people out of the danger area. Ensure good visual control of the whole operation area. Ceck for damage of wire. If the snatch block, wire or hook brakes it will thrown away with big forse, keep distance. Do not use the winch at tree felling The winch is not allowed for lifting, therefore conduct loading works with the crane. Do not use the winch for towing another vehicle or load Fix near the end of the log so it does not thrown away if it sticks Maintenance and service Regular checkups: All screws and nuts must be tight. The cable must not be damaged. The hydraulic system must not leak. There must be no damaged areas on the hydraulic tubes. The electric cables must be no damaged and the contact is OK Instructions for lubrication Lubricate motor bracket and the wirewheel every 8 hour. It is better to lubricate more frequently rather than to use large amounts of lubricant at a time. Change damaged lubrication nipples. If winching in or out of the cable is difficult, spray some lubricant behind the drum. Terms of guarantee Weimer Hydraulik ab undertakes to guarantee for one years all details broken or damaged as a result of manufacturing or material defects. All products purchased from us - the engine, the valves and the radio device - are given a one year guarantee by our supplier. The guarantee starts on the date of delivery. The guarantee does not cover faults caused by normal wear and tear, negligence or misuse, incorrect assembly, insufficient maintenance or inadequate repair. The guarantee does not cover hydraulic tubes and their connections. Expenses resulting from disassembly, assembly and transportation connected with the guarantee are not covered. The guarantee holds if Weimer Hydraulik ab has been informed of the defect directly. The defect may be repaired after consultations between the client, the retailer and Weimer Hydraulik ab. If we deem it necessary, the machine/part has to be sent back to the manufacturer for guarantee treatment. In such case the make of the machine, production number, date of delivery, owner’s name and address have to be indicated. The guarantee is not valid if the machine has been modified to such an extent that it is no longer in its original form, for instance due to addition of supplements, installations, additional constructions, or use of spare parts not supplied by us. Otherwise general procurement terms NL02 apply. Montering / Assebling Måttritning och infästningspunkter Dimension and attachment points -Håll upp fixtururen på bommens sidoplåtar -Sätt vinschen så långt fram som möjligt och i höjd eller under ovankanten av bommen, se mått ritning ovan -Märk upp och slipa rent från färg -Mät in och svetsa fast -Mycket viktigt att fästjärnen ligger i linje med taljans infästning, om inte bygg upp med plåtar -Svetsa fast taljfästet i fästjärn på bommen så långt från vinschen som möjligt -Montera upp vinschen -Hold the fixture on the bom side plate -Put the winch far in front as possible and in height or under the top of the bom, look at dimensions -Mark and grind clean of paint -Measure and weld -Very important that brackets and wirewheel attachment are in line, if not build up with plates -Weld the wirewheel attachment on the bom plates so far as possible from the winch -Put the winch in place Mycket viktigt att rulla upp vajen Very important to roll up the wire Montera vajern i trumman Assamble the wire in the drum Viktigt att vajern går in på rätt sida på trumman Important that wire will go in on right side of drum Svetsa fast ventilplåten på lämpligt plats, kontrollera med slang, ventil och radio att det blir bra. Montera hydraul slangarna enl bild Weld valve plate on a appropriate place, check with tubes, valve and radio device so it will be ok. Assamble the tubes according the picture Till vinschen, 3/8” slang 90°-45° To the winch. 3/8” tube Retur från vinschventil, 1/2” slang 90°-IR med adapt Return from winch valve Tryck till kran ventil Pressure to crane valve Tryck från traktorn, 1/2” slang 90°-UF med snabbkoppling Pressure from the tractor Retur till traktor Return to the tractor 1. To perform the frequency shift the transmitter must first be turned on. Make sure the transmitter is on, then press the OFF button, then within three seconds: TX1-A/B Tele Radio warrants its products against defects relating to materials, design and manufacture. ON During the warranty period of two years Tele Radio will at its discretion either replace the product or replace defective components with new ones at no cost to the purchaser. The warranty work will be carried out by Tele Radio or an authorised service point. OFF ON 3. Press the indicated button featured in “pic.1” to shift DOWN in the frequency table. TX1-A/B pic 2. OFF The following are not covered by the warranty: TX1-C – defects caused by normal wear and tear, – consumables, ON 4. Press the indicated button featured in “pic.2” to shift UP in the frequency table. OFF – products modified in an unapproved manner, OFF EN ON EN pic 1. CONDITIONS FOR WARRANTY TX1-C – defects due to damage, REMOVE THE INTERLOCK FUNCTION 7 2. 9 DE 1. Start the system. 2. On the receiver: Press the Function button 2. 3. The green LED 5 turns off. 1 2 3 48-230 VAC 4 5 6 7 + 12-24 VAC/DC 8 9 1 8 TR Interlocking is now turned off. In this mode all relays can be simultaneously activated. 1. 6 FR Interlocking is now turned on. In this mode, only one relay can be activated at any given time. 10 11 12 13 14 15 16 17 18 19 20 21 2 3 4 5 22 23 24 6 25 26 27 7 28 27 29 28 30 25 26 8 31 32 33 C 4 3 2 9 5 RELAY 1 RELAY 3 6 RELAY 4 RELAY 5 RELAY 6 RELAY 7 RELAY 8 8 RELAY 9 10 1 2 3 48-230 VAC 4 5 37 38 39 11 6 + 12-24 VAC/DC 7 8 1 9 40 41 42 43 44 45 46 12 13 14 10 11 12 13 14 15 16 17 18 19 20 21 2 3 4 5 47 48 15 23 24 6 25 26 27 7 1-2 Power supply 48-230 VAC 4-5 Power supply 12-24 VAC/DC 4 7 9 49 50 51 22 28 27 29 28 30 25 26 8 Red code storing LED 3. Yellow latch LED 4. Green interlocking LED 5. Logout LED 6. Receiver switch 7. Antenna connector 8. Function button 9. Select button 9 7 RELAY 2 34 35 36 Yellow power supply LED NO NC 1-2 Power supply 48-230 VAC 4-5 Power supply 12-24 VAC/DC 1 ES T70RX-09SB (RX2-A) T70RX-15SB (RX3-A) ES 5 FR 4 3 2 1 DE 1. Start the system. 2. On the receiver: Press the Function button 2. 3. The green LED 5 turns on. TR ENABLING THE INTERLOCK FUNCTION NL SE SE NO NO DK – moisture/water damage. RECEIVER INTERLOCKING RECEIVER DK – apparent damage due to incorrect use/installation, or 5. When frequency has been shifted the LED will blink three times in quick succession and the transmitter will turn off. The next time you turn on the transmitter it will operate on the new frequency. Please note that the next time the transmitter is started it might take a few more seconds for the receiver to find it. NL 2. Press and hold down OFF and ON (pressing OFF slightly before ON). This will make transmitter LED blink slowly for 5 seconds. WARRANTIES 31 32 33 9 C NO NC Reservdelslista/Spareparts 1311120 1311130 1311110 49320040-M20x40 8,8 FZB 490620-M16 1311140 131010210-Nylon 131010200-Fjäder/String 1311150-Cylinder 1 1311170-Kolv/Piston 42019200300-O-ring 19,2x3 42SR020025-Ring 20-25 1311160-Cylinder 2 1311170-Kolv/Piston 42019200300-O-ring 19,2x3 42SR020025-Ring 20-25 49310055-M10x55 8,8 FZB 49310110-M10x110 8,8 FZB 49411008-M10x8 SK6SS FZB 5516001-We-1400 5520001-We-1700 5525001-We-2200 75090608-3/8”UF-1/2”UF Drilled 3mm 7500608-3/8”UF-1/2”UF 79508-Tredo 1/2” 49312030-M12x30 8,8 FZB 490612-M12 49410816-M8x16 SK6SS 1311180 1311190 49511-M8x1,25 Nippel 1311200 45106010-6010 2RS 49411016-M10x16 SK6SS 49310050-M10x50 8,8 FZB 1311300 49116030-M16x30 8,8 FZB 490616-M16 7500606-3/8”UFx3/8”UF 70906003-3/8”UF-IR 340mm 4954030-SGA 30 49310020-M10x20 8,8 FZB 490610-M10 Bricka Vajer kompl./Wire compl. 131010900-6mmx40m 131010910-8mmx35m 49116080-M16x80 490216-M16 Nylock 496312-M12 1/2” 131012210 131011500 131012220-Axel/Axle 49511-Nippel M8x1,25 49530640-Pin 6x40mm 82122-Radio compl. 822121-Sändare/Transmitter Ventilplåt 602519-Ventil/Valve 7500808-1/2”UR-1/2”UF 60935S-Serienippel 813210 70908325-1/2” IR-90° L=2,5m 70908527-3/8” 45°-90° L=2,7m 70908725-1/2” UF-90° L=2,5m