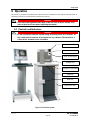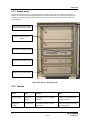
1
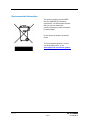
PXScanner Protein Crystal Screening System User Manual Version 4.3, September 2013 Agilent Technologies XRD Products 10 Mead Road, Yarnton, Oxfordshire. OX5 1QU, UK Tel: +44 (0)1865 291600 Fax: +44 (0)1865 291601 http://www.agilent.com/chem Notices © Agilent Technologies, Inc. 2011 No part of this manual may be reproduced in any form or by any means (including electronic storage and retrieval or translation into a foreign language) without prior agreement and written consent from Agilent Technologies, Inc. as governed by United States and international copyright laws. For Assistance and Support http://www.agilent.com/find/assist Limitation of Warranty The foregoing warranty shall not apply to defects resulting from improper or inadequate maintenance by Buyer, Buyersupplied software or interfacing, unauthorized modification or misuse, operation outside of the environmental specifications for the product, or improper site preparation or maintenance. No other warranty is expressed or implied. Agilent Technologies specifically disclaims the implied warranties of Merchantability and Fitness for a Particular Purpose. Warranty The material contained in this document is provided “as is,” and is subject to being changed, without notice, in future editions. Further, to the maximum extent permitted by applicable law, Agilent disclaims all warranties, either express or implied, with regard to this manual and any information contained herein, including but not limited to the implied warranties of merchantability and fitness for a particular purpose. Agilent shall not be liable for errors or for incidental or consequential damages in connection with the furnishing, use, or performance of this document or of any information contained herein. Should Agilent and the user have a separate written agreement with warranty terms covering the material in this document that conflict with these terms, the warranty terms in the separate agreement shall control. Technology Licenses The hardware and/or software described in this document are furnished under a license and may be used or copied only in accordance with the terms of such license. Restricted Rights Legend If software is for use in the performance of a U.S. Government prime contract or subcontract, Software is delivered and licensed as “Commercial computer software” as defined in DFAR 252.2277014 (June 1995), or as a “commercial item” as defined in FAR 2.101(a) or as “Restricted computer software” as defined in FAR 52.227-19 (June 1987) or any equivalent agency regulation or contract clause. Use, duplication or disclosure of Software is subject to Agilent Technologies’ standard commercial license terms, and non-DOD Departments and Agencies of the U.S. Government will receive no greater than Restricted Rights as defined in FAR 52.227-19(c)(1-2) (June 1987). U.S. Government users will receive no greater than Limited Rights as defined in FAR 52.227-14 (June 1987) or DFAR 252.2277015 (b)(2) (November 1995), as applicable in any technical data. Safety Notices CAUTION A CAUTION notice denotes a hazard. It calls attention to an operating procedure, practice, or the like that, if not correctly performed or adhered to, could result in damage to the product or loss of important data. Do not proceed beyond a CAUTION notice until the indicated conditions are fully understood and met. WARNING A WARNING notice denotes a hazard. It calls attention to an operating procedure, practice, or the like that, if not correctly performed or adhered to, could result in personal injury or death. Do not proceed beyond a WARNING notice until the indicated conditions are fully understood and met. Safety Summary General Ground the Instrument This product is a Safety Class 1 instrument (provided with a protective earth terminal). The protective features of this product may be impaired if it is used in a manner not specified in the operation instructions. To minimize shock hazard, the instrument chassis and cover must be connected to an electrical protective earth ground. The instrument must be connected to the ac power mains through a grounded power cable, with the ground wire firmly connected to an electrical ground (safety ground) at the power outlet. Any interruption of the protective (grounding) conductor or disconnection of the protective earth terminal will cause a potential shock hazard that could result in personal injury. General Safety Precautions The following general safety precautions must be observed during all phases of operation of this instrument. Failure to comply with these precautions or with specific warnings elsewhere in this manual violates safety standards of design, manufacture, and intended use of the instrument. Environment Conditions Agilent Technologies Inc. assumes no liability for the customer's failure to comply with these requirements. Before operation, review the instrument and manual for safety markings and instructions. You must follow these to ensure safe operation and to maintain the instrument in safe condition. This instrument is intended for indoor use in an installation category II, pollution degree 2 environment. Refer to the specifications tables for the ac mains voltage requirements and ambient operating temperature range. Before Applying Power Verify that all safety precautions are taken. The power cable inlet of the instrument serves as a device to disconnect from the mains in case of hazard. The instrument must be positioned so that the operator can easily access the power cable inlet. When the instrument is rack mounted the rack must be provided with an easily accessible mains switch. PXScanner USER MANUAL Version 4.3 Page iii Do Not Operate in an Explosive Atmosphere Do not operate the instrument in the presence of flammable gases or fumes. Do Not Remove the Instrument Cover Operating personnel must not remove instrument covers. Component replacement and internal adjustments must be made only by qualified personnel. Instruments that appear damaged or defective should be made inoperative and secured against unintended operation until they can be repaired by qualified service personnel. Environmental Information This product complies with the WEEE Directive (2002/96/EC) marketing requirements. The affixed label indicates that you must not discard this electrical/electronic product in domestic household waste. Do not dispose in domestic household waste. To return unwanted products, contact your local Agilent office, or see www.agilent.com/environment/product/ for more information. PX Scanner Version 4.3 Page 4 USER MANUAL Important Information This user manual applies to the PX Scanner systems manufactured in Poland by Agilent Technologies. Product: Electrical Ratings: PX SCANNER 1/N AC 230 V 50/60 Hz 1000 Watts Before attempting to operate the system, PLEASE READ THE INSTRUCTIONS. Persons legally permitted to do so should only use this product. If the equipment is used in a manner not specified in the User Manual, the protection provided by the equipment may be impaired. Important Health and Safety Notice When returning components for service or repair it is essential that the item is shipped together with a signed declaration that the product has not been exposed to any hazardous contamination or that appropriate decontamination procedures have been carried out so that the product is safe to handle. Care has been taken to ensure the information in this manual is accurate and at an appropriate level. Please inform Agilent Technologies if you have any suggestions for corrections or improvements to this manual. PX Scanner service and support is available for technical and operational issues as indicated below. Web : www.agilent.com/chem/contactus E-mail: [email protected] Phone: +44 (0) 1865 291600 between 8 a.m. and 4.30 p.m. (UK time), Monday to Friday Fax: +44 (0) 1865 291601 Agilent Technologies acknowledges all trademarks and registrations. Copyright 2013 Agilent Technologies Limited. All rights reserved. No part of this document may be reproduced or distributed in any form, or by any means, or stored in a database or retrieval system, without prior written permission of Agilent Technologies. PX Scanner Version 4.3 Page 5 USER MANUAL Table of Contents 1 Health and Safety Information............................................................. 8 1.1 General ................................................................................................................................... 8 1.2 Electrical Safety ....................................................................................................................... 9 1.2.1 Potential Electrical Hazards .................................................................................................... 9 1.2.2 Recommended Precautions .................................................................................................... 9 1.2.3 First Aid ............................................................................................................................. 10 1.3 Mechanical Handling Safety .................................................................................................... 10 1.4 Safe Mechanical Practice ........................................................................................................ 10 1.5 Moving Parts ......................................................................................................................... 10 1.6 X-ray Radiation ....................................................................................................................... 11 1.7 Extreme Temperatures ............................................................................................................ 11 1.8 Vacuum ................................................................................................................................. 12 1.9 Hazardous or Toxic Materials ................................................................................................... 12 1.10 Modifications and Service ....................................................................................................... 12 2 Introduction .................................................................................... 13 2.1 2.2 2.3 Scope.................................................................................................................................... 13 How To Use This Manual ........................................................................................................ 13 System Overview .................................................................................................................... 13 3 Specifications ................................................................................. 14 3.1 Environmental Requirements ................................................................................................... 14 3.2 Services ................................................................................................................................ 14 3.2.1 Electrical Supply..................................................................................................................... 14 3.2.2 Mains Supply Water Cooling.................................................................................................... 15 3.3 Performance Data......................................................................................................................... 15 3.3.1 Micro-focus source (Typical Operating Conditions) ..................................................................... 15 4 Handling, Installation, Storage and Transit Information ....................... 16 4.1 Reception and Handling .......................................................................................................... 16 4.1.1 Delivery ............................................................................................................................. 16 4.1.2 Unpacking .......................................................................................................................... 16 4.1.3 Mechanical Handling ........................................................................................................... 17 4.2 Installation and Setting to Work ............................................................................................... 18 4.2.1 Preparation of Site and Services ........................................................................................... 18 4.2.2 Setting to Work .................................................................................................................. 19 4.2.3 Installation Procedures ........................................................................................................ 19 4.3 Storage ................................................................................................................................. 19 5 Operation ....................................................................................... 20 5.1 Controls and Indicators ........................................................................................................... 20 5.1.1 System layout ..................................................................................................................... 21 5.1.2 Controls ............................................................................................................................. 21 5.1.3 Power ................................................................................................................................ 22 5.1.4 Indicators........................................................................................................................... 22 5.2 Initial Switch on Procedure ...................................................................................................... 23 5.3 Normal Shutdown Procedure ................................................................................................... 24 5.4 Emergency Shutdown ............................................................................................................. 25 PX Scanner Version 4.3 Page 6 USER MANUAL 5.4.1 Emergency Shutdown Procedure .......................................................................................... 25 5.5 Summary of Operation ............................................................................................................. 26 6 Maintenance Instructions ................................................................ 30 6.1 6.2 6.3 6.4 6.5 Checking the Door Safety Interlocks ......................................................................................... 30 Checking the X-ray Radiation Levels ......................................................................................... 31 Checking the Emergency stop .................................................................................................. 31 Cleaning Water Filters ............................................................................................................. 32 Refilling water reservoir .......................................................................................................... 33 7 Trouble Shooting ............................................................................. 34 8 Disposal Instructions ....................................................................... 37 8.1 X-ray Tube and CCD Detector ................................................................................................... 37 9 Additional Information ..................................................................... 38 9.1 Drawings ............................................................................................................................... 38 Table of Figures Figure 1 PX Scanner system ................................................................................................................... 20 Figure 2 PX Scanner electronics rack ....................................................................................................... 21 Figure 3 Touch panel display: eject and insert buttons ............................................................................... 26 Figure 4 Overview of the desktop ............................................................................................................ 27 Figure 5 Water filters ............................................................................................................................. 33 Figure 6 PXScanner suggested layout ...................................................................................................... 38 PX Scanner Version 4.3 Page 7 USER MANUAL 1 Health and Safety Information 1.1 General In normal operation the system is designed to operate safely. All users of the PX Scanner should be aware of potential hazards, which exist in and around equipment of this type and the ways of avoiding possible injury and equipment damage, which may result from inappropriate ways of working. A description of such potential hazards and how to avoid them is given in this section. This manual adopts the following convention: WARNING Indicates a potential hazard which may result in injury or death CAUTION Indicates a potential hazard which may result in damage to equipment Warning symbols on the equipment are: Protective conductor terminal Earth (ground) terminal CAUTION Risk of electric shock CAUTION Refer to accompanying documents WARNING Radiation Hazard See original manufacturers' manuals for further safety data on third party equipment supplied with the system. A list of these is given in this manual. WARNING Do not take risks. You have a responsibility to ensure the safe condition and safe operation of equipment. WARNING The PX Scanner should only be operated and maintained by authorised operators of the system. An authorised operator is a person who has undergone specialist radiation training and has been trained in the use of the PX Scanner by Agilent Technologies personnel. PX Scanner Version 4.3 Page 8 USER MANUAL 1.2 Electrical Safety In normal use the user is protected from the dangers associated with the voltage, current and power levels used by the equipment. Only personnel qualified to work with the voltages and currents used by this equipment should attempt to disconnect, dismantle or modify the equipment. 1.2.1 Potential Electrical Hazards The following list is not intended as a complete guide to all the electrical hazards on the system, but serves to illustrate the range of potential hazards that exist: electric shock electric burn fire of electrical origin electric arcing 1.2.2 Recommended Precautions WARNING All of the electrical equipment supplied as part of the system should be provided with a protective ground. Do not remove protective grounds as this may give rise to an electrical safety hazard. It is vitally important that the system is properly grounded at all times. Follow local and national electrical regulations and procedures. Do not defeat interlocks, remove connectors, disconnect equipment, open safety covers, dismantle or modify equipment unless you are qualified and authorised to do so and you are fully conversant with its operation and potential hazards, or have total assurance through your local electrical permit to work system that the equipment has been made safe. Ensure that the mains supply is fused at an appropriate rating, or fitted with a circuit breaker, and that it can be isolated locally via a clearly labelled, clearly visible and easily accessible isolating switch. Isolate the supply before carrying out any maintenance work. Do not touch any unshielded wires or connectors while mains power is supplied to the system. Do not allow water or any other foreign objects to come into contact with PX Scanner’s electrical components. PX Scanner Version 4.3 Page 9 USER MANUAL 1.2.3 First Aid A course in first aid to include methods of artificial respiration is recommended for those whose work involves equipment that may produce a high voltage. WARNING Do not attempt to administer first aid to someone who may have suffered electric shock until the source of the shock has been isolated. Mains voltages are present in the system. High voltages are used by the X-ray tube and power supply. These can cause serious injury or death. Only personnel qualified to work with high voltages and currents should perform service or maintenance work on such equipment. 1.3 Mechanical Handling Safety WARNING Lifting points are provided for safe handling of components and safe handling practice must be observed to comply with local regulations. Check that lifting points are used only for the job intended. The system itself and some components are heavy and require careful handling. Use safe lifting procedures for heavy items to prevent possible strain injury. 1.4 Safe Mechanical Practice In normal use personnel are not required to undertake mechanical work. However, servicing or repair may necessitate access to any part of the system. Only personnel who have been trained by Agilent Technologies to carry out service work on this equipment should attempt to dismantle, modify or repair the equipment. Water connections should be made and tested in accordance with any local and national safety regulations. 1.5 Moving Parts There are a number of moving parts in the system which are powered by electric motors. WARNING Injury could result if clothing or body parts become caught in moving mechanisms. Keep clothing, hands and body parts away from moving mechanisms. PX Scanner Version 4.3 Page 10 USER MANUAL 1.6 X-ray Radiation WARNING This equipment contains an X-ray tube. Ensure that safe working practices relating to radiation are employed. Follow any local, national or international rules and guidelines. Intentional or reckless misuse of the X-ray generator or its safety devices including safety interlocks and cabinet shielding can result in serious injury or even death. During operation, there is an acceptable level of X-ray radiation as based on the recommendations on risk published by the International Commission of Radiological Protection (ICRP) and endorsed by the National Radiological Protection Board (NRPB) in the UK. For use in the UK, the Ionising Radiations’ Regulations 1999 should be adhered to. For countries outside the UK the appropriate laws apply such as registration and inspection. Customers should be aware of their duty of safety to their employees and visitors. WARNING To prevent injury to personnel and possible damage to the equipment, please note the following guidelines: 1. Only authorised personnel who have received appropriate instruction and are aware of the laboratory rules that govern the use of this type of system should operate the system. 2. Use appropriate X-ray detection equipment to perform regular radiation checks as per any laboratory rules Use only genuine firmware, X-ray tubes, X-ray generators, collimators, as recommended by Agilent Technologies. Use of other products may compromise the performance of the shielding and safety system, and may invalidate your warranty. 1.7 Extreme Temperatures WARNING During operation both the X-ray tube and the heat sink of the CCD power supply become hot. In normal use they are located inside a cabinet and hot parts are not accessible. During maintenance periods, however, great care must be taken to avoid touching either the X-ray tube or the heat sink of the CCD power supply when they are operating and for a period of 20 minutes after operation. PX Scanner Version 4.3 Page 11 USER MANUAL 1.8 Vacuum WARNING When handling and using X-ray tubes and the CCD detector, particular care should be taken to avoid injury caused by possible implosion of the vacuum tube. Wear eye protection. 1.9 Hazardous or Toxic Materials Beryllium and beryllium oxide are toxic materials. Follow appropriate handling, shipping, use, storage and disposal procedures and regulations. Refer to BrushWellman Material Safety Data Sheet No. M10 for further information. WARNING If Beryllium is exposed to fire, it may oxidise to highly toxic beryllium oxide powder. Do not attempt to clear up the remains of any fire, but contact the relevant local agency stating that there is an incident involving possible beryllium or beryllium oxide contamination. 1.10 Modifications and Service The manufacturer will not be held responsible for the safety, reliability or performance of the equipment unless only persons carry out assembly operations, extensions, re-adjustments, modifications and repairs authorised by the manufacturer. It should be stressed that those parts of the equipment which are interchangeable, and which are subject to deterioration during operation, may significantly affect the safety of the equipment. PX Scanner Version 4.3 Page 12 USER MANUAL 2 Introduction 2.1 Scope This manual applies to the PXScanner system designed and manufactured by Agilent Technologies. 2.2 How To Use This Manual This manual is aimed at operators of the PXScanner system. Operators of the system should be computer literate, familiar with X-ray diffraction techniques, have had training in the use of the PXScanner system by Agilent Technologies staff, and have had training about radiation safety. This manual is intended to provide operators with a practical guide to the system and its operation. This is intended to familiarise the user with how the system works and provide a better understanding of the system operation. All personnel who are likely to operate the system or who are likely to come into contact with any of the system components should read the HEALTH AND SAFETY INFORMATION section of the manual. This provides basic information aimed at highlighting the safety hazards associated with the equipment. More detailed information and instructions for component parts of the system are given in the third party manuals supplied with the system, which are listed in this manual. These manuals should also be read and understood before operating the system. The purpose of this manual is to: explain how to operate the equipment explain how to interface to the equipment list performance characteristics of the equipment describe how the equipment operates assist with simple fault finding and maintenance 2.3 System Overview The selection of good quality crystals for diffraction experiments does not have to be a dark art. The PX Scanner lets you automatically screen a 96 well crystallization plate and test crystals for their X-ray diffraction qualities. Combining an optical imager and X-ray diffraction system, the PX Scanner lets you visualize, identify and automatically screen an unlimited number of crystals without having to remove them from their growth environment. The PX Scanner accelerates every stage of the crystallization work flow. It can even rescue projects by finding diffraction quality crystals that you might have missed using other screening techniques. PX Scanner Version 4.3 Page 13 USER MANUAL SPECIFICATIONS 3 Specifications 3.1 Environmental Requirements It is essential that the climate of the laboratory is controlled to ensure that the CCD detector is not damaged. Typically air-conditioning should be installed to maintain the temperature and humidity within the ranges listed below. The Relative Humidity is particularly important as the CCD and its cooling pipes can reach ~15C, condensation should not be allowed to collect on the CCD at any time. PXScanner may be cooled using either ambient air or an external water supply, but this decision must be made when ordering the instrument and Agilent Technologies should be informed so that the hardware can be preconfigured before shipment. The configuration may also be changed at the installation by Agilent Technologies engineers but extra cost will be incurred. The environmental requirements for both configurations are shown below. Air temperature in the room during operation. PXScanner dissipates 4000 BTU/hr heat 18 – 25 C Stability of ambient temperature during operation 1 C Storage temperature >10C <40C Relative humidity 20 - 80 % non – condensing Location Clean, dust free environment >2m from air conditioning or heating units Floor strength Able to bear system weight of 300kg 3.2 Services 3.2.1 Electrical Supply Number of outlets required. 1 x single-phase outlet (16A) 208-240V for PXScanner system (computer, head, interface, water chillers etc.) Voltage fluctuation < 10 % (with line voltage regulator fitted if necessary) Location of outlet On wall behind system. Earth/Ground A common Earth (ground) should be supplied for all connections <0.5 Ohm. Protection Circuit breaker to be fitted to all electrical outlets PX Scanner Version 4.3 Page 14 USER MANUAL SPECIFICATIONS 3.2.2 Mains Supply Water Cooling Note: This is only required if the PXScanner is not to be used with a closed loop cooling system. Min flow rate 1.8 l/min Supply line pressure 1 - 3 bar gauge Return line pressure At least 1 bar less than supply line pressure (Take care to check this on closed loop water systems) Temperature stability 5 C Temperature range 10 – 20 C Water connections Connections suitable for water Hoses with a 10mm internal diameter Composition Filtered, without deposits, chemically neutral and optically clear If the external cooling water for the PXScanner system is to be supplied by a third party chiller, this circuit should incorporate it’s own bypass valve system as the Agilent Water Chiller will only take water as and when it is required. 3.3 Performance Data 3.3.1 Micro-focus source (Typical Operating Conditions) Tube Voltage (kV) setting Current (mA) setting Resulting power (W) 50W tube 50 0.8 40 Maximum radiation dose due to scattering or leakage at 10cm distance from any outside surface < 1µSv/hr PX Scanner Version 4.3 Page 15 USER MANUAL HANDLING, INSTALLATION, ETC. 4 Handling, Installation, Storage and Transit Information 4.1 Reception and Handling 4.1.1 Delivery Carry out the following steps on delivery of the PX Scanner system: 1. When the system arrives, check that there is no visible damage, with the delivery driver present. If damage has occurred contact the carrier and Agilent Technologies immediately. 2. Check that shock-watch and tilt indicators fitted to the outside of the packing cases have not been activated. If the indicators have been activated notify Agilent Technologies immediately. 3. Check the number of delivered items against the packing list. If any items are missing contact Agilent Technologies within 3 days. WARNING The packing crates are heavy and could cause serious injury and damage to the equipment if not handled correctly. Use suitable lifting equipment and procedures. Only lift the packing cases from the bottom. CAUTION Do not remove the equipment from the packing crates until they have been moved to their designated installation site. The equipment has been carefully packed to protect the equipment from damage in transit. Removal of the packing equipment could make the equipment vulnerable to damage during transit. 4. Always lift packing cases from the bottom using suitable lifting equipment (refer to list of component weights in the following section. 5. Move packing cases into the designated installation site. 6. Contact Agilent Technologies to notify them that the equipment is awaiting installation by a factory trained service representative. 4.1.2 Unpacking 1. Retain all packing material until installation of the system is completed. 2. Ensure that special tools are stored safely for use during maintenance periods. PX Scanner Version 4.3 Page 16 USER MANUAL HANDLING, INSTALLATION, ETC. 4.1.3 Mechanical Handling 4.1.3.1 Weights, Dimensions and Lifting Points Description NET Weight kg Dimensions (width x height x depth) cm Centre of gravity Lifting points PX Scanner head 65 45 x 47 x 25 Left side of unit From the sides and below Electronics rack 140 61 x 106 x 65 Centre of unit All four corners and from below Monitor Stand 40 61 x 102 x 65 Centre of unit All four corners and from below Rack Mounted computer 10 48 x 9 x 48 Centre of unit From the sides and below HV Generator 12 48 x 13 x 43 Centre of unit From the sides and below X-ray Source 13 32 x 26 x 13 Centre of unit From below. Water cooler 35 48 x 13 x 48 Centre of unit All four corners and from below. 4.1.3.2 Approximate Boxed Weights, Dimensions and Lifting Points on Delivery Box (No.) Item Weight (kgs) Length (cm) Width (cm) Height (cm) 1 PX Scanner head 180 94 84 129 2 Electronics rack 195 92 71 134 3 Accessories 200 122 80 94 4 Source, water cooler 130 96 61 90 5 AirCooler (optional) 95 110 52 90 The weights and dimension above are an estimate and should only act as an indication of the lifting requirements when the system is delivered. All boxes are fitted with the facility to use forks to unload. There is 15 cm clearance from floor to the base of each box. It is recommended that a fork lift truck is available to unload the delivery vehicle with a pallet truck to move the packing cases into the systems final location. PX Scanner Version 4.3 Page 17 USER MANUAL HANDLING, INSTALLATION, ETC. 4.2 Installation and Setting to Work 4.2.1 Preparation of Site and Services 4.2.1.1 Environmental Requirements It is the customer’s responsibility to ensure that all local building and safety regulations are met. Ensure that the environmental conditions of the installation site conform to the requirements stated in the SPECIFICATIONS section of this manual. 4.2.1.2 System Layout Adequate space is required around the system for servicing. The minimum clearance from the walls and a suggested system layout are shown in Figure 6. For the air cooled configuration Air Cooler unit, or for any additional third party chiller, an extra space of footprint 70 cm x 50 cm is required close to the system (either behind or to the right hand side) Unpacked, the largest subassembly will fit through a door aperture of 65 cm. Check the door aperture to ensure the system can be assembled in its designated area. 4.2.1.3 Electrical Services The entire PXScanner system is designed to be run from a single 16A wall socket. Use only the power cables supplied. Do not connect the electrical power supply circuit to any other devices. Limit the electrical noise in the system by attaching the earth cable exclusively to an external earth terminal with a resistance of less than 0.5 ohms. Fit a line voltage regulator if the power supply voltage fluctuates more than ±10 %. Locate the electrical supply outlet [208-240V] on the wall behind the system. The outlet should be of the circuit breaker type. (Outlet and connecting plugs are not supplied). The plug should be readily accessible by the operator when the equipment has been installed. In areas where the electrical power supply is unreliable an ‘uninterruptible power supply’ (UPS) is recommended. The UPS should have specifications of 2200VA with single phase output and one battery pack, for example the following solution from APC would run PXScanner for about 100 minutes: APC Smart-UPS XL 2200VA 230V Tower/Rack Convertible + (1)SUA48XLBP Battery Unit Description Voltage V Frequency Hz Maximum nominal mains current A X-ray generator 90 - 264 50/60 1.2 CCD detector & water cooler 90 - 264 50/60 2.5 Interface 90 – 132 / 180 - 264 50/60 2.0 Computer and peripherals 100 - 240 50/60 2.5 PX Scanner Version 4.3 Page 18 USER MANUAL HANDLING, INSTALLATION, ETC. 4.2.1.4 Water Supply (if water-to-air chiller is not used) A cooling system is required to dissipate the heat produced by the X-ray tube. A closed circuit cooling system is supplied to minimise the effects of particles, low pressure and water temperature fluctuation on the performance of the system from local tap water supply. The Chiller is a closed circuit cooling system suitable for this purpose. It is supplied with hoses that have a 10mm inside diameter. The distance between the water supply and the chiller is not limited but the supply must deliver 1 – 3 bar gauge pressure with a minimum 1.8 litres/min flow. The water supply should have a wall mounted shut off valve. 4.2.2 Setting to Work 4.2.2.1 Equipment Required 1. Engine hoist/portable lifting device with soft slings capable of lifting 100 kg 2. 1 set of Allen keys 3. Phillips (+) screw drivers (assorted sizes) 4. Flat headed screw drivers (assorted sizes) 4.2.2.2 Personnel Required for Installation 4 persons for lifting of heavy components 4.2.3 Installation Procedures Agilent Technologies personnel normally perform installation. The duration of the installation is typically 2 - 3 working days. This is followed by 2 days training from an Agilent Technologies crystallographer. 4.3 Storage Before installation commences, or when the system is not being used for extended periods, store the PXScanner in accordance with the environmental conditions for temperature and humidity stated in the SPECIFICATIONS section of this manual. Always store PXScanner in a secure room. PX Scanner Version 4.3 Page 19 USER MANUAL OPERATION 5 Operation PX Scanner is a computer-controlled system. All functions are controlled from the computer terminal. Power is switched on and off via manual switches located on PX Scanner. WARNING Local rules and regulations may apply to the use of PX Scanner. If these exist, refer to these local rules before operating the system. 5.1 Controls and Indicators WARNING Do not override the interlock system during normal operation of PX Scanner, as this could result in exposure of personnel to X-ray radiation. The interlock is a safety device and must not be overridden. Touch panel display Head X-ray, shutter lights Sample door Emergency stop button Table top Door lock Electronics rack Figure 1 PX Scanner system PX Scanner Version 4.3 Page 20 USER MANUAL OPERATION 5.1.1 System layout The system is shown in Figure 1. The head enclosure contains motors, video microscopes and a CCD X-ray detector. Sample trays are inserted and removed via the sample insertion door on the front of this enclosure. The electronics rack beneath the system contains an X-ray source, X-ray generator, computer, coolers and system interface. Main power switch to whole rack and PXScanner head System interface power switch Computer on/off/reset button HV generator power switch Water cooler power switch Figure 2 PX Scanner electronics rack 5.1.2 Controls Control Type Location Effect Emergency Stop Red push button On PX Scanner front; electronics rack door Shutdown X-ray generator HV and stop all motors Sample plate handling Touch screen On PX Scanner head; front topright corner Display and control of inserting and ejecting plates PX Scanner Version 4.3 Page 21 USER MANUAL OPERATION 5.1.3 Power Control Type Location Effect PX Scanner system mains Red rocker switch Top panel, left; Inside front door of electronics rack Switch mains power for the whole system (head and rack) System interface Red rocker switch Interface front panel, left; Inside front door of electronics rack Switch power to motors, X-ray source shutter and shutter lights and vacuum sensor Cooler unit Red rocker switch Cooler front panel, left; Inside front door of electronics rack Power on/off to X-ray source and CCD dual cooler HV generator power Red rocker switch Generator front panel, left; Inside front door of electronics rack Power on / off to high voltage generator Computer Red push button PC front panel; Inside front door of electronics rack Power on to computer. Reset computer with short press or power off with long press. 5.1.4 Indicators Indicator Location Meaning Red light Outside, top right of the PX Scanner head enclosure X-ray shutter open No red light Outside, top right of the PX Scanner head enclosure X-ray shutter closed or system interface is off, or lights have failed. In any case, the X-ray shutter cannot be opened. Yellow lights Outside, left side of PX Scanner head and on front side below the touch screen panel. High voltage on. X-rays are being produced. PX Scanner Version 4.3 Page 22 USER MANUAL OPERATION 5.2 Initial Switch on Procedure Safety devices in PX Scanner protect against damage to the system and the operator during start up. The following initial switch on procedure should be followed. CAUTION The CCD power supply is accessed through the back door of the PX Scanner electronics rack. Its on/off switch should normally be left in the on position even when the system is turned off: the CCD will only switch on when the cooler is running. If switching the CCD power supply off, always switch the cooler off first. The CCD detector could be damaged if the ON/OFF switch on the CCD detector DC power supply is used to turn the power off. 1. Open the front door of the PX Scanner electronics rack. 2. Switch on the system mains using the red power switch on the top panel. 3. Turn on the interface using the red switch located on the left hand side of the interface front panel. On the MGC model: ensure 4 green LEDs are illuminated on the right hand side of the interface panel. (These lights are labeled Power, EXT I/O, Ready and Enable). On the DC08 model: wait 15 seconds for the LEDs to selftest and then ensure 2 green LEDs are illuminated (these are labeled: Power and Ext Supply) 4. If the PC does not automatically start then press the red on / off button which is located on the front of the rack-mounted computer. 5. If the PXScanner is connected to external water, turn on mains water supply. 6. Turn on power to rack mounted water cooler unit using switch on the front panel. The CCD detector will now start. CAUTION The CCD detector requires between 60 and 90 minutes cool down time. The system should not be used to collect X-ray data until the correct temperature is achieved. However, video images may be recorded during this time. 7. Switch on X-ray generator using red switch on front panel. 8. Wait for the ‘interlock closed’ lamp to light on the front panel of the generator. The high voltage will be turned on later by the software. 9. Close the front and back doors of the PX Scanner electronics rack. PX Scanner Version 4.3 Page 23 USER MANUAL OPERATION 5.3 Normal Shutdown Procedure 1. Open the front door of the electronics rack. 2. If the software is running: click on the exit icon in the toolbar. The X-ray generator settings will automatically ramp down (to whatever manual setting existed when the software was started). 3. Shutdown the computer: choose ‘Shut Down’ from the Windows Start menu. 4. Switch off X-ray generator using the red switch on the front panel. CAUTION Switching the CCD detector off and on stresses the CCD. Ideally the CCD should be left on at all times. 5. Switch off power to the rack mounted water cooler unit using switch on the front panel. This will turn off the CCD detector. 6. If the PXScanner is connected to external water, turn off mains water supply. 7. Switch off PX Scanner system interface using the red power ‘on / off ‘ switch located on the left of the unit’s front panel 8. Once the computer has completed its shut down, the PX Scanner system mains may be switched off using the red switch on the top panel of the electronics rack. 9. PX Scanner may now be disconnected from the mains. PX Scanner Version 4.3 Page 24 USER MANUAL OPERATION 5.4 Emergency Shutdown The emergency shutdown procedure should be used: If there is a fire or any other emergency requiring the evacuation of personnel from the area AND The procedure can be performed without endangering any persons’ safety. 5.4.1 Emergency Shutdown Procedure 1. Press red emergency stop button located at the top of the front door of the PX Scanner electronics rack. WARNING The emergency stop button will only shut down power to the X-ray generator. Other equipment in the PX Scanner system will still be powered on. 2. Switch off all power at the mains electrical supply. 3. Turn off mains water supply, if connected to the PXScanner. CAUTION Switching off mains power while the computer is turned on may cause wear or permanent damage to the computer’s hard disk. Use in an emergency only. Switching off mains power while the CCD detector is turned on may cause wear or permanent damage to the CCD detector. Use in an emergency only. PX Scanner Version 4.3 Page 25 USER MANUAL OPERATION 5.5 Summary of Operation This section describes a typical sequence of operations needed to image a plate. It is assumed that the plate type is already included in the plate definitions library. The definition of a new plate type is described in the CrystalEyes software manual. The sequence may be briefly summarised as: Insert plate Check model and calibrate plate (optional) Video imaging Object selection X-Ray imaging Data evaluation Eject plate 1. Software Start-up. Start the PX Scanner software using the CrystalEyes icon on the desktop. 2. Login. Login to the PX Scanner using your specific username and password. If you do not have a PX Scanner login then ask your PX Scanner administrator to access the user accounts and provide a login and password. New user accounts can be provided by the PX Scanner administrator using the SETUP and SERVICE menu. User Accounts are detailed in the software manual. WARNING There are dangerous moving parts inside the head. Never insert any part of your body through the plate insertion door of the PX Scanner head. CAUTION Ensure that plate support is empty and visible in Insert Plate software dialog before inserting a plate. 3. Eject plate. Press the Eject button (it is underneath the queue list on the software or on the touch screen panel on the head). The plate loading door will automatically open. Any plate which is inside the head will be ejected. Even if no plate is currently mounted then this operation will position the carriage in the correct place to receive a new plate. Figure 3 Touch panel display: eject and insert buttons PX Scanner Version 4.3 Page 26 USER MANUAL OPERATION 4. Naming and Bar-coding. For imaging the first stage is to insert the crystallisation plate into the PX Scanner. The plate should be oriented so that the A row is inserted first. - If the plate is bar-coded then use the barcode scanner to read the barcode. Use of the Barcode Scanner is detailed below. In this case the plate name is the same as the barcode. - If the user wishes to enter the plate name manually the Insert button should be clicked (it is underneath the queue list on the software or on the touch screen panel). This allows the user to type the plate name and select the plate type. After clicking OK the hardware will make an operation to ensure the plate is correctly inserted (i.e. fully inserted into the carriage) and the door will automatically close. The insert plate procedure names the plate and registers the plate within the database. This step ensures that either a new plate is registered or, if a plate has been previously imaged in the PX Scanner, the previous data for this plate is recovered and displayed. 5. Precise plate alignment (optional). For normal PX Scanner usage the previous step is enough to ensure that the plate is accurately inserted. The positions of the drops in the video images will be well aligned. However, if drops are required to be precisely in the same position on the video image on this insertion as was seen on previous insertions (for precise comparisons) then the two steps of well alignment and detail alignment can be carried out by clicking on the calibration icon on the toolbar. These steps are described in the software manual. Crystal object list Main viewer Drop list for selected well Queue list Plate schematic Figure 4 Overview of the desktop 6. Acquiring Optical Images. Once the plate has been inserted and named, optical imaging can be started. The plate schematic provides a route to navigate through the droplets. If you already know where the crystals are then these can be selected and imaged directly using the plate schematic. Left click on the wells which contain crystals. Once the wells are selected Right click to pull up the image acquisition menu. UPDATE SEL will take optical images of all the selected wells. UPDATE ALL will take optical images of all droplets in the crystallisation plate. There are also options to image only specific drops (e.g. D1) within a particular well. This option may be useful if the user is only using the top or bottom drop in an Innovadyne SD2 plate. The operation of the Plate PX Scanner Version 4.3 Page 27 USER MANUAL OPERATION schematic is detailed in the software manual. All the drop selections will be queued for imaging. The queue list shows the current task at the top and waiting tasks underneath. 7. The Queue and Stopping Operations. Optical and X-ray imaging result in a queue forming, which is visible in the control panel. The jobs can be halted by clicking the padlock icon to the left of the current operation box after the current operation is completed no further operations will be executed. The queue can be cleared using the clear queue button. Should the user wish to halt and cancel all operations, including the current operation, the reset button should be pressed. The main viewer is updated as each task is completed, but to maintain the current view the updating can be stopped by clicking the ‘i’ icon to the right of the current operation box. Then the new images are stored as normal, but are not displayed automatically. Note that the well schematic is also only updated when the ‘i’ icon is green. 8. Viewing Optical Results. Images of the droplets will appear in the main image window. The well view window describes the current co-ordinates of the well. Rapid scanning of the available optical results can be achieved using the directional arrows found in the well view window. The image is a composite of different focal depths. The individual slices can be seen clicking on the toolbar icon Data List. Distances can be measured on the image using the ruler tool on the Ruler toolbar icon. Details can be found in the software manual. The video-imaging step monitors the visual appearance of drops. All optical images are stored in the database and can be used to monitor any changes to the crystal during the lifetime of the drop (using the History tool bar icon). 9. Selecting Crystals for X-ray Evaluation. When the optical images have been assessed, crystals can be chosen for X-ray imaging. Crystals are selected using the right mouse button and are targeted for X-ray evaluation. Clicking on a crystal using the Right Mouse button activates a menu, from which the user can select an experiment to perform on the crystal. The user has the ability to perform a short ‘salt scan’, a 10 min screening experiment, a long 30 min experiment, or a user-defined choice. If any of these options are selected then crystal is moved to the X-ray position of the PX Scanner and X-ray imaging is started. Subsequent crystal selections will be queued awaiting X-ray imaging. Before or after X-ray imaging the crystal size can be stored using the polygon tool on the Ruler toolbar icon. The visualization and analysis of X-ray images are detailed in the software manual. 10. Adjustment. After X-ray image acquisition the optical and X-ray image for a particular crystal are shown in the Object view window. The X-ray image can be selected using the left mouse button and will be presented as the main image view. After clicking the ADJUST/RULER button on the toolbar, the sliders for intensity and contrast should be adjusted to maximise the visualization of the weakest, highest resolution, diffraction spots. Resolution rings are provided for a rapid assessment of the resolution limit. The pixel location and the resolution of pixels within the X-ray image are displayed at the bottom of the X-ray image. 11. Evaluation. Once X-ray diffraction images are available they can be analysed using the evaluation button on the toolbar. This provides the option to determine the Unit cell from the available data. This module conducts peak hunting and unit cell evaluation. In order to minimise spurious spots thresholds parameters can be utilized. This step can be performed in parallel with the X-Ray imaging. 12. Reporting. Pressing the report button on the toolbar will automatically generate an HTML report with optical, X-ray and numerical data shown for every defined object. This is described in the software manual. PX Scanner Version 4.3 Page 28 USER MANUAL OPERATION 13. History. Data for all the Optical and X-ray images is saved in the PX Scanner database. Previous Images for both optical and X-ray imaging are viewed using the history button on the toolbar. From this menu the user can access previously acquired optical and X-ray Data. Information pertaining to the size of the crystal and any unit cell evaluation data can be retrieved via the history menu. Reading data from the history menu is described in the software manual. 14. Plate definition. The PX Scanner is capable of using almost any SBS format plate. There are some exceptions. Art Robbins plates are not accepted by the PX Scanner as they do no fully comply with the SBS format. Low Profile plates, such as the Greiner Low Profile plate, are also less suitable due to problems with placing the plate in the plate carriage and the location of the crystal in the plate. The process of plate definition is described in the software manual. 15. Ejecting Plate. To remove a plate from the PX Scanner head an eject request must be sent. When the eject button is pressed (on the software or the touch panel display) the request is added to the queue. If there are no jobs in the queue the plate will be immediately ejected. If there are other jobs scheduled in the queue the eject command will be scheduled after the completion of all the pending queued jobs. The eject operation will automatically open the plate door and then the plate can be recovered by the user. PX Scanner Version 4.3 Page 29 USER MANUAL MAINTENANCE INSTRUCTIONS 6 Maintenance Instructions WARNING 1. Read and understand the Health and Safety Information section of this manual before performing any maintenance procedures. 2. Follow any local, national or international rules and guidelines that apply to this equipment when performing maintenance tasks. 3. Maintenance tasks must only be performed by authorised operators of the PXScanner. 6.1 Checking the Door Safety Interlocks Task Time: 2 minutes When: Once a week Tools: None WARNING Ensure the interlocks are not defeated. No warning buzzer to be heard. If interlock defeated there is the risk of exposure to X-ray radiation. 1. With the PXScanner in normal operation and at normal X-ray generator settings start X-ray imaging of any object in a plate (real crystal is not necessary) with an exposure time of one minute, and the shutter will open (red lamp illuminated), 2. Open the front door of the electrical rack. The X-ray shutter should immediately close and the red lamp will go off.Close the front door. 3. Repeat step 1. 4. Open the left side panel of the electrical rack. The X-ray shutter should immediately close. 5. Close the side panel. 6. Repeat step 1. 7. Open the right side panel of the electrical rack. The X-ray shutter should immediately close. 8. Close the side panel. 9. Repeat step 1. 10. Open the back door of the electrical rack. The X-ray shutter should immediately close. 11. Close the back door. 12. Record the date, persons testing and sign off the outcome. PX Scanner Version 4.3 Page 30 USER MANUAL MAINTENANCE 6.2 Checking the X-ray Radiation Levels Task Time: 20 minutes When: Once a month Tools: Radiation meter Procedure 1. With the PXScanner in normal operation and at normal X-ray generator settings start X-ray imaging of any object in a plate (real crystal is not necessary) with an exposure time of one minute and the shutter will open (red lamp illuminated),Sweep the outside of the enclosure using the radiation meter, paying particular attention to the plane of the X-ray tube and the door seals. The red lamp must remain illuminated during this step. If it goes out then repeat step 1. 2. Wait for the imaging to finish and the shutter will close (red lamp will go off). 3. Open the rear door of the electrical rack. 4. Use the radiation meter to sweep the area around the X-ray tube housing, fast shutter and collimator for any radiation leak (inside the rack). The red lamp should be off during this step. The yellow lamps must remain illuminated during this step. If the yellow lamps go off then repeat step 1 and wait for the imaging to finish and the red lamp to go off. 5. Close the rear door of the electrical rack. 6. Record details of the test in the local radiation log, stipulating the date, person testing, outcome and signature. . 6.3 Checking the Emergency stop Task Time: 10 minutes When: Once a month Tools: None Procedure 1. With the PXScanner in normal operation and at normal X-ray generator settings start X-ray imaging of any object in a plate (real crystal is not necessary) with an exposure time of one minute, and the shutter will open (red lamp illuminated), 2. Press the emergency stop button. Wait a few seconds for the HV to ramp to zero. 3. The yellow X-rays lamps on the PXScanner head should go off. 4. Release the emergency stop button by twisting. PX Scanner Version 4.3 Page 31 USER MANUAL MAINTENANCE 5. Open the front door of the electrical rack. 6. Switch off the system interface using the red rocker switch on the front. Wait 5s. Switch on the system interface again. 7. Switch off the X-ray generator using the red rocker switch on the front. Wait 5s. Switch on the generator again. 8. Close the front door of the electrical rack. 9. Close PX Scanner software and restart. 10. Record details of the test in the local radiation log, stipulating the date, person testing, outcome and signature.0. 6.4 Cleaning Water Filters Task Time: 2 hours When: Once a year or as required Tools: Large size spanner Container to catch water spillage Cleaning brush In order to clean the CCD coolant filter the CCD detector will need to be turned off for a period of time while the filter is opened. This will cause the CCD to warm up and therefore this procedure should not be carried out frequently, but only on a regular preventive maintenance visit or in the case of a coolant flow error on the CCD detector circuit. Procedure 1. Use CrystalEyes software to turn off the X-ray source power. Wait for the active source power to ramp down to zero. 2. Open the front door of the electronics rack. 3. Switch off the Water Cooler using the front panel mounted red switch (this will also stop the HV Generator and prevent X-rays from being generated). 4. The CCD detector will be turned off automatically by the previous step. 5. Open the left side of the electrical rack and locate the two water filters as shown in the figure below. 6. Using an appropriately sized spanner unscrew the brass nuts, one at a time, as indicated by arrows in the figure below. Be ready to catch water spillage. 7. From the inside remove the metal sieve and clean under running water or with a brush as necessary. 8. Replace the metal sieve in the correct orientation. 9. Replace the brass nut (and o-ring seal) and tighten with correct torque to seal against water leakage. 10. Start the Water Cooler and wait for a minute to observe that there are no water leaks. Repair if necessary. PX Scanner Version 4.3 Page 32 USER MANUAL MAINTENANCE 11. Observe the front panel of the Water Cooler to check that there are no error indications. 12. In the case of a level warning refill the reservoir according to the procedure below. 13. Close the left side of the electronics rack. 14. Wait about 60 minutes for the CCD detector to cool down. 15. Close and re-open the CrystalEyes software to ensure re-connection to the CCD detector Figure 5 Water filters 6.5 Refilling water reservoir The system includes a small water reservoir mounted either in the AirCooler or inside the left side of the electronics rack (for water-to-water cooling option). The software may report to the user a water level warning, and if no action is taken, later a water level error which will shut down the water cooler for the CCD detector. The front panel of the water chiller in the electrical rack will also show this warning with a flashing LED. In case of this warning or error the user is required to refill the reservoir. The procedure is as follows: 1. Water-to-water version: Open the left side panel of the electronics rack by turning the locks at the top and bottom using the same key used to open the protection cabinet doors. 2. Locate the reservoir tank which is towards the front side of the rack. 3. Open the filling port on the top of the reservoir (or on the top of the AirCooler). 4. Pre-mix a solution of 10% ethylene glycol – 90% distilled water. 5. If fitted, locate the viewing window on the side of the reservoir. 6. Pour the solution into the filling port until the level is visible in the viewing window. 7. If no viewing window is fitted then fill until just below the filling port. 8. Close the filling port. 9. Close the left side panel of the electronics rack. 10. If the water chiller of the CCD detector had shut down due to the level error, then open the front door of the electronics rack, switch off the water chiller using the front panel illuminated switch, wait 5s, and switch on again. 11. The system should then restart automatically. Observe that the level error LED is not illuminated on the front of the water chiller. 12. Close the front door of the electronics rack PX Scanner Version 4.3 Page 33 USER MANUAL TROUBLESHOOTING 7 Trouble Shooting Symptom Fault Solution Unit is not switched on System mains switch is off Open front door of electronics rack and switch on system mains with the red rocker switch on the top panel. Unit cannot be turned on from the front panel Mains power is not connected or circuit breaker is open Connect mains power at the rear of the unit. Ensure mains power is switched on. Open the right panel of the electronics rack and reset the circuit breaker switch inside. Computer is off Computer must be reset Open front door of electronics rack and press the red button at the front of the PC. Computer monitor display is off Monitor is switched off or video / power cable is disconnected Switch on monitor, plug in power to a socket and plug video cable into floor level socket on electronics rack at right-hand side. Computer keyboard and/or mouse do not operate Keyboard and/or mouse are disconnected Plug keyboard and/or mouse cables into USB floor level sockets on electronics rack at right-hand side. Computer software operating system fails Operating system software may require repair or update Repair or update via the external network connection. If access is required to a DVD drive then connect an external USB mounted drive (sockets on monitor). No movement of plate holder 1. System interface is switched off or requires a reset Open front door of electronics rack and switch on system interface using the red rocker switch. If this unit does not show green LEDs on the front panel then exit PX Scanner software, switch off system interface, wait 5s, turn on, and restart PX Scanner software. PX Scanner Version 4.3 Page 34 USER MANUAL TROUBLESHOOTING 2. Emergency stop button on front of system pressed Release the emergency stop button by twisting clockwise Exit PX Scanner software Power off system interface; wait 5 seconds and then power on. Restart PX Scanner software No movement of plate holder after System interface reset System interface not initialized properly Open PX Scanner software and log in as admin user. Click on hardware status icon in tool bar. Wait for window to open and blue Details button to appear next to Goniometer. Press that button to open the next window. Press the AutoSlit button to reinitialize the interface. Observe changes to the x y z numbers which indicate that the plate is being moved. Finally the indicator lamps on this window should all be green (H Sync, R Sync, etc) X-ray generator sounds intermittent alarm Loss of vacuum in optics housing – while generator HV is on. Note that vacuum is not pumped when HV is off. Check pump is running: open right side panel of electrical rack, locate pump near the top, and touch to feel vibrations from normal operation. Check power cable connection at the pump and at the rear of the Xray generator. Check vacuum line for leaks. Check all hose connections (at pump, at Xray source and at the rear of the Xray generator – where sensor is located) and repair. X-ray generator HV won’t switch on 1. Check the water cooler for the X-ray source is switched on. Switch on cooler unit at the front panel and wait for four LEDs on front panel to flash three times – unit is then ready. 2. Water leak Check connections and water pipes for leaks and repair PX Scanner Version 4.3 Page 35 USER MANUAL TROUBLESHOOTING 3. Emergency stop button on front of system pressed Release the emergency stop button by twisting clockwise Exit PX Scanner software Power off system interface; wait 5 seconds and then power on. Restart PX Scanner software 4. X-ray tube is too hot Look for temperature error LED on X-ray generator. Switch off generator and restart to reset the error. Contact Agilent Technologies Support before proceeding. 5. X-rays on signal lights defective on PXScanner head Check connection to X-ray generator rear panel (X3). Contact Agilent Technologies Support. Interlock Closed LED is not lit but intermittent alarm is not sounding Electronics rack door is open or Scanner head plate-loading door is open Close all doors. Close and restart PX Scanner software to activate plateloading door closing. HV is on but cannot set mA above zero kV setting is too small Set kV to at least 10 and then raise mA setting. kV or mA error LED lights when changing settings Setting is ramping quickly so that actual value lags behind requested After completing the ramping the error LED should go off. X-ray shutter will not open 1. Electronics rack doors are not closed properly Close doors properly 2. Shutter-open light defective Check light bulb connections and bulb. Contact Agilent Technologies Support. 3. Plate-loading door is open Use PX Scanner software to close the door. Restart software if needed. 4. System interface is off Switch on system interface (open front door of electronics rack to access) 5. X-ray generator is off Switch on generator (open front door of electronics rack to access) 6. Vacuum pump is off Check pump is connected. Pump starts automatically when HV is switched on. PX Scanner Version 4.3 Page 36 USER MANUAL DISPOSAL INSTRUCTIONS 8 Disposal Instructions 8.1 X-ray Tube and CCD Detector The X-ray tube and CCD detectors have beryllium windows. Dispose of Beryllium in accordance with local government regulations. PX Scanner Version 4.3 Page 37 USER MANUAL ADDITIONAL INFORMATION 9 Additional Information 9.1 Drawings Figure 6 PXScanner suggested layout PX Scanner Version 4.3 Page 38 USER MANUAL © Agilent Technologies, Inc. Printed in Poland, September 2013