1
TELink 1250i
Internet Downloadable
MP3 Music & Message Series
INSTALLATION AND OPERATION MANUAL
Quick install
instructions
on back cover
Please leave this manual with the unit at all times
Important warranty information enclosed
TELink 1250i
8/17/2004
This page intentionally left blank.
TELink 1250i
2
8/17/2004
TABLE OF CONTENTS
WHAT IS THE TELINK® 1250I?
TELink® 1250i and Messaging Provider Contact Information
4
5
SYSTEM OVERVIEW
Front Panel
Figure 1 - Front Panel Diagram
Connections Panel
Figure 2 - Side Panel Diagram
6
6
6
7
7
INSTALLATION
Step 1 – Connections
Figure 3 - Installation Diagram
Connection Instructions
Step 2 – Adjust Volume
8
8
8
9
9
PLAYBACK OPERATION
Continuous Play
Volume Adjustments
Connect On Demand
Stauts LED Indications
Table 1 – Status LED Indications
10
10
10
10
10
10
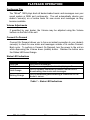
WALL MOUNTING INSTRUCTIONS
11
FLAT SURFACE INSTRUCTIONS
11
TECHNICAL SPECIFICATIONS
12
TROUBLESHOOTING
Table 2 – Troubleshooting
13
13
FCC NOTICE
14
COPYRIGHT NOTICE
14
LIMITED WARRANTY
15
INSTALLER/CUSTOMER QUICK INSTALL GUIDE
16
TELink 1250i
3
8/17/2004
WHAT IS THE TELINK® 1250I?
The TELink® 1250i is an Internet downloadable messaging system utilizing stateof-the-art MPEG-3 compression to achieve truly stunning, near-CD quality, audio
storage and playback. The 1250i is connected to the Internet through the user’s
high-speed Internet connection via a built-in 10/100 Ethernet jack. Configuration is
simple. Just assign it an available IP address with the Nel-Tech Labs
configuration software and you are ready to go! The 1250i has a Shuffle Play
option which allows multiple messages to play back in random order. This is a
great feature when utilized for a background music application. For longer
message applications such as in-store messaging and background music, the
1250i is available with message storage times of up to 68 hours.
All remote unit management and audio downloads are accomplished using your
standard PC and Nel-Tech’s DigiLAN™ controller software. When an update is
needed, the DigiLAN™ software opens its own dedicated “socket” using your highspeed Internet connection, locates the remote TELink® 1250i by IP address, and
digitally transfers the .mp3 audio files and configuration settings you specify.
The TELink® 1250i is the most versatile digital player of its kind with a list of
features that includes:
9
9
9
9
9
9
9
9
9
Base memory of 64 minutes @ 32Kbps
Storage for up to 1,000 total messages
Sample rates up to 320K bits-per-second (near CD quality)
Signal-to-noise ratio up to 96db
BGM Music input, fader & timer
Remote and on-site digital volume control
Flash memory
5-year parts and labor warranty
Manufactured in the USA
Each TELink® 1250i is built to exacting quality standards using state-of-the-art
SMT (surface mount) assembly for outstanding reliability and years of
dependable service.
To get the best possible performance from your TELink® 1250i, please take the
time to read this manual and fully familiarize yourself with how the TELink®
1250i works before you begin installation.
TELink 1250i
4
8/17/2004
Use the space below to record information about the TELink® 1250i and about
your messaging provider. You must have this information should you require
assistance installing or configuring the unit, and when you need new voice
messages or background music.
TELink® 1250i and Messaging Provider Contact Information
Dealer name:
Contact
person:
Phone:
Address:
Serial number:
(8 digits)
I __ __ __ __ __ __ __
MAC Address:
__ __ - __ __ - __ __ - __ __ - __ __ - __ __
IP Address:
(Static)
__ __ __ . __ __ __ . __ __ __ . __ __ __
TELink 1250i
5
8/17/2004
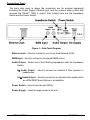
SYSTEM OVERVIEW
Front Panel
The Status LED, Volume adjustments, and BGM adjustments are located on the
front panel.
Figure 1 - Front Panel Diagram
Status LED – Lights to indicate the current operation status of the unit.
Volume Adjustments – Used to control the Volume locally, if permitted to do
so by your dealer. Also used in Connect On Demand situations (see
page 10).
BGM Adjustment – Used to control the BGM Volume locally, if permitted to
do so by your dealer.
TELink 1250i
6
8/17/2004
Connections Panel
The back side panel is where the connectors are for external equipment
including the Power Supply, Ethernet jack, and the external audio system that
receives the TELink® 1250i 's output. Also located here are the Impedance
Switch and the Power Switch.
Figure 2 - Side Panel Diagram
Ethernet Jack – Used to connect to your Local Area Network (LAN).
BGM Input – Used to connect to an external BGM source.
Audio Output – Select one of the following Impedances with the Impedance
Switch.
8Ω Audio Output – Used to connect an external 8 Ohm speaker or
headphones.
1KΩ Audio Output – Used to connect to an external audio system such
as a KSU/PBX Phone System or an amplifier.
Power Switch – Used to turn the unit Off/On.
Power Supply – Used to supply power to the unit.
TELink 1250i
7
8/17/2004
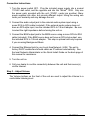
INSTALLATION
Step 1 – Connections
Locate the TELink® 1250i within 6 feet of an 110VAC outlet. The unit is designed
to be placed on a flat, level surface or securely mounted on a wall. Be sure to
leave clearance for connections and adjustments.
Important: Devices that emit strong electromagnetic fields such as computer
monitors and fluorescent lights may interfere with message loading, so locate
the unit at least a few feet away from such devices.
To help protect against power surges and other electrical problems, the use of a
quality surge suppressor strip (which is different from a standard multi-outlet
power strip) is strongly recommended. Damage caused by power surges,
lightning, or other electrical problems are not covered under warranty.
Figure 3 - Installation Diagram
TELink 1250i
8
8/17/2004
Connection Instructions
1. Turn the power switch OFF. Plug the included power supply into a normal
110VAC wall outlet, and the opposite end into the TELink® 1250i. Only use
the power pack provided with the unit (12VDC, center pin positive). Many
power supplies look alike, but provide different output. Using the wrong one
voids your warranty and may damage the unit.
2. Connect the audio output jack to the external audio system input using a
mono RCA-to-RCA cable (included). If the external audio system does not
have an RCA-style input, use the included RCA to 1/8 inch adapter. Be sure
to select the right impedance before turning the unit on.
3. Connect the BGM output jack to the BGM source using a mono RCA-to-RCA
cable (included). If the BGM source does not have an RCA-style output, use
the included RCA to 1/8 inch adapter. This step is optional and only required
if you are using Background Music.
4. Connect the Ethernet jack to your Local Area Network. (LAN) The unit is
factory DHCP enabled and should obtain an IP address automatically. See
the local Network Administrator or the Quick Install Guide on the back page of
this manual for assistance.
5. Turn the unit on.
6. Call your dealer to confirm connectivity between the unit and their server(s)
via the Internet.
Step 2 – Adjust Volume
The Volume buttons on the front of the unit are used to adjust the Volume to a
comfortable listening level.
TELink 1250i
9
8/17/2004
PLAYBACK OPERATION
Continuous Play
The TELink® 1250i plays back all dealer-loaded music and messages over your
sound system or MOH port continuously. The unit automatically checks your
dealer’s server(s) on a routine basis for new music and messages as they
become available.
Volume Adjustments
If permitted by your dealer, the Volume may be adjusted using the Volume
buttons on the front of the unit.
Connect On Demand
Connect On Demand allows you to force an instant connection to your dealer’s
server(s) to check for new music and messages outside of its routine ConnectBack cycle. To perform a Connect On Demand, turn the power to the unit on
while depressing the Volume down (middle) button. Release the button once
the Status LED turns Orange.
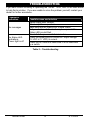
Status LED Indications
Indication
Solid Red
Solid Green
Solid Orange
Blinking Orange
Meaning
Unit has no messages.
Unit has messages loaded and is playing audio.
Unit is currently connected to dealer’s server and is
downloading new music and messages.
Unit is establishing/disconnecting a connection to the
dealer’s server.
Table 1 – Status LED Indications
TELink 1250i
10
8/17/2004
WALL MOUNTING INSTRUCTIONS
Using the included wall mount bracket and two screws, secure the unit onto the wall
where you wish to mount it.
Consider the weight of the TELink® 1250i when choosing a mounting wall. Make
sure the wall’s construction is sufficiently strong to support the weight of the unit
securely. Make sure both screws are driven into sturdy supports.
When mounting the unit, be sure that the front panel and Status LED is clearly
visible for you to see.
FLAT SURFACE INSTRUCTIONS
Place the unit on a sturdy table, away from any obstructions that may disrupt it.
The unit may be placed in any direction, however, be sure that the front panel and
Status LED is clearly visible for you to see.
TELink 1250i
11
8/17/2004
TECHNICAL SPECIFICATIONS
Encoding......................................MPEG-2 or MPEG-3 (.mp3)
Frequency response....................80Hz to 15 KHz (Depending on sample rate)
Bit Rate........................................80K to 320K bits per second
Sample Rate................................16KHz to 48KHz
Signal to noise .............................>90 dB
Memory type................................High-density, Non-volatile FLASH
Memory capacity .........................64 minutes @ 32 Kbps (Expandable to 68 hours)
Message capacity........................Up to 1,000 messages
Message loading .........................Internet (via DigiLAN™ software and PC)
Message playback.......................Continuous (linear) or shuffle mode
Power supply……………………..110VAC 60Hz to 12VDC @ 500 mA
BGM input....................................Mono RCA jack for low-impedance BGM source
Adjustable digital volume control
Audio output ................................Mono RCA jack
Adjustable digital volume control
Impedance – 6V p-p @ 8 Ohm or
12V p-p @ 1K Ohm
Size..............................................1.50" x 8.25" x 9.00" (H x W x D)
Color ............................................Black
Weight .........................................2 pounds (excluding power supply)
TELink 1250i
12
8/17/2004
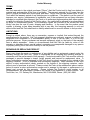
TROUBLESHOOTING
If you have trouble installing or operating the TELink® 1250i, refer to the table below
to help find a solution. If you are unable to solve the problem yourself, contact your
dealer for further assistance.
Problem or
Indication
No messages
No Status LED
Indications
Power light is off
Possible cause and solution
Adjust output level Volume.
Check amplifier or speakers.
Make sure that the Status LED is solid Green.
Call your dealer. A download may be required if the
Status LED is solid Red.
Check that the power switch is turned on.
Check the power pack for correct DC output voltage
(12 VDC to 17 VDC) & current.
Check the AC source to make sure it is not controlled
by a switch.
Table 2 – Troubleshooting
TELink 1250i
13
8/17/2004
FCC Notice
WARNING: This equipment has been tested and found to comply with the limits for a Class A
digital device pursuant to Part 15 of FCC Rules. These limits are designed to provide reasonable
protection against harmful interference when this equipment is operated in a commercial
environment. This equipment generates, uses, and can radiate radio frequency energy and, if not
installed and used in accordance with the instruction manual, may cause harmful interference to
radio communications. Operation of this equipment in a residential area is likely to cause harmful
interference in which case the user is required to correct the interference at his/her own expense.
This digital apparatus does not exceed the Class A limits for radio noise emissions from
digital apparatus set out in the Radio Interference Regulations of the Canadian Department of
Communications.
Le présent appareil numérique n'émet pas de bruits radioélectriques dépassant les limites
applicables aux appareils numériques de la Class A prescrites dans le Règlement sur le brouillage
radioélectrique édicté par le ministère des Communications du Canada.
Copyright Notice
The Nel-Tech Labs, Inc. TELink® product line is strictly used for Licensed Music only. Use of
copyrighted music is illegal and Nel-Tech Labs, Inc. takes no responsibility for that action. TELink®
1250i users are fully responsible for any music, mechanical, and recording rights.
This manual is copyright ©2004 Nel-Tech Labs, Inc. All rights reserved. No part of it may be
copied, photocopied, reproduced, translated, or reduced to any electronic medium or
machine-readable form without Nel-Tech's prior written consent.
Information contained herein is subject to change without prior notification. Nel-Tech Labs, Inc.
provides this manual without warranty of any kind, express or implied. This user's manual may
contain technical and/or typographical errors. TELink® is a registered trademark of Nel-Tech Labs,
Inc.
TELink 1250i
14
8/17/2004
Limited Warranty
TERMS:
Nel-Tech warrants to the original purchaser ("Buyer") that the Product sold is free from defects in
material and workmanship at the time of purchase. The warranty extends five (5) years from the
date of original purchase and covers parts and labor. Buyer must provide written notice to NelTech within the warranty period of any defective part or conditions. If the defect is not the result of
improper use, service, maintenance or installation, and if the equipment has not been otherwise
damaged or modified after shipment, Nel-Tech or its authorized representative shall either replace
or repair the defective Product at Nel-Tech's option. No credit shall be allowed for work performed
by Buyer or unauthorized parties. Out-of-warranty repairs are invoiced at the current Nel-Tech
hourly rate plus the cost of parts, shipping and handling. In the event that the product serial
number is missing or has been tampered with in any way, the foregoing warranty is void and
without effect and Nel-Tech shall have no liability whatsoever on account defects to such product.
LIMITATIONS:
Except as stated above, there are no warranties, express or implied, that extend beyond the
specifications for the product. Nel-Tech expressly disclaims any warranty, express or implied, that
equipment sold hereunder is of merchantable quality or that it can be used, or is fit for any
particular purpose. Buyer purchases and accepts equipment solely on the basis of the warranty
here in above expresses. Under no circumstances shall Nel-Tech be liable by virtue of this
warranty or otherwise for any special indirect, secondary or consequential damages to any person
or property arising out of the use or inability to use the product.
REPAIRING OR REPLACING PRODUCT:
Buyer may obtain the repair or replacement of any eligible part or equipment covered under this
warranty through Nel-Tech only. Buyer is responsible for all shipping and handling charges in
connection with the performance of this warranty. Products returned to Nel-Tech must be securely
packaged to prevent damage in transit, freight prepaid, and insured for replacement value. A
return authorization number assigned by Nel-Tech must be clearly marked on the outside of the
shipping container. Proof of purchase must accompany shipment. Items delivered to Nel-Tech
without a return authorization clearly marked on the outside of the shipping container, and/or
without proof of purchase is refused. Please contact Nel-Tech at the address and phone number
below to receive a return authorization number and to arrange for the repair or replacement of a
flawed part covered by this warranty. Please indicate the Product's serial number in all
correspondence. an authorization number is not issued in the absence of a serial number. NelTech Labs, Inc., 101 Zachary Rd., Manchester, NH 03109-5609, Phone: (603) 641-8844.
TELink 1250i
15
8/17/2004
INSTALLER/CUSTOMER QUICK INSTALL GUIDE
Step 1 : Unpack the contents of the TELink® 1250i package - You should have the following
items:
- TELink® 1250i
- Installer Utilities CD
- Power pack
- Network cable
- RCA to RCA cord
- RCA to 1/8” adapter
- Wall mount kit
- Manual and/or Quick Install Guide
Step 2: Connect the TELink® 1250i to power using the supplied power pack.
Step 3: Connect the TELink® 1250i to your network using the supplied network cable.
Step 4: Turn the unit ON.
Step 5: The TELink® 1250i has been factory-set for DHCP and should obtain an IP address
automatically.
Step 6: Turn the unit OFF.
Step 7: Wait 5 seconds.
Step 8: Turn the unit ON while pressing the VOLUME DOWN button.
Step 9: Release the button when the status LED turns ORANGE.
Step 10: Call your dealer to confirm that the unit has made a connection* to their server.
Step 11: Connect the RCA output to your music-on-hold port or PA system.
Step 12: Verify the status LED is green and audio is playing to your MOH port or your PA
speakers.
* You can also verify connection to the dealers/service provider’s server by using the
“Connection Tester” application that is included on the Installer Utilities CD.
IF YOU NEED TO SET A STATIC IP ADDRESS PLEASE READ BELOW
If you do not have a DHCP server, you will need to manually assign IP information to the
TELink® 1250i using the Configuration Utility on the Installer Utilities CD.
Replace Step 5 above with the following:
Step 5a - Place the Installer Utilities CD on a computer on the local network.
Step 5b - Select the Configuator Utility from the pop-up menu.
Step 5c - The utility will automatically search the network and find the TELink® 1250i.
Step 5d - You can now assign it an available static IP address.
Step 5d - If the utility can not find the TELink® 1250i, click MANUAL ENTRY and enter the MAC
address and IP information. The MAC address label can be found on the bottom of
the unit.
Step 5e - Press EXIT and continue with installation.
INSTALLATION OF THIS PRODUCT SHOULD BE DONE BY A QUALIFIED INSTALLER!
PLEASE CALL YOUR DEALER FOR SUPPORT ON THIS PRODUCT!
TELink 1250i
16
8/17/2004