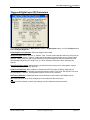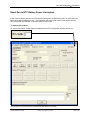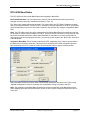
1
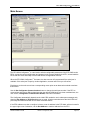
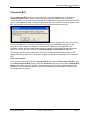
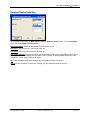
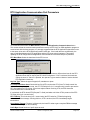
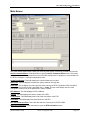
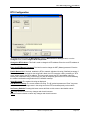
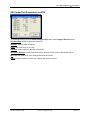
FERGUSON BEAUREGARD
RTU-5000 Configurator™
User Manual
RTU-5000 Configurator™– User Manual
FERGUSON BEAUREGARD
RTU-5000 Configurator™
User Manual
The Ferguson Beauregard RTU-5000 Configurator™ program and manuals are Copyright ©
1997-2004 by Ferguson Beauregard. All rights reserved. This program and manual are the
property of Ferguson Beauregard and are not intended for public distribution.
Ferguson Beauregard
2913 Specialty Drive
Tyler, TX 75707
Phone: (903) 561-4851
Fax: (903) 561-6567
Email: [email protected]
Printed: 8/12/2005 9:27 AM
Version 1.24 August 12, 2005
Page ii
RTU-5000 Configurator™– User Manual
Table of Contents:
Chapter 1 Overview _______________________________________________________1-2
System Summary________________________________________________________1-2
Who Will Use It?_________________________________________________________1-2
Document Organization: __________________________________________________1-2
Chapter 2 Procedures: ____________________________________________________2-3
RTU-5000 Configurator Installation __________________________________________2-4
Main Screen ____________________________________________________________2-5
Changing an RTU5000 RTC Battery _________________________________________2-7
Connect to RTU _________________________________________________________2-8
Program Code Flash _____________________________________________________2-9
Change RTU Address or KDT Password_____________________________________2-10
Chapter 3 Screen Reference: ______________________________________________3-11
About RTU-5000 Config__________________________________________________3-12
Analog Information Block _________________________________________________3-13
Comm Port Parameters on the RTU ________________________________________3-14
Configure SCI Ports _____________________________________________________3-15
Configuring the Auxiliary Board ____________________________________________3-16
Default Parm Data File Name Selection _____________________________________3-17
Digital Out (DO) Parameters ______________________________________________3-18
External Device Selection ________________________________________________3-19
RTU Application Communication Port Parameters _____________________________3-20
Main Screen ___________________________________________________________3-22
Menu Options__________________________________________________________3-25
Program RTU Code Flash ________________________________________________3-28
RTU Configuration ______________________________________________________3-29
RTU Information________________________________________________________3-30
SCI Comm Port Parameters on RTU ________________________________________3-32
Set PC Communications _________________________________________________3-33
Triggered Digital Input (DI) Parameters ______________________________________3-34
Chapter 4 Technical Reference: ____________________________________________4-35
Reset Due to RTC Battery Power Interruption _________________________________4-36
RTU-5000 Baud Rates___________________________________________________4-37
Chapter 5 Index _________________________________________________________5-38
Printed: 8/12/2005 9:27 AM
Version 1.24 August 12, 2005
Page 1-1
RTU-5000 Configurator™– User Manual
Chapter 1 Overview
This Ferguson Beauregard RTU-5000 Configurator ™ User Manual is designed to document and explain
the System Setup and Maintenance functions required for the proper operation of the RTU-5000
Configurator™ program.
System Summary
Ferguson Beauregard’s RTU-5000 Configurator ™ provides the capability to…
Ferguson Beauregard is a major manufacturer of plunger lift products and wellhead automation and
control systems. For additional information on the RTU-5000 Configurator ™ or other Ferguson
Beauregard products, contact Ferguson Beauregard, 2913 Specialty Drive, Tyler, Texas 75707.
Telephone: (903) 561-4851. Fax: 561-6567. E-Mail: [email protected]. Web:
www.fergusonbeauregard.com.
Who Will Use It?
The RTU-5000 Configurator™ Manual is designed to be used by the following people:
•
System Installer: Person responsible for initially installing the RTU-5000 Configurator ™ program on a
PC and setting up the initial communications.
•
System Manager: Customer person or persons responsible for setting up new RTU’s and making
other configuration changes to the RTU-5000 Configurator ™ Program.
•
Trouble Shooter: Ferguson Beauregard and/or Customer persons involved in troubleshooting
problems with the RTU-5000 Configurator ™ Program.
Document Organization:
•
Chapter 1 Overview: Provides an overview of this manual and the RTU-5000 Configurator ™.
•
Chapter 2 Procedures: Provides step-by-step instructions for performing a number of specific tasks.
These may be initial setup, normal operation, or ongoing maintenance tasks.
•
Chapter 3 Screen Reference: Provides alphabetical list of every screen, a sample copy of each
screen, instructions for accessing each screen, and a detailed list of all information and options
available on that screen. This chapter would be used to find out information about any screen or any
field on a screen.
•
Chapter 5 Technical Reference: Provides technical details on a number of specific topics. This
chapter would be used during initial setup and later troubleshooting.
Printed: 8/12/2005 9:27 AM
Version 1.24 August 12, 2005
Page 1-2
RTU-5000 Configurator™– User Manual
Chapter 2 Procedures:
The following are example procedures intended to help get a new user started on each of the described
operations. For more details, please refer to the detailed description of each form and report.
Printed: 8/12/2005 9:27 AM
Version 1.24 August 12, 2005
Page 2-3
RTU-5000 Configurator™– User Manual
RTU-5000 Configurator Installation
This section provides information you need before, during, and after installing Ferguson Beauregard
RTU-5000.
Resource Requirements
To run the Ferguson Beauregard RTU-5000 software, you need a PC or laptop running the Windows
operating system (Microsoft Windows 9X, or Microsoft Windows NT, or Windows 2000 Professional
operating system.) The PC or laptop should meet the minimum system requirements (CPU clock speed,
RAM, hard disk space, video, etc.) as outlined by the Windows operating system selected.
Go to http://www.micrsoft.com for a list of system requirements for each of the targeted Windows
operating systems.
Note: If a PC or laptop system is used that only has USB ports, a USB to serial port adapter will need to
be used to allow the USB port to support standard serial communications port operations and functions.
The USB to serial Port Adapter will come with its own set of Windows drivers that will need to be installed
for the operating system used.
Expected Ferguson Beauregard Install Program Behavior
The Ferguson Beauregard Install program uses Microsoft components to run Setup. If these files are not
on your computer (and Windows 98 installation, for example, does not include these files as part of a
typical install and thus will not be installed on a clean computer) Setup copies them and then restarts the
computer. After this restart, the user must re-run Setup to complete the installation of the Ferguson
Beauregard RTU-5000™ system.
Installation Overview
The SETUP.EXE program supplied on the Ferguson Beauregard RTU-5000™ CD-ROM installs Ferguson
Beauregard RTU-5000™.
Installation Procedure
To install Ferguson Beauregard RTU-5000™, follow these steps:
1. Insert the Ferguson Beauregard RTU-5000™ CD-ROM into the appropriate drive on your
computer.
2. Select “Run” from the “Start” menu of the Task Bar, and enter “D:SETUP.EXE” (assuming your
CD-ROM drive is your D drive; if not, substitute the correct drive letter.)
Uninstalling Ferguson Beauregard RTU-5000™
Follow these steps to completely remove and uninstall Ferguson Beauregard RTU-5000™ from your
Windows system:
1. From the “Control” panel, double click “Add/Remove Programs.”
2. Click the “Install/Uninstall” tab.
3. Highlight “Ferguson Beauregard RTU-5000™”
4. Click “Add/Remove.” This removes the RTU-5000™ program files and database file from your
computer. In most cases, the RTU-5000™ installation directory will not be removed.
5. Manually delete the RTU-5000™ installation directory if it exists.
Printed: 8/12/2005 9:27 AM
Version 1.24 August 12, 2005
Page 2-4
RTU-5000 Configurator™– User Manual
Main Screen
The RTU-5000 Configurator ™ is a tool used to edit the configurable parameters of the RTU-5000 series
RTUs, review the current configuration and program levels currently loaded in the RTU, set and read the
RTUs real time clock and finally to reload and execute an application code set.
When the RTU-5000 Configurator ™ first starts, the above screen is first presented if the serial port is
available. If the serial port is open by another application, a screen will inform you of that fact.
Each button on the main screen has a corresponding menu option as an alternative method to activate
that function.
Use the Set Configurator Communications button to change the serial port number. If the RTU to
communicate with uses a different baud rate than the default (9600 baud) or the last used baud rate, the
next section, Configurator Communication Details, has further information.
The Configurator automatically determines the initial CRC needed to use in subsequent messages only
when the Get Address or Read Clock buttons are used. All other controls assume the initial CRC has
previously been determined with one of these command buttons.
If the RTU address to review or configure is known, enter its address in the RTU Addr: edit box located in
the upper right corner. Otherwise, use the Get Address to read the address from the RTU.
Printed: 8/12/2005 9:27 AM
Version 1.24 August 12, 2005
Page 2-5
RTU-5000 Configurator™– User Manual
The Get Address button should only be used while directly connected to the RTU. If the computer is
connected to a radio, more than one RTU may reply, corrupting the response or providing the address of
an RTU other than the desired one.
Once the Configurator has the correct initial CRC value and the RTU address, the other buttons can be
used to retrieve the RTU Configuration data, read the RTUs clock, and set the RTUs LCD contrast.
These functions can be used without affecting the RTUs application program.
The Read Configuration button retrieves the current RTU configuration and enables the buttons in the
RTU Information and Configure RTU Components blocks. Since the Configurator is not connected to the
RTU, the program allows viewing the configuration but will not allow changing it.
The More RTU Information button displays a list of software components loaded on the RTU. Note that
unless the application code has executed at least once since the last code load was performed, the Code
flash and Host, Aux1 and Aux2 code information may be invalid.
The Read Clock button retrieves the current real time clock value and displays it in the RTU Clock Date
and Time fields.
The Set LCD Contrast button displays a screen allowing adjustment of the LCD screen contrast on the
RTU. See the following section for details.
The previous buttons can be used with affecting the operation of the RTU.
The Connect to RTU button stops the RTUs application program and put it in the Boot Loader mode of
operation. See the next section for details.
Printed: 8/12/2005 9:27 AM
Version 1.24 August 12, 2005
Page 2-6
RTU-5000 Configurator™– User Manual
Changing an RTU5000 RTC Battery
The RTU5000 Real Time Clock (RTC) battery will occasionally need to be replaced. Changing the battery
will destroy the trend data stored in the RTU. However, following this procedure preserves the trend data
contents in the RTU when changing the battery. This procedure should be followed whenever the battery
is changed.
The procedure requires reading trend and schematic information from the “Event Client” computer that
scans the RTUs and generates the system reports. A “Mobile Client” (laptop) cannot be used for this
procedure.
Read the schematic information from the RTU by pressing the “Receive” button.
1.
Backup up the RTU information by using the Maintenance/Backup RTU Settings menu
option.
2.
Read the most current trend data from the RTU by displaying the RTUs latest trend data and
pressing the “Receive” button.
3.
Power the RTU off, replace the battery and turn the RTU power back on.
4.
Reset the RTU with the host Maintenance/Reset RTU menu option, selecting the “Clear trend
data” option.
5.
Restore the data for the RTU by selecting the Maintenance/Restore RTU Settings menu
option.
6.
Send the restored data to the RTU by pressing the “Send” button.
7.
When three minutes has elapsed since reading the trend data from the RTU in step 3, read
the trend from the RTU again.
8.
After another three minute period has elapsed, read the trend data from the same RTU.
Printed: 8/12/2005 9:27 AM
Version 1.24 August 12, 2005
Page 2-7
RTU-5000 Configurator™– User Manual
Connect to RTU
Use the Connect to RTU button to Connect to the RTU, or use the Connect menu entry under the
Perform RTU Action menu. While it is connecting you can press this button again to cancel the
connection. When you click this button a message will be displayed telling you that connecting to the RTU
stops the RTU application without changing modes. Press Yes if you would like to connect anyway. Press
No if you would like to use the host to set the RTU in a required mode before continuing.
Connecting to the RTU also starts a timer in the RTU. The number of seconds in this timer is used by the
RTU as an escape timer. If the timer expires without receiving any valid FB/Net message from the
computer, the Boot Loader code attempts to restart the RTU application. If the application code
checksum is invalid, the Boot Loader restarts the timer. Likewise, a valid FB/Net message restarts the
timer. The value for this timer can be set in the Set Configurator Communications dialog box.
Connecting to the RTU will also retrieve the current RTU configuration and enables all buttons. This
updates all the setup fields in the “Configurator” program to match the current settings in the connected
RTU.
Disconnect from RTU
Once you are connected to the RTU the Connect to RTU button becomes Disconnect from RTU. Click
on the Disconnect from RTU button, or select the Disconnect menu entry from under the Perform RTU
Action menu to disconnect from the RTU. Disconnecting from an RTU will not explicitly start the RTU
application. The RTU starts the application, assuming the application code checksum is verified, when
the configuration timer expires.
Printed: 8/12/2005 9:27 AM
Version 1.24 August 12, 2005
Page 2-8
RTU-5000 Configurator™– User Manual
Program Code Flash
This screen is used to erase and reload the RTU application code. The following sequence is used to
perform this function.
1. Press the Erase Program button on the Program RTU Code Flash screen to erase the current
program. The current program must be erased before sending a new program.
2. Select a program from the list to send to the RTU.
3. Once the program is selected, press the Send Program button to send the program to the RTU.
Note: While the program is loading the Cancel Programming button becomes enabled and can be used
to cancel the programming.
While sending a new program to the RTU, there are several errors that can occur. If a communication
error occurs, you are given the option to retry sending the block of data or to cancel programming. If you
cancel programming, you will have to re-erase the code flash before attempting to reprogram the RTU.
Once the new program has been sent to the RTU, a message is displayed. You need to wait for
approximately ten seconds and then press the Read Configuration button to confirm the RTU code flash
checksum is valid. If so, the Start Application button is enabled.
Printed: 8/12/2005 9:27 AM
Version 1.24 August 12, 2005
Page 2-9
RTU-5000 Configurator™– User Manual
Change RTU Address or KDT Password
1. Press the Miscellaneous Settings button on the Main Screen. This will open the RTU
Configuration screen…
2. To change to RTU Address, enter the new address in the Change the RTU Address field.
3. To change the Master Password, enter the new password in the Enter KDT (Master) Password
field.
4. Press OK.
Printed: 8/12/2005 9:27 AM
Version 1.24 August 12, 2005
Page 2-10
RTU-5000 Configurator™– User Manual
Chapter 3 Screen Reference:
Printed: 8/12/2005 9:27 AM
Version 1.24 August 12, 2005
Page 3-11
RTU-5000 Configurator™– User Manual
About RTU-5000 Config
To access this screen, on the “Help” menu, select “About.”
This screen shows the version of the currently running copy of RTU-5000 Configurator.
OK: Press this button to close the “About RTU-5000 Configurator” screen.
Printed: 8/12/2005 9:27 AM
Version 1.24 August 12, 2005
Page 3-12
RTU-5000 Configurator™– User Manual
Analog Information Block
To access this screen from the Main Screen, press the Analog Inputs button, or on the Configure
menu, select Configure Analog IN. You can also access a similar screen from the Configuring the
Auxiliary Board screen, by pressing the A/D Converter Parm Set button.
Select Analog Information Block: Select an Analog Information Block from the list.
Logical Mapped To: Select the logical channel that the data will be mapped to. This is the same channel
the host computer expects the data to be in.
Physical Channel: Select a physical channel whose data will be mapped to the logical channel. This
matches the connectors on the RTU board.
Set Factory Defaults: Pressing this button returns all fields on this screen to their default values. Once
all settings have been changed, you can create a new or update an existing default file with the Save
Defaults As… menu option under the file menu.
OK: Press this button to save any changes you have made and close this screen.
Cancel: Press this button to cancel any changes you have made and close this screen.
Printed: 8/12/2005 9:27 AM
Version 1.24 August 12, 2005
Page 3-13
RTU-5000 Configurator™– User Manual
Comm Port Parameters on the RTU
To access this screen, press the “Comm Card Parm Set” button on the “Configuring the Auxiliary Board”
screen.
RTU Baud Rate: Select the baud rate the RTU uses to communicate with the external device. It is
strongly suggested that the RTU Application's baud rate be set to the same value as the RTU-5000
Configurator's baud rate. If the baud rates are set differently, the ease of switching between the RTU
application and the RTU boot code is hampered. This makes updating the RTU configuration and
application code somewhat involved and subject to problems.
Stop Bits: Select number of stop bits.
Parity: Select odd, even or no parity.
Data Bits: Select between 7 data bits or 8 data bits.
CTS Required Before Send: Check this box if the RTU requires the CTS (Clear To Send) control line
before transmitting data. In this case, the CTS TO Delay time (in 0.1 second units) is used to prevent the
RTU from waiting for CTS forever. If that time expires without receiving CTS, the RTU aborts the
communication to the external device.
If unchecked, the RTU raises RTS (Request To Send) and waits until either CTS is present of the RTS
TX Delay time (in 0.1 second units).
RTS TX Delay: This is the time (in 0.1 second units) the RTU waits for CTS before beginning
transmission of the message. If during this time, CTS is received, the RTU immediately begins
transmission.
Prefix Byte Count: Number of prefix bytes to send.
Prefix Byte (HEX): The prefix byte in hexadecimal.
Postfix Byte Count: Number of suffix (postfix) bytes to send.
Postfix Byte (HEX): The postfix byte in hexadecimal.
1st Hdr Byte (HEX): The first of optionally two header bytes that may be used by the RTU application.
2nd Hdr Byte (HEX): The second of two header bytes that may be used by the RTU application.
Set Factory Defaults: Pressing this button returns all fields on this screen to their default values. Once
all settings have been changed, you can create a new or update an existing default file with the Save
Defaults As… menu option under the file menu.
Ok: Press this button to save any changes you have made and close this screen.
Cancel: Press this button to cancel any changes you have made and close this screen.
Printed: 8/12/2005 9:27 AM
Version 1.24 August 12, 2005
Page 3-14
RTU-5000 Configurator™– User Manual
Configure SCI Ports
To access this screen from the Main Screen, press the SCI Port button.
SCI RS-485 Communication Port: Select the communications port.
Select Port Use: Select either Not Used or RS-485 Communications.
Comm Card Parm Set: If RS-485 Communications is selected, this button becomes enabled. Press
this button to open the SCI Comm Port Parameters on RTU screen.
Set Factory Defaults: Pressing this button returns all fields on this screen to their default values. Once
all settings have been changed, you can create a new or update an existing default file with the Save
Defaults As… menu option under the file menu.
OK: Press this button to save your changes and close this screen.
Cancel: Press this button to cancel you changes and close this screen.
Printed: 8/12/2005 9:27 AM
Version 1.24 August 12, 2005
Page 3-15
RTU-5000 Configurator™– User Manual
Configuring the Auxiliary Board
To access this screen from the Main Screen, press the Auxiliary Ports button.
Select a Port Number: Select the auxiliary port number.
Select a Peripheral Interface Card: Select a peripheral interface card. Select either communications
card, A to D Converter, or none.
Comm Card Parm Set: Press this button to open the “Comm Port Parameters on the RTU” screen. This
button is only available if “Communications Card” is selected as the peripheral interface card.
A/D Converter Parm Set: Press this button to open the “Analog Information Block” screen. This button is
only available if “A to D Converter” is selected as the peripheral interface card.
Set Factory Defaults: Pressing this button returns all fields on this screen to their default values. Once
all settings have been changed, you can create a new or update an existing default file with the Save
Defaults As… menu option under the file menu.
OK: Press this button to save your changes and close the “Configuring the Auxiliary Board” screen
Cancel: Press this button to cancel any changes and close the “Configuring the Auxiliary Board” screen.
Printed: 8/12/2005 9:27 AM
Version 1.24 August 12, 2005
Page 3-16
RTU-5000 Configurator™– User Manual
Default Parm Data File Name Selection
On the File menu, select Load Defaults File, to access this screen.
This screen is also opened when you press the Set Factory Default button on any page.
Ok: Press this button to save your changes and close this screen.
Cancel: Press this button to cancel your changes and close this screen.
Printed: 8/12/2005 9:27 AM
Version 1.24 August 12, 2005
Page 3-17
RTU-5000 Configurator™– User Manual
Digital Out (DO) Parameters
To access this screen from the Main Screen, press the Digital Outputs button, or on the Configure
menu, select Configure Digital OUT.
Select Digital Out Port Number: Select the digital out port number.
Select Port Current: Select high or low port current.
Select Port Pulsing: Select Pulsed or non-Pulsed output. High current requires pulsed output.
Set Factory Defaults: Pressing this button returns all fields on this screen to their default values. Once
all settings have been changed, you can create a new or update an existing default file with the Save
Defaults As… menu option under the file menu.
OK: Press this button to save any changes you have made and close this screen.
Cancel: Press this button to cancel any changes you have made and close this screen.
Printed: 8/12/2005 9:27 AM
Version 1.24 August 12, 2005
Page 3-18
RTU-5000 Configurator™– User Manual
External Device Selection
To access this screen from the Main Screen, press the External Devices button, or on the Configure
menu, select Configure External Devices.
MotherBoard(SCI): Select the MotherBoard from the list to the left.
Aux Port 1: Select Aux Port 1 from the list to the left.
Aux Port 2: Select Aux Port 2 from the list to the left.
Set Factory Defaults: Pressing this button returns all fields on this screen to their default values. Once
all settings have been changed, you can create a new or update an existing default file with the Save
Defaults As… menu option under the file menu.
OK: Press this button to save any changes you have made and close this screen.
Cancel: Press this button to cancel any changes you have made and close this screen.
Printed: 8/12/2005 9:27 AM
Version 1.24 August 12, 2005
Page 3-19
RTU-5000 Configurator™– User Manual
RTU Application Communication Port Parameters
To access this screen from the Main Screen, press the RTU Application Communications button.
This screen selects the communication parameters used by the RTU ACP or CBM application program to
communicate with the host computer. It is strongly suggested that the RTU Application’s baud rate be set
to the same value as the RTU-5000 Configurator’s baud rate. If the baud rates are set differently, the
ease of switching between the RTU application and the RTU boot code is hampered. This makes
updating the RTU configuration and application code somewhat involved and subject to problems.
RTU Baud Rate: Select the baud rate for the RTU to use.
This warning message is displayed when the operator selects a different baud rate for the RTU
application than what is used by the RTU-5000 Configurator. If “OK” is selected, the baud rate
change is saved. If “Cancel” is pressed, the operator is given another chance to set the desired
RTU application baud rate.
Key Pad Type: Select the type of keypad; off, membrane or piezo.
CTS Required Before Send: Check this box if the RTU requires the CTS (Clear To Send) control line
before transmitting data. In this case, the CTS TO Delay time (in 0.1 second units) is used to prevent the
RTU from waiting for CTS forever. If that time expires without receiving CTS, the RTU aborts the
communication to the external device.
If unchecked, the RTU raises RTS (Request To Send) and waits until either CTS is present of the RTS
TX Delay time (in 0.1 second units).
RTS TX Delay: This is the time (in 0.1 second units) the RTU waits for CTS before beginning
transmission of the message. If during this time, CTS is received, the RTU immediately begins
transmission.
Host Header Timeout: The time, in 20ms units, the host PIC waits to get a complete FB/Net message
header before timing it out and restarting.
Prefix Byte Count: Number of prefix bytes to send.
Printed: 8/12/2005 9:27 AM
Version 1.24 August 12, 2005
Page 3-20
RTU-5000 Configurator™– User Manual
Prefix Byte (HEX): The prefix byte in hexadecimal.
Postfix Byte Count: Number of suffix (postfix) bytes to send.
Postfix Byte (HEX): The postfix byte in hexadecimal.
1st Hdr Byte (HEX): The first of optionally two header bytes that may be used by the RTU application.
2nd Hdr Byte (HEX): The second of two header bytes that may be used by the RTU application.
Set Factory Defaults: Pressing this button returns all fields on this screen to their default values. Once
all settings have been changed, you can create a new or update an existing default file with the Save
Defaults As… menu option under the file menu.
OK: Press this button to save any changes you have made and close this screen.
Cancel: Press this button to cancel any changes you have made and close this screen.
Printed: 8/12/2005 9:27 AM
Version 1.24 August 12, 2005
Page 3-21
RTU-5000 Configurator™– User Manual
Main Screen
This is the initial program screen. When you close any other screen, it will bring you back to this screen.
Set PC Communications: Press this button to open the Set PC Communications screen. This screen
selects the communication parameters for the RTU-5000 Configurator PC program to communicate with
the RTU to configure or changes its application code.
Comm Port Number: This field displays the communications port number.
Baud Rate: This field displays the baud rate, parity, data bits, and stop bits.
Initial CRC: This is display only and is the initial value used by the RTU’s Application CRC calculation.
Currently, Auto-Cycle Plus uses 0 and CBM uses -1. (Note: The boot code always uses 0, but the
Configurator must try both to the application in case it is CBM).
RTU Address: This field displays the RTU address.
Version: This field displays the version number of the RTU.
CodeChkSum: This field displays the Code Flash Check Sum of the RTU.
Serial/Num: This field displays the Serial Number of the RTU.
RTU Clock Date and Time: This is the date and time currently set in the RTU-5000.
More RTU Information: Press this button to open the RTU Information screen.
Printed: 8/12/2005 9:27 AM
Version 1.24 August 12, 2005
Page 3-22
RTU-5000 Configurator™– User Manual
Structure Last Updated: This field displays the date and time the structure was last updated.
As Indicated at RTU: When this check box is “Checked”, the Configurator program is showing that the
RTU has the “Request” to perform a “Factory Clear.”
Request: When this box is “Checked”. The Configurator program is requesting that the RTU perform a
“Factory Clear” operation.
Set / Reset: Pressing the button sets or clears the Request check box described above.
Perform RTU Action:
Get Address: Press this button to get the RTU Address from the RTU.
Read Configuration: Press this button to get the Version Number, Serial Number,
CodeChkSum, and the Last Update from the RTU. This will update all of the setup fields in the
“Configurator” program to match the current settings in the currently connected RTU.
Read Clock: Pressing this button causes the program to request the clock time from the RTU5000 and display in on the screen in the field labeled RTU Clock Date and Time.
Set LCD Contrast: Pressing this button displays a screen allowing you to adjust the RTU LCD
contrast.
Connect to RTU: Press this button to connect to the RTU. While it is connecting you can press
this button again to cancel the connection. Once you are connected to the RTU this button
becomes Disconnect from RTU.
Update Configuration: Pressing this button will cause the Configurator program to send the
current “Configuration” to the RTU.
Set Clock: Press this button to set the current time in the RTU.
Program Code Flash: Press this button to open the Program RTU Code Flash screen. This
screen is used to send a program to the RTU or erase to program from the RTU. The current
program must be erased before sending a new program.
Start Applications: Press this button to start the RTU application.
Configure RTU Components:
RTU Application Communications: Press this button to open the RTU Application
Communication Port Parameters screen. This screen selects the communication parameters
used by the RTU ACP or CBM application program to communicate wit the host computer.
Digital Outputs: Press this button to open the Digital Out (DO) Parameters screen.
Digital Inputs: Press this button to open the Digital In (DI) Parameters screen.
Analog Inputs: Press this button to open the Analog Information Block screen.
SCI Port: Press this button to open the Configure SCI Port screen.
Auxiliary Ports: Press this button to open the Configuring the Auxiliary Board screen.
External Devices: Press this button to open the External Device Selection screen.
Miscellaneous Settings: Press the button to open the RTU Configuration screen.
Configuration Data Default File:
File Name and Description: This field will display the file name and description of the currently
selected default configuration file. There will probably be one of these distributed for each
distributed application and could also be others created for specific user requirements or
installations.
Printed: 8/12/2005 9:27 AM
Version 1.24 August 12, 2005
Page 3-23
RTU-5000 Configurator™– User Manual
Set Defaults in All Structures: Pressing this button will set the default values in all of the
configuration data structures in the Configurator program.
Returned Byte Count: This field shows the number of bytes in the most recent message from the RTU.
Note: To the left of this field on the top is the “Hex” message sent to the RTU and below is the “Hex”
message received from the RTU.
Exit: Press this button to close the RTU-5000 Configurator ™ Program.
Printed: 8/12/2005 9:27 AM
Version 1.24 August 12, 2005
Page 3-24
RTU-5000 Configurator™– User Manual
Menu Options
The following options are available on the “File” menu:
Load Defaults File: Select this option to open the “Default Parm Data File Name Selection” screen.
Save Default File As: Select this option to open the “Save Default File” screen. This allows you to save
the current RTU configuration under a new name.
Exit: Select this option to close the program.
The following options are available on the “Configure” menu:
Set Configurator Communications: Press this button to open the Configuator Communications
Details screen.
Factory Clear Set/Reset: Choosing this option sets or clears the Request check box on the Main
Screen.
Configure Host Communication: Press this button to open the Host Comm Port Parameters on RTU
screen.
Configure Digital Out: Press this button to open the Digital Out (DO) Parameters screen.
Configure Digital In: Press this button to open the Triggered Digital Input (DI) Parameters screen.
Configure Analog In: Press this button to open the Analog Information Block screen.
Configure External Devices: Press this button to open the External Device Selection screen.
Configure RTU Components: Press this button to open the RTU Configuration screen.
Display Additional RTU Info: Press this button to open the RTU Information screen
Printed: 8/12/2005 9:27 AM
Version 1.24 August 12, 2005
Page 3-25
RTU-5000 Configurator™– User Manual
Set All Defaults: Choosing this option will set the “Default” values in all of the configuration data
structures in the Configurator program.
Show FB/Net Communication: Makes the Sent, Reply and Returned Byte Count fields at the bottom
of the screen visible. This is the default.
Hide FB/Net Communication: Hides the Sent, Reply and Returned Byte Count fields at the bottom of
the screen.
Exit: Press this button to exit the RTU-5000 Configurator Program.
The following options are available on the “Perform RTU Action” menu:
Get Address: Choose this option to get the RTU Address from the RTU.
Read Configuration: Choose this option to get the Version Number, Serial Number, CodeChkSum, and
the Last Update from the RTU. This will update all of the setup fields in the Configurator program to
match the current settings in the currently connected RTU.
Update Configuration: Choosing this option will cause the Configurator program to send the current
Configuration to the RTU.
Connect: Choose this option to connect to the RTU. While it is connecting you can choose this option
again to cancel the connection. Once you are connected to the RTU this option becomes Disconnect,
and can be used to disconnect from the RTU.
Set LCD Contrast: Choose this option to display the Set LCD Contrast screen.
Get Time: Choose this option to read and display the RTUs real time clock.
Set Clock: Choose this option to set the current time in the RTU.
Program Code Flash: Choose this option to open the Program RTU Code Flash screen. This screen is
used to send a program to the RTU or erase to program from the RTU. The current program must be
erased before sending a new program.
Start Application: Choose this option to start the RTU application.
The following options are available on the “Help” menu:
Printed: 8/12/2005 9:27 AM
Version 1.24 August 12, 2005
Page 3-26
RTU-5000 Configurator™– User Manual
About: Select this option to open the “About RTU-5000 Config” screen. This screen shows the version of
the currently running copy of RTU-5000 Configurator.
Printed: 8/12/2005 9:27 AM
Version 1.24 August 12, 2005
Page 3-27
RTU-5000 Configurator™– User Manual
Program RTU Code Flash
To access this screen from the Main Screen, press the Program Code Flash button, or on the Perform
RTU Action menu, select Program Code Flash.
Erase Program: Press this button to erase the current RTU program. The current program must be
erased before sending a new one.
Send Program: Once you have selected a program from the list, press this button to send it to the RTU.
Cancel Programming: While you are sending a program to the RTU, you can press this button to cancel
programming.
OK: Press this button to close this screen.
Printed: 8/12/2005 9:27 AM
Version 1.24 August 12, 2005
Page 3-28
RTU-5000 Configurator™– User Manual
RTU Configuration
To access this screen from the Main Screen, press the Miscellaneous Settings button, or on the
Configure menu, select Configure RTU Components.
Change the RTU Address: This field is used to change the RTU address. Enter the new RTU address in
the text box.
Enter the KDT(Master) Password: This field is used to change the KDT (Master) password. Enter the
new password in the text box.
Enable Modem Init: If checked, enables the RTU to transmit a Modem init string (if defined) at startup. If
Enable Modem Init is checked but the string field is blank, the RTU transmits a string consisting of “RTU
xxxxx” where xxxxx is the RTUs address. The host cannot prevent the RTU boot loader code from
sending this initialization string, so this is the only way to completely prevent the RTU from broadcasting
the modem initialization string and/or the RTU address at startup.
String Displayed: The modem init string as displayed.
Edit Modem Init String: The current modem init string. The ‘¶’ symbol represents an “Enter” key press
and is translated to a carriage return in the string sent to the RTU and subsequently to the modem.
Set Factory Defaults: Pressing this button returns all fields on this screen to their default values.
Ok: Press this button to save any changes and close this screen.
Cancel: Press this button to cancel any changes and close this screen.
Printed: 8/12/2005 9:27 AM
Version 1.24 August 12, 2005
Page 3-29
RTU-5000 Configurator™– User Manual
RTU Information
To access this screen from the Main Screen, press the More RTU Information button, or on the
Configure menu, select Display Additional RTU Info.
Code Flash:
Checksum: This field displays the Code Flash Checksum.
Code Date: This field displays the date the Code Flash was last compiled or updated.
Boot Flash:
Checksum: This field displays the Boot Flash Checksum.
Code Date: This field displays the date the Boot Flash was last compiled or updated.
Host:
PIC Version: This field displays the Host PIC Version.
PIC Code Date: This field displays the date the Host PIC Code was last compiled or updated.
Aux Port 1:
PIC Version: This field displays the Auxiliary Port 1 PIC Version.
PIC Code Date: This field displays the date the Auxiliary Port 1 PIC Code was last compiled or updated.
Aux Port 2:
PIC Version: This field displays the Auxiliary Port 2 PIC Version.
PIC Code Date: This field displays the date the Auxiliary Port 2 PIC Code was last compiled or updated.
Printed: 8/12/2005 9:27 AM
Version 1.24 August 12, 2005
Page 3-30
RTU-5000 Configurator™– User Manual
RTC Battery OK: This field tells if the internal Real Time clock battery is good.
Close: Press this button to close the RTU Information screen.
Printed: 8/12/2005 9:27 AM
Version 1.24 August 12, 2005
Page 3-31
RTU-5000 Configurator™– User Manual
SCI Comm Port Parameters on RTU
To access this screen, press the Comm Card Parm Set button on the Configure SCI Port screen.
RTU Baud Rate: Select the baud rate of the RTU.
Stop Bits: Select number of stop bits.
Parity: Select odd, even or no parity.
Data Bits: Select between 7 data bits or 8 data bits.
Set Factory Defaults: Pressing this button returns all fields on this screen to their default values.
OK: Press this button to save any changes and close this screen.
Cancel: Press this button to cancel any changes and close this screen.
Printed: 8/12/2005 9:27 AM
Version 1.24 August 12, 2005
Page 3-32
RTU-5000 Configurator™– User Manual
Set PC Communications
To access this screen press the “Set PC Communications” button on the “Main Screen”.
This screen selects the communication parameters for the RTU-5000 Configurator PC program to
communicate with the RTU to configure or changes it’s application code.
Port Number: Select the communications port number.
Baud Rate: Select the baud rate. The baud rate selected here controls the speed the Configurator uses
to communicate with the RTU application and boot code.
Configuration Time: Number of seconds the RTU will wait before automatically restarting the
application.
Set Factory Defaults: Pressing this button returns all fields on this screen to their default values.
OK: Press this button to save your changes and close this screen.
Cancel: Press this button to cancel you changes and close this screen.
Printed: 8/12/2005 9:27 AM
Version 1.24 August 12, 2005
Page 3-33
RTU-5000 Configurator™– User Manual
Triggered Digital Input (DI) Parameters
To access this screen from the Main Screen, press the Digital Inputs button, or on the Configure menu,
select Configure Digital IN.
Select Digital In Port Number: Select the digital in port number.
Select Port Input: Select “Normal” or “Capture” input. “Normal” means that the static level of the port pin
is reported once a second. “Capture” means that the processor is interrupted to report a “Rising” edge
high or a “Falling” edge low and will not detect the next directed edge low and will not detect the next
directed edge change until the “Hold Time” of 1 times 100ms thru 655 times 100ms (65.5sec) has
expired.
Select Port Edge Capture: Select whether you would like the processor to be interrupted to report a
“Rising” edge high or a “Falling” edge low.
Input Level Hold Time: When “Capture” is selected, the RTU will report a “Rising” edge high or a
“Falling” edge low and will not detect the next edge change until the “Hold Time” has expired. This value
can be between 1 and 655. This represents times of 100 ms to 65.5 seconds.
Set Factory Defaults: Pressing this button returns all fields on this screen to their default values.
OK: Press this button to save any changes you have made and close this screen.
Cancel: Press this button to cancel any changes you have made and close this screen.
Printed: 8/12/2005 9:27 AM
Version 1.24 August 12, 2005
Page 3-34
RTU-5000 Configurator™– User Manual
Chapter 4 Technical Reference:
This section will provide technical details to be used to help trouble shoot problems in the setup or
operation of the RTU-5000 Configurator Program.
Printed: 8/12/2005 9:27 AM
Version 1.24 August 12, 2005
Page 4-35
RTU-5000 Configurator™– User Manual
Reset Due to RTC Battery Power Interruption
In the event the battery power on the FB8 board is interrupted, the board may reset. In some cases the
board will change its address to zero. If this happens, the configurator cannot communicate with the
RTU, except the “Get Address” command, which will return zero.
To Resolve this Conflict:
To resolve this conflict, simply change the address in the RTU Configurator address edit box to 1.
This will allow you to connect and communicate with the RTU normally.
Printed: 8/12/2005 9:27 AM
Version 1.24 August 12, 2005
Page 4-36
RTU-5000 Configurator™– User Manual
RTU-5000 Baud Rates
The RTU-5000 has a Boot Code Baud Rate and an Application Baud Rate.
Boot Code Baud Rate: This is a feature that is “burned” into the board at the factory and can’t be
changed except by returning to manufacturing facility in Tyler, TX.
The “Boot Code” always talks at this baud rate. This means that in the RTU-5000 Configurator program
after you have performed the “Connect to RTU” operation to stop the application in the RTU, you must be
set to this baud rate to talk to the “Boot Code” to perform any operation like setting the “Application Baud
Rate”
Note: The RTU-5000 module should be ordered with a Boot Code Baud Rate that matches the rate that
will be used for remote communications to this RTU. If this RTU will be connected to a cell phone at 1200
baud, then the board should have a Boot Code Baud Rate of 1200 baud. If you lose communications
while trying to upload a new program remotely, you will only be able to talk to the “Boot Code” at the Boot
Code Baud Rate.
Application Baud Rate: This is the baud rate that the RTU “Application Code” uses to communicate to
the Radio and to the direct connection. This baud rate is set with the RTU-5000 Configurator program.
After connecting to the RTU, press the “Host Communications” button to get the following screen.
Select the desired baud rate and any other communication parameters and select “OK” Then use the
“Upgrade Configuration” button to cause this new configuration setting to be sent to the RTU.
Note: The Application Code Baud Rate should be set the same as the Boot Code Baud Rate so that
when swapping back and forth between them you don’t have to quickly change the baud rate of the PC
comm port.
Printed: 8/12/2005 9:27 AM
Version 1.24 August 12, 2005
Page 4-37
RTU-5000 Configurator™– User Manual
Chapter 5 Index
Analog Information Block, 3-12, 3-16, 3-24
CodeChkSum, 3-21, 3-22, 3-25
Comm Port Parameters, 3-13, 3-15, 3-16, 3-20, 3-22,
3-24, 3-30
Communications Details, 3-14, 3-21, 3-24
Configure SCI Ports, 3-15
Configuring the Auxiliary Board, 3-12, 3-13, 3-16, 3-22
Connect to RTU, 2-5, 2-7, 3-22
Digital Inputs, 3-22, 3-31
Digital Outputs, 3-18, 3-22
External Device Selection, 3-19, 3-22, 3-24
Installation, 2-4
KDT Password, 2-9
Printed: 8/12/2005 9:27 AM
Main Screen, 2-9, 3-12, 3-14, 3-15, 3-16, 3-18, 3-19,
3-20, 3-21, 3-24, 3-26, 3-27, 3-28, 3-31
Manual, i, ii, 1-2
Menu Options, 3-24
Overview, 1-2, 2-4
Procedures, 1-2, 2-3
Program Code Flash, 2-8, 3-22, 3-25, 3-26
RTU Address, 2-9, 3-21, 3-22, 3-25, 3-27
RTU Configuration, 2-9, 3-22, 3-24, 3-27
RTU Information, 3-21, 3-24, 3-28, 3-29
System Installer, 1-2
System Manager, i, 1-2
Technical Reference, 1-2, 4-32
Trouble Shooter, 1-2
Version 1.24 August 12, 2005
Page 5-38