1
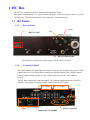
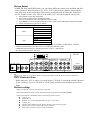
DynaScan
ISC User Manual
Edition 2
1
2
Table of Contents
ISC Box.............................................................................................................................................3
1.1
ISC Panels .............................................................................................................................3
ISC Menu Operation .........................................................................................................................5
2.1
Select the Screen to Change..................................................................................................6
2.2
Menu Setting .........................................................................................................................6
2.3
Video Input function ...........................................................................................................10
1 ISC Box
The ISC box contains two Panels, System and Connection Panels.
The System control Panel is for you to connect the power cable and setup the timer for preset
ON/OFF time. The connection Panel is for connection of external devices.
1.1 ISC Panels
1.1.1
System Panel
Timer
RS-232 of ISC
Fans
RS-232 of DVI Board
The function of each device on the system control panel is as above.
1.1.2
Connection Panel
The panel contains AV signal input and output connectors, the Sound control panel, LVDS
output connectors. The Sound Panel contains two Speaker output (L/R), Volume control,
External enable switch, and line in. The LVDS connectors provide video output to
Display.
The ISC Box contains the connection panel. The external multimedia device with DVI
interface, for example a computer, can be connected to the DVI input.
DVI input
DC 5V Output
Sound Control Panel
Built-in ISC for DS0808
LVDS Connectors
DVI input
DC 5V Output
Sound Control Panel
LVDS Connectors
Built-in ISC for DS0706
DVI input
DC 5V Output
Sound Control Panel
External ISC for DS0706、DS0716、DS3522
1.1.3
AV Signal Input & Output
The Connection Panel showing as following provides singles input and output.
DVI In
Y.Pb.Pr.
Video In
PC Audio Video
Audio Out (L/R)
Out
In
Audio In
S-Video In
Component
Audio In L/R
Component
Y.Cb.Cr/Y.Pb.Pr.
VGA In
2
C
1
Y.Cb.Cr.
Note. Composite Video and S-Video In share the Composite Audio in.
C
2 ISC Menu Operation
ISC Remote Control
Power ON/OFF
Display the Video info
Source and Mode
Mute
(Save Settings)
Main Menu
ON/OFF
Cursor: Up
Sound: Volume down
Cursor: Left
Sound: Volume Up
Cursor: Right
Enter: enter to setup or
go back
Source: Change the source of
the current screen
Digit Key
To select a TV
Channel
Switch two sources
Single / PIP Mode Switch
Adjust the PIP
screen’s size
+: Enlarge
-: Shrink
Display Modes Switch:
PBP, POP, WPOP, Single
Note. Functions of other buttons not described here are reserved or unused.
2.1 Select the Screen to Change
To adjust the setting of the ISC, you need to use the remote control to select your target
window to change first.
Please follow the instruction,
z First, in the PBP mode (default mode), twin views, you need to press the MENU
button to open the Setting Menu
z Second, use cursors left or right to select the Display mode
z Third, Use cursor Down (CH─) move the light bar to “Menu Select”
z Fourth, Press Enter to activate (Light bar becomes brown) and use LEFT (VOL─)
and RIGHT (VOL+) to change the setting. There are two screen to choose, “Main
or Sub”
z Fifth, press enter to go back (Light bar becomes blue)
As for other setting, the way is the same. Use cursors to move the light bar. Press Enter
to activate setting or go back. Use left or right to change.
To save, press the PWR buttons to power off the ISC and the setting you made will be
saved
Finally, press the PWR buttons to power on the ISC. You will find the setting saved as
previous actions.
Note. For Tuner Inputs, you can’t switch the two screens by swapping.
2.2 Menu Setting
Video and Audio adjustment
Steps
1.
2.
3.
4.
5.
Press “Menu” to open the setup menu
Press cursor UP (CH+) and Down (CH─) to move the light bar
Press ENTER to activate the setting
Press cursor LEFT (VOL─) and RIGHT (VOL+) to change setting
Press ENTER to go back
Note. You can set different image settings (Brightness and Contrast) for each source, but the color setting
change will be applied on every source.
Menu items
Mode
Instruction
Brightness
Image
Contrast
Audio
Volume
R
Color
Press Right (Vol+) to increase, and left (Vol-) to decrease the value
G
B
Note. For the best image quality, please don’t adjust the sharpness.
Display mode adjustment
1. Single
Display
Mode
2. PBP
3. PIP
4. POP
5. WPOP
Steps
To change the Display mode of the selected screen, you can press POP button on the
remote control to switch between four modes, PBP, POP, WPOP, Single, or change it
according to the instruction as below. If you want to switch to PIP mode, just press the PIP
button.
1.
2.
3.
4.
5.
Press “Menu” button to open main menu
Use right cursor to move to Display mode
Press Enter to activate the setting (Light bar becomes brown)
Press Cursor Left or Right to change mode.
Press Enter to go back
1
2
3
4
5
PIP Adjustment
You can adjust the Small screen’s size and position by using the remote control.
To adjust size, you need to switch to the small screen and press the button(+)(-) to
enlarge or shrink the screen.
To change the position,
1. You need to press Menu
2. Switch to Display mode
3. Move to the PIP H Position (Horizontal) or PIP V Position (Vertical) and press
Enter
4. Press Cursor Right and Left to move the position
Aspect Ratio
You can change the screen aspect ratio by pressing the WIDE button on the remote
control. There are four modes to choose, Full for full Screen, 16:9 for 16:9 screen ratio,
4:3 for 4:3 screen ratio and Native for the DS0706L screen ratio. If you use PC with AP3
to be the source, you need to choose Full to get the best quality. As for other sources, you
need to choose Native. Native is the default Setting for DynaScan. display.
Source Select
In PBP, PIP, POP, and WPOP mode, you can choose different sources to be the Main and Sub
source. However, only four sources, PC, DVI, Y.Cb.Cr and Y.Pb.Pr cannot be showed at the
same time. You need to select those four sources to collocate with S-Video1&2, Video1&2
and TV. In other words, VGA, DVI, Y.Pb.Pr, and Y.Cb.Cr. can’t be displayed side by side.
1.
2.
3.
4.
5.
Press Menu to open the setup menu
Press Cursor right to select the Display mode
Press Cursor down to move the light bar to Main or Sub
Press Enter to activate (Light bar becomes brown) and use left and right to change the setting.
There are nine sources for you to choose
Source List
VGA
DVI
Main
S-Video1
S-Viideo2
Video1
Video2
Y.Pb.Pr
Sub
Y.Cb.Cr
CATV
Or you can change the selected Screen’s source by press TV, VIDEO, COMP, and PC to switch.
VIDEO=Switch within four video sources, S-Video1&2 and Video 1&2
COMP=Switch between two component sources, Y.Cb.Cr., and Y.Pb.Pr.;
PC= Switch between DVI and VGA
DVI In
Y.Pb.Pr.
Video In
PC Audio Video
Audio Out (L/R)
Out
In
Audio In
S-Video In
Component
Audio In L/R
Component
Y.Cb.Cr/Y.Pb.Pr.
2
VGA In
C
C
1
Y.Cb.Cr.
Note. A=2, and B=1. Ex. Video A (Panel)= Video 2 (ISC Menu); Video B (Panel)= Video 1 (ISC Menu)
CATV Channels Scan
Before start use CATV as source, you need use the “CH Scan” to search the existed Channels.
To do “CH Scan”, move to CH Scan of TV SET page and press enter and then press Cursor
Right.
Restore setting:
1. Make sure the ISC is power off with power connected.
2. Press menu button of remote control and then press the power button within two seconds.
3. After reboot the ISC, The Default values as following will be restored.
z
Contrast: 51
z
Brightness: 64
z
RGB: R=0, G=0, B=0 (DS0706, DS0716: R:-13, G=0, B=0)
z
Volume: 63
z
Display mode: PBP (Picture By Picture, Picture on Picture side by side)
z
Main source: S-Video 1 (source B) (from CF Player)
z
Sub source: S-Video 2 (source A) (from CF Player)
2.3 Video Input function
When the display receives only one Input from Sub source, the display will expand the
image and show a wide screen
H
H
No Input
Sub
V
V
Main
Display
When the display receives only one Input from Main source, the display will clone the image
and show two identical screens.
H
H
No Input
Sub
V
V
Main
Display
When the display receives two Inputs from Main and Sub source, the display will show two
different screens.
H
H
No Input
Sub
V
V
Main
Display
Note. If “No Input” (All Blue), “No Media” (All white) or the video input is all single
Color lasting for more than 15 Sec, the other video input will be duplicated or extended.