1
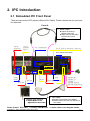
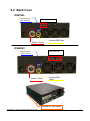
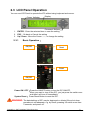
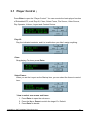
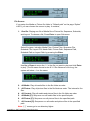
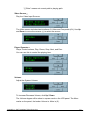
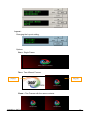
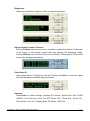
DynaScan Embedded IPC User Manual Edition 6 Table of Contents: 1. 2. 3. 4. 5. Introduction ...............................................................................................................1 IPC Introduction .........................................................................................................2 2.1 Embedded IPC Front Panel .............................................................................2 2.2 Back Panel ....................................................................................................4 2.3 LCD Panel Operation ......................................................................................5 2.3.1 Basic Operation: ...................................................................................5 Main Menu: ..............................................................................................................6 3.1 Player Control: ............................................................................................8 3.2 Monitor System ........................................................................................... 14 3.3 Option Setting ............................................................................................. 20 3.4 Test Pattern................................................................................................. 32 3.5 Power Control.............................................................................................. 33 How to Upgrade Operation System ............................................................................ 34 Appendix .................................................................................................................. 36 5.1 IPC Grounding:............................................................................................ 36 5.2 Files playing notice of AP3: .......................................................................... 36 5.3 5.4 5.5 5.6 Dummy VGA Monitor: .................................................................................. 36 Embedded IPC Default Setting: .................................................................... 37 LCD Default Setting ..................................................................................... 38 Operation Tree of the IPC LCM ..................................................................... 39 1. Introduction Embedded IPC is an all-in-one player of the DynaScan Networking Media Broadcast System. Although the player is an IPC, you don’t need to use the keyboard mouse and monitor to operate. Just Connected the Display with the DVI Port of Embedded IPC and you can setup and operate the IPC by using the LCD Control Panel. The Embedded OS provide a proof that the OS won’t breakdown even when the power supply is unstable. The Built-in Watchdog-Timer will restart the IPC when the program crashes. The All-in-one Card reader is the storage media device of contents. To play the contents, just plug the memory card with contents into the Card reader and select the files. If you want to play different contents in different cards on different frames, just plug several cards into different sockets, or use built-in 2.5” hard disk to storage more contents. Moreover, the IPC provides two analog video inputs, Composite(AV)and S-Video. As for audio part, we provide one external audio input, and two speaker output connecters (10W). When the Embedded IPC connects to the control server, it will become a network control node in the network. You can remote control the IPC and monitor the IPC. By network, the Control Server will transfer the content to several remote nodes. You can turn on/off the IPC while the content transferring, and the transferring will be continue next time the IPC is on. The IPC can play the content while the content transmission. The IPC will play the new content when all transmission is done. Copyright © 2007 DynaScan Technology Corp. 1 2. IPC Introduction 2.1 Embedded IPC Front Panel There are two kinds of IPC panels (different DVI Cable). Please choose the one you have for reference. Panel A 3. Audio Cable Output the audio of Capture card to PC Please Connect the Audio Out and Line In as it shows Mouse Keyboard Line In Line Out Mic In 8 in 1 Card Reader Tuner In, AV In, Audio In, S-Video In, Audio Out Power Switch, Reset Rest Button Power Switch, Button USB COM2 COM1 RJ-45 DVI Out Power USB DVI In VGA Out 2. Dummy VGA Monitor Please Refer to the Appendix for more Info Please install 1. DVI Cable Speaker (R) Speaker (L) Volume External Audio In External Enable Switch 1. DVI Cable Output the PC Video to the Display Please Connect the DVI Out and DVI In as it shows 2. Dummy VGA Monitor 3. Audio Cable as the diagram shows. Copyright © 2007 DynaScan Technology Corp. 2 Panel B 2. Audio Cable Output the audio of Capture card to PC Please Connect the Audio Out and Line In as it shows Mouse Keyboard Line In Line Out Mic In 8 in 1 Card Reader Tuner In, AV In, Audio In, S-Video In, Audio Out Power Rest Button Power Switch, Switch, Reset Button USB COM2 COM1 RJ-45 DVI Out Power USB VGA Out Speaker (R) Speaker (L) Volume External Audio In External Enable Switch 1. Dummy VGA Monitor Please Refer to the Appendix for more Info Please install 1. Dummy VGA Monitor Copyright © 2007 DynaScan Technology Corp. 2. Audio Cable as the diagram shows. 3 2.2 Back Panel DS0706L Thermal Sensor LVDS Video Out (IPC to Drum) Power 6 Pin(s) Inverter/SSR Cable DS0808C Thermal Sensor (IPC to Drum) LVDS Video Out Power 6 Pin(s) Inverter/SSR Cable Bracket for Wall-Mount Copyright © 2007 DynaScan Technology Corp. 4 2.3 LCD Panel Operation You can use LCD Panel to operate the IPC without using keyboard and mouse. Power Indicator Display 1. Command Buttons ENTER:Enter the selected item or save the setting 2. ESC:Go back or Cancel the setting 3. Up / Down:Move the Cursor(>)or change the setting 2.3.1 Basic Operation: ON/OFF Reset Reset ON/OFF Power ON / OFF:Press the ON/OFF button to turn the IPC ON/OFF. When you want to turn off the IPC, you just press the switch once and then it will turn off immediately. System Reset: Press Reset Button to reset the IPC. WARNING: The data/settings of IPC may be destroyed or deleted if the shut-down procedure is not adequate, e.g. by Reset, pressing I/O switch more than 5 seconds, and power off. Copyright © 2007 DynaScan Technology Corp. 5 3. Main Menu: Software Edition:AP3_0247R After booting the IPC, the LCD Display will show the message, “DynaScan Tech. AP3 is running” The LCD Display will show the status of “Monitor System” after connecting with DynaScan Display. Power Started Motor Started Drum Temp Motor Alarm Tilt Alarm Thermal Alarm If the LCD Display shows as below, it means disconnecting. Please check AP3\Option\Startup Setting\Select Model for right model, and AP3\Option\Monitor System\Serial Port for right COM port. If you see the massage like that, it means the AP3 is abnormal. Please check the program status. You can operate the Main Menu when the AP3 is running normally. To summon the Main Menu, press the “Enter”. Main Menu contains Player Control, Monitor system, Option Setting, Test Pattern and Power Control. Press Enter to summon the Main Menu Copyright © 2007 DynaScan Technology Corp. 6 Press Up or Down to move the “>“ to the item you want to setup and press Enter to open the Sub-Menu. Copyright © 2007 DynaScan Technology Corp. 7 3.1 Player Control: Press Enter to open the “Player Control”. You can execute the basic player function of Embedded IPC, such Play All, Close, Select Frame, File Source, Video Source, Play Operator, Volume, Layout and Content Device. Play All: Play the indicated contents, and it is invalid when you didn’t assign anything. Close: Stop playing. To close, press Enter. Select Frame: When you set the Layout as the Startup item, you can select the frame to control here. * How to select one screen and frame 1. Press Enter to open the sub-menu. 2. Press the Up or Down to switch the target. Ex. Default. 3. Press Enter to decide. Copyright © 2007 DynaScan Technology Corp. 8 File Source: If you setup the Media or Picture file folder in “Default path” on the page “Option” in AP3, you can choose the source to play. It contains, 1. One file: Playing one file of Media file or Picture file, Sequence, Schedule, and Layout. To choose a file, Press Enter to open Sub-menu. Select file types, including Media Files, Picture Files, Sequence File, Schedule File, Layout File, Media Path, Picture Path, Sequence Path, Schedule Path or Layout Path by pressing the Enter. Use Up or Down to move the “>“ to the file you want to play and click Enter to play. (The file name format is dos 8.3. If the filename is too long, the system will show ~1 on the name. 2. 3. 4. 5. 6. 7. All Media: Play all media files in the file folder as order. All Picture: Play all picture files in the file folder as order. The interval is five Sec. All Content: Play all media and picture files in the file folder as order. All Media [P]: Sequence run all media files in the specified path. All Picture [P]: Sequence run all picture files in the specified path. All Content [P]: Sequence run all media and picture files in the specified path. Note: “[..]” means go to one directory higher. Copyright © 2007 DynaScan Technology Corp. 9 “[.] Enter” means set current path to playing path. Video Source: Play the Video Input Sources. The Video source includes two interfaces, S-Video and Composite (AV), Use Up and Down to move the cursors (>) to select the source. Player Operator: Player Control actions, Play, Pause, Stop, Next, and Prev. You can use this to control the playing item. Volume: Adjust the System Volume. To Increase/Decrease Volume, click Up / Down. The Volume degree will be show in square mark on the LCD panel. The More marks on the panel, the louder Volume is. Mute is (0). Copyright © 2007 DynaScan Technology Corp. 10 Layout: Changing the Layout setting. Options: One = Single Frame. Two = Two different Frames. Default Region1 Clone = Two Frames with the same contents. Copyright © 2007 DynaScan Technology Corp. 11 Two Clone = Two identical pictures. Default Region1 Three = Three different Frames. Default Region1 Region2 To Choose an option, use Up or Down to move cursor”>“and click Enter. After selecting the layout, you can assign the content to each Frame. As for Setting, please refer to “Select Frame” and File Source page. Note: If you choose Clone, you can only choose one frame to setup. Example: Layout: Two Select one frame to setup. Select Frame: Default Copyright © 2007 DynaScan Technology Corp. 12 File Source: All Media When the setting is done, you can see the media files playing on the “Default”. You can setup another frame “Region1” as setting above. Content Device: Select the storage device for media contents. There are six devices, CF/MicroDrive, SD/MMC, MS/MSPro, SmartMedia, Label and Disk Drive. Note: If you change the storage media, the default download path will be changed as well. If you change the setting while file transferring, the transferring data will be lost. Therefore, please does not change this setting while file transferring? Note: Name of label has to be DSPlayer. When ECU sees two or more drives labeled as DSPlayer, ECU will follow the alphabetical order of the drive. For example, if both F and G drives are all labeled as DSPlayer, ECU will choose F drive as a priority. Copyright © 2007 DynaScan Technology Corp. 13 3.2 Monitor System Monitor and control DynaScan displays. Monitor System provides the function settings and status monitoring to DynaScan displays. Power On / Off: Turn On / Off the display. Click Enter to Enact or Esc to chancel. Spin: The spin speed of display. The greater the value is, the faster it spins. “Fixed” means to stop spinning. Press Up to increase, or Down to decrease. Copyright © 2007 DynaScan Technology Corp. 14 Brightness: Adjust the brightness of Display. 100% for highest brightness. Adjust Display Forward / Reverse: Clicking Forward can turn the screen clockwise to adjust the position of the edge of the image or surrounding objects that may obstruct the displaying image. Clicking Reverse can move the screen anti-clockwise. Please wait for 30 seconds to save the settings automatically. Clear Alarm R.: Clear Alarm Record. Display has had the. Presses the Enter to clear the Alarm Records that abnormal states happened before. Advance: Press Enter for further settings, including DVI Version, System Run Time, LEDM ON/OFF, Force PW On, Force PW OFF, Motor OFF, Virtual Enc., Excool En., Thermal Wa., Auto V.E., Display Mode, DS Model, COM Port. Copyright © 2007 DynaScan Technology Corp. 15 DVI Version: Press Enter to show the version of DVI board, including PCB, LOG (Logic), F.W (Firmware). System Run Time: Total system working hour is calculated by hour. Click Enter to display. LEDM ON / OFF: Turn ON / OFF the LEDM. Press Up or Down to select, and Enter to switch. Copyright © 2007 DynaScan Technology Corp. 16 Force PW On: Force Power On manually. The function is to force power on the displays immediately. Make sure the safety issue for the display before pressed. We do not suggest users to operate it arbitrarily. Force PW OFF: Force Power On manually. The function is to force power on the displays immediately, including motor and LEDM. Motor OFF: Turn off the motor manually. Press Enter to power off the motor of the display immediately. Virtual Enc.: ON / OFF the Virtual Encoder. Click Enter to Switch. When the physical encoder is out of order, you can start the Virtual Encoder for replacement. It is designed for the use of our technical staff only. Excool En.: To determine to enable the function of Ex-cool (extended cooling after turn of) or not. The function support model DS0706, DS0716, DS0808, DS1016, DS1713-3 and DS2012-3 at present. Copyright © 2007 DynaScan Technology Corp. 17 Thermal Wa.: Thermal warning. To determine to enable the function of thermal warning function. Auto V.E.: Auto Virtual Encoder function. Virtual Encoder will automatically enable when the system detects that the hardware encoder malfunctions. Display Mode: Not available. DS Model: Select DynaScan display model. This function will affect image size of the display and communication of Monitor System. Press button Up and Down to choose display model and press Enter to set. Copyright © 2007 DynaScan Technology Corp. 18 COM Port: Assign communication port. DynaScan displays are controlled through COM port, so you must assign COM port number of the computer connecting the displays. Copyright © 2007 DynaScan Technology Corp. 19 3.3 Option Setting Setup Options, including OS protect, Clock, Network, Auto Run, Watchdog, Window Adjust, and Video Out, Display Setting, Back Light, Upgrade Program, License Manager and Embedded OS. OS Protect: OS Protection status: Stable: The OS is protected. Unstable: OS is not protected. Please remain stable when operating. This function is show the status of protection only. To switch status, please refer to the Embedded OS. Clock: System Time, press Enter to setup. To switch to next digit, press Enter. Press ESC to return to previous menu with discarding, and press Enter to go next menu for date/time settings. Up or Down to change the value. After setup, press ESC will summon the menu to save. You can press Enter to save or ESC to discard. Copyright © 2007 DynaScan Technology Corp. 20 Network: Network Settings for this IPC. If you want the IPC to get IP from DHCP server, choose ON. Press Enter to Switch. When DHCP Enable is ON, you can get the IP Address, Subnet Mask and Default Gateway in following options. If DHCP Enable is OFF, you need to input those values in those options. If you want to setup the IPC in Static IP, 1. Enter the IP address in IP Address option. Press Enter to switch next digit. Press Up to increase, or Down to decrease. 2. Setup the Subnet mask. Press Enter to switch next digit. Press Up to increase, or Down to decrease. 3. Setup Default Gateway. Press Enter to switch next digit. Press Up to increase, or Down to decrease. 4. Host Name: Name of the PC Press Enter to setup Copyright © 2007 DynaScan Technology Corp. 21 Use Up and Down to change the digit. Press Enter to switch to next digit. Press Esc to leave and Enter to save. 5. Press Enter on Set to save, or Cancel to discard. Note: After you press Set to change the Network setting, you have use the Preserve under the Embedded OS option to reboot the IPC and save the setting to OS. Note: The network settings are functional only when the network cable is connected. Auto Run: Automatically Power on the IPC at specific time everyday. You can use Enter to switch between ON (enable) and OFF (disable). Startup ON / OFF: To enable the function, choose Startup ON. Press Enter to change. Startup Time: When Startup is ON, you can setup the time to start the IPC. The time format is HH:MM. Press enter to switch next digit. Press Up to increase, or Down to decrease. To save, press ESC, and then Press Enter to save or ESC to discard. Copyright © 2007 DynaScan Technology Corp. 22 Shutdown ON / OFF: To enable the function, choose Shutdown ON. Press Enter to change. Shutdown Time: Setup the time to shut the IPC down. Press Enter to switch next digit. Press Up to increase, or Down to decrease. To save, press ESC, and then Press Enter to save. Reboot ON / OFF: To enable the function, choose Reboot ON. Press Enter to change. Reboot Time: Setup the time to reboot the IPC. Press Enter to switch next digit. Press Up to increase, or Down to decrease. To save, press ESC, and then Press Enter to save. Start Play ON / OFF: AP3 starts to play media. AP3 will check if the Start Play Time is up or not in order to play or not when it’s set as ON, otherwise AP3 will not play when it starts for OFF. Press ENTER to switch the settings. Start Play Time: Show / Set the start time (format hh:mm) to play content, it will be valid only if Start Play is ON. Press Up and Down to change the time, Enter to change the position of the cursor. Press ESC to leave with save by Enter or Copyright © 2007 DynaScan Technology Corp. 23 without save by ESC. Watchdog: When the IPC doesn’t run for a specific interval, the Watchdog will reboot the IPC. This is for the instance of IPC program crash recovery. You can setup a specific time. Note, please don’t setup the value too short or the Watchdog will reboot the IPC continuously. To enable this function, 1. Choose ON in Watchdog. 2. Setup the Timer. Press Enter to switch next digit. Press Up to increase, or Down to decrease. To save, press ESC, and the Press Enter to save. Unit is Second. Note: The system will handle the system crash quicker when you setup shorter timer interval. It will create extra burden for system, and may cause misjudgment if the interval is too short. The suggest Value is 3~5 minutes. Window Adjust: Adjust the player windows potion. If you see some red region on the edge of the screen, it means that Window position is not correct. You can use this function to adjust. Copyright © 2007 DynaScan Technology Corp. 24 Use Up or Down to select, and Enter to setup, the Unit is pixel, Left Pos.: Adjust the window position to left or right. Press Up to increase, or Down to decrease. To save, press ESC, and press Enter to save. The Value with + is to right, -is to left. Ex. +0002 is two pixels to the right, and -0002 is two pixels to the left. Top Pos.: Adjust window position to Top or Bottom. Press Up to increase, or Down to decrease. To save, press ESC, and then Press Enter to save. The Value with + is to the bottom, -is to the Top. Ex. +0002 is two pixels to the bottom, and -0002 is two pixels to the Top. Width: Adjust the width of windows. Press Up to increase, or Down to decrease. To save, press ESC, and then Press Enter to save. The Value with + is to extend, -is to shrink. Ex. +0002 is expending two pixels, and -0002 is to shrink two pixels. Height: Adjust the height of windows. Press Up to increase, or Down to Copyright © 2007 DynaScan Technology Corp. 25 decrease. To save, press ESC, and then Press Enter to save. The Value with + is to extend, -is to shrink. Ex. +0002 is expending two pixels, and -0002 is to shrink two pixels. Display Setting: Adjust the Display Setting, including Brightness, Contrast, and Gamma. Press Up and Down to select the option to adjust. Press Enter to enter the option. Brightness: Press Up and Down to adjust. The brightness will be changed immediately. Press ESC to return. Contrast: Press Up and Down to adjust. The Contrast values will be changed immediately. Press ESC to return. Gamma: Press Up and Down to adjust. The Gamma values will be changed immediately. Press ESC to return. Note: For mode DS0808, DS0706 and DS0716, We suggest that you set the Gamma values to 0.45 for better picture quality. Copyright © 2007 DynaScan Technology Corp. 26 Video Out: Select the Video Output port, DVI (default) and VGA. Press Up or Down to switch. This setting will change the Video output into Single Screen mode. Please don’t use this function unless you need to do some maintenance. Back Light: Adjust the brightness of the LCD Panel Back Light. Default is 25%. Press Up and Down to adjust. The brightness will be changed immediately. Press ESC to return. Update Program: Update AP3 by press Enter. Select the storage device for update program from Select Device, CF/MicroDrive for example, then press Enter. Copyright © 2007 DynaScan Technology Corp. 27 Choose the target update program from the list by Enter. Query, press Enter (YES) to execute updating, and it will restart the IPC with blank screen during the processes. It’s done when it shows DynaScan Tech. again after a few minutes. License Manager: Press Enter to enable authorization function. License State: Query which from the 5 status of authorization. Serial Empty: No serial number. Trial: Trial version with serial number for 30 days. OEM: OEM version. No registration needed. Release: Release version with finishing registration. Not Accept: Authorization fail. Install Serial: Press Enter to input the serial number. Copyright © 2007 DynaScan Technology Corp. 28 Select the storage device, CF/MicroDrive for example, for the file of serial number by Enter. Choose the file of serial number by Enter. Press Enter (YES) to confirm the serial number. Then it will generate the codes, 14 digits with numbers and letters combined, of registration. Please send the file with .register extension to DynaScan to get the license. Active License: Press Enter to activate license. Select the storage device, CF/MicroDrive for example, for the file of serial number by Enter. Choose the legal license file from the list by Enter. Copyright © 2007 DynaScan Technology Corp. 29 Press Enter (YES) to confirm the license. Export RegCode: Press Enter to export the registration codes. It could not be used until the users need to get the registration codes again. Select the storage device, CF/MicroDrive for example, for the file of registration codes by Enter. SUCCESS for finished. Find Device: Re-find the USB card reader. Press Enter to find, it will show “OK” when found, otherwise show “Failed”. Copyright © 2007 DynaScan Technology Corp. 30 Embedded OS: To Enable the OS protection ON/OFF, Press Up or Down to change and Enter to save. After Reboot, the Protection status is preserved. Preserve: When System is stable (protected), you can save the OS current settings by using Preserve. Press Enter to preserve and the menu will show up. Press Enter to save the setting and reboot the IPC, or Press ESC to Chancel. The IPC will remain Stable after the rebooting. Note: It’s very dangerous to open the OS protection. If the system is attacked or operated incorrectly, it will damage the system enormously. After you turn off the OS protection, every change you make will be save immediately. For safety reason, please turn on the OS protection after you reboot the IPC. Warning: “Preserve” will change the OS setting permanently, please don’t use it unless you need to change the OS setting. Copyright © 2007 DynaScan Technology Corp. 31 3.4 Test Pattern Generate test patterns for technical staff to adjust picture quality or debug. You can choose the frame to test by setting frame in the Player Control. Pure Color: Choose one color to generate a whole screen picture by press Up or Down, and then press Enter to send the picture to the display device. Level Color: Choose one color to generate Color Level by pressing Up or Down, and then press Enter to send the picture to the display device. The Color sections are 16 x 16 (256) block. Copyright © 2007 DynaScan Technology Corp. 32 3.5 Power Control Provide the functions to control the power and reopen AP3. Restart AP3: press Enter to restart AP3. Reboot PC: This will restart the computer. After pressing Enter, the computer will immediately reboot. Any unsaved data will be lost. Reset PC: press Enter to reset IPC, same as the button of Reset on IPC front panel when the IPC is down, otherwise the data might be destroyed. Shutdown PC: press Enter to shut down the IPC. Don’t power off during the process, otherwise the data might be destroyed. Copyright © 2007 DynaScan Technology Corp. 33 4. How to Upgrade Operation System Step1. Remove the screws of the Front Cover (red mark). There are seven screws, please see two pictures as below. 《There are three screws at back of IPC.》 《There are four screws at top cover of IPC.》 Step2. Push the Front cover backward to remove it. See the picture above. Step3. Remove the screws of DVI board holder ( red mark). There are five screws. 《There are three screws at back of IPC.》 Copyright © 2007 DynaScan Technology Corp. 34 《There is one screw at one side of IPC, and one inside IPC.》 Step4. Push the Holder backward to remove it shown above. Step5. Remove the CF card with older version shown below. Step6. Put the New CF Card into the Slot shown below. Step7. Put the Holder back. Step8. Fasten the three screws of DVI Board Holder. Step9. Put the Front Cover back and push forward to close it. Step10. Fasten the screws of Front Cover. Under Normal condition, if you want to update the program within the IPC, all you have to do is saving the program in a flash card and inserting it into the card reader and then run Update to renew the program. However, the best way is to replace the old System Card with a new one when you wan to change the Embedded OS or update many programs. Copyright © 2007 DynaScan Technology Corp. 35 5. Appendix 5.1 IPC Grounding: When our display is shipped, we have design the proper grounding for IPC and Power Control Box. However, if you don’t attach the IPC case and the Power Control Box with screws on the same frame, the IPC is not connected to the ground. To prevent possible interferes and abnormal situations, please make sure that your IPC is connected the ground. The IPC and Power Control box can share the ground cable. In other words, you can connect the Power Control box to the ground first and then attach the IPC and Power Control box with screws on the same frame and connect the frame to the ground, and two of them are connect to the ground. 5.2 Files playing notice of AP3: When the content types are those media files which can’t be resized such as MS PowerPoint files or flash files and you play them in single mode, the content may not be display correctly. To play those files correctly, please choose layout “Clone” or “Two” to play the file. Clone is two frames with the same content and “Two” is two frames with different contents. Please refer to the Layout Setting as above for more information. As many as two MPEG-2 media files are allowed to play at the same time due to the limitation of CPU performance of the Embedded IPC. As big as the size of 1024x768 pixels for graphic files is allowed to play due to the limitation of the graphics hardware performance of the Embedded IPC . 5.3 Dummy VGA Monitor: When you use twin view, you put the operating screen and display screen in different monitors. You will find out the twin view will disappear when you unplug the VGA monitor cable. To solve the situation, you need to plug the Dummy VGA Monitor into the VGA port of video-card as the Following picture shows. When you want to reconnect the VGA cable, please unplug the Dummy VGA Monitor and plug the VGA cable connector into the VGA monitor connector while the IPC is Copyright © 2007 DynaScan Technology Corp. 36 operating. Note: Please don’t turn ON/OFF the IPC if you don’t plug any VGA Monitor Cable or Dummy VGA Monitor, or you may need to setup the twin view again. 5.4 Embedded IPC Default Setting: Please use AP3 software of IPC to setup the default setting. Option Default Value Startup Setting\Select Model\ Select the matching Model Startup Setting\Accelerator\ VMR7 Startup Setting\Screen Type\ Screen 2 Startup Setting\Auto Startup\ Check Startup Setting\Auto Clear Content\ Check Startup Setting\Content Preload\Content in Check Sequence Preload\ Startup Setting\Content Preload\Content in Check Schedule Preload\ Startup Setting\Content Preload\Sequence in Schedule Preload\ Check DS0706 DS0808 DS0716 Display Position\Display Position\ DS0613C DS0616C DS1508 (P-Link) Left:2 Right:-1 Top:0 Bottom:-3 Left:6 Right:-3 Top:3 Bottom:0 Left:5 Right:2 Top:5 Bottom:2 Left:3 Right:-1 Top:3 Bottom:0 Left:5 Right:2 Top:5 Bottom:2 Left:5 Right:2 Top:5 Bottom:2 Left:3 DS1508 (GigaFiber) Top:3 Monitor System\Serial Port\ Right:0 Bottom:0 COM 3 COM 1 (DS1508 Only) Monitor System\Power Control Enable\ Check Monitor System\Outside Power Off Enable\ Check (For DS0613C, DS0616C, DS1508) Copyright © 2007 DynaScan Technology Corp. 37 Monitor System\Spin Speed\ Fixed Monitor System\Brightness\ 100% Monitor System\Advance\Power On Safe Time\ 360 Sec. 240 Sec. (DS1508 Only) Capture Setting\00 Default\IS 180 Sec. (DS0616C Only) Check Capture Setting\Country Code\ Select the location Capture Setting\Input Pin\ 1 Capture Setting\Default Setting\Resolution\ Low (For DS0706, DS0808) Color Adjust\Gamma\ Network Setting\Network Control Enabled\ 0.45 (For DS0706, DS0808, DS0716) 1.00 (For DS0613C, DS0616C, DS1508) Check 5.5 LCD Default Setting Please use the LCD of IPC to setup the default setting. Monitor System\Brightness\ 100% Option Setting\Watchdog\ ON Option Setting\Watchdog Timer\ 300 Sec. Option Setting\Display Setting\Brightness\ 100% Option Setting\Display Setting\Contrast\ Option Setting\Display Setting\Gamma\ Option setting\Back Light\ Copyright © 2007 DynaScan Technology Corp. 100% 0.45 (For DS0706, DS0808, DS0716) 1.00 (For DS0613C, DS0616C, DS1508) 25% 38 5.6 Operation Tree of the IPC LCM Main Menu Menu Level 1 Menu Level 2 Menu Level 3 One File ------- Media File Picture File Sequence File Schedule File Layout File Media Path Picture Path Sequence Path Schedule Path Layout Path Play All Close Select Frame File Source ---------------- Player Control Video Source ------------- Play Operator ------------Volume Layout ----------------------- Content Device ------------ Copyright © 2007 DynaScan Technology Corp. All Media All Picture All Content All Media [P] All Picture [P] All Content [P] SVideo AV Tuner Channel Play Pause Stop Next Prev. One Two Clone Two Clone Three CF/MicroDrive SD/MMC MS/MSPro SmartMedia Label Disk Drive 39 Main Menu Menu Level 1 Power ON Power OFF Spin Brightness Adj Dis Forward Adj Dis Reverse Clear Alarm R. Monitor System Advance ---------------- Copyright © 2007 DynaScan Technology Corp. Menu Level 2 Menu Level 3 DVI Version System Run Time LEDM ON/OFF Force PW On Force PW OFF Motor OFF Virtual Enc. Excool En. Thermal Wa. Auto V.E. Display Mode DS Model COM Port 40 Main Menu Menu Level 1 OS Protect Clock Tuner ----------------------- Network -------------------- Auto Run ------------------- Watchdog -----------------Option Setting Window Adjust ------------ Display Setting -----------Video Out ------------------Back Light Update Program ---------- License Manager --------Find Device Embedded OS ------------ Copyright © 2007 DynaScan Technology Corp. Menu Level 2 Country Code Input Type -----Input Pin DHCP Enable IP Address Subnet Mask Default Gateway Set Cancel Host Name Startup Startup Time Shutdown Shutdown Time Reboot Reboot Time Start Play Start Play Time Watchdog Watchdog Timer Left Pos. Top Pos Width Height Brightness Contrast Gamma DVI VGA Menu Level 3 Cable Antenna CF/Micro Drive SD/MMC MS/MSPRO Smart Media Label Disk Drive License State Install Serial Active License Export RegCode Stable Unstable Preserve 41 Main Menu Menu Level 1 Pure Color ------------- Test Pattern Level Color ------------- Main Menu Power Control Menu Level 1 Restart AP3 Reboot PC Reset PC Shutdown PC Copyright © 2007 DynaScan Technology Corp. Menu Level 2 White Red Green Blue No Red No Green No Blue White Red Green Blue No Red No Green No Blue Menu Level 2 Menu Level 3 Menu Level 3 42