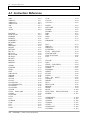
1
SCREEN CREATOR 5
User's Manual
Vol. 6
SCREEN CREATOR 5
K-Basic
Program Description
Electronic System & Component Dept.
Electronics Div.
Contents
■ Contents
CHAPTER
1
INTRODUCTION ................................................... 1-1
1-1 What is an Operation Program? ................................................................................................................ 1-2
1-2 Objects to be Described in Operation Programs........................................................................................ 1-3
1-2-1
Operation programs for parts....................................................................................................... 1-3
1-2-2
Operation programs for screens .................................................................................................. 1-3
1-3 Terms ........................................................................................................................................................ 1-4
1-3-1
Screens ....................................................................................................................................... 1-4
1-3-2
Figures (backgrounds)................................................................................................................. 1-4
1-3-3
Parts ............................................................................................................................................ 1-5
1-3-4
Controls ....................................................................................................................................... 1-5
1-3-5
Messages .................................................................................................................................... 1-6
CHAPTER 2
EXAMPLES OF PROGRAMMING........................ 2-1
2-1 Creating a Part for Displaying Numerics .................................................................................................... 2-2
2-1-1
Arranging controls........................................................................................................................ 2-4
2-1-2
Coding a program ........................................................................................................................ 2-6
2-1-3
Drawing a figure in a part............................................................................................................. 2-7
2-1-4
Saving a created part................................................................................................................... 2-8
2-1-5
Using a created part .................................................................................................................... 2-9
2-1-6
Explanation for coded program content ..................................................................................... 2-12
2-1-7
Modifying a created part ............................................................................................................ 2-15
2-2 Creating a Part to be Linked to a PLC Device ......................................................................................... 2-20
2-2-1
Numeral displays ....................................................................................................................... 2-20
2-2-2
Indicator lamps .......................................................................................................................... 2-24
2-2-3
Switches .................................................................................................................................... 2-26
2-2-4
Indicator switches ...................................................................................................................... 2-28
2-3 Creating a Part to be Linked to an External Device ................................................................................. 2-30
2-3-1
Display for host computer .......................................................................................................... 2-30
i
Contents
2-4 Creating a Part for Controlling Others ......................................................................................................2-32
2-4-1
Part for calling others from touch panel......................................................................................2-32
2-4-2
Part for sending/receiving numerics to/from others ....................................................................2-34
2-5 Creating a Part for Using a Timer.............................................................................................................2-38
2-5-1
Part for counting up ....................................................................................................................2-38
2-6 Editing a Program for a Displayed Part ....................................................................................................2-42
CHAPTER 3
CODING RULES.................................................... 3-1
3-1 Usable Characters..................................................................................................................................... 3-2
3-2 Special Characters .................................................................................................................................... 3-3
3-3 Constants .................................................................................................................................................. 3-4
3-4 Constant Declaration................................................................................................................................. 3-5
3-5 Variables ................................................................................................................................................... 3-6
3-5-1
Classification of variables ............................................................................................................ 3-6
3-5-2
Types of Variables....................................................................................................................... 3-7
3-5-3
Checking variable types and variable interpretation in compilation........................................... 3-8
3-5-4
Initializing variables ..................................................................................................................... 3-9
3-6 Expressions and Operations ....................................................................................................................3-10
3-7 Type Conversion ......................................................................................................................................3-13
3-8 Labels.......................................................................................................................................................3-14
3-9 Subroutines ..............................................................................................................................................3-15
3-10 User-defined Functions.............................................................................................................................3-16
ii
3-10-1
Definition of user-defined functions ............................................................................................3-16
3-10-2
Definition positions of user-defined functions and ranges of referencing....................................3-17
3-10-3
How to call user-defined functions..............................................................................................3-17
3-10-4
Variable declaration in user-defined functions and referencing external variables .....................3-17
Contents
3-11 Program Operation .................................................................................................................................. 3-18
3-12 Message Format...................................................................................................................................... 3-20
3-13 Program Blocks ....................................................................................................................................... 3-22
3-14 Devices and Communication ................................................................................................................... 3-24
3-15 Memory Tables ........................................................................................................................................ 3-25
3-15-1
Describing memory table ........................................................................................................... 3-25
3-15-2
Reading and writing One element.............................................................................................. 3-25
3-15-3
Reading and writing two or more elements................................................................................ 3-25
3-16 ................................................................................................................................................... File Systems3-26
3-16-1
Precautions for file systems ....................................................................................................... 3-26
3-16-2
Specifying a file.......................................................................................................................... 3-27
3-17 .............................................................................................................................................................. Notes3-28
CHAPTER 4
INSTRUCTION REFERENCE............................... 4-1
4-1 Instruction Reference................................................................................................................................. 4-2
4-2 Indexes by Functions ................................................................................................................................. 4-5
iii
How This Manual Is Organized
How This Manual Is Organized
This manual, Chapter 1 through 4, includes structures of data to be displayed on the OIP and operations in
detail for you to use the OIP.
Chapter 1 Fundamentals in Creating Screens
Outlines general ideas and organizations of data to be displayed on the OIP. You should read
through this chapter before referencing the other chapters.
Chapter 2 Installation for Screen Creator 5
Covers the environment in operation and installation of Screen Creator 5.
Chapter 3 Basic Operations for Screen Creator 5
Describes each function name of Screen Creator 5 and operations for the keyboard and mouse.
Chapter 4 Menu Reference
Thoroughly discusses each menu of Screen Creator 5.
You are recommended to reference the following manuals for using Screen Creator 5.
Vol.1
Screen Creator 5 Manual Introduction
Introduces fundamental operations of Screen Creator 5.
Vol.2
Screen Creator 5 Manual Operations
Describes operations of Screen Creator 5 in details.
Vol. 3
Screen Creator 5 Manual PLC/External Equipment Connection
Covers the communications procedures with a host computer and connections to peripheral
devices.
Vol. 4
Screen Creator 5 Manual Standard Component Catalog
You can get to know the standard components and their functions the maker. offers.
Vol. 5
Screen Creator 5 Manual Control Reference
Describes what are controls and how to use controls for creating components.
Vol. 6
Screen Creator 5 Manual K-Basic Programming
Offers information on how to write action programs for creating screens and how to use
functions.
Vol. 7
Screen Creator 5 Manual Trouble Shooting and Error Codes
Covers restrictions on creating screens with Screen Creator 5, how to cope with trouble, and error
codes.
iv
Safety Precautions
Safety Precautions
Be sure to follow the safety precautions listed below in order to use the OIP safely. Koyo Ltd. cannot be
held liable for any damages incurred if these safety precautions are not followed.
WARNING
Design your system so that there are sufficient countermeasures for personnel
accidents and major equipment accidents. The system should have an external
protection and safety circuit, so that even if the OIP should malfunction or even if
there is a defect in the program the safety of the system is assured.
Do not use the touch panel of the OIP to make switches that are related to safety or
people or major damages (emergency safety switches, etc.). Be sure that the
system is designed so that it can cope with any errors or malfunctions in the touch
panel.
Be sure that type 3 grounding is used for the protective-grounding terminal. There
is a possibility of electrical shock if the unit is not grounded.
If the OIP should malfunction, immediately turn off the poser and leave it alone.
If there is direct output to external output device such as PLCs, direct output will be
driven regardless of the ladder circuit interlock. Output may be used to drive
motors and the like, so avoid using direct output because it is dangerous.
CAUTION
Use and store the OIP in the environment described in the specifications (regarding
vibration, shock, temperature, humidity, etc.).
Do not use the OIP where it is subjected to inflammable or explosive gas, or steam.
Before turning on the power, be sure that the power voltage rating of the OIP and
the voltage rating power supply match. Using a mistaken power supply can damage
the unit.
Do not disassemble or modify the OIP. Doing so can cause malfunctions and lead
to other problems.
The OIP touch panel is made of glass. Striking it with hard objects or pressing hard
on it may break the glass.
Do not push down on the OIP touch panel with mechanical pencils, screwdrivers, or
other sharp objects. Doing so can damage the touch panel or cause malfunctions.
v
Notations Used In This Manual
Notations Used In This Manual
This manual uses the following symbol marks for you to use this system comfortably.
WARNING
Describes a peril that may cause operator's death or serious injury in
neglecting the WARNING item(s).
Caution
Describes a peril that may cause bodily injury or serious device damage in
neglecting the CAUTION items(s).
Describes general note(s) in use.
Note)
Explanations and supplements.
Glossaries used in this manual are as follows.
OIP
Stands for Advanced Intelligent Panel.
PLC
Stands for programmable controller. It is also called a sequence controller.
Link unit
A link unit is a communication equipment which connects this equipment
and the PLC. The nomenclature of the communication equipment is
different from each manufacture and the equipment is called a link unit in
general.
Device
A device is such equipment that an input/output relay, internal relay,
timer, counter, or resister in the PLC.
vi
Notice
Notice
We have used our best efforts in preparing this manual. We make no warranties with respect to the
accuracy, or completeness of the contents of this manual and purpose. We shall not be liable any loss
of profit or any other commercial damages, applying this manual directly and indirectly.
1)
All rights reserved. No part of this book may be reproduced in any form or by any means, without
permission n in writing from Koyo Ltd.
2)
Contents of this manual shall be subject to change without notice.
3)
While every precaution has been taken in the preparation of this manual, if the reader notice any
errors or has any advice on the contents of this manual, please contact our customer support in
Sales Division of koyo Ltd.
4)
We shall have no liability to any loss or damage caused or alleged to be caused directly or
indirectly by the statements contained in this manual or by the computer software and hardware
products described in it.
5)
Koyo Ltd. may have patens or pending patent applications, copyrights, or other intellectual
property rights covering subject matter in this manual. The furnishing of this manual does not
give you any license to these patents or other intellectual property rights. And we do not have any
responsibility on troubles involved in the patents and other intellectual rights caused by the use of
this manual.
6)
Contact us at the following place concerning other unclear points in this manual.
Customer Support Group
Electronics System Division
Komatsu Ltd.
Address:
Telephone:
4-20-1, Kamata, Ota-ku, Tokyo Japan
81-03-5711-1838
Facsimile: 81-03-5711-1840
E-MAIL:
[email protected]
vii
Version Up
Version Up
Koyo Ltd. has upgraded Screen Creator 5 for adding new functions, operationability and so forth.
Below will be introduced the updated functions.
1.
Version 2.10
Supporting middle size systems (GC53) of GC5x Series
Adding the uploading editing function
To make this function effective, attach all screen data and K-Basic programs used in the project
and download them to the panel. Then download the uploaded entities from the panel and
restore them. Then you can edit the data and programs. Note that the data with the project
attached increase their size.
The following PLCs have been added.
Omron
Fuji Dennki
Fuji Dennki
Fuji Dennki
Toyota Koki
Toyota Koki
Matsushita Electric Industry
SYSMAC α
FLEX-PC NJ-T/NS-T
Computer-link protocol
Loader command protocol
PC1
PC3
Panadac 7000
Standard components, centered on the parts used for middle size systems (GC53) in the GC5x
Series have drastically been added.
viii
CHAPTER 1
INTRODUCTION
1
INTRODUCTION
1-1
1-1
What is an Operation Program?
1-1 What is an Operation Program?
You must code an operation program to display data such as numerical values and characters in a
part or to make a switch operate when you press it on the touch panel.
A dedicated language K-Basic is used to code the specific operation of each part.
1-2
CHAPTER 1 INTRODUCTION
1-2
Objects to be Described in Operation Programs
1-2 Objects to be Described in Operation Programs
1-2-1 Operation programs for parts
You can code an operation program individually for each part.
1-2-2 Operation programs for screens
You can also code an operation program for each screen just like for a part.
Screen
10245
00023
Operation program for screen
Error
occurrence
conf
global send_id@
00127
10315
Confirm
open .B000. ,1
close .B001.
end conf
evnt
end evnt
Next
screen
Parts
Operation program for part
conf
cyclic [station number]~[connected device address]
end conf
evnt
input ty%, id@, dat%
if ty% = 16
numdsp ..num,dat%
end if
end evnt
1-3
1-3 Terms
1-3 Terms
1-3-1 Screens
A screen consists of a figure (screen background) and some parts.
Figure
Parts
Parts
1-3-2 Figures (backgrounds)
You can draw a figure on a screen or a part by plotting elements such as lines, rectangles,
circles, and characters.
1-4
CHAPTER 1 INTRODUCTION
1-3 Terms
1-3-3 Parts
A part is a combination of a figure (part background) and same controls such as displays and
touch switches. The operation of such a part is coded as an operation program.
Part
Part
background
Plotting elements such as
a straight line, a square,
and a cicle
Operation program
Control
(K-Basic)
Program for handling
controls
Basic function elements
such as data display and
touch switch
1-3-4 Controls
A control is used to display the value of a part or a meter value or to activate a switch.
designation "primitive" has been used for GCSGP3, instead of control.)
It is possible to overlay several controls on a single part.
(The
Part
Control
(Meter)
Control
(Number indicator)
1-5
1-3 Terms
1-3-5 Messages
A message is a trigger for activating an operation program. A part starts its operation when it
receives a message. Switches and external devices such as a PLC can issue messages.
Each message contains a sender ID (PLC device name, part name, etc.), data and so on.
Part to be used
Operation program
Switch
External device
Message
ex) Data from PLC
PLC
1-6
CHAPTER 1 INTRODUCTION
CHAPTER 2
EXAMPLES OF PROGRAMMING
2EXAMPLES OF PROGRAMMING
2-1
2-1
Creating a Part for Displaying Numerics
2-1 Creating a Part for Displaying Numerics
1234
Let’s create the part that displays 1234 on the screen.
In this section, try to create a part which displays a numeric value on the OIP, for example.
First, create a project on Screen Creator 5. To create a project, select "Project" on the Screen
Creator 5 menu, then select "New".
Now, the "Create new property of project" dialog box opens. Select "test" in the "Project
Name" field and a model to be used in the "Panel" field, then press the OK button.
2-2
CHAPTER 2
EXAMPLES OF PROGRAMMING
2-1
Then, select "Library" on the Screen Creator 5 menu.
the part creation window opens.
Creating a Part for Displaying Numerics
Select "New", then select "Part".
Now,
Then, set the environmental conditions for creating a part. Select "Tool" on the Screen Creator
5 menu, then select "Option". The option setting dialog box opens. (Hereinafter, figures
showing on-menu selection are not shown.)
In this dialog box, check off the "Name automatically" check box and "Compile when saving
screen" check box. Keep these boxes checked off.
2-3
2-1
Creating a Part for Displaying Numerics
2-1-1 Arranging controls
This section describes how to arrange a number indicator for displaying numeric values in the
part creation window. In this example, use the number indicator control. For details of the
controls, refer to the Control Reference Manual. To arrange the number indicator control,
select "Create" on the menu, select "Control", then select "number indicator". The number
indicator setting dialog box appears. Leave the default properties unchanged. Do not forget
that the control name is "NUM000".
Then, click on the "Arrangement and color" tab in the dialog box as shown below. Try to
change the number of digits of values displayed on the number indicator control. Change the
value in the "Length and Interval" field into 4. Now, the number indicator control has been set.
Press the Arrangement button.
2-4
CHAPTER 2
EXAMPLES OF PROGRAMMING
2-1
Creating a Part for Displaying Numerics
The dialog box is closed, and the mouse cursor changes into the mouse. In this condition,
move the cursor to a window where the control is to be arranged (i.e., part creation window),
and click the left mouse button. The mouse cursor changes into a rectangle frame, which
shows the size of the number indicator control. Click the left mouse button at any position, and
the number indicator control is arranged at that position.
Then, try to change the size of this number indicator control. There are light blue squares on
the frame of the control. These are called handles. When you brings the mouse pointer close
to a handle, the pointer shape changes. In this condition, drag the handle, and you can
change the control size as you like. In the example shown below, the control is enlarged four
times as large as the original control size vertically and horizontally by dragging the lower right
handle.
2-5
2-1
Creating a Part for Displaying Numerics
2-1-2 Coding a program
In this section, try to code a program for the part being created. Select "Edit" on the menu,
then select "Edit Part Programs". The program editor window opens as shown below.
Type the following program on this screen.
init
numdsp ..NUM000,1234
end init
conf
end conf
evnt
end evnt
The program contents will be explained later.
program editor screen will change as follows:
2-6
CHAPTER 2
EXAMPLES OF PROGRAMMING
First of all, type the following program.
The
2-1
Creating a Part for Displaying Numerics
To save this program, select "Program" on the menu, then select "Save". Then, select
"Program" on the menu and select "Close" in order to close the program editor window. Now,
the program editor window is closed and the part editor window is re- displayed.
2-1-3 Drawing a figure in a part
Then, try to add a pattern to the part. In this example, enclose the number indicator control in
a rectangle.
Select "Create" on the menu, select "Rectangle", and drag the rectangle along the diagonal line
of the number indicator control. Now, the number indicator control is enclosed in a rectangle.
The rectangular frame should be slightly larger than the control.
While drawing the rectangle, the dialog box for inputting the rectangle properties is open. It is
possible to make changes in the rectangle shape, color, etc. in this dialog box. However, no
properties are changed in this example.
Even after a rectangle has been drawn, the rectangle drawing mode is still active. To cancel
this mode, click the right mouse button.
2-7
2-1
Creating a Part for Displaying Numerics
2-1-4 Saving a created part
Select "Window" on the menu, then select "Adjust to Object Size" in order to reduce the screen
size to the current size of the part. The part must be displayed all over the OIP screen. Since
such a part is too large, reduce the area to a size enough to accommodate the created numeral
display enclosed in the rectangle. Look at the screen periphery, and you may see that the
screen is enclosed in dotted lines. These dotted lines indicate the size of the part. Each side
of the dotted rectangle has a red mark at the center. The red mark is a handle for changing
the part area. Move the mouse pointer to one of the handles. The mouse pointer shape
changes. Then, drag the handle to change the area size. The following shows an example of
reducing the area.
Then, save this part. Select "Library" on the menu, then select "Save". The dialog box shown
below opens. The Class List field on the left shows the groups of the parts in the library. This
example assumes that the part is saved in "User Parts". Thus, click on "User Parts". Input
"test" in the "Name" field and "test part" in the "Comment" field. Click on the "Save" button to
save the part. Then, select "Close" on the "Library" menu to close the part creation window.
Now, part creation procedures are completed.
2-8
CHAPTER 2
EXAMPLES OF PROGRAMMING
2-1
Creating a Part for Displaying Numerics
2-1-5 Using a created part
"New" to create a new screen.
The screen creation window opens as shown below.
Arrange the part created above on this screen. Select "Create" on the menu, select "Parts",
then select "User Parts". The part selection dialog box opens. Click on "test" created above.
The "Arranged Part Properties" dialog box opens.
(Arrange) button without changing any items.
In this dialog box, only press the OK
2-9
2-1
Creating a Part for Displaying Numerics
The dialog box closes, and the mouse cursor changes into the mouse. In this condition, move
the cursor to a screen where the part should be arranged, then click the left mouse button.
The mouse cursor changes into a rectangular frame, which shows the size of the part. Click
the left mouse button at an intended position on the screen, and the part is arranged at that
position on the screen as shown below.
Then, save this screen. Select "Screen" on the menu, then select "Save". Input "gamen1" in
the "Name" field, "test screen" in the "Comment" field, and "1" in the "Registration No." field in
the "Save Screen" dialog box, then press the "Save" button. Now, the screen with the created
part is saved.
2-10
CHAPTER 2
EXAMPLES OF PROGRAMMING
2-1
Creating a Part for Displaying Numerics
Then, try to download this screen and display it. Connect the downloading cable between the
OIP and the personal computer on which Screen Creator 5 is running, and bring the OIP into
the download condition. Select "Project" on the menu, and select "Download". The download
dialog box appears. Select "Build Transmit" in the download dialog box. When data to be
downloaded is created and it is downloaded properly, bring the OIP into the user mode. A
character string "1234" enclosed in a rectangular frame should be displayed on the OIP.
If an error occurs while creating data, check carefully if the input program is correct. If an error
occurs while downloading data, read carefully the description about downloading in the
Operation Manual and check the serial port channel, baud rate, etc.
1234
2-11
2-1
Creating a Part for Displaying Numerics
2-1-6 Explanation for coded program content
The following program was used.
init
numdsp ..NUM000,1234
init init
conf
end conf
evnt
end evnt
The operation program for this part will be explained in detail below.
(1) init-end init
This portion is called a Configuration Block, and is first executed in this program, which is
generally used for declaring variable or initializing them,
(2) numdsp ..NUM000,1234
The “numdsp” instruction displays a numerical value in a number indicator control. Write
the name of the number indicator control for displaying data and the data to be displayed
following the instruction. "..NUM000" shows the name of the control.
The following rules apply to this naming.
● Control names and naming rules
Screen:
Part on GAMEN:
Control in BUHIN on GAMEN:
Current part on the current screen:
Control in the current part on the current screen:
Note:
GAMEN..
GAMEN.TEST.
GAMEN.TEST.NUM000
.. (Omitted)
..NUM000
Be sure to specify the names only with alphabetical and numerical characters.
Just like the part in this example, if a control is set in the same place as that of a programmed
part, you can omit the screen name and the part name to specify the control.
2-12
CHAPTER 2
EXAMPLES OF PROGRAMMING
2-1
System name (TEST)
Creating a Part for Displaying Numerics
Use screen
Screen name
(GAMEN1)
Control name
(NUM000)
Part name
(TEST)
Part
Screen
The program in part TEST is supposed to indicate control NUM000.
or
GAMEN.TEST .NUM000
..NUM000
The other parameter is the numerical value to be displayed.
by changing this parameter.
1234
You can change the display value
Number indicator control
(NUM000)
Drawing
On screen
Displayed data
init
numdsp ..NUM000,1234
end init Control name
conf
end conf
Program in part
Correlation of this part
This sample program displays a character string "1234" on the number indicator control, which
is the only control for the part.
2-13
2-1
Creating a Part for Displaying Numerics
(3) conf to end conf
This block is called a configuration block, which executes a program between "conf" and
"end conf" only when a part is displayed on the screen (i.e., a part is opened or the screen
is displayed or, to be accurate, immediately before the screen is displayed). The
configuration block in this sample program causes no processing.
(4) evnt to end evnt
This portion is called Event Block. The program between these statements is executed
only when a message is transmitted to this portion. In this example, no program is
processed.
Note: A K-Basic program always requires the “conf”, “end conf”, “evnt”, “end evnt”
statements.
Messages arrive at a part from several devices and parts. For details, try to use the part
actually in the following section and see what messages come.
External
device
External devices such as a PLC, a host
Form inside the part
such as a switch
Operation
program
Other
parts
From inside the part such as a switch
Switch
Part to which messages are to be issued
Message issuance
2-14
CHAPTER 2
EXAMPLES OF PROGRAMMING
2-1
Creating a Part for Displaying Numerics
2-1-7 Modifying a created part
1234
5678
Press this display section.
The numeric value changes.
Modify the created part so that a numerical value may change when the
display section is pressed.
First, read "test" which has been created above. Select "Library", select "Open", then select
"Parts". The "Open Parts" dialog box appears. Select "User Parts" and open "test".
In this example, try to add a switch control to this part in order to use the touch panel. Select
"Create" on the menu, select "Control", then select "Switch". The switch control setting dialog
box is displayed. Press the OK (Arrange) button, since the default setting is not changed in
this example. The mouse cursor changes into the mouse. Click on the part editor window of
the part "test". The mouse cursor changes into a square switch control. Put this in the upper
left of the part area. Since the switch control is a switch of the touch panel (20 dots x 20 dots),
it moves in 20-dot steps.
Note: This switch is a momentary switch.
off when you release the finger.
It is turned on when you press it and turned
2-15
2-1
Creating a Part for Displaying Numerics
Then, try to change the size of the switch control. To change the size, drag a handle around
the switch control with the mouse. Drag the lower right handle of the switch control, since the
area should be expanded to the lower right. By the way, the part was created above without
taking the switch size into consideration, and the size of the enlarged switch may not fit the size
of the part. In such a case, drag the lower right of the part editor window to enlarge the
window sufficiently. Then, enlarge the switch to a size enough to cover the part. Then,
expand the part area identically to the switch size. As a result, the number indicator control
shifts from the center of the part area. Select and move it to a proper position. In addition,
drag the handle to enlarge the rectangular outer frame so that it shows the switch area. The
part shown below is now created.
Then, select "Edit" on the menu, and select "Edit Part Programs" in order to edit the programs.
The program editor window opens. Add programs to the initialization block and event block as
shown below.
2-16
CHAPTER 2
EXAMPLES OF PROGRAMMING
2-1
Creating a Part for Displaying Numerics
init
Line to be
added
local type%, id@, data%
numdsp ..NUM000,1234
end init
conf
end conf
evnt
input type%,id@,data%
if type%=3 and id@=..SWT000 and data%=1 then
numdsp ..NUM000,5678
end if
end evnt
Line to be
added
Try to explain where the program has modified.
The program added to the initialized block is a statement of declaring the variable used in the
Event Block.
The “input” statement added in the Event Block enables to receive messages from the Switch
control. You can know the message sender’s type, message sender’s ID, and data. If the
condition is satisfied in the “if” and “end if” statements, the display of the Number indicator
control changes.
First, the “input” instruction will be explained.
The “input” instruction can read various information from messages.
the “input” instruction is given below.
input
The standard usage of
type%,id@,data%
2-17
2-1
Creating a Part for Displaying Numerics
In this example, the statement reads the type and ID of sender and data as explained below.
type%: The number indicating sender’s type. For example, if the message is send by a switch,
it is set to 3. If it is send by a PLC, it is set to 16. (For details, refer to 3-2, “Message
format” reference.)
id@:
The identification (ID) of sender. For example, if the message is send by a switch, it is
set to the name of the switch. The ID is written in order of the screen name, the part
name and the control name, delimiting each by a period(.).
Example:
GAMEN.BUHIN.NUM000
This ID is called an ID-type constant; it is specific to K-Basic. You can also handle the
ID as a variable by adding a “@” after the variable just like “id@”.
Note:
A message contains sender’s type, ID and data in order.
data%: Data written by sender.
OFF, it is set to 0.
For example, if the switch is ON, it is set to 1.
If the switch is
Next line is “if” and “end if” statements.
if type%=3 and id@=..SWT000 and data%=1 then
: : : : : : : : : : : : : : : :
end if
Condition “type%=3” following “if” means a message from a Switch control. “id@=..SWT000”
means the ID of the Switch control. “data%=1” means that the switch is ON. Inserting “and”
between these three conditions enables the instruction of the next line executed if all the
conditions are satisfied. If the “if” statement consists only of “type%=3 and id@=..SWT000”,
this condition is satisfied twice, when the switch is pressed and when it is released. In this
example, the operation is restricted to be executed only when the switch is pressed after
“data%=1” is added.
Pressing the switch
generates an event.
Releasing the switch
generates an event.
Switch
Switch
Presshere
Releae
Contents of message
Contents of message
input type%、 id@、 data%
input type%、 id@、 data%
3..SWT000
1
3..SWT000
0
Note: If the switch type is set to “Momentary”, it generates two messages “when it is
pressed and when it is released”.
2-18
CHAPTER 2
EXAMPLES OF PROGRAMMING
2-1
Creating a Part for Displaying Numerics
These programs are so modified to execute the numdsp instruction and display "5678" on the
number indicator control when the if statement is satisfied.
The part is almost completed now. Save the programs in the same manner as described in
2-1-2. Also save the part as described in 2-1-4. Though a warning message is given since
the part "test" has already been registered, overwrite it to replace the old part with the new part.
Now, use this part actually. Open "gamen1" created above again, and replace the old part
with the new "test". To replace the old part, click on it, select "Edit" on the menu, then select
"Delete". From now on, arrange the new part, create the screen data, and download it to the
OIP in the same manner as described in 2-1-5. When the screen appears, "1234" must be
displayed on the screen as previously. Press a point inside the frame, and you can see that
"1234" changes into "5678".
In K-Basic, an “input” statement is used to receive messages and “if and “end if” statements
used to judge various messages and execute operations.
For how to receive messages of other events, see the examples introduced in subsequent
chapters.
2-19
2-2
Creating a Part to be Linked to a PLC Device
2-2 Creating a Part to be Linked to a PLC Device
All the programs in this examples are for Mitsubishi PLCs. If you use a PLC of other maker,
change the station number and device name of those programs and select the PLC type to be
used in setting a connecting device setting.
2-2-1 Numeral displays
Display of D10 value
100
100 D10
PLC
Create the part that displays a PLC value on the screen.
Control to use
One Number indicator control (NUM000)
Exterior view of the part
Figure
1 00
Number indicator control
(NUM000)
2-20
CHAPTER 2
EXAMPLES OF PROGRAMMING
2-2
Creating a Part to be Linked to a PLC Device
An example of the program is given below.
init
local type%, id@, data%
cyclic 00~D10
end init
conf
end conf
evnt
input type%,id@,data%
if type%=16 and id@=00~D10 then
numdsp ..NUM000,data%
end if
end evnt
Configuration Block
cyclic 00˜D10
The “cyclic” instruction reads the value of a device “D10” of
the PLC whose station number is set to “00”.
The “cyclic” instruction is used to keep observing of PLC device values.
The “cyclic” instruction reads PLC device values periodically. When a PLC device value
changes, the “cyclic” instruction transmits a messages to the Event Block. Type the station
number and device name to be read after “cyclic”. K-BASIC rules require you to link the
station number and the device name by a tilde “~”.
This instruction transmits a message when ever the screen changes.
Configuration Block
Noting is processed.
Event Block
input type%,id@,data%
The “input” instruction reads the messages transmitted to the part. The format of the
messages are in order of “type%” (16), id@ (00~D10) and data% (PLC value: 00~D10).
if type%=16 and id@=00˜D10 then
: : : : : : : : : : :
end if
A condition “type%=16” put after “if” means a message from the PLC. “id@=00~D10”
means that the ID of the device that has issued this message is 00~D10. Inserting “and”
between these two items enables the subsequent programs to be executed only when both
the conditions are satisfied.
2-21
2-2
Creating a Part to be Linked to a PLC Device
numdsp ..NUM000,data%
The “numdsp” instruction displays data specified as a variable “data%” in the number
indicator control specified as “..NUM000”. The variable “data%” in the “numdsp” instruction
has the same value as that of “data%” of the “input” instruction (PLC device). This displays
the PLC device value on the screen.
The flow of this program is as follows: The PLC device value is observed because the “cyclic”
instruction is used in the Initialization Block. If the PLC device value changes, a message is
issued to this part and the newest PLC device value is displayed on the screen by “numdsp”
instruction.
Try to change the numerical value of the device used in this program from the PLC.
see the numerical value on the screen changes simultaneously.
You can
How to make the part easier to use
If you want to observe plural PLC devices on one screen, you must rewrite and arrange two
or more parts accordingly, each of which has a different device name. This will make you
troublesome. The “Parameter” function will make this operation easier.
cyclic [station-number]˜[num connected-device-address]
A character string enclosed in a pair of brackets, [ ], as shown above is called a template. (A
maximum of 32 half-size characters can be written in [ ].) Since a character string written in
brackets is displayed in the template of the corresponding part, the part can be used like a
standard part. A a result, you only have to rewrite an operation parameter to change any
device name without the need of changing the program.
A program example using templates is shown below.
init
local type%, id@, data%
cyclic [station number]~[num connected-device address]
end init
conf
end conf
evnt
input type%,id@,data%
if type%=16 and id@=[station number]~[num connected-device name]
then
numdsp ..NUM000,data%
end if
end evnt
2-22
CHAPTER 2
EXAMPLES OF PROGRAMMING
2-2
Creating a Part to be Linked to a PLC Device
The "station number" and "num connected device address" templates are displayed in the
"Property of arranged part" dialog box of the part having this operation program as shown below.
It is possible to input values for these templates of each arranged part.
2-23
2-2
Creating a Part to be Linked to a PLC Device
2-2-2 Indicator lamps
Display of M0 bit status
1 M0
Goes on when the bit is turned on.
Goes out when the bit is turned off.
PLC
Create the part that displays the PLC bit value in a lamp.
Control to use
One Lamp control (LAM000)
Exterior view of part
Figure
Lamp control
Note: The Lamp control has a function to change the OFF color of its area to the ON
color if it is set to ON. So, the figure of the Lamp area must be painted with the
OFF color.
2-24
CHAPTER 2
EXAMPLES OF PROGRAMMING
2-2
Creating a Part to be Linked to a PLC Device
A program of a indicator lamp to be linked to a PLC device is given below.
init
local type%, id@, data%
cyclic [station-number]˜[lamp connected-device-address]
end init
conf
end conf
evnt
input type%,id@,data%
if type%=16 and id@= [station-number]˜[lamp connected-device-address]
then
lampdsp ..LAM000,data%
end if
end if
conf
cyclic [station-number]˜[connected-device-address]
end conf
evnt
input type%,id@,data%
if type%=16 and id@=[station-number]˜[connected-device-address] then
lampdsp ..LAM000,data%
end if
end if
Initialization Block
As explained above, a “cyclic” instruction is written in this block.
Configuration Block
Noting is processed.
Event Block
The “input” and “if” instructions are the same as that given in 2-2-1.
lampdsp ..LAM000,data%
The “lampdsp” instruction displays the ON or OFF color in the Lamp control. When the
“data%” value is 0, the instruction displays the OFF color. When it is 1, the instruction displays
the ON color.
The lanm displayed part has been created. Try to set and reset the PLC device bit specified in
the program from the PLC. You can see the lamp color changes.
2-25
2-2
Creating a Part to be Linked to a PLC Device
2-2-3 Switches
Set the M0 bit to 1 or 0.
1 M0
Pressing this switch sets the M0
bit to 1; releasing this switch sets
the M0 bit to 0.
PLC
Create the part that writes values 1 and 0 to the PLC.
Control to use
One Switch control (SWT000)
Exterior view of part
Figure
Switch control
A program of a switch to be linked a PLC device is given below.
init
local type%, id@, data%
end init
conf
end conf
evnt
input type%,id@,data%
if type%=3 and id@=..SWT000 and data%=1 then
[station-number]˜[connected-device-address]=1
else if type%=3 and id@=..SWT000 and data%=0 then
[station-number]˜[connected-device-address]=0
end if
2-26
CHAPTER 2
EXAMPLES OF PROGRAMMING
2-2
Creating a Part to be Linked to a PLC Device
end evnt
Initialization Block
You don’t have to use any “cyclic” instruction in this example because a value is only written
to the PLC.
Configuration Block
Nothing is processed.
Event Block
input type%, id@, data%
The “input” instruction reads messages from the switch. Messages are read in order of
“type%=3”, “id@=...SWT000.”, and data%” =ON/OFF (1 or 0) of switch.
if type%=3 and id@=..SWT000 and data%=1 then
: : : : : : : : : : : : : :
else if type%=3 and id@=..SWT00 and data%=0 then
: : : : : : : : : : : : : :
end if
“type%=3” means the message from the switch. “id@=..SWT000” means the ID of the
switch control. “data%=1” means that the switch is pressed and “data%=0” means that the
switch is released. The following instruction is executed when these three conditions are
satisfied simultaneously.
[station-number]˜[connected-device-address]=1
In this statement, 1 is written in the PLC device. 0 may be written in the same manner.
The "if" statement of this program detects the moment the switch is pressed and writes 1 in the
PLC device. The "else if" statement detects the moment the switch is released and writes 0 in
the PLC device.
2-27
2-2
Creating a Part to be Linked to a PLC Device
2-2-4 Indicator switches
Set the M0 bit to 1 or 0.
1 M0
Pressing this switch sets the M0
bit to 1 and at the same time
displays the result in the lamp.
PLC
Create the part that writes values 1 and 0 to the PLC and
displays the result in the lamp.
Control to use
One Switch control (SWT000) and one Lamp control (LAM000)
Exterior view of part
Figure
Lamp control
Switch control
These two contorls are placed, overlapping each other.
A program of an indicator lamp switch is given below.
init
local type%, id@, data%
cyclic[station-number]˜[connected-device-address]
end init
conf
cyclic[station-number]˜[connected-device-address]
end conf
evnt
2-28
CHAPTER 2
EXAMPLES OF PROGRAMMING
2-2
Creating a Part to be Linked to a PLC Device
input type%,id@,data%
if type%=3 and id@=..SWT000 and data%=1 then
[station-number]˜[connected-device-address]=1
else if type%=3 and id@=..SWT000 and data%=0 then
[station-number]˜[connected-device-address]=1
else if type%=16 and id@=[station-number]˜[connected-device-address] then
lampdsp ..NUM000,data%
end if
end evnt
This program consists of a lamp part and a switch part.
Initialization Block
In this example, you can use a “cyclic” instruction to observe the PLC bit device that turns
on/off the indicator lamp according to the device value.
Configuration
Nothing is processed.
Event Block
input type@,id@,data%
The “input” instruction reads messages from the switch and the PLC. If the message is
from the switch, “type%” is set to 3, “id@” is set to ..SWT000, and “data%” is set to switch
ON/OFF status (1 or 0). If the message is from the PLC, “type%” is set to 16, “id@” is set
to the device ID (station number and device name), and “data%” is set to device value.
if type%=3 and id@=..SWT00 and data%=1 then
: : : : : : : : : : : : : :
else if type%=3 and id@=..SWT000 and data%=0 then
: : : : : : : : : : : : : :
else if type%=16 and id@=[station-number]˜[connected-device-address]
: : : : : : : : : : : : : :
end if
In this portion, the message from the switch writes a value in PLC devices and the message
from PLC turns on/off of the lamp.
2-29
2-3
Creating a Part to be Linked to an External Device
2-3 Creating a Part to be Linked to an External
Device
2-3-1 Display for host computer
Connection to the host
100
Create the part that displays the value transmitted from the host
on the screen.
Control to use
One Number indicator control (NUM000)
Exterior view of part
Figure
1 00
Number indicator control
(NUM000)
A program of a numeral display used for the host computer is given below
init
local type%, id@, data%
opencom HST
end init
conf
end conf
conf
opencom HST
2-30
CHAPTER 2
EXAMPLES OF PROGRAMMING
2-3
Creating a Part to be Linked to an External Device
end conf
evnt
input type%,id@,data%
if type%=22 then
numdsp ..NUM000,data%
end if
end evnt
Initialization Block
The “opencom” instruction is written in the Configuration Block.
opencom HST
The “opencom” instruction declares receiving of messages from external devices.
the following external device names after the “opencom” instruction.
HST:
BCR:
TKY:
Specify
Host computer
Bar-code reader
Ten-key pad
Configuration Block
Nothin is processed.
Event Block
input type%,id@,data%
The “input” instruction reads messages from the host computer.
if type%=22 then
: : : : : : :
end if
The condition “type%=22” put after “if” means a message from the host computer. If the
message is transmitted from the host computer, the statement following “then” will be
executed.
numdsp ..NUM000,data%
This block displays data on the numeral display. A numeric value from the host is input in
"data%" in this block. This program ends here. The configuration block of this program
receives a message from the host, and the event block displays the numerical data in the
message from the host.
Note: For how to send data from the host computer, refer to the “Communication
Manual”.
2-31
2-4
Creating a Part for Controlling Others
2-4 Creating a Part for Controlling Others
2-4-1 Part for calling others from touch panel
Press
here.
This part is opened.
Create part open switch.
Control to use
One Switch control (SWT000)
Exterior view of part
Figure
Lamp control
Switch control
(SWT000)
A program of a part for calling other parts from the touch panel is given below.
init
local type%, id@, data%
end init
conf
end conf
evnt
input type%,id@,data%
if type%=3 and id@=..SWT000 and data%=1 then
2-32
CHAPTER 2
EXAMPLES OF PROGRAMMING
2-4
Creating a Part for Controlling Others
open .[name-of-part-to-be-opened].,1
end if
end evnt
Initialization Block
Nothing is processed except that the block declares local variables.
Configuration Block
Nothing is processed.
Event Block
input type%,id@,data%
The “input” instruction reads messages from the switch control.
if type%=3 and id@=..SWT000 and data%=1 then
: : : : : : : : : : : :
end if
The portion indicates that the program between the “if” and “end if” statements is executed
when the switch is pressed.
open.[name-of-part-to-be-opened].,1
The “open” instruction changes the part state specified by ID from close to open. If the
numerical value following the part name is 1, the Configuration Block of the opened part is
executed when the part opens. If the value is 0, the Configuration Block is not executed.
This block uses an operation parameter for allowing a called part to be changed easily.
This program ends here. The configuration block of the part specified in the operation
parameter is executed and the part is opened when the switch is pressed.
Note: Close the part specified for [name-of-part-to-open] on the screen.
2-33
2-4
Creating a Part for Controlling Others
2-4-2 Part for sending/receiving numerics to/from others
Transmission of
numeric data
25
25
Reception of
numeric data
Press
here.
Create a part that transmits numeric data and a part
that receives numeric data.
First, create a part that transmits numerical data.
Control to be use
One Number indicator control (NUM000) and one Switch control (SWT000)
Exterior view of part
25
Figure
Switch control (SWT000)
Number indicator control
(NUM000)
These two controls overlap each other.
A program of a part for sending numerical data is given below.
init
local type%, id@, data%
conf
numdsp ..NUM000,[numeric-value-to-be-displayed]
end init
conf
end conf
2-34
CHAPTER 2
EXAMPLES OF PROGRAMMING
2-4
Creating a Part for Controlling Others
evnt
input type%,id@,data%
if type%=3 and id@=..SWT000 and data%=1 then
print [numeric-value-to-be-displayed]
send .[remote-destination-part-name].
end if
end evnt
Initialization Block
numdsp ..NUM000,[numeric-value-to-be-displayed]
The “numdsp” instruction in the Configuration Block is necessary to display a numerical
value from the beginning.
Configuration Block
Nothing is processed.
Event Block
input type%,id@,data%
The “input” instruction reads messages from the switch control.
if type%=3 and id@=..SWT000 and data%=1 then
print [numeric-value-to-be-displayed]
send .[remote-destination-part-name].
end if
This portion executes “print” and “send” instructions when the switch is pressed.
print [numeric-value-to-be-displayed]
The “print” instruction transmits messages to other parts. A message comprises a type, an
ID, and a “display value” described here. If you want to transmit two or more numeral
values, you can chain them by delimiting each value by a comma (‘).
Example print 123,456,789
In this case, the “input” instruction set for the part receiving data is divided into three as
shown below.
Example input type%,id@,data1%,data2%,data3%
In this example, “data1%” is read to 123, “data2$” is read to 456, and “data3%” is read to
789.
send .[remote-destination-part-name].
2-35
2-4
Creating a Part for Controlling Others
The “send” instruction transmits a message generated by the “print” instruction to the
specified part ([remote-destination-part-name]).
Be sure to use print” and “send”
instructions in combination.
When [numeric-value-to-be-displayed] is 25
Part (BUHIN1)
25
Contents of print
message
2,TEST.BUHIN1.,25
Part (BUHIN2)
Press this switch
Transmission
(send)
Screen (TEST)
Print
send
Message creation
Message transmission to the specified part
The program of this part ends here. This program sends a message containing a [display
value] to the [remote destination part] specified in the operation parameter when the switch is
pressed.
In the next place, create a part that receives numerical data.
Control to use
One Number indicator control (NUM000)
Exterior view of part
Figure
25
Number indicator control
(NUM000)
A program of a part that receives numerical data is given below.
init
local type%, id@, data%
end init
conf
end conf
evnt
input type%,id@,data%
if type%=2 then
numdsp ..NUM000,data%
end if
2-36
CHAPTER 2
EXAMPLES OF PROGRAMMING
2-4
Creating a Part for Controlling Others
end evnt
Initialization Block
Nothing is processed except that this block defines local variables.
Configuration Block
Nothing is processed.
Event Block
input type%,id@,data%
The “input” instruction reads messages from the specified part.
if type%=2 then
numdsp ..NUM000,data%
end if
The condition “type%=2” means receiving of a message from the part.
“data%” and displayed by the “numdsp” instruction.
The message is set in
The program of this part ends here. When another part sends numerical data to this part, this
program displays the numerical data.
Next, try to paste two parts on the screen and use them actually. The operation parameter
[destination-part-name] must coincide with the name of the part to receive the data. If you
press the switch of the part that transmits numerical data, the same value will be displayed in
the part that receives data.
2-37
2-5 Creating a Part for Using a Timer
2-5 Creating a Part for Using a Timer
2-5-1 Part for counting up
3
When the switch is pressed, the
timer start operation. When
pressed again, it stops.
The numeric value is incremented
per second like 4, 5, 6.
Create a timer function part.
Control to use
One Number indicator Control (NUM000) and one Switch Control (SWT000)
Exterior view of part
3
Figure
Switch control (SWT000)
Number indicator control
(NUM000)
These two controls overlap each other.
A program of a part that increments a numerical value is given below.
init
local type%, id@, data%
static timeid@
static flag%
static number%
flag%=0
numdsp ..NUM000,0
end init
conf
end conf
2-38
CHAPTER 2
EXAMPLES OF PROGRAMMING
2-5 Creating a Part for Using a Timer
evnt
input type%,id@,data%
if type%=3 and id@=..SWT000 and data%=1 then
if flag%=0 then
timeid@=opentim()
settim timeid@,10,1
starttim timeid@
flag%=1
else if flag%=1 then
stoptim timeid@
closetim timeid@
flag%=0
end if
else if type%=4 then
number%=number%+1
numdsp ..NUM000,number%
end if
end evnt
Initialization Block
The definitions of the local variables and static variables are written.
static timeid@
static flag%
static number%
You can use the “static” instruction to retain the contents of variables during a program
execution. In this example, these instructions are used to retain the value of the timer ID,
the timer ON/OFF flag, and the display value. Some “static” instructions can also be written
as a group. The list of parameters also can be chained, delimiting each parameter by a
comma in this case.
Example: static timeid@,flag%,number%
flag%=0
The statement “flag%=0” initializes the flag variable which indicates the timer ON/OFF state.
numdsp ..NUM000,0
The “numdsp” instruction displays “0” first at starting.
Configuration Block
Nothing is processed.
Event Block
input type%,id@,data%
2-39
2-5 Creating a Part for Using a Timer
The “input” instruction reads messages from the Switch control and the timer.
if type%=3 and id@=..SWT000 and data%=1 then
: : : : : : : :
← When the switch is pressed
else if type%=4 then
: : : : : : : :
← When messages from the timer are read
end if
An operation to be performed when the switch is pressed and an operation to be performed
when a message is received from a timer are described after “then”. A message is
received from the timer each time the displayed value is counted. (A message is
transmitted every second.)
If the switch is pressed, the following program is executed:
if type%=3 and id@=..SWT000 and data%=1 then
if flag%=0 then
timeid@=opentime()
settim timeid@,10,1
starttim timeid@
flag%=1
else if flag%=1 then
stoptim timeid@
closetim timeid@
flag%=0
end if
When the timer stops (flag%=0), the program following the “if flag%=0 then” statement is
executed.
timeid@=opentim()
This function acquires the ID of the timer to be used.
“timeid@”.
The ID is assigned for a variable
settim timeid@,10,1
This instruction sets the time limit of the timer to generate events. You can set the time limit
in units of 100 milliseconds. Parameter “1” following “10” means that the timer generates
events repeatedly. If it is set to “0”, the timer generate only an event.
starttim timeid@
This instruction starts the timer.
You must use these three instructions as a set to operate the timer.
flag%=1
2-40
CHAPTER 2
EXAMPLES OF PROGRAMMING
2-5 Creating a Part for Using a Timer
In this example, the variable “flag%” is used to indicate and retain the timer state.
means that the timer is in operation.
“flag%=1”
The statements following “else if” stop the timer in operation (flag%=1).
stoptim timeid@
This instruction cancels counting up the timer.
closetim timeid@
This instruction cancels the use of the timer obtained with “opentim” and returns the timer to
the system.
You can use up to 16 times.
Unnecessary timers must be returned to the system.
flag%=0
flag%=0 indicates that the flag is set to 0 because the timer stopped.
When a message is transmitted from the timer, the following program is executed.
else if type%=4 then
number%=number%+1
numdsp ..NUM000,number%
end if
Each time a message is transmitted from the timer, the numerical value to be displayed
(variable “number%) is incremented by “1” and displayed in the Number indicator control.
The program ends here. The initialization block of this program declares the variable and
displays the default value of 0. The event block processes a message from the switch or timer.
As a result, this program alternates two conditions. Every time the switch is pressed, a
displayed value increased by one in one condition or such increase stops in the other condition.
2-41
2-6
Editing a Program for a Displayed Part
2-6 Editing a Program for a Displayed Part
To edit the program of a part arranged on the screen, double-click on that part in the screen
creation window. The "Property of arrangement part" window opens. Select "Program" in the
window.
The program editor window opens.
2-42
CHAPTER 2
EXAMPLES OF PROGRAMMING
CHAPTER 3
CODING RULES
3CODING RULES
3-1
3-1
Usable Characters
3-1 Usable Characters
Half-size alphanumeric characters (0x20 to 0x7f ASCII codes), half-size Kana characters (0xa0
to 0xdf ASCII codes), and full-size characters (2-byte codes) can be used to write programs.
As for the full-size characters, character strings enclosed in double quotation marks, " " , are
valid. As for the Kana characters, device names and character strings enclosed in double
quotation marks, " " , are valid. Alphabetic characters can be written in either capital letters or
small letters. However, capital alphabetic letters and small alphabetic letters are discriminated
from each other when they are used in character strings.
What uppercase and lowercase letters are not identified means that variable, function, and
subroutine names used in K-Basic are handled as follows:
Label means the same as LABEL.
variable means the same as Variable.
3-2
CHAPTER 3 CODING RULES
3-2
Special Characters
3-2 Special Characters
Some characters in OIP K-Basic have special meanings. These characters are called special
characters. The following special characters are used in OIP K-Basic.
Period “.”
Used to delimit screen, part, and control. Also used to represent a
decimal point.
Example of using periods to delimit screen, part, and a control
GAMEN.BUHIN.PRIM
BUHIN.
Example of using periods to represent decimal points
1.23, 0.01
&, &0, &H
& and &0 are used to represent an octal number.
&H is used to represent a hexadecimal number.
&7 (octal notation) represents 7 in decimal notation.
&10 and &010 (octal notation) represent 8 in decimal notation.
&H20 (hexadecimal notation) represents 32 in decimal notation.
%, $, !, @
Used to represent the types of variables or functions. These special
characters are added to the ends of variable names or function names.
%:
Represents an integer-type variable. (VAR%)
$:
Represents a character-type variable. (MOJI$)
!:
Represents a floating-point-type variable. (FLOAT!)
@:
Represents an ID-type variable. (ID@)
Tilde “ ˜ ”
Used to delimit a station number and a PLC device name.
00˜D100: 00 is a station number and D100 is a PLC device address.
“ [ ”, “ ] ”
Used when operation parameters are written.
conf
cyclic [station-number]˜[connected-device-address]
end conf
Apostrophe “ ’ ”
Symbol for indicating the start of a comment. The portion from this symbol
to the end of a line is treated as a comment. An apostrophe is used as
follows:
conf
global var(3,2)
’ This is the declaration of a variable.
end conf
“:”
Used to delimit a label. A label is used as a GOTO jump destination or a
subroutine name.
evnt
if var% = 0 then goto LABEL
aa% = bb% + 1
LABEL: aa% = 10
end evnt
3-3
3-3 Constants
3-3 Constants
OIP K-Basic uses character constants, integer-type constants, floating-point-type constants,
and ID-type constants.
Character constant
Integer-type constant
Floating-point-type
ID-type constant
3-4
CHAPTER 3 CODING RULES
A character string enclosed in double quotation marks (”) is called a
character constant. Character strings of up to 80 bytes can be
enclosed in double quotation marks.
“ABCDEF” and “1234”, etc., are character constants.
Integer-type constants can be represented in the octal, decimal, and
hexadecimal formats.
&123,&66 (octal notation) & or &O is added to the beginning of
numbers 0 to 7.
100,322 (decimal notation) Values from -2147483648 to
2147483647 can be assigned.
&H123,&HFF
&H is added to the beginning of
(hexadecimal notation) characters 0 to F.
Floating-point-type constants can consist of values from
1.70141E+38 to constant +1.70141E+38. The number of significant
digits is 6 digits.
A floating-point-type constant can be written like 1.23,0.001,-2,3E-4.
E-4 indicates the -4 power of 10.
Screen names, part names, primitive names, logical device names,
graphic names, text names, and PLC device names can be written
as ID-type constants.
• Screen name, part name, and primitive name
A screen name can be written like SCREEN.. and a part name
can be written as SCREEN.PART. A primitive name can be
written like SCREEN.PART.PRIM.
• Logical device name
In OIP BASIC, HST (host computer), PRN (printer), BCR (bar
code reader), MCR (magnetic card reader), TKY (ten-key pad),
ICC (memory card), and SIO (serial port) can be written as
logical device names. Logical devices are connected to the
OIP.
• For figures and texts, the names assigned to register them can
be written as they are.
• PLC device names are written as 00˜D100 and 00˜M10, etc.
3-4
Constant Declaration
3-4 Constant Declaration
In Screen Creator 5, it is possible to declare constants. Declaring constants means giving
constant names to constants in frequent use and using such constant names, instead of
constant values, in programs. The character constants, integer constants, and real number
constants can be declared. It is impossible to declare ID constants. Constant declaration
allows the user to change the values of constants in programs at a time. It also makes
programs easy to read.
Declare a constant as shown below.
const constant name = constant value
A constant name is a character string which is created in the same manner as creating a
variable name and enclosed in a pair of # symbols. The constant value is as described in 3-3
above.
Example: const #pai# = 3.1415
When the "pai" constant is declared as shown above, all "pai" constants in the programs are
replaced with the value of 3.1415.
Constants can be declared in portions other than the screen operation programs on a global
screen. If a constant is declared in a screen operation program on a global screen, a
compilation error occurs.
3-5
3-5
Variables
3-5 Variables
Alphanumeric characters and an underscore “_” can be used as variable names. (Uppercase
and lowercase letters of variable names are not identified.) A variable name cannot begin with
a number. Write each variable name with up to 20 characters (bytes).
Add one of the type declaration characters $, %, ! and @ in order to the end of a constant name
to express the type of the constant. The real number constant is the only exception. No type
declaration character is added to the end of the real number constant.
3-5-1 Classification of variables
Character-type variable
Variable that stores characters. A variable ending with “$” is a
character-type variable. For the default, up to 20 characters
(bytes) can be stored in a character-type variable. Use the
STRING command to increase the number of characters.
Integer-type variable
Variable that stores an integer.
an integer-type variable.
Floating-point-type
Variable that stores a floating-point number. A variable ending
variable with “!” is a floating-point-type variable. Variables that
do not end with ! are also treated as floating-point-type
variables.
ID-type variable
Variable that stores ID-type values such as a screen name, a
part name, a primitive name, and a logical device name. A
variable ending with “@” is an ID-type variable.
Array-type variable
A character-, integer-, floating-point-, or ID-type variable
followed by the element(s) enclosed in parentheses is an
array-type variable. Array-type variables can be used by
declaring their arrays in the DIM command. They are usually
written as follows:
GLOBAL VAR$(2,3), VAR1%(10)
An array element can be usually referenced by specifying the
subscript value in the parentheses. The subscript starts at 0.
That is, VAR1%(10) is an integer-type array having 11
elements. Array-type variables can handle two-, three-, and
ten-dimensional arrays.
Note:
A variable ending with “%” is
Variables followed by different symbols (!, @, %, and $) are handled as different
variables although their names are the same. Variables are also handled as different
variables, depending on whether they have an array.
VAR!, VAR@, VAR%, VAR$, VAR!(5), VAR@(5), VAR%(5), VAR$(5) are all
different variables.
3-6
CHAPTER 3 CODING RULES
3-5
Variables
3-5-2 Types of Variables
The variables may be classified according to the storage method and difference between the
ranges of the program to which can be referred in addition to the types.
Global variables
Variables defined in the global declaration. Global variables
are the common variables that can be referenced by all the
global-declared BASIC programs.
This variable can be referenced in a program where the variable
is declared, as far as it is declared as a global variable.
When the OIP is started, global variables are initialized only
once. Integer- and floating-point-type global variables are
initialized to 0. Character- and ID-type global variables are
placed in the status in which nothing is written. A global
variable is declared as follows:
GLOBAL VAR%
When this declaration is made in two or more programs, they
reference the same variable.
Static variables
Variables defined in the static declaration. Static variables can
be referenced only in the declared program. When the OIP is
started, static variables are initialized only once. Integer- and
floating-point-type static variables are are initialized to 0.
Character- and ID-type static variables are placed in the status
in which nothing is written. A static variable is declared as
follows.
STATIC VAR%
Backup variables
Backup variables have almost the same characteristics as
global variables except that their contents are retained even if
the OIP power is turned off.
Backup variables are not
initialized even if the power is turned on again.
However, a backup variable which hasn't been initialized is
initialized to 0 when new screen data is down-loaded.
A backup variable is declared as follows:
BACKUP VAR%
When this declaration is made in two or more programs, they
reference the same variable.
Backup variables can be used for only OIP units with
built-in backup memory. The backup memory stores data
in it even when the OIP is turned off. If backup variables
are used for an OIP with no backup memory, they cause
the same functions as global variables. In other words,
the values of backup variables are lost when the OIP is
turned off and are initialized to 0's when the OIP is turned
on again.
An OIP with backup memory uses the backup memory for
backup variables and RAM files (MS-DOS file systems or
memory files). Thus, the sum of the memory size used
for backup variables and the memory size used for RAM
files must be less than the total size of the backup
memory. The memory size used for RAM files is
3-7
3-5
Variables
specified in "RAM File Setup" of "System Setup" on the
OIP system screen.
Models
GC56LC
GC55EM
GC53LC
GC53LM
Backup memory sizes
63KB
63KB
None
None
Backup variable operations
Can be backed up.
Can be backed up.
Regarded as global variables.
Regarded as global variables.
Local variables
Local variables denote variables defined by local declarations
(LOCAL) and undeclared variables used in portions other than
the screen programs on global screens. Local declaration is
not allowed in the screen programs on global screens.
Use LOCAL for local declaration as far as possible in Screen
Creator 5, though it is possible to use DIM for local declaration
of arrangement variables and STRING for local declaration of
character string variables for compatibility with K-Basic of
GCSGP3. Local variables are initialized every time programs
are executed.
Each integer variable or real number variable is initialized to 0.
Each character variable or ID variable is initialized to a blank.
A local variable is declared as shown below:
LOCAL VAR%
Auto variables
Auto variables denote variables defined by auto declarations
(AUTO).
Auto variables can be defined and referred to in functions only.
Auto variables are initialized every time functions are executed.
Each integer variable or real number variable is initialized to 0.
Each character variable or ID variable is initialized to a blank.
An auto variable is declared as shown below:
AUTO VAR%
3-5-3 Checking variable types and variable interpretation
in compilation
When screen data is created, the compiler executes syntactic analysis and processing of the
program. If the program contains global declaration, static declaration or other distinctive
declaration, processing is executed according to such declaration. In some cases, the type is
interpreted and processing is done tacitly. If you do not keep such tacit interpretation in mind
as a rule of writing programs, programs may not function as you expect. This section
describes which types are interpreted tacitly.
3-8
1)
Variables contained in screen programs on global screens not defined by global
declaration, static declaration or backup declaration are interpreted as global variables
tacitly, and variables are created automatically.
2)
Variables contained in screen programs on screen other than global screens and variables
contained in all part programs not defined by global declaration, static declaration, backup
declaration, local declaration or auto declaration are interpreted as local variables tacitly,
and variables are created automatically.
CHAPTER 3 CODING RULES
3-5
Variables
Tacit variable generation as shown above is one of the features of general BASIC languages.
However, such a feature may not be desirable for some programmers. For example, if an
incorrect variable name is written in a program, a local variable or global variable is generated
automatically, while the programmer does not realize it. It is quite difficult to find such an error,
since compilation of the program cannot find it.
To avoid such a trouble, Screen Creator 5 is capable of giving an error when it finds a variable
with no declaration while it compiles a program. Normally, Screen Creator 5 goes not give an
error. When a LOCAL CHECK statement is written in a program, Screen Creator 5 gives an
error when it finds a variable with no declaration. For details of using the LOCAL CHECK
statement, see Chapter 4 "Instruction Reference". To make programs as easy to read as
possible and to minimize errors, it is recommended that the "LOCAL CHECK 1" statement be
written at the beginning of a program to validate the error check function and all variables be
declared.
3-5-4 Initializing variables
Screen Creator 5 can initialize a variable when it is declared. To initialize a variable, write an
assignment statement behind declaration of the variable as shown below.
Example: STATIC VAR% = 12
In the case of an arrangement variable, the initialization data is complicated. Use "{" and "}" to
list the initialization data. In the case of one-dimensional arrangement, write elements having
subscripts which begin with 0.
Example:
GLOBAL ARRAY%(5) = {0, 1, 2, 3, 4, 5}
In the case of multi-dimensional arrangement, write elements so that the subscripts increase
from the right.
Example:
GLOBAL ARRAY%(2, 3) = {{0, 1, 2, 3, 4}, {4, 5, 6, 7}, {8, 9, 10, 11}}
GLOBAL ARRAY%(1, 2, 3) = {{{0, 1, 2, 3, 4}, {4, 5, 6, 7}, {8, 9, 10, 11}},
{{12, 13, 14, 15}, {16, 17, 18, 19}, {20, 21, 22, 23}}}
If the type of the initialization data is different from the type of the variable, the data is initialized
in the variable type.
It is impossible to initialize ID variables. Other types of variables can be initialized.
Initialization applies to all types of variables. Note that, however, if initialization of backup
variables is specified, backup variables are initialized every time the OIP is turned on and
accordingly the purpose of using backup variables, i.e., storing values even after turning off the
power, is not achieved.
It is also possible to initialize variables into backup variables. Note that, however, backup
variables are initialized every time the OIP is activated and the purpose of using backup
variables such as memorizing variable values is is not fulfilled in this case.
Global variables, static variables and backup variables are initialized before all blocks in all
programs are executed.
The position of initializing a variable depends on the variable type and where declaration is
done. Global variables, static variables and backup variables are initialized before the
program blocks are executed. Local variables are initialized when the block where the local
variables are declared are executed. Therefore, note that, if local variables are declared in
configuration blocks or event blocks, the variables are initialized every time these blocks are
executed. Auto variables are initialized when the functions for which the auto variables are
declared are called and executed.
3-9
3-6
Expressions and Operations
3-6 Expressions and Operations
This section explains operations performed between variables and constants.
Arithmetic operators
^ (exponent operation)
Exponent operation is written like X ^ Y.
the Y power of X.
This represents
- (minus sign)
-100,-VAR!
Integer- and floating-point-type numeric
values are converted to minus values.
* (multiplication)
VAR1*VAR2
VAR1 is multiplied by VAR2.
/ (division)
VAR1/VAR2
VAR1 is divided by VAR2.
¥ (division)
VAR1¥VAR2
VAR1 is divided by VAR2.
becomes an integer-type value.
+ (addition)
VAR1+VAR2
VAR2 is added to VAR1.
- (subtraction)
VAR1-VAR2
VAR2 is subtracted from VAR1.
MOD (remainder of integers)
VAR1 MOD VAR2
VAR1 by VAR2.
The quotient
The remainder is obtained by dividing
Relational operators
Relational operators are used to compare two numeric values.
true (-1) or false (0).
3-10
The comparison result is
= (equal to)
= is used like VAR1=VAR2. When two values (VAR1 and
VAR2) are equal, the result becomes true.
<> (not equal to)
<> is used like VAR1<>VAR2. When two values (VAR1
and VAR2) are not equal, the result becomes true.
< (less than)
< is used like VAR1<VAR2. When VAR1 is less than
VAR2, the result becomes true.
> (greater than)
> is used like VAR1>VAR2. When VAR1 is greater than
VAR2, the result becomes true.
<= (less than or equal to)
<= is used like VAR1<=VAR2. When VAR1 is less than or
equal to VAR2, the result becomes true.
>= (greater than or equal to)
>= is used like VAR1>=VAR2. When VAR1 is greater
than or equal to VAR2, the result becomes true.
CHAPTER 3 CODING RULES
3-6
Expressions and Operations
Logical operators
NOT
NOT is used like NOT VAR%. Logical negation applies to the
numerical expression (variable or constant) following NOT.
AND
AND is used like VAR1% AND VAR2%.
are ANDed for each bit.
VAR1% and VAR2%
OR
OR is used like VAR1% OR VAR2%.
are ORed for each bit.
VAR1% and VAR2%
XOR
XOR is used like VAR1% XOR VAR2%.
VAR2% are XORed for each bit.
Logical operators are used to operate two numeric values for each bit.
inversion is applied for each bit.
VAR1% and
For NOT, however,
Character operations
- Character connection
+
-
+ is used like VAR1$+VAR2$. That is, + is used to connect
two characters. For VAR$=VAR1$+VAR2$, the connected
characters are assigned to VAR$.
Character string comparison
Two character strings are compared.
The comparison result is true (-1) or false (0).
=
= is used like VAR1$=VAR2$. It is used to judge whether two
character strings (VAR1$ and VAR2$) are equal.
<>
<> is used like VAR1$<>VAR2$. It is used to judge whether
two character strings are not equal.
<
< is used like VAR1$<VAR2$. When VAR1$ is less than
VAR2%, the result becomes true.
>
> is used like VAR1$>VAR2$. When VAR1$ is greater than
VAR2%, the result becomes true.
<=
<= is used like VAR1$<=VAR2$. When VAR1$ is less than
or equal to VAR2$, the result becomes true.
>=
>= is used like VAR1$>=VAR2$. When VAR1$ is greater
than or equal to VAR2$, the result becomes true.
Two character strings are compared from the beginning for each byte. When two different
characters are found, whether one character is greater than or less than the other is judged.
When one character string becomes shorter than the other during comparison, the shorter
string becomes small.
3-11
3-6
Expressions and Operations
Priorities of operators
Operators are written according to priorities below.
Expressions
Expression enclosed in parentheses
Functions
System-defined function and user-defined function
-
Minus sign
^
Exponent operator
*, /, ¥
Multiplication and division
+,
Addition and subtraction
-
MOD
Remainder of integer
=, <>
Relational operators
NOT
Logical negation
AND, OR, XOR
Conjunction, disjunction, and exclusive
Note: ID-type variables and constants can be applied only to the comparison
between two items using relational operator “=”.
3-12
CHAPTER 3 CODING RULES
3-7
Type Conversion
3-7 Type Conversion
If logical operation is performed for different types when integer- and floating-point-type values
are assigned to variables of different types, type conversion occurs.
Assignment
The following is an example of assigning floating-point-type data to integer-type data.
VAR1% = 2.45
VAR2% = 2.56
In this case, 2 is assigned to VAR1% and 3 assigned to VAR2%.
A real number is rounded off when it is converted to an integer.
result of this rounding-off becomes an integer type.
The value obtained as a
Logical operation
For logical operation, floating-point-type data is converted to integer-type data and operated.
VAR% = 23
FLOAT! = 12.35
VAR% AND
FLOAT!
The result of this calculation is like 23 AND 12.
Others
When an integer-type value is converted to a floating-point-type value, which in turn is
converted to an integer-type value again, loss of significant digits may occur. In the OIP,
the number of significant digits is 6 digits.
VAR% = 99999999
FLOAT! = VAR%
VAR% = FLOAT!
As a result of executing the above, 100000000 is set in VAR%.
3-13
3-8
Labels
3-8 Labels
Labels indicate a program jump destination and a subroutine name, etc. Labels are assigned
names like variables. They are delimited by a colon (:). An example of a program that use
labels is given below.
evnt
input ty%,id@,dat%
if dat% = 1 then goto LABEL1
gosub SUBNAME
........
.......
LABEL1: dat% = 20
end evnt
SUBNAME:
dat% = 10
return
3-14
CHAPTER 3 CODING RULES
3-9
Subroutines
3-9 Subroutines
Subroutines are written as a subroutine block outside the event block. Description of a
subroutine begins with a label name and ends with RETURN. No K-BASIC command can be
written in the line where a label name is written. Two or more subroutines can be written in
one program.
conf
....
Description of configuration block
gosub SUB1
....
end conf
evnt
....
Description of event block
gosub SUB10
....
end evnt
SUB1:
....
Subroutine body
RETURN
SUB10:
....
Subroutine body
RETURN
Subroutines are classified into two types:
local and global.
Global subroutine
Global subroutines are the subroutines written on the global screen. Global subroutines
can be called from all screen and part programs. Variables to be used by global
subroutines are global and static variables. When a global subroutine is called from a
screen (local screen) other than the global screen, only the variables for which “global” or
“static” was declared on that screen can be used as global subroutine variables.
Local subroutine
Subroutines written on screens other than the global screen are called local subroutines.
Local subroutines can be used only in the program where they are written.
If the name of a written local subroutine is also contained in the global subroutine, the global
subroutine is executed when the local subroutine is called. It is possible to give a warning
indicating that the local subroutine name and global subroutine name are duplicated when
creating download data by writing a LOCAL CHECK statement in such a program. For details
of using the LOCAL CHECK statement, see Chapter 4, "Instruction Reference".
3-15
3-10
User-defined Functions
3-10 User-defined Functions
Screen Creator 5 supports user-defined functions. Several arguments are input by a caller,
the user-defined functions are executed, and return values are sent to the caller.
3-10-1 Definition of user-defined functions
A user-defined function is defined in the format as shown below:
function function name [type declaration character] (argument 1, argument 2, .... )
Program of the function
end function
The block between "function" and "end function" is called a function block. It is one of the
program elements like the initialization block, configuration block, event block and subroutine
block. It is impossible to write a function block in any other block.
The function name consists of a character string written in the same manner as writing a
variable name. One of the type declaration characters $, %, ! and @, which indicate the type
of a return value, should be added to the function name. The real number function name is the
only exception. It needs no type declaration character.
Argument 1, argument 2 and so forth enclosed in parentheses are given by the caller to the
function. The type of the arguments is declared by the type declaration character. If no type
declaration character is written, arguments are regarded as real numbers. The function caller
can use variables, constants and calculation expressions as arguments.
If variables are specified as arguments, the function may substitute values for the arguments
and, as a result, the arguments may be changed. In such a case, the variables of the caller
are also changed. In other words, the function uses such arguments as the original variables,
though they are called arguments, not variables.
If constants or calculation expressions are specified as arguments, the values are substituted
for the arguments and the function is executed. If values are substituted for the arguments,
the values of the arguments are changed, while no influences are placed upon the caller. In
other words, the function regards such arguments as variables having default values (i.e., auto
variables).
When a value is substituted for the function name with a type declaration character, a return
value for the function is decided. The function caller can use the function name in an
expression as a variable or an argument of another function.
The program of the function ends when processing reaches "end function" and processing is
handed over to the caller. Use "exit function" to terminate processing of a function in the
middle of a function program.
The following shows an example of user-defined function declaration:
function my_div%(a%, b%)
if b% = 0 then
if a% < 0 then
my_div% = -217483648
else
my_div% = 217483647
end if
exit function
end if
my_div% = a% / b%
end function
3-16
CHAPTER 3 CODING RULES
3-10
User-defined Functions
3-10-2 Definition positions of user-defined functions and
ranges of referencing
The types of programs which can refer to user-defined functions and the ranges of referencing
differ with the positions where the functions are defined. The user-defined functions are
classified into three types as shown below:
Global functions
A global function has its function block written in the global screen program.
function can be read from any screen or part program.
A global
Local functions
A local function has its function block written a program for a screen other than the global
screen. A local function can only be called by the program in which it is defined.
Library functions
A library function has its function block written in a function library under the control of
Screen Creator 5. A library function can be read by any program.
3-10-3 How to call user-defined functions
To call a user-defined function, the user should declare the type of the function (i.e., prototype
declaration) before all blocks of the program (i.e., initialization block, configuration block, event
block, subroutine block and function block). The following format is used to declare a function.
declare function name [type declaration character] (argument 1, argument 2, ... )
The type of the function shown in 3-10-1 "Definition of user-defined functions" is declared as
shown below:
declare my_div% (a%, b%)
Functions to be actually referenced are selected in the order of the library functions, global
functions, and local functions. If there are several types of functions having the same function
name, these functions are referenced in the order shown above. By writing a LOCAL CHECK
statement at the beginning of the program (before function declaration), it is possible to give an
error indicating that function names are duplicate when compiling the program. For details of
using the LOCAL CHECK statement, see Chapter 4, "Instruction Reference".
3-10-4 Variable declaration in user-defined functions and
referencing external variables
It is possible to use auto variables in function blocks by declaring them. It is impossible to
declare other types of variables.
Global variables and local variables contained in operation programs can be referenced,
provided they can be referenced in the programs. In other words, it is possible to reference
global variables, static variables and backup variables if they are declared in the programs. It
is also possible to reference local variables which are declared or not declared in programs.
No library functions can be referenced, except auto variables declared in programs.
3-17
3-11
Program Operation
3-11 Program Operation
Operation of an OIP program is started when a message is issued to the part or screen written
in the program. GCSGP3 provides the following types of messages:
Part and screen messages
• Part and screen programs can execute the SEND instruction to issue messages to a part
or screen.
Switch messages
• A message is issued when the switch primitive placed on a part is set to ON or OFF.
• A message is also issued by touching the switch primitive.
Internal timer messages
• A message is issued when the specified time has elapsed.
• The internal timer in the program must be operated to receive messages from the timer.
(See “OPENTIM.”)
Alarm messages
• A message is issued when the specified time is reached.
• For how to operate alarms, see “SETALARM Command.”
PIO messages
• A message is issued when the parallel input status changes.
• To receive messages from the parallel input, which PIO bit is to be used must be declared
in the program in advance. (See “OPENPARALLEL.”)
Non-procedual communication messages
• A non-procedual communication message is issued when non-procedual communication
data reception is completed.
Sampling messages
• A sampling message is issued when the primitive that is performing sampling reads data.
PLC messages
• PLC device values are transmitted as a message. A PLC message is transmitted when
the device contents change during communication between the OIP and PLC.
• If the values of several PLC devices change, the changes are detected after the OIP
communicates with the PLC. Therefore, messages may not been issued in the order of
the changes in the device values.
• To receive messages from the PLC, what PLC device is to be used must be declared in
the program in advance. (See “CYCLIC command.”)
Bar code/ten-key pad messages
• A message is issued when a bar code reader or ten-key pad starts communication with a
part or screen. The contents of a message are the data itself transmitted from the bar
code reader or ten-key pad.
• The program must be coded in advance so that messages can be received from the bar
code reader and ten-key pad. See “OPENCOM.”
Host messages
• A message is issued when the host computer starts communication with a part or screen.
The contents of a message are the data itself transmitted from the host computer.
3-18
CHAPTER 3 CODING RULES
3-11
Program Operation
• The program must be coded in advance so that messages can be received from the host
computer. See “OPENCOM.”
Messages are processed in the order they are issued (execution of the program that received
messages).
Messages can also be issued to the undisplayed screen (rear screen).
that received messages on the rear screen also operates.
The operation program
3-19
3-12
Message Format
3-12 Message Format
A message is a trigger for operating an OIP program. Each message consists of an issuer, an
issuer ID, and issued data. By the way, each message can have one or more data.
Three types are as shown below:
1 Value indicating the type of the message issuer
2 Value indicating the ID of the message issuer
3 Data itself
(integer type)
(ID type)
(type of data to be issued)
Use the INPUT instruction to read messages into a program. Suppose, for example, that
numeric data 10 was transmitted from the program whose screen name is SCREEN and whose
part name is PART. In this case, the INPUT statement that reads messages is written as
follows:
INPUT TYPE% , ID@ , DATA%
TYPE%: Value 2 indicating that messages were transmitted from the part is set in
TYPE%.
ID@:
GAME.BUHIN. indicating the ID of the transmitted part is set in ID@.
DATA%: Data itself. 10 in this case.
The message format is as follows:
Screens
Type of the message issuer: 1
ID of the message issuer:
Screen name
Data:
Data written in the PRINT statement
Parts
Type of the message issuer: 2
ID of the message issuer:
Part name
Data:
Data written in the PRINT statement
Switches
Type of the message issuer: 3
ID of the message issuer:
Switch name
Data (single switch):
1 (when ON), 0 (when OFF)
Data (multi-switches):
Switch number 1 (when ON), 0 (when OFF)
Data (selector switch):
Switch number
The switch number of a selector switch indicates the number of an activated switch when the
number is 1 or more. If it is 0, it indicates that all switches are deactivated.
Timers
Type of the message issuer: 4
ID of the message issuer:
ID of the timer opened by OPENTIM
Data:
1 (fixed)
Alarms
Type of the message issuer: 5
ID of the message issuer:
ID of the timer opened by SETALARM
Data:
1 (fixed)
3-20
CHAPTER 3 CODING RULES
3-12
Message Format
PIO
Type of the message issuer:
ID of the message issuer:
Data:
First:
Second:
Third:
6
ID representing the parallel port
Bit number matching the condition set by OPENPARALLEL.
Bit status (1: ON, 0: OFF)
PIO channel number (0 to 3)
Non-procedual communication
Type of the message issuer:
ID of the message issuer:
Data:
First:
Second:
Third:
7
–
Port number
Status
Number of received bytes
Sampling
Type of the message issuer: 9
ID of the message issuer: ID of the primitive that is performing sampling
Data:
Sampled value
PLC and memory link
Type of the message issuer: 16
ID of the message issuer: Device name or memory table name
Data:
Device value or memory table value
Bar codes
Type of the message issuer: 18
ID of the message issuer: Logical name “BCR”
Data:
Character string read from bar code reader
Ten-key pad
Type of the message issuer: 20
ID of the message issuer: Logical name “TKY”
Data:
Characters read from the ten-key pad
Host computer (command communication)
Type of the message issuer: 22
ID of the message issuer: Logical name “HST”
Data:
Data transmitted from the host computer
Use the INPUT instruction to read messages into a program. Suppose, for example, that
numeric data 10 was transmitted from the program whose screen name is SCREEN and whose
part name is PART. In this case, the INPUT statement that reads messages is written as
follows:
INPUT TYPE% , ID@ , DATA%
TYPE%: Value 2 indicating that messages were transmitted from the part is set in
TYPE%.
ID@:
GAME.BUHIN. indicating the ID of the transmitted part is set in
ID@.
DATA%: Data itself. 10 in this case.
3-21
3-13
Program Blocks
3-13 Program Blocks
An OIP K-Basic program consists of THE blocks: INITIALIZATION (INIT to END INIT),
configuration (CONF to END CONF), event (EVNT to END EVNT), subroutine (label name: RETURN), AND FUNCTION (FUNCTION to END FUNCTION).
This section describes the initialization block, configuration block and event block. For details
of the subroutine block, see 3-9 "Subroutines" above. For details of the function block, see
3-10, "User-defined functions" above.
The following shows an example of a program using these blocks:
declare func%(a%, b%)
'Function-type declaration
init
'Initialization block
static var1% = 10
global var2% = 20
end init
conf
'Configuration block
var2% = 30
end conf
evnt
'Event block
input type% , id@ , data%
if type% = 3 then
var1% = func%(data, var2%)
...............
...............
endif
end evnt
SUB1:
'Subroution block
....
RETURN
function func%(a%, b%)
'Function block
...............
...............
end function
Initialization block (INIT ˜ END INIT)
• An initialization block written in a screen or part program is executed only once when the
configuration block or event block of that program is executed for the first time.
An initialization block is used to declare or initialize variables needed in a configuration
block or event block.
Configuration block (CONF ˜ END CONF)
• The configuration block where screens and parts are written is executed only once when a
screen is displayed. This block is not executed while a screen is being displayed. It is
executed only once again when another screen is redisplayed.
• The configuration block for global screens and parts is executed only once when the
system is started.
• The configuration block is used to write processing such as initialization.
• Only the closed part’s configuration block is not executed even if a screen is displayed; it is
executed when a part is opened. (See “OPEN Instruction.”)
3-22
CHAPTER 3 CODING RULES
3-13
Program Blocks
Event block (EVNT END ˜ EVNT)
• The event block is a program block that starts its operation when a message is received.
The contents to be executed when a switch is pressed are written in this block.
• The event block cannot be written in the global screen program.
Note: A configuration block is not executed if a message is sent to a screen not
displayed and an event block is executed (by the timer or a host command).
Thus, initialization written in the configuration block is not executed. Write
necessary initialization in an initialization block.
3-23
3-14
Devices and Communication
3-14 Devices and Communication
To reference and modify PLC devices, device names are written in K-Basic as follows:
station number and a device name are delimited by “˜”.
A
VAR%=00˜D100: The contents of the device whose device name is D100 and whose
station number is 00 are read.
00˜D200=40:
40 is written into the device whose device name is D200 and whose
station number is 00.
Communication is used to read and write the contents of a device.
the following two communication methods:
Screen Creator 5 provides
Cyclic communication
• The OIP always communicates with the PLC to read the contents of the device to be used.
A message is issued when the contents of the device to be used are modified.
• Cyclic communication can be performed even if a K-Basic program is not executed.
• Cyclic communication is enabled by declaring CYCLIC.
• Cyclic write is inapplicable.
Event communication
• Event communication is performed when the contents of a device are read or modified.
• Event communication is executed by a K-BASIC program.
• Event communication can also be used to write data to a device.
In the OIP, a global screen and a local screen are displayed, overlapping each other.
this case, communication between the global and local screens is performed as follows:
In
Global screen communication
• Cyclic communication in a global screen is always executed irrespective of the local
screen to be used.
Local screen communication
• Only the cycle communication declared in the current screen can be used.
• Event communication is performed when the contents of a device are read or written
during execution of the program being displayed on the current screen.
• If a program of a screen not displayed currently is activated and device reading or writing
is executed, data may be read or written from/into a device not specified in the program.
To avoid such a trouble, write a program so that device reading or writing will never be
executed in a program of a screen not displayed. For example, messages are sent to
programs of non- displayed programs in timer, alarm or graph sampling. Thus, device
reading or writing should be prevented in programs containing event blocks which process
these messages. If device reading or writing is necessary for message processing,
execute it in a global screen program.
3-24
CHAPTER 3 CODING RULES
3-15
Memory Tables
3-15 Memory Tables
A memory table is used for communication between the host computer and memory link. This
table is of word type (2 bytes). There are 2048 configuration elements (address 0 to address
2047).
The following explain how to access the memory table in K-Basic.
3-15-1 Describing memory table
00˜MTBL(0):
00˜MTBL(2047):
00˜MTBL(NO%):
Memory table of 0th element
Memory table of 2047th element
Memory table of element indicated by NO%
3-15-2 Reading and writing One element
ABC=00˜MTBL (100)
The contents of the 100th memory table are read into variable ABC.
00˜MTBL (200) = 23
Data 23 is written to the 200th memory table.
00˜MTBL (ABC) = XYZ
The contents of variable XYZ are written to the memory table indicated by variable ABC.
3-15-3
Reading and writing two or more elements
BREAD 00˜MTBL (100), 20, ABCD (XY)
BREAD 00˜MTBL (START), NUMS, ABCD (XY)
In the first example, 20 configuration elements are read into the XY location of array variable
ABCD, starting at address 100 of the memory table. In the second example, NUMS
configuration elements are read into the XY location of array variable ABCD, starting at the
address indicated by START of the memory table.
BWRITE 00˜MTBL (100), 20, ABCD (XY)
BWRITE 00˜MTBL (START), NUMS, ABCD (XY)
In the first example, 20 data is written from the XY location of array variable ABCD to the
memory table beginning with address 100.
In the second example, NUMS data is written from the XY location of array variable ABCD to
the memory table beginning with the address indicated by START.
3-25
3-16
File Systems
3-16 File Systems
This section describes the features of the file systems and the commands for accessing the file
systems.
In the OIP, the backup memory and external memory cards can be used as
MS-DOS-compatible file systems. These are called "MSDOS file systems".
Specify a drive name.
Drive name
Description
Drive A:
A part of the backup memory is used as the MS-DOS file system.
Drive E:
Memory card drive. Use a serially connected memory card.
In addition, "memory files" are available. In memory files, memory images are read and written
from/into the system memory. To access a memory file, use the file name "MEMORY".
File systems or memory files created in the backup memory are also called RAM files. Only
OIP units with built-in backup memory can use RAM files. The backup memory stores data in
it even when the OIP is turned off. A model with no backup memory cannot use file systems or
memory files in the backup memory.
Models
KDP5648CA
KDP5640EHA
KDP5320CA
KDP5320LA
None:
Backup memory sizes
63KB
63KB
None
None
RAM files
Available.
Available.
Not available.
Not available.
Not available.
3-16-1 Precautions for file systems
Memory
Memory files are managed not in the form of file systems. Since the same system memory
is used, it is impossible to use the drive A and MEMORY simultaneously.
Precautions for using backup memory for RAM files
To use the backup memory for RAM files (i.e., files in drive A or MEMORY files), it is
necessary to specify the capacity to be assigned to the RAM files on the system mode
screen of the OIP. Use "RAM File Setup" of "System Setup" on the system screen.
A model with backup memory uses the backup memory for backup variables and RAM files.
Therefore, the sum of the memory size used for backup variables and the memory size used
for RAM files must be less than the total size of the built-in backup memory.
Making backup
Data in drive A and memory file is backed up and stored even after the power is turned off.
However, the backup data is cleared to zero if the memory size is changed on the system
mode screen.
Formatting files
Before using a file system, it is necessary to format the file.
command to format a file.
Use the K-Basic "FORMAT"
Formatting memory card drive
The OIP's memory card drive creates files in the MS-DOScompatible format, and data in the
memory card can be read and written by the MS-DOS system running on a personal
computer, etc. However, make a directory so that the sum of a file path name and a file
name does not exceed 128 characters.
3-26
CHAPTER 3 CODING RULES
3-16
File Systems
The OIP's memory card drive does not support long file names, which are supported by
Windows 95, etc. Be careful not to give long names to files which are to be used on
Windows 95, etc.
3-16-2 Specifying a file
The character A or E followed by a colon, : , indicates a drive.
Example: A:, E:
To show a directory, type ¥ or / as shown below.
Example: A:¥ABC, A:/ABC/DEF
Each file name consists of a file name (in eight characters) and an extension (in three
characters). ASCII codes and Kanji codes can be used.
Example: ABCDE.DOC
3-27
3-16
File Systems
3-17 Notes
Note the following points when writing K-Basic.
Color and tiling numbers
In K-Basic, numeric values (0 to 15) are used to change the display colors and tile figures of
graphs and displays. These numbers are assigned like 0, 1, 2, starting at the left of the
pallet color displayed by the tool and tile figures.
Note 1 on screen transition
When one OIP screen is switched to another, the momentary switch is forcibly turned OFF if
it is ON. This is done irrespective of the mode (Input Enabled, Input Disabled, or Half Tone)
of the switch. When the OFF message is issued, the BASIC program is also activated.
Note 2 on screen transition
When the screen for cyclic communication is displayed, messages are issued from all the
devices that are performing cyclic communication.
If a message is issued to a part of the undisplayed screen, the program is executed in
background. If an attempt is made to execute an unexecutable instruction in background,
however, an error occurs.
If an infinite loop is created in a program, switching and communication cannot be
performed.
Parts on which switches are installed can be moved only in grid units.
3-28
CHAPTER 3 CODING RULES
CHAPTER 4
INSTRUCTION REFERENCE
4INSTRUCTION REFERENCE
4-1
4-1
Instruction References
4-1 Instruction Reference
ABS .............................................................. 4-10
ADDCYC ..................................................... 4-11
ADDCYC2 ................................................... 4-12
ADDCYCID ................................................. 4-13
ASC .............................................................. 4-14
ATN.............................................................. 4-15
AUTO ........................................................... 4-16
BACKUP...................................................... 4-17
BARCOLOR ................................................ 4-18
BARDSP ...................................................... 4-20
BARSET....................................................... 4-21
BARSHIFT................................................... 4-22
BCD2BIN ..................................................... 4-23
BEEP ............................................................ 4-24
BIN2BCD ..................................................... 4-25
BITSET ........................................................ 4-26
BITTEST ...................................................... 4-27
BLCTL ......................................................... 4-28
BLSTAT ....................................................... 4-29
BLTCOLOR ................................................. 4-30
BLTDSP ....................................................... 4-31
BLTSET ....................................................... 4-32
BREAD ........................................................ 4-33
BWRITE....................................................... 4-34
CHDIR.......................................................... 4-35
CHKTIM ...................................................... 4-36
CHR$............................................................ 4-37
CINT............................................................. 4-38
CIRCOLOR.................................................. 4-39
CIRDSP ........................................................ 4-40
CIRSET ........................................................ 4-41
CLEAR ......................................................... 4-42
CLOSE ......................................................... 4-43
CLOSECOM ................................................ 4-44
CLOSEPARALLEL ..................................... 4-45
CLOSESIO ................................................... 4-46
CLOSETIM .................................................. 4-47
COLOR ........................................................ 4-48
CONF ... END CONF................................... 4-49
CONST ......................................................... 4-50
CONTTIM.................................................... 4-51
COPY ........................................................... 4-52
COS .............................................................. 4-53
CURDIR ....................................................... 4-54
CVB.............................................................. 4-55
CVF .............................................................. 4-56
CVI ............................................................... 4-57
CVID ............................................................ 4-58
4-2
CHAPTER 4 INSTRUCTION REFERENCE
CVW .............................................................4-59
CYCLIC........................................................ 4-60
CYCLIC2......................................................4-62
DATE$..........................................................4-63
DECLARE ....................................................4-64
DEVRD.........................................................4-65
DEVWR........................................................4-66
DIM...............................................................4-67
DIR................................................................4-69
DINV ............................................................4-71
DOT ..............................................................4-72
DSPMODE ...................................................4-73
EOF...............................................................4-74
ERRCTL .......................................................4-75
ERRSTAT.....................................................4-76
EVENTWR ...................................................4-77
EVNT ... END EVNT ...................................4-78
EXECPRCODE ............................................4-79
EXIT FUNCTION ........................................4-80
EXP...............................................................4-81
FCLOSE........................................................4-82
FGET ............................................................4-83
FIELD ... END FIELD..................................4-84
FIGCOLOR ..................................................4-86
FIGDSP.........................................................4-87
FIGFORM.....................................................4-88
FINPUT ........................................................ 4-89
FLUSH..........................................................4-90
FOPEN..........................................................4-91
FOR ... TO ... NEXT.....................................4-92
FORMAT......................................................4-93
FPRINT.........................................................4-94
FPUT.............................................................4-95
FRECOLOR..................................................4-96
FREDSP........................................................4-98
FSEEK ..........................................................4-99
FSUM..........................................................4-100
FUNCTION ... END FUNCTION ..............4-101
FWRITE......................................................4-103
GETBLIGHT ..............................................4-104
GETDATE ..................................................4-105
GETGID......................................................4-106
GETGNO ....................................................4-107
GETID ........................................................4-108
GETOFFSET ..............................................4-109
GETTIME...................................................4-110
4-1
GLOBAL.................................................... 4-111
GOSUB ...................................................... 4-112
GOTO......................................................... 4-113
Instruction Reference
NUMCOLOR ............................................. 4-161
NUMDSP.................................................... 4-162
NUMFORM................................................ 4-163
HEX$.......................................................... 4-114
IF ... THEN ... ELSE .................................. 4-115
INIT ... END INIT...................................... 4-116
INP ............................................................. 4-117
INPBIT ....................................................... 4-118
INPUT ........................................................ 4-119
INSTR ........................................................ 4-121
INT ............................................................. 4-122
INTERLOCK ............................................. 4-123
IOCTL ........................................................ 4-124
IOCTL2 ...................................................... 4-126
IOSTAT...................................................... 4-127
OCT$ .......................................................... 4-164
ONFERR..................................................... 4-165
OPEN.......................................................... 4-166
OPENCOM................................................. 4-167
OPENPARALLEL...................................... 4-168
OPENSIO ................................................... 4-169
OPENTIM................................................... 4-170
OPENTIM2................................................. 4-171
OPENTIM3................................................. 4-172
OUT ............................................................ 4-173
OUTBIT...................................................... 4-174
OUTBITSTAT............................................ 4-175
OUTSTAT .................................................. 4-176
JUMP.......................................................... 4-128
KILL........................................................... 4-129
LAMPCOLOR ........................................... 4-130
LAMPDSP ................................................. 4-131
LEFT$ ........................................................ 4-132
LEN ............................................................ 4-133
LINE........................................................... 4-134
LINPUT...................................................... 4-135
LNECOLOR............................................... 4-136
LNEDSP..................................................... 4-137
LNESET ..................................................... 4-138
LNESHIFT ................................................. 4-139
LNESHIFT2 ............................................... 4-140
LOCAL....................................................... 4-141
LOCALCHECK ......................................... 4-142
LOF ............................................................ 4-144
LOG............................................................ 4-145
MCPY......................................................... 4-146
MEDIACHK .............................................. 4-147
MEDIASIZE .............................................. 4-148
MID$ .......................................................... 4-149
MID$ .......................................................... 4-149
MKB........................................................... 4-151
MKDIR....................................................... 4-152
MKF ........................................................... 4-153
MKI ............................................................ 4-154
MKID ......................................................... 4-155
MKS ........................................................... 4-156
MKW.......................................................... 4-157
MOVE ........................................................ 4-158
MTRCOLOR.............................................. 4-159
MTRDSP.................................................... 4-160
PIPCOLOR ................................................. 4-177
PIPDSP ....................................................... 4-178
PLTCOLOR................................................ 4-179
PLTDSP...................................................... 4-180
PMODE ...................................................... 4-181
PRDSP ........................................................ 4-182
PREVJUMP................................................ 4-183
PRINT......................................................... 4-184
PRMCTL .................................................... 4-185
PRMSTAT.................................................. 4-192
PSTAT ........................................................ 4-202
RANGE....................................................... 4-203
READTIM .................................................. 4-204
RENAME ................................................... 4-205
REOPENCOM............................................ 4-206
REOPENPARALLEL ................................ 4-207
RESETALARM.......................................... 4-208
RETURN .................................................... 4-209
RIGHT$ ...................................................... 4-210
RMDIR ....................................................... 4-211
ROTATE..................................................... 4-212
RSTAT........................................................ 4-213
RUN............................................................ 4-214
SELECT CASE ... END SELECT.............. 4-215
SEND.......................................................... 4-216
SETALARM............................................... 4-217
SETBEEP ................................................... 4-218
SETBLIGHT............................................... 4-219
SETDATE................................................... 4-220
SETLNEPLOT ........................................... 4-221
SETSIO....................................................... 4-222
SETTIM...................................................... 4-223
4-3
4-1
Instruction References
SETTIME ................................................... 4-224
SHIFT......................................................... 4-225
SIN.............................................................. 4-226
SLDDSP ..................................................... 4-227
SOF............................................................. 4-228
SQR ............................................................ 4-229
STARTTIM ................................................ 4-230
STATIC ...................................................... 4-231
STOP .......................................................... 4-232
STOPTIM ................................................... 4-233
STR$........................................................... 4-234
STRCOLOR ............................................... 4-235
STRDSP ..................................................... 4-236
STRFORM ................................................. 4-237
STRING...................................................... 4-238
SWFIG........................................................ 4-239
SWMODE .................................................. 4-240
SWREAD ................................................... 4-241
SWREV ...................................................... 4-242
SWWRITE ................................................. 4-243
TAN............................................................ 4-245
TIME$ ........................................................ 4-246
TIMID ........................................................ 4-247
TIMINT ...................................................... 4-248
VAL/VAL2................................................. 4-249
WHILE ... WEND ...................................... 4-250
WRITESIO/WRITESIOB .......................... 4-251
4-4
CHAPTER 4 INSTRUCTION REFERENCE
4-2
Indexes by Functions
4-2 Indexes by Functions
Control structure
CONF ... END CONF ..................................4-49
EVNT ... END EVNT ..................................4-78
FOR ... TO ... NEXT ....................................4-92
GOSUB ......................................................4-112
GOTO.........................................................4-113
IF ... THEN ... ELSE ..................................4-115
INIT ... END INIT......................................4-116
RETURN....................................................4-209
SELECT CASE ... END SELECT .............4-215
STOP ..........................................................4-232
WHILE ... WEND ......................................4-250
Arithmetic operation
ABS ............................................................. 4-10
ATN ............................................................. 4-15
BITSET........................................................ 4-26
BITTEST ..................................................... 4-27
CINT............................................................ 4-38
COS ............................................................. 4-53
EXP.............................................................. 4-81
INT............................................................. 4-122
LOG ........................................................... 4-145
SHIFT ........................................................ 4-225
SIN............................................................. 4-226
SQR ........................................................... 4-229
TAN ........................................................... 4-245
Variable declaration
AUTO...........................................................4-16
BACKUP......................................................4-17
CONST.........................................................4-50
DIM ..............................................................4-67
GLOBAL....................................................4-111
LOCAL ......................................................4-141
STATIC......................................................4-231
STRING .....................................................4-238
Messages
INPUT ........................................................4-119
PRINT ........................................................4-184
RUN ...........................................................4-214
SEND .........................................................4-216
Character string manipulation
ASC ............................................................. 4-14
CHR$ ........................................................... 4-37
CVB ............................................................. 4-55
CVF ............................................................. 4-56
CVI .............................................................. 4-57
CVID ........................................................... 4-58
CVW............................................................ 4-59
HEX$ ......................................................... 4-114
INSTR........................................................ 4-121
LEFT$........................................................ 4-132
LEN ........................................................... 4-133
MCPY........................................................ 4-146
MID$ (Function)........................................ 4-150
MID$ (Statement)...................................... 4-149
MKB .......................................................... 4-151
MKF........................................................... 4-153
MKI ........................................................... 4-154
MKID......................................................... 4-155
MKS........................................................... 4-156
MKW ......................................................... 4-157
OCT$ ......................................................... 4-164
RIGHT$ ..................................................... 4-210
STR$.......................................................... 4-234
VAL ........................................................... 4-249
4-5
4-2
Indexes by Functions
Type conversion
BCD2BIN.....................................................4-23
BIN2BCD.....................................................4-25
GETGID .....................................................4-106
GETGNO....................................................4-107
GETID ........................................................4-108
GETOFFSET..............................................4-109
TIMID ........................................................4-247
TIMINT ......................................................4-248
Graphic displays
FIGCOLOR ................................................. 4-86
FIGDSP........................................................ 4-87
FIGFORM.................................................... 4-88
ROTATE.................................................... 4-212
Plot displays
PLTCOLOR............................................... 4-179
PLTDSP..................................................... 4-180
Screen/part control
CLOSE .........................................................4-43
JUMP..........................................................4-128
MOVE ........................................................4-158
OPEN .........................................................4-166
PMODE ......................................................4-181
PREVJUMP................................................4-183
PSTAT........................................................4-202
RSTAT .......................................................4-213
Bar graph displays
BARCOLOR................................................ 4-18
BARDSP...................................................... 4-20
BARSET ...................................................... 4-21
BARSHIFT .................................................. 4-22
Line chart displays
Switch control
SWFIG .......................................................4-239
SWMODE ..................................................4-240
SWREAD ...................................................4-241
SWREV ......................................................4-242
SWWRITE .................................................4-243
LNECOLOR .............................................. 4-136
LNEDSP .................................................... 4-137
LNESET .................................................... 4-138
LNESHIFT ................................................ 4-139
LNESHIFT2 .............................................. 4-140
SETLNEPLOT........................................... 4-221
100 percent bar chart displays
Numeric displays
NUMCOLOR .............................................4-161
NUMDSP ...................................................4-162
NUMFORM ...............................................4-163
BLTCOLOR ................................................ 4-30
BLTDSP ...................................................... 4-31
BLTSET....................................................... 4-32
Pie chart displays
Character string displays
STRCOLOR ...............................................4-235
STRDSP .....................................................4-236
STRFORM .................................................4-237
4-6
CHAPTER 4 INSTRUCTION REFERENCE
CIRCOLOR ................................................. 4-39
CIRDSP ....................................................... 4-40
CIRSET........................................................ 4-41
4-2
Free graph displays
FRECOLOR .................................................4-96
FREDSP .......................................................4-98
Slide displays
SLDDSP .....................................................4-227
Indexes by Functions
Serial control
CLOSECOM ............................................... 4-44
CLOSESIO .................................................. 4-46
FLUSH......................................................... 4-90
OPENCOM................................................ 4-167
OPENSIO .................................................. 4-169
REOPENCOM........................................... 4-206
SETSIO...................................................... 4-222
WRITESIO ................................................ 4-251
Meter displays
MTRCOLOR..............................................4-159
MTRDSP....................................................4-160
Lamp displays
LAMPCOLOR ...........................................4-130
LAMPDSP .................................................4-131
Pipe displays
PIPCOLOR.................................................4-177
PIPDSP.......................................................4-178
Control control
CLEAR.........................................................4-42
DSPMODE...................................................4-73
EXECPRCODE............................................4-79
PRDSP........................................................4-182
PRMCTL....................................................4-185
PRMSTAT .................................................4-192
RANGE ......................................................4-203
Parallel control
CLOSEPARALLEL .................................... 4-45
INP............................................................. 4-117
INPBIT ...................................................... 4-118
OPENPARALLEL .................................... 4-168
OUT ........................................................... 4-173
OUTBIT..................................................... 4-174
OUTBITSTAT........................................... 4-175
OUTSTAT ................................................. 4-176
REOPENPARALLEL ............................... 4-207
Timers/alarms
CHKTIM ..................................................... 4-36
CLOSETIM ................................................. 4-47
CONTTIM ................................................... 4-51
OPENTIM ................................................. 4-170
OPENTIM2 ............................................... 4-171
OPENTIM3 ............................................... 4-172
READTIM ................................................. 4-204
RESETALARM......................................... 4-208
SETALARM.............................................. 4-217
SETTIM..................................................... 4-223
STARTTIM ............................................... 4-230
STOPTIM .................................................. 4-233
4-7
4-2
Indexes by Functions
PLC/memory link communication
ADDCYC .....................................................4-11
ADDCYC2 ...................................................4-12
ADDCYCID.................................................4-13
BREAD ........................................................4-33
BWRITE.......................................................4-34
CYCLIC .......................................................4-60
CYCLIC2 .....................................................4-62
DEVRD ........................................................4-65
DEVWR .......................................................4-66
EVENTWR ..................................................4-77
Hardcopy
COPY ...........................................................4-52
Drawing
COLOR ........................................................4-48
DINV ............................................................4-71
DOT..............................................................4-72
LINE...........................................................4-134
Back light control
BLCTL .........................................................4-28
BLSTAT.......................................................4-29
GETBLIGHT..............................................4-104
SETBLIGHT ..............................................4-219
Buzzer control
BEEP ............................................................4-24
SETBEEP ...................................................4-218
4-8
CHAPTER 4 INSTRUCTION REFERENCE
Time/date
DATE$......................................................... 4-63
GETDATE ................................................. 4-105
GETTIME.................................................. 4-110
SETDATE.................................................. 4-220
SETTIME .................................................. 4-224
TIME$........................................................ 4-246
File control
CURDIR ...................................................... 4-54
DIR .............................................................. 4-69
EOF.............................................................. 4-74
FCLOSE ...................................................... 4-82
FGET ........................................................... 4-83
FIELD .......................................................... 4-84
FINPUT ....................................................... 4-89
FOPEN......................................................... 4-91
FORMAT..................................................... 4-93
FPRINT........................................................ 4-94
FPUT............................................................ 4-95
FSEEK ......................................................... 4-99
FWRITE .................................................... 4-103
KILL .......................................................... 4-129
LINPUT ..................................................... 4-135
LOF............................................................ 4-144
MEDIACHK.............................................. 4-147
MEDIASIZE.............................................. 4-148
MKDIR ...................................................... 4-152
ONFERR.................................................... 4-165
RENAME .................................................. 4-205
RMDIR ...................................................... 4-211
SOF ............................................................ 4-228
SUM........................................................... 4-100
4-2
Indexes by Functions
System control
ERRCTL ......................................................4-75
ERRSTAT ....................................................4-76
INTERLOCK .............................................4-123
IOCTL ........................................................4-124
IOCTL2 ......................................................4-126
IOSTAT......................................................4-127
Function control
DECLARE ...................................................4-64
EXIT FUNCTION........................................4-80
FUNCTION ... END FUNCTION .............4-101
Compiler control
LOCALCHECK .........................................4-142
4-9
ABS
ABS
Function
■ Function
The ABS function calculates an absolute value.
■ Format
ABS (numerical-expression)
■ Example of Use
AA = ABS (-50)
AA = ABS (Var)
■ Description
The ABS function calculates the absolute value of the numerical
expression
(numeric
constant,
integer-type
variable,
or
floating-point-type variable) enclosed in parentheses.
■ Related Item
None
■ Example of Program
evnt
input type% , id@ , data%
if data% < 0 then data% = abs(data%)
numdsp ..num000 , data%
end evnt
4-10
CHAPTER 4 INSTRUCTION REFERENCE
ADDCYC
ADDCYC
Statement
■ Function
The ADDCYC statement enables even BASIC of a part to read the device
declared in control-name.
■ Format
ADDCYC control-name
■ Example of Use
ADDCYC ..NUM000
■ Description
• When a control in a part is used to validate an operation parameter, the
ADDCYC statement enables even a part program to cyclically
communicate with the PLC device/memory table set in the part
operation parameter specification.
• The number of devices must match that of devices to be used by the
control. (The devices placed in consecutive stages are used only the
number of elements.)
• control-name must be the primitive in the local part.
• If the specified control is not using the PLC device/memory table, an
error occurs.
• When the control is specified in a numeric display in a doubleword,
the ADDCYC statement also reads it in a doubleword.
■ Related Item
CYCLIC, CYCLIC2, ADDCYCID
■ Example of Program
conf
ADDCYC ..NUM000
end conf
evnt
input type% , id@ , data%
id1@ = addcycid ( ..NUM000)
i% = getoffset (id1@, id@)+1
’ Uses 2X2 as a consecutive-stage display.
’ Displays data on the corresponding display.
’ Indicates the ID of the device being used.
’ Indicates the device to be used relative to the first
device.
id1@ = getid(..NUM000, i%)
numdsp id1@, data%
end evnt
’ Obtains the ID of the corresponding display.
’ Displays the ID on the display.
4-11
ADDCYC2
ADDCYC2
Statement
■ Function
The ADDCYC2 statement enables even BASIC of a part to read the
device declared in primitive-name.
■ Format
ADDCYC2 primitive-name
■ Example of Use
ADDCYC2 ..NUM000
■ Description
• The ADDCYC2 statement is almost equivalent to the ADDCYC
statement.
• The only difference between these two statements is that the PLC
device declared in the ADDCYC2 statement can communicate to
obtain data even if the screen showing the declared part is not being
displayed (when another screen is being displayed). Usually, the
declared PLC device communicates to obtain data only when the
screen showing the declared part is being displayed.
■ Related Item
ADDCYC, ADDCYCID
■ Example of Program
conf
ADDCYC2 ..NUM000
end conf
evnt
input type% , id@ , data%
id1@ = addcycid ( ..NUM000)
i% = getoffset (id1@, id@)+1
’ Uses 2X2 as a consecutive-stage display.
’ Displays data on the corresponding display.
’ Indicates the ID of the device being used.
’ Indicates the device to be used relative to the first
device.
id1@ = getid(..NUM000, i%)
numdsp id1@, data%
end evnt
4-12
CHAPTER 4 INSTRUCTION REFERENCE
’ Obtains the ID of the corresponding display.
’ Displays the ID on the display.
ADDCYCID
ADDCYCID
Function
■ Function
The ADDCYCID function obtains the ID of the device that was declared
in control-name and enabled to be read by even part programs.
■ Format
ADDCYCID (control-name)
■ Example of Use
ID@ = ADDCYCID ( ..NUM000)
■ Description
• The ADDCYCID function obtains the ID of the device being used by
the control enabled to be read by even part programs and returns the
ID type. To enable this operation, however, the operation parameters
of the control in the part must be set to “effective” and the PLC device
must be set in the associated operation parameter in advance.
• control-name must be the primitive in the local part.
• If the specified primitive is not using the PLC device/memory table,
an error occurs.
■ Related Item
ADDCYC, ADDCYC2
■ Example of Program
conf
addcyc ..NUM000
end conf
evnt
input type% , id@ , data%
id1@ = ADDCYCID ( ..NUM000)
i% = getoffset (id1@, id@)+1
’ Uses 2X2 as a consecutive-stage display.
’ Displays data on the corresponding display.
’ Indicates the ID of the device being used.
’ Indicates the device to be used relative to the first
device.
id1@ = getid(..NUM000, i%)
numdsp id1@, data%
end evnt
’ Obtains the ID of the corresponding display.
’ Displays the ID on the display.
4-13
ASC
ADDCYC2
ASC
Function
■ Function
The ASC function specifies the first 1-byte character code of a character
string.
ASC (character-string)
■ Format
■ Example of Use
■ Description
■ Related Item
AA = ASC (“AABCD”)
AA = ASC (MOJI$)
• The ASC function specifies the first character code of the character
expression (character string constant or variable) enclosed in
parentheses with a decimal number.
• The ASC function specifies only the initial 1-byte code of a character
expression which begins with a Kanji character.
CHR$
■ Example of Program
evnt
input type, id@, data$
num = ASC (data$)
numdsp ..NUM000, num
end evnt
4-14
CHAPTER 4 INSTRUCTION REFERENCE
ATN
ATN
Function
■ Function
The ATN function calculates the inverse tangent for the numerical
expression.
■ Format
ATN (numerical-expression)
■ Example of Use
ANGLE = ATN (X/Y)
■ Description
The ATN function calculates the inverse tangent value for the numerical
expression. The result must be a value from -π/2 to π/2. The unit is
radian.
■ Related Item
TAN
■ Example of Program
evnt
..........
pi = 3.141592
angle% = atn( pi/4)
numdsp ..num000 , angle%
end evnt
4-15
AUTO
ADDCYC2
AUTO
Statement
■ Function
The AUTO statement declares an auto variable.
■ Format
AUTO variable name [, variable name ...]
■ Example of Use
AUTO VAR, XYZ(2,3), MOJI$ * 20
■ Description
• The AUTO statement declares that the variable
is an auto variable. An auto variable can be
declared and referenced in a function only.
• The value of an auto variable stays valid only
while the function of that variable is called and
executed.
• The value of an auto variable is initialized when
the function is called and execution starts.
• A variable name can be specified in a normal
variable, arrangement variable or character
string variable.
• DIM declaration or STRING declaration is not
needed to declare an arrangement variable or
character variable.
• The auto variable type is one of the new features
of Screen Creator 5.
■ Related Item
■ Example of Program
function userfunc%(a%, b%)
AUTO c%
c% = a% + b%
userfunc% = c% / 2
end function
4-16
CHAPTER 4 INSTRUCTION REFERENCE
BACKUP
BACKUP
Statement
■ Function
The BACKUP statement declares a backup variable.
■ Format
BACKUP variable-name [,variable-name ...]
■ Example of Use
BACKUP VAR, XYZ(2,3), MOJI$*20
■ Description
• The BACKUP statement declares a backup variable. Besides the
characteristics of a global variable, a backup variable has a function to
retain its value even if the power supply is turned off.
• A normal variable, an array variable, or a character string variable can
be specified in variable-name.
• In order to declare arrays and character string type, no DIM and
STRING declarations are required.
■ Related Item
AUTO, DIM, GLOBAL, LOCAL, STATIC, STRING
■ Example of Program
conf
BACKUP a , x(2,3) , moji$ * 40
......
end conf
4-17
BARCOLOR
ADDCYC2
BARCOLOR
Statement
■ Function
The BARCOLOR statement changes the bar color and figure of the bar
graph display.
■ Format
BARCOLOR display-name, bar-number, tile-1, display-color-1,
background-color-1, tile-2, display-color-2, background-color-2
■ Example of Use
BARCOLOR ..BAR000, 2, 3, 1, 4, 5, 2, 1
■ Description
• The BARCOLOR statement changes the bar tiles and colors of the bar
graph display and the background tiles and colors of the entire
display. -1 indicates that the color and tile for which -1 was
specified remain unchanged.
• control-name is the name of a bar graph or the ID-type variable
indicating the graph.
• The value indicating the bar number in the bar graph to be changed
is set in bar-number. The bar number can be specified with a
constant or variable. The bar number starts at 1.
• tile-1 indicates the tiling figure of the bar. Specify this tiling figure
with a numeric value from 0 to 15.
• display-color-1 is a numeric value indicating the color number of the
tile display section. Specify this color number with a numeric value
from 0 to 15.
• background-color-1 is a numeric value indicating the color number
of the tile background section. Specify this color number with a
numeric value from 0 to 15.
• tile-2 indicates the background tiling figure of the bar graph.
Specify this tiling figure with a numeric value from 0 to 15.
• display-color-2 is a numeric value indicating the color number of the
tile display section of the background. Specify this color number
with a numeric value from 0 to 15.
• background-color-2 is a numeric value indicating the color number
of the tile background section of the background. Specify this color
number with a numeric value from 0 to 15.
■ Related Item
BARDSP, BARSHIFT
4-18
CHAPTER 4 INSTRUCTION REFERENCE
BARCOLOR
■ Example of Program
conf
static name@
name@ = ..BAR000
end conf
evnt
input type%, id@, data%
if type% = 3 then
barcolor name@, 2, 2, 3, 1, 4, 5, 2
end if
end evnt
4-19
BARDSP
ADDCYC2
BARDSP
Statement
■ Function
The BARDSP statement displays data in the bar graph display.
■ Format
BARDSP control-name, bar-number, display-value
■ Example of Use
BARDSP ..BAR000, 1, 30
■ Description
• The BARDSP statement displays bar data in the bar graph display.
• control-name is the name of a bar graph or the ID-type variable
indicating the graph.
• The value indicating the bar number in the bar graph to be displayed
is set in bar-number. The bar number starts at 1.
• display-value is the numeric data indicating the size of the bar graph.
• display-value cannot be changed even if this statement is issued to the
display for which operation parameters are set to “effective” in the
control.
■ Related Item
BARCOLOR, BARSHIFT
■ Example of Program
conf
static name@
name@ = ..BAR000
end conf
evnt
input type%, id@, data%
bardsp name@, 2, data%
end evnt
4-20
CHAPTER 4 INSTRUCTION REFERENCE
BARSET
BARSET
Statement
■ Function
The BARSET statement sets data in the bar graph display.
■ Format
BARSET, control-name, bar-number, display-data
■ Example of Use
BARSET .BUHIN.GRAPH, 2, 30.0
■ Description
• The BARSET statement sets the data to be displayed in the bar graph
display. The speed of executing the PRDSP (display) statement after
setting data in each bar is faster than that of modifying all bar values
after executing the BARDSP statement.
• control-name is the name of the bar graph display name or the
ID-type variable indicating the bar graph display.
• bar-number indicates which bar data is to be modified when two or
more bars are displayed in one bar graph display. The bar number is
integer value data starting at 1.
• display-data is the numeric data indicating the size of the bar graph.
■ Related Item
BARDSP, PRDSP
■ Example of Program
evnt
BARSET .buhin.gpaph , 3 , 20.1
var@ = .buhin.graph
no = 4
value = 23
barset var@ , no , value
prdsp var@
end evnt
4-21
BARSHIFT
ADDCYC2
BARSHIFT
Function
■ Function
The BARSHIFT function shifts bar graph data left or right and displays
it.
■ Format
DATA% = BARSHIFT (control-name, shift-direction, display-data)
■ Example of Use
DATA% = BARSHIFT (..BAR000, 1, 30)
■ Description
• When two or more bars are being displayed in one bar graph display,
the BARSHIFT statement shifts the bars constituting the graph left or
right by one bar and displays the bars.
• When the BARSHIFT function is executed, the values of the bars
purged from the graph are returned as a result of the shifting.
• The variable indicating the graph name or ID is set in control-name.
• When shift-direction is 1, bar graph data is shifted left and above.
When shift-direction is -1, bar graph data is shifted right and below.
• display-data indicates the data to be displayed in the vacant area
produced as a result of the shifting.
■ Related Item
BARDSP, BARCOLOR
■ Example of Program
evnt
input type%, id@, data%
if data% > 0 then
abc% = barshift ( ..BAR000, 1, 0)
else
abc% = barshift ( ..BAR000, -1, 100)
endif
end evnt
4-22
CHAPTER 4 INSTRUCTION REFERENCE
BCD2BIN
BCD2BIN
Function
■ Function
The BCD2BIN function converts BCD data to binary data.
■ Format
BCD2BIN (numerical-expression)
■ Example of Use
BINDATA% = BCD2BIN (BCDDATA%)
■ Description
The BCD2BIN function converts the entered BCD data to binary data.
■ Related Item
BIN2BCD
■ Example of Program
conf
cyclic 00˜D10
end conf
evnt
input type%, id@, data%
if type% = 16 then
data% = BCD2BIN(data%)
numdsp ..NUM000, data%
endif
end evnt
4-23
BEEP
ADDCYC2
BEEP
Statement
■ Function
The BEEP statement performs buzzer ON/OFF control.
■ Format
BEEP command-value
■ Example of Use
BEEP 1
■ Description
• The BEEP statement is a command that sounds and stops the buzzer.
• When command-value is 1, the buzzer sounds; when 0, the buzzer
stops.
• The SETBEEP statement can be used to set the buzzer ON/OFF time.
■ Related Item
SETBEEP
■ Example of Program
conf
SETBEEP 50,20,3
end conf
evnt
input type%, id@, data%
if id@ = ..SWT000 then
BEEP 1
else
BEEP 0
endif
end evnt
4-24
CHAPTER 4 INSTRUCTION REFERENCE
BIN2BCD
BIN2BCD
Function
■ Function
The BIN2BCD function converts binary data to BCD data.
■ Format
BIN2BCD (numerical-expression)
■ Example of Use
BCDDATA% = BIN2BCD (BINDATA%)
■ Description
• The BIN2BCD function converts binary data to BCD data.
• If the binary data to converted to BCD data is greater than 99999999,
it is fixed at 99999999.
■ Related Item
BCD2BIN
■ Example of Program
evnt
input type%, id@, data%
data% = BIN2BCD ( data% )
00˜D10 = data%
end evnt
4-25
BITSET
ADDCYC2
BITSET
Statement
■ Function
The BITSET statement sets the specified bit of a variable to ON or OFF.
■ Format
BITSET variable-name, set-position, ON/OFF-value
■ Example of Use
BITSET VARIABLE%, 10, 1
■ Description
• The BITSET statement sets the specified bit of the specified variable
to 0 or 1.
• variable-name specifies the name of the variable where the specified
bit is set to 0 or 1; it must be an integer- or floating-point-type
variable.
• set-position specifies where in the variable the specified bit is to be
set with a value from 0 to 31; it must be a variable or constant.
• When 1 is set in the variable, ON/OFF-value also specifies 1. When
0 is set, ON/OFF-value also specifies 0. It must be a variable or
constant.
■ Related Item
BITTEST
■ Example of Program
conf
end conf
evnt
input type% , id@ , data%
numdsp ..NUM000 , data%
if bittest ( data% , 31 ) = 1 then
bitset data% , 31 , 0
else
bitset data% , 31 , 1
endif
numdsp ..NUM000 , data%
end evnt
4-26
CHAPTER 4 INSTRUCTION REFERENCE
BITTEST
BITTEST
Function
■ Function
The BITTEST function tests the specified bit of a variable.
■ Format
BITTEST (variable-name, test-position)
■ Example of Use
ONOFF% = BITTEST (VARIABLE%, 10)
■ Description
• The BITTEST function tests whether the value of the specified bit in
the specified variable is 1 or 0. When the value of the specified bit is
1 as a result of the test, the function returns 1. When the value is 0,
the function returns 0.
• variable-name specifies the name of the variable where the value of
the specified bit is to be tested; it must be an integer- or
floating-point-type variable.
• test-position specifies where in the variable the specified bit is to be
tested with a value from 0 to 31; it must be a variable or constant.
■ Related Item
BITSET
■ Example of Program
conf
end conf
evnt
input type% , id@ , data%
if bittest ( data% , 0 ) = 1 then
strdsp ..STR000 , ‘‘bit is ON’’
else
strdsp ..STR000 , ‘‘bit is OFF’’
endif
end evnt
4-27
BITSET
ADDCYC2
BLCTL
Statement
■ Function
The BLCTL statement performs back light ON/OFF control.
■ Format
BLCTL status
■ Example of Use
BLCTL 1
■ Description
• The BLCTL statement performs back light ON/OFF control.
• status indicates whether to turn on or off the back light with the
following numeric values:
0: The back light is turned off.
1: The back light is turned on.
■ Related Item
BLSTAT
■ Example of Program
evnt
ret =blstat()
if ret = 0 then BLCTL 1
end evnt
4-28
CHAPTER 4 INSTRUCTION REFERENCE
BLSTAT
BLSTAT
Function
■ Function
The BLSTAT function reads the back light status.
■ Format
BLSTAT ()
■ Example of Use
■ Description
The BLSTAT function reads the current back light status (ON/OFF).
The return values of this function are as follows:
0: The back light is off.
1: The back light is on.
■ Related Item
BLCTL
■ Example of Program
conf
ret = BLSTAT()
if ret = 0 then blctl 1
end conf
4-29
BLTCOLOR
ADDCYC2
BLTCOLOR
Statement
■ Function
The BLTCOLOR statement changes the tile and color of a belt graph
display.
■ Format
BLTCOLOR
control-name,
background-color
■ Example of Use
BLTCOLOR ..BLT000, 2, 1, 2, 3
■ Description
• The BLTCOLOR statement changes the tile and color of the specified
zone of a belt graph display. -1 indicates that the color and tile for
which -1 was specified remain unchanged.
• control-name is the bar graph name or the ID-type variable
indicating the bar graph.
• The value indicating the zone number to be changed is set in
zone-position. The zone position can be specified with a constant
or variable. The zone position starts at 1.
• tile indicates the tiling figure of the zone. Specify this tiling figure
with a numeric value from 0 to 15.
• display-color is a numeric value indicating the color number of the
tile display section. Specify this color number with a numeric value
from 0 to 15.
• background-color is a numeric value indicating the color number of
the tile background section. Specify this color number with a
numeric value from 0 to 15.
■ Related Item
BLTDSP
zone-position,
■ Example of Program
evnt
input type%, id@, zone%, tile%
BLTCOLOR ..BLT000, zone%, tile%, -1, -1
end evnt
4-30
CHAPTER 4 INSTRUCTION REFERENCE
tile,
display-color,
BLTDSP
BLTDSP
Statement
■ Function
The BLTDSP statement displays data on a belt graph display.
■ Format
BLTDSP control-name, zone-number, display-value
■ Example of Use
BLTDSP ..BLT000, 1, 30
■ Description
• The BLTDSP statement displays data in the specified zone of a belt
graph display.
• control-name is the name of the graph or the ID-type variable.
• The value indicating the zone number in the 100 percent bar chart to
be displayed is set in zone-position. The zone position can be
specified with a constant or variable. The zone position starts at 1.
• display-value is the numeric data indicating the size of the data to be
displayed in the 100 percent bar chart.
• display-value cannot be changed even if this statement is issued to the
display for which operation parameters are set to “effective” in the
control.
■ Related Item
BLTCOLOR
■ Example of Program
conf
static name@
name@ = ..BLT000
end conf
evnt
input type%, id@, zone%, data%
BLTDSP ..BLT000, zone%, data%
end evnt
4-31
BLTSET
ADDCYC2
BLTSET
Statement
■ Function
The BLTSET statement sets data in a belt graph display.
■ Format
BLTSET control-name, zone-number, display-data
■ Example of Use
BLTSET .BUHIN.GRAPH, 2, 30.0
■ Description
• The BLESET statement sets the data to be displayed in the 100
percent bar chart display. The speed of executing the PRDSP
(display) statement after setting data in each zone is faster than that of
modifying all zone values after executing the BLTDSP statement.
• control-name is the name of the belt graph display or the ID-type
variable.
• zone-number indicates which zone data is to be modified. The zone
number is integer value data starting at 1.
• display-data is the numeric data indicating the size of each zone in
the 100 percent bar chart.
■ Related Item
BLTDSP, PRDSP
■ Example of Program
evnt
BLTSET .buhin.gpaph , 3 , 20.1
var@ = .buhin.graph
no = 4
value = 23
BLTSET var@ , no , value
prdsp var@
end evnt
4-32
CHAPTER 4 INSTRUCTION REFERENCE
BREAD
BREAD
Function
■ Function
The BREAD function reads the contents of the specified device or
memory table in blocks.
■ Format
BREAD device-name, data-read-count, array-variable-to-which-readdata-is-written
BREAD memory-table-name, data-read-count, array-variable-to-whichread-data-is-written
■ Example of use
BREAD 00˜D0001, 10, VARI(2)
BREAD 00˜MTBL(5), NUMS, VARI(X)
• The BREAD function reads the contents of the specified device or
memory table in blocks.
• This function collectively reads data from the specified device by the
specified data read count.
• device-name indicates the name of the device to be read (device
name indicating the read start address).
• data-read-count specifies the number of data to be continuously read
from the specified device.
• The data read from the specified device is set in
array-variable-to-which-read-data-is-written. This variable must
be a one-dimensional array-type variable. The data read from the
specified device is continuously written, starting from the location
specified by this variable.
• When the array variable is smaller than the data read count, the data
that cannot be written to the array is discarded.
• The number of data that can be read depends on the type of PLC.
(Refer to “Serial Communication Manual.”)
• For memory link, a variable can be used as a table number.
■ Description
■ Related Item
BWRITE
■ Example of Program
conf
cyclic 00˜M01
static PARAM%(10)
end conf
evnt
input type%, id@, data%
if id@ = 00˜M01 and data% = 1 then
BREAD 00˜D10, 5, PAARAM%(3)
endif
end evnt
4-33
BWRITE
ADDCYC2
BWRITE
Function
■ Function
The BWRITE function writes data to the specified device or memory
table in blocks.
■ Format
BWRITE device-name, data-write-count, write-data-variable
BWRITE memory-table-name, data-write-count, write-data-variable
■ Example of use
BWRITE 00˜D0001, 10, VAR%(1)
BWRITE 00˜MTBL(20), NUM, VAA(1)
■ Description
• The BWRITE function writes data to the specified device or memory
table in blocks.
• This function collectively write data to the specified device by the
specified data write count.
• device-name indicates the name of the device to be written (device
name indicating the write start address).
• data-write-count specifies the number of data to be continuously
written to the specified device.
• write-data-variable is the variable containing the value to be written
to the specified device.
This variable must be a one-dimensional
array-type variable. Data is continuously written to the specified
device, starting from the location specified by this variable.
• When the array variable is smaller than the data write count, 0 is
written to the remaining area. When the array variable is greater
than the data write count, the larger part is ignored.
• The number of data that can be written depends on the type of PLC.
(Refer to “Serial Communication Manual.”)
• For memory link, a variable can be used as a table number.
■ Related Item
BREAD
■ Example of Program
conf
cyclic 00˜M01
static PARAM%(10)
end conf
evnt
input type%, id@, data%
if id@ = 00˜M01 and data% = 1 then
BWRITE 00˜D10, 5, PAARAM%(3)
endif
end evnt
4-34
CHAPTER 4 INSTRUCTION REFERENCE
CHDIR
CHDIR
Statement
■ Function
The CHDIR statement changes a directory and/or a drive.
■ Format
CHDIR directory-name
■ Example of Use
CHDIR “C:TEST”
■ Description
• The CHDIR statement is an instruction that changes the current
directory and a drive.
• Specify the directory to be changed with a character string constant or
variable.
• directory-name can be specified, starting from a drive name.
■ Related Item
MKDIR, RMDIR
■ Example of Program
conf
end conf
evnt
......
CHDIR ‘‘C:’’
CHDIR ‘‘TEST’’
CHDIR ‘‘E:ABC’’
......
end evnt
’ Changes the drive.
’ Changes the directory.
’ Changes both the drive and directory.
4-35
CHKTIM
ADDCYC2
CHKTIM
Function
■ Function
The CHKTIM function checks the status of the specified timer.
■ Format
RET = CHKTIM (timer-number)
■ Example of Use
RET = CHKTIM (14)
■ Description
• The CHKTIM function checks whether the specified timer is being
used (opened).
• timer-number indicates the number of the timer to be checked; it
must be an integer-type value from 0 to 15.
• As a result of executing this function, any of the following values is
returned:
0: The timer is not being used.
1: The timer is being used by the local program.
2: The timer is being used by a remote program.
■ Related Item
CLOSETIM, STARTTIM, STOPTIM, CONTTIM, SETTIM, READTIM,
OPENTIM, OPENTIM2
■ Example of Program
evnt
for i = 0 to 15
ret = CHKTIM (i)
if ret = 0 then i = 15
next
end evnt
4-36
CHAPTER 4 INSTRUCTION REFERENCE
CHR$
CHR$
Function
■ Function
The CHR$ function assigns the character corresponding to the specified
numeric value (character code).
■ Format
CHR$ (character-code)
■ Example of Use
MOJI$ = CHR$(&H30)
■ Description
• The CHR$ function assigns the character (1-byte character)
corresponding to the character specified by character-code.
• character-code must be an integer from 1 to 255.
• As a result of executing this function, the character corresponding to
character-code is returned.
■ Related Item
ASC
■ Example of Program
evnt
input type%, id@ data%
moji$ = CHR$(data%)
strdsp ..STR000, moji$
end evnt
4-37
CINT
ADDCYC2
CINT
Function
■ Function
The CINT function rounds off a real number and converts it to an integer.
■ Format
CINT (numerical-expression)
■ Example of Use
A% = CINT (FLOAT)
■ Description
• The CINT function rounds off the value indicated
numerical-expression and converts it to an integer.
• The conversion result range becomes the integer range.
■ Related Item
INT
■ Example of Program
evnt
input type%, id@, data
intvar% = CINT ( data )
numdsp ..NUM000, intvar%
end evnt
4-38
CHAPTER 4 INSTRUCTION REFERENCE
by
CIRCOLOR
CIRCOLOR
Statement
■ Function
The CIRCOLOR statement changes the tile and colors of the pie chart
display.
■ Format
CIRCOLOR control-name, zone-position, tile, display-color,
background-color
■ Example of Use
CIRCOLOR ..CIR000, 2, 1, 2, 3
■ Description
• The CIRCOLOR statement changes the tile and colors of the the pie
chart display. -1 indicates that the color and tile for which -1 was
specified remain unchanged.
• control-name is the pie chart name or the ID-type variable indicating
the pie chart.
• The value indicating the number of the zone in the pie chart to be
changed is set in zone-position. The zone position starts at 1.
• tile indicates the tiling figure of the zone. Specify this tiling figure
with a numeric value from 0 to 15.
• display-color is a numeric value indicating the color number of the
tile display section. Specify this color number with a numeric value
from 0 to 15.
• background-color is a numeric value indicating the color number of
the tile background section. Specify this color number with a
numeric value from 0 to 15.
■ Related Item
CIRDSP
■ Example of Program
evnt
input type%, id@, zone%, tile%
CIRCOLOR ..CIR000, zone%, tile%, -1, -1
end evnt
4-39
CIRDSP
ADDCYC2
CIRDSP
Statement
■ Function
The CIRDSP statement displays data in the zone where the pie chart
display was specified.
■ Format
CIRDSP control-name, zone-number, display-value
■ Example of Use
CIRDSP ..CIR000, 1, 30
■ Description
• The CIRDSP statement displays data in the zone where the pie chart
display was specified.
• control-name is the pie chart name or the ID-type variable indicating
the pie chart.
• The value indicating the zone number in the pie chart to be displayed
is set in zone-number. The zone number can be specified with a
constant or variable. The zone number starts at 1.
• display-value is the numeric data indicating the size of the pie chart
to be displayed.
• display-value cannot be changed even if this statement is issued to the
display for which operation parameters are set to “effective” in the
control.
■ Related Item
CIRCOLOR
■ Example of Program
conf
static name@
name@ = ..CIR000
end conf
evnt
input type%, id@, zone%, data%
CIRDSP ..CIR000, zone%, data%
end evnt
4-40
CHAPTER 4 INSTRUCTION REFERENCE
CIRSET
CIRSET
Statement
■ Function
The CIRSET statement sets data in the pie chart display.
■ Format
CIRSET control-name, zone-number, display-data
■ Example of Use
CIRSET .BUHIN.GRAPH, 2, 30.0
■ Description
• The CIRSET statement sets the data to be displayed in the pie chart
display. The speed of executing the PRDSP (display) statement after
setting data in each zone is faster than that of modifying all zone
values after executing the CIRDSP statement.
• control-name is the name of the pie chart display or the ID-type
variable indicating the pie chart display.
• zone-number indicates which zone data is to be modified. The zone
number is integer value data starting at 1.
• display-data is the numeric data indicating the size of each zone of
the pie chart.
■ Related Item
CIRDSP, PRDSP
■ Example of Program
evnt
CIRSET .buhin.gpaph , 3 , 20.1
var@ = .buhin.graph
no = 4
value = 23
CIRSET var@ , no , value
prdsp var@
end evnt
4-41
CLEAR
ADDCYC2
CLEAR
Statement
■ Function
The CLEAR statement clears the display of the specified display.
■ Format
CLEAR control-name
■ Example of Use
CLEAR ..NUM000
■ Description
• The CLEAR statement clears the display of the specified display,
leaving only the background color.
• When the slide display is specified, the CLEAR statement clears the
pointer graphic.
• When the meter display is specified, the CLEAR statement clears the
needle.
• When the clock display is specified, the CLEAR statement clears
nothing.
• control-name is the graph name or the ID-type variable indicating the
graph. display-name.
■ Related Item
NUMDSP, STRDSP, FIGDSP, SLDDSP, MTRDSP, FREDSP, PLTDSP,
BARDSP, BLTDSP, CIRDSP, LNEDSP
■ Example of Program
evnt
input type%, id@, data%
if data% = 1 then
CLEAR ..NUM000
end if
end evnt
4-42
CHAPTER 4 INSTRUCTION REFERENCE
CLOSE
CLOSE
Statement
■ Function
The CLOSE statement closes the specified part.
■ Format
CLOSE part-name
■ Example of Use
CLOSE .B000.
■ Description
• The CLOSE statement closes the part displayed on the screen. The
undisplayed status is called the close status.
• Nothing is performed even if the CLOSE statement is executed for the
closed part.
• The program is started if the closed part receives a message.
• part-name is the name or ID of the part to be closed.
■ Related Item
OPEN
■ Example of Program
evnt
input type% , id@ , data%
if pstat(..) = 0 then
close ..
endif
end evnt
4-43
CLOSECOM
ADDCYC2
CLOSECOM
Statement
■ Function
The CLOSECOM statement temporarily stops the use of a serial line.
■ Format
CLOSECOM device-name
■ Example of Use
CLOSECOM HST
■ Description
• The CLOSECOM statement is a command that temporarily inhibits a
program from receiving data from an external connecting device using
the OPENCOM instruction.
• HST (host computer), BCR (bar code reader), or TKY (ten-key pad)
can be specified in device-name.
■ Related Item
OPENCOM
■ Example of Program
conf
OPENCOM HST
end conf
evnt
input type% , id@ , data%
if type% = 3 and data% = 1 then
CLOSECOM HST
else if type% = 3 and data% = 0 then
REOPENCOM HST
endif
end evnt
4-44
CHAPTER 4 INSTRUCTION REFERENCE
CLOSEPARALLEL
CLOSEPARALLEL
Statement
■ Function
The CLOSEPARALLEL statement temporarily stops data input from a
parallel port.
■ Format
CLOSEPARALLEL input-bit
■ Example of Use
CLOSEPARALLEL 3
■ Description
• The CLOSEPARALLEL statement is an instruction that temporarily
inhibits a program from receiving data as a message from the parallel
port specification bit using the OPENPARALLEL instruction.
• input-bit specifies the bit for inhibiting data reception.
■ Related Item
OPENPARALLEL, REOPENPARALLEL
■ Example of Program
conf
OPENPARALLEL 3
end conf
evnt
input type% , id@ , data%
if type% = 3 and data% = 1 then
CLOSEPARALLEL 3
else if type% = 3 and data% = 0 then
REOPENPARALLEL 3
endif
end evnt
4-45
CLOSESIO
ADDCYC2
CLOSESIO
Statement
■ Function
The CLOSESIO statement closes a non-procedual communication port.
■ Format
CLOSESIO port-number
■ Example of Use
CLOSESIO 2
■ Description
• The CLOSESIO statement closes the port for stopping non-procedual
communication.
• port-number specifies a channel for stopping non-procedual
communication. CH1 to CH3 correspond to 1 to 3, respectively.
• The port to be closed must be opened in advance by the OPENSIO
statement to be explained later.
■ Related Item
OPENSIO, SETSIO, WRITESIO, WRITWSIOB, FLUSH
■ Example of Program
conf
global buf$ * 200
opensio 2 , 1 , buf$
setsio 2 , &HD
end conf
evnt
strdsp ..STR000 , buf$
CLOSESIO 2
end evnt
4-46
CHAPTER 4 INSTRUCTION REFERENCE
CLOSETIM
CLOSETIM
Statement
■ Function
The CLOSETIM statement stops the user of the specified timer.
■ Format
CLOSETIM timer-number
■ Example of Use
CLOSETIM TIMID@
CLOSETIM VAR
■ Description
• The CLOSETIM statement returns the timer allocated by the
OPENTIM, OPENTIM2, or OPENTIM3 function to the system.
• The system can use up to 16 timers. The timers not to be used must
be returned to the system. If allocating more than 16 timers is
attempted, an error occurs.
• timer-number indicates the number of the timer to be stopped and
returned to the system. Whether the timer number is an ID- or
integer-type value depends on how the timer is opened. (See
“OPENTIM”, “OPENTIM2”, and “OPENTIM3.”)
■ Related Item
OPENTIM, OPENTIM2, OPENTIM3, STARTTIM, STOPTIM, CONTTIM,
SETTIM, READTIM
■ Example of Program
conf
static timid@
timid@ = opentim()
setim timid@, 20, 0
starttim timid@
end conf
evnt
input type% , id@ , data%
if type% = 3 and id@ = ..SWT000 then
stoptim timid@
else if id@ = ..SWT001 then
closetim timid@
end if
end evnt
4-47
COLOR
ADDCYC2
COLOR
Statement
■ Function
The COLOR statement sets the color, type, and size of a straight line or a
dot.
■ Format
COLOR display-color, line-type, line-thickness or dot-size
■ Example of Use
COLOR 1, 0, 2
■ Description
• The COLOR statement sets the colors, types, and sizes of a straight
line and a dot. The values specified in the LINE and DOT
statements have priority over those to be specified in this statement.
• display-color indicates the display color of the straight line or dot.
Specify this display color with a numeric value from 0 to 15. The
specified display color becomes the color pallet number of the tool.
• line-type indicates the type of line to be drawn (for example, solid
line and dotted line). Specify this line type with a numeric value
from 0 to 3. For the types of line, see “Plotting” to “Straight Line”
of the tool.
• line-thickness indicates the thickness of the line. dot-size indicates
the size of the dot. Specify both the line thickness and dot size with
a numeric value from 0 to 2.
■ Related Item
LINE, DOT
■ Example of Program
conf
color 1 , 0 , 3
end conf
evnt
....
dot 100,200
dot 100,300
color 1 , 0 , 0
line 100,200,100,300
....
end evnt
4-48
CHAPTER 4 INSTRUCTION REFERENCE
CONF ... END CONF
CONF ... END CONF
Statement
■ Function
The CONF ... END CONF statements declare the configuration block
area.
■ Format
CONF
.....
.....
END CONF
■ Example of Use
CONF
static VAR%
END CONF
■ Description
• The configuration block written in a screen and a part is executed only
once when the screen is displayed. This block is not executed when
the screen is being displayed. It is executed once again when the
screen is redisplayed after another screen has been displayed.
• The configuration block for global screens and parts is executed only
once when the system is started.
• Initialization blocks (INIT) are used to write processing such as
initialization.
• Only the configuration block for closed parts is not executed even if a
screen is displayed. This configuration block is executed when a part
is opened. (See “OPEN Instruction.”)
■ Related Item
EVNT ... END EVNT, INIT ... END INIT
■ Example of Program
CONF
static moji$
END CONF
evnt
input ty%, id@, dat$
end evnt
4-49
CONST
ADDCYC2
CONST
Statement
■ Function
The CONST statement declares a constant.
■ Format
CONST constant name = constant
■ Example of Use
CONST #MAX#=10
■ Description
• The constant name should be enclosed in a pair of # marks according
to the variable name generation rule.
• If a constant is declared in a program, the constant name is replaced
with a declared constant value.
• The CONST statement cannot be used in a global screen program.
• Constant declaration is one of the new features of Screen Creator 5.
■ Related Item
■ Example of Program
conf
global L%
const #MAXLENGTH#=100
if L > #MAXLENGTH# then
L = #MAXLENGTH#
end if
end conf
4-50
CHAPTER 4 INSTRUCTION REFERENCE
CONTTIM
CONTTIM
Statement
■ Function
The CONTTIM statement restarts the stopped timer.
■ Format
CONTTIM timer-number
■ Example of Use
CONTTIM TIMID@
CONTIM 4
■ Description
• The CONTTIM statement restarts the timer stopped by the STOPTIM
instruction. The internal counter in the timer is continued from the
timer stop status.
• timer-number indicates the number of the timer to be restarted.
Whether the timer number is an ID- or integer-type value depends on
how the timer is opened. (See “OPENTIM”, “OPENTIM2”, and
“OPENTIM3.”)
■ Related Item
OPENTIM,
OPENTIM2,
OPENTIM3,
CLOSETIM,
STARTTIM,
STOPTIM,
SETTIM, READTIM
■ Example of Program
conf
static timid@
opentim2(3)
settim 3, 20, 0
starttim 3
end conf
evnt
input type% , id@ , data%
if type% = 3 and id@ = ..SWT000 then
stoptim 3
else if id@ = ..SWT001 then
conttim 3
end if
end evnt
4-51
COPY
ADDCYC2
COPY
Statement
■ Function
The COPY statement makes a hardcopy of a screen.
■ Format
COPY color-number
■ Example of use
COPY 5
■ Description
• The COPY statement makes a hard copy of a displayed screen. In
the "Color Number" field, a color specified on the color palette of
Screen Creator 5 is printed black.
• If color palette number 16 is specified, in addition to color palette
numbers from 0 and 15, colors of even color palette numbers are
printed black. If 17 is selected, the print colors of number 16 are
inversed, i.e., colors of odd color palette numbers are printed black.
• If an even color palette number is specified in monochrome printing,
the print color is the same as in the case where color palette number 2
is selected. If an odd color palette number is specified, the print color
is the same as in the case where color palette number 1 is selected.
• The "Color Number" can be specified only when "Select Color" is
selected in "Screen Print Mode" of "Printer Setup" of "System Setup"
on the OIP system screen.
■ Related Item
■ Example of Program
evnt
input ty%,id@
if id@ = ..SWT000 then COPY 8
end evnt
4-52
CHAPTER 4 INSTRUCTION REFERENCE
COS
COS
Function
■ Function
The COS function calculates a cosine for the specified numerical
expression.
■ Format
COS (numerical-expression)
■ Example of Use
X = COS (ANGLE)
■ Description
The COS function calculates a cosine value for the specified numerical
expression. The unit for the numerical expression is radian.
■ Related Item
ATN, SIN, TAN
■ Example of Program
evnt
angle = 3.141592/3
x = COS ( angle )
end evnt
4-53
CURDIR
ADDCYC2
CURDIR
Statement
■ Function
The CURDIR statement makes a character string indicating the current
directory path name into a character string variable.
■ Format
CURDIR character string variable
■ Example of Use
CURDIR PATH$
■ Description
A full path name including a drive name should be written.
■ Related Item
DIR,CHDIR,MKDIR,RMDIR
■ Example of Program
conf
strdsp ..str, "curdir"
end conf
evnt
input type%, id@, data%
if data% = 1 then
curdir path$
strdsp .dsp.str, path$
end if
end evnt
4-54
CHAPTER 4 INSTRUCTION REFERENCE
CVBS
CVB
Function
■ Function
The CVB function allocates data from any position of a character string
variable.
■ Format
CVB (character-string-variable-name, allocation-position)
■ Example of Use
VAR% = CVB (MOJI$,
■ Description
• The CVB function allocates data one byte from the specified
allocation- position of the specified character variable name.
The allocated data is regarded as an integer value.
• allocation-position must be an integer- or floating-point-type variable
or constant. 1 specifies the beginning of the character string
variable.
■ Related Item
MKS, MKB, MKW, MKI, MKF, MKID, CVW, CVI, CVF, CVID
5)
■ Example of Program
conf
end conf
evnt
org$ = ‘‘1234567’’
data% = CVB ( org$, 3 )
numdsp ..NUM000, data%
end evnt
’
Displays 51(&H33).
4-55
CVF
ADDCYC2
CVF
Function
■ Function
The CVF function allocates data from any position of a character string
variable.
■ Format
CVF (character-string-variable-name, allocation-position)
■ Example of Use
VAR = CVF (MOJI$, 5)
■ Description
• The CVF function allocates data four bytes from the specified
allocation- position of the specified character variable name.
The allocated data is regarded as a real value.
• allocation-position must be an integer- or floating-point-type variable
or constant. 1 specifies the beginning of the character string
variable.
• The CVF function returns a real number.
• A cut-out value is converted into a 86 series boundary.
■ Related Item
MKS, MKB, MKW, MKI, MKF, MKID, CVB, CVW, CVI, CVID
■ Example of Program
conf
end conf
evnt
org$ = ‘‘1234567’’
strdsp ..STR000, org$
mkf org$, 2, 1.23
strdsp ..STR001, org$
’ The character string will not be displayed correctly.
data% = CVF ( org$, 2 )
numdsp ..NUM000, data% ’ Displays 1.23.
end evnt
4-56
CHAPTER 4 INSTRUCTION REFERENCE
CVI
CVI
Function
■ Function
The CVI function allocates data from any position of a character string
variable.
■ Format
CVI (character-string-variable-name, allocation-position)
■ Example of Use
VAR% = CVI (MOJI$, 5)
■ Description
• The CVI function allocates data four bytes from the specified
allocation- position of the specified character variable name.
The allocated data is regarded as an integer value.
• allocation-position must be an integer- or floating-point-type variable
or constant. 1 specifies the beginning of the character string
variable.
• A cut-out value is converted into a 86 series boundary.
■ Related Item
MKS, MKB, MKW, MKI, MKF, MKID, CVB, CVW, CVF, CVID
■ Example of Program
conf
end conf
evnt
org$ = ‘‘1234567’’
data% = CVI ( org$, 3 )
numdsp ..NUM000, data%
end evnt
’ Displays &H36353433.
4-57
CVID
ADDCYC2
CVID
Function
■ Function
The CVID function allocates data from any position of a character string
variable.
■ Format
CVID (character-string-variable-name, allocation-position)
■ Example of Use
VAR@ = CVID (MOJI$, 5)
■ Description
• The CVID function allocates data six bytes from the specified
allocation- position of the specified character variable name.
The allocated data is regarded as an ID value.
• allocation-position must be an integer- or floating-point-type variable
or constant. 1 specifies the beginning of the character string
variable.
• The CVID function returns an ID-type value.
• A cut-out value is converted into a 86 series boundary (by 2 bytes).
■ Related Item
MKS, MKB, MKW, MKI, MKF, MKID, CVB, CVW, CVI, CVIF
■ Example of Program
conf
end conf
evnt
org$ = ‘‘1234567’’
data@ = CVID ( org$, 1 )
end evnt
4-58
CHAPTER 4 INSTRUCTION REFERENCE
CVW
CVW
Function
■ Function
The CVW function allocates data from any position of a character string
variable.
■ Format
CVW (character-string-variable-name, allocation-position)
■ Example of Use
VAR% = CVW (MOJI$, 5)
■ Description
• The CVW function allocates data two bytes from the specified
allocation-position of the specified character variable name. The
allocated data is regarded as an integer value.
• allocation-position must be an integer- or floating-point-type variable
or constant. 1 specifies the beginning of the character string
variable.
• A cut-out value is converted into a 86 series boundary.
■ Related Item
MKS, MKB, MKW, MKI, MKF, MKID, CVB, CVI, CVF, CVID
■ Example of Program
conf
end conf
evnt
org$ = ‘‘1234567’’
data% = CVW ( org$, 3 )
numdsp ..NUM000, data%
end evnt
’ Displays &H3433.
4-59
CYCLIC
ADDCYC2
CYCLIC
Statement
■ Function
The CYCLIC statement declares that the contents of the specified device
or memory table are periodically read.
■ Format
CYCLIC device-name, device-name, device-name, *number CYCLIC
memory-table-name, memory-table-name, memory-table-name, *number
■ Example of Use
CYCLIC 00˜D01, 00˜D10 * 5
CYCLIC 00˜MTBL(100), 00˜MTBL(200) * 10
■ Description
• The CYCLIC statement periodically reads the contents of the declared
PLC device through communication. If the previously read contents
do not match the contents read by this statement (change of contents),
a messages is transmitted to the declaring operation program. This
statement never operates during execution of the operation program
because it makes a declaration.
• This declaration must be made before the device is used in the
program.
• Communication occurs when data is read from the device (example:
A=00˜D0001) for which CYCLIC is not declared.
• To declare CYCLIC for the memory table, the table number must be
specified with an integer value.
• In the cyclic operation of the memory table, a message is issued when
data is written from the host computer or operation program to the
memory table. (This message is issued even if the contents do not
change.)
• Specifying “*number” following device-name or memory-table-name
enables CYCLIC to be continuously declared.
• When the screen is switched, a message is issued to all the parts for
which CYCLIC is declared.
■ Related Item
INPUT
4-60
CHAPTER 4 INSTRUCTION REFERENCE
CYCLIC
■ Example of Program
conf
cyclic 00˜d01 , 00˜d4 * 3
cyclic 00˜mtbl(20), 00˜mtbl(100)
end conf
evnt
input ty%,id@,dat%
if id@ = 00˜mtbl(20) then
numdsp ..num , dat%
end if
......
end evnt
4-61
CYCLIC2
ADDCYC2
CYCLIC2
Statement
■ Function
The CYCLIC2 statement declares that the contents of the specified device
are periodically read as a doubleword.
■ Format
CYCLIC2 device-name, device-name, device-name, *number
■ Example of Use
CYCLIC2 00˜D01, 00˜D10 * 5
■ Description
• The CYCLIC2 statement is the same as the CYCLIC statement except
that the contents of the device are read as a doubleword.
• The word having a larger device number is the high-order word.
• No memory table can be declared.
• When the screen is switched, a message is issued to all the parts for
which CYCLIC2 is declared.
■ Related Item
INPUT, CYCLIC
■ Example of Program
conf
cyclic2 00˜d01 , 00˜d7 * 3
end conf
evnt
input ty%,id@,dat%
if id@ = 00˜d01 then
numdsp ..num , dat%
end if
......
end evnt
4-62
CHAPTER 4 INSTRUCTION REFERENCE
DATE$
DATE$
Function
■ Function
The DATE$ function reads the current date.
■ Format
DATE$
■ Example of Use
MOJI$ = DATE$
■ Description
• The year, month, and day of the current date to be read are each
represented in two digits like YY/MM/DD.
• The DATE$ function cannot be used to set a date.
• Once date is set using the SETDATE command in a model with a
battery backup calendar IC (GC56LC or GC55EM), the date is
updated even while the power is off. If a model with no calendar IC
(GC53LC or GC53LM) is turned off, the date is initialized to
98-01-01 and the time to 00:00:00 when it is turned on again. The
date and time are updated while the power is on.
■ Related Item
GETDATE,GETTIME,SETDATE,SETTIME,TIME$
■ Example of Program
conf
moji$ = DATE$
strdsp ..STR000 , moji$
end conf
4-63
DECLARE
ADDCYC2
DECLARE
Statement
■ Function
The DECLARE statement declares a function.
■ Format
DECLARE function name [type
declaration[, variable declaration] ...)
■ Example of Use
DECLARE ADD\%(A\%,B\%)
■ Description
• The DECLARE statement declares a type of a function used in a
program. (Such declaration is called prototype declaration.)
• A function itself is declared in one of the three manners as shown
below:
- Local function: Defined in a program other than a global screen
program.
- Global function: Defined in a global screen program.
- Library function: Defined in a library.
• The declared type of a function (in the prototype declaration) must be
the same as the type of the function itself.
• This is one of the new features of Screen Creator 5.
■ Related Item
FUNCTION, FUNCTIONCHECK
■ Example of Program
DECLARE my_add(a%,b%)
conf
global x%,y%
local sum%
sum% = my_add(x%,y%)
end conf
4-64
CHAPTER 4 INSTRUCTION REFERENCE
declaration
character](variable
DEVRD
DEVRD
Statement
■ Function
The DEVRD statement reads the contents of the specified device.
■ Format
DEVRD device-name, offset-value, variable-name
■ Example of Use
DEVRD 00˜D10, 10, VALUE%
■ Description
• The DEVRD statement reads data from the device that is offset-value
away from the device specified in device-name.
• offset-value specifies the distance from the device specified in
device-name. The DEVRD statement reads data from the device
corresponding to the specified distance. offset-value must be an
integer- or floating-point-type variable or constant.
• variable-name specifies the variable that stores the read data; it must
be an integer- or floating-point-type variable.
• The DEVRD statement is used for the device (e.g., CYCLIC 00˜D10 *
10) where “continuous cycle” is declared in the CYCLIC or
CYCLIC2 statement.
• If the device from which data is to be read does not exist, an error
occurs.
• Be sure to use this command in an event block. The value 0 is set in
the variable, since an initialization block or configuration block is
executed before reading device data.
■ Related Item
CYCLIC, EVENTWR, DEVWR
■ Example of Program
conf
cyclic 00˜D10 * 5
’ Declares that data is read from the device that is 5
end conf
’ away from D10.
evnt
input type% , id@ , data%
’ Reads and displays the continuif id@ = ..SWT000 and data% = 1 then ’ ous device value when a switch
for i% = 0 to 4
’ is pressedfor the continuousid@ = getid ( ..NUM000, i%+1)
’ stage numeric display.
DEVRD 00˜D10, i% , data%
numdsp ..NUM000, data%
next
endif
end evnt
4-65
DEVWR
ADDCYC2
DEVWR
Statement
■ Function
The DEVWR statement writes data to the specified device.
■ Format
DEVWR device-name, offset-value, write-value
■ Example of Use
DEVWR 00˜D10, 10, 5
■ Description
• The DEVWR statement writes data to the device that is offset-value
away from the device specified in device-name.
• offset-value specifies the distance from the device specified in
device-name. The DEVWR statement writes data to the device
corresponding to the specified distance. offset-value must be an
integer- or floating-point-type variable or constant.
• write-value specifies the data to be written to the specified device; it
must be an integer- or floating-point-type variable or constant.
• The DEVWR statement is used for the device (e.g., EVENTWR 00˜
D10 * 10) where “continuous write” is declared in the EVENTWR
statement.
• If the device to which data is to be written does not exist, an error
occurs.
■ Related Item
CYCLIC, EVENTWR, DEVRD
■ Example of Program
conf
eventwr 00˜D10 * 5
’ Declares that data is to be written to the device that is
end conf
’ 5 away from D10.
evnt
input type% , id@ , data%
’
Writes 10 to the
device whose
DEVWR 00˜D10, data% , 10
data%.
end evnt
4-66
CHAPTER 4 INSTRUCTION REFERENCE
’
offset value is
DIM
DIM
Statement
■ Function
The DIM statement defines an array.
■ Format
DIM
variable-name
maximum-subscript-value] ...)
■ Example of Use
DIM ABC$(20), XYZ%(4,4,3), LOC!
■ Description
• The DIM statement defines the variable defined in variable-name as
an local variable.
• A local variable can be read and written only in a program where it is
declared. The compiler gives a warning if an undefined local
variable is used. Each local variable is initialized every time the
block is executed.
• If a variable has a subscript enclosed in parentheses, an arrangement
variable is declared.
• The number of maximum subscript values in parentheses indicates
that of array dimensions. In arrays of two dimensions or higher,
subscripts are specified, delimited by a comma (,).
• maximum-subscript-value indicates the maximum value of subscript
that can be specified. The subscript starts at 0.
• A variable can be used as an array variable even if it is not declared in
the DIM statement. In this case, the maximum value of the subscript
is 10.
• When a character variable is declared in an array, the element size can
be declared.
• Defining many arrays makes it impossible to display many screens
because the OIP work area becomes small.
• Screen Creator 5 has a new function for declaring local variables other
than arrangement variables distinctively.
• The DIM statement is provided to maintain the compatibility with
GCSGP3. Use LOCAL, instead of DIM, to declare a local variable.
• When a DIM statement is used to declare an arrangement variable,
compatibility with GCSGP3 is maintained.
■ Related Item
AUTO, BACKUP, GLOBAL, LOCAL, STATIC, STRING
(maximum-subscript-value
[,
4-67
DIM
ADDCYC2
■ Example of Program
conf
DIM FLOAT(10),ID@(5),MOJI$(10) * 40
for i% = 1 to 5
FLOAT(i%) = i*3
next
end conf
4-68
CHAPTER 4 INSTRUCTION REFERENCE
DIR
DIR
Function
■ Function
The DIR function makes a list of directory or file data into character
string variables and returns the number of created data (i.e., the number
of entries in the directory or file).
■ Format
DIR (directory name, file attribute value, offset value, and character
string variable)
■ Example of Use
NUM% = DIR("A:SUBDIR", &H20, 6, LIST$)
■ Description
• A directory name can be specified in a full path name including a
drive name or in an abbreviated name beginning with a current
directory name.
Example: A:\SUBDIR1\SUBDIR2
SUBDIR2\SUBDIR3
• A file name, instead of a directory name, should be specified to create
data of a single file.
• A file attribute value for selecting data to be created should be
specified in a logical OR of the flags shown below:
&H01: Read-only file
&H02: Hidden file
&H04: System file
&H08: Volume label
&H10: Sub-directory
&H20: Standard file
• An offset value is specified in order to exclude the first "n" data from
data to be created.
• Each created data consists of a 40-byte record of the fixed length. It
is followed by detailed data as shown below:
Name
DISK_1
SAMPLE
ABCDEFG
TEST2
DOWNLOAD
KBASIC
DATA_007
Extension
.
.EXE
.
.C
.OIP
.
.
Size
<VOL>
98765
123456
256
<DIR>
<DIR>
32
Day of
updating
87-01-15
92-11-03
94-03-21
93-05-05
87-02-14
93-12-24
89-10-10
Time of
updating
15:25
9:12
11:34
12:07
21:13
8:25
10:42
In this example, seven data are created in character strings of 280
bytes in all. The label is shown for convenience only.
The number of data to be created depends on the size of the character
string variable. As much data as possible is created.
■ Related Item
DIR,CHDIR,MKDIR,RMDIR
4-69
DIM
ADDCYC2
■ Example of Program
conf
global dname$(13), pname1$(13), pname2$(13)
global dsel%, p1sel%, p2sel%
static list$*2000
strdsp ..str, "dir"
end conf
evnt
input type%, id@, data%
if data% = 1 then
path$ = dname$(dsel%) + pname1$(p1sel%) + pname2$(p2sel%)
strdsp .dsp.str, path$
num% = dir(path$, &H3F, 0, list$)
strdsp .dsp.str, list$
numdsp ..num000,num%
end if
end evnt
4-70
CHAPTER 4 INSTRUCTION REFERENCE
DIR
DINV
Statement
■ Function
Inverses the color in a specified screen area.
■ Format
DINV
upper-left-X-coordinate,
upper-left-Y-coordinate,
lower-right-X-coordinate, lower-right-Y-coordinate
■ Example of Use
DINV 10, 10, 30, 30
■ Description
• Inverses the color in a rectangular area having opposite points of
specified coordinates.
• The upper left corner of the panel has the coordinates (0, 0). The
horizontal direction (toward the right) corresponds to the X axis, and
the vertical direction (toward below) corresponds to the Y axis.
• Color is inversed as shown below.
In color display, the palette values (0 to 15) are inversed. In other
words, 0 is changed into 15, 1 is changed into 14, 7 is changed into 8,
and so forth.
In monochrome display, activated color is changed into deactivated
color, deactivated color is changed into activated color, and
transparent color is changed into activated color.
• If this is used in an initialization block or configuration block,
drawing is executed after executing this block and accordingly color is
not inversed.
Be sure to use this in an event block.
■ Related Item
None
■ Example of Program
evnt
input ty,id@,dat
if ty = 3 and id@ = ..SWT000 then
DINV 0,0,639,399
endif
end evnt
4-71
DOT
ADDCYC2
DOT
Statement
■ Function
The DOT statement displays dots on a screen.
■ Format
DOT X1, Y1
■ Example of Use
DOT 20,300
■ Description
• The DOT statement displays a dot in the specified coordinate
(X1,Y1).
• X1 must be a numeric value from 0 to 639. Y1 must be a numeric
value from 0 to 399 (GC55EM) or 0 to 479 (GC56LC).
• Dots are directly displayed as the background of a screen. When a
part is opened or closed in the area where dots are displayed or when a
control is displayed, the dots may be cleared. The cleared dots are
not redisplayed.
• The size and color of a dot are specified by the COLOR statement.
• If this is used in an initialization block or configuration block,
drawing is executed after executing this block and accordingly points
are not plotted.
Be sure to use this in an event block.
■ Related Item
COLOR
■ Example of Program
conf
color 1 , 0 , 3
end conf
evnt
....
dot 100,200
dot 100,300
color 1 , 0 , 0
line 100,200,100,300
....
end evnt
4-72
CHAPTER 4 INSTRUCTION REFERENCE
DSPMODE
DSPMODE
Statement
■ Function
The DSPMODE statement changes the display mode of the control.
■ Format
DSPMODE control-name, display-mode
■ Example of Use
DSPMODE ..NUM000, 2
■ Description
• The DSPMODE statement is a command that changes the display
mode of the control.
• control-name is the control name or the ID-type variable indicating
control name.
• control-mode specifies the mode in which the control is displayed.
The display mode is specified with any of the following numeric
values:
0: Normal display mode
1: Inverse display mode
2: Blink display mode. (The display color is replaced with the
background color.)
3: On-and-off display mode.
(The display status and
nondisplay status are repeatedly displayed.)
■ Related Item
NUMDSP, STRDSP, FIGDSP, SLDDSP, MTRDSP, FREDSP, PLTDSP,
BARDSP, BLTDSP, CIRDSP, LNEDSP
■ Example of Program
evnt
input ty,id@,data
if id@ = ..SWT000 then
DSPMODE ..NUM000 , 3
endif
end evnt
4-73
EOF
ADDCYC2
EOF
Function
■ Function
The EOF function checks whether the end of the file was reached.
■ Format
EOF (file-number)
■ Example of Use
AAA = EOF (file-number)
■ Description
• file-number specifies the number of the file for which whether the
end of the file was reached is to be checked. This file number must
match the number of the file opened by the FOPEN statement.
• Return value 1 indicates that the end of the file was reached. Return
value 0 indicates that the end of the file is not reached.
■ Related Item
FOPEN, FIELD, FCLOSE, FPUT, FGET
■ Example of Program
conf
field 5
global no%
global moji1$ , moji2$
end field
global sum%
fopen ``C:TEST'', 2 , 5
......
end conf
evnt
while EOF(5) = 0
fget 5, i
numdsp ..NUM000, no%
strdsp ..STR000, moji1$
strdsp ..STR001, moji2$
wend
fclose (5)
end evnt
4-74
CHAPTER 4 INSTRUCTION REFERENCE
ERRCTL
ERRCTL
Statement
■ Function
The ERRCTL statement controls the error number display position.
■ Format
ERRCTL mode
■ Example of Use
ERRCTL 0
■ Description
• The ERRCTL statement controls the error number display position.
• The error display position conforms with the value specified in mode.
When mode is 0: An error number is displayed below a screen.
When mode is 1: A message is issued to the error display.
– When mode is 1, messages of error numbers 4000 to 4499 and
5000 to 5999 are issued to the error display (part ERRPTS on
global screen).
– Messages of error numbers 2000 to 2999 are issued only to the
error display.
– Following the type and issuer ID of an error, the error code, the
number of the screen where the error occurred, and the number of
the part where the error occurred are issued to the error display.
(If a screen program error occurs, -1 is set as the part number.)
– If part ERRPTS does not exist in the global screen, the error is
displayed in the lowest line of the window screen.
■ Related Item
ERRSTAT
■ Example of Program
evnt
input ty%,id@,dat%
if id@ = ..sw1 then
if errstat () = 1 then
errctl 0
else
errctl 1
endif
endif
end evnt
4-75
ERRSTAT
ADDCYC2
ERRSTAT
Function
■ Function
The ERRSTAT function reads the error display position.
■ Format
ERRSTAT
■ Example of Use
ERRSTAT()
■ Description
• The ERRSTAT function reads the current error display position.
• When this function is executed, any of the following numeric values
indicating the display position is returned:
When 0 is returned, the error is displayed below the screen.
When 1 is returned, the error is displayed in the error display.
■ Related Item
ERRCTL
■ Example of Program
evnt
input ty%,id@,dat%
if id@ = ..sw1 then
if errstat () = 1 then
errctl 0
else
errctl 1
endif
endif
end evnt
4-76
CHAPTER 4 INSTRUCTION REFERENCE
EVENTWR
EVENTWR
Statement
■ Function
The EVENTWR statement declares the device(s) to which data is to be
written.
■ Format
EVENTWR device-name, device-name, device-name *number,,,
■ Example of Use
EVENTWR 00˜D01, 00˜D10 * 5
■ Description
• The EVENTWR statement declares the device(s) in a part or screen to
which data is to be written. This statement only declares the devices
to which data is to be written; it does not actually write data to the
devices.
• Specifying *number enables two or more devices to be continuously
declared. This continuous declaration, however, does not mean that
data is written to all the declared devices at a time.
• The DEVWR statement is used to actually write data to the declared
devices.
• The devices to which data is to be written must be declared before the
DEVWR statement is executed.
■ Related Item
CYCLIC, DEVRD, DEVWR
■ Example of Program
conf
EVENTWR 00˜D10 * 5
end conf
evnt
input type% , id@ , data%
devwr 00˜D10, data% , 10
’ Declares that data is to be written to
’ five devices from D10.
’ Writes 10 to the device whose offset
’ value is data%.
end evnt
4-77
EVNT ... END EVNT
ADDCYC2
EVNT ... END EVNT
Statement
■ Function
The EVNT...END EVNT statements declares the event block area.
■ Format
EVNT
.....
.....
END EVNT
■ Example of Use
EVNT
input ty,id@,data
.....
END EVNT
■ Description
• The event block is a program block that operates when it receives a
message. The contents executed when a switch is pressed or a
message is received are written in these statements.
■ Related Item
CONF ... END CONF, INIT ... END INIT
■ Example of Program
conf
static moji$
end conf
evnt
input ty%, id@, dat$
end evnt
4-78
CHAPTER 4 INSTRUCTION REFERENCE
EXECPRCODE
EXECPRCODE
Statement
■ Function
The EXECPRCODE statement executes primitive data operation.
■ Format
EXECPRCODE control-name, type, operation-data, variable-name
■ Example of Use
EXECPRCODE ..NUM000, 0, 20, VAR%
■ Description
• When a control in a part is used to validate an operation parameter, the
EXECPRCODE statement executes data operation set in the part
operation parameter specification.
• type is usually 0. When the specified primitive is the plot display
and type is 0, the EXECPRCODE statement executes X data
operation. When type is 1, the statement executes Y data operation.
• control-name must be the control in the local part.
• operation-data specifies the value to be operated; it must be an
integer- or floating-point-type variable or constant.
• variable-name specifies the variable to which the operation result is
to be written; it must be an integer- or floating-point-type variable.
• If no operation code is written in the specified control, the value
specified in operation-data is set in the specified variable.
■ Related Item
None
■ Example of Program
conf
end conf
evnt
input type% , id@ , data%
EXECPRCODE ..NUM000, 0, data%, data1%
numdsp ..NUM001, data1%
end evnt
4-79
EXIT FUNCTION
ADDCYC2
EXIT FUNCTION
Statement
■ Function
The EXIT FUNCTION statement exits a function forcedly.
■ Format
EXIT FUNCTION
■ Example of Use
FUNCTION DIV%(A%,B%)
IF B%=0 THEN EXIT FUNCTION
DIV%=A%/B%
END FUNCTION
■ Description
• The EXIT FUNCTION statement gives an instruction to exit a
function forcedly in a function block where the function itself is
defined and returns the control to the side which called the function.
• This statement is one of the new features of Screen Creator 5.
■ Related Item
DECLARE, FUNCTION, FUNCTIONCHECK
■ Example of Program
declare my_div%(a%,b%)
conf
global x%,y%
local share%
share% = my_div(x%,y%)
end conf
function my_div%(a%,b%)
if b%=0 then EXIT FUNCTION
my_div%=a%/b%
end function
4-80
CHAPTER 4 INSTRUCTION REFERENCE
EXP
EXP
Function
■ Function
The EXP function calculates the value of an exponential function for the
base of a natural logarithm.
■ Format
EXP (numerical-expression)
■ Example of Use
VAR = EXP (A/2)
■ Description
The EXP function returns the result of exponent operation for the base
(E) of the natural logarithm.
■ Related Item
LOG
■ Example of Program
evnt
input ty,id@,data
if ty = 3 then
numdsp ..NUM000, EXP(10)
else
numdsp ..NUM000, EXP(5)
endif
end evnt
4-81
FCLOSE
ADDCYC2
FCLOSE
Statement
■ Function
The FCLOSE statement closes the specified file.
■ Format
FCLOSE file-number
■ Example of Use
FCLOSE 5
■ Description
• The FCLOSE statement closes the file specified by file-number.
• file-number must match the number of the file opened by the FOPEN
statement to be explained later. If another file number is specified,
an error occurs. Specify file-number directly with a numeric value
from 1 to 16.
■ Related Item
FOPEN, FIELD, FPUT, FGET
■ Example of Program
conf
field 5
global no%
global moji1$ , moji2$
end field
fopen ‘‘MEMORY’’, 2 , 5
......
end conf
evnt
......
FCLOSE 5
end evnt
4-82
CHAPTER 4 INSTRUCTION REFERENCE
FGET
FGET
Statement
■ Function
The FGET statement reads data from the specified file.
■ Format
FGET file-number, record-number
■ Example of Use
FGET 5, 3
■ Description
• The FGET statement reads the contents of the specified record
(record-number) in the specified file (file-number) into the variable
group declared by FIELD...END FIELD.
• file-number specifies the number of the file to be read. This file
number must match the number of the file opened by the FOPEN
statement.
• record-number specifies which record in the file is to be read first.
In this case, the variable group included in FIELD declared in
file-number is used as one unit. record-number is 1 when data is
read from the beginning of the file.
■ Related Item
FOPEN, FIELD, FCLOSE, FPUT
■ Example of Program
conf
field 5
global no%
global moji1$ , moji2$
end field
fopen ‘‘MEMORY’’, 2 , 5
......
end conf
evnt
FGET 5 , 3
numdsp ..NUM000 , no%
strdsp ..STR000 , moji1$
strdsp ..STR001 , moji2$
fclose 5
end evnt
4-83
FIELD ... END FIELD
ADDCYC2
FIELD ... END FIELD
Statement
■ Function
FIELD ... END FIELD sets a file read/write unit.
■ Format
FIELD file-number
variable-list
variable-list
END FIELD
■ Example of Use
FIELD 5
global abcd , xyz%
static dddd(10,10)
backup moji$
END FIELD
■ Description
• FIELD ... END FIELD declares the unit for reading the file by the
FGET statement or that for writing the file by the FPUT statement.
• file-number specifies the number of the file onto or into which the
variable group in the field is to be written or read. This file number
must match the number of the file opened by the FOPEN statement; it
is a value from 1 to 16.
• The variable list that can be written between FIELD and END FIELD
must be the GLOBAL, STATIC, or BACKUP variable. The method
for declaring variable lists is the same as that for declaring the
GLOBAL, STATIC, and BACKUP variables.
• The FIELD declared in the program where the FOPEN statement was
executed is the default read/write unit.
• When a file is read or written by a part that differs from the part
opened by the FOPEN statement, the FIELD declared in that part is
used. If this FIELD is not declared, the default FIELD is used.
• If two or more FIELDs are declared in the same file-number in one
program, the last declared FIELD is valid.
• FIELD ... END FIELD cannot be written in the global screen
program.
■ Related Item
FOPEN, FCLOSE, FPUT, FGET
■ Example of Program
conf
field 5
global no%
global moji1$ , moji2$
end field
fopen ‘‘MEMORY’’, 2 , 5
4-84
CHAPTER 4 INSTRUCTION REFERENCE
FIELD ... END FIELD
......
end conf
evnt
no% = 1
moji1$ = ‘‘product-name’’
moji2$ = ‘‘product-number’’
fput 5 , 3
fclose 5
end evnt
4-85
FIGCOLOR
ADDCYC2
FIGCOLOR
Statement
■ Function
The FIGCOLOR statement changes the tile and colors of the graphic
display.
■ Format
FIGCOLOR control-name, tile, display-color, background-color
■ Example of Use
FIGCOLOR .B000.FIG000, 1, 2, 3
■ Description
• The FIGCOLOR statement changes the tile and colors of the the
graphic display. -1 indicates that the color and tile for which -1 was
specified remain unchanged.
• control-name is the graphic display name or the ID-type variable
indicating the graphic display.
• tile indicates a tiling figure. Specify this tiling figure with a numeric
value from 0 to 15.
• display-color is a numeric value indicating the color number of the
tile display section. Specify this color number with a numeric value
from 0 to 15.
• background-color is a numeric value indicating the color number of
the tile background section. Specify this color number with a
numeric value from 0 to 15.
■ Related Item
FIGDSP
■ Example of Program
evnt
input type%, id@, tile%
FIGCOLOR ..FIG000, tile%, -1, -1
end evnt
4-86
CHAPTER 4 INSTRUCTION REFERENCE
FIGDSP
FIGDSP
Statement
■ Function
The FIGDSP statement texture the graphic specified in the graphic
display.
■ Format
FIGDSP control-name, texture-name
■ Example of Use
FIGDSP .B000.FIG000, SWFIG
■ Description
• The FIGDSP statement displays the texture specified in the texture
display. This texture name must be the one created by the plotting
tool.
• control-name is the graphic display name or the ID-type variable
indicating the graphic display.
• texture-name is the variable indicating the name or ID of the texture
to be displayed in the texture display or the registered graphic number
(integer type).
• display-value cannot be changed even if this statement is issued to the
display for which operation parameters are set to “effective” in the
control.
■ Related Item
FIGCOLOR, FIGFORM
■ Example of Program
evnt
input ty , id@, figno%
FIGDSP ..FIG000 , figno%
end evnt
4-87
FIGFORM
ADDCYC2
FIGFORM
Statement
■ Function
The FIGFORM statement changes the display format of the texture
display.
■ Format
FIGFORM control-name, resize-specification
■ Example of Use
FIGFORM ..HYOJIKI, 0
■ Description
• When the size of the texture display differs from that of the texture to
be control in the control, the FIGFORM statement specifies whether
to perform resize (magnification/reduction). Resize is performed to
make the size of the texture to be displayed match that of the texture
display.
• control-name is the graphic display name or the ID-type variable
indicating the graphic display.
• The integer-type value indicating whether to perform resize is set in
resize-specification.
0: Resize is not performed.
1: Resize is performed.
■ Related Item
FIGCOLOR, FIGDSP
■ Example of Program
evnt
input ty , id@, data
if ty = 3 and data = 1 then
FIGFORM ..FIG000, 1
else
FIGFORM ..FIG000, 2
endif
figdsp ..FIG000, figno
end evnt
4-88
CHAPTER 4 INSTRUCTION REFERENCE
FINPUT
FINPUT
Statement
■ Function
The FINPUT statement reads data from the specified file.
■ Format
FINPUT file-number, variable, variable, ...
■ Example of Use
FINPUT 12, VAR% , STRING$
■ Description
• The FINPUT statement reads data from the file specified by
file-number into the specified variable.
• A numeric or character string variable can be specified in variable.
• The following delimiters can be used when data is read into the
specified variable. They are not included in the variable.
– Only comma “,” and carriage return (CR) can be used as
delimiters. Line feed (LF) following CR is ignored.
– When a numeric variable is specified, a blank can also be used as a
delimiter.
– When a character string variable is specified, the character string
between double quotation marks (“) is to be read.
– If the type of data written to the specified file does not match that
of the specified read variable, the contents of the variable are
undefined.
• file-number must match the number of the file opened by the
FOPEN statement.
■ Related Item
FOPEN, FCLOSE, FPRINT, FWRITE, LINPUT
■ Example of Program
conf
fopen ‘‘C:TEST’’, 2 , 5
end conf
evnt
var% = -2
fwrite 5, 123, var%, ‘‘ABCD’’, ‘‘XYZ’’
fseek(5, 0, 0)
finput 5, VAR1%, VAR2%, VSTR1$, VSTR2$
end evnt
Data is written to the specified file as follows:
123,-2,’’ABCD’’,’’XYZ’’ CR/LF
When data is read, the variables change as follows:
VAR1%
123
VSTR1$
ABCD
VAR2%
-2
VSTR2$
XYZ
4-89
FLUSH
ADDCYC2
FLUSH
Statement
■ Function
The FLUSH statement returns the write position of a non-procedual
communication reception buffer to the beginning of the variable.
■ Format
FLUSH port-number
■ Example of Use
FLUSH 2
■ Description
• The FLUSH statement enables received data to be written from the
beginning of the variable to which the write position of the
non-procedual communication reception buffer was returned.
• port-number specifies the port (CH1 to CH3) to be flushed with a
value from 1 to 3.
• Execute the FLUSH statement when a reception completion message
is received. Unless the FLUSH statement is executed, the reception
buffer may become full. This statement only returns the write
position of the reception buffer to the beginning of the variable; it
does not clear data in the buffer.
• The port to be flushed must be opened in advance by the OPENSIO
statement to be explained later.
■ Related Item
OPENSIO, CLOSESIO, WRITESIO, WRITWSIOB, SETSIO
■ Example of Program
conf
global buf$ * 200
opensio 2 , 1 , buf$
setsio 2 , &HD
end conf
evnt
strdsp ..STR000 , buf$
FLUSH 2
closesio 2
end evnt
4-90
CHAPTER 4 INSTRUCTION REFERENCE
FOPEN
FOPEN
Statement
■ Function
The FOPEN statement opens the specified file.
■ Format
FOPEN file-name, mode, file-number
■ Example of Use
FOPEN “MEMORY”, 2, 5
■ Description
• The FOPEN statement opens the file to be read or written.
• file-name specifies the name of the file to be opened. The file
having the name enclosed in double quotation marks is to be opened.
Specify the name of the file to be opened with up to eight characters.
When MEMORY is specified in file-name, internal memory is
handled as a file. (Currently, only “MEMORY” can be specified in
file-name.)
• mode specifies the type of the file to be opened with one of the
following numeric values:
0: Read-only file
1: Write-only file
2: Read/write file
When file-name is “MEMORY”, the read/write file is opened
regardless of what value is specified in mode.
• file-number is used when a file is read or written or when a record is
set. Specify file-number directly with a numeric value from 1 to 16;
it cannot be specified by a variable.
• To handle internal memory as a file, the capacity of that memory must
be set on the system mode screen in advance.
• Attempting to execute the FOPEN statement for an unformatted file
causes an error.
■ Related Item
FCLOSE, FIELD, FPUT, FGET, FORMAT
■ Example of Program
conf
field 5
global no%
global moji1$ , moji2$
end field
FOPEN ‘‘MEMORY’’, 2 , 5
......
end conf
evnt
......
end evnt
4-91
FLUSH
ADDCYC2
FOR ... TO ... NEXT
Statement
■ Function
The instructions between the FOR statement and NEXT statements are
repeatedly executed by the specified count.
■ Format
FOR variable-name = start-value TO end-value [STEP increment] ...
NEXT
■ Example of Use
FOR I = 1 TO 10
A(I) = 3
NEXT
■ Description
• variable-name after the FOR statement specifies the variable used to
count how many times the FOR to NEXT loop is repeated.
variable-name must be an integer- or floating-point-type variable.
• start-value indicates the initial value. The value of the variable
increases by the value specified in increment each time the FOR to
NEXT loop is repeated. (No negative value can be specified in
increment.) When the increased value of the variable is greater
than end-value, the statement following the NEXT statement is
executed.
• One FOR to NEXT loop can be nested.
■ Related Item
WHILE ... WEND, SELECT CASE
■ Example of Program
conf
static VAR%(10)
for i% = 0 to 10
VAR%(i%) = i% * 3
next
end conf
4-92
CHAPTER 4 INSTRUCTION REFERENCE
FORMAT
FORMAT
Statement
■ Function
The FORMAT statement initializes (formats) the specified file.
■ Format
FORMAT file-name
■ Example of Use
FORMAT “A:”
■ Description
• file-name specifies the name of the file to be initialized.
• "A:", "E:" or "MEMORY" can be specified as the drive name.
• When “MEMORY” is specified in drive-name, the contents of the
file are filled with 0.
• Be sure to execute the FORMAT statement when using the file for the
first time.
■ Related Item
FOPEN, FIELD, FCLOSE, FPUT, FGET
■ Example of Program
conf
field 5
global no%
global moji1$ , moji2$
end field
global sum%
FORMAT ‘‘MEMORY’’
fopen ‘‘MEMORY’’, 2 , 5
......
end conf
evnt
no% = 1
moji1$ = ‘‘product-name’’
moji2$ = ‘‘product-number’’
fput 5 , 3
fclose 5
end evnt
4-93
FPRINT
ADDCYC2
FPRINT
Statement
■ Function
The FPRINT statement writes data to the specified file.
■ Format
FPRINT file-number, expression, expression, ...
■ Example of Use
FPRINT 12, 100, “ABCD”, VAR%, STRING$
■ Description
• The FPRINT statement writes the numeric value, variable or character
defined in expression to the file specified by file-number.
• A numeric value, a character, or a numeric or character variable can be
specified in expression.
• A numeric expression is converted to a numeric string and written to
the specified file. When the data to be written is positive, a blank is
written before it. When the data is negative, a minus sign (-) is
written before it. A blank is also written after the written numeric
string.
• When a character string is written, no delimiter is inserted.
• file-number must match the number of the file opened by the
FOPEN statement.
■ Related Item
FOPEN, FCLOSE, FPUT, WRITE
■ Example of Program
conf
fopen ‘‘C:TEST’’, 2 , 5
end conf
evnt
var% = -2
fprint 5, 123, 45, var%, ‘‘ABCD’’, ‘‘XYZ’’
end evnt
Data is written to the specified file as follows:
△123△△45△-2△ABCDXYZ (△ indicates a blank.)
4-94
CHAPTER 4 INSTRUCTION REFERENCE
FPUT
FPUT
Statement
■ Function
The FPUT statement writes data to the specified file.
■ Format
FPUT file-number, record-number
■ Example of Use
FPUT 5, 3
■ Description
• The FPUT statement writes the contents of the variable group declared
by FIELD...END FIELD to the specified record (record-number) in
the specified file (file-number).
• file-number specifies the number of the file to be written. This file
number must match the number of the file opened by the FOPEN
statement.
• record-number specifies the record in the file to which the contents
of the declared variable group is to be written. In this case, the
variable group included in FIELD is used as one unit.
record-number is 1 when data is written to the beginning of the file.
■ Related Item
FOPEN, FIELD, FCLOSE, FGET
■ Example of Program
conf
field 5
global no%
global moji1$ , moji2$
end field
fopen ‘‘MEMORY’’, 2 , 5
......
end conf
evnt
no% = 1
moji1$ = ‘‘product-name’’
moji2$ = ‘‘product-number’’
FPUT 5 , 3
fclose 5
end evnt
4-95
FRECOLOR
ADDCYC2
FRECOLOR
Statement
■ Function
The FRECOLOR statement changes the tiles and colors of the free graph
display.
■ Format
FRECOLOR cotrol-name, tile-1, display-color-1, background-color-1,
tile-2, display-color-2, background-color-2
■ Example of Use
FRECOLOR ..FRE000, 2, 1, 4, 5, 2, 1
■ Description
• The FRECOLOR statement changes the tiles and colors of the free
graph display and the background tiles and colors of the entire
display. tile-1 indicates that the color and tile for which 1 was
specified remain unchanged.
• control-name is the free graph name or the ID-type indicating the
free graph name.
• tile-1 indicates the tiling figure of the tile display section. Specify
this tiling figure with a numeric value from 0 to 15.
• display-color-1 is a numeric value indicating the color number of the
tile display section. Specify this color number with a numeric value
from 0 to 15.
• background-color-1 is a numeric value indicating the color number
of the tile background section. Specify this color number with a
numeric value from 0 to 15.
• tile-2 indicates the background tiling figure of the free graph.
Specify this tiling figure with a numeric value from 0 to 15.
• display-color-2 is a numeric value indicating the color number of the
tile display section of the background. Specify this color number
with a numeric value from 0 to 15.
• background-color-2 is a numeric value indicating the color number
of the tile background section of the background. Specify this color
number with a numeric value from 0 to 15.
■ Related Item
FREDSP
4-96
CHAPTER 4 INSTRUCTION REFERENCE
FRECOLOR
■ Example of Program
conf
static name@
name@ = ..FRE000
end conf
evnt
input type%, id@, data%
if type% = 3 then
FRECOLOR name@, 2, 3, 1, 4, 5, 2
endif
end evnt
4-97
FREDSP
ADDCYC2
FREDSP
Statement
■ Function
The FREDSP statement specifies the value to be displayed in the free
graph display.
■ Format
FREDSP control-name, display-value
■ Example of Use
FREDSP .B000.FRE000, 50
■ Description
• The FREDSP statement specifies the value to be displayed in the free
graph.
• control-name is the name of the free graph display or the ID-type
variable indicating the free graph display.
• display-value is the value specifying the filling range in the free
graph display.
• display-value cannot be changed even if this statement is issued to the
display for which operation parameters are set to “effective” in the
primitive.
■ Related Item
FRECOLOR
■ Example of Program
conf
static name@
name@ = ..FRE000
end conf
evnt
input type%, id@, data%
FREDSP name@, data%
end evnt
4-98
CHAPTER 4 INSTRUCTION REFERENCE
FSEEK
FSEEK
Function
■ Function
The FSEEK function changes the read/write position of a file.
■ Format
FSEEK (file-number, reference-position, offset)
■ Example of Use
AAA% = FSEEK (12, 0, 0)
■ Description
• The FSEEK function moves the read/write position of the file by the
value specified by offset, starting from reference-position.
• file-number specifies the number of the file opened by the FOPEN
statement.
• 0, 1, and 2 can be specified in reference-position. When 0 is
specified, the FSEEK function moves the read/write position, starting
from the beginning of the file. When 1 is specified, the function
moves the read/write position, starting from the current position.
When 2 is specified, it moves the read/write position, starting from the
end of the file.
• Specify offset in bytes. Specify a positive value in offset when
moving the read/write position to the end of the file.
• The read/write position obtained as a result of executing the FSEEK
function is returned.
■ Related Item
FOPEN, FCLOSE, FPRINT, FWRITE, FINPUT
■ Example of Program
conf
fopen ‘‘C:TEST’’, 2 , 5
end conf
evnt
AAA$ = ‘‘12345’’
fwrite 5, AAA$, ‘‘ABCD’’
fseek(5, 0, 0)
finput 5, VSTR$
end evnt
4-99
FSUM
ADDCYC2
FSUM
Function
■ Function
The FSUM function calculates the sum of the variable group in the
specified field.
■ Format
FSUM (file-number)
■ Example of Use
SUM = FSUM (5)
■ Description
• The FSUM function calculates the sum (eight low-order bits) of the
variable group included in the FIELD specified by file-number by
incrementing the contents of the group for each byte. The function
calculates the area where no character code is defined in the character
string variable as 0.
• The FSUM function returns the calculation result as an integer-type
value within the range from 0 to 255.
• If the FIELD specified by file-number does not exist, an error occurs.
■ Related Item
FOPEN, FIELD, FCLOSE, FPUT, FGET
■ Example of Program
conf
field 5
global no%
global moji1$ , moji2$
end field
global sum%
fopen ‘‘MEMORY’’, 2 , 5
......
end conf
evnt
fget 5 , 3
if sum% = FSUM(5) then
numdsp ..NUM000 , no%
strdsp ..STR000 , moji1$
strdsp ..STR001 , moji2$
else
strdsp ..STR002 , ‘‘SUM-error’’
fclose 5
end evnt
4-100
CHAPTER 4 INSTRUCTION REFERENCE
FUNCTION ... END FUNCTION
FUNCTION ... END FUNCTION
Statement
■ Function
The FUNCTION ... END FUNCTION statement declares a function
block.
■ Format
FUNCTION function name [type
declaration[, variable declaration] ...)
...
END FUNCTION
■ Example of Use
FUNCTION ADD%(A%,B%)
ADD%=A%+B%
END FUNCTION
■ Description
• The FUNCTION ... END FUNCTION statement declares a function
block where the function itself is defined.
• A defined function can be referenced in three ways as shown below
according to the position where it is declared:
- Local function: Defined in a program other than a global screen
program.
- Global function: Defined in a global screen program.
- Library function: Defined in a library.
• The declared type of a function (in the prototype declaration) must be
the same as the defined type of the function itself.
• Like a variable, a function has a return value of a type determined by
the type declaration character ($, % or !).
A function with no type declaration character is a real number
function.
• The return value of a function depends on a value substituted for the
function name including the type declaration character.
• Variable declaration is an argument of a function.
A variable with no argument declaring a variable type is regarded as a
real number variable.
• An argument of a function is given when referenced. Therefore, if a
value is changed by substituting it for an argument in the function or
the like, the variable itself given as the argument by the caller is also
changed.
• Type declaration using DECLARE is needed to call a function
declared in a function block.
• To exit a function in a function block forcedly, use EXIT
FUNCTION.
• This is one of the new features of Screen Creator 5.
■ Related Item
DECLARE, EXIT FUNCTION, FUNCTIONCHECK
declaration
character](variable
4-101
FUNCTION ... END FUNCTION
ADDCYC2
■ Example of Program
declare my_add%(a%,b%)
conf
global x%,y%
local sum%
sum% = my_add(x%,y%)
end conf
FUNCTION my_add%(a%,b%)
my_add%=a%+b%
END FUNCTION
4-102
CHAPTER 4 INSTRUCTION REFERENCE
FWRITE
FWRITE
Statement
■ Function
The FWRITE statement writes data to the specified file.
■ Format
FWRITE file-number, expression, expression, ...
■ Example of Use
FWRITE 12, 100, “ABCD”, VAR%, STRING$
■ Description
• The FWRITE statement writes the numeric value or character defined
in expression to the file specified by file-number.
• A numeric value, a character, or a numeric or character variable can be
specified in expression.
• When writing two or more expressions to the file, delimit them with a
comma (,). Add the code indicating carriage return (CR) or line feed
(LF) to the end of expression description.
• A numeric expression is converted to a numeric string and written to
the specified file. When the numeric string is negative, a minus sign
(-) is inserted before it.
• When writing a character string, enclose it in double quotation marks
(”).
• file-number must match the number of the file opened by the
FOPEN statement.
■ Related Item
FOPEN, FCLOSE, FPUT, FPRINT
■ Example of Program
conf
fopen ‘‘C:TEST’’, 2 , 5
end conf
evnt
var% = -2
fwrite 5, 123, var%, ‘‘ABCD’’, ‘‘XYZ’’
end evnt
Data is written to the specified file as follows:
123,-2,’’ABCD’’,’’XYZ’’ CR/LF
4-103
GETBLIGHT
ADDCYC2
GETBLIGHT
Statement
■ Function
The GETBLIGHT statement reads the time that lasts till the back light is
turned off.
■ Format
GETBLIGHT variable-name
■ Example of Use
GETBLIGHT VAR
■ Description
variable-name specifies the variable used to write the time that lasts till
the back light is turned off. The unit for the read values is minute.
When 0 is specified, the back light is not turned off.
■ Related Item
SETBLIGHT
■ Example of Program
conf
GETBLIGHT var
var = var*2
setblight var
end conf
4-104
CHAPTER 4 INSTRUCTION REFERENCE
GETDATE
GETDATE
Statement
■ Function
The GETDATE statement obtains the data representing a date.
■ Format
GETDATE year-read-variable, month-read-variable, day-read-variable,
day-of-week-read-variable
■ Example of Use
GETDATE YEAR%, MONTH%, DATE%, DAY%
■ Description
• The GETDATE statement writes the current date value to
year-read-variable, month-read-variable, day-read-variable, and
day-of-week-read-variable.
• Year is the low-order two digits of A.D. Month is a numeric value
from 1 to 12. Day is a numeric value from 1 to 31. The day of the
week is a numeric value from 0 to 6 (Sunday to Saturday).
• Read variables must be integer-type variables.
• Once date is set using the SETDATE command in a model with a
battery backup calendar IC (GC56LC or GC55EM), the date is
updated even while the power is off. If a model with no calendar IC
(GC53LC or GC53LM) is turned off, the date is initialized to January
1, 1998 (Thursday) and the time to 00:00:00 when it is turned on
again. The date and time are updated while the power is on.
■ Related Item
DATE$, GETTIME, SETDATE, SETTIME, TIME$
■ Example of Program
conf
GETDATE yr%, mt%, d%, dd%
numdsp ..NUM000, yr%
numdsp ..NUM001, mt%
numdsp ..NUM002, d%
end conf
4-105
GETGID
ADDCYC2
GETGID
Function
■ Function
The GETGID function obtains the ID of the local screen currently being
displayed.
■ Format
GETGID()
■ Example of Use
VAR@ = GETGID()
■ Description
• The GETGID function obtains the ID of the local screen currently
being displayed.
• This function cannot be used to obtain the ID of a global screen.
■ Related Item
GETGNO
■ Example of Program
evnt
input type%, id@, data%
if type% = 3 then
VAR@ = GETGID()
NO% = GETGNO(VAR@)
00˜D100 = NO%
end if
end evnt
4-106
CHAPTER 4 INSTRUCTION REFERENCE
GETGNO
GETGNO
Function
■ Function
The GETGNO function obtains the registration number of the screen
currently being displayed.
■ Format
GETGNO (screen-ID)
■ Example of Use
NO = GETGNO (ID@)
■ Description
• The GETGNO function obtains the registration number of the screen
specified in screen-ID.
• screen-ID specifies a screen name or an ID-type variable.
■ Related Item
GETGID
■ Example of Program
evnt
input type%, id@, data%
if type% = 3 then
VAR@ = GETGID()
NO% = GETGNO(VAR@)
00˜D100 = NO%
end if
end evnt
4-107
GETID
ADDCYC2
GETID
Function
■ Function
The GETID function obtains the value of the ID separate from the
reference ID by offset.
■ Format
GETID (object-indicated-by-reference-ID, offset-value)
■ Example of Use
ID@ = GETID (VARID@, 10)
■ Description
• The GETID function obtains the ID-type value separate from the
reference ID-type value by the specified offset value.
• object-indicated-by-reference-ID specifies an ID-type variable
name, a screen name, a part name, a registration character
string/graphic name, or a device name.
• offset-value is the integer or real value indicating the offset from the
reference ID to the ID to be obtained. When 0 is specified in
offset-value, the reference ID value is obtained.
• When 1 is specified in offset-value, the ID of the first element of a
continuous-stage-type control is obtained.
■ Related Item
GETOFFSET
■ Example of Program
conf
cyclic 00˜d0001 * 30
end conf
evnt
input ty%,id@,dat%
offset = getoffset(00˜d0001,id@)
...
Error processing corresponding to the offset value, etc.
...
id@ = getid (00˜d0001,offset)
....
end evnt
4-108
CHAPTER 4 INSTRUCTION REFERENCE
GETOFFSET
GETOFFSET
Function
■ Function
The GETOFFSET function calculates the offset between the reference ID
and specified ID.
■ Format
GETOFFSET (reference-ID, ID-to-be-specified)
■ Example of Use
OFFSET% = GETOFFSET (00˜D0001, ID@)
■ Description
• The GETOFFSET function calculates the offset indicating how long
the specified ID is separate from the reference ID.
• reference-ID specifies the ID-type variable, screen name, part name,
registration character string/graphic name, or device name used as the
reference offset.
• ID-to-be-specified specifies the ID-type variable, screen name, part
name, registration character string/graphic name, or device name used
to calculate the offset.
• When the GETOFFSET function applies to the device declared in
CYCLIC2, the offset value is a multiple of 2.
■ Related Item
GETID
■ Example of Program
conf
cyclic 00˜d0001 * 30
end conf
evnt
input ty%,id@,dat%
offset = GETOFFSET(00˜d0001,id@)
...
Error processing corresponding to the offset value, etc.
...
id@ = getid (00˜d0001,offset)
....
end evnt
4-109
GETTIME
ADDCYC2
GETTIME
Statement
■ Function
The GETTIME statement obtains the data indicating time.
■ Format
GETTIME hour-read-variable, minute-read-variable, second-readvariable
■ Example of Use
GETTIME HOUR%, MIN%, SEC%
■ Description
• The GETTIME statement writes the current value (time) to
hour-read-variable, minute-read-variable, and second-read-variable.
• Hour is a numeric value from 0 to 23. Minute is a numeric value
from 0 to 59. Second is a numeric value from 0 to 59.
• Read variables must be integer-type variables.
• Once date is set using the SETDATE command in a model with a
battery backup calendar IC (GC56LC or GC55EM), the date is
updated even while the power is off. If a model with no calendar IC
(GC53LC or GC53LM) is turned off, the date is initialized to January
1, 1998 (Thursday) and the time to 00:00:00 when it is turned on
again. The date and time are updated while the power is on.
■ Related Item
DATE$, GETDATE, SETDATE, SETTIME, TIME$
■ Example of Program
conf
GETTIME H%,M%,S%
numdsp ..NUM000, H%
numdsp ..NUM001, M%
numdsp ..NUM002, S%
end conf
4-110
CHAPTER 4 INSTRUCTION REFERENCE
GLOBAL
GLOBAL
Statement
■ Function
The GLOBAL statement declares that global variables are to be used.
■ Format
GLOBAL variable-name [, variable-name ...]
■ Example of Use
GLOBAL VAR, XYZ(2,3), MOJI$ * 20
■ Description
• The GLOBAL statement declares that global variables are to be used.
Global variables can be read and written from all programs. Global
variables must be declared before they are used in a program. These
variables are initialized once when the power supply is turned on.
The values of global variables used after the power supply has been
turned on are retained.
• A normal variable, an array variable, or a character string variable can
be written in variable-name.
• When an array or character variable is declared, the DIM and
STRING statements need not be declared.
• Use the DIM or STRING statement to specify a non-global array and
a character string type.
■ Related Item
AUTO, BACKUP, DIM, LOCAL, STATIC, STRING
■ Example of Program
conf
GLOBAL var%, float
GLOBAL moji$ * 50
GLOBAL xyz@(10,10)
end conf
4-111
GOSUB
ADDCYC2
GOSUB
Statement
■ Function
The GOSUB statement executes the specified subroutine.
■ Format
GOSUB subroutine-name
■ Example of Use
GOSUB SUB001
■ Description
• Control is transferred to the subroutine specified after the GOSUB
statement.
• Subroutine names written in the global screen and those in the
program containing the GOSUB statement can be specified. Use the
RETURN statement to return control.
• If the same name exists both in the global and local subroutines, the
global subroutine is called.
■ Related Item
RETURN
■ Example of Program
evnt
X = 10
GOSUB SUB001
numdsp ..NUM000, X
end evnt
SUB001:
ab = X+3
RETURN
4-112
CHAPTER 4 INSTRUCTION REFERENCE
GOTO
GOTO
Statement
■ Function
The GOTO statement unconditionally moves control to the specified line.
■ Format
GOTO label-name
■ Example of Use
GOTO LABEL1
■ Description
The GOTO statement unconditionally moves control to the line specified
by label-name. Execution is continued from the line to which control
was moved.
■ Related Item
None
■ Example of Program
evnt
if a = 1 then goto L1
a = 3
L1: numdsp ..NUM000 , a
end evnt
4-113
INIT ... END INIT
ADDCYC2
HEX$
Function
■ Function
The HEX$ function converts a decimal character string to a hexadecimal
character string.
■ Format
HEX$ (numerical-expression)
■ Example of Use
HEX$ (123)
■ Description
• The HEX$ function converts a decimal character string to a
hexadecimal character string.
• When a floating-point type is specified in numerical-expression, the
decimal character string (numeric value) is converted to an integer
type, then converted to a hexadecimal character string.
• Specify the decimal character string (numeric value) within the range
from -2147483648 to 2147483647.
■ Related Item
OCT$, VAL
■ Example of Program
evnt
input type , id@ , data
moji$ = HEX$(data)
strdsp ..STR000, moji$
end evnt
4-114
CHAPTER 4 INSTRUCTION REFERENCE
IF ... THEN ... ELSE
IF ... THEN ... ELSE
Statement
■ Function
Condition judgment is performed to select the next program to be
executed.
■ Format
IF conditional expression THEN statement [ELSE statement]
IF conditional-expression THEN
statement-list
[ELSEIF conditional-expression THEN
statement-list]
[ELSE
statement-list]
END IF
■ Example of Use
IF TYPE% = 1 THEN VALUE = 10
■ Description
• conditional-expression is the relational operation expression
obtained when the operation result is true (other than 0) or false (0).
• When the operation result is true as a result of executing a conditional
expression, the THEN and subsequent statements are executed.
When the operation result is false, the ELSE and subsequent
statements are executed.
• The ELSE, ELSEIF and subsequent statements can also be omitted.
• Up to 50 ELSEIF statements can be used in IF THEN...END IF.
■ Related Item
None
■ Example of Program
evnt
if a =
if x =
a =
elseif
a =
else
a =
end if
end evnt
2 then x = 3
5 then
1
x = 6 then
2
3
4-115
INIT ... END INIT
ADDCYC2
INIT ... END INIT
Statement
■ Function
The INIT ... END INIT statement declares an area of an initialization
block.
■ Format
INIT
.....
....
END INIT
■ Example of Use
INIT
static VAR\%
END INIT
■ Description
• An initialization block written in a screen program or part program is
executed first only once when the program including the block is
executed.
• Write processing which should be executed first only once such as
initialization or the like.
■ Related Item
CONF .... END CONF,EVNT .... END EVNT
■ Example of Program
INIT
global moji$
moji$="initial value"
END INIT
4-116
CHAPTER 4 INSTRUCTION REFERENCE
INP
INP
Function
■ Function
The INP function reads 2-byte data from the specified parallel I/O port.
■ Format
INP (port-number)
■ Example of Use
VAR = INP (0)
■ Description
• The INP function reads data from the specified parallel I/O port.
• The port-number to be specified depends on the option board
inserted into the option bus. A numeric value from 0 to 3 can be
specified in port-number.
■ Related Item
OUT
■ Example of Program
evnt
var% = inp (0)
if (var% and 1) = 1 then var% = 0
OUT 0,var%
end evnt
4-117
INPBIT
ADDCYC2
INPBIT
Function
■ Function
The INPBIT function reads the specified BIT number from the specified
input port.
■ Format
INPBIT (port-number, BIT-number)
■ Example of Use
DATA% = INPBIT (0,10)
■ Description
• The INPBIT function reads the specified BIT number from the
specified input port.
• Specify port-number and BIT-number with an integer value relative to
0.
• The lowest-order bit number of the parallel IO is 0 and the next
lowest-order bit number is 1. That is, the BIT number is sequentially
incremented.
• If an unexisting port or BIT number is specified, 0 is returned.
■ Related Item
INP, OUT, OUTBIT, OUTBITSTAT, OUTSTAT
■ Example of Program
evnt
data% = INPBIT(0,3)
if data% = 0 then
outbit 0,3,1
endif
end evnt
4-118
CHAPTER 4 INSTRUCTION REFERENCE
INPUT
INPUT
Statement
■ Function
The INPUT statement reads the data transmitted to a screen or part into
the specified variable(s).
■ Format
INPUT variable-name [, variable-name] .....
■ Example of Use
INPUT V1, ID@, DATA
■ Description
• The INPUT statement reads the data transmitted to a screen or part.
• The integer value indicating the type of the sender that transmitted
data is set in the first variable-name. The value indicating the ID of
the sender is set in the second variable-name, which is followed by
data.
Sender
Screen
Type
1
Part
2
Switch (single)
Switch (multi)
1
ID
Optional
Selector switch
Timer
4
Alarm
5
Parallel port
6
Non-procedual
7
Sampling
PLC
9
16
Bar code
reader
Magnetic card
Ten-key pad
Memory card
Host
18
19
20
21
22
Control
Contents of data
Item written in the PRINT
statement
Item written in the PRINT
statement
1 when ON, 0 when OFF
Switch number: 1 when ON,
0 when OFF
Number of activated switch
Value indicating the ON (1)
or OFF (0) status
Value indicating the ON (1)
status
BIT number, BIT value, or
channel number satisfying
the condition
The port number, status, and
number of received bytes are
set in this order.
Sampled data
Integer value indicating the
device value
Bar code value
Code of pressed key
Optional data to be
determined by the user
4-119
INPUT
ADDCYC2
4-120
CHAPTER 4 INSTRUCTION REFERENCE
INPUT
bytes written to the reception buffer). For the text mode, a
terminator code is also read. (When the status is 1 or -1, the number
of received data is read.)
• The numbers of multi-switches and selector switches are counted as 1,
2, 3 and so forth from the upper left switch. When all switches are
counted in the X direction, the switches on the lower Y line are
counted in the same way. They are integers.
■ Related Item
PRINT, CYCLIC, OPENPARALLEL, OPENCOM, OPENSIO
■ Example of Program
conf
global buffer$
opensio 2 , 0, buffer$
setsio 2, 10
end conf
evnt
input type, id@, port%, status%, bytes%
if type = 7 then
moji$ = left(buffer$, bytes% - 1)
strdsp ..STR000 , moji$
end if
end evnt
4-121
INPUT
ADDCYC2
INSTR
Function
■ Function
The INSTR function retrieves character strings to find the specified
character string. When the specified character string is found, the
function notifies the system of the start position of the character string.
■ Format
INSTR
(start-position,
character-string-to-be-found)
■ Example of Use
A = INSTR (10. MOJI1$, MOJI2$)
■ Description
• The INSTR function retrieves the character strings specified in
character-strings-to-be-retrieved to find the character string
specified in character-string-to-be-found. This retrieval starts at
the start position specified in start-position. When the specified
character string is found, the function notifies the system of the
position in a number of bytes relative to the beginning of the character
strings to be retrieved. If the specified character string is not found,
0 is set.
• start-position is 1 when retrieval starts at the beginning of character
strings.
• Character string variables, direct character strings, registration
character string names, and registration character string numbers can
be specified in character-strings-to-be-retrieved.
■ Related Item
None
character-strings-to-be-retrieved,
■ Example of Program
evnt
a$ = “this is oip.”
p = instr (1, a$, “company”)
specified
p = instr (1, num,”ab”)
string number
end evnt
4-122
CHAPTER 4 INSTRUCTION REFERENCE
’
When a character string variable is
’
When a registration character
is specified
INSTR
INT
Function
■ Function
The INT function omits the fraction of the value specified in
numerical-expression to create an integer.
■ Format
INT (numerical-expression)
■ Example of Use
A = INT (30.1)
■ Description
• The INT function omits the fraction of the numerical-expression
enclosed in parentheses in the negative direction.
• The INT function calculates the maximum integer that does not
exceed the value specified in numerical-expression when omitting the
decimal point.
• When the value specified in numerical-expression is negative, the INT
function omits the figures below the decimal point as follows:
INT (1.4) → 1
INT (-1.4) → -2
■ Related Item
CINT
■ Example of Program
evnt
input type%, id@, data
intvar% = INT ( data )
numdsp ..NUM000, intvar%
end evnt
4-123
INT
ADDCYC2
INTERLOCK
Statement
■ Function
The INTERLOCK statement controls transition to the system mode
screen.
■ Format
INTERLOCK mode
■ Example of Use
INTERLOCK 1
■ Description
• When mode is 1, the INTERLOCK statement sets the interlock to ON.
When 0, the INTERLOCK statement sets the interlock to OFF.
• When the interlock is ON, the system mode screen is not displayed
even if two dots on a diagonal line are pressed. When power is ON,
the system mode screen is not displayed even if the upper left edge on
the screen is pressed.
• When lock is activated, it must be reset by a program. Make a
program so that it resets lock securely.
• A mode specified using the INTERLOCK command in a model with a
battery backup calendar IC (GC56LC or GC55EM) is maintained
even while the power is off.
A mode specified using the
INTERLOCK command in a model with no calendar IC (GC53LC or
GC53LM) is lost when the power is turned off. Therefore, a mode
must be specified in a program which is always executed when the
power is turned on.
■ Related Item
None
■ Example of Program
conf
INTERCLOCK 1
end conf
evnt
input tp%,id@,dat%
if id@ = ..sw the interlock 0
.....
end evnt
4-124
CHAPTER 4 INSTRUCTION REFERENCE
IOCTL
IOCTL
Statement
■ Function
The IOCTL statement controls the I/O device connected to the OIP.
■ Format
IOCTL I/O-type, mode
■ Example of Use
IOCTL 0, 0
■ Description
• Write the integer value indicating the I/O device to be controlled in
I/O-type. Currently, the type of I/O device that can be controlled are
the PLC, switch, and non-procedure transmission buffer.
• mode is the integer value indicating how the I/O device is controlled.
• When controlling the PLC, specify one of the following values
indicating how the PLC is controlled in mode. The value used to
determine the IO type is 0.
0: The PLC is write- and read-enabled.
1: The PLC is write-inhibited.
– If write is executed when the PLC is write-inhibited, an error will
occur.
• Switches are controlled as follows: The value used to determine the
IO type is &H60.
– When switches are simultaneously pressed, the number of switches
to be assumed ON can be controlled.
– Specify the number of switches that can be simultaneously
recognized in mode with a numeric value from 0 to 640.
– Specifying 0 inhibits switch input. The switch cannot be used in
this case. Thus, be sure to make a program in another way so that
it resets prohibition of turning on the switch.
– The number of switches specified using this command in a model
with a battery backup calendar IC (GC56LC or GC55EM) is
maintained even while the power is off. The number of switches
specified using this command in a model with no calendar IC
(GC53LC or GC53LM) is lost when the power is turned off.
Therefore, the number of switches must be specified in a program
which is always executed when the power is turned on.
• A non-procedure type send buffer is cleared as shown below. The
value for deciding the I/O type is &H41.
- Specify a port (CH1 to CH3) for clearing the send buffer in
"mode". Input a number between 1 and 3.
■ Related Item
IOSTAT
4-125
IOCTL
ADDCYC2
■ Example of Program
evnt
input ty%,id@,dat%
if id@ = ..sw1 and dat% = 1 then
ioctl 0,0
else
ioctl 0,1
endif
end evnt
4-126
CHAPTER 4 INSTRUCTION REFERENCE
IOCTL2
IOCTL2
Statement
■ Function
The IOCTL2 statement controls PLC cyclic communication.
■ Format
IOCTL2 device-name, code, data
■ Example of Use
IOCTL2 00˜D10, 0, 0
■ Description
• Executing the IOCTL2 statement executes the cyclic communication
specified by device-name. The cyclic communication to be
specified by device-name must be declared in the CYCLIC or
CYCLIC2 statement in advance.
• Set 0 in code and data.
■ Related Item
None
■ Example of Program
conf
cyclic 00˜D10
end conf
evnt
input ty%,id@,dat%
if id@ = ..sw1 then
00˜D11 = 1
ioctl2 00˜D10 ,0 ,0
endif
end evnt
4-127
IOSTAT
ADDCYC2
IOSTAT
Function
■ Function
The IOSTAT function reads the status of the I/O device connected to the
OIP.
■ Format
IOSTAT (I/O-type)
■ Example of Use
IOSTAT (0)
■ Description
• Write the integer value indicating the I/O device whose status is to be
read in I/O-type. Currently, the type of I/O device that can be
controlled are the PLC and switch.
• To read the PLC status, specify 0 in I/O-type.
0: The PLC is write- and read-enabled.
1: The PLC is write-inhibited.
• To read the switch status, specify &H60 in I/O-type.
– The number of switches that can be recognized when they are
pressed simultaneously is returned (0 to 640).
■ Related Item
IOCTL
■ Example of Program
evnt
input ty%,id@,dat%
if id@ = ..sw1 then
if iostat(0) then
ioctl 0,0
else
ioctl 0,1
end if
endif
end evnt
4-128
CHAPTER 4 INSTRUCTION REFERENCE
JUMP
JUMP
Statement
■ Function
The JUMP statement displays the specified screen.
■ Format
JUMP screen-name
■ Example of Use
JUMP 10
■ Description
• The JUMP statement displays the screen specified in screen-name.
• screen-name is the name of the screen to be displayed or the ID-type
variable indicating the screen to be displayed. Alternatively,
screen-name specifies the screen number stored in screen registration.
• When this statement is executed, the subsequently coded program is
not executed.
• If a non-extant screen is specified, a system error occurs.
■ Related Item
None
■ Example of Program
evnt
input type , id@ , data
if type = 3 and id@ = ..SWT000 then
JUMP GAMEN..
end if
end evnt
4-129
KILL
ADDCYC2
KILL
Statement
■ Function
The KILL statement deletes the specified file.
■ Format
KILL file-name
■ Example of Use
KILL “C:ABC.DOC”
■ Description
• The KILL statement deletes the file specified by file-name.
• A wild card (*) can be specified in file-name.
■ Related Item
■ Example of Program
conf
end conf
evnt
.......
KILL ‘‘ABC.*’’
.......
end evnt
4-130
CHAPTER 4 INSTRUCTION REFERENCE
LAMPCOLOR
LAMPCOLOR
Statement
■ Function
The LAMPCOLOR statement changes the ON display color of the lamp
display.
■ Format
LAMPCOLOR display-name, color-number
■ Example of Use
LAMPCOLOR .BUHIN.GRAPH, 5
■ Description
The LAMPCOLOR statement changes the ON display color of the lamp
display.
• display-name is the name of lamp display or the ID-type variable
indicating the lamp display.
• color-number indicates the color displayed when the lamp display is
ON. Specify this color number with a numeric value from 0 to 15.
■ Related Item
LAMPDSP
■ Example of Program
conf
lampdsp .buhin.gpaph , 0
LAMPCOLOR .buhin.gpaph , 7
lampdsp .buhin.gpaph , 1
end conf
4-131
LAMPDSP
ADDCYC2
LAMPDSP
Statement
■ Function
The LAMPDSP statement indicates whether the lamp display is ON or
OFF.
■ Format
LAMPDSP control-name, lamp-mode
■ Example of Use
LAMPDSP .BUHIN.GRAPH, 1
■ Description
The LAMPDSP statement indicates whether the lamp display is ON or
OFF.
• control-name is the name of lamp display or the ID-type variable
indicating the lamp display.
• lamp-mode indicates whether the lamp display is ON or OFF.
When lamp-mode is 0, the lamp display is OFF. When 1, the lamp
display is ON.
• display-value cannot be changed even if this statement is issued to
the control for which operation parameters are set to “effective” in
the control.
■ Related Item
LAMPCOLOR
■ Example of Program
evnt
input type,id@,data
var@ = .buhin.graph
LAMPDSP var@ , data
end evnt
4-132
CHAPTER 4 INSTRUCTION REFERENCE
LEFT$
LEFT$
Function
■ Function
The LEFT$ function returns a character string the specified number of
characters, starting from the left of the specified character string.
■ Format
LEFT$ (character-string, number-of-characters)
LEFT$ (registered-character-string-number, number-of-characters)
LEFT$ (registered-character-string-name, number-of-characters)
■ Example of Use
A$ = LEFT$ (MOJI$, 5)
A$ = LEFT$ (4, 10)
A$ = LEFT$ (TOROKU, 8)
■ Description
• The LEFT$ function returns a character string the number of bytes
specified in number-of-characters, starting from the left of the
specified character string.
• number-of-characters specifies the number of bytes of the character
string to be fetched with a numeric value from 0 to 255. When
number-of-characters is 0, a null character string is returned.
• character-string is a direct character string or a character string
variable.
• registered-character-string-number is the numerical expression
indicating the number registered by GCSGP3.
• registered-character-string-name is the name of the character
string created by GCSGP3 or the ID-type variable indicating the name
of the character string.
■ Related Item
MID$, RIGHT$
■ Example of Program
evnt
b$ = “12345678”
a$ = LEFT$(b$ , 3)
c$ = LEFT$ (no , 3)
c$ = LEFT$ (id@ , 4)
end evnt
4-133
LEN
ADDCYC2
LEN
Function
■ Function
The LEN function returns the length of the specified character string in a
number of bytes.
■ Format
LEN (character-string)
LEN (registered-character-string-number)
LEN (registered-character-string-name)
■ Example of Use
A = LEN (B$)
A = LEN (MOJI)
■ Description
• The LEN function returns the length of the character string specified
by
character-string,
registered-character-string-number,
or
registered-character-string-name in a number of bytes.
• character-string is a direct character string or a character string
variable.
• registered-character-string-number is the numerical expression
indicating the number registered by GCSGP3.
• registered-character-string-name is the name of the character
string created by GCSGP3 or the ID-type variable indicating the name
of the character string.
■ Related Item
None
■ Example of Program
conf
a = len
a = len
a = len
a = le
end conf
4-134
(b$)
(“abcdefg”)
( toroku )
(1)
CHAPTER 4 INSTRUCTION REFERENCE
LINE
LINE
Statement
■ Function
The LINE statement draws a straight line on a screen.
■ Format
LINE X1, Y1, X2, Y2
■ Example of Use
LINE 20,30,100,200
■ Description
The LINE statement draws a straight line between the specified two
coordinates ((X1,Y1) and (X2,Y2)).
• X1 and X2 must be a numeric value from 0 to 639. Y1 and Y2
must be a numeric value from 0 to 399 (GC55EM) or 0 to 479
(GC56LC).
• A straight line is directly displayed as the background of a screen.
When a part is opened or closed in the area where a straight line was
displayed or when a primitive is displayed, the straight line may be
cleared. The cleared straight line is not redisplayed.
• The type and color of the straight line are specified by COLOR.
• If this is used in an initialization block or configuration block,
drawing is executed after executing this block and accordingly lines
are not drawn.
Be sure to use this in an event block.
■ Related Item
COLOR
■ Example of Program
conf
color 1 , 0 , 3
end conf
evnt
....
dot 100,200
dot 100,300
color 1 , 0 , 0
line 100,200,100,300
....
end evnt
4-135
LINPUT
ADDCYC2
LINPUT
Statement
■ Function
The LINPUT statement reads data from the specified file.
■ Format
LINPUT file-number, character-string-variable
■ Example of Use
LINPUT 12, STRING$
■ Description
• The LINPUT statement reads data from the file specified by
file-number
into
the
character
string
defined
by
character-string-variable.
• The data between the current file position and carriage return (CR) or
line feed (LF) is assigned to character-string-variable. (CR and
LF, however, are not assigned.)
• file-number must match the number of the file opened by the
FOPEN statement.
■ Related Item
FOPEN, FCLOSE, FPRINT, FWRITE, FINPUT
■ Example of Program
conf
fopen ‘‘C:TEST’’, 2 , 5
end conf
evnt
AAA$ = ‘‘12345’’
fwrite 5, AAA$, ‘‘ABCD’’
fseek(5, 0, 0)
linput 5, VSTR$
end evnt
The file is written as follows:
‘‘12345’’,’’ABCD’’ CR/LF
When data is read, the variables change as follows:
VSTR$
‘‘12345’’,’’ABCD’’
4-136
CHAPTER 4 INSTRUCTION REFERENCE
LNECOLOR
LNECOLOR
Statement
■ Function
The LNECOLOR statement changes the line colors and figure of the line
chart display.
■ Format
LNECOLOR control-name, line-number, line-type, line-color, tile,
display-color, background-color
■ Example of Use
LNECOLOR ..LNE000, 1, 2, 1, 4, 5, 2
■ Description
• The LNECOLOR statement changes the line colors and figure of the
line chart display and the background tile and color of the entire
display.
• control-name is the name of a line chart or the ID-type variable
indicating the chart.
• line-number is the integer value indicating the number of the line to
be changed. The line number starts at 1.
• line-type is the numeric value indicating the type of the line.
Specify this line type with a numeric value from 0 to 3.
• tile indicates the tiling figure of the bar. Specify this tiling figure
with a numeric value from 0 to 15.
• display-color is the numeric value indicating the color number of the
tile display section. Specify this color number with a numeric value
from 0 to 15.
• background-color is the numeric value indicating the color number
of the tile background section. Specify this color number with a
numeric value from 0 to 15.
■ Related Item
LNEDSP, LNESHIFT
■ Example of Program
conf
static name@
name@ = ..LNE000
end conf
evnt
input type%, id@, data%
if type% = 3 then
LNECOLOR name@, 2, 3, 1, 4, 5, 2
endif
end evnt
4-137
LNEDSP
ADDCYC2
LNEDSP
Statement
■ Function
The LNEDSP statement displays data in the line chart display.
■ Format
LNEDSP control-name, line-number, point-number, display-data
■ Example of Use
LNEDSP .BUHIN.GRAPH, 2, 2, 30.0
■ Description
• The LNEDSP statement displays line data in the line chart display.
• control-name is the name of a line chart or the ID-type variable
indicating the chart.
• line-number is the value indicating the line number in the line chart
to be displayed. The line number starts at 1.
• point-number specifies the data point to be changed in the line chart;
it is the integer-type value starting at 1. The maximum point value
depends on what line chart is placed.
• display-value is the numeric data indicating the size of the specified
line chart point.
• display-value cannot be changed even if this statement is issued to the
display for which operation parameters are set to “effective” in the
control.
■ Related Item
LNECOLOR, LNESHIFT
■ Example of Program
conf
static name@
name@ = ..LNE000
end conf
evnt
input type%, id@, data%
lnedsp name@, 2, 2, data%
end evnt
4-138
CHAPTER 4 INSTRUCTION REFERENCE
LNESET
LNESET
Statement
■ Function
The LNESET statement sets data in the line chart display.
■ Format
LNESET control-name, line-number, point-number, display-data
■ Example of Use
LNESET .BUHIN.GRAPH 2, 4, 30.0
■ Description
• The LNESET statement sets the data to be displayed in the line chart
display. The speed of executing the PRDSP (display) statement after
setting data in two or more points is faster than that of modifying all
the line point values after executing the LNEDSP statement.
• control-name is the name of the line chart display or the ID-type
variable indicating the line chart display.
• line-number specifies which line data is to be displayed when two or
more lines are displayed in one line chart display. This line number
is the integer value data starting at 1.
• point-number specifies which point value on the specified line is to
be changed. This point number is the integer value data starting at 1.
• display-data is the numeric data indicating the size of the line chart.
■ Related item
LNEDSP, PRDSP
■ Example of Program
evnt
lneset .buhin.graph , 3 , 8 , 20.1
var@ = .buhin.graph
no = 4
value = 23
point = 4
LNESET var@ , no , point, value
prdsp var@
end evnt
4-139
LNESHIFT
ADDCYC2
LNESHIFT
Statement
■ Function
The LNESHIFT statement shifts the display data of a line chart left or
right.
■ Format
LNESHIFT (cotrol-name, line-number, shift-direction, display-data)
■ Example of Use
A = LNESHIFT ( ..LNE000, 1, 1, 30)
■ Description
• The LNESHIFT statement is a function that shifts each of the points
constituting the line chart in the line chart display left or right by one
point and displays the points.
• When this statement is executed, the values of the points purged from
the line chart are returned as a result of the shifting.
• control-name is the line chart name or the ID-type variable indicating
the line chart.
• line-number is the value indicating which line in the line chart
display is to be shifted. This line number starts at 1.
• When shift-direction is 1, line chart data is shifted left and above.
When shift-direction is -1, line chart data is shifted right and below.
• display-data indicates the data to be displayed in the vacant area
produced as a result of the shifting.
■ Related Item
LNEDSP, LNECOLOR, LNESHIFT2
■ Example of Program
evnt
input type%, id@, data%
if data% > 0 then
abc% = lneshift ( ..LNE000, 1, 1, 0)
else
abc% = lneshift ( ..LNE000, 1, -1, 100)
endif
end evnt
4-140
CHAPTER 4 INSTRUCTION REFERENCE
LNESHIFT2
LNESHIFT2
Statement
■ Function
The LNESHIFT2 statement shifts the display data of a line chart left or
right.
■ Format
LNESHIFT2 (control-name, line-number, shift-direction, display-data)
■ Example of Use
A = LNESHIFT2 ( ..LNE000, 1, 1, 30)
■ Description
• Different from the LNESHIFT statement, the LNESHIFT2 statement
shifts line chart data but does not display it. To display line chart
data, execute the PRDSP statement.
• The LINESHIFT2 statement is a function that shifts each of the points
constituting the line chart in the line chart display left or right by one
point.
• When this statement is executed, the values of the points purged from
the line chart are returned as a result of the shifting.
• control-name is the line chart name or the ID-type variable indicating
the line chart.
• line-number is the value indicating which line in the line chart
display is to be shifted. This line number starts at 1.
• When shift-direction is 1, line chart data is shifted left and above.
When shift-direction is -1, line chart data is shifted right and below.
• display-data indicates the data to be displayed in the vacant area
produced as a result of the shifting.
■ Related Item
LNEDSP, LNECOLOR, LNESHIFT, PRDSP
■ Example of Program
evnt
input type%, id@ data%
if data% > 0 then
abc% = lneshift2 ( ..LNE000, 1, 1, 0)
else
abc% = lneshift2 ( ..LNE000, 1, -1, 100)
endif
prdsp ..LNE000
end evnt
4-141
LOCAL
ADDCYC2
LOCAL
Statement
■ Function
The LOCAL statement defines a local variable.
■ Format
LOCAL variable name [, variable name ...]
■ Example of Use
LOCAL VAR , XYZ(2,3) , MOJI$ * 20
■ Description
• The LOCAL statement defines a variable defined in "variable name"
as a local variable.
• A local variable can be read and written only in a program where it is
declared. The compiler gives a warning if an undefined local
variable is used. Each local variable is initialized every time the
block is executed.
• A variable name can be specified in a normal variable, arrangement
variable or character string variable.
• DIM declaration or STRING declaration is not needed to declare an
arrangement variable or character variable.
• The LOCAL statement is one of the new features of Screen Creator 5
added for distinctive declaration of local variables.
• DIM can substitute for LOCAL. However, use LOCAL as far as
possible in Screen Creator 5.
• STRING can be used, instead of LOCAL, to specify a size of a
character string variable. However, use LOCAL as far as possible in
Screen Creator 5.
■ Related Item
AUTO,BACKUP,DIM,FUNCTION,GLOBAL,STATIC,STRING
■ Example of Program
conf
global float(5)
LOCAL i%
for i% = 0 to 5
float(i%) = i%*3
next
end conf
4-142
CHAPTER 4 INSTRUCTION REFERENCE
LOCALCHECK
LOCALCHECK
Statement
■ Function
The LOCALCHECK statement controls the level of warning messages
output by the compiler.
■ Format
LOCALCHECK warning level
■ Example of Use
LOCALCHECK 1
■ Description
• The LOCALCHECK statement specifies whether or not to output a
warning if local and global variables, functions and/or subroutines are
used vaguely in a program.
• Two warning levels are available as shown below:
1: A warning is output.
0: No warning is output.
• Three types of warnings are available as shown below:
(1) If a variable not declared is used in a program
In this case, the compiler regards such a variable as a local
variable. It regards such a variable as a global variable in a
global screen program.
(2) If global and local variable names or subroutine names are
duplicate
In this case, such variables or subroutines are regarded as global
variables or subroutines.
(3) If two or more global, local and/or library function names are
duplicate
In this case, the priority is given to a library function, if any. If
no library functions are used, the functions are regarded as global
functions.
• The warning level is set to 0 unless the LOCALCHECK statement is
written.
• The warning level is changed from the position where the
LOCALCHECK statement is written in the program.
• The LOCALCHECK statement is one of the new features of Screen
Creator 5.
■ Related Item
BACKUP,DECLARE,DIM,FUNCTION,GLOBAL,LOCAL
4-143
LOCALCHECK
ADDCYC2
■ Example of Program
conf
local newvar3$
newvar1$ = "no warning"
LOCALCHECK 1
newvar2$ = "warning is given!"
newvar3$ = "no warning"
end conf
4-144
CHAPTER 4 INSTRUCTION REFERENCE
LOF
LOF
Function
■ Function
The LOF function calculates the size of the specified file.
■ Format
LOF (file-number)
■ Example of Use
AAA = LOF (file-number)
■ Description
• file-number specifies the number of the file whose size is to be
calculated. This file number must match the number of the file
opened by the FOPEN statement.
• The size of the specified file is calculated in bytes.
■ Related Item
FOPEN, FIELD, FCLOSE, FPUT, FGET, EOF
■ Example of Program
conf
field 5
global no%
global moji1$ , moji2$
end field
global sum%
fopen ‘‘MEMORY’’, 2 , 5
......
end conf
evnt
no% = 1
moji1$ = ‘‘product-name’’
moji2$ = ‘‘product-number’’
fput 5 , 3
if LOF(5) > 100 then
fclose 5
end if
end evnt
4-145
LOG
ADDCYC2
LOG
Function
■ Function
The LOG function calculates the natural logarithm specified in
numerical-expression.
■ Format
LOG (numerical-expression)
■ Example of Use
A = LOG (B*C)
■ Description
• numerical-expression must be a numeric value greater than 0.
■ Related Item
EXP
■ Example of Program
conf
la = log ( 10 )
lb = log ( a * b )
end conf
4-146
CHAPTER 4 INSTRUCTION REFERENCE
MCPY
MCPY
Statement
■ Function
The MCPY statement copies the contents of a field to a character string
variable.
■ Format
1:MCPY file-number, character-string-variable
2:MCPY character-string-variable, file-number
■ Example of Use
MCPY 5, moji$
■ Description
• The MCPY statement copies the contents of the variable group in a
field to a character string variable or the contents of a character string
variable to the variable group in a field. That is, the MCPY
statement in the first example (1:MCPY) copies the contents of the
character string variable to the variable group in the field specified by
file-number.
The MCPY statement in the second example
(2:MCPY) copies the contents of the variable group in the specified
field to the character string variable.
• file-number specifies the file number defined in the FIELD
declaration.
• When the contents of the variable group or character string variable
are copied, the size is used, whichever is smaller.
■ Related Item
FOPEN, FIELD, FCLOSE, FPUT, FGET, EOF, SOF
■ Example of Program
conf
field 5
global no%
global moji1$ , moji2$
end field
global buff$ * 50
opensio 1 , 0 , buff$
fopen ‘‘MEMORY’’, 2 , 5
end conf
evnt
no% = 1
moji1$ = ‘‘product-name’’
moji2$ = ‘‘product-number’’
size% = sof(5)
MCPY 5 , buff$
writesiob 1 , size% , buff$
end evnt
4-147
MEDIACHK
ADDCYC2
MEDIACHK
Function
■ Function
The MEDIACHK function checks whether a medium exists in the drive
and returns the check result.
■ Format
MEDIACHK (drive name)
■ Example of Use
STATUS\% = MEDIACHK("E:")
■ Description
• The return value is as shown below:
0: No medium
1: Medium exists.
■ Related Item
MEDIASIZE
■ Example of Program
conf
global dname$(13)
global dsel%
strdsp ..str, "mediachk"
end conf
evnt
input type%, id@, data%
if data% = 1 then
strdsp .dsp.str, dname$(dsel%)
num% = mediachk(dname$(dsel%))
if num% = 1 then
strdsp ..str, "valid"
else
strdsp ..str, "invalid"
end if
end if
end evnt
4-148
CHAPTER 4 INSTRUCTION REFERENCE
MEDIASIZE
MEDIASIZE
Function
■ Function
The MEDIASIZE function checks the size of a medium in the drive and
returns the number of bytes.
■ Format
MEDIASIZE (drive name, calculation method)
■ Example of Use
SIZE% = MEDIASIZE("E:", 0)
■ Description
• The calculation method is as shown below:
0: Full space
1: Free space
When the full space is specified, the medium size is calculated from
the number of all clusters.
When the free space is specified, free clusters are checked and the
medium size is calculated from the total number of free clusters.
■ Related Item
MEDIACHK
■ Example of Program
conf
global dname$(13)
global dsel%
static mode%
mode% = 0
strdsp ..str, "mediasize"
numdsp ..num001, mode%
end conf
evnt
input type%, id@, data%
if data% = 1 then
if mode% = 1 then
mode% = 0
else
mode% = 1
end if
numdsp ..num001,mode%
strdsp .dsp.str, dname$(dsel%)
num% = mediasize(dname$(dsel%),mode%)
numdsp ..num000,num%
end if
end evnt
4-149
MID$
ADDCYC2
MID$
Statement
■ Function
The MID$ statement replaces part of a character string with another
character string.
■ Format
MID$ (character-string-variable, start-position, number-of-characters) =
replacing-character-string
■ Example of Use
MID$ (x$, 1, 1) = “A”
■ Description
• The MID$ statement replaces the character string specified in
character-string-variable with the character string specified in
replacing-character-string the specified number-of-characters
(bytes), starting from the specified start-position.
• If the specified number-of-characters is greater than the specified
character-string-variable, the character string is replaced only by the
size of the variable. For this reason, the size of the character string
variable remains unchanged even if the character string is replaced.
• The start position of the character string to be replaced starts at 1.
• When number-of-characters is negative and start-position is 0 or
negative, an error occurs.
■ Related Item
LEFT$, RIGHT$, MID$
■ Example of Program
conf
static moji$
moji$ =”ABCDEFG”
end conf
evnt
input type, id@, data$
mid$(moji$, 4, 3) = data$
end evnt
4-150
CHAPTER 4 INSTRUCTION REFERENCE
MID$
MID$
Function
■ Function
The MID$ function returns a character string the specified number of
characters.
■ Format
MID$ (character-string, start-position, number-of-character)
MID$
(registered-character-string-number, start-position, number-of-characters)
MID$
(registered-character-string-name, start-position, number-of-characters)
■ Example of Use
A$ = MID$ (X$, 2, 3)
A$ = MID$ (10, 2, 3)
A$ = MID$ (NAME, 2, 3)
■ Description
• The MID$ function fetches the specified number-of-characters
(bytes) from the specified character-string, starting from the position
specified in start-position.
• character-string is a direct character string or a character string
variable.
• registered-character-string-number is the numerical expression
indicating the number registered by GCSGP3.
• registered-character-string-name is the name of the character
string created by GCSGP3 or the ID-type variable indicating the name
of the character string.
• When number-of-characters is 0 or when start-position is greater
than the number of bytes of the specified character string, a null
character string is returned.
■ Related Item
LEFT$, RIGHT$
■ Example of Program
evnt
input type,id@,data$
a$ = mid$(data$ , 3 , 3)
strdsp ..STR000,a$
end evnt
4-151
MKB
ADDCYC2
MKB
Statement
■ Function
The MKB statement stores data in any position of a character string
variable.
■ Format
MKB character-string-variable-name, storage-position, integer-value
■ Example of Use
MKB MOJI$, 5, VAR
■ Description
• The MKB statement stores one low-order byte of integer-value in the
position specified by storage-position, starting from the beginning of
the specified character-string-variable-name.
• storage-position must be a integer- or floating-point-type variable or
constant. 1 specifies the beginning of the character string variable.
• integer-value specifies an overwriting value; it must be an integer- or
floating-point-type variable or constant.
When specified in
integer-value, a floating-point-type variable or constant is converted to
an integer. One low-order byte of this value overwrites the specified
character-string-variable-name.
■ Related Item
MKS, MKW, MKI, MKF, MKID, CVB, CVW, CVI, CVF, CVID
■ Example of Program
conf
end conf
evnt
org$ = ‘‘1234567’’
strdsp ..STR000, org$
MKB org$, 2, &H39
strdsp ..STR001, org$
end evnt
4-152
CHAPTER 4 INSTRUCTION REFERENCE
MKDIR
MKDIR
Statement
■ Function
The MKDIR statement creates a directory.
■ Format
MKDIR directory-name
■ Example of Use
MKDIR “TEST”
■ Description
• The MKDIR statement is an instruction for creating a subdirectory.
• Specify the directory to be created with a character string constant or
variable.
• The directory to be created can be specified in directory-name
together with a drive name.
■ Related Item
RMDIR, CHDIR, DIR
■ Example of Program
conf
end conf
evnt
......
MKDIR ‘‘C:TEST’’
......
end evnt
4-153
MKF
ADDCYC2
MKF
Statement
■ Function
The MKF statement stores data in any position of a character string
variable.
■ Format
MKF character-string-variable-name, storage-position, real-value
■ Example of Use
MKF MOJI$, 5, VAR
■ Description
• The MKF statement stores fours bytes of real-value in the position
specified by storage-position, starting from the beginning of the
specified character-string-variable-name.
• storage-position must be a integer- or floating-point-type variable or
constant. 1 specifies the beginning of the character string variable.
• real-value specifies an overwriting value; it must be an integer- or
floating-point-type variable or constant.
When specified in
real-value, an integer-type variable or constant is converted to a real
number.
This
value
overwrites
the
specified
character-string-variable-name.
• The value is converted into a 86 series boundary and saved.
■ Related Item
MKS, MKB, MKW, MKI, MKID, CVB, CVW, CVI, CVF, CVID
■ Example of Program
conf
end conf
evnt
org$ = ‘‘1234567’’
strdsp ..STR000, org$
MKF org$, 2, 1.23
strdsp ..STR001, org$
end evnt
4-154
CHAPTER 4 INSTRUCTION REFERENCE
’ The character string will not be displayed
’ correctly.
MKI
MKI
Statement
■ Function
The MKI statement stores data in any position of a character string
variable.
■ Format
MKI character-string-variable-name, storage-position, integer-value
■ Example of Use
MKI MOJI$, 5, VAR
■ Description
• The MKI statement stores four bytes of integer-value in the position
specified by storage-position, starting from the beginning of the
specified character-string-variable-name.
• storage-position must be a integer- or floating-point-type variable or
constant. 1 specifies the beginning of the character string variable.
• integer-value specifies an overwriting value; it must be an integer- or
floating-point-type variable or constant.
When specified in
integer-value, a floating-point-type variable or constant is converted to
an
integer.
This
value
overwrites
the
specified
character-string-variable-name.
• The value is converted into a 86 series boundary and saved.
■ Related Item
MKS, MKB, MKW, MKF, MKID, CVB, CVW, CVI, CVF, CVID
■ Example of Program
conf
end conf
evnt
org$ = ‘‘1234567’’
strdsp ..STR000, org$
MKI org$, 2, &H39404142
strdsp ..STR001, org$
end evnt
4-155
MKID
ADDCYC2
MKID
Statement
■ Function
The MKID statement stores data in any position of a character string
variable.
■ Format
MKID character-string-variable-name, storage-position, ID-value
■ Example of Use
MKID MOJI$, 5, VAR
■ Description
• The MKID statement stores six bytes of ID-value in the position
specified by storage-position, starting from the beginning of the
specified character-string-variable-name.
• storage-position must be a integer- or floating-point-type variable or
constant. 1 specifies the beginning of the character string variable.
• ID-value specifies an overwriting value; it must be an ID-type
variable or constant. If an integer or constant of non-ID type is
specified, an error occurs. This value overwrites the specified
character-string-variable- name.
• The value is converted into a 86 series boundary (by 2 bytes) and then
saved.
■ Related Item
MKS, MKB, MKW, MKI, MKF, CVB, CVW, CVI, CVF, CVID
■ Example of Program
conf
end conf
evnt
input type%, id@, data%
org$ = ‘‘1234567’’
strdsp ..STR000, org$
MKF org$, 2, id@
strdsp ..STR001, org$
end evnt
4-156
CHAPTER 4 INSTRUCTION REFERENCE
’ The character string will not be displayed
’ correctly.
MKS
MKS
Statement
■ Function
The MKS statement stores data in any position of a character string
variable.
■ Format
MKS character-string-variable-name, storage-position, character-string
■ Example of Use
MKS MOJI$, 5, “ABCD”
■ Description
• The MKS statement stores a character string (character-string) in the
position specified by storage-position, starting from the beginning of
the specified character-string-variable-name.
• storage-position must be a integer- or floating-point-type variable or
constant. 1 specifies the beginning of the character string variable.
• character-string specifies an overwriting character string; it must be
a variable or constant.
■ Related Item
MKB, MKW, MKI, MKF, MKID, CVB, CVW, CVI, CVF, CVID
■ Example of Program
conf
end conf
evnt
org$ = ``1234567''
strdsp ..STR000, org$
MKS org$, 2, ``76543''
strdsp ..STR001, org$
end evnt
4-157
MKW
ADDCYC2
MKW
Statement
■ Function
The MKW statement stores data in any position of a character string
variable.
■ Format
MKW character-string-variable-name, storage-position, integer-value
■ Example of Use
MKW MOJI$, 5, VAR
■ Description
• The MKW statement stores two bytes of integer-value in the position
specified by storage-position, starting from the beginning of the
specified character-string-variable-name.
• storage-position must be an integer- or floating-point-type variable
or constant. 1 specifies the beginning of the character string
variable.
• integer-value specifies an overwriting value; it must be an integer- or
floating-point-type variable or constant.
When specified in
integer-value, a floating-point-type variable or constant is converted to
an integer. The two low-order bytes of this value overwrites the
specified character-string-variable- name.
• The value is converted into a 86 series boundary and saved.
■ Related Item
MKS, MKB, MKI, MKF, MKID, CVB, CVW, CVI, CVF, CVID
■ Example of Program
conf
end conf
evnt
org$ = ‘‘1234567’’
strdsp ..STR000, org$
MKW org$, 2, &H3940
strdsp ..STR001, org$
end evnt
4-158
CHAPTER 4 INSTRUCTION REFERENCE
MKW
MOVE
Statement
■ Function
The MOVE statement moves the specified part.
■ Format
MOVE
part-name,
Y-direction-move-quantity, move-method
■ Example of Use
MOVE .BUHIN., 100, 20, 0
■ Description
• part-name is the name of the part to be moved or the ID-type variable
indicating the part to be moved.
• X-direction-move-quantity and Y-direction-move-quantity are the
values indicating the distance in which the part is moved. When the
upper left end on the display screen is (0,0), the coordinates in the
right direction are X coordinates and those in the downward direction
are Y coordinates. The move unit is specified in dots. X must be a
numeric value from 0 to 639. Y must be a numeric value from 0 to
399 (GC55EM) or 0 to 479 (GC56LC).
• For absolute move, move-method is 0.
For relative move,
move-method is 1. Absolute move is referenced to the upper left end
on the display screen. Relative move is referenced to the position of
the current part.
■ Related Item
None
X-direction-move-quantity,
■ Example of Program
evnt
input type,id@,data
if type = 3 then
buhin@ = .buhin2.
MOVE buhin@ , 10 , 10 , 0
endif
end evnt
4-159
MTRCOLOR
ADDCYC2
MTRCOLOR
Statement
■ Function
The MTRCOLOR statement changes the needle color of the meter
display.
■ Format
MTRCOLOR display-name, color-number
■ Example of Use
MTRCOLOR ..MTR000, 1
■ Description
• The MTRCOLOR statement changes the needle color of the meter
display.
• control-name is the meter display name or the ID-type variable
indicating the meter display.
• color-number is the number indicating the needle color. Specify
this color number with a numeric value from 0 to 15.
■ Related Item
MTRDSP
■ Example of Program
evnt
input type%, id@, mcolor%
MTRCOLOR ..MTR000, mcolor%
end evnt
4-160
CHAPTER 4 INSTRUCTION REFERENCE
MTRDSP
MTRDSP
Statement
■ Function
The MTRDSP statement displays data in the meter display.
■ Format
MTRDSP control-name, display-data
■ Example of Use
MTRDSP .BUHIN.GRAPH, 30.0
■ Description
• The MTRDSP statement displays data (value) in the meter display.
• control-name is the meter display name or the ID-type variable
indicating the meter display.
• display-data is the numeric data to be displayed in the meter display.
• display-value cannot be changed even if this statement is issued to the
display for which operation parameters are set to “effective” in the
primitive.
■ Related Item
MTRCOLOR
■ Example of Program
conf
static name@
name@ = ..MTR000
end conf
evnt
input type%, id@, data%
MTRDSP name@, data%
end evnt
4-161
NUMCOLOR
ADDCYC2
NUMCOLOR
Statement
■ Function
The NUMCOLOR statement changes the colors and background figure of
the numeric display.
■ Format
NUMCOLOR
control-name,
display-color, background-color
■ Example of Use
NUMCOLOR ..GRAPH, 1, 2, 5, 2
■ Description
• The NUMCOLOR statement changes the display and background
colors and tile in the numeric display. -1 indicates that the color and
tile for which -1 was specified remain unchanged.
• control-name is the numeric display name or the ID-type variable
indicating the numeric display.
• numeric-value-display-color is the numeric value indicating the
color number of the numeric value display section. Specify this
color number with a numeric value from 0 to 15.
• tile indicates the tiling figure. Specify this tiling figure with a
numeric value from 0 to 15.
• display-color is the numeric value indicating the color number of the
tile display section. Specify this color number with a numeric value
from 0 to 15.
• background-color is the numeric value indicating the color number
of the tile background section. Specify this color number with a
numeric value from 0 to 15.
■ Related Item
NUMDSP, NUMFORM
■ Example of Program
conf
static name@
name@ = ..NUM000
end conf
evnt
input type%, id@, data%
if type% = 3 then
NUMCOLOR name@, 2, -1,-1,-1
endif
end evnt
4-162
CHAPTER 4 INSTRUCTION REFERENCE
numeric-value-display-color,
tile,
NUMDSP
NUMDSP
Statement
■ Function
The NUMDSP statement displays data in the numeric display.
■ Format
NUMDSP control-name, display-data
■ Example of Use
NUMDSP .BUHIN.GRAPH, 30.0
■ Description
• The NUMDSP statement displays data (value) in the numeric display.
• control-name is the numeric display name or the ID-type variable
indicating the numeric display.
• display-data is the numeric data to be displayed in the numeric
display.
• Specifying a primitive name in display-name when the numeric
display is of continuous stage type enables the same data to be
displayed for all the elements. When setting a value for each
element, use the GETID function to obtain the control ID and specify
this ID in control-name.
• display-value cannot be changed even if this statement is issued to the
display for which operation parameters are set to “effective” in the
control.
■ Related Item
NUMCOLOR, NUMFORM
■ Example of Program
conf
static name@
name@ = ..NUM000
end conf
evnt
input type%, id@, data%
NUMDSP name@, data%
end evnt
4-163
NUMFORM
ADDCYC2
NUMFORM
Statement
■ Function
The NUMFORM statement changes the display format of the numeric
display.
■ Format
NUMFORM control-name, display-method, decimal-point-position
■ Example of Use
NUMFORM ..HYOJIKI, 0, 0
■ Description
• The NUMFORM statement changes the display method of the
numeric display. This statement can also specify a display method
and a decimal-point display position.
• control-name is the numeric display name or the ID-type variable
indicating the numeric display.
• display-method is the numeric value indicating any of the following
seven display methods:
0: Floating-point display method 4: Binary representation
1: Integer display method
5: Octal representation
2: Fixed-point display method
6: Hexadecimal representation
3: Binary fixed-point representation
• decimal-point-position specifies where the decimal point is
displayed when display-method is 2 (fixed-point display method).
To display the decimal point in the first position from the right,
specify 1. To display it in the second position from the right, specify
2.
• Binary fixed-point representation is the method for writing a decimal
point in the specified integer data position.
• Be sure to execute the NUMDSP statement after executing this
statement. Otherwise, display may be disordered.
■ Related Item
NUMCOLOR, NUMDSP
■ Example of Program
evnt
input type , id@,data
var@ = .buhin.gamen
NUMFORM var@ , data , 2
numdsp var@ , 30.1
end evnt
4-164
CHAPTER 4 INSTRUCTION REFERENCE
OCT$
OCT$
Function
■ Function
The OCT$ function converts a decimal character string to an octal
character string.
■ Format
OCT$ (numerical-expression)
■ Example of Use
OCT$ (134)
■ Description
• The OCT$ function converts a decimal character string to an octal
character string.
• When a floating-point type is specified in numerical-expression, the
decimal character string (numeric value) is converted to an integer
type, then converted to an octal character string.
• Specify the decimal character string (numeric value) within the range
from -2147483648 to 2147483647.
■ Related Item
HEX$, VAL
■ Example of Program
evnt
input type , id@ , data
moji$ = OCT$(data)
strdsp ..STR000, moji$
end evnt
4-165
OCT$
ADDCYC2
ONFERR
Statement
■ Function
The ONFERR statement specifies the destination to which error messages
are to be transmitted.
■ Format
ONFERR destination
■ Example of Use
ONFERR .B000.
■ Description
• The ONFERR statement specifies the destination to which file
operation function error messages are to be transmitted.
• destination is a screen or part name or the ID-type variable indicating
the screen or part name.
• When data is received by INPUT, the screen or part to which a file
operation function error message was transmitted can receive
information such as a type (8) and data (error number).
■ Related Item
FOPEN, FCLOSE, FPRINT, FWRITE, FINPUT
■ Example of Program
conf
ONFERR ..
end conf
evnt
input ty%, id@, dat1%
......
end evnt
When an error occurs, 8 is set in ty% and an error code (number) is set in dat1%.
4-166
CHAPTER 4 INSTRUCTION REFERENCE
OPEN
OPEN
Statement
■ Function
The OPEN statement opens (displays) the specified part.
■ Format
OPEN part-name, mode
■ Example of Use
OPEN .BUHIN., 1
■ Description
• The OPEN statement opens (displays) the closed part on the screen.
• part-name is the name of the part to be opened or the variable
indicating the ID of the part to be opened.
• mode specifies whether to execute the configuration block of the
program attached to the part when the part is opened.
0: The configuration block is not executed.
1: The configuration block is executed.
■ Related Item
CLOSE
■ Example of Program
evnt
input type% , id@ , data%
if pstat(.BUHIN.) = 3 then
OPEN .BUHIN., 0
endif
end evnt
4-167
OPENCOM
ADDCYC2
OPENCOM
Statement
■ Function
The OPENCOM statement declares that the program receives data from a
serial line.
■ Format
OPENCOM logical-device-name
■ Example of Use
OPENCOM HST
■ Description
• The OPENCOM statement declares that the program receives data
from the specified external connecting device. (When the host
computer transmits data, this statement need not be declared.)
• logical-device-name specifies any of the following external
connecting devices:
HST: Host computer
BCR: Bar code reader
TKY: Ten-key pad
■ Related Item
CLOSE COM, REOPENCOM
■ Example of Program
conf
OPENCOM HST
end conf
evnt
input type% , id@ , data%
if type% = 3 and data% = 1 then
CLOSECOM HST
else if type% = 3 and data% = 0 then
REOPENCOM HST
endif
end evnt
4-168
CHAPTER 4 INSTRUCTION REFERENCE
OPENPARALLEL
OPENPARALLEL
Statement
■ Function
The OPENPARALLEL statement declares that the program receives data
from a parallel port.
■ Format
OPENPARALLEL input-bit, mode
■ Example of Use
OPENPARALLEL 3, 1
■ Description
• The OPENPARALLEL statement declares that the program receives
data when the bit for specifying a parallel input port changes.
• input-bit indicates the bit used to transmit data when the value
changes. Specify this input bit with a numeric value from 0 to 15.
• mode specifies the time when data is transmitted. The time when
data is transmitted depends on how the bit changes.
1: Data is transmitted when the bit goes High.
2: Data is transmitted when the bit goes Low.
3: Data is transmitted when the bit goes High or Low.
■ Related Item
CLOSEPARALLEL, REOPENPARALLEL
■ Example of Program
conf
OPENPARALLEL 3
end conf
evnt
input type% , id@ , data%
if type% = 3 and data% = 1 then
CLOSEPARALLEL 3
else if type% = 3 and data% = 0 then
REOPENPARALLEL 3
endif
end evnt
4-169
OPENTIM
ADDCYC2
OPENSIO
Statement
■ Function
The OPENSIO statement opens a non-protocol communication port.
■ Format
OPENSIO port-number, mode, reception-buffer
■ Example of Use
OPENSIO 1, 1, moji$
■ Description
• The OPENSIO statement opens a port for starting non-procedual
communication.
• port-number specifies a channel that performs non-procedual
communication. CH1 to CH3 correspond to 1 to 3, respectively.
• mode specifies the type of non-procedual communication. Specify
0 (binary mode) or 1 (text mode).
• reception-buffer specifies the name of the variable to which the data
to be received from an external device is to be written. The variable
to be specified must be a global or static character string variable.
• When the condition is satisfied after data has been received from a
connecting device, a reception completion message is issued to the
part or screen that executed this statement. Two or more parts cannot
execute the OPENSIO statement for the same port.
Binary mode: In the binary mode, all codes from 0 to 0FFh can be
transmitted and received. In this mode, read and write
are also enabled by specifying the length of received
data.
Text mode: In the text mode, codes from 1 to 0FFh can be
transmitted and received. In this mode, the end codes
of texts are also set and used. The end codes are used
to judge the data to be received.
■ Related Item
CLOSESIO, SETSIO, WRITESIO, WRITWSIOB, FLUSH, IOCTL
■ Example of Program
conf
global buf$ * 200
OPENSIO 2 , 1 , buf$
setsio 2 , &HD
end conf
evnt
strdsp ..STR000 , buf$
closesio 2
end evnt
4-170
CHAPTER 4 INSTRUCTION REFERENCE
OPENTIM
OPENTIM
Function
■ Function
The OPENTIM function allocates timer resources.
■ Format
OPENTIM ()
■ Example of Use
VAR@ = OPENTIM ()
■ Description
• The OPENTIM function allocates the resources necessary to use a
timer.
• The OPENTIM function must be an ID-type variable because it
returns the ID of the timer to be used.
• The allocated ID can be used to set the timer.
• The system can use up to 16 timers. The timers not to be used must
be returned to the system. (See “CLOSETIM.”)
• The OPENTIM function can be used by the screen or part program
being displayed. (If this function is executed on an undisplayed rear
screen, an error occurs.)
• The allocated timer is not deallocated even if one screen changes to
another. If the timer is being used by the event type, a message is
also issued to the rear screen.
■ Related Item
CLOSETIM, STARTTIM, STOPTIM, CONTTIM, WRITETIM, READTIM
■ Example of Program
conf
static timid@
timid@ = OPENTIM()
settim timid@, 20, 0
starttim timid@
end conf
evnt
input type% , id@ , data%
if type% = 3 and id@ = ..SWT000 then
stoptim timid@
else if id@ = ..SWT001 then
closetim timid@
end if
end evnt
4-171
OPENTIM2
ADDCYC2
OPENTIM2
Function
■ Function
The OPENTIM2 function allocates (opens) the timer to be used.
■ Format
RET = OPENTIM2 (timer-number)
■ Example of Use
RET = OPENTIM2 (14)
■ Description
• The OPENTIM2 function opens the timer specified in timer-number.
• timer-number specifies the number of the timer to be used. Specify
this timer number with an integer-type value from 0 to 15.
• When the OPENTIM2 function is executed, any of the following
value is returned:
0: The timer could be opened.
1: The timer could not be opened.
• The OPENTIM2 function can be used by the screen or part program
being displayed. (If this function is executed on an undisplayed rear
screen, an error occurs.)
• The allocated timer is not deallocated even if one screen changes to
another. If the timer is being used by the event type, a message is
also issued to the rear screen.
■ Related Item
CLOSETIM, STARTTIM, STOPTIM, CONTTIM, SETTIM, READTIM,
OPENTIM
■ Example of Program
conf
static timid@
ret=OPENTIM2(5)
setim 5, 20, 0
starttim 5
end conf
evnt
input type% , id@ , data%
if type% = 3 and id@ = ..SWT000 then
stoptim 5
else if id@ = ..SWT001 then
closetim 5
end if
end evnt
4-172
CHAPTER 4 INSTRUCTION REFERENCE
OPENTIM3
OPENTIM3
Function
■ Function
The OPENTIM3 function allocates (opens) the timer to be used.
■ Format
RET = OPENTIM3 (timer-number)
■ Example of Use
RET = OPENTIM3 (14)
■ Description
• The OPENTIM3 function opens the timer specified in timer-number.
• timer-number specifies the number of the timer to be used. Specify
this timer number with an integer-type value from 0 to 15.
• When the OPENTIM2 function is executed, any of the following
value is returned:
0: The timer could be opened.
1: The timer could not be opened.
• When the screen for which “open” was declared changes to another,
the opened timer is automatically closed.
• The OPENTIM3 function can be used by the screen or part program
being displayed. (If this function is executed on an undisplayed rear
screen, an error occurs.)
■ Related Item
CLOSETIM, STARTTIM, STOPTIM, CONTTIM, SETTIM, READTIM,
OPENTIM
■ Example of Program
conf
ret = opentim3 (3)
settim 3 , 20, 1
stoptim 3
closetim 3
end conf
4-173
OUT
ADDCYC2
OUT
Statement
■ Function
The OUT statement writes 2-byte data to an I/O port.
■ Format
OUT port-number, output-data
■ Example of Use
OUT 0, &H20
■ Description
• Currently, data can be written only to parallel I/O ports.
• port-number specifies the number of the I/O port inserted into the
option bus. (For the color/plasma, this port number is fixed at 0.)
■ Related Item
INP
■ Example of Program
evnt
input type,id@,data
out 0, data
end evnt
4-174
CHAPTER 4 INSTRUCTION REFERENCE
OUTBIT
OUTBIT
Statement
■ Function
The OUTBIT statement rewrites the specified BIT number of the
specified output port.
■ Format
OUTBIT port-number, BIT-number, write-data
■ Example of Use
OUTBIT 0, 10, 1
■ Description
• The OUTBIT statement rewrites the specified BIT number of the
specified output port.
• Specify port-number and BIT-number with an integer value relative to
0.
• When write-data is 0, the output is set to OFF. When 1, the output is
set to ON.
• The lowest-order bit number of the parallel IO is 0 and the next
lowest-order bit number is 1. That is, the BIT number is sequentially
incremented.
• If an unexisting port or BIT number is specified, an error occurs.
■ Related Item
INP, OUT, INPBIT, OUTBITSTAT, OUTSTAT
■ Example of Program
evnt
DATA% = INPBIT(0,3)
if data% = 0 then
outbit 0,3,1
endif
end evnt
4-175
OUTBITSTAT
ADDCYC2
OUTBITSTAT
Function
■ Function
The OUTBITSTAT function reads the specified BIT number of the
specified output port.
■ Format
OUTBITSTAT (port-number, BIT-number)
■ Example of Use
DATA% = OUTBITSTAT (0,10)
■ Description
• The OUTBITSTAT function reads the specified BIT number of the
specified output port.
• Specify port-number and BIT-number with an integer value relative to
0.
• The lowest-order bit number of the parallel IO is 0 and the next
lowest-order bit number is 1. That is, the BIT number is sequentially
incremented.
• If an unexisting port or BIT number is specified, 0 is returned.
■ Related Item
INP, OUT, INPBIT, OUTBIT, OUTSTAT
■ Example of Program
evnt
data% = outbitstat(0,3)
if data% = 0 then
outbit 0,3,1
endif
end evnt
4-176
CHAPTER 4 INSTRUCTION REFERENCE
OUTSTAT
OUTSTAT
Function
■ Function
The OUTSTAT function reads the value of the specified output port.
■ Format
OUTSTAT (port-number)
■ Example of Use
DATA% = OUTSTAT (0)
■ Description
• The OUTSTAT function reads the value of the specified output port.
• Specify port-number with an integer value relative to 0.
• If an unexisting port number is specified, 0 is returned.
■ Related Item
INP, OUT, INPBIT, OUTBIT, OUTBITSTAT
■ Example of Program
evnt
data% = outstat(0)
if data% = 0 then
out 0,&hffff
endif
end evnt
4-177
PIPCOLOR
ADDCYC2
PIPCOLOR
Statement
■ Function
The PIPCOLOR statement changes the OFF, ON1, and ON2 colors of
the pipe display.
■ Format
LAMPCOLOR display-name, ON-OFF-number, color-number
■ Example of Use
LAMPCOLOR .BUHIN.GRAPH, 5
■ Description
The PIPCOLOR statement changes the OFF, ON1, and ON2 colors of
the pipe display.
• display-name is the name of the pipe display or the variable
indicating the ID of the pipe display.
• ON-OFF-number specifies 0, 1, or 2 for OFF, ON1, or ON2.
• color-number specifies the color to be displayed when the lamp
display is on with a numeric value from 0 to 15.
■ Related Item
PIPDSP
■ Example of Program
conf
pipdsp .buhin.graph , 0
PIPCOLOR .buhin.graph ,1 ,7
lampdsp .buhin.graph , 1
end conf
4-178
CHAPTER 4 INSTRUCTION REFERENCE
PIPDSP
PIPDSP
Statement
■ Function
The PIPDSP statement displays data in the pipe display.
■ Format
PIPDSP control-name, pipe-mode
■ Example of Use
PIPDSP .BUHIN.GRAPH, 1
■ Description
The PIPDSP statement sets the pipe display to OFF, ON1, or ON2 for
data display.
• control-name is the name of the pipe display or the variable
indicating the ID of the pipe display.
• pipe-mode sets the pipe display to OFF, ON1, or ON2; it specifies 0,
1, or 2 for OFF, ON1, or ON2.
• Display cannot be changed even if the PIPDSP statement is issued to
the display for which the operation parameters of the control are set to
“effective.”
■ Related Item
PIPCOLOR
■ Example of Program
conf
pipdsp .buhin.pip , 0
PIPCOLOR .buhin.pip ,1 ,7
pipdsp .buhin.pip , 1
end conf
4-179
PLTCOLOR
ADDCYC2
PLTCOLOR
Statement
■ Function
The PLTCOLOR statement changes the colors and background figure of
the plot display.
■ Format
PLTCOLOR
control-name,
background-color
■ Example of Use
PLTCOLOR ..GRAPH, 1, 1, 2, 1
■ Description
• The PLTCOLOR statement changes the background tile and colors of
the plot display. -1 indicates that the color and tile for which -1 was
specified remain unchanged.
• control-name is the plot display name or the ID-type variable
indicating the plot display.
• plot-color indicates the display color of a dot. Specify this plot color
with a numeric value from 0 to 15.
• tile indicates the background tiling figure of the graph.
• Specify this tiling figure with a numeric value from 0 to 15.
• display-color is the numeric value indicating the color number of the
tile display section. Specify this color number with a numeric value
from 0 to 15.
• background-color is the numeric value indicating the color number
of the tile background section. Specify this color number with a
numeric value from 0 to 15.
■ Related Item
PLTDSP
■ Example of Program
conf
static name@
name@ = ..PLT000
end conf
evnt
input type%, id@, data%
if type% = 3 then
PLTCOLOR name@, 2, 3, 1, 4
endif
end evnt
4-180
CHAPTER 4 INSTRUCTION REFERENCE
plot-color,
tile,
display-color,
PLTDSP
PLTDSP
Statement
■ Function
The PLTDSP statement displays data in the plot display.
■ Format
PLTDSP control-name, display-coordinate-X, display-coordinate-Y
■ Example of Use
PLTDSP .BUHIN.GRAPH, 15, 30
■ Description
• The PLTDSP statement displays data in the plot display.
• display-name is the plot display name or the ID-type variable
indicating the plot display.
• display-coordinate-X and display-coordinate-Y are the numeric
data indicating the coordinates to be displayed in the plot display.
• display-value cannot be changed even if this statement is issued to the
display for which operation parameters are set to “effective” in the
control.
■ Related Item
PLTCOLOR
■ Example of Program
conf
static name@
name@ = ..PLT000
end conf
evnt
input type%, id@, x%,y%
if type% = 3 then
PLTDSP name@, x%, y%
endif
end evnt
4-181
PMODE
ADDCYC2
PMODE
Statement
■ Function
The PMODE statement changes the status of the specified part.
■ Format
PMODE part-name, mode
■ Example of Use
PMODE .BUHIN., 3
■ Description
• part-name is the name of the part whose status is to be modified or
the ID-type variable indicating the part.
• mode indicates the status to be modified.
0: Normal status
1: Switch input disable status
2: Half tone status
■ Related Item
PSTAT
■ Example of Program
evnt
input type% , id@ , data%
if pstat(.BUHIN.) = 0 then
PMODE .BUHIN., 1
endif
end evnt
4-182
CHAPTER 4 INSTRUCTION REFERENCE
PRDSP
PRDSP
Statement
■ Function
The PRDSP statement redisplays the specified control.
■ Format
PRDSP control-name
■ Example of Use
PRDSP .BUHIN.PRIM
■ Description
• control-name is the name of the control to be redisplayed or the
ID-type variable indicating the control.
■ Related Item
BARSET, CIRSET, BLTSET, LNESET
■ Example of Program
evnt
lneset .buhin.graph , 3 , 8 , 20.1
lneset .buhin.graph , 3 , 8 , 20.1
PRDSP .buhin.graph
end evnt
4-183
PREVJUMP
ADDCYC2
PREVJUMP
Statement
■ Function
The PREVJUMP statement jumps to the immediately preceding screen.
■ Format
PREVJUMP
■ Example of Use
PREVJUMP
■ Description
• The PREVJUMP statement jumps to the screen displayed before the
current screen according to the recorded screen transition path.
• Up to 30 screens can be recorded. The PREJUMP statement cannot
jump to a screen before the recorded 30 screens.
■ Related Item
JUMP
■ Example of Program
conf
end conf
evnt
input type% , id@ , data%
if id@ = ..SWT000 then PREVJUMP
end evnt
4-184
CHAPTER 4 INSTRUCTION REFERENCE
PRINT
PRINT
Statement
■ Function
The PRINT statement writes messages.
■ Format
PRINT expression [, expression] ......
■ Example of Use
PRINT 23, “ABCD”, XYZ, MOJI$
■ Description
• The PRINT statement writes the messages to be output the screen,
part, serial port, or paralle port.
• When two or more messages are written, delimit them in commas (,).
• Messages are not output when the PRINT statement is executed; they
are output for the first time when the SEND command is executed.
• When messages are output to the host computer, commas (,) are
inserted to delimit data.
■ Related Item
INPUT, SEND
■ Example of Program
evnt
input type% , id@ , data%
if type% = 3 then
PRINT “ABCD”, data%
send .B000.
endif
end evnt
4-185
PRMCTL
ADDCYC2
PRMCTL
Statement
■ Function
The PRMCTL statement changes the attributes of the specified primitive.
■ Format
PRMCTL1 control-name, request-code, control-value-1
PRMCTL2 control-name, request-code, type-1, control-value-1
PRMCTL3 control-name, request-code, type-1, control-value-2
PRMCTL4 control-name, request-code, type-1, type-2, control-value-1
■ Example of Use
PRMCTL1 ..NUM000, _PD_STAT, 3
PRMCTL2 ..NUM000, _PD_DCOLOR, 3, 4
PRMCTL3 ..LNE000, _PD_RANGE, 0, 2.5
PRMCTL4 ..BAR000, _PD_PTRN, 1, 0, 12
■ Description
• The PRMCTL statement changes the attributes of the specified
control. This statement is classified into four types: PRMCTL1,
PRMCTL2, PRMCTL3, and PRMCTL4.
• control-name is the constant indicating the control to be changed or
the ID-type variable indicating the ID of the control.
• request-code specifies what attribute changes is to be performed.
The types of request codes are shown on the next and subsequent
pages.
• type-1 and type-2 depend on the request code to be specified.
• control-value-1 specifies the value corresponding to the specified
request code; it must be an integer-type constant or variable.
• control-value-2 specifies the value corresponding to the specified
request code; it must be a floating-point constant or variable.
■ Related Item
PRMCTL1, PRMCTL2, PRMCTL3, PRMCTL4, PRMSTAT1, PRMSTAT2,
PRMSTAT3, PRMSTAT4
■ Example of Program
conf
end conf
evnt
status% = prmstat1(..NUM000, _PD_STAT)
if status% = 0 then
PRMCTL1 ..NUM000, _PD_STAT, 2
endif
end evnt
4-186
CHAPTER 4 INSTRUCTION REFERENCE
PRMCTL
• The types and usage of the request codes that can be used by PRMCTL1 are explained below.
1._PD_STAT
Function:
Range:
Control-value:
2._PD_DSPFMT
Function:
Range:
Control-value:
3._PD_PTPOS
Function:
Range:
Control-value:
4._PD_ZSPRS
Function:
Range:
Control-value:
5._PD_FIGMD
Function:
Range:
Control-value:
_PD_STAT
changes
the
display
format
(normal/reversal
video/blinking/on-and-off) of a control.
_PD_STAT is applicable to all controls.
Set one of the following numeric values indicating the display format:
0: Normal display
1: Reversal video display
2: Blinking
3: On-and-off display
_PD_DSPFMT changes the display format of a control.
_PD_DSPFMT is applicable to numeric and character displays.
The control value depends on whether the numeric or character display
is used.
Numeric display
Character display
0: Floating-point representation
0: Left-justification
1: Integer representation
1: Centering
2: Fixed-point representation
2: Right-justification
3: Binary fixed-point representation
4: Binary representation
5: Octal representation
6: Hexadecimal representation
_PD_PTPOS changes the position of a decimal point.
_PD_PTPOS is applicable only to numeric displays.
Set a value indicating the position of a decimal point.
value is set, PRMCTL1 forcibly changes it to 0.
If a negative
_PD_ZSPRS sets zero suppression operation.
_PD_ZSPRS is applicable only to numeric displays.
When not perform zero suppression, set 0. When performing zero
suppression, set 1.
_PD_FIGMD sets whether to match the size of the graphic to be
displayed on a graphic display with that of the display.
_PD_FIGMD is applicable only to graphic displays.
When not matching the size of the graphic with that of the graphic
display, set 0. When matching the size of the graphic with that of the
graphic display, set 1.
4-187
PRMCTL
ADDCYC2
6._PD_WSIZ
Function:
Range:
Control-value:
7._PD_PIPSTAT
Function:
Range:
Control-value:
8._PL_FIRST
Function:
Range:
Control-value:
9._PL_SMPMSG
Function:
Range:
Control-value:
10._PL_SMPCTL
Function:
Range:
Control-value:
11._PL_SMPTME
Function:
Range:
Control-value:
4-188
_PD_WSIZ changes the dot size or line width of a display.
_PD_WSIZ is applicable to plot, meter, and pipe displays.
For a plot display, set the dot size (small to large) with a numeric value
from 0 to 2. For a meter display, set the line width (narrow to wide)
with a numeric value from 0 to 2. For a pipe display, set the thickness
(1, 3, 5, or 7) with a numeric value from 0 to 3.
_PD_PIPSTAT changes the ON or OFF status of a lamp or pipe display.
_PD_PIPSTAT is applicable to lamp and pipe displays.
Set the ON and OFF statuses of the lamp and pipe displays as follows:
Lamp display
Pipe display
0: OFF
0: OFF
1: ON
1: ON1
2: ON2
_PL_FIRST changes the start registration number of the registration
graphic or character string to be displayed.
_PL_FIRST is applicable to character and graphic displays.
Set the value you want to use as the start registration number.
_PL_SMPMSG specifies whether to issue messages to the part on which
the control is placed when sampling is performed by the control.
_PL_SMPMSG is applicable to plot, bar graph, and line chart displays.
When issuing messages to the part, set 1. When not issuing messages,
set 0.
_PL_SMPCTL controls sampling. (“Stop”, “start”, and “reset”)
_PL_SMPCTL is applicable to plot, bar graph, and line chart displays.
“Stop” stops sampling. “Start” starts sampling from the stop status.
“Reset” clears display and starts sampling from the beginning.
0: Sampling is stopped.
1: Sampling is started.
2: Sampling is reset.
_PL_SMPTME changes a sampling time.
_PL_SMPTME is applicable to plot, bar graph, and line chart displays.
Set a value indicating the sampling time (setting value* 0.5 second).
When the sampling time is changed, sampling is started after it has been
reset (see “_PL_SMPCLT”).
CHAPTER 4 INSTRUCTION REFERENCE
PRMCTL
12._PL_DIRECT
Function:
Range:
Control-value:
13._SW_RACT
Function:
Range:
Control-value:
14._SW_BZER
Function:
Range:
Control-value:
15._SW_STAT
Function:
Range:
Control-value:
16._SW_BMODE
Function:
Range:
Control-value:
17._SW_ONCOLOR
Function:
Range:
Control-value:
_PL_DIRECT changes the display direction of a line chart.
_PLl_DIRECT is applicable only to line chart displays.
When changing the display direction of the line chart from right to left,
set 0. When changing the display direction from left to right, set 1.
This direction change is meaningless if sampling is not performed.
When the display direction is changed, sampling is started after it has
been reset (see “_PL_SMPCLT”).
_SW_RACT sets whether to perform reverse operation when a switch is
ON.
_SW_RACT is applicable to switches and selector switches.
To perform reverse operation when a switch is ON, set 1. Not to
perform reverse operation, set 0.
_SW_BZER sets whether to sound the buzzer when a switch is ON.
_SW_BZER is applicable to switches and selector switches.
To sound the buzzer when a switch is pressed, set 1. Not to sound the
buzzer, set 0.
_SW_STAT changes the status (normal operation/ input
disable/halftone) of a switch.
_SW_STAT is applicable to switches and selector switches.
Set one of the following numeric values indicating the switch status:
0: Normal operation status
1: Input disable status
2: Halftone status
_SW_BMODE changes the switch background color display method.
_SW_BMODE is applicable to switches and selector switches.
When changing the switch background color display method to “direct
display”, set 0. When changing the display method to “replacement
display”, set 1.
_SW_ONCOLOR sets a switch-ON background color.
_SW_ONCOLOR is applicable to switches and selector switches.
Set the number of the switch-ON background color to be used with a
numeric value from 0 to 15.
4-189
PRMCTL
ADDCYC2
18._SW_OFFCOLOR
Function:
Range:
Control-value:
19._SW_ONOFF
Function:
Range:
Control-value:
_SW_OFFCOLOR sets a switch-OFF background color.
_SW_OFFCOLOR is applicable to switches and selector switches.
Set the number of the switch-OFF background color to be used with a
numeric value from 0 to 15.
_SW_ONOFF changes the ON/OFF status of a switch. (Executing
_SW_ONOFF for the switch for synchronous operation causes an error.)
_SW_ONOFF is applicable to switches and selector switches.
When changing a switch to the OFF status, set 0. When changing a
switch to the ON status, set 1. When changing all selector switches to
the OFF status, set 0. When changing one of the selector switches to
the ON status, set the corresponding element number.
• The types and usage of the request codes that can be used by PRMCTL2 are explained below.
1. _PD_DCOLOR
Function:
Range:
_PD_COLOR changes the display color of a display.
_PD_DCOLOR is applicable to the ON color specification of numeric,
character, clock, plot, free graph, meter, and lamp displays.
Type:
Specify one of the following:
0: Figure change
1: Fore color change
2: Back color change
3: Display color change
Control-value: Set the number of the display color to be changed with a numeric value
from 0 to 15.
2. _PD_BCOLOR
Function:
Range:
_PD_BCOLOR changes the background color of a control.
_PD_BCOLOR is applicable to numeric, character, clock, plot, bar
graph, line chart, and free graph displays.
Type:
Specify one of the following:
0: Figure change
1: Fore color change
2: Back color change
Control-value: Set the number of the background color to be changed with a numeric
value from 0 to 15.
3. _PD_PIPCOLOR
Function:
Range:
Type:
_PD_PIPCOLOR changes the internal color of a pipe or lamp display.
_PD_PIPCOLOR is applicable to pipe and lamp displays.
Specify one of the following:
0: Change of OFF display color (valid for pipe and lamp displays)
1: Change of ON1 display color (valid for pipe and lamp displays)
2: Change of ON2 display color (valid for pipe displays)
Control-value: Set the number of the internal color to be changed with a numeric value
from 0 to 15.
4-190
CHAPTER 4 INSTRUCTION REFERENCE
PRMCTL
4. _PD_BSLNE
Function:
Range:
Type:
_PD_BSLNE changes the type of a base line or a reference line.
_PD_BSLNE is applicable to bar graphs and line charts.
Specify one of the following:
0: Change of base line type
1: Change of reference line 1 type
2: Change of reference line 2 type
Control-value: Set the number of the line type to be changed with a numeric value from
0 to 3.
5. _PD_BSCOLOR
Function:
Range:
Type:
_PD_BSCOLOR changes the color of a base line or a reference line.
_PD_BSCOLOR is applicable to bar graphs and line charts.
Specify one of the following:
0: Change of base line color
1: Change of reference line 1 color
2: Change of reference line 2 color
Control-value: Set the number of the line color to be changed with a numeric value
from 0 to 15.
6. _SW_ONFIG
Function:
Range:
Type:
_SW_ONFIG changes a switch-ON display graphic.
_SW_ONFIG is applicable to switches and selector switches.
For a switch, specify 1. For a selector switch, specify the element
number of the switch whose ON graphic is to be changed. The
element number starts at 1.
Control-value: Specify the registration graphic number displayed when a switch is ON.
7. _SW_OFFFIG
Function:
Range:
Type:
_SW_OFFFIG changes a switch-OFF display graphic.
_SW_OFFFIG is applicable to switches and selector switches.
For a switch, specify 1. For a selector switch, specify the element
number of the switch whose OFF graphic is to be changed. The
element number starts at 1.
Control-value: Specify the registration graphic number displayed when a switch is
OFF.
4-191
PRMCTL
ADDCYC2
• The types and usage of the request codes that can be used by PRMCTL3 are explained below.
1. _PD_RANGE
Function:
Range:
_PD_RANGE sets the display range of a display.
_PD_RANGE is applicable to bar graph, line chart, free graph, slide,
meter, and plot displays.
Type:
When the plot display is used, specify 0 (Xmin change), 1 (Xmax
change), 2 (Ymin change), or 3 (Ymax change). When the bar graph,
line chart, free graph, slide, or meter display is used, specify 2
(minimum change) or 3 (maximum change).
Control-value: Set the value (display range) to be changed.
2. _PD_BSVAL
Function:
Range:
Type:
_PD_BSVAL changes the setting value of a base or reference line.
_PD_BSVAL is applicable to bar graph and line chart displays.
Specify 0 (base line change), 1 (change of reference line 1), or 2
(change of reference line 2).
Control-value: Set the value to be changed.
• The types and usage of the request codes that can be used by PRMCTL4 are explained below.
1. _PD_PTRN
Function:
Range:
_PD_PTRN changes the display color of a control.
_PD_PTRN is applicable to bar graph, 100 percent bar chart, and pie
chart displays.
Type-1:
Specify the number of the bar or zone whose display color is to be
changed.
Type-2:
Specify one of the following:
0: Figure change
1: Fore color change
2: Back color change
Control-value: Set the number of the display color to be changed with a numeric value
from 0 to 15.
2. _PD_LNE
Function:
Range:
Type-1:
Type-2:
_PD_LNE changes the display color of a line chart.
_PD_LNE is applicable only to line charts.
Specify the number of the line whose display color is to be changed.
Specify one of the following:
0: Line type change
1: Line color change
Control-value: Set the number of the display color to be changed with a numeric value
from 0 to 15.
4-192
CHAPTER 4 INSTRUCTION REFERENCE
PRMSTAT
PRMSTAT
Function
■ Function
The PRMSTAT function reads the attributes of the specified primitive.
■ Format
return-value-1 = PRMSTAT1 (control-name, request-code)
return-value-1 = PRMSTAT2 (control-name, request-code, type-1)
return-value-2 = PRMSTAT3 (control-name, request-code, type-1)
return-value-1 = PRMSTAT4 (control-name, request-code, type-1, type-2)
■ Example of Use
VAL% = PRMSTAT1 (..NUM000, _PD_STAT)
VAL% = PRMSTAT2 (..NUM000, _PD_DCOLOR, 3)
VALF! = PRMSTAT3 (..LNE000, _PD_RANGE, 0)
VAL% = PRMSTAT4 (..BAR000, _PD_PTRN, 1, 0)
■ Description
• The PRMSTAT function reads the attributes of the specified
primitive. This function is classified into four types: PRMSTAT1,
PRMSTAT2, PRMSTAT3, and PRMSTAT4.
• control-name is the constant indicating the primitive to be read or the
ID-type variable indicating the ID of the control.
• request-code specifies the attributes to be read. The types of
request codes are shown on the next and subsequent pages.
• type-1 and type-2 depend on the request code to be specified.
• return-value-1 is the return value of the function corresponding to the
specified request code; it must be an integer-type constant or variable.
• return-value-2 is the return value of the function corresponding to the
specified request code; it must be a floating-point constant or variable.
■ Related Item
PRMCTL1, PRMCTL2, PRMCTL3, PRMCTL4, PRMSTAT1, PRMSTAT2,
PRMSTAT3, PRMSTAT4
■ Example of Program
conf
end conf
evnt
status% = prmstat1(..NUM000, _PD_STAT)
if status% = 0 then
PRMCTL1 ..NUM000, _PD_STAT, 2
endif
end evnt
4-193
PRMSTAT
ADDCYC2
• The types and usage of the request codes that can be used by PRMSTAT1 are explained below.
1. _PD_NUMS
Function:
_PD_NUMS reads the number of control elements.
Range:
_PD_NUMS is applicable to all display controls.
Return-value-1: The value indicating the display format is set. When the display
format is not “continuous-stage type”, 1 is always set.
2. _PD_ROTATE
Function:
_PD_ROTATE reads the rotation direction of a control .
Range:
_PD_ROTATE is applicable to all display controls.
Return-value-1: For 0 degree, 0 is returned. For 90 degrees, 1 is returned. For 180
degrees, 2 is returned. For 270 degrees, 3 is returned. For pie chart,
meter, lamp, and pipe displays, 0 is always returned.
3. _PD_STAT
Function:
_PD_STAT reads the display format (normal/reverse
display/blinking/on-and-off display) of a control.
Range:
_PD_STAT is applicable to all controls.
Return-value: One of the following values is returned:
0: Normal display
1: Reverse video display
2: Blinking
3: On-and-off display
video
4. _PD_DSPFMT
Function:
_PD_DSPFMT reads the display format of a control.
Range:
_PD_DSPFMT is applicable to numeric and character controls.
Return-value-1: The value to be returned depends on whether the numeric or character
display is used.
Numeric display
Character display
0: Floating-point representation
0: Left-justification
1: Integer representation
1: Centering
2: Fixed-point representation
2: Right-justification
3: Binary fixed-point representation
4: Binary representation
5: Octal representation
6: Hexadecimal representation
5. _PD_DATFMT
Function:
_PD_DATFMT reads the display data format.
Range:
_PD_DATFMT is applicable to all controls except for clock displays.
Return-value: For a real number, 0 is returned. For an integer, 1 is returned. For an
unsigned integer, 2 is returned. For a BCD, 3 is returned. (For the
lamp primitive, 2 is always returned.)
4-194
CHAPTER 4 INSTRUCTION REFERENCE
PRMSTAT
6. _PD_FONT
Function:
_PD_FONT reads the type of the font displayed on the control.
Range:
_PD_FONT is applicable to numeric and clock displays.
Return-value: For half-size character display, 0 is returned. For full-size character
display, 1 is returned.
7. _PD_XFSZ
Function:
_PD_XFSZ reads the horizontal-direction size of the font displayed on
the control.
Range:
_PD_XFSZ is applicable to numeric, character, and clock displays.
Return-value: For 1 magnification, 0 is returned. For 2 magnifications, 1 is returned.
For 4 magnifications, 2 is returned. For 8 magnifications, 3 is returned.
For 16 magnifications, 4 is returned.
8. _PD_YFSZ
Function:
_PD_YFSZ reads the vertical-direction size of the font displayed on the
control.
Range:
_PD_YFSZ is applicable to numeric, character, and clock displays.
Return-value: For 1 magnification, 0 is returned. For 2 magnifications, 1 is returned.
For 4 magnifications, 2 is returned. For 8 magnifications, 3 is returned.
For 16 magnifications, 4 is returned. For 32 magnifications, 5 is
returned.
9. _PD_PTPOS
Function:
_PD_PTPOS reads the position of a decimal point.
Range:
_PD_PTPOS is applicable only to numeric displays.
Return-value: The position of the decimal point is returned.
10. _PD_ZSPRS
Function:
_PD_ZSPRS reads whether to perform zero suppression.
Range:
_PD_ZSPRS is applicable only to numeric displays.
Return-value: When zero suppression is not performed, 0 is returned.
suppression is performed, 1 is returned.
When zero
11. _PD_XNUM
Function:
_PD_XNUM reads the number of horizontal-direction display digits.
Range:
_PD_XNUM is applicable to numeric and character displays.
Return-value: The number of characters that can be displayed when
horizontal-direction half-size conversion is performed is returned.
12. _PD_YNUM
Function:
_PD_YNUM reads the number of vertical-direction display digits.
Range:
_PD_YNUM is applicable only to character displays.
Return-value: The number of characters that can be displayed in the vertical direction
is returned.
13. _PD_DIRECT
Function:
_PD_DIRECT reads the display direction of a character display.
Range:
_PD_DIRECT is applicable only to character displays.
Return-value: For horizontal writing, 0 is returned. For columnar writing, 1 is
returned.
4-195
PRMSTAT
ADDCYC2
14. _PD_PLTNUM
Function:
_PD_PLTNUM reads the maximum number of plots that can be
displayed on the control.
Range:
_PD_PLTNUM is applicable to plot and line chart displays.
Return-value: The maximum number of plots that can be displayed is returned.
15. _PD_LNENUM
Function:
_PD_LNENUM reads the number of bars and lines that can be
displayed on the control.
Range:
_PD_LNENUM is applicable to plot and line chart displays.
Return-value: The maximum number of bars and lines that can be displayed is
returned.
16. _PD_ZNNUM
Function:
_PD_ZNNUM reads the number of zones that can be displayed on the
control.
Range:
_PD_ZNNUM is applicable to pie chart and 100 percent bar chart
displays.
Return-value: The number of zones that can be displayed is returned.
17. _PD_FIGMD
Function:
_PD_FIGMD reads whether to match the size of the graphic to be
displayed on a graphic display with that of the display.
Range:
_PD_FIGMD is applicable only to graphic displays.
Return-value: When matching the size of the graphic with that of the graphic display,
set 1. When not matching the size of the graphic with that of the
graphic display, set 1.
18. _PD_WSIZ
Function:
_PD_WSIZ reads the dot size or line width of a control.
Range:
_PD_WSIZ is applicable to plot, meter, and pipe displays.
Return-value: For a plot display, the numeric value (0 to 2) indicating the dot size
(small to large) is returned. For a meter display, the numeric value (0
to 2) indicating the line width (narrow to wide) is returned. For a pipe
display, the numeric value (0 to 3) indicating the thickness (1, 3, 5, or 7)
is returned.
19. _PD_PIPSTAT
Function:
_PD_PIPSTAT reads the ON or OFF status of a lamp or pipe display.
Range:
_PD_PIPSTAT is applicable to lamp and pipe displays.
Return-value: Any of the following values indicating the ON or OFF status of the
lamp or pipe display is returned:
Lamp display
Pipe display
0: OFF
0: OFF
1: ON
1: ON1
2: ON2
4-196
CHAPTER 4 INSTRUCTION REFERENCE
PRMSTAT
20. _PL_NUMS
Function:
_PL_NUMS reads the number of devices being used.
Range:
_PL_NUMS is applicable to all controls except for clock displays.
Return-value: The number of devices being used is returned. (When a doubleword is
specified for a numeric display, the number of devices is doubled.)
21. _PL_FIRST
Function:
_PL_FIRST reads the start registration number of the registration
graphic or character string to be displayed.
Range:
_PL_FIRST is applicable to character and graphic displays.
Return-value: The start registration number to be displayed is returned.
22. _PL_DVTYP
Function:
_PL_DVTYP reads the type of the device being used by the control.
Range:
_PL_DVTYP is applicable only to numeric displays.
Return-value: For a doubleword, 0 is returned. For a single word, 1 is returned.
23. _PL_ENDI
Function:
_PL_ENDI reads the doubleword display method.
Range:
_PL_ENDI is applicable only to numeric displays.
Return-value: When doublewords are displayed from downward to upward, 0 is
returned. When doublewords are displayed from upward to downward,
1 is returned.
24. _PL_SMPMSG
Function:
_PL_SMPMSG reads whether to issue messages to the part on which
the control is placed when sampling is performed by the control.
Range:
_PL_SMPMSG is applicable to plot, bar graph, and line chart displays.
Return-value: When messages are issued to the part, 1 is returned. When no message
is issued, 0 is returned.
25. _PL_SMPTME
Function:
_PL_SMPTME reads a sampling time.
Range:
_PL_SMPTME is applicable to plot, bar graph, and line chart displays.
Return-value: A value indicating the sampling time (read value* 0.5 second) is
returned.
26. _PL_DIRECT
Function:
_PL_DIRECT reads the display direction of a line chart.
Range:
_PLl_DIRECT is applicable only to line chart displays.
Return-value: When line charts are displayed from right to left, 0 is returned.
they are displayed from left to right, 1 is returned.
When
27. _SW_NUMS
Function:
_SW_NUMS reads the number of switch elements.
Range:
_SW_NUMS is applicable to switches and selector switches.
Return-value: For a switch, 1 is always returned. For a selector switch, the number
of elements is returned.
4-197
PRMSTAT
ADDCYC2
28. _SW_TYPE
Function:
_SW_TYPE reads a switch type.
Range:
_SW_TYPE is applicable to switches and selector switches.
Return-value: For the momentary switch, 0 is returned. For the alternate switch, 1 is
returned. For the auto-repeat switch, 2 is returned. For a selector
switch, 3 is returned.
29. _SW_ONCOLOR
Function:
_SW_ONCOLOR reads a switch-ON background color.
Range:
_SW_ONCOLOR is applicable to switches and selector switches.
Return-value: The number (0 to 15) of the read switch-ON background color is
returned.
30. _SW_OFFCOLOR
Function:
_SW_OFFCOLOR reads a switch-OFF background color.
Range:
_SW_OFFCOLOR is applicable to switches and selector switches.
Return-value: The number (1 to 15) of the read switch-OFF background color is
returned.
31. _SW_BMODE
Function:
_ SW_BMODE reads the switch background color display method.
Range:
_SW_BMODE is applicable to switches and selector switches.
Return-value: When the switch background color display method is “direct display”, 0
is returned. When the display method is “replacement display”, 1 is
returned.
32. _SW_RACT
Function:
_SW_RACT reads whether to perform reverse operation when a switch
is ON.
Range:
_SW_RACT is applicable to switches and selector switches.
Return-value: If reverse operation is performed when a switch is ON, 1 is returned.
If reverse operation is not performed, 0 is returned.
33. _SW_BZER
Function:
_SW_BZER reads whether to sound the buzzer when a switch is ON.
Range:
_SW_BZER is applicable to switches and selector switches.
Return-value: If the buzzer is sounded when a switch is pressed, 1 is returned. If the
buzzer is not sounded, 0 is returned.
34. _SW_STAT
Function:
_SW_STAT reads the status (normal operation/ input disable/halftone)
of a switch.
Range:
_SW_STAT is applicable to switches and selector switches.
Return-value: One of the following numeric values indicating the switch status is
returned:
0:
Normal operation status
1:
Input disable status
4-198
CHAPTER 4 INSTRUCTION REFERENCE
PRMSTAT
2:
Halftone status
35. _SW_ONOFF
Function:
_SW_ONOFF reads the ON/OFF status of a switch.
Range:
_SW_ONOFF is applicable to switches and selector switches.
Return-value: When a switch is in the OFF status, 0 is returned. When a switch is in
the ON status, 1 is returned. When all the selector switches are in the
OFF status, 0 is returned. When one of the selector switches is in the
ON status, the corresponding element number is returned.
36. _SL_SYNC
Function:
_SL_SYNC reads the synchronous operation of a switch.
Range:
_SL_SYNC is applicable to switches and selector switches.
Return-value: When the synchronous operation is not performed, 0 is returned.
When the synchronous operation is performed, 1 is returned.
37. _SL_BORW
Function:
_SL_BORW reads the switch device write method.
Range:
_SL_BORW is applicable to selector switches.
Return-value: When the switch device write method is the bit type write method, 0 is
returned. When it is the word type write method, 1 is returned.
• The types and usage of the request codes that can be used by PRMSTAT2 are explained below.
1. _PD_DCOLOR
Function:
Range:
_PD_COLOR reads the display color of a control.
_PD_DCOLOR is applicable to the ON color specification of numeric,
character, clock, plot, free graph, meter, and lamp displays.
Type:
Specify one of the following:
0: Figure read
1: Fore color read
2: Back color read
3: Display color read
Return-value: The number (0 to 15) of the read display color is returned.
2. _PD_BCOLOR
Function:
Range:
_PD_BCOLOR reads the background color of a control.
_PD_BCOLOR is applicable to numeric, character, clock, plot, bar
graph, line chart, and free graph displays.
Type:
Specify one of the following:
0: Figure read
1: Fore color read
2: Back color read
Return-value: The number (0 to 15) of the read background color is returned.
4-199
PRMSTAT
ADDCYC2
3. _PD_PIPCOLOR
Function:
Range:
Type:
_PD_PIPCOLOR reads the internal color of a pipe or lamp display.
_PD_PIPCOLOR is applicable to pipe and lamp displays.
Specify one of the following:
0: Read of OFF display color (valid for pipe and lamp displays)
1: Read of ON1 display color (valid for pipe and lamp displays)
2: Read of ON2 display color (valid for pipe displays)
Return-value: The number (0 to 15) of the read internal color is returned.
4. _PD_BSLNE
Function:
Range:
Type:
_PD_BSLNE reads the type of a base line or a reference line.
_PD_BSLNE is applicable to bar graphs and line charts.
Specify one of the following:
0: Read of base line type
1: Read of reference line 1 type
2: Read of reference line 2 type
Return-value: The number (0 to 3) of the read line type is returned.
5. _PD_BSCOLOR
Function:
Range:
Type:
_PD_BSCOLOR reads the color of a base line or a reference line.
_PD_BSCOLOR is applicable to bar graphs and line charts.
Specify one of the following:
0: Read of base line color
1: Read of reference line 1 color
2: Read of reference line 2 color
Return-value: The number (0 to 15) of the read line color is returned.
6. _SW_ONFIG
Function:
Range:
Type:
_SW_ONFIG reads the graphic number displayed when a switch is ON.
_SW_ONFIG is applicable to switches and selector switches.
For a switch, specify 1. For a selector switch, specify the element
number of the switch whose ON graphic is to be changed. The
element number starts at 1.
Return-value: The read graphic number is returned.
7. _SW_OFFFIG
Function:
_SW_OFFFIG reads the graphic number displayed when a switch is
OFF.
Range:
_SW_OFFFIG is applicable to switches and selector switches.
Type:
For a switch, specify 1. For a selector switch, specify the element
number of the switch whose OFF graphic is to be changed. The
element number starts at 1.
Return-value: The read graphic number is returned.
4-200
CHAPTER 4 INSTRUCTION REFERENCE
PRMSTAT
8. _SL_WRITE
Function:
Range:
Type:
_SL_WRITE reads the switch write value.
_SL_WRITE is applicable to switches.
To read the write value when a switch is ON, specify 1.
write value when a switch is OFF, specify 0.
Return-value: The read write value is returned.
9. _PD_PLOTRNG
Function:
Range:
Type:
To read the
PD PLOTRNG writes the start and end points of displaying a line chart.
PD PLOTRNG is applicable to line charts.
Specify one of the following:
0:
Indicates reading of the display start point.
1: Indicates reading of the display end point.
• The types and usage of the request codes that can be used by PRSTAT3 are explained below.
1. _PD_RANGE
Function:
Range:
_PD_RANGE reads the display range of a control.
_PD_RANGE is applicable to bar graph, line chart, free graph, slide,
meter, and plot displays.
Type:
When reading Xmin, specify 0. When reading Xmax, specify 1.
When reading Ymin, specify 2. When reading Ymax, specify 3.
Return-value: A value indicating the display range is returned.
2. _PD_BSVAL
Function:
Range:
Type:
_PD_BSVAL reads the setting value of a base or reference line.
_PD_BSVAL is applicable to bar graph and line chart displays.
When changing a base line, specify 0. When changing reference line 1,
specify 1. When changing reference line 2, specify 2.
Return-value: A value indicating the display range is returned.
• The types and usage of the request codes that can be used by PRMSTAT4 are explained below.
1. _PD_PTRN
Function:
Range:
_PD_PTRN reads the display color of a control.
_PD_PTRN is applicable to bar graph, 100 percent bar chart, and pie
chart displays.
Type-1:
Specify the number of the bar or zone whose display color is to be
changed.
Type-2:
Specify one of the following:
0: Figure read
1: Fore color read
2: Back color read
Return-value: The values indicating the read figure and color number are returned.
4-201
PRMSTAT
ADDCYC2
2. _PD_LNE
Function:
Range:
Type-1:
Type-2:
_PD_LNE reads the display color of a line chart.
_PD_LNE is applicable to line charts.
Specify the number of the line whose display color is to be changed.
Specify one of the following:
0: Line type read
1: Line color read
Return-value: The values indicating the read line type and color are returned.
4-202
CHAPTER 4 INSTRUCTION REFERENCE
PSTAT
PSTAT
Function
■ Function
The PSTAT function reads the status of the specified part.
■ Format
PSTAT (part-name)
■ Example of Use
MODE = PSTAT (.BUHIN.)
■ Description
• The PSTAT function reads the status of the part specified in
part-name.
• part-name is the name of the part whose status is to be read or the
ID-type variable indicating the part.
• The value indicating the mode of the part can be obtained by
executing this function. The following numeric values indicate
modes.
1: Switch input disable status
2: Half tone status
3: Close status
■ Related Item
PMODE
■ Example of Program
evnt
input type% , id@ , data%
if PSTAT(.BUHIN.) = 0 then
pmode .BUHIN., 1
endif
end evnt
4-203
RANGE
ADDCYC2
RANGE
Statement
■ Function
The RANGE function modifies the area(s) of the control for which the
maximum and minimum display data values were specified.
■ Format
RANGE control-name, area-1, area-2, area-3, area-4
■ Example of Use
RANGE ..GRAPH, 0, 0, 100, 100
■ Description
• control-name is the graph name or the ID-type variable indicating the
graph.
• The maximum and minimum area values in the control can be set for
each display as follows:
Area 1
Plot display
Bar graph display
Line chart display
Free graph display
Slide display
Meter display
Area 2
Area 3
Area 4
Minimum
horizontal
value
Minimum
value
Minimum
value
Minimum
value
Minimum
value
Minimum
value
Maximum
horizontal
value
Maximum
value
Maximum
value
Maximum
value
Maximum
value
Maximum
value
Minimum
vertical
value
Base
value
–
Maximum
vertical
value
–
–
–
–
–
–
–
“-” is ignored even if it is specified.
■ Related Item
None
■ Example of Program
evnt
input type% , id@ , min%,max%
if type% = 3 then
range ..MTR000 , min%, max%,0,0
endif
end evnt
4-204
CHAPTER 4 INSTRUCTION REFERENCE
–
READTIM
READTIM
Function
■ Function
The READTIM function reads the current value of the specified timer.
■ Format
READTIM (timer-number)
■ Example of Use
DD = READTIM (TNO@)
DD = READTIM (VAR)
■ Description
• The READTIM function reads the current elapse time of the operating
timer. This time is read in units of 100 milliseconds.
• timer-value is the ID-type variable indicating the number of the timer
to be read or an integer-type value from 0 to 15.
■ Related Item
OPENTIM, STARTTIM, STOPTIM, CLOSETIM, CONTTIM, WRITETIM
■ Example of Program
conf
static timid@
timid@ = OPENTIM()
settim timid@, 20, 0
starttim timid@
end conf
evnt
input type% , id@ , data%
if type% = 3 then
tim% = READTIM(timid@)
numdsp ..NUM000,tim%*100
end if
end evnt
4-205
RENAME
ADDCYC2
RENAME
Statement
■ Function
The RENAME statement changes a file name or directory name.
■ Format
RENAME old file name, new file name
■ Example of Use
RENAME
■ Description
• A file name can be specified in a full path name including a drive
name or in an abbreviated name beginning with a current directory
name.
Example: A:\SUBDIR\FILE1
FILE1
• A new file name must not contain a path name.
• To change a directory name, specify a directory name, instead of a file
name.
■ Related Item
FOPEN,KILL,MKDIR,RMDIR
"A:\SUBDIR\FILE1", "FILE2"
■ Example of Program
conf
global dname$(13), pname1$(13), pname2$(13), pname3$(13)
global dsel%, p1sel%, p2sel%, p3sel%
strdsp ..str, "rename"
end conf
evnt
input type%, id@, data%
if data% = 1 then
path$ = dname$(dsel%) + pname1$(p1sel%) + pname2$(p2sel%)
strdsp .dsp.str, path$
rename path$, pname3$(p3sel%)
end if
end evnt
4-206
CHAPTER 4 INSTRUCTION REFERENCE
REOPENCOM
REOPENCOM
Statement
■ Function
The REOPENCOM statement reopens the temporarily closed serial line.
■ Format
REOPENCOM logical-device-name
■ Example of Use
REOPENCOM HST
■ Description
• The REOPENCOM statement permits the program, whose data
reception from an external connecting device was temporarily
inhibited by the CLOSECOM statement, to receive data again.
• logical-device-name specifies any of the following external
connecting devices:
HST: Host computer
BCR: Bar code reader
TKY: Ten-key pad
■ Related Item
OPENCOM, CLOSECOM
■ Example of Program
conf
OPENCOM HST
end conf
evnt
input type% , id@ , data%
if type% = 3 and data% = 1 then
CLOSECOM HST
else if type% = 3 and data% = 0 then
REOPENCOM HST
endif
end evnt
4-207
REOPENPARALLEL
ADDCYC2
REOPENPARALLEL
Statement
■ Function
The REOPENPARALLEL statement permits data re-reception from the
temporarily closed parallel port.
■ Format
REOPENPARALLEL input-bit
■ Example of Use
REOPENPARALLEL 3
■ Description
• The REOPENPARALLEL statement permits the script, whose data
reception from the parallel port was temporarily inhibited by the
CLOSEPARALLEL statement, to re-receive data.
• input-bit is the bit for restarting data reception. This input bit is the
same as the bit specified by the CLOSEPARALLEL statement.
■ Related Item
OPENPARALLEL, CLOSEPARALLEL
■ Example of Program
conf
OPENPARALLEL 3
end conf
evnt
input type% , id@ , data%
if type% = 3 and data% = 1 then
CLOSEPARALLEL 3
else if type% = 3 and data% = 0 then
REOPENPARALLEL 3
endif
end evnt
4-208
CHAPTER 4 INSTRUCTION REFERENCE
RESETALARM
RESETALARM
Statement
■ Function
The RESETALARM statement resets the specified alarm.
■ Format
RESETALARM alarm-number
■ Example of Use
RESETALARM (NO@)
■ Description
• alarm-number is the number of the alarm set by the SETALARM
statement; it must be an ID-type variable.
• This statement resets the setting for posting an alarm ON to the
program when a specified time is reached.
■ Related Item
SETALARM
■ Example of Program
conf
static alid@
alid@ = setalarm(10,0)
end conf
evnt
input type% , id@ , data%
if type% = 3 then
RESETALARM(alid@)
end if
end evnt
4-209
RETURN
ADDCYC2
RETURN
Statement
■ Function
The RETURN statement returns control from the subroutine to the
original program.
■ Format
RETURN
■ Example of Use
RETURN
■ Description
• The RETURN statement returns control to the statement following the
statement called by the GOSUB statement.
■ Related Item
GOSUB
■ Example of Program
evnt
X = 10
GOSUB SUB001
numdsp ..NUM000, X
end evnt
SUB001:
X = X+3
RETURN
4-210
CHAPTER 4 INSTRUCTION REFERENCE
RIGHT$
RIGHT$
Function
■ Function
The RIGHT$ function returns a character string the specified number of
characters, starting from the left of the specified character string.
■ Format
RIGHT$ (character-string, number-of-characters)
RIGHT$ (registered-character-string-number, number-of-characters)
RIGHT$ (registered-character-string-name, number-of-characters)
■ Example of Use
A$ = RIGHT$ (MOJI$, 5)
A$ = RIGHT$ (4, 10)
A$ = RIGHT$ (TOROKU, 8)
■ Description
• The RIGHT$ function returns a character string the specified number
of characters (bytes), starting from the right of the specified
character-string.
• number-of-characters specifies the number of bytes of the character
string to be fetched with a numeric value from 0 to 255. When
number-of-characters is 0, a null character string is returned.
• character-string is a direct character string or a character string
variable.
• registered-character-string-number is the numerical expression
indicating the number registered by Screen Creator.
• registered-character-string-name is the name of the character
string created by Screen Creator or the ID-type variable indicating the
name of the character string.
■ Related Item
MID$, LEFT$
■ Example of Program
evnt
b$ = “12345678”
a$ = RIGHT$(b$ , 3)
c$ = RIGHT$ (no , 3)
c$ = RIGHT$ (id@ , 4)
end evnt
4-211
RMDIR
ADDCYC2
RMDIR
Statement
■ Function
The RMDIR statement deletes a directory.
■ Format
RMDIR directory-name
■ Example of Use
RMDIR “TEST”
■ Description
• The RMDIR statement is an instruction for deleting a subdirectory.
• Specify the directory to be deleted with a character string constant or
variable.
• The directory to be deleted can be specified in directory-name
together with a drive name.
■ Related Item
MKDIR, CHDIR
■ Example of Program
conf
end conf
evnt
......
RMDIR ‘‘C:TEST’’
......
end evnt
4-212
CHAPTER 4 INSTRUCTION REFERENCE
ROTATE
ROTATE
Statement
■ Function
The ROTATE function rotates the figure displayed in the graphic display.
■ Format
ROTATE control-name, angle-of-rotation
■ Example of Use
ROTATE ..FIG000, 2
■ Description
• control-name is the graphic display name or the ID-type variable
indicating the graphic display.
• angle-of-rotation specifies the angle of rotation with one of the
following numeric values:
0: Rotation of 0 degree
1: Rotation of 90 degrees
2: Rotation of 180 degrees
3: Rotation of 270 degrees
■ Related Item
FIGDSP
■ Example of Program
evnt
input ty , id@, fig%
ROTATE ..FIG000 , fig%
end evnt
4-213
RSTAT
ADDCYC2
RSTAT
Function
■ Function
The RSTAT function checks the status of registered objects.
■ Format
RSTAT (registration-name, type, option)
■ Example of Use
VAR@ = RSTAT (GAMEN1.., 0, 1)
■ Description
• Of registered objects, the RSTAT function obtains the number of the
object that is “number specified by option” away from the specified
registration name.
• A variable or constant representing a screen name, registration
character string name, or registration graphic name can be specified in
registration-name.
• Specify 0 in type.
• When option is a positive value, the RSTAT function checks the
registered objects in ascending order of their numbers. When option
is a negative value, the RSTAT function checks the objects in
descending order of their numbers.
• If there is no object that is “number specified by option” away from
the specified registration name, the RSTAT function returns -1.
■ Related Item
GETGID, GETGNO
■ Example of Program
conf
end conf
evnt
id@ = getgid()
no% = RSTAT ( id@, 0, 1)
if no% <> -1 then jump no%
end evnt
4-214
CHAPTER 4 INSTRUCTION REFERENCE
’ Checks the next registered screen
’ number.
RUN
RUN
Statement
■ Function
The RUN statement runs the specified program.
■ Format
RUN execution-part/screen
■ Example of Use
RUN .BUHIN.
■ Description
• The RUN statement issues a message to the part/screen specified in
execution-part/screen and runs the part/screen program.
(The
message to be issued contains the message type and ID. It, however,
does not contain the issued data.)
• The program to which a command was issued is not run when the
RUN command is issued; it is run when the program that issued the
RUN command terminates.
• execution-part/screen is a screen name, a part name, or an ID-type
variable.
■ Related Item
INPUT, PRINT, SEND
■ Example of Program
evnt
input ty , id@, fig%
if ty = 3 and id@ = ..SWT000 then
RUN .B000.
endif
end evnt
4-215
SELECT CASE ... END SELECT
ADDCYC2
SELECT CASE ... END SELECT
Statement
■ Function
The statements satisfying the specified condition are executed.
■ Format
SELECT CASE
CASE
statement-list
CASE
statement-list
CASE ELSE
statement-list
END SELECT
■ Example of Use
See “Example of Program” below.
■ Description
• The SELECT CASE statement executes the CASE statement list
satisfying the specified conditional expression.
• When CASE, CASE ELSE, and END SELECT appear after the
statements satisfying the specified condition have been executed, the
SELECT CASE statement executes the statement following END
SELECT.
• Condition judgment can be performed up to 50 times.
■ Related Item
IF ... THEN ... ELSE
■ Example of Program
evnt
input ty , id@, dat%
select case dat%
case 1
aaa = 1
case 2,3
aaa = 2
case 4 to 10
aaa = 3
case else
aaa =4
end select
end evnt
4-216
CHAPTER 4 INSTRUCTION REFERENCE
’
When dat% is 1
’
When dat% is 2 or 3
’
When dat% is 4 to 10
’
When dat% is another value
SEND
SEND
Statement
■ Function
The SEND statement sends data to the specified screen, part, or logical
connecting device.
■ Format
SEND send-destination-name
■ Example of Use
SEND .BUHIN.
■ Description
• The SEND statement sends the data written by the PRINT statement
to the specified send destination.
• send-destination-name is the name of the screen or part to which
data is to be sent, the ID-type variable indicating the name, or one of
the following logical connecting devices:
HST: Host computer
PRN: Printer
• The screen or part script that received data is not executed when the
SEND command is issued; it is executed when the program that issued
the SEND command terminates.
■ Related Item
RUN, PRINT
■ Example of Program
evnt
input ty , id@, dat%
if ty = 3 and id@ = ..SWT000 then
print “BUHIN1”,dat%
send .B0000.
endif
end evnt
4-217
SETALARM
ADDCYC2
SETALARM
Statement
■ Function
The SETALARM statement sets an alarm time.
■ Format
SETALARM (hour, minute)
■ Example of Use
ID@ = SETALARM (13, 30)
■ Description
• The SETALARM statement sets an alarm time in the OIP built-in
clock. When the set alarm time is reached, the data indicating this
effect is transmitted to the set screen or part program. Up to 16
alarms can be used.
• hour specifies the hour(s) to be set with a numeric value from 0 to 23.
• minute specifies the minute(s) to be set with a numeric value from 0
to 59.
• When the SETALARM function is executed, the alarm number is
returned. The alarm number to be returned is an ID-type variable.
• This function can be used by the screen or part program being
displayed.
■ Related Item
RESETALARM
■ Example of Program
conf
static alid@
alid@ = SETALARM(10,0)
end conf
evnt
input type% , id@ , data%
if type% = 3 then
resetalarm(alid@)
end if
end evnt
4-218
CHAPTER 4 INSTRUCTION REFERENCE
SETBEEP
SETBEEP
Statement
■ Function
The SETBEEP statement specifies the tone of a buzzer.
■ Format
SETBEEP ON-time, OFF-time, sound-count
■ Example of Use
SETBEEP 10, 5, 3
■ Description
• The SETBEEP statement sets the tone color of the buzzer to be
sounded by the BEEP command
• ON-time specifies the time during which the buzzer continues to
sound in units of 100 milliseconds.
• OFF-time specifies the time during which the buzzer continues not to
sound in units of 100 milliseconds.
• sound-count indicates the number of times the buzzer sounds and
does not sound. It is impossible to specify 0.
• When OFF-time is 0, the buzzer continues to sound.
■ Related Item
BEEP
■ Example of Program
conf
SETBEEP 50,20,3
end conf
evnt
input type%, id@, data%
if id@ = ..SWT000 then
BEEP 1
else
BEEP 0
endif
end evnt
4-219
SETBLIGHT
ADDCYC2
SETBLIGHT
Statement
■ Function
The SETBLIGHT statement sets the time that lasts till the back light is
turned off.
■ Format
SETBLIGHT OFF-time
■ Example of Use
SETBLIGHT 20
■ Description
• OFF-time indicates the time that lasts till the back light is turned off;
it is an integer-type variable or a numeric value. OFF-time is set in
minutes. When OFF-time is 0, the back light is not turned off.
■ Related Item
GETBLIGHT
■ Example of Program
conf
getblight var
var = var*2
SETBLIGHT var
end conf
4-220
CHAPTER 4 INSTRUCTION REFERENCE
SETBLIGHT
SETDATE
Statement
■ Function
The SETDATE statement sets the date of the built-in clock.
■ Format
SETDATE year, month, day
■ Example of Use
SETDATE 92, 12, 1
■ Description
•
•
•
•
•
■ Related Item
DATE\$, GETDATE, GETDATE, SETTIME, TIME\$
year is the low-order two digits of A.D (0 to 99).
month is a numeric value from 1 to 12.
day is a numeric value from 1 to 31.
If an unexisting year, month, or day is specified, an error occurs.
The day of the week is automatically set based on preset year, month
and day.
• Once date is set using the SETDATE command in a model with a
battery backup calendar IC (GC56LC or GC55EM), the date is
updated even while the power is off. If a model with no calendar IC
(GC53LC or GC53LM) is turned off, the date is initialized to January
1, 1998 (Thursday) and the time to 00:00:00 when it is turned on
again. The date and time are updated while the power is on.
■ Example of Program
evnt
input type,id@,dat
if type = 3 then
y = 94
m = 12
d = 1
setdate y, m, d
endif
end evnt
4-221
SETLNEPLOT
ADDCYC2
SETLNEPLOT
Statement
■ Function
The SETLNEPLOT statement sets the display range of a line chart.
■ Format
SETLNEPLOT display-start-point, display-end-point
■ Example of Use
SETLNEPLOT 10, 50
■ Description
• The SETLNEPLOT statement sets the display range of a line chart.
Executing LNEDSP, LNESHIFT, or PRDSP after this display range
has been set displays the line chart within the set range.
• After LNEDSP, LNESHIFT, or PRDSP has been executed, the
set
display range is released and the entire range display status is set.
• Line charts for which “Blink” or “On-and-Off” is specified are
displayed within the entire range.
• When different ranges are set for two or more line charts within 100
milliseconds, the last set range corresponds to the first line chart to be
displayed. All other line charts are displayed.
■ Related Item
LNEDSP, LNESHIFT, PRDSP
■ Example of Program
evnt
input type,id@,data
SETLNEPLOT 20, 30
lneshift (..lnegraph , 1,1, 40)
end evnt
4-222
CHAPTER 4 INSTRUCTION REFERENCE
SETSIO
SETSIO
Statement
■ Function
The SETSIO statement sets a non-protocol communication reception
method.
■ Format
SETSIO port-number, value
■ Example of Use
SETSIO 2 , &HD
■ Description
• The SETSIO statement sets the condition for issuing messages to
BASIC of the part/screen when data is received in the non-procedual
communication mode.
• port-number specifies the port for which the non-procedual
communication mode is to be set.
• When the port specified in port-number is in the binary mode, value
specifies the number of data to be received (in bytes). (0 cannot be
specified.) When the port is in the text mode, value specifies a
terminator code (1 to 0FFh) of the received data.
• For the binary mode, specify the number of bytes to be received from
the connecting device. When the specified number of bytes are
received, a message is transmitted to the part/screen.
• For the text mode, when a terminator code is received, a message is
transmitted to the part/screen. A terminator code can be specified
only by one byte.
• The port to be set must be opened by the OPENSIO statement in
advance.
■ Related Item
OPENSIO, CLOSESIO, WRITESIO, WRITWSIOB, FLUSH, IOCTL
■ Example of Program
conf
global buf$ * 200
opensio 2 , 1 , buf$
SETSIO 2 , &HD
end conf
evnt
strdsp ..STR000 , buf$
closesio 2
end evnt
4-223
SETTIM
ADDCYC2
SETTIM
Statement
■ Function
The SETTIM statement sets the limit time of the specified timer.
■ Format
SETTIM timer-number, time-limit, timer-type
■ Example of Use
SETTIM ID@, 100, 0
SETTIM VAR, 200, 1
■ Description
• The SETTIM statement determines the operation of the specified
timer. The timer must be stopped when it is set.
• timer-number is the ID-type variable indicating the number of the
timer whose operation is to be set or an integer-type value from 0 to
15.
• The time specified in time-limit starts to be counted when operation of
the specified timer is started. It is specified in units of 100
milliseconds.
• timer-type specifies the type of timer to be set. Timers are classified
into two types: normal and interval. The normal timer stops when
the specified time limit is reached once. The interval timer restarts
counting from 0 when the specified time limit is reached once.
0: Normal timer
1: Interval timer
• If one second or lower is set as the time limit in the interval timer,
messages may be accumulated to cause an error.
■ Related Item
OPENTIM, STARTTIM, STOPTIM, CLOSETIM, CONTTIM, READTIM
■ Example of Program
conf
static timid@
timid@ = opentim()
SETTIM timid@, 20, 0
starttim timid@
end conf
evnt
input type% , id@ , data%
if type% = 3 then
tim% = readtim(timid@)
numdsp ..NUM000,tim%*100
end if
end evnt
4-224
CHAPTER 4 INSTRUCTION REFERENCE
SETTIME
SETTIME
Statement
■ Function
The SETTIME statement sets the time of the built-in clock.
■ Format
SETTIME hour, minute, second
■ Example of Use
SETTIME 12, 0, 0
■ Description
•
•
•
•
•
■ Related Item
DATE\$, GETDATE, GETDATE, SETDATE, TIME\$
hour is a numeric value from 0 to 23.
minute is a numeric value from 0 to 59.
second is a numeric value from 0 to 59.
If an unexisting hour, minute, or second is specified, an error occurs.
Once time is set using the SETTIME command in a model with a
battery backup calendar IC (GC56LC or GC55EM), time is updated
even while the power is off. If a model with no calendar IC
(GC53LC or GC53LM) is turned off, the date is initialized to January
1, 1998 (Thursday) and the time to 00:00:00 when it is turned on
again. The date and time are updated while the power is on.
■ Example of Program
evnt
input type% , id@ , h%, m%, s%
settime h%, m%, s%
end evnt
4-225
SHIFT
ADDCYC2
SHIFT
Statement
■ Function
The SHIFT statement shifts the contents of the specified variable left or
right.
■ Format
SHIFT variable-name, shift-amount
■ Example of Use
SHIFT VARIABLE% , 1
■ Description
• The SHIFT statement shifts the contents (bit string) of the specified
variable by the specified amount left or right.
• 0 is set in the positions of the bits vacated as a result of the shifting.
• variable-name specifies the variable name used to shift the bit string;
it must be an integer-type variable.
• shift-amount specifies how much the bit string in the variable is to be
shifted. A numeric value from 31 to -31 can be specified in
shift-amount. When the specified shift amount is positive, the
SHIFT statement shifts the bit string left. When it is negative, the
SHIFT statement shifts the bit string right.
■ Related Item
None
■ Example of Program
conf
end conf
evnt
input type% , id@ , data%
numdsp ..NUM000 , data%
shift data% , 1
numdsp ..NUM000 , data%
end evnt
4-226
CHAPTER 4 INSTRUCTION REFERENCE
SIN
SIN
Function
■ Function
The SIN function calculates a sine for the specified numerical expression.
■ Format
SIN (numerical-expression)
■ Example of Use
X = SIN (ANGLE)
■ Description
• The SIN function calculates a sine value for the specified numerical
expression. The unit for the numeric expression is radian.
■ Related Item
ATN, COS, TAN
■ Example of Program
evnt
angle = 3.141592/3
x = SIN ( angle )
numdsp ..num000,x
end evnt
4-227
SLDDSP
ADDCYC2
SLDDSP
Statement
■ Function
The SLDDSP statement displays data in the slide display.
■ Format
SLDDSP control-name, display-data
■ Example of Use
SLDDSP .BUHIN.GRAPH, 30.0
■ Description
• control-name is the slide display name or the ID-type variable
indicating the slide display.
• display-data is numeric data indicating the display position of the
point graphic to be displayed in the slide display.
• display-value cannot be changed even if this statement is issued to the
display for which operation parameters are set to “effective” in the
control.
■ Related Item
None
■ Example of Program
evnt
input type,id@,data
SLDDSP ..SLD000, data
end evnt
4-228
CHAPTER 4 INSTRUCTION REFERENCE
SOF
SOF
Function
■ Function
The SOF function calculates the size of a field.
■ Format
SOF (file-number)
■ Example of Use
AAA = SOF (file-number)
■ Description
• file-number is the file number defined in the FIELD declaration.
This size becomes the size of the file to be actually read or written.
• The size is calculated in bytes.
■ Related Item
FOPEN, FIELD, FCLOSE, FPUT, FGET, EOF
■ Example of Program
conf
field 5
global no%
global moji1$ , moji2$
end field
global buff$ * 50
opensio 1 , 0 , buff$
fopen ‘‘C:TEST’, 2 , 5
end conf
evnt
no% = 1
moji1$ = ‘‘product-name’’
moji2$ = ‘‘product-number’’
size% = SOF(5)
mcpy 5 , buff$
writesiob 1 , size% , buff$
end evnt
4-229
SQR
ADDCYC2
SQR
Function
■ Function
The SQR function calculates a square.
■ Format
SQR (numerical-expression)
■ Example of Use
X = SQR (Y)
■ Description
• The SQR function calculates a square for the specified numerical
expression. numerical-expression must be a numeric value greater
than or equal to 0.
■ Related Item
None
■ Example of Program
evnt
x = SQR ( a^2 + b^2)
numdsp ..NUM000, X
end evnt
4-230
CHAPTER 4 INSTRUCTION REFERENCE
STARTTIM
STARTTIM
Statement
■ Function
The STARTTIM statement starts the operation of the specified timer.
■ Format
STARTTIM timer-number
■ Example of Use
STARTTIM ID@
STARTTIM VAR
■ Description
• The STARTTIM statement starts the operation of the specified timer.
(The timer starts increment from 0.)
• timer-number is the ID-type variable indicating the number of the
timer that starts increment or an integer-type variable from 0 to 15.
■ Related Item
OPENTIM, STOPTIM, CONTTIM, CLOSETIM, SETTIM, READTIM
■ Example of Program
conf
static timid@
timid@ = opentim()
settim timid@, 20, 0
STARTTIM timid@
end conf
evnt
input type% , id@ , data%
if type% = 3 then
tim% = readtim(timid@)
numdsp ..NUM000,tim%*100
end if
end evnt
4-231
STATIC
ADDCYC2
STATIC
Statement
■ Function
The STATIC statement declares that static variables are to be used.
■ Format
STATIC variable-name [, variable-name ...]
■ Example of Use
STATIC VAR, XYZ(2,3), MOJI$ * 20
■ Description
• The STATIC statement declares that static variables are to be used.
Static variables can be used only the declared program. These
variables are initialized once when the power supply is turned on.
The values of static variables used after the power supply has been
turned on are retained.
• A normal variable, an array variable, or a character string variable can
be written in variable-name.
• When an array or character variable is declared, the DIM and
STRING statements need not be declared.
■ Related Item
AUTO, BACKUP, DIM, GLOBAL, LOCAL, STRING
■ Example of Program
conf
STATIC var%, float
STATIC moji$ * 50, moji2(10) * 3
STATIC xyz@(10,10)
end conf
4-232
CHAPTER 4 INSTRUCTION REFERENCE
STOP
STOP
Statement
■ Function
The STOP statement stops the execution of the program.
■ Format
STOP
■ Example of Use
STOP
■ Description
• The STOP statement stops the execution of the program following this
statement.
■ Related Item
RUN
■ Example of Program
evnt
input type , id@, data
if type = 3 and data = 0 then STOP
numdsp ..NUM000, data
end evnt
4-233
STOPTIM
ADDCYC2
STOPTIM
Statement
■ Function
The STOPTIM statement stops the increment operation of the specified
timer.
■ Format
STOPTIM timer-number
■ Example of Use
STOPTIM ID@
STOPTIM VAR
■ Description
• The STOPTIM statement stops the increment operation of the
specified timer.
• timer-number is the ID-type variable indicating the number of the
timer that stops increment or an integer-type variable from 0 to 15.
■ Related Item
OPENTIM, STARTTIM, CONTTIM, CLOSETIM, SETTIM, READTIM
■ Example of Program
conf
static timid@
timid@ = opentim()
settim timid@, 20, 0
starttim timid@
end conf
evnt
input type% , id@ , data%
if type% = 3 and data% = 1 then
tim% = readtim(timid@)
numdsp ..NUM000,tim%*100
else
STOPTIM timid@
end if
end evnt
4-234
CHAPTER 4 INSTRUCTION REFERENCE
STR$
STR$
Function
■ Function
The STR$ function converts the specified numeric value to a character
string.
■ Format
STR$ (numerical-expression)
■ Example of Use
A$ = STR$(123)
■ Description
• An integer- or floating point-type numerical expression can be
specified in numerical-expression.
• When the numeric value specified in numerical-expression is negative,
“-“ is added to the beginning of the character string.
■ Related Item
VAL
■ Example of Program
evnt
input type, id@,data
a$ = STR$ ( data )
strdsp ..hyojiki , a$
end evnt
4-235
STRCOLOR
ADDCYC2
STRCOLOR
Statement
■ Function
The STRCOLOR statement changes the colors and background figure of
the character display.
■ Format
STRCOLOR control-name, character-display-color, tile, display-color,
background-color
■ Example of Use
STRCOLOR ..GRAPH, 1, 2, 5, 2
■ Description
• The STRCOLOR statement changes the background tile and colors of
the character display. -1 indicates that the color and tile for which -1
was specified remain unchanged.
• control-name is the character display name or the ID-type variable
indicating the character display.
• character-display-color indicates the color in which characters are
displayed. Specify this character display color with a numeric value
from 0 to 15.
• tile indicates the background tiling figure of the character display.
Specify this tiling figure with a numeric value from 0 to 15.
• display-color is the numeric value indicating the color number of the
tile display section. Specify this color number with a numeric value
from 0 to 15.
• background-color is the numeric value indicating the color number
of the tile background section. Specify this color number with a
numeric value from 0 to 15.
■ Related Item
STRDSP, STRFORM
■ Example of Program
conf
static name@
name@ = ..STR000
end conf
evnt
input type%, id@, data%
if type% = 3 then
STRCOLOR name@, 2, -1,-1,-1
endif
end evnt
4-236
CHAPTER 4 INSTRUCTION REFERENCE
STRDSP
STRDSP
Statement
■ Function
The STRDSP statement displays data in the character display.
■ Format
STRDSP control-name, display-data
■ Example of Use
STRDSP .BUHIN.GRAPH, “ABCDEF”
■ Description
• The STRDSP statement displays data in the character display.
• control-name is the character display name or the ID-type variable
indicating the character display.
• display-data is character data to be displayed in the character display.
• display-value cannot be changed even if this statement is issued to the
display for which operation parameters are set to “effective” in the
control.
■ Related Item
STRCOLOR, STRFORM
■ Example of Program
conf
static name@
name@ = ..STR000
end conf
evnt
input type%, id@, data$
STRDSP name@, data$
end evnt
4-237
STRFORM
ADDCYC2
STRFORM
Statement
■ Function
The STRFORM statement changes the display method of the character
display.
■ Format
STRFORM control-name, display-method
■ Example of Use
STRFORM ..HYOJIKI, 0
■ Description
• The STRFORM statement changes the display method of the character
display.
• control-name is the character display name or the ID-type variable
indicating the character display.
• display-method is the numeric value indicating any of the following
three display methods:
0: Left-justification method
1: Centering method
2: Right-justification method
■ Related Item
STRCOLOR, STRDSP
■ Example of Program
evnt
input type , id@,data
var@ = .buhin.moji
STRFORM var@ , data
strdsp var@ , "ABCDEFG"
end evnt
4-238
CHAPTER 4 INSTRUCTION REFERENCE
STRING
STRING
Statement
■ Function
The STRING statement specifies the size of the character string variable
to be used.
■ Format
STRING variable-name * size [variable-name * size ......]
■ Example of Use
STRING MOJI$ * 50
■ Description
• The STRING statement is used to specify a size of a local character
string variable.
• The STRING statement is adopted to maintain the compatibility with
GCSGP3. Use LOCAL, instead of STRING, in Screen Creator 5.
• The default size of the character string variable is 20 bytes. Use the
STRING statement to use a variable whose size is greater than 20
bytes. The character string variable must be declared before it is
used.
• variable-name must end with $.
• Specify size with an integer value.
• Two or more character string variable can be specified in one line,
delimited by a comma (,).
■ Related Item
GLOBAL, STATIC, BACKUP, LOCAL
■ Example of Program
conf
string xxx$ * 40
string moji$ * 50
end conf
4-239
SWFIG
ADDCYC2
SWFIG
Statement
■ Function
The SWFIG statement sets the graphic to be displayed when the status of
the specified switch changes.
■ Format
SWFIG switch-name, display-graphic, status, sub-ID
■ Example of Use
SWFIG ..SW1, FIG3, 0, 0
■ Description
• The SWFIG statement specifies the graphic to be displayed in the
specified switch when the switch changes from the ON status to the
OFF status. Both the unit switch and selector switch can be used.
When the selector switch is used, its sub-ID must be specified.
• switch-name is the name assigned to the switch or the ID-type
variable indicating the name.
• display-graphic is the graphic name or the ID-type variable
indicating the name.
• status is the integer value indicating whether the graphic is displayed
when the switch status is ON or OFF.
0: The graphic is displayed when the switch status is OFF.
1: The graphic is displayed when the switch status is ON.
• sub-ID is required when the selector switch is used. Specify the
sub-switch number of the selector switch in sub-ID. The sub-switch
number in the upper left end is assigned 1. The sub-switch numbers
increase in the right direction. They decrease in the downward
direction. (Specify 0 in sub-ID when the selector switch is not used.)
■ Related Item
None
■ Example of Program
conf
static figid@,subid,onoff
figid@ = FIG03
subid = 3
onoff = 1
end conf
evnt
input type,id@,data
if type = 3 and id@ = ..SWT000 then
SWFIG id@ , figid@ , onoff , subid
endif
end evnt
4-240
CHAPTER 4 INSTRUCTION REFERENCE
SWMODE
SWMODE
Statement
■ Function
The SWMODE statement modifies the status of the specified switch.
■ Format
SWMODE switch-name, mode
■ Example of Use
SWMODE ..SW1, 2
■ Description
• switch-name is the name of the switch whose status is to be modified
or the ID-type variable indicating the switch.
• mode indicates the status to be modified.
0: Normal status
1: Input disable status
2: Half tone status
■ Related Item
None
■ Example of Program
evnt
input type,id@,data
if type = 3 then
SWMODE ..sw2 , 1
SWMODE var@ ,2
end if
end evnt
4-241
SWREAD
ADDCYC2
SWREAD
Function
■ Function
The SWREAD function reads the status of the specified switch.
■ Format
SWREAD (switch-name)
■ Example of Use
STATE = SWREAD (..SW1)
■ Description
• The SWREAD function reads the status (ON or OFF) of the specified
switch.
• switch-name is the name assigned to the switch or the ID-type
variable indicating the name.
• The CONF and part CONF block of the global screen cannot be used
in the switch primitive where operation parameters are valid.
• The SWREAD statement cannot read the synchronous switch status of
an undisplayed screen.
• As a result of executing this function, the status of normal switches is
indicated by the following numeric values:
0: OFF status
1: ON status
• As a result of executing this function, the status of selector switches is
indicated by the following numeric values:
0:
All selector switches are OFF.
Other values: Numbers of the sub-switches that are ON. (The
sub-switch number in the upper left end is 1. The
sub-switch numbers increase in the right direction.
They decrease in the downward direction.)
■ Related Item
SWWRITE
■ Example of Program
evnt
input type,id@,data
id@ = ..SW2
state = SWREAD (ID@)
if state = 0 then
swwrite id@,1
endif
end evnt
4-242
CHAPTER 4 INSTRUCTION REFERENCE
SWREV
SWREV
Statement
■ Function
The SWREV statement sets whether to reverse the display of the
specified switch when the switch status changes.
■ Format
SWREV switch-name, operation
■ Example of Use
SWREV ..SW2, 0
■ Description
• The SWREV statement sets whether to reverse the display of the
specified switch when the switch on the touch panel is pressed or the
status is changed.
• switch-name is the name assigned to the switch or the ID-type
variable indicating the name.
• The CONF and part CONF block of the global screen cannot be used
in the switch primitive where operation parameters are valid.
• operation indicates whether to reverse the display of the switch with
the following numeric values:
0: The display of the switch is not reversed.
1: The display of the switch is reversed.
■ Related Item
None
■ Example of Program
evnt
input type,id@,data
if type = 3 and id@ = ..SWT000 then
id@ = ..SW2
SWREV id@,1
endif
end evnt
4-243
SWWRITE
ADDCYC2
SWWRITE
Statement
■ Function
The SWWRITE statement changes the status of the specified switch.
■ Format
SWWRITE switch-name, status
■ Example of Use
SWWRITE ..SW1, 1
■ Description
• The SWWRITE statement changes the status (ON or OFF) of the
specified switch even if the switch on the touch panel is not pressed.
When the status is changed, the data indicating the status is
transmitted to the part program on which the switch is placed.
• switch-name is the name assigned to the switch or the ID-type
variable indicating the name.
For multi-switches, it is necessary to set switch numbers in the offset
and to get switch IDs using the GETID command.
• status indicates that the normal switches are in any of the following
statuses:
0: OFF status
1: ON status
• status indicates that the selector switches are in any of the following
statuses:
0:
All selector switches are OFF.
Other values: Numbers of the sub-switches that are ON. (The
sub-switch number in the upper left end is 1. The
sub-switch numbers increase in the right direction.
They decrease in the downward direction.)
• The numbers of multi-switches and selector switches are counted as 1,
2, 3 and so forth from the upper left switch. When all switches are
counted in the X direction, the switches on the lower Y line are
counted in the same way. They are integers.
• When this statement is executed, a message is issued as a switch is
pressed.
• Executing the SWWRITE statement for the switch where synchronous
operation is valid causes an error.
• The SWWRITE statement is invalid for the switch of the momentary
type.
■ Related Item
GETID,SWREAD
4-244
CHAPTER 4 INSTRUCTION REFERENCE
SWWRITE
■ Example of Program
evnt
input type,id@,data
id@ = ..SW2
state = swread (ID@)
if state = 0 then
SWWRITE id@,1
endif
end evnt
4-245
SWWRITE
ADDCYC2
TAN
Function
■ Function
The TAN function calculates a tangent for the specified numerical
expression.
■ Format
TAN (numerical-expression)
■ Example of Use
X = TAN (ANGLE)
■ Description
• The TAN function calculates a tangent value for the specified
numerical expression. The unit for the numeric expression is radian.
■ Related Item
ATN, SIN, COS
■ Example of Program
evnt
angle = 3.141592/3
x = TAN ( angle )
numdsp ..num000,x
end evnt
4-246
CHAPTER 4 INSTRUCTION REFERENCE
TAN
TIME\$
Statement
■ Function
The TIME$ statement reads the current time.
■ Format
TIME$
■ Example of Use
A$ = TIME$
■ Description
• The TIME$ statement reads the current time with a character string of
H:M:S format.
• This statement cannot be used to set the current time.
• Once time is set using the SETTIME command in a model with a
battery backup calendar IC (GC56LC or GC55EM), time is updated
even while the power is off. If a model with no calendar IC
(GC53LC or GC53LM) is turned off, the date is initialized to
98-01-01 and the time to 00:00:00 when it is turned on again. The
date and time are updated while the power is on.
■ Related Item
DATE\$, GETDATE, GETTIME, SETDATE, SETTIME
■ Example of Program
conf
moji$ = TIME$
strdsp ..STR000 , moji$
end conf
4-247
TIME$
ADDCYC2
TIMID
Function
■ Function
The TIMID function changes an integer-type timer number to an ID-type
timer number.
■ Format
TIMID ( number )
■ Example of Use
AA@ = TIMID (VAR)
■ Description
• number is the timer number (integer value) to be changed to an
ID-type timer number.
■ Related Item
TIMINT, OPENTIM2
■ Example of Program
conf
opentim2(2)
settim 2 , 20, 0
starttim 2
end conf
evnt
input type,id@
if id@ = timid(2) then
.......
end if
end evnt
4-248
CHAPTER 4 INSTRUCTION REFERENCE
TIMID
TIMINT
Function
■ Function
The TIMINT function changes an ID-type timer number to an an
integer-type timer number.
■ Format
TIMINT ( ID-number )
■ Example of Use
VAR = TIMINT (ID@)
■ Description
• ID-number is the ID-type timer number to be changed to to an
integer-type timer number.
■ Related Item
TIMID, OPENTIM
■ Example of Program
evnt
.....
id@=opentim()
no = TIMINT (id@)
chktim ( no )
....
end evnt
4-249
TIMINT
ADDCYC2
VAL/VAL2
Function
■ Function
The VAL/VAL2 function converts
character-string to a numeric value.
■ Format
VAL (character-string)
VAL2 (character-string)
■ Example of Use
A = VAL (“123”)
A = VAL2 (“123.45”)
■ Description
• When the specified character string begins with a character other than
+, -, 0 to 9, E and ., the VAL/VAL2 function returns 0.
• If the specified character string contains an unconvertible character,
the VAL/VAL2 function converts the characters before it.
• When the VAL function is used to convert the number specified in
character-string to a numeric value, the result becomes real type.
• When the VAL2 function is used to convert the number specified in
character-string to a numeric value, the result becomes integer type.
■ Related Item
STR$
■ Example of Program
conf
var = VAL ( “234”)
numdsp ..NUM000 , var
end conf
4-250
CHAPTER 4 INSTRUCTION REFERENCE
the
number
specified
in
WRITESIO/WRITESIOB
WHILE ... WEND
Statement
■ Function
The instructions between the WHILE and WEND statements are
executed while the specified conditional expression is true (satisfactory).
■ Format
WHILE conditional-expression
......
WEND
■ Example of Use
WHILE
....
WEND
■ Description
• When the specified conditional expression is true, the instructions
between the WHILE and WEND statements are executed. When it
becomes false, the instructions following the WEND statement are
executed.
■ Related Item
IF ... THEN ... ELSE
X>0
■ Example of Program
conf
static var(10)
WHILE i% < 10
var(i%) = i% * 5
WEND
end conf
4-251
WHILE ... WEND
WRITESIO/WRITESIOB
Statement
■ Function
The WRITESIO and WRITESIOB statements write transmission data to
a non-procedual communication transmission buffer.
■ Format
WRITESIO port-number, variable-name
WRITESIOB port-number, number-of bytes, variable-name
■ Example of Use
WRITESIO 2 , moji$
WRITESIOB 2 , 20 , moji$
■ Description
• The WRITESIO statement writes transmission data to a
non-procedual communication transmission buffer (serial port) in the
text mode. The WRITESIOB statement writes transmission data to
the same buffer (serial port) in the binary mode.
• port-number specifies the channel (CH1 to CH3) to which
transmission data is to be written with a numeric value from 1 to 3.
• Of the transmission data written to the variable specified by
variable-name, number-of-bytes specifies the number of bytes to be
transmitted (valid when the binary mode is used).
• variable-name specifies the name of the variable to which
transmission data is written.
• In the text mode, the written data is transmitted till the code (0h)
indicating the end of the character string is detected. (That is, data
from 1 to 0FFh can be transmitted. No terminator code is
automatically inserted into the end of data.)
• In the binary mode, all data (0 to 0FFh) can be transmitted.
• The port to which transmission data is to be written must be opened
by the OPENSIO statement in advance.
■ Related Item
OPENSIO, CLOSESIO, WRITESIO, WRITWSIOB, SETSIO
■ Example of Program
conf
global buf$ * 200
opensio 2 , 1 , buf$
setsio 2 , &HD
end conf
evnt
sendbuf$ = ‘‘ABCDEFG’’
WRITESIO 2 , sendbuf$
closesio 2
end evnt
4-252
CHAPTER 4 INSTRUCTION REFERENCE
WRITESIO/WRITESIOB
4-253