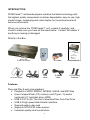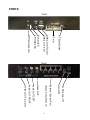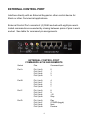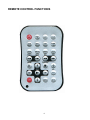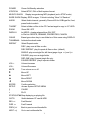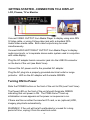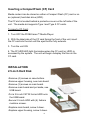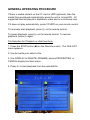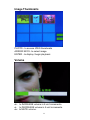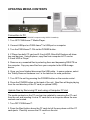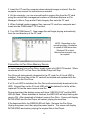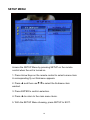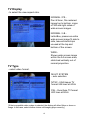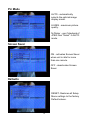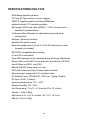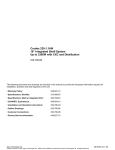
1
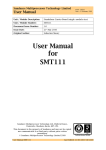
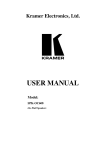
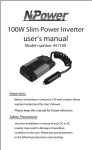
Pro DVX-F100
Solid State Digital Player
©2006 GeoData Systems Management Inc.
All Right Reserved.
1
SAFETY PRECAUTIONS
Damage
Never use the unit if it is damaged in any way.
Weather
It is advisable to unplug the unit during an
electrical storm.
Moisture
Do not allow the unit to be exposed to rain,
moisture, or dust. If any liquid is spilt into the unit
it can cause serious damage. If any liquid is
spelled into the unit, unplug it immediately and
contact the dealer.
Interference
Do not place the unit on or near appliances which
may cause electromagnetic interference (unit or
Hi-Fi speakers). Such may adversely affect the
unit and cause a distorted picture or sound.
Temperature
Avoid extremes of temperature, either hot or cold,
place the unit well away from heat sources such
as radiators or gas/electric fires.
Ventilation
The unit must be well ventilated. Do not cover the
unit or position it in a small confined space. It is
recommended that at least a 10cm gap remain
around the unit during operation.
Covers
Do not remove any fixed covers as this may
expose persons to dangerous voltages.
Power source
Use only the power cord and adapter that is
supplied with the unit. Use of power sources not
recommended for this unit may lead to
overheating, electrical shock, and/or other
hazards.
2
INTRODUCTION
PIXELframe™ multimedia players combine the latest technology with
the highest quality components to deliver dependable, easy to use, high
impact image, messaging and video display for the professional and
home environments.
When you receive the PIXELframe™ unit, unpack it carefully, and
check to make sure you have all the items below. Contact the retailer if
anything is missing or damaged.
What’s in the Box:
DVX-F100
PIXELframe player
AC power supply
AC cord
Remote
Control
USB
cable
A/Vcable
S-video
cable
User’s Manual
(2) mounting
brackets
Features
Plug-and-Play & auto loop playback
• Playback of JPEG, MPEG1, MPEG2, WAVE, and MP3 files
• Uses CompactFlash (CF) memory card (Type I / II) and/or
(optional) 2.5” hard disk drive (HDD)
• USB 2.0 OTG (On-The-Go) to download files from Pen Drive
• USB 2.0 high speed data transfer interface
• Supports add-on key-pad
• Supports NTSC/PAL video system
• Industrial quality steel construction
3
PORTS
Front
CF Eject Button
12vDC power IN
ON / OFF
External Control Port
(keypad interface RJ45 x4)
Video OUT
Audio OUT LEFT
Audio OUT RIGHT
S-Video OUT (mini-DIN)
4
CF slot
USB port OTG (out)
USB port 2.0 (in)
Power LED
CF/HDD LED
IR Remote sensor
Rear
EXTERNAL CONTROL PORT
Interface directly with an External Keypad or other control device for
Kiosk or other Commercial applications.
External Control Port consists of (4) RJ45 sockets with eight pins each.
Listed commands are executed by closing between pairs of pins in each
socket. See table for command pin assignments.
EXTERNAL CONTROL PORT
COMMANDS & PIN ASSIGNMENTS
Socket
Pins
Command Input
Port A
Pin1 / pin3:
Pin5 / pin7:
Pin2 / pin4:
Pin6 / pin8:
0
1
2
3
Port B
Pin1 / pin3:
Pin5 / pin7:
Pin2 / pin4:
Pin6 / pin8:
4
5
6
7
Port C
Pin1 / pin3:
Pin5 / pin7:
Pin2 / pin4:
Pin6 / pin8:
8
9
+10
Stop
Port D
Pin1 / pin3:
Pin5 / pin7:
Pin2 / pin4:
Pin6 / pin8:
Play
CF/HDD (toggle)
Next
Previous
5
REMOTE CONTROL FUNCTIONS
6
POWER
Power On/Standby selection
NTSC/PAL
Select NTSC, PAL or Multi-system format.
MUSIC S.SHOW
Display images during MP3 playback (set in STOP mode)
SLIDE SHOW Display JPEG images, 13 kinds including “None” & “Random”
AUDIO
Select Audio channel; generally Channel 80 for VOB type file; if not,
press Audio to switch
TARGET
Select a folder or files in the CF Card as target to copy to 2.5” HDD.
ZOOM
Zoom ON / OFF
DISPLAY
for MPEG: chapter elapsed time ON / OFF
in File List: DELETE, RENAME, PROPERTIES, CANCEL
CLEAR
Erase typos when key in new folder’s or file’s name using DISPLAY
THUMBNAIL Activate thumbnail mode
REPEAT
Select Repeat mode:
DISC -play once all files on disc
DISC REPEAT -play & repeat all files on disc (default)
SINGLE -play one single file, still frame jpegs chg w >>| and |<<
FOLDER -play once a single folder
REP-ONE -play & repeat single file only
FOLDER REPEAT -play & repeat a folder
VOL +
Volume Increase
VOL -
Volume Decrease
MUTE
Turn volume on or off
é
Move UP
ç
Move LEFT
è
Move RIGHT
ê
Move DOWN
ENTER
Confirm selection
SETUP
Access System SETUP MENU
||
PAUSE
>
PLAY
STOP/QUIT n Stop displaying or playing file
GOTO
Switch between CF card & HDD
REV <<
Fast Rewind
FWD >>
Fast Forward
PREV |<<
Back to previous multimedia file
NEXT >>|
Go to next multimedia file
7
GETTING STARTED - CONNECTION TO A DISPLAY
LCD, Plasma, TV or Monitor
Connect VIDEO OUTPUT from Media Player to display using mini-DIN
S-Video cable, or using Yellow video jack with a standard RCA
Audio/Video media cable. Both video outputs may be used
simultaneously.
Connect AUDIO LEFT/RIGHT OUTPUT from Media Player to display
audio input ports, or to separate stereo audio system used in conjuction
with video display.
Plug the AC adapter barrel connector jack into the LINE IN connector
on the back of the unit (see Back View).
Connect the AC power cord to the provided AC adapter.
Plug the AC plug into a properly grounded electrical outlet or surge
protector. LED on the AC adapter will illuminate GREEN.
Turning ON the Power
Slide the POWER button on the front of the unit to ON (see Front View).
The Power LED on the front of the unit should illuminate GREEN
indicating that unit power is ON. The PIXELframe™ boot-up
initialisation screen appears as the power-on sequence is run.
If there are files on either the inserted CF card, or an (optional) HDD,
imagery play starts automatically.
WARNING! If the unit will be left unattended or unused for a long
period of time, unplug it from the electrical outlet.
8
Inserting a CompactFlash (CF) Card
Media content can be stored on either a Compact Flash (CF) card or on
an (optional) hard disk drive (HDD).
The CF slot is located behind a protective cover on the left side of the
unit. The media slot supports Type I and Type II CF cards.
To insert a CF Card:
1. Turn OFF the PIXELframe™ Media Player.
2. With the label side of the CF card facing the front of the unit, insert
the CF card into the slot until the eject button fully extends.
3. Turn the unit ON.
4. The CF/HDD LED light illuminates when the CF card (or HDD) is
accessed by the system. The unit will begin Autoplay the files on the
CF card.
INSTALLATION
2.5-inch Hard Disk
-Remove (4) screws on case bottom.
-Remove upper housing, see main board.
-Remove (3) screws on main board.
-Remove main board and put aside, see
USB board.
-Put a 2.5-inch FAT32 format HDD onto
the USB board.
-Secure 2.5-inch HDD with (4) 3x6mm
machine screws.
-Replace main board, screw it down.
-Replace upper housing, screw it down.
9
GENERAL OPERATING PROCEDURE
If there is media content on the CF card or HDD (optional), then the
media files are played automatically when the unit is turned ON. All
supported files are played in alphabetic order and in a continous loop.
If it does not play automatically, press CF/HDD on your remote control.
To manually start playback, press ||> on the remote control.
To pause playback, press ||> on the remote control. To resume
playback, press ||> again.
File Selection for Playback or other functions:
1. Press the STOP button (n) on the Remote control. The FILE LIST
menu appears.
2. Use Arrow Keys to select a file.
3. Use DISPLAY to DELETE, RENAME, access PROPERTIES, or
CANCEL display functions menu.
4. Press ll> to start playback from the selected file.
10
Image Thumbnails
PHOTO - to access JPEG thumbnails
ARROW KEYS -to select image
ENTER - to display / begin playback
Volume
X + to INCREASE volume in 5 unit increments.
X - to DECREASE volume in 5 unit increments.
X x to MUTE volume.
11
UPDATING MEDIA CONTENTS
Connection to PC
(MicroSoft Windows Me/NT/2000/XP computer using USB 2.0 interface).
1. Turn OFF PIXELframe™ Media Player.
2. Connect USB port on PIXELframe™ to USB port on computer.
3. Turn the PIXELframe™ ON via the POWER button.
4. If Player has both CF card and 2.5-inch HDD, MircoSoft Explorer will show
two new devices. Using Explorer, copy files from computer to CF card or
2.5-inch HDD in Player.
5. Remove any unwanted files by selecting them and depressing DELETE on
the computer. Copy any new files from your computer to the USB storage
device.
6. Once you have finished disconnect the USB cable. In some systems, select
the “Safely Remove Hardware icon” in the task bar for extra protection.
7. Turn OFF the unit by pressing the POWER button on the remote control.
8. Press the POWER button on the back of the unit. New files will begin playing
from the root directory of the CF card (or optional HDD).
Update files by Removing CF and using a Computer CF slot
The media contents on the CF card can be updated by removing the CF card
from the unit and inserting it into a CF card slot on a computer where the new
contents are located.
1. Turn OFF PIXELframe™.
2. Press the Eject button above the CF card slot all the way down until the CF
card ejects. Carefully remove the CF card from the slot.
12
3. Insert the CF card the computer where desired imagery is stored. See the
computer user manual for instructions as needed.
4. On the computer, you can now add and/or remove files from the CF card
using the normal files management routines of Windows Explorer or File
Manager to Move, Copy and/or Paste imagery files onto the CF card.
5. When finished loading imagery files, remove CF card from computer and
insert into the PIXELframe™ CF card slot.
6. Turn ON PIXELframe™. New image files will begin playing automatically
from the root directory of the CF card.
NOTE: Depending on the
operating system, installation
or update of USB driver from
Windows CD or latest
Microsoft service pack may
be required.
Connection to Pen Drive Memory Device
To input imagery from a Pen Drive, simply insert into USB OTG socket. When
connected to a PC or Pen Drive, the Media Player will Stop.
Pen Drive will automatically download to the CF card if no 2.5-inch HDD is
installed. Previous files on the CF card will be deleted and replaced with the
new files from the Pen Drive.
If a 2.5-inch HDD is installed, the Pen Drive will automatically download to the
HDD. Original files on the 2.5-inch HDD will not be deleted, but a file will be
replaced if it has the same name a new file.
During download, the display screen will show “USB PLUG IN” and the RED
LED will flash. When download is finished, the RED LED will stop flashing but
remain ON. After download is finished, remove Pen Drive. Screen will display
INITIALIZING and the the Player will restart, playing the new files.
If file download fails, the GREEN LED will flash. Remove the Pen Drive.
Unplug the power cord, then plug the power back in. The screen will display
INITIALIZING and restart, playing the original files in the Player.
13
SETUP MENU
Access the SETUP Menu by pressing SETUP on the remote
control when the unit is turned on.
1. Press Arrow Keys on the remote control to select a menu item.
A corresponding fly out Submenu appears.
2. Press è and then use éê to select the Submenu item
wanted.
3. Press ENTER to confirm selection.
4. Press ç to return to the main menu items.
5. With the SETUP Menu showing, press SETUP to EXIT.
14
TV Display
- to select the view aspect ratio.
NORMAL / PS Pan & Scan, fits centered
image top to bottom, crops
off left and right sides of
wide screen images.
NORMAL / LB LetterBox, preserves entire
wide screen image fit side to
side, leaves blank strips
unused at the top and
bottom of the screen.
WIDE Shows wide screen image
within the full screen area,
stretched vertically out of
normal proportion.
TV Type
- select video format.
MULTI SYSTEM
- auto selection
NTSC - USA/Japan TV
format 525 lines at 60Hz
PAL - Euro/Asia TV format
600 lines at 50Hz
[ If the incompatible video system is selected, the display will either flicker or show no
image. In this case, select another choice until imagery plays correctly. ]
15
Pic Mode
AUTO - automatically
selects the optimal image
display mode.
HI-RES - maximum picture
quality.
N-Flicker - use if playback of
JPEG files “flicker” in AUTO
mode.
Screen Saver
ON - activates Screen Saver
when unit is idle for more
than one minute.
OFF - deactivates Screen
Saver.
Defaults
RESET- Restores all Setup
Menu settings to the factory
Default values.
16
SPECIFICATIONS DVX-F100
ROM based operating system
CF Type I/II flash memory card for imagery
USB 2.0 TypeB computer interface (480Mb/sec)
optional internal 2.5" hard disk available
Still image (JPEG) and video (MPEG-1, 2 & 4) content can be
combined in presentations
On Screen Menu Displays for video/audio setup and show
configuration
Autoplay, Autoloop functions
Handheld IR remote control
External keypad control via set of (4) RJ-45 connectors on rear
(keypad not included)
NTSC/PAL compatible, auto sensing
4:3 and 16:9 compatible
Plays MP3 background soundtracks during still image slideshows
Stereo Audio out for MP3 music and video soundtrack (L/R RCA)
dual S-Video out (RCA, mini-DIN)
Manual ON/OFF power switch on rear
RCA audio/video and 9-pin S-video cables included
External power supply with U.S.-standard cable
AC Adapter Power 100-240vAC, 50/60 Hz, 1.2amp, 80watts
DC input 12vDC, 3.0amps
Operating temperature: 0°C ~ 60°C
Relative humidity: 5% ~ 95%
Unit Dimensions: 7.9 x 5.1 x 1.6 inches (20 x 13 x 4mm)
Weight: 1.9 lbs (0.9Kg)
Shp.carton 9.5 x 7.8 x 5.6 inches (24.1 19.7 14.2 cm)
Shp.wt. 3.5 lbs (1.6Kg)
20