1
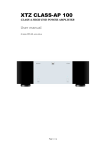
XTZ SUB AMP1
Subwoofer Amplifier
User manual
© 2009 XTZ AB , www.xtz.se
Table of contents
Page
Contents
3
About XTZ
4
Technical presentation
5
Preparations
5
Practice of sound / Installation and placement tips
6
Mounting and connection tips
8
Functional reference
9
Technical specifications
11
Service & Support
12
- 2-
Contents
Contents
XTZ SUB AMP1 offers some possibilities, so in
order to utilize your new loudspeaker in the best
way; you should carefully read through this manual
before using the loudspeaker for the first time. It
may take some patience in order to make the
loudspeaker sound optimal.
If you have no previous experience of these kinds of
installations, or if you have any questions, feel free
to contact our free of charge support and we will
help you. (See further under the heading of
Support on the last page of this manual).
- 3-
About XTZ
Philosophy
Our reference and starting point is to recreate a
natural sound, but also in respect to the fact that
acoustics always is a matter of taste.
XTZ Goals
Our main goal is to provide the best value
for money.
Our concept:
- Cut down the numbers of middlemen
- Put more money on product quality
and less on advertising.
- Manufacture cost-effective in large volume
- Provide perfect technical solutions
Contact us
Website: www.xtz.se
E-mail: [email protected]
- 4-
Technical presentation
SUB AMP 1 works just as good for those who want
to power the passive subwoofers (XTZ 99 W10.17P)
or any other subwoofers. SUB AMP1 can be perfect
as a amplifier for bi-amping for full range speakers
By using one or two subwoofers (with correct
placement), it is often easier to get a better
frequency response.
Amplifier
The XTZ Sub Amp 1 is equipped with a powerful
300 watt amplifier with a large heat sink for
effective cooling. For professional use (studio, PA
etc), it is equipped with a balanced input. The
terminal connectors are gold plated and very solid.
To achieve a high power and a long durability, the
amplifier use a large toroidal transformer, large
electrolytic capacitors and Toshiba bipolar
transistors in the output stage.
The active amplifier also provides a variety of
adjustment options, not possible to obtain using a
passive filter. These include phase, frequency, high
pass filtering, volume etc.
By using these settings, the main amplifier is
relieved and only needs to drive the midrange and
treble. This usually results in lower distortion and
the risk of damages on it is lowered.
Preparations
Unpacking
Carefully unpack the speaker, and pay attention so
you don't break anything. If possible, save the
packing box for future transportations. If there
should be damage on the loudspeaker, please
contact your retailer.
Check that the mains voltage marking on the back
panel matches your local mains voltage.
If the product is cold, wait to connect the power
cable till it reaches room temperature. If you don’t
do this you can cause damage of the product.
Accessories
Main power cable
User manual
Logotype
Robber feet
- 5-
Practice of sound / Installation and placement tips
This chapter contains common information on
loudspeaker placement and installation.
This is general rules, so there are exceptions of
some rules
In which room do
you achieve the best
sound?
No matter how good the equipment is, in the wrong
listening environment it will inevitably sound bad.
There are some basic rules concerning a proper
loudspeaker installation:
Reflections
Carpets, curtains and soft furniture absorb mid
range and high frequency sound, and this is
preferable. Big empty area, on the contrary, reflects
it and produces hard reflections that may lead to
blurry dialogue. Apart from colouring the sound,
also the perspective of the sound will deteriorate.
Reflections in the room can roughly be compared to
the reflections that yield ghost pictures on a TV
screen.
Amplification of bass A loudspeaker that is placed near a wall, ceiling or
floor will amplify lower frequencies in a sometimes
frequencies
not desirable way (since it may lead to an indistinct
sound recreation). This amplification becomes even
more obvious if the loudspeaker is placed near a
corner. Thus, for a sound as clear as possible, the
loudspeaker should be placed at least 30 cm (about
12 inch) away from the wall
Some constructions are made to be placed closed to
a wall.
Room dimensions
Quadratic rooms or rooms where the length is
exactly twice as long as the width should be
avoided, since they may create unwanted
resonance.
Furniture
Be aware that furniture may vibrate and thus create
bad sound at loud bass.
Front speakers
To get the best result the front speakers should be
placed symmetrical in front of the listener. The
distance between the front speakers should be
around 80% of the distance to the listener. In other
words, the recommended angle between the front
speakers should be 45°
Angling?
Either you can have the loudspeakers angled in
towards the listener or you can have them directed
straight ahead. Some loudspeakers sounds better
when angled, but this may also depend on
reflections from the side walls. By angling the
loudspeakers inwards, you decrease unwanted
reflections and thus you get a better stereo
perspective.
- 6-
Placement of the
subwoofer
The placement of the subwoofer in the room
dramatically affects the overall frequency response
and sound level of the system. At low frequencies
the effect of the room is strong. Even a slight
change in the subwoofer's location can make a
significant difference in the frequency balance.
Patience and experimentation is needed to find the
optimal placement. The placement affects the
phase difference between the main loudspeakers
and the subwoofer.
Subwoofers often get a more linear frequency
response placed in a corner.
The correct height
If the loudspeakers are small, they should be placed
on stands or tilted so that they are on the same
level as the ears.
Cables
Try to keep them as short as possible. By its
electrical parameters, a long conductor will have a
bigger influence on the sound than a short one.
The subwoofer cable should be shielded, to avoid
noise.
Make sure that all connections are clean and not
oxidised. All connections should be mechanically
stable, both power, signal and loudspeaker cables.
Signal cables should be separated from other
cables.
Finally
Please remember that good sound is a matter of
taste, so you have to experiment to obtain your
favourite one. We wish you best of luck!
- 7-
Mounting and connecting tips
Mounting
alternatives
SUM AMP1 is constructed to be placed lying down Mount the feet on the side you want to be
or standing up. Place the logotype in same direction down.
as SUB AMP1
Connect using the
correct phase
Always connect using the correct phase, from the If you by accident connect the other way,
+-pole on the amplifier to the +-pole on the there is no risk of damage. However, the
sound will not be correct, especially in the
loudspeaker and corresponding for minus (-).
lower frequencies.
Overload
With high power load under long time there is risk If you play extremely loud for a long time
there is a big risk that you destroy the
of overloading the driver and/or the amplifier.
product.
Load
We recommend that no more than 2pcs of 8 Ohms
subwoofer should be connected to SUB AMP1.
This is because the impedance should be extremely
low.
- 8-
Functional reference
XTZ SUB AMP1
Rear panel
To obtain the optimal sound, you should
let the subwoofer be in ON mode. The
amplifier will then immediately have the
right working temperature from the
beginning. Turn off the subwoofer if it is
not in use for along period.
Main switch
(ON, OFF)
Power switch. Press down "I" to power on and the
indicator will be lighted. Press "0" to power off.
Make sure it is set OFF when connecting /
disconnecting cables. There is an automatic switch
on the subwoofer. When it has signal in, it will
switch on and consequently switch to standby (this
is indicated by the LED, which turns blue when
standby is present) when no signal is present (after
a certain time period).Therefore, you can have it
ON constantly.
VOLUME
Controls volume level of subwoofer. Be gentle on
the volume knob; please remember that certain
sound signals may containa lot of energy.
FREQUENCY
Variable control from 40Hz to 250Hz provides (3dB) optimum setting of subwoofer crossover
frequency to match crossover frequency of Home
Theatre components.
EQ 1
Increases 7dB @ 25Hz
Excessive use of EQ can lead to damage of the
subwoofer, when used at high volumes
EQ 2
Increases 7dB @ 50Hz
Excessive use of EQ can lead to damage of the
subwoofer, when used at high volumes
EQ 2 and High Pass filter should not be used
at same time.
- 9-
PHASE
0-180 phase adjustment
HIGH PASS
Switch ON and the high pass are available. Switch
OFF and the high pass are unavailable.
BALANCE
Balanced input
LINE IN
Line-level inputs to subwoofer. Use these RCA
jacks to connect audio signals from line-level
outputs on a receiver, preamplifier, television set or
surround sound decoder. If only a mono (single)
subwoofer output is provided, connect it to either
of input jack.
SPEAKER IN
Stereo high-level inputs to subwoofer. Use these
terminals when line-level connections are not
available from receiver, preamplifier or surround
sound decoder.
AC INPUT
Connect to regular 230 V / 50 Hz.
OUT
(SPEAKER OUT)
High Level OUTPUT to speaker/passive subwoofer.
Stereo high-level inputs to subwoofer. Use these
terminals when line-level connections are not
available from receiver, preamplifier or surround
sound decoder.
- 10-
The high pass crossover removes the
deepest part of the bass spectra. This is
helpful in many rooms, since they heavily
amplify the deep bass tones, which may
lead to uncontrolled bass.
Remark: By connecting both lines in
inputs to the same signal, you increase the
level by 3 dB. Certain types of simpler low
level audio cables may create a noise in
the subwoofer. We recommend double
shielded low level cables to be used.
Technical specifications
Construction type
Amplifier Class AB
Dimensions
376 x 396 x 225 mm (HxBxD)
Weight
16 kg/pcs
Frequency response
10-250 Hz
Connections
Gold plated RCA
XLR Balanced input
Speaker input: Banana plug/Pole screw
Speaker output: Banana plug/Pole screw
Power amplifier
300 W RMS in 4 ohm
400 W RMS in 2 ohm
Connections and
settings
•
•
•
•
•
•
•
Stereo low level input, balanced input and
high level (speaker) input.
Auto on
Phase selector 0 to 180 degrees.
Boundary frequency control (40-250Hz)
Volume control
High pass switch
Heavy duty screw terminal connectors
- 11-
Feet add 22mm
Service & support
Service
If you need service contact your local dealer.
You are always welcome to contact us if you have
problems
with
product
by
e-mail:
[email protected]
Webpage: www.xtz.se
Support
Please contact our “free-of-charge” support if you
need installation advice, or if any problems occur
during the installation.
Contact us by e-mail [email protected] and include
your phone number if you require help, and we will
ring you back.
- 12-
ALWAYS pack the product / part very
carefully. Unfortunately damages during
transportation are very common. If the
package is weak, the transporting
company does not compensate damages.
Always enclose a copy of the receipt and a
description of the defect.