1
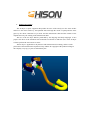
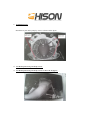
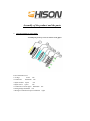
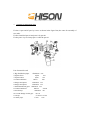
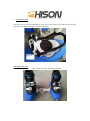
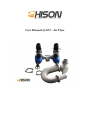
User Manual of JF1 - Jet Flyer
1. Product descriptions
2. Compliance with safety regulations and codes
3. PWC(boats) type
4. Connections of boats bodies
5. Where to practice?
6. Post-sales service
7. Assembly and fitting of the Jet Flyer
1. Product descriptions
The Jet Flyer is sports equipment that pushes the users of the Jet Flyer to the water surface
and leaves the water surface by the hydraulic thrust through the nozzle of pump and the water
pipes by the direct connection of jet motor and the transmission shaft and the rotation of the
impeller driven by the turning of the transmission shaft.
The use of the Jet Flyer shall be performed by the language and body languages of two
people. The driver of the motorboat will control the accelerator to make the users of the Jet Flyer
to better perform the movements on water.
The Jet Flyer is applicable to all pleasures and relaxation and for renting, and it is under
protection of the international cooperation treaty and the all copyright of the product belongs to
the company. Any copy or parts is forbidden by law.
2. Compliance with safety regulations and codes
Safety and application rules
The Jet Flyer is extreme sport equipment, and people under 16 are not suggested to use.
Besides, there is no weight limit for this product.
It is forbidden to use the Jet Flyer and it is dangerous when the wind speed exceeds 60km/h
and the waves are higher than 1m.
It is suggested for the first time users to practice for about one hour in the professional
training center by a teacher or coach to understand the basic concepts of this product and pay
attention to the safety precautions.
No use after drinking or not feeling well.
It is forbidden to use in the swimming areas of the sea swimming pool, work zone of the
fishers and water areas where boats in and out frequently to avoid influencing the safety of others
and the user himself.
3. Safety equipment
Life jacket and CE certificate
one/person
The users must wear the life jackets
Helmets for fancy water skating
one
Professional swimming suits
one
To protect the user himself from harm better during using.
4. Important notes
The Jet Flyer for rent, it is forbidden to use the Jet Flyer by the user alone and monitoring is
required.
The using area of the Jet Flyer shall be at least 4m deep and the water area shall be clear
enough to open the eyes under water. It is strongly recommend not try out the taking off and
landing of the Jet Flyer in the place where there is any risk nearby, such as rocks, wharf, beach and
the boats etc.
First of all, the Jet Flyer must be used in water and do not exceed your limit and avoid to
practice over your limit to minimize the risk resulting from out of control. And the Jet Flyer is a
high performance sports product not a toy.
Do not imitate the dangerous backward somersault on TV and from the network because they
are professionals to avoid the risks of serious injuries.
In order to avoid the collision of the boats and cause injuries the Jet Flyer shall not be too close to
the boat during flying. Do not turn the boats 360°to avoid the damage at connections of belts
causing the disconnections of water pipes and connectors and cause hazard.
If you are the green hand, the driver of the boats shall not drive the boats over 4500
REV/MIN. if the user of the Jet Flyer fails to leave the water surface, it is important not to speed
up, because the user may be thrown into the air and lose the center of gravity of the location by
feet. If the user fails to fly up indicating that his feet is not located correctly.
If it is the first time for the user to use the Jet Flyer, he is required to learn how the
positioning for the first step for at least 20 minutes. Move onto the next step after 20 min of each
necessary step.
The user of the Jet Flyer and the boat driver shall confirm that the user of the Jet Flyer
possesses enough stability and can not fall in front of the new gear height at his back.
The user of the Jet Flyer must control continuously and judge any object such as the submerged
rock and drogue nearby.
When falling into the water, the user of the Jet Flyer must check your distance with the boat
frequently, because inertia may cause collision even when the boat is in low speed.
When the user of the Jet Flyer falls in to the water, the driver of the boat must loosen the
accelerator immediately and shutdown the motor.
During using the Jet Flyer, the temperature in summer must be comfortable for man to play in
the water.
The user of the Jet Flyer must be the person who is not afraid of water.
If the user falls into the water at back, the user falls into 2m deep under the water. And 10s
suffocation must be estimated during falling and emerging in the water.
At any time the user of the Jet Flyer must be prepared for possible occurrences and try to fall
into the water from front, because the thrust of the nozzles is directly downwards which will you
to buffer the flow in order not to sink in to the water.
5. PWC (boats) type
Boats of any type shall be approved and certified by the authority no matter in which country
the boat is used.
General power requirements: 100 horse power
Maximum power requirements: 300 horse power
Boats of each type are allowed to be available from our dealers.
6. Connections of boats bodies
Refer to the connection and installation of boats bodies for more details on the connections of
boats bodies.
7. Where to practice?
The Jet Flyer can be not only used on the lake but also in the sea area in the development
zone and the minimum depth of water must be 4m. The using of Jet Flyer is absolutely forbidden
in the confined space such as swimming pool etc.
Do not startup the motorboat or use the Jet Flyer in the sandy deep water lower than 1m
which may possibly cause the damage of the bearing of the Jet Flyer. Locate the bearing to avoid
the damage of the equipment before further use.
Warnings: the user shall be responsible to make sure there is no sand in the deep water for the
selected water area.
8. Post-sales service
In order to ensure enough safety, we suggest that replace the parts such as plastic nylon
sleeves of the Jet Flyer for every 2 years.
Replace the outlet elbow for protection of pump periodically, as it is a quick-wear part. The
Jet Flyer shall be flushed by clean water after each use.
When the pipes are full of water, do not pull it out directly onto the ground.
The water pipes shall be cleaned and be kept dry and be rolled during storage after using.
The Jet Flyer shall be stored in a dry environment when it is not used.
We herein remind you that the Hison company will not provide warranty if the user does not
use the Jet Flyer as per the instructions. The Jet Flyer shall be used under the original
configurations. It is forbidden and dangerous to change, remove and add the parts which are not
supplied by Hison.
The damages of the equipment by falling caused by any extremely violence will not be in the
warranty scope.
9. Assembly and fitting of the Jet Flyer
Refer to the assembly of the product for more information.
Connections and assembly of boats
Schematic diagram
List of materials used
1 Fixing connection plate
aluminum one
2 Hexagon socket head cap screw M8*40
four
3 Outer hexagon head cap screw M8*60
four fitted with four M8 locking nuts
4 Outlet elbow of pump
aluminum one
5 Connectors of outlet elbow of pump aluminum one
6 Hexagon socket head cap screw M8*25 four
1. Installation steps:
Install the 01 part on the pump by screws as shown in the figure:
2. Fix the 05 part on the part 04 by screws .
3. Fix the 04 part on the part 01 by screws as shown in the figure:
4. Bind up one end of the water pipe with two hoops onto the 05 part as shown in the figure:
5. Bind the water pipes with the ropes at the front of boat body as shown in the figure:
Adjust the adaptation of the water pipes again during the first use to make sure that the user of
the Jet Flyer is in one line.
Assembly of the product and the parts
1. Overall assembly of water intake
Assembly the parts by screws as shown in the figure.
List of materials used
1 O-rings
¢105 one
2 Connectors
aluminum one
3 Nylon washer nylon
one
4 Nylon sleeve nylon
one
5 Connectors of water pipes aluminum one
6 Fixing flange aluminum one
7 Hexagon socket head cap screw M6*20 eight
2. Assembly of distribution pipes
Fix the 01 part and 07 part by screws as shown in the figure first (the same for assembly of
two ends).
Fix the assembled part 10 and part 01 by part 09.
Fix the part 12 by two hoops part 11 onto the part 10.
List of materials used
1 Big distribution pipes
aluminum one
2 Nylon sleeve
nylon
two
3 Nylon washer
nylon
two
4 Countersunk bolts
M*50
four
5 Flange fixed plates
aluminum two
6 Flange fixed plates
aluminum two
7 Small distribution pipes aluminum two
8 Countersunk head
M6*25
sixteen
9 Fixed hoops
aluminum one
10 Overall fittings of inlet pipe one set
11 Hoops
¢104-¢112 four
12 Water pipes
¢100
15m
3. Installations of distribution pipes and pontoon
Fix part 06 and part 12 by screws.
Fix part 11 onto the part 12 by screws and then fix part 02 and 03 onto part 12 by screws.
Fix the part 07 onto part 06 and then fix part 10 onto the part 07 by screws (the same for the
assembly of the four).
List of materials used
1 Countersunk head screws
M6*20
fourteen
2 Fixture shoe boards
aluminum plates two
3 Upper pontoon
two
4 Round head screw
M6*25
five
5 Hexagon socket head cap screw M6*20
sixteen
6 Outlet elbow
aluminum
four
7 Outlet connector
aluminum
four
8 Hexagon socket head cap screw M5*10
eight
9 Fixing frame
aluminum
four
10 Hexagon socket head cap screw M6*15
sixteen
11 Lower pontoon
two
12 Small distribution
aluminum
two
4. Assembly of shoes
The shoes are fixed on the baseboards by four screws (the same for the right and left) and pay
attention to the adjustment angle as shown in the figure.
List of materials used
Round head screw M6*15 eight fitted with eight M6 enlarged gaskets