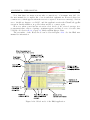
1
Charles University in Prague Faculty of Mathematics and Physics BACHELOR THESIS Marcel Krčah Evolution of Springy Organisms Institution: Department of Software and Computer Science Education Supervisor: RNDr. František Mráz, CSc. Study branch: Theoretical informatics 2008 I would like to record sincere gratitude to my supervisor, RNDr. František Mráz, CSc., for advice and guidance he gave me throughout work on this thesis. I also gratefully acknowledge Mgr. Peter Krčah for his patience and invaluable help. I hereby certify that I wrote the thesis myself, using only the referenced sources. I give consent with lending the thesis. Prague, August 8, 2008 Marcel Krčah 2 Contents Introduction 6 1 Review of existing projects 1.1 SodaRace: Adventures in Artificial Life . . . . . . . . . . . . . . . . . . . . 1.2 Springs World 3d . . . . . . . . . . . . . . . . . . . . . . . . . . . . . . . . 8 8 12 2 Specification 2.1 Main concepts of springy organisms . . . . . . . . . . . . . . . . . . . . . . 2.2 Functional requirements . . . . . . . . . . . . . . . . . . . . . . . . . . . . 13 13 14 3 Project design 3.1 Physics engine . . . . . . . . . . . 3.2 Springy organism . . . . . . . . . 3.3 Editor . . . . . . . . . . . . . . . 3.4 Evolution and genetic algorithms . . . . 17 17 18 22 24 . . . . . 34 34 36 44 50 51 5 Future works 5.1 Improving performance . . . . . . . . . . . . . . . . . . . . . . . . . . . . . 5.2 Possible extensions . . . . . . . . . . . . . . . . . . . . . . . . . . . . . . . 53 53 54 6 Conclusion 55 . . . . 4 Evolutionary experiments 4.1 Introduction . . . . . . . . . . . . . 4.2 Evolving Pyramids . . . . . . . . . 4.3 Evolving Snake . . . . . . . . . . . 4.4 Evolving Round Ladder and Horse 4.5 Discussion on results . . . . . . . . . . . . . . . . . A User Manual A.1 Starting the application, main modes A.2 Creating the initial population . . . . A.3 Evolution settings . . . . . . . . . . . A.4 Computational layer . . . . . . . . . 3 . . . . . . . . . . . . . . . . . . . . . . . . . . . . . . . . . . . . . . . . . . . . . . . . . . . . . . . . . . . . . . . . . . . . . . . . . . . . . . . . . . . . . . . . . . . . . . . . . . . . . . . . . . . . . . . . . . . . . . . . . . . . . . . . . . . . . . . . . . . . . . . . . . . . . . . . . . . . . . . . . . . . . . . . . . . . . . . . . . . . . . . . . . . . . . . . . . . . . . . . . . . . . . . . . . . . . . . . . . . . . . . . . . . . . . . . . . . . . . . . . . . . . . . . . . . . . . . . . . . . . . . . 57 57 58 68 71 CONTENTS B Developer Manual B.1 Basic concepts . . . . . . . . . . . . . . . . . . . . . . . . . . . . . . . . . . B.2 Simulator . . . . . . . . . . . . . . . . . . . . . . . . . . . . . . . . . . . . B.3 3D Editor . . . . . . . . . . . . . . . . . . . . . . . . . . . . . . . . . . . . 4 76 76 78 90 C CD-ROM 101 Bibliography 102 Název práce: Evoluce pružinových organismů Autor: Marcel Krčah Katedra (ústav): Kabinet software a výuky informatiky Vedoucı́ bakalářské práce: RNDr. František Mráz, CSc. E-mail vedoucı́ho: [email protected] Abstrakt: Pružinový organismus reprezentuje velmi zjednodušený model pohybujı́cı́ se struktury, který se skládá z několik harmonicky kmitajı́cı́ch pružin. V současné době existuje několik projektů, které se zabývajı́ návrhem a simulacı́ těchto umělých modelů. K dispozici jsou rovněž nástroje, které jsou schopné automaticky najı́t vhodný řı́dı́cı́ systém pro daný pružinový organismus, ale pouze pro jeho dvourozměrnou verzi. Předložená práce poskytuje sadu nástrojů pro návrh, simulaci a optimalizaci třı́rozměrných pružinových organismů. Obsahuje interaktivnı́ editor pro vytvářenı́ těchto modelů, simulátor pro znázorněnı́ jejich chovánı́ a optimalizačnı́ nástroj, jež je založen na principu genetických algoritmů, hledajı́cı́ vhodné nastavenı́ pružin. Všechny uvedené nástroje jsou zabudované do programu s názvem ERO, který poskytuje univerzálnı́ platformu pro evolučnı́ experimenty a distribuované výpočty. Optimalizačnı́ mechanismus je předveden na experimentech, jejichž průběžná analýza vedla k výraznému zlepšenı́ jeho původnı́ho nastavenı́. Klı́čova slova: pružinový organismus, genetické algoritmy, optimalizace, ERO. Title: Evolution of springy organisms Author: Marcel Krčah Department: Department of Software and Computer Science Education Supervisor: RNDr. František Mráz, CSc. Supervisor’s e-mail address: [email protected] Abstract: A springy organism is an extremely simplified model of a moving structure consisting of springs contracting in a simple harmonic motion (SHM). Several projects are devoted to design and simulation of these artificial models. Automatic tools which search for an appropriate control system of a given springy organism are also available, but for two-dimensional versions only. The main contribution of the present work is to provide a set of tools for designing, simulating and optimizing three-dimensional springy organisms. They include an interactive editor, a run-time graphical simulator and an automatic tool based on genetic algorithms, which optimizes parameters of SHMs. The tools are integrated into a framework for evolutionary experiments and distributed computations called ERO. Optimization mechanism is tested using a set of experiments. Analysis of the experiments led to improvement of the original configuration of the mechanism. Keywords: springy organism, genetic algorithm, optimization, ERO 5 Introduction The field of evolutionary robotics is an active area of research today. Because robots in existing projects are often based on solid, non-flexible parts, their movements do not resemble movements found in nature. This thesis takes a different approach. It focuses on robots which are comprised of springy parts—structures inspired by biological muscles. A springy organism is an extremely simplified model of a moving structure consisting of several springs contracting in a simple harmonic motion. Each organism can be divided into two parts: morphology and a control system. While morphology describes structure of an organism, its control system contains parameters of SHMs. Designing morphology is usually an interesting activity involving almost no practice or deeper knowledge. However, configuration of a control system in order to create a naturally moving organism can be a very tiring and time-consuming task. Existing projects devoted to design and simulation of springy organisms approach the problem of configuration in different ways. SodaRace, a project for simulating and designing two-dimensional springy organisms, uses various optimization mechanisms like genetic algorithms or simulated annealing to find suitable parameters of SHMs. On the other hand, the Springs World 3d project (SW3d), which provides tools for modeling and simulating these structures in three dimensions, lacks any of these algorithms, so users are forced to configure their models manually. The main contribution of this work is the optimization of three-dimensional springy organisms, which is not possible with existing projects. This work also proposes a set of tools for designing, simulating and automatic configuration of these organisms. The introduced tools include an interactive 3D editor, which can be used for designing organism’s morphology and configuring its control system. Another tool contains a run-time 3D graphical simulator, which cooperates with the editor, and allows users to immediately watch behavior of their models. The proposed optimization mechanism–based on genetic algorithms–can search for control systems suitable for an appropriately designed organism. The tools are integrated into the framework for evolutionary experiments called ERO, which provides several templated genetic algorithms, distributed computations of largescale evolutions, and advanced statistics of evolution progress. The thesis also cover several evolutionary experiments performed on four testing organisms. The proposed optimization mechanism has successfully found control systems providing 6 CONTENTS 7 stable and natural movement for given organisms. The analysis of chosen genetic operators and parameters of genetic algorithm is also discussed. Structure of the thesis. The thesis is divided into six main chapters and three appendices. Chapter 1 briefly describes the SodaRace and SW3d projects. Main concepts of springy organisms and functional requirements for each of the introduced tools are covered in Chapter 2. Chapter 3 presents basic design decisions made during development together with an explanation of the genetic algorithm and operators used for optimization. Chapter 4 covers evolutionary experiments performed on four tested organisms. Chapter 5 is devoted to improvements and extensions of the current implementation. Finally, Chapter 6 summarizes achieved results. A user and a developer manual can be found in Appendix A and B, respectively. The proposed tools, together with the ERO application, movies of evolved organisms and a keymap reference for the editor, can be found in a CD attached to this thesis in Appendix C. Chapter 1 Review of existing projects There are several projects which simulate and optimize creatures based on a set of nodes with interconnecting springs. The SodaRace project, a racing contest between human and machine engineered two-dimensional springy organisms, is described in Section 1.1. Section 1.2 is devoted to Springs World 3D, which is a 3D simulator of Soda organisms. 1.1 SodaRace: Adventures in Artificial Life The SodaRace project [1, 2], known as online Olympics pitching humans again machine intelligence, is a competition between two-dimensional racers moving across various types of terrains. This section covers technical description of a Soda creature (Section 1.1.1), introduces programs for building and racing them (Section 1.1.2) and describes basic approaches to modeling and optimizing Soda racers (Section 1.1.3). 1.1.1 Organism description A Soda organism consists of a linked set of node masses and interconnecting springs in a two-dimensional plane (see Figure 1.1 for examples). To provide movement, some springs can be selected to represent muscles. A muscle is a special spring, which drives in a simple harmonic motion. More formally, if lij (t) is the length of a muscle connecting nodes i, j in time t, then 0 lij (t) = lij (1 + αij βsin(ωt + ϕij )) + (t), where 0 lij is the resting (initial) length of a muscle, αij is muscle-specific amplitude, β is global amplitude, ω is muscle contraction speed, 8 CHAPTER 1. REVIEW OF EXISTING PROJECTS 9 ϕij is a muscle phase offset and (t) is an additional element caused by a physical interaction between a muscle and other structures (springs, ground, etc). Moreover, (t) may also depend on muscle’s springiness. By combining static and appropriately parameterized muscles a user can design various kinds of organisms. Both nodes and springs are discrete, which means they have zero diameter or width. Furthermore, the Soda simulator allows two parts of an organism to intersect. (a) Daintywalker – the SodaRace mascot and the most famous Soda racer. (b) Spine – a more complicated Soda organism. Figure 1.1: Examples of Soda organisms. 1.1.2 SodaConstructor, SodaZoo and SodaRace Soda creatures can be easily designed by a program called SodaConstructor. The first version of the editor was created in BASIC by Ed Burton in 1990. Ten years later, when Burton joined the team of digital artists at Soda Creative Ltd, the project was updated to Java and officially released. The most recent version of SodaConstructor allows users to place nodes into 2D plane, make static and parameterized springs, and configure various global parameters like springiness, gravity or friction. Persistence of organisms is also provided as they can be imported and exported in a form of an XML document. Therefore, users can design their creatures in a plain text editor or with an algorithm and load them to the program. After the first official version, SodaConstructor quickly spread among the community. There have been to date almost a million various Soda creatures. The database of these organisms is called SodaZoo and is available at SodaRace website. When users create new organisms (manually with SodaConstructor or computationally with an algorithm), they can register their creatures to the SodaRace competition. The contest takes the form of races over various types of terrains. The SodaRace simulator adjudicates races and provides the timing information, which may act like fitness functions for the artificial intelligence-based organisms. CHAPTER 1. REVIEW OF EXISTING PROJECTS 1.1.3 10 Approaches to design and optimization There have been so far two basic approaches to modeling a fast Soda racer. The first strategy consists in applying an optimization algorithm (like exhaustive search, simulated annealing or genetic algorithms) on a previously designed organism. The second option is building a racer from scratch, which can be done either algorithmically or with the help of artificial intelligence. We will briefly describe both of these strategies. Exhaustive search Because finding optimal parameters for muscles is a computationally intensive task, exhaustive search becomes unusable for more complex organisms. However, the algorithm may be useful for simple organisms which comprises of several muscles. Simulated annealing and Daintywalker Pre-designed organisms can be optimized using an algorithm of simulated annealing [3]. The authors of SodaRace describe the strategy in [1]: Daintywalker was randomly modified, then raced and the new version retained if it improves performance, but we also allow non-improving modification to survive with a probability that decreases over time. The rate of this decrease is determined by the cooling schedule, a term in keeping with the thermodynamic metaphor on which this heuristic optimization algorithm is based. With some appropriate assumptions about the cooling schedule, this algorithm will converge in probability to the global optimum. This was not, however, necessary in our application; we just wanted a racer to beat the competition. An example of an optimized racer can be seen in Figure 1.2a. Genetic algorithms Burton, the author of the first SodaConstructor, was inspired by Karl Sims’s work on evolved virtual creatures [4, 5], and decided to use genetic algorithms for optimization of racer’s parameters. Initially, a population of random organisms, based on a basic template design, is created. Each organism is then raced and its fitness function is computed as time needed to reach a finish line. The fittest then bred forward with parents to the next generation. Using this method, a racer can be optimized to the required performance level. Wodka – genetic algorithms from ‘scratch’ Wodka, an Austrian AI group, uses genetic algorithms to create a racer without any prior information except the fitness function. Their algorithm generates a random set of nodes, springs and muscles forming multiple SodaRace creatures. The organisms are then loaded CHAPTER 1. REVIEW OF EXISTING PROJECTS 11 (a) Daintywalker, optimized with simulated annealing, beats the original human engineered version. (b) Building racers from ‘scratch’ using genetic algorithms. (c) A flex loop and a worm creature algorithmically designed with Amoebatic. Figure 1.2: Various strategies of Soda racers modeling and optimization. to the SodaRace simulator and raced. The quickest organisms move to the the next generation. The creatures in the first generation look like simple segmented sticks bouncing across the screen (see Figure 1.2b). However, later populations start to develop a structure and look as if they have powered flippers in the front. Amoebatic - systematic builder The ability to load organisms into SodaRace in XML format gives users an option to algorithmically design their racers. One of the most known program that systematically builds a racer according to a given template is called Amoebatic. (an amoeba is a community term for a wheel-like structure). For examples of Soda organisms created with the software see Figure 1.2c. CHAPTER 1. REVIEW OF EXISTING PROJECTS 1.2 12 Springs World 3d Another project that simulates organisms based on a set of springs is called Springs World 3d (see [6]), whose author is a mathematics and physics teacher Marcello Falco. In 2001, the author discovered the SodaRace project and started to implement his own 2D Fortran version of SodaRace, called JSIM 2D. Later, he upgraded the program into a 3D version. However, it was non-interactive, and users were forced to design their models by hand, which requires high level of mental abstraction. Therefore, he decided to create a new editor and a simulator with a three-dimensional Soda-like graphical interface called SW3d. With the new program, users can create their own models of 3D Soda organisms and save them to an online database called Fauna. Currently, the database contains almost three hundred various SW3d creatures. Example of the 3D DaintyWalker (2D version of the organism is proposed in the previous section) can be seen in Figure 1.3. Figure 1.3: 3D Dainty-walker created and simulated in the SW3d project. Because Falco was inspired directly by the SodaRace project, the control system of his organisms is based on the same principles as Soda racers’ system. Contrary to the SodaRace project, SW3d creatures can be simulated only on a flat terrain without an option to join a competition. Currently, there are no efforts to optimize SW3d creatures neither by genetic algorithms nor any other optimization tools. Chapter 2 Specification Projects like SodaRace or SW3d (described in Chapter 1) share the same kind of problem: their organisms are very hard to optimize manually to fulfill given tasks. For that reason, the Soda team uses various strategies like genetic algorithms or simulated annealing to increase speed of their two-dimensional racers. The SW3d project does not provide any optimization tool at all. The aim of this work is to simulate 3D springy organisms based on SodaRace/SW3d principles and provide an automatic tool for their optimization. A user should be able to easily design a creature and then run an optimization algorithm, which should find proper settings for its control system. Both of these requirements should be implemented in one computer program, whose specification is described in this chapter. First, we cover the main concepts of springy organisms (Section 2.1). Then we divide the program into several modules and lists basic functional requirements for each of them (Section 2.2). 2.1 Main concepts of springy organisms A springy organism represents an extremely simplified model of a moving creature (see Figure 2.1 for an example) inspired by both the SodaRace and the SW3d project. This section introduces morphology of a springy organism and describes the basics of their control system. An organism consists of several nodes, rods and muscles. A node is represented as a sphere with constant diameter and weight placed in a 3D space. Two nodes can be connected by a tube, which can be either a rod or a muscle. A rod is a rigid tube, whose length remains fixed during an organism life and thus maintains the same distance of the nodes it interconnects. On the other hand, muscles are contracting tubes, whose length is driven in a simple harmonic motion. They provide movement and form the control system of an organism. Several approaches to configuring driving sinusoids are covered in Section 3.2. In order to simulate our organisms more realistically, we forbid two parts of an organ13 CHAPTER 2. SPECIFICATION 14 Figure 2.1: Example of a springy organism. Orange connections represent rods, static parts of an organism. Muscles, drawn in yellow, provide movement. ism to intersect. However, this approach can bring several problems. First, it may be more difficult to implement the simulation part of the program. Second, it can cause the simulation to be more time-consuming and slow. 2.2 Functional requirements The springy organism project should consist of three modules: an organism editor, a simulator and an optimization tool. Users should be to able to design organisms in the editor and watch their behavior with the simulator. Then they should choose the goal of optimization and run the tool that will try to appropriately configure a control system of the organism. This section lists functional requirements for each of the described modules. Last paragraphs introduce ERO – a framework for evolutionary experiments, which the springy organisms project should be a part of. Editor The program should contain a user-friendly editor of springy organisms. The tool should provide basic operations like addition, translation and deletion of organism parts and an option to configure the driving sinusoid of a selected muscle. The editor should be oriented to organism construction not optimization of an existing control system (this is the goal of the optimization tool). To provide persistence and allow computer generation of organisms, the editor should be able to import and export a creature in a form of a file. Simulator The module should be able to simulate behavior of both designed and optimized creatures placed in a simplified three-dimensional Earth-like flat terrain. Additionally, a graphical user output should be provided. Therefore, the simulator requires a stable physics engine and a real-time 3D graphical renderer for a user output. CHAPTER 2. SPECIFICATION 15 Optimization tool The optimization tool should try to find an appropriate control system for an organism in such a way that the creature will be able to accomplish a given task. The module should be focused primarily on finding proper muscle parameters for locomotion behavior. If experiments are successful, another behaviors (like reaching the flag or jumping) can be added. The optimization algorithm cannot use exhaustive search because the search space becomes too large even for small organisms comprising of a few muscles. It should be based on a fast algorithm that does not necessarily need to find the global optimum. Therefore, genetic algorithm will be used to adjusts parameters of the muscles. Morphology of the organisms will not be optimized. ERO framework The springy organism project should be developed as a new module of an existing framework for evolutionary experiments called Evolution of Robotical Organism (ERO) [7]. ERO is a software project developed at Faculty of Mathematics and Physics, Charles University in Prague. The framework provides many advanced features including distributed computation engine for computing CPU-intensive tasks, advanced statistics of evolutionary process, browsable history of previous generations available during the evolution run and support for the Hierarchical NEAT algorithm (proposed in [8, 9]). Currently, ERO framework contains two small and one main project. The first testing project distributedly computes an approximation of π, while the second evolves realnumbers coded as binary strings. The main project uses genetic algorithms for optimizing virtual creatures, whose examples can be seen in Figure 2.2. (a) Creature evolved for walking. (b) Creature evolved for jumping. Figure 2.2: Examples of virtual creatures evolved with the ERO framework. CHAPTER 2. SPECIFICATION 16 The project evolving springy organisms should be the next large project of the framework. Since the framework provides several types of genetic algorithms and universal operators (e.g. selection), we need to implement only springy organism-specific operators like mutation, crossing, fitness function and several more. Implementation notes The project should be implemented in Java programming language, which is defined by the use of Java in the framework. ERO has been tested and fully works on recent Linux and Windows operating systems on 32-bit architectures. Virtual creatures uses OpenGL/JOGL as a real-time 3D renderer and ODE/JavaODE[10] for rigid body dynamics simulation. Because springy organisms are independent from virtual creatures, we are free to choose different engines for the simulator. Chapter 3 Project design The previous chapter is devoted to the specification of functional requirements for the springy organism project. In the following pages, we discuss available alternatives and choose the most appropriate solutions. We do not cover implementation details as they are covered in the developer manual (see Appendix B). First, we select a physics engine used for simulation of springy organisms (Section 3.1). Then we study various combinations for muscle parameters and define a consistent springy organism (Section 3.2). Third, we explain the key decisions made during its development (Section 3.3). In the last section, we explain the genetic algorithm available in the ERO framework and introduce springy organism-specific operators (Section 3.4). 3.1 Physics engine The most important decision is to choose a physics engine that will be able to simulate springy organisms. Because we want to use genetic algorithms, the chosen simulator must be deterministic, i.e. yield identical results for two equally configured simulations. Moreover, the engine should be robust enough to support possible future extensions (non-flat or slippery terrain, wind, etc.). Basically, there are three various options how a physics engine in the Java programming language can be handled. Implement a new physics engine in Java The first option is to implement a brand new physics engine as the SodaRace and SW3d projects did. Although the library would support all functional requirements, an implementation phase would be very complicated, especially for a non-physicists. Use a proprietary engine of the SodaRace or SW3d project The SodaRace project is based on a two-dimensional world, which makes their engine unusable. On the other hand, the SW3d project uses a three-dimensional world and can be thus suitable for the simulator. However, it cannot be used for two main 17 CHAPTER 3. PROJECT DESIGN 18 reasons: their library is not open-source, and the engine is not extendable enough as it is oriented solely to the SW3d simulator. Use an existing Java physics engine Currently, there are two robust physics engines available in Java programming language: JavaODE and JBullet. Both of them uses native libraries ported to Java. The computational and distributed layer of the ERO framework has already been tested for the JavaODE library by a project evolving virtual creatures (see Figure 2.2). Therefore, we first tested JavaODE library for ability to simulate springy organisms. After several experiments, the library proved to be a deterministic and extendable engine suitable for simulating springy organisms, and it was consequently chosen as a physics engine for the simulator. The ODE physics library does not provide a mechanism to directly control distance between two nodes of an organism. However, the engine is able to define relative speed of two nodes for each time step. Therefore, parameters of distance driving sinusoid must be converted to speed driving sinusoid. Conversion of muscle parameters, construction of ODE model of springy organisms and simulator integration with the ERO framework can be found in Section B.2. 3.2 Springy organism Because the description of the morphology of an organism can be found in the specification (Section 2.1), we will focus on the control system of a springy organism. First, we will discuss three sets of parameters, which can be used for configuration of driving sinusoids (Section 3.2.1). We will analyze their shortcomings and choose the most appropriate combination of parameters. The next section (Section 3.2.2) then defines a consistent organism. However, additional constraints for muscle parameters are added in Section 3.4.2 because of genetic algorithms. 3.2.1 Choosing muscle parameters The control system of a springy organism consists of a set of muscles driving in a simple harmonic motion (SHM). The question is how to parameterize a SHM to be both intuitive enough for users and usable in the simulator. Let L(t) be the length of a muscle in time t. The initial length Li at the beginning of simulation (i.e. when t = 0) is given by morphology, so we can consider Li to be a constant. Next, let Lr be a center of the driving sinusoid, i.e. the resting length of the muscle. Because we expect a SHM to be phased, the initial length would usually be different from the resting length. Furthermore, let A, ω and ϕ be amplitude, angular frequency and the initial wave offset of the sinusoid, respectively. Finally, let δ be the first movement of the muscle. The value of δ can be either contract or expand according to the initial action performed by the muscle. CHAPTER 3. PROJECT DESIGN 19 A simple harmonic motion can be parameterized in several ways according to chosen combination of proposed characteristics: Combination (Lr , A, ω, ϕ) – intuitive but problematic variant Using this option, the length of a muscle in time t can be expressed as L(t) = Lr + A sin(ωt + ϕ). (∗) Thus, the initial length of a muscle in the beginning of simulation is L(0) = Lr + A sin(ϕ). However, while the initial length Li is a constant given by morphology, value of L(0) can vary according to concrete values of parameters. Therefore, L(0) 6= Li in most cases, i.e. the muscle lengths prescribed by the equation in the beginning of the simulation would be different from actual lengths designed by the user. This fact can cause problems, because in the first time steps of the simulation the organism would try to quickly change the length of the muscle from Li to L(0). This behavior would not seem natural and would cause stability problems in the physics engine. Thus, this approach is not suitable. Combination (A, ω, ϕ) – usable but not very intuitive variant Another approach is not to use the resting length directly as a parameter, but to calculate it according to amplitude, phase and the initial length. Let L(0) = Li . According to (∗), the resting length can be then expressed as Lr = Li − A sin(ϕ). A harmonic motion set by these parameters is better than the previous approach as the ideal length at the beginning is equal to the initial length of a muscle. However, if we study this combination more closely, we find out that it is not very user-friendly. The reason is that these parameters can appear misleading for many users. Some practice and knowledge about parameterized sinusoids is needed, if a designer wants to set muscles correctly using this approach. Assume a user configures a muscle with A, ω and ϕ. A harmonic motion thus drives according to formula L(t) = Li − A sin(ϕ) +A sin(ωt + ϕ) . {z } | {z } | Lr ∈[−1,1] Therefore, the range of the muscle is L[R+ ] = [Li − A(sin ϕ + 1), Li − A(sin ϕ − 1)]. Even if we consider the three basic values for ϕ, we [Li − A, Li + A] L[R+ ] = [Li − 2A, Li ] [Li , Li + 2A] get suprising results: for ϕ = 0, for ϕ = π2 , for ϕ = − π2 . CHAPTER 3. PROJECT DESIGN 20 For example, if a user sets ϕ = π2 , the length of a muscle will drive from Li − 2A to Li . However, if the value is ϕ = − π2 , behavior of a muscle is completely different. During simulation, the muscle will not get shorter than its initial length, and will not get longer than Li + 2A. We assume that these values can suprise end users. Therefore, this set of parameters is not suitable as well. Combination (Lr , A, ω, δ) – usable and intuitive variant We notice that more complex springy organisms would probably contain several muscles which share the same driving sinusoid. For example, if we imagine three-dimensional DaintyWalker (Figure 1.3 on page 12), we can observe that all muscles which belong to the same leg have identical resting length and amplitude. The only difference consists in various phases. With this observation, we let a user set the resting length, amplitude and frequency of a muscle. Therefore, the driving sinusoid is accurately configured, and phase becomes the only missing parameter. Contrary to the first variant, where phase is also set by a designer, we can calculate the wave offset by the initial length and the very first move of a muscle. With this approach, a user can assign the same sinusoids to several muscles and change their phases by adjusting the initial lengths. Suppose that a muscle drives according to (∗). Because we know values of Lr , A and ω, we only need to calculate the offset ϕ according to Li and δ. Again, we let L(0) = Li as we want the organism behavior to be natural and stable. Assuming A > 0 (muscles with A = 0 represent rods), we get sin ϕ = Li − Lr . A If we imagine the graph of the sine function, we have two options for choosing ϕ – either on the interval [− π2 , + π2 ], where sine is increasing, or on the interval [+ π2 , 3π ], where the 2 function is decreasing. Since we know the very first movement of a muscle, we can easily make the decision and define a value of ϕ as Li − Lr for δ = lengthen, arcsin A ϕ= Li − Lr π − arcsin for δ = shorten. A This combination of parameters provides an intuitive and user-friendly option for configuring the SHM of muscles. Therefore, we have chosen this variant for our project. However, for the sake of simplicity, we use frequency f instead of an angular frequency ω. These quantities can be converted to each other using a formula ω = 2πf . CHAPTER 3. PROJECT DESIGN 3.2.2 21 Organism Consistency Not every set of spheres, rods and muscles driven in a SHM can be considered a valid springy organism. There are several rules that a model must meet, which can be divided into two groups – consistence of morphology and consistence of a control system. Valid morphology Organism with consistent morphology must pass the following restrictions: (1) An organism must represent a connected graph. (2) No parts of an organism (except for a set of muscles and rods connected at one end to the same node) may intersect as it would cause unnatural behavior in the first steps of the simulation. If we apply this rule to a muscle with the initial length Li , which connects nodes with radii r1 and r2 , we get a restriction Li ≥ r1 + r2 . Valid control system Each muscle with parameters (Lr , A, f, δ), the initial length Li and ending nodes with radii r1 and r2 must meet the following formulas: (3) A, f ≥ 0. We require non-negative values for amplitude and frequency. A muscle with zero amplitude or frequency represents a rod. (4) Lr − A ≤ Li ≤ Lr + A. This is a natural restriction. When we set a range for the length of a muscle, we need the initial length to be within the range. Moreover, the formula must be valid in order to calculate the correct phase for a muscle (see Section 3.2.1). (5) r1 + r2 ≤ Lr − A. In other words, the minimal length of a muscle during simulation cannot get too short to make the ending nodes intersect. CHAPTER 3. PROJECT DESIGN 3.3 22 Editor According to the specification (Section 2.2), we need to find or create an easy-to-use editor for modeling springy organisms with support for data persistence. This section lists various options for editors and discusses their advantages and weaknesses. First, we have to decide whether to use an existing editor or to implement a new one. Altogether, there are three available options: Use the SodaRace or SW3d editor The SodaRace editor (also called SodaConstructor) and SW3d editor (Chapter 1) are neither open-source nor compatible with our representation of springy organisms. Therefore, we cannot use them as a tool for creating our creatures. Use another existing 3D editor We have tested several three-dimensional editors, but none of was suitable for designing springy organisms. They were either too complex or too simple. Complicated editors would probably scare amateur designers, as they are usually hard to learn. On the other hand, 3D discrete graphs can be drawn by simple editors, but they lack an option of integrating custom plugins. Therefore, we decide not to use any existing editor. Implement a new editor The only option that remains is to create a new editor for designing our organisms. With a new springy organism-specific editor, we can cover all functional requirements and update the editor according to our current needs. As our first try, we implemented a simple text editor, where a user could design an organism in a form of an XML document. The solution of persistence was trivial and we did not need any support from native libraries. However, it turned out that the editor cannot be used as it did not provide any visualization of an organism. A user could not imagine a creature nor perform any complicated operations like translating or deleting a group of nodes. Figure 3.1: The first version of editor for springy organisms. It lacked the third dimension and contained non-intuitive parameters of muscles. CHAPTER 3. PROJECT DESIGN 23 Therefore, we started to create another, two-dimensional editor (see Figure 3.1). Lack of the third dimension could be solved by several approaches. As a first idea, we wanted to provide three basic projections. First, a user would choose a pair of coordinates; for example X and Z. Then the canvas would update and show appropriately projected positions of nodes; for example, if a node was placed at x, y, z, a user would see a circle at x, z, while the third coordinate y would be editable by a text field. The described editor with projections was certainly better than the text editor based on XML documents. It provided at least partial visualization and relatively easy-to-use tools for creating right angle organisms. Because the drawing canvas was implemented by a Swing component JPanel, there was no need for extra native libraries, and it could be easily integrated into the ERO framework. However, users still could not fully imagine their organisms, and the tool became unusable in case of more sophisticated creatures. Therefore, we considered another approach. Instead of three basic projections, we could offer a general plane. After a user entered a normal vector, the drawing canvas would update and show nodes projected on the plane. The depth of a node would be entered in a text field like in the case of the third coordinate. At this point of implemention, we found out that the two–dimensional editor would be probably too cumbersome for creating 3D organisms. Even with a general plane, a user still would not be able to fully imagine an organism. We needed an editor that would provide a realistic graphical representation of a creature. For that reason, we decided to implement a three-dimensional editor with the use of OpenGL technology (see Figure A.5 on page 61 for a screenshot). The SW3d editor always assumes an invisible canvas parallel to screen with a constant distance from a user. When designers want to add a new node, they click on a screen, which uniquely defines a point on the canvas. This point is then used as a center for the new node. Inspired by the SW3d editor and our ideas from the 2D editor, we created a 3D editor with a 2D drawing canvas. The canvas is represented by a visible rectangle arbitrary positioned and rotated in the 3D scope. A click on a screen uniquely defines a point, which can be used for addition and translation of a node. Because the rectangle is visible, a user know the exact position of the node–contrary to SW3d project when a user can only guess what the real position of the node is. Customizable canvas provides an easy tool for designing more complex and non-orthogonal creatures. Moreover, it offers various advanced operations with nodes, muscles, rods and the canvas (see Section A.2.1 of the user manual for description of these operations). However, the use of the OpenGL technology requires support for native libraries. Moreover, in special cases, the integration with the framework fails, as we are mixing lightweighted and heavy-weighted components (see Section B.3.4 of developer manual for more information). Despite these shortcomings, the editor is finally able to provide a full visualization and user-friendly tool for creating more complicated springy organisms. CHAPTER 3. PROJECT DESIGN 3.4 24 Evolution and genetic algorithms Because the springy organism project will be implemented as a plugin into the ERO framework, we need to design such genetic operators which will be fully compatible with the genetic algorithm (GA) used in the framework. Thus, we first cover the algorithm and list operators already provided by ERO (Section 3.4.1). Then we focus on springy organism-specific issues like representation of a genotype and creating the initial population (Section 3.4.2), generating random control system (Section 3.4.3), mutation operator (Section 3.4.4), crossing operator (Section 3.4.5) and an objective (fitness) function (Section 3.4.6). 3.4.1 Genetic algorithm used in the framework Even though the framework provides an advanced version of a genetic algorithm, called the Hierarchical NEAT (proposed in [8, 9]), we will use a much simpler form of evolution described in Algorithm 3.1. In order to make the algorithm work, we need to supply the following parameters: an initial population, a generator, operators of selection, mutation and crossing, and an objective (fitness) function. Because a selection operator is general enough to be used with any type of genotypes, the framework already contains several implementations. We briefly review available algorithms for selecting N individuals. Fitness proportionate selection (roullete wheel selection) If fi is a value of fitness function for individual i, then its probability of being selected fi is pi = Pj=m , where m is a size of population. The algorithm of selection is j=1 fj repeated more times to return N genotypes. Stochastic universal sampling Stochastic universal sampling (SUS) is an advanced version of the fitness proportionate selection. While roullete wheel selection chooses several individuals from the population by repeated random sampling, SUS uses a single random value to sample all of the individuals by choosing them at evenly spaced intervals. See [11] and Figure 3.2 for more information. Tournament selection The selection returns the best genotype among a set of random chosen t individuals, where the tournament size t is passed as a parameter. This operation is repeated N times to return N genotypes. CHAPTER 3. PROJECT DESIGN 25 Truncation selection This algorithm takes a set of the best p percent of population and randomly chooses N individuals from the set. Percentage p, truncation threshold, is passed as an argument. Truncation pair selection This is a proprietary selection used in the framework similar to the truncation selection. See documentation in [7] for more details. Other operators are specific for springy organism. They are described in the rest of this chapter. Figure 3.2: Example of stochastic universal sampling selection. Four individuals (N = 4) are being selected according to a random number r. In this case, individuals A,B,C and F are returned. (Source: http://en.wikipedia.org/wiki/Stochastic universal sampling) Parameter Pinit N Description Initial population of genotypes Size of the initial population G Generator operator, which creates a random genotype according to a given template Nelite Number of champions (elitism) rmut Mutation ratio (number between 0 and 1) defines how many genotypes are created by mutation pmut Probability of mutation after crossing Smut , Scross Mmut , Mcross C1 , C2 F Selection operators for mutation and crossing, respectively Mutation operators for standalone mutation and for mutation after crossing, respectively Crossing operators Fitness function Table 3.1: Description of parameters for Algorithm 3.1. 26 Algorithm 3.1: Genetic algorithm provided by the ERO framework input : parameters described in Table 3.1 begin P ← create the first population by applying generator G on each genotype of the initial population Pinit ; while not stopped do Q ← create a new empty population; move the best Nelite genotypes from population P to population Q; Nmut ← d(N − Nelite ) ∗ rmut e; (g1 , g2 , ..., gNmut ) ← choose Nmut genotypes from P using selection Smut ; foreach genotype gi do mutate gi using mutation Mmut , and place it to population Q; endfch Ncross ← (N − Nelite − Nmutate ); Ncross1 ← bNcross /2c; (h1 , h2 , ..., hNcross1 ) ← breed Ncross1 genotypes from population Q using selection Scross and crossing C1 (see Alg. 3.2); (hNcross1 +1 , ..., hNcross ) ← breed another (N − Ncross1 ) genotypes from Q with selection Scross and crossing C2 (see Alg. 3.2); foreach genotype hi do with probability pmut mutate genotype hi with operator Mcross ; place hi into population Q; endfch forall the genotypes in population Q do evaluate the genotype using the fitness function F ; endfall P ← Q; endw end Algorithm 3.2: Breeding organisms with crossing operator input : Q – population of genotypes, N – number of genotypes to breed by crossing, S – selection operator, C – crossing operator begin (a1 , a2 , ..., a2N ) ← choose 2N genotypes from population Q using selection S; for i = 1 to N do bi ← cross genotypes a2i−1 and a2i with operator C; endfor return (b1 , ..., bN ) end CHAPTER 3. PROJECT DESIGN 3.4.2 27 Genotype, phenotype and the initial population Operators of a genetic algorithm usually work with individuals encoded into genotypes. Before a fitness function evaluates an individual, it first decodes the genotype into a phenotype and then calculates the value of an objective function. Genotypes of individuals with high fitness then breed next populations. Because our goal is to evolve the control system of a springy organism, a genotype should contain mainly information about muscle parameters. Even though there are many options of encoding an organism into a genotype, we choose a simple solution – identity. We do not distinguish between a genotype and a phenotype of an organism; both structures will be identical. Genotype will hold a collection of nodes, muscles and rods without any compression or encoding. Each muscle can be configured by a set of parameters described in Section 3.2. As stated in the section, each such quadruple must also follow several rules to prevent unstable behavior. However, we need to add another constraint in order to make the genetic algorithm work – restriction for the maximal length of muscles. Minimal length of a muscle is determined by a sum of radii of the two nodes it connects. However, there is no constraint for the maximal length. If we do not limit this value, the operators can produce muscles expanding to enormous length. For that reason, we add a new rule for muscle parameters. For a given global constant Cmax and for each parameters (Lr , A, f, δ) the formula Lr + A ≤ Cmax must be valid. Moreover, the frequency of contraction must be smaller than a given constant. The reason is that higher frequencies cause severe stability problems in the ODE physics engine. A set of genotypes used in the initial population can be created in the editor. See Section 3.3 for design decisions and Section A.2 on page 58 of a user manual for more information about designing organisms and creating the initial population. Because we want to evolve the control system of an organism, the operators work only with a set of muscles. For that reason, the initial population must consist of genotypes with identical morphology. 3.4.3 Generator of control system The first step of a genetic algorithm consists in generating the first generation according to individuals in the initial population. Because the morphology of an organism remains fixed, the generator should create a new organism with the same structure but random control system, which is represented by a set of muscle parameters. For a given muscle the generator should return parameters uniformly distributed over the space of all possible valid configurations. For that reason, each quadruple (Lr , A, f, δ), representing consistent muscle parameters, should be generated with the same propability. While frequency f and the first move δ can be generated independently, resting length Lr and amplitude A depend on each other. As explained in Section 3.2, the following formula must be true: Lr − A ≤ Li ≤ Lr + A. (3.1) CHAPTER 3. PROJECT DESIGN 28 Furthermore, the maximal and minimal length of a muscle is also constrained by Lr − A ≥ Cmin , Lr + A ≤ Cmax . (3.2) The first restriction is natural, as a muscle cannot be shorter than a sum of radii of the two nodes it connects. The second formula must be met in order to limit the maximal length of a muscle. We will discuss several algorithms for generating a correct tuple (Lr , A): One approach is to generate one element randomly, compute a range of valid values for the second element, and then generate the second element as a random number from the range. However, this approach produces tuples which are not uniformly distributed over the space because size of a generated interval changes according to the first element. The second possible option is a usage of Monte-Carlo method: Random tuples (Lr , A) are generated and tested for their validity; the first correct tuple is returned. This algorithm should not be used because it is not deterministic and can cause unpredictable amount of tries for extreme cases. The correct solution of generating a valid resting length and amplitude consists in a graphical representation of formulas (3.1) and (3.2), which is illustrated in Figure 3.3. Using this model, the operator can generate uniformly distributed pseudorandom tuples (Lr , A) in constant time (see Algorithm 3.3). CHAPTER 3. PROJECT DESIGN 29 (2) (1) (4) (3) (4) (1) (2) B (3) C allowed values A Figure 3.3: Restrictions of amplitude and resting length. Algorithm 3.3: Control system generator input : T – organism template output: Organism with the morphology of T but random control system begin S ← create a copy of T ; forall the muscles in S do (Lr , A) ← random tuple from rectangle Li ABC; f ← random number between fmin and fmax ; δ ← contract or expand according to an unbiased coin toss; set (Lr , A, f, δ) to be new parameters for the muscle; endfall return T ; end CHAPTER 3. PROJECT DESIGN 3.4.4 30 Mutation operator The purpose of mutation is to slightly change a given genotype. In the case of springy organisms, the mutation should operate on a set of parameters which configure behavior of muscles. The first implemented approach, called Atomic muscle mutation, treats muscles as atomic parts of a control system. Thus, the mutator either keeps original parameters, or generate a new set of frequency, amplitude, resting length and the first move. There are various strategies how a set of muscles assigned for mutation can be chosen. The first implemented algorithm uses a probabilistic approach; it mutates a muscle with probability pm (see Algorithm 3.4). The constant pm is passed to mutation as a parameter. However, this strategy often led to organisms which remained identical after mutation, especially for individuals with simpler morphology. This reason led us to the second algorithm, which randomly chooses a set of n muscles assigned for mutation (see Algorithm 3.5), where n is a parameter of mutation. Even though these two approaches yield sufficient results, evolutionary experiments (see Section 4.2) have shown that they mutate organisms very strongly. For that reason, we implemented another mutation operator, called Parameter mutation, which treats a control system as a list of independent parameters. However, because amplitude and the resting length are dependent quantities, this tuple is represented as a single parameter. Thus, the first three elements of the list correspond to parameters of the first muscle, second three elements to the second muscle, and so on. The operator takes n randomly selected muscle parameters and assigns a new random value to each of them (see Algorithm 3.6). We have implemented two strategies of selecting number n. The first one always takes constant amount of parameters, which is passed to an operator as an argument. The second algorithm generates values from geometric distribution with parameter p, where probability p is defined by mutation configuration. Using the latter algorithm, 100p percent of mutations will modify one parameter, 100(1 − p)p two parameters, and so on. Algorithm 3.4: Atomic muscle mutation – probabilistic approach input : springy organism, p – probability of muscle mutation output: mutated organism begin forall the muscles in organism do x ← pseudo-random number between 0 and 1; if x ≤ p then generate a brand new set of parameters for the muscle; endif endfall end 31 Algorithm 3.5: Atomic muscle mutation – quantity approach input : springy organism, n – number of muscles to mutate output: mutated organism begin M ← randomly choose n muscles from the organism; foreach muscle m ∈ M do generate a brand new set of parameters for the muscle; endfch end Algorithm 3.6: Parametric muscle mutation input : springy organism, G – positive number generator output: mutated organism begin nmuscles ← number of muscles in organism; nparams ← nmuscles ∗ 3 {number of parameters in organism}; n ← get number from generator G; clamp n to be between 1 and nparams ; P ← randomly choose n parameters; foreach parameter p ∈ P do generate a new value for the parameter; endfch end Algorithm 3.7: Uniform muscle crossing input : M , F – springy organisms with the same morphology representing a mother and a father; p – probability of taking a muscle from mother genotype; output: crossed organism begin O ← create a copy of mother; foreach muscle m in offspring O do x ← pseudo-random number between 0 and 1; if x ≤ p then parent ← mother else parent ← father; take the corresponding muscle from parent and copy its parameters to the muscle m; endfch return O; end CHAPTER 3. PROJECT DESIGN 3.4.5 32 Crossing operator We have implemented only one crossing operator as it has proved to be sufficient enough for our purposes. Like atomic muscle mutation, the uniform muscle crossing (Algorithm 3.7) treats a control system as a set of atomic muscles. The operator first creates morphology identical to its parents. Then it iterates over muscles and–according to a given probability p– copy parameters either from a mother or a father. Parameter p can be a constant with value 0.5 (i.e. approximately half of muscles correspond to each parent) or it can be a random number between 0 and 1. We have used p = 0.5 for all experiments. 3.4.6 Fitness function The objective (fitness) function is implemented using the engine described in Section 3.1. First, we initialize the simulator, insert a tested organism into a physical world and observe its behavior. When it achieves desired goal or the time limit for simulation exceeds, we stop the engine and return a value calculated according to preliminary or final states of an organism. We have implemented two behaviors: locomotion and reaching a given flag. Both of them are simulated on a flat non-slippery terrain, which creates conditions similar to SW3d world (see Section 1.2). Locomotion behavior Initially, a tested organism is placed on a starting point. The world is then simulated for N seconds, where N is a parameter of the fitness function. When the simulation is over, the organism is evaluated according to distance between the starting point and its current position. Organisms evolved with this fitness should be able to move quickly in a direction they choose. Reaching-a-flag behavior A tested springy organism is again placed to the start point. However, we also set a flag in position (X, Y ), where coordinates X and Y are arguments of the fitness function. We let the simulation run and observe creature’s position (i.e. its center of gravity). If the organism is closer than R meters to the flag, we stop the simulation. However, if it does not reach the flag in N seconds, we terminate it as well. Constants N and R are another parameters of the function. After the simulation, we need to calculate the objective function from the two values: duration of simulation t (0 ≤ t ≤ N ) and the distance d between an organism and the flag at the end of simulation. There are several mechanisms how to obtain the value. A very simple approach would be to completely ignore one value and return the transformed second value. However, we cannot ignore the distance d: In the first steps of evolution, no organism is usually able to reach a flag, which means that duration t is always N . Any transformation of t would therefore return the same value and a genetic algorithm would not yield any results. Another idea is to ignore the duration of simulation, CHAPTER 3. PROJECT DESIGN 33 but we would not be able to award organisms which reach a flag more quickly than their counterparts. However, we can combine these two strategies by dividing the total fitness into two parts: a bonus for distance f (d) and a bonus for short duration g(t). If we appropriately evaluate both of√them, we can return f (d) + g(t) as the fitness of an organism. Let Df lag (= X 2 + Y 2 ) be the distance between a flag and a start point. We can then use the following form of the distance bonus: for d ≥ Df lag , 0 f (d) = α(Df lag − d) otherwise. If an organism gets further from the flag, the bonus will be zero. On the other hand, the closer the organism is to the flag, the higher the distance bonus is. We chose a very simple transformation – a linear function with gradient α, where α is a parameter of the fitness function. We can use the same approach for calculating the time bonus: g(t) = β(N − t). If an organism does not reach the flag at all, the bonus will be g(N ) = 0. However, the sooner it gets to the flag, the higher time bonus will be. Gradient β is passed as an argument. Chapter 4 Evolutionary experiments This chapter covers evolutionary experiments with springy organisms performed by a springy organism project embedded into the ERO framework. We advise to read Chapter 3 first because we will use many technical details about genetic algorithms and springy organisms. To begin with, we setup and describe the basic parameters of evolution (Section 4.1) shared by all further experiments. We explain the goals of an optimization and cover the general steps of an experiment. Then we describe an evolution of a simple organism called Pyramids (Section 4.2). We focus on the operator of mutation and discuss several algorithms with their shortcomings. The next section is devoted to another, a bit more complicated organism called Snake (Section 4.3). In this section, we discuss appropriate parameters for mutation and crossing rate and introduce a powerful heuristic for increasing performance of evolution. Then we optimize other organisms like Round Ladder or Horse using improvements discovered during previous experiments (Section 4.4) and summarize achieved results (Section 4.5). In the following text, we use the terms organism, creature, genotype and individual interchangeably. However, the first two expressions relate to springy organism-specific issues, while the latter two are used mainly in conjunction with operators and genetic algorithms. Moreover, we sometimes refer to an operator of crossing as a mating operator or an operator of reproduction. A term population is also sometimes replaced by generation. 4.1 Introduction Evolutionary experiments described in this chapter will be focused on optimization of a control system of springy organisms. The first three creatures, Pyramids, Snake and Round Ladder, will be evolved for locomotion behavior. The fourth organism, called Horse, will be optimized for both locomotion and reach-the-flag behavior. Description of the corresponding fitness functions can be found in Section 3.4.6 on page 32. While we modify parameters for a genetic algorithm after each experiment, configuration of the simulator will remain identical for all evolutions. Table 4.1 lists common 34 CHAPTER 4. EVOLUTIONARY EXPERIMENTS 35 simulation settings, and Table 4.2 describes technical ODE configuration. We will describe the chosen parameters more closely: We set gravity to correspond with a real world. Tube collision detection is set to yes, because two parts of an organism should not be allowed to intersect. Parameters maximal allowed angular velocity, linear velocity and joint error are set to low values, which prevent the ODE simulation from stability problems. However, these settings are high enough to avoid constraining naturally-behaved organisms. Moreover, two parts of an organism are allowed to touch at most 5 times per seconds. The reason for such small amount lies again in the ODE model of organisms (see Section B.2 of the developer manual for more information). If an organism exceeds any of these limits, it is automatically assigned zero value by a fitness function. Consequently, the organism will not survive, and thus its genetic information is not spread to next generations. We performed several experiments with the ODE engine in order to find a stable configuration of physics. Results can be seen in Table 4.2; we use them for all our experiments. See [10], which explains the settings more deeply. Parameter Value Node weight Gravity Node diameter Tube diameter Tube collision detection Maximal allowed angular velocity Maximal allowed linear velocity Maximal allowed joint error Maximal allowed contacts 1kg 10m/s2 20cm 15cm yes 10 rad/s 100 m/s 0.1m 5 hits/s Table 4.1: Simulator general configuration. Parameter Value ERP 0.9 CFM 0.01 Friction mu 1000 N Surface bounce 0 Surface bounce velocity 0 m/s Step size 0.01 s Slider fudge factor 0.5 Slider max force 200 N Slider stop ERP 0.9 Slider stop CFM 0.01 Table 4.2: ODE engine parameters. Most of the following experiments follow the same procedure. First, we introduce morphology of an organism and point out its characteristic. Then we configure a genetic algorithm and let evolution optimize the control system. Finally, results are analyzed and configuration of the genetic algorithm is discussed. Evolution is sometimes re-run with different settings to improve its performance or to illustrate a discussed issue. CHAPTER 4. EVOLUTIONARY EXPERIMENTS (a) Pyramids. (c) Round ladder. 36 (b) Snake. (d) Horse. Figure 4.1: Morphology of the four tested organisms designed with the proposed 3D editor. Notice the increasing complexity of organisms. While Pyramids contain only three muscles, the control system of Horse comprises of sixteen dynamic parts. 4.2 Evolving Pyramids In the following set of three experiments we will try to evolve an organism called Pyramids (see Figure 4.1a). We want to optimize its control system for locomotion behavior. The morphology of an organisms is simple, as it consists of only three muscles. However, we will focus on analysis of basic evolution results and fitness graphs. Moreover, we will study mutation operator and try several variants for gaining desired behavior of evolution. CHAPTER 4. EVOLUTIONARY EXPERIMENTS Experiment 37 1 (the first try) The first experiment will be set up according to the default parameters provided by the ERO framework. Table 4.3 lists general GA settings, and Table 4.4 covers springy organism-specific parameters. Parameter Value Population size Elitism Mutation rate Mutation selection Crossing selection Mutation after crossing propability 300 1 30% Stochastic universal sampling Stochastic universal sampling 30% Table 4.3: Setup for Experiment No.1 (general GA settings). Parameter Value Mating Mutation Prop. of muscle mutation Uniform muscle crossover Probabilistic muscle mutation 33% Table 4.4: Setup for Experiment No.1 (organism-specific settings). A random control system is usually unstable in the ODE physical engine, which results in high values of their maximal linear/angular velocity or joint error. As a consequence, the majority of the first population is usually evaluated to zero fitness. In order to give the first generation a chance to contain at least a few stable organisms, we set the population size to a high value. Because of the elitism, evolution will preserve non-decreasing character. The best organism in each population should be at least as good as the winner of the previous one. (We need the physics engine to be deterministic in order to make elitism work.) Thirty percent of every population will be bred by a mutation operator using the stochastic universal sampling selection. For our first experiment, the probabilistic muscle mutator will be used, which iterates over all muscles and generates a new set of parameters for a muscle with probability 33%. The rest of a population will be reproduced by a mating operator, which will use the same selection technique as mutation. Each muscle of an offspring will be taken either from its mother or father according to an unbiased coin toss. Each third child will be then mutated by the same operator which is described earlier. CHAPTER 4. EVOLUTIONARY EXPERIMENTS 38 Figure 4.2: Fitness values of all organisms evolved in Experiment No.1. Each red segment corresponds to one organism. A green point represents an average fitness of all genotypes in a population. The best fitness is drawn as a blue point. Results Results of the first experiment can be seen in Table 4.5. Values of the fitness function for all organisms participating in the evolution is illustrated in Figure 4.2. The experiment was stopped after 64 populations because the fitness values of the best organisms started to stagnate. Result Value Populations Best fitness Average fitness 64 6.88 4.0 Table 4.5: General results of Experiment No.1. To begin with, we analyze the progress of evolution. As expected, the maximal value of fitness function did not decrease over populations, which is caused by elitism and a deterministic simulator. However, we observe many horizontal red lines across the graph. Let us explain main reasons of their presence: Assume that a group of genotypes in a population shares the same control system. Therefore, the fitness operator evaluates the organisms with an identical value. If the group is large, or the value is close to the fitness of the best genotype, then it is very probable that the organisms will survive to the next generation. The reason of this behavior is that a selection operator often chooses genotypes from the group. Consequently, a mating operator crosses two identical control systems, which yields an offspring equal to its parents. As a global result, the group is reborn in the next population, which causes the horizontal red lines in a graph of fitness. CHAPTER 4. EVOLUTIONARY EXPERIMENTS Group size % of pop. Fitness 120 97 56 10 40 32 20 3 6.21 0.0 6.05 6.04 Table 4.6: Sizes and fitness values of the largest dominant groups. 39 Figure 4.3: Dominant groups are visible in the fitness graph. If we study, for example, the last generation (Table 4.6), we detect four dominant groups. The three largest groups are clearly visible in the fitness graph (Figure 4.3). Our goal for further experiments is to avoid such dominant groups because they make a population homogeneous. Good genotypes should be chosen to breed a new generation according to their fitness. When a dominant group occurs, genotypes in the group are preferred in the reproduction process, and they affect the next population more strongly. More importantly, heterogeneous populations mean more options tried by a genetic algorithm and, therefore, higher chance to find a better organism. If we examine the mutation operator used in the experiment, we can find a partial reason for existence of the dominant groups. The operator modifies each muscle with probability p. When morphology of an organism consists of n muscles, probability that no muscle will be affected by mutation is equal to (1−p)n . We used p = 0.33 and n = 3, which gives us that 30% of organisms remain identical after mutation. According to a performed analysis, the mutation operator used in the experiment produced 27±5 identical genotypes in average, which is 30% of 90 individuals. The first intuitive idea to solve the problem would be to increase the value of p. Consider the probability p = 0.5 and the number of muscles n = 3. With this configuration, approximately 12.5% of mutated organisms would still remain identical after the mutation. Moreover, every second muscle of an organism would be modified, which is probably too strong mutation for our purposes. Conclusion The first experiment consisted in evolving an organism with morphology comprising of three muscles. The genetic algorithm did not give us a satisfactory result because a user could easily design a faster creature by hand. However, we have detected the problem of dominant groups, which caused populations to become homogeneous. Moreover, we analyzed the mutation operator used in the experiment. It turned out to be improperly strong as it produced too many identical genotypes. CHAPTER 4. EVOLUTIONARY EXPERIMENTS Experiment 40 2 (different mutation) The second experiment uses the same configuration as the previous one, except for the operator of mutation. Instead of the probabilistic muscle mutator, the quantity muscle mutator will be used. This operator chooses n random muscles, and generates random parameters for each of them. The constant n is passed as a parameter. Propability that this algorithm generates an organism identical to an input template is close to zero. Therefore, the problem with mutation detected in the previous experiment should be solved. Because we are optimizing Pyramids, which consist of three muscles, we set n = 1. Table 4.7 summarizes organism-specific settings for a genetic algorithm. Parameter Value Crossing operator Uniform muscle crossover Mutation operator Quantity muscle mutator Number of mutated muscles 1 Table 4.7: Setup for Experiment No.2. Results We have run the genetic algorithm twice to illustrate possible differences between the two identically configured evolutions. Both of them were stopped because of the best fitness values of the best organisms started to stagnate. Results of the first evolution can be seen in Table 4.8 and Figure 4.4. Table 4.9 with Figure 4.5 contain results of the second evolution. Result Value Result Value Populations Best fitness Average fitness 40 12.5m 7.1m Populations Best fitness Average fitness 52 7.6m 4.2m Table 4.8: General results of Experiment No.2 (Evolution A). Table 4.9: General results of Experiment No.2 (Evolution B). We observe that two identically configured genetic algorithms can yield different results. Except for the last ten generations of Evolution A, the operators were not able to create organisms with the fitness value close to the best creature in the corresponding population. Organisms are either identical to a champion or their are significantly worse. This behavior is even more visible in Evolution B. After 13 generations evolution found a genotype with fitness 7.3. However, evolution stagnated for the rest of populations because operators were not able to generate genotypes similar to champions. For this reason, we can see an empty region under the best genotype in Figure 4.5. Moreover, fitness values 41 Figure 4.4: Fitness of all organisms in Experiment No.2 (Evolution A). Figure 4.5: Fitness of all organisms in Experiment No.2 (Evolution B). CHAPTER 4. EVOLUTIONARY EXPERIMENTS 42 in both graphs are not scattered and form horizontal red lines, which indicates presence of dominant groups. Why the operators cannot yield similar genotypes? To find a possible answer to this question, we can again examine the operator of mutation used in the experiment. For a given organism the operator generates random parameters, which are assigned to a randomly chosen muscle. Assume that an input genotype is a champion of the previous population. Mutation takes the genotype and completely reconfigures a random muscle. Because morphology of the organism consists of only three muscles, the change in behavior is significant and causes the output organism to be much worse than its ancestor. According to performed analysis (Table 4.10), less than 10% of mutation results were evaluated to non-zero fitness. The vast majority (more than 90%) ended up with zero fitness and did not evolve anymore. We can thus conclude that the mutation operator is too strong and that it changes organism behavior too rapidly. Positive fitness Evolution A Evolution B Zero fitness Total 235 (6.7%) 3275 (93.7%) 385 (8.1%) 4385 (91.9%) 3510 4770 Table 4.10: Fitness of organisms produced by the mutation operator. Conclusion We tested a new approach to mutation operator with the use of quantity muscle mutator. We solved the problem of identical results of mutation detected in Experiment No.1. However, the majority of organisms produced by the operator was evaluated to zero fitness. Dominant groups are still present in populations. We have to search for another mutation operator, which will hopefully lead to better results. Experiment 3 (weaker mutation) In the previous experiment the majority of output genotypes were evaluated to zero fitness, which was probably caused by the fact that mutation based on generating a new set of parameters for a random muscle(s) modifies an organism too strongly. In this experiment, we will use weaker mutation which does not treat muscles as atomic parts of a control system. The operator takes n random parameters of an organism (amplitude and resting length are considered a single parameter as they depend on each other) and generates their new values randomly. The number n can be either a chosen constant or a pseudo-random number from the geometrical distribution with a parameter p, where p is passed as an argument. We will use n = 1. Table 4.11 summarizes the setup for this experiment. CHAPTER 4. EVOLUTIONARY EXPERIMENTS 43 Results General results of the experiment can be found in Table 4.12. See Figure 4.6 for detailed progress of the evolution. Parameter Value Result Value Crossing operator Mutation operator Number of mutated parameters Uniform Parametric 1 Populations Best fitness Average fitness 160 13.23m 8.6m Table 4.11: Setup for Experiment No.3. Table 4.12: General results of Experiment No.3. If we study the graph of the fitness values, we can see that the current structure of populations rapidly differs from the previous ones. First, we can observe that if there are any dominant groups, they are not so apparent. Moreover, we can see that GA operators generate organisms similar to champions. It is most evident between generations 10 and 30 and generations 90 and 160 (dark red segments under the blue line). Interesting behavior occurred between generations 50 and 60 when they split up into two groups. Each group then represented a local optimum of the search space. When we analyze results of mutation operator (Table 4.13), we can observe that only 45% of output genotypes are evaluated to zero fitness. Another 55% are evaluated to positive fitness. It is a great improvement in comparison with the previous operator, which yielded less than ten percent of valid organisms. However, a new problem arises – 17% of the results are evaluated to the same value as their input genotypes. Because mutation generates new values randomly, it often assigns a value identical to a parameter with small domain (like parameter defining the very first move of a muscle, which has only two states). Since Pyramids consists of three muscles, the input for mutation operator is a set of nine parameters and the mutation operator mutates only one of them. Probability that the direction of the first movement will be chosen for mutation is p1 = 3/9. Probability that a random generator chooses identical value for the first move is p2 = 1/2. We get probability that initial contraction remains identical equal . to p1 p2 = 17%. Fitness of output organism Count % of total Zero fitness Same fitness as input Different, non-zero fitness 6391 2375 5474 45% 17% 38% Table 4.13: Analysis of performed mutations. CHAPTER 4. EVOLUTIONARY EXPERIMENTS 44 Figure 4.6: Fitness of all organisms in Experiment No.3. Conclusion We tested another mutation operator, which does not modify organisms so strongly because it changes individual parameters instead of whole muscles. The genetic algorithm evolved a faster organism and produced more heterogeneous populations. The number of invalid organisms yielded by the mutation operator was reduced to a half. 4.3 Evolving Snake The next three evolutionary experiments will be devoted to a more complicated organism called Snake (see Figure 4.1b on page 36). Again, we will try to optimize this creature for locomotion behavior. We cannot use reach-the-flag behavior because the morphology constrains the organism to move only forwards or backwards. Unlike Pyramids, Snake is very hard to optimize manually. The control system of Pyramids consists of three muscles, where two of them may share the same settings. A user can find appropriate parameters in a short while. However, Snake contains six muscles, which must drive in harmony to achieve movement. A user would have probably come across correct parameters but it would require a some skill and much more time. Therefore, we will try to use a genetic algorithm to find a sufficient control system. Experiment 4 In the following experiment, the settings from the previous evolution will be used, except for several changes in the mutation operator. We set the algorithm to yield an opposite value instead of a random value in case of the first move parameter. Therefore, the operator will always produce genotype unequal to an input organism. Moreover, the number of parameters to mutate will be generated from geometric distribution with parameter p = 0.5 instead of a constant (i.e. a half of mutations will modify one parameter, one fourth will modify two parameters and so on). Table 4.14 summarizes the configration. CHAPTER 4. EVOLUTIONARY EXPERIMENTS 45 Parameter Value Crossing operator Mutation operator Number of mutated parameters Uniform muscle crossover Parametric Geometric distribution with p = 0.5 Table 4.14: Setup for Experiment No.4. Results Results of the evolution, terminated after 160 generations, can be seen in Table 4.15. Unlike results of the previous three experiments, the champion of this evolution does not move naturally and, furthermore, does not seem like an optimized organism. If we study structure of populations, we can observe that from the very beginning the vast majority of organisms are clustered in one/two dominant groups. These genotypes come from the crossing operator only. The reason is obvious— mutation yields different results and thus cannot produce dominant groups. The evolution contained 15 points of improvement (i.e. the best genotype of a population is better than a champion of the previous one). Table 4.16 lists distribution of the points between operators. However, if we analyze the three points generated by mutation after reproduction, we find out that the crossing operator took identical parents, which means it creates an offspring with the same control system. Consequently, mutation modified the offspring, which produced a new champion. Therefore, we can assign 8 + 3 = 11 points to mutation and 4 points to the crossing operator. Only 13% of genotypes produced by mutation were valid (but each of them differed from the input as we expected) and the rest 87% were evaluated to zero. The partial reason for such low rate of valid creatures probably consists in evolving a more complex organism, where behavior strongly depends on harmony of muscles. Modification of one muscle can thus break stable movement more easily than in the case of Pyramids. Result Value Populations Best fitness Average fitness 160 4.9m 2.9m Table 4.15: General results of Experiment No.4. Operation Improvements Mutation Crossing (standalone) Crossing (with mutation) 8 4 3 Total 15 Table 4.16: Distribution of points of improvement between operators. CHAPTER 4. EVOLUTIONARY EXPERIMENTS 46 Conclusion We have performed an experiment on a more complicated structure called Snake. Even though the organism may seem simple at first glance, its control system requires high cooperation of muscles. The experiment still did not yield sufficient results. The evolved organism moves forward very slowly without any apparent coordination. However, we have detected that the majority of improvements were caused by the mutation operator. The problem of too many invalid results occurred again, which is probably caused by complexity of Snake’s control system. The crossing operator yielded large dominant groups and did not produce unique genotypes. Experiment 5 (more space for mutation) The goal of the next experiment is to devote more space for the mutation operator, as it produced good results in the previous evolution. Higher number of mutations can be achieved by several ways. First, we increase the mutation rate from 30% to 50%, which means that a half of each population will consist of mutated genotypes. Second, we set the mutation probability after crossing to 50%, which will cause every second offspring to be mutated after reproduction. Thirdly, we double the population size to 600 in order to make mutation operator generate more valid organisms. Other parameters remain identical. The summary of settings can be seen in Table 4.17. We expect smaller dominant groups and more heterogeneous generations. Parameter Value Population size 600 Mutation rate 50% Mutation after crossing prob. 50% Crossing operator Uniform muscle crossover Mutation operator Parametric Number of mutated parameters Geometric distribution with p = 0.5 Table 4.17: Setup for Experiment No.5. Results Results of the experiment can be seen in Table 4.18 (general results) and Figure 4.7 (fitness of all organisms). We can see directly in graph of fitness that organisms are scattered in populations more uniformly than in the previous experiments. Moreover, there are almost no dominant groups visible. Operators are able to produce genotypes which are approximately as good as champions. CHAPTER 4. EVOLUTIONARY EXPERIMENTS Result Value Populations Best fitness Average fitness 50 4.1m 1.0m Table 4.18: General results of Experiment No.5. 47 Operation Improvements Mutation Crossing (standalone) Crossing (with mutation) 4 8 1 Total 13 Table 4.19: Distribution of points of improvement between operators. Analysis of fitness values shows that there were ca 126 ± 30 unique genotypes (21% of population size) in each generation which did not belong to any group (i.e. there were no other organisms with identical fitness). If we perform the same analysis on the previous experiment, we get that 22±12 organisms were unique, which is only 7% of the population. To gain another sign of heterogeneous structure, we can study the number of organisms in small groups. For our purposes, a small group is a cluster of genotypes in one population with identical fitness which contains at most five individuals. Groups are also allowed to contain only a single organism. Therefore, all organisms which do not belong to a small group belong to a large group. Concretely, we examine each population and compute the amount of all valid genotypes that belong to small groups. Results of the analysis performed on Experiment No.4 and Experiment No.5 can be seen in Figure 4.8. The graph shows that in the previous experiment only ca 20% of organisms belonged to groups containing less than 5 individuals. It means than a population was divided into several large groups, which caused homogeneity. On the other hand, organisms in the current experiment tended to form four times more small groups than their counterparts. Therefore, we can conclude the we have successfully achieved more heterogeneous populations. When we focus on mutation operator, 26% of results were valid, while the rest 74% were evaluated to zero. We do not consider these values problematic because of the more complex structure of Snake’s morphology requiring harmony of all muscles. However, we detect interesting behavior of improvement points (see Table 4.19). Even though we had reduced the space for reproduction from 70% to 50%, distribution of points changed rapidly. Nine new champions were generated by crossing operator while only four points corresponded to mutation. CHAPTER 4. EVOLUTIONARY EXPERIMENTS 48 Figure 4.7: Fitness of all organisms in Experiment No.5. Figure 4.8: Dependency between a population and total amount of organisms in small groups. Conclusion We increased the population size and enlarged space for mutation operator, which caused more scattered and heterogeneous populations. But, even though we have achieved desired structure of populations, the experiment did not produce sufficient results because the evolved organism is similar to its predecessor in Experiment No.4. Experiment 6 (freezed frequency parameter) The previous experiments did not yield desired results despite of relatively good structure of populations. One of possible reasons may be the fact that operators treat each muscle as an independent piece of control system. However, many springy organisms move systematically and their muscles are dependent on each other. For example, a group of muscles belonging to a leg should share the same resting length to produce movement they were designed for. Because we do not encode springy organisms into genotypes and evolve them CHAPTER 4. EVOLUTIONARY EXPERIMENTS 49 Result Value Populations Best fitness Average fitness 50 16.3m 5.7m Table 4.20: Results of Experiment No.6. Figure 4.9: Fitness of all organisms in Experiment No.6. directly, we loose advantages of defining various dependencies between muscles. However, we still can make organisms a bit more systematic. If we study SodaRace/SW3d organisms, we find out that there is one basic dependency shared by all creatures – identical frequency of their muscles. If we, for example, imagine Snake’s muscles driving with different frequencies, it will not seem as a natural movement. Moreover, when we imagine real animals, like a running tiger or swimming fish, we can see that their muscles really contract with identical frequency. For that reason, we will try to set frequency of all muscles to the same value f = 1 and evolve only amplitude, the resting length and the first move. For other settings we will use values from the previous experiment. Results Results of the experiment can be seen in Table 4.20 and fitness of all organisms in Figure 4.9. We can see that freezed frequency dramatically speeds up the evolution process. The best organism of the very first generation was evaluated to 2.6 and the champion of the second generation to 7.3. Furthermore, the evolved organism moves systematically. It raises most of its body to air and expands muscles that touch the ground to translate its body forwards. Then, it lays the body and prepares for the next phase. Periodical repetition of this movement causes Snake to move forwards quickly and naturally. Conclusion We have freezed the frequency parameter in order to make organism similar to animals living in nature. The evolution was able to quickly produce desired results. CHAPTER 4. EVOLUTIONARY EXPERIMENTS 4.4 50 Evolving Round Ladder and Horse It seems that we have found sufficient configuration for the genetic algorithm. Very high mutation rate causes populations to be more heterogeneous. The more organisms are members of small groups, the more options for control system is tried by evolution. Furthemore, with frozen value of frequency, the search space is smaller, and the algorithm finds best individuals more quickly. We will test these GA settings on another two organisms, called Round Ladder (Figure 4.1c on page 36) and Horse (Figure 4.1d). Round Ladder Round Ladder is a more complicated organism that the previous two creatures, as it contains eight muscles. We ran the genetic algorithm with the settings used in Experiment No.6, except for the population size, which was set to 300. The evolution found a sufficient control system, because the evolved organism achieves fitness 146m. The creature uses the cube in its central part for producing systematic movement. The organism even accelerated during the simulation as shown in Figure 4.10. Figure 4.10: Speed of the evolved Round Ladder during simulation. Horse Horse is the most complicated tested organism. Its control systems contains parameters of sixteen muscles. All the muscles must drive in harmony to provide a stable and natural movement. First, we optimize Horse for locomotion behavior. We run the evolution twice in order to observe different types of behavior. The first evolution yielded a control system, which corresponds to movement of a running animal. The Horse first extends the front legs forwards and makes a skip by stretching the back legs. Then it shortens all four legs and starts the movement again. (Because this experiment was performed with different ODE settings, the organism walks in a circle instead of running forwards in the current simulator.) CHAPTER 4. EVOLUTIONARY EXPERIMENTS 51 The second evolution produced a control system similar to the movement of another types of animals, where the opposite legs behave approximately in the same way. The front left leg and the back right legs extends while the front right leg and a the back left leg shorten. After this movement pushes an organism forwards, the roles of legs change and the front left leg and the back right leg start to shorten and the other two start to expand. Similar results have been achieved in the work of Valsalam and Miikkulainen, who study multilegged robots. They found four basic types of gaits for animals with four legs. Our experiments have achieved two of them. For more information about their results, see [12]. Finally, we tried to optimize Horse for reaching-the-flag behavior. We placed the flag perpendicular to the natural movement of the previous Horse. The optimization tool found such control system, which uses small jumps for reaching the flag. While direction of the organism remains approximately identical, the body performed small jumps perpendicular to the natural movement. 4.5 Discussion on results This section discusses progress and results of the performed experiments and analyze their duration. Ideas for improvements of the optimization mechanism are described in Chapter 5. Performed experiments. We have performed more than ten experiments with four different morphologies. The first set of experiments, with a relatively simple organism, tests various types of mutation. We have found out that mutation which treats muscles as atomic parts of a control system is not appropriate for our purposes, as it yields either unstable or identical creatures. On the other hand, mutation based on parameters produces less faulty organisms and smaller dominant groups. The next set of experiments were performed on an organism with higher demands for muscle cooperation. Even though we used parametric mutation and higher mutation rate, the experiments did not yield sufficient results. Because the search space was too large, the evolutions started to stagnate and were not able to produce any sufficient control systems. Inspired by real animals, we freezed the frequency parameters of all muscles to the same constant value. This approach dramatically improved the evolution progress and yielded much better results in shorter time than the previous experiments. With the frozen frequency parameter and large space for mutation, we performed several experiments on more complicated structures comprising of eight or sixteen muscles. The experiments were successfull as each evolved organism resembles behavior of a real moving animal. Duration. The duration of a single evolution depends mainly on the chosen population size and the complexity of the chosen morphology. The more complicated organism is being evolved, the longer is the duration of the fitness evaluation. However, because we used the CHAPTER 4. EVOLUTIONARY EXPERIMENTS 52 distribution layer of the ERO framework, large-scale evolution computed on a cluster of 10-20 computers took less than ten hours to complete. In case of a simple organisms (e.g. Pyramids), the distributed computation evolves a creature in several minutes. For comparison, we can analyze an optimization mechanism based on exhaustive search applied on Horse. If we tried five values for the resting length, another five values for amplitude, two values for the first move, and a single constant for frequency, there would be 50 combinations of parameters for each muscle. If we optimized an organism comprising . of 16 muscles, the total amount of tries would be 5016 = 1.5 × 1027 . Assuming that each fitness evaluations takes one second (simulation of Horse for twenty seconds in the ODE world usually takes about 20-30 seconds in the real world), the algorithm would take approximately 4.8 × 10¹⁹ years to complete. On the other hand, if we use genetic algorithms with a population size 1000 and let evolution run for 500 generations, total number of fitness evaluations would be 5 × 10⁵ and the evolution would take only six days to complete. Chapter 5 Future works The development process together with performed experiments brought many ideas for enhancement the project of springy organisms. Possible improvements of the editor are described in the developer manual (Appendix B). In this chapter, we cover ideas for increasing performance of the optimization mechanism (Section 5.1) and present possible future extensions of the springy organism project (Section 5.2). 5.1 Improving performance Although the results achieved during experiments are sufficient, the optimization mechanism could be enhanced by various improvements. We can observe that evolutions usually found one appropriate solution in the very first generation and continued in improving its fitness during the rest of the evolution. In other words, there was usually only one champion, whose parameters were enhancing by operators. With this behavior, we often achieved different results when we run evolution twice, because the very first population contains different organisms. We can improve the evolution process by using a more advanced genetic algorithm. The Hierarchical NEAT (proposed in [8, 9], briefly described in Section A.3) divides the population into several subpopulations according to the difference between organisms. Each subpopulation is evolved independently, but sometimes a good piece of genetic information moves from one subpopulation to another. Using this approach, the optimization mechanism would probably evolve several springy organisms based on different control systems at the same time and combine good properties of each control system together to form a better creature. The only operator, which is needed to implement, is a compatibility distance function, which returns number between zero (absolutely different) and one (identical) for two given genotypes according to their similarity. Compatibility distance function is used by H-NEAT algorithm to assign organisms to species. Because we can image the control system of a springy organism as a vector of numbers, implementation of the compatibility distance would not be complicated. Because the search space of all possible parameters is too large, we tried to freeze the 53 CHAPTER 5. FUTURE WORKS 54 frequency parameter, which turned out to be a beneficial decision. We can use another types of heuristics to increase performance of the algorithm. Instead of a global limit for the maximal length of a muscle, a user can define the maximal length for each muscle. Another strategy is to provide a mechanism for freezing any parameter in any muscle, instead of all frequencies. We can observe that control systems of SodaRace/SW3d creatures or real animals usually result in systematic movement, where a group of muscles depend on each other. However, our optimization tool treats each muscle as an independent piece of the control system, which slows performance of the algorithm. The solution is to enhance genotype of a springy organism and use more sophisticated genetic operators. For example, parameters of a muscle do not have to be bound directly to the muscle. The genotype could contain a list of parameters and each muscle would point to one group. Therefore, several muscles would share the same parameters and the movement would be more systematic. 5.2 Possible extensions The first possible extension of the springy organism project is to continue in tendency of the previous projects and create a web page which offers users online tools for designing, simulating and optimizing 3D springy organisms. Because the proposed tools have been implemented in Java programming language, they can be easily integrated into web pages using the Java Web Start technology. An online database of springy organisms, similar to SodaZoo and Fauna (introduced in the SodaRace and SW3d projects), can be also implemented and integrated with the site. In order to ease users configuration of a control system, another program which would automatically configure the genetic algorithm and gather results from evolution can be implemented and provided withing the pages. Therefore, designers would only need to create the structure of an organism, and the automatic tool would try to find proper parameters for springs. The pages would may also serve as an example and a guide for genetic algorithms. As the second alternative, the project of springy organisms can diverse from the previous projects and continue in enhancing capabilities of the control system. The constant parameterization of springs can by replaced by a more sophisticated mechanism—based for example on artificial neural networks—, which would be able to change behavior of an organism continuously during simulation according to the input from several extra added sensors. Therefore, organisms could be evolved for more complicated types of behavior including light following or following prescribed way. Chapter 6 Conclusion A springy organism is as an extremely simplified model of an artificial moving structure comprising of several springs driven in a simple harmonic motion. The main contribution of this thesis is a set of tools for creating, simulating and automatic configuration of such types of creatures. The work introduces an interactive 3D editor with a universal drawing canvas aimed for designing springy organisms. The editor can be used for any other models requiring accurate and interactive positioning of objects in a three-dimensional virtual space. The problem of selecting a point on the drawing canvas according to the current position of the mouse pointer is discussed, as this issue is complicated to solve using the OpenGL technology. Several available mechanisms are introduced and a working solution has been implemented. However, a better approach, which would lead to improvement of accuracy in shorter time, is presented as well. Another implemented tool is a graphical simulator of springy organisms based on the ODE physics engine and the OpenGL technology. Because construction of the ODE model is not trivial, several variants were discussed and the most stable solution has been implemented. Even though the approach has proved to be sufficient for the purposes of optimization, search for another physics engine with better support for springs and collisions is recommended for future works. Besides, the thesis presents a tool based on genetic algorithms, which optimizes a springy organism’s control system. Since the project of springy organisms has been integrated into a framework for evolutionary experiments called ERO, a configuration and a computational layer of the evolution were not necessary to implement. The basic operators of genetic algorithms—including generation, mutation, crossing and a fitness evaluation— have been designed and embedded into the ERO application together with the editor and the simulator. Several evolutionary experiments with four specific organisms have been performed and their progress and results analyzed. The experiments are considered to be successful as they yielded sufficient control systems for all organisms and target behaviors. Analysis of the experiments have uncovered several ideas for improving effectiveness of the evolution mechanism. Suggestions include more sophisticated encoding of an organism into the 55 CHAPTER 6. CONCLUSION 56 genotype, enhanced hints for operators, and a usage of more advanced genetic algorithms. Proposed experiments together with the attached user manual can serve as guidelines for users which try to configure the introduced optimization algorithm and want to understand results and progress of their experiments. As springy organisms form another large project in the ERO framework after the virtual creatures, the implementation of the project and suggestions for enhancements have hopefully improved the overall quality of the framework. Even though the manuals attached to the thesis cover the application very briefly, they are the very first guides in the English language describing the basics of the application from both the user and the developer point of view. As a whole, the goals of this thesis have been successfully fulfilled as a working software for complete course of designing and optimizing springy organisms has been created and tested. Results achieved during experiments and development can be also used as a groundwork for the further research in this area. Appendix A User Manual This chapter covers basic guidelines for configuring and performing evolutionary experiments on springy organisms with the ERO application. Because of complexity of the framework, we focus mainly on springy organism-specific issues. Section A.1 describes start of the application and explains its three main modes. Section A.2 is devoted to creation of the initial population with the use of the proposed springy organism editor. Section A.3 covers configuration of the genetic algorithm. Issues related to the computation layer are described in Section A.4. A.1 Starting the application, main modes The ERO application is available in Appendix C in a directory called ERO. In order to run the application, you must first set the property native.dir in ero.properties to either linux-i386 or win32 according to a localhost platform. Then look for a directory called /ERO/bin, which contains executable files win/run gui.bat and linux/run gui.sh. To Figure A.1: Three modes of the ERO application. 57 APPENDIX A. USER MANUAL 58 start the application, run the corresponding file according to a localhost platform. More information about starting the application can be found in the ERO user manual - [7]. The application consists of three modes, which can be seen in Figure A.1. When the program starts, a user can see the starting screen (Figure A.2), which represents the basic mode. From this point, a user can either configure a new project (designing new organisms, setting parameters of a genetic algorithm, sending a project to a server) or watch an existing project, which runs on a computational server. After a click on New project button, a user is asked to choose a scheme. To evolve binary organisms or virtual creatures (see [7]) a user should select Binary scheme or Creature scheme, respectively. Because these schemes are fully documented in the ERO manual, we will cover only the springy organism-specific issues. When a springy organism scheme is chosen, the mode of the application changes to configuration. A user can design and simulate springy organisms, test operators of a genetic algorithm, configure evolution and start a project on a server. As shown in Figure A.3, the screen is divided into two main tabs: the Initial population tab and the Evolution settings tab. We will explain these tabs on typical steps of configuring an evolutionary experiment: 1. First, create an initial population of springy organisms in the Initial populations tab using the 3D editor (see Section A.2). 2. Then switch to the Evolution settings tab and configure parameters of the genetic algorithm (see Section A.3 on page 68). 3. Start the distributed layer of the application and set a server hostname. (see Section A.4 on page 71). 4. Press the blue arrow in left top corner and watch progress of running evolution (also in Section A.4). A.2 Creating the initial population In order to see all features of the Initial populations tab, find a button which switches the tab into an advanced view ( icon). As illustrated in Figure A.4, the tab should be dividing into the following five sections: Genotype Editor Using this window, a user can create/load/save/mutate/generate springy organisms. Usually, designing a new creature in the editor is the first step of setting up a new evolutionary experiment. Section A.2.1 covers this tool more deeply. Note that the Setup section provides configuration of generation and mutation operators. Phenotype Viewer When the genotype and the phenotype of an organism are not identical structures, the phenotype editor is used for visual representation of a genotype. However, these structures are identical for springy organisms, so the phenotype viewer is not used. 59 Figure A.2: Initial screen of the ERO application. Figure A.3: Basic tabs and buttons in the configuration mode. APPENDIX A. USER MANUAL 60 Figure A.4: Advanced view of the Initial populations tab. Populations The Initial Populations section stores genotypes loaded from the genotype editor. This set of genotypes represents the initial population parameter used in the genetic algorithm (see Algorithm 3.1 on page 26). Creating the initial population is the main purpose of this tab. Furthermore, a user can manually perform basic operators of a genetic algorithm, which is extremely helpful for testing purposes. A popup menu, which appears after a right click, also provides several operations, which can be performed with selected genotypes. Section A.2.2 covers this section more closely. Setup Testing operators can be configured in the Setup section. Notice that these operators are not used during experiments. Operators and other parameters used during experiments can be set in the Evolution settings tab. Because testing operators are parameterized in the same way as evolution operators, we cover them at once in Section A.3. Project comments A simple text editor used for project comments. This section is shared by both tabs and is useful for brief notes about configuration. A.2.1 Editor of springy organisms The editor consists of three panels: the 3d organism panel, the property panel and the panel with buttons. Figure A.5 shows the panels and provides explanation of the buttons. APPENDIX A. USER MANUAL 61 The only button which may seem unclear is generate ( icon), which is used both in the editor and the section with the initial population. If this operator is applied on an empty genotype, a new springy organism consisting of one node at position (0, 0, 0) is created. On the other hand, when the operator is applied on an existing genotype(s), the morphology of the organism remains identical, but random control system (i.e. parameters of muscles) is generated. Figure A.5: Genotype editor for springy organisms. The basic usage of the editor is described on the following set of most common tasks. Task 1: Adding a new node The basic idea behind node addition is a drawing canvas (see Figure A.6), which is a rectangle arbitrary positioned and rotated in 3D space. You can add a new node by clicking on the canvas by the left mouse button. The purpose of the drawing canvas is to avoid unambiguous node addition. When users click on a screen, they should exactly know where the new node will be placed. For the same reasons, nodes can be moved only withing the area of the canvas. Movement of a node can be achieved by pressing and dragging the left mouse button. Task 2: Adding a new muscle/rod Addition of muscles and rods are performed in the same way, so we will cover them at once. Initially, you have to select nodes between which you want to create connections. APPENDIX A. USER MANUAL 62 Then click with the right mouse button on a screen to invoke the popup menu. Choose Create muscles or Create rods item. You will see a submenu offering several shapes like a path or a circle. For each desired shape (except for the full graph) the editor must know some additional information (e.g. the center of a star) to be able to create muscles/rods that represent the shape. For this reason, each selected node is assigned a number according to the order in which it was selected. With this numbering, the editor can create shapes as illustrated in Figure A.7. Task 3: Selecting parts of an organism Each organism part (a node, a muscle or a rod) can be selected by a single click. When you hold shift key and click on a part, it is added or removed from the current selection. Task 4: Removing parts of an organism First, select all parts you wish to remove. Then invoke a popup menu and choose Delete selection. Note that if a node is removed, all muscles and rods connected to the node are removed as well. Task 5: Duplicate parts of an organism To copy a part of your organism, select all parts you want to duplicate and choose Duplicate selection in the popup-menu. Note that if you duplicate a muscle or a rod, corresponding nodes are copied as well. Task 6: Translating parts of an organism If you want to move a part of an organism to another location, you have four options: 1. A single node can be translated by dragging it by mouse across the drawing canvas. 2. You can directly enter position of the currently selected node in the property panel. Do not forget to press Apply changes button to make the editor update an organism. 3. If you need to move several parts at once, select them first and move any node on the canvas by dragging the mouse. This feature can be used even if selected parts are not on the canvas. 4. Nodes can be projected to the canvas by invoking the popup menu and choosing Project nodes on canvas. Task 7: Settings parameters in the property panel The property panel provides parameters of a currently selected part. It also shows several information useful for configuring organism’s control system. There is one property common for all parts – a name. The property has informational purpose only as it is used in editor error messages to indicate the problematic part. Other properties and specific for each type of a part. 63 Figure A.6: Editor of springy organisms with description of its elements. APPENDIX A. USER MANUAL 64 Figure A.7: Five ways of creating muscles/rods between a set of selected nodes. Each node is assigned a number according to which the editor can create desired shape. Node You can set an exact position of a node by entering coordinates of its center. Moreover, the panel informs you about a node diameter. Currently, all nodes have identical diameters. However, this may change in future releases. Rod Because rod is a rigid connection between two nodes, it has no other parameters except for a name. Additional information includes diameter and the length of a cylinder which represents a rod. Note that length is measured as distance between centers of the nodes. Muscle Apart from rods, muscles can be configured with four parameters. See Section 3.2.1 on page 18 for their detailed explanation. The panel also provides various data about a currently selected muscle. The initial length is the length of the muscle in the editor (value of Li ). The value depends only on organism structure and does not change during simulation. The minimal and maximal length depend on muscle parameters, and they inform you about length limits the muscle reaches during simulation. Muscle parameters must be set correctly in order to meet defined restrictions (see Section 3.2.2) The panel also contains diameter that corresponds to a cylinder which represets the muscle. Task 8: Copying parameters of a muscle To copy muscle parameters to local clipboard, invoke a popup menu on a currently selected muscle and choose Copy muscle parameters. Then select muscles you want to apply the parameters to, invoke the popup menu again and choose Paste muscle parameters. APPENDIX A. USER MANUAL 65 Task 9: Translating the origin The origin can be translated to any location using keys A (left), D (right), R (up), F (down), W (forward) and S (backward). A key T can be used for returning the origin to the initial position. Task 10: Rotation of the model If you press and hold the left mouse button and there is no element under the cursor, you can change rotation of the whole model by dragging. Task 11: Changing position and rotation of the drawing canvas The drawing canvas is a rectangle with constant dimensions. It is defined by the position of its center (we will refer to this point as a canvas position) and a normal vector, which is a vector perpendicular to the rectangle. If you invoke a popup menu and choose Transform canvas submenu, you will see four operations which can be performed with the drawing canvas: Parallel to screen This transformation changes the normal in such a way that the drawing canvas is parallel to a user screen. The canvas position is not modified. Define by nodes The transformation can be used only if one, two or three nodes are selected. If one node is selected, the canvas position is changed to correspond with center of the node. Rotation is not modified. If two nodes are selected, the canvas is placed between the nodes. Rotation of the canvas is changed in such a way that it is parallel with Z axis (i.e. its normal is changed to be perpendicular to the Z axis) and it contains the two nodes. If three nodes are selected, the canvas is placed into a plane which is defined by the nodes. Move to active node Operation is enabled only if the mouse cursor is above a node. The transformation does not change rotation, it only places the canvas to the center of the active node. This operation is usually performed by the provided keystroke. Perpendicular to nodes The option is available only if exactly two nodes are selected. The normal is chosen to be parallel with a line defined by centers of the nodes. The canvas is placed between them. Start translating After selecting this option, the editor switches into idle mode when only mouse movement is recorded. According to vertical changes of cursor’s position, the canvas is moved along the normal. If you want to exit the translating mode, press the left mouse button. Show canvas normal This option does not change canvas rotation or position. It only toggles visibility of the normal. APPENDIX A. USER MANUAL 66 Task 12: Correction of wrongly configured muscles When you move a node, you also changes initial lengths of muscles connected to the node. However, the initial length of a muscle must be greater than the minimal length and smaller that the maximal length. These two limits are calculated according to muscle parameters. Red color of a muscles indicates that the parameters are not correct and the initial length exceed one of the limits. Therefore, if you see a red muscle, you can either change its length or correct its parameters. Note that no further operations with an organism (like simulation, saving, etc.) are allowed if the organism contains a wrong muscle. Task 13: Running simulation of an organism The simulator can be configured in the Setup section. It simulator uses parameters of a fitness function (Table A.3 on page 70) to determine tested behavior and ODE settings. Note that velocity restrictions and the maximal contacts restriction are ignored during graphical simulation. To watch behavior of a designed organism in the simulator, the creature must represent a consistent organism (see Section 3.2.2). If the organism satisfies all requirements, icon, which opens two windows. The first one (Figure A.8) shows the running press simulation, while the second describes available keystrokes. If you want detailed information about organism’s behavior during simulation, the Apache Log4j logger (see [13]) called SimulatedOrganismAppender is available. Place a file log4j.xml with the configured logger to the /ERO directory and the simulator will print Figure A.8: Simulation of a springy organism. APPENDIX A. USER MANUAL 67 state of the organism into desired locations. The state includes current time, the position and speed of an organism, the z-coordinate of the lowest node, the maximal linear and angular velocity, the maximal joint error and the number of contacts in the last simulated second. Task 14: Increasing speed of editing All operations covered in the previous tasks can be performed using keyboard shortcuts. All shortcuts are shown in a popup-menu on the right sight. Complete keymap is also available as a standalone document in Appendix C. A.2.2 Initial population The initial population holds genotypes which are be passed to the genetic algorithm as a parameter. The section provides various operations for the population, like setting its size, testing operators of the genetic algorithm, moving genotypes up and down in the list, loading a selected genotype into the editor, and much more. A popup menu invoked a group of selected genotypes provides additional operations like computing values of a fitness function or sorting the population according to fitness values. Using these features, a user can perform evolution manually by applying operators on a group of organisms. Rule. In order to make the genetic algorithm work, the initial population must consists of springy organisms with the same morphology. Otherwise, the crossing operator will fail as it is designed for springy organisms with identical morphology. Warning. Sometimes, when the ERO application is run on Java Runtime Environment version 6, frequent manipulation with genotypes in the initial population may cause a dead-lock. Because the graphical user interface is going to be replaced by a newer version in the next release of the framework, this bug has not been solved yet. APPENDIX A. USER MANUAL A.3 68 Evolution settings The Evolution settings tab provides a lot of parameters of evolutionary experiments, which can be divided into three groups: Genetic algorithm settings The settings consist of parameters universal for all experiments independently of chosen organisms. All schemes (e.g. binary scheme, virtual creatures scheme, springy organism scheme) share these parameters. Organism specific settings These parameters configures springy organism-specific operators. Computational layer settings Parameters in this category configures the computational layer. They are described in Section A.4 on page 71. The most of the genetic algorithm settings are devoted to configuration of the more advanced version of genetic algorithm - the Hierarchical NEAT (H-NEAT), proposed in [8, 9]. To be able to appropriately configure H-NEAT to represent a simple genetic algorithm (SGA), we must briefly explain the basic idea behind H-NEAT. The SGA consists of applying several operators on one population of genotypes. However, the H-NEAT divides a population into several subpopulations, where each subpopulation evolves independently. Sometimes a good piece of genotype information is copied from one subpopulation to another. We can illustrate this approach on an example of islands. We can image that the SGA evolves a group of organisms on one isolated island. However, the H-NEAT evolves creatures on a group of islands, where a good piece of DNA occasionally gets get from one island to another (on a bird, for example). Thus, the H-NEAT evolutions are not stuck in a local optimum and yield better results than the SGA. Because we want to evolve organisms using the SGA, we need to configure the H-NEAT to occupy only one island. In other words, we need to configure the population to be divided into only one subpopulation. To make the H-NEAT work with only one subpopulation, the following parameter must be set: Subpopulation assigner ← Always zero. The subpopulation assigner divides the initial population into islands. There are several approaches for the division. The always-zero assigner is one such strategy, which places all organisms on one isolated island. Now we can configure the SGA with a group of settings called Subpopulation parameters. We use only a part of settings, because others are not needed in case of the SGA. Table A.1 lists available parameters. If you need more information about the SGA and its parameters, see Section 3.4 on page 24. Springy organism-specific operators are described in Table A.2. Tables A.3 and A.4 cover parameters of a fitness function and genotype limits (a set of global rules for all all operators), respectively. Parameters for concrete operators are not listed, as they are described also in Section 3.4. 69 Parameter Description Champions Number of elite organisms, which are automatically passed to a new population. Champions - min. pop. size Parameter of the H-NEAT. Set the value to 1. Mutation percentage Part of a new population that is be created by mutation. Mutation selection Selection operator used for mutation. Interspecies crossing probability Parameter of the H-NEAT ignored in the SGA. Mutation after crossing probability Probability that an offspring bred by crossing is mutated. Crossing selection Selection operator used for crossing. Table A.1: General parameters of the genetic algorithm. Parameter Description Genotype limits Fitness Mutation (standalone) A list of rules and limits all operators must follow. Configuration of the fitness function. Mutation operator used for organisms which are bred by mutation. Mutation operator used after crossing. Crossing operator used for the first half of organisms which are created by mating. Crossing operator used for the second half of organisms which are created by mating. Configuration of an operator which creates the first population of genotypes according to the initial population. Parameter of the H-NEAT ignored in the SGA. Mutation after crossing Crossing 1st Crossing 2st Generator Compatibility distance Table A.2: Springy organism-specific parameters of the genetic algorithm. 70 Parameter Description Test duration Duration of a simulation. However, the simulator may be stopped sooner if an organism fulfill a given task (e.g. it reaches a given flag). Behavior Defines the target of optimization. Currently implemented behaviors includes locomotion and reaching a flag. Max contacts Organism parts can touch each other at most max contacts times during one second. Otherwise, simulation is stopped and zero fitness returned. Too large limit (> 50) can lead to stability problems of the physics engine. Default value is zero, which means no contacts are allowed. 0 Max. allowed Maximal rotation velocity of organism’s nodes. If the angular veloc- limit is exceeded, simulation is stopped, and zero fitness ity returned. Common velocity is usually less than 10rad/s. 10 Max. allowed Maximal linear velocity of organism’s nodes. If the limit linear velocity is exceeded, simulation is stopped, and zero fitness returned. Common velocity is usually not higher than 50m/s. 100m/s Max. allowed Maximal allowed distance between main body and proxy joint error body (see Section B.2 for details). If the limit is exceeded, simulation is stopped, and zero fitness returned. Common error is usually less than 0.1m. 0.1m Tube collision If set to yes, two parts of an organism are not allowed to detection intersect. Otherwise, two parts can intersect, the parameter max contacts is ignored, and an organism behaves like SodaRace/SW3d racers. yes Show collision geoms This option does not influence behavior nor fitness evaluation. It toggles visibility of capsule geoms (see Section B.2.2 for more details). no Node weight Weight of a node. Gravity Magnitude of gravity force. Physics engine settings Technical ODE settings used in simulation. See [10] for more details. Table A.3: Parameters of the fitness function. Default value 10s 1kg 10m/s2 APPENDIX A. USER MANUAL 71 Parameter Description Tube diameter Diameter of cylinders used for muscles and rods Diameter of spheres representing nodes Limit for the maximal length of a muscle. Allowed range of frequency parameter. Toggles freezing the parameter of frequency during evolution. Node diameter Maximal muscle length Frequency Evolve frequency Default value 0.15m 0.2m 2m 0Hz - 2Hz yes Table A.4: Parameters of genotype limits. A.4 Computational layer This section covers the basics of the computational layer. Deeper guidelines for the computational layer can be found in [7]. The ERO application can be divided into two basic layers: a user front-end and a computational layer. The front-end consists of a desktop application called user-client, by which a user can set up an (evolutionary) project (covered in Sections A.2 and A.3). The computational layer consists of a server and several workers, which are connected to the server (see Figure A.9). When a user-client sends a project to a server, the server distributes the received task among connected workers, which start to compute given jobs. While the server (and corresponding workers) computes, a user-client can watch preliminary results from the server. We will describe the procedure of starting a server and connecting several workers to a running server. Then we will configure a distributed computation using the user-client and send a project to a server. USER CLIENT USER CLIENT SERVER WORKER USER FRONT-END COMPUTATION LAYER WORKER WORKER Figure A.9: Main components of the ERO framework. APPENDIX A. USER MANUAL 72 Starting a server and workers The Appendix C contains a directory called ERO with the ERO application. In order to make a server and workers run, modify a file called ero.properties first. The file contain several pairs key=value, which provide information for a server and a worker. Table A.5 describes all available keys with possible values. Tables A.6 and A.7 show examples of the file for a server and a worker, respectively. All executable files can be found either in a directory /ERO/bin/linux or /ERO/bin/win according to a target platform. Content of both directories are identical. They consist of several batches used for starting various ERO layers. According to a target platform, batches are suffixed with either .sh (for Linux OS) or .bat (for Windows OS). We will refer to the batches without the suffix (e.g. run gui instead of run gui.sh/run gui.bat). To start a server, configure ero.properties and launch run server. To run a worker, set server.hostname.for.worker to the hostname of a server, native.dir to the platform of the worker and launch run worker. If everything goes well, the computational layer has just been started. Sending a configured project to the server To start a distributed computation of an evolutionary experiment (which must be already set up as described in Sections A.2 and A.3) several further steps must be done. First, we need to configure behavior of a server. Go to the Evolution settings tab and look for Other parameters section. This group of settings control how a server computes a given project. See Table A.8 for description of each parameter. After a server is configured, set the user-client to connect to the running server. Go to Preferences->Connection and enter the hostname of the server. As the last step, it is recommended to comment and save the whole project. Then press the blue arrow in the left upper corner to send the project to the server. Rule 1: It is necessary to toggle off computing fitness on server. Otherwise the computational layer will not work. (Current implementation of the computational layer allows only workers to load native libraries. Loading ODE library by a server will fail. Projects which do not need native libraries (e.g. Binary scheme) can compute fitness on a server.) Rule 2: It is very important to switch off automatic results receiving in Preferences->Connec as this option is not fully tested and may cause connection problems. Watch results If you want to watch results of a running project, configure a server hostname in Preferences->Connecti first. Then click on the Watch button in the initial screen (see Figure A.2). 73 Key Description server.hostname.for.server Fully qualified hostname of a localhost, where a server runs. The value is used only by a server to correctly identify itself when establishing connections with workers. server.hostname.for.worker Fully qualified hostname of a server to which a worker connects. The address may also contain a port in a form hostname:port. If the port is not present, default value 1099 is chosen. This pair is used only by workers. native.dir The platform of a localhost according to which native libraries are chosen. Because workers perform fitness calculations, the value is not used by a server, only by a user-client and a worker. Available values are linux-i386 and win32. server.port.for.server The port at which a server listens. The Default value is 1099. Table A.5: Keys available for the ero.properties file. server.hostname.for.server = u-pl0.ms.mff.cuni.cz server.port.for.server = 1099 Table A.6: Example of the ero.properties for a server. In this case, the server must be started on a computer with hostname u-pl0.ms.mff.cuni.cz. The server will listen on a port 1099. server.hostname.for.worker = u-pl0.ms.mff.cuni.cz native.dir = linux-i386 Table A.7: Example of the ero.properties for a worker. In this example, the worker must be run on a Linux platform. The worker will connect to a server whose hostname is upl0.ms.mff.cuni.cz using the port 1099 (default port is used, when the port is not present in the value). 74 Parameter Description Store temporary populations on disk If the value is set to yes, a server will store the last completed population and the population currently computed on a disk instead of RAM. Store history on disk If the value is set to yes, a server will store all populations on a disk instead of RAM. The destination place is a global temporary directory like /tmp or c:\temp. Send transformed fit- If set to yes, a server sends also values of a transformed fitness to the userclient ness function, not only values of a normal fitness function. Fitness group size A server sends tasks to workers. A worker computes a given task and send results back to the server. This parameter defines amount of organisms in a task which demands for computing a fitness value. If the value is N , a server sends N genotypes to a worker with a demand for computing a fitness value. The worker performs N simulations (one simulation for each springy organism) and sends back N numbers defining their fitness values. Compute fitness on server Determine, whether the fitness of a genotype will be computed on a server or workers. In case of springy organisms, switch off this option. Operator group size Same as fitness group size, but for operators of the genetic algorithm. Compute operators on server Determine, whether the operators will be computed on a server or workers. In case of springy organisms, operators are advised to be computed on a server, because it is faster. Update evolution sta- Unusable for projects evolving springy organisms. tus each iteration Table A.8: Parameters of the computational layer. APPENDIX A. USER MANUAL 75 Note that there are many reasons why a connection to a hostname may fail. See the user manual for a complete list of errors and their explanations. However, there is a common error, which appears when the server is congested. A user sees a message “Serious error: should not happen - see LOG”, and the application raises the ClientNotLoggedIn exception. In this situation, stop all workers and try to connect again. Moreover, when a user invokes an action show details of the selected genotype in a popup menu, three editors of springy organisms appear, and they do not cover each other correctly. See Section B.3.4 on page 98, which explains this problem. The screenshot of the Watch mode can be seen in Figure A.10. See the ERO user manual for information. Figure A.10: Watch mode of the ERO application. Appendix B Developer Manual This chapter describes basic implementation concepts of the springy organism project and its integration with the ERO framework. It is divided into three main sections. Section B.1 covers the architecture of schemes, which are ERO components providing integration with the framework. The section also presents a brief overview of the springy organism scheme. Next two sections are then devoted to implementation of two most challenging modules: the simulator and the editor. In Section B.2 we construct the ODE model of a springy organism and discuss various strategies considered during development. We also explain the basic principles of integration the physics simulator and the graphical output into the ERO framework. Section B.3 is devoted to the 3D interactive editor. We divide the editor into two parts: an organism-specific controller and an universal viewer. However, the largest part of the section discusses the problem of selecting a point on the canvas according to the position of a mouse cursor. At the end of the section, we cover integration of the editor to the framework. The developer manual describing the whole ERO framework can be found in Appendix C. B.1 Basic concepts The ERO framework is a tool for distributed computing and evolutionary experiments. A component called scheme stands in the center of each such computation. It defines a set of tasks assigned for computation together with GUI components used for their configuration. A scheme can also be thought of as a class, which provides access to the tasks and GUI components. We can see the hierarchy of schemes (e.g. the hierarchy of the corresponding classes) in Figure B.1. GeneralScheme stands at the top of the hierarchy as a unified interface for communication between others schemes and the computational layer. Because of the universal design of the framework, the evolutionary experiments are not the only ones which can be passed to the computational layer. The proof of this conception is a testing scheme called DartsPi, 76 APPENDIX B. DEVELOPER MANUAL 77 Figure B.1: Hierarchy of schemes in the ERO framework. which distributedly calculates an approximation of π without any genetic algorithm (GA). Evolution scheme is a more specific class, which can be used for evolutionary experiments based on GAs. The scheme assumes that its subclasses will implement basic GA operators like mutation, crossing and a fitness function. However, it already provides several universal operators, which can be used for all evolutions (e.g. operators of selection). If we want to implement a new scheme which will evolve our own types of organisms, we create a subclass of Evolution scheme and register organism-specific operators and GUI components to the new scheme. Binary scheme and Creature scheme are examples of such subclasses. The Binary scheme evolves binary-coded strings, while the Creature scheme works with virtual creatures (see Figure 2.2 on the page 15 for examples of these cubical organisms). Because springy organisms are optimized using GAs, a new subclass of EvolutionScheme–called SpringyOrganism scheme–has been created, and corresponding genetic operators with GUI components has been registered. Where are the schemes located? The ERO framework is implemented in Java programming language, which supports the system of packages. Therefore, all schemes can be found in cz.matfyz.ero.schemes. For the historical reasons, the GeneralScheme can be found in the subpackage called common. However, the rest of schemes try to follow a name convention. For example, the springy organism scheme together with all its operators and GUI components can be found in the subpackage called springy. Content of the SpringyOrganism scheme The springy organism scheme contains several subpackages and a lot of classes, which can be divided into five main groups according to their purpose (see Table B.1). APPENDIX B. DEVELOPER MANUAL Name Description The core Core classes and resources providing classes integration of the springy organism project to the framework as another evolution scheme. 78 Packages Devoted section base package Organism model Classes representing a springy organ- organism, ism and several utilities connected with organism.* organisms. partially in 3.2 on page 18 Simulator Physical simulator of springy organ- presentation, isms with real-time 3D graphical user presentation.* output B.2 on page 78 Editor The three-dimensional interactive editor of springy organisms B.3 on page 90 Genetic operators A set of springy organism-specific ge- generator, netic operators. mutation, crossing, fitness gui, gui.* 3.4 on page 24 Table B.1: List of five main modules in the springy organism scheme. We will not cover the core classes and resources because their explanations would be too technical, and a reader can find them in the ERO manual. Basic concepts of springy organisms, together with descriptions and pseudo codes of organism-specific operators, can be found in Section 3.2 (pg.18) and Section 3.4 (pg.24), respectively. This chapter is devoted to the two most challenging modules: the simulator and the editor. The simulator, described in Section B.2, is used for computing the objective value of the fitness function and for graphical user output. The editor, covered in Section B.3, is an interactive three dimensional tool designed for modeling springy organisms. B.2 Simulator The ODE model of a springy organism can be divided into two parts: the dynamic part (contraction of muscles, gravity, etc) and collision detection (suppressing intersection of two parts of an organism). Each of them requires different ODE concepts, which are joined together to form a stable physical model of a creature. The dynamic part is described in Section B.2.1. In Section B.2.2 we cover collision detection and discuss various considered alternatives. Section B.2.3 puts these parts to- APPENDIX B. DEVELOPER MANUAL 79 gether and presents an algorithm according to which the ODE model is created. Finally, we explain integration of these mechanisms to the ERO framework in Section B.2.4. We assume that a reader is familiar with basic ODE concepts including world, body, joint, geom, motor, mass and collision handling. If not, see the ODE manual in [10] for more information. B.2.1 Dynamic part The dynamic part of the model consists of a set of bodies connected with various types of joints (especially fixed, universal and slider joints). A node is represented as a single body with spherical mass. For the sake of clarity, we will refer to this type of bodies as main bodies. A rod is always simulated as a fixed joint between two main bodies. This approach ensures the same distance and relative rotation for two nodes connected by a rod. The whole problem of the dynamic part consists in simulating muscles. Experiments with the ODE engine have shown that a simple harmonic motion (SHM) of a muscle can be imitated by a slider joint with an attached slider motor. First of all, we will discuss several options for attaching a slider joint to the main bodies. Secondly, we will describe conversion between SHM parameters and ODE parameters of a slider joint. Connecting a slider joint to main bodies The main problem of slider joints is that they preserve relative rotation of the bodies they are attached to. If we attach a slider joint directly to corresponding main nodes, each slider joint would fight to preserve its relative rotation. Because this fighting behavior often leads to severe stability problems (like organism explosion), another mechanism must be used. Instead of using main bodies directly, we place an additional body (i.e. proxy body) between a joint and a main body (see Figure B.2.1). Because a proxy body needs to be connected to a corresponding main body by a joint, we need to choose a joint suitable for this purpose. The most appropriate joint is a universal joint because it reasonably constrains a rotation freedom of connected bodies. Experiments have shown that even though this approach solves the problem of fighting sliders, it causes another difficulties. Muscles correctly drive in a SHM, but they slip on the ground and produce no forward motion. The problem consists in nodes which are connected exclusively to muscles. If all sliders are connected to a main body via proxy nodes, any friction forces would cause the main body to rotate and to produce no resistance. This behavior is undesired because accurately simulated nodes must produce drag when touching the ground. We can solve this problem with a simple trick: A slider joint is attached to the main body via a proxy body only if the main body has already been attached to another slider joint or a fixed joint. If there are no joints attached to the main body, the slider joint is connected directly. APPENDIX B. DEVELOPER MANUAL 80 Figure B.2: ODE model of a springy organism – dynamic part. Using this trick, each node produces resistance when touching the ground and organism is able to move naturally. Note that the ODE engine does not support zero masses for bodies, which means that non-zero mass must be assigned to each proxy body. Therefore, we uniformly distribute mass of a node between the main body and all corresponding proxy bodies. APPENDIX B. DEVELOPER MANUAL 81 Conversion of SHM parameters In Section 3.2 we describe parameters of the driving SHM. Recall that a muscle is parameterized by a quadruple (Lr , A, f, δ), and that the length of a muscle in time t can be expressed as L(t) = Lr + A sin(ωt + ϕ), where ϕ is computed from the initial length Li and parameters Lr , A and δ. The ODE engine does not support any mechanism to directly control the length of a slider. Instead, it offers an option to define velocity of a slider in each time step. Therefore, we convert length parameters to velocity parameters. Let v(t) be slider’s velocity in time t. The formula for v(t) can be calculated using the first derivation of L(t) as v(t) = L(t)0 = Aω cos(ωt + ϕ). Because the velocity parameter defines speed of a slider’s contraction not expansion, the actual value of parameter is −v(t) instead of v(t). B.2.2 Collision detection Because one of our goals is to simulate springy organisms more realistically than the SodaRace/SW3d counterparts, we forbid two parts of an organism to intersect. The ODE model of our creatures uses a built-in collision system called JavaCollision, which is bound to the native ODE collision system. Collision detection for nodes in implemented with standard SphereGeoms, while rods and muscles are represented by CappedCylinderGeom (called CapsuleGeom as well). While SphereGeom can be attached directly to the corresponding main body of a node, CapsuleGeom turns out to be more problematic. We will present two solutions of muscle/rod collision detection. The first one yields very unstable behavior and, therefore, cannot be used for the simulation. The latter is relatively stable but still problematic in some cases. Unstable solution Assume that the dynamic part of an organism has already been created. If a muscle connects two nodes, there is either none or at least one proxy body attached to each of the corresponding main bodies. Furthermore, there is a slider joint connecting the corresponding proxy/main bodies. Now we add an extra body between the two main bodies (see Figure B.3). We then connect the new body to the main bodies with two extra slider joints, which makes the extra body remain between the main bodies. Finally, CapsuleGeom is attached to the extra node. Using this mechanism, the position and the rotation of the capsule is automatically updated during simulation by the ODE engine. The only parameter that needs to be updated manually is the length of the capsule. APPENDIX B. DEVELOPER MANUAL 82 Figure B.3: Unstable design of the collision system. Figure B.4: Relatively stable but still problematic implementation of the collision system. Even though this approach may seem stable, experiments have shown the opposite. There are too many slider joints constraining the same type of motion, which leads to severe stability problems. However, these problems can be partially solved by removing the dynamic slider joint and transfer muscle’s strength into the collision sliders. This configuration would still lead to fracture behavior during collisions, when a muscle temporarily breaks into two pieces in the point of an extra body. Stable solution Currently implemented collision mechanism is much simpler and more stable than the first introduced approach. For a given muscle we first choose a random ending node and the corresponding main body. Then we attach a capsule geom to the main body, which is properly offset by a transform geom (see Figure B.4). With this configuration, we must manually update position, rotation and the length of a capsule after each time step of simulation. However, according to performed experiments, these calculations do not slow down the simulation. APPENDIX B. DEVELOPER MANUAL 83 Problems Both of introduced collision models share the same type of problem caused by the ODE collision system. When two muscles/rods touch each other, the ODE physics engine applies force proportional to depth of penetration to the corresponding bodies. Because of stability issues, this force cannot exceed an allowed limit. The problem appears when the two parts with high relative speed intersect; the generated force cannot repel them and they consequently move through each other. The same problem occurs when two parts of an organism are pushed towards each other very strongly. However, this type of behavior can be avoided by several workarounds. Objective functions used during optimization can evaluate an organism with zero result if any of its parts moves to quickly or generate too many contact points. In proposed fitness functions (see Section 3.4.6 on page 32), we use the latter strategy, which leads to evolving creatures whose parts do not intersect at all. B.2.3 Putting it all together Putting the dynamic part and the collision system together, we can formulate an algorithm (presented in Algorithm B.1 on page 84) for creating a complete ODE model of a springy organism. 84 Algorithm B.1: Creating the ODE model of a springy organism input : springy organism begin forall the nodes in organism do create a (main) ODE body at node’s position; attach an ODE sphere geom with node diameter to the (main) body; endfall forall the rods in organism do create an ODE fixed joint connecting the two (main) bodies of the rod; attach a properly offset ODE capsule geom to randomly selected main body of the rod; endfall forall the muscles in organism do b1 ← gain body of the first ending node (see Alg.B.2); b2 ← gain body of the second ending node (see Alg.B.2); create an ODE slider joint between b1 and b2 ; attach a properly offset ODE capsule geom to randomly selected main body of the muscle; endfall forall the nodes in organism do uniformly distribute node mass among main body and all proxy bodies; endfall end Algorithm B.2: Gaining body of a node (used in Alg. B.1) input : node of a springy organism output: ODE body begin if the node is already connected to a rod or a muscle then create an (proxy) ODE body b; attach b to the main body of the node with an ODE universal joint; return b; else return the main body of the node; endif end APPENDIX B. DEVELOPER MANUAL B.2.4 85 Integration with the framework Before we describe integration of the physics and the graphical rendering engine to the framework, we must first explain the basic principles of simulation tools which are already provided by ERO (see Figure B.5 on page 86). Scene, scene objects and simulator In the center of each simulation stands a class called Scene. Generally, a scene represents a list of scene objects with several additional information. A scene object can be thought of as anything that can be simulated. For example, a scene object can be a primitive shape like a plane or a box; or it can wrap a more complex object like a virtual creature or a springy organism. Scene objects are designed to hold data needed for further manipulation, like translation or graphical rendering. After we create a scene with several scene objects (for example a simple scene with one springy organism and a plane), we pass it to the Simulator class. This class modifies the scene together with all registered scene objects in regular intervals and provides information about current state of simulation. Computations The simulator class does not modify scene objects directly but via objects that implement Computation interface. For the sake of clarity, we will refer to these objects as computations. A computation represents a class that changes or monitors scene objects. They are registered to the simulator at the initialization phase. When the simulation starts, the simulator calls computations after each time step to modify the scene. Usually, there are only a few computations that modify scene objects during simulation. In case of springy organisms or virtual creatures, the central computation that affects scene objects uses ODE physical engine. However, a developer is free to choose any other library and is not bound to the ODE engine. There can be several extra computations modifying scene objects. For example, the authors of virtual creatures have implemented an interesting feature when a user can interact with a simulated organism by dragging its part by a mouse pointer. This behavior can be achieved by implementing another computation that adjusts position of the corresponding scene object according to the current position of the cursor. However, this approach needs special treatment, because the physics library must both update scene objects from internal structures and, more importantly, read state of scene objects and reflect it back to the internal data. Usually, the simulator also contains several computations which modify the scene without affecting scene objects. Example: The scene contains a property defining the current position of a camera. When a user turns on an automatic camera positioning, the corresponding computation starts updating the camera position according to currently simulated organisms. 86 Figure B.5: Design of the simulator in a simplified UML diagram. APPENDIX B. DEVELOPER MANUAL 87 Another large group of computations includes various monitoring tools. For example, the framework contains a timeout computation, which stops the simulator after a given number of seconds. The computation is very useful for fitness evaluations as the duration of a simulation is limited to constant number of seconds. We have also implemented several springy organism-specific computations. For example, our logger computation writes current state of a springy organism into a file. Another computation checks the distance between a springy organism and a flag and stops the simulation when the distance is smaller than a given limit. Physics engine computation The ERO framework already contains a computation called AirPhysicsODE, which provides common methods for all simulations based on the ODE library. (The computation was primarily intended to be used only for simulations in air, however it currently supports water environment as well). The computation first initializes the ODE world and creates ODE representations of scene objects. After each simulator step the computation performs one ODE time step and updates scene objects according to their representatives in the ODE world. Another purpose of this computation is to monitor various characteristics of ODE objects. For example, the computation checks current speed of a springy organism in the ODE world and saves it to springy organism scene object so other computations (computation for checking maximal linear velocity) can see the value. Another properties like current angular speed or number of contacts are also monitored. In order to make the physics computation simulate an object, the corresponding class that implements the SceneObjectPhysicsODE interface must be created and registered to the computation. Therefore, we have created the AirSpringyOrganismPhysicsODE class, which builds an ODE representation of a springy organism according to the Algorithm B.1. Then we ordered the physics computation to delegate all operations with springy organism scene objects to this class. Graphical rendering engine So far we have explained computations which modify or monitor scene objects. However, we have not covered the graphical user output at all. The run-time OpenGL rendering is provided by the RenderingEngine class, which is also available in the framework. Like AirPhysicsODE engine, the RenderingEngine contains common methods for all graphical user outputs based on the OpenGL technology. The engine can draw various general objects (like a textured skybox or a red starting point) and perform several advanced operations (like shadows casting) to make the output more attractive to users. Moreover, each scene object can be bound to a renderer. A renderer is a class that implements the SceneObjectRenderer interface. It should draw graphical representation of a corresponding scene object using the OpenGL/JOGL technology. Therefore, the engine can draw all general objects together with scene objects (using registered renderers) and shadows to form a graphical user output. APPENDIX B. DEVELOPER MANUAL 88 Naturally, the RenderingEngine class must have access to a scene containing scene objects. However, it cannot be implemented as a computation as it runs in an infinite loop with asynchronous callbacks to developer-defined methods. Therefore, the renderer is only attached to the simulator as a non-computation element. Classes we had to implement Let us recapitulate the basic steps we had done to make simulation of springy organisms work correctly. First, we have created the SpringyOrganismSceneObject, which represents a springy organism in a scene. Then, in order to provide the physical representation of the organism, we have implemented AirSpringyOrganismPhysicsODE. To provide the graphical representation, we have created the DebugSpringyOrganismRenderer, which draws springy organisms with the OpenGL commands. Finally, we have made several springy organism-specific computations for their monitoring and logging. Typical workflow of the simulator If we want to simulate an organism, we start with creating a new scene with one or more organisms wrapped as scene objects and several primitive objects (like PlaneSceneObject). Then we create an instance of the Simulator class and attach the scene to the simulator. We create an instance of AirPhysicsODE and register AirSpringyOrganismPhysicsODE as a physical model of a SpringyOrganismSceneObject. We also need to register PlaneSceneObject to AirPlanePhysicsODE. Then we add this computation together with several others to the simulator. If we want graphical output, we create an instance of RenderingEngine and register DebugSpringyOrganismRenderer to be used for drawing SpringyOrganismsSceneObjects. We also register DebugPlaneRenderer to draw PlaneSceneObject. Finally, we attach the renderer to the simulator and start the simulation. The simulator first initialize all computations. The initializing phase of AirPhysicsODE includes initialization of all physics objects, which results in calling initialize method of the AirSpringyOrganismPhysicsODE object. The object creates the physical model of a springy organism according to procedure discussed in this section and puts in into the ODE world. From this moment on, there is one springy organism living as a scene object and another one as an ODE model. When the initialization part of computations is over, the attached graphical renderer initializes its internal buffers by loading textures and other resources. Then it enters the infinite rendering loop. The simulation starts. The simulator calls computations after each step. When the physics computation is called, it steps the ODE world and calls the AirSpringyOrganismPhysicsODE method, which updates the springy organism wrapped in SpringyOrganismSceneObject according to the model of an organism living in the ODE world. When the logging computation is called, it reads actual status of the organism in the corresponding scene objects and logs the information to the file. When the timeout computation is called, it checks the duration of simulation; if it exceeds an allowed limit, the computation stops APPENDIX B. DEVELOPER MANUAL 89 the simulator. In the next thread the rendering engine reads scene objects and calls the corresponding renderers. The engine also renders several static objects including a skybox or a starting point, which do not need to be registered. These two loops continue until any computation terminates the simulator. There are many reasons why the simulator may be stopped. The simulation has run for too long (TimeoutComputation), or an organism has reached the specified target (like it reaches a given flag), or it has violated a limit for joint error (JointErrorComputation), speed (MaxVelocityComputation) or contacts (MaxContactsComputation), or a user has just decided to stop the simulation manually. APPENDIX B. DEVELOPER MANUAL B.3 90 3D Editor The editor consists of two main classes which create the basic concept of this tool: Editor3d and GLModel (see Figure B.6). The Editor3d class holds and controls data according to which the GLModel renders a picture a user can see on the screen. The GLModel class renders OpenGL scene according to given data and can detect the part of a springy organism which is currently under the mouse cursor. In this section, we will refer to GLModel as a renderer. Do not mislead this word with the DebugRenderingEngine class described in the previous section. We can think of GLModel as a view, while Editor3d represents a controller. Editor3d contains an instance of SpringyOrganism class, which can be considered as data. Figure B.6: Two basic classes create the basic concept of the editor. Section B.3.1 is devoted to basic principles of the GLModel class. Section B.3.2 discusses various algorithms, which can be used for selecting the point of the canvas which is under the cursor. Main concepts of the Editor3d class are described in Section B.3.3. Section B.3.4 explains integration of the editor into the ERO framework and related problems. B.3.1 GLModel The GLModel class on its own can generate only a drawing canvas, which is the rectangle positioned and rotated in 3D space, whose points can be detected according to current position of the cursor. Any further objects must be registered from outside. With this approach, the renderer can be used not only for drawing springy organisms but for rendering any three-dimensional model. Drawable interface Before we describe the registration process, we need to explain the Drawable interface, which stands in the center of the GLModel class. When an object is registered, there is always one or more implementations of Drawable bound to the object. Every time GLModel APPENDIX B. DEVELOPER MANUAL 91 renders the scene, it iterates all registered objects with their Drawable instances and calls the draw() method on each of them. A Drawable instance bound to an object should implement an OpenGL rendering algorithm that paints the object graphical representation. The prototype of the draw() method is public void draw(javax.media.opengl.GL gl, String objectId); where GL is a basic interface to OpenGL, providing access to core OpenGL functionality, and objectId is an identifier of the object currently being drawn. Thus, a developer can (but do not have to) use the same instance of Drawable for rendering two or more objects. Object registration The object registration consists in passing a quadruple (ObjectID, Drawable, Category, DrawingMode) to the renderer. We will briefly describe these elements: ObjectID ObjectID uniquely identifies the object which the Drawable instance will be connected to. The identifier is also necessary for further manipulation with existing Drawables. Furthermore, when the renderer searches the object under the cursor, it returns its ID as a result. Drawable Drawable instance implements an OpenGL algorithms that renders the shape bounded to an object. Category Category is a number which is assigned to the Drawable. Drawables registered in the renderer can be deleted according to their category numbers. DrawingMode The mode defines whether the shape rendered by this Drawable can be under the cursor. There are many Drawables for which being under the cursor does not make sense. Example Let us illustrate the workflow of Drawables and Editor3d on a simple example. Suppose we need to render a scene containing a house with a fence and several trees. Because we want to provide a GUI component for modifying several properties of these object (like color of the house or the width of the trunks), we need Editor3d class to detect objects which are currently under the cursor. Because our fence has no properties, we do not want the fence object to be found during selection procedure. APPENDIX B. DEVELOPER MANUAL 92 1. First, we need to write OpenGL rendering algorithms that represent desired shapes. Thus, we create classes which implements the Drawable interface and put the rendering code into draw() methods. 2. Then we register classes HouseDrawable, TreeDrawable and FenceDrawable to the renderer. The fence object will be registered under the same ID as the house, but it will not be able to be under the cursor. glModel.addDrawable("house", glModel.addDrawable("house", glModel.addDrawable("tree1", glModel.addDrawable("tree2", new new new new HouseDrawable(), 0, DrawingMode.SELECTABLE); FenceDrawable(), 1, DrawingMode.NOT_SELECTABLE); TreeDrawable(), 0, DrawingMode.SELECTABLE); TreeDrawable(), 0, DrawingMode.SELECTABLE); 3. Now the Renderer can draw the scene with registered Drawables and search for the object under the cursor. APPENDIX B. DEVELOPER MANUAL 93 4. Later, we can decide to remove several Drawables. First, we remove all objects (with the corresponding Drawables) registered to identifier tree1. Then we remove all Drawables bound to the house whose category number is zero. glModel.removeAllDrawables("tree1"); glModel.removeAllDrawables("house", 0); 5. The removal leads into the following form of the scene: B.3.2 Selection algorithms This section covers technical description of algorithms which are used for finding the object or the canvas point under the mouse cursor. We assume that a reader understands the basic OpenGL principles like rendering mode, primitives and viewport. Currently, there are two mechanisms implemented in the OpenGL engine, which can detect the primitive at the specified screen position: color coding and picking (see [14]). Let us briefly describe both of them: Picking In order to use this strategy, we must first switch from the rendering display mode (rendered graphical output is sent directly to a graphical device) to the selection mode. In this mode, rendered data is returned back to an application rather than being sent to the frame buffer. When a primitive, which is being drawn in this mode, intersects the current viewport, a selection hit is generated and stored to a temporary buffer. A selection hit contains identifier of the primitive and its maximal and minimal depth. When leaving the selection mode, the temporary buffer–containing hit records–is returned by the OpenGL engine to the application, where it can be thereafter analyzed. Using this strategy, the primitive located under the cursor can be found. First, the drawing area is restricted to a small region of the viewport (typically a tiny square around the cursor). While a scene is rendered in the selection mode, each primitive is assigned a unique identifier before it is drawn. When the hit buffer is returned to the application, it can be searched for the hit with the minimal depth. The hit’s id then corresponds to the object under the mouse pointer. APPENDIX B. DEVELOPER MANUAL (a) Result of a normal rendering function. 94 (b) Result produced in the back buffer by a color coding rendering function. Figure B.7: Color coding principle. (Source: http://www.lighthouse3d.com/opengl/picking) Color coding This is much more simpler approach of selecting primitives that the previous one, because it does not require any perspective changes. However, this mechanism suffer from several several shortcomings, which are discussed at the end of this description. First, we define an additional rendering function which assigns different color to each relevant object. When a user clicks on a screen, the scene is rendered on the back buffer using the new function. The selected pixel is then read back from the back buffer and checked for its color, according to which the actual object can be determined. This process is completely transparent to the user because the buffers are not swapped, so the color coding rendering is never seen. Figure B.7 illustrates this mechanism on an example of four ducks/snowmen. However, this approach runs into problems when monitors set to High Color instead of True Color are used, because 24/32 bits that represent color component must be rounded to 16 bits. If two colors are not sufficiently apart, they may turned out to be the same color when rendered. Eventually, the first approach have been chosen for selecting objects under the cursor. The reason is that the author of this thesis had already been experienced with the picking algorithm and had not known the latter approach in the time of decision. Suppose that a set of objects with corresponding Drawable instances have already been registered to the renderer. The detection of the object or the point on the canvas under the mouse pointer then runs according to Algorithm B.3. Notice that the algorithm provides an option to choose between three types of primitives the renderer searches for. For instance, some situations may require searching for canvas points only, another may need only registered objects. The only algorithm that has not been explained yet is the selection of a canvas point (line GPOC of Algorithm B.3). In our project we have implemented two solutions: quadratic selection and quadtree selection. Both of them uses picking. 95 Algorithm B.3: Get element under the mouse pointer input : P – position of the cursos, S – set of primitives to be searched for output: element under the cursor begin switch from the render mode to the selection mode and initialize picking (change the drawing area to be a tiny rectangle with the center at P ); if objectsBeforeCanvas ∈ S then {search for objects before the drawing canvas} foreach registered object o do foreach drawable d assigned to the object o do id ← identifier of o; assign the identifier id to a shape which is going to be rendered; call d.draw(gl, id); endfch endfch endif if canvasPoints ∈ S then {search for canvas points} assign a reserved identifier to a shape which is going to be rendered; render a simple rectangle represeting the drawing canvas; else if objectsBehindCanvas ∈ S then {the drawing canvas is not rendered, thus these objects are visible, we do not have to do anything} else draw a rectangle representing the drawing canvas (without any assigned identifier); endif endif switch back to the render mode and read the hit buffer; closest ← id of the closest primitive in the buffer; GPOC if closest is empty then return nothing; else if closest corresponds to a registered object then return closest; else {at this point, closest must correspond to the identifier of the canvas} return getPointOnCanvas(P ); endif end APPENDIX B. DEVELOPER MANUAL 96 Figure B.8: Example of the QuadTree selection. A blue square represents occurrence region. Occurrence intervals are drawn in gray (before picking) and red (scaled after picking). Contrary to the Quadtric selection, the scene must rendered multiple times in order to achieve desired precision. Quadratic selection The basic idea behind the quadratic selection consists in dividing the drawing canvas into N × N squares. Each square is assigned a unique identifier (for example (0, 0) identifies left bottom square, and (N − 1, N − 1) right top square). OpenGL picking is performed and the corresponding square (X, Y ) found. The center of the square is then returned as the point. The main advantages of this approach are that the algorithm is easy to implement and the scene must be rendered only once in order to find the point. However, there is one severe problem, which makes quadratic selection unusable. Parameter N must be a very large number even for small sizes of the canvas (ca 100 ≤ N ≤ 500). The smaller the parameter, the less user-friendly the editor is. Rendering N 2 rectangles in rendering mode does not make any speed problems. However, turning to selection mode, the engine takes too much time for rendering N 2 named rectangles. This noticeable time delay makes the approach unusable. QuadTree selection The QuadTree selection minimizes the amount of rectangles at the expense of increasing number of scene rendering. The Figure B.8 illustrates the situation. The algorithm is inspired by a quadtree searching algorithm. The main concept consists in repeatable scene rendering. After each iteration, the possible region where the cursor may be located is cut to the fourth of the original size. The area is represented by two intervals (one interval for each coordinate). For the sake of clarity, we will refer to the region as a occurrence region and to the intervals as occurrence intervals. Initially, the occurrence region covers the whole canvas. Before the picking procedure APPENDIX B. DEVELOPER MANUAL 97 is performed, the canvas is divided into four squares. Each square is assigned a number between zero and three as shown in the figure. The picking algorithm is then executed, and the identifier of a square under the cursor is found. Next, the occurrence intervals are cut in a half according to the selected square. The new smaller occurrence region is again divided into four squares and the algorithm continues iteratively until desired precision is reached. Using this approach, the rendering phase is very fast as only four squares must be drawn. However, experiments have shown that the increased number of scene renderings caused a too long delay, which made the QuadTree selection in this original version unusable. We needed to find a compromise between the rendered number of squares and the amount of scene rendering. We enhanced the QuadTree selection to divide the occurrence region to M × M squares for universal M . With 10 ≤ M ≤ 20 and search depth between two and four, the desired precision in reasonable time has been reached. Note that the Quadratic selection is a special case of the QuadTree selection for very large M and search depth equal to one. Colour Coding Selection The whole problem of the point selection is caused by the time-consuming rendering to the selection mode. The color coding selection provides a fast way of selecting primitives usable in the previous two selections. QuadTree searching with the support of color coding selection instead of picking would probably solve this problematic issue once for all. However, we have found the new strategy after the fully functional QuadTree selection had been implemented. Hence, this approach remains a theoretical ideal solution. B.3.3 Editor3d The Editor3d class works as a controller. According to user input the class changes internal data bound to a springy organism and updates visual representation of the organism using GLModel class. Firstly, we will illustrate the basic workflow on a simple example. Then we briefly describe the inner parts of the Editor3d class. Assume we want to create a new node via the editor and then remove it. The following steps happen behind the scene: 1. A user clicks on the drawing canvas. The Editor3d class detects the click with coordinates (cx , cy ) in the corresponding mouse listener. The listener asks GLModel what the corresponding element at (cx , cy ) is. The GLModel class executes the picking algorithm and answers that the element is a canvas point, whose global position is (px , py , pz ). The Editor3d adds a new node to data which represents springy organism. The new node’s name is “n1”. Editor3d then registers a object “n1” with the corresponding Drawable instance (which renders a sphere) to the GLModel. Finally, Editor3d calls repaint() method on GLModel, which causes the new node to appear on the screen. APPENDIX B. DEVELOPER MANUAL 98 2. A user moves the cursor. After each move, the Editor3d class detects the movement in the mouse listener. The class asks GLModel for the object under the cursor. (Note that the question does not include canvas points as it would cause the time-consuming canvas-pointpicking procedure to be executed, which is not necessary during mouse movement.) According to the answer, Editor3d adds/removes a Drawable instance which draws an active part. 3. A user clicks on the node. The whole procedure of getting the element under the cursor is executed. GLModel returns “n1” as the object under the pointer. The Drawable instance which renders an outline of a box is registered to “n1” in unselectable mode (i.e. the GLModel class will not render this shape during the picking selection, which means it can never be under the cursor ). The Editor3d class stores the identifier of selected node into internal structures and repaints the canvas. 4. A user chooses delete selection in the popup-menu. The Editor3d class again registers the event in the corresponding listener and runs the removal procedure. The method removes all Drawables bound to “n1” (and all Drawables registered to muscles/rods connected to the node) with the use of GLModel API. It also removes the nodes from data representing the organism. Finally, it clears identifier of selected objects and repaints the canvas. Because responsibilities of the controller are too complex, it is divided into several independent parts called modules. Each module takes care about a specific part of the controller and provides a tiny interface, which other modules can use. Table B.2 lists the modules with their description. B.3.4 Integration with the ERO framework Evolution schemes in the ERO framework must provide two editors: a genotype editor and a phenotype editor. A user should be able to create the genotype of an organism in the genotype editor and see the real structure of the organism in the phenotype editor. The framework API contains interfaces GenoEditor and PhenoEditor, which encapsulate the work with both editors. A class implementing the GenoEditor or the PhenoEditor interface must provide a GUI editor component and a set of toolbars components as marked in the Figure B.9. Because the genotype and the phenotype of a springy organism is the same structure, we need to implement only one editor. The purpose of a genotype editor is to provide a mechanism to model a new genotype and to show results of testing genetic operators. For this reason, we have encapsulated our editor with the GenoEditor interface rather than the PhenoEditor interface. 99 Module Name Description InputListener Listens to user mouse/keyboard inputs and calls corresponding method of other modules. MenuItemHelper Creates popup menu and calls other modules API connected to the events. CanvasHelper Performs canvas transformations (like translation or rotation). ErrorHandler Shows and logs error messages. ModelHelper Helps with global scene transformations (like scene rotation). OrganismHelper Encapsulates methods that change internal representation of a springy organism. PropertyPanelHelper Reads and updates properties connected to organism parts, which a user can change with the GUI. SelectedObjects Contains methods working with a user-selected organism parts. ClipboardHelper Temporarily stores data in local clipboard. Table B.2: List of Editor3d modules. Components provided by the GenoEditor interface Components provided by the PhenoEditor interface Figure B.9: Integration of the editor into the ERO framework. The componenets for the left two rectangles are provided by the GenoEditor interface, while the right two by the PhenoEditor interface. APPENDIX B. DEVELOPER MANUAL 100 Mixing lightweight and heavyweight components The integration of our editor into the ERO application suffers from a severe shortcoming. To understand its source, we must first explain the difference between a lightweight and a heavyweight GUI componenets as stated in [15]: A heavyweight component is one that is associated with its own native screen resource. A lightweight component is one that “borrows” the screen resource of an ancestor (which means it has no native resource of its own – so it’s “lighter”). As the framework is implemented in the Java programming language, the graphical user interface is based on Swing components only, which are lightweight. However, the Editor3d is implemented as a subclass of GLCanvas, which is a heavyweight AWT component. Because we mix heavyweight and lightweight components, the application may sometimes behave incorrectly. The wrong behavior is apparent mostly in the watching mode, when a user can watch results of the evolution project currently running on a server. After a user invokes an action show details of the selected genotype, three editors of organisms appear, and they do not cover each other correctly. A possible solution for the problem is a component called GLJPanel, which uses a lightweighted component for OpenGL output. However, according to the JOGL manual1 (see [16]), the GLJPanel provides slower performance that GLCanvas: JOGL provides two basic widgets into which OpenGL rendering can be performed. The GLCanvas is a heavyweight AWT widget which supports hardware acceleration and which is intended to be the primary widget used by applications. The GLJPanel is a fully Swing-compatible lightweight widget which currently does not support hardware acceleration but which is intended to provide 100% correct Swing integration in the rare circumstances where a GLCanvas can not be used Experiments performed on several computers have shown that this mechanism is really too slow for our purposes, as we often need to run several quick renderings at once. 1 JOGL is a Java library providing access to OpenGL API Appendix C CD-ROM Content of the CD attached to this thesis: ERO Binary and source files of the ERO framework together with the integrated project of springy organisms. ERO-doc User and developer manuals for the ERO application (in Slovak language). movies Videos of the evolved organisms and the corresponding genotypes saved as XML documents. keymap.pdf Keymap for the 3D editor. thesis.pdf Document containing electronic version of this thesis. Source files for the springy organism project can be found in ERO/src/cz/matfyz/ero/ schemes/springyOrganisms. The Directory ERO/bin contains executable files for the ERO application. See Appendix A or the ERO user manual for more information about starting and using the program. 101 Bibliography [1] P. W. McOwan and E. J. Burton. Sodarace Adventures in Artificial Life, pages 97–111. Springer Verlag, 2004. 8, 10 [2] Sodarace project. Available at http://sodarace.net/. 8 [3] S. Kirkpatrick, C. D. Gelatt, and M. P. Vecchi. Optimization by simulated annealing. Science, Number 4598, 13 May 1983, 220, 4598:671–680, 1983. 10 [4] Karl Sims. Evolving virtual creatures. In SIGGRAPH ’94: Proceedings of the 21st annual conference on Computer graphics and interactive techniques, pages 15–22, New York, NY, USA, 1994. ACM. 10 [5] Karl Sims. Evolving 3D morphology and behaviour by competition. In R. Brooks and P. Maes, editors, Artificial Life IV Proceedings, pages 28–39, MIT, Cambridge, MA, USA, 6-8 July 1994. MIT Press. 10 [6] Marcello Falco. Springs world 3d. http://www.sw3d.net/. 12 [7] Peter Krčah with colleagues. Evolution of robotical organisms. Available at http://ero.matfyz.cz/, distribution with manuals also available in the corresponding appendix. 15, 25, 58, 71 [8] Peter Krčah. Evolutionary development of robotic organisms. Master’s thesis, Charles University in Prague, 2007. 15, 24, 53, 68 [9] Peter Krčah. Towards efficient evolutionary design of autonomous robots. In Evolvable Systems: From Biology to Hardware, 2008. 15, 24, 53, 68 [10] Russell Smith. Open Dynamics Engine Manual, February 2006. http://www.ode.org/. 16, 35, 70, 79 Available at [11] James E. Baker. Reducing bias and inefficiency in the selection algorithm. In Proceedings of the Second International Conference on Genetic Algorithms on Genetic algorithms and their application, pages 14–21, Mahwah, NJ, USA, 1987. Lawrence Erlbaum Associates, Inc. 24 102 BIBLIOGRAPHY 103 [12] Vinod K. Valsalam and Risto Miikkulainen. Modular neuroevolution for multilegged locomotion. In Genetic and Evolutionary Computation Conference (GECCO), 2008. 51 [13] Ceki Gülcü. Short introduction to log4j, http://logging.apache.org/. 66 March 2002. Available at [14] The OpenGL Red Book. Available at http://www.glprogramming.com/red/. 93 [15] Mixing heavy and light components. The document http://java.sun.com/products/jfc/tsc/articles/mixing/. 100 is available [16] Jogl User’s Guide. The document is available at http://jogl.dev.java.net/. 100 at