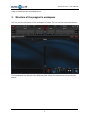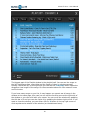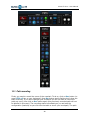
1
User Manual
English version
Based on the 1.0.2 software version
Document version: 1.0.2-1 (Last modification: 14th December 2011.)
© 2011 Novonext Bt. All rights reserved.
Music FX Live – User Manual
Legal statement
This document contains information regarding to the final, purchasable version of
"Music FX Live" software.
This document is available „as is”. All information and notion in this document such as
URL addresses, links to Internet web pages can be modified without previous
notifications. Risks coming from the use of information are borne by the user.
This document does not empower you for any legal right to any of the intellectual
products of Novonext Bt. You can use and copy this document for your private use and
guidance.
© 2011 Novonext Bt. All rights reserved.
Version of this document
This document is prepared based on the 1.0.2 software version of Music FX Live. The
version number of this document is 1.0.2-1 which stands for the first version of the
above mentioned 1.0.2 software version.
It is possible that there is a newer version of this document. You can download the
latest version on www.musicfxlive.com .
Product support
We provide you product support service together with the software which is currently
only available via email. You can send your questions, problems, error notifications to
the email address below:
[email protected]
Our product support service is available in English and in Hungarian.
2
Music FX Live – User Manual
Table of Contents
LEGAL STATEMENT ..................................................................................................................................................... 2
VERSION OF THIS DOCUMENT................................................................................................................................. 2
PRODUCT SUPPORT ..................................................................................................................................................... 2
TABLE OF CONTENT .................................................................................................................................................... 3
1.
INTRODUCTION................................................................................................................................................... 6
2.
NECESSARY HARDWARE AND SOFTWARE.................................................................................................. 6
2.1.
SUITING PROGRAM TO THE TOUCHPAD CONTROL .............................................................................................. 6
3.
STRUCTURE OF THE PROGRAM’S WORKSPACE ...................................................................................... 7
4.
BASICS TO KNOW REGARDING TO THE FUNCTION OF THE SOFTWARE ......................................... 8
5.
SYSTEM BUTTONS .............................................................................................................................................. 9
6.
SETTINGS............................................................................................................................................................. 10
6.1.
AUDIO TAB ..................................................................................................................................................... 10
6.1.1. Sound output device .................................................................................................................................. 11
6.1.2. Further settings in case of device without ASIO standards....................................................................... 11
6.1.3. Further settings in case of device with ASIO standards............................................................................ 12
6.1.4. Free ASIO support for any sound device: ASIO4ALL............................................................................... 12
6.2.
RECORDING TAB ............................................................................................................................................. 13
6.2.1. Settings of MP3 format ............................................................................................................................. 14
6.2.2. Settings of WAV format ............................................................................................................................. 14
6.2.3. Which file format should you choose? ...................................................................................................... 14
6.3.
LANGUAGE TAB .............................................................................................................................................. 14
7.
DETAILED PRESENTATION OF CHANNELS ............................................................................................... 15
7.1.
USE OF KNOBS ................................................................................................................................................ 16
7.2.
INPUT AND OUTPUT VOLUME .......................................................................................................................... 16
7.2.1. Always pay attention on volume when using the program ........................................................................ 16
7.3.
INPUT SOUND SOURCES ................................................................................................................................... 17
7.3.1. File sound source ...................................................................................................................................... 17
7.3.1.1
Playlist............................................................................................................................................................18
7.3.2. Live sound source...................................................................................................................................... 20
7.3.3. Capture sound source ............................................................................................................................... 21
7.4.
BPM COUNTING UNIT ..................................................................................................................................... 22
8.
WARNING LIGHTS............................................................................................................................................. 23
8.1.
CLIP WARNING LIGHT..................................................................................................................................... 23
8.2.
WARNING LIGHT FOR LOW BATTERY ............................................................................................................... 23
8.3.
WARNING LIGHT FOR CPU LOAD .................................................................................................................... 24
8.3.1. Why is it important to pay attention to the CPU light?............................................................................. 24
8.3.2. What can you do to avoid high CPU load?............................................................................................... 24
9.
SWITCH ON AND OFF CHANNEL EFFECTS................................................................................................ 24
10.
AUDIO RECORDING INTO FILE .................................................................................................................... 25
11.
THE EFFECT CONFIGURATION ZONE ........................................................................................................ 25
3
Music FX Live – User Manual
11.1.
11.2.
12.
THE EFFECT AREA............................................................................................................................................ 27
12.1.
12.2.
12.3.
12.4.
12.5.
12.6.
13.
TOUCHPAD BUTTON ........................................................................................................................................ 26
FX STOP BUTTON ........................................................................................................................................... 26
ADD EFFECTS TO CONFIGURATION .................................................................................................................. 28
TWO TYPES OF EFFECTS: DRY/WET BANDS ..................................................................................................... 30
PATH OF SOUND AND THE ORDER OF EFFECTS.................................................................................................. 34
SCROLLING ON THE EFFECT AREA ................................................................................................................... 34
RENAMING THE CONFIGURATION .................................................................................................................... 35
CHANGE BETWEEN THE SET-UPS ..................................................................................................................... 36
VIRTUAL TOUCHPAD (THE „TABLE”) ......................................................................................................... 36
13.1.
ACTIVATING CONFIGURATIONS AND EFFECTS .................................................................................................. 38
13.2.
HOLD MODE ................................................................................................................................................... 39
13.3.
ASSIGNING PARAMETERS TO THE TABLE’S AXIS .............................................................................................. 40
13.4.
TOUCHPAD MODE AND TOUCHPAD CONTROL .................................................................................................. 42
13.5.
ELEMENTS OF THE BIG TABLE VIEW ................................................................................................................ 43
13.5.1.
Continual type of effect parameters ..................................................................................................... 44
13.5.2.
Fixed-value type of effect parameters .................................................................................................. 46
14.
PATH RECORDING AND PLAYING UNIT ..................................................................................................... 48
14.1.
14.2.
14.3.
14.4.
14.5.
14.6.
14.7.
PATH RECORDING ............................................................................................................................................ 49
SETTING THE SPEED OF PLAYING ..................................................................................................................... 50
SELECTING THE REFERENCE CHANNEL ........................................................................................................... 51
PLAYING THE PATH.......................................................................................................................................... 51
SELECTING THE MODE OF PLAYING ................................................................................................................. 51
REPEATING THE PLAYING ................................................................................................................................ 52
SHIFTING THE PATH ......................................................................................................................................... 53
15.
WORKSPACE AND SAVING, IMPORTING THE CONFIGURATION........................................................ 54
16.
GLOBAL EFFECT INTENSITY CONTROL KNOB ....................................................................................... 55
17.
THE EFFECTS ..................................................................................................................................................... 56
17.1.
SWITCHING ON AND OFF THESE EFFECTS......................................................................................................... 56
17.2.
INPUT AND OUTPUT VOLUME CONTROL........................................................................................................... 56
17.3.
REMOVING EFFECT FROM THE CONFIGURATION .............................................................................................. 57
17.4.
EFFECT INTENSITY CONTROL (DRY/WET) KNOB .............................................................................................. 57
17.5.
BEAT SELECTION BUTTONS ............................................................................................................................. 58
17.6.
LFO (AUTOMATIC KNOB ROTATION) ............................................................................................................... 58
17.7.
„FILTER & MODULATOR” CATEGORY EFFECTS ................................................................................................ 59
17.7.1.
Low Pass Filter (LPF) ......................................................................................................................... 59
17.7.2.
Band Pass Filter (BPF)........................................................................................................................ 60
17.7.3.
High Pass Filter (HPF)........................................................................................................................ 60
17.7.4.
Flanger (FLA) ...................................................................................................................................... 61
17.7.5.
Phaser (PHA) ....................................................................................................................................... 62
17.7.6.
Formant Filter (FMT) .......................................................................................................................... 63
17.7.7.
Pitch Shifter (PTC)............................................................................................................................... 63
17.7.8.
Frequency Shifter (FRQ)...................................................................................................................... 64
17.7.9.
Ring Modulator (RNG) ........................................................................................................................ 65
17.7.10.
Gate (GAT)........................................................................................................................................... 66
17.7.11.
Decimator (DCM) ................................................................................................................................ 67
17.7.12.
Distortion (DST) .................................................................................................................................. 67
17.7.13.
Vocoder (VCR) ..................................................................................................................................... 68
17.8.
„LOOP & ECHO” CATEGORY EFFECTS.............................................................................................................. 69
17.8.1.
Looper (LPR) ....................................................................................................................................... 69
17.8.2.
Stretch Looper (STR)............................................................................................................................ 71
17.8.3.
Reverser (REV) .................................................................................................................................... 72
4
Music FX Live – User Manual
17.8.4.
Grain Shifter (GRN) ............................................................................................................................. 72
17.8.5.
Echo (ECH).......................................................................................................................................... 73
17.8.6.
Delay (DLY) ......................................................................................................................................... 74
17.8.7.
Reverb (RVB) ....................................................................................................................................... 75
17.9.
„SYNTH, SAMPLER & TOOLS” CATEGORY EFFECTS ......................................................................................... 76
17.9.1.
Synth (SYN) .......................................................................................................................................... 76
17.9.2.
Sampler (SMP) ..................................................................................................................................... 78
17.9.3.
Splitter (SPL)........................................................................................................................................ 79
18.
FLOATING WINDOW......................................................................................................................................... 80
APPENDIX – SHORTCUTS ......................................................................................................................................... 82
5
Music FX Live – User Manual
1. Introduction
Music FX Live is a sound effect software, primarily for DJs, with which you can add
effects to any sound or music in real time. You can continuously modify the
parameters of the effect therefore you can always adjust the sound to the audience’s
reaction. This software can be used for music writing or remix as a complimentary
effect software.
Attention! This software is not applicable for mixing music. It does not contain those
regularly-used main elements that a DJ mix program does, for example speed
modification, CUE points, channel volumes and tones, cross fader. But you have the
opportunity to use Music FX Live together with any MP3 mixer program in a way that
Music FX Live „catches” the output sound of the DJ mix program and you can add
effects to it afterwards. Traktor and Virtual DJ is a DJ mix program like this but
basically you can connect it to any music program, for example Ableton Live, Reason.
2. Necessary hardware and software
For smooth program performance, the following minimum configuration is
recommended:
−
−
−
−
−
PC or notebook/laptop (the program does not run on Apple Macintosh
computers)
Dual-Core, 2 GHz Intel or AMD processor
1 GB memory
100 MB free space on hard-drive
1024x768 screen resolution
Necessary operating system and software:
−
−
Windows XP, Windows Vista or Windows 7 operating system
Microsoft DirectX 9 (install of Music FX Live already contains this)
2.1. Suiting program to the touchpad control
If you use this program with notebook/laptop the effects can be controlled by the
embedded touchpad (the rectangular touch-sensitive area). You need to install the
touchpad driver on your computer prior to that. Most of the notebook/laptop
manufacturing companies provide a touchpad driver along with the computer but in
case you do not have that, you can download and install the Synaptics’s touchpad
driver for free.
You can download the latest touchpad driver of Synaptics from the following webpage:
http://www.synaptics.com/support/drivers . In case you cannot download it from
here, we recommend you to type „synaptics touchpad driver” into Google search, and
most probably the first option of the search will lead you to the appropriate website in
6
Music FX Live – User Manual
order to download the touchpad driver.
3. Structure of the program’s workspace
You can see the structure of the workspace of Music FX Live on the screenshot below:
This workspace can be split into different parts which are marked on the screenshot
below:
7
Music FX Live – User Manual
−
−
−
−
−
−
−
−
−
1: System buttons
2A/2B: „A” and „B” channel
3: Warning lights and channel effects on/off switches
4: Record sound into file
5: Effect configuration zone
6: Effect area
7: Virtual touchpad (the „Table”)
8: Path recording and playing unit
9: Global effect intensity controller knob
We will show you the details of these elements in this document (not necessarily in
the above mentioned order).
4. Basics to know regarding to the function of the software
Music FX Live software can receive incoming sound from 3 types of audio sources. You
can use the same effects for all the 3 types of audio sources. These 3 types of audio
sources are the following:
1. Audio or music file on your computer (MP3 or WAV format)
2. Device connected to your computer (for example: microphone, CD player, DJ
mixer output)
3. Sound created by another running program on your computer (this can only
8
Music FX Live – User Manual
work if that other program supports ASIO standards – you can see the details
of it at 7.3.3. Capture sound source chapter)
You can use two audio sources at the same time if you wish to and you can add
effects to both of them separately. For this purpose there is a channel „A” (on the left
side) and a channel „B” (on the right side) in the program. These two channels work
exactly the same way, the only difference is that one is the reflection of the other
regarding to the layout.
After selecting the audio source you can only hear the original sound (without effects).
To be able to add any effect to the sound, first you need to select the effect you would
like to use and then activate it. You can hear the effect as long as it is activated.
Meanwhile you can continuously change the parameters of the effect and you can hear
these changes immediately. At 12. The effect area and 13. Virtual touchpad (the
„Table”) chapters you can read more about how to select and activate effects.
Important note: The above mentioned ’immediately’ means in a moment as a
human being can realise it. Computers and digital sound effects work in a way that
latency always exists between the actual sound we hear and the root cause. We count
latency in milliseconds (ms). The bigger the latency is the later you hear the sound
(the effects in case of Music FX Live). The duration of latency depends on many
things: performance of your computer, capability of your sound card and many more
technical aspects. In general, we can say that human beings cannot differentiate 5 ms
or less latency, 40-50 ms latency is ’normal’ and above 100 ms is avoidable. In fact
there is no trouble if the latency reaches 200 ms (which is 0.2 second) but it can
generate difficulty in the accurate timing of effects.
5. System buttons
There are three buttons in the top right corner of the program’s window:
If you click on the first one (cog) a window will come up which allows you to edit
settings of the program. You can see the icon of settings below:
If you click on the second one (which has 4 arrows) the program’s window will go fullscreen. You can change it back to the original size by clicking on it again. You can see
the icon of full-screen mode below:
If you click on the third one (which is an X sign) you will exit from the program. If you
are playing music at that time then the program will ask a confirmation whether you
are sure about to exit. You can see the icon of exit below:
9
Music FX Live – User Manual
6. Settings
If you click on the cog button in the top right corner, a window will come up which
allows you to edit settings of the program. You can see three tabs at the top of this
window which enables you to switch between the pages.
The changes you make within settings will not take effect until you save them by
clicking on the Save button. If you click on Cancel or X button in the top right corner,
none of your changes will take effect.
6.1. Audio tab
You can see the content of Audio tab (within Settings window) on the screenshot
below:
On this tab you can set which devices the program should use during playing and
10
Music FX Live – User Manual
recording. You can adjust these settings separately for the two channels therefore the
window is split into two. You can adjust settings for channel „A” on the left side and
for channel „B” on the right side.
6.1.1. Sound output device
First you need to select which sound device (sound card) the channel should use for
playing. You can select it from the Sound output device drop-down list. In this list
you will see all the sound devices which are recognized by your operating system. If
you select Not used then this channel will not play any music (basically you are not
able to use this channel). You can read [ASIO] prefix if the sound device uses ASIO
standards. If you have such option on your list we highly recommend you to use that
one as it minimizes latency.
Then select the desired sampling frequency from the Sample rate drop-down list, it
gives you values in Hz. Sample rate means how many sound data comes out in one
second. The higher that number is the clearer the sound will be, on the other hand the
more time needed for the effects’ calculation therefore you need a computer with
higher performance. The traditional CD standard is 44100 Hz which is more than
enough most of the times but if your sound device supports 96 KHz and your
computer is a quite recent model (with high performance) then you can easily select
96000 Hz too.
Depending on the type of the Sound output device you have selected from the
drop-down list, the parameters may differ in the area below. There are 2 cases
basically; either you selected a device with ASIO or without ASIO standards.
6.1.2. Further settings in case of device without ASIO standards
If you are about to apply effects on sounds coming from an external sound source (for
example from turntable or CD player through the output of your mixer) then you must
select the sound input device which receives the sound from the external device. You
can select this from the Sound input device drop-down list.
You can set latency on the output device which we count in milliseconds (ms). You can
make this setting with the fader of Latency; you can see the actual ms on the display
next to the fader. The smaller the latency is the faster the program will be when you
change parameters of the effect, but at the same time you need a computer with
higher performance and it is more likely to hear different obstructions during the
sound playing. If you set latency to a higher value then you will be secured in a sense
that the sound will not jam (low performance computers can take this load as well),
on the other hand the program will react more slowly to the data input (for example if
you set one of the effects to a higher value you will hear the result a bit later).
There is no standard recommendation for the setting of latency, because there are as
many ideal options as computers. You should find your ideal settings. It is good to
know though that there is a minimum value which you must not go below, not even if
you have the most recent or best computer. This minimum is around 45-50 ms in case
11
Music FX Live – User Manual
of Windows XP and Vista, 25 ms in case of Windows 7. Secured setting starts at 60
ms and it is recommended to set latency to the maximum (100 ms) in case of older
and slower computers. It is important to note that these numbers are only valid if
sound devices do not have ASIO standards.
6.1.3. Further settings in case of device with ASIO standards
ASIO is a standard which is supported by certain sound card manufacturers. These
sound devices were produced for professional use. The two most important aims of
devices with ASIO standards are low latency and stability.
If you have selected a sound device which supports ASIO standards then you will get
two different drop-down lists to the settings of input and output channels. ASIO
standards work in a way that the sound devices have input and output channels and
you must select two you would like to use for the left and right speakers. You must
give these in case of output but it is not necessary in case of input channels. If you do
not select the input channels then you will not be able to apply effects on sounds
coming from external source (for example from your mixer).
You can select input channel for the left speaker from the menu below the Input
channel (left) and for the right speaker from the menu below the Input channel
(right). Similarly you can select output channel for the left speaker from the menu
below the Output channel (left) and for the right speaker from the menu below the
Output channel (right).
Below these menus you can see a display which shows you the actual latency in ms.
You are not able to modify that here. Usually all sound devices with ASIO standards
have their own software to modify their settings (including latency). To modify latency
please read the specification belonging to your sound device.
Important note: Because of ASIO standards’ limitations, there is no opportunity for
a software to use two sound devices with ASIO standards at the same time. Therefore
you cannot set one sound device with ASIO standards for channel „A” and another one
for channel „B” (this setting is not allowed by the program either).
6.1.4. Free ASIO support for any sound device: ASIO4ALL
There is a free software that could be installed on your computer and could virtually
be your sound card with ASIO standards. This program simulate a real sound card
with ASIO standards, uses your original sound device (without ASIO standards) and
your latency will be lower than by using your original sound device directly.
This program is called ASIO4ALL, it is free and you can install it to any Windows
operating system.
We could not put it into the Music FX Live software because of legal restrictions, you
need to download and install it. The program is free. You can download it from the
following webpage:
12
Music FX Live – User Manual
http://www.asio4all.com/
After installing it you will see a new item on the list of sound devices, it is called
[ASIO] ASIO4ALL v2, it is a virtual sound card in fact but it fulfils the purpose.
Most probably you need to do some settings in the configuration program of ASIO4ALL
in order to ensure everything works how you prefer and latency is as little as possible.
We recommend you the read through the description of ASIO4ALL.
6.2. Recording tab
You can see the content of Recording tab (within Settings window) on the screenshot
below:
In the software you have the opportunity to record the heard music along with the
effects. In this tab you can make settings regarding to recording.
On the top, below the Save recorded files into this directory, you can see the path
of the folder where your recorded files will be saved. You can change this folder by
clicking on the Browse button then select the folder you prefer.
13
Music FX Live – User Manual
Music FX Live can record music into two types of sound format: MP3 or WAV. You can
select the desired format from the File format drop-down list. Depending on the
selected format, different menus appear below that.
6.2.1. Settings of MP3 format
-
-
-
Sample rate: It is a sampling frequency which gives you values in Hz. The
higher that number is the clearer the recording will be. The traditional CD
standard is 44100 Hz but you can set it higher than that too. Take it also into
consideration that even if you set higher value here than the original sample
rate (sample rate of playing), the quality of the recorded sound will not be
better.
Bit rate: It is the speed of data stream. The higher that number is the clearer
the sound of recording will be. 128 kbit is an average, good quality starts at
192 kbit.
Compression quality: It is the efficiency of compression (sound quality versus
speed). The smaller that number is the better the sound of recording will be,
but at the same time sound compression process puts more load on your
computer (MP3 is a compressed file format while WAV is not).
6.2.2. Settings of WAV format
-
Sample rate: It is a sampling frequency; you can see the details above at the
’Settings of MP3 format’.
Bits per sample: It influences sound quality. We do not recommend you to
choose 8 bit unless this is your purpose. Choose 16 bit instead which is
equivalent to CD sound quality.
6.2.3. Which file format should you choose?
If you want to reach maximum sound quality, choose WAV format. It is a further
advantage that you do not need to compress that hence it does not put load on your
computer. It is a disadvantage though that the file size will be bigger therefore you
need more space on your hard disk.
The advantage of MP3 format is that it is the most popular format and the file size is
less than in case of WAV, so you can easily send your recorded mix to your friends.
6.3. Language tab
You can see the content of Language tab (within Settings window) on the screenshot
below:
14
Music FX Live – User Manual
On this page you can only set the language of the different text areas of the program
(mainly system messages). You can choose from two languages: English and
Hungarian.
7. Detailed presentation of channels
You need to switch on a channel before use. Click on the switch on and off button. You
can see the icons of these buttons below:
After switching it on, the lights will be on at the back of the channel and the volume
control knob will be set to 50% as a default. You can see the icons of the volume
control knob below:
15
Music FX Live – User Manual
7.1. Use of knobs
You can find knobs (rounded, rotating controls) in the program at various places. The
volume control on the picture above is a knob as well. If you move your mouse over
any knob then you will see its current value below or above the knob (in case of the
volume control e.g. 50%). You can change the value of the knob (actually rotate the
knob) if you keep the left mouse button clicked over the knob (this case the arrow of
the mouse disappears) and move your mouse up and down. You can rotate the knob
clockwise by moving your mouse upwards (for example amplifying volume), and
rotate the knob counter clockwise by moving your mouse downwards (for example
softening volume). If you want fine rotating, keep the CTRL key pressed. As a
consequence the knob will rotate 4 times more slowly. If you double-click on the knob,
it will restore itself to the original value.
7.2. Input and Output volume
At the top of both channels there is a double-light which shows the volume of input
and output. IN light shows the input, OUT light shows output volume. Lights on the
left belong to the left speaker; lights on the right belong to the right speaker. You can
see the icons of the input and output volume indicators below:
It is important to know that the volume control is not linear which means that even if
volume is very low more lights can turn on, but as volume gets higher and approaches
the maximum, less and less new lights will turn on.
7.2.1. Always pay attention on volume when using the program
Due to the digital technology, volume has a certain limit; if you overstep that there
will be distortion in the sound. It is more likely if several effects are turned on because
many effects can increase volume. To overcome on this issue, we have embedded a
compressor into this program, but it can only moderate volume without distortion till a
certain extent. The best way though if you are conscious about volume, you should
keep both input and output volume on low or mid level. Do not turn your input and
output volume to the maximum unless the original music is really quiet. You would
rather keep all volume around 50% and turn your speaker or amplifier on.
If the output volume is so high that the embedded compressor cannot moderate it
either, there will be distortion. CLIP light warns you for this, it flashes for 2 seconds
and you can see it next to the output volume lights. You can see the icon of CLIP light
below (currently the left-side CLIP light is on which means there is distortion on
channel „A”):
16
Music FX Live – User Manual
7.3. Input sound sources
Both channels can handle 3 types of input sound sources but one at a time. You can
change between the three with three buttons. In case of channel „A” you can see
these buttons on the left side, in case of channel „B” you can see these buttons on the
right side. You can see the icons of these 3 types of sound sources below:
If you click on any of these options, that type of sound source will be selected. The
sound source which is selected will light with blue colour. On the illustration above the
File (audio file) type of sound source is selected. The 3 types of sound sources are the
following:
-
File: Audio or music file on your computer (MP3 or WAV format)
Live: Device connected to the line-in input of the computer (for example
microphone, CD player, output of DJ mixer)
Capture: Sound created by another program on the computer (only if the other
program supports ASIO standards – you can see details at 7.3.3. Capture
sound source chapter)
Note: The panels of Live and Capture sound sources look the same.
7.3.1. File sound source
The panel of File type is a conventional music player. You can open an MP3 or WAV
format file on your computer, but you also have playlist to which you can add more
files and these can be played in order or shuffled.
17
Music FX Live – User Manual
On the left side of the panel you can read the current artist and the title of the song
(only in case of MP3 – you can only read the name of the file in case of WAV). On the
right side you can see the time left or passed. You can switch between the two by
clicking on the time area with your mouse. You can mute and unmute your music by
clicking on the speaker icon under time area. The triangle-shape area next to the
speaker icon can control the playback volume. You can change volume by clicking to
any of its area (if it is 100% then it plays your music with its original volume, but we
recommend you to keep it on 50% because of the reasons above mentioned).
Important note regarding to the input volume: Input volume is 50% as a default
setup because it is not always wise having the input volume on maximum when you
apply effects. Many effects increase the output volume. If the input volume is really
high then it can generate distortion in the output volume which we would like to
avoid. This limit comes with digital technology. Therefore it is better to keep your
volume control knob in the program at a low level and turn on the volume on your
speaker or amplifier.
Below the artist and the title of the song there is a long, horizontal fader on which the
rectangular shape shows the actual position within the song. If you click anywhere on
the line, the music will continue playing from that point onwards.
There are more buttons on the bottom of Input panel, you can see them below:
These functions are the following in order:
−
−
−
−
−
−
−
−
−
Jump to the previous song on the playlist
Start playing the song marked on the playlist or continue playing after pause
Pause or continue playing after pause
Stop playing
Jump to the next song on the playlist
Open a file and add it to the playlist then play it immediately
Open playlist
Modification on the type of repetition. There are three types of repetition: Off,
Repetition of all songs, Repetition of actual song. If it is turned on, the button
will light and there will be an icon above the volume control according to the
type.
Shuffle on and off. If it is turned on, the button will light and the songs will be
played randomly from the playlist.
7.3.1.1
Playlist
There is a playlist for both channels separately. If you click on the Playlist button, a
window will come up with the playlist; you can see that on the screenshot below:
18
Music FX Live – User Manual
The biggest part of the Playlist window is the playlist itself. You can see the songs on
the list (including artists, song titles and the length of them in minutes:seconds
format). Below the list, on the right side you can see the Total time which means the
altogether time length of the songs. On the screenshot above 6h 09m means 6 hours
and 9 minutes.
If you have many songs on your list, it may happen you cannot see all songs in the
window at the same page, this case you can use the scrolling zone at the right side of
the window or you can scroll with your mouse. You can move the window by grabbing
the title bar of it and you can also resize it by grabbing the bottom right corner. If you
want to close the window, you can either click on X button in the top right corner or
click anywhere else outside of the window (on the darkened area).
19
Music FX Live – User Manual
If you double-click on any of the songs, that selected song will start playing. If the
song has already been played, a white speaker icon appears in front of the song. Of
course you can play that song more and more times if you want to; it is just a mark
on which you can take no notice. You can remove these marks by clicking on the icon
at the bottom left corner, you can see this icon below:
You can select your songs on the list one-by-one or in blocks (for example before
deleting or reorganising your songs). If you keep pressing CTRL key and you click on
any of the songs that one will be marked. If you keep pressing SHIFT key then you
can select a block of songs. You have the opportunity to reorganise your songs. To do
so, click on the song or block, and keep your left mouse button pressed, then move
your mouse up or down.
You can change the content of the playlist with the buttons at the top of the window.
You can see the icons of these buttons below:
The functions of these buttons are the following:
−
−
−
−
−
−
−
Add file: You can select one or more audio file on your computer. If you want
to select more files, then keep pressed CTRL and SHIFT keys before clicking.
These selected songs will be added to the end of your playlist.
Add dir: You can also select a folder on your computer and then the program
will search all audio files under that folder including sub-folders. All the found
audio files will be added to the end of your playlist.
Rem sel: The selected songs will be removed from the playlist.
Rem all: It removes all songs from the playlist.
Sel all: All songs on the list will be selected.
Sel none: It undoes all selection.
Shuffle: It shuffles the songs on the list randomly.
7.3.2. Live sound source
With live sound source you can attach for example the output of your DJ mixer to the
input of your computer line-in and the output of the computer speaker to your
speaker or amplifier. With this you can achieve that even if you mix from turntable or
CD player, you can add effects to sound coming out from the mixer in real time.
In case if you have two sound cards in your computer, you can also do that you do not
attach your CD players directly to the mixer but to the input line-in of your sound
cards at first (one CD player to one sound card), and the sound output of your sound
cards to the input of the channels on the mixer. You can achieve two things with that:
on one hand, you can add effects to both CD players separately; on the other hand,
20
Music FX Live – User Manual
sounds with effects will get to your mixer. Because the previous way means you add
effects to sounds coming out from your mixer which get to the amplifier or speaker
afterwards.
Both solutions can work during a party, both has its advantages and disadvantages.
Try both and decide which one you prefer.
You can see the panel of live sound source unit below:
You can start or stop your live sound source by clicking on the OFF-ON switch on the
panel. You can also see the name of the sound input device which is in use on the
display next to the OFF-ON switch.
7.3.3. Capture sound source
Capture means catching. This sound source was named by the fact that it can catch
sound created by another program running on your computer and before you could
hear that sound through the speakers, Music FX Live can add the selected effects to
the sound.
You can see the panel of Capture sound input source unit below (it looks the same as
the panel of Live sound source):
Capture sound source can only be used with those programs which support ASIO
standards which makes latency low. It is a further requirement for Music FX Live that
the sound device selected to this channel supports ASIO standards. In order to make
Capture sound source work, first you need to start Music FX Live, and then start the
program whose output you would like to „catch”. Open settings in the other program
and select Music FX Live Capture sound card which supports ASIO standards. This is
not a real sound card but a virtual one which was installed to your computer by Music
FX Live. After this, click on OFF-ON switch on the panel of capture sound source in
21
Music FX Live – User Manual
Music FX Live, then you can start using that other software. If that other program
makes any sound, you will see the indication of output and input sound in the window
of Music FX Live and you can add effects to the input sound.
7.4. BPM counting unit
Music FX Live was primarily made for DJs and prepared for playing electronic music.
Electronic music (as it was named as well) is made by different music hardware and
computer programs which can make totally standard and fixed rhythm music. That is
why all electronic music has a steady pace which we measure in beats per minute =
BPM. For example a general house or electronic music has 120-130 BPM, meaning we
can hear the kick drum 120- 130 times a minute.
Many effects can be truly impactful if we adjust them to the beat of the music. That is
why it is really important for the program to know the actual beat of the music all the
time or when we can hear the kick drum. Therefore we embedded an automatic BPM
counting unit into both channels.
As a default, BPM counting unit works automatically, there is no need for user
intervention. Auto button refers to that. If the button lights blue, the counting unit
works automatically (on the picture above it works automatically). The actual BPM
value is shown by big numbers on the display with two decimal places (it is 130 BPM
on the picture above).
Important note: The minimum is 90 BPM, the maximum is 180 BPM when it is set to
automatic mode. This interval is enough for measuring the beat of most of the
electronic music (and the most popular ones).
If the program is not able to measure the beat (or you think the shown value is not
correct), then you can change it to manual mode. Simply start clicking on Tap button
with the same beat and you will see the new value after the second click, but this is
not really punctual yet. To reach a more or less punctual level, you need to click on
Tap button 8-10 times.
The light of Auto button will be switched off when you use manual mode. You can
change back to automatic mode if you click on Auto button again. In manual mode
you can see the counted BPM value with small numbers above the Auto button. If you
think this BPM value is correct, it is recommended to switch back to automatic mode.
You can see BPM counting unit in manual mode on the picture below. 130.36 big
22
Music FX Live – User Manual
numbers show the actual beat while 130.00 smaller numbers show the result of the
automatic measurement. This case it is worthy to change back to automatic mode as
it seems that it measures correctly.
8. Warning lights
Between the two channels, there are warning lights in the middle which make you pay
attention to problems.
8.1. CLIP warning light
On the top you can see two CLIP lights. The left one belongs to channel „A”, the right
one belongs to channel „B”. These ones will light up for 2 seconds if the sound output
volume of the respective channel is so high that it causes distortion. It can happen if
the volume control knobs were already set on high level and additionally those effects
were added which increase the output volume. Distortion is a phenomenon to avoid.
You can avoid it if you decrease the output volume which also means to increase the
volume on your amplifier to reach the same volume level on your speakers than
earlier.
You can see the icons of these CLIP lights below (now the left CLIP light is on which
means there is distortion on channel „A”):
8.2. Warning light for low battery
Below the CLIP lights there is a light representing your battery which will only light if
you use a notebook/laptop not connected to the power network (therefore your
battery is in use) and the charge level goes under 10%. It means your computer will
switch off soon and if you are making music in a party, the audience would not really
like a sudden shut-down of music. So if this warning light starts lightning, quickly
connect your computer the power network.
23
Music FX Live – User Manual
8.3. Warning light for CPU load
The third type of warning light is for CPU load. CPU is continuously counting and
working as the „brain” of your computer. CPU has a maximum capacity as well. CPU
light is actually not a lightning-up light but an indicator based on percentage. If CPU
light is not lightning, Music FX Live uses approximately 0% of CPU, basically „not
uses” that. If it were above 50%, then half of the CPU light would light, the upper half
would not light at all. In case of 75%, 75% of the button would light from the bottom
and the top 25% would not light at all.
You can see the icon of CPU light below which now shows approximately 60% level:
8.3.1. Why is it important to pay attention to the CPU light?
Because if CPU load reaches 100%, serious problems can arise in playing music and
that cannot happen during a party.
8.3.2. What can you do to avoid high CPU load?
The first option is to decrease the number of effects used at the same time. Not all the
effects do the same amount of counting, some of them use less energy, but some of
them require a lot of counting capacity. The other option is to use Music FX Live on a
higher performance computer.
If your computer is relatively not so recent, its performance is less than the recent
models, we recommend you to pay attention to CPU load warning light when you use
these effects: Reverb, Vocoder.
9. Switch on and off channel effects
Below the warning lights you can see an FX enable inscription and two blue buttons:
„A” and „B”. With these buttons you can switch on and off all the effects on the
respective channels. For example if „A” button lights then all the effects of channel „A”
will work otherwise they will not. This opportunity is good for you if you temporarily
want to switch off all the effects on any of the channels. As a default, when you switch
on a channel, the respective button for switching on and off effects will be on.
You can see the icons of these buttons for switching on and off channel effects:
24
Music FX Live – User Manual
10. Audio recording into file
You can start recording any sound anytime, and so all sounds you can hear with Music
FX Live can be recorded into one audio file. If both channels are switched on, the
output music (or sound) of these channels will be mixed. Of course you can hear the
effects as well on the recorded audio file.
You can start recording by clicking on Record button at the top left corner. After you
have started recording the Record button will be lighting and on the display next to it
you can see the length of the file being recorded at that moment (in
hour:minute:second format). If you click on the Record button again, the recording
will be finished. You can start and stop recording by pressing the R key.
You can see the picture of Record button with its display below:
The format of the recorded audio file can be MP3 or WAV. You can set the desired
format, quality settings and the location of the recorded files on your computer in the
settings window (see 6. Settings chapter) The name format of the audio file will be
the following every case:
−
−
In case of MP3 format: Record_001.mp3
In case of WAV format: Record_001.wav
001 will be automatically replaced by the next number. You should never worry about
that the program will overwrite a previously recorded file, because it always checks
the last number in the name of the files in the folder, and it gives the next number for
the new file. Therefore you can press Record button anytime, none of your previously
recorded files will be disappeared.
11. The effect configuration zone
You can make maximum 9 effect variations at the same time with Music FX Live, we
call these effect variations as banks and you can change between these variations
anytime by clicking or pressing a button. The configuration zone is below the
channels. You can see the picture of effect configuration zone below:
25
Music FX Live – User Manual
On the zone you can see as many tabs as many effect configurations you have
created. On the tabs you can see the name of the respective configuration which you
can rename anytime (see this in 12.5. Renaming the configuration chapter). Only
one configuration can be selected at a time, the tab of this selected configuration will
be emphasised (on the picture above the second configuration is selected). You can
change between the tabs on the configuration zone by clicking on them or by pressing
the respective number of the tab (1-9) on the keyboard.
You can create a new effect configuration by clicking on the + icon after the last tab or
by pressing the INS (or INSERT) key on your keyboard. You can see the icon of
adding new effect configuration below:
If you do not need an effect configuration any more, you can delete that by clicking on
the X icon at the right side of the tab. If you want to delete the selected effect
configuration at that moment, you can also do that by pressing DEL (or DELETE) on
your keyboard. Before deleting, the program will ask you if you really want to delete
that selected tab. You can see the icon of deleting effect configuration below:
11.1. Touchpad button
There are two more fixed buttons on the right side of the configuration zone. You can
switch on and off the touchpad control by clicking on Touchpad button. If this button
lights blue, then the touchpad control is switched on.
You can read more about touchpad control in 13. Virtual touchpad (the „Table”)
chapter.
11.2. FX Stop button
Next to touchpad button you can see FX Stop button which starts to flash when any
of the configurations is activated (meaning the effects came into action on at least one
of the configurations).
The displayed names of the tabs will change to blue if their configuration is activated
(meaning the effects added to them came into action). For example on the picture
below configurations no. 1, 2, 4 are activated:
26
Music FX Live – User Manual
If FX Stop button flashes and you click on it (or you press SPACE key on your
keyboard), then all the effects will switch off immediately (meaning none of the effect
configurations will be activated).
So as a result of using FX Stop button, all effect configurations will be inactive, Hold
mode will be switched off on all configurations, and path plays will be stopped on all
configurations.
12. The effect area
The central part of the program is the big area in the middle (below the configuration
zone) where you can select and modify your effects.
This area has two views (set-up). One of the set-ups is when you can see the effects
and change their parameters; the other one is when you can see a big virtual
touchpad (called the „table”) in the middle.
As a default, when you start the program, you can see the effects set-up. We will
introduce you that one first. You can see the effects set-up on the screenshot below:
27
Music FX Live – User Manual
With Music FX Live you can add effects to two input sounds separately. To support
that, the effects set-up is divided into two. The left part belongs to channel „A”, the
right part belongs to channel „B”.
In a previous chapter we have written about effects configuration, you can have
maximum 9 of them in the program at the same time. In any of the configurations
you can uniquely add effects to both channels. You can add maximum 5 effects to
both channels within one configuration.
12.1. Add effects to configuration
You can imagine adding effects like you would have a cable through which the original
sound would come in and you would add effects to it one after the other. When you
add one effect, the sound goes through and during that it modifies that sound. If you
add another effect afterwards, the sound with the previously added effect goes
through; therefore the second effect applies to that sound with the previously added
effect. You can do this until you reach 5 effects per channel. In fact it is like
connecting different devices with cables.
You can see a clip on the effect’s area under both channels, there is a + button at the
end of it. You can see this button on the picture below:
Imagine that the sound comes in through that clip. Currently no effects are added to
the sound. It is true that the end of the cable is „cut”, but it does not mean that the
sound does not go anywhere; it means that is the end of the effects’ concatenation. If
you start playing music now you will not hear any changes in that.
You can add a new effect by clicking on the + button. As a result, a window will come
up to select an effect; you can see the screenshot of it below:
28
Music FX Live – User Manual
In the program all effects have their own icon. The drawing refers to the function of
the effect. We have organised the effects into 3 groups, you can change between
these groupings through the tabs (or by pressing the TAB key on your keyboard).
If you click on any of these effects, this window will be closed and the selected effect
will be added to the cable. If you decide not to select any effect, just click on the X
button at the top right corner or on Cancel button at the bottom or click anywhere
else outside the window (on the darkened area).
Important note: Even though you have added an effect to the configuration, you will
still not hear any changes. The reason behind is that as a default the configuration is
not activated (it is not switched on), therefore all the effects are not active, the sound
goes through without any changes. You can read more about activating effects in the
13. Virtual touchpad (the „Table”) chapter.
For example now we add Low Pass Filter effect to channel „A” (we will show you the
function of effects in more details in 17. The effects chapter). As a result you will see
the screenshot below:
29
Music FX Live – User Manual
The end of the cable now connects to Low Pass Filter effect from which the cable
comes out at the bottom and it ends there. Now there are two + icons on the cable
which means that you can add the second effect above or below the Low Pass Filter
effect.
12.2. Two types of effects: dry/wet bands
There are two types of effects. One of the types when it modifies the input sound
(most of them are these types in Music FX Live software), the other type mixes sound
on the original one. This one is important because this case the virtual cable goes into
two and you will have two parallel bands. The original sound continues to go on one
band (the one has arrived to the effect) and on the other band the sound generated
by the effect will proceed. This allows you to add effects to both of them and generate
very special sounds. Sooner or later the two bands will be merged. It happens if you
want it to be merged or there are no more effects on the cable. Both cases the sound
on the different bands will be mixed and this mixed sound will proceed together within
the cable.
Now let us see what happens if you add an effect to the cable which belongs to the
second type described above, so you mix a new sound on the original one. For
example let us add the Delay effect. As a result you will see the screenshot below:
30
Music FX Live – User Manual
You can see that there are two cables coming out from the bottom of the effect, one
goes left, the other one goes right, and then they go down together in parallel. The
cable on the left always takes the original sound (actually the sound which arrived to
the effect on the top). The term we call for the sound without effects is: DRY. The
cable on the right always takes the sound which is created by the effect (now it is
Delay). This cable does not contain the original sound, just the effect which will be
mixed on the original sound. The term for this cable is: WET.
Both cables (dry and wet) has a + icon, therefore you can add new effects to both of
them separately.
Important note: Neither the dry, nor the wet band can be divided any more.
Therefore if you add an effect to the dry or to the wet band which would divide the
sound into two more bands (like Delay), that will not happen, but the two bands
coming out from the effect will be mixed immediately and will proceed together
through the cable.
You can see above that the two bands will merge again into one cable. This case the
sounds from these two channels will be mixed. You can set the ratio of this mixing
with the DRY/WET knob at the bottom right corner of the effect. If the knob is on
centre position, it means the bands will be mixed equally (both bands will be added to
the mix on 100% volume). If you start turning down the knob, wet band will be lower
while dry band volume stays 100%. If you fully turn it down, basically you will only
hear dry band. Opposite of that if you start turning up the knob, you will hear wet
band 100% while dry band will be lower or at the maximum you will not even hear
that.
31
Music FX Live – User Manual
As you can see it on the screenshot above, after the cables merged, the bands were
mixed, the joint cable proceeds down and there is a + icon on it. You can also add
new effect here.
On the screenshot below you can see an example when there are effects on both sides
of the divided bands and after the merger there is an effect as well:
32
Music FX Live – User Manual
33
Music FX Live – User Manual
12.3. Path of sound and the order of effects
The order is very important when you add effects. As we have written, the original
sound comes in on the top and proceeds further down, so the effect on the top will
modify the sound at first, then the effects below will modify that sound which comes
out after the first modification by the first effect and so on. There are cases when the
order of the effects does not count, but most of the times the order how you put the
effects on the cable does matter.
An example: It matters whether you add a Low Pass Filter effect to the cable first and
then a Delay effect or the other way around. Both ways are good, just they sound
differently and you can use them for different purpose. All cases you need to decide
about the order. You do not need to worry about that, after some practise you will
know how these effects sound, what they are good for and if you experiment with the
order of effects, after a while you will know which effect is worthy to add after another
effect.
In the program you can create 9 effect configurations at the same time and you can
add 5 effects to all of them per channel. As a default, when none of the configurations
are activated, the sound coming from the sound source proceeds through the program
without any changes. When you activate a configuration, the input sound goes to the
effect on the top, then goes further down through the cable, finally you will hear the
sound which comes out after applying the last effect.
Music FX Live has a very useful characteristic. More effect configurations can be active
at the same time, and the order of the configurations depends on the order of your
activations.
For example if you have activated the configuration no. 3 first, after that no. 1, then
the sound will go through the effects of configuration no. 3 first, and the sound
coming out from the last effect of configuration no. 3 will go into configuration no. 1.
This means it is not the original sound that goes into configuration no. 1, but the
sound coming out from configuration no. 3. But if you activate configuration no. 1 first
and after that configuration no. 3, then the order will be the other way around.
The point is that the program remembers the order of your activations and the sound
will go through on the activated configurations in this order.
12.4. Scrolling on the effect area
In case if you have added so many effects to the configuration that they do not fit
vertically any more, then you can scroll down and up your effects. You can do that
with the scroll wheel of your mouse. This scrolling option is also available as a vertical
line in the middle of the effect area and you can see your current position on it. The
left side of the scrolling line belongs to channel „A”, the right side belongs to channel
„B”.
34
Music FX Live – User Manual
You can see this scrolling line on the picture below as it shows the scrolling position of
channel „A” (there is no line on the right side as there is no need for scrolling at
channel „B”, all the effects of that channel fits on the effect area):
12.5. Renaming the configuration
As we have mentioned earlier, you can create maximum 9 configurations. When you
create a new configuration, on the respective tab and on the top middle of the effect
area you can see the configuration name as Untitled. This is the name as a default
when you create a new configuration. You have the opportunity to rename the
configuration by clicking on the name of the configuration (not on the tab but on the
effect area) or by pressing B key on your keyboard. After this an editing window
appears in which you can rename the configuration. You can finalise your renaming by
pressing ENTER key or if you decide not to rename, just press ESC key.
On the screenshot below you can see how to rename the configuration:
35
Music FX Live – User Manual
It is useful to rename your configuration to a name which you can easily know what
effects it contains and what you want to use it for. After renaming you will see the new
name on the tab as well.
12.6. Change between the set-ups
At the beginning of this chapter we have mentioned that the effect area has two types
of set-ups. Previously you could get to know the one which shows the effects. You can
see a button below the vertical line in the middle of the effect area; if you click on that
you will switch to the other set-up (you can also do that by pressing TAB key on your
keyboard). You can see the icon of this button below:
This other set-up shows you a rectangular area which we call the „table”. What is the
table good for? We answer for this in the next chapter.
13. Virtual touchpad (the „Table”)
The software was created in a way that if you use notebook, then you will be able to
use your touchpad (embedded rectangular area to control your mouse by touching) to
control your effects. If you do not want to use your touchpad or you do not have a
notebook, the program still gives you the opportunity to use the advantages of
touchpad control.
In the program you can find a rectangular area which stands for a real touchpad, that
is why we can call it as a virtual touchpad, we shortly call it table. In the previous
chapter we have shown you that there are two set-ups of the program. You can see
the table on both of them.
36
Music FX Live – User Manual
On the two screenshots below you can see these two types and we put an arrow to
show the table area on both of them:
37
Music FX Live – User Manual
The table works the same way like Touchpad control would be switched on in the
program (see in 11.1. Touchpad button chapter) and you would touch the
embedded touchpad area. In case of this table you can do that by clicking. So clicking
on the table and moving your mouse mean the same as touching the real touchpad
and moving your fingers on it.
We have shown you how you can add effects to the configuration in 12. The effect
area chapter but we have not mentioned yet how to activate effects so that they
really change the input sound.
13.1. Activating configurations and effects
Function principles of Music FX Live are the following:
You create effect configurations in advance (you can change between them through
the tabs) and you can add maximum 5 effects to each configuration (per channel). As
a default none of the effects are active so you can only hear the original sound. You
need to activate your effects to hear any changes. You cannot activate your effects
one by one but the configurations. When you activate a configuration, all the effects
(of both channels) belonging to it will be activated. When you make a configuration
inactive, all the effects belonging to that configuration will be inactive (the sound will
go through without any changes).
38
Music FX Live – User Manual
A configuration can be activated in several ways, at first we show you the simplest
way. When you click into the table (it does not matter where exactly) or you touch
your touchpad anywhere (if your touchpad control is switched on), then that specific
configuration will be activated. This lasts until you press your mouse or you touch
your touchpad. As soon as you do not press your mouse any more or you do not touch
your touchpad, the configuration will be inactive.
When you activate a configuration, all the effects belonging to that configuration will
be activated and will modify the input sound. We have written in 12.3. Path of
sound and the order of effects chapter that the order of effects matters in terms of
the final sound as the sound goes through on the virtual cable from top to bottom
which means the effect on the top will modify the input sound at first and the effect
below afterwards and so on.
There are more signs showing that a configuration is activated or not. One is that the
name of the configuration on the tab will change to blue. Secondly FX Stop button
continuously flashes. On the picture below you can see that configurations no. 1, 2, 4
are activated:
Thirdly a crosshair continuously changes its shape on the table. The crosshair appears
where the mouse was for the last time when it was activated or where you have
touched the touchpad for the last time. On these pictures below you can see
crosshairs when one is inactive and when one is active (it continuously changes its
shape when it is active):
13.2. Hold mode
In the program there is a possibility not to press your mouse or touch your touchpad
continuously. Hold mode serves this purpose. You can switch on and off Hold mode by
clicking on Hold button or pressing ENTER key on your keyboard.
You can find Hold button next to the table (or above the table if you have the big
table view). When Hold mode is switched on, Hold button continuously flashes.
On the picture below you can see Hold buttons (there are two types of this button
belonging to the two types of views, now you can see both):
39
Music FX Live – User Manual
As long as Hold mode is switched on, you do not need to press your mouse or touch
your touchpad continuously and still the configuration will be active.
Hold mode only activates the selected configuration, not all of them.
You can switch off Hold mode by clicking on Hold button again (or by pressing ENTER
key on your keyboard). An alternative option is that you click on FX Stop button (or
you press SPACE key on your keyboard), but it is important to note that it inactivates
all configurations, not just the selected one.
As we have written, as long as a configuration is active, all the belonging effects are
active as well; they all modify the input sound. During that time you can continuously
change the parameters (knobs, buttons) of your effects and you will immediately hear
these changes. We show the parameters of effects in detail in 17. The effects
chapter.
13.3. Assigning parameters to the table’s axis
The table has a very useful characteristic. You can assign any of the parameters of the
effect to the horizontal axis and to the vertical axis of the table as well (one
parameter to one axis at a time). For example if you assign the volume control knob
of an effect to the horizontal axis, then it will matter where you click within the table
or where you touch the touchpad. If the crosshair is on the left side, the volume
control knob will rotate itself to the minimum and as you move your mouse or your
finger on the touchpad, the volume control knob will rotate upwards and you will hear
these volume changes. If the crosshair is on the right side, the volume control knob is
rotated to the maximum.
On the pictures below you can see how knob controls function on the table. We
assigned Pitch knob of Pitch Shifter effect to the horizontal axis. We moved the
crosshair from left to right on the table while the assigned Pitch knob rotates to the
maximum (we put the picture of Pitch knob at each steps so that you can see these
changes).
40
Music FX Live – User Manual
How can you assign effect parameters to the table?
Simply move your mouse above the parameter you wish to change and click with the
right button of the mouse. Then a menu will appear with two options:
-
Assign to X (horizontal) axis
Assign to Y (vertical) axis
You can see the displayed menu on the picture below:
41
Music FX Live – User Manual
By choosing one of the options you can assign the parameter to the horizontal or
vertical axis. For example if you have assigned it to the X (horizontal) axis, there will
be an X icon on the parameter and you will not be able to change this parameter by
„hand” but through the table.
On the picture below we have assigned Pitch parameter of Pitch Shifter effect to the X
(horizontal) axis (an X icon is on the Pitch parameter):
If you want to remove this parameter from the axis, click again with the right button
of your mouse and select Remove from (horizontal) X axis option.
13.4. Touchpad mode and touchpad control
It is important to know that the table uses absolute control, not relative one. This
means that on the example above if you release the table after the third picture and
click on the left side of the table with your mouse (or you touch your touchpad on the
left side), the Pitch knob will immediately take a leap to the minimum.
Absolute control is interesting when you use touchpad and you control the assigned
knob by touching the touchpad. You have already got used to that when you move
42
Music FX Live – User Manual
your fingers on the touchpad in Windows operating system, it does not matter where
you touch your touchpad because as you start moving your fingers so the arrow of
Windows will move. But if you switch on the touchpad mode in Music FX Live, it will
function differently. On one hand the arrow of Windows will not move (therefore we
recommend you to connect a USB mouse to your notebook and control the arrow of
Windows by that). On the other hand wherever you touch the touchpad, the crosshair
will take a leap exactly there within the table.
13.5. Elements of the big table view
If you have assigned a parameter to the horizontal axis and you change to the big
table view (for example with TAB key), then you will see a scale at the bottom of the
table and a few things next to the table.
On the picture below you can see an example when we assigned Frequency parameter
of Low Pass Filter effect to the horizontal axis:
On the top left side of the table you can see Hold button which we have already
written about. To the right, you can see a text which shows which channel, which
effect and which parameter we have assigned to the axis. On the right side of this text
there are three buttons.
X button removes the assigned parameter from the axis. By clicking on the triangle
button, you can change the orientation of the axis which means if you move the
crosshair from left to right; the knob will not rotate from minimum to maximum, but
from maximum to minimum.
By clicking on the third button (showing two arrows into different directions) you can
43
Music FX Live – User Manual
switch the axis which means those parameters which were assigned to the horizontal
axis, will be assigned to the vertical axis and vice versa. You can find this button at
the bottom left corner as well.
There are two types of effect parameters as well.
One of the types is the continual (or continuous) parameters. These parameters are
usually set by knobs, and you can continuously rotate these knobs without any blocks.
For example we can categorize a typical volume control to this type; you can rotate it
with very sophisticated moves so that the volume changes only a little.
Parameters belonging to the other type are the ones which have fixed values and you
can only select those values and cannot select values in between. For example those
switches which enable switch between different modes and they have as many options
as many modes.
13.5.1. Continual type of effect parameters
If we stick to the example above and we assign Frequency continual parameter of Low
Pass Filter effect to the horizontal axis, then you will see a scale at the bottom of the
table which shows frequency values in Hz. It is 600 Hz on the left side and it is 20000
Hz on the right side. These numbers come from the fact that the minimum value of
Frequency knob on the axis is 600 Hz and the maximum value of it is 20000 Hz.
Values in between are proportionately spread on the scale. The scale shows the value
of the parameter regarding to a point on the axis.
There is also a slider below the scale, but most cases of effects it is fully pulled back
therefore you cannot move it neither to the left, nor to the right. This means the table
applies to the entire latitude of the parameter, the left side of the table shows the
minimum value and the right side shows the maximum value. If you resize the slider
to a smaller size, the whole scale will change. You can change the size of the slider by
hovering on it with your mouse and rotating the scroll wheel of the mouse. Afterwards
you can drag the fader with the left button of the mouse and you can move it.
Changing the fader you can see the numbers of the scale changing which means you
cannot fully change the parameter with the table any more, but you can change within
the values indicated by the slider.
On the picture below you can see how the scale changed with the slider resizing and
moving:
If you set the slider as it is indicated on the picture above, then even if you move the
crosshair fully from the left side to the right side, you will not be able to rotate the
Frequency knob from the minimum (600 Hz) to the maximum (20000 Hz), but from
3486 Hz to 10245 Hz. In some cases this function might be very useful, for example if
44
Music FX Live – User Manual
you want to reach that the knob does not go below or above a specific value.
In case of the vertical axis, everything functions the same as of the horizontal axis,
but it is rotated by 90 degree. On the picture below you can see the same settings we
mentioned above but now it is on the vertical axis:
Of course you can assign parameters to both axes at the same time. On the picture
below you can see an example when we have assigned different parameters of
different effects to the two axes (Volume knob of Synth effect of channel „B” to the
horizontal axis and Frequency knob of Low Pass Filter effect of channel „A” to the
vertical axis):
45
Music FX Live – User Manual
13.5.2. Fixed-value type of effect parameters
In the previous examples we have assigned continual parameters to the axis of the
table and you could see that there were a scale and a slider in these cases to modify
the scale. Fixed values can be assigned to the axis but you will see some difference.
Let us take an example.
Mode parameter of Echo effect is a knob as well, but it has only 3 statuses as Echo
effect has 3 modes. You can see the first two modes of Echo effect on the picture
below. The first mode is NORMAL, the second is SCRATCH and they are written on a
display. You can see that in case of NORMAL mode, the mode knob status is on the
minimum and in case of SCRATCH mode, it status is on centre value and statuses in
between are not possible.
If you assign Mode knob now to the horizontal axis of the table, you will see the
following:
46
Music FX Live – User Manual
The table has been divided into three equal parts with dashed lines. The three parts
are equal to the three modes. You can read the three names of the modes at the
underside of the table. The first one-third of the table is the NORMAL mode, the
second one-third of the table is the SCRATCH mode, and the third one-third of the
table is the DOUBLE mode. If the crosshair is in the first one-third of the table, then
NORMAL mode of Echo effect will be selected. As soon as you move your crosshair to
the second one-third of the table, the mode will immediately change to SCRATCH.
You can see three blue-lighting buttons below the three modes on which you can read
the short names of these modes (NOR, SCR, DBL). For example if you click on NOR
button, the lighting will go off (that one will be dark) and you indicate it to the
program that you do not want to use NORMAL mode on the table. As a result, the
split of the table will change and it will only be split into two equal parts, left side is
SCRATCH mode and right side is DOUBLE mode. You can see this on the picture
below:
47
Music FX Live – User Manual
Hence the table will be split into as many parts as many values are allowed. It could
be very useful in those situations when the knob has many fixed values (for example
Carrier and Chord knob of Vocoder effect), because if you want to switch between 2-3
from many options, it is easier for you having these 2-3 options on the table and the
rest could be switched off. It is even more useful if those values you plan to use are
not next to each other (for example if you plan to switch between 4 and 11).
The order of fixed values cannot be changed, they always follow the order how they
exist on the knob. You can only influence this by switching off a value and that one
will not appear on the table any more.
By clicking on the triangle button on the axis of the table, you can change the
orientation of values; it is the same as it was in case of continual parameters.
14. Path recording and playing unit
You have the opportunity to record the move of the crosshair on the table and play
that afterwards. The path recording and playing unit serves this purpose, you can find
it in the program as PATH. This unit is displayed differently in the two views, but they
both have the same elements. It is horizontal in one of the views and it is vertical in
the other. You can see these two displays on the two pictures below:
48
Music FX Live – User Manual
14.1. Path recording
Firstly you need to record the move of the crosshair. To do so, click on Rec button (or
press CTRL+P key on your keyboard). Now Rec button starts flashing but it does not
start recording. If you have changed your mind and you do not want to record the
path any more, then click on Rec button again (the previously recorded path will not
be deleted in this case). The recording starts immediately as you activate the
configuration (basically as you click into the table or touch your touchpad). The path
49
Music FX Live – User Manual
of the crosshair will be recorded. The recording lasts until you release the button of
your mouse or your touchpad. As soon as the recording has been finished, the
recorded path will be displayed on the table. On the picture below you can see how
the table looks like after recording a path:
14.2. Setting the speed of playing
Playing your path recording does not happen with the speed you have recorded but
with the speed you have set for playing. You can set the speed of playing in the
number of beats or kick drums (in music theory we call them quarters). The blue
lighted number buttons on the unit serve this purpose (below the SPEED text). For
example if „8” button lights, this means the crosshair will go through its path from the
beginning to the end during 8 beats time while playing it; it does not depend on the
length of the original path. If „1/2” button lights, this means it will play its path
during a half beat time. If you click on a number that one will light (all the others’
lights will be switched off) and it will play its path during that beat time which is
displayed on the button.
On the picture below you can see the panel for these beats and now 16 beats number
is selected as the desired speed:
50
Music FX Live – User Manual
14.3. Selecting the reference channel
As you need to give the playing speed in beats, it is essential that your channel BPM
counting unit shows prompt BPM value (well, it must show any BPM value). If the
measured BPM value is not prompt or you do not have any, the path recording and
playing unit will not know how long a beat takes. Therefore it is important to check if
you have BPM value and that is prompt before you start recording your path.
You can manage the effects of both channels with one table, so the two channels
(channel „A” and „B”) jointly use the table and the path recording and playing unit.
Therefore you need to let the program know which channel’s BPM counting unit should
be considered by the path recording and playing unit: channel „A” or „B”. You can
verify it by clicking on the green buttons which are next to (or below if it is the other
view) the counting unit. There are two rounded buttons; one is A, the other one is B.
Only one can light at the same time. The path recording and playing unit will consider
that channel’s BPM counting unit which lights during the counting of speed.
You can see these two buttons on the picture below, right now B button lights:
14.4. Playing the path
You can play your recorded path by clicking on Play button (or pressing P key on your
keyboard). As a result, the path playing starts immediately which means the program
will touch the table or move the crosshair on your behalf.
Important note: Recording and playing the path does not mean that you record and
play the sound you heard from your speaker but only the moves of your crosshair. You
can also do that you change your effects or assign different parameters to the axes
during playing it (this may not be a good idea though). So the path recording and
playing unit does not care what kind of effects you have previously added to your
configuration or what parameters you have assigned to the axis of the table, it only
moves the crosshair from one end of the path to the other.
When you start playing your path, as a default it plays from the beginning of the path
until it ends or you stop it. You can stop playing by clicking on Play button (or
pressing P key on your keyboard) or you can also click on FX Stop button (or
pressing SPACE key on your keyboard) but it will inactivate not only the selected
configuration but all of them.
14.5. Selecting the mode of playing
51
Music FX Live – User Manual
You have the opportunity to set path playing that it should not play from the
beginning of the path to the end but in reverse order: from the end to the beginning.
The third option is that you start from the beginning and when it arrives to the end it
starts going backwards and stops again at the beginning. You can change between
these three options with a switch which is on the panel of the unit below MODE.
On this picture below you can see the MODE switch:
FWD (as Forward) is set as default, it plays from the beginning to the end. REV (as
Reversed) means it plays from the end to the beginning. The third mode is BNC (as
Bounce) when it starts playing from the beginning and when it arrives to the end it
starts going backwards and stops again at the beginning. You can select the desired
mode by clicking on the name of the mode (do not misunderstand the slider next to it,
you cannot grab and slide that with your mouse).
Important note: In BNC (Bounce) mode playing takes twice amount of time then in
case of the other two. If you set the playing speed to 4 (button 4 lights) then it takes
4 beats time to get to the end from the beginning and 4 beats time to get to the
beginning again from the end, altogether it takes 8 beats time to play.
14.6. Repeating the playing
If you prefer not to end playing at the end of the path, you can switch on Loop mode.
You can do that by clicking on Loop button which you can find next to the Mode
buttons. If Loop button lights then repetition is switched on. If you start playing your
path this case, it will go on and on until you stop it. If Loop mode is switched on and
you selected Forward mode, then when playing reaches the end the crosshair will go
back to its beginning and will start replaying it. The same happens in Reverse mode
but the opposite way. Both cases there will be a break in the effects which sometimes
does not sound well (but sometimes that is the purpose), therefore in case of Loop
mode it is recommended to select Bounce mode.
You can see Loop button on the picture below (as it looks differently in the two views,
there are two pictures):
52
Music FX Live – User Manual
14.7. Shifting the path
The software provides opportunity for you to shift the recorded path horizontally or
vertically. You can do that with two knobs, you can see X and Y letters below them
(they are both below SHIFT inscription).
You can see these two knobs on the picture below:
Both knobs are on their centre values (in the middle) as a default. If you rotate X
knob to the left, the path will start shifting to the left as well. If you rotate it to the
right, it will shift to the right as well. In case of Y knob, if you rotate it to the left, the
path will shift downwards, if you rotate it to the right, the path will shift upwards.
In fact it is not shifting but shrinking. For example if the original path reaches the left
side of the unit and you shift it to the left, then the path will not go beyond the table
even after the shift because the whole path will be shrunk horizontally (we can also
say that the path will be pushed to the left side of the table).
On these two pictures below you can see the same path, on the first one it is not
shifted, on the second one it is shifted by 60%. You should see that even though we
have shifted the path to the left, it did not go beyond the table.
53
Music FX Live – User Manual
15. Workspace and saving, importing the configuration
The software provides opportunity for you to save your effect configurations
separately or altogether into one file and later on you can import them anytime.
We call the configurations altogether as workspace in the program. So a workspace
can have maximum 9 configurations and all configurations have their own effects and
settings for their path recording and playing unit.
If you click with the right mouse button on the effect area, a menu will appear which
you can see on the following picture:
In the menu you can select from the following options:
-
New: You can start a new workspace, but the current one will be deleted. The
new workspace will not have any configuration as a default. Alternative
shortcut: CTRL+N.
54
Music FX Live – User Manual
-
-
-
-
Open: You can open a previously saved workspace. A window will open when
you click on this menu element with which you can select the desired
workspace file. Music FX Live workspaces are saved as *.fxw file extension (w
stands for workspace). Alternative shortcut: CTRL+O.
Save: You can save the actual workspace. If you have not saved that
workspace before, the program will ask you to select the file location and name
the file. If you have already saved that workspace before (or if you have
opened that earlier) you will only get a message about successful saving.
Alternative shortcut: CTRL+S.
Save as: You can also save the workspace with this menu element, the
program will always ask the file location and the name of the file.
Import new effect configuration: A window will open when you click on this
menu element; you need to select which effect configuration you want to
import. Music FX Live effect configurations are saved as *.fxb file extension (b
stands for bank which is effect configuration). A new tab will be opened when
you import and the selected effect configuration will be imported to that.
Alternative shortcut: CTRL+I.
Export current effect configuration: You can export your actual effect
configuration into a file which you can import anytime later on. After selecting
this menu element, it will ask you to select the file location and name the file.
Alternative shortcut: CTRL+E.
16. Global effect intensity control knob
At the bottom right corner of the program you can always see a big knob which is
MASTER FX. You can set effects intensity globally for the program with this knob.
Actually it is a virtual cross fader between the original sound and the sound with
effects. It is always on maximum as a default, on WET value, and it means all effects
work normally in the program. If you start rotating the knob downwards, the sound
with effects starts to be lower and you will more and more hear the original sound. If
you rotate it to the minimum, to DRY value, you will not hear any effects but the
original sound.
You can see MASTER FX knob on the picture below:
This knob is global for the whole program and all effects. There is only one of this type
of knobs and the changes you make with it act on all effect configurations and all
effects within.
55
Music FX Live – User Manual
17. The effects
If you take a look at the effects (not the icons but the panel of the effects) you can
see they all look very similar. There are some control elements of the effects that
almost all of them have and they work the same way (or very similarly).
17.1. Switching the effects on and off
You can see the small-sized icon for this on the top left corner of each effect. If you
click on this icon, it will get dark and the effect will be inactive (even if the
configuration to which it is added is active at that moment). If the effect is inactive it
will not modify the sound going through. There is only one exception: if the function
of the effect is to generate decay (continuously decreasing volume), then after
inactivation you can still hear the decay until it fades away, but there will not be any
more new decays generated.
There is a good example for this: Delay effect which continuously repeats the sound
arrived to it but it plays the sound lower and lower each and every time when it
repeats it until it fades away. If you inactive Delay effect during its functioning, then
you will hear the last decay until it fades away. To sum up, inactivating an effect does
not always mean that the effect switches off itself immediately.
Below you can see the icon of Low Pass Filter effect on a switched on and on a
switched off mode:
17.2. Input and output volume control
On the right side of the icon of the effect you can see the name of it, and to the right
there is a double-light which shows the volume of the input and output effects (same
way and colour as the input and output volume of channels). The upper row belongs
to the left speaker and the lower row belongs to the right speaker. You can only see
either the input or the output volume at the same time, not both of them. If the
configuration to which you have added your effects is not active, you can see the
input volume (blue-white lights), if the configuration is active (the effects are
functioning) you can see the output volume (green-yellow-red lights).
On these two pictures below you can see the volume of the input and output effects:
56
Music FX Live – User Manual
17.3. Removing effect from the configuration
There is an X icon at the top right corner of all effects, if you click on it the effect will
be removed from the configuration. In case of removal, the previously mentioned
phenomenon is not valid like it was in case of inactivation, for example you will not
hear the decay any more. If you remove your effect and this effect generates decay
when it is functioning, you will not hear the decay any more, it will immediately stop
being.
You can see the effect removal icon on the picture below:
17.4. Effect intensity control (dry/wet) knob
There is a DRY/WET knob at the bottom right corner of all effects. You can control
the effect intensity or volume with this knob but it works differently in case of those
effects which modify the input sound and which mix an extra sound on the input
sound. You can read about these two types in 12.2. Two types of effects: dry/wet
bands chapter.
In case of those effects which modify the input sound, the DRY/WET knob functions
as a cross fader which provides a transition between the original sound and the
modified sound. If the knob is on minimum (on DRY position) value, you only can
hear the original sound. If the knob is on maximum (on WET position) value, you only
can hear the modified sound. Between the two ends we can hear a transition between
the original sound and the modified sound. For example, on centre value (in the
middle) you can hear the original sound and the modified sound with the same
volume.
In case of those effects which belong to the other type, the DRY/WET knob functions
differently. There are two cables coming out from these effects. The cable on the left
takes the original sound without any changes. The cable on the right takes the sound
which is created by the effect. Sooner or later the two cables will merge and the
sounds within them will be mixed and they will proceed together in one cable. With
DRY/WET knob you can set the volume of the left and the right cable in case of mix.
If the knob is on minimum (in DRY position) value, the volume of the left cable (DRY
zone) will be 100% while the volume of the right cable (WET zone) will be muted, it
will have 0% of volume. If the knob is on maximum (in WET position) value, the
situation will be the opposite: you will only hear the WET zone, and not at all the DRY
zone. On centre value (in the middle) both zones will have 100% volume in the mix.
In other positions of the knob, one zone will always have 100% volume while the
other will have less as much as it gets closer to the minimum and maximum of the
knob.
You can see the DRY/WET knob of effect on the picture below:
57
Music FX Live – User Manual
17.5. Beat selection buttons
You can see numerical buttons in two rows in case of many effects. These are beat
selection buttons (to be more punctual they are quarter selection buttons). We have
previously written about that current electronic music has standard rhythm which we
count in BPM. BPM means beats per minute (to be more punctual quarters per
minute); the beat is usually the kick drum you can hear in the music.
In case of those effects which have beat selection buttons, you can set how long (how
many beats) the effect should be. It means different things regarding to all effects
(we will show the meaning of theses buttons in case of all effects in 17. The effects
chapter). You can only select one beat selection button at a time, and that button will
light; it can also happen that none of the buttons is selected. If you click on any of
these buttons, that beat per minute will be selected and the button will light as well.
On the picture below you can see the panel for beat selection and now 3/4 beat per
minute is selected:
17.6. LFO (automatic knob rotation)
You can see a separated area in case of few effects, that area is called LFO. LFO
stands for Low Frequency Oscillator. LFO is to rotate one of the knobs of your effect
from the minimum to the maximum on your behalf. It does it with the speed you set
with Speed knob. It rotates different knobs in case of different effects (you will see
which knob it rotates in case of the different effects in the chapter of effects). LFO
only functions if its ON button lights and the effect is activated. When LFO functions
the knob will not be rotated physically (you will not see it rotating on your screen) but
in fact it will be rotated at the background and you will hear it on the sounding of the
effect.
You can switch on LFO two ways: either you click on ON button or you click on any of
the beat selection buttons and as a result ON button will light as well. All effects have
beat selection buttons that have LFO. But LFO can function not only according to the
selected beat number but the speed you set with Speed knob from the very fast to
the really slow. When you switch on LFO by clicking on any of the beat selection
58
Music FX Live – User Manual
buttons, the program calculates the exact speed of the selected beat per minute and it
sets Speed knob to that calculated value. If you rotate Speed knob after this, the
selected beat number will not light anymore and none of the beat selection buttons
will light.
You can switch off the LFO by clicking on ON button again. The LFO also turns off
automatically if you rotate the knob that the LFO modifies. In the following chapters
we indicate in case of all effects the knob that the LFO modifies.
You can see LFO as switched on and as switched off on these two pictures below:
17.7. „Filter & Modulator” category effects
17.7.1. Low Pass Filter (LPF)
This effect cuts (basically mutes) those frequencies which are above the selected
frequency and only keeps those ones which are below that. It intensifies that narrow
frequency band which is around the selected frequency cut with a given extent.
Resonance determines this extent. The higher the resonance is the more you can hear
a sound similar to a beep while you are continuously changing the frequency.
Parameters:
- Frequency: Selected frequency cut in Hz. Minimum: 0 Hz, maximum: 20000
Hz.
- Resonance: Extent of resonance. Minimum: 0, maximum: 0,95.
59
Music FX Live – User Manual
The effect has LFO which modifies Frequency parameter.
17.7.2. Band Pass Filter (BPF)
This effect keeps the selected frequency band and cuts the frequency bands above
and below that. You can set the middle and the width of the band separately. You can
also set resonance here like you can do that at Low Pass Filter effect and it will show
up at the sides of the band.
Parameters:
- Frequency: Frequency of the middle of the band in Hz. Minimum: 0 Hz,
maximum: 20000 Hz.
- Width: Width of the band in Hz. Minimum: 10 Hz, maximum: 10000 Hz.
- Resonance: Value of resonance. Minimum: 0, maximum: 0,95.
The effect has LFO which modifies Frequency parameter.
17.7.3. High Pass Filter (HPF)
60
Music FX Live – User Manual
It is the opposite of Low Pass Filter. You can also give a frequency cut here but this
effect cuts the frequencies below that and keeps the frequencies above that. You can
also give the value of resonance which intensifies that narrow frequency band around
the selected frequency cut with the given extent.
Parameters:
- Frequency: Selected frequency cut in Hz. Minimum: 0 Hz, maximum: 20000
Hz.
- Resonance: Value of resonance. Minimum: 0, maximum: 0,95.
The effect has LFO which modifies Frequency parameter.
17.7.4. Flanger (FLA)
This may be the most popular effect; you must have heard about this at least once. It
is popular between DJs because it has a typical sound which can be used in almost all
music. Its sound is similar to the take-off of a jet aeroplane. It can be used well if
there are many high tones in the music and LFO is switched on.
Parameters:
61
Music FX Live – User Manual
-
-
Time: Flanger effect functions in a way that it plays the original sound with a
time-lag more times. You can set the extent of time-lag in ms with Time
parameter. The smaller the time-lag is the higher tune the effect will sound.
Minimum: 0,3 ms, maximum: 5 ms.
Feedback: The effect repeats the original sound more times but lower and
lower each time. Feedback determines the percentage of the volume of the next
repetition relative to the volume of the previous repetition. The higher that
value is, the sharper the sound of effect will be. Minimum: 50%, maximum:
95%.
The effect has LFO which modifies Time parameter.
17.7.5. Phaser (PHA)
It is similar to Flanger effect a bit as their functioning is similar. It can be used very
well if there are many high tones in the music and LFO is switched on.
Parameters:
- Frequency: This parameter determines the depth of the effect in Hz. The lower
the frequency is the deeper the effect will sound. Minimum: 1600 Hz,
maximum: 20000 Hz.
- Feedback: Similarly to the Flanger effect, this effect repeats the original sound
more times as well and lower and lower each time. Feedback determines the
percentage of the volume of the next repetition relative to the volume of the
previous repetition. The higher that value is the sharper the sound of effect will
be. Minimum: 0%, maximum: 95%.
The effect has LFO which modifies Frequency parameter.
62
Music FX Live – User Manual
17.7.6. Formant Filter (FMT)
It imitates vowels such as a, e, i, o sounds like the music would „say them out”.
Actually it is a filter which is set in a way that its characteristics are similar to the
vowels said out by humans. This effect is used a lot to make mainly drum&bass and
dubstep music.
Parameters:
- Frequency: It affects the pitch of vowels by the Vowel parameter in Hz. The
lower the frequency is the deeper the impact of the filter will be. Minimum: 0
Hz, maximum: 20000 Hz.
- Vowel: With this you can set which vowel the filter should focus on. You can
use only 4 out of the basic vowels: a, e, i, o. This is not a fixed parameter but a
continual one which means you can set a transition in between two vowels. Out
of the vowels next to the knob, that one will light the most which shows up the
most. For example in case of 0% set-up, the sound of the filter will imitate „a”
the most and as you increase the value of the knob, it will slowly change to „e”
and so on. Minimum: 0%, maximum: 100%.
The effect has LFO which modifies Frequency parameter.
17.7.7. Pitch Shifter (PTC)
63
Music FX Live – User Manual
The purpose of this effect is to shift pitch. You can shift pitch of input sound with one
octave above or below, of course with customized extent and transition. You can use
this to music but the best is if you talk to the microphone and as a result of the effect
you will have high or low voice which you can continuously change.
Parameters:
- Semitones: This is an on/off switch button, if you click on it, it will light, if you
click on it again, it will not light any more. If the button lights, you will not be
able to set customized pitch with Pitch knob, you will only be able to make
standard semitone leaps. So if Pitch knob is on its centre value, it means
normal C4 sound, one leap above is C#4 then D4 and so on until C5. One level
below from the centre value is B3, one more level below is A#3 and so on until
C3.
- Pitch: You can set pitch with it in percentage. Centre value (100%) means the
original pitch, the minimum value (50%) takes the sound one octave lower, and
the maximum value (200%) takes the sound one octave higher. If Semitones
button lights then you will not be able to set customized pitch with the knob,
you will only be able to make standard semitone leaps.
17.7.8. Frequency Shifter (FRQ)
64
Music FX Live – User Manual
This effect changes low tones (for example the kick drums) to mid tones and mid
tones to high tones or the other way around; so it shifts the music frequency
downwards or upwards which creates interesting result. This effect is not the same as
Pitch Shifter because that one really changes the pitch while Frequency Shifter only
shifts the frequency and the result of this is totally different (usually non-standard,
non-realistic sounds are created).
Parameters:
- Shift: You can set the extent of frequency shifts. Centre value (0%) means
there is no shift and you can hear the original sound. Minimum: -100%,
maximum: 100%.
- Auto HPF: This button stands for „Automatic High Pass Filter”. If the value of
Shift knob is higher than zero (which means you shift the frequency upwards),
low tones (mainly kick drums) of the original sound will be on higher frequency
which can be a little bit disturbing. To moderate that you can switch on an
embedded automatic High Pass Filter effect (passing filter from the top), this
starts to function before Frequency Shifter. The frequency parameter of the
filter will be automatically set according to the rotation of Shift knob. If Auto
HPF button lights, the automatic filter is switched on, otherwise it is switched
off.
17.7.9. Ring Modulator (RNG)
This effect can make volume changes very fast on the original sound; actually it is so
fast that you cannot even hear that. That is why it changes the original sound to a
beeping sound. This is the only effect in the program whose LFO functions a bit
differently than the other effects with LFO (see it below).
Parameters:
- Frequency: You can set the frequency of volume changes in Hz. So basically
65
Music FX Live – User Manual
you set how many times it should quickly turn down and up the volume of the
original sound within a second. If you just take a look, the minimum value is
250 Hz which means 250 times turning down and up the volume in one second.
This is like you would use the volume control knob that amount of times on the
mixer. It is obvious that humans are not able to do that, only a computer.
Minimum: 250 Hz, maximum: 5000 Hz.
The effect has LFO which modifies Frequency parameter but in case of this effect it
does not rotate Frequency knob from the minimum to the maximum but nearby the
current value of Frequency knob. So if you use LFO, you will only hear slight changes
in frequency modification.
17.7.10.
Gate (GAT)
You can turn music volume up and down very quickly (like you would use the volume
control knob on the mixer but it can be 10 or 100 times faster). This effect sounds
really well if you switch on and off the volume as the music rhythm (by one, half or
quarter beats).
Basically it does the same as Ring Modulator, the difference is that Ring Modulator
does the volume changes faster and that makes different sounding than Gate.
Furthermore in case of Gate you can set how these volume changes should happen.
Parameters:
- Waveform: You can see 5 icons next to each other, out of them only one lights
at a time (the one which is selected). The icons show how the effect modifies
the volume. Each waveform will create different sounding. You can change
between the waveforms by clicking on the icon of the desired waveform.
- Speed: You can set the speed of volume changes in ms. Actually the time given
here means how long it takes for the effect to change the volume to zero and
back to the original level afterwards. Minimum: 10 ms, maximum: 21333 ms.
66
Music FX Live – User Manual
The effect has beat selection buttons as well. When you click on any of these buttons,
the program will calculate how long the selected beat takes and set the Speed knob
accordingly to this calculated value based on the actual BPM value. If you rotate
Speed knob after this, the light of the selected beat button will switch off.
17.7.11.
Decimator (DCM)
It decreases sound quality artificially. As you rotate Frequency knob lower and lower,
the music will be noisier and noisier (like quality would get worse and worse). You can
create interesting soundings with this effect.
Parameters:
- Frequency: You can set the extent of quality decrease in Hz. As a default the
knob is on maximum value which means it does not decrease quality, basically
you hear the original sound. As you rotate the knob lower and lower, the quality
will get worse and worse. Minimum: 0 Hz, maximum: 20000 Hz.
The effect has LFO which modifies Frequency parameter.
17.7.12.
Distortion (DST)
67
Music FX Live – User Manual
It is a classical distortion which is mainly used with electronic guitars by bands to
reach hard, metallic sounding. Besides that you as a DJ can also take an advantage of
it if you want your music to be rougher. This effect sounds better if you use the
embedded Low Pass Filter as well.
Parameters:
- Overdrive: You can set the extent of distortion. The more you rotate this knob
the more the sound will be distorted. Be careful with this parameter because
the more you rotate it upwards the louder the music will be. Minimum: 0%,
maximum: 100%.
- LPF Freq: It stands for „Low Pass Filter Frequency”. This effect has an
embedded Low Pass Filter effect whose frequency (Frequency parameter) you
can set with this knob. As you rotate the frequency lower and lower, the
resonance (Resonance parameter) of Low Pass Filter will automatically
increase.
17.7.13.
Vocoder (VCR)
This is the most interesting effect and it is recommended for human talk. If you select
a synthesizer-like sound, this effect makes changes on the original sound or human
68
Music FX Live – User Manual
talk in a way that it turns into the previously selected synthesizer-like sound. It is like
the synthesizer would start „talking”. This effect is in use since the ’70s. One of the
firsts was for example Kraftwerk. In music, vocoder effect is mainly used to distort
human talk and the result is an interesting robot-like talk.
Parameters:
- Carrier: It is a fixed-value knob; you can select one sounding out of the
previously embedded 12. Minimum: 1, maximum: 12.
- Chord: Vocoder effect sounds really well if the selected base sound is brought
out on different pitches as a chord. As Music FX Live is primarily not for making
music but making effects live, therefore you do not have the opportunity to give
unique chords but you can select from the previously embedded 12 chords. This
is a fixed-value knob as well, you can select from 12 chords. Minimum: 1,
maximum: 12.
- Pitch: You can change the pitch of the final generated sound +/- one octave
with this knob. On centre value it will sound on the original pitch, on minimum
value it will sound one octave lower, on maximum value it will sound one octave
higher. Minimum: 50%, maximum: 200%.
- Semitones: This is an on/off switch, if you click on it, it will light, if you click
on it again, it will not light any more. If the button lights, you will not be able to
set customized pitch with Pitch knob, but the standard semitone leaps. So if
Pitch knob is on its centre value, it means normal C4 sound, one leap above is
C#4 then D4 and so on until C5. One level below from the centre value is B3,
one more level below is A#3 and so on until C3.
- 32 Band Equalizer: There is a 32 bands equalizer embedded in the effect with
which you can attenuate or even mute the final, generated frequency bands.
The 32 vertical lines mean the 32 bands. As a default they are all on maximum
value which means none of the frequencies are attenuated. If you click on one
of the bands, you can change the volume of that band and so as the height of
the respective line will change.
17.8. „Loop & Echo” category effects
17.8.1. Looper (LPR)
69
Music FX Live – User Manual
When you activate this effect, a pre-defined part of the music will be recorded and as
it finishes recording it starts playing it immediately and repeats that until you switch
that off. You can set the length of recording in the number of beats, for example 1/2,
1, 2, 4.
Parameters:
- Direction: The button shows a triangle directed to the right which means the
repetition will be played forwards (normal way). If you click on the button, the
triangle will be directed to the left and the button will light as well. This case
the recorded sound will be played backwards.
- Length: With this you can set the length of playing out of the recorded sound.
You can give the length in percentage relative to the whole length. Minimum:
0%, maximum: 100%.
- Speed: With this knob you can set that the recorded sound will not be played
on the original speed but faster or more slowly (which also means lower or
higher pitch) if you want to. As a default the knob is on centre value which
means the recorded sound will be played on its original speed. Rotating the
knob downwards the playing will be more slowly (also the pitch will be lower);
on minimum value it will be one fourth of the original speed. Rotating the knob
upwards the playing will be faster (also the pitch will be higher); on maximum
value it will be four times faster than the original speed. Minimum: 25%,
maximum: 400%.
- Resample: If you click on this button, it will light, if you click on it again, it will
not light any more. If the button lights and a four beats play is in progress and
you suddenly select the length 1 (basically you click on beat selection button
1), the program first takes a 1 beat-length part of the music and then starts
repeating that. If the button does not light and you change the beat while
playing, the effect will not record a new part from the music but you basically
set how many beats it should repeat from the previously recorded sound.
The effect has beat selection buttons. With these you can set how many beats of the
original sound should the effect repeat.
Important note: When the effect is functioning and repeating the recorded part of
the original sound that does not affect the actual playing position of the music (this
means playing the original music will continue at the back). You could have got used
to it at the DJ mix programs that loop function repeats a part of the music in a way
that at the end of the repetition the playing position takes a leap back to the
beginning of the repetition position, but this does not happen here. Music FX Live
70
Music FX Live – User Manual
cannot influence the playing position of the original sound (for example it cannot
rewind your vinyl if you are playing from a vinyl).
17.8.2. Stretch Looper (STR)
It is very similar to Looper effect as this also repeats a part of the music with predefined length but you can set different parameters in case of this effect than Looper.
Stretch Looper effect makes the playing more slowly without changing the original
pitch. So you can lengthen the playing time.
Parameters:
- Stretch: You can set the extent of time lengthening. As a default (on minimum
value) there is no lengthening, the recorded sound will take the same amount
of time to replay as it took for playing. As you rotate the knob more and more
upwards, playing takes more and more time till even 4 times longer. You can
give the extent of lengthening in percentage. Minimum: 100%, maximum:
400%.
- Grain size: The effect lengthens the music in a way that it divides the original
music into small pieces and it plays these pieces in the right amount and
overlaps. With this knob you can set the size of these small pieces in ms.
Different settings will create different soundings. This knob only have affect if
the Auto size button does not light. Minimum: 10ms, maximum: 250ms.
- Auto size: If you click on this button, it will light, if you click on it again, it will
not light any more. If the button lights, the effect will not take the position of
Grain size knob into consideration but it will calculate the size of the small
pieces by itself based on position of Stretch knob.
The effect has beat selection buttons. With these you can set how many beats of the
original sound should the effect repeat.
Important note: See comments at Looper effect. The comments mentioned there
71
Music FX Live – User Manual
apply here as well.
17.8.3. Reverser (REV)
This is the simplest effect in the program as it does not have any parameters (except
of DRY/WET knob but all effects have that). It simply plays the original music on
reverse. When you activate this effect, it starts playing the latest 1 beat piece of the
music on reverse meanwhile it records a new 1 beat piece of the music. As soon as
the previous playing ends, it starts playing the pre-recorded piece on reverse and so
on until this effect is active. In fact you can only hear that the music is playing on
reverse.
17.8.4. Grain Shifter (GRN)
72
Music FX Live – User Manual
This effect records a little part of the original music and immediately starts playing
that the amount of times is set by you. If the last playing ends, it starts from the
beginning, so it records a little part again and replays that the amount of times is
required. The function of this effect also depends on the measured BPM as it
calculates the length of the recordable piece based on the values of Blocks and
Repeats knobs and the measured BPM. The length of the recordable little part equals
to the length of 1 beat divided by the product of the values of Blocks and Repeats
knobs.
Parameters:
- Blocks: You can set how many times it should record a new piece from the
original sound during 1 beat time, it will play as many times as it is set with
Repeats knob. This is a fixed-value knob; you can only set whole numbers.
Minimum: 1, maximum: 16.
- Repeats: With this you can set how many times it should play the recorded
pieces. This is a fixed-value knob; you can only set whole numbers. Minimum:
2, maximum: 16.
- DYN LPF Freq: This button stands for „Dynamic Low Pass Filter Frequency”.
This effect has an embedded Low Pass Filter effect which changes its frequency
all the time, when the effect records a new piece of music and starts playing, it
sets the frequency of the embedded Low Pass Filter to the maximum. As the
effect repeats the recorded piece more and more times, it continuously
decreases the frequency of the embedded Low Pass Filter until it reaches the
set value. If the last repetition has ended, a new piece of music gets recorded,
and then the frequency will take a leap to the maximum again. Minimum: 0
Hz, maximum: 20000 Hz.
17.8.5. Echo (ECH)
73
Music FX Live – User Manual
This effect is an echo effect. As long as the effect is activated, it plays a pre-defined
part of the original music without any changes then it repeats that pre-defined part
again. After that it plays again a pre-defined part of the original music and so on. You
can set the playing mode with Mode knob; you can select one out of 3 types.
Parameters:
- Mode: This is a three-way knob; you can select one out of 3 types of playing.
In Normal mode it plays the pre-defined part of the music without any
changes. In Scratch mode it plays on reverse which sounds like a DJ would
continuously scratch on a turntable (mostly you can only hear that if the beat
number is ½ beat). The third type, in Double mode it plays the pre-defined
part of the music twice as quick and double.
- Volume: You can set the volume of echo (played part of the music) relative to
the original music. You can give that in percentage. Minimum: 0%,
maximum: 100%.
The effect has beat selection buttons with which you can set how long part it should
record and repeat (basically the length and frequency of the echo). The best if you
select the originally set ½ beat number, but sometimes ¼ and 1 can also be good.
17.8.6. Delay (DLY)
74
Music FX Live – User Manual
This effect also generates echo but differently than Echo. This is one of those effects
whose bottom has two cables coming out and on the left one (DRY band) we can hear
the original sound input without any changes, on the right one (WET band) we can
hear the sound generated by the effect. In this case the sound generated by the effect
is the original sound input but with latency and a bit lower. Moreover this effect does
not repeat the echo only once but it repeats it until it gets silent.
Parameters:
- Delay time: You can set the timing of latency with this which means the time
spent between the echoes. You can give that in ms. If you set the time very
short (less than 20 ms) and you set the Feedback knob at least 75-80%, you
can reach robotical effect. Minimum: 10 ms, maximum: 21333 ms.
- Feedback: It sets the volume of the next repetition relative to the volume of
previous repetition in percentage. The higher this value is the longer the decay
will take. Minimum: 0%, maximum: 95%.
The effect has beat selection buttons. If you click on any of them, that button will light
and the program will calculate how long the selected beat takes based on the
measured actual BPM and will automatically set the Delay time knob. If you rotate
the Delay time knob after this, the light of the last selected beat will be switched off.
17.8.7. Reverb (RVB)
75
Music FX Live – User Manual
Its full name is reverberator. In everyday language we call it as „hall echo”. It is like
when you step into a huge hall, you shout and you can hear the decay of your voice
for 2-3 seconds.
This effect proceeds on two different bands. You can hear echo on WET band.
Parameters:
- Room size: You can set the size of the „hall”. The bigger the hall is the longer
the decay will be. Minimum: 0%, maximum: 100%.
- St. spread: This button stands for „Stereo spread”. You can set how much the
echo should have stereo effect. The more you rotate the knob downwards the
more the echo will have mono sounding. Minimum: 0%, maximum: 100%.
- Damp: It is the suppression of high frequency sounds in echo. The more you
rotate this knob upwards the flatter the echo will be. Minimum: 0%,
maximum: 100%.
- HPF Freq: This button stands for „High Pass Filter Frequency”. This effect has
an embedded High Pass Filter with which you can filter lower frequencies of the
echo. You can set the frequency of the embedded High Pass Filter in Hz.
Minimum: 0 Hz, maximum: 20000 Hz.
17.9. „Synth, Sampler & Tools” category effects
17.9.1. Synth (SYN)
76
Music FX Live – User Manual
This is the most complex effect in the program which has a lot of setting
opportunities. This effect is like a simple (but you can use in different ways)
synthesizer. You can select from the 18 embedded sound samples which are looped,
this means if you start playing the sample, you will hear that until you stop it.
This effect functions in two modes. In one of the modes the sample will sound until
the effect is active. Meanwhile you can continuously set the volume and the pitch. You
can set the pitch with fixed semitones or with customized approach. The other mode
is called arpeggiator which is able to play pre-programmed melodies with the
selected sound samples. You can select the desired melody, the speed of playing and
the length of the sounds in the melody.
This effect proceeds on two different bands. You can hear the synthesized sound on
WET band. It is worthy to add a Delay and a Reverb effect to this band because it will
sound much better with them.
Parameters:
- ARPG: This button stands for „Arpeggiator”. If you click on this button, it will
light, if you click again, it will not light any more. If the button lights, the effect
functions in arpeggiator mode, otherwise it functions in normal mode.
- Sample: It is a fixed-value knob; you can select the desired sound sample out
of 18 samples. Minimum: 1, maximum: 18.
- Volume: You can set the volume of the selected sound sample in percentage
relative to the original volume of the sound sample. As the sound samples are
quite loud as a default, we suggest you to start with lower volume and only
make it louder if it is necessary. Minimum: 0%, maximum: 100%.
- Pitch: If the effect does not function in arpeggiator mode, you can set the pitch
of the played sound sample with one octave lower or higher relative to the pitch
of the original sound. On centre value of this knob the sound sample will be
played on the original pitch, on minimum value it will be one octave lower, on
maximum value it will be one octave higher. Minimum: 50%, maximum:
200%.
- Semitones: This is an on/off switch button, if you click on it, it will light, if you
click on it again, it will not light any more. If the button lights, you will not be
able to set customized pitch with Pitch knob, you will only be able to make
standard semitone leaps. So if Pitch knob is on its centre value, it means
normal C4 sound, one leap above is C#4 then D4 and so on until C5. One level
below from the centre value is B3, one more level below is A#3 and so on until
C3.
77
Music FX Live – User Manual
-
-
-
Speed: In arpeggiator mode all pre-programmed melodies have their own
playing speed. Some melodies are more slowly, some are faster. With Speed
knob you can speed up or slow down the melody you are replaying. This knob
has fixed values: 25%, 50%, 100%, 200%, 400%. If it is on 100%, the speed
of the melody will be the original one, but for example on 400%, it will be four
times faster.
Pattern: You can see a little window above the text of Pattern. It illustrates
the musical notes of the selected melody. There are two arrows on the left and
on the right side of the window; you can switch between the melodies with
them.
Gate: In arpeggiator mode all notes of the melody have their own length. You
can shorten the length of the notes with Gate knob; you can give that in
percentage relative to the original length of the notes. Minimum: 0%,
maximum: 100%.
17.9.2. Sampler (SMP)
You can record a part of the input sound which you can play afterwards as many times
as you want to. This effect will not „forget” this recorded sound even if you inactivate
it (not like Looper effect).
This effect has two modes: recording and playing. The two lamps below the icon of
the effect show the actual mode. If the upper (red) light is on, the effect is in
recording mode, and next time when you active it, it will start recording but it will not
mix anything on the original sound. As soon as recording is finished, the effect will
change its mode to playing. The recording ends at the moment you inactivate the
effect or the length of recording reaches the beat number you have set previously. If
the lower (green) light is on, the effect is in playing mode. When you activate the
effect in playing mode, it starts playing the recorded sound sample. The effect will be
in playing mode until you change it back to recording mode by clicking on the red
light. In this case the previous sound sample will be deleted.
78
Music FX Live – User Manual
This effect proceeds on two different bands. You can hear the played sound sample on
WET band.
Parameters:
- Loop: If you click on this button, it will light, if you click on it again, it will not
light any more. If the button lights, it will continuously repeat the sound sample
during it’s playing.
- Pitch: You can set the pitch (and the speed) of the played sound sample with
one octave lower or higher relative to the pitch (and the speed) of the original
sound. On centre value of this knob the sound sample will be played on the
original pitch (and speed), on minimum value it will be one octave lower (and
half the speed), on maximum value it will be one octave higher (and two times
faster). Minimum: 50%, maximum: 200%.
- Semitones: This is an on/off switch button, if you click on it, it will light, if you
click on it again, it will not light any more. If the button lights, you will not be
able to set customized pitch with Pitch knob, you will only be able to make
standard semitone leaps. So if Pitch knob is on its centre value, it means
normal C4 sound, one leap above is C#4 then D4 and so on until C5. One level
below from the centre value is B3; one more level below is A#3 and so on until
C3.
The effect has beat selection buttons. They serve two purposes.
In recording mode you can set the maximum length of the recordable sound sample.
You can actually record a shorter sound sample if you inactivate the effect before
reaching its maximum length. If you do not inactivate it, the effect will finish recording
when it reaches the selected beat number (the effect can calculate the exact length of
the recording based on the selected beat number and the measured actual BPM).
In playing mode you can set the maximum length of the playable sound sample out
of the recorded sound sample.
17.9.3. Splitter (SPL)
79
Music FX Live – User Manual
This is an odd-one-out as this is not a real effect. Splitter makes the input sound
double and without any changes it transmits that on DRY and WET bands. You only
have the opportunity to set the volume of the output sound of DRY and WET bands
separately.
When and for what can you use Splitter? It is useful when you want to use two effects
but not one after the other, but simultaneously.
Parameters:
- Dry volume: You can set the volume of the output sound of DRY band in
percentage relative to the original volume. Minimum: 0%, maximum: 100%.
- Link: This is an on/off switch button, if you click on it, it will light, if you click
on it again, it will not light any more. If the button lights and you move either
Dry volume or Wet volume knob, the other one will have the same value as
the one you just set. This means if the Link button lights, these two knobs will
move together.
- Wet volume: You can set the volume of the output sound of WET band in
percentage relative to the original volume. Minimum: 0%, maximum: 100%.
18. Floating window
Music FX Live has a secondary window which is a long, narrow floating window. This is
floating because you can always see that on your screen even if the window of Music
FX Live is not the active one.
For example if you use a DJ mix program to mix (for example: Traktor, Virtual DJ) and
you want to add effects to its output sound with Music FX Live, it would be good to
see both program’s window at the same time. However many cases you do not need
to see the whole Music FX Live, especially if you have previously set all your effect
configurations and you only want to switch between them.
The purpose of Music FX Live floating window is to move that to above or below the DJ
mix program, you can only see the most important data on this window. These are the
following:
-
Actual measure BPM (of both channels)
Input and output volume (of both channels)
Number and name of the effect configurations, the actual selected effect
80
Music FX Live – User Manual
-
configuration is marked with a different colour
Little icon indicating Hold mode of the actual configuration (if the Hold button
flashes on the actual configuration, this icon will flash as well)
The flashing FX icon shows if any effect is in use at that moment (if the FX
Stop button flashes, this icon will flash as well)
On the picture below you can see the floating window:
The floating window has a fixed size. It is always as wide as your screen. You can
move the floating window anywhere by dragging it with your mouse and move it.
You can display and remove the floating window anytime if you click CTRL+SHIFT+F
key combination on your keyboard.
Important note: When you can see the floating window, Music FX Live „takes” the
following keys (which means even if a window of another program is active, when you
press these keys, they will respond to Music FX Live): SPACE, ENTER, all the
numbers between 1-9 and the combination of CTRL+SHIFT+F. If you want to use
these keys in another program, then you need to remove the floating window by
pressing CTRL+SHIFT+F keys.
81
Music FX Live – User Manual
APPENDIX – Shortcuts
Summary of the shortcuts in the program
-
INS: Adding new effect configuration
DEL: Deleting actual configuration
1-9: Change to configuration 1, 2, ..., etc.
CTRL+N: Creating new workspace (the current workspace will be deleted)
CTRL+O: Opening workspace from file
CTRL+S: Saving current workspace into file
CTRL+I: Import new effect configuration
CTRL+E: Export current effect configuration into file
B: Renaming the current configuration
TAB: Change between the big size table view and editing effect view
ENTER: Switching on and off Hold mode on the current configuration
SPACE Stop all effects (it will switch off effects, Hold mode and path playing on
all configurations at the same time)
CTRL+P: Recording new path on the actual configuration
P: Start/stop playing the recorded path on the actual configuration
T: Switching on and off touchpad mode (only on notebook)
R: Start/stop sound recording into a file
CTRL+SHIFT+F: Display/remove the floating window
82