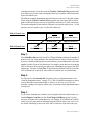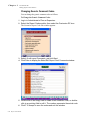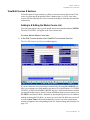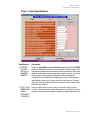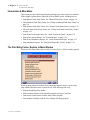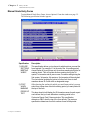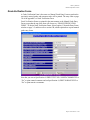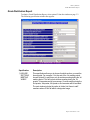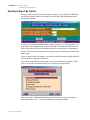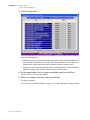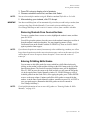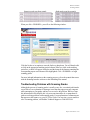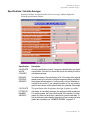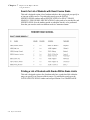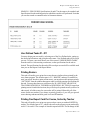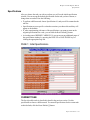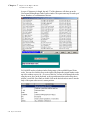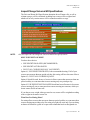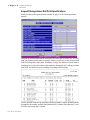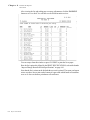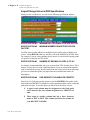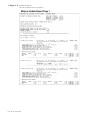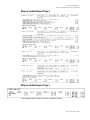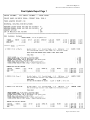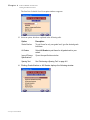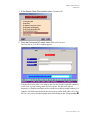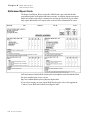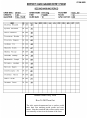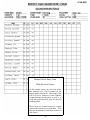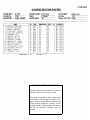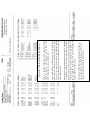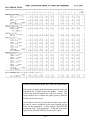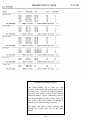
1
Admin ist rator ’s Plus Report Car ds Manual
Administrator’s Plus
Report Cards Manual
Report Cards Manual
i
A d m i n i s t r a t o r ’s P l u s R e p o r t C a r d s M a n u a l
Legal Notices
Legal Notices
Copyright
Copyright © 2004 Rediker Software
All rights reserved
Printed in the United States of America
Warranty
Information in this document is subject to change without notice. Companies, names,
and data used in examples herein are fictitious unless otherwise noted. No part of this
document may be reproduced or transmitted in any form or by means, electronic or
mechanical, for any purpose, without the express written permission of Rediker
Software
Trademarks
Administrator’s Plus™ is a trademark of Rediker Software, Incorporated.
The School Office Suite® is a registered trademark of Rediker Software, Incorporated.
All other hardware or software products mentioned in this document are the trademarks
or registered trademarks of their respective companies or holders.
Part Number: RC0030105
ii
Report Cards Manual
Admin ist rator ’s Plus Report Car ds Manual
About this Guide
About this Guide
The Administrator’s Plus Report Cards Manual details the functions and use of the
Administrator’s Plus Report Cards module.
Included in this Guide
The Administrator’s Plus Report Cards Manual is organized as follows:
Chapter
Description
1
Customize RC
The Cutomize RC module allows you to:
• Define your school’s grading system.
• Define the GPA factor (for Honors and advanced courses).
• Enter report card columns.
• Enter Department Names.
• Enter comments for report cards.
• Define skills and concepts.
2
Enter Courses
The Enter Course module allows you to:
• Enter Master Course List information.
• Enter Course Section List information.
• Maintain Course Master and Section List files.
• Send course skills to GradeQuick.
3
Entry Forms
The Entry Forms Chapter shows you how to:
• Print manual or scanner data entry forms upon which teachers will enter
students' grades.
• Print grade verification forms.
• Print course section rosters.
• Print grade distribution reports.
• Print teacher enrollment reports.
• Print your school’s Master Course List and Section List.
Report Cards Manual
iii
A d m i n i s t r a t o r ’s P l u s R e p o r t C a r d s M a n u a l
Included in this Guide
Chapter Description
4
Enter Grades
This chapter describes how to:
• Enter students' names into course sections.
• Enter students' grades into the computer using either a scanner or the
keyboard.
• Import students' grades from the Grade Quick.
5
Calculate Averages
This chapter describes how to:
• Calculate midterm and final averages.
• Erase report card columns.
6
View/Change/Add/Drop
This chapter describes how to:
• View students' transcripts.
• Change any grades in the transcripts.
• Enter narrative comments.
• Add or drop courses/sections from students' schedules.
• Enter students’ courses and grades for previous school years.
• Enter students' past GPA and credits information.
• Overide credit for a course.
iv
Report Cards Manual
Admin ist rator ’s Plus Report Car ds Manual
Included in this Guide
Chapter Description
7
Report Cards Report Writer
This chapter describes how to:
• Design & print various reports.
• Print report cards.
• Print transcripts.
• Print permanent labels.
• Print deficiency letters.
• Print congratulatory letters for students on the honor roll.
• Search for students who have earned an particular grade.
• Search for students who have earned any grade within a user specified
range.
8
Statistical Reports
This chapter describes how to:
• Print students' class rank by career GPA.
• Print eligibility reports.
• Print honor rolls for a particular marking period.
• Update students' career credits and grade point averages.
9
Archive
This chapter describes how to change Course numbers of archived courses.
NOTE: The archiving feature is now integrated with program C. Transfer Credits
& GPA (see program C).
A
Print Schedule Scan Forms
This chapter describes how to print forms that will be used to scan students'
schedules into the computer.
B
Scan Students' Schedules
This chapter describes how to enter students' schedules into the computer with
a scanner.
Report Cards Manual
v
A d m i n i s t r a t o r ’s P l u s R e p o r t C a r d s M a n u a l
Contact Information
Chapter Description
C
Transfer Credits & GPA
This chapter describes how to:
• Transfer credit and GPA records from the previous school year.
• Archive current year's data so that it may later be printed on transcripts.
D
Skills-Based Report Cards
This chapter describes how to assess students on curriculum Skills and
Concepts.
Contact Information
Technical Support
Please do not hestitate to call us toll free at 1-800-882-2994.
Monday - Thursday7:30 a.m. - 6:30 p.m. EST
Friday7:30 a.m. - 5:00 p.m. EST
You can also e-mail us at [email protected].
When emailing technical support questions, please include your school's name, phone
number, and zip code. We respond to e-mail from schools in the continental United
States by phone.
Technical support information can also be found on the Rediker Web site at:
http://www.rediker.com/support.html
Training
For information on current training available, see the Rediker Web site at:
http://www.rediker.com/training.html
Follow the links to obtain information about scheduled classes, training at customer
sites, and class registration.
Documentation Feedback
Your comments on the documentation help us to understand and meet your needs. You
can send e-mail to [email protected].
vi
Report Cards Manual
Table of Contents
Introduction
Enter Courses
Introduction . . . . . . . . . . . . . . . . . . . . . . 2
Using a Split Grading System . . . . . . . . 3
How to Archive Grades . . . . . . . . . . . . . 4
Introduction & Main Menu . . . . . . . . . . . 2-2
View/Edit Courses & Sections . . . . . . . . 2-3
Step 1:
Step 2:
Step 3:
Step 4:
...........................
...........................
...........................
...........................
Adding to & Editing the Master Course List2-3
Master Course Fields (Fields found on the
View/Edit Courses and
Sections Window) . . . . . . . . . . . . . . . . 2-4
Adding to & Editing the Course
Section List . . . . . . . . . . . . . . . . . . . . . 2-11
5
5
5
6
The Report Card Plus Programs . . . . . . 6
Program #1: CUSTOMIZE RC . . . . . . . . . 7
Program #2: ENTER COURSES . . . . . . . 7
Program #3: DATA ENTRY FORMS . . . . 7
Program #4: ENTER GRADES . . . . . . . . 8
Program #5: CALCULATE AVERAGES. . 8
Program #6: VIEW/CHANGE/ADD/DROP 8
Program #7: REPORT CARDS REPORT
WRITER. . . . . . . . . . . . . . . . . . . . . . . . . 9
PROGRAM #8: STATISTICAL REPORTS 9
Program #9: ARCHIVE . . . . . . . . . . . . . . 10
Program A: PRINT SCHEDULE
SCAN FORMS . . . . . . . . . . . . . . . . . . . . 10
Program B: SCAN SCHEDULES. . . . . . . 10
Program C: TRANSFER CREDITS & GPA10
Customize RC
Section List Fields. . . . . . . . . . . . . . . . . . .2-14
Understanding Meeting Times . . . . . . . . .2-14
Print Reports . . . . . . . . . . . . . . . . . . . . . . .2-18
Inspect/Change Specifications . . . . . . . 2-18
Page 1: Initial Specifications . . . . . . . . . . .2-19
PAGE 2: More Specifications . . . . . . . . . .2-22
Skills Specifications. . . . . . . . . . . . . . . . . .2-24
New Master & Section List Files . . . . . .
New Section List File Only. . . . . . . . . . .
Rebuild Section Rosters . . . . . . . . . . . .
Rebuild Section List File . . . . . . . . . . . .
Rebuild Skills File . . . . . . . . . . . . . . . . .
Send Skills to GradeQuick. . . . . . . . . . .
Import Section List from SAMSA . . . . . .
Batch Enter Rooms . . . . . . . . . . . . . . . .
View/Edit Sections. . . . . . . . . . . . . . . . .
1
Introduction & Main Menu . . . . . . . . . . . 1-2
Edit Grade Table . . . . . . . . . . . . . . . . . . 1-2
Entry Forms
The Default Grade Table . . . . . . . . . . . . . 1-3
2-25
2-25
2-25
2-25
2-26
2-26
2-27
2-27
2-28
3
Introduction & Main Menu . . . . . . . . . . . 3-2
The Print Entry Forms, Rosters,
& More Window . . . . . . . . . . . . . . . . . . 3-2
Manual Grade Entry Forms . . . . . . . . . . 3-4
GPA Factor . . . . . . . . . . . . . . . . . . . . . . 1-4
Customize Report Card Columns . . . . . 1-5
Editing Report Card Comments . . . . . . 1-9
Changing Generic Comment Codes . . . . 1-10
Edit Number Grade Print Table . . . . . . .
Entering Department Names . . . . . . . . .
Skills and Concepts . . . . . . . . . . . . . . . .
Course Settings. . . . . . . . . . . . . . . . . . .
Maintain Grade Change Log . . . . . . . . .
2
1-11
1-11
1-13
1-13
1-14
The Entry Form Print Window. . . . . . . . . .3-7
Filling Out Manual Grade Entry Forms . 3-8
SITUATION #1: . . . . . . . . . . . . . . . . . . . . .3-8
SITUATION #2: . . . . . . . . . . . . . . . . . . . . .3-9
SITUATION #3: . . . . . . . . . . . . . . . . . . . .3-9
1
SITUATION #4: . . . . . . . . . . . . . . . . . . . .
SITUATION #5: . . . . . . . . . . . . . . . . . . . .
SITUATION #6: . . . . . . . . . . . . . . . . . . . .
SITUATION #7: . . . . . . . . . . . . . . . . . . . .
SITUATION #8: . . . . . . . . . . . . . . . . . . . .
SITUATION #9: . . . . . . . . . . . . . . . . . . . .
SITUATION #10: . . . . . . . . . . . . . . . . . . .
Calculate Averages
3-10
3-11
3-11
3-12
3-12
3-13
3-13
Entering the Weight For Each Column . . .5-5
Calculating Averages For
Which Columns? . . . . . . . . . . . . . . . . . 5-7
How Are Averages Calculated?. . . . . . . 5-8
Scanner Grade Entry Forms . . . . . . . . . 3-13
Filling Out Scanner Grade Entry Forms 3-19
NUMBER GRADES . . . . . . . . . . . . . . . . .5-9
LETTER GRADES . . . . . . . . . . . . . . . . . .5-9
SCANNING LETTER GRADES . . . . . . . . 3-21
SCANNING NUMBER GRADES . . . . . . . 3-22
Grade Verification Forms. . . . . . . . . . . .
Section Rosters . . . . . . . . . . . . . . . . . . .
Grade Distribution Report . . . . . . . . . . .
Comment Distribution Report . . . . . . . .
Enrollment Report By Teacher . . . . . . .
Master Course And Section Lists . . . . .
Examples of Midyear Average
Calculations . . . . . . . . . . . . . . . . . . . . . 5-11
Examples of Final Average Calculations 5-12
3-23
3-24
3-27
3-31
3-32
3-33
Reading the Log . . . . . . . . . . . . . . . . . . . .5-15
Blank Report Card Columns . . . . . . . . . 5-16
View/Change/Add/Drop
Specifications . . . . . . . . . . . . . . . . . . . . . .6-4
Withdrawing Student from Course/Section6-5
Editing the OVR Column. . . . . . . . . . . . . .6-5
Printing the Transcript View (F9: PRINT) .6-5
Manually Editing GPA, Quality Points,
Weight & Credits . . . . . . . . . . . . . . . . . . .6-6
Entering and Editing Information for Previous
(Minus) Years . . . . . . . . . . . . . . . . . . . . .6-7
Entering and Editing Grades in the
Minus Years . . . . . . . . . . . . . . . . . . . . . .6-7
Editing the Teacher (TCH) Column in
the Minus Years . . . . . . . . . . . . . . . . . . .6-8
Editing Daily Attendance Information in
the Minus Years . . . . . . . . . . . . . . . . . . .6-8
Scheduling View (F10: SCHED) . . . . . . . .6-8
Hot Key Enabled: . . . . . . . . . . . . . . . . . . .6-8
Skills Grade Verification Form . . . . . . . . 3-36
Teacher Grade Search Report . . . . . . . 3-40
4
Introduction and Main Menu . . . . . . . . . 4-2
Entering Grades Manually. . . . . . . . . . . 4-3
Specification Window 1 . . . . . . . . . . . . . .
Specification Window 2 . . . . . . . . . . . . . .
Entering Or Editing Grades Manually . . .
Adding Students To Courses/Sections . . .
Removing Students From
Courses/Sections . . . . . . . . . . . . . . . . . .
Entering Or Editing Skills Grades . . . . . .
6
Introduction . . . . . . . . . . . . . . . . . . . . . . 6-2
Viewing and Editing Grades . . . . . . . . . 6-3
Specifications for the Master Course And
Section Lists. . . . . . . . . . . . . . . . . . . . . . 3-33
Using the Master Course and Section
Lists Print Window . . . . . . . . . . . . . . . . . 3-35
Enter Grades
5
Introduction . . . . . . . . . . . . . . . . . . . . . . 5-2
Specifications: Calculate Averages . . . . 5-3
4-3
4-5
4-6
4-8
4-9
4-9
Entering Grades Or Skills Manually . . . 4-10
Scanning Grades. . . . . . . . . . . . . . . . . . 4-16
Troubleshooting Problems with Scanning
Grades . . . . . . . . . . . . . . . . . . . . . . . . . . 4-17
Import From GradeQuick. . . . . . . . . . . . 4-20
2
Report Cards Report Writer
7
PAGE 4: Transcript & Optional Field
Specifications . . . . . . . . . . . . . . . . . . . . .7-24
Introduction . . . . . . . . . . . . . . . . . . . . . . 7-3
Using the Task List . . . . . . . . . . . . . . . . 7-4
Print Menus . . . . . . . . . . . . . . . . . . . . . . 7-27
PRINT WHICH STUDENTS? . . . . . . . . . .7-27
PRINT WHICH SECTIONS?. . . . . . . . . . .7-29
Using Tasks #1-7 to Print Report Cards
and Transcripts . . . . . . . . . . . . . . . . . . . 7-4
Printing a Wide Report Card . . . . . . . . . . 7-5
Printing a Narrow Report Card. . . . . . . . . 7-5
Printing a Wide Transcript By Year . . . . . 7-5
Printing a Wide Transcript By Year By
Department . . . . . . . . . . . . . . . . . . . . . . 7-5
Printing a Narrow Transcript By Year . . . . 7-5
Printing a Narrow Transcript
By Department . . . . . . . . . . . . . . . . . . . . 7-6
Printing a Permanent Label . . . . . . . . . . . 7-6
Printing One Separate Report Card
Per Course . . . . . . . . . . . . . . . . . . . . . . . 7-6
Printing an Honor Roll Certificate. . . . . . . 7-7
Exporting the Honor Roll to an ASCII File
Named HROLL.ASC . . . . . . . . . . . . . . . 7-7
Generating a Form Letter: Congratulations
on Making the Honor Roll . . . . . . . . . . . 7-8
Print a Letter for Each Course Within the
Search Range . . . . . . . . . . . . . . . . . . . . 7-9
Producing a Progress Report for Each
Course with Grade . . . . . . . . . . . . . . . . . 7-9
Search for List of Students with Exact
Course Grade . . . . . . . . . . . . . . . . . . . . 7-10
Printing a List of Students with Grades
Within Grade Limits . . . . . . . . . . . . . . . . 7-10
User Defined Tasks #1 - #11 . . . . . . . . . . 7-11
Printing Rosters . . . . . . . . . . . . . . . . . . . . 7-11
Printing One Report Card Per Course,
Sorted by Teacher . . . . . . . . . . . . . . . . . 7-11
Printing Mailing Labels for a Course . . . . 7-12
Comparisons Between Data Base &
Report Card Reports . . . . . . . . . . . . . . 7-31
View/Edit Letters/Reports . . . . . . . . . . . 7-32
Viewing and Editing Report Cards
Reports/Letters Window . . . . . . . . . . . . .7-32
Using the View/Edit Letters/
Reports Toolbar. . . . . . . . . . . . . . . . . . . .7-32
File Menu . . . . . . . . . . . . . . . . . . . . . . . . .7-33
Edit Menu . . . . . . . . . . . . . . . . . . . . . . . . .7-34
Search Menu. . . . . . . . . . . . . . . . . . . . . . .7-35
Options Menu . . . . . . . . . . . . . . . . . . . . . .7-36
Window Menu . . . . . . . . . . . . . . . . . . . . . .7-38
Function Keys . . . . . . . . . . . . . . . . . . . . . .7-38
Page Setup . . . . . . . . . . . . . . . . . . . . . . 7-42
Page Layout Menu . . . . . . . . . . . . . . . . . .7-42
Printer Setup Menu . . . . . . . . . . . . . . . . . .7-43
Printer Properties . . . . . . . . . . . . . . . . . . .7-44
Report Card Codes . . . . . . . . . . . . . . . . 7-45
Table Codes For Skills and Non
Skills-Based Report Cards . . . . . . . . . . .7-45
Course Table Box . . . . . . . . . . . . . . . . . . .7-45
Advanced Specification Box (for
skills-based report cards) . . . . . . . . . . . .7-48
Attendance Box. . . . . . . . . . . . . . . . . . . . .7-53
GPA Box . . . . . . . . . . . . . . . . . . . . . . . . . .7-55
Honor Roll Box . . . . . . . . . . . . . . . . . . . . .7-55
General Box Specifications . . . . . . . . . . . .7-56
Inserting a Graphic into a Report . . . . . . .7-57
Standard Codes for Reports in
Report Card Report Writer. . . . . . . . . . 7-59
Specifications . . . . . . . . . . . . . . . . . . . . 7-13
PAGE 1: Initial Specifications . . . . . . . . . .
CURRENT TASK: . . . . . . . . . . . . . . . . . .
PRINT LETTERS/REPORTS FOR: . . . . .
PAGE 2: More Specifications . . . . . . . . . .
Page 3: Code Override Specifications . . .
7-13
7-13
7-14
7-18
7-23
Code Preliminaries:. . . . . . . . . . . . . . . . . .7-62
Codes That May Share a Line With
Other Codes:. . . . . . . . . . . . . . . . . . . . . .7-64
Header Codes: . . . . . . . . . . . . . . . . . . . . .7-70
Special Course Line Code: . . . . . . . . . . . .7-71
Special Register Code Two: . . . . . . . . . . .7-74
3
Reset Credits, GPAs, Last Update
Data To Zero . . . . . . . . . . . . . . . . . . . . . .8-40
OTHER ATTENDANCE CODES . . . . . . . 7-74
Attendance Codes That Make Up the Daily
Attendance Grid . . . . . . . . . . . . . . . . . . . 7-76
Universal Report Codes. . . . . . . . . . . . . . 7-76
Codes 4 or Fewer Characters In Length That
May Share a Line With Other Codes . . . 7-82
Codes That Must Be On a Line
By Themselves . . . . . . . . . . . . . . . . . . . 7-83
How Career GPAs & Credits
Are Calculated . . . . . . . . . . . . . . . . . . . 8-41
General Updating Rules . . . . . . . . . . . . . .8-41
General Rules For Calculating Credits . . .8-41
General Rules For Calculating Quality
Points & Weight. . . . . . . . . . . . . . . . . . . .8-42
BRIEF EXAMPLE OF A COMPLETE
UPDATING . . . . . . . . . . . . . . . . . . . . . . .8-45
DETAILED EXAMPLE OF A
MIDYEAR UPDATING . . . . . . . . . . . . . .8-46
Midyear Update Report Page 1 . . . . . . . .8-48
Midyear Update Report Page 2 . . . . . . . .8-49
Midyear Update Report Page 3 . . . . . . . .8-49
TOP OF THE REPORT. . . . . . . . . . . . . . .8-50
Detailed Example of an End of
Year Updating . . . . . . . . . . . . . . . . . . . . .8-55
Final Update Report Page 1 . . . . . . . . . . .8-57
The Pre-defined Reports . . . . . . . . . . . . 7-84
Statistical Reports
8
Introduction & Main Menu . . . . . . . . . . . 8-2
Using Honor Rolls . . . . . . . . . . . . . . . . . . 8-2
Grade Point Averages . . . . . . . . . . . . . . . 8-3
Honor Rolls . . . . . . . . . . . . . . . . . . . . . . 8-4
Print honor roll #1-5 . . . . . . . . . . . . . . . . . 8-4
Inspect/Change Universal
HR Specifications. . . . . . . . . . . . . . . . . . 8-5
Inspect/Change Honor Roll
Print Specifications. . . . . . . . . . . . . . . . . 8-10
How to Obtain Class Rank Reports . . . . 8-65
Defining Class Rank Reports . . . . . . . . 8-68
Defining Honor Roll Reports . . . . . . . . . 8-15
Individual Student Audit . . . . . . . . . . . . . . 8-19
Archive
How Honor Roll Averages
Are Calculated . . . . . . . . . . . . . . . . . . . 8-21
9
Archive. . . . . . . . . . . . . . . . . . . . . . . . . . 9-2
HOW TO CHANGE THE NUMBERS
OF ARCHIVED COURSES . . . . . . . . . 9-7
Grade Point Averages Menu . . . . . . . . . . 8-23
How Adjusted & Simple GPA’s
Are Calculated . . . . . . . . . . . . . . . . . . . 8-24
Update/Un-update GPA's & Credits . . . 8-27
Print Schedule Scan Forms
Inspect/Change Universal
GPA Specifications. . . . . . . . . . . . . . . . . 8-28
UPDATE GPA'S & CREDITS
SPECIFICATIONS . . . . . . . . . . . . . . . . . 8-30
A
Introduction . . . . . . . . . . . . . . . . . . . . . . A-2
Printing Schedule Scan Forms . . . . . . . A-2
Performing a Spacing Test . . . . . . . . . . . .A-5
Sorting by Your Chosen Fields . . . . . . . . .A-6
How To Perform a Third Quarter Update 8-35
The Permanent Third Quarter Update . . . 8-35
The Temporary Third Quarter Update . . . 8-36
Scan Students' Schedules
B
Introduction/Main Menu . . . . . . . . . . . . . B-2
The Actual Scanning Of The
Request Forms . . . . . . . . . . . . . . . . . . B-2
Updating and Resetting GPAs & Credits 8-37
Un-Update GPAs & Credits . . . . . . . . . . . 8-37
Reprint Last Update Summary Report . . 8-39
Reset Last Update Data Only to Zero . . . 8-39
Scanner Error . . . . . . . . . . . . . . . . . . . . . .B-3
STUDENT NUMBER ERROR . . . . . . . . .B-4
Resolving Errors . . . . . . . . . . . . . . . . . . . .B-4
4
Transfer Credits & GPA
C
Introduction . . . . . . . . . . . . . . . . . . . . . . C-2
How to Archive Grades . . . . . . . . . . . . . C-2
Specifications . . . . . . . . . . . . . . . . . . . . C-4
GPA WARNING: . . . . . . . . . . . . . . . . . . . C-5
Main Menu. . . . . . . . . . . . . . . . . . . . . . . C-5
BEGIN TRANSFER . . . . . . . . . . . . . . . . . C-6
INDIVIDUAL STUDENT OVERRIDE . . . . C-6
Skills and Concepts
D
Introduction . . . . . . . . . . . . . . . . . . . . . . D-2
Initial Setup . . . . . . . . . . . . . . . . . . . . . . D-2
Entering Customized Lists of Skills
and Concepts . . . . . . . . . . . . . . . . . . . . . D-4
Link Skills and Concepts to Courses . . . . D-6
Enter Skills Grades Manually . . . . . . . . D-9
Interfacing with GradeQuick . . . . . . . . . D-10
Preparing Administrator’s Plus. . . . . . . . .
Sending Skills to GradeQuick . . . . . . . . .
Preparing GradeQuick . . . . . . . . . . . . . . .
Setting up Skills . . . . . . . . . . . . . . . . . . . .
Entering Skills Grades . . . . . . . . . . . . . . .
Send Skills Grades to
Administrator’s Plus . . . . . . . . . . . . . . . .
D-10
D-12
D-12
D-13
D-17
Skills-based Report Cards. . . . . . . . . . .
Codes to Create Skill and Nonskillbased Report Cards . . . . . . . . . . . . . .
Universal Codes . . . . . . . . . . . . . . . . . .
New Box Codes. . . . . . . . . . . . . . . . . . .
D-20
D-21
D-21
D-25
Attendance Box . . . . . . . . . . . . . . . . . . . .
Draw Box . . . . . . . . . . . . . . . . . . . . . . . . .
Course Table Box. . . . . . . . . . . . . . . . . . .
Advanced Specification Box. . . . . . . . . . .
GPA Box . . . . . . . . . . . . . . . . . . . . . . . . .
Honor Roll Box. . . . . . . . . . . . . . . . . . . . .
Print Image. . . . . . . . . . . . . . . . . . . . . . . .
D-25
D-26
D-27
D-28
D-30
D-30
D-31
D-18
Box Code Definitions. . . . . . . . . . . . . . . D-32
Sample Skill-based Report
Card Template . . . . . . . . . . . . . . . . . . . D-42
5
6
Introduction
Introduction . . . . . . . . . . . . . . . . . . . . . 2
Using a Split Grading System . . . . . . . 3
How to Archive Grades . . . . . . . . . . . . 4
Step 1: ............................................... 5
Step 2: ............................................... 5
Step 3: ............................................... 5
Step 4: ............................................... 6
The Report Card Plus Programs . . . . . 6
Program #1: CUSTOMIZE RC .......... 7
Program #2: ENTER COURSES ...... 7
Program #3: DATA ENTRY FORMS . 7
Program #4: ENTER GRADES ......... 8
Program #5: CALCULATE
AVERAGES..................................... 8
Program #6: VIEW/CHANGE/ADD
/DROP ............................................. 8
Program #7: REPORT CARDS
REPORT WRITER .......................... 9
PROGRAM #8: STATISTICAL
REPORTS ....................................... 9
Program #9: ARCHIVE ..................... 10
Program A: PRINT SCHEDULE
SCAN FORMS ................................ 10
Program B: SCAN SCHEDULES ...... 10
Program C: TRANSFER CREDITS
& GPA.............................................. 10
Report Cards Manual
1
Introduction
Introduction
Introduction
Report Cards Plus allows you to define each master course so that when the course is
successful completed, students will earn the appropriate credit, weight and quality
points.
You can schedule students into sections of master courses using either the Scheduling
Plus module, or by manually entering students into course rosters using the Enter
Grades program. In each marking period, you can enter students’ grades manually,
import them from GradeQuick, or use an NCS optical scanner to scan the grades into the
program.
After entering students’ grades, you can perform various calculations, including:
• Calculating semester and final averages using the specific terms and weights you
specify.
• Defining up to 5 honor rolls based on students term averages’ and/or a minimum
grade requirement.
• Customizing the calculation of students’ cumulative GPA and class rank.
• Producing grade distribution reports by teacher or by course and department.
The Report Cards Report Writer comes with numerous reports, including attractive
report cards and transcripts, permanent record labels, grade searches (by student or
teacher), honor roll certificates, congratulatory letters, progress reports and warning
letters. All reports in the Report Card Report Writer may be customized to meet the
specific needs of your school. With the Report Writer, you can determine what
information prints on the report, as well as customize font type, size and color, and
design the overall layout of the report. Up to 120 pre-defined and/or customized reports
may be stored inside the Report Card Report Writer.
This manual assumes that you have already done the following:
Read and understood the Data Base Plus user’s manual.
2 Used Data Base Plus to enter student and staff names.
Report Cards Plus consists of the twelve programs listed on the front of this manual.
These programs will generally be used in the order in which they are listed. This manual
describes each of the programs in its own chapter. Please note that Administrator’s Plus
provides several methods of accessing a particular program, including the navigation
window, (click View D Navigation Menu), the shortcut bar (click View D Shortcut
Bar) and the toolbar at the top of the window.
1
If you ever have a question that is not answered in the manual, please do not hesitate to
call Rediker Software Technical Support at 1-800-882-2994.
The next several pages provide information on two extremely important aspects of the
Report Cards Plus program: “Using a Split Grading System” on page 1-3, and “How
to Archive Grades” on page 1-4. If you plan to print transcripts using the program, we
recommend you read the section on How to Archive Grades carefully, as it guides you
step by step on how to set up the program to allow you to print grades from previous
2
Report Cards Manual
Introduction
Using a Split Grading System
years. If your school uses a combination of number and letter grades for each student,
we advise you to read the section on Using a Split Grading System so that you can see
how it works within the program.
Should you have any questions about anything explained in the manual, please call
Rediker Software Technical Support at 1-800-882-2994.
Using a Split Grading System
A “Split Grading System” is one in which the lower grade levels are on a different
grading scale than the higher grade levels. For example, a school may use letter grades
(with quality point values ranging from 0 to 4) for elementary students, and number
grades (with quality point values ranging from 0 to 100) for high school students.
In Administrator’s Plus, you can define the quality point values for each letter and
number grade used by your school. These values are stored inside the Grade Table
located inside the Customize RC program. See Chapter 1“The Default Grade Table” on
page 1-3.) In the above example, letter grades would be defined on a 4 point scale with
“F” equal to 0.00 quality points and “A” equal to 4.00 quality points. Numeric grades
would be worth the number of quality points that corresponds to the actual grade (i.e., a
grade of 98 is worth 98 quality points).
If you are using a Split grading system, note the following cautions:
• Report Cards Plus will determine students’ honor roll status, career GPA and class
rank based on the quality points associated with the grades found in each student’s
transcript record. These quality points are defined in the Grade Table, as noted above.
• The honor roll criteria for grade levels using one grading system (i.e., 4 point scale)
should be defined separately from the honor roll criteria for grade levels using the
other grading system (i.e., 100 point scale). Please refer to Chapter 8 for more
information on defining your honor rolls.
• If you use the New Files program to promote a student from a grade level using one
grading system to a grade level using the other grading system, and the student
continues with any of his or her previous courses, the grades for those courses should
be adjusted to reflect the equivalent values on the new grading system. For example,
an 8th grade student with a “B” in English 1A who is moved to grade 9 should have
the grade changed to the numeric equivalent of a “B” on the grading system used for
high school students.
• When students are promoted into a grade level using a different grading system (i.e.,
from middle school to high school), use the Update GPAs & Credits program to reset
their GPAs and credits to zero (see “Updating and Resetting GPAs & Credits” on
page 8-37.) This will ensure that grades obtained in middle school courses are not
averaged in with grades obtained in high school courses, thus lowering students’
overall GPAs. After resetting GPAs and credits to zero, students’ cumulative credit
totals and GPAs can be calculated using the high school grading system for only
those grades obtained in high school courses.
Report Cards Manual
3
Introduction
How to Archive Grades
• If you wish to use the Calculate Averages program to automatically calculate
students’ midyear and/or final averages, you must use Specification #3 Calculate
Letter or Number Grades? to tell the program which grading system to use.
• By default, the Calculate Averages program uses the following quality point table to
calculate letter grades:
NOTE:
A+: 4.33
B+: 3.33
C+: 2.33
D+: 1.33
F+: 0.00
A: 4.00
B: 3.00
C: 2.00
D: 1.00
F: 0.00
A-: 3.67
B-: 2.67
C-: 1.67
D-: 0.67
F-: 0.00
If your school wishes to calculate letter grades using an alternate quality point table, please
contact Rediker Software Technical Support at 1-800-882-2994 for assistance.
• When calculating averages on a numeric system, the actual grade symbol is used and
not the quality point value assigned in the grade table. (See “Edit Grade Table” on
page 1-2).
How to Archive Grades
The Transfer Credits & GPA feature of Report Cards Plus can archive grades in
preparation for printing transcripts. You do not have to perform these steps immediately
after installing Report Cards Plus; however, when you are ready to archive grades, you
should follow these instructions carefully.
NOTE:
The Archive program should NOT be used to archive students’ grades. The process of
archiving grades is now performed using the Transfer Credits & GPA program. Using the
Archive program in conjunction with the Transfer Credits & GPA program will result in
inaccurate transcripts. Although the Archive program is still available, it should only be
used in special circumstances under the recommendation of Technical Support.
Students’ courses and grades are stored in the report cards files for the current year.
When creating a new school year, the Beginning program creates an exact copy of the
previous year until you run the Beginning program. Running the Beginning program
promotes students up one grade level and deletes the courses and grades from the
previous year. See the Data Base Plus manual for more information on the Beginning
program.
The Beginning program can erase students' current courses and grades from the report
card files, but it does not erase their total career credits, quality points, and weight. In
other words, these totals will be updated at the end of each year, and will stay in
students’ report card files as they are promoted to the next grade level.
After promoting students in the new year, use the Transfer Credits and GPA program
to copy students' courses and grades from the report card files of the previous year to the
archival files of the new year, from where they may be viewed on the window or printed
4
Report Cards Manual
Introduction
How to Archive Grades
on college transcripts. If you do not use the Transfer Credits and GPA program at the
end of each year, previous courses and grades taken by your students will be stored only
in previous school years.
The following example demonstrates the archival process for a new 11th grade student.
When using the Transfer Credits & GPAs program, his or her report card record for
grade 10 (stored in the previous year) is copied into Archival year -1 of the current year.
The courses and grades for this student’s 9th grade year (stored in archival year -1 of the
previous year) are copied to year -2 of the new school year.
2002-03 School Year
Year -1
Year 0
Grade 9 Courses
Grade 10 Courses
(Archival File)
2003-04 School Year
Year -2
Grade 9 Courses
Year -1
Grade 10 Courses
(Report Card File)
Year 0
Grade 11 Courses
Step 1:
Go to Data Base Plus and click New Files D Specifications to indicate the number of
archival years you wish to maintain. (See Specification #8: Number of Archival Years.)
If you are currently scheduling in next year's directory, you must indicate the exact same
number of archival years in both directories. For example, assume that you are using the
2002-03 directory for the current year and you are scheduling for next year in the 200304 directory. You must use New Files D Specifications in both the 2002-03 and in the
2003-04 directories to specify the same number of archival years in each directory.
Step 2:
Use Option #6 in the Customize RC program to enter your department names (See
“Entering Department Names” on page 1-11.) This will enable the transcripts to group
courses and credits by department (that is, subject), as well as by year. If you are
currently working in two separate school years, you must specify the department names
in both years.
Step 3:
If you want to manually enter students’ previous grades and courses taken before you
installed Report Cards Plus, use the View/Change/Add/Drop program. It is only
necessary to do this in the current directory. For example, if it is currently the 2002-03
school year, only enter archival information into the 2002-03 school year, even if you
are already scheduling for next year in the 2003-04 directory. At the end of the year,
Report Cards Manual
5
Introduction
The Report Card Plus Programs
after updating students’ GPAs and printing final report cards in the 2002-03 directory,
the Transfer Credits and GPA program will transfer the archival data along with the
updated credits and GPA data from the current year’s directory to the next school year.
Step 4:
To schedule students for next year while continuing to work in Administrator’s Plus in
the current year, use the following outline to guide you through your end of the year
tasks. For the following examples, assume that you are using the 2002-03 directory for
the current year and you are scheduling for next year in the 2003-04 directory.
Create the new school year directory.
2 Change into the new school year directory and promote students using the
Beginning program. You can now create schedules in the new year.
Remember to change back to the current directory to continue working in
that year. See the Data Base Plus manual for more information.
3 At the end of the 2002-03 school year, update students’ final career credits
and GPAs in that directory.
4 Run the Transfer Credits and GPA program to transfer students’ updated
career credits and GPAs as well as their archival files from the 2002-03
directory to the 2003-04 directory. For further details on the archival feature,
refer to Chapter C Transfer Credits and GPA.
1
NOTE:
At the end of the 2002-03 school year, you will print students’ final report cards from that
directory. Also use the 2002-03 directory to print honor roll reports, transcripts, grade
distribution reports, etc.
The Report Card Plus Programs
Report Cards Plus allows you to record students’ courses for the current year along with
the grades earned in each course. The program will store up to 80 courses per student
each year. Also stored in students’ report card records are students' total career credits,
adjusted quality points, simple quality points, and weight.
Each program has one chapter of this manual that explains in detail the purpose of each
option and how to perform the functions available in that program. Before performing a
function in Report Cards Plus, read the section that explains that option in detail. We
recommend paying careful attention to the tips provided throughout each chapter to help
you get the most out of the Report Cards Plus module.
The following is an overview of how to use the programs in Report Cards Plus:
6
Report Cards Manual
Introduction
The Report Card Plus Programs
Program #1: CUSTOMIZE RC
Use this program to set up the grade table, specify how GPAs should be calculated,
customize your report card columns, enter your list of “canned” report card comments,
define the Number Grade Print Table, enter department names and enter course skills
and concepts. See Chapter 1 for further details on the items to be customized with this
program.
Program #2: ENTER COURSES
Enter Master Course List: This program must first be used to build your Master Course
List. If you have scheduled your students with Scheduling Plus, you have already built
your Master Course List. Building your Master Course List involves entering each
course offered at your school along with information about each course, such as the
course length, level, department credits, weight, and so on. For example, the sample
master course list in the appendix lists “Reading” as course #001 and “General Math”
as course #111. This sample Master Course List also shows the other information that
will be entered for each master course. It is recommended that courses be grouped into
departments by entering them into record numbers in the same hundreds. For example,
all of your Science courses might use numbers in the one hundreds while all of your
math courses will use numbers in the two hundreds. This numbering system would be
used to associate all departments with courses. See “Entering Department Names” on
page 1-11 for more information on how to set up departments.
NOTE:
The Master Course list carries over from the previous year to give you a starting list.
Enter Course Section List: After completing the Master Course List, you can use either
the Build Master Schedule program in Scheduling Plus to automatically create your
section list or manually create sections in the Enter Courses program. Building your
Course Section List means simply dividing each master course into one or more
sections. Each section can also have a different teacher, room number, and meeting time.
Program #3: DATA ENTRY FORMS
Print Grade Entry Forms: After completing your master course list and course section
list, use this program to print either manual or scanner grade entry forms for each section
in your school, which teachers can use to record students' grades each marking period.
If students' names have not been entered into their sections with Scheduling Plus, you
can print blank manual entry forms and use them to schedule students into sections. You
can then use these forms to input the information into the Enter Grades program. See
“Entering Grades Manually” on page 4-3.
Print Grade Verification Forms: Teachers can use these manual data entry forms to
confirm that all of their grades were properly entered into the program. These forms
contain students’ entered grades and comment codes.
Report Cards Manual
7
Introduction
The Report Card Plus Programs
Print Grade Distribution Reports: A useful tool for statistical analysis, the Grade
Distribution Report shows the number and percentage of students who received a grade
within a user-defined range. You can choose to show the distribution of grades either by
teacher, or by course and department.
Program #4: ENTER GRADES
Enter Students’ Schedules: This program displays section rosters and allows you to
manually add students to them. This is the quickest way to manually schedule students
into a section if a previously-created list needs entering.
NOTE:
As an alternative to entering schedules manually, you can scan students' schedules into
Administrator’s Plus using the Scan Schedules program (see Chapter B).
Enter Students' Grades: At the end of each marking period, use this program to enter
students' grades into the program from either scanner or manual data entry forms. If you
are entering grades manually, the names of the students in that section will appear on the
window after entering the course and section number. The only data you need to enter
are the grades and one or two optional comment codes. Also use this program to import
students’ grades from GradeQuick.
Program #5: CALCULATE AVERAGES
Calculate Averages: This option calculates midyear or final average grades based on the
marking period grades entered with the Enter Grades program. The Calculate Averages
program calculate averages for either letter or numeric grading systems. See Chapter 5
of this manual for more information on calculating averages.
Blank Report Card Columns: This option allows you to remove grades from a report
card column for every student at once, rather than deleting them one student at a time.
Many schools that need to update GPAs/Credits on the third quarter for purposes of
printing the class rank report (and that do not have a midyear column on the report card)
use this option to blank the grades from the final column for all-year courses after
calculating an average into that column.
Program #6: VIEW/CHANGE/ADD/DROP
Transcript View: The View/Change/Add/Drop (VCAD) program can:
• View students' transcripts and to make changes to those transcripts, such as to fix
incorrect grades that may have been entered with the Enter Grades program. You
can also use VCAD to view or change students' grades from previous years that are
stored in the archival files.
• Manually change students' total career credits, quality points and weight.
• Enter students' past courses, grades, career credits and GPA data directly into
students’ archival records, which many schools do when they first purchase the
program. Note that if you enter grades from past years, the Statistical Reports
program should be used to calculate students’ career GPAs based on these past
grades.
8
Report Cards Manual
Introduction
The Report Card Plus Programs
Schedule View: Pressing F10 while in the transcript view displays the Schedule view.
You will see the student’s schedule with course and section numbers. You can then add
or drop students from course sections right from this window. As students are added and
dropped, add/drop forms can be automatically printed. This option must be turned on in
Specifications for Add/Drop Forms to print.
Program #7: REPORT CARDS REPORT WRITER
Use this program to print, modify, and design numerous reports, including report cards,
transcripts, permanent labels, progress reports, deficiency letters and honor roll
congratulatory letters. You can also create customized reports containing virtually any
information stored in the Report Cards Plus module.
Reports can be printed for the entire school, an individual grade level or for individual
students. Attractive pre-printed report cards are available from Rediker Software. Your
school's logo and any other information of your choice may be pre-printed on these
report cards. It is also possible to print either wide or narrow report cards on plain white
paper.
Complete transcripts may be printed containing all of the courses students have taken in
their school career. Moreover, these transcripts may be printed with students' courses
sorted by the year taken or they may be printed with students' courses sorted by
department. See Chapter 7 for complete information on creating and printing reports in
Report Cards Report Writer.
PROGRAM #8: STATISTICAL REPORTS
Update Career GPAs: Use this program to permanently update students' career credits
and GPAs at the end of each school year, as well as to temporarily update students'
career credits and GPAs during the school year. Any temporary updating will be
automatically “undone” before the final permanent updating is performed. These
updated totals will stay in students' report card files as they are promoted to the next
grade level by the Beginning program.
If you have entered grades for previous years through View/Change/Add/Drop, this
program may also be used to calculate their career GPAs based on archival grades.
Transcripts printed in the new year can then be set to display the student’s career GPA.
The Statistical Reports program will calculate both an adjusted and simple career GPA
for each student. The adjusted GPA takes into account the fact that some advanced
courses may offer more quality points for a grade than would be awarded for the same
grade in a lower level course. For more information on calculating GPAs, see
“Update/Un-update GPA's & Credits” on page 8-27
When you calculate class rank, you will have the option to use either the adjusted or
simple GPA. Similarly, when you print report cards, transcripts or permanent labels, you
will have the option to print either the adjusted or simple GPA.
Report Cards Manual
9
Introduction
The Report Card Plus Programs
Print Class Rank Report: The class rank report can be used to rank students by career
or last-update GPA, credits or quality points. After you run the class rank report, you
can choose to print the class rank on the report card or transcript.
Program #9: ARCHIVE
Archive Data: This program is no longer used to archive grades. Students’ courses and
grades taken during previous school years are now archived by the Transfer Credits
and GPAs program (see Chapter C). On rare occasions, the Archive program is used to
change the numbers of archived courses, but under no circumstances should you attempt
to do this without assistance from Rediker Technical Support. If you believe you may
need to use this option, call Technical Support at 1-800-882-2994.
Program A: PRINT SCHEDULE SCAN FORMS
If you have a scanner and have not used Scheduling Plus to enter students' names into
their course sections, use this program to print forms on which you can bubble in
students’ course and section numbers for use with an NCS scanner.
Program B: SCAN SCHEDULES
If you have a scanner and have not used SCHEDULING PLUS to enter students’ names
into their course sections, this program may be used to scan students’ schedules into the
computer.
Program C: TRANSFER CREDITS & GPA
This program allows you to transfer students’ archival data, as well as career GPAs and
credits to the new school year so that you can print transcripts containing courses and
grades from each year the student attended the school.
10
Report Cards Manual
1
Customize RC
Introduction & Main Menu . . . . . . . . . . 1-2
Edit Grade Table . . . . . . . . . . . . . . . . . 1-2
The Default Grade Table ................... 1-3
GPA Factor . . . . . . . . . . . . . . . . . . . . . 1-4
Customize Report Card Columns . . . . 1-5
Editing Report Card Comments. . . . . . 1-9
Changing Generic Comment Codes . 1-10
Edit Number Grade Print Table . . . . . . 1-11
Entering Department Names . . . . . . . . 1-11
Skills and Concepts . . . . . . . . . . . . . . . 1-13
Course Settings . . . . . . . . . . . . . . . . . . 1-13
Maintain Grade Change Log . . . . . . . . 1-14
Report Cards Manual
1-1
Chapter 1
Customize RC
Introduction & Main Menu
Introduction & Main Menu
The Customize RC program allows you to customize most of the universal settings in
Report Cards Plus. You will use this program to set the value of each grade a student can
receive for a course, select how you wish to apply the GPA factor, define your report
card columns and pre-define and enter comments. You can also use it to set up the table
that allows you to translate number grades into letter grades for printing report cards,
and to enter department names. In addition, schools that have purchased the skills-based
report card module will use this program to create customized lists of skills and
concepts. Finally, you can set the number of available courses up to 9,999.
Select an option, and then click Next to display each option, described in the following
sections.
Edit Grade Table
This option allows you to view and edit the grade table, which stores the quality point
values for each grade a student may receive. (Note that you must be logged in as
Supervisor to view or edit the Grade Table.) In addition, you can use the grade table to
specify whether or not the grade is worth credit and if it should be considered in
calculations of students’ averages. In the grade table, you will enter a symbol for each
grade you wish to print on students’ report cards. You can have up to 200 grade symbols
in your grade table, including 50 customized grades. Symbols can be any numerical
grade of up to 3 digits or any letter grade up to 3 characters, including plus (+) and minus
(-) grades, or customized symbols such as “3”, “3+” and “3-”.
NOTE:
1-2
Note that although it is possible to change a customized grade in the grade table, you should
not change a grade or its quality points if you need to print the original grade on students’
transcripts.
Report Cards Manual
Customize RC
Edit Grade Table
You can assign both letter and number grades to the same student. If you choose to use
a combination of letter and number grades, it is recommended that you use the same
scale for both. In other words, if you assign 4.0 quality points for a grade of “A”, you
should also assign 4.0 quality points for a grade of 95. Conversely, if you assign 95
quality points for a grade of 95, you should assign 95 quality points for a grade of A.
In addition to entering the number of quality points assigned to each grade, you will also
need to enter a “Y” or an “N” in the credit and average columns. If you enter a “Y”,
credit will be awarded if the student receives the corresponding grade. An “N” means
that no credit will be awarded. A “Y” in the average column denotes that the grade will
be used when calculating averages for GPAs and honor rolls. Use an “N” if you do not
wish the grade to be counted toward the average. Note that wildcard grades, like “N”,
“X” and “P”, are not counted when using the Calculate Averages program. See “How
Are Averages Calculated?” on page 5-8.
NOTE:
Enter an “N” in the average column for grades which have 0 quality points associated with
them if you do not want them to count as zeroes when the average is calculated.
The Default Grade Table
The default grade table includes the numeric grade symbols from “0” through “110”, as
well as letter grades from “A+” to “F-”. By default, number grades have quality points
on a 100 point scale (for example, “99” = 99 QP), and letter grades are on a 4.0 scale.
The quality point value for any of the default numeric grades can be changed.
NOTE:
The bracketed “[]” grade symbols in fields #1 to #150 are pre-defined and cannot be
changed. The entries that contain brackets but no symbol are reserved by the program for
future use. When adding a symbol to the grade table, choose a field that is completely blank.
The default grade table also includes W for withdrawn, WF for withdrawn failing and
WP for withdrawn passing. These grades do not earn credit. W and WP are not
calculated in students’ averages. WF calculates with a value of 0 quality points.
Report Cards Manual
1-3
Chapter 1
Customize RC
GPA Factor
The wildcard grades N, X, and P included in the default grade table can be modified
unless they are used in students’ transcripts. If you change the value of these grades in
the grade table, the symbol you changed them to in the grade table will print on the
report cards. For example, if you change the N to NC for No Credit, when teachers
bubble in N on the scan forms, NC will print on the report card.
GPA Factor
The GPA factor calculates the adjusted GPA and may optionally be used in calculating
honor rolls. It enables extra quality points to be awarded for grades received in advanced
level courses. For example, a grade of a B in Advanced Placement Chemistry could be
made to count the same as an A in a lower level course. In an alpha grading system, this
is generally accomplished by entering a 1 as the GPA factor for the course. When the
program calculates the student's GPA, this GPA factor of 1 will be added to the normal
quality points of 3 for a B to give the student 4 quality points for the course. Average
level courses would have zeroes entered as their GPA factors, which would cause the
quality points to remain unchanged.
Similarly, in a numerical grading system, a GPA factor of 10 could be added to a grade
of 85 to make it count as a 95. However, some schools may choose to have their quality
points multiplied by the GPA factor. In this case, a GPA factor of 1.1 could be entered
for an accelerated course so that an 85 would count as a 93.5 when the GPA is calculated.
These schools would have to enter a 1 for their average courses so that their quality
points would remain unchanged.
NOTE:
1-4
This option in the Customize RC program allows you to choose between adding or
multiplying your GPA factor. If you do not intend to use the GPA factor, choose the adding
option so that the default GPA factor of zero does not affect the quality points associated
with the course.
Report Cards Manual
Customize RC
Customize Report Card Columns
Customize Report Card Columns
There are 11 columns on your report card, not counting the comment columns. The
default report card column table, which is set up for schools with four marking periods,
only uses eight of the 11 columns. The three unused columns are used strategically to
leave spaces on the report card so that it will look better.
The heading line of a report card using the default table could look like:
SUBJECT
1st 2nd MIDEX MIDGR 3rd 4th FINEX FINAL EFF CIT
CRDTS TEACHER
Report Cards Manual
1-5
Chapter 1
Customize RC
Customize Report Card Columns
If your school has six marking periods, you can modify the four-marking period default
table to read as follows:
This report card column table does not have any unused columns. The heading line of a
report card using every possible column might appear as follows:
SUBJECT
1st 2nd 3rd S1EX SEM1 4th 5th 6th S2EX SEM2 FINAL COM 1 COM2
CRDTS TEACHER
You can change the title of any column in the table. For each column, you will have to
enter the following information:
Column Title
Description
25
CHARACTER
NAME
This column name will be used in windows in the software which
specify which column(s) to use for a particular task. Entering a zero “0”
indicates to the program that the column will not be used.
5 CHARACTER This column name will be used to construct the heading line on the
NAME
wide report card. If you use less than the five characters, it is suggested
that you center the characters you do use for appearance sake. For
example, if you enter “1st” as your five character name, enter it as “1st
“, that is, center the 3 characters within the five character box.
3 CHARACTER This column name will be used to construct the heading line on the
NAME
narrow report card, permanent label, and transcript.
1-6
Report Cards Manual
Chapter 1
Customize RC
Customize Report Card Columns
Column Title
Description
TYPE
A drop-down list will appear allowing you to select what type of column
you are using. A column should only be called a FINAL type column if
it will contain a grade that will be the average for the entire course.
Many schools will have a first semester grade column and a second
semester grade column without any final grade column. The OTHER
classification should be used for a column for which the grades should
be excluded from average and GPA calculations.
NOTE: The column used to store the Regent's grade in New York
should be defined as an OTHER type column.
A classification as an ABSENCE column will allow any number from 0
to 99 to be placed in the column. This holds true even if you are using
letter grades. In the default table that uses four marking periods, you
might want to make column 11 an ABSENCE column. If you are using
the Period Attendance module, you may have the absences in each
class automatically print in this column. If you have two columns
available, you may have an absent column and a tardy column. Both
would be set as column type ABSENT.
Columns #12 and #13 are automatically classified as COMMENT
columns and their type cannot be changed.
NOTE: The program will place a “W” in the right-most FINAL or
appropriate SEMESTER column if a student withdraws.
1-7
Report Cards Manual
Chapter 1
Customize RC
Customize Report Card Columns
Column Title
Description
CREDIT
Only SEMESTER and FINAL columns may be designated as credit
columns. The default report card column setup for a school with four
marking periods shows that the FINAL column is the only credit
column. When printing report cards and updating GPAs, the program
will look for a passing grade in this column and award full credit to those
courses. You may not have both SEMESTER and FINAL columns
simultaneously designated as credit columns.
The report card column table for schools with six marking periods
shown above has both the Semester One and the Semester Two
columns defined as credit columns. Although there is a final grade
column, it is not a credit column. When printing report cards and
updating GPAs, the program will look at both of these credit columns
and award credit to passing grades as follows:
Full Year Courses: Will be awarded half of their total entered credit for
each semester. (In a trimester school, full year courses would be
awarded one third of their total credit for a passing grade in each
semester.)
Semester and Quarter Courses: Will be awarded their full total credit
for a passing grade in either semester column.
NOTE:
1-8
Report Cards Manual
When you move a grade column, the grade remains in the same
location. Consequently, it is very important that you do NOT change
your report card columns during the year if you print transcripts in order
to prevent grades from printing in the wrong columns on transcripts.
Customize RC
Editing Report Card Comments
Column Title
Description
TYPE
A drop-down list appears, allowing you to select what type of column
you are using. A column should only be called a FINAL type column if
it will contain a grade that will be the average for the entire course.
Many schools will have a first semester grade column and a second
semester grade column without any final grade column. The OTHER
classification should be used for a column for which the grades should
be excluded from average and GPA calculations.The column used to
store the Regent's grade in New York should be defined as an OTHER
type column. A classification as an ABSENCE column will allow any
number from 0 to 99 to be placed in the column. This holds true even
if you are using letter grades. In the default table that uses four marking
periods, you might want to make column 11 an ABSENCE column. If
you are using the Period Attendance module, you may have the
absences in each class automatically print in this column. If you have
two columns available, you may have an absent column and a tardy
column. Both would be set as column type ABSENT.
Columns #12 and #13 are automatically classified as COMMENT
columns and their type cannot be changed.
NOTE: The program will place a “W” in the right-most FINAL or
appropriate SEMESTER column if a student withdraws.
Editing Report Card Comments
Each marking period, students may be given up to two comments for each course that
they take. Use this option to enter a pool of up to 190 comments. Each comment may
have up to 59 characters, although only 35 characters will print on the default report
cards. If you wish to use comments that are longer than 35 characters, you must use the
View/edit letters/reports feature in Report Cards Report Writer to edit your school’s
report card. See Chapter 7 for more information.
The Edit Report Card Comments table contains 76 default comments, which you can use
as is or modify to meet your school’s particular needs. Numbers 1 to 12 contain positive
comments; numbers 51-76 contain negative comments. To print a list of all of your
comments, use the F9: PRINT option. These printouts may be distributed to teachers,
who will use them when they enter the comment codes on data entry forms, as well as
in their GradeQuick grade books.
Report Cards Manual
1-9
Chapter 1
Customize RC
Editing Report Card Comments
Changing Generic Comment Codes
You can change the generic comment codes as follows.
To Change the Generic Comment Codes:
1
Log in to Administrator’s Plus as Supervisor.
2
Select the Report Cards module, then select the Customize RC icon.
The Customize Report Cards Plus window appears.
Select 4) edit report Comments, and click Next.
4 Click Done to display the Enter/Edit Report Card Comments window.
3
Double-click in an empty field to create a new comment code, or doubleclick in an existing field to edit it. The number represents the actual code.
6 Click F10 Accept to save the codes and exit this window.
5
1-10
Report Cards Manual
Customize RC
Edit Number Grade Print Table
Edit Number Grade Print Table
The Number Grade Print Table allows you to translate enter or import numeric grades
and print letter grades on the report card. The default table contains all the number
grades that exist in the Grade Table with the same number next to it. In other words,
each numeric grade is set to print as itself. However, you may enter an alternate grade
to be printed for each number grade, which would allow schools entering numeric
grades into Report Cards Plus (or into GradeQuick) to print letter grades on report cards.
When printing any report with the Report Cards Report Writer, you have the option
to print the original numeric grades as they were entered or to print the corresponding
grades found in the number grade print table. See “PAGE 4: Transcript & Optional Field
Specifications” on page 7-24.
Entering Department Names
This option lets you enter a ten-character name for each department. Department “0"
will usually be courses numbered 1 to 99. Department “1" will normally be courses
“100" to “199", and so on. Use this option to specify that department #1 is “ENGLISH”
and department #2 is “HISTORY”, and so on.
Note that when entering master courses, a default department code appears in the
department field. You can keep the default codes or change the number that appears in
this field. For example, the default department code for course number “121" is “1"
because it is in the one hundreds. You may change the code to “9" so that it appears with
the department #9 courses even though the course’s number is “121". When you enter
Report Cards Manual
1-11
Chapter 1
Customize RC
Entering Department Names
department names, students’ earned credit in each department may be printed on
transcripts. You can even print transcripts in which courses are organized by department
and whether they are included in lists of master schedules.
To Enter Department Names:
Double click a filed to make it active.
2 Enter the desired name.
3 Press Tab to move to the Print in Master Schedule column.
The Print in Master Schedule column lets you determine if the course will be included
in the Scheduling Report Writer’s Master Schedule formats.
1
4
1-12
Use the drop-down box to select Yes or No.
After your departments have been named, you might have a table that looks like this:
Report Cards Manual
Customize RC
Skills and Concepts
Skills and Concepts
If you have purchased the optional Skills module, you can use this option to create the
skills and concepts that you will print on the report card. Skills are linked to individual
courses and concepts are linked to individual sections of a course through the View/Edit
Courses & Sections program. (See Chapter 2.)
Skills are those abilities which a student is expected to acquire through a course. An
example of a “skill” that might be linked to a Math course is “Counts 1-5”; An English
course might have a “skill” called “spelling” linked to it.
Concepts can be defined as the material or areas of information covered in a particular
section of a course. An example of a “concept” that might be linked to a section of an
Algebra course is “Long Division”. A Social Studies section might have a “concept”
called “20th century presidents” linked to it.
NOTE:
Skills are graded while concepts are not graded.
Course Settings
You can have up to 9,999 course numbers. This allows you to have 4-digit course
numbers.
NOTE:
Setting your course number to the maximum of 9,999 may slow certain operations for
scheduling and report cards. A lower maximum, such as 2,000, should not significantly slow
these operations. Also note that expanding your course numbers beyond 999 means your
data will not be backwards-compatible to releases prior to version 4.
To Change Course Settings:
1
In the Customize Report Cards Plus window, select Course Settings, and
then click Next.
A warning window appears.
Report Cards Manual 1-13
Chapter 1
Customize RC
Maintain Grade Change Log
2
Read the warning, and then click Done.
The Specifications: Course Settings window appears.
In the Maximum Course Number field, enter your maximum course number.
4 Click Done.
A confirmation window appears.
3
5
Click yes to confirm your course number and return to the Customize Report
Cards Plus window.
Maintain Grade Change Log
The grade change log tracks student grade changes made through
View/Change/Add/Drop, Enter Grades, Calculate Averages, GradeQuick Imports, and
even student schedule changes that affect grades. Y
You can export the log to Excel™, then quickly sort and/or filter the log to show only
the information you need. You can also print the log for a specific date range, a specific
Administrator’s Plus user or all users. Included in the grade change log are the student
name, the year (current or archival), course/section number, teacher, grading column,
previous grade, new grade, date, time and name of the user making the grade change.
The log is automatically enabled as soon as you install version 4. Only the Supervisor
can view, print and delete the grade change log by choosing Setup D Grade Change Log
from the Administrator’s Plus toolbar.
To Enable the Grade Change Log:
1
1-14
In the Customize Report Cards Plus window, select Maintain Grade Change
Log, and then click Next.
Report Cards Manual
Customize RC
Maintain Grade Change Log
The Maintain Grade Change Log Specifications window appears.
Click yes to enable the grade change log, or click No to disable it.
3 Click Done to confirm and exit this window.
The Customize Report Cards Plus window re-appears.
2
Report Cards Manual 1-15
Chapter 1
Customize RC
Maintain Grade Change Log
1-16
Report Cards Manual
2
Enter Courses
Introduction & Main Menu . . . . . . . . . . 2-2
View/Edit Courses & Sections . . . . . . . 2-3
Adding to & Editing the Master Course
List (Create a Master Course List?) 2-3
Master Course Fields (Fields found on the
View/Edit Courses and
Sections Window) . . . . . . . . . . . . . . 2-4
Adding to & Editing the Course
Section List. . . . . . . . . . . . . . . . . . . . 2-11
Section List Fields . . . . . . . . . . . . . . 2-13
Understanding Meeting Times . . . . . 2-14
Print Reports . . . . . . . . . . . . . . . . . . 2-18
Inspect/Change Specifications. . . . . . . 2-18
Page 1: Initial Specifications . . . . . . 2-19
PAGE 2: More Specifications . . . . . . 2-22
Skills Specifications . . . . . . . . . . . . . 2-23
New Master & Section List Files . . . . . 2-24
New Section List File Only. . . . . . . . . . 2-24
Rebuild Section Rosters . . . . . . . . . . . 2-24
Rebuild Section List File . . . . . . . . . . . 2-24
Rebuild Skills File . . . . . . . . . . . . . . . . 2-25
Send Skills to GradeQuick. . . . . . . . . . 2-25
Import Section List from Somas. . . . . . 2-25
Report Cards Manual
2-1
Chapter 2
Enter Courses
Introduction & Main Menu
Introduction & Main Menu
The enter courses icon allows you to do the following:
• Build/change Master Course List
• Build/change Course Section List
•
•
•
•
•
•
•
Link skills to courses
Link concepts to course sections
Make printouts of the above lists
View section rosters on the window
Rebuild Section Rosters and the Section List file
Send skills to GradeQuick
Batch enter rooms
• View and edit sections
Before entering grades or printing report cards, you must first use this program to build
both your Master Course List and your Course Section List. Both Report Cards Plus
and Scheduling Plus read the Master Course List and Section List from the same file,
so if they have already been built with Scheduling Plus, you do not need to recreate
them. Building your Master Course List involves entering into the program all of the
courses taught in your school. Building your Course Section List involves entering
sections for each of these courses according to meeting time and teacher.
2-2
Report Cards Manual
Enter Courses
View/Edit Courses & Sections
View/Edit Courses & Sections
Select this option to begin entering or editing your master courses and sections. Each
course you enter into the program will have a number from 1 to 9,999. Later, these
courses will be divided into one or more sections according to when they meet and who
teaches them.
Adding to & Editing the Master Course List
To create a new master course, type an unused master course number and press ENTER.
The word *UNUSED* will appear in the Course Name field.
To Add or Edit the Master Course List:
1
In the Edit Courses window, click View/Edit Courses and Sections.
The View/Edit Courses and Sections window appears.
If you have chosen to sort your lookup list numerically, choosing F6: LOOKUP will
allow you to instantly see which numbers are unused. (Use Specification #1: COURSE
LOOKUP: ALPHA OR NUMERIC ORDER? on page 1 of the Specifications to set how
you want the lookup list to be sorted.) To enter information about your new course, press
F3: EDIT to activate Edit Mode. Alternatively, pressing the Up arrow key is a shortcut
method of entering the Edit Mode. As soon as you are in the Edit Mode, the cursor will
be in the Course Name field and the defaults that you have set in the specifications
window will appear in the corresponding fields. See “Inspect/Change Specifications” on
page 2-18.
Report Cards Manual
2-3
Chapter 2
Enter Courses
Master Course Fields (Fields found on the View/Edit Courses and Sections Window)
Note that the bottom of the window now displays a help message about the field
containing the cursor. You can use the specification window to turn off these help
messages. See SPECIFICATION #2) “2) PRINT HELP MESSAGES WHEN
ENTERING COURSES?” on page 2-19.
When you are finished entering the course information, choose F10: ACCEPT to
permanently save the course in your Master Course List. To abort and abandon the new
course, press or click ESC.
NOTE:
While viewing a master course, use F4: PREVIOUS or F5: NEXT to scan through your
master courses. Unused numbers will automatically be skipped. Once entered, a course may
be called up to the window by entering its number, typing a few letters of its name, or by
using the F6: LOOKUP option. It can then be edited by using the F3: EDIT or arrow keys.
If you are archiving transcript information using the Transfer Credits & GPA program, we
recommend that you do NOT change existing master course information. If you need to
change course information, simply add a new course. Using the Transfer Credits & GPA
option lets you store students' courses and grades from previous school years. When
students’ courses are stored in the archival file, only the master course number is recorded.
When transcripts are printed, the Report Card Report Writer uses the information in the
current master course list to determine the course name, level, length, credits and so on.
Consequently, any change in the Master Course List will affect all of those students that took
the course in previous years. This also means that you should NOT delete a master course
as long as it exists in any current student's archived courses.
Master Course Fields (Fields found on the View/Edit Courses and Sections
Window)
The following fields appear in the View/Edit window.
Field Name
Description
Inactive
This checkbox determines whether or not a course is considered active
or inactive.
Course Number Master course number from 1 to 9999. Later, these courses will be
broken down into one or more sections. Most schools have courses
from the same department listed in the same hundreds. For example,
all English courses could be assigned numbers in the 500's, all science
courses the 400's, etc. Grouping courses by department allows you to
use the program to produce Grade Distribution Reports, as well as print
credit totals by department on students’ transcripts. See Chapter 7.
NOTE: When setting up master course numbers, note that courses are
printed on transcripts and report cards in numerical order.
Consequently, English, math, science and social studies courses
should be given the lowest numbers if they are to be printed first.
2-4
Report Cards Manual
Enter Courses
Master Course Fields (Fields found on the View/Edit Courses and Sections Window)
Field Name
Description
Course Name
Course names are limited to 10 characters in length. If you choose to
print the level after the course name, you can print an additional three
characters. It is advisable to use names with upper and lower case
letters as shown in the sample Master Course List in the appendix.
Course
Description
Course Descriptions can be up to 40 characters in length. On reports
printed from Report Cards Report Writer, any portion of this description
can be printed instead of the 10 character course name by changing
the code ~!NM9999:11~ to ~!ND9999:25~ in the body of the report
(See Chapter 7). If a course doesn’t have a description entered in the
Master Course List, the course name will print instead. The same is
true of reports printed in Schedule Report Writer.
Level
Enter any three-character alpha numeric code in this field or leave it
blank. On transcripts, permanent labels, report cards and line
schedules, you will have the option to print this code. A space will be
inserted just before the three-character level, giving you a fourteen
character course name. For example, you could enter “I” for your level
one courses and “III” for your level three courses. For advanced
placement courses, use “AP” as the level. An advanced level
Chemistry course with the level printed would read as “Chemistry AP”
on the report card.
Department <0
to 9>
Enter a single digit code from 0 through 9. A course's department will
initially default to the first digit in the course number. For example,
course 099 will have a default department code of 0, while course 722
will have a default code of 7.
When you print transcripts, you will be able to indicate the number of
credits earned in the courses for each department code. For example,
a school might enter a code of “1” for all of their Math courses and a
code of “2” for all of their English courses. If you print a transcript by
department, it will group the courses according to department code. At
the bottom of the transcript by year, you can also show the total math
credits, the total English credits and so on.
Report Cards Manual
2-5
Chapter 2
Enter Courses
Master Course Fields (Fields found on the View/Edit Courses and Sections Window)
Field Name
Description
Optimum
Section Size
After setting up your Master Course List, you will divide each course
into sections according to meeting time and teacher. If you use
SCHEDULING PLUS, the Perform Scheduling program will attempt to
limit each section's enrollment to no more than the entered optimum
size.
NOTE: There is a limit of 250 students per section. However, if you
need to have more than 250 students in a particular section, you may
divide the section into two separate sections.
For both of these sections, enter the exact same data. For example,
221/01 and 221/02 could both have the same teacher, time and room.
That teacher would later get two report card data entry forms or two
attendance forms for the one “real” section.
Course Length
<Q/S/A>
You must enter whether the course is a (Q)uarter, (S)emester, or (A)ll
year course. When you later enter sections for these courses, you will
be able to specify in which of four quarters the section meets for quarter
courses or in which of two semesters it meets for semester courses. If
your school runs on a Trimester system, you can call a course that only
meets for one semester a quarter course and use the first three
quarters of the year.
NOTE: Note that the course length should NOT be changed if the
course exists on students’ transcripts.
If you do change the course length from all year to semester or quarter,
the Course Length in the Section List will automatically appear as
semester 1. If it is a semester 1 or quarter 2, 3 or 4 section, you will
have to manually edit the course length entry in the Section List. If you
change the course length from semester to all year, the Course Length
entry in the section list will automatically change to all year.
2-6
Report Cards Manual
Enter Courses
Master Course Fields (Fields found on the View/Edit Courses and Sections Window)
Field Name
Description
Priority
The Priority Code is used by Administrator’s Plus in two ways:
• Scheduling Plus uses the Priority code to try to resolve conflicts in
students’ schedules. If necessary, the program will schedule
students into courses with higher priority codes over courses with
lower priority codes. A priority code of “0” is considered the highest
priority and is the default for all courses. A priority code of “5” is the
lowest priority. Normally core courses, such as English and Math,
would be considered highest priority, while elective courses would
have lowest priority.
• Report Cards Plus can use the priority code to help determine
which students are included in honor rolls. The honor roll
specifications will allow you to exclude students from honor rolls
based on grades received in Major and Minor courses. For example,
you could set up your highest honor roll to exclude students
receiving a B+ or below in a Major course, and a B- or below in a
Minor course. See “Defining Honor Roll Reports” on page 8-15.
Credits
Credit values may be entered using up to 5 digits, including the decimal
point. For example, 1.75, 3.50, and 10.50 are valid entries, but 10.675
is not. It has six digits including the decimal. You may enter 0 or 0.0 for
no credit.
Students will be awarded credits for passing grades found in any
columns on their report card defined as credit columns. If there is only
one credit column, students will be awarded full credit for each passing
grade. However, if there is more than one credit column, they will be
awarded partial credit for all year courses and full credit for semester
or quarter courses. For example, assume that you are a semester
school and that your first semester grade and second semester grade
are the two grades that bear credit. For example, assume that Math is
an all year course worth 5 credits and Journalism is a semester 1 (half
year) course worth 2.5 credits. Passing grades for each of these
courses in the first semester column will be awarded 2.5 credits.
Report Cards Manual
2-7
Chapter 2
Enter Courses
Master Course Fields (Fields found on the View/Edit Courses and Sections Window)
Field Name
Description
Weight
Most schools will enter a weight value that is equal to the number of
credits for a course. For these schools, weight is really credits
attempted. However, weights are used by Administrator’s Plus as
comparative values. They tell the program how a grade in one course
should compare to a grade in another course in GPA and honor roll
calculations. For example, the course Driver’s Ed may meet every
other day for the entire year, while Algebra meets each day for the
entire year. The weight for Driver’s Ed would usually be 1/2 of the
weight for Algebra. Because the weight is a comparative value,
weighing one course 150 and another 75 yields the same result as
using weights of 1.00 and 0.50.
Any value may be entered for a course’s weight. However, as with
credits, you are limited to five characters, including a decimal point. If
you do not want a course to count in calculating GPAs, do not enter a
weight of 0. Instead, set the Count in GPA radio button to No.
GPA Factor
The GPA factor is used to calculate students' adjusted GPA and may
optionally be used in calculating honor rolls. It is also used to specify
which courses should not be used at all in calculating GPAs.
If you do not use the GPA factor, your adjusted GPAs will always be
equal to your simple GPAs. The adjusted GPA takes into account the
fact that some advanced courses may offer more quality points for a
grade than would be awarded for the same grade in a lower level
course. The simple GPA is calculated with the same number of quality
points being offered for each grade regardless of the level of the
course. When you calculate class rank, you will have the option to use
either the adjusted or simple GPA. Similarly, when you print report
cards, transcripts, or permanent labels, you will have the option to print
either the adjusted or simple GPA.
2-8
Report Cards Manual
Enter Courses
Master Course Fields (Fields found on the View/Edit Courses and Sections Window)
Field Name
Description
Adding
Multiplying the
GPA Factor
The GPA factor will either be added to or multiplied by the values you
assign for quality points. The Customize RC program is used to choose
between adding and multiplying the GPA factor. Using the Edit Grade
Table option in Customize RC, you can also assign values for quality
points, and choose whether or not particular letter or number grades
will count in the GPA and honor roll calculations.
Assuming that you have chosen to Add, you will use a GPA factor of 0
for most courses. However, if you enter a 1, all of the values will be
increased by 1. In other words, if an A is usually worth 4 quality points,
it will now be worth 5 quality points.
NOTE: The GPA factor will not be added to 0 quality points. In other
words, an “F” will never be awarded more than zero quality points. You
can also enter a negative number as your GPA factor. A GPA factor of
-1 will make a 100 worth 99 points and a B (typically worth 3 quality
points) only worth 2 points. However, in no case will the total quality
points be allowed to be less than 0. A student who gets an F or 0 in a
course with a GPA factor of -1 will still have 0 quality points for that
course. Whether you use letter or number grades, the GPA factor will
be used in the same way.
Some schools want the number of quality points to be multiplied by the
GPA factor. In this case, use the Customize RC program to specify that
you want the GPA factor to multiply the quality points. If you choose to
multiply, you should enter a 1 as the GPA factor for standard courses.
This will leave the quality points for those courses unchanged. For
accelerated courses, use a GPA factor such as 1.1 or 1.2. For lower
level courses, use a GPA factor less than 1, such as 0.9.
Report Cards Manual
2-9
Chapter 2
Enter Courses
Master Course Fields (Fields found on the View/Edit Courses and Sections Window)
Field Name
Description
Course Link
When you link two courses, students who sign up for both courses will
be scheduled into the same section of each course through Scheduling
Plus. If the student can't be scheduled into both sections of a linked
pair, then it is considered by the Perform Scheduling program as a
conflict situation. Course Links allow you to keep students with the
same teacher for the entire year if you use semester courses. These
linked courses do not need to meet during different semesters. If you
link two courses meeting the same semester, for example a Physics
course and a physics lab, then the student will be scheduled into the
same section for both courses. Enter the link for only one of the two
courses. For example, if course 101 is being linked to 102, enter 102
in the link field for course 101 and leave the link field for course 102
empty.
NOTE: You cannot link 3 courses together by linking the first to the
second and then the second to the third.
Course Number You may enter a ten-character alphanumeric course number alias if the
Alias
standard three- digit number is not sufficient. For example, you could
enter Chem122A as the course number alias for course 122. This ten
character number may be printed on report cards and transcripts by
changing a specification in the Report Cards Report Writer. See
Chapter 7.
Count in Honor
Rolls
Determines whether to count the course in the honor roll. See “Defining
Honor Roll Reports” on page 8-15.
Count in Simple Determines whether to count the course when calculating simple GPA.
GPA
2-10
Count in
Adjusted GPA
Determines whether to count the course when calculating adjusted
GPA.
Texts
You may enter a text book name and the next two items if you have
turned on the USE TEXTS, COST AND FEES? specification (see
Specification E on page “E) USE TEXTS, COSTS & FEES?” on
page 2-21). A 12 character limit applies. The text book name will
appear both on the printout of all master courses and on students'
schedules.
Report Cards Manual
Enter Courses
Adding to & Editing the Course Section List
Field Name
Description
Cost
This is the cost of the text(s) entered in the previous field. Do not use
a dollar sign. The cost may not be more than $999.99. You will be
asked to enter a cost only if you have turned on the USE TEXTS,
COST AND FEES? specification (see Specification E on page “E) USE
TEXTS, COSTS & FEES?” on page 2-21). The cost will appear both on
the printout of all master courses and on students' schedules in
Scheduling Plus. This amount can also be used by Billing Plus to
automatically generate an invoice for course costs.
Fee
This is any fee that may be needed for a course. An example would be
a lab fee for science courses. The same rules apply as for Cost.
Adding to & Editing the Course Section List
NOTE:
The easiest way to edit course section lists is with the View/Edit Sections option. See
“View/Edit Sections” on page 2-28 for information how to use this option. You can also
batch enter the room in which a section meets: see “Batch Enter Rooms” on page 2-27 for
more information.
After entering your Master Course List, it is necessary to break up your master courses
up into one or more sections each. A sample Course Section List is in the appendix. On
it, course #1, Reading, has been divided into six sections. Each section has a section
number between 1 and 99. You have a limit of 2000 total sections among all of your
master courses. Each section may have a different teacher, meet in a different room at a
different time of day, and meet during different marking periods.
NOTE:
Each section of a master course has the exact same name, credits, weight, GPA factor, and
optimum size, which come from the master course list, so you don’t have to enter this
information for each section. Assume you wanted one section of Reading to have a GPA
factor of 1, unlike the rest, which have a GPA factor of 0. You would have to assign it a to
different Master Course number. In other words, add a course #002, which is also called
Reading. However, unlike course #001, all sections of course #002 would have a GPA factor
of 1.
When creating your Master Course and Section Lists, note the following:
At the beginning of each school year, you will probably want to start a brand new section
list in your new school year directory. Unlike your Master Course List, which you will
keep from year to year and modify as needed, your Section List will usually require too
many changes to bother modifying the list each year, so it is preferable to create a new
one. In an extremely small school that does not require many changes, you may use the
same section file from one year to the next. To begin a brand new section file, selection
option 4) New section list file only from the Enter Courses window. See page “New
Section List File Only” on page 2-25.
NOTE:
See the chapter on entering skills and concepts for more information on these buttons.
Report Cards Manual
2-11
Chapter 2
Enter Courses
Adding to & Editing the Course Section List
To Enter or Edit Sections:
Call up the appropriate master course by entering a few letters of its name, its number,
or by using the F6: LOOKUP option.
The window below shows you course #221, Biology, which does not yet have any
sections:
The bottom half of the window will display any sections that have already been entered
for this course. Press F2: SECTION to enter or edit sections. If no previous sections have
been entered for this course, you will jump immediately to entering a new section.
The cursor will be in front of the default section number of 01. You may change it if you
would like. Press ENTER or tab to the Teacher column, where you will enter the ID
number of the teacher assigned to the current section. The F6: LOOKUP option will be
available if you do not know the teacher’s ID number. Keep pressing ENTER or tab to
then enter a meeting time, course length, a room and the applicable grade levels for
scheduling (if you have chosen to limit sections to specific grade levels). The Size
column shows the current number of students in the section and the Rec column is the
Record Number of the section from 1 to 2000, which helps you keep track of how many
sections you have entered. Each of the fields that you will enter for a section will be
explained on the following pages. To save a new section, choose F10: ACCEPT. To
abandon the new section without saving, press the ESC key.
2-12
Report Cards Manual
Enter Courses
Adding to & Editing the Course Section List
You can tell the program to automatically move the cursor to the next section after
saving a section using the Enter Courses specifications (see “2) AFTER ENTERING A
SECTION, ADD ANOTHER SECTION?” on page 2-22). If you set this specification
to Yes, after saving section number 01, the cursor will automatically move to the Section
Number column, blinking over section number 02. If you do not wish to add an
additional section, press or click ESC.
If you have set the option on page 2 of Specifications, PRINT DEFAULTS FOR A NEW
SECTION? to Yes (See “1) PRINT DEFAULTS FOR A NEW SECTION?” on page 222), subsequently entered sections will automatically contain the following information:
• A section number one greater than the section number of the previously entered
section
• The same teacher, time and room as the previous section.
If you wish to edit the teacher, room or time, you can move the cursor by pressing the
TAB or ENTER keys. Choose F10: ACCEPT to save this new section. Press SHIFT +
TAB to move back to a previous field.
When editing existing sections, note that:
• F6: ROSTER brings up a window containing the names of the students in the section.
• F8: DELETE can be used to remove the highlighted section as long as there are no
students currently in the section.
• F10: SORT will allow you to sort the list of sections by section number, time or staff.
Press F3: EDIT or the ENTER key to edit the current section.
• F2: ADD allows you to enter a new section.
Report Cards Manual 2-13
Chapter 2
Enter Courses
Adding to & Editing the Course Section List
Section List Fields
When you press F2: SECT in the View/Edit Courses & Sections window, your cursor
will move to the section list. If the course already has sections, it will look similar to the
following:
Understanding Meeting Times
The time must be entered in a certain manner in order to be used by Scheduling Plus.
The program will display a warning message if you enter the time incorrectly. You can
have up to 24 blocks (periods) per day and up to an eight day rotation with each block
meeting no more than seven times within the rotation.
The blocks (periods) are lettered A to X. Because each block may meet up to 7 times in
your rotation, you could have A1, A2, A3, A4, A5, A6, and A7 blocks running through
X1, X2, X3, X4, X5, X6 and X7 blocks. It does not matter when these blocks actually
meet. On some days you can have H block first and A block last, and so on. Here is a
sample standard schedule for a school using a five day rotation with seven blocks
meeting in the same order each day:
2-14
Report Cards Manual
Enter Courses
Adding to & Editing the Course Section List
Day 1
Day 2
Day 3
Day 4
Day 5
A1
English
A2
English
A3
English
A4
English
A5
English
B1
B2
B3
B4
B5
C1
Chem
C2
Chem
C3
Chem
C4
Chem
C5
Chem
D1
Chem
D2
D3
Gym
D4
Chem
D5
Gym
E1
E2
E3
E4
E5
F1
F2
F3
F4
F5
G1
G2
G3
G4
G5
When entering the times for sections into the computer, you may enter just letters or
letters followed by numbers. Your time code may not be longer than 24 characters. If
your time code is longer than 16 characters, pressing {F6:LONG} will allow you to
enter up to 24 characters. If the program finds a letter without any numbers after it, it
assumes that the section meets each time that block meets. In the above example, you
may enter either A or A12345 as the time for English. Either notation tells the computer
that this section meets A1, A2, A3, A4, and A5 blocks. For Gym, enter D35 as the time.
This tells the program that Gym meets the third and fifth day that D block meets.
NOTE:
Do NOT enter D3D5.
For chemistry, in this example, enter CD14. This section meets C1, C2, C3, C4, C5, D1,
and D4 blocks for a total of 7 blocks a week. Because C does not have any numbers after
it, it is assumed to meet each time that C block meets. C12345D14 would mean the same
thing.) Notice how this makes it easy to block off double lab blocks for your Science
courses.
Report Cards Manual 2-15
Chapter 2
Enter Courses
Adding to & Editing the Course Section List
ABCD would block off each time that A, B, C, and D blocks meet. Below is a sample
rotating four day schedule used by a school with eight blocks. They use A - H. Note that
because only six blocks meet each day, each block meets three times in the four day
rotation.
Day 1
Day 2
Day 3
Day 4
A1
English
B2
Chem
A3
English
B3
Chem
C1
D1
C2
D3
Chem
B1
Chem
A2
English
D2
C3
E1
Chem
F2
E3
Music
F3
G1
Gym
H1
G2
Gym
H3
F1
E2
H2
G3
Gym
For this school, the time for English would be A or A123. Note, however, that English
meets first period on days 1 and 3 and third period on day 2. It does not meet on day 4.
The time for Chem would be BE1D3. This means that Chem meets each time that B
block meets, which is third period on day one, first period on day 2 and first period on
day 4. In order to give Chemistry two double labs, it also meets on E1 block on day 1
and D3 block on day 4. Chem does not meet on day 3.
The time for music would be E3, since it just meets one block per four-day rotation. The
time for gym would be G because it meets each time that G block meets.
Note that in this school's schedule, blocks A - D always meet in the morning while
blocks E - H always meet in the afternoon. Consequently, their entire morning can be
blocked off for vocational courses by entering ABCD as the time, while the afternoon
could be blocked off by entering EFGH as the time.
2-16
Report Cards Manual
Enter Courses
Adding to & Editing the Course Section List
Field Name
Description
ID?
Enter the ID number of the staff member teaching the section. The
teacher's name will appear after you enter the number. If you do not
know the ID number of a staff member, the F6: LOOKUP is available
to help you. Highlight the correct staff member’s name and press
ENTER, and his or her ID number will automatically be inserted. If you
wish to designate a section as *UNASSIGNED*, enter 000.
Room:
This will allow a room number to appear on students' schedules for
each section. It will also allow you to print a schedule for each room's
usage in Scheduling Plus. If you do not wish to enter a room, simply
press ENTER to leave it blank. You have a limit of 4 characters, either
letters or numbers.
Meeting Time:
Enter the meeting time.
Course Length:
The Course Length (CRS LEN) field only applies to sections of quarter
and semester master courses. It enables you to specify when, during
the school year, the section meets. If the master course length has
been entered as quarter, you will have to indicate which quarter the
section meets. Enter a number from 1 to 4. If the master course length
has been entered as semester, you will have to indicate in which
semester the course meets. Enter either a 1 or a 2.
If you are a trimester school, you will treat your trimester length courses
as quarter courses, and indicate that they meet quarter one, two or
three.
If the master course length has been entered as ALL YEAR, the length
of the section will automatically be entered as ALL YEAR and you will
not have to enter anything in the COURSE LENGTH column.
The information you enter into the COURSE LENGTH column for a
section is crucial to the following functions of Scheduling Plus:
• Entry forms can be printed for only sections that meet during a
particular marking period.
• In some circumstances, in calculating GPAs, the program will use
half credit and weight for full year courses but ALL YEAR and weight
for QUARTER and SEMESTER courses.
• Scheduling Plus uses this information when scheduling students into
courses/sections and printing schedules.
SC?
This is the section number.
Report Cards Manual 2-17
Chapter 2
Enter Courses
Inspect/Change Specifications
Field Name
Description
SG?
This is the section’s start grade.
EG?
This is the section’s end grade.
SIZE?
This is the number of students in the section.
REC?
This is the section’s record number.
Print Reports
The F9: PRINT option allows you to print your Master Course List or Section List in a
variety of formats. Choose from the following options:
Regardless of which option you choose, the report will print to the window as long as
you have specification #4 on page 2 of the Specifications window set to “Yes”. See page
“5) PRINT PREVIEWER?” on page 2-23.
From the Preview window, you can press F9: PRINT to print the report to paper. If you
would prefer to print the report immediately without generating the preview, change this
specification to No.
Inspect/Change Specifications
Select this option to look at or change the specifications associated with the Enter
Courses program, including the default settings for the View/Edit Courses & Sections
window and the location of your skills folder (used to send course skills to Grade
Quick).
There are three specification windows for this program. The first one is called the Initial
Specifications window. A description of the second page of specifications begins on
page “1) PRINT DEFAULTS FOR A NEW SECTION?” on page 2-22. See the
explanation of the skills specifications under “Skills Specifications” on page 2-24.
2-18
Report Cards Manual
Enter Courses
Inspect/Change Specifications
Page 1: Initial Specifications
Specification
Description
1) COURSE
LOOKUP:
ALPHA OR
NUMERIC
ORDER?
Inside the View/Edit Courses & Sections window, the F6: LOOKUP
window is available to help you find and select a master course. This
specification determines how master courses are sorted in this lookup
window. Having them sorted numerically makes it easy for you to see
which master course numbers have been used and which are
available, which is helpful when adding new courses. Sorting them
alphabetically allows you to type just the first few letters of a course
name and jump immediately to the first course in the list starting with
the letters you entered.
2) PRINT HELP Help messages appear when entering information about master
MESSAGES courses. These messages explain the purpose of each field. If you no
longer want these help messages to appear, set specification #2 to No.
WHEN
ENTERING
COURSES?
Report Cards Manual 2-19
Chapter 2
Enter Courses
Inspect/Change Specifications
2-20
Specification
Description
3 thru 8
DEFAULTS
Use these specifications to set the default values you wish to appear
when entering new master courses. If they are correct, it will only be
necessary to enter the course name and press or click F10: ACCEPT
to save the new course. Of course, you may edit any of the default
entries if they are not correct for the current master course. It is
suggested that you first set the defaults to the values needed by all
year courses and then enter your all year courses. Then change the
defaults to those values needed by semester courses and proceed to
enter your semester courses. The next section explains each of these
fields in detail and gives suggestions as to what values they should
contain.
9&A
START/END
COURSE
FOR
PRINTOUTS?
Only master courses numbers within this range will be included when
printing Master Course Lists or Section Lists. Use these specifications
to include only those courses for a specific department or range of
departments. To include all courses, set your range from 0 to 999.
B&C
START/END
STAFF FOR
SECTION
PRINTOUTS?
Only sections taught by staff members whose ID numbers fall within
this range will be included when printing course section lists. Use these
specifications to include only those sections taught by one staff
member (START & END STAFF FOR SECTION PRINTOUTS? will be
the same number), or a few staff members. When you click this
specification, the Lookup window displays staff members
alphabetically. Click the top of the ID column to display staff by ID
number.
D) PRINT
SECTIONS
MEETING
WHEN?
This specification allows you limit your Section List printout to only
those sections meeting during a designated quarter or semester. To
print all sections, make sure that this specification is set to ALL
SECTIONS.
Report Cards Manual
Enter Courses
Inspect/Change Specifications
Specification
Description
E) USE TEXTS, Use this specification to indicate that you wish to enter a text book
name, its cost and any other fees for each master course. If you use
COSTS &
Scheduling Plus, this information can be printed on students'
FEES?
schedules along with the total amount that they owe the school. Only
the default reports #21, #22, and #23 in Schedule Report Writer will
include this information.
You may turn this setting on and off without losing any entered texts,
costs and fees. With the setting off, the following will happen:
• You will not be asked to enter texts, costs and fees for new master
courses that you enter, nor will old entries appear on the window.
• Texts, costs and fees will not be printed on the master course
printout.
• Texts, costs and fees will not be printed on students' schedules.
Turning this option on will cause the opposite to take place.
F) LIMIT
SECTIONS
TO SPECIFIC
GRADE
LEVELS?
This option should be used only if you are using Scheduling Plus and
if you wish to limit certain sections of master courses to specific grade
levels. For example, assume that you will have three sections of master
course #12 and that you want two of the sections open to any grade
level but that you do not want your grade 9 students to have it last
block. Using this option, you may limit the section meeting last block to
grades 10 through 12. This means that the Perform Scheduling
program will have to schedule grade 9 students into one of the other
two sections.
Setting this option to Yes, when you create a section, you will have to
enter a beginning and ending grade level for that section. Section
printouts will then display this information. Note that this option is used
by Scheduling Plus to determine if it should limit students to specific
sections by grade level during the scheduling process. If you turn this
option off, although students will no longer be limited to specific
sections, no data will be lost. Turning it on again will once again limit
students to specific sections.
NOTE: If you have some sections of a course that are limited to certain
grade levels and others that are not, you can still use this option.
Simply set Start Grade (SG) to lowest grade level and End Grade (EG)
to highest grade level for sections that are not limited to specific grade
levels.
Report Cards Manual 2-21
Chapter 2
Enter Courses
Inspect/Change Specifications
PAGE 2: More Specifications
2-22
Specification
Description
1) PRINT
DEFAULTS FOR
A NEW
SECTION?
When adding a new section, Report Cards Plus can save you a few
keystrokes by printing as the defaults for the new section the same
teacher, room and meeting time that the previous section for that
course has. You may then accept or type over these defaults. If you
do not want default settings to appear when you add a new section,
set this specification to No.
2) AFTER
ENTERING A
SECTION, ADD
ANOTHER
SECTION?
To add a new section of a course, you will need to choose F2: ADD.
If this specification is set to No, you will need to press F2: ADD each
time you want to add a new section to a course. If this specification
is set to “Yes”, after you create a section, another new section will
automatically be added. When you are finished, press ESC to cause
the last additional section to be erased and leave the add mode.
3) PRINT
DESCRIPTION
ON MASTER
COURSE
PRINTOUT?
If you choose to include the 40 character course description on your
master course printout, the print will be condensed to allow it to fit
properly on a page.
Report Cards Manual
Enter Courses
Inspect/Change Specifications
Specification
Description
4) PRINT GPA
SETTINGS ON
MASTER
COURSE
PRINTOUT?
This option lets you display the settings for the Count in Honor Roll
and Count in GPA options in the View/Edit Courses and Sections
window. Choose Yes to add columns in your Master Course List
printout to display these settings. See “View/Edit Courses &
Sections” on page 2-3 for more information on these settings.
5) PRINT
PREVIEWER?
Choose Yes to view reports generated from the Enter Courses
program in a Print Preview window. Choose No to bypass Print
Previewer and send the report directly to the printer.
6) FONT SIZE FOR Use the drop-down list to decide your font size: small, medium, or
large.
MASTER
COURSE AND
SECTION LIST?
7) PRINT ACTIVE/ The Inactive checkbox in the View/Edit Courses and Sections
determines whether or not a course is considered active or inactive.
INACTIVE
This option lets you print only active, inactive, or both active and
COURSEs?
inactive courses.
Report Cards Manual 2-23
Chapter 2
Enter Courses
Inspect/Change Specifications
Skills Specifications
Specification
Description
1) Skills to GQ
Folder?
This specification indicates the path of the shared directory used to
export Grade Quick Skills files. It is only for informational purposes. A
user with Supervisor rights must use the SOS interface options to set
this path. See the GradeQuick-Administrator’s Plus Interface Guide for
more information.
2) WHICH
COURSES
TO SEND?
Use this specification to control which skills are sent to Grade Quick
when you choose Option 8) Send Skills to GradeQuick in the Enter
Courses window. You may choose to send the skills file for all courses
or only those for which the linked skills information has changed.
You may limit the courses for which skills files will export by selecting
3&4
a start and end course number. Only the skills for those courses within
START
COURSE TO the specified range of course numbers will be exported.
SEND?
END
COURSE TO
SEND?
2-24
Report Cards Manual
Enter Courses
New Master & Section List Files
New Master & Section List Files
Use this option to completely erase both your course master and section list files. You
will use this option only under extremely rare circumstances; most schools use the same
Master Course List from year to year. It is easy to modify your existing Master Course
List by adding new courses. If you want to create a brand new Section List in preparation
for scheduling in the new year, use the next option.
NOTE:
Do not delete courses that are no longer offered if they are still in students' transcripts.
New Section List File Only
Use this option to completely erase only your course section file. At the beginning of
each subsequent school year, it is advisable to use this option to totally delete your old
course section file and create a new one. Unlike the Master Course List, which generally
remains the same from year to year, the Section List changes each school year, to the
extent that it’s usually not worthwhile to edit the existing section list. Instead, just make
a new one each year. The exception to this would be in the case of extremely small
schools, whose section list doesn’t change much from one year to the next; for these
schools, it is worth the effort to keep the existing Section List and just make changes as
needed.
Rebuild Section Rosters
Your course Section List keeps track of the ID numbers of all of the students in each
section, which greatly speeds up the printing of reports and other functions that require
knowing which students are in each section.
Rarely, these lists of ID numbers may contain bad data, such as the ID numbers of
students who have been withdrawn, or invalid ID numbers. These errors will show up
as you print class rosters or grade entry forms. Selecting Option 5) Rebuild Section
Rosters eliminates any invalid ID numbers in the section list file and corrects errors in
printed rosters.
The Rebuild Section Rosters process erases the current list of ID numbers in the section
file. The program then goes through each of your active students' current records and
adds their ID number to the rosters for each of their sections in which a withdrawn grade
is not found in the final grade column. Withdrawn grades are W, WF, and WP. The final
grade column is defined as the right-most column on the report card that has been
designated as a FINAL or SEMESTER column.
Rebuild Section List File
This option is similar to the one above, except that it is used to eliminate corrupt data in
course section information contained in the section list file. It should be used under the
recommendation of Rediker Software Technical Support whenever abnormal characters
Report Cards Manual 2-25
Chapter 2
Enter Courses
Rebuild Skills File
appear in the course section information, either on window or in printed documents.
Please call our Technical Support Department at 1-800-882-2994 if you believe that
your Master Course or Section List contains corrupt data.
NOTE:
If you are using a scanner to enter course request forms, this option must not be used until
printed scan forms have been scanned into the computer. If you must rebuild the section list
file before scanning printed course request forms, the printed scan forms must be discarded
and new forms must be printed. Also note that if you are on a network, no other users can
be logged into Administrator’s Plus during this process.
Rebuild Skills File
Use the Rebuild Skills File option whenever skills are added to master courses that have
already been entered into students’ schedules. It ensures that the newly entered skills are
recorded in the students’ transcript records so that you may record skills grades, as well
as export the new skills to GradeQuick.
Send Skills to GradeQuick
This option, which can only be used if you have purchased the Skills Based Report
Cards Plus module, is used to export the list of course skills to Grade Quick, so that
teachers can import and record Skills grades using the Grade Quick Skills feature. Skills
grades may then be imported into Administrator’s Plus and printed on students’ report
cards. Course skills are exported to the shared folder indicated in Specification #1 on the
Skills page of the Enter Courses specifications. (See page “Skills Specifications” on
2-26
Report Cards Manual
Enter Courses
Import Section List from SAMSA
page 2-24.) Only those skills that have been linked to master courses will be included in
the export file. Each file is named according to the master course number followed by
the .skf extension. For example, the export file containing the skills information for
course #110 is named 110.skf. See the GradeQuick-Administrator’s Plus Interface
Guide for more information.
Import Section List from SAMSA
This option will erase your course section files and replace it with one created in the
third-party SAMSA software.
To Import a Section List from SAMSA:
Selecting this option displays a message, warning you that you will erase
and replace your current course section file.
2 Click Done to display the Importing from SAMSA window.
1
3
Browse to and select the location of the SAMSA course section data file,
and then click Done.
Batch Enter Rooms
By default, you have to manually enter the room numbers for each individual section.
This option lets you tell the program which staff database field to use as the homeroom
number, and whether or not to overwrite any existing room field entries during the batch
entry.
To Batch Enter Rooms:
1
In the Enter Courses window, click Batch Enter Rooms.
The Batch Enter Rooms window appears.
Report Cards Manual 2-27
Chapter 2
Enter Courses
View/Edit Sections
2
Click the browse button
next to the Get Room From Which Staff Field
text box.
The Select Field to Batch Enter browse window appears.
3
Select the field you want to use as the homeroom number, and then click
Select.
The room number field is replace with that in the select field.
View/Edit Sections
The View/Edit Sections window makes it easy to make changes to your section list from
one convenient location. This new window displays your school’s section list in a table
that can be sorted by course number, section number, teacher, meeting time, course
length, room, size and more. Of course, changes made to your section list through the
View/Edit Sections window are saved to course/section list and can be viewed and or
printed from the View/Edit Courses& Sections window.
To View and Edit Sections:
1
2-28
In the Enter Courses window, click View/Edit Sections, and then click Next.
Report Cards Manual
Enter Courses
View/Edit Sections
The View/Edit Sections window appears.
2
Highlight the row you want to edit, and then click F3 Edit to begin editing.
See “Adding to & Editing the Master Course List” on page 2-3 for information on each
option.
Report Cards Manual 2-29
Chapter 2
Enter Courses
View/Edit Sections
2-30
Report Cards Manual
3
Entry Forms
Introduction & Main Menu . . . . . . . . . . 3-2
The Print Entry Forms, Rosters,
& More Window . . . . . . . . . . . . . . . . 3-2
Manual Grade Entry Forms . . . . . . . . . 3-4
The Entry Form Print Window . . . . . 3-7
Filling Out Manual Grade Entry Forms 3-8
SITUATION #1: . . . . . . . . . . . . . . . . 3-8
SITUATION #2: . . . . . . . . . . . . . . . . 3-9
SITUATION #3: . . . . . . . . . . . . . . . . 3-9
SITUATION #4: . . . . . . . . . . . . . . . . 3-10
SITUATION #5: . . . . . . . . . . . . . . . . 3-11
SITUATION #6: . . . . . . . . . . . . . . . . 3-11
SITUATION #7: . . . . . . . . . . . . . . . . 3-12
SITUATION #8: . . . . . . . . . . . . . . . . 3-12
SITUATION #9: . . . . . . . . . . . . . . . . 3-13
SITUATION #10: . . . . . . . . . . . . . . . 3-13
Scanner Grade Entry Forms . . . . . . . . 3-13
Filling Out Scanner Grade Entry Forms 3-19
SCANNING LETTER GRADES . . . . 3-21
SCANNING NUMBER GRADES . . . 3-22
Grade Verification Forms . . . . . . . . . . . 3-23
Section Rosters . . . . . . . . . . . . . . . . . . 3-24
Grade Distribution Report . . . . . . . . . . 3-27
Comment Distribution Report . . . . . . . 3-31
Enrollment Report By Teacher. . . . . . . 3-32
Master Course And Section Lists . . . . 3-33
Specifications for the Master
Course And Section Lists . . . . . . . . 3-33
Using the Master Course and Section
Lists Print Window . . . . . . . . . . . . . 3-35
Skills Grade Verification Form . . . . . . . 3-36
Teacher Grade Search Report. . . . . . . 3-40
Report Cards Manual
3-1
Chapter 3
Entry Forms
Introduction & Main Menu
Introduction & Main Menu
This section provides a brief introduction to printing grade entry forms; the remainder
of this chapter explains how to obtain all of the available reports, including how to:
• Print Manual Grade Entry Forms. See “Manual Grade Entry Forms” on page 3-4
• Fill out Manual Grade Entry Forms. See “Filling Out Manual Grade Entry Forms” on
page 3-8
• Print Scanner Grade Entry Forms. See “Scanner Grade Entry Forms” on page 3-13.
• Fill out Scanner Grade Entry Forms. See “Filling Out Scanner Grade Entry Forms”
on page 3-19.
•
•
•
•
Print Grade Verification Forms. See “Grade Verification Forms” on page 3-23
Print course Section Rosters. See “Section Rosters” on page 3-24.
Print Grade Distribution Reports. See “Grade Distribution Report” on page 3-27.
Print Enrollment Reports. See “Enrollment Report By Teacher” on page 3-32.
The Print Entry Forms, Rosters, & More Window
When you click Entry Forms, the Print Entry Forms, Rosters, & More window appears.
Before printing manual or scanner forms containing students' names, you must first
enter students into their course sections in one of the following four ways:
• With the Scheduling Plus module
• With a scanner using the Scan Schedules program in Report Cards Plus
• From course section rosters with the Enter Grades program
• From students' schedules with the View/Change/Add/Drop program.
3-2
Report Cards Manual
Entry Forms
The Print Entry Forms, Rosters, & More Window
NOTE
It is not necessary to enter students into their sections before the end of the first marking
period unless you are using a scanner or want to pre-print entry forms containing students'
names. Instead, teachers may record students' names, ID numbers, and first marking period
grades on a blank Manual Grade Entry Form, from where they may be subsequently entered
into the program.
Grades may be entered into the program either manually using Manual Grade Entry
Forms as a reference or with a scanner using special scanner forms. The Entry Forms
program can produce both types of forms.
NOTE:
These forms may be used to enter names into course sections as well as to enter grades and
comment codes into the program. Entry forms will always include any prior grades that
have been entered for students in the section. However, they will not include prior comment
codes. The reason for this is that the new comment codes will have to be entered into the
comment code boxes. To see prior comment codes, print a Grade Verification Form. See
“Grade Verification Forms” on page 3-23.
Report Cards Manual
3-3
Chapter 3
Entry Forms
Manual Grade Entry Forms
Manual Grade Entry Forms
To print Manual Grade Entry Forms, choose Option #1 from the window on page 3-2.
The following specification window appears:
3-4
Specification
Description
1) INCLUDE
SECTIONS
MEETING
WHEN?
This specification allows you to choose for which sections you want the
forms printed. For example, if it is the end of the 1st marking period,
choose Option #1 to print forms only for sections meeting during the 1st
marking period. This will include sections meeting during the 1st
quarter, 1st semester and all year courses. Courses meeting during the
2nd quarter, 3rd quarter, 4th quarter or 2nd semester will be excluded.
The next window includes the option to further limit forms to staff
members whose ID #’s fall within a designated range.
2) PRINT
WHICH
MARKING
PERIOD AT
TOP?
After choosing the sections for which you want forms printed, you may
select from a drop-down list which marking period you want printed at
the top of the form.
Report Cards Manual
This drop-down list will display the 25 character names for each report
card column that you have defined as a marking period in the
Customize Report Card Columns window. This specification
determines ONLY what the top of the form will say. The previous
specification determines for which sections forms will be printed.
Entry Forms
Manual Grade Entry Forms
Specification
Description
You can set this specification to “No” in order to print forms for only
3) PRINT
those sections that have students enrolled in them.
FORMS
WITHOUT
ANY
STUDENTS?
4) OMIT
COURSES
NUMBERED
LOWER
THAN?
5) OMIT
COURSES
NUMBERED
GREATER
THAN?
6) Start Grade
7) End Grade
Forms may be printed for courses within a numeric range. For
example, forms for courses from 200 to 299 will be printed if
specification #4 is set to 200 and specification #5 is set to 299. If
specification #4 is set to 1 and specification #5 to 999, all courses will
be included.
If you would like to limit printing to a range of grade levels, choose the
lowest grade in that range for the start grade and the highest grade in
that range for the end grade.
Report Cards Manual
3-5
Chapter 3
Entry Forms
Manual Grade Entry Forms
Specification
Description
8) LINE
SPACING?
This specification determines whether the Manual Grade Entry Forms
will be single spaced, double spaced or use a combination of the two.
When you click on this specification, a drop-down list appears that
contains the following 3 options:
• Single Spacing: This setting allows up to 50 names to be printed on
a single sheet of paper. With this option, a blank form will contain 39
blank spaces.
• Double Spacing: This is the recommended setting. It allows the
forms to be double spaced, which makes them easier to read. If
more than one page is needed, the course name and other
information will be printed at the top of each page. If you print a blank
form with this option, 19 blank double spaces will be printed. The
sample manual entry forms in the appendix have all been printed
using this setting.
• Fit To Page: This setting adjusts line spacing depending on the
number of students in the course/section. The program will fit up to
48 students on one page before adding a second page. If two pages
are needed, names will be spaced evenly on both pages. Fit To
Page is the recommended setting for blank Manual Grade Entry
Forms.
NOTE: Unless you are printing forms for individual sections, forms are
always printed by staff member alphabetically, making them easy to
distribute. If you would like to print forms for only certain staff members,
choose the option Individual Teachers on the following window. If you
would like to print forms for several teachers, you can choose the
option Range of Teachers, provided that the teachers for whom you
wish to print forms have ID numbers within a numeric range.
9) PRINT
PREVIEW
3-6
Report Cards Manual
Choose Yes to view reports generated from the Enter Courses
program in a Print Preview window. Choose No to bypass Print
Preview and send the report directly to the printer.
Entry Forms
Manual Grade Entry Forms
The Entry Form Print Window
When you finish entering specifications, the following print window appears.
Option
Description
Options 1 to 4
These options allow you to print Manual Grade Entry Forms for all
sections, as well as for individual teachers or sections, or for a range of
teachers. When you select “Range of teachers”, the program prompts
you to enter the starting teacher’s name and then prompts you for the
ending teacher’s name. You can select the teachers by ID number or
name from the lookup list. Forms then print alphabetically by teacher.
If you choose to print forms for individual teachers or sections, you can
either type in each ID or section number or use the F6: LOOKUP option
to select the teacher(s) or section(s). To select multiple teachers or
sections, hold down the Control (CTRL) key and click on each ID
number or section number in the Lookup window. Then click Select or
press Enter. Press F10: ACCEPT to complete the process.
Report Cards Manual
3-7
Chapter 3
Entry Forms
Filling Out Manual Grade Entry Forms
Option
Description
5) Blank Form
To make the task of entering students into courses/sections easier, you
can distribute a blank manual grade entry form to teachers, who would
use it to hand-enter the names of students in their sections (They’ll also
have to fill in the course/section information at the top of the form.) The
completed form can then be used as a reference when manually
entering students into the appropriate sections in Enter Grades
Manually. See “Entering Grades Manually” on page 4-3. Note that Fit
To Page is the recommended line spacing setting for the blank Manual
Grade Entry Form.
NOTE: If you print a standard Manual Grade Entry Form for a
course/section that has no students entered, you will get a blank form
with the course/section information filled in for each section you
choose.
6) New Report
This option allows you to return to the previous window to begin the
process of creating a new report.
If you are manually entering grades into the program, read the following
section for information on how to fill out the manual entry forms. If you
are using a scanner to enter grades into the program, see page “Filling
Out Scanner Grade Entry Forms” on page 3-19 for information on how
to fill out the Scanner Grade Entry Forms.
Filling Out Manual Grade Entry Forms
It is recommended that this section and the sample entry forms in the appendix be copied
and given to teachers. The following examples are for a school with four marking
periods that has designated the FINAL grade column as the only column worth credit.
Notice that this school has a column defined as an ABSENCE column. If the school has
the Period Attendance module, the number of absences that each student had in each of
their classes would automatically be printed in this column on the report card once you
run the Report Card Interface in View Period Attendance. See the Period Attendance
manual for more information. Otherwise, teachers may enter the number of absences on
this entry form.
SITUATION #1:
• Summer or sometime before the end of the 1st Marking Period.
• Quarter, Semester, or All Year course.
• No students have been entered into the section.
Either the blank entry form on page iv or page v of the appendix is being used in order
to gather the names of the students in each section so that they may be input into the
program BEFORE the end of the 1st marking period.
3-8
Report Cards Manual
Entry Forms
Filling Out Manual Grade Entry Forms
The teacher should fill in each student's name on the blank entry form. Enter students’
grade levels in the “GR” column and students’ ID numbers in the “#” column. You can
find this information by using the Print Program in Database Plus to print an
alphabetical listing of students and their ID numbers by grade level. (See the Database
Plus manual.)
SITUATION #1 SAMPLE ENTRY (Bold entries are newly entered):
NAME
GR
#
Doe; Jon
12
43
1st
2nd
MEX
MID
3rd
4th
FEX
FNL
ABS
C1
C2
SITUATION #2:
• The end of the 1st Marking Period.
• ALL YEAR Course.
No students have been entered into the section.
Either the blank entry form on page iv or page v of the appendix is being used.
As in situation #1, the teacher should fill in the names of the students as well as their
grade levels and ID numbers. Under the column labeled “1st”, the grade for the 1st
marking period should be entered, followed by up to two comment codes. (The Enter
Courses program can be used to provide a printout of the comments and their codes for
each teacher - See “Editing Report Card Comments” on page 1-9). Any comment codes
should be placed in the “C1” and “C2” columns.
SITUATION #2 SAMPLE ENTRY (Bold entries are newly entered):
NAME
GR
#
1st
Doe; Jon
12
43
A-
2nd
MEX
MID
3rd
4th
FEX
FNL
ABS
C1
C2
1
2
SITUATION #3:
• The End of the 1st Marking Period.
• All Year or Semester 1 Course.
• Students Have Been Entered Into the Section.
This is the same as situation #2 except that students have already been entered into the
section. The entry form on page vi of the appendix is being used.
Fill out the form out in a manner similar to situation #2 except that names, grade levels,
and ID numbers will not have to be entered. If a new student has entered the section and
his name is not on the entry form, write that student's name in on the bottom of the form
with their grade level and ID number. See the sample completed form on page vii of the
appendix. Note that a student has been written in at the bottom of the form.
Report Cards Manual
3-9
Chapter 3
Entry Forms
Filling Out Manual Grade Entry Forms
SITUATION #3 SAMPLE ENTRY (Bold entries are newly entered)
NAME
GR
#
1st
Doe; Jon
12
43
A-
2nd
MEX
MID
3rd
4th
FEX
FNL
ABS
C1
C2
1
2
SITUATION #4:
• The End of the 1st Marking Period
• QUARTER 1 Course
• Students Have Been Entered Into the Section
This situation is similar to Situation #3. The only difference is that this is only a
QUARTER course.
Fill out the form in the same manner as in situation #3 except that a final grade must be
placed into the “final” grade column unless you are going to use the CALCULATE
AVERAGES program to calculate your midyear and final averages. See Chapter 5 for
more information.
If you intend to update credits and GPA information based on your midyear grades,
make sure that this “final” grade is also in the “midyear” grade column, especially for
seniors, since you might want to update their GPA data half-way through their senior
year. If there were a “final” exam in this course, that grade would be placed in either the
“midyear exam” or “final exam” column. If the program is going to calculate your
midyear averages, place any exam grade in the midyear exam column.
SITUATION #4 SAMPLE ENTRY (Bold entries are newly entered)
NAME
GR
#
1st
Doe; Jon
12
43
A-
NOTE:
2nd
MEX
MID
B+
A-
3rd
4th
FEX
FNL
ABS
C1
C2
A-
2
1
2
This sample entry assumes that the program is NOT going to calculate midyear averages
and that you are going to update career credits and GPAs using the midyear grade.
Therefore, the final grade has been entered into both the “midyear” and “final” columns.
If you only put the “final” grade for this quarter course into the “midyear” grade column,
the program will automatically copy this grade to the final grade column when you
update students' career credits and GPAs at the end of the year. It will copy this grade
only if it does not find any grades after the midyear grade and only if you are doing a
complete update with the final grade column being the only column worth credit. For
more information, see Chapter 8, Update GPAs & Credits on page “Updating and
Resetting GPAs & Credits” on page 8-37.
3-10
Report Cards Manual
Entry Forms
Filling Out Manual Grade Entry Forms
SITUATION #5:
• The End of the 2nd Marking Period
• All Year Course
• Students Have Been Entered Into the Section
The data entry form in the appendix is being used. This form contains students' grades
as they were input at the end of the 1st marking period.
Enter the 2nd marking period grade into the column labeled 2nd. Optionally, one or two
comment codes may be entered in the C1 and C2 columns. Also, a midyear exam grade
may be entered into the “midyear exam” column and a “midyear” average grade may be
entered into the “midyear” column. This midyear grade is really a 1st semester grade; in
other words, it is the average of the 1st and 2nd quarter grades.
You may choose to leave the “midyear” grade column blank and let the program
calculate your midyear averages with the Calculate Averages program. See Chapter 5.
SITUATION #5 SAMPLE ENTRY (Bold entries are newly entered)
NAME
GR
#
1st
2nd
MEX
MID
Doe; Jon
12
43
A-
B-
C+
B-
3rd
4th
FEX
FNL
ABS
C1
C2
2
1
2
SITUATION #6:
• The End of the 2nd Marking Period.
• Semester 1 Course.
• Students Have Been Entered Into the Section.
Follow the situation #5 instructions except that you must enter a final grade for the
course unless you are having the program calculate it. If you are going to update your
students' career credits and GPAs based on their midyear grades, you must also enter a
midyear grade for the course unless you are going to have the program calculate it.
Also enter any exam grades into the appropriate exam columns. If the program is going
to calculate the midyear average, the exam grade must be placed into the midyear exam
column.
If you do not give a course a grade in a credit column either manually or through Calculate
Averages, credits will NOT be awarded, and the course will NOT count toward students'
GPAs. -See Chapter 5 for more information.
NOTE:
SITUATION #6 SAMPLE ENTRY (Bold entries are newly entered)
NAME
GR
#
1st
2nd
MEX
MID
Doe; Jon
12
43
A-
B-
C+
B-
3rd
4th
FEX
FNL
ABS
C1
C2
B-
2
1
2
Report Cards Manual
3-11
Chapter 3
Entry Forms
Filling Out Manual Grade Entry Forms
This sample entry assumes that the program is NOT going to calculate midyear averages.
and that you are going to update career credits and GPAs using the midyear grade.
Therefore, the final grade has been entered into both the “midyear” and “final” columns.
NOTE:
As in Situation #4 (See page “SITUATION #4:” on page 3-10), if you only enter the
“final” grade for this SEMESTER 1 course into the “midyear” grade column, the
program will automatically copy this grade to the final grade column when it updates
students' career credits and GPAs at the end of the year. It will copy this grade only if it
does not find any grades after the midyear grade and only if you are doing a complete
update with the final grade column being the only column worth credit. For more
information, see “Updating and Resetting GPAs & Credits” on page 8-37.
SITUATION #7:
• The End of the 2nd Marking Period
• Quarter 2 Course
• Students Have Been Entered Into the Section
Follow the same instructions as situation #4, in which there was a Quarter course that
only met the 1st marking period. The only difference, obviously, is that the quarter grade
will go in the column marked 2nd.
SITUATION #7 SAMPLE ENTRY (Bold entries are newly entered)
NAME
GR
#
1st
2nd
Doe; Jon
12
43
A-
B+
MEX
MID
3rd
4th
FEX
A-
FNL
ABS
C1
C2
A-
2
1
2
This sample entry assumes that the program is NOT going to calculate midyear averages
and that you are going to update career credits and GPAs using the midyear grade.
Therefore, the final grade has been entered into both the “midyear” and “final” columns.
NOTE:
SITUATION #8:
• The End of the 3rd Marking Period.
• ALL YEAR Course.
• Students Have Been Entered Into the Section.
Fill out the form in the same manner as you did for this course in the 1st marking period.
See situations #2 and #3 on page “SITUATION #2:” on page 3-9.
SITUATION #8 SAMPLE ENTRY (Bold entries are newly entered)
NAME
GR
#
1st
2nd
MEX
MID
3rd
Doe; Jon
12
43
A-
B-
C+
B-
C-
3-12
Report Cards Manual
4th
FEX
FNL
ABS
C1
C2
2
1
2
Entry Forms
Scanner Grade Entry Forms
SITUATION #9:
• The End of the 3rd Marking Period.
• Quarter 3 Course.
• Students Have Been Entered Into the Section.
Enter the grades and optional comments in the usual manner. However, a final grade
must be placed into the “final” grade column unless the program is going to calculate it.
Optionally, a final exam grade may be placed into the “final exam” column.
SITUATION #9 SAMPLE ENTRY (Bold entries are newly entered)
NAME
GR
#
Doe; Jon
12
43
1st
2nd
MEX
MID
3rd
4th
FEX
A-
FNL
ABS
C1
C2
A-
2
1
2
This sample entry assumes that the program is NOT going to calculate final averages.)
NOTE:
SITUATION #10:
• The End of the 4th Marking Period.
• ALL YEAR, QUARTER 4 OR SEMESTER 2 Course.
• Students Have Been Entered Into the Section.
Enter the grades and optional comments in the usual manner. However, enter a final
grade unless the program is going to calculate it. Optionally, a final exam grade may be
entered.
SITUATION #10 SAMPLE ENTRY (Bold entries are newly entered)
NAME
GR
#
1st
2nd
MEX
MID
3rd
4th
FEX
FNL
ABS
C1
C2
Doe; Jon
12
43
A-
B-
C+
B-
C+
B+
B
A-
2
1
2
NOTE:
This sample entry shows an ALL YEAR course and assumes that the program is NOT going
to calculate final averages.
Scanner Grade Entry Forms
Administrator's Plus supports the entry of grades with the NCS Opscan scanner, which
is sold by Rediker Software. Pages ix - x of the appendix contain samples of the forms
which must be used with the scanner. With dot matrix printers, these forms are
continuous feed so that this program may be used to print students' names on them. With
laser printers, you simply need to place the laser forms in the paper tray. Note that you
can use old dot matrix forms with a laser printer by tearing off the tractor-feed guides at
the perforations.
Report Cards Manual 3-13
Chapter 3
Entry Forms
Scanner Grade Entry Forms
In order to actually use the scanner to enter grades, the SCANNER INTERFACE
SOFTWARE module must be installed on the computer which you will use to scan
grades. This software can be purchased from Rediker Software. Call 1-800-213-9860
for more information.
In order to print Scanner Grade Entry Forms, students' names must have been previously
entered into course sections. For further information on how to enter students' names
into course sections, see “Adding Students To Courses/Sections” on page 4-8.
To print Scanner Grade Entry Forms, from the Entry Forms window on page 3-2, choose
Option #2.
The following specification window appears:
Specification
Description
Specifications
1 through 7
These specifications perform the same functions as Specifications for
Manual Grade Entry Forms. See “Manual Grade Entry Forms” on
page 3-4.)
NOTE: After printing a new form for a section, the old form MUST be
destroyed. If the old form is scanned, the list of students that is on the
disk for the new form will be used, which will cause grades to be
entered for the wrong students.
3-14
Report Cards Manual
Entry Forms
Scanner Grade Entry Forms
Specification
Description
8) PRINT
CIRCLE
EXAM/FINAL
HEADING?
This specification allows you to print at the top of the Scanner entry
form “CIRCLE EXAM GRADE: MIDYEAR FINAL ||| CIRCLE FINAL
GRADE: MIDYEAR FINAL.” This prompts the teacher to designate
whether this is the exam for the midyear term or the exam for the end
of the year. It also prompts the teacher to do the same with the final
grade.
9) SCAN FORM Choose “Regular/Alpha Numeric Form” if you are not using Skills or
TYPE?
“Special Skills Form” if you are scanning skills grades.
If you select “Special Skills Form”, you can click on the “Special Skills Form” tab at the
top of the window to access the following specification page:
Specification
Description
Specifications
1 through 4
These specifications determine what marking period headings will print
on the Scanner Grade Entry Forms. Choose the marking period from
your list of report card columns in the drop-down list.
5) WHICH
COURSE
NUMBER TO
PRINT?
You can choose “REGULAR COURSE NUMBER” or “ALIAS FIELD”.
The latter option allows you to print the course alias defined in the
View/Edit Courses & Sections window. See “Course Number Alias” on
page 2-10.
Report Cards Manual 3-15
Chapter 3
Entry Forms
Scanner Grade Entry Forms
3-16
Specification
Description
6) WHICH
TERM TO
PRINT?
Choose the “term” designator that you would like to print at the top of
the form. This is for reference purposes only.
7) REPORT
PERIOD?
Choose the reporting period that you would like to print at the top of the
form.
Report Cards Manual
Entry Forms
Scanner Grade Entry Forms
After you accept the specifications, the following window appears.
Report Cards Manual 3-17
Chapter 3
Entry Forms
Scanner Grade Entry Forms
Specification
Description
These options allow you to print Scanner Grade Entry forms for
individual teachers or sections or for a range of teachers, as well as for
all sections. If you choose Option 1) All Sections, Scanner Grade Entry
Forms will be printed for the course range set in specification #1:
INCLUDE SECTIONS MEETING WHEN? (See the previous page.)
When you select a range of teachers, the program prompts you to enter
the starting teacher’s ID and then it prompts you for the ending
teacher’s ID. If you select Individual teachers or sections, you will be
able to type the teacher ID #’s or course/section #’s or choose them
from the F6: LOOKUP.
This feature also enables you to avoid printing forms for lunch sections,
and so on. Simply enter as the teacher of lunch a “fake” teacher who
has ID #1 and tell the program to print entry forms starting with teacher
#2. (This “fake” teacher could also be at the end of your file of
teachers.)
Note that each form only contains room for up to eight students.
Consequently, a section with 26 students would require 4 forms. In this
example, the first form for this section would say “1 OF 4” and the
second form would say “2 OF 4", and so on. The order in which the
forms are later scanned does not matter.
NOTE: Be aware that when the forms are printed, the program keeps
track of the names of the students on each form. This information is
stored in a file called “RCSCAN.FRC”. When the form is later scanned,
the page number information is used to match up the form with the
name of the section, as well as with which students are in that section.
If a student is added to or dropped from a section after its form has
been printed, the printed form will still be successfully scanned
because the “RCSCAN.FRC” file is not affected by adding or dropping
students. The “RCSCAN.FRC” file will not change until a new scanner
form is printed for a section.
3-18
Report Cards Manual
Entry Forms
Filling Out Scanner Grade Entry Forms
Specification
Description
SPACING TEST It is extremely important that your forms are aligned properly because
the program is going to pre-print identifying information in the
PAGE NO. box which is in the upper right hand corner of the scanner
forms. This information will later be read by the scanner so that the
program will know which form is being scanned.
If you are using a dot matrix (continuous feed) printer, after selecting
the sections for which you want forms printed, you must make sure that
the scanner forms are aligned properly in the printer.
You should keep selecting Option #5 until the spacing is correct. After
choosing Option #5, the computer will fill in the bubbles in the
“PAGE NO.” box one line at a time. After each line, the printer will
pause allowing you to align the forms so that the marks fall entirely
inside the bubbles in the “PAGE NO.” box. You may then press “G” to
print the next line. After the form seems to be aligned, do the spacing
test one more time for the entire “PAGE NO.” box.
NOTE: If the scanner cannot correctly read the marks in the bubbles,
the forms will not be properly scanned. Consequently, if you are using
a dot matrix (continuous feed) printer, it is highly recommended that
you make sure entries on the scan form are dark enough before
scanning.
If you are using a laser printer, you will need to keep printing sample
forms until the bubbles on the form are aligned properly.
NEW REPORT
This option allows you to return to the previous window to begin the
process of creating a new report.
Filling Out Scanner Grade Entry Forms
If you are using a scanner to enter grades into the computer, this section will explain how
to fill out the Scanner Grade Entry Forms. If you are manually entering grades into the
program, see “Filling Out Manual Grade Entry Forms” on page 3-8.
The process of filling out the pre-printed Scanner Grade Entry Forms is fairly selfexplanatory. However, the following guidelines should be followed:
Always use a #2 pencil and completely darken bubbles. Make sure that any erased marks
are totally erased. Keep all marks inside the appropriate bubbles.
Report Cards Manual 3-19
Chapter 3
Entry Forms
Filling Out Scanner Grade Entry Forms
Separate forms are used depending upon whether you are using alpha or numeric grades.
If you are using alpha grades for your lower grade levels and numeric grades for your
higher grade levels, the forms may be scanned together. The program will automatically
differentiate them. A sample of each type of form may be found in the appendix on
pages ix- x.
For each student, there are six categories (rectangles) on the form that may be marked:
• PERIOD GRADE
• EXAM GRADE
• FINAL GRADE
• OPTIONAL GRADE
• COMMENT ONE
• COMMENT TWO
Before scanning a batch of forms, you will be able to designate into which report card
column(s) these grades should be placed.
PERIOD GRADE:
This will generally be the grade for the marking period printed at the top of the form.
When the forms are scanned, you will be able to tell the program into which designated
marking period column(s) this grade should be placed. It must be a PERIOD column.
The program may also be instructed to simultaneously enter this grade as the semester
or final grade for the course.
EXAM GRADE:
When the forms are scanned, you will be able to tell the program into which designated
exam column(s) this grade should be placed.
FINAL GRADE:
When the forms are scanned, this grade may be entered into any report card column that
has been designated as a SEMESTER or FINAL grade.
COMMENT ONE & COMMENT TWO:
When the forms are scanned, these grades may be entered into either of the two
COMMENT columns or into an ABSENCE column.
OPTIONAL GRADE:
This grade may be placed in any column. Note that if you are using letter grades, this
grade may not be placed in a comment or absence column.
3-20
Report Cards Manual
Entry Forms
Filling Out Scanner Grade Entry Forms
SCANNING LETTER GRADES
The parts of the form containing the period grade, exam grade, final grade and optional
grade are identical. They appear as follows:
• If the letters A - F are bubbled, then either a “+” or “-” may also be bubbled. If two
or more of the letters A - F are bubbled or if both the “+” and “-” are bubbled, an error
will result.
• If nothing on the top row is bubbled, one of the items on the bottom row may be
bubbled. The bottom row consists of the grades P through X. Filling in two or more
bubbles on the bottom row results in an error.
• The bottom row will not even be looked at if there are one or more bubbles on the top
row.
• If there is an error, an error message will be sent to the printer as the form is scanned
and no grade will be entered into the affected students' transcript for that category.
Any prior grade in the transcript for the category will remain. An error in one
category, such as the PERIOD GRADE, will not affect the other categories if they are
properly bubbled.
• Giving the student any of the “withdrawn” grades will only put that grade in their
transcript; the student will not be withdrawn from the course/section. To officially
withdraw a student from a section and remove them from the section roster, the
View/Change/Add/Drop program must be used. See “Withdrawing Student from
Course/Section” on page 6-5.
The part of the form containing the comment bubbles looks like:
• Fill in one bubble in the top row and one bubble in the bottom row. Having more than
one bubble marked in a row will result in an error. Do not bubble in a zero in each
row for comment “00” since it does not exist. If you do, the comment number will
be read as “100”. Although comment “4” should be entered as “04”, if the program
finds one row blank, the comment will become the value bubbled in the other row.
For example, if the top row has the “4” bubbled and the bottom row is blank, the
comment will be #4. Similarly, if the top row is blank and the bottom row has the “4”
bubbled, the comment will also be #4.
Report Cards Manual 3-21
Chapter 3
Entry Forms
Filling Out Scanner Grade Entry Forms
• If any comment is left totally blank, a blank will replace whatever comment may
already exist in the student's transcript. For example, assume that during the first
marking period, a student received comment #56 as his first comment. If his first
comment is blank for the second marking period, his first comment will now be blank
in the transcript.
• For the four categories besides the comments, scanning a blank will result in any prior
grade in the transcript remaining.
SCANNING NUMBER GRADES
The parts of the form containing the period grade, exam grade and final grade are
identical. They look like:
• To give the student a number grade, bubble one digit from the top row and one digit
from the bottom row. Two or more digits bubbled in any row results in an error. If
only one row has a bubble, that will become the student's grade. For example, if the
top row has a “9” bubbled and the bottom row is blank, the student's grade becomes
a “9”.
• Bubbling both zeroes (00) will result in a grade of 100. To give an actual grade of
zero, bubble in only one of the zeroes. Grades from 101 through 110 have to be
entered manually.
• If no digits are bubbled on either row, then one of the four letter grades on the right
may be bubbled. If more than one letter grade is bubbled, the first one that the
program finds bubbled will become the grade. The letter grades are looked at in this
order: P; F; I and X.
• Letter grades not listed, such as “W”, “WP”, “WF”, “N”, “A”, “B”, “C” and “D” will
have to be entered manually.
• The OPTIONAL column will be similarly filled in except that there are no letter
grades on the right. Letter grades for the optional column will have to be entered
manually.
The part of the form containing the comment bubbles looks the same as the alpha scan
form. The same rules apply for scanning comments on the numeric grade scan form as
on the alpha grade scan form. See page “The part of the form containing the comment
bubbles looks like:” on page 3-21.
3-22
Report Cards Manual
Entry Forms
Grade Verification Forms
Grade Verification Forms
A Grade Verification Form is the same as a Manual Grade Entry Form except that the
previously entered grades and comment codes will be printed. The entry form on page
viii of the appendix is a Grade Verification Form.
Grade Verification Forms are printed in the same manner as the Manual Grade Entry
Forms except that the top of the form will always say “GRADE VERIFICATION
FORM”. To obtain Grade Verification Forms, choose option #3 from the Entry Forms
window on page 3-2, and then refer to section 3B, which explains how to print manual
grade entry forms.
Note that you can set Specification #9 PRINT TEXT OF CANNED COMMENTS? to
“Yes” to print canned comments and set Specification A) PRINT NARRATIVES? to
“Yes” to print narrative comments.
Report Cards Manual 3-23
Chapter 3
Entry Forms
Section Rosters
When you finish entering specifications, you will see the following window:
These options allow you to print Grade Verification forms for individual teachers or
sections or for a range of teachers and all sections. When you select a range of teachers,
the program prompts you to enter the starting teacher’s name and then it prompts you
for the ending teacher’s name. If you choose to print forms for individual teachers or
sections, you will need to type in each teacher’s ID number or each section number, or
select them from the F6: LOOKUP.
The “Range of Teachers” option also enables you to avoid printing forms for sections
that do not have grades associated with them, such as lunch. You could, for example,
simply enter as the teacher of lunch a “fake” teacher who has ID #1 and enter the name
of the teacher who has ID #2 as your STARTING STAFF MEMBER. This “fake”
teacher could also be at the end of your file of teachers. You would then enter the name
of the teacher who has the ID number before the “fake” teacher as your ENDING
STAFF MEMBER.
Section Rosters
Course Section Rosters contain the names, grades, and ID numbers of the students in
each section. An example of a course section roster is on page xi of the appendix.
Essentially, a course section roster is the same as a manual grade entry form without all
of the lines and without students' previous grades.
3-24
Report Cards Manual
Entry Forms
Section Rosters
To print course Section Rosters, choose option #4 from the Entry Forms window.
Specification
Description
INCLUDE
SECTIONS
MEETING
WHEN?
This specification allows you to choose for which sections you want
rosters printed. For example, Specification #1 will print rosters for only
those sections meeting during the first marking period. These sections
include Quarter 1, Semester 1 and All Year sections. They will not
include Quarter 2, Quarter 3, Quarter 4, or Semester 2 sections. You
will subsequently be able to enter starting and ending staff names with
the appropriate rosters being printed for only those staff members.
If this specification is set to All Sections, rosters will print for all of your
sections. You will subsequently be able to enter starting and ending
staff names with ALL rosters being printed for only those staff
members.
PRINT SEX
COUNT AT
ROSTER
BOTTOM?
This specification allows you to print the number of females and the
number of males in a class. It will also indicate if the sex was not
entered by totalling blanks as OTHER.
Choosing Option 4) Individual Sections from the window lets you type
the course number, a slash and a section number for as many sections
as you want. Rosters will then be printed for only the sections that you
have entered.
These specifications perform the same function as Specifications #3-7
in the Manual Grade Entry Forms specification window. See page “3)
PRINT FORMS WITHOUT ANY STUDENTS?” on page 3-5.
OPTIONAL
FIELD #1?
OPTIONAL
FIELD #2?
OPTIONAL
FIELD #3?
These specifications allow you to choose up to three additional fields
of student information from the database. These fields are printed on
the report by adding three additional columns.
Report Cards Manual 3-25
Chapter 3
Entry Forms
Section Rosters
Specification
Description
Specifications
1 through 4
These options allow you to print Section Rosters for individual teachers
or sections or for a range of teachers and all sections. When you select
a range of teachers, the computer prompts you to enter the starting
teacher’s name and then it prompts you for the ending teacher’s name.
Individual teachers or sections require you to manually enter each
teacher or section into a list prior to printing.
The “Range of Teachers” option also enables you to avoid printing
forms for sections that do not have grades associated with them, such
as lunch. You could, for example, simply enter as the teacher of lunch
a “fake” teacher who has ID #1 and enter the name of the teacher who
has ID #2 as your STARTING STAFF MEMBER. This “fake” teacher
could also be at the end of your file of teachers. You would then enter
the name of the teacher who has the ID number before the “fake”
teacher as your ENDING STAFF MEMBER.
NEW REPORT
3-26
Report Cards Manual
This option allows you to return to the previous window to begin the
process of creating a new report.
Entry Forms
Grade Distribution Report
Grade Distribution Report
To obtain a Grade Distribution Report, select option #5 from the window on page 3-2.
The following specification window then appears.
Specification
Description
1) INCLUDE
SECTIONS
MEETING
WHEN?
This specification allows you to choose for which sections you want the
forms printed. For example, if it is the end of the 1st marking period,
choose Option #1 to print forms only for sections meeting during the 1st
marking period. This will include sections meeting during the 1st
quarter, 1st semester and all year courses. Courses meeting during the
2nd quarter, 3rd quarter, 4th quarter or 2nd semester will be excluded.
The next window includes the option to further limit forms to staff
members whose ID #’s fall within a designated range.
Report Cards Manual 3-27
Chapter 3
Entry Forms
Grade Distribution Report
Specification
Description
2) DISTRIBUTION This specification allows you to sort the report four different ways: “By
Teacher”, “By Course and Department”, “By Course (combine
REPORT
teacher)” or “By Course (combine teacher on disk)”.
TYPE?
• BY TEACHER: As shown on page xxv of the Appendix, this report
shows the number and percentage of each grade given by each
teacher for each of their courses and the totals for all of their
courses. Teachers will appear in alphabetical order. The end of the
report shows the total grade distribution for all of the grades given in
your school.
• BY COURSE AND DEPARTMENT: As shown on page xxvi of the
Appendix, this report shows the number and percentage of each
grade given for each section of a course and the totals for the entire
course. It also displays the teacher for each section, enabling you to
compare the distribution of grades for different teachers teaching the
same course. Departments are considered to be courses with
numbers in the same hundreds. For example, you may have up to
10 departments. Department #1 is all of the courses numbered from
#100 to #199. Department #2 is all of the courses numbered from
100 to 199. This report will also display the grade distribution by
department.The end of the report shows the total grade distribution
for all of the grades given in your school. These totals will be the
same as those displayed at the end of the Grade Distribution Report
by teacher.
• BY COURSE <COMBINE SAME TEACHER>: This report displays
grade distribution information in the same way as the Grade
Distribution Report by Course and Department, except that if a
teacher is assigned to two sections of the same course, it will
combine both sections in the distribution percentages.
• BY COURSE <COMBINE TEACHER> TO DISK: This option creates
the file distrib0.frc, which is stored in your school year folder and can
then be used to print a transcript showing the grade distribution
percentages. See Chapter 7 for information on creating and
modifying reports.
3-28
Report Cards Manual
Entry Forms
Grade Distribution Report
Specification
Description
2) DISTRIBUTION
REPORT
TYPE?
<continued>
After selecting the distribution report type, you will be asked to choose
the report card column on which the report should be based. Any
column may be used except COMMENT and ABSENT columns or
columns designated as type OTHER. See “Editing Report Card
Comments” on page 1-9. These columns will not be listed in the dropdown list in Specification #3: WHICH GRADES TO USE? In other
words, Grade Distribution Reports may be based on marking period,
exam, semester, or final grades.
The OTHER column in all Grade Distribution reports includes blank
grades as well as any of the “withdrawn” grades, such as “W”, “WP”,
and “WF”. The “OTHER” column is NOT included in total percentages.
If all of the grades for a section fall into the “OTHER” column, that
section will not be printed. In other words, Report Cards Plus will
assume that the section did not meet for that marking period.
The program will attempt to avoid splitting a course or teacher between
two pages of the report. In other words, before starting a teacher or
course, it will determine if there is enough space left on the current
page for all of the sections. If there is not enough space left, the
program will skip to the top of the next page.
3) WHICH
GRADES TO
USE?
After selecting the distribution report type, you will be asked to choose
the report card column on which the report should be based. Any
column may be used except COMMENT and ABSENT columns or
columns designated as type OTHER. In other words, Grade
Distribution Reports may be based on any column of type PERIOD,
EXAM, SEMESTER or FINAL. If yours is a two semester school that
gives credit at the end of each semester, select ALL CREDIT
COLUMNS.
4) GRADING
SYSTEM?
This specification is used to set the number of columns needed on the
report. LETTER GRADES WITH +/- require three columns for each
letter grade, such as A+, A, A-. LETTER GRADE report created without
using + or - will need only one column. If you are using NUMBER
GRADES, you will have the option to set a range in the next window
that appears. YEAR? If you have transferred GPAs/credits so that
previous grades show in View/Change/Add/Drop in the minus years,
use this specification to create a report showing the distribution of
grades in a past year. The default setting is always the current year.
Report Cards Manual 3-29
Chapter 3
Entry Forms
Grade Distribution Report
Pressing Enter takes you to the next window, shown below:
SET COLUMN LIMITS FOR NUMERIC GRADES
If you are using numeric grades, you may set the beginning and ending grades for up to
six columns. When you first use this option, you will see the following table, which will
contain the default settings.
These default settings will produce a Grade Distribution Report. If you never change
them, the default setting will automatically be in effect each time you print the report.)
3-30
Report Cards Manual
Entry Forms
Comment Distribution Report
The six columns with asterisks over them may be customized with this option. The other
columns may not be changed. For each column, the high grade must be equal to or
higher than the low grade. If any of your columns overlap, grades will only be tallied to
the first applicable column. For example, if you set column one to be all grades from 90
- 100 and column two to be all grades from 85 - 95, a grade of 93 would only be counted
in the total for column one.
Comment Distribution Report
This report is similar to the Grade Distribution Report, except that it displays the
distribution of comments assigned to students. To print the Comment Distribution
Report, choose option #6 from the window on page 3-2. The following specification
window will appear:
Option
Description
1) SORT
DISTRIBUTIO
N REPORT
BY?
You will have the option to sort the report by comment number,
alphabetically by description or by the number of times the comment
was used in ascending order. For a sample of the report sorted each
way, see the Appendix.
2) GRADE?
The Comment Distribution Report is printed one grade level at a time.
Use this specification to choose the grade level for which you want to
print the report.
Report Cards Manual 3-31
Chapter 3
Entry Forms
Enrollment Report By Teacher
Enrollment Report By Teacher
When you choose option #7 from the window on page 3-2, you will see the following
specification window, which is a modified version of the Grade Distribution Report
specification window.
A sample of the teacher enrollment form is shown on page xxvii of the appendix. For
each teacher listed alphabetically, it shows the number of students enrolled in each of
their sections, their total student enrollment and their average number of students per
section. The end of the report shows the average number of students per section for the
entire school.
Again, as in previous report windows, you can select which sections you wish to include
in your report by setting specification #1.
After setting specifications for the report, you will see the following window, which
allows you to select for which teachers you would like to print the report.
You can print the Teacher Enrollment Report for all teachers, a range of teachers or
individual teachers. See 3-7 for more information on the print window.
3-32
Report Cards Manual
Entry Forms
Master Course And Section Lists
Master Course And Section Lists
The option lets you print your Master Course List or Section List in a variety of formats.
Selecting this option first display the specifications window. You can then select the list
format to generate a print preview of your report.
Specifications for the Master Course And Section Lists
Choosing the Master Course List and Section List option from the Print Entry Forms,
Rosters, & More window displays the Specifications: Master Course and Section List
window:
These specifications are described in the following table.
Specification
Description
1) PRINT
SECTIONS
MEETING
WHEN?
This specification allows you limit your Section List printout to only
those sections meeting during a designated quarter or semester.
To print all sections, make sure that this specification is set to ALL
SECTIONS.
2 & 3 START/END Only master courses numbers within this range will be included
COURSE FOR when printing Master Course Lists or Section Lists. Use these
PRINTOUTS? specifications to include only those courses for a specific
department or range of departments. To include all courses, set
your range from 0 to 9999.
Report Cards Manual 3-33
Chapter 3
Entry Forms
Master Course And Section Lists
Specification
Description
4) USE TEXTS,
COSTS &
FEES?
Use this specification to indicate that you wish to enter a text book
name, its cost and any other fees for each master course. If you
use Scheduling Plus, this information can be printed on students'
schedules along with the total amount that they owe the school.
Only the default reports #21, #22, and #23 in Schedule Report
Writer will include this information.
You may turn this setting on and off without losing any entered
texts, costs and fees. With the setting off, the following will
happen:
• You will not be asked to enter texts, costs and fees for new
master courses that you enter, nor will old entries appear on the
window.
• Texts, costs and fees will not be printed on the master course
printout.
• Texts, costs and fees will not be printed on students' schedules.
If you choose to include the 40 character course description on
5) PRINT
DESCRIPTION your master course printout, the print will be condensed to allow it
ON MASTER to fit properly on a page.
COURSE
PRINTOUT?
6) PRINT GPA
SETTINGS ON
MASTER
COURSE
PRINTOUT?
This option lets you display the settings for the Count in Honor
Roll and Count in GPA options in the View/Edit Courses and
Sections window. Choose Yes to add columns in your Master
Course List printout to display these settings. See “View/Edit
Courses & Sections” on page 2-3 for more information on these
settings.
7) FONT SIZE?
Use the drop-down list to decide your font size: small, medium, or
large.
8) PRINT
ACTIVE/
INACTIVE
COURSEs?
The Inactive checkbox in the View/Edit Courses and Sections
determines whether or not a course is considered active or
inactive. This option lets you print only active, inactive, or both
active and inactive courses.
After setting your specifications, click Done. This displays the Master Course and
Section Lists print window. See “Using the Master Course and Section Lists Print
Window” on page 3-35.
3-34
Report Cards Manual
Entry Forms
Master Course And Section Lists
Using the Master Course and Section Lists Print Window
After selecting the selecting the specifications for the Master Course and Section Lists
option, click Done to display the Master Course and Section Lists print window.
This window allows you to print master course and section lists. Selecting an option
generates the corresponding report which is automatically displayed as a print preview.
The following table describes each option.
Option
Description
1) Master Course List by
Course Number
Prints the master course list in numerical,
ascending order.
2) Master Course List by
Course Name
Prints the master course list in alphabetical,
ascending order.
3) Section List by Course
/Section Number
Prints the courses and their sections together in
numerical, ascending order.
4) Section List by Staff
Prints the staff members in alphabetical, ascending
order, as well as which classes they teach.
5) Section List by Time
Print each section by both the day of the week and
block each section meets.
6) Section List by Course
Name
Prints the section list in alphabetical, ascending
order.
7) Section List by Room
Lists the room numbers in numerical, ascending
order, along with the corresponding section.
8) Course List with Skills
Lists all courses that have skills associated with
them course number, in ascending order.
Report Cards Manual 3-35
Chapter 3
Entry Forms
Skills Grade Verification Form
Option
Description
9) Inspect/Change
Specifications
Opens the Master Course and Section Lists
specifications window. See “Specifications for the
Master Course And Section Lists” on page 3-33 for
more information.
A) Do Not Print a Report
Closes this window and returns you to the Print
Entry Forms, Rosters, and More window. See “The
Print Entry Forms, Rosters, & More Window” on
page 3-2.
Skills Grade Verification Form
This option lets you print skills grade verification forms for specific courses and section.
To Print Grade Verification Forms:
3-36
1
In the Print Entry Forms, Rosters, & More window, click Skills Grade
Verification from.
The Specifications: Skills Grade Verification Forms window appears.
2
Set the specifications as desired.
The specifications are described in the following table.
Report Cards Manual
Entry Forms
Skills Grade Verification Form
Specification
Description
1) INCLUDE
SECTIONS
MEETING
WHEN?
This specification allows you to choose for which sections you want the
forms printed. For example, if it is the end of the 1st marking period,
choose Option #1 to print forms only for sections meeting during the 1st
marking period. This will include sections meeting during the 1st
quarter, 1st semester and all year courses. Courses meeting during the
2nd quarter, 3rd quarter, 4th quarter or 2nd semester will be excluded.
The next window includes the option to further limit forms to staff
members whose ID #’s fall within a designated range.
2) MARKING
PERIOD FOR
SKILLS?
This drop-down list will display the 25 character names for each report
card column that you have defined as a marking period in the
Customize Report Card Columns window. This specification
determines ONLY what the top of the form will say. The previous
specification determines for which sections forms will be printed.
3) PRINT FORMS You can set this specification to “No” in order to print forms for only
WITHOUT ANY those sections that have students enrolled in them.
STUDENTS?
4) OMIT
COURSES
NUMBERED
LOWER
THAN?
5) OMIT
COURSES
NUMBERED
GREATER
THAN?
6) Start Grade
7) End Grade
Forms may be printed for courses within a numeric range. For
example, forms for courses from 200 to 299 will be printed if
specification #4 is set to 200 and specification #5 is set to 299. If
specification #4 is set to 1 and specification #5 to 999, all courses will
be included.
If you would like to limit printing to a range of grade levels, choose the
lowest grade in that range for the start grade and the highest grade in
that range for the end grade.
Report Cards Manual 3-37
Chapter 3
Entry Forms
Skills Grade Verification Form
Specification
Description
8) LINE
SPACING?
This specification determines whether the Manual Grade Entry Forms
will be single spaced, double spaced or use a combination of the two.
When you click on this specification, a drop-down list appears that
contains the following 3 options:
• Single Spacing: This setting allows up to 50 names to be printed on
a single sheet of paper. With this option, a blank form will contain 39
blank spaces.
• Double Spacing: This is the recommended setting. It allows the
forms to be double spaced, which makes them easier to read. If
more than one page is needed, the course name and other
information will be printed at the top of each page. If you print a blank
form with this option, 19 blank double spaces will be printed. The
sample manual entry forms in the appendix have all been printed
using this setting.
• Fit To Page: This setting adjusts line spacing depending on the
number of students in the course/section. The program will fit up to
48 students on one page before adding a second page. If two pages
are needed, names will be spaced evenly on both pages. Fit To
Page is the recommended setting for blank Manual Grade Entry
Forms.
NOTE: Unless you are printing forms for individual sections, forms are
always printed by staff member alphabetically, making them easy to
distribute. If you would like to print forms for only certain staff members,
choose the option Individual Teachers on the following window. If you
would like to print forms for several teachers, you can choose the
option Range of Teachers, provided that the teachers for whom you
wish to print forms have ID numbers within a numeric range.
9) FONT SIZE?
Use the drop-down list to decide your font size: small, medium, or
large.
A) PRINT
PREVIEW
Choose Yes to view reports generated from the Enter Courses
program in a Print Preview window. Choose No to bypass Print
Preview and send the report directly to the printer.
B) Print SKILLS Decide whether or not to print the actual text of the skill on the form
DESCRIPTION
C) FORM TYPE
3
3-38
Decide whether to print a skill verification form or a skill entry form.
Click the page 2 tab.
Report Cards Manual
Entry Forms
Skills Grade Verification Form
Page two of the Specifications: Skills Grade Verification Forms window appears.
NOTE:
4
From the Print Which Marking Period list, select the period whose skills
grades you want to view.
For example, selecting midyear exam and final grade will display the corresponding
skills list for these marking periods. The Print Which Skills list lets you select the
individual skills that are associated with the selected marking period.
5
From the Print Which Skills list, select the skills you want to view.
These individual skills are define in the Customize RC program. Appendix D has all skills
and standards information in one location. To learn how create skills, start withe the section
entitled “Initial Setup” on page D-2.
6
Click Done.
The print menu appears. See “The Print Entry Forms, Rosters, & More Window” on
page 3-2 for more information on the print menu.
Report Cards Manual 3-39
Chapter 3
Entry Forms
Teacher Grade Search Report
Teacher Grade Search Report
This option allows you to search for an exact grade or grade range, by teacher. This
report is similar to the student grade searches, except that the report is sorted by teacher
and course. Use this report to search for teachers who have awarded specific grades
during one or more marking periods. You can print the actual grade to the right of each
student’s name.
To Search for an Exact Grade or Grade Range by Teacher:
1
In the Print Entry Forms, Rosters, & More window, select Teacher Grade
Search Report, and then click Next.
Page one of the Teacher Grade Search Report window appears.
These specifications set your search criteria for report card grades, courses, and sections.
You can also confine your search to specific grade levels. For example, you could find
all students in the 9th and 10th grades who have a B+.
A later window allows you to set your range on teachers.
2
3-40
Set the specifications as desired.
The specifications are described in the following table.
Specification
Description
1) Search Type
Select whether to search for a marking grade that exactly matches your
search, or a range of grades.
Report Cards Manual
Entry Forms
Teacher Grade Search Report
Specification
Description
2) Select Grade
to Search
3) Include
Sections
Meeting
When?
This specification allows you to choose for which sections you want the
forms printed. For example, if it is the end of the 1st marking period,
choose Option #1 to print forms only for sections meeting during the 1st
marking period. This will include sections meeting during the 1st
quarter, 1st semester and all year courses. Courses meeting during the
2nd quarter, 3rd quarter, 4th quarter or 2nd semester will be excluded.
The next window includes the option to further limit forms to staff
members whose ID #’s fall within a designated range.
4) Omit Courses
Forms may be printed for courses within a numeric range. For
Numbered
Lower Than? example, forms for courses from 200 to 299 will be printed if
specification #4 is set to 200 and specification #5 is set to 299. If
5) Omit Courses specification #4 is set to 1 and specification #5 to 999, all courses will
Numbered
be included.
Greater
Than?
6) Start Grade
7) End Grade
If you would like to limit printing to a range of grade levels, choose the
lowest grade in that range for the start grade and the highest grade in
that range for the end grade.
9) Print Preview Choose Yes to view reports generated from the Enter Courses
program in a Print Preview window. Choose No to bypass Print
Preview and send the report directly to the printer.
Report Cards Manual 3-41
Chapter 3
Entry Forms
Teacher Grade Search Report
3
Click the Page 2 tab.
These options determine which report card columns to search and/or print, depending
on the selected checkbox.
• Selecting Search for an option means that report card column will be searched to see
if it meets the search criteria set on page one of the specifications. This report card
column and its value prints on the report whether it meet the search criteria.
• Selecting Print for an option prints that report card column and its value on the report
whether or not the grade in those columns meet the search criteria.
4 Set the specifications for both pages as desired, and then click Done.
The Entry Forms Print window appears.
5
Select your range of teachers, and then click Next.
The report generates.
See “The Entry Form Print Window” on page 3-7 for more information on this window.
3-42
Report Cards Manual
4
Enter Grades
Introduction and Main Menu . . . . . . . . 4-2
Enter Grades Manually . . . . . . . . . . . . 4-3
Specification Window 1 . . . . . . . . . . 4-3
Specification Window 2 . . . . . . . . . . 4-5
Adding Students To Courses/Sections4-6
Removing Students From
Courses/Sections . . . . . . . . . . . . . . 4-7
Entering Or Editing Grades . . . . . . . 4-7
Entering Or Editing Skills Grades. . . 4-8
Scanning Grades . . . . . . . . . . . . . . . . . 4-9
Troubleshooting Problems with Scanning
Grades . . . . . . . . . . . . . . . . . . . . . . 4-10
Import From GradeQuick . . . . . . . . . . . 4-13
Report Cards Manual
4-1
Chapter 4
Enter Grades
Introduction and Main Menu
Introduction and Main Menu
Users can input grades into Report Cards Plus in the following ways:
• Manually, by typing grades directly into the Enter Grades Manually window
• Entering grades and skills manually
• Using an NCS scanner to scan grades from bubble sheets into the program
• By importing grades from Grade Quick grade book software
Each of these options can be accessed through the Enter Grades window, pictured
below:
4-2
Report Cards Manual
Enter Grades
Entering Grades Manually
Entering Grades Manually
The Enter Grades Manually option has two pages of specification windows. Press the
PAGE DOWN and PAGE UP key or click on the appropriate tab to toggle between
them. The first specification window appears below:
Specification Window 1
Specification
Description
USE WHICH
ROSTER?
The Enter Grades Manually window contains a roster of students in a
section. This roster can reflect either the current enrollment in that
section or the enrollment as it was the day entry forms were printed.
The default is to use the “CURRENT ROSTER”. If you have changed
students’ schedules since your entry forms were printed, but still want
the Enter Grades Manually window to reflect their OLD schedules,
change this specification to read “WHEN ENTRY FORMS PRINTED”.
Report Cards Manual
4-3
Chapter 4
Enter Grades
Entering Grades Manually
Specification
Description
ERASE
COMMENTS?
Setting this specification to “Yes” causes any previous comments to be
erased from the window the next time you bring up a course/section in
the Enter Grades Manually window. Unless you enter new comment
codes, no comments will be printed on the report card.
If this specification is set to “No”, old comments will be saved in the
program and will appear on the window and on report cards if you do
not replace them with new comments.
NOTE: If you are retyping grades into a section, or if you just wish to
look at the grades in a section, choose the option “No” so that you DO
NOT ERASE OLD COMMENTS. Otherwise, your previously entered
comments will be lost if you choose to save the section. If no previous
comment codes have been entered into your sections, it does not
matter which option you choose.
ENTER WHICH These specifications determine which columns you can edit. They also
COLUMNS?
determine if the cursor will stop in the column when manually entering
grades. In order to speed up data entry, you want to prevent the cursor
from stopping in columns in which you will not be entering grades.
To enter grades most efficiently, you should first separate your entry
forms into “LIKE” piles depending upon which columns have been
used. Assuming it is the end of the first marking period, here are some
sample piles:
•
First quarter grade & no comments
•
First quarter grade and one comment
•
First quarter grade and up to 2 comments
•
First quarter grade, up to 2 comments and a midyear exam grade
•
First quarter grade, up to 2 comments, a midyear exam and
midyear grade
Then use these specifications to tell the program which columns are
used in the “pile” of entry forms whose data you wish to enter. Each
time you change a pile of entry forms, you will have to return to this
window and re-set your specifications.
4-4
Report Cards Manual
Enter Grades
Entering Grades Manually
Specification Window 2
This window allows you to re-define your numeric keyboard to make entering letter
grades easier.
Specification
Description
USE REDEFINED
NUMBER
KEYS?
Note that Specification A is followed by specifications #1 thru #9. With
Specification A set to “Yes”, when entering grades manually, pressing
the number keys “1” thru “9” will enter the values you enter for
specifications #1 thru #9. The above example shows that pressing a “1”
will cause an “A” to appear and pressing a “2” will cause a “B” to
appear. You may then enter an optional “+” or “-” after the grade. Note
that in this example, pressing a “7” will insert “C+” directly.
When in a COMMENT column or an ABSENT column, number keys
automatically revert back to numbers. Using re-defined number keys is
a way for users who are more proficient at using the numeric keypad to
enter grades quickly and easily.
Report Cards Manual
4-5
Chapter 4
Enter Grades
Entering Grades Manually
Entering Or Editing Grades Manually
After entering students into courses, you can enter grades for each student in the roster
by typing grades into the appropriate grade columns, scanning grades into the program
using an NCS scanner, or by importing grades from GradeQuick grade book software.
The following sections describe the various ways to enter grades into Report Cards Plus.
NOTE:
You can store narrative comments specific to a particular marking period as well as
narratives for the entire year. Manually enter narrative comments for any term from the
View/Change/Add/Drop or Enter Grades Manually screen. Simply click in the appropriate
grading column and click the Narratives button.
To Enter or Edit Grades Manually:
1 Click the Enter Grades icon to display the Enter Grades window.
2 Click Enter Grades Manually.
The specification window appears.
3 Define the specifications as desired, and then click Done. See “Specification
Window 1” on page 4-3 for definitions of each specification.
NOTE:
4-6
Make sure that you use the specifications to select which marking periods you want to edit.
Report Cards Manual
Enter Grades
Entering Grades Manually
The Enter Grades Manually window appears.
4 In the Enter CRS or CRS/SC field, enter the course or section.
The easiest way is to click the Browse button
, which displays the list of courses and
sections from which you can choose.
You can also type your course/section choices directly into the field. The course/section
number must be entered with a forward slash (/) separating the master course number
and section number. Leading zeroes are not necessary. For example, you can enter
“54/1” or “054/01”. You can also type in just the course number, which will cause the
first section of that course to appear. Press the F7: REPEAT SEARCH key to call up the
remaining sections of this course.
NOTE:
The course and section may be found at the top of each data entry form. While in the Enter
Grades Manually window, you can access Specifications at any time by clicking on the
Specifications button in the upper right corner of the window.
5 Place your cursor in the field you want to edit, and then edit the field as
desired.
Pressing ENTER moves your cursor to the right, stopping only in those columns in
which you denoted in the specification window that you want to enter grades. See page
“ENTER WHICH COLUMNS?” on page 4-4 for more information about which
columns you can edit. At the end of a row, it drops down to the first column in which
you want to enter grades in the next row. You may move to the left with the SHIFT-TAB
key or move up and down with the UP ARROW and DOWN ARROW keys.
Select the checkbox labeled Use Re-Defined Number Keys to enable the grade shortcuts
you defined on page 2 of the specifications.
Report Cards Manual
4-7
Chapter 4
Enter Grades
Entering Grades Manually
6 At any time, press the F10: ACCEPT key to save all of your changes, or
press the ESC key to abort and lose all of your changes.
NOTE:
When you are in either of the comment columns, the F6: LOOKUP key is available to view
a list of all of your available comments.
Adding Students To Courses/Sections
After you set your specifications in Enter Grades Manually, the following window will
appear:
To Add Students to Courses/Sections:
1 In the Enter CRS or CRS/SC field, enter the course or section.
The easiest way is to click the Browse button
, which displays the list of courses and
sections from which you can choose.
You can also type your course/section choices directly into the field. The course/section
number must be entered with a forward slash (/) separating the master course number
and section number. Leading zeroes are not necessary. For example, you can enter
“54/1” or “054/01”. You can also type in just the course number, which will cause the
first section of that course to appear. Press the F7: REPEAT SEARCH key to call up the
remaining sections of this course.
2 From the View Mode, press the F2: ADD key to begin adding new students
to this section.
The cursor appears in the GR (Grade Level) field below the last student currently in the
section. The default grade is the same as the previously entered student.
4-8
Report Cards Manual
Enter Grades
Entering Grades Manually
3 Press F6 Lookup to display a list of students.
4 Choose a student from the list, and then click Select.
NOTE:
You can select multiple students using the Windows-standard Shift-click or Ctrl-click.
5 After selecting your students, click F10 Accept.
IMPORTANT:
Note that an add/drop form will not automatically print when you add or drop a student from
a section using Enter Grades Manually. If you need to print an add/drop form, use
View/Change/Add/Drop to add a course or remove a course from a student’s schedule.
Removing Students From Courses/Sections
To remove a student from a course or section, highlight the student’s name, and then
press F8: WTH.
You will be given the option to leave the course in the student’s transcript or to delete it
from the student’s transcript altogether. You may instantly generate a Grade
Verification Form on the window with the F9: PRINT key. Press or click F9: PRINT
again to print the form to paper.
NOTE:
If you choose the option to remove from transcript when withdrawing a student, you will no
longer have the option to print the course/section on report cards or on the transcript. If you
need to show the course on reports, choose the option “Leave course & section in
transcript”.
Entering Or Editing Skills Grades
You can enter or edit skills grades for courses which have skills linked to them by
clicking on the student’s name and then clicking on the Skills button to the left of the
Specifications button. The first skill associated with that course will be highlighted.
Press F3: EDIT to move the cursor to the field in which you will enter the first grade.
(As in the regular Enter Grades Manually window, F6: LOOKUP brings up a list of
available grades from the Grade Table). After typing the grade, press TAB or ENTER
to move to the next column. Continue until all the skills grades are entered for that
student. As in the Enter Grades Manually window, remember to press F10: ACCEPT to
save your grade entries. (Remember that skills grades can also be entered in
View/Change/Add/Drop.)
NOTE:
For detailed information on how to enter skill grades see “Entering Grades Or Skills
Manually” on page 4-10.
Report Cards Manual
4-9
Chapter 4
Enter Grades
Entering Grades Or Skills Manually
Note that unlike in the Enter Grades Manually window, when you press TAB or
ENTER, the cursor will stop in each column regardless of whether you have that column
turned on in the specification window.
NOTE:
Also see the Skills chapter at the end of this book for more information on skills.
Entering Grades Or Skills Manually
This option lets you enter both grades and skills in one window.
To Enter Grades or Skills Manually:
1 In the Enter Grades window, select Enter Grades or Skills Manually, and
then click Next.
4-10
Report Cards Manual
Enter Grades
Entering Grades Or Skills Manually
Page one of the Specifications: Enter Grades and Skills window appears.
2 From the Display Which Marking Period list, select the period whose skills
and grades you want to view.
For example, selecting midyear exam and final grade will display the corresponding grades
for these marking periods.
3 From the Display Which Skills list, select the skills you want to view.
The Display Which Skills list lets you select the individual skills that are associated with
the selected marking period.
NOTE:
To make the selected grading periods and skills, editable, make sure to select the check box
next to each of your selections. These checkboxes determine which columns you can edit.
They also determine if the cursor will stop in the column when manually entering grades. In
order to speed up data entry, you want to prevent the cursor from stopping in columns in
which you will not be entering grades.
4 From the Marking Period for Skills drop-down box, select the marking period
whose skills you want to edit.
For example, selecting First Marking Period allows you to see the corresponding skillgraders for the First Marking Period.
Report Cards Manual
4-11
Chapter 4
Enter Grades
Entering Grades Or Skills Manually
5 Click Page 2 to display the next page of specifications.
6 Set the specifications as desired.
4-12
Report Cards Manual
Enter Grades
Entering Grades Or Skills Manually
See the following table for a description of each specification.
Specification
Description
Use Which
Roster?
The Enter Grades or Skills Manually window contains a roster of
students in a section. This roster can reflect either the current
enrollment in that section or the enrollment as it was the day entry
forms were printed. The default is to use the “CURRENT ROSTER”. If
you have changed students’ schedules since your entry forms were
printed, but still want the Enter Grades Manually window to reflect their
OLD schedules, change this specification to read “WHEN ENTRY
FORMS PRINTED”.
Erase
Comments
Setting this specification to “Yes” causes any previous comments to be
erased from the window the next time you bring up a course/section in
the Enter Grades or Skills Manually window. Unless you enter new
comment codes, no comments will be printed on the report card.
If this specification is set to “No”, old comments will be saved in the
program and will appear on the window and on report cards if you do
not replace them with new comments.
NOTE: If you are retyping grades into a section, or if you just wish to
look at the grades in a section, choose the option “No” so that you DO
NOT ERASE OLD COMMENTS. Otherwise, your previously entered
comments will be lost if you choose to save the section. If no previous
comment codes have been entered into your sections, it does not
matter which option you choose.
Report Cards Manual 4-13
Chapter 4
Enter Grades
Entering Grades Or Skills Manually
Specification
Description
SPACING FOR
MANUAL
FORMS
This specification determines whether the forms will be single spaced,
double spaced or use a combination of the two.
When you click on this specification, a drop-down list appears that
contains the following 3 options:
• Single Spacing: This setting allows up to 50 names to be printed on
a single sheet of paper. With this option, a blank form will contain 39
blank spaces.
• Double Spacing: This is the recommended setting. It allows the
forms to be double spaced, which makes them easier to read. If
more than one page is needed, the course name and other
information will be printed at the top of each page. If you print a blank
form with this option, 19 blank double spaces will be printed. The
sample manual entry forms in the appendix have all been printed
using this setting.
• Fit To Page: This setting adjusts line spacing depending on the
number of students in the course/section. The program will fit up to
48 students on one page before adding a second page. If two pages
are needed, names will be spaced evenly on both pages. Fit To
Page is the recommended setting for blank Manual Grade Entry
Forms.
NOTE: Unless you are printing forms for individual sections, forms are
always printed by staff member alphabetically, making them easy to
distribute. If you would like to print forms for only certain staff members,
choose the option Individual Teachers on the following window. If you
would like to print forms for several teachers, you can choose the
option Range of Teachers, provided that the teachers for whom you
wish to print forms have ID numbers within a numeric range.
USE REDEFINED
NUMBER
KEYS?
Note that Specification A is followed by specifications #1 thru #9. With
Specification A set to “Yes”, when entering grades manually, pressing
the number keys “1” thru “9” will enter the values you enter for
specifications #1 thru #9. The above example shows that pressing a “1”
will cause an “A” to appear and pressing a “2” will cause a “B” to
appear. You may then enter an optional “+” or “-” after the grade. Note
that in this example, pressing a “7” will insert “C+” directly.
When in a COMMENT column or an ABSENT column, number keys
automatically revert back to numbers. Using re-defined number keys is
a way for users who are more proficient at using the numeric keypad to
enter grades quickly and easily.
4-14
Report Cards Manual
Enter Grades
Entering Grades Or Skills Manually
7 Click Next to display the Enter Grades And Skills window.
8 In the Enter CRS or CRS/SC field, enter the course or section.
The easiest way is to click the Browse button
, which displays the list of courses and
sections from which you can choose.
You can also type your course/section choices directly into the field. The course/section
number must be entered with a forward slash (/) separating the master course number
and section number. Leading zeroes are not necessary. For example, you can enter
“54/1” or “054/01”. You can also type in just the course number, which will cause the
first section of that course to appear. Press the F7: REPEAT SEARCH key to call up the
remaining sections of this course.
NOTE:
The course and section may be found at the top of each data entry form. While in the Enter
Grades Manually window, you can access Specifications at any time by clicking on the
Specifications button in the upper right corner of the window.
9 After selecting a course, it appears similar to the following picture.
10 Place your cursor in the field you want to edit, and then edit the field as
desired.
Pressing ENTER moves your cursor to the right, stopping only in those columns in
which you denoted in the specification window that you want to enter grades. Note that
each field description appears in the status bar at the bottom of the window.
Select the checkbox labeled Use Re-Defined Number Keys to enable the grade shortcuts
you defined on page 2 of the specifications.
11 At any time, press the F10: ACCEPT key to save all of your changes, or
press the ESC key to abort and lose all of your changes.
Report Cards Manual 4-15
Chapter 4
Enter Grades
Scanning Grades
Scanning Grades
Grades can be entered into the program quickly and accurately using an NCS optical
scanner.
In order to use your NCS scanner, you will need to calibrate and configure it according
to the instructions in the NCS user's manual. Owners of the OPSCAN 4 should use the
window on the scanner to tell the scanner to emulate the 3000 and to use the default
configuration. Enter the baud rate at 9600.
Before scanning grades each marking period, the read head on the scanner should be
cleaned with a lint-free cloth, as explained in the NCS user's manual.
In order to use the scanner, select option 3 Scan Grades, from the Enter Grades window.
If you select this option without first installing the scanner interface software, the
program will tell you that the scanner cannot be used until the software is installed. The
Scanner Interface software must be purchased separately from Rediker Software.
Once the Scanner Interface Software is installed, when you click option 3 Scan Grades,
you should see the following window
When setting up the Specifications for scanning grades, note that:
• The list box displays the six items displayed on the scan form for each student
• Checking an item in the list box will highlight the corresponding report card column
in the report card at the bottom
• You can check more then one report card column
• In the center of the window are instructions to guide you through the setup process
Below are views of numeric grade and alpha grade scan forms:
4-16
Report Cards Manual
Enter Grades
Scanning Grades
Numeric grade scan form sample
Alpha grade scan form sample
When you click <FINISHED>, you will see the following window:
Click the list box or its caption to cause the list box to drop down. You will then be able
to click on the appropriate marking period column. When you click on the marking
period box, a check will appear in that box and the button at the bottom containing the
corresponding report card column will be highlighted. Click <FINISHED> to begin
scanning grades.
For more in depth information on the scanning process, refer to the manual that comes
with the Scanning Interface software or the Scheduling Plus manual.
Troubleshooting Problems with Scanning Grades
Although the process of scanning grades is usually worry-free, occasional problems do
occur. Below is an explanation of messages/errors that may appear on your computer
while attempting to scan grades and how best to resolve the problem. While we hope
this information will be helpful, this is by no means intended to be a comprehensive
guide to resolving problems with scanning grades. For an explanation of common errors
that appear on the scanner, see your NCS User Guide. If at any time, you are unable to
solve a scanning problem, call Rediker Technical Support at 1-800-882-2994.
Report Cards Manual 4-17
Chapter 4
Enter Grades
Scanning Grades
• Jam on feed bed/Scanner not ready indicates the transport path needs to be cleared.
Clear the jam and then click on RESUME. Any forms that were stuck in the scanner
at the time of the error or that may have been scanned backwards will have to be rescanned with the next batch of forms.
• Error 102/unable to find a component of SFW means the program cannot locate an
essential file. Resolve by copying the sfw file from the rs4\config\sfw folder to the
rs4\sfw folder. Reset scanner configuration.
• Error 202/sfw already loaded can usually be resolved by rebooting the computer.
• Error 302/cannot find SFW application is similar to error 102 described above.
• Error 401/error requesting a sheet from sfw indicates a scanner problem. See NCS
Users Manual.
• Input hopper empty/Scanner not ready means the scanner hopper is out of scan forms.
This message appears as follows:
Either add sheets to the hopper and click RESUME or press ESC if you are finished
scanning.
NOTE:
It is recommended that you disable any virus scan program you have on the workstation to
which the scanner is connected and that you do not have any other programs running when
scanning grades in Report Cards Plus.
If the scanner error cannot be corrected, call NCS using their 800 number.
When you are finished scanning grades, a window will appear asking if you would like
to view a log.
4-18
Report Cards Manual
Enter Grades
Scanning Grades
.
Click “Yes” to view the log, or click “No” and open the file later in a program like
Microsoft Word.
NOTE:
Scanning any form more than once will not cause any harm. The grades on the form will
simply replace the same grades in the transcript. Consequently, if the form has not been
changed, the transcript will not be changed.
Report Cards Manual 4-19
Chapter 4
Enter Grades
Import From GradeQuick
Import From GradeQuick
This option is used to bring grades into Report Cards Plus from GradeQuick Gradebook
Software. See the GradeQuick-Administrator’s Plus Interface manual for detailed
information on how to import grades.
4-20
Report Cards Manual
5
Calculate Averages
Introduction . . . . . . . . . . . . . . . . . . . . .
Specifications: Calculate Averages . . .
Entering the Weight For
Each Column . . . . . . . . . . . . . . . . .
Calculating Averages For
Which Columns? . . . . . . . . . . . . . . .
How Are Averages Calculated?. . . . . .
NUMBER GRADES . . . . . . . . . . . . .
LETTER GRADES . . . . . . . . . . . . . .
Examples of Midyear
Average Calculations . . . . . . . . . . . .
Examples of Final
Average Calculations . . . . . . . . . . . .
Reading the Log. . . . . . . . . . . . . . . .
Blank Report Card Columns . . . . . . . .
5-2
5-3
5-5
5-7
5-8
5-9
5-9
5-11
5-12
5-15
5-16
Report Cards Manual
5-1
Chapter 5
C a l c u l a t e Av e r a g e s
Introduction
Introduction
The Calculate Averages program calculates semester, midyear, and final averages based
on quarter and semester grades. It is also used to erase all grades or entries in any report
card column, including ATTENDANCE or COMMENT columns. Report Cards Plus
follows certain guidelines in calculating averages. It is recommended that you read and
understand all of the information that follows BEFORE proceeding to use the program
to calculate averages so that you are certain that the program will do what you expect it
to. As an extra check, calculate a random sampling of averages manually and compare
them to the program’s calculations.
For example, assume that a school has defined their report card columns so that their
report card heading line reads as follows:
Subject
1st
2nd
SEM1
3rd
4th
SEM2
FINEX
FINAL
CRDTS
TEACHER
This school could calculate a semester 1 average based on the grades in the 1st and 2nd
marking period columns for semester courses. The final average could be calculated
based on the 1st, 2nd, 3rd and 4th marking periods and the Final Exam grade for All
Year courses.
The rest of this chapter explains in detail how to use this program to 1) calculate
averages and 2) blank report card columns. There is also an explanation of how averages
are calculated beginning under “How Are Averages Calculated?” on page 5-8 and
examples of average calculations under “Examples of Midyear Average Calculations”
on page 5-11.
5-2
Report Cards Manual
C a l c u l a t e Av e r a g e s
Specifications: Calculate Averages
Specifications: Calculate Averages
Selecting Calculate Averages from the Calculate Averages window displays the
following specifications window:
Specification
Description
CALCULATE
WHICH
COLUMN?
Choosing specification number 1 brings up a window listing your report
card columns. From this list, choose the column into which you wish to
calculate an average.
REPLACE
EXISTING
GRADES?
The default status of this specification is No. This means that if a grade
already exists in the column for which averages are being calculated,
the program will not replace it. In other words, it will not calculate an
average for the course. If you change this option to Yes, any existing
grade in that column will be replaced when you calculate the average.
CALCULATE
LETTER OR
NUMBER
GRADES?
This specification tells the program what type of grades you will be
calculating. In calculating averages, the quality point table is not used.
For number grades, the value used is equal to the number. For letter
grades, the value for each letter is taken from a hard-coded table. To
see the table and read a detailed description of how number and letter
grades are calculated, see “NUMBER GRADES” on page 5-9.
Report Cards Manual
5-3
Chapter 5
C a l c u l a t e Av e r a g e s
Specifications: Calculate Averages
5-4
Specification
Description
USE MINUS IF
LETTER
GRADES?
USE PLUS IF
LETTER
GRADES?
The default for specifications 3 and 4 is Yes. Change them to No if you
do not want the average calculated to contain a plus or minus.
INCLUDE
WHICH
SECTIONS?
Use this specification to limit the sections for which averages will be
calculated. For example, if you choose SEMESTER 1 SECTIONS
ONLY (Not all year), averages will be calculated for only those sections
that meet in the first semester. SEMESTER 2 and ALL YEAR sections
will be ignored.
MINIMUM
NUMERIC
GRADE?
This specification determines the lowest possible grade a student can
receive after averages are calculated for number grades. If you set 50
as the minimum numeric grade, the lowest grade the student will
receive is 50, regardless of the average the program calculates. See
the description of how Number Grades under “NUMBER GRADES” on
page 5-9.
Report Cards Manual
C a l c u l a t e Av e r a g e s
Specifications: Calculate Averages
Entering the Weight For Each Column
When you have finished entering specifications, you will see the following window:
NOTE:
The column into which you are calculating the average will have “THIS COLUMN BEING
CALCULATED” next to it.
Beginning with the first column that will be used in calculating the average, begin typing
the weight you wish to assign that column. For example, to assign a weight of 20% to
the First Marking Period, type “20”. When you press ENTER, the weight will appear as
a percentage, in this case, “020.00”. You can enter any weight up to “999”. Up to two
decimal places may be used. Continue entering percentages until all weights have been
set to calculate the column specified.
The program remembers the weights entered for each marking period each time you
calculate the averages for a particular column. Consequently, the next time you calculate
averages for the Semester 1 column, you will see the weights you entered the last time
you calculated an average for that column. If you calculate averages for the Final
column, you will see the weights you entered the last time you performed that operation.
NOTE:
The percentages that you enter are COMPARATIVE. In other words, they are used in
relation to each other as a ratio. If you want to calculate a midyear average in which the
1st marking period, 2nd marking period and Midyear Exam grades count equally, simply
enter the same number as the percentage for each column. For example, entering “10” as
the percentage for each and every column would produce the same results as entering
“33.33” as the percentage for each and every column.
Report Cards Manual
5-5
Chapter 5
C a l c u l a t e Av e r a g e s
Specifications: Calculate Averages
In the following example, each marking period counts twice that of the exam grade.
Each of the following sets of weights will produce the SAME desired results:
Example One
NOTE:
5-6
Example Two
1st Marking
Period
: 40
1st Marking Period:
1.0
2nd Marking
Period
: 40
2nd Marking Period
1.0
Midyear Exam
: 20
Midyear Exam
0.5
If there is no grade in a weighted column, the program will ignore that column when
calculating the average. For example, if you give the Final Exam column a weight of 20%,
if a student has no grade in that column, the average will be calculated based on the
weighted columns that do have grades. The Final Exam column will be ignored.
Report Cards Manual
C a l c u l a t e Av e r a g e s
Calculating Averages For Which Columns?
Calculating Averages For Which Columns?
Specification #6: INCLUDE WHICH SECTIONS? helps determine the sections to
calculate the average; See “Specifications: Calculate Averages” on page 5-3. When you
finish entering weights, the Final Grade print window appears, further defines the
sections to calculate the average:
Specification
Description
1 to 4
If you choose option #1, averages will be calculated for the course
range set in specification #6: INCLUDE WHICH SECTIONS? See
page “Specifications: Calculate Averages” on page 5-3.
The Individual Sections option allows you to enter the master course
and section numbers of those courses for which you want the program
to calculate an average. You can type them in manually or select them
from the F6: LOOKUP. This can be very useful in the following
situation: Assume that you have special courses for which you want to
use a different weighting system. Special courses could be quarter and
semester courses with exams that need to use a different weighting
system than full year courses with exams. You may define your weights
and then choose to calculate averages for only these individual
sections. You may then change your weights and do another group of
“special” courses. Once averages have been calculated for your
“special” courses, set your standard weights and choose to do all
sections. When averages are being calculated for all courses, any
averages previously calculated for individual sections will NOT be
changed if specification #2: REPLACE EXISTING GRADES? is set to
No.
Report Cards Manual
5-7
Chapter 5
C a l c u l a t e Av e r a g e s
How Are Averages Calculated?
Specification
Description
VIEW LOG
This option should be used after calculating averages in order to see
whether the process was successful for all students, and if not, why
averages did not calculate for some students. Note that each time you
calculate averages, a new log will generate, overwriting the old one.
The Calculate Averages log is a helpful tool for diagnosing problems
that prevent averages from being calculated for particular students.
See the sample log on page “Reading the Log” on page 5-15.
NOTE: The View Log window contains a FIND option that can be used
to quickly locate information on a particular student.
After choosing how you would like to calculate averages, you will be
asked if you have backed-up. Remember, that although it’s not
required by the program, it is advisable to backup your data before
calculating averages. Should you calculate averages incorrectly, you
can:
•
Restore from backup, or
•
Set Specification 2) REPLACE EXISTING GRADES? to Yes and
recalculate averages
How Are Averages Calculated?
The following rules are followed in calculating averages:
• Any non-weighted column will not even be looked at. A non-weighted column is one
for which you have assigned a weight of 0%.
• Unless you have changed the REPLACE EXISTING GRADE? option in the main
window to Yes, any grade already in the column for which the average is being
calculated will not be overwritten, and the course will be skipped.
• If any grade is in the Final column and the Final Average is not the average being
calculated, the course will be skipped. For example, if the student has been
withdrawn, a W will be in the Final column and a midyear average will not be
calculated. As another example, assume that a final grade had been given for a quarter
course meeting during the 1st quarter. Because there is a grade in the Final Grade
column, the average will not be calculated. The “Final” column is considered to be
the right-most column on your report card that has been defined as a SEMESTER or
FINAL column. See “Customize Report Card Columns” on page 1-5.
• If a grade of I, W, WP, or WF appears in any of your weighted columns, that grade
will become the average. A weighted column is one that was not given a weight of
0%. For example, when calculating the midyear average based on grades in the 1st
and 2nd marking periods, if a student has an I as the 1st marking period grade and an
A as the 2nd marking period grade, the I will become the midyear average. As another
example, assume that you are calculating a midyear average based on the 1st and 2nd
5-8
Report Cards Manual
C a l c u l a t e Av e r a g e s
How Are Averages Calculated?
marking period and Midyear Exam grades. A student who has 1st and 2nd marking
period grades but has an “I” as the exam grade will receive an “I” for the midyear
average.
• If any wildcard (user-defined) grade is in a column that has been designated as an
EXAM column, the exam grade will not be used in calculating the average. Instead,
the remaining columns will be weighted against each other in calculating the average.
This applies to any grade that is not in brackets in the grade table, including “N”, “X”
or “P”, or any customized grade. For example, assume that you have assigned 40%,
40% and 20% as the weights of the 1st marking period, 2nd marking period and
Midyear Exam grades, respectively. If the exam grade is a wildcard grade, the two
marking periods will count equally in calculating the midyear average since they both
have the same weight of 40%.
• If any wildcard (user-defined) grade is found in a weighted column other than the
exam column, an average will NOT be calculated for the course. This is because the
program does not know how to count these grades.
• If a blank is found in any weighted column, that column will be skipped and the
remaining columns will be weighted against each other in a similar manner as
described above.
NUMBER GRADES
The Calculate Averages program does NOT use the quality point table. For number
grades, the value used is equal to the number. Averages will be calculated to six decimal
places and then rounded off to the closest grade. Fives will always be rounded up. For
example, a grade of 89.50 will become a 90 while a grade of 89.49 or 89.499999 will
become an 89. Note that number grades below the minimum numeric grade will be
raised to the minimum grade in calculating averages. For example, if you set 50 as your
minimum numeric grade in the Specifications window, and the student’s average
calculates as 35, the grade will appear as 50. See “MINIMUM NUMERIC GRADE?”
on page 5-4 for more information.
LETTER GRADES
Letter grades will first be converted to a certain number of quality points according to
the following table:
A+:
4.33
B+:
3.33
C+:
2.33
D+:
1.33
F+:
0.00
A:
4.00
B:
3.00
C:
2.00
D:
1.00
F:
0.00
A-:
3.67
B-:
2.67
C-:
1.67
D-:
0.67
F-:
0.00
Report Cards Manual
5-9
Chapter 5
C a l c u l a t e Av e r a g e s
How Are Averages Calculated?
The average will be calculated to six decimal places using weights in the same manner
as numeric grades, and then converted back to a letter grade based on the following
table: If the averaged quality points are greater than or equal to the listed value, they will
obtain the corresponding letter grade.
NOTE:
A+:
4.16
B+:
3.16
C+:
2.16
D+:
1.16
A:
3.83
B:
2.83
C:
1.83
D:
0.83
A-:
3.50
B-:
2.50
C-:
1.50
D-:
0.50
F:
0.00
Although they are included in the default grade table, the grades “E+”,“E” and “E-”
cannot be averaged. Thus, if one of these grades appears in a weighted column (other than
an EXAM column), no average will be calculated.
This table ensures that students half-way between two grades will always receive the
higher grade. For example, an A and a B equally weighted would average to an A-.
Similarly, an A- and a B+ would also average to an A-.
NOTE:
5-10
It is not advisable to use this program to calculate averages if you are using a letter grading
system. Instead, teachers should manually calculate the averages. For example, if a student
has two A's and two B’s, the program does not know if these are high or low A's and B's.
Consequently, because the program always rounds up, the student will be given an A- for
an average. However, the teacher knows if these are high or low A's and B's and is in a
better position to determine if the student should be given an A- or a B+. The teacher can
also take into account other mitigating factors like effort and attitude in determining final
averages in borderline cases.
Report Cards Manual
C a l c u l a t e Av e r a g e s
Examples of Midyear Average Calculations
Examples of Midyear Average Calculations
The following examples show how the midyear average is calculated by a school using
the weights specified:
1st marking period grade
40%
2nd marking period grade
40%
Midyear Exam grade
20%
EXAMPLE ONE:
1st marking period grade
90
2nd marking period grade
80
Midyear Exam grade
Blank
MIDYEAR AVERAGE
85
EXPLANATION: The exam grade is not counted because it is blank. Since the 1st and
2nd marking periods have the same 40% weight, they are weighted equally in
calculating the midyear average.
EXAMPLE TWO:
1st marking period grade
90
2nd marking period grade
Blank
Midyear Exam grade
Blank
MIDYEAR AVERAGE
90
EXPLANATION: The first marking period grade becomes the midyear grade because
there are no other grades. This would happen if you have a quarter course without a
Midyear Exam.
EXAMPLE THREE:
1st marking period grade
90
2nd marking period grade
Blank
Midyear Exam grade
100
MIDYEAR AVERAGE
93
Report Cards Manual
5-11
Chapter 5
C a l c u l a t e Av e r a g e s
Examples of Final Average Calculations
EXPLANATION: The 2nd marking period grade is not counted because it is blank.
Since the 1st marking period grade is weighted 40% and the exam grade is weighted
20%, the 1st marking period grade counts twice as much in calculating the midyear
average. This results in an average of 93, which was calculated as follows:
1st marking period grade
90 times
40%
= 3600
100 times
20%
= 2000
60%
5600
2nd marking period grade
Midyear Exam grade
TOTALS
Dividing 5600 by 60 produces an average of 93.33, which rounds off to 93.
If this is not a quarter course, it is important not to leave the grade for the 2nd marking
period blank. If there is no grade, enter an “I” for incomplete or a “W” for withdrawn
etc. (Note that withdrawing the student through the View/Change/Add/Drop program
will automatically enter a “W” as the Final Grade, which will cause the midyear average
NOT to be calculated.)
With the 40, 40, 20 weighting system, you only intend the exam to count for 20% or
1/5th of the midyear grade. However, for a quarter course, it will in effect be counting
33.33% or 1/3 of the midyear grade. This is because the 1st marking period with a
weight of 40% will count twice that of the exam grade with a weight of 20%. If you have
a quarter course with an exam, you should either enter the midyear grade by hand or
define a different set of weights for these courses and calculate their midyear averages
by using the Individual Sections option BEFORE doing the rest of your courses. Of
course, for a quarter course without an exam grade, it does not matter, since the marking
period grade will become the midyear average.
Examples of Final Average Calculations
The following examples are for a school calculating their final averages for the year
using the following weights:
5-12
Report Cards Manual
1st marking period grade
20%
2nd marking period grade
20%
Midyear Exam grade
10%
Midyear grade
0%
3rd marking period grade
20%
4th marking period grade
20%
Final Exam grade
10%
C a l c u l a t e Av e r a g e s
Examples of Final Average Calculations
With this weighting system, the 1st marking period, 2nd marking period and Midyear
Exam grades will make up 50% of the final average. As an alternative weighting system,
the midyear grade could have been weighted 50%, with the columns above it weighted
0%. The resulting final averages would be similar with either definition. This assumes
that the midyear average was initially calculated weighting the 1st marking period, 2nd
marking period and Midyear Exam 40%, 40% and 20%, respectively. They may differ
due to any rounding that took place in calculating the midyear grade. Rounding will
affect letter grading systems much more than number grading systems. See the note on
page 5-10)
EXAMPLE ONE:
1st marking period grade
90
2nd marking period grade
95
Midyear Exam grade
Blank
3rd marking period grade
I
4th marking period grade
85
Final Exam
75
FINAL AVERAGE
I
EXPLANATION: As soon as the program finds the “I”, it becomes the final grade.
Consequently, as soon as a student makes up an Incomplete, replace it in the transcript
with the proper grade using the View/Change/Add/Drop program. (See Chapter 6.)
EXAMPLE TWO:
1st marking period grade
90
2nd marking period grade
80
Midyear Exam grade
X
3rd marking period grade
90
4th marking period grade
80
Final Exam grade
75
FINAL AVERAGE
84
REASON: All of the marking periods count equally, since they are weighted 20% each.
The Final Exam counts half of a marking period, because it has a weight of 10%. The
Midyear Exam is ignored, due to a wildcard grade of “X”.
Report Cards Manual 5-13
Chapter 5
C a l c u l a t e Av e r a g e s
Examples of Final Average Calculations
This is how the weighted average is calculated:
1st marking period grade
90 times
20%
= 1800
2nd marking period grade
80 times
20%
= 1600
Midyear Exam grade
X
3rd marking period grade
90 times
20%
= 1800
4th marking period grade
80 times
20%
= 1600
Final Exam grade
75 times
10%
= 750
90%
7550
TOTALS
When 7550 is divided by 90, the result is 83.88, which rounds off to a final average of
84.
EXAMPLE THREE:
1st marking period grade
Blank
2nd marking period grade
Blank
Midyear Exam grade
Blank
3rd marking period grade
90
4th marking period grade
80
Final Exam grade
75
FINAL AVERAGE
83
EXPLANATION: The first three columns are ignored because they are blank. The 3rd
and 4th marking periods count equally, since they are weighted 20% each. The Final
Exam counts half of a marking period, because it has a weight of 10%. This is how the
final average is calculated:
1st marking period grade
Blank
2nd marking period grade
Blank
Midyear Exam grade
Blank
3rd marking period grade
90 times
20%
= 1800
4th marking period grade
80 times
20%
= 1600
Final Exam grade
75 times
10%
= 750
50%
4150
TOTALS
5-14
Report Cards Manual
C a l c u l a t e Av e r a g e s
Examples of Final Average Calculations
When 4150 is divided by 50, the result is 83.00. In this example, if there were no Final
Exam grade, the 3rd and 4th marking periods would count equally, producing a final
average of 85.
Reading the Log
The following is a page from a log printed after calculating averages for an individual
section, which shows students for whom an average calculated and others for whom it
did not. See Option 6 View Log on the Calculate Average For Which Sections? window
on page 5-8:
Note the reasons averages did not calculate for three students. Student 12071, Brittany
Baggett, has the wildcard grade “P” for “Passing” in the 4th marking period column.
Student 11064, Andrew Battan, has the letter grade “A” in a weighted column and
averages were calculated for number grades. Student 12066, Ben Ralls, has the wildcard
grade “O” in the 4th marking period column.
Student 09003, Emily Altmeyer, has the grade “WP” for “Withdrawn Passing” in a
weighted column, so that grade becomes the average. See rule D on page 5-8.
Report Cards Manual 5-15
Chapter 5
C a l c u l a t e Av e r a g e s
Blank Report Card Columns
Blank Report Card Columns
This option allows you to erase all entries in one or two report card columns of your
choice, for all grades or one grade level at a time. This includes COMMENT and
ATTENDANCE columns.
After selecting option 2) Blank Report Card Columns from the main Calculate Averages
window, you will see a specification window, at which you will select the grade range
and the report card column(s) to blank. You can use this option to blank one or two report
card columns at a time, for all sections, all-year sections only, semester or quarter
sections You can also choose to blank columns for a range of sections.
One example of a scenario in which this option is useful is after calculating a final
average based on the 1st and 2nd marking period and midyear exam grades, which you
may need to do in order to print a class rank at midyear (assuming you don’t have a
midyear grade column on the report card). You can run the Blank Report Card
Column(s) option to blank the grades in the Final column in order to free up that column
for Final grades at the end of the year.
This option is also often used to blank COMMENT and ABSENCE columns after
importing grades into those columns from Grade Quick. For example, if you do not
import a new comment each marking period, the old comment remains in the column.
You can use Blank Report Card Columns to blank the comments after printing report
cards so that the next time you print report cards, you can be sure that the old comments
will not print. Likewise, if you print absences on the report card, you can blank the
ABSENCE column afterwards, so that the next time you print report cards, the old
attendance information will not print.
5-16
Report Cards Manual
6
View/Change/Add/Drop
Introduction . . . . . . . . . . . . . . . . . . . . . 6-2
Viewing and Editing Grades . . . . . . . . 6-3
Specifications . . . . . . . . . . . . . . . . . . 6-4
Withdrawing Student from
Course/Section. . . . . . . . . . . . . . . . 6-5
Editing the OVR Column . . . . . . . . . 6-5
Printing the Transcript View
(F9: PRINT) . . . . . . . . . . . . . . . . . . 6-5
Manually Editing GPA, Quality Points,
Weight & Credits . . . . . . . . . . . . . . 6-6
Entering and Editing Information for
Previous (Minus) Years . . . . . . . . . 6-7
Entering and Editing Grades in
the Minus Years . . . . . . . . . . . . . . . 6-7
Editing the Teacher (TCH) Column
in the Minus Years . . . . . . . . . . . . . 6-8
Editing Daily Attendance
Information in the Minus Years . . . . 6-8
Scheduling View (F10: SCHED) . . . 6-8
Hot Key Enabled: . . . . . . . . . . . . . . . 6-8
Report Cards Manual
6-1
Chapter 6
View/Ch ange/Add/ Drop
Introduction
Introduction
This program simplifies the task of entering or changing students' grades. When you
click on View/Change/Add/Drop (also called View/Change or VCAD) in Report Cards
Plus, you will be in Transcript Mode (unlike when you enter VCAD from Scheduling
Plus, which puts you in the View Schedules mode). From this window, you can:
•
•
•
•
•
•
•
NOTE:
Enter or edit each student’s grades, one course/section at a time
View and edit courses and grades for an individual student in the current year
View and edit courses and grades in the previous (minus) years
View and edit attendance data in the previous (minus) years
Enter and edit GPA and credit information
Enter narrative comments
Enter skills grades
• Modify a student’s total credits and total weight, as well as simple and adjusted
quality points and simple and adjusted GPA.
• Print a student’s courses and grades.
• Enter or view a student’s grades from previous years by pressing the Minus key or
clicking the Year - button at the bottom of the window
• View the daily attendance summary for a previous year while in the Minus year view
• Enter courses by typing an “A” before the course/section number
• Add and remove courses from students’ transcripts.
Pressing a single function key F10 toggles the view between schedules and transcripts.
When you switch to Scheduling View, you will be in the same window as when you enter
VCAD from Scheduling Plus. All the same rules of usage will apply. (See the Scheduling
Plus manual for detailed information on how to schedule students through
View/Change/Add/Drop.) Note that Study Halls appear only in the Schedule View. For more
information on the Scheduling View and its functions, see the end of this chapter or the
SCHEDULING PLUS Manual.
The rest of this chapter explains how to use this program to perform each of these
functions.
6-2
Report Cards Manual
View/Change/Add/D rop
Viewing and Editing Grades
Viewing and Editing Grades
Selecting View/Change/Add/Drop displays a blank Transcript View window.
There are two ways to bring up a student’s transcript in VCAD. The same rules apply
when you bring up a student in the View Schedules mode:
• Type the student’s 5-digit ID number or name in the blank at the bottom of the
window or if you have chosen to lookup By Grade, select the grade level from the
drop-down list at the top of the window and type the student’s 3-digit ID number in
the blank.
• Press F6: LOOKUP and select the student from the list. If you have chosen to lookup
By School in the Specifications, you will see all students in the school listed
alphabetically. If you have chosen to look up By Grade, you will see all students in
the grade level you chose listed alphabetically. (See page 6-4 for more information
on the Lookup options.)
Once you call up a student, you will see a window that looks like the following:
Enter or modify the grade in the desired column and then press Enter to move to the next
column. Note that while editing the comment grades, a lookup window is available
displaying all of your comments. Select the comment you wish to add from the list. Press
F10: ACCEPT to save your work or press ESC to abort without saving.
Report Cards Manual
6-3
Chapter 6
View/Ch ange/Add/ Drop
Viewing and Editing Grades
Specifications
The specifications that are available for the View/Change/Add/Drop program are
explained in detail in the SCHEDULING PLUS Manual.
NOTE:
You can access Specifications at any time through the Transcript View as well as through
the Schedule View by clicking on the Specifications button in the upper right corner of the
VCAD window.
All Specifications pertain to the Scheduling Views except for the following:
Page 1
B) LOOKUP/SEARCH BY SCHOOL OR GRADE?
If you set this specification to search By School, when you type Smith to call up a
student, the first Smith alphabetically will appear, no matter what grade level they are
in. If you want a different Smith, press the F7: REPEAT SEARCH key to call up the
next Smith regardless of grade level. If you press the F6: LOOKUP key, your entire
school will appear in alphabetical order. Choose the student whose transcript you wish
to view.
If you choose to search By Grade, when you type “Smith”, only a “Smith” in the current
grade will be accessed. Moreover, only the students in the current grade will appear in
the LOOKUP list. Note that you can always switch from one grade to another by typing
a five-character ID number. For example, while in grade 12, you may call up student #50
in grade 9 by typing “09050” and pressing ENTER. Once in grade 9, you can type a
name to search for the first student in grade 9 matching the ID number you entered.
If you choose to sort By School and if you have a slow computer, upon selecting a grade
level from the main window there will be a noticeable delay while the key file for the
entire school is read. This delay will be barely noticeable to those of you with fast
computers. Consequently, if you have a slow computer, you may want to use the By
Grade option. You will also want to use this option if you are entering grades by grade
level.
NOTE:
By default, students appear alphabetically in the F6: LOOKUP window. To view students
in the LOOKUP listed by ID number, click on the column heading ID in the lookup window.
To return to an alphabetical view, click on the column heading NAME.
Page 2
8) EXPORT GRADE QUICK ROSTERS ON EXIT?
9) GRADE QUICK EXPORT PATH?
A) YEAR FOR GQ EXPORT?
Specification #8 determines whether rosters will automatically export to Grade Quick
when a change is made to the roster such as adding a course/section, which you can do
in the Transcript View using the “Alternate Add” method described below.
Specifications #9 and #9-A also relate to exporting rosters to GradeQuick.
6-4
Report Cards Manual
View/Change/Add/D rop
Viewing and Editing Grades
NEXT/PREV ORDER?
Set this specification to “By Record” to bring up the next student numerically when you
press F5: NEXT in the VCAD window or set it to “Alphabetically” to bring up the next
student alphabetically when you press F5: NEXT.
Withdrawing Student from Course/Section
Students can be withdrawn from courses/sections in the Transcript View, as well as in
the Schedule View. The same options for withdrawing are available when you press F8:
WTH in either window. See the SCHEDULING PLUS manual for a detailed
explanation of each option.
• If you manually enter a “W” into the final grade column of a student's transcript either
in the Transcript View of this program or in the Enter Grades program, that student
will NOT automatically be dropped from the roster. Consequently, the student will
still be included in class size counts and on data entry forms. You must use the F8:
WTH option to remove a student from a course section roster.
• The option to remove all of a student’s courses from the transcript (Shift + F8) is
available in the Schedule View, but NOT in the Transcript View. The same is true of
the option to Withdraw the student from all his/her courses but leave them in the
transcript (Control + F8) Refer to the SCHEDULING PLUS manual for more
information on how to use these options.
• To add a course/section to a student’s schedule in the Transcript View, type the letter
“A” for “ADD” followed by a number, a slash and a section number in the ENTER
ID # OR NAME field. For example, type “A121/1” and press ENTER to enter the
student into section #1 of course #121. Use a section number of 0 to enter a student
into a study hall. For example, type “A121/0” to enter the student into study hall
#121. Type the letter “A” followed by the course number to add a course request. For
example, type “A121” and press ENTER to enter course #121 as a course request.
Do not leave any spaces.
Editing the OVR Column
The OVR (override) column allows you to specify that a student is taking a course for
less than full credit and/or less than full GPA value. With the cursor in this column, click
the F6: LOOKUP key to display a list of valid entries. For example, if a student is
auditing a course, you might choose the code “1” to indicate that the student should
receive no credit and that the course should not count towards the career GPA. Code of
“2” indicates that the student should receive HALF of the possible total credit and that
the course should count for HALF of what it normally does toward the GPA calculation.
The OVR column is available in both the current (0) year and the minus year views.
Printing the Transcript View (F9: PRINT)
Press or click F9: PRINT to obtain a printed copy of the Transcript View showing the
student’s courses/sections and grades. This option can be used in both the current (0)
year and in the minus year views.
Report Cards Manual
6-5
Chapter 6
View/Ch ange/Add/ Drop
Viewing and Editing Grades
Manually Editing GPA, Quality Points, Weight & Credits
The Statistical Reports program is used to update a student’s career credits and GPA at
the semester and at the end of the year. The top of the YEAR 0 (current year) view shows
these numbers as of the last time they were updated. Choosing F2: GPA allows you to
manually edit these numbers. Note that this function key is used to edit the GPA
information while viewing a transcript for the current year and to edit attendance
information while viewing a transcript for a previous or “minus” year.
When you first purchase REPORT CARDS PLUS, if you do not want to enter past
courses into the program, this option may be used to manually enter a students’ prior
cumulative career credits and GPA's. While editing these numbers, pressing or clicking
ESC aborts the edit, losing any changes you have already made. To accept and save your
changes, choose F10: ACCEPT.
To manually edit a student’s credits, simply type in that field at the top of the window.
Press F10: ACCEPT to save and exit the window or press TAB or ENTER to move to
the Adjusted GPA (AGPA) field, where you can change the number of quality points
with GPA factor included that the student receives. Pressing TAB or ENTER again will
move the cursor to the Weight (WT) field. When you modify the adjusted quality points
and the weight, the Adjusted GPA (AGPA) will automatically be updated. Similarly,
when you modify the Simple Quality Points (SQP) and weight, the program will
automatically update the Simple GPA (SGPA). (Note that the cursor will not stop in the
AGPA or SGPA fields because there is no way to modify those fields without adjusting
the Quality Points and weight.)
A description of each of the fields at the top of the window in the Transcript View
follows:
CREDITS The Credits shown on the top of the window for YEAR 0 are the student’s
career credits. You may manually change this number or enter it for the
first time if you have just purchased REPORT CARDS PLUS.
6-6
AQP
Adjusted Quality Points. The adjusted quality points are divided by the
weight to calculate the adjusted GPA, which is listed as “AGPA” at the top
of the window. The adjusted quality points includes extra points the
student may have earned for taking honors courses. (The GPA factor is
used to give extra points for honors courses.)
WT
The weight is usually the same as “credits attempted”. It is divided into the
adjusted quality points to produce the adjusted GPA. Similarly, it is divided
into the simple quality points to produce the simple GPA.
SQP
Simple Quality Points. The simple quality points are divided by the weight
to calculate the simple GPA, which is listed as “SGPA” at the top of the
window.
Report Cards Manual
View/Change/Add/D rop
Viewing and Editing Grades
You can edit a student’s GPA, credits or quality points only in the current year. However,
be aware that modifications you make to these figures in the current year will affect the
student’s career credits and GPA.
Entering and Editing Information for Previous (Minus) Years
Whether in the Schedule or Transcript view, the PLUS {+} and MINUS {-} keys will
change the year you are viewing, provided you have set up the program to archive grades
in Database PlusD New FilesDSpecifications (See the DATABASE PLUS manual for
information on how to do this.) For example, while viewing YEAR 0, pressing the
MINUS key will display YEAR -1, which contains the previous year's transcript.
Pressing the MINUS key again will bring up a view of the student’s transcript from two
years ago, and so on. For example, a grade 12 student, YEAR -1 is the 11th grade
transcript and YEAR -2 is the 10th grade transcript, and so on. To return to the current
year’s view, simply press the PLUS key. Alternatively, you can click on the Year - and
Year + keys at the bottom of the window.
Entering and Editing Grades in the Minus Years
When in the Minus year view, you can enter or edit grades the same way you can in the
current (0) year view. Remember that in order to view a student’s courses and grades in
the minus year, you must run the Transfer Credits & GPA option to archive previous
years’ grades. See the “Viewing and Editing Grades” on page 6-3 for detailed
information on how to perform this function.
NOTE:
Note that after entering or changing a student’s grade in VCAD in the minus year, you must
update GPAs/Credits on archival years in order to update the student’s career GPA based
on the new grade. (See Chapter 8)
Report Cards Manual
6-7
Chapter 6
View/Ch ange/Add/ Drop
Viewing and Editing Grades
Editing the Teacher (TCH) Column in the Minus Years
The TCH column appears in years other than year 0. It contains the ID number of the
teacher who taught that course, enabling the printing of teacher names on transcripts for
archived courses. You can manually edit this ID number in the same manner as you
would edit a grade. While in this column, the F6: LOOKUP option will display a list of
teachers and their ID numbers. As in other F6: LOOKUP windows in the program, you
can click on the top of the CODE column to sort by ID Number or click on the
DESCRIPTION column to sort by name.
Editing Daily Attendance Information in the Minus Years
Whereas the top of the YEAR 0 Transcript View contains career credits and GPA
information, the top of the Transcript View for a minus year contains daily attendance
summary information for that year.
The top of the YEAR -1 window above shows that in his senior year, this student was a
member of the school for 172 days, had 23 absences, 0 half absences, no suspensions, 9
tardies and 2 dismissals. Choose F2: ATT to edit these numbers. While editing
attendance information, as while editing grades, pressing ESC aborts the edit, losing any
changes you may have already made. To accept and save your changes, choose F10:
ACCEPT.
Scheduling View (F10: SCHED)
When you press F10 to switch to Scheduling View, you will be able to perform a variety
of functions, including:
•
•
•
•
Add or edit courses and sections
Print the scheduling log
Mass copy students from one section to another
Mass drop all students from a section and mass unschedule all students from a
section.
For more information on how to perform these functions, see the SCHEDULING
PLUS manual.
Hot Key Enabled:
This program is HOT KEY ENABLED, meaning that while viewing a student’s data, a
single keystroke will take you to that same student’s data in any other module! You can
press another key to return to this program or stay in the new module. One program in
each module is Hot Key Enabled. While in a Hot Key Enabled program, you can move
directly to the Hot Key Enabled program in any other module by pressing SHIFT + the
6-8
Report Cards Manual
View/Change/Add/D rop
Viewing and Editing Grades
function key corresponding to that module. The following is a list of the programs in
Administrator’s Plus that are Hot Key Enabled. While in any of these programs, you can
DATA BASE
The ADDRESS program is HOT KEY ENABLED. Move to the
ADDRESS program from another module by pressing the
SHIFT key while holding down the F1 function key
ATTENDANCE
The CORRECT program is HOT KEY ENABLED.
{SHIFT+F2}
REPORT CARDS
The View/Change/Add/Drop program is HOT KEY
ENABLED. {SHIFT+F3}
SCHEDULING
The View/Change/Add/Drop program is HOT KEY
ENABLED. {SHIFT+F4}
DISCIPLINE
The INCIDENTS program is HOT KEY ENABLED.
{SHIFT+F5}
BILLING
The INVOICES program is HOT KEY ENABLED.
{SHIFT+F6}
press SHIFT + F3 to return to the VCAD Transcript View.
Report Cards Manual
6-9
Chapter 6
View/Ch ange/Add/ Drop
Viewing and Editing Grades
6-10
Report Cards Manual
7
Report Cards Report Writer
Introduction . . . . . . . . . . . . . . . . . . . . . 7-3
Using the Task List . . . . . . . . . . . . . . . 7-4
Using Tasks #1-7 to Print Report
Cards and Transcripts . . . . . . . . . . 7-4
Printing a Wide Report Card . . . . . . 7-5
Printing a Narrow Report Card . . . . 7-5
Printing a Wide Transcript By Year . 7-5
Printing a Wide Transcript By Year
By Department . . . . . . . . . . . . . . . . 7-5
Printing a Narrow Transcript By Year 7-5
Printing a Narrow Transcript By
Department . . . . . . . . . . . . . . . . . . 7-6
Printing a Permanent Lable . . . . . . . 7-6
Printing One Separate Report Card Per
Course . . . . . . . . . . . . . . . . . . . . . . 7-6
Printing an Honor Roll Certificate . . 7-7
Exporting the Honor Roll to an ASCII
File Named HROLL.ASC . . . . . . . . 7-7
Generating a Form Letter:
Congratulations on Making the
Honor Roll . . . . . . . . . . . . . . . . . . . 7-8
Print a Letter for Each Course
Within the Search Range . . . . . . . . 7-9
Producing a Progress Report for
Each Course with Grade . . . . . . . . 7-9
Search for List of Students with Exact
Course Grade . . . . . . . . . . . . . . . . 7-10
Printing a List of Students with Grades
Within Grade Limits . . . . . . . . . . . . 7-10
User Defined Tasks #1 - #11 . . . . . . 7-11
Printing Rosters . . . . . . . . . . . . . . . . 7-11
Printing One Report Card Per Course,
Sorted by Teacher . . . . . . . . . . . . . 7-11
Printing Mailing Labels for a Course 7-12
Specifications. . . . . . . . . . . . . . . . . . . . 7-13
PAGE 1: Initial Specifications . . . . . . 7-13
CURRENT TASK: . . . . . . . . . . . . . . 7-13
PRINT LETTERS/REPORTS FOR: . 7-14
PAGE 2: More Specifications . . . . . 7-18
Page 3: Code Override
Specifications . . . . . . . . . . . . . . . . . 7-23
PAGE 4: Transcript & Optional
Field Specifications. . . . . . . . . . . . . 7-24
Print Menus . . . . . . . . . . . . . . . . . . . . . 7-27
PRINT WHICH STUDENTS?. . . . . . 7-27
PRINT WHICH SECTIONS? . . . . . . 7-29
Comparisons Between Data Base &
Report Card Reports . . . . . . . . . . . . 7-31
View/Edit Letters/Reports . . . . . . . . . . 7-32
Viewing and Editing Report Cards
Reports/Letters Window . . . . . . . . . 7-32
Using the View/Edit Letters/Reports
Toolbar . . . . . . . . . . . . . . . . . . . . . . 7-32
File Menu . . . . . . . . . . . . . . . . . . . . . 7-33
Edit Menu . . . . . . . . . . . . . . . . . . . . . 7-34
Search Menu . . . . . . . . . . . . . . . . . . 7-35
Options Menu. . . . . . . . . . . . . . . . . . 7-36
Window Menu . . . . . . . . . . . . . . . . . 7-38
Function Keys . . . . . . . . . . . . . . . . . 7-38
Page Setup . . . . . . . . . . . . . . . . . . . . . 7-42
Page Layout Menu . . . . . . . . . . . . . . 7-42
Printer Setup Menu . . . . . . . . . . . . . 7-43
Printer Properties . . . . . . . . . . . . . . . 7-44
Report Cards Manual
7-1
Report Card Codes . . . . . . . . . . . . . . . 7-45
Table Codes For Skills and Non SkillsBased Report Cards . . . . . . . . . . . 7-45
Course Table Box . . . . . . . . . . . . . . 7-45
Advanced Specification Box
(for skills-based report cards) . . . . 7-48
Attendance Box . . . . . . . . . . . . . . . . 7-53
GPA Box . . . . . . . . . . . . . . . . . . . . . 7-55
Honor Roll Box. . . . . . . . . . . . . . . . . 7-55
General Box Specifications . . . . . . . 7-56
Inserting a Graphic into a Report. . . 7-57
Standard Codes for Reports in Report
Card Report Writer. . . . . . . . . . . . . . 7-59
Code Preliminaries: . . . . . . . . . . . . . 7-62
Codes That May Share a Line
With Other Codes: . . . . . . . . . . . . . 7-64
Header Codes:. . . . . . . . . . . . . . . . . 7-70
Special Course Line Code: . . . . . . . 7-71
Special Register Code Two: . . . . . . 7-74
OTHER ATTENDANCE CODES . . . 7-74
Attendance Codes That Make Up the
Daily Attendance Grid . . . . . . . . . . 7-76
Universal Report Codes. . . . . . . . . . 7-76
Codes 4 or Fewer Characters In Length
That May Share a Line With Other
Codes. . . . . . . . . . . . . . . . . . . . . . . 7-82
Codes That Must Be On a Line By
Themselves . . . . . . . . . . . . . . . . . . 7-83
The Pre-defined Reports . . . . . . . . . . . 7-84
Report Cards Manual
7-2
Report Cards Report Writer
Introduction
Introduction
This program is used to produce many different reports, including report cards,
transcripts, permanent labels and letters.
Report Cards Report Writer includes all of the features of the Data Base Report Writer.
Reports and letters are designed similarly. Users can print report cards containing
attendance data and information from the student database, and even perform searches
based on report card criteria, such as grade range.
In this chapter, you will find all the information you need to print report cards,
transcripts and other reports in an attractive and easy-to-read format, including
instructions on how to custom design your own reports to meet your school’s particular
needs. Report Cards Report Writer lets you:
•
•
•
•
•
•
Design and print numerous reports
Print report cards with or without skills
Print transcripts
Print deficiency letters
Print honor roll certificates and congratulatory letters
Print honor roll certificates
Report Cards Manual
7-3
Chapter 7
Report Cards Report Writer
Using the Task List
Using the Task List
Although the Report Cards Report Writer is extremely powerful and versatile, the vast
majority of the time you will use it to perform a handful of standard tasks, including
printing report cards, transcripts and permanent labels.
NOTE:
The task you select determines which specifications appear.
Using Tasks #1-7 to Print Report Cards and Transcripts
Notice that there are two tasks for printing report cards and four tasks for printing
transcripts. Though you may use all of them, you will most likely use one of each. For
example, if your school prints a wide report card on a pre-printed form, then you should
choose Task #1, “Print a WIDE Report Card”, rather than Task #2, “Print a Narrow
Report Card”. The same holds for transcripts: you will print either wide or narrow
transcripts, and you will print them either by department or by year. The default report
for the task you choose will appear in Specification #3: ACTIVE LETTER/REPORT?
You can choose to accept the default report or choose another pre-formatted or
customized report. The following section describes each task in the task list.
NOTE:
7-4
Although any of the reports included in Report Cards Report Writer will work with a dot
matrix as well as a laser or inkjet printer, some modifications to the report designed for use
with a laser or inkjet printer may be needed to make them work properly with a dot matrix
printer. For information on editing reports, see “View/Edit Letters/Reports” on page 7-32
Report Cards Manual
Report Cards Report Writer
Using the Task List
Printing a Wide Report Card
After selecting this task, use specification #3, ACTIVE LETTER/REPORT” to choose
from reports #2, #3, #4 or #20, or design your own. The default report is #20, which will
print wide report cards on plain paper; optimally, this report should be used with a laser
or inkjet printer. Report #18, “RC: Pre-printed Form”, also designed especially for use
with a laser or inkjet printer, prints a wide report card on a pre-printed form that has had
your school name and other information pre-printed on the top. If you are using a dot
matrix (continuous feed) printer, choose report #2 to print on plain paper, report #3 to
print on a form that does NOT have the school name or other information pre-printed on
it, or report #4 to print on a form pre-printed with the school name and other information.
All of these forms are available from Rediker Software.
Printing a Narrow Report Card
The default report for this task is #19, “RC: Nar Plain LASER”. Use it or define your
own. If you are using a dot matrix printer, choose Report #1: RC: Narrow Plain.
Printing a Wide Transcript By Year
This task allows you to print a transcript showing courses and grades for each year of
the student's record in a different corner (quadrant) of the transcript. Although the
default report for this task is report #59, you can also use reports #41, #42, #45, or #46.
Use #41 or #42 to print your transcripts on plain paper. Use #45 or #46 to print your
transcripts on pre-printed forms (available from Rediker Software). Use #41 or #45 if
you only offer credit based on the final grade. Use report #42 or #46 if you are a semester
school offering credit for passing each semester.
Printing a Wide Transcript By Year By Department
Use this task to print a student’s courses for all years in their record arranged by
department. See “Entering Department Names” on page 1-11 for an explanation of how
to set up Departments in Report Cards Plus. Choose from reports #43, #44, #47 or #48.
Use #43 or #44 to print your transcripts on plain paper. Use #47 or #48 to print your
transcripts on pre-printed forms available from Rediker Software. Use #43 or #47 if you
only offer credit based on the final grade. Use report #44 or #48 if you are a semester
school offering credit for passing each semester.
Printing a Narrow Transcript By Year
The default report for this task is #57, but you can also use reports #50 - #53. There are
no forms for narrow transcripts. Use #50 or #51 to print your narrow transcripts using
one column. You can fit more on a line but it may take more than one piece of paper.
Use #52 or #53 to print your narrow transcripts using two columns. Because the columns
are so narrow, you may have room for only a midyear and final grade and not the grades
for each marking period.
Report Cards Manual
7-5
Chapter 7
Report Cards Report Writer
Using the Task List
Printing a Narrow Transcript By Department
Use either the default report #54 or #55. Both are two column reports. Use #54 if you
offer credit based only on the final grade. Use #55 if you award credit based on each
semester's grades.
Printing a Permanent Label
Use this task to print a permanent transcript label. Choose from reports #21, #22 or #23.
Use #21 or #22 if you award credit based only on the final grade. Use #23 if you award
credit based on each semester's grades.
Printing One Separate Report Card Per Course
This task allows you to print a separate report card per course, per student. It leaves a
space for the teacher to hand write a personal comment. Choose between reports #6 or
#7 or design your own. The default report is #6, “RC: 1 per course I” and looks like:
7-6
Report Cards Manual
Report Cards Report Writer
Using the Task List
Printing an Honor Roll Certificate
Use this task to print a simple certificate listing the student and the honor roll he or she
achieved. Use the default report #9 (see below), or if you are using a pre-printed form
available from Rediker Software (call for a sample.), use report #8. You can also design
your own.
NOTE:
Note that Specification #2: “PRINT LETTERS/REPORTS FOR?” in the INITIAL
SPECIFICATIONS window, is set by default to conduct an honor roll search for this task.
You may change it to search for a different honor roll, but it must be set to sort on one or all
honor rolls. See “PRINT LETTERS/REPORTS FOR:” on page 7-14.
Exporting the Honor Roll to an ASCII File Named HROLL.ASC
The file created by this task will be composed of the names of the students on an honor
roll, the name of the honor roll they made, and the marking period for which they made
the honor roll. The default report is #10. You could use this list to design your own honor
roll certificate using a graphics program. As with Task 9, specification #2, “PRINT
LETTERS/REPORTS FOR”, in the INITIAL SPECIFICATIONS, is set by default to
conduct an honor roll search for this task. See the note above.
Report Cards Manual
7-7
Chapter 7
Report Cards Report Writer
Using the Task List
Generating a Form Letter: Congratulations on Making the
Honor Roll
This task searches on the honor roll you select in Specification #2 and generates a letter
of congratulations to all students on that honor roll list. Use the default report #11 or
design your own. Like the honor roll certificate, the honor roll letter must be set to search
on one or all honor rolls.
7-8
Report Cards Manual
Report Cards Report Writer
Using the Task List
Print a Letter for Each Course Within the Search Range
Use this task to print a letter for each course within the search range. This task generates
a letter for all students who have met a grade search specification you have set. The
default letter is report #12, “Letter: Search”. Use it or design your own. Since this is a
warning letter, you will want to search for low grades; of course, you could edit the body
of the letter so that it becomes an honorific letter instead. To perform a grade search, you
need to set Specification #2 of the INITIAL Specifications window to some sort of grade
search;. The default setting is one per course. Set SPECIFICATIONS #5-8 to the desired
the marking period and grade(s) on which to search.
NOTE:
You can modify this report so that the letter lists each course in which the student received
the selected grade by adding the code ~TABLE5~ to the body of the report. See “View/Edit
Letters/Reports” on page 7-32 for information on how to edit reports.
Producing a Progress Report for Each Course with Grade
This task produces a progress report for each course with a grade in the search range.
The default report is #13, “Letter: Search.Com”. Use it or design your own. Room is left
for the teacher to hand enter a comment paragraph.
Report Cards Manual
7-9
Chapter 7
Report Cards Report Writer
Using the Task List
Search for List of Students with Exact Course Grade
This task is designed to print a list of students who have the exact grade you specify in
at least one of their courses. To perform this search go to the INITIAL
SPECIFICATIONS window and set SPECIFICATION #2 to EXACT GRADE
SEARCH: 1 PER COURSE, SPECIFICATION #5 to the grade to be searched for, and
SPECIFICATION #8 to the marking period on which the search is to be performed.
Note that you can also search on comment codes in Comment columns.
Printing a List of Students with Grades Within Grade Limits
This task is designed to print a list of students who have a grade that falls within the
range you specify in at least one of their courses. To perform this search go to the
INITIAL SPECIFICATIONS window and set Specification #2 to GRADE RANGE
7-10
Report Cards Manual
Report Cards Report Writer
Using the Task List
SEARCH: 1 PER COURSE, Specifications #6 and #7 for the range to be searched, and
Specification #8 to the marking period on which the search is to be performed. Note that
you can also search on comment codes in Comment columns.
User Defined Tasks #1 - #11
You may design your own tasks by selecting one of the User Defined tasks, setting up
the desired specifications, and giving the task a name. User Defined tasks will be saved
per user. To create a new task, choose one of the unused “USER DEFINED TASKS”
from the task list. After entering a task name, set the specifications for the task as
desired. The specifications for this task will be saved per user and will be available each
time you use the Report Cards Report Writer.
Printing Rosters
This task will enable you to print class rosters that are similar to those printed by the
entry forms program. The default report is #35, “ROSTER” and may be modified to
meet your needs. In order to print section rosters, you must choose the option to print by
“SECTIONS” from the window that appears when you finish entering specifications for
the task. You may then choose to print rosters for ALL SECTIONS, a RANGE OF
TEACHERS, INDIVIDUAL TEACHERS or INDIVIDUAL SECTIONS. Except when
printing rosters for individual sections, they will always be printed sorted by teacher. Inother-words, all of the rosters for one teacher will be printed followed by all of the
rosters for the next teacher. If you choose to print by grade level, you will get a general
roster showing students and their grade levels and ID numbers.
Printing One Report Card Per Course, Sorted by Teacher
This task will enable you to print one report card per course per student SORTED by
teacher. The default report is #37, which is the same as the progress report produced by
task #13. See task #13 for a sample of what this report looks like. The advantage of this
Report Cards Manual
7-11
Chapter 7
Report Cards Report Writer
Using the Task List
task is that the progress reports will be printed sorted by teacher as opposed to by
student. From the print window, which has “GRADE NUMBER” as the first choice, you
must choose the option to print by “SECTIONS”. You may then choose to print for ALL
SECTIONS, a RANGE OF TEACHERS or INDIVIDUAL TEACHERS or
INDIVIDUAL SECTIONS. Except when printing for individual sections, they will
always be printed sorted by teacher. In-other-words, all of the report cards or progress
reports for one teacher will be printed followed by those for the next teacher. You may
also use report #36, which will give you the same report as that produced by Task #8)
Print One Separate Report Card Per Course. See “Printing One Separate Report Card
Per Course” on page 7-6.
Printing Mailing Labels for a Course
The default report for this task is #33, which prints a mailing label with the parent’s
name and address information. These labels can be used to send report cards or
transcripts to parents. You can copy and modify the report to pull the desired address
information from the database. If you choose to print the report by section, you can
obtain mailing labels for only those students taking a particular course or range of
courses. To print labels, you must use the SECTIONS option from the main window.
7-12
Report Cards Manual
Report Cards Report Writer
Specifications
Specifications
After you choose the task you wish to perform, you will see the initial specification
window. You can accept the default specifications for the task you have chosen, or
change them as needed. Note the following:
• To perform a different task, choose Specification #1, and you will be returned to the
task list.
• Specifications are user-specific so that the next time you choose this task they will
appear as the defaults.
• If, after experimenting with some of the specifications, you want to return to the
original specifications for a task, you can click the Reset Default[!] button.
• As in other parts of REPORT CARDS PLUS, you can access any additional pages of
the specification windows by pressing the PAGE UP or PAGE DOWN keys or
clicking the appropriate Page tab.
PAGE 1: Initial Specifications
CURRENT TASK:
The list of possible tasks is described in detail in the previous section. Use this
specification to choose a different task. To return all specifications for the current task
to their defaults, click the Reset Default [!] button.
Report Cards Manual 7-13
Chapter 7
Report Cards Report Writer
Specifications
PRINT LETTERS/REPORTS FOR:
Along with the options on the print window that appears when you exit the
Specifications window, this specification determines which students will be printed on
a report. Clicking this specification displays the following Search list:
As part of your primary filter, you may choose to print reports for only those students
meeting specified search and sort criteria, such as only those students in a certain
homeroom. This specification, which is a secondary filter, will further narrow down
those students that passed your primary filter.
For printing most reports, such as report cards, transcripts and permanent labels, use the
“ALL SELECTED STUDENTS” option.
7-14
Report Cards Manual
Report Cards Report Writer
Specifications
The following table describes each option and how it is used:
PRINT LETTERS/REPORTS
FOR?
DESCRIPTION
ALL SELECTED STUDENTS
The report or letter will be printed for every student
that passed the primary filter.
EXACT GRADE SEARCH: 1
per course
If you choose this option when printing An Exact
Search List, you will see listed on the report every
course in which the student received the selected
grade. If you print a Search Letter using this option,
you will receive one letter for each course in which the
student received the selected grade. For example,
you could send a separate letter for each course in
which a student has a grade of “I”. Use Specification
#5 to set the grade and Specification #8 to set the
marking period on which to search.
EXACT GRADE SEARCH: 1
per student
If you choose this option when printing An Exact
Search List, you will see listed on the report only the
first course in which the student received the selected
grade. If you print a Search Letter using this option,
only one letter will be printed for a student who
received the selected grade even if they have that
grade in multiple courses. If you choose to search on
I for “Incomplete”, only one letter will be printed per
student even if they have incompletes in five courses.
See the note on page 7-9 for information on modifying
the report so that all courses in which the student
received the selected grade appear on the letter. Use
Specification #5 to set the grade and Specification #8
to set the marking period on which to search.
GRADE RANGE SEARCH: 1
per course
This is the same as EXACT GRADE SEARCH: 1 per
course listed above, except that you can search on a
RANGE of grades instead of one particular grade.
Specifications #6 and #7 will be used to set the grade
range for which to search. Specification #8 sets the
report card column to search.
GRADE RANGE SEARCH: 1
per student
This is the same as EXACT GRADE SEARCH: 1 per
student listed above, except that you can search on a
RANGE of grades instead of one particular grade.
Specifications #6 and #7 will be used to set the grade
range for which to search. Specification #8 sets the
report card column to search.
Report Cards Manual 7-15
Chapter 7
Report Cards Report Writer
Specifications
HONOR ROLL SEARCH 1-5
Use when printing honor roll letters or certificates for
students who are on a particular honor roll list. The
honor roll must first be run with the Statistical Reports
program and saved to disk (press F9:PRINT after
generating the honor roll). See chapter 8 for more
information on running honor rolls.
ON ANY HONOR ROLL
SEARCH
The honor roll must first be run with the Statistical
Reports program and saved (press F9:PRINT after
generating the honor roll). The active report will then
be printed for those students on any honor roll. For
example, a letter could be sent congratulating all of
those students that made the honor roll.
NOT ON ANY HONOR ROLL
SEARCH
The honor roll must first be run with the Statistical
Reports program and saved to disk (press F9:PRINT
after generating the honor roll.) The active report will
then be printed only for those students who were NOT
on any honor roll.
ACTIVE LETTER/
REPORT
Click the browse button to display the letters and
reports come with Report Cards Plus.
YEAR: R.CARDS, LABELS,
SEARCHES?
All reports can be printed and searches conducted
using the current year's data or the data from any past
year in the archival files. For example, choose year 0
to print a report card using the current year's data.
Choose YEAR -1 to print a report card using the data
from the previous year.
GRADE FOR EXACT GRADE Enter into this specification the grade you want the
SEARCH?
program to search for when doing an exact grade
search. If you want to find all students with a 75, then
set Specification #2 to one of the exact grade options
and enter 75 for Specification #5. You can also use
this to search for incompletes (enter I) or for blank
grades (leave this specification blank).
LOW GRADE FOR RANGE
SEARCH?
HIGH GRADE FOR RANGE
SEARCH?
7-16
Report Cards Manual
Use these two specifications to specify the limits of a
range of grades for which you want the program to
search. For example, if you are a school using
numerical grades and you want to find all students
who have an “A” in at least one of their classes, you
can set Specification #6 to 90 and Specification #7 to
100 (assuming that 90-100 = A in you school) and
Specification #2 to GRADE RANGE SEARCH: 1 per
student.
Report Cards Report Writer
Specifications
COLUMN FOR GRADE
SEARCHES?
When doing an exact grade or grade range search,
use this specification to designate which report card
column you wish to search. A drop-down list will
appear when you click on this specification. Simply
choose the desired column from the list.
PRINT DAILY ATTENDANCE? Most of the report cards, transcripts, and permanent
label reports are designed to print attendance data.
The obvious exceptions are the transcripts in which
courses are organized by department rather than by
year. Use this specification to designate whether or
not you wish to print this attendance data.
ATTENDANCE INTERVAL
START DATE?
ATTENDANCE INTERVAL
END DATE?
Attendance data will be read only for the interval
between and including these dates. Specification B,
INTERVAL ENDING DATE?, always defaults to the
current date.
ATTENDANCE YEAR-TODATE THRU?
The bottom of a report card contains two columns of
attendance data. One is for the interval defined by
SPECIFICATIONS A and B, and the other is for the
first day of school through this date. Note that this
date may not be BEFORE the interval ending date as
defined by SPECIFICATION B.
REPORT CARD MESSAGE
LINE #1
REPORT CARD MESSAGE
LINE #2
REPORT CARD MESSAGE
LINE #3
You may enter a three line message that will appear
at the top of each report card. Each line may contain
35 characters. If you need to enter a longer message,
you may type the text directly into the body of the
report. See “View/Edit Letters/Reports” on page 7-32
for information on how to edit reports.
Report Cards Manual 7-17
Chapter 7
Report Cards Report Writer
Specifications
PAGE 2: More Specifications
These specifications work in conjunction with the COURSES TO PRINT specifications
on page 3 of Specifications. For example, if you choose to include courses 100 through
900 and exclude 400 through 500, then you will only obtain courses 100 through 399
and 501 through 900. Because the last course number must be greater than the first
course number, you must change Specification #3 before you change Specification #2.
Specification
Description
INCLUDE
COURSES
MEETING
WHEN?
You may limit the courses printed on reports or used in searches to
only those meeting during a specific marking period. If you set this
specification to “FIRST MARKING PERIOD”, only those courses that
met during the first marking period will be included. This includes ALL
YEAR courses as well as FIRST SEMESTER and FIRST QUARTER
courses. When printing by SECTIONS, only those sections included
by this specification will be printed.
These specifications allow you to enter a starting master course
number and an ending master course number. Any courses falling
within this range and including the entered numbers will NOT be
printed on any reports. This will enable you to specify that courses
LAST COURSE such as lunch should not be printed on report cards. When printing
NOT TO
by SECTIONS, courses within this range will NOT be printed.
PRINT?
FIRST
COURSE NOT
TO PRINT?
7-18
Report Cards Manual
Report Cards Report Writer
Specifications
Specification
Description
ACTIVE/
INACTIVE
STUDENTS?
Your reports may include only active students, only inactive students
or both active and inactive students. Inactive students are students
who have withdrawn from your school.
INCLUDE
BLANK
SEARCH/SORT
CATEGORIES?
When you search for students in a certain (Data Base) category, you
must decide whether or not to include students who do not have an
entry in that category. Answer “Yes” if you want to include them;
otherwise, answer “No”. If this specification is set to “Yes” and you
are sorting by sex, then a separate report will be printed for those
students who have not yet had their sex entered into their data base
records. See the Data Base Plus manual for an explanation of the
Search/Sort options in Administrator’s Plus.
START GRADE
FOR ALL
GRADES?
END GRADE
FOR ALL
GRADES?
These specifications define which grade levels will be used if you
select the ALL GRADES option. See page “Print Menus” on page 727. For example, if you are a K - 12 school and want to print report
cards for only grades 9 - 12, set these specifications to grade 9 and
grade 12, respectively. Since the Start Grade must be earlier than the
End Grade, it may be necessary to set the End Grade before you set
the Start Grade.
PRINT
CREDITS?
Choose from the following:
DO NOT PRINT CREDITS: There will not be a credit column on the
report card displaying the current earned credits for each course.
Also, career credits earned to date will not be printed at the bottom
of the report card.
PRINT CREDIT COLUMN AND BOTTOM TOTALS: There will be a
credit column on the report card displaying the current earned credits
for each course. Credits will be earned by having a passing grade in
any column(s) that have been designated as CREDIT columns when
you customized your report card columns using the Customize RC
program.See “Customize Report Card Columns” on page 1-5. If you
have one credit column, all courses will be given full credit for a
passing grade in that column. If you have more than one credit
column, full year courses will earn a portion of their credit for a
passing grade in each of the credit columns. In other words, if you
have two semester grade columns that are each credit columns, a full
year course would earn half credit for a passing grade in each
column. Also, career credits earned to date will be printed at the
bottom of the report card as in the following sample report card:
Report Cards Manual 7-19
Chapter 7
Report Cards Report Writer
Specifications
Specification
Description
PRINT CREDIT COLUMN ONLY: The same thing will happen as in
choice #2 except that credits earned to date will NOT be printed at
the bottom of report cards, as in the following sample report card:
PRINT BOTTOM TOTALS ONLY: The same thing will happen as in
choice #2 except that the column listing credits earned for each
course will NOT be printed
7-20
Report Cards Manual
Report Cards Report Writer
Specifications
Specification
Description
USE REGENT
OPTION FOR
CREDITS?
This option is only needed by some schools in New York. If you have
one column which has been designated as a FINAL column worth
credit, and if you have another column that has a three character
name of “REG” or “RGT”, and if this option is set to “Yes”, then the
program will use the higher grade between the FINAL column and
the “REG” column when it prints the earned credits.
PRINT HONOR When honor rolls are printed using the Statistical Reports program,
the program writes to the hard disk each student's name and the
ROLL
number of the honor roll they were on. (Either a 1, 2 or 3.) If you then
STATUS?
set this specification to “Yes”, any student who is on an honor roll will
have that honor roll's name printed in the lower right-hand corner of
their report card. The name of the honor roll may be changed by
using the DEFINE HONOR ROLL option in the Statistical Reports
program.See “Defining Honor Roll Reports” on page 8-15.
For example, if a student is on an honor roll called “High Honors”, the
following would print on his report card:
HONOR ROLL STATUS:
High Honors: If a student is not on any honor roll, nothing will be
printed. (The words “HONOR ROLL STATUS” will not even show on
the report card.)
If you use this option, it is imperative that you press F9: PRINT after
generating your honor rolls with the Statistical Reports program
BEFORE printing your report cards. Otherwise, you will have the
honor roll status from the previous marking period printed on your
report cards for this marking period. The Statistical Reports program
does have an option to clear the honor roll status from all previous
marking periods as it calculates another honor roll. For further
information, see “3) INCLUDE STUDENTS ALREADY ON ANY
HONOR ROLL?” on page 8-16.
PRINT
COLUMN
AVERAGES?
This specification allows column averages to be printed at the bottom
of each report card column that has at least one grade. Columns
designated as “ABSENT” or “OTHER” columns will not have
averages printed.
Report Cards Manual 7-21
Chapter 7
Report Cards Report Writer
Specifications
Specification
Description
USE WEIGHT?
USE GPA
FACTOR?
COUNT CRS
WITH GPA
FACTOR OF
99?
These specifications are set in the Inspect/Change Universal HR
Specifications window. See “Inspect/Change Universal HR
Specifications” on page 8-5 for an explanation of each of these
options. Note that Specification E: COUNT CRS WITH GPA
FACTOR OF 99 is no longer used by the program. It is now possible
to designate whether a course counts in GPAs in the View/Edit
Courses & Sections window. See “View/Edit Courses & Sections” on
page 2-3.
ROUND OR
TRUNCATE
COLUMN
AVERAGES?
Because there is only room for a limited number of decimal places,
depending upon your report, this option determines if column
averages are rounded or truncated. In other words, an average of
84.67 will be rounded to an “85” or truncated to an “84”. If an “85” is
the cutoff for your honor roll, you should truncate, so that parents do
not complain when they see a grade of 85 on the report card and their
child was not on the honor roll.
SCHOLARSHIP This specification determines whether the heading “SCHOLARSHIP
REPORT” or “PROGRESS REPORT” will print on a report card.
OR
PROGRESS?
7-22
Report Cards Manual
Report Cards Report Writer
Specifications
Page 3: Code Override Specifications
Specification
Description
PRINT GPA
This option allows you to designate if you want GPA information
INFORMATION printed and if yes, whether or not it should be the adjusted or simple
GPA data. Adjusted GPAs include extra points awarded for honors
courses (the GPA factor) while simple GPAs do not. If you choose to
print CURRENT & UPDATE GPA, the report card will show quality
points, credits, and weight from before the last update in addition to
the last update data:
If you choose to print CURRENT GPA DATA, the report card will
display the GPA, quality points, and weight as of the last update
Report Cards Manual 7-23
Chapter 7
Report Cards Report Writer
Specifications
Specification
Description
2)-K
These specifications determine whether or not a particular piece of
information prints on a report, provided that the report is designed to
print this information in the first place. If a report is not designed to
print some report card data (e.g. Report #1, Narrow Plain Report
Card, does not contain the code to print section numbers), the above
toggles will have no effect. For this reason, you should print a few
sample copies of a given report before you commit yourself to a mass
printing.
NOTE: If something is not printing that you believe should be
printing, for example, the staff name in a warning letter, check to
make sure that these specs are set the way you want them to be.
PAGE 4: Transcript & Optional Field Specifications
7-24
Report Cards Manual
Report Cards Report Writer
Specifications
Specification
Description
START YEAR
FOR
TRANSCRIPTS
END YEAR FOR
TRANSCRIPTS
The “Start Year” refers to the first year's data that will print on the
transcript. To change the start year, press “1” and use the arrow keys
to select the earliest year you want to print. The “End Year” refers to
the last year you want to print on the transcript. If you are printing a
transcript for your current seniors, you would probably set
SPECIFICATION #1 to “YEAR -3” (3 years less than the current year),
and set SPECIFICATION #2 to “YEAR 0" (the current year). If you are
printing transcripts for juniors, you will want to set the START YEAR
FOR TRANSCRIPTS? to -2 and the END YEAR FOR
TRANSCRIPTS? to 0.
OPTIONAL
FIELD #1 FOR
RC/TRANS?
This option allows you to specify a Data Base field to be printed on the
top of wide report cards and transcripts. On wide report cards it prints
on the top line of the report, whereas on transcripts it prints across from
the parents' name.
OPTIONAL
FIELD #2 FOR
TRANS?
This option allows you to specify a second Data Base field to print on
transcripts. It will print below any entry in SPECIFICATION #3.
OPTIONAL
FIELD FOR
TRANS YR 1?
OPTIONAL
FIELD FOR
TRANS YR 2?
OPTIONAL
FIELD FOR
TRANS YR 3?
OPTIONAL
FIELD FOR
TRANS YR 4?
These specifications allow you to print a Data Base field at the bottom
of a transcript organized by years (rather than organized by
department). This field will print below each year's data and to the right
of any attendance data.
USE NUMBER
GRADE PRINT
TABLE?
This option permits you to use or not use the number grade print table
you set up with the Customize RC program. See “Edit Number Grade
Print Table” on page 1-11. If you are using number grades, you have
the option to have them print as something other than the grade you
have entered (for example, letter grades). The number grade print
table translates the grades you have entered into the grades you want
to be printed (the original number grade is what the program stores).
The default setting for this specification is No.
TRANSCRIPT
PRINTED `AT
END OF'?
This specification determines what will print in the “AT END OF” box at
the bottom of the transcript. If you are printing senior transcripts at the
end of the first semester, you could enter “SEMESTER1” into this
specification.
Report Cards Manual 7-25
Chapter 7
Report Cards Report Writer
Specifications
Specification
Description
YEAR, GRADE
LEVEL
OFFSET?
This specification permits you to print transcripts from directories in
which you have already archived. In such a directory, you should set
this specification to “1” and Specifications #1 and #2 to one year less
than you would in the current year. For example, a high school that
normally prints transcripts from the current year with Specifications #1
and #2 set to YEAR -3 and Year 0, respectively, will leave this
specification at “0”. However, if they print a transcript from last year's
directory after they have archived, then they should set Specifications
#1 and #2 to Year -4 and Year -1, respectively, and they should set
Specification E to 1.
NOTE: You can also open a previous year’s directory to print
transcripts.
7-26
FIRST COURSE
TO PRINT?
LAST COURSE
TO PRINT?
Only courses in the range set by these specifications will be printed on
reports. When printing by sections, only sections in this range will be
included. For example, if you want to print mailing labels for only course
#50, BAND, set both specifications to course #50 and then choose to
print labels by sections. These specifications work in conjunction with
the COURSES NOT TO PRINT specifications. For example, if you
choose to include courses 100 through 900 and exclude 400 through
500, you will only see courses 100 through 399 and 501 through 900
on reports.
NARRATIVES
FOR WHICH
COLUMNS?
The ~ComparX~ code (where x is any report card column 1-11) prints
the narrative comments for a specific grading column. You can use this
specification to determine which column’s comments to print.
Report Cards Manual
Report Cards Report Writer
Print Menus
Print Menus
After you accept your specifications, the following print window appears:
Enter a grade number to print a report for students in a particular grade. To print a report
for students in a particular grade range, set Specification #6: START GRADE FOR ALL
GRADES? and #7: END GRADE FOR ALL GRADES? to the desired grade range and
choose All Grades on this window. You can also choose to print a report for students by
course/section and print for only students in a particular course/section by choosing the
Sections option.
When printing section rosters, you should choose the Sections option. If you choose a
grade number or all grades, you will get a list of students alphabetically without regard
to course/section. You should also choose this option when printing mailing labels for
students in a particular course/section.
PRINT WHICH STUDENTS?
Entering either a grade level or choosing all grades displays the next print window
All of the options on this window will apply to one grade if you have selected a specific
grade level from the previous window or to all grades or an interval of grade levels if
you have selected the all grades option from the previous window.
Report Cards Manual 7-27
Chapter 7
Report Cards Report Writer
Print Menus
Option
Description
These options allow you to further specify for whom the reports
Options 1 and 3 should be printed. For instance, if you selected All Grades from the
previous window, you can now select all students, individual
students, or students who meet a database criterion. (See below.)
Resume
Alphabetical
Printing
If your print job is interrupted for any reason, you can select Resume
Alphabetical Printing to pick up where you left off. When you select
this option, the following window will appears where you can enter
the ID number of the last student printed on the report. Printing will
resume with the next student alphabetically.
Search by one
field (all
categories)
This option allows you to print reports sorted by a particular database
criterion. For example, you could print report cards sorted by
homeroom to simplify the distribution process. You could even
search on the homeroom field and sort on another field, such as
Team, which would make it easier to distribute report cards to
students in a homeroom who are on a particular team.
Search by fields As in other Report Writers in Administrator’s Plus, this option is used
to limit students for whom reports are printed to only those matching
(you enter
a database criterion. You could use this option to print transcripts for
criteria)
only students applying to college (after designating such in a
database field) and choose to sort on homeroom.
7-28
Report Cards Manual
Report Cards Report Writer
Print Menus
PRINT WHICH SECTIONS?
If you choose to print a report by section, the following window appears:
Starting with staff member #1, the sections for each staff member will be processed one
at a time. Within each section, Report Cards Plus will print the body of the current active
report for each student in the roster. Whenever a new section is encountered, the search
header for the report, if there is one, will print. At the end of a section, the search footer
for the report, if there is one, will print.
For example, if you are printing rosters, the search header will print at the top of each
roster, including the name of the current section and the teacher, as pictured below:
The body of the roster report simply contains the name and ID number of each student.
You can modify the body of the report to print any data base fields for each student. See
“View/Edit Letters/Reports” on page 7-32 for information on editing reports.
Specifications
Description
All Sections
All staff members will be processed one at a time.
NOTE: Printing reports for all sections, only includes those sections
meeting during the marking period(s) specified by Specification #1:
INCLUDE COURSES MEETING WHEN? on Specification page 2.
Sections will also be limited by Specifications #2: FIRST COURSE
NOT TO PRINT? and Specification #4: LAST COURSE NOT TO
PRINT? on page 2 and Specifications C: FIRST COURSE TO PRINT?
and D: LAST COURSE TO PRINT? on page 4.
Report Cards Manual 7-29
Chapter 7
Report Cards Report Writer
Print Menus
7-30
Specifications
Description
Range of
Teachers
You will be able to enter starting and ending staff ID numbers and only
sections assigned to teachers within that range will be processed.
Individual
Teachers
You may enter a list of ID numbers and only sections assigned to those
teachers will be processed. You have the option of using an F6 Lookup
window to select teachers.
Individual
Sections
You may enter a list of ID numbers and only sections assigned to those
teachers will be processed. You have the option of using an F6 Lookup
window to select sections.
Report Cards Manual
Report Cards Report Writer
Comparisons Between Data Base & Report Card Reports
Comparisons Between Data Base & Report Card Reports
Report Card reports are designed and stored in much the same way that data base reports
are designed and stored in the Report Writer program in Data Base Plus. Hence, this
manual assumes that you have already read and understood sections 5C, 5D and 5E in
the Data Base Plus manual, which explain how to design and write data base reports.
This section will highlight the major differences between report card and data base
reports. The next three sections, in explaining how to create and edit report card reports,
will assume that you already know how to create and edit data base reports.
Both the Database and Report Cards Report Writer programs provide for 120 reports,
including pre-formatted and customizable reports. In the Data Base Plus module, the
definitions for the 120 reports are stored in small files in your data directory called
WLABEL#.FDB, where the “#” sign is replaced by a number from 1 to 120. For
example, data base report #1 is stored as WLABEL1.FDB and data base report #60 is
stored as WLABEL60.FDB. In the report cards Plus module, the last three letters of the
report name end in “FRC” as opposed to “FDB”. Consequently, report card report #1 is
stored as WLABEL1.FRC and report card report #60 is stored as WLABEL60.FRC. In
fact, all data base reports will work in the report card module without change simply by
renaming them so that the last three letters change from “FDB” to “FRC”.
As in Data Base Report Writer, reports created in one school year can be made available
in another school year by simply copying the wlabel file from one school year folder to
the other, provided that the report # is available in the target year. Briefly,
To Copy Reports Created in One School Year to Another School Year:
Using Windows Explorer or My Computer, navigate to the following path:
RS4/Data/<SchoolName>/<SchoolYear>
2 Copy the WLABEL##.FRC files, where ## are the numbers for the report.
3 Paste the file into the directory for the previous school year.
The Report Cards Report Writer includes many codes not included in the Data Base
Report Writer. These codes allow you to use report card data in your Report Cards Plus
reports. On the other hand, almost all of the codes that are valid in Data Base Plus reports
are also valid in Report Cards Plus reports.
1
Report Cards Manual 7-31
Chapter 7
Report Cards Report Writer
View/Edit Letters/Reports
View/Edit Letters/Reports
To access the body of a report you wish to edit, click Done in the Report Cards Report
Writer Specifications and choose View/Edit Letters/Reports from the Print Menu. See
“Print Menus” on page 7-27.
This feature, accessible from the Print Menu, allows you to either modify any preexisting report or create a new one. Reports can include any of the Report Writer codes
available in the Data Base Report Writer as well those specific to the Report Cards Plus
module.
In View/Edit Letters/Reports, you can view the body of any Report Cards Report Writer
report, and make any necessary changes to codes, text, or layout. This manual assumes
basic knowledge of report writing in Administrator’s Plus. For a more detailed
explanation of how to use, create and customize reports, refer to Chapter 5 of the Data
Base Plus manual.
Viewing and Editing Report Cards Reports/Letters Window
When you select View/Edit Letters/Reports, you will be prompted to select the report
you would like to edit from the window pictured below. Note that this is the same
window you see when you click on Specification #2: ACTIVE LETTER/REPORT? on
page 1 of specifications, except that you can copy or delete a report using the options in
the lower right of the window. If you want to create a new report from scratch, select a
report designated **UNUSED**.
Using the View/Edit Letters/Reports Toolbar
When you open the body of a report, the toolbar will be replaced by the Report Writer
toolbar. Each toolbar window is described on the following pages.
7-32
Report Cards Manual
Report Cards Report Writer
View/Edit Letters/Reports
File Menu
From the File menu, you can Open, Close, Save and Delete reports. You also have the
ability to print the body of the report you are editing. Note that the Windows shortcut
key combinations are displayed to the right of each action. You can also perform these
functions by clicking on the corresponding icon under the toolbar (pictured to the left of
each toolbar function below.
Option
Description
New (Ctrl+N)
Allows you to create a new report from scratch. After choosing New,
the Viewing and Editing Scheduling Reports/Letters window will
appear from which you may choose an **UNUSED** number. After
choosing a number you will be asked to type in a name for the report.
Pressing Enter will bring you into the editing window.
Open... (Ctrl+O) Allows you to select a pre-existing report to open in the current
View/Edit Letters/Reports window.
Close
Exits the body of the report and brings you back to Report Writer Menu
2 where you may choose to print the report.
Save (Ctrl+S)
Saves the current report without exiting the View/Edit Letters/Reports
window. Use this option as an alternative to F10 (Accept), or if you wish
to preview the report (see Preview below).
Save As...
This option should be used if you wish to leave the original report
unchanged and save the modified report under a different report
number and name. Save As... is similar to the Copy function found on
the bottom of the Viewing & Editing Report Cards Reports/Letters
window.
Print
Generates a print-out of the body of the report.
Report Cards Manual 7-33
Chapter 7
Report Cards Report Writer
View/Edit Letters/Reports
Option
Description
Delete Report
Erases the current report. The report name will be replaced by the
name **UNUSED** in the Viewing and Editing Scheduling
Reports/Letters window. Note that you can delete a report only if it is
NOT set as the active report in Specifications. See “Specifications” on
page 7-13.
NOTE: You can also delete or copy a report using the buttons on the
bottom right of the View/Edit Letters/Reports window.
Edit Menu
From the Edit menu, you have access to many of the tools available for editing the body
of a report. Note that the Windows shortcut key combinations are listed to the right of
each option. You can also perform these functions by clicking on the corresponding icon
under the toolbar, pictured to the left of each toolbar function below.
7-34
Option
Description
Cut (Ctrl+X)
Deletes all highlighted text and saves it to the Windows clipboard so
that it may be pasted in a different location.
Copy (Ctrl+C)
Copies all highlighted text to the Windows clipboard so that it may be
pasted in a different location in the body of a report.
Paste (Ctrl+V)
After cutting or copying text and placing it onto the Windows clipboard,
click the paste icon to insert the saved text at the position of the cursor.
You may paste the selected text as many times as you wish.
Delete
Totally deletes all highlighted text. If no text is highlighted, Delete will
erase one character space to the right of the cursor.
Select All
(Ctrl+A)
Highlights the entire body of a report for the purpose of copying and
deleting text.
Time/Date
Inserts the time and date at the cursor’s current position. The time and
date are in the following format: 04/15/2003 10:25:30 AM.
Report Cards Manual
Report Cards Report Writer
View/Edit Letters/Reports
Option
Description
Bold
Bolds all highlighted text and Report Writer codes (e.g. ~FN~ = John).
Note that the entire line of text will be bolded. If you want only one word
to be bolded, it needs to be on a line by itself.
Italic
Italicizes all highlighted text and Report Writer codes (e.g. ~FN~ =
John). Note that the entire line of text will be italicized. If you want only
one word to appear in italics, it needs to be on a line by itself.
Underline
Underlines all highlighted text and Report Writer codes (e.g. ~FN~ =
John). Note that the entire line of text will be underlined. If you want
only one word to be underlined, it needs to be on a line by itself.
Search Menu
The search feature locates and highlights codes and text so that each occurrence of the
text may be easily edited. For example, if you needed to adjust all the Tab codes in a
specific report, you would enter “~T” in the Find What field in the Find dialog box (see
below). Clicking Find will cause the program to highlight the first occurrence of a Tab
code. You can then choose Find Next from the Search window or press Shift+F7 to
locate and highlight all succeeding tab codes.
Find (F7)
Activates the window seen below. Type the text or code for which you are searching and
click Find. You may type entire words or code or just key letters. The Match Case option
allows you to choose whether the case of letters is considered in the search. The
Direction option allows you to search the body of a report from top-down, or bottom-up.
If you click the Replace button, the above window will appear with an additional field
titled Replace With. Type the text with which you wish to replace the text in the Find
field and then click Replace. You will have the option to click Replace each time the text
Report Cards Manual 7-35
Chapter 7
Report Cards Report Writer
View/Edit Letters/Reports
is found. If you wish to mass replace every instance of the found text, click the button
Replace All on this window. Each instance of the text in the Find field will then be
automatically replaced with the text in the Replace with field.
Find Next (Shift + F7)
Repeats the last search. Clicking the Find button on the window pictured above
performs the same function.
Options Menu
The Options window is used to generated a report while in the body. It is also used to
tell the program to print one report per student with the same phone number and to set a
report as ascii.
Option
Description
Generate
Report
The Generate Report option allows you to edit and preview reports
from the same window. While editing the body of a report from the
View/Edit Letter/Reports program:
•
Save the report.
•
Click the Generate Report button shown above.
•
Select a grade level or All Grades from the first Report Writer
Print Menu, then select All Students, Individual Students, or
perform a database field search on the next window.
If you click this option after making changes to a new report, a
window will appear reminding you that this report will be made the
active report. If you click “Yes”, you will not need to return to
Specifications to make the report active. Note that you must save a
report before you can preview it.
7-36
Report Cards Manual
Report Cards Report Writer
View/Edit Letters/Reports
Option
Description
1 Student Per
Phone #
The 1 Student Per Phone # setting, used primarily for letters and
labels, causes the report to print for only one sibling per family.
Fixed Length
Fields
The Fixed Length Fields setting is designed for reports that print data
base fields in columns. From the Data Base Plus Address program,
you may set the maximum number of characters that will print for
each of the 160 possible data base fields. With Fixed Length Fields
turned on, columnar reports will have enough room to accommodate
this maximum character length. Therefore the columns will line up
evenly. Data that is longer than the fixed length will be truncated.
Data that is shorter than the fixed length will be padded with spaces.
In other words, the data inserted into a report from a particular data
base field will take up the same amount of pre-defined space for
every student, no matter how long or short the entry. With the fixed
length setting off, you may line up columns using the Tab Report
Writer codes (for example, ~T4.25~).
ASCII
Checking ASCII displays the following the window. The path and
filename must be entered in the format shown. You can either type in
or browse to the folder to which you want to export the file. If you
select Overwrite, and if a file with the same name exists in the
destination folder, the existing file will be replaced with the new one.
If you select Append, if a file with the same name exists in the
destination folder, the new information will be added to the end of the
existing file. To save the report to a floppy disk, enter a:\ on this line.
Report Cards Manual 7-37
Chapter 7
Report Cards Report Writer
View/Edit Letters/Reports
Window Menu
The Window window provides access to different modules by allowing multiple open
windows to be arranged according to your preferences.
Option
Description
Cascade
Overlaps all open windows diagonally, with each window’s title
displayed in the upper left-hand corner. The title of the open window
is also listed on the bottom portion of the Window drop-down window,
below Arrange Icons (See previous page.)
Tile
Stacks open windows one on top of another.
Current Report
Each of the currently open Administrator’s Plus Administrator’s Plus
windows are listed on the bottom portion of the Window toolbar
window. The window that is active will appear with a check mark next
to it
Function Keys
In addition to the Report Writer Toolbar, you can use function keys to edit reports. You
can either click on the function key buttons at the bottom of the editing window, or press
the corresponding function key on your keyboard.
F2 FONT opens the font drop-down window, from which you may choose any font in
your Windows\Fonts folder. When changing the font, the selected lines of text will
change to the new font.
7-38
Report Cards Manual
Report Cards Report Writer
View/Edit Letters/Reports
F3 FONT SIZE opens the font size drop-down window, from which you may change
the size of the highlighted text. When changing the font size, the selected lines of text
will change to the new font size.
Pressing F4 FONT COLOR activates the font color drop-down window. From this
window you may change the color of the fonts in your report (if you use a color printer).
When the font color is changed, the entire line of text will change to the new font color.
F5 RENAME allows you to rename a report from within the View/Edit Letters/Reports
window. The report name is displayed next to the report’s corresponding number at the
Report Writer’s Viewing and Editing Report Cards Reports/Letters window. To change
a report’s name, open the body of the report and press F5 RENAME. The window
pictured below will appear. Type a report name and press Enter. The report name may
Report Cards Manual 7-39
Chapter 7
Report Cards Report Writer
View/Edit Letters/Reports
be up to 45 characters in length, but only 27 of the characters will show up on the
Viewing and Editing Report Cards/Letters window. The report name may be made up of
letters, numbers, or a combination of the two.
F6 LOOKUP invokes a lookup window listing many of the available Report Writer
codes. You can also click the arrow to the right of the Report Keywords window at the
top of the window or press Alt + X to access this list. You may scroll through the codes
using the arrow keys on the keyboard, or the up and down arrows on the drop-down
window’s scroll bar. Press Enter or double click on the desired code to enter it into the
body of the report at the cursor’s current position.
7-40
Report Cards Manual
Report Cards Report Writer
View/Edit Letters/Reports
F7 SEARCH activates a search utility which locates and highlights each instance of a
particular code so that it may be edited. The same function can be performed by clicking
Find on the Search window at the top of the window. See “Search Menu” on page 7-35.
Pressing F8 PAGE SETUP causes the Printer and Page Setup window to appear. See
“Page Setup” on page 7-42. You can also access these windows by right clicking on the
Administrator's Plus desktop and choosing Print D Page Setup.
Report Cards Manual 7-41
Chapter 7
Report Cards Report Writer
Page Setup
Page Setup
Administrator’s Plus print jobs may be sent to any local or networked printer installed
on your computer. Because different printers may be connected to different
workstations, each report has a Page Setup and Printer Setup window specific to each
user. Every time a user makes changes to the Page Setup and/or Printer Setup settings
within a particular report or program, they are saved inside the individual’s user folder.
Consequently, the same report may be printed on different printers with alternate
settings for each user.
Page Layout Menu
Use the Page Layout window to select paper size, source, orientation and margins.
7-42
Option
Description
Size
The drop-down window lists possible paper types available for any
report. The default size is letter (8½ x 11).
Source
Allows you to specify from what printer tray or manual feed source the
paper will originate when printing.
Orientation
Can be set to either portrait or landscape. The initial default setting
for all reports is portrait, including wide report cards and transcripts.
Report Cards Manual
Report Cards Report Writer
Page Setup
Margins
The page margins are measured in inches. You may change left,
right, top and bottom margins by typing a value in the corresponding
boxes. Be aware that the smallest margin you can have is what your
print driver will allow. If you type 0.00 in the box and the smallest
margin your print driver will accept is .166, that is what will appear
here.
Printer
Clicking Printer brings you to the printer setup window.
Printer Setup Menu
From the Printer Setup window, you may change the default printer for the report. This
window also displays the printer’s status, type and network path. Click Properties to
change options that are specific to the type of printer you have, such as paper source and
duplexing features.
Option
Description
Name
Displays the name of the printer currently set to print the report.
Change printers by clicking on the drop down arrow
to the right
of the printer name and selecting a new printer name from the list.
Status
Indicates whether or not the printer is busy, paused, or is ready to
print.
Type
Displays the brand and model number of the currently selected
printer.
Where
Shows the line printer port or network path to the selected printer.
Properties
Activates the selected printer’s Properties window (see Printer
Properties below).
Report Cards Manual 7-43
Chapter 7
Report Cards Report Writer
Page Setup
Printer Properties
The printer Properties window varies depending on the brand and model of your printer.
You can access a printer’s Properties window from the Windows\Printers folder, or by
clicking the Properties button in the Administrator’s Plus Printer Setup window.
The default printer settings will reflect the most commonly used page layout, paper
source and paper type. If you need to change a setting for a particular report in
Administrator's Plus, you should change it from the Administrator’s Plus Printer Setup
window.
7-44
Report Cards Manual
Report Cards Report Writer
Report Card Codes
Report Card Codes
The following codes are specific to Report Cards Report Writer. They are the newest
codes used to create course tables and other boxes and also to format text properly. For
an explanation of universal codes used in all Report Writers in Administrator’s Plus, see
the end of this chapter.
Table Codes For Skills and Non Skills-Based Report Cards
Note that although box codes are designed to align text within parameters defined in the
body of the report, in most cases, you can choose not to print vertical or horizontal lines
around the text by simply setting the border width to “0”. The exceptions to this are the
course boxes for both skills and non-skills courses. To print a non skills-based report
card without boxes around the courses, choose one of the default reports for wide or
narrow report cards. See “The Pre-defined Reports” on page 7-84.)
Course Table Box
Used to print courses in a table that looks similar to default report cards #18 and #20,
this box is designed to print courses not associated with skills. If you have both skills
and non-skills courses, you must use the Advanced Specifications Box code to produce
a separate course box with skills (more than one Table Box can be used within a report).
Code
Description
~CourseTableSpecStart = #~
Denotes the start of the course table specification.
# is the table number, used to distinguish multiple
boxes in a report.
PrintDescription = ‘N’ or ‘Y’
Determines whether the course description will
print in place of the course name. If this code is set
to ‘Y’, courses that do not have a long description
will print the standard course name.
BoxWidth = Auto or #.##
Width of the entire course table. Columns that will
not fit in this width will be truncated. Use Auto to
have the box width calculate automatically based
on the width of the page and the columns printed.
Enter a number in inches. If you choose to use the
AUTOCALC option, the settings here will be
Subject; Course #; Level; Section; ignored, and the program will calculate an optimal
Credit; Teacher; Comment
width based on how many columns are needed
and how much text is entered in each column.
Other “Width” codes = #.##
MinGradingColumnWidth = #.##
Minimum width of columns containing grades.
Column width will increase if needed to
accommodate grades, but it will not be lower than
this number.
Report Cards Manual 7-45
Chapter 7
Report Cards Report Writer
Report Card Codes
Code
Description
...BorderWidth = #.##
Controls width of border around box.
Left, Right, Top, Bottom
0 = thin border, 3 = thick border
BoxHeight = Auto or #.##
Height of the entire course table. Rows that will
not fit in this height will be truncated. Use Auto to
have the box height calculate automatically based
on the page width and number of courses in the
student’s course list.
Other “Height” codes = #.##
Title; Row; Comment; Narrative
Enter a number in inches. If you choose to use the
AUTOCALC option, the program will ignore the
numbers entered here, and will calculate the
optimal height based on the number of courses
and the amount of text in each row.
TitleBorder = ‘Y’ or ‘N’
Specifies whether to draw a border for the title.
TitleHorizontalAlign=Left, Right,
Center
Determines the alignment of text inside of all the
cells in the course box.
CourseNameHorizontalAlign =
Left, Right or Center
VerticalBodyAlign = Top, Bottom,
Center
PrintVerticalLines = Y or N
Determines whether a vertical line will print
separating each column.
PrintLineAfterXCourses = #
Draws a horizontal line after specified number of
courses. 0 for no lines.
PrintWhichColumns = #, #...(1-13) Determines which grade columns will be printed.
Any or all of the possible 13 columns may be set.
This setting overrides page 3 of the report writer
specifications.
PrintColumnHeaderEveryCourse = Defaults to No. If set to Yes, it will print table
‘Y’ or ‘N’
header above every course.
7-46
Report Cards Manual
Report Cards Report Writer
Report Card Codes
Code
Description
PrintCommentTextWhere=
Prints comment text using values in Report Card
columns #12 and #13. ‘Right1Column’ will print
both comments in one column separated by a
semi-colon. ‘Right2Column’ will print both
comments in a separate column (width set by
CommentWidth). Text will word wrap to fit in
defined width. ‘Below’ will print comments in an
additional row below the course details (height set
by CommentHeight)
Right1Column
Right2Column or
Below
PrintColumnAverageAndFont = ‘Y’ Determines if column averages print, if so, adopts
or ‘N’
the font style and size of the specification text.
TitleAndFont=<TitleText>
The text entered in this specification will print on
the top, center of the course table, and will adopt
the font style and size of the specification text.
PrintColumnHeaderAndFont =
‘Y’ or ‘N’
These 3 specs determine whether the Column
Header, Course List, or Narratives print in the
table. If set to ‘Y’, will adopt the font style and size
of the specification text.
PrintBodyAndFont = ‘Y’ or ‘N’
PrintNarrativeAndFont= ‘Y’ or ‘N’
~CourseTableSpecEnd~
End of the course table specifications
~PrintCourseTable=#,
WhichCourses=(see below),
Left=X, Top=Y~
Determines the position on the page in which the
course table prints. The number after
~PrintCourseTable= must match the number after
CourseTableSpecStart. The default entry after
Which Courses is “All”, but you can enter a course
# range, or individual course numbers, separated
by commas. The X and Y represent coordinates in
inches from the left margin and the top of the
page.
Skills; NonSkills; All; AllSkillFirst;
AllNonSkillsFirst;
###, ###, ###-###, ###, ###-###
etc....
Report Cards Manual 7-47
Chapter 7
Report Cards Report Writer
Report Card Codes
Advanced Specification Box (for skills-based report cards)
This box is used to print courses with skills on the report card. More than one box can
be used to determine where specific courses will print.
Code
Description
~AdvancedSpecStart = #~
Start of the Skills box specifications. # is the table
number, used to distinguish multiple skills boxes
in a report.
:GeneralSpecStart
Start of general specifications. Specifications are
split up into 5 sections: General, Course,
Comment, Concepts and Narratives.
AutoCalcAll
Causes the program to automatically set the
dimensions of all the course boxes based on the
page height and width. Any entries entered into
the Height and Width specification lines discussed
below will be ignored. ~REM~ this line if you do
not want the skills table to AUTOCALC.
NumBoxAcross = #
Number of course boxes to print from left to right.
If a high value is set, the program fits the
(recommended: 1-3) maximum boxes possible based on page width.
7-48
MaxBoxDown = # or Auto
Number of course boxes in one column, up and
down. If a high value is set, the program fits the
maximum boxes possible based on page height.
“Auto” will cause the specification to AUTOCALC
the # of boxes in a row.
CellGapDown = #.## (inches)
Vertical space between course boxes.
CellGapAcross = #.## (inches)
Horizontal space between course boxes.
TableGapDown = #.## (inches)
Vertical space between course boxes
TableGapAcross = #.## (inches)
Horizontal space between course boxes
BoxWidth = #.## (inches) or Auto
Common width of all cells (course, concepts,
comments and narrative cells) in a course box. If
the narrative cell is printed on the right side of the
course box, BoxWidth, which includes the
narrative cell width, must be specified. In addition,
the width of the narrative cell must be specified
using: WidthIfRight= line in the Narrative specs.
:GeneralSpecEnd
End of general specifications.
Report Cards Manual
Report Cards Report Writer
Report Card Codes
Code
Description
CourseCellStart = 1
Start of the codes that define what prints in the
course section of the advanced box.
Print = Y or N
Determines whether the Courses section of the
skills table will print.
PrintDescription = Y or N
Determines whether or not to use the course
description. If set to ‘N’, the standard course name
will print. If set to ‘Y’, the course description will
print. Courses with no description will print the
standard course name.
CharPerColumn = 3 or 5
Designates whether the 3 character or 5 character
report card column heading will print, as defined in
the report card column table in Customize RC.
IncludeSkills = Y or N
Determines whether or not to print the skill
information associated with each course.
PrintWhichColumns= #, #, #...(113)
Specifies which grade columns will be printed.
Columns are identified by column number,
defined in Customize RC. Any or all of the
possible 13 columns may be set. This setting
overrides page 3 of the report writer
specifications.
CellHeight = #.## or Auto
Maximum height of each course cell. Text that will
not fit in this height will be truncated. Set to ‘Auto’
to have the Course cell AUTOCALC.
TitleHeight = #.## (in inches)
Height of the course title. Text that will not fit in this
height will be truncated.
DescriptionWidth = #.##
Width of the course description cell. Text that will
not fit in this width will be truncated (AUTOCALC
overrides).
MinGradingColumnWidth = #.##
Minimum width of columns containing grades.
Column width will increase if needed to
accommodate grades, but it will not be lower than
this number.
...BorderWidth = 0-3
Controls width of border around course cell.
Left, Right, Top, Bottom
0 = thin border, 3 = thick border
TitleHorizontalAlign = Left, Right or Determines the alignment, left-to-right, of the
Center
course header titles.
Report Cards Manual 7-49
Chapter 7
Report Cards Report Writer
Report Card Codes
Code
Description
SkillHeaderAlignment = Left, Right Determines the alignment, left-to-right, of the Skill
or Center
header text.
Print Border = Y or N
Specifies whether or not course cell border prints.
TitleBorder = Y or N
Designates whether or not a border will print
around the course title.
BlankLineBeforeHeader = Y or N
Specifies whether or not a blank line will print
before the course header text.
TitleAndFont = <TitleText>
Course titles are printed with the font of this
keyword.
PrintCourseNameAndFont = Y or N Determines whether or not course name will print.
If set to ‘Y’, course names will print with the font of
this keyword.
PrintTeacherAndFont = Y or N
Determines whether or not teacher name will
print. If set to ‘Y’, teacher names will print with the
font of this keyword.
PrintSkillHeaderAndFont = Y or N Specifies whether or not the skill headers will
print. If ‘Y’, skills will print with the font of this
keyword.
PrintSkillsAndFont = Y or N
Determines whether or not skills will print. If set to
‘Y’, skills will print with the font of this keyword.
PrintColumnHeaderAndFont=Y or Specifies whether or not column headers will print.
N
If set to ‘Y’, column headers will print with the font
of this keyword.
:CourseCellEnd
End of the codes that define what prints in the
course section of the advanced box
CommentCellStart = #
Start of the codes that define what prints in the
Comment cell. # determines the Comment cell’s
print position after (below) the initial Course cell.
Print = Y or N
Determines whether or not the Comment cell will
print.
CellHeight = #.## (inches) or Auto Specifies the Comment cell height. “Auto” will
cause the cell height to Auto-Calc.
7-50
...BorderWidth = 0-3
Controls width of border around course cell.
Left, Right, Top, Bottom
0 = thin border, 3 = thick border
Report Cards Manual
Report Cards Report Writer
Report Card Codes
Code
Description
TitleHorizontalAlign = Left, Right or Determines the alignment, left-to-right, of the
Center
comment header.
Print Border = Y or N
Specifies whether or not comment cell border
prints.
TitleBorder = Y or N
Designates whether or not a border will print
around the comment title.
TitleAndFont = <TitleText>
Determines the heading of the Comments cell.
Text in the report will adopt the specification line’s
font and size
PrintBodyAndFont = Y or N
Determines whether or not comments print in the
comment cell. If set to ‘N’, the comment cell will
remain empty.
:CommentCellEnd
End of the codes that define what prints in the
comment cells of the advanced box
ConceptsCellStart = #
Start of the codes that define what prints in the
Concept cell. # determines the Concept cell’s print
position after (below) the initial Course cell.
Print = Y or N
Determines whether or not the Concept cell will
print.
CellHeight = #.## (inches) or Auto Specifies the Concept cell height. “Auto” will
cause the cell height to AUTOCALC.
...BorderWidth = 0-3
Controls width of border around concept cell.
Left, Right, Top, Bottom
0 = thin border, 3 = thick border
TitleHorizontalAlign = Left, Right or Determines the alignment, left-to-right, of the
Center
concept header.
Print Border = Y or N
Specifies whether or not the concept cell border
prints.
TitleBorder = Y or N
Designates whether or not a border will print
around the concept title.
TitleAndFont = <TitleText>
Determines the heading of the Concepts cell. Text
will adopt the specification line’s font and size
PrintBodyAndFont = Y or N
Determines whether or not concepts print in the
concept cell. If set to ‘N’, the concept cell will
remain empty.
Report Cards Manual 7-51
Chapter 7
Report Cards Report Writer
Report Card Codes
Code
Description
:ConceptCellEnd
End of the codes that define what prints in the
concept cells of the advanced box
NarrativeCellStart = # or Right
Start of the codes that define what prints in the
Narrative cell. # determines the Narrative cell’s
print position after (below) the initial Course cell. If
‘Right’, narrative cell is printed on the right side of
the course box.
Print = Y or N
Determines whether or not the Narrative cell will
print.
WidthIfRight = #.##
If narratives are set to print to the right of each
course, use this code to set the width in inches of
the narrative box.
CellHeight = #.## (inches) or Auto Specifies the Narrative cell height. “Auto” will
cause the cell height to AUTOCALC.
...BorderWidth = 0-3
Controls width of border around narrative cell.
Left, Right, Top, Bottom
0 = thin border, 3 = thick border
TitleHorizontalAlign = Left, Right or Determines the alignment, left-to-right, of the
Center
narrative header.
7-52
Print Border = Y or N
Specifies whether or not the narrative cell border
prints.
TitleBorder = Y or N
Designates whether or not a border will print
around the narrative title.
TitleAndFont = <TitleText>
Determines the heading of the Narrative cell. Text
will adopt the specification line’s font and size
PrintBodyAndFont = Y or N
Determines whether or not narratives print in the
cell. If set to ‘N’, the narrative cell will remain
empty.
:NarrativeCellEnd
End of the codes that define what prints in the
narrative cells of the advanced box
~AdvancedSpecEnd~
End of the Skills table Specifications
Report Cards Manual
Report Cards Report Writer
Report Card Codes
Code
Description
~PrintAdvancedBox=#,
WhichCourses=(see below),
Left=X, Top=Y~
Determines the position on the page in which the
Skills box prints. The number after
~PrintAdvancedBox= must match the number
after ~AdvancedSpecStart=. The default entry
after “Which Courses” is “Skills”, but you can enter
a course # range, or individual course numbers,
separated by commas. The X and Y represent
coordinates from the left margin and the top
margin.
Skills; NonSkills; All; AllSkillFirst;
AllNonSkillsFirst;
###, ###, ###-###, ###, ###-###
etc....
Attendance Box
This box can be set to print the number of absences, tardies, dismissals, days present and
days of school by marking period or “quarter”, set in the Calendar program in
Attendance Plus (See the Attendance Plus manual), or date ranges, set in Report Cards
Report Writer Specifications. See “PRINT DAILY ATTENDANCE?” on page 7-17.
Code
Description
~AttendanceBoxStart=#~
Denotes the start of the attendance box
specifications. # is the table number, used to
distinguish multiple attendance boxes in a report.
Print = Y or N
Determines whether or not the Attendance box
will print.
BoxWidth = #.## (inches) or Auto
Width of the entire attendance table. Columns that
will not fit in this width will be truncated. Use Auto
to have the box width calculate automatically
based on the number of columns printed.
RowHeaderWidth = #.## (inches)
Determines width of cells containing row headers,
such as “Absence”, “Tardy”, and so on.
ColumnWidth=#.## (inches) or
Auto
Determines the width of each attendance column.
Set to “Auto” to Auto-Calc the column width.
...BorderWidth = 0-3
Controls width of border around attendance box.
Left, Right, Top, Bottom
0 = thin border, 3 = thick border
BoxHeight = #.## or Auto
Height of the entire attendance table. Rows that
will not fit in this height will be truncated. Use Auto
to have the box height calculate automatically.
Report Cards Manual 7-53
Chapter 7
Report Cards Report Writer
Report Card Codes
Code
Description
...Height = #.##
Enter a number in inches. Determines the height
of Title, Column Header and Attendance rows.
Title; ColumnHeader; R ow
Print Border = Y or N
Specifies whether or not the attendance box
border prints.
TitleBorder = Y or N
Specifies whether or not a border will print around
the title of the box (e.g., “Attendance” or
“Attendance Record”).
TitleHorizontalAlign = Left, Right or Determines the alignment, left-to-right, of the
Center
attendance header.
ColumnContents = QRT#,
RCSpecRange, YTD
Determines what data will print in each column.
QRT# designates quarters. RCSpecRange prints
the interval total (set in specifications). YTD prints
Year-to-Date total.
TitleAndFont = <TitleText>
Attendance box title is printed with the font of this
keyword. Enter title here and select font.
ColumnHeadersAndFont =
<Column Header Text>
Determines the headings of the attendance box
columns and their font and size. Quarter date
ranges (QRT#) are set in the Calendar program.
DateRCSpecRange will cause the date range set
in Specifications to print; DateYTD will cause the
Year-to-Date set in Specifications to print.
RowContentsAndFont =
Determines the data that prints in each row, as
well as the text’s font and size. A, T, D, P, DOS,
MEM will print absences, tardies, dismissals,
presents, days of school and membership,
respectively.
A, T, D, P, DOS, MEM
7-54
RowHeadersAndFont=<text>,
<text>
Specifies the headers that print to the left of each
row and their font and size, such as ABSENCES,
TARDIES, and DISMISSALS.
~AttendanceBoxEnd~
Denotes the end of the attendance box
specifications
PrintAttendanceBox=#, Left=X,
Top=Y~
Determines the position on the page in which the
Attendance Box prints. The number after
~PrintAttendanceBox= must match the number
after ~AttendanceBoxStart=. The X and Y
represent coordinates from the left margin and the
top of the margin.
Report Cards Manual
Report Cards Report Writer
Report Card Codes
GPA Box
Code
Description
~GPABoxStart~
Denotes the start of the GPA box specifications
BoxHeight = #.## (inches)
Height of the GPA box
BoxWidth = #.## (inches)
Width of the GPA box
BoxGap = #.## (inches)
Horizontal space between individual boxes
BorderWidth = (0-3)
Controls width of border around GPA box.
0 = thin border, 3 = thick border
PrintBorder = Y or N
Specifies whether or not a box prints around the
GPA table
TitleBorder = Y or N
Specifies whether to draw a border for the title
TitleHorizontalAlign = Left, Right or Determines the alignment, left-to-right, of the GPA
Center
header(s).
TitleAndFont1=<Text>
TitleAndFont2=<Text>
Specified text is printed at the top of the
corresponding sections of the GPA box with the
font and size of the keyword.
TitleAndFont3=<Text>
TitleAndFont4=<Text>
BodyFont
Content of the GPA box will print with the font and
size of this keyword.
~GPABoxEnd~
Denotes the end of the GPA box specifications
~PrintGPABox=#, Left=X, Top=Y~ Determines the position on the page in which the
GPA Box prints. The X and Y represent
coordinates from the left margin and the top of the
page.
Honor Roll Box
Code
Description
~HonorRollBoxStart~
Denotes the start of the honor roll box
specifications
BoxHeight = #.## (inches)
Height of the honor roll box
BoxWidth = #.## (inches)
Width of the honor roll box
Report Cards Manual 7-55
Chapter 7
Report Cards Report Writer
Report Card Codes
Code
Description
BorderWidth = (0-3)
Controls width of border around GPA box.
0 = thin border, 3 = thick border
TopGap = #.## (inches)
Space in inches between honor roll header and
top of box.
MiddleGap = #.## (inches)
Space between honor roll status and honor roll
header.
PrintBorder = Y or N
Specifies whether or not a box prints around the
HR table
TitleBorder = Y or N
Specifies whether to draw a border for the HR title
TitleHorizontalAlign = Left, Right or Determines the alignment, left-to-right, of the HR
Center
header.
TitleAndFont= <text>
Title of the honor roll box will print with the font and
size of this keyword
BodyFont
Contents of the honor roll box will print with the
font and size of this keyword
~HonorRollBoxEnd~
Denotes the end of the honor roll box
specifications
~PrintHonorRollBox=#, Left=X,
Top=Y~
Determines the position on the page in which the
Honor Roll Box prints. The X and Y represent
coordinates from the left margin and the top of the
page.
General Box Specifications
The following codes are used to align and position non course-related text on the page,
including name and address information, grading scales, data from the message lines in
Specifications, and so on. Although these codes create “boxes” around the text, you can
prevent lines from printing around the boxes by setting PrintBoarder and
PrintVerticleLines to N. Note that general box codes can be used in other Report Writers
in Administrator’s Plus as well.
7-56
Code
Description
~StartBoxDef=#~
Denotes the start of the box specifications. # is the
spec number. Multiple box specifications can be
included on one report card, with each set
numbered consecutively.
Report Cards Manual
Report Cards Report Writer
Report Card Codes
Code
Description
BoxWidth = #.## (in inches)
Determines width of box.
BoxHeight = #.## (in inches)
Determines height of box
Align = L, R, C
Specifies alignment of text inside the box: Left,
Right or Center (tabs do work when aligning left!).
BorderWidth = #.##
Thickness of border in inches
PrintBorder = Y or N
Determines whether or not a border prints around
the box
ContentAndFont1 = <Text>
Determines what text will print in the box as well
as the font and size. EVERY line of text must be
preceded by a ContentAndFont# code, even
blank lines, and they must be numbered
consecutively. These lines may include codes,
including tabs.
ContentAndFont2 = <Text>
ContentAndFont3 = <Text>
~EndBoxDef~
Denotes the end of the box specifications.
PrintBox=#, Left=X, Top=Y~
Determines the position on the page in which the
box prints. The number after ~PrintBox= must
match the number after ~BoxStart=. The X and Y
represent coordinates from the left margin and the
top of the page.
Inserting a Graphic into a Report
You can insert a school logo or other graphics file directly into the body of the report.
Graphics files can be created in any graphics program, but must be in one of the
following formats: .bmp, .ico, .gif, or .jpg. To insert a graphic when in the body of a
report, click on the Insert Image button at the top of the page. A Windows dialog box
will appear allowing you to locate the file. Once you select the file, the following codes
will be inserted, which control the placement of the graphic on the page.
Code
Description
~ImageStart=1~
Denotes the start of the image specifications. # is the spec
number. Multiple image specifications can be included on
one report, with each set numbered consecutively.
Zoom=###
Zoom percentage. Zoom=100 prints the image actual size,
Zoom=200 prints the image double the size, etc. Zoom
ignores the Stretch parameter value.
Filename=<string>
This should be a valid image file (only the file name) in the
folder RS4\PPImages
Report Cards Manual 7-57
Chapter 7
Report Cards Report Writer
Report Card Codes
NOTE:
Code
Description
BoxWidth=
Width of the image, provided Stretch parameter is set as Y. If
not to be stretched, then the image’s aspect ratio will be
maintained and the size will be adjusted to best fit in the given
Width and Height. Setting of BoxWidth & BoxHeight ignores
Zoom parameter.
BoxHeight=
Height of the image, provided Stretch is set as Y. If not to be
stretched, then the image’s aspect ratio will be maintained
and the size will be adjusted to best fit in the given Width and
Height. Setting of BoxWidth & BoxHeight ignores Zoom
parameter.
Stretch=Y or N
‘Y’ stretches the image without maintaining the aspect ratio.
EveryPage=
If ‘Y’, this image will be printed on every page (as a
background image) with Left and Top positions as specified
in ImageLeft and ImageTop parameters, respectively. In this
case, a Print Image code is unnecessary and the presence of
the code will make the picture print again for each execution
of the code in the loop.
ImageLeft=##.#
Left position of the image if EveryPage=Y. This parameter is
ignored if EveryPage=N
ImageTop=
Top position of the image if EveryPage=Y. This parameter is
ignored if EveryPage=N.
~ImageEnd~
Denotes the end of the image specifications.
PrintImage=#, Left=X,
Top=Y~
Determines the position on the page in which the image
prints. The number after ~PrintImage= must match the
number after ~ImageStart=. The X and Y represent
coordinates from the left margin and the top of the page.
To print as background image (for all pages), do not use the ~PrintImage~ code. Instead,
set the EveryPage parameter to ‘Y’.
Note that the following sections describe codes used in many of the default non skillsbased reports. They are included here in the event that you need to modify an existing
default report. When creating new reports, and when using skills-based report cards,
however, it is recommended that you use the newer box codes described in the previous
section.
7-58
Report Cards Manual
Report Cards Report Writer
Standard Codes for Reports in Report Card Report Writer
Standard Codes for Reports in Report Card Report Writer
Code
Description
Codes That Must Be On a Line By Themselves:
~CRSSTART1~ All lines between this code and the ~CRSEND~ code will be repeated
for each course that a student has. If a student has 11 courses, the
Course Loop
lines between these codes will be repeated 11 times, once for each
Start
course. There may be no more than 6 loops per report containing no
more than 30 lines per loop.
~CRSSTART2~ The same as CRSSTART1 except that space will be included for all 16
courses a student can have even if the student has fewer courses in
Course Loop
her course list. This is useful if you want the same number of lines to
Start
be used for each student no matter how many courses they have. This
code is used for transcripts so that each quadrant is the same size.
~CRSSTART3~ This course loop will hold space for 22 course lines, regardless of the
number of courses in a student’s course list.
Course Loop
Start
~CRSSTART4~ This course loop gauges the amount of space needed to print the next
course in the course loop so that the course information does not get
Course Loop
divided onto 2 pages. An ideal code to utilize when printing a report
Start
card with long comments, it will work only if the report contains a page
header.
~CRSSTART5:
XX~
Course Loop
Start
This course loop allows transcripts to contain more than 22 courses per
year. “XX” is the number of courses you want included in your course
loop. You may have to edit the report further to allow your selected
number of courses to fit.
~CRSEND~
Course Loop
End
Defines the end of a course loop started by any of the ~CRSSTART~
codes above.
NOTE: Although ~CRRSTART~ and ~CRSEND~ codes are still used
in Administrator’s Plus and appear in default reports, the newer Course
Table codes can be used instead to print all or a portion of the courses
in a student’s course list in a box format.
~NOPAD~
If this code is used, when a column defined in Customize Report Card
Columns is set in Report Cards Report Writer Specifications not to print
(See “Specifications” on page 7-13.), the column will NOT be padded.
In other words, for permanent labels, if this is on, NOT printing columns
will allow your data to be printed on narrower labels. You usually do not
want this code when printing report cards because you want extra
space left for unprinted columns.
Report Cards Manual 7-59
Chapter 7
Report Cards Report Writer
Standard Codes for Reports in Report Card Report Writer
7-60
Code
Description
~SECTION~
Use as the first line in a report if printing one report card per student per
course sorted by teacher. If the student does not have the current
section in their transcript, the student will be skipped. To convert a
report designed to print one report card per student per course sorted
by STUDENT to one sorted by TEACHER, remove the ~CRSSTART~
and ~CRSEND~ codes and make the section code the first line of the
report. Then print the report using the section option from the main
window.
~MAJOR~
When this code is placed on the line directly after the ~CRSSTART~
code, it causes the course loop to print ONLY Major courses. Major and
Minor courses are defined using the “Priority” setting in the Enter
Courses program. See “Priority” on page 2-7.
~MINOR~
When this code is placed on the line directly after the ~CRSSTART~
code, it causes the course loop to print ONLY Minor courses. Major and
Minor courses are defined using the “Priority” setting in the Enter
Courses program. See “Priority” on page 2-7. Using the ~MAJOR~ and
~MINOR~ codes in conjunction with separate course loop codes will
enable you to list major and minor courses separately on students’
transcripts.
~TMARG:X.X~
Sets a margin for any ~TABLE~ code. Without this tab code, all tables
start on the left margin. Use this code to indent “X.X” amount of spaces.
~TABLE1~
Prints bottom GPA & update info. The GPA information that goes on
the bottom of report cards may be built manually, code by code, to give
you increased flexibility. It is much simpler, however, to use the
TABLE1 code.
~TABLE3XY~
Prints the body of a transcript sorted by department. X is replaced by a
“R”, “L” or “S” to indicate how each course will be printed: with the final
grade on the RIGHT or LEFT or if a SEMESTER label should be
printed. Y is replaced by a “W” for blank wide paper, an “F” for forms or
an “N” for blank narrow paper. “P” now indicates preprinted narrow
forms.
~TABLE5~
Allows you to print failure letters that include a list of only those courses
containing a failing grade. Previously, you had to produce a separate
letter for each failing course or include a a table containing all courses
and their grades. ~TABLE5~ works the same as ~TABLE2~, except
that it only includes courses matching range/exact search parameters.
See “Print a Letter for Each Course Within the Search Range” on
page 7-9.
Report Cards Manual
Report Cards Report Writer
Standard Codes for Reports in Report Card Report Writer
Code
Description
~COMPARx~
Allows comment paragraphs (narratives) to be printed directly on
report cards or progress reports. In addition, you can now use the new
code ~COMPARx~ (where x is any report card column 1-11) to print
the narrative comments for a specific grading column. Teachers may
enter these comment paragraphs either with GradeQuick electronic
grade book or with their own word processing program. The comment
must be in a directory called “\RS4COM”, which must be a folder on the
root of the drive containing Administrator’s Plus. Each comment must
be its own ASCII file. If you are using GradeQuick, comments may be
entered by highlighting a student’s name and pressing the F2 key.
When importing grades from GradeQuick, these comment paragraphs
are placed in the RS4COM directory. If you do not have an RS4COM
directory, one is created for you. If you are using a word processing
program like Microsoft Word to create your comment paragraphs, save
each comment as an ASCII file with a name such as 1210112.005. The
file must be named as follows: The first 3 characters are the course
number, in this case “121”, followed by a 2-digit section number, in this
case “01”; The next 2 characters are the student’s grade level, in this
case “12”, then a period followed by the student’s ID number.
Reports #6, #7, #36 and #37 have the ~COMPAR~ code in them.
These reports will incorporate the comment paragraph when printing
one report card per course per student. (Reports #6 & #7 print these
report cards sorted by student while reports #36 and #37 print them
sorted by teacher.) When the ~COMPAR~ code is encountered,
REPORT CARDS PLUS checks the RS4COM directory for a comment
for the current course for the current student. If it is found, it is printed.
Otherwise, the space is left blank.
~DESCRIPTION Put this code near the beginning of a transcript report to force any CL
:XX~
codes to print XX characters of the course description, if there is one,
instead of the course name.
Report Cards Manual 7-61
Chapter 7
Report Cards Report Writer
Standard Codes for Reports in Report Card Report Writer
Code Preliminaries:
Many of these codes use certain parameters defined as follows:
Code
Description
YR: 00 to 14
YEAR: If you see “YR” in a code, enter a two digit number from “00”
to “14”.Year “00” is for year 0 or the current year. Year “01” is for Year
–1 or the first year in the archival files.
Use year “99” to be the year designated by Specification #3. The “99”
code allows you to use the same report and change the year from the
specification window. For example, the same report may be used to
print a report card for the current year or any archival year by
changing the Specification #3 setting, “YEAR”.
Use the special YR codes of “80” to “94” to indicate how many years,
from 0 to 14, after the “START YEAR FOR TRANSCRIPTS”
specification. Assume that you want to print transcripts for years –3
to 0 with year –3 being in the upper left quadrant. You would enter
the year as “80” to print in the upper left quadrant of a transcript for
the year 0. Enter the year as “81” to print in the lower left quadrant of
a transcript for the year –1. Enter “82” to print in the upper right
quadrant for year –2 and enter “83” to print in the lower right quadrant
to print year –3. If the code is outside of the transcript start and stop
years, then nothing will be printed. For example, if you want years –
3 and –2 to be on the transcript, you may use the same report with
nothing printed in quadrants designated by codes 82 to 94. (Code 80
prints year –3 and code 81 prints year –2. Any other code is outside
of the specification settings for the transcript start and stop years.)
7-62
Report Cards Manual
Report Cards Report Writer
Standard Codes for Reports in Report Card Report Writer
Code
Description
CR: 01 to 16
COURSE: Enter a two-digit number from 01 to 16 to indicate which
course(s) to print, from course #1 to #16. Courses are always printed
in order by master course number. The numbers range from 001 to
999.
If you are in a course loop defined by the ~CRSSTART~ and
~CRSEND~ codes, using a course number of 99 indicates you want
to use the current course counter in the loop. A loop will be gone
through one time for each course. The code of 99 will become a 01
the first time through the loop and a 02 the second time through the
loop until all the courses are printed.
If printing by sections, the course number of 99 indicates to use the
current section.
A course number of 98 indicates to use the course found in a search.
For example, if you are doing an exact grade search for grades of “I”
for incomplete, then a course number of 98 indicates to use the
course that was found to have a grade of “I”.
CL: 01 to 13
COLUMN: Enter a two digit number from 01 to 13 to indicate the
report card column to print. Note that columns 12 and 13 are the
comment columns.
The special column code of 98 designates to use the column
indicated by specification #8, which designates the search column.
NUM
NUMBER: Indicates the number of spaces to allocate for codes that
are not numbers. For example, entering “12” for the NUM part of the
code that prints course names means to allocate 12 characters for
the course name. Names longer than 12 will be truncated, and
shorter than 12 will be padded with spaces.
If NUM=0, then the field is trimmed of leading and trailing spaces for
COURSE NAME, LEVEL, STAFF NAME and COLUMN NAMES.
This is useful when imbedding this information in letters.
###
Indicates the format that a number will take. For example, “###.##”
means to print three digits before the decimal and two after.
Report Cards Manual 7-63
Chapter 7
Report Cards Report Writer
Standard Codes for Reports in Report Card Report Writer
Codes That May Share a Line With Other Codes:
NOTE:
7-64
The spaces in the codes below are for illustration only. Do NOT leave any spaces in the
actual codes.
Code
Description
~!GR YR CR
CL:###~
GRADES: Number grades are right justified, letter grades are
padded to 2 if no plus or minus is used and then also right justified.
Letter grades will be allocated the number of spaces indicated by the
length of the “###”. This grade will print only if the specification on
Page 3 of Report Cards Report Writer is set to “Yes”. For example,
~!GR999901:###~ will print the column one grade (CL=1) for the
year in the specification setting (YR=99) for the current course in the
course loop (CR=99). Three spaces will be allocated (###) for the
grade.
~!GR YR CR
CL:###~
GRADES: This code is similar to the one on the previous page, but it
prints the grade AFTER it has been adjusted by the GPA factor. This
code only works for number grades, and was added to allow a school
to juxtapose both adjusted and non-adjusted grades. See “GPA
Factor” on page 2-8.
~!NM YR
CR:NUM~
COURSE NAME: The course name will automatically print on the
report card or transcript. It can be found and modified in Enter
Courses, View/Edit Courses & Sections. The NAME is maximum 10
characters long.
~!ND YR
CR:NUM~
COURSE DESCRIPTION: The course description is found and
modified in the Enter Courses, View/Edit Courses & Sections. The
description can be up to 35 characters long. For example,
~!ND9999:25~ will print a course description up to 25 characters
long. If there is no description entered for a course in View/Edit
Courses & Sections, the course name will print instead. This code is
often used on wide reports.
~!LV YR
CR:NUM~
COURSE LEVEL: If this code is used in a report, a specification in
the Report Cards Report Writer will determine if the course level
will/will not print on a report.
~!ST YR
CR:NUM~
STAFF NAME: If this code is used in a report, a specification in the
Report Cards Report Writer will determine if the staff will/will not print
on a report.
~!TI XX
CL:NUM~
COLUMN TITLE: XX=03, 05, 25 for which name to use. For example,
~!TI0501:6~ indicates the five character name (XX=05) for the first
column (CL=01) and to allocate it 6 spaces. If this code is used in a
report, a specification in the Report Cards Report Writer will
determine if the title of the column will/will not print on a report.
Report Cards Manual
Report Cards Report Writer
Standard Codes for Reports in Report Card Report Writer
Code
Description
~!NU YR
CR:NUM~
COURSE NUMBER: If this code is used in a report, a specification in
the Report Cards Report Writer will determine if the course number
will/will not print on a report.
~!NA YR
CR:NUM~
COURSE NUMBER ALIAS: Prints the alias master course number
that you may have entered for a course. If this code is used in a
report, a specification in the Report Cards Report Writer will
determine if the course number alias will/will not print on a report.
~!SU YR
CR:NUM~
SECTION NUMBER: If this code is used in a report, a specification
in the Report Cards Report Writer will determine if the section
number will/will not print on a report.
.~!CM YR CR
X:NUM~
COMMENT WORDS: X is “1” or “2” for comment #1 or comment #2.
For example, ~!CM99012:40~ prints the words for comment #2 (X=2)
for course #1 (CR=01) for the year in the specification window
(YR=99). If this code is used in a report, a specification in the Report
Cards Report Writer will determine if the comments will/will not print
on a report.
~!CR YR
CR:###.##~
COURSE CREDITS: Total credits earned for a course. If this code is
used in a report, a specification in the Report Cards Report Writer
determines if the credits will/will not print on a report.
~!CS
YR:###.##~
CREDIT SUM: Sum of total credits earned for a year. If this code is
used in a report, a specification in the Report Cards Report Writer will
determine if the credit sum will/will not print on a report.
~!CC YR CR
CL:###
COLUMN CREDITS: The amount of credits earned for a grade in a
credit column for one course. If you are a semester school, with
columns #5 and #10 being your credit columns, ~!CC990105:#.##~
will print the credits earned for the first semester grade while
~!CC990110:#.##~ will print the second semester credits. If you
indicate a non-credit column, then a 0 will be printed. If the column is
empty (no grade), then a blank will be printed for the credits. If this
code is used in a report, a specification in the Report Cards Report
Writer will determine if the column credits will/will not print on a report.
~!CB YR
CL:###
CREDIT COLUMN BOTTOM: Prints the sum of the credits earned in
a credit column. Designed to be printed at the bottom of the column
represented by the previous code. (This would be the total credits
earned for the first semester or for the second semester depending
upon the value of CL.)
~!PC:###.##~
This will give you the total projected credits fro a student.
Report Cards Manual 7-65
Chapter 7
Report Cards Report Writer
Standard Codes for Reports in Report Card Report Writer
7-66
Code
Description
~!AV YR
CL:###.##~
COLUMN AVERAGE: Prints the average grade for a column.
Specifications in the Report Writer determine how the average is
calculated. Specifications allow you to determine if weights or GPA
factors are to be used and if the averages are to be truncated or
rounded.
~!TG YR
CR:NUM~
TRANSCRIPT GRADE LEVEL: Prints the grade level as of year YR
plus colon “10:”. This code is used to identify the grade level when a
course in the transcript was taken. If the course identified by CR does
not exist, no grade level will be printed. On the report, the code prints
“12:01-02”. “12” is the grade level of the quadrant that will show the
12 grade classes that this student took followed by the year in which
he took those classes (see transcript year below). If a student only
has 10 courses, the grade level will not be printed for courses 11
through 16.
~!TY YR
CR:NUM~
TRANSCRIPT YEAR: Prints the year in which a course is taken.
Year 0 will be current year’s data directory, such as 01-02. If printing
from a past directory that has already been archived, you may
change this value to force the correct year to be printed. Use 80 (year
0), if printing year 81 (year –1) and so on. If the course identified by
CR does not exist, no year will be printed.
~!DPX:NUM~
DEPARTMENT NAME: Name of department X (0 to 9).
~!RN:###~
RANK: rank in class. Use the Statistical Reports program to calculate
the “rank to disk” before printing it.
~!OF:###~
OUT OF: For rank in class. If a student is ranked 24 out of 82
students, this prints the “82”.
~!DC X:###~
DEPARTMENT CREDITS: Prints credits for department (0 to 9 or a
“T” for the total of all departments). Used at the bottom of transcripts.
Only prints if the credit specification is set to print bottom totals.
Department credits are only counted for courses in years that are in
the transcript year interval which is set on Page 4 of the Report Cards
Report Writer specifications.
~!ON X:NUM~
OPTIONAL FIELD NAME: Used to print data base fields on the
transcript or report cards. Six specifications let you designate six data
base fields. This code causes the name of these fields to be printed
followed by a colon. NUM designates the number of characters to
use NOT counting the colon. X will equal 1 – 6 to identify the optional
field. For example, ~!ON1:10~ prints the name of the optional field #1
designated by a specification and allocates it 10 spaces.
Report Cards Manual
Report Cards Report Writer
Standard Codes for Reports in Report Card Report Writer
Code
Description
~OD X:NUM~
OPTIONAL FIELD DATA: Similar to the optional field name
described by the previous code. This code prints the data in those
optional fields.
~!CNZN:NUM~ CENTER CODE: Helps center your school name and address. The
NUM after the colon is the number of spaces in which to center the
line. Usually it is the same as the characters you are printing on a
line. In other words, if you have a left margin of 5 and a characters
per line setting of 75, you are actually printing 70 characters on a line.
Hence, use 70 as your NUM.“Z” can be:
•
N: Centers the name of your school
•
U: Prints an underline under your centered school name.
•
S: Centers your school’s street address.
•
C: Centers the City, State and Zip of your school in a single line.
•
P: Centers the phone number of your school. For example:
~!CNNN:70~ would center the name of your school.
~!YRXX~
Prints the years (e.g. 2001-02) that a student attended “XX” grade
level. This code is intended for use on transcripts.
~TAB~
This code produces a tab in the Report Writer for tab delimited
exports.
~!GY YR:NUM~ “GR:YEAR”: If YR is outside of range, nothing is printed.
~!SL YR
CR:NUM~
STAFF LAST NAME: Prints the formal last name of the staff member
teaching the indicated course.
~!SF YR
CR:NUM~
STAFF FIRST NAME: Prints the formal first name of the staff
member teaching the indicated course.
~!MSGX:NUM~ MESSAGE: Three message lines may be set in the specification
window. Replace X with a 1, 2, or 3 to indicate which message you
want printed.
~ATEND~
Prints data in AT END OF specification. It is always padded to 9.
~!SRCL~
Prints the 25 character name for current column for searches or
honor rolls as set by a specification in the Report Cards Report
Writer.
~!GDST~
Search Grade start as set by a specification in the Report Cards
Report Writer.
Report Cards Manual 7-67
Chapter 7
Report Cards Report Writer
Standard Codes for Reports in Report Card Report Writer
Code
Description
~!GDEN~
Search Grade end as set by a specification in the Report Cards
Report Writer.
~!GDEX~
Exact Search Grade as set by a specification in the Report Cards
Report Writer.
~!CTXX:###.## CAREER TOTALS: Replace XX with a two digit code:
~
• CODE 01: Career credits
•
CODE 02: Career QP PARA
•
CODE 03: Career WT
•
CODE 04: Career GPA
•
CODE 05: Rank (34 of 82)
•
CODE 06: Previous Credits
•
CODE 07: Previous QP
•
CODE 08: Previous WT
•
CODE 09: Previous GPA
•
CODE 10: Last Credits
•
CODE 11: Last QP
•
CODE 12: Last WT
If you have just updated, “career” totals are the new totals, “previous”
totals are before the updating was done and the “last” totals are the
numbers added to the “previous” totals to get the “career” totals.
7-68
Report Cards Manual
Report Cards Report Writer
Standard Codes for Reports in Report Card Report Writer
Code
Description
~!FSXX:NUM~
FOUND SECTION: If printing by section, these codes can be used to
print information about the current section, such as at the top of a
roster. Replace XX with a two digit code.
•
CODE 01: Course Name
•
CODE 02: Course Number
•
CODE 03: Course Section
•
CODE 04: Teacher First Name
•
CODE 05: Teacher Last Name
•
CODE 06: Future Use
•
CODE 07: Homeroom
•
CODE 08: Credits
•
CODE 09: Optimum size
•
CODE 10: Current Size
•
CODE 11: Weight
•
CODE 12: GPA Factor
•
CODE 13: Time
•
CODE 14: Quarter
~!CNFL:NUM~
CENTERS THE STUDENT NAME. The NUM after the colon is the
number of spaces in which the name is to be centered. Usually it is
the same as the characters you are printing on a line. This code is
useful centering student’s names on certificates.
~PR~
Prints the words “SCHOLARSHIP REPORT”, “PROGRESS
REPORT”, or “REPORT CARD” depending on how you have set the
Specification G on Page 2 of the specifications window.
~PRU~
Underlines the ~PR~ words listed above.
Report Cards Manual 7-69
Chapter 7
Report Cards Report Writer
Standard Codes for Reports in Report Card Report Writer
Header Codes:
Many of the Report Writer codes represent words that will print only if a specification
is set to print a certain item. For example, the code ~!LEV~ will print the word “LEV”
in the header of a report card, transcript or label to indicate a course’s level. If the
specification “PRINT LEVEL” is set to “No”, this heading will not be printed. It allows
you to turn on and off the option to print these items without ever having to go in and
modify the report.
NOTE:
These codes contain an exclamation point, indicating they are controlled by a specification.
Code
Description
~!LEV~
Prints “LEV” in header if spec is on to print the LEVEL.
~!CRS~
Prints “CRS” in header if spec is on to print the course number
~!SC~
Prints “SC” in header if spec is on to print the course section.
~!CRDT~
Prints “CRDT” in header if spec is on to print credits.
~!CRDTS~
Prints “CRDTS” in header of spec on to print credits.
~!TEACHER~
Prints “TEACHER” if spec is set to print teacher’s names.
~!AVERAGES~
Prints “AVERAGES:” if spec is set to print column averages.
~!RANK~
Prints “RANK:” (for perm labels) if spec is set to print rank in class.
~!CR~
Prints “CR:” for perm labels if spec is set to print credits.
~!WT~
Prints “WT:” for perm labels if spec is set to print GPA data.
~!QP~
Prints “QP:” for perm labels if spec is set to print GPA data.
~!GPA~
Prints “QPA:” for perm labels if spec is set to print GPA data.
~!HRSTAT~
Prints “HONOR ROLL STATUS” if a student is on the honor Roll and
the specification is set to print the honor roll status.
~!HRSTATUND~ Underlines the words HONOR ROLL STATUS if a student is on an
Honor Roll and the specification is set to print the honor roll status.
7-70
~!HRNAME~
Prints the name of any honor roll the student is on if the specification is
set to print the honor roll status. Honor rolls must first be calculated with
the STATISTICAL REPORT program.
~!HON~
Prints the name of any honor roll a student is on regardless of how the
specification is set to print the honor roll status.
Report Cards Manual
Report Cards Report Writer
Standard Codes for Reports in Report Card Report Writer
Special Course Line Code:
Code
Description
~!CLYRCRXY:N This code builds a line for labels or transcripts without you having to
UM~
build it one column at a time. While sacrificing some flexibility, it is easy
to use. If you need more flexibility, you may use other codes to build
your course lines.
Course lines may be built with the final grade on the right or left or in a
special semester format which prints only those columns worth credit
followed by the number of credits earned in those columns. Replace
the variable X with an L, R or S to indicate respectively “final grade on
RIGHT”, “final grade on LEFT” or “SEMESTER”. Because they have
more room with fewer columns being printed, semester lines use the 5
character name for column headings and 6 spaces for column
averages, while LEFT and RIGHT labels use the 3 character name for
column headings and 3 spaces for averages.
Y indicates the type of line to construct: Replace the variable Y with an
“H” to build the header. Headers contain the names of the columns.
Use a “U” to underline the header on a permanent label. The length of
the line will be the length of the last header printed. Use a “V” to
underline the header on a transcript. The length of the line will be the
length of the last header printed plus 10 to account for underlining
“GR:YEAR” which prints above the column containing the year and
grade level of the courses that were taken. Use a “B” to build the
BODY. If CR is 99 and in a course loop, the body will be repeated for
each course. Use an “A” to build a line containing column averages.
NUM indicates the length of the line. If doing a HEADER or AVERAGE,
the CR is irrelevant. Put anything as the CR. It is there for consistency.
If you are forcing all 16 courses to print with ~CRSSTART2~, this code
prints the averages directly below the last course printed when the
specification is set to print averages (This occurs so that the averages
will not be printed at the bottom of the 16 course loop but after the last
course.)
~!CLYR99RX~
- is similar to the ~!CLYR99RH~ described above, but it prints the
header with a “1.1” column after the final grade column. This code is
meant to be used in conjunction with the two codes listed below:
~!CLYR99RY~
- is similar to the ~!CLYR99RB~ code, but it prints the grade adjusted
by the GPA factor in a column after the final grade column.
Report Cards Manual 7-71
Chapter 7
Report Cards Report Writer
Standard Codes for Reports in Report Card Report Writer
Code
Description
~!CLYR99RZ~
-is similar to the ~!CLYR99RA~ code, but it prints the final grade for the
additional column set up for grades adjusted by the GPA factor using
the previous two ~!CL~…~ codes above.
Special Register The following code contains almost any kind of value that you would
Code One:
want printed on a register report. Each character in the code has a
special meaning.
~Z#(01-25)(I,Y)(E,U,P,A,S)(0,1,2,3):###.##~
Character #1: A “Z” which identifies this as an attendance variable.
Character #2: A “#” sign which identifies this as a register code total.
Characters #3, #4: A two digit number identifying which register code
from 01 to 25. Special codes of 26-30 may also be used.
Code 26: The number of membership days which is calculated by
subtracting the number of non-member days from the number of daysin-session. If a student has a code of “N” in their record, and a day is
worth some other value than “1’ member day, the student is considered
to be a non-member for that value. For example, a student who is a
non-member for a date with membership value of “.5” will only be
credited with a .5 non-member day.
Code 27: The number of days present. This is calculated by subtracting
the number of absences, (register code #1) from the number of
member days.
Code 28: The Average Daily Attendance which is calculated by dividing
the number of days present by the number of days in session.
Code 29: The Average Daily Membership which is calculated by
dividing the number of membership days by the number of days in
session.
Code 30: The percent attendance which is calculated by dividing the
number of days present by the number of membership days.
CHARACTER #5: Either the letter “I” for an interval total or the letter “Y”
for the year-to-date total.
CHARACTER #6: Either the letter “E” for “excused”, “U” for
“unexcused”, “P” for “pending”, “A” for “all” or “S” for “special code”. The
letter “S” must be used with special codes 26-30. If you are printing the
totals for register code #1, “absences”, and “A” in this character will
print all absences while an “E” will only print excused absences.
Pending absences are those that are neither excused nor unexcused.
7-72
Report Cards Manual
Report Cards Report Writer
Standard Codes for Reports in Report Card Report Writer
Code
Description
CHARACTER #7: A number from 0 to 4. Use a “0” for an individual
student total which would normally be in the body of the register. Use
a “1” for the totals of the current sort category which would normally be
printed in a sort footer. Use a “2” for the totals of the current search
category which would normally be printed in a search footer. Use a “3”
for the grand totals which would normally be printed in a grand footer.
For example, if you are printing the register sorted by sex, use the
number “2” in the search footer to print the totals for each sex.
CHARACTER #8: Must be a colon followed by a formatting template
such as “###.##”. This template means to print three digits to the left of
the decimal and two to the right. All numbers in a column will be neatly
lined up.
Report Cards Manual 7-73
Chapter 7
Report Cards Report Writer
Standard Codes for Reports in Report Card Report Writer
Special Register Code Two:
The following code allows you to print totals for individual attendance codes including
individual entry and withdrawal codes.
Code
Description
CHARACTER #1: A “Z” which identifies this as an attendance
~Z!(001250)(I,Y)(0,1,2,3):# variable.
##.##~
• CHARACTER #2: A “!” sign which identifies this as an
attendance code total.
•
CHARACTERS #3-#5: 3 digit number identifying which
attendance Code from 001 to 250.
•
CHARACTER #6: Either the letter “I” for an interval total or
the letter “Y” for the year-to-date total.
•
CHARACTER #7: A number from 0 to 4. Use a “0” for an
individual student total which would normally be in the body
of the register. Use a “1” for the totals of the current sort
category which would normally be printed in a sort footer. Use
a “2” for the totals of the current search category which would
normally be printed in a search footer. Use a “4” for the grand
totals which would normally be printed in a grand footer. For
example, if you are printing the register sorted by sex, use the
number “2” in the search footer to print the totals for each sex.
•
CHARACTER #8: Must be a colon followed by a formatting
template such as “###.##”. This template means to print three
digits to the left of the decimal and two to the right. All
numbers in a column will be neatly lined up.
OTHER ATTENDANCE CODES
Code
Description
~!ATYRX:###.# ATTENDANCE: X=1: member days, 2: absences, 3: half absences,
#~
4: suspensions, 5: Tardies, 6: Dismissals. For year 0, suspensions
are linked to attendance code 12 which is EXTERNAL
SUSPENSION. Half absences are not available for year 0 because
they are included in REGISTER absences. Take them out by
removing the register link for .5 abs. The archived data for these 6
categories are used. If year 0, ½ abs not available unless you
manually use the attendance code for these categories. Only
integers are archived (for backward compatibility)
7-74
Report Cards Manual
Report Cards Report Writer
Standard Codes for Reports in Report Card Report Writer
Code
Description
~ZBDT~
The attendance beginning interval date as set by a specification. An
exclamation point is not needed.
~ZFDT~
The attendance ending interval date as set by a specification. An
exclamation point is not needed.
~ZYDT~
The attendance year-to-date final date as set by a specification.
~!MEMB~
Prints “MEMB:” if the specification is set to print the attendance.
~!ABS~
Prints “ABS:” if the specification is set to print the attendance.
~!TAR~
Prints “TAR:” if the specification is set to print the attendance.
~!DIS~
Prints “DIS:” if the specification is set to print the attendance.
~!MBYR:NUM~ Prints “MEMB:” if the year is in the transcript year interval set by
specifications.
~!ABYR:NUM~ Prints “ABS:” if the year is in the transcript year interval set by
specifications.
~!TAYR:NUM~
Prints “TAR:” if the year is in the transcript year interval set by
specifications.
~!DIYR:NUM~
Prints “DIS:” if the year is in the transcript year interval set by
specifications.
Report Cards Manual 7-75
Chapter 7
Report Cards Report Writer
Standard Codes for Reports in Report Card Report Writer
Attendance Codes That Make Up the Daily Attendance Grid
These codes make up the daily attendance grid on the bottom of report cards. They print
only if you have set Specification #9, “PRINT DAILY ATTENDANCE” set to “Yes”.
Code
Description
~ZTO~
Prints the word “TO”
~Z|~
Prints the Vertical Line, “|”.
~ZYEAR~
Prints the word “YEAR”.
~ZABSENCES~
Prints the word “ABSENCES”.
~ZTARDIES~
Prints the word “TARDIES”.
~ZDISMISSALS~ Prints the word “DISMISSALS”.
~ZU:##~
Prints ## number of underline characters.
Universal Report Codes
The following codes can be used in all report writers in Administrator’s Plus.
7-76
Code
Description
~BLANK~
Forces blank
line(s)
The last line of a report is the last line containing code or text.
Consequently, all empty lines after the last line are disregarded.
Insert ~BLANK~ codes to leave blank lines at the end of a report
(within a report, simply leave an empty line to create space) You
can control the height of a blank line within a report by setting the
font size of the ~BLANK~ code (for example, size 4 for a small
blank line, size 12 for a larger one) on that line.
Report Cards Manual
Report Cards Report Writer
Standard Codes for Reports in Report Card Report Writer
Code
Description
~CNXN:#.#~
Centering Code
The Centering Code helps center school information on report
headers. You can view and edit school information from the
Customize Data Base program, or by choosing
FileDCustomizeDSchool Information from the upper toolbar.
The #.# after the colon is the number of inches in which to center
the entry. On a normal 8 ½ x 11 inch piece of paper, with ½ inch
margins on either side, # would be replaced with 7.5.
The X may be replaced with an N, U, S, C, or P
•
N: centers Name of school
•
U: underlines the school name
•
S: centers school’s Street address
•
C: centers City, State & Zip of school on a single line
•
P: centers the Phone # of school
For example: ~CNNN:7.5~ would center your school name on a
standard piece of paper.
~HLINE:XY~
Header line
This header line Report Writer code prints a solid line from margin
to margin. The X variable indicates the width of the line, with
1=thin, 2=medium and 3=thick. The Y variable indicates the
position of the line, with 1=top, 2=middle and 3=bottom. For
example, to underline the heading of a report with a bold line
running from one side of the paper to another, place a ~HLINE:31~
code on the line directly below the heading.
~ULINE:X:Y~
Underline
This code prints an underline starting at point X and ending at point
Y on a line of a report. (X and Y = number of inches from the left
margin.) This code is meant to be used on a report writer line with
other text and codes, including other ~ULINE~ codes (i.e., you may
want to underline more than one item on a line).
~VLINE~:Y1:Y2~ Prints a Vertical Line starting from the Y1 coordinate, and ending
Vertical Line
at the Y2 coordinate, Y being the number of inches from the top
margin. Use a tab code in conjunction with the vertical line code to
position the X coordinate, X being the number of inches from the
left margin). For example, ~T5.0~~VLINE:1.04.0~ will print a three
inch vertical line starting one inch from the top margin, beginning
five inches from the left margin.
Report Cards Manual 7-77
Chapter 7
Report Cards Report Writer
Standard Codes for Reports in Report Card Report Writer
Code
Description
If the Report Writer code on the line below an ~EMPTY~ code does
~EMPTY~
Skips the next line not contain an entry for a student, the line will be skipped. This
code is used to skip blank lines in mailing labels.
if it is blank
~TS####~
Tab for fixedlength exports
Tabs over the designated number of character spaces to the right
(#### being an integer). For example, consider the line of code:
~FN~~TS23~~LN~. The last name will print in the 24th position. If
the first name is less than 23 characters, trailing spaces will be
added. If the first name exceeds 23 characters, the name will be
truncated.
~TAB~
Tabs text
Produces a tab in the Report Writer for tab-delimited exports.
Use this code to move all the code and text below it up or down the
~MOVEY:#.#~
Alters the vertical designated number of inches (in decimals) on the report. For
example, ~MOVEY:0.33~ will move the print position a third of an
print position
inch. ~MOCVEY:-0.25~ will move the print position up 1/4 inch. In
addition to giving you more control of the printing position of each
line of a report, this code will allow you to print more than one font
per line, as well as text upon text.
~REM~
Ignores all the
code and text in a
line
Used to insert text into the body of the report that will not be printed
on the report or read by the report writer as code. (i.e., ~REM~print
courses 010-060, positioned to the right of an
~AdvancedSpecStart=1~ code could be used to indicate that this
part of the report will print courses 010 to 060, without affecting the
actual printing of the report.) The ~REM~ code must appear
BEFORE the text being “ignored”.
~ENDPAGE~
Whenever the Report Writer encounters an ~ENDPAGE~ code,
Starts a new page the report will move to the beginning of the next page.
~ENDPAGE~ codes are commonly used in Search Headers so
that each found search category starts on a new page.
7-78
Report Cards Manual
Report Cards Report Writer
Standard Codes for Reports in Report Card Report Writer
Code
Description
~GHSTART~
Start of Grand
Header (printed at
the beginning of a
report)
~GHEND~End of
Grand Header
All the lines between the ~GHSTART~ and ~GHEND~ codes
make up a Grand Header. The Grand Header prints at the top of
the first page of a report only. Codes that may be used in a Grand
Header are listed below:
•
~L1~ thru ~L17~: School Information fields (1 thru 17)
•
~GR~: Student’s Grade Level (2 digits)
•
~SF~: Search Field
•
~TF~: Sort Field
•
~SFC~: Search Field(s) and Criteria
•
~DATE~: Current Date
•
~T#.#~: Tab Code (in inches)
~LFOFF~
Line Feed Off
Turns off the printer's line feed so that the next line can be an
underline. If you do not turn it back on again, the printer will stay at
the same line.
~LFON~
Line Feed On
Turns the printer's line feed on again after it has been turned off by
LFOFF.
~LPI:X~
Lines Per Inch
The Lines Per Inch code determines the number of lines per
vertical inch. This code was added to the Report Writer so that
certain portions of a report could have a fixed Lines Per Inch
setting, regardless of the font height. As a result, users have a
wider range of font options to choose from when generating reports
on pre-printed forms.
Essentially, the Lines Per Inch code causes large print to cram
together and smaller print to expand in order to adhere to the lines
per inch setting. X represents the lines per inch in character
spaces. It may be replaced with a 1 through 10, with 10 being the
most tightly spaced. When there is no Lines Per Inch code present,
or when the code reads ~LPI:0~, the lines per inch is determined
by the size of the font.
~PGSTART~
Page Start
~PGEND~ Page
End
All the lines between the ~PGSTART~ and ~PGEND~ codes make
up a Page Header. The Page Header prints at the top of every
page of a report. Page Headers are used on lists that DO NOT
require a search. Often times, Page Headers contain page
numbers.
Report Cards Manual 7-79
Chapter 7
Report Cards Report Writer
Standard Codes for Reports in Report Card Report Writer
Code
Description
~PGNUM:X~
Page Number
Reset
The page number code (~PG~) is placed in the header or footer of
a report and prints the page number of each page, starting with #1.
The Page Number Reset code allows you to start numbering
pages at a number other than 1. Replace X with the number from
which you will start counting the page numbers, that is, the number
that will print on the first page of the report.
~PRINTPAGEHE The code is mandatory for the Page Header to print on the page. It
usually appears after the ~PGNUM:X~ code in the report.
ADER~
Causes the page
header to print on • ~SHSTART~: Start of Search Header (printed at the start of
search category)
the report
•
~SHEND: End of Search Header (printed at the end of search
category)
All the lines between the ~SHSTART~ and ~SHEND~ codes make
up the Search Header. The Search Header prints at the beginning
of every new search category. For instance, if you run a report
searching on HOMEROOM and sorted by GENDER, a Search
Header will be printed for each new Homeroom. If the Search
Header contains an ~ENDPAGE~ code, a new page will be printed
for every found search category. If the body of a report contains a
Search Header and no search is performed when running the
report, the Search Header will not be printed.
7-80
Report Cards Manual
Report Cards Report Writer
Standard Codes for Reports in Report Card Report Writer
Code
Description
~WRAPON~
Word Wrap On
~WRAPOFF~
Word Wrap Off
Word Wrap will be performed on all the lines of text between the
~WRAPON~ and ~WRAPOFF~ codes. You may use the word
wrap codes as many times as necessary in a report. Word Wrap is
generally used in letters.
Because the text in letters oftentimes contain variables that get
replaced with entries from the data base (“Your son ~FN~…"), the
length of a line containing the variable may get longer or shorter
depending on the length of the data base entry replacing it. Without
the word wrap codes, any line exceeding the margin settings will
be truncated. On the other hand, if the line is very short, it will print
“as is” and look awkward. Using the word wrap codes, words that
go beyond the right margin will scroll down to the next line, with the
rest of the lines below it being adjusted accordingly. Similarly, if the
line does not fill the available space, words from the line below will
move up to fill the gap.
In order to maintain spacing between the first word in the line and
the last word in the line above it, there is one space at the
beginning of every line inside the word wrap codes. If the end of a
line ends in the middle of a word, do not leave a space so that both
halves of the word will be joined.
For a sample of this feature, go to View/Edit Letters/Reports in
Data Base Plus and select report #42, the Sample Letter. Note that
the heading and signature line are outside the word wrap codes.
When using the word wrap codes, leave a blank line between
paragraphs. Also, Tab codes should never be used “inside” of word
wrap codes.
~UNIVERS~
Identifies a Search
Header as a
Universal Header
A ~UNIVERS~ Search Header acts as a grand header when a
search and sort is not being performed. This code enables reports
with Search Headers (~SHSTART~ ~SHEND~) to be used both
when searching on a category, and when printing reports for ALL
STUDENTS ALPHABETICALLY or INDIVIDUAL STUDENTS. The
~UNIVERS~ code must be the first code in the Search Header.
Report Cards Manual 7-81
Chapter 7
Report Cards Report Writer
Standard Codes for Reports in Report Card Report Writer
Codes 4 or Fewer Characters In Length That May Share a Line
With Other Codes
Code
Description
~1~ thru ~160~ Data Base fields (1 through 160)
7-82
~N1~ thru
~N160~
Names of Data Base fields (1 through 160)
~T#.#~
Tab #.# inches to the right of the left margin
~L1~ thru
~L17~
School Information fields (1 through 17)
~FN~
Student's First Name
~MN~
Student's Middle Name
~LN~
Student's Last Name
~GR~
Student's Grade Level (2 digits)
~ID~
Student's Record Number (3 digits)
~UNID~
Student's Unique ID number
~DATE~
Current Date
~DOB1~
Date of birth in the format: MM/DD/YYYY
~DOB6~
Date of birth in the format: MMDDYY
~PG~
Prints the current page number
~REM~
Ignores all code and text appearing after it
~HIS~
Prints “his” or “her” (depending on entry in GENDER field)
~SEX~
Prints “son” or “daughter” (depending on entry in GENDER field)
~SX2~
Prints “he” or “she” (depending on entry in GENDER field)
~YEAR~
Current School Year Name
~YOG~
Year of Graduation
~SF~
Search Field
~SC~
Search Category
~SFC~
Search field(s) and criteria
~ULINE:X:Y
Underlines text starting at X, ending at Y (for example,~ULINE:3:5~)
Report Cards Manual
Report Cards Report Writer
Standard Codes for Reports in Report Card Report Writer
Codes That Must Be On a Line By Themselves
Code
Description
~GFSTART~ Start
Grand Footer
~GFEND~
End Grand Footer
All the lines between the ~GFSTART~ and ~GFEND~ codes make up
a Grand Footer. The Grand Footer prints at the very end of a report
only. Grand Footers are often used to generate a count of all the
students included in a report. For example, the line of code inside a
Grand Footer will typically include text followed by a grand count code:
Total Students: ~GCT~, which will print “Total Students: 118”
~ORPHANSTART~ All the lines between the ~ORHPANSTART~ and ~ORPHANEND~ will
remain together on a report. In this way, text where a caption and a
Start of text to
paragraph follow will not be split.
remain together
~ORPHANEND~
End of text to
remain together
~SFSTART~
Start of Search
Footer
~SFEND~
End of Search
Footer
All the lines between the ~SFSTART~ and the ~SFEND~ codes make
up a Search Footer. The Search Footer prints at the end of each sort
category. Search Footers are often used to generate a count of all the
students included in a search category. For Example, the line of code
inside a search footer will typically include text followed by a search
category code and a search count code: Total: ~SC~: ~SCT~.
Searching on HOMEROOM and sorting on SEX, the line of code would
print something like, “Total: Mrs. Jones: 18”, indicating 18 students in
Mrs. Jones’ homeroom (the search category).
~TFSTART~
Start of the Sort
Footer
~TFEND~
End of the Sort
Footer
All the lines between the ~TFSTART~ and the ~TFEND~ codes make
up a Sort Footer. The Sort Footer prints at the end of each sort
category. Sort Footers are often used to generate a count of all the
students included in a sort category. For Example, the line of code
inside a sort footer will typically include text followed by a sort category
code and a sort count code: Total: ~TC~: ~TCT~. Searching on
HOMEROOM and sorting on GENDER, the line of code would print
something like, “Total: F: 7”, indicating 7 female students in the current
homeroom (the sort category). The following is an annotated list of
codes used by the Report Cards Report Writer. As with data base
codes, these codes must be between a pair of tildes (~).
Report Cards Manual 7-83
Chapter 7
Report Cards Report Writer
The Pre-defined Reports
The Pre-defined Reports
Each task in the task list has a default report linked to it. “Using the Task List” on
page 7-4 describes which reports are linked to each task in detail. You can accept
the default, which appears in Specification #3: ACTIVE LETTER/REPORT? (See
“ACTIVE LETTER/ REPORT” on page 7-16) or click on that field and choose
another report from the list. This section briefly describes each of the reports that
may be selected from the following window:
NOTE:
Transcript reports must be numbered over 40 (i.e., they must appear in the third column). If
you are going to copy a transcript to a new number in order to modify it, copy it to an unused
number in the third column.
Report Name
Description
RC: Narrow
Plain
This report gives you a report card on a plain, 8.5" x 11" paper.
RC: Wide Plain This report gives you a report card on plain, 11" x 8.5" paper, printed
landscape. Because it is a wide report card, comments for a course
print on the same line as the course's grades.
RC: Blank
Forms
Use this report if you have purchased the blank, wide three-part
forms from Rediker Software. It will print both your school's name and
the column headings.
RC: Pre-Printed This report prints a wide report card on attractive pre-printed, threeForm
part forms you can purchase from Rediker Software. Because your
school's name is pre-printed on these forms, it is not printed by this
report.
7-84
Report Cards Manual
Report Cards Report Writer
The Pre-defined Reports
Report Name
Description
RC: Multi
This narrow report card contains narrative comments, which can be
Comment/pg*** imported from GradeQuick or entered manually in
View/Change/Add/Drop (See Chapter 6.)
RC: 1 per
course I
This report prints one report card per course, per student, including
narrative comments. It leaves a space for the teacher to hand write a
personal comment.
RC: 1 per
Course II
Like the previous report, this report prints one report card per course,
per student. However, it puts the grades in a different format. By
editing this report you can change the headings that print next to
each grade and what grade appears next to each label. As in report
#6, narrative comments are included and there is room for personal
comments.
HR Cert: Forms Use this report to print an honor roll certificate on our great looking
forms. Call 1-800-882-2994 for a sample.
H Roll
Certificate
This report prints a simple certificate listing the student and the honor
roll he or she achieved. To print the certificate, make Report #9 the
active report and set Specification #2: PRINT LETTER/REPORT
FOR? on the INITIAL SPECIFICATIONS window to “ON ANY
HONOR ROLL SEARCH”. You could make the certificate more
attractive by adding a graphic (See “Inserting a Graphic into a
Report” on page 7-57), or export the report to an ascii file for
importing into another program.
H Roll Export
This report generates a comma delimited ASCII file composed of the
names of the students on an honor roll, which honor roll they made,
and the marking period on which they made the honor roll. You can
import the file into a graphics program (See “Inserting a Graphic into
a Report” on page 7-57.) and design your own honor roll certificate.
Once again, you need to set Specification #2 of the INITIAL
SPECIFICATIONS window to search on one or any honor roll.
Letter: Honor
Roll
This report prints a letter for all students who have made an honor
roll. As with the above two reports, you must set Specification #2 of
the INITIAL SPECIFICATIONS window to search on one or any
honor roll.
Report Cards Manual 7-85
Chapter 7
Report Cards Report Writer
The Pre-defined Reports
Report Name
Description
Letter: Search
This report generates a letter for all students who have met a grade
search specification you have set. Since this is a warning letter, you
will want to search for low grades; of course, you could edit the body
of the letter so that it becomes an honorific letter instead. To perform
a grade search, you need to set Specification #2 of the INITIAL
SPECIFICATIONS window to some sort of grade search (probably
one per course), and set Specifications #5-8 appropriately, i.e.,
choose the marking period and grade(s) on which to search.
Letter:
Search..Com
This report is a combination of Report #12 and Report #7. You need
to search for students meeting grade specifications you have set,
and this report will generate a report card in the same format as
Report #7.
Search List:
Exact
This report generates a list of students meeting an exact grade
search specification. To perform this search go to the INITIAL
SPECIFICATIONS window and set Specification #2 to EXACT
GRADE SEARCH: 1 PER COURSE, Specification #5 to the grade to
be searched for, and Specification #8 to the marking period on which
the search is to be performed.
Search List:
Range
This is similar to Report #14, except that the search is for all students
whose grades fall within a range of grades. Use Specifications #6
and #7 to set the grade range.
RC: Multi
comment/pg
This report prints a report card with narrative comments, which can
either be imported from Grade Quick or entered manually in
View/Change/Add/Drop. See Chapter 6.
New Progress
A report card that includes introductory text in letter format and a
table that defines each comment code in the comment code list. This
report was specifically designed to handle the special demands of a
laser printer. It is the laser equivalent of Report #2.
RC: Pre-Print
LASER
Prints a wide report card on pre-printed forms, available from Rediker
Software. This report is designed to leave enough space at the top
for pre-printed information, including school name and address, date,
and so on.
RC: Nar Plain
LASER
Prints a report card on narrow 8.5” x 11” plain paper. The default for
the task “Print a NARROW Report Card” (see “Printing a Narrow
Report Card” on page 7-5.), this report is designed for use with a
laser printer.
RC: Wide Plain Prints a wide report card on 11” x 8.5” plain paper. The default for the
LASER #20
task “Print a WIDE Report Card” (See “Printing a Wide Report Card”
on page 7-5.), this report is designed for use with a laser printer.
7-86
Report Cards Manual
Report Cards Report Writer
The Pre-defined Reports
Report Name
Description
LABEL: FNL
GRD RIGHT
Prints a permanent transcript label with the final grade and credit
columns to the right of the other grades. This is the default report for
the Task “Print a Permanent Label”. See “Printing a Permanent
Label” on page 7-6.
LABEL: FNL
GRD LEFT
This report is similar to Report #21, except that the final grade and
credit columns appear to the left of the other grades.
LABEL:
SEMESTER
This report prints a label for a school with two credit columns. The
only grade columns that print are the semester columns (in the
example below these are the midyear and final columns), the
corresponding credits-earned-each-semester columns, and the totalcredits-earned column.
RC: RC Form
Long Commnt
Prints a report card including narrative comments on a pre-printed
form available from Rediker Software.
RC: Plain Long Designed to print a report card with narrative comments on plain 11”
Commnt
x 8.5” paper.
RC: Form Lng
Com LAS
Same as report #25, but designed especially for a laser printer.
RC: Plain Lng
Cm LAS
Same as report #26, but designed especially for a laser printer.
ASCII Export
Generates a comma delimited ASCII file containing an entry for each
report card column, which can be imported into a spreadsheet
program like Excel. The file contains an empty entry (“”) in case you
do not want to print a particular column (see OVERRIDE
SPECIFICATIONS).
GQ V4 Export
Previously used to export rosters to GradeQuick across a network
using GradeQuick Deluxe.This process is now performed exclusively
through the Tools->GradeQuick window.
LABEL:
PARENTS
Same as report #1 in Database Report Writer (See the Data Base
Plus manual), prints 1 column labels containing parent name and
address. This is the default report for Task #29: Print mailing labels
by course. See “Printing Mailing Labels for a Course” on page 7-12.
Although the report is designed for use with a dot matrix printer, it can
be modified to print 2 or 3 column labels using a laser printer.
GQ Export
Previously used to export rosters to GradeQuick by users who do not
have the networked version of GradeQuick. This process is now
performed exclusively through the Tools->GradeQuick window.
Report Cards Manual 7-87
Chapter 7
Report Cards Report Writer
The Pre-defined Reports
Report Name
Description
Roster
Prints class rosters similar to those printed with the Data Entry
Forms program. Because this rooster is a report, it can be modified
to suit your needs.
1 per course I
Sect
Same as report #6 (See “RC: 1 per course I” on page 7-85.), except
that it sorts report cards by section and so must be run by SECTION.
1 per course II
Sect
Same as report #7 (See “RC: 1 per course I” on page 7-85.), except
that it sorts report cards by section and so must be run by SECTION.
LABEL: No
Table
LABEL: No
Table
These reports are similar to Reports #21 and #23 respectively,
except these reports do not employ the pre-defined Tables. As a
result, these reports lend themselves to user modifications. If you
decide to modify them, you should first copy the report to another
number.
Trans: Plain RT This report creates a wide, two-column transcript capable of holding
Year
four years on a single piece of paper. This report is recommended for
schools with one credit column. This column and the credit earned
will print on the right. Because the report is wide, you can print more
report card columns on this report than you can on the narrow, twocolumn report (Report #52).
Trans: Plain SM This report is similar to Report #41, except that it is intended for a
Year
semester school with two credit columns. These columns, along with
the credit earned after each semester and the total credits earned,
are the only grade columns that print.
Trans: Plain RT This transcript is organized by department rather than by year.
Dept
Consequently, it does not include yearly attendance data.
Trans: Plain SM This report is similar two Report #43, except that it is intended for a
Dept
semester school with two credit columns. These columns, along with
the credit earned after each semester as well as the total credits
earned, are the only grade columns that print.
7-88
Trans: Forms
RT Year
Transcript printed on special 11" x 8.5" forms available from Rediker
Software with final grade on right and organized by year.
Trans: Forms
SM Year
Transcript printed on special 11" x 8.5" forms for school with 2
semester columns, organized by year.
Trans: Forms
RT Dept
Transcript printed on special 11" x 8.5" forms with final grade on right
and organized by department]
Report Cards Manual
Report Cards Report Writer
The Pre-defined Reports
Report Name
Description
Trans: Forms
SM Dept
These reports are similar to Reports #41-#44 respectively, except
they are intended to be printed on two-color hard stock paper. As
such, these reports do not print the header labels (e.g. “STUDENT:”,
etc.), nor do they print the dashed lines demarcating the different
quadrants of the transcript.
Trans: Forms
RT Yr 22
Prints course information separated by year on a wide 11” x 8.5” preprinted form that does not have school name and address
information pre-printed on it.
Trans: Nar 1Col Because this transcript is only one column wide you can print as
RT YR
many report card columns as you want; however, depending on how
many courses your students take, this transcript may require more
than one sheet of paper. Use this report if your school has one
column for credit, the final grade column. This column and the credit
earned will print on the right between the vertical lines.
Trans: Nar 1Col This report is similar to Report #50, except that it is designed for a
SM YR
semester school with two credit columns. As with the other semester
reports, the only columns that print are the two semester columns,
along with the credits earned each semester and the total credits.
Tran: Nar 2 Col Same as report #50, except that it prints two columns instead of one.
RT YR
Due to spacing restrictions, this report is recommended for schools
who do not need to print many grading columns.
Tran: Nar 2 Col Same as report #51, except that it prints two columns instead of one.
SM YR
Due to spacing restrictions, this report is recommended for schools
who do not need to print many grading columns.
Tran: Nar 2 Col Prints courses in two columns, organized by department with Final
RT DP
grade on right followed by Credit column.
Tran: Nar 2 Col Prints courses in two columns, organized by department. This report
SM DP
is designed for a semester school with two credit columns. As with
the other semester reports, the only columns that print are the two
semester columns, along with the credits earned each semester and
the total credits.
TR: Plain RTYR See Report #41 on “Trans: Plain RT Year” on page 7-88. This report
LASER
was designed especially for use with a laser printer.
TR: Narw RTYR Prints courses in four quadrants separated by year on narrow 8.5” x
LASER
11” paper. The default report for Task #5: Print a NARROW
Transcript by Year, this report was designed for use with a laser
printer.
Report Cards Manual 7-89
Chapter 7
Report Cards Report Writer
The Pre-defined Reports
Report Name
Description
TR: PrePrt
RTYR LZFM
Prints courses in four quadrants separated by year on wide 11” x 8.5”
pre-printed forms available from Rediker Software. Forms contain
school name and address information. Call Rediker Software for a
sample.
TR: Plain RTYR Prints courses in four quadrants separated by year on wide 11” x 8.5”
LZFRM
forms. Forms are colored but do not have school name and address
information pre-printed on them. The report contains codes to print
school name and address information.
Tran: RT YR 2
pg
7-90
Report Cards Manual
Prints courses separated by year in a single column, putting heading
information on 2nd page if 2nd page is needed.
8
Statistical Reports
Introduction & Main Menu . . . . . . . . . . 8-2
Using Honor Rolls . . . . . . . . . . . . . . 8-2
Grade Point Averages . . . . . . . . . . . 8-3
Honor Rolls . . . . . . . . . . . . . . . . . . . . . 8-4
. . . . . . . . . . . . . . . . . . . . . . . . . . . . . Print
honor roll #1-5 . . . . . . . . . . . . . . . . 8-4
Inspect/Change Universal HR
Specifications . . . . . . . . . . . . . . . . . 8-5
Inspect/Change Honor Roll Print
Specifications . . . . . . . . . . . . . . . . . 8-10
Defining Honor Roll Reports . . . . . . . . 8-15
Individual Student Audit . . . . . . . . . . 8-19
How Honor Roll Averages
Are Calculated . . . . . . . . . . . . . . . . . 8-21
Grade Point Averages Menu . . . . . . 8-23
How Adjusted & Simple GPA’s Are
Calculated . . . . . . . . . . . . . . . . . . . . 8-24
Update/Un-update GPA's & Credits . . 8-27
Inspect/Change Universal GPA
Specifications . . . . . . . . . . . . . . . . . 8-28
UPDATE GPA'S & CREDITS
SPECIFICATIONS . . . . . . . . . . . . . 8-30
How To Perform a Third
Quarter Update . . . . . . . . . . . . . . . . 8-35
The Permanent Third
Quarter Update . . . . . . . . . . . . . . . 8-35
The Temporary Third Quarter Update8-36
Updating and Resetting GPAs
& Credits . . . . . . . . . . . . . . . . . . . . . 8-37
Un-Update GPAs & Credits . . . . . . . 8-37
Reprint Last Update
Summary Report . . . . . . . . . . . . . . 8-39
Reset Last Update Data Only to Zero8-39
Reset Credits, GPAs, Last
Update Data To Zero . . . . . . . . . . . 8-40
How Career GPAs & Credits
Are Calculated . . . . . . . . . . . . . . . . . 8-41
General Updating Rules. . . . . . . . . . 8-41
General Rules For Calculating
Credits . . . . . . . . . . . . . . . . . . . . . . 8-41
General Rules For Calculating Quality
Points & Weight . . . . . . . . . . . . . . . 8-42
BRIEF EXAMPLE OF A
COMPLETE UPDATING . . . . . . . . 8-45
DETAILED EXAMPLE OF A
MIDYEAR UPDATING . . . . . . . . . . 8-46
Midyear Update Report Page 1 . . . . 8-48
Midyear Update Report Page 2 . . . . 8-49
Midyear Update Report Page 3 . . . . 8-49
TOP OF THE REPORT . . . . . . . . . . 8-50
Detailed Example of an End of Year
Updating . . . . . . . . . . . . . . . . . . . . . 8-55
Final Update Report Page 1. . . . . . . 8-57
How to Obtain Class Rank Reports . . . 8-65
Defining Class Rank Reports. . . . . . . . 8-68
Report Cards Manual
8-1
Chapter 8
St a t i s t i c a l R e p o r t s
Introduction & Main Menu
Introduction & Main Menu
The Statistical Reports program lets you perform four actions:
•
•
•
•
Print Honor Roll Reports
Update students' career credits and grade point averages
Print Class Rank Reports
Print Eligibility Reports
Using Honor Rolls
This portion of the program calculates students' grade point averages for one marking
period at a time. Honor roll reports may be generated based on these averages and other
criteria based on students' grades in this marking period. Honor roll lists are written to
the disk so that the report card report writer program is able to print on the report card
which honor roll the student made. Note that:
• Up to FIVE honor rolls may be defined.
• Each honor roll can be viewed on the window before printing. While being viewed,
students may be deleted from the honor roll for any reason with a single keystroke.
• The honor roll printouts are customizable: Each of the following may be printed or
omitted from the printouts: rank, name, ID number, average, # of incompletes, # of
courses, # of F's, # of courses used to calculate the honor roll and two optional data
base fields. For example, you could choose to print only rank and social security
number (which would be an optional data base field) so that you could post students'
averages and only they would know which average was theirs.
• Honor rolls may also be based on having no grades lower than a specific grade.
Different limits may be entered for MAJOR and MINOR courses. For example, you
could specify that students must have all “A's” in major courses but are allowed one
“B” in a minor course. See “Priority” on page 2-7 for an explanation of the
differences between major and minor courses.
8-2
Report Cards Manual
St a t i s t i c a l R e p o r t s
Introduction & Main Menu
• You can define Universal honor roll specifications to use with all honor rolls and
Report Cards Report Writer to ensure that column averages on report cards will be
identical to honor roll averages. These specifications include selecting between 0 and
4 decimal places and setting a minimum grade to which the GPA factor should be
applied. For example, you could specify that only grades in an AP course higher than
a “C-” should be awarded AP bonus points.
• The GPA factor may be used (or not used) in checking for minimum grades. For
example, if students are omitted for having a grade less than an “A-”, you can have a
“B” in an AP course count as an “A” and not omit those students. (See “The Universal
Honor Roll Specifications determine how all honor rolls, as well as column averages,
will be calculated, including how courses will be weighted and whether all or only
certain courses will be counted toward the average.” on page 5 for more information.)
• A complete help explanation window automatically pops up for each specification.
• A detailed report may now be printed showing just how honor roll GPA's are
calculated.
• If a student doesn't make an honor roll, you may now print an INDIVIDUAL
STUDENT AUDIT report showing just how their GPA was calculated and stating in
plain English why they didn't make the honor roll.
Grade Point Averages
Administrator’s Plus also keeps a running career grade point average that takes into
account all of a student's grades since they enrolled in your school. This portion of the
program is used to update students' career credits and grade point averages at the end of
the semester and at the end of the year. It is also used to produced various reports based
on students' career credits and grade point averages such as class rank reports. Class rank
reports are written to the disk so that they can be optionally printed on report cards,
permanent labels and transcripts.
The newest version of the program allows you to track simple and adjusted GPA
separately, and print them both on reports so that you can see the difference in a
student’s GPA between courses that use GPA factor and those that don’t. Separate
weights can be used for simple and adjusted GPAs as well - see Chapter 2. Furthermore:
• Two different GPA reports may be defined. One for class rank and one for eligibility.
• Either report can be viewed on the window and students deleted from the list for any
reason before it is printed.
• When updating GPAs, the report will appear on the window. You can choose not to
print it or to print it in summary or detailed form. The detailed report provides much
more information and is easier to read than in previous versions.
• Un-updating is not necessary. If you are re-updating, un-updating will automatically
be done first.
• When updating past years, GPAs and credits will automatically be set to 0 prior to
beginning.
Report Cards Manual
8-3
Chapter 8
St a t i s t i c a l R e p o r t s
Honor Rolls
• When updating based on a non-credit column, separate weights may be entered for
semester one courses and semester two courses. This is helpful for schools that would
like to update at the end of the third marking period, as 1st semester courses can be
weighted 100% and 2nd semester courses 50%.
From the main window, you can access either the Honor Roll or Grade Point Averages
sections of the program. The first part of this section describes honor rolls while the
remaining sections describe grade point averages:
Honor Rolls
When you click Honor Rolls, you will see the following window:
Print honor roll #1-5
These options define the specifications for each honor roll, including marking period,
average lower and upper limits and conditions for omission from the honor roll list. See
“Defining Honor Roll Reports” on page 8-15 for a detailed explanation of how to define
honor rolls.
NOTE:
8-4
You must update career GPA's before you can print class rank reports. See “How Adjusted
& Simple GPA’s Are Calculated” on page 8-24.
Report Cards Manual
St a t i s t i c a l R e p o r t s
Honor Rolls
Inspect/Change Universal HR Specifications
The Universal Honor Roll Specifications determine how all honor rolls, as well as
column averages, will be calculated, including how courses will be weighted and
whether all or only certain courses will be counted toward the average.
NOTE:
Only the Supervisor can change the Universal Honor Roll Specifications!
HOW TO WEIGHT COURSES?
You have three choices:
• USE WEIGHT PRO-RATED (RECOMMENDED)
• USE WEIGHT NOT PRO-RATED
• COUNT ALL COURSES EQUALLY (NO WEIGHT)
Option #1, USE WEIGHT PRO-RATED, is the recommended setting. If all of your
courses meet no more than one period each day, this setting will have the same effect as
Option #3, COUNT ALL COURSES EQUALLY.
Option #1 should be used, however, because it allows courses that meet more than one
period each day to count more than courses meeting only one period per day.
Option #2, USE WEIGHT NOT PRO-RATED should not be used because it also causes
courses meeting all year to count more than courses meeting one semester, which you
do not want to do for an honor roll.
If you choose to use weight, either pro-rated or not, courses will be weighted according
to the weights in the master course list.
What Does Pro-Rating Mean?
Pro-rating allows courses that meet more than one period each day to count more than
courses meeting one period per day. Pro-rating of weight will occur only if you are doing
an honor roll based on a grade in a report card column that has been designated as a
Report Cards Manual
8-5
Chapter 8
St a t i s t i c a l R e p o r t s
Honor Rolls
PERIOD or SEMESTER column. For all other columns, regardless of this setting,
weights will be used but will not be pro-rated. The following describes how pro-rating
works:
If your honor roll is based on a PERIOD column grade, pro-rating your weight will do
the following:
• The weight for full year courses will be divided by the number of marking periods.
In other words, if you have four marking periods, the weight of a full year course will
be divided by four.
• The weight for semester courses will be divided by half of the number of marking
periods. In other words, if you have four marking periods, the weight of a semester
course will be divided by two, assuming that there are two marking periods per
semester. If you have six marking periods, the weight of a semester course will be
divided by three, assuming that there are three marking periods per semester. If these
assumptions are not correct, pro-rating will not work for you.
• The weight for quarter courses will not be affected.
If your honor roll is for a SEMESTER column, pro-rating your weight will do the
following:
• The weight for full year courses will be divided by the number of semesters, with two
for a minimum. For example, if you have two semesters, the weight of a full year
course will be divided by two. If you have only one column designated as a
SEMESTER column because your 2nd semester grade is designated as a Final grade,
the minimum of two semesters will be used. In other words, calculating an honor roll
based on your semester column will cause the weights of full year courses to be
divided by two.
• The weights for semester and quarter courses will not be affected.
Why Pro-Rate Weights?
If your weight is based solely on how many quarters a course meets, pro-rating your
weight will give you the exact same results as not using the weight. For example, assume
that you have four marking periods and are calculating the honor roll based on a
PERIOD column grade. A student has the following three courses:
COURSE
QTR
PERIODS/WEEK
WT
PRO-RATED WEIGHT
100
1st
5
.25
.25
200
1&2
5
.50
.50
300
ALL
5
1.00
.25
By using your weight pro-rated, course #100, being a quarter course, will not have its
weight changed. Its pro-rated weight will still be .25.
Course #200, being a semester course, will have its weight divided by half the number
of marking periods, or two. Its pro-rated weight will be .25.
8-6
Report Cards Manual
St a t i s t i c a l R e p o r t s
Honor Rolls
Course #300, being a full year course, will have its weight divided by the number of
marking periods, or four. Its pro-rated weight will be .25.
In other words, all of these courses will be weighted the same, just as if you did not use
weight, which would have given each course a weight of 1.
The question naturally arises as to why a pro-rated weight should ever be used. To the
above example, add course #400, which is also a full year course. However, because this
course is a vocational course meeting three periods each day, it is given a weight of 3.00:
COURSE
QTR
PERIODS/WEEK
WT
PRO-RATED WEIGHT
100
1st
5
.25
.25
200
1&2
5
.50
.25
300
ALL
5
1.00
.25
400
ALL
15
3.00
.75
Its pro-weighted weight would be 3 divided by 4 marking periods which is .75.
Consequently, this course would be given three times the weight of the other three
courses, which each had a pro-rated weight of .25. This would be the fairest way to count
the courses. In other words, by pro-rating weights, the course that meets three times each
day is weighted three times more than courses meeting only once each day.
If you enter an N for setting #3 and choose to use the weight NOT pro-rated, the actual
weights will be used. In other words, in this example, even though the full year course
#300 met the same number of times per week as the quarter course #100 during the
marking period, its grade would count four times the grade of the quarter course.
(Course #300 is weighted 1, while course #100 is weighted .25.)
If you are printing an honor roll for the FINAL GRADE column on the report card, prorating will automatically be turned off. (Pro-rating is done only for grades in PERIOD
and SEMESTER columns.) This is because the entered weights indicate the relative
number of times that each course has met over the entire year.
HOW TO USE THE GPA FACTOR?
You have three choices:
• DO NOT USE THE GPA FACTOR
• USE FOR AVERAGES ONLY
• USE FOR AVERAGES & MINIMUM GRADE CHECKS
The GPA factor is used to give extra quality points to grades earned in higher level
courses. A GPA factor may be entered for each course through the Enter Courses
program. See “GPA Factor” on page 2-8. A specification in the Customize RC program
determines whether the GPA factor is added to or multiplied by the quality points for the
grade. See “GPA Factor” on page 1-4.
Report Cards Manual
8-7
Chapter 8
St a t i s t i c a l R e p o r t s
Honor Rolls
In order to determine if a student is on an honor roll, their average is calculated AND
their grades go through minimum grade checks. For example, assume that you have an
HONORS course to which you will add a GPA factor of 1. In-other-words, a C in this
course will count like a B when the average is calculated. Also assume that you want to
omit students from the honor roll with any grade less than a B-. If you select Option #3,
USE FOR AVERAGES & MINIMUM GRADE CHECKS, a student with a C in an
honors course will NOT be omitted, because the C will be raised to a B when performing
the minimum grade checks.
INCLUDE COURSES WITH GPA FACTOR OF 99? (NO LONGER USED)
In previous versions of Administrator’s Plus, a GPA factor of ‘99’ was entered for a
course in order to prevent it from being counted toward honor rolls or GPAs. This setting
was then set not include courses with a GPA factor of ‘99’. However, beginning with
Version 3, this feature is no longer used. Instead, the option of whether or not to count
a course toward honor rolls and/or GPAs is set in Enter Courses DView/Edit Courses
& Sections.
MINIMUM GRADE FOR THE GPA FACTOR?
The GPA factor is either added to or multiplied by the quality points of advanced level
courses. Grades BELOW what you enter here will not be affected by the GPA factor.
For example, if you are a letter grading school, enter a D- to not have grades of F raised
by the GPA factor.
MAJOR COURSES HAVE PRIORITIES 0 to?
Administrator’s Plus allows you to split all courses into MAJOR and MINOR courses.
You may then use the next two specifications to determine which courses will be used
in average calculations as well as in minimum grade checks. For example, you could
specify that only major courses will be used in the average calculation but that both
MAJOR & MINOR courses will be used in minimum grade checks.
With the Enter Courses program, a PRIORITY code from 0 to 5 may be entered for each
course. 0 is highest priority while a 5 is lowest priority. These priorities were originally
used by the scheduling module when conflicts occur. (The course with the lower priority
is dropped.) Consequently, major courses usually have a high priority (0 or 1 or 2) and
minor courses usually have a low priority (3, or 4, or 5). This specification allows you
to define when major courses stop and minor courses start. If you enter a 2, then courses
with priorities of 0 to 2 will be considered major courses and those with priorities from
3 to 5 will be considered minor courses.
INCLUDE WHICH COURSES IN AVERAGES?
You have three options: See the explanation for specification #5 for the definition of
MAJOR and MINOR courses.
• ALL COURSES
• MAJOR COURSES ONLY
• MINOR COURSES
8-8
Report Cards Manual
St a t i s t i c a l R e p o r t s
Honor Rolls
Note that if you choose ALL COURSES, all courses that have been set to be counted in
the honor roll in Enter CoursesDView/Edit Courses & Sections will be counted in the
honor roll. See “View/Edit Courses & Sections” on page 2-3 for an explanation of how
to set this option.
If you set the option to include MAJOR COURSES ONLY in the Honor Roll
calculations, even if you have set the “Count in Honor Rolls” option to “Yes” in Enter
Courses, the course will NOT be counted in the Honor Roll if it is not designated a major
course. The same is true of the MINOR COURSES ONLY option.
INCLUDE WHICH COURSES FOR OTHER CHECKS?
You have three options:
• ALL COURSES
• MAJOR COURSES ONLY
• MINOR COURSES ONLY
See Specification #5 on the previous page for the definition of MAJOR and MINOR
courses. Other Checks include minimum grade checks and having a comment code
outside of a specified range, as well as having grades of I or F.
NUMBER OF DECIMAL PLACES (0 TO 4)?
It is strongly recommended that you never use more than TWO decimal places. This is
because you may not have more significant figures in your average than the numbers
used to calculate the average. Because teachers do not usually use decimals when they
give tests or submit their grades, any digits after the second decimal tend to be
meaningless.
Report Cards Manual
8-9
Chapter 8
St a t i s t i c a l R e p o r t s
Honor Rolls
Inspect/Change Honor Roll Print Specifications
When you choose this option from the window on page 8-4, the following window
appears:
The print specifications determine what your honor roll report will look like. You may
print your report sorted by name or average. Moreover, you may or may not print each
of the following items: rank, name, ID number, average, the number of courses used in
calculating the average, the number of incompletes, the number of F's and any two data
base fields. An honor roll report including everything would look like:
The two optional fields are the SEX and PHONE NUMBER. If these students had any
incompletes, the number would be listed under the INC column. If they had any F's, they
would be listed under the F column.
8-10
Report Cards Manual
St a t i s t i c a l R e p o r t s
Honor Rolls
The # CRS column is the number of courses used in calculating the average. For
example, the number one student, Cary Claver, had only one grade used in calculating
his 100.00 average. When defining honor rolls, a specification allows you to exclude
students with less than a minimum number of courses being used to calculate their
averages. See “Defining Honor Roll Reports” on page 8-15.
ALPHA BY NAME OR AVERAGE?
If you set Specification #8 to “Yes” to view the honor roll on the window before
printing, this determines how the honor roll is initially displayed on the window. While
viewing the list, the F10: SORT key may be used to toggle between alphabetical order
by name or numerically by average. If you print it without first viewing it on the
window, this determines the list's order.
PRINT RANK?
Set this specification to “Yes” if you want to print the student’s rank in class on the
honor roll report.
PRINT NAME?
You have three choices:
• NO: DO NOT PRINT NAME
• YES: PRINT NAME FIRST NAME FIRST
• YES: PRINT NAME LAST NAME FIRST
PRINT ID NUMBER?
If set to “Yes”, 5-digit Administrator’s Plus ID number will print on honor roll reports.
PRINT OPTIONAL FIELD #1
PRINT OPTIONAL FIELD #2
You can print data from up to 2 database fields on the honor roll report. Choose the fields
you wish to print from the list that pops up when you click on these specifications.
VIEW ON WINDOW BEFORE PRINTING?
If you answer “Yes”, then you will be able to use the F8: DEL key to remove any student
from the honor roll or F10: SORT to change its order. Note that pressing F9: PRINT
while in the view window will cause the report to print to the window. You must then
press F9: PRINT again in order to print it to paper. If you set this option to “No”, you
will still be able to view the report on the window before printing, but you will not be
able to remove students from the honor roll or change the order in which students are
printed.
NOTE:
If you plan to print the honor roll status on the Report Card and you have set the honor roll
print preview option to “Yes”, you MUST press F9: PRINT after the honor roll is generated
in order to save it to disk. You can then choose to escape the print preview window, or press
F9: PRINT again in order to print the honor roll list to paper. If you have set the honor roll
Report Cards Manual
8-11
Chapter 8
St a t i s t i c a l R e p o r t s
Honor Rolls
print preview option to “No”, the honor roll will automatically be saved to disk when
generated and you will be able to print the updated honor roll status on the report card, even
if you do not choose to press F9: Print to print it to paper.
When you are finished entering all specifications for Options 6 and 7, click Done to
return to the Honor Roll window.
Honor rolls should be run in order by grade level. Choose Option 1 to run Honor Roll
#1, the highest honor roll, first. For example, print honor roll #1 for grade 12, followed
by honor roll #2 for grade 12 and then honor roll #3 for grade 12, and so on. Then do the
same thing for your other grade levels.
After selecting honor roll #1, the specification window for that honor roll will appear.
Administrator’s Plus will remember how you last defined honor roll #1. You can accept
these specifications or make changes as needed. The following sections will explain
these specifications in detail.
After accepting the specifications, you will see the following window:
8-12
Report Cards Manual
St a t i s t i c a l R e p o r t s
Honor Rolls
Select a grade level to begin calculating the honor roll for that grade. If you select to
have the honor roll appear on the window first, the following window appears:
In this example, there are six students on the HIGH HONORS list. You can use the
F6:SEARCH option to find any student in the list. The F8:DEL option may be used to
delete any student from the list. The F10: SORT option allows you to toggle the list
between sorting by name or by average. The upper left corner of the window identifies
that this list is currently sorted by name.
Report Cards Manual 8-13
Chapter 8
St a t i s t i c a l R e p o r t s
Honor Rolls
After viewing the list and making any necessary adjustments, click the F9: PRINT
button to save it to disk. You will then see the following print preview:
You can escape from this window or press F9: PRINT to print the list to paper.
How the list is printed is defined by the PRINT SPECIFICATIONS, as described under
“Inspect/Change Honor Roll Print Specifications” on page 8-10.
Note that the list is written to the disk whether or not it is printed. The report card report
writer uses these lists to print on the bottom of report cards which honor rolls students
were on. It also uses them to print honor roll certificates.
8-14
Report Cards Manual
St a t i s t i c a l R e p o r t s
Defining Honor Roll Reports
Defining Honor Roll Reports
After selecting the honor roll you are going to generate, the specification window for
that honor roll will appear. The window will be the same as the last time you defined
that honor roll. You can accept these specifications or change them as desired:
Specification
Description
1) TITLE OF THIS
HONOR ROLL?
The title of your report may be up to 25 characters long. The title will
be printed centered at the top of the page. It will be printed in the
same case of letters that you enter. The title of the report may also
be optionally printed on the report card for each student who made
that honor roll. For example, if the title of an honor roll is High Honors,
a student who is on the honor roll report could have the following
printed in the lower right corner of his report card:
2) MARKING
PERIOD?
Enter the report card column whose grades will be used to produce
the honor roll.
Report Cards Manual 8-15
Chapter 8
St a t i s t i c a l R e p o r t s
Defining Honor Roll Reports
Specification
Description
3) INCLUDE
STUDENTS
ALREADY ON
ANY HONOR
ROLL?
This setting should always be “Yes” for the highest honor roll and
“No” for all subsequent honor rolls. When students make an honor
roll, that honor roll number is stored in their report card file. This is
called the student's HONOR ROLL STATUS. For each grade level,
always print the highest honor roll first and make sure that this
specification is set to Yes. This causes all students to be looked at
even if they were already marked as being on an honor roll last
marking period or last year. If a student is looked at and doesn't make
the new honor roll, then their honor roll status is cleared.
In other words, the old honor roll status is erased from their report
card file. For all subsequent honor rolls, make sure that this
specification is set to “No”. This means that students who already are
on a higher honor roll will not be looked at when generating lower
honor rolls.
4) AVERAGE
LOWER LIMIT?
(0 FOR NO
LOWER LIMIT)
8-16
Report Cards Manual
Enter your average lower limit using up to 2 decimal places. Students
with GPAs LOWER THAN what you enter for this setting will be
omitted from your honor roll. For example, if you enter 3.00, only
those students with averages of 3.00 or greater will be included. If
you enter 0, no students will be excluded due to your lower limit.
St a t i s t i c a l R e p o r t s
Defining Honor Roll Reports
Specification
Description
5) AVERAGE
UPPER LIMIT?
(999 FOR NO
UPPER LIMIT)
Enter your average upper limit using up to 2 decimal places.
Students with averages higher than what you enter for this setting will
be omitted from your honor roll. For example, a high honors list for
numerical grades might set settings #6 and #7 as follows:
•
Specification #4: AVERAGE LOWER LIMIT: 93.00
•
Specification #5: AVERAGE UPPER LIMIT: 999.00
The resulting honor roll list will only include students with averages
of 93.00 and above.
A second honors list might have specification #4 and #5 as follows:
•
Specification #4: AVERAGE LOWER LIMIT: 86.00
•
Specification #5: AVERAGE UPPER LIMIT: 999
The resulting honor roll list will include students with averages equal
to and above 86.00 and not on the high honors list. (The same upper
limit is used as for honor roll #1. Specification #3 ensures that
students already on honor roll #1 will not also be on honor roll #2.
NOTE: It is generally advisable to keep the average upper limit set to
999.
6) COMMENT
CODE LOWER
LIMIT
This specification and specification #7 will allow you to omit students
with comment codes outside of your specified range. A blank
comment code will not cause a student to be omitted. Any student
with a comment code less than what you enter for this setting will be
omitted from your honor roll. Enter a 0 to not omit anyone.
7) COMMENT
CODE UPPER
LIMIT
Any student with a comment code greater than what you enter for this
setting will be omitted from your honor roll. Enter a 999 to not omit
anyone. For example, assume that your school uses the comment
codes for conduct and effort with 1 being the best and 6 being the
worst. If you do not want anybody on the honor roll with a conduct or
effort code greater than a 2, enter 2 as your upper limit.
NOTE: All courses will be checked for comment codes within your
range even if there is no grade in your specified column or if the
grade is not used for the average, such as with a W, WP, P, or I. You
may use the UNIVERSAL HONOR ROLL specifications to omit major
and/or minor courses from OTHER CHECKS including the comment
code range check.
Report Cards Manual 8-17
Chapter 8
St a t i s t i c a l R e p o r t s
Defining Honor Roll Reports
Specification
Description
Use the UNIVERSAL HONOR ROLL specifications as described in
8) OMIT IF 1
MAJOR GRADE sections 8B to define major and minor courses. A student receiving
one grade lower than what you enter for this specification in a major
LESS THAN?
course will be omitted from the honor roll. For example, in a letter
grading system, you may enter a C- for this setting. Any student with
a grade of D, F, or WF will be omitted from the honor roll.
In a numerical grading system, a grade of 70 could be entered. Any
student with a grade less than 70, an F, or WF will be omitted from
the honor roll.
A blank grade or grades of WP, P, I, X, N, or W will not be checked
against this grade. Leaving it blank will cause no students to be
omitted due to this specification.
NOTE: If you are using a SPLIT grading system, you will only be able
to enter a valid numeric grade. A split grading system is one in which
your younger grade levels use letter grades while your older grade
levels use numeric grades. If you set a minimum numeric grade, do
NOT use that honor roll report for your grade levels using letter
grades. Instead, make another honor roll report dedicated to your
grade levels using letter grades. If you wish to set a minimum letter
grade for that honor roll report, do the following:
Use an option in the Customize RC program and select
that you are using LETTER GRADES.
2 Return to this program and enter the minimum letter grade
for your honor roll report that will be used for your grade
level using letter grades.
3 Use the option in the Customize RC program to once again
select that you are using a split grading system.
1
8-18
9) OMIT IF 2
MAJOR
GRADES LESS
THAN?
Putting an entry of A- in this specification and a B- in specification #8
would allow a student to make the honor roll with exactly one B in a
major course and no grades lower than a B-. In-other-words,
students make the honor roll with all A's and one B. They would not
make it with all A's and two B's or with all A's and one C.
A) OMIT IF 1
MINOR GRADE
LESS THAN?
The same as specification #8 but for minor courses. If specification
#8 has an A- and this specification a B-, students make the honor roll
with all A's in major courses but are allowed B's in minor courses.
B) OMIT IF 2
MINOR GRADE
LESS THAN?
The same as Specification #9 but for minor courses.
Report Cards Manual
St a t i s t i c a l R e p o r t s
Defining Honor Roll Reports
Specification
Description
C) OMIT FROM
HONOR ROLL IF
1 OR MORE
INCOMPLETES?
If you answer YES for this setting, any student with at least one
Incomplete will be omitted from your honor roll. If you choose to
include these students, the course will not count towards calculating
the GPA.
D) MINIMUM # OF
GRADES USED
FOR THE
AVERAGE?
This setting will keep students off of the honor roll that do not have
this number of grades used in calculating their honor roll average. In
other words, if you set this number to 2 and a student has five
incompletes and one A, he will not be on your honor roll.
Individual Student Audit
Instead of entering a grade level in the previous window, you may choose the option to
print an audit report for an individual student. If the student made the honor roll, the
report will explicitly show in a step by step format exactly how the students' honor roll
average was calculated.
If a student did not make the honor roll, this report will show why. If it was due to the
average not being high enough, it will show how the average was calculated. If it was
because the student failed some other checks, it will list which checks were failed. A
sample audit report on Kathy Albrecht shows why she didn't make the high honor roll.
Report Cards Manual 8-19
Chapter 8
St a t i s t i c a l R e p o r t s
Defining Honor Roll Reports
This report shows that Mary did not make the honor roll because she had an 89 in a
major course. As you can see, specifications were set to OMIT IF 1 MAJOR GRADE
LESS THAN? 90:
8-20
Report Cards Manual
St a t i s t i c a l R e p o r t s
How Honor Roll Averages Are Calculated
How Honor Roll Averages Are Calculated
A student's honor roll average is the average of his/her grades in the report card column
you have selected in Print Honor Roll Specifications. See“Defining Honor Roll
Reports” on page 8-15. A blank grade or grades of “I”, “P”, “WP”, “W”, “N” or “X”
will be skipped. In the numeric grading system, the letter grades of “A”, “B”, “C”, or
“D” will also be skipped.
NOTE:
Students with comment codes outside of your specified limits in a course containing one of
these “skipped” grades will still be eliminated from the honor roll. For example, assume
that you have set your comment code upper limit as 2. A student with a comment code of 3
in a course with a blank grade will still be eliminated from the honor roll.
Each grade is then given a certain number of quality points based on either the letter
grade or number grade quality point tables. These tables may be customized through the
Customize RC program. See Chapter 1 “Edit Grade Table” on page 1-2. The default
quality points for number grades is the value of the grade itself. In other words, a grade
of 95 will be awarded 95 quality points if you do not modify the Grade Table. The
default quality points for letter grades are:
A+:
4.33
B+:
3.33
C+:
2.33
D+:
1.33
F+:
0.00
A:
4.00
B:
3.00
C:
2.00
D:
1.00
F:
0.00
A-:
3.67
B-:
2.67
C-:
1.67
D-:
0.67
F-:
0.00
The following sample worksheet shows how the average might be calculated
based on grades a student obtained during the 1st marking period in a school using
letter grades
SUBJECT
GRADE =
QP + GPA FACTOR =
ADJ QP x WEIGHT =
TOTAL
QP
MATH
A=
4.00 + 0 =
4.00 x 1.00 =
4.00
ENGLISH
F=
0.00 + 0 =
0.00 x 1.00 =
0.00
AP HISTORY
B=
3.00 + 1 =
4.00 x 1.00 =
4.00
ART
BLANK
SPANISH
P
GYM
C=
2.00 + 0 =
2.00 x 0.50 =
1.00
GRAND TOTALS:
3.50
GPA =
GRAND TOTAL QP
GPA =
9.00
/ GRAND TOTAL WEIGHT
9.00
/
3.50
= 2.57
Report Cards Manual 8-21
Chapter 8
St a t i s t i c a l R e p o r t s
How Honor Roll Averages Are Calculated
The QP column shows the awarded quality points based on the default letter grade
quality point table. ART is skipped because there is no first marking period grade and
SPANISH is skipped due to the grade of P.
If your honor roll criteria says to use the GPA factor, the awarded quality points will be
adjusted by either multiplying the GPA factor times the awarded quality points or
adding the GPA factor to the awarded quality points. A setting in the Customize RC
program determines whether multiplication or addition takes place. See “GPA Factor”
on page 1-4. If a negative GPA factor brings the quality point total below 0, the quality
points for the course will be raised to 0. In other words, a student will never receive a
negative number of quality points for a course.
Specifications # 4 and #5 in the Inspect/Change Universal HR Specifications determines
the minimum grade the GPA factor will modify. See “MINIMUM GRADE FOR THE
GPA FACTOR?” on page 8-8. Use this setting to avoid applying the GPA factor to a
failing grade.
NOTE:
If the setting “Count in Honor Rolls” is set to “No” for a course in View/Edit Courses &
Sections, that course will be skipped.
In the example, the school uses the option to ADD the GPA factor to the number of
awarded quality points. Only one course, AP HISTORY, has a GPA factor other than 0.
For this course, the GPA factor of 1 is added to the awarded quality points of 3.00 to
produce an adjusted quality point total of 4.00. For the other courses, the adjusted
quality points equal the awarded quality points.
Once the adjusted quality points have been calculated, weight will be applied to the
course depending upon how your criteria says courses should be weighted. This weight
will be pro-rated if you have selected to do so. See Universal Honor Roll Specification
#1: “HOW TO WEIGHT COURSES?” on page 8-5. In this example, weights are used
but they are NOT pro-rated.
The OVR (Credit Override) column in the student's transcript for the course will now be
looked at. Through the View/Change/Add/Drop program, codes may be entered in this
column, causing the course to count for less than full credit and/or GPA or more than
full credit and GPA for this student only. See “Editing the OVR Column” on page 6-5.
These codes are displayed below:
8-22
Report Cards Manual
St a t i s t i c a l R e p o r t s
How Honor Roll Averages Are Calculated
If the code is a 1, the course will be skipped because it says 0.00 GPA, which means not
to count it towards this student's GPA. If the code is a 2, the weight as it now stands will
be cut in half. A code of 5 will only use 1/4 of the weight and a code of 6 will only use
3/4 of the weight. Codes of 3 and 4 will have no effect on the GPA.
In the example, the OVR column is blank for all courses, which means that they will all
count for FULL GPA, that is, their full weight will be used.
The adjusted quality point total for each course is then multiplied by the weight of the
course to give the total quality points for each course.
The total quality points for each course will be added together to produce the Grand
Total Quality Points. The weights for each course will be added together to produce the
Grand Total Weight. The Grand Total Quality Points divided by the Grand Total Weight
produces the student's honor roll average. In the example, the student's honor roll
average for the first marking period is 2.57.
Grade Point Averages Menu
Use this option to access the GPAs/Credits window, which includes Print Class Rank
Report, Print Eligibility Report, and Update/Un-update GPAs/Credits, this is the same
window you will see when you select Grade Point Averages from the window.
Report Cards Manual 8-23
Chapter 8
St a t i s t i c a l R e p o r t s
How Adjusted & Simple GPA’s Are Calculated
How Adjusted & Simple GPA’s Are Calculated
The top portion of each student's report card record as viewed in the
View/Change/Add/Drop program displays the student’s Career Adjusted Quality
Points, Career Adjusted Weight, Career Adjusted GPA, Career Credits, Career Simple
Quality Points, Career Simple Weight, and Career Simple GPA.
There are two types of quality points so that you may maintain both an adjusted and
simple career GPA for each student. The adjusted GPA takes into account the fact that
some advanced courses may offer more quality points for a grade than would be
awarded for the same grade in a lower level course. The simple GPA is calculated with
the same number of quality points being offered for each grade regardless of the GPA
factor of the course. When you calculate class rank, you will have the option to use either
the adjusted or simple GPA. Similarly, when you print report cards, transcripts or
permanent labels, you will have the option to print either the adjusted or simple GPA or
both.
When a student is first entered into Administrator’s Plus, these four slots all contain
zeroes. At the end of each semester or year, the Statistical Reports program will be used
to update these figures based on students' grades for the current year in the report card
columns that you have designated as CREDIT columns. The Customize RC program is
used to designate report card columns as credit columns. See Chapter 1 page “CREDIT”
on page 1-8. Students' career adjusted grade point averages are calculated by dividing
their career adjusted quality points by their career weight. Students' career simple grade
point averages are calculated by dividing their career simple quality points by their
career weight. Once numbers exist in these slots, Class Rank Reports may be obtained
listing and/or sorting students by career grade point averages, career credits, career
adjusted quality points or career simple quality points.
At any time during a school year, students' career credits and grade point averages may
be temporarily updated based on the grades in any report card column. For example, you
may want to temporarily update your seniors’ career GPA's half-way through the year
so that you can obtain an up-to-date class rank report.At the end of the year, this
temporary updating will be automatically un-done before the final updating takes place.
At the end of the year, when the Beginning program is run to move students to the next
grade, students' career credits, simple quality points, adjusted quality points and weight
are kept in their report card files even though all of their courses and grades for the
current year are either erased or archived for use on college transcripts.
Report Cards Plus also keeps track of the values obtained during the most recent update
of GPAs/credits, including: Last Credit Update, Last Adjusted Quality Points Update,
Last Weight Update, Last Simple Quality Points Update. When student's career credits,
adjusted quality points, simple quality points and weight are updated, the current credits,
current simple quality points, current adjusted quality points and current weight are
calculated and placed into these four slots. These current figures are then added to the
8-24
Report Cards Manual
St a t i s t i c a l R e p o r t s
How Adjusted & Simple GPA’s Are Calculated
old figures in the Career Credits, Career Adjusted Quality Points, Career Simple Quality
Points and Career Weight slots to give new figures for Career Credits, Career Adjusted
Quality Points, Career Simple Quality Points and Career Weight.
As an example, in a school using number grades, assume that a student has the following
figures stored in his report card record following his sophomore year of high school.
QP = Quality Points.
CAREER CREDITS
CAREER A DJ USTED QP
:
8.50
: 700.00
LAST CREDITS
: 0.00
LAST ADJUSTED QP UPDATE : 0.00
CAREER WEIGHT
: 10.00
LAST WEIGHT UPDATE
: 0.00
CAREER SIMPLE QP
: 680.00
LAST SIMPLE QP UPDATE
: 0.00
This student's career adjusted GPA is currently (700/10) or 70.00. This student's career
simple GPA is currently (680/10) or 68.00. At the end of the student's junior year, an
update is performed. During this update, the program calculates the following for this
student's junior year grades:
• JUNIOR YEAR (CURRENT) CREDITS
: 4.00
• JUNIOR YEAR (CURRENT) ADJUSTED QP : 400.00
• JUNIOR YEAR (CURRENT) WEIGHT
: 5.00
• JUNIOR YEAR (CURRENT) SIMPLE QP
: 390.00
The current credits of 4.00 are added to the previous career credits of 8.50 to give a new
career credits total of 12.50. The current adjusted quality points of 400 are added to the
previous career quality points of 700 to give a new career quality points total of 1100.
The current simple quality points of 390 are added to the previous career quality points
of 680 to give a new career quality points total of 1070. Finally, the current weight of
5.00 is added to the previous career weight of 10 to give a new career weight total of 15.
This student's career adjusted GPA is now (1100/15) or 73.33 and his simple GPA is
now (1070/15) or 71.33.
After this update, the student's report card record will now contain these figures:
CAREER CREDITS
:
12.50 LAST CREDITS UPDATE
:
CAREER ADJUSTED QP
: 1100.00
LAST ADJUSTED QP UPDATE : 400.00
CAREER WEIGHT
: 15.00
LAST WEIGHT UPDATE
CAREER SIMPLE QP
: 1070.00 LAST SIMPLE QP UPDATE
:
4.00
5.00
: 390.00
Report Cards Manual 8-25
Chapter 8
St a t i s t i c a l R e p o r t s
How Adjusted & Simple GPA’s Are Calculated
If the LAST updated figures are not all zeroes, before an update is done for the second
time in the same year, an UN-UPDATE automatically takes place. Un-updating may
also be done manually at any time although it’s usually not necessary. Un-updating will
reverse everything to the way it was before the update:
NOTE:
CAREER CREDITS
:
8.50
LAST CREDITS UPDATE
:
0.00
CAREER ADJUSTED QP
: 700.00
LAST ADJUSTED QP UPDATE :
0.00
CAREER WEIGHT
: 10.00 LAST WEIGHT UPDATE
:
0.00
CAREER SIMPLE QP
: 680.00 LAST SIMPLE QP UPDATE
:
0.00
Un-updating involves subtracting the Last Credits Update of 4.00 from the Career Credits
of 12.50 to get the old credits of 8.50. The Old Credits of 8.50 are then stored in the
CAREER Credits column and the Last Credits Update column is set to zero. Similar
calculations un-update the quality points and weight.
Once everything has been un-updated, this student’s GPA and Credits may be updated
again. This is why the last update data is stored. It enables a temporary updating to take
place based on the grades in any marking period. Subsequently, this temporary update
may be un-updated, followed by another temporary update or a complete update at the
end of the year.
If a student's grades change after he has been updated, that student may be un-updated
individually and then updated again using the new grades.
When the Beginning program is run at the end of the year, the Last Update figures will
be reset to zero so that further updating can take place in the new year.
When you first purchase Report Cards Plus, students’ prior career credits, career
adjusted quality points, career simple quality points and career adjusted and simple
weight may be entered into the computer using the View/change/add/drop program. The
View/change/add/drop program may be used at anytime to view or change these
numbers.
The next sections will explain in detail how to update students' career credits and grade
point averages.
8-26
Report Cards Manual
St a t i s t i c a l R e p o r t s
Update/Un-update GPA's & Credits
Update/Un-update GPA's & Credits
After selecting Grade Point Averages from the main window of the Statistical Reports
program, (see “Introduction & Main Menu” on page 8-2),the GPA’S/CREDITS
window appears:
Before options #1 and #2 can be used to print class rank or eligibility reports, Option #4
MUST be used to update students’ career grade point averages and credits.
Consequently, this section will discuss Option #4 in detail. Subsequent sections will
discuss how to define and obtain reports as well as explain how averages and credits are
calculated. However, in order to understand this section, it is necessary to have read the
previous section on “How Adjusted & Simple GPA’s Are Calculated” on page 8-24.
After selecting Option #4, the Update/Un-UpDate GPA’s & Credits window, the main
window for updating GPAs and Credits, appear:
Before proceeding to do an update, you should first set the Universal GPA
Specifications in order to designate how GPAs and credits should be updated.
NOTE:
Only the Supervisor can modify the Universal GPA Specifications
Report Cards Manual 8-27
Chapter 8
St a t i s t i c a l R e p o r t s
Update/Un-update GPA's & Credits
Inspect/Change Universal GPA Specifications
When you click on Option #6, you will see the following specification window.:
SPECIFICATION #1)
SPECIFICATION #2
FACTOR?
MINIMUM LETTER GRADE FOR GPA FACTOR
MINIMUM NUMBER GRADE FOR THE GPA
The GPA factor is either added to or multiplied by the quality points of higher level
courses. Grades BELOW what you enter here will not be modified by the GPA factor.
For example, if you are a letter grading school, enter a D- to not have the quality points
of a grade of F raised by the GPA factor.
SPECIFICATION #3
NUMBER OF DECIMAL PLACES (0 TO 4)?
It is strongly recommended that you never use more than TWO decimal places. This is
because you may not have more significant figures in your average than the numbers
used to calculate the average. Because teachers do not usually use decimals when they
give tests or submit their grades, any digits after the second decimal tend to be
meaningless.
SPECIFICATION #4
USE REGENT'S COLUMN FOR CREDITS?
Schools in New York may use this option to cause the HIGHER of the grades in the
final column and REGENT'S column to be used in updating student's career credits and
grade point averages. To use this option, the school must meet these criteria:
1) A report card column must be designated as the final grade
and it must be the only column designated as a CREDIT column.
2) There must be another column that has a three character
name of RGT or REG. This column would be the column for
your REGENT'S GRADE.
8-28
Report Cards Manual
St a t i s t i c a l R e p o r t s
Update/Un-update GPA's & Credits
Choose from among the following options:
NO
Regent’s column will not be used in updating GPAs and
Credits even if it exists as one of the report card columns.
YES
Regent’s column will be used for updating GPAs and
Credits.
YES, BUT FOR CREDITS
ONLY
Regent’s column will be used in updating credits but not for
updating the GPA.
YES, MUST PASS BOTH
FOR CREDIT
Credit will be awarded only if the student has a passing
grade in BOTH the Final and the Regent’s columns. (A
passing grade is any grade that has a ‘Y’ in the Credit
column in the Grade Table.) The higher of the two grades
will still prevail in updating the GPA.
If you set this specification to “YES” or “YES, BUT
FOR CREDITS ONLY”, if one of the two columns is
blank, the grade in the other column will be used in
updating.
SPECIFICATION #5
ADJUSTED GPA’S?
USE SEPARATE WEIGHTS FOR SIMPLE AND
The newest version of Administrator’s Plus allows you to use different weights for the
simple GPA than you use for the adjusted GPA. By using separate weights, you will be
able to have some courses count in one GPA, simple or adjusted, and not in the other.
Use Enter CoursesDView/Edit Courses & Sections to specify which courses count
for which GPA. See “Master Course Fields (Fields found on the View/Edit Courses and
Sections Window)” on page 2-4. Note that until you change the setting in View/Edit
Courses & Sections, courses that currently count for the simple GPA will count for
BOTH the simple and adjusted GPA. Courses that now do not count for the simple GPA
will NOT count for the adjusted GPA.
Report Cards Manual 8-29
Chapter 8
St a t i s t i c a l R e p o r t s
Update/Un-update GPA's & Credits
UPDATE GPA'S & CREDITS SPECIFICATIONS
After verifying your universal GPA specifications, choose Option 1) Update GPAs &
Credits to update your students' career GPAs and credits. The Update Specifications
window will appear allowing you to specify how the update will be performed:
8-30
Report Cards Manual
St a t i s t i c a l R e p o r t s
Update/Un-update GPA's & Credits
Specification
Description
1) UPDATE
BASED ON
WHICH
COLUMN(S)?
The default setting for this specification is ALL CREDIT COLUMNS,
which you will use at the end of the year, when all grades are in.
When you click on this specification, a drop-down list will appear
containing all of your report card columns. To update during the
school year based on grades in a particular column, choose the
column on which you wish to upgrade from the drop-down list. Note
that if you choose any option other than ALL CREDIT COLUMNS,
you will need to set the percent to weight courses in Specifications
#4-8. These options are described in detail below.
•
Updating based on all “All Credit Columns”: All columns that have
been designated in the Customize RC program as being worth
credit will be inspected when awarding credits and updating
GPAs (See “TYPE” on page 1-7.) If a course is an ALL YEAR
course and there are two credit columns, half of the total possible
credit will be awarded for a passing grade in the first semester
column and half the possible credit for a passing grade in the final
grade column.
If only one final grade column is designated as a credit column
and that column is blank, the following will happen when updating
quarter and semester courses:
The program will look for a grade in an earlier column designated
as a SEMESTER column. If it finds one, it will look for any
additional grades after it in columns other than EXAM columns. If
it does NOT find any additional grades, it will permanently copy
the earlier semester grade to the final grade column and use it in
awarding credits, quality points and weight. (This earlier
semester grade will now appear on report cards as BOTH the
semester grade and the final grade.) Note that the presence of a
W or I after this semester grade will prevent the semester grade
from being copied to the final grade column. This feature saves
you from having to enter the final grade for a semester one
course into both the semester and final grade columns!
•
Updating Based On One Designated Report Card Column: ALL
YEAR schools will use this option to temporarily update seniors’
credits and GPAs based on their semester grades or on their 3rd
quarter average. ALL YEAR schools are schools that award
credits and update students' career grade point average based
only on the final grade column. In-other-words, they have only
one designated credit column.
Report Cards Manual 8-31
Chapter 8
St a t i s t i c a l R e p o r t s
Update/Un-update GPA's & Credits
Specification
Description
(Continued)
1) UPDATE
BASED ON
WHICH
COLUMN(S)?
•
To update students' averages based on the semester grades,
choose to update based on the SEMESTER column.
•
Because updating is being done based on one column,
specifications #4-7 must be used to designated how different
courses should be weighted.
2) WHICH
YEARS?
If your school has archival years, you will see the choices in the dropdown list when you click on this specification. The number of archival
years is set in Database PlusDNew Files Specifications (See the
Introduction page I-13 for information on how to set the number of
archival years.) This setting will determine how many archival years
appear in the list above.
Normally, you will update GPAs and credits each year based on the
grades in year 0, which contains the current year's grades. In a YEAR
0 update, totals calculated on the current year's grades are added to
the career totals as of the end of the previous school year.
Assume you have just purchased Administrator’s Plus and have
entered students' past grades into their archival files. (Negative years
are archival years. For a senior, year -4 would be their grade 8
grades, year -3 their grade 9 grades, etc.) If you want to calculate
students' career totals from scratch based on their past grades, first
choose to update based on archival years -3 to -1. (We are omitting
the grade 8 grades in year -4.)
When updating is done on archival years, all career GPA data that
may currently exist for students is automatically first set to zeroes.
After updating based on archival years, you may then update based
on YEAR 0 to add this year’s grades to the totals calculated with the
archival grades.
The same procedure must be used whenever you change a student's
grade in an archival year. For example, if you manually change a
student's grade in year -1, first update his GPAs based on the
archival data. The top of page 0 in the View/Change/Add/Drop
program will then show that student’s GPA for the archival data only.
If you have already updated the student’s GPA and credits based on
data in year 0, you must then re-update based on year 0 to bring that
student's GPA information up-to-date.
WARNING: Do NOT update GPAs and credits on archival years if
you:
8-32
Report Cards Manual
St a t i s t i c a l R e p o r t s
Update/Un-update GPA's & Credits
Specification
Description
WARNING: Do NOT update GPAs and credits on archival years if
you:
3) REPORT
DETAIL?
•
Changed any course information in the master course file, such
as weight, credits and GPA factors since that student’s GPA and
credits were originally calculated
•
Manually adjusted the student’s GPA information in
View/Change/Add/Drop in one of the archival years being
updated
•
Made any changes to the grade table in a previous year that
would affect the student’s GPA and/or credits
If any of these situations apply, it is recommended that you do
NOT update based on archival data, because the newly
calculated GPA may not match the old one. Instead, you should
update the student’s GPA and credits in the previous year and
use the Transfer Credits & GPA program to transfer the archival
data to the current year. Then update in the current year to bring
the GPA and credits up to date.
You can choose to generate either a Summary or a Detailed Update
Report. The report will print to the window and you can then choose
to escape from the preview or press F9: PRINT to print the report to
paper. The Detailed Update Report is very useful when you want to
analyze one student’s GPA and credit calculation on a course by
course basis. When updating all students in one or more grade
levels, it is generally recommended that you keep this specification
set to “Summary Report”, especially if you intend to print a hard copy
of the report, as the detailed report tends to be quite lengthy.
The percents entered into specifications #4 - #7 are used only if
specification #1 has been set to update based on one designated
column. When updating based on ALL CREDIT COLUMNS, you can
ignore these specifications.
Report Cards Manual 8-33
Chapter 8
St a t i s t i c a l R e p o r t s
Update/Un-update GPA's & Credits
Specification
Description
4) PERCENT TO
WEIGHT FULL
YEAR
COURSES?
The number you enter here should reflect the percentage of the ALL
YEAR course that is complete at the time of the update. If you are
updating on the Semester 1 grade, enter “50.00” as the weight. If you
are updating on the quarter grade, enter “25.00” as the weight. The
grade the student receives in this column for an ALL YEAR course
will count as 50 percent or 25 percent of their total GPA respectively.
The 50 percent entry will cause half of a course's entered weight to
be used in calculating the grade point average.
NOTE: Note that 50.00 here means 50 percent of the TOTAL weight
entered for that course in Enter CoursesDView/Edit Courses &
Sections. If a course is worth 1 credit and you set this specification to
“50.00”, the student will receive .5 credits for the course after the
update.
5) PERCENT TO For a midyear update, schools will always enter a 100 percent for
WEIGHT SEM their semester and quarter courses. This is because for these
1 COURSES? courses, the midyear grade represents the final grade and should be
given whole weight.
6) PERCENT TO
WEIGHT SEM However, for a temporary update based on a third quarter average,
2 COURSES? you should weight semester one courses 100 percent, but semester
two courses only 50 percent, because they are only half finished.
7) PERCENT TO Quarter courses would still be weighted 100 percent, because any
WEIGHT QTR quarter course with a grade has been completed.
COURSES?
See “How Career GPAs & Credits Are Calculated” on page 41 for
additional information on how the program uses weights when
performing an update.
8) THIRD
QUARTER
UPDATE?
This specification is always set to “No”, unless you are performing a
TEMPORARY update based on third quarter grades. The
procedures for performing both a permanent and a temporary third
quarter update are explained in the next section.
After verifying that the update specifications are correct, the next
window will allow you to select a grade level on which to perform the
update. You will then be able to select the entire grade level or
individual students.
8-34
Report Cards Manual
St a t i s t i c a l R e p o r t s
How To Perform a Third Quarter Update
How To Perform a Third Quarter Update
The third quarter update is typically performed by schools seeking to determine
eligibility such as for National Honor Society based on the cumulative GPA as of the
third quarter. There are two methods of performing a third quarter update. The method
you choose depends on whether you need to permanently store the third quarter update
data or are simply seeking to temporarily update GPA’s and credits for purposes of
gathering data, as described above.
The Permanent Third Quarter Update
If you wish to permanently store the data acquired from the third quarter update, use the
Calculate Averages program to calculate the average of the first 3 quarters into the final
grade column. Remember to set Calculate Averages Specification #1: REPLACE
EXISTING GRADES? to “No” so that you do not overwrite any grades that may already
exist in the final grade column. Then perform an update with specifications set as
follows
UPDATE BASED ON WHICH COLUMNS?
FINAL GRADE
WHICH YEARS?
CURRENT YEAR: YEAR 0
REPORT DETAIL
SUMMARY REPORT
PERCENT TO WEIGHT FULL YEAR COURSES? 75%
NOTE:
PERCENT TO WEIGHT SEM 1 COURSES?
100%
PERCENT TO WEIGHT SEM 2 COURSES?
50%
PERCENT TO WEIGHT QTR COURSES?
100%
THIRD QUARTER UPDATE?
NO
Unlike the temporary third quarter update, the permanent third quarter update can be
repeated without losing data.
After updating for all grades, return to Calculate Averages and use the option Blank
Report Card Columns to blank the final grade column for ALL YEAR SECTIONS
ONLY (Set Specification #3: INCLUDE WHICH SECTIONS?) in order to free the
final column for grades at the end of the year. Use the Blank Report Card Columns to
blank the final grade column for any other groups of sections (such as Semester 2
sections) if necessary.
Report Cards Manual 8-35
Chapter 8
St a t i s t i c a l R e p o r t s
How To Perform a Third Quarter Update
The Temporary Third Quarter Update
If you need to update students’ GPAs and credits based on the third quarter for purposes
of determining eligibility but do not wish to permanently store the data, you can perform
a temporary third quarter update, which you will have to “undo” by performing a
midyear update afterwards. When doing a third quarter update, do NOT use Calculate
Averages. Simply do an update with Specifications set as follows:
UPDATE BASED ON WHICH COLUMNS?
THIRD QUARTER GRADE
WHICH YEARS?
CURRENT YEAR: YEAR 0
REPORT DETAIL
SUMMARY REPORT
PERCENT TO WEIGHT FULL YEAR COURSES? 25%
PERCENT TO WEIGHT SEM 1 COURSES?
0%
PERCENT TO WEIGHT SEM 2 COURSES?
50%
PERCENT TO WEIGHT QTR COURSES?
100%
THIRD QUARTER UPDATE?
NO
After performing the update, print class rank and eligibility reports as needed. Then
PERFORM A MIDYEAR UPDATE IN ORDER TO UNDO THE THIRD QUARTER
UPDATE. Be sure to set specification #8: THIRD QUARTER UPDATE? to “No”.
NOTE:
8-36
DO NOT perform the third quarter update more than once. If you do, students’ GPA data
will be lost and you will have to restore data from backup!
Report Cards Manual
St a t i s t i c a l R e p o r t s
Updating and Resetting GPAs & Credits
Updating and Resetting GPAs & Credits
The following section describes the options on the Update/Un-Update GPAs/Credits
window devoted to reversing or “undoing” the update process. See “Update/Un-update
GPA's & Credits” on page 8-27. Keep in mind that these options are rarely used and
should be used only after doing a backup of the school year data.
Un-Update GPAs & Credits
This option on the Update/Un-update GPAs/Credits window will undo the last
updating that you have performed. Normally, you do not need to use this option, as the
Update GPAs & Credits program automatically un-updates before performing a new
update. There may be times however, when you need to undo your last update without
performing a new update, as for example, if you have just performed a semester update
and wish to restore the student’s GPA and credits to what they were at the beginning of
the school year. The Un-Update program subtracts the LAST UPDATE numbers from
the CAREER totals to determine what the CAREER totals were before they were last
updated.
As an example, in a school using number grades, assume that a student has the following
six figures stored in his report card record following his SOPHOMORE year of high
school:
CAREER CREDITS
:
8.50
LAST CREDITS UPDATE
: 0.00
CAREER ADJUSTED QP
: 700.00
LAST ADJUSTED QP UPDATE : 0.00
CAREER WEIGHT
: 10.00
LAST WEIGHT UPDATE
: 0.00
CAREER SIMPLE QP
: 680.00
LAST SIMPLE QP UPDATE
: 0.00
This student's career adjusted GPA is currently (700/10) or 70.00 and his career simple
GPA is (680/10) or 68.00. At the end of the student's junior year, the Update GPAs &
Credits program is used, which calculates the following based on the student's junior
year grades:
JUNIOR YEAR (CURRENT) CREDITS
:
4.00
JUNIOR YEAR (CURRENT) ADJUSTED QP :
400.00
JUNIOR YEAR (CURRENT) WEIGHT
:
5.00
JUNIOR YEAR (CURRENT) SIMPLE QP
:
390.00
The current credits of 4.00 are added to the previous career credits of 8.50 to give a new
career credits total of 12.50. The current adjusted quality points of 400 are added to the
previous career adjusted quality points of 700 to give a new career adjusted quality
points total of 1100. The current simple quality points of 390 are added to the previous
simple quality points of 680 to give a new career simple quality points total of 1070.
Report Cards Manual 8-37
Chapter 8
St a t i s t i c a l R e p o r t s
Updating and Resetting GPAs & Credits
Finally, the current weight of 5.00 is added to the previous career weight of 10 to give a
new career weight total of 15. This student's career adjusted GPA is now (1100/15) or
73.33 and his simple GPA is (1070/15) or 71.33.
After this update, the student's report card record will now contain these eight figures:
CAREER CREDITS
:
12.50 LAST CREDITS UPDATE
:
4.00
CAREER ADJUSTED QP
: 1100.00 LAST ADJUSTED QP UPDATE : 400.00
CAREER WEIGHT
: 15.00 LAST WEIGHT UPDATE
:
CAREER SIMPLE QP
: 1070.00 LAST SIMPLE QP UPDATE
: 390.00
5.00
Un-updating will reverse everything to the way it was before the update, leaving the
following in the student’s record:
CAREER CREDITS
:
8.50 LAST CREDITS UPDATE
:
0.00
CAREER ADJUSTED QP
: 700.00 LAST ADJUSTED QP UPDATE :
0.00
CAREER WEIGHT
: 10.00 LAST WEIGHT UPDATE
:
0.00
CAREER SIMPLE QP
: 680.00 LAST SIMPLE QP UPDATE
:
0.00
Un-updating subtracted the LAST CREDITS UPDATE of 4.00 from the CAREER
CREDITS of 12.50 to get the old credits of 8.50. The OLD CREDITS of 8.50 are then
stored in the CAREER CREDITS column and the LAST CREDITS UPDATE column
is set to zero. Similar calculations un-update the quality points and weight.
Once everything has been un-updated, the student may be updated again.
NOTE:
8-38
Note that this option is rarely used for all students in a grade level. Normally, it is used to
un-update an INDIVIDUAL student.
Report Cards Manual
St a t i s t i c a l R e p o r t s
Updating and Resetting GPAs & Credits
Reprint Last Update Summary Report
Choose option #3 from the Update/Un-UpDate GPA’s & Credits window to print the
summary report of how students were last updated. See “Update/Un-update GPA's &
Credits” on page 8-27.
Note that the previous credits, quality points and weight are calculated by subtracting
the stored current credits, quality points and weight from the stored new credits, quality
points and weight.
Reset Last Update Data Only to Zero
Before an update is performed, the four LAST UPDATE figures are all zeroes. After an
update, the last credits, adjusted quality points, simple quality points and weight that the
student earned are added to his career totals. The following is an example of the eight
figures stored in a student’s report card record AFTER an update of GPAs and credits:
CAREER CREDITS
:
12.50 LAST CREDITS UPDATE
:
4.00
CAREER ADJUSTED QP
: 1100.00 LAST ADJUSTED QP UPDATE : 400.00
CAREER WEIGHT
: 15.00 LAST WEIGHT UPDATE
:
CAREER SIMPLE QP
: 1070.00 LAST SIMPLE QP UPDATE
: 390.00
5.00
Because the program stores these LAST UPDATE figures, the update may later be
UNDONE so that it can be redone in a different way. Also, by storing these LAST
figures, Report Cards Plus is able to show how the last update was performed on both
the Detailed Update Report and on report cards. See “3) REPORT DETAIL?” on
page 8-33.
When the BEGINNING program is run and students are moved up a grade, these LAST
UPDATE figures are reset to zero so that further updates may be done in the new year.
Report Cards Manual 8-39
Chapter 8
St a t i s t i c a l R e p o r t s
Updating and Resetting GPAs & Credits
This option is almost never used unless for some reason you wish to update a student
again for the current year without first un-updating him. Although you can perform this
function for all students in a grade level, it is very unlikely that you would need to do it
for more than one student at a time.
NOTE:
After this option has been run, you will no longer be able to automatically un-update
students or print their last update reports. You may still manually un-update students by
using the View/Change/Add/Drop program to enter their OLD credits, quality points and
weight.
Reset Credits, GPAs, Last Update Data To Zero
Whereas the last option described resets only the four LAST UPDATE figures to zeroes,
this option resets ALL eight figures to zeroes. As with Option #4, this option should
almost NEVER be used except in situations such as the following: Assume that a school
with grades 7 - 12 maintains credits and GPAs for students starting in grade 7. However,
once students reach grade 9, they wish to start over. Each year, this school will use this
option to reset the credits, adjusted quality points, simple quality points and weight for
only their grade 9 students back to zeroes.
NOTE:
Whenever you update based on a year other than the current year, Report Cards Plus
automatically resets the values to zero before it recalculates. You therefore do NOT need to
use this option for this purpose.
If you do use this option, it will most likely be for one grade level or for an individual
student.
NOTE:
8-40
Remember to backup the school year BEFORE doing any of the un-update procedures
described above!
Report Cards Manual
St a t i s t i c a l R e p o r t s
How Career GPAs & Credits Are Calculated
How Career GPAs & Credits Are Calculated
The previous two sections have given you some background on the update process and
how it is used to update students’ career credits, quality points and weight. This section
will provide details on exactly how the program updates these totals for students. After
reading it, you should have a better understanding of how a student's current grades are
used to calculate that student's new credits, quality points and weight.
Following this overview are detailed examples of both a temporary update and a
complete update.
General Updating Rules
A complete update is based upon grades in all of the columns that you have designated
as credit columns. The Customize RC program is used to designate report card columns
as credit columns. See “CREDIT” on page 1-8. A complete update is generally
performed at the end of the year immediately before printing students' final report cards.
A temporary update may be performed at any time during the year based on the grades
in any one report card column. For example, half-way through your students' senior
year, you will probably want to update their career grade point averages based on their
midyear grades in order to calculate their up-to-date rank in class for college transcripts.
When you perform a temporary update, you will have to set Specification #1: UPDATE
BASED ON WHICH COLUMNS? to the column on which the update will be based. At
midyear, you will likely set the Midyear or Semester 1 grade as your selected column.
You will then be required to set the percentage of each course’s total weight you wish
to use for your FULL YEAR, SEMESTER and QUARTER COURSES. You may enter
a different percentage for each type of course. See “4) PERCENT TO WEIGHT FULL
YEAR COURSES?” on page 8-34 for additional information on entering these weights.
NOTE:
Do not confuse the weights entered in Update Specifications with the total weight of the
course entered in View/Edit Courses & Sections. The number entered in Update
Specifications represents a PERCENTAGE of the total weight set in View/Edit Courses &
Sections. See “View/Edit Courses & Sections” on page 2-3. When updating on the Semester
grade, if you enter 50.00 as the percentage for ALL YEAR courses, students will receive 1/2
the credit & GPA for the course at midyear.
General Rules For Calculating Credits
Current credits are computed based on the grades in the credit columns. See page 1-8 for
information on how to designate a report card column as a CREDIT column. Only
passing grades, that is, grades that have a Y in the credit column in the Grade Table are
awarded credits. By default, letter grades of D- or above and number grades of 65 or
above are awarded credit. A grade of P is also awarded credits by default, but the grades
X, N, WP, WF, F, F+, F-, W, and I are not awarded credits. However, the Customize
RCDEdit Grade Table program can be used to change a grade to credit or non-credit.
See “Edit Grade Table” on page 1-2.
Report Cards Manual 8-41
Chapter 8
St a t i s t i c a l R e p o r t s
How Career GPAs & Credits Are Calculated
In a complete update in a school with only one credit column, a student will be awarded
full credit for each course in which he has a passing grade.
In a complete update, if there is more than one credit column, the following will take
place for each passing grade:
All Year Courses
The total credit entered in View/Edit Courses & Sections will be divided by the number
of credit columns. For example, if there are two credit columns and an ALL YEAR
course is worth one credit, a passing grade in a credit column will be worth .50 credits.
If you are updating based on the Semester 1 column, the student will receive .50 credit
for the course. When all grades are in at the end of the year, passing grades in both credit
columns will amount to full credit. See “View/Edit Courses & Sections” on page 2-3.
Semester & Quarter Courses
These courses will be awarded full credit for a passing grade in any credit column. There
shouldn't be a grade in more than one credit column for these courses. Once credit has
been awarded, no further credit columns will even be looked at.
In a temporary update based upon one column, the credits will be multiplied by the
percentage that you have entered for each type of course. For example, if you are doing
a temporary update using the MIDYEAR grade column, and you have entered 50.00 as
the PERCENT TO WEIGHT FULL YEAR COURSES an ALL YEAR course worth 5
credits will be awarded only 50 percent of those 5 credits or 2.5 credits. See “3)
REPORT DETAIL?” on page 8-33.
After credits have been awarded according to the above criteria, the OVR column in the
student's transcript is examined for each course. See Chapter 6 page “Editing the OVR
Column” on page 6-5 for an explanation of the function of the OVR column in
View/Change/Add/Drop.
If the REGENT'S option is being used for a complete update, credits will be awarded
for a passing REGENT'S grade even if the FINAL grade is a failing grade or any other
grade. A REGENT'S grade will not take the place of a blank final grade.
General Rules For Calculating Quality Points & Weight
Current quality points and weight are computed based on the grades in the appropriate
report card columns. By default, grades of P, W, WP, I, X, N or a blank space will be
ignored in calculating the weight and quality points. A course will also be skipped if it
is set not to count in the GPA in View/Edit Courses & Sections. See “Master Course
Fields (Fields found on the View/Edit Courses and Sections Window)” on page 2-4.
NOTE:
8-42
Note that although P, W, WP, I, X, and N are set in the grade table not to count in calculating
the weight and quality points, if you assign them a quality point value and set the Average
column to “Y” in the grade table, they will count in weight and quality point calculations.
Report Cards Manual
St a t i s t i c a l R e p o r t s
How Career GPAs & Credits Are Calculated
Each grade is then given a certain number of quality points based on either the letter
grade or number grade quality point tables. These tables may be customized through the
Customize RC program. If you do not touch these tables, the default quality points for
number grades is the value of the grade itself. In other words, a grade of 95 will be
awarded 95 quality points.
The default quality points for letter grades are:
A+: 4.33
B+: 3.33
C+: 2.33
D+: 1.33
F+: 0.00
A: 4.00
B: 3.00
C: 2.00
D: 1.00
F: 0.00
A-: 3.67
B-: 2.67
C-: 1.67
D-: 0.67
F-: 0.00
A grade of WF is always awarded 0 quality points.
For schools using number grades, any grade below the minimum grade as well as grades
of F and WF will be awarded the number of quality points that would be awarded for the
minimum grade. The Customize RC program is used to enter a minimum grade. The
original default is 50. For example, if a student receives a 35, using the default number
grade quality point table, the student will be awarded 50 quality points.
To calculate the adjusted quality points, the awarded quality points will be adjusted by
either multiplying the GPA FACTOR times the awarded quality points or adding the
GPA FACTOR to the awarded quality points. A setting in the Customize RC program
determines whether multiplication or addition takes place.
If a negative GPA factor brings the quality point total below 0, the adjusted quality
points for the course will be raised to 0. In other words, a student will never receive a
negative amount of quality points for a course.
Any grade with zero quality points from the quality point table will NOT use the GPA
factor. In other words, assume that a student receives an F in an honors course. The
course has a GPA factor of +1 and the quality point table shows that this F is worth zero
quality points. Because the GPA factor is not used, the student will still end up with zero
quality points for this course.
In the numeric grading system without the minimum grade, the F will similarly always
be worth zero quality points.
Once the weight is calculated, the awarded adjusted and simple quality points will be
multiplied by the weight. These products will then be added to the student's career total
simple and adjusted quality points.
Weight will be awarded following similar rules as to the awarding of credits.
In a complete updating, if you only have one credit column, the student will be awarded
full weight for a passing grade in that column for each course.
In a complete updating, if there is more than one credit column, the following will take
place for each course:
Report Cards Manual 8-43
Chapter 8
St a t i s t i c a l R e p o r t s
How Career GPAs & Credits Are Calculated
Full Year Course
The entered weight will be divided by the number of credit columns. For example, if
there are two credit columns a full year course with a weight of 1 will only be awarded
a weight of .50.
Semester & Quarter Courses
These courses will be awarded their full entered weight for a grade in any credit column.
There shouldn't be a grade in more than one credit column for these courses. Once
weight has been awarded, no further credit columns will even be looked at.
In a temporary updating, the entered weight will be multiplied by the percent that you
have entered for each type of course. For example, if you are doing a temporary updating
using the MIDYEAR grade column, you may have entered 50 percent for how to weight
your full year courses. Consequently, a full year course with a weight of 5 will in fact
be weighted 2.5.
After weight has been awarded according to the above criteria, the OVR column in the
student's transcript is examined for each course. The following codes may be entered for
each course in a student's transcript with the View/Change/Add/Drop program:
A code of 1 will cause a course to be skipped while a code of 2 will cause the previously
awarded weight to be cut in half.
Quarter And Semester Courses In A Complete Updating
If a complete updating is being done for a school with one final grade column designated
as a credit column and if that final grade column is blank, the following will take place
for quarter and semester courses:
8-44
Report Cards Manual
St a t i s t i c a l R e p o r t s
How Career GPAs & Credits Are Calculated
The computer will look for a grade in an earlier column designated as a semester
column. If it finds one, it will look for any additional grades after it in columns other
than exam columns. If it does NOT find any additional grades, it will permanently copy
the earlier semester grade to the final grade column and use it in awarding credits,
quality points and weight. This earlier semester grade will now appear on report cards
as BOTH the semester grade and the final grade. Note that a W or I after this semester
grade will cause the semester grade NOT to be copied to the final grade column.
BRIEF EXAMPLE OF A COMPLETE UPDATING
The following is a worksheet for a complete updating in a school using letter grades.
This school has the final grade column as its only column worth credit. The following
worksheet shows a student's final grades and how they are used to calculate the adjusted
quality points and adjusted GPA.:
SUBJECT
GRADE
= QUAL
+ GPA
Fact
= ADJ
QUAL
x
WEIGHT
=
Math
A
=
4.00
+
0
=
4.00
x
1.00
=
4.00
English
F
=
0.00
+
0
=
0.00
x
1.00
=
0.00
AP History
B
=
3.00
+
1
=
4.00
x
1.00
=
4.00
Art
Blank
Spanish
P
GYM
C
=
2.00
+
0
=
2.00
x
0.50
=
1.00
Grand Totals
ADJ
QUAL
3.50
9.00
The OVR column was blank for each course so it did not affect the above table.
Because there is only one credit column, this student will be awarded the full entered
credit for the four courses with passing grades. These courses are MATH, AP
HISTORY, SPANISH, and GYM.
The QUAL column shows the awarded quality points based on the default letter grade
quality point table. ART is skipped because there is no final grade and SPANISH is
skipped due to the grade of P.
In the example, the school uses the option to ADD the GPA factor to the number of
awarded quality points. Only one course, AP HISTORY, has a GPA factor other than 0.
For this course, the GPA factor of 1 is added to the awarded quality points of 3.00 to
produce and Adjusted Quality Point total of 4.00. For the other courses, the adjusted
quality points equal the awarded quality points.
NOTE:
Normally GPA factors are used in accelerated courses so that students are not penalized for
taking harder courses in which their grades are likely to be lower. In the above example, the
student's B in AP History earned him as many adjusted quality points as the A in math.
Report Cards Manual 8-45
Chapter 8
St a t i s t i c a l R e p o r t s
How Career GPAs & Credits Are Calculated
Once the adjusted quality points have been calculated, weight will be applied to the
course depending upon how your criteria says courses should be weighted. This weight
will be pro-rated if you have selected to do so. In this example, weights are used but they
are NOT pro-rated.
The adjusted quality points for each course is then multiplied by the weight of the course
to give the total quality points for each course.
The total adjusted quality points for each course will be added together to produce the
Grand Total Adjusted Quality Points. The weights for each course will be added
together to produce the Grand Total Weight. These totals will then be added to students'
old career adjusted quality points and weight to produce their new updated career
adjusted quality points and weight.
The simple quality points and simple GPA is simultaneously calculated. It is done the
exact same way as the adjusted quality points and adjusted GPA are calculated except
that the step adding the GPA factor to the awarded quality points is omitted:
SUBJECT
GRADE
= QUAL
x
WEIGHT
=
SIMPLE
QUAL
Math
A
=
4.00
x
1.00
=
4.00
English
F
=
0.00
x
1.00
=
0.00
AP History
B
=
3.00
x
1.00
=
3.00
Art
Blank
Spanish
P
GYM
C
=
2.00
x
0.50
=
1.00
Grand Totals
3.50
8.00
Note that the adjusted quality points were 9.00 while the simple quality points are 8.00.
DETAILED EXAMPLE OF A MIDYEAR UPDATING
When an updating is done, a detailed report may optionally be printed. This detailed
report shows grade by grade how the computer updated a student's career credits, quality
points and weight.
This section will analyze and explain the detailed report produced for the updating of a
student based on his MIDYEAR grades. This updating is being done half-way through
this student's senior year.
8-46
Report Cards Manual
St a t i s t i c a l R e p o r t s
How Career GPAs & Credits Are Calculated
The student's transcript prior to the midyear update, as viewed in the
View/Change/Add/Drop program is:
The top portion of the window lists the student’s current credits, adjusted quality points,
weight, adjusted GPA, simple quality points and simple GPA. Because no updates have
been performed for the current year, the values listed reflect what the student earned
during previous years. The detailed update report for an update performed on the
midyear column appears on the next three pages. The View\Change\Add\Drop window
showing credit weight and GPA information as it appears after the temporary update
appears on page 8-55.
Report Cards Manual 8-47
Chapter 8
St a t i s t i c a l R e p o r t s
How Career GPAs & Credits Are Calculated
Midyear Update Report Page 1
8-48
Report Cards Manual
St a t i s t i c a l R e p o r t s
How Career GPAs & Credits Are Calculated
Midyear Update Report Page 2
Midyear Update Report Page 3
This temporary update report will now be explained in detail:
Report Cards Manual 8-49
Chapter 8
St a t i s t i c a l R e p o r t s
How Career GPAs & Credits Are Calculated
TOP OF THE REPORT
The top of the report shows that the update was performed on the MIDYEAR grade
column. Full year courses were given 50% of their entered weight while semester and
quarter courses were given 100% of their entered weights. This weighing system will
mean that the first half of full year courses in the senior year will count half as much as
full year courses in other years. In other words, they will count for 1/8th of the student's
career GPA. If full year courses had been weighted 100%, they would have counted 1/4
of the student's career GPA. This based on certain assumptions, such as the same
number of full-year courses.
Course #1
The first line for each course shows the course number, the number of possible credits,
weight, and GPA factor that has been entered for the course. The course length (quarter,
semester or full year) is also listed on the first line. This quarter length course is not
worth any credits, it has an entered weight of .25 and a GPA factor of 0.
The second line displays the status of the OVR (Credit Override) column. The OVR
column for this course is blank so it will count fully towards credits and GPA.
The third line shows the student's actual midyear grade in the course.
8-50
Report Cards Manual
St a t i s t i c a l R e p o r t s
How Career GPAs & Credits Are Calculated
The next six lines show the total credits awarded, the simple quality points, the adjusted
quality points, the weight, the course simple quality points and the course adjusted
quality points. These values are based on the grade earned in the course. Because this
course is not worth any credits, the student obtained 0 credits for this grade. The simple
quality points is determined using the quality point value (assigned in the grade table)
for the grade the student earned. For this course, the student obtained a grade of 90,
which, according to the grade table, is worth 90 simple quality points. These are the
quality points before they have been adjusted due to the GPA factor or any other factor.
Because this course has a GPA factor of 0, the adjusted quality points equals the simple
quality points. Since this is a quarter course, it is given its full weight of .25. 100% was
entered for how quarter courses should be weighted. The course simple quality points
for this grade are determined by multiplying the weight of .25 times the quality points
of 90 which produces 22.50 course simple quality points for this grade. Because the
GPA factor is 0, the course adjusted quality points equals the course simple quality
points.
The last three lines show the running total of credits, quality points and weight for all of
the student's courses for this updating. It includes the previous, added and new values
for credit, weight, quality points as well as the simple and adjusted GPA. Since this is
the first course counted for this update, the new values listed on last line are equal to the
added values on the line above it.
Course #2
Because the midyear grade is a blank, this course is skipped.
Course #3
Report Cards Manual 8-51
Chapter 8
St a t i s t i c a l R e p o r t s
How Career GPAs & Credits Are Calculated
The midyear grade of 95 is also worth 95 simple quality points. Because the GPA factor
is 0, the adjusted quality points equals the simple quality points. Because this is a
semester course, its full weight is used. 100% was entered for how semester courses
should be weighted. The quality points for this grade, 47.50 was obtained by multiplying
the weight of .50 times the quality points of 95.
The total simple and adjusted quality points of 70 represents the quality points of 47.50
for this course added to the quality points of 22.50 for the first course.
Similarly, the total weight of .75 represents the weight of .50 for this course added to the
weight .25 for the first course.
Course #4
This is a full year course which means that only 50% of its entered weight of 1.00 is
used. This means that the weight for this grade will be .50.
As a result of this being an honors chemistry course, the GPA factor has been entered as
5.00. Because this school chooses to ADD the GPA factor, 5 points are added to the
number grade quality point table value of 93 to produce 98 adjusted quality points for
this course.
The weight for this grade of .50 is multiplied by the simple quality points of 93 to
produce 46.50 simple quality points for this grade. The weight of .50 is also multiplied
by the adjusted quality points of 98 to produce 49 adjusted quality points for this course.
Note that because this course has a GPA factor, the total simple quality points is now
different from the total adjusted quality points.
This course is the first course worth credit in which the student has obtained a passing
grade. Because this is a full year course, as with the weight, only 50% of the possible
1.50 credits are awarded. Consequently, the student has earned .75 credits for this grade.
Because this course has a GPA factor, the simple quality points for this are less than the
adjusted quality points.
8-52
Report Cards Manual
St a t i s t i c a l R e p o r t s
How Career GPAs & Credits Are Calculated
Course #5
In this course, the student obtained a midyear grade of 45 which, according to the grade
table is worth 45 simple quality points. Because the GPA factor is 0, it is also worth 45
adjusted quality points.
Note that this is the only course with a code entered into the OVR column. Because the
code was a 2, the second line displays that this course is worth HALF CREDIT & HALF
GPA.
Since the course is a full year course, 50% of the possible weight of 1.00 is used. This
is then cut in half again because the OVR column code says to only count this grade half
of what it normally will count towards the student's GPA. Consequently, the weight for
this grade is .25.
The weight of .25 times the quality points of 45 produces 11.25 simple and adjusted
quality points for this grade.
If the grade was a passing grade, like the weight, the credits would have been cut in half
and then half again.
Course #6
Because of the GPA factor of 99, this course does not count towards quality points and
weight.
Report Cards Manual 8-53
Chapter 8
St a t i s t i c a l R e p o r t s
How Career GPAs & Credits Are Calculated
However, credits are awarded because of the passing grade of 96. Because it is a full
year course, 50% of the possible credits of 1.00 are awarded giving the student .50
credits for this grade.
Course #7
Because the student's midyear grade in this course is an I for incomplete, this course is
skipped.
Course #8
This course does not count towards quality points and weight because the grade of P (for
passing) has been assigned 0 quality points in the grade table.
However, credits are awarded because P is a passing grade. Because it is a full year
course, 50% of the possible credits of 1.00 are awarded giving the student .50 credits for
this grade.
Bottom Of The Report
For his midyear grades, the student earned 1.75 credits, 127 simple quality points,
130.25 adjusted quality points and a weight of 1.50. These CURRENT values are added
to the PREVIOUS career values to produce the NEW values. The NEW values are then
stored on the disk as the student's career credits, quality points and weight - they are
replacing the old PREVIOUS values. Note that due to this update the student's simple
GPA changed from 88.96 to 88.54 and his adjusted GPA changed form 88.96 to 88.72.
The GPA is calculated by dividing the appropriate quality points by the weight.
8-54
Report Cards Manual
St a t i s t i c a l R e p o r t s
How Career GPAs & Credits Are Calculated
After the MIDYEAR update has been performed, the student’s View\Change Add\Drop
window lists the updated credit, weight and GPA values.
Detailed Example of an End of Year Updating
The student's transcript, before printing the final report cards looks like:
Note that the student has added a ninth course for the second semester, Accting I.
Report Cards Manual 8-55
Chapter 8
St a t i s t i c a l R e p o r t s
How Career GPAs & Credits Are Calculated
This school has designated the MIDYEAR and FINAL columns to be credit columns.
In other words, they have two credit columns. The school has done this because they
want a student who passes half of a full year course and fails the other half to still gets
half of the possible credit for the course. Consequently, GPA's will be updated based on
both the midyear and final grades as opposed to just on the final grades.
The detailed complete update report appears on the next three pages.
8-56
Report Cards Manual
St a t i s t i c a l R e p o r t s
How Career GPAs & Credits Are Calculated
Final Update Report Page 1
Report Cards Manual 8-57
Chapter 8
St a t i s t i c a l R e p o r t s
How Career GPAs & Credits Are Calculated
Final Update Report Page 2
8-58
Report Cards Manual
St a t i s t i c a l R e p o r t s
How Career GPAs & Credits Are Calculated
Final Update Report Page 3
The top of this report shows that the updating is being done based on the two credit
columns: MIDYEAR and FINAL grades.
Course #1
Report Cards Manual 8-59
Chapter 8
St a t i s t i c a l R e p o r t s
How Career GPAs & Credits Are Calculated
The first line for each course shows the course number and the number of possible
credits and weight that you have entered for that course. It also shows the GPA factor
that you have entered for the course and the course length (quarter, semester or full
year). This quarter length course is not worth any credits, it has an entered weight of .25
and a GPA factor of 0.00.
The second line displays the status of the OVR column. The OVR column for this course
is blank so it will count fully towards credits and GPA.
The third line shows the student's actual final grade in the course. This course is a quarter
course that met in the first quarter. The student received a 90 in the course which was
entered both into the FIRST MARKING PERIOD column as well as into the
MIDYEAR GRADE column. For this course, the FINAL grade column is blank.
Because this is a quarter course, no further credit columns are looked at. Even if the
grade of 90 had been also entered into the FINAL grade column, the computer would
not erroneously give the student double credits, quality points and weight for the course.
The next six lines show the total credits awarded, the simple quality points, the adjusted
quality points, the weight, the course simple quality points and the course adjusted
quality. These values are based on the grade earned in the course. Because this course is
not worth any credits, the student obtained 0 credits for this grade. The simple quality
points is determined using the quality point value (assigned in the grade table) for the
grade the student earned. For this course, the student obtained a grade of 90, which,
according to the grade table, is worth 90 simple quality points. (These are the quality
points before they have been adjusted due to the GPA factor or any other factor.)
Because this course has a GPA factor of 0, the adjusted quality points equals the simple
quality points. Since this is a quarter course, it is given its full weight of .25. 100% was
entered for how quarter courses should be weighted. The course simple quality points
for this grade are determined by multiplying the weight of .25 times the quality points
of 90 which produces 22.50 course simple quality points for this grade. Because the
GPA factor is 0, the course adjusted quality points equals the course simple quality
points.
The last three lines show the running total of credits, quality points and weight for all of
the student's courses for this updating. It includes the previous, added and new values
for credit, weight, quality points as well as the simple and adjusted GPA.
Course #2
This is a quarter course. Because the computer found a blank grade in the MIDYEAR
grade column, it looked for a grade in the FINAL grade column. When that grade was
also blank, the course was skipped.
8-60
Report Cards Manual
St a t i s t i c a l R e p o r t s
How Career GPAs & Credits Are Calculated
Course #3
Because this is a semester course, once a grade is found in a credit column, no further
credit columns are looked at. Even if the grade of 95 had been also entered into the
FINAL grade column, the computer would not erroneously give the student double
credits, quality points and weight for the course.
The midyear grade of 95 is also worth 95 quality points. Because this is a semester
course, its full weight is used. Because there is no GPA factor, the adjusted quality
points is the same as the simple quality points. The simple and adjusted quality points
for this grade, 47.50 was obtained by multiplying the weight of .50 times the simple and
adjusted quality points of 95.
The total simple and adjusted quality points of 70 represents the simple and adjusted
quality points of 47.50 for this course added to the simple and adjusted quality points of
22.50 for the first course.
Similarly, the total weight of .75 represents the weight of .50 for this course added to the
weight .25 for the first course.
Course #4
Therefore, the student receives full credit for passing this course and full weight is used
during the end of the year update.
Report Cards Manual 8-61
Chapter 8
St a t i s t i c a l R e p o r t s
How Career GPAs & Credits Are Calculated
Because this is an honors chemistry course, the GPA factor has been entered as 5.00.
Because there is a GPA factor of 5, for both the midyear and final grades, 5 points are
added to the simple quality points to get the adjusted quality points. To obtain the simple
and adjusted quality points for the grade, the weight of .50 is multiplied by the simple
and adjusted quality points. For example, .50 is multiplied by the simple quality points
of 93 to obtain 46.50 simple quality points for the midyear grade. 0.50 is then multiplied
by the adjusted quality points of 98 to obtain 49 adjusted quality points for the midyear
grade.
A similar calculation is performed to the final grade of 90. Adding 5 quality points
produces an adjusted quality point total of 95. Multiplying this by the weight of 0.50
produces 47.50 adjusted quality points for the final grade compared with 45 simple
quality points.
Course #5
As with the previous two courses, because this is a full year course, the student receives
half the possible credit for passing each semester and half of the possible weight for each
semester. Therefore, the student receives full credit for passing this course and full
weight is used during the end of the year update.
In this course the student obtained a midyear grade of F that was below the minimum
grade. Consequently, the grade was raised to the minimum grade of 50, which is worth
50 simple quality points. Because there is no GPA factor, the adjusted quality points
equals the simple quality points.
Note that this is the only course with a code entered into the OVR column. Because the
code was a 2, the second line displays that this course is worth HALF CREDIT & HALF
GPA.
Since the course is a full year course, the possible weight of 1.00 is cut in half for each
semester. This is then cut in half because the OVR column code says to only count this
grade half of what it normally will count towards the student's GPA. Consequently, the
weight for this grade is .25. The weight of 0.5 times the simple and adjusted quality
points of 0 produces 0 simple and adjusted quality points for the midyear grade.
If the grade was a passing grade, the credits would have been cut in half like the weight.
8-62
Report Cards Manual
St a t i s t i c a l R e p o r t s
How Career GPAs & Credits Are Calculated
The final grade of an F is now examined. In the grade table, the grade of F is assigned 0
quality points.
Course #7
When the temporary updating was done at the midyear, the student had an a midyear
grade of I for incomplete. This grade has since been changed to a 90. Because the
temporary updating has been undone, it is perfectly OK to change grades before the final
complete updating is performed.
Because this is a full year course, the student receives half of the possible credit for
passing each semester and half of the possible weight for each semester. The student
receives HALF because the possible credits and weight are divided by the number of
credit columns which in this case is two. If the school had three semester columns each
worth credit, each of these columns would be worth one third of the total possible credits
and weight.
The computer then looks at the final grade of 100. For this grade the student is awarded
another 1.0 credits and 1.0 weight. The weight of 1.0 multiplied by the grade of 100
produces 100 quality points for this grade.
Note that the student's running totals are updated for each grade for this course.
Course #6
This course does not count towards quality points and weight. However, credits are
awarded for each passing grade. Because it is a full year course, 50% of the possible
credits of 1.00 are awarded for each semester's passing grade.
Report Cards Manual 8-63
Chapter 8
St a t i s t i c a l R e p o r t s
How Career GPAs & Credits Are Calculated
Course #8
This course does not count towards quality points and weight due to the grade of P for
passing in both the midyear and final columns. However, credits are awarded because P
is a passing grade.
Course #9
This is a second semester course which is why the midyear grade is a blank.
Consequently, the student is awarded the full possible credit and weight for the passing
grade of 75. The awarded weight of 1 is multiplied times the 75 simple and adjusted
quality points to produce 75 simple and adjusted quality points for this grade.
Bottom of the Report
The student earned 5.50 credits, 335.00 simple quality points, 340.00 adjusted quality
points and a weight of 4.25. These CURRENT values are added to the PREVIOUS
career values to produce the NEW career values. These NEW career values are then
stored on the disk as the student's career credits, simple quality points, adjusted quality
points and weight. Note that due to this updating the student's simple GPA changed from
88.96 to 86.31 while the adjusted GPA changed from 88.96 to 86.62. The GPA is
calculated by dividing the appropriate quality points by the weight.
8-64
Report Cards Manual
St a t i s t i c a l R e p o r t s
How to Obtain Class Rank Reports
How to Obtain Class Rank Reports
The previous three sections provided you with background information on students'
career credits, quality points and weight. They explained in detail how to update them
and then gave details on the mathematics of the updating process.
Once students' career credits, quality points and weight have been updated, CLASS
RANK REPORTS may be obtained based on them. A CLASS RANK REPORT simply
reads these three numbers from students' records and produces the report of your choice.
An ELIGIBILITY REPORT may also be produced. An ELIGIBILITY REPORT is just
a CLASS RANK REPORT that has been defined differently.
The main window of the GPA'S/CREDITS portion of the Statistical Reports program
looks like:
First choose Option #3 and inspect your PRINT SPECIFICATIONS which determine
how your report will look. The print specifications for class rank reports operate in
virtually the same way as the print specifications for honor roll reports.
Report Cards Manual 8-65
Chapter 8
St a t i s t i c a l R e p o r t s
How to Obtain Class Rank Reports
Choose either Option #1, PRINT CLASS RANK REPORT, or Option #2, PRINT
ELIGIBILITY REPORT to print reports based on students career GPA's and credits.
You will then see the following window allowing you to define your report:
Administrator’s Plus will remember how you last defined this report. If it is correct, just
click Done. The next section explains the specifications in detail.
You will then see the following window:
8-66
Report Cards Manual
St a t i s t i c a l R e p o r t s
How to Obtain Class Rank Reports
Select a grade level to begin generating the report. If you have selected in the PRINT
SPECIFICATIONS window to view the report on window, you will see the following:
In this example, there are 91 students on the class rank report. To easily find a student,
use the {F6:SEARCH} key to find any student in the list. The {F8:DEL} key may be
used to delete any student from the list. The {F10: SORT} key may be used to toggle
the list between sorting by name or by average. The upper left corner of the window
identifies that this list is currently sorted by name.
When you are ready, use the {F9: PRINT} key to print the list. How the list is printed is
defined by the PRINT SPECIFICATIONS. As the list is printed, it will be written to the
disk if specification #2, ALSO PRINT TO DISK has been set to YES. The next sections
describes this and other specifications on the report definition window.
Report Cards Manual 8-67
Chapter 8
St a t i s t i c a l R e p o r t s
Defining Class Rank Reports
Defining Class Rank Reports
After selecting either the CLASS RANK report or the ELIGIBILITY report from the
GPA'S/CREDITS main window, you will see the following window allowing you to
define the report you have selected:
8-68
Specification
Description
TITLE OF
REPORT?
The title of your report may be up to 25 characters long. The title will be
printed centered at the top of the page. It will print in the same case of
letters that you enter.
Report Cards Manual
St a t i s t i c a l R e p o r t s
Defining Class Rank Reports
Specification
Description
ALSO PRINT
TO DISK?
In order for students' class rank to be printed on transcripts or report
cards, it must first be written to the disk. If this specification is set to
YES, students' rank will be written to the disk at the same time that is
printed on paper. It will match what is printed.
As an example, if Karen Amato is 23rd out of 250 students on the report
you are printing, a 23 will be put in her record in her report cards file.
The LAST CALCULATED CLASS RANK is another figure stored in
each students' report cards record along with their career credits,
quality points, weight, last updated credits, last updated quality points,
and last updated weight.
All of the students in a grade level who are not included in the current
defined report will have their class ranks blanked. Each time a report is
also written to the disk, the total number of students in that report is
stored on the disk for that grade level. In this example, the computer
would store that there were 250 students in the last class rank report
calculated to the disk for grade 12. This is will enable the computer to
print that Karen Amato's rank as 23 of 250. Consequently, only print
reports to the disk that contain all of the students in a grade level and
their rank.
USE CAREER
OR LAST
UPDATE
DATA?
You will almost always use the CAREER choice. However, to print
athletic eligibility list based on the credits earned last marking period,
use the LAST UPDATE choice.
Being able to use the LAST UPDATE data will enable you to produce
reports using students credits and GPA's for just one marking period,
semester, or year. For example, to produce a report of those students
receiving less than 2.5 credits for a marking period, do the following:
Perform a temporary updating of students' credits and
GPA's based on the marking period of your choice. The
computer will record the credits awarded for your chosen
marking period as the LAST UPDATED CREDITS.
2 Set specification #5 to use credits as the search category. In
specifications #6 and #7, enter 0 and 2.49 as your search
category limits. The resulting report will contain students
who received under 2.5 credits for your chosen marking
period.
3 You may then undo the updating performed in step #1 with
the UN-UPDATE option.
1
Report Cards Manual 8-69
Chapter 8
St a t i s t i c a l R e p o r t s
Defining Class Rank Reports
Specification
Description
USE SIMPLE
OR ADJUSTED
GPA'S/QUAL
POINTS?
There are two types of quality points so that you may maintain both an
adjusted and simple career GPA for each student. The adjusted GPA
takes into account the fact that some advanced courses may offer
more quality points for a grade than would be awarded for the same
grade in a lower level course. The simple GPA is calculated with the
same number of quality points being offered for each grade regardless
of the level of the course. This specification determines which of these
types of GPA will be used when you calculate class rank to either paper
or the disk. If your search category in SPECIFICATION #5 has been
set to QUALITY POINTS or GPA, this setting determines whether the
simple or adjusted quality points will be used.
SEARCH BY
GPA, CREDITS,
QUALITY
POINTS?
This setting determines whether the report will be based upon students'
career grade point averages, credits or quality points. In-other-words,
you can rank students by credits or quality points as well as by grade
point average. Specification #5 will allow you to enter as your search
category either GPA, CREDITS or WEIGHT. If you enter GPA as your
criterion, the computer obtains the GPA for each student by dividing
their career quality points by their career weight.
The value entered in this setting, SEARCH CATEGORY LOWER
SEARCH
LIMIT, will keep students off of your class rank report if their search
CATEGORY
LOWER LIMIT? category value is below this value. For example, if credits is your
search category, students with below this number of credits will not be
on your report. If GPA is your search category, students with GPA's
below this GPA value will not be on your report. Enter a 0 to not have
any lower limit.
SEARCH
CATEGORY
UPPER LIMIT
Students with a value in their search category greater than what you
enter for this setting will be omitted from your class rank report.
For example, to find all students with less than 20 credits, choose
CREDITS as the search category and enter 19.99 as your upper limit.
Enter a 9999 to not have any upper limit.
MINIMUM
WEIGHT <0
FOR NONE>?
8-70
Report Cards Manual
Any student with a career weight less than this number will be omitted
from the class rank report. This will enable you to omit students from
the report who have not taken enough courses.
9
Archive
Archive. . . . . . . . . . . . . . . . . . . . . . . . . 9-2
HOW TO CHANGE THE NUMBERS OF
ARCHIVED COURSES . . . . . . . . . . 9-7
Report Cards Manual
9-1
Chapter 9
Archive
Archive
Archive
NOTE:
The end-of-year archiving function has been replaced by
program C) Transfer Credits & GPA which now archives
students’ report card information.
Students' courses and grades for the current year are stored in REPORT CARD files for
each grade level. At the end of each year, when the BEGINNING program is run from
DATA BASE PLUS, the courses and grades in the REPORT CARD files are erased to
make room for the next year's courses and grades. However, the current year's courses
and grades may be copied into ARCHIVAL files in which they will be preserved. These
files are then transferred to the new year's directory where they may be viewed, changed
or printed on transcripts.
The process of copying students' current report cards information from the REPORT
CARD files into the ARCHIVAL files is called the ARCHIVING process. This chapter
will describe the archiving process while the next chapter will explain how you can
change course numbers after they have been archived. This will be helpful if in the
future your change your master course list.
9-2
Report Cards Manual
Archive
Archive
The first window that you will see when you choose Option #9 ARCHIVE, from the
Report Cards Plus master window will be:
Specification
Description
ARCHIVE
STUDENTS'
REPORT
CARDS DATA:
The ARCHIVAL files have enough room to hold a specified number of
years worth of report cards information. Before you set up your
ARCHIVAL files, you used the CUSTOMIZE RC program to set how
many years of report cards information you wanted your archival files
to be able to hold. PARAGRAPH BREAK The current year's report
cards information, which is stored in the report card files, is defined as
“YEAR 0”. Last year's report cards information, which is stored in the
ARCHIVAL files, is defined as “YEAR -1”. The information for the year
before is defined as “YEAR -2”, and so on. If you have defined your
archival files to hold three year's worth of report cards information, they
will contain slots for “YEAR -1”, “YEAR -2” and “YEAR -3”.
At the end of each year, after updating students' career credits and
grade point averages, this option will be used to archive the current
year's report cards data. ARCHIVING means copying this year's data,
which is YEAR 0, into the archival file as YEAR -1. It will also move all
of the current data in the archival file back one year.
The previous diagram shows what happens when the archival process
is run. Note that the archival process does not MOVE the current year's
data from YEAR 0 to YEAR -1 but it COPIES it. In other words, after
running the archival process, the current year's data is in two places. It
still exists as YEAR 0 and it is also in YEAR -1. When the BEGINNING
program is used, the YEAR 0 data will be erased to make room for next
year's current data. In the archival file, however, MOVING does take
place. The data from YEAR -1 is moved to YEAR -2 and the data from
YEAR -2 is moved to YEAR -3. Because this archival file has only been
set up for three years, any data in YEAR -3 will be lost.
COPY YEAR After using option 1, you may make further changes to YEAR 0 data.
0 to YEAR-1 Use this option to copy the data from YEAR 0 to YEAR -1 without also
moving the other years back another year.
ONLY:
Report Cards Manual
9-3
Chapter 9
Archive
Archive
Specification
Description
UNARCHIVE: This option reverses Option #1. For example, it would copy YEAR -4 to
YEAR -3, YEAR -3 to YEAR -2, and YEAR -2 to YEAR -1. It does not
copy YEAR -1 to YEAR 0 because the data in YEAR 0 remained there
during the original archiving with Option #1. If there was a power failure
during the original archiving process, this option may NOT be used in
lieu of restoring a backup because the original archiving was
interrupted in the middle of the process.
NOTE: When students' courses are archived, only the master course
numbers are moved to the archival files and not the section numbers.
When transcripts are printed, course names, credits, quality points and
course lengths are found by using these master course numbers in the
archival files and matching them up with what is currently in the master
course list. Consequently, it is important that you do not change these
items in your master course list unless you also want them changed for
all of the students who may have those courses in their archival files.
Only the report card columns that have been identified as ARCHIVAL
columns will be archived. Option #2 in the Customize RC program is
used to define which of your report card columns will be archived.
Note that any codes in the “CR?” column are automatically archived.
The “CR?” column is used to designate that a student has taken a
course for half or no credit as well as if the course should count half or
none towards GPA's.)
The archival process also takes the daily attendance data for the
current year and stores it in the archival files so that it may optionally
be printed on transcripts.Therefore, it is important to finish entering all
of the daily attendance before running the archival process.
Lastly, the archival process takes the ID numbers of the teachers for
each course and stores them in students' archival files. These STAFF
ID numbers will only be used if you later decide to print teachers'
names on the transcripts. If you do decide to print teachers' names, it
is important that you do not remove STAFF members from your STAFF
file as long as their ID numbers are in the archival files.
NOTE: Backup before archiving your data. If there is a power failure or
the archiving process aborts for some reason, you will have to restore
your backup and redo the archiving process.
9-4
Report Cards Manual
Archive
Archive
Specification
Description
UNARCHIVE If you schedule your school for next year while using
ADMINISTRATOR'S PLUS for the rest of the current year, you will
(continued)
have two active directories on your hard disk drive. If you have two
active directories and are using archival files, the following is an outline
of your end of the year tasks. For the following examples, assume that
you are using the 2004-05 directory for the current year and you are
scheduling for next year in the 2005-06 directory.
•
In the 2004-05 directory, update students's final career credits and
GPA's.
•
In the 2004-05 directory, print students' final report cards. Also use
the 2004-05 directory to print honor roll reports, transcripts, grade
distribution reports etc.
•
In the 2004-05 directory, use the ARCHIVE program to copy this
year's report cards data into the archival file as “YEAR -1” and to
move all of the other data in the archival file back one year. This
program also takes the daily attendance data for the current year
and stores it in the archival files so that it may later be optionally
printed on transcripts.
•
Sometime towards the end of the summer run the TRANSFER
CREDITS program in REPORT CARDS PLUS to transfer students'
updated career credits and GPA's as well as their archival files from
the 2004-05 directory to the 2005-06 directory.
NOTE: If in the future you want to be able to print transcripts for
graduating seniors in the 2004-05 directory and you have chosen to
archive one less year of school than the number of grades in your
school (i.e. you have chosen to archive three years in a four year
school), you will need to take some precautions before performing the
above steps. After you archive, year -1 data becomes the same as year
0 data and the oldest year's data gets erased. If you have set up
ADMINISTRATOR'S PLUS to keep enough archival years, you will
have no problem. You can tell the transcript program to print years -1
to -4 instead of years 0 to -3. If you have not specified enough years,
you must use the NEW FILES program in DATA BASE PLUS to
increase the number of years you archive.
Report Cards Manual
9-5
Chapter 9
Archive
Archive
Specification
Description
UNARCHIVE In order to save a lot of disk space, information about each course such
as its name and how many credits it is worth is only stored in one place:
(continued)
the MASTER COURSE LIST. Students' report cards and archival files
contain the course numbers of the courses they are taking or have
taken. When it needs to, the computer matches up the course numbers
with the Master Course List in order to find out the names and other
information about the courses in students files.
It is important to understand that there is only ONE master course list
and that it is used for both students' current courses in their report
cards files as well as for their previous courses in their archival files. If
you change something in the master course list for a course number,
that change will be carried through to every student that has that
course in their archival files. For example, if you change the name of
COURSE #123 from “English” to “Math”, students' transcripts will show
course #123 as “Math” instead of as the “English” they took. The same
thing will happen of you change the number of credits for a course.
Consequently, it is recommended that you do not remove or change
master course list entries. Instead, just make a new course number if
the number of credits or the name of a course changes.
However, if you must re-organize your master course list, this chapter
will explain an option that allows you to change the course numbers in
students' archival files. In the above example, assume that you have
made a new number for the old “English” course that was COURSE
#123. Assume that COURSE #923 is now “English”. You can use this
option to change all of the “123's” in students' archival files to “923's”.
Transcripts will then correctly show that they took “English” instead of
“Math” which you made into the new COURSE #123. When using this
option, you will be able to specify for which grade levels and for which
archival years this change should take place. In the printing of
transcripts, if a course number is in a student's archival file and NOT in
the master course list, the computer will not know the name of the
course, how many credits it is worth and how it should be weighted.
Consequently, it will print the course number as the course name and
it will not award any credits for the course nor will it count the course
towards any GPA's. If you see any courses like this on a transcript, you
should add the course to the master course list and re-print the
transcript.
9-6
Report Cards Manual
Archive
HOW TO CHANGE THE NUMBERS OF ARCHIVED COURSES
HOW TO CHANGE THE NUMBERS OF ARCHIVED COURSES
The first window that you will see when you choose ARCHIVE, form the Report Cards
Plus master window, will be:
From this window, select number 4 to move into the part of this program that actually
changes the numbers of archived courses. You will then see the Set Master Course
Translation Table window:
This window allows you to enter up to 38 pairs of numbers. If you have more than 38
course numbers to change, you will have to run this procedure more than one time.
There is room for 19 pairs on the left side of the window and 19 pairs on the right side
of the window. Each pair consists of on “OLD COURSE #” and a “NEW COURSE #”.
For example, if you wanted to change COURSE #123 to COURSE #923 and COURSE
#900 to COURSE #850, you would enter the following:
Each time that you press {ENTER} after entering an OLD COURSE #, the cursor will
move to the NEW COURSE # next to it. After pressing {ENTER} from a NEW
COURSE #, the cursor will move to the next available OLD COURSE #. You may move
around the window to edit any entry at any time by using the UP and DOWN ARROW
keys to move up and down a column or by moving the {TAB} and
Report Cards Manual
9-7
Chapter 9
Archive
HOW TO CHANGE THE NUMBERS OF ARCHIVED COURSES
{SHIFT-TAB} keys to move between columns. Pressing the Clear button at the bottom
of the window will clear the table so that you can start over. When the table is as you
want it, press the Next button at the bottom of the window.
After the table has been set, you will be able to enter a STARTING and ENDING grade
level for which the translation will take place. You will then be able to enter a
STARTING ARCHIVAL year and an ENDING ARCHIVAL year. For example, if you
want to change course numbers for the past two archived years, enter a “-2” or “2” as
your STARTING ARCHIVAL YEAR and a “-1” or “1” as your ENDING ARCHIVAL
YEAR. The “starting” year must always be the year that contains the oldest data.
NOTE:
9-8
DO NOT change a course number if a course already exists with the new number. For
example, suppose you wish to change COURSE 102 to COURSE 200 and COURSE 100 to
COURSE 102. If you change COURSE 100 to 102 first, and then change COURSE 102 to
200, then all of the original COURSE 100's and COURSE 102's will be changed to
COURSE 200. Think carefully about which course numbers to change first.
Report Cards Manual
A
Print Schedule Scan Forms
Introduction . . . . . . . . . . . . . . . . . . . . .
Printing Schedule Scan Forms . . . . . .
Performing a Spacing Test . . . . . . . .
Sorting by Your Chosen Fields. . . . .
A-2
A-2
A-5
A-6
Report Cards Manual
A-1
Chapter A
Print Schedule Scan Forms
Introduction
Introduction
This program allows you to print scan forms so students can bubble in their schedules.
Students' schedules may be entered into the computer using an NCS optical scanner.
This program will pre-print students' names onto the scanner forms. The computer will
also print students' ID numbers in the STUDENT NUMBER box and it will print marks
in the bubbles of this box so that the computer will later be able to identify to which
student each form belongs.
The first two digits of the ID number is a code for a student's grade level. “01” stands
for the youngest grade in your school while “02” is your next youngest grade etc. The
last three digits is the student's ID number. For example, if your school contains grades
9 - 12, “04010” is student #10 in grade 12.
These same forms may also be printed by the COURSE REQUEST FORMS program
in SCHEDULING PLUS. By bubbling just course numbers, these forms are COURSE
REQUEST FORMS for Scheduling Plus. By bubbling in both course and section
numbers, they may be used to enter students' schedules into the computer for Report
Cards Plus. Consequently, these forms are often called REQUEST forms when in fact
they may also be used for scanning schedules into the computer.
Printing Schedule Scan Forms
Use the following procedure to print schedule scan forms.
To Print Schedule Scan Forms:
1
A-2
Report Cards Manual
Click the Print Schedule Scan Forms icon.
The first Print Schedule Scan Forms print window appears.
Print Schedule Scan Forms
Printing Schedule Scan Forms
2
Click Inspect/Change Specifications to display the specifications window.
3
Set the specifications as desired.
The specifications are described in the following table.
Specification
Description
1) Start Grade for
All Grades
When you print the scan forms, you have the option to print for all
grade levels. If you would like to limit printing to a range of grades,
choose the lowest grade in that range for the start grade and the
highest grade in that range for the end grade.
2) End Grade for
All Grades
3) Include Blank
Search/Sort
Categories
This specification only applies when searching and/or sorting based
on a database field. Selecting Yes causes the program to print a
separate category called “No Entry” for all students who do not have
an entry in the search field.
4) Include
Active/Inactive
Students
Choose whether to include or omit inactive students.
5-7 Option Fields
Click the browse button to display a Lookup window, and then select
a data base field to sort by. See “Sorting by Your Chosen Fields” on
page A-6 for more information.
4
Click Done.
Report Cards Manual
A-3
Chapter A
Print Schedule Scan Forms
Printing Schedule Scan Forms
The first Print Schedule Scan Forms print window re-appears.
5
6
A-4
Report Cards Manual
Select an option, which are explained in the following table.
Option
Description
Grade Number
To print forms for only one grade level, type the desired grade
level here.
All Grades
Select All Grades to print forms for all grade levels in your
school.
Inspect/Change
Specifications
Opens the specifications window.
Spacing Test
See “Performing a Spacing Test” on page A-5.
Clicking Grade Number or All Grades deploys the following window.
Print Schedule Scan Forms
Printing Schedule Scan Forms
7
Select an option, which are described in the following table.
Option
Description
1) All Students
Alphabetically
Prints All students in alphabetical order.
2) Resume
Alphabetical
Printing
If printing has been paused, you can resume printing
beginning with the next student alphabetically.
3) Individual Students Opens a second window from which you can select
individual students to appear on the report.
4) Sorted Students
8
Presents you with a list of all of fields for which you
are storing information about your students. You will
then select the field by which you want your entry
forms to be sorted. See “Sorting by Your Chosen
Fields” on page A-6.
Select an option, and then click Next.
The list appears in print-preview mode.
Performing a Spacing Test
It is extremely important that your course request scanner forms are aligned properly in
the printer because the scanner MUST be able to read the student number that is going
to be printed on the forms.
NOTE:
If the scanner cannot correctly read these identifying marks, the forms will not be able to be
scanned. Consequently, it is highly recommended that a new ribbon be used to print these
forms. If the student number marks are not dark enough, scanning will be unsuccessful.
Report Cards Plus automatically causes your printer to print the student number marks
using the bold feature of your printer. If you must use an old ribbon, you may also tell
Report Cards Plus to use enhanced print as well. In other words, the student number
marks will be printed both in bold and enhanced. Bold print cause a second pass of the
printer to print a second dot slightly to the right of each original dot. Enhanced print
causes another pass which prints another dot slightly below the original dots.
The computer will fill in the bubbles in the “STUDENT NUMBER” box one line at a
time. After each line, the printer will pause allowing you to align the forms so that the
marks fall entirely inside the bubbles in the “STUDENT NUMBER” box. You may then
press “G” to print the next line. After the form seems to be aligned, do the spacing test
one more time for the entire “STUDENT NUMBER” box.
After the forms have been aligned, the following window will allow you to select for
which students in your selected grade level forms will be printed.
Report Cards Manual
A-5
Chapter A
Print Schedule Scan Forms
Printing Schedule Scan Forms
Sorting by Your Chosen Fields
Selecting this option displays a lookup window. Choose a field to sort by, and then click
Select.
NOTE:
For the sake of this example, let’s assume you selected the Homeroom field.
The How to Sort window appears.
The “ALL CATEGORIES” choice will cause entry forms to be printed for all
homerooms. In other words, all of the entry forms for the students in your first
homeroom will be printed alphabetically followed by all of the entry forms for the
students in your next homeroom.
The “ONE CATEGORY” option will allow you to enter a specific homeroom and only
entry forms for those students will be printed. Note that the category must be entered
EXACTLY as at has been entered for each student. Watch the case of your letters.
If you print scanner forms sorted by a field, that field will be printed on each form. For
example, if you print them sorted by homeroom, each form will contain the student's
homeroom printed at the top. Moreover, all of the forms for the students in each
homeroom will be printed together.
A-6
Report Cards Manual
B
Scan Students' Schedules
Introduction/Main Menu . . . . . . . . . . . .
The Actual Scanning Of The
Request Forms. . . . . . . . . . . . . . . . .
Scanner Error. . . . . . . . . . . . . . . . . .
STUDENT NUMBER ERROR . . . . .
Resolving Errors. . . . . . . . . . . . . . . .
B-2
B-2
B-3
B-4
B-4
Report Cards Manual
B-1
Chapter B
S c a n St u d e n t s ' S c h e d u l e s
Introduction/Main Menu
Introduction/Main Menu
This program may be used to scan course requests into the computer for SCHEDULING
PLUS or to scan students' schedules into the computer for those not using
SCHEDULING PLUS. This sections will explain the scanning of schedules. If you are
scanning course requests, see the sections explaining the ENTER REQUESTS program
in the SCHEDULING PLUS manual.
In order to use this program to enter students' schedules into the computer, place a check
in the box labeled Scan Sections.
All scanner forms must be properly filled out according to the following guidelines:
The top of the form is a work area where students may optionally enter each course
name, its number and section. These course master numbers and sections must then be
bubbled in at the bottom of the form. The course (class) number and section should be
entered at the top of a rectangle and the appropriate bubbles below it filled in. Leading
zeroes should be entered and filled in. For example, if a student is taking course 059/01,
under class number for rectangle #1, 059 should be entered and next to it 01 should be
entered as the section. Then for the course number, the zero bubble under the 0 should
be darkened, the 5 bubble under the five should be darkened and the 9 bubble under the
9 should be darkened. Similarly, for the section, the 0 bubble under the zero should be
filled in and the 1 bubble under the one should be filled in.
If more than one bubble in a column is darkened or if any columns are left blank, the
computer will treat the entry as an error.
When the computer comes to the first completely blank rectangle, it will stop reading
the form. Consequently, do not accidentally leave a blank rectangle between two
rectangles containing requests.
A number two pencil must be used and stray marks should be avoided.
The upper left hand corner of the scanner entry window displays the scanner port. Some
computers have two serial ports. One is called PORT 1 and the other is called PORT 2.
If you have a serial printer plugged into port 1 you will have to use port 2 for your
scanner. Simply select Option #2 and press {RETURN} to toggle the scanner port from
1 to 2. The computer will remember this setting next time this program is used. Note that
most printers are PARALLEL printers and do not use the serial port.
The Actual Scanning Of The Request Forms
Before choosing Option #1 from the main window, CONTINUE, your scanner must be
on and the first stack of 50 scan forms should be in the automatic feeder. The scan forms
MUST be inserted so that the bubbles are facing up and the black lines on the side of the
forms are closest to the front of the scanner. The order in which the forms are scanned
does not matter. Grade levels may be mixed.
B-2
Report Cards Manual
S c a n St u d e n t s ' S c h e d u l e s
The Actual Scanning Of The Request Forms
If a student has at least one request with a section in their transcript, a form may not be
scanned for that student. In other words, to re-scan a form for a student, that student must
be unscheduled or dropped from all of their courses using the View/Change/Add/Drop
program.
The printout obtained during the scanning process will inform you if a form has not been
scanned for a student.
After selecting Option #1, CONTINUE, the following message will appear on the
window:
IF THE READY LIGHT ON THE SCANNER IS OFF, PRESS THE START
BUTTON
PRESS {ESC} TO ABORT SCANNING AT ANYTIME
If nothing is happening, it is probably because the READY light on the scanner is off.
Simply press the START button on the scanner to turn it on and start the forms through
the scanner.
At anytime, pressing the {ESCAPE} key on the computer will halt the scanner and
return you to the main window from where you may later choose to CONTINUE and
resume scanning exactly where you left off. If you halt the scanner by pressing the
{ESCAPE} key, you may have to re-scan the last form that passed through the scanner.
You may also temporarily halt the scanner by pressing the START button on the scanner
which will turn the READY light off if it is already on.
When the automatic feeder is empty, the ready light on the scanner will go off and the
computer will pause as it waits for more data from the scanner. Place the next stack of
50 forms in the scanner and press the START button on the scanner to resume the
scanning process. There is no need to touch anything on the computer during the process
of refilling the automatic feeder.
If the automatic feeder is empty and you do not have any more forms to scan, press the
{ESC} key to return to the main window from where the program may be ended.
There are three types of errors that may occur:
• Scanner Errors
• Student Number Error
• Resolving Error
Scanner Error
If there is a scanner error, the scanner stops and the scanner's display flashes ERROR.
The computer does not know that there has been an error because it is patiently waiting
for data to arrive from the scanner. The most common scanner errors are caused by
forms being entered backwards, paper jams or from a dirty read head. If a scanner error
occurs, fix the problem, reset the forms in the automatic feeder if necessary, and press
the START button on the scanner to resume the scanning process.
Report Cards Manual
B-3
Chapter B
S c a n St u d e n t s ' S c h e d u l e s
The Actual Scanning Of The Request Forms
STUDENT NUMBER ERROR
After a form has been successfully scanned, the scanner sends the data from that form
to the computer. If you have inserted the wrong type of form, if the data received by the
computer is garbled, or if the computer can't read the student number information from
the form, the computer will buzz and inform you of the problem. You will be instructed
to remove the last scan form that passed through the scanner from the collection bin and
then press the G key on the computer to continue the scanning process. If the sheet that
caused the problem is a proper form, it may later be re-scanned with the next batch of
forms.
A STUDENT NUMBER error may result from the printer ribbon not being dark enough
when the student numbers were pre-printed. Alternately, the student number marks may
not be in the center of the bubbles. The forms may be able to be successfully scanned if
you darken these marks with a #2 pencil.
(When a student number error occurs, the computer stops the scanning process and
instructs you to remove the last form because it can't identify the form in order to later
tell you which forms were bad.)
Resolving Errors
Once the computer has successfully received the data from the scanner and has
identified the student from the student number, it then tries to make sense of the bubbled
information on the form. This is called the resolving process. If there are any invalid
entries, it prints them on the printer as error messages. When the computer finds the first
error on a form, it stops the resolving process, prints the error on the printer and goes to
the next form. After all of the forms have been scanned, you should pull the forms with
errors, correct the errors and re-scan the form. If there are no errors, the printer will
record that the form was successfully scanned.
Possible errors are:
• ILLEGAL MULTIPLE MARKS:
Two or more bubbles in the same column have been filled in. You will be told which
course or section contains the illegal multiple marks.
• REQUEST #1 IS BLANK:
The computer stops reading courses when it comes to the first blank course. If course #1
is blank, it has not read any courses.
• ILLEGAL COURSE NUMBER:
A course number that does not exist has been requested.
• ILLEGAL SECTION NUMBER:
A section number that does not exist has been requested.
• BLANK DIGIT:
B-4
Report Cards Manual
S c a n St u d e n t s ' S c h e d u l e s
The Actual Scanning Of The Request Forms
You will be told which course or section has a blank column. If a student has course 59
they should bubble in 059 and not just 59.
• STUDENT HAS AT LEAST ONE COURSE WITH A SECTION:
The student has already been scheduled into at least one section. This student must be
un-scheduled before his schedule can be re-scanned. Use the ADD & DROP portion of
the View/Change/Add/Drop program to unschedule students.
Some errors cause the entire form to be skipped while other errors cause just one course
and section to be ignored with the rest tabulated. The above errors cause the entire form
to be skipped. When they are corrected, the form may be re-scanned.
Other errors will cause just one or more courses to be skipped. These include duplicate
requests and requests for sections that are full with 50 students. In other words, if a
student requests the same course and section number twice, the second request will be
ignored and the rest of the student's requests will be tabulated to the disk. The printout
produced as the scanning takes place will clearly list each type of error and inform you
if each form has been tabulated.
Remember, once a student has a section in their schedule, their forms may not be rescanned. Any changes must either be made manually or the student may be quickly
unscheduled with the View/Change/Add/Drop program and then their form may be rescanned.
Report Cards Manual
B-5
Chapter B
S c a n St u d e n t s ' S c h e d u l e s
The Actual Scanning Of The Request Forms
B-6
Report Cards Manual
C
Transfer Credits & GPA
Introduction . . . . . . . . . . . . . . . . . . . . . C-2
How to Archive Grades . . . . . . . . . . . . C-2
Specifications. . . . . . . . . . . . . . . . . . . . C-4
GPA WARNING:. . . . . . . . . . . . . . . . C-5
Main Menu . . . . . . . . . . . . . . . . . . . . . . C-5
BEGIN TRANSFER . . . . . . . . . . . . . C-6
INDIVIDUAL STUDENT OVERRIDE C-6
Report Cards Manual
C-1
Chapter C
Tr a n s f e r C r e d i t s & G PA
Introduction
Introduction
Transfer credits and GPA information from the current school year to the next school
year.
NOTE:
This process should be used every year by every school.
It is only necessary to use this program if you are using Report Cards Plus AND you
started the scheduling process before the end of the previous school year AND the
previous school year has ended.
For example, assume that it is the end of June and the 2004-05 school year has just
ended. A few months ago you created a 2005-06 directory and have been using it to
schedule for the 2005-06 school year. However, you have done the following in the
2004-05 directory:
Updated students' career credits and GPA information.
Archived students grades into their archival files.
This program will be used to transfer these report card information from the 2004-05
directory to the 2005-06 directory. Once this information has been transferred, it will no
longer be necessary to use the 2004-05 directory. It can either be deleted from your hard
drive to free up space or it can remain so that it can be used in the future for such
purposes as printing the transcripts of graduating seniors who are not in the 2005-06
directory or looking up student's exact attendance records.
How to Archive Grades
The Transfer Credits & GPA feature of Report Cards Plus can archive grades in
preparation for printing transcripts. You do not have to perform these steps immediately
after installing Report Cards Plus; however, when you are ready to archive grades, you
should follow these instructions carefully.
NOTE:
The Archive program should NOT be used to archive students’ grades. The process of
archiving grades is now performed using the Transfer Credits & GPA program. Using the
Archive program in conjunction with the Transfer Credits & GPA program will result in
inaccurate transcripts. Although the Archive program is still available, it should only be
used in special circumstances under the recommendation of Technical Support.
Students’ courses and grades are stored in the report cards files for the current year.
When creating a new school year, the Beginning program creates an exact copy of the
previous year until you run the Beginning program. Running the Beginning program
promotes students up one grade level and deletes the courses and grades from the
previous year. See the Data Base Plus manual for more information on the Beginning
program.
The Beginning program can erase students' current courses and grades from the report
card files, but it does not erase their total career credits, quality points, and weight. In
other words, these totals will be updated at the end of each year, and will stay in
students’ report card files as they are promoted to the next grade level.
C-2
Report Cards Manual
Tr a n s f e r C r e d i t s & G PA
How to Archive Grades
After promoting students in the new year, use the Transfer Credits and GPA program
to copy students' courses and grades from the report card files of the previous year to the
archival files of the new year, from where they may be viewed on the window or printed
on college transcripts. If you do not use the Transfer Credits and GPA program at the
end of each year, previous courses and grades taken by your students will be stored only
in previous school years.
The following example demonstrates the archival process for a new 11th grade student.
When using the Transfer Credits & GPAs program, his or her report card record for
grade 10 (stored in the previous year) is copied into Archival year -1 of the current year.
The courses and grades for this student’s 9th grade year (stored in archival year -1 of the
previous year) are copied to year -2 of the new school year.
2002-03 School Year
Year -1
Year 0
Grade 9 Courses
Grade 10 Courses
(Archival File)
2003-04 School Year
Year -2
Grade 9 Courses
Year -1
Grade 10 Courses
(Report Card File)
Year 0
Grade 11 Courses
Report Cards Manual
C-3
Chapter C
Tr a n s f e r C r e d i t s & G PA
Specifications
Specifications
The specification window is:
From the specification window you will enter the source and destination directories as
well as the source and destination starting and ending grade levels. The starting and
ending grade levels in each directory MUST encompass the same number of grade
levels. In the above example, the data for grade 9 student #1 in the 2001-02 directory
will be transferred to grade 10 student #1 in the destination directory.
C-4
Report Cards Manual
Tr a n s f e r C r e d i t s & G PA
Main Menu
GPA WARNING:
Before using this program, students' career GPA's must have been updated in the
SOURCE directory with the Statistical Reports program. This program will then
transfer these updated GPA's from the SOURCE directory to the DESTINATION
directory. Only continue if you have updated the SOURCE directory's GPA's.
Main Menu
Report Cards Manual
C-5
Chapter C
Tr a n s f e r C r e d i t s & G PA
Main Menu
BEGIN TRANSFER
Select option #1 to begin the transfer from the source to the destination directory. A
transfer will NOT be done unless the names are identical. In other words, if source
directory grade 9 student #1 is not the same name as the destination directory grade 10
student #1, the transfer will not be done. This could have happened if the grade 10
student #1 had been withdrawn with a new student occupying that number. All transfers
NOT done will be printed on the printer.
INDIVIDUAL STUDENT OVERRIDE
If you have students that have stayed back or had their names changed, their data will
not be transferred with option #1 because the names in the corresponding ID numbers
will not match. Instead, you may use this option to specify a source grade level and ID
number and a destination grade level and ID number. When you choose this option, you
will see the following window:
To choose a student, either type in his or her number, or press {F6:LOOKUP} to pop up
an alphabetical list of all of the students in your school. The data will then be transferred
regardless of what names occupy these ID numbers. Consequently, you must be careful
to enter the proper information.
INSPECT/CHANGE SPECIFICATIONS
This option returns you to the previous window.
C-6
Report Cards Manual
D
Skills and Concepts
Introduction . . . . . . . . . . . . . . . . . . . . D-2
Initial Setup . . . . . . . . . . . . . . . . . . . . D-2
Entering Customized Lists of Skills
and Concepts. . . . . . . . . . . . . . . . D-4
Link Skills and Concepts
to Courses . . . . . . . . . . . . . . . . . . D-6
Enter Skills Grades Manually . . . . . . D-9
Interfacing with GradeQuick . . . . . . . D-10
Preparing Administrator’s Plus . . . D-10
Sending Skills to GradeQuick . . . . D-12
Preparing GradeQuick . . . . . . . . . . D-12
Setting up Skills . . . . . . . . . . . . . . . D-13
Sample Skill-based Report
Card Template . . . . . . . . . . . . . . . .D-42
Linking Skills to Standards . . . . . . . . . . . . D-14
Skills Assessment Scale . . . . . . . . . . . . . D-15
Date Completed . . . . . . . . . . . . . . . . . . . . D-17
Time Spent . . . . . . . . . . . . . . . . . . . . . . . . D-17
Descriptions/Notes . . . . . . . . . . . . . . . . . . D-17
Entering Skills Grades . . . . . . . . . . D-17
Send Skills Grades to
Administrator’s Plus . . . . . . . . . . . D-18
Skills-based Report Cards. . . . . . . . . D-20
Codes to Create Skill and
Nonskill-based Report Cards. . . . . D-21
Universal Codes . . . . . . . . . . . . . . . . D-21
New Box Codes. . . . . . . . . . . . . . . . . D-25
Attendance Box . . . . . . . . . . . . . . . D-25
Draw Box . . . . . . . . . . . . . . . . . . . . D-26
Course Table Box . . . . . . . . . . . . . D-27
Advanced Specification Box . . . . . D-28
GPA Box . . . . . . . . . . . . . . . . . . . . D-30
Honor Roll Box. . . . . . . . . . . . . . . . D-30
Print Image . . . . . . . . . . . . . . . . . . D-31
Box Code Definitions. . . . . . . . . . . . . D-32
Report Cards Manual
D-1
Chapter D
Skills and Concepts
Introduction
Introduction
Administrator’s Plus’s Skills-based Report Card module allows you to assess students
on curriculum Skills and Concepts. Skills (also referred to as Standards) are defined as
learning objectives needed to meet the curriculum requirements for a particular course.
For example, skills for Reading 100 could include “Progressing toward reading 25
grade appropriate books”, and “Shows evidence of understanding his/her reading in
writing/discussion”. Students can be assessed on each skill using letter or number
grades, or any symbol defined in your Administrator’s Plus grade table (located inside
the Customize RC program). Concepts are defined as the specific topics covered in a
course section. Students are not assessed on concepts. However, concepts can be printed
on report cards to show parents the topics covered during each marking period of a
course. Concepts are associated with course sections because the concepts for a
particular master course may vary from teacher-to-teacher. For example, the course
Reading could be linked to the concepts: “Re-telling” for 1st quarter, and “Connecting
text to prior knowledge” for 2nd quarter.
In Administrator’s Plus, your school can create customized lists of skills and concepts.
These skills and concepts will be linked to the appropriate master courses, and sections
respectively. Grades for course skills can be entered manually using the Enter Grades
or View/Change/Add/Drop programs. The Skills-based Report Card module also
interfaces with GradeQuick’s Skills feature, so skills grades can be imported at the same
time as conventional grades.
New “box codes” in the Report Card Report Writer make it easy to produce
attractive Skills-based report cards showing skills grades and course concepts. As with
all reports, you can customize your skills-based report card to meet the particular needs
and preferences of your school.
Initial Setup
Before you begin setting up skills and concepts for your school, you must verify that
your maximum skills per student setting is sufficient to accommodate all skills in a
student’s record. This setting is found in Data Base PlusÖNew FilesÖSpecifications
(Page 2). If your students may have more than the default of 100 skills per student then
this value must be increased. You will use the Customize RC program in Report Cards
Plus to enter and store your customized lists of skills and concepts. The skills and
concepts you define will later be linked to specific courses and sections so that they can
appear in students transcript records.
D-2
Report Cards Manual
Skills and Concepts
Initial Setup
1 In the Report Cards Plus module, select Customize RC.
2 From the Customize RC menu, select Skills and Concepts.
The View/Edit or Print Skills window appears:
Click the Skills tab to enter, view, print or edit your list of skills. Each skill consists of
a skills code, a group heading and a skills description. The skill code, (up to 4
characters), is an abbreviated name used to sort the list of skills in lookup windows. For
example, if all skills associated with Art courses are given the skills codes: AR1, AR2,
AR3 etc., they can be grouped together in the skills lookup menus. Group headings b
Report Cards Manual
D-3
Chapter D
Skills and Concepts
Initial Setup
create headings for each category of skills on the printed report card. They can also be
used to sort the skills list in lookup windows. The skills description c is the text that
actually prints on the report card (see below).
b
c
Entering Customized Lists of Skills and Concepts
To Enter Customized Lists of Skills and Concepts:
1 To enter a new skill, press or click F2: ADD. The next unused record number
appears.
2 Enter a code, group heading (optional) and description up to 256
characters.
3 Press or click F10: Accept to save.
D-4
Report Cards Manual
Skills and Concepts
Initial Setup
4 To print the entire list of skills, press or click F9: Print. The following sample
report lists each skill, including the description, code, group heading and
record number.
5 To enter your list of concepts, click the Concepts tab at the top of the window.
6 Press F2 Add and the next unused record number appears.
7 Enter a description for each concept (up to 100 characters).
8 Press F10: Accept to save.
9 You can print the entire list of concepts by pressing F9: Print.
Report Cards Manual
D-5
Chapter D
Skills and Concepts
Initial Setup
Link Skills and Concepts to Courses
You will use the Enter Courses program to link skills and concepts to courses. You
may link up to 20 skills to each master course and up to 10 concepts per marking period
for each section.
To Link Skills and Concepts to Course:
1 Navigate to the Enter Courses Program and choose View/Edit Courses &
Sections.
2 To link a skill to a master course, call up the course and click Skills.
D-6
Report Cards Manual
Skills and Concepts
Initial Setup
The Assign Skills to Course window appears:
3 Highlight the desired skill in the Available Skills window on the left, and then
click the right arrow button.
The skill moves to the Selected Skills window on the right. To deselect a skill, highlight
it in the Selected Skills window on the right, and then click the left arrow button.
NOTE:
You can make multiple selections all at once by holding down the Ctrl or Shift keys while
clicking a selection. To highlight a block of skills, hold down the Shift key and click the first
and last skill to highlight. To highlight multiple skills not listed in order, hold down the Ctrl
key and click once on each skill.
4 To copy all skills from one course to another, after linking the desired skills
to the selected course, click the Copy Skills button. A lookup window of all
master courses appears. When you select a course from the lookup, all
linked skills will be copied to that course.
NOTE:
All currently linked skills for the target course will be replaced by the skills for the selected
course.
5 Press F10: Accept to save.
6 To link concepts to course sections, select a section, and click the Concepts
button.
Report Cards Manual
D-7
Chapter D
Skills and Concepts
Initial Setup
7 In the Concepts for Section window, enter up to ten concepts for each
marking period.
8 To enter a concept, click the desired marking period and type in the
concept’s record number. If you do not know the record number, click F6:
Lookup.
9 After entering each concept for the selected course section, click F10:
Accept to save.
NOTE:
D-8
A message appears asking if you wish to rebuild the skills file. If you have just linked skills
or concepts to courses that are already in student schedules, it is important that you rebuild
the skills file. Until this step is done, you will not be able to view, edit or print the skills and
concepts for students.
Report Cards Manual
Skills and Concepts
Enter Skills Grades Manually
Enter Skills Grades Manually
Skills grades are recorded using the Enter Grades or View/Change/Add/Drop
programs. For instructions on importing skills grades from GradeQuick, “Interfacing
with GradeQuick” on page D-10.
NOTE:
Also see “Entering Grades Or Skills Manually” on page 4-10 for another way to enter skills
grades.
To access the View Skills window from the Enter Grades Manual Entry window:
1 Call up the course and highlight a student name.
2 Click the Skills button in the upper right corner of the window.
To access the View Skills window from View/Change/Add/Drop:
1 Call up a student and highlight a course in his or her schedule.
2 Click the Skills button in the lower right corner of the View/Change/Add/Drop
window.
The View Skills window displays each skill linked to the selected course in the students’
record. The report card columns are listed across the top of the window in the same order
as the windows for View/Change/Add/Drop and Enter Grades. Highlight any skill
to view the code, heading, and full description at the top of the window. The selected
student’s name appears in the upper left corner. To scroll to the next or previous student,
use the F4: Prev or F5: Next function keys. The course and section information, along
Report Cards Manual
D-9
Chapter D
Skills and Concepts
Interfacing with GradeQuick
with each linked skill are listed in the left hand columns. To view all skills for courses
in a students’ schedule, access the View Skills window from the
View/Change/Add/Drop program and press F7: All.
You may print all of the information shown in the View Skills window, by pressing F9:
Print.
• To enter skills grades, highlight the desired skill, and then press F3: Edit. Use the
Tab or Enter keys to select the appropriate marking period. Type any grade defined
in the grade table, and then press F10: Accept.
• To edit a skills grade, highlight the desired skill, and then press F3: Edit. Use the
Tab or Enter keys to highlight the grade to change. Type a new grade, and then press
F10: Accept to save and exit.
Interfacing with GradeQuick
The Skills-based Report Cards module interfaces with GradeQuick’s Skills feature, so
teachers can send both skills grades and conventional grades to Administrator’s Plus.
The skills linked to each course are first exported to GradeQuick so that teachers can
record grades for the skills set up in Administrator’s Plus. The grades teachers enter for
skills are exported along with the conventional grades and comments stored in the grade
book.
NOTE:
This section is limited the skill components of the Administrator’s Plus/GradeQuick
Interface. For complete instructions on setting up the interface, refer to the Administrator’s
Plus/GradeQuick Deluxe Interface Guide.
Preparing Administrator’s Plus
There are certain steps to take to prepare Administrator’s Plus before skills work
seamlessly with GradeQuick.
To Prepare Administrator’s Plus:
1 Log into Administrator’s Plus as the Supervisor and click
FileÖCustomizeÖS.O.S. Interface Options. The S.O.S. Interface Options
window appears.
2 Click the Specifications button under the heading “GradeQuick (Grade Book
Software)”.
D-10
Report Cards Manual
Skills and Concepts
Interfacing with GradeQuick
The Specifications: GradeQuick Options window appears.
3 Make sure that Specification 3) “Location of the Skills to GQ folder” is set to
the correct path of the shared directory designated to store skill files. By
default, this is the GQWin\SkillsFromAP folder.
4 Make sure that Specification B) “Send Skill File Names (GQ V7 & Later
Only)” is set to YES.
Report Cards Manual D-11
Chapter D
Skills and Concepts
Interfacing with GradeQuick
Sending Skills to GradeQuick
From the Enter Courses menu, select Send Skills to GradeQuick. The skills
associated with each master course are exported to the shared directory designated to
store skill files. By default this is the GQWin\SkillsFromAP folder.
Preparing GradeQuick
There are certain steps to take to prepare GradeQuick before skills work seamlessly with
Administrator’s Plus.
To Prepare GradeQuick:
1 Log into GradeQuick as the “AdminW” and open your master grade book,
which is usually either School.gbk or Master.gbk.
2 Click OptionsÖSystem Information.
D-12
Report Cards Manual
Skills and Concepts
Interfacing with GradeQuick
The Edit System Information window appears.
3 Make sure that the “Skill Import Directory” indicates the correct path of the
shared directory designated to store skill files.
Setting up Skills
When teachers open a new or existing grade book for a course with linked skills. They
a appears message stating that the new skill fields have imported. To view the skills
linked to the master course in Administrator’s Plus, click the Edit Skills button on the
GradeQuick toolbar.
Report Cards Manual
D-13
Chapter D
Skills and Concepts
Interfacing with GradeQuick
Linking Skills to Standards
Use the following procedure to both create new standards and link skills to standards.
Skills can be categorized by associating them with a Standard. By default, all skills are
associated with the “General” standard. If you do not want to associate skills with a
standard, leave it linked to the “General” standard.
To Link Skills to Standards:
1 To create new standards, click the Standards button.
The General standard is the default and cannot be deleted or changed.
2 To add a new standard, click Add.
3 Type a name and description for the new standard: Enter additional
information about the standard into the Teacher Notes text box (optional).
4 Click OK to save the standard and return to the Edit Skills window.
5 To associate skills with a standard, select the desired standard from the
corresponding cell’s drop-down list.
NOTE:
D-14
You can display only those skills associated with a particular standard, using the Skills for
Standards drop-down list.
Report Cards Manual
Skills and Concepts
Interfacing with GradeQuick
Skills Assessment Scale
GradeQuick allows you to set up custom assessment scales to grade students specifically
on course skills. Your assessment scale can include any letter or number grade defined
in your Administrator’s Plus grade table (up to 3 characters). In addition, you can
include a check mark in the assessment scale to import into Administrator’s Plus.
• To create a new assessment scale, click the Assessment Scales button on the toolbar.
To add a new assessment scale:
1 Click the Add Scale button; To edit an existing scale, highlight the desired
scale and then click the Edit Selected Scale button.
Report Cards Manual
D-15
Chapter D
Skills and Concepts
Interfacing with GradeQuick
2 To create an assessment scale, enter a Scale Name and the grades
included in the scale in order from highest to lowest.
• You can optionally set up a default assessment value. This should be the most
common assessment value as it will be automatically entered for all students assigned
a skill linked to the assessment scale. If you do not wish to set a default value, choose
None.
• You can optionally select the skill assessment value that equals mastery of a skill.
This setting is only for information purposes
3 Use the Scale Type radio buttons to either restrict the entry of skills grades
to those that are defined in the assessment scale or to allow entries that are
not in the assessment scale.
4 Click OK.
5 To associate an assessment scale with a skill, select it from the drop-down
list.
D-16
Report Cards Manual
Skills and Concepts
Interfacing with GradeQuick
Date Completed
To track which skills you have completed teaching, select the date completed from the
drop-down calendar.
Time Spent
Once you have completed teaching a skill, you can track how much time was spent.
Click the time spent cell to enter the number of hours/minutes.
Descriptions/Notes
You can record additional information about the skill by creating descriptions and/or
notes. Click the View Descriptions Notes cell to enter a description or notes about the
skill.
This completes the skills setup in GradeQuick. To exit the Edit Skills Information
window click the Gradebook Spreadsheet button on the toolbar.
Entering Skills Grades
To enter grades for skills, from the Grade Book Spreadsheet, click the Skills Assessment
button on the upper toolbar. The appearance of the Skills Assessment window can be
changed using the drop-down lists.
To enter skills grades for a particular term:
1 Select By Term from the drop-down list in the center of the toolbar, and then
select the appropriate term from the drop-down list on the right.
Report Cards Manual
D-17
Chapter D
Skills and Concepts
Interfacing with GradeQuick
2 To enter skills grades, click the cell corresponding to the desired skill,
student and marking period. Select the desired grade from the drop-down
list. This list is determined by the assessment scale linked to the skill.
3 Click Gradebook Spreadsheet to save your changes
4 Exit the Skills Assessment window.
Send Skills Grades to Administrator’s Plus
Use the following procedure to send skills grades to Administrator’s Plus.
To Send Skills Grades to Administrator’s Plus:
1 From the Gradebook Spreadsheet, click File Ö Send Ö Send to
Administrator’s Plus.
NOTE:
The actual text of the Send menu item “Send to Administrator’s Plus” is determined by the
Description that has been associated with the Rediker.etp in SiteManager’s Export Manager.
For more information refer to the Site Licence Notebook.
The default export path and file name appears.
2 Verify that this information is correct, and then click OK.
3 In Administrator’s Plus, navigate to Report Cards Plus ÖEnter Grades.
D-18
Report Cards Manual
Skills and Concepts
Interfacing with GradeQuick
4 From the Enter Grades menu, click Import from GradeQuick.
5 Use the Import from GradeQuick specifications to select the import path
and the appropriate marking periods to import. After selecting the desired
specifications, click Done.
6 Using the Import from GradeQuick menu (shown below), choose to import
grades for All Sections, Individual Sections, or a range of grade levels
The skills grades imported from GradeQuick can be viewed through either the Enter
Grades Manual Entry window, or View/Change/Add/Drop. See D-8 for a
description of the View Skills window.
Report Cards Manual
D-19
Chapter D
Skills and Concepts
Skills-based Report Cards
Skills-based Report Cards
The Report Card Report Writer can produce Skills-based report cards that include
conventional grades, skills grades and course concepts. As with any report writer report,
Skills-based report cards can be customized to meet the specific needs of your school.
Only reports that include skills report writer codes will show information for course
skills and concepts. Default Skills-based report card templates can be downloaded from
the report template page on our web site:
http://www.administrators-plus.org/Reports/Reports.htm
If you wish to design your own custom Skills-based reports, refer to the supplement
“Codes to Create Skill and Nonskill-based Report Cards”.
D-20
Report Cards Manual
Skills and Concepts
Codes to Create Skill and Nonskill-based Report Cards
Codes to Create Skill and Nonskill-based Report Cards
Universal Codes
~CNXN:#.#~
This code centers school information on report headers. You may view and edit school
information from the Customize Data Base program, or by choosing File-CustomizeSchool Information from the upper toolbar.
The #.# after the colon is the number of inches in which to center the entry. On a normal
8 ¾ x 11 inch piece of paper, with ¾ inch margins on either side, # would be replaced
with 7.5.
The X may be replaced with an N, U, S, C, or P
N:
U:
S:
C:
P:
Centers Name of school
Underlines the school name
Centers school’s Street address
Centers City, State & Zip of school on a single line
Centers the Phone # of school
For example: ~CNNN:7.5~ would center your school name on a standard piece of
paper.
~HLINE:XY~
This header line report writer code prints a solid line from margin to margin. The X
variable indicates the width of the line, with 1=thin, 2=medium and 3-thick. The Y
variable indicates the position of the line, with 1=top, 2=middle and 3-bottom. For
example, to print a solid bold line running from one side of the paper to the other,
dividing the heading of a report from the report body, place an ~HLINE:31~ code on
the line directly above the header end code.
~ULINE:X:Y~
This code prints an underline starting at X (in inches) and ending at Y on a line of a
report. This code is meant to be used on a report writer line with other text and codes,
including other ~ULINE~ codes (i.e. you may want to underline more than one item on
a line).
~VLINE:Y1:Y2~
Prints a Vertical Line starting from the Y1 coordinate, and ending at the Y2 coordinate,
“Y” being the number of inches from the top margin. Use a tab code in conjunction
with the vertical line code to affect the X coordinate.
For example,
~T5.0~~VLINE:1.0:4.0~ will print a three inch vertical line starting 1 inch from the top
margin, and moved 5 inches from the left-hand margin.
~ENDPAGE~
This code tells the program where to start a new page.Whenever the report writer encounters an ~ENDPAGE~ code, the report will move to the beginning of the next page.
~ENDPAGE~ codes are commonly used in Search Headers so that each found search
Report Cards Manual
D-21
Chapter D
Skills and Concepts
Universal Codes
category starts on a new page.
~REM~
Ignores all the code and text in a line. The ~REM~ code must be the FIRST code in the
line.
~LPI:X~
The Lines per Inch code determines the number of lines per vertical inch. This code
was added to the report writer so that certain portions of a report could have a fixed
Lines Per Inch setting, regardless of the font height. As a result, users have a wider
range of font options to choose from when generating reports on pre-printed forms.
Essentially, the Lines Per Inch code causes large print to cram together and smaller print
to expand in order to adhere to the lines per inch setting. X represents the lines per inch
in character spaces. It may be replaced with a 1 through 10 with 10 being the most
crammed. When there is no Lines Per Inch code present, or when the code reads
~LPI:0~, the lines per inch is determined by the size of the font.
~PGSTART~
~PGEND~All lines between the ~PGSTART~ and ~PGEND~ codes make up a Page Header. The
Page Header prints at the top of every page of a report. Page Headers are used on lists
that DO NOT require a search. Often times, Page Headers contain page numbers.
~PGNUM:X~Resets the page number. The page number code (~PG~) is placed in the header or footer of a report, and prints the page number of each page, starting with #1. The Page
Number Reset code allows you to start numbering pages at a number other than 1. Replace X with the number from which you will start counting the page numbers; that is,
the number that will print on the first page of the report.
~PRINTPAGEHEADER~This code causes the page header to print on the report. The code is mandatory for the
Page Header to print on the page. It usually appears after the ~PGNUM:X~ code in the
report.
~WRAPON~
~WRAPOFF~
Word Wrap will be performed on all the lines of text between the ~WRAPON~ and
~WRAPOFF~ codes. You may use the word wrap codes as many times as necessary in
a report. Word Wrap is generally used in letters.
Because the text in letters oftentimes contain variables that get replaced with entries
from the data base (“Your son ~FN~”), the length of a line containing the variable may
get longer or shorter depending on the length of the data base entry replacing it. Without
the word wrap codes, any line exceeding the margin settings will be truncated. On the
other hand, if the line is very short, it will print as is and look awkward. Using the word
wrap codes, words that go beyond the right margin will scroll down to the next line,
D-22
Report Cards Manual
Skills and Concepts
Universal Codes
with the rest of the lines below it being adjusted accordingly. Similarly, if the line does
not fill the available space, words from the line below will move up to fill the gap. In
order to maintain spacing between the first word in the line and the last word in the line
above it, there is one space at the beginning of every line inside the word wrap codes.
If the end of a line ends in the middle of a word, do not leave a space so that both halves
of the word will be joined. When using the word wrap codes, leave a blank line between
paragraphs. Also, Tab codes should never be used inside of word wrap codes.
Report Cards Manual
D-23
Chapter D
Skills and Concepts
Universal Codes
~UNIVERS~
Identifies a Search Header as a Universal Header. A ~UNIVERS~ Search Header acts
as a grand header when a search and sort is not being performed. This code enables reports with Search Headers (~SHSTART~ ~SHEND~) to be used both when searching
on a category, and when printing reports for ALL STUDENTS ALPHABETICALLY
or INDIVIDUAL STUDENTS. The ~UNIVERS~ code must be the first code in the
Search Header.
CODES 4 OR LESS CHARACTERS IN LENGTH THAT MAY SHARE A LINE WITH OTHER
CODES:
~1~ thru ~160~
~N1~ thru ~N160~
~T#.#~
~L1~ thru ~L17~
~FN~
~MN~
~LN~
~GR~
~ID~
~UNID~
~DATE~
~DOB1~
~DOB6~
~PG~
~REM~
~HIS~
field)
~SEX~
SEX field)
~SX2~
field
~YEAR~
~YOG~
~SF~
~SC~
~SFC~
~ULINE:X:Y
~ULINE:3:5~
D-24
Report Cards Manual
:Data Base fields (1 through 160)
:Names of Data Base fields (1 through 160)
:Tab #.# inches to the right of the left margin
:School Information fields (1 through 17)
:Student’s First Name
:Student’s Middle Name
:Student’s Last Name
:Student’s Grade Level (2 digits)
:Student’s Record Number (3 digits)
:Student’s Unique ID number
:Current Date
:Date of birth in the format: MM/DD/YYYY
:Date of birth in the format: MMDDYY
:Print the current Page number
:Ignore all code and text in the next line
:Prints “his” or “her” (depending on entry in SEX
:Prints “son” or “daughter” (depending on entry in
:Prints “he” or “she” (depending on entry in SEX
:Current School Year Name
:Year of Graduation
:Search Field
:Search Category
:Search field(s) and criteria
:Underlines text starting at X, ending at Y (i.e.
Skills and Concepts
New Box Codes
New Box Codes
The following is a list of new box codes available only in version 3 of Administrator’s
Plus or higher. Box codes allow you to print report card components such as grades,
attendance and GPA value inside an attractive table. Each box code includes a list
specifications with which you can control the table’s parameters including the size of
rows and columns, borders, text alignment, and fonts for body and header text.
Attendance Box
This procedure creates a box for the number of absences, tardies, dismissals, days
present, and days of school by marking period, or, it can print using date ranges. Date
ranges are set in the Report Card Report Writer specifications. Marking periods are set
in the Calendar program.
~AttendanceBoxStart = #~
(Default= 1)
Print = Y or N
(Default= Y)
BoxWidth = Auto
RowHeaderWidth = #.##
(Default= 1)
ColumnWidth = Auto or #.##
(Default= Auto)
LeftBorderWidth = #.##
(Default= 0)
RightBorderWidth = #
(Default= 0)
TopBorderWidth = #
(Default= 0)
BottomBorderWidth = #
(Default= 0)
BoxHeight = Auto or #.##
(Default= Auto)
TitleHeight = #.##
(Default= 0.2)
ColumnHeaderHeight = #.##
(Default= 0.4)
RowHeight = #.##
(Default= 0.2)
PrintBorder = Y or N
(Default= Y)
TitleBorder = N or Y
(Default= N)
TitleHorizontalAlign = Left, Right,Center
(Default= Center)
ColumnContents = Qtr1,Qtr2,Qtr3,Qtr4,Qtr5,Qtr6,RCSpecRange,YTD,Total
TitleAndFont =(Blank) or (Text)
(Default Attendance Record)
ColumnHeadersAndFont
=
(DateQtr1,DateQtr2,DateQtr3,DateQtr4,DateQtr5,DateQtr6,
DateRCSpecRange,DateYTD,Total)
RowContentsAndFont = A,T,D,P,DOS,MEM
RowHeadersAndFont = A,T,D,P,DOS,MEM (fill in your own row headers i.e. Absences)
~AttendanceBoxEnd~
~PrintAttendanceBox = 1, Left=0, Top=0.5~
Report Cards Manual
D-25
Chapter D
Skills and Concepts
New Box Codes
Draw Box
The parameters below define how the draw box will appear on the report card. The draw
box is used to place text or blank boxes, such as checkoff boxes, on the report card. If
borderwidth is set to 0, the text is printed without a box.
~StartBoxDef = #~
(Default=1)
BoxWidth = #.##
(Default=1)
BoxHeight = #.##
(Default=0.25)
Align = L,R,C
(Default=L)
BorderWidth = #.##
(Default=0.01)
PrintBorder = Y or N
(Default=Y)
ContentAndFont1 =Line 1 (Text String)
~REM~ more content statements could be added if needed. ContentAndFontN =
<String>
where N is integer
~EndBoxDef~
~PrintBox = 1, Left = 0, Top = 0~
D-26
Report Cards Manual
Skills and Concepts
New Box Codes
Course Table Box
This box is used to print courses in a table and replaces the old course loop codes used
in Version 1 and Version 2. Note: This table is designed to print all courses but not the
skills associated with those courses. It can combine non-skill courses in one box and
use the Advanced Specifications Box codes on Page 6 to produce a course box with
skills. More than one Course Table Box can be used within a report.
~CourseTableSpecStart = #~
(Default=1)
PrintDescription = Y or N
(Default=N)
Year = 0 (Optional)
BoxWidth = Auto or #.##
(Default=Auto)
SubjectWidth = #.##
(Default=0.9)
CourseNumberWidth = #.##
(Default=0.45)
LevelWidth = #.##
(Default=0.4)
SectionWidth = #.##
(Default=0.3)
MinGradingColumnWidth = #.##
(Default=0.35)
CreditWidth = #.##
(Default=0.5)
TeacherWidth = #.##
(Default=1)
CommentWidth = #.##
(Default=2)
LeftBorderWidth = #
(Default=0)
RightBorderWidth = #
(Default=0)
TopBorderWidth = #
(Default=0)
BottomBorderWidth = #
(Default=0)
BoxHeight = Auto or #.##
(Default=Auto)
TitleHeight = #.##
(Default=0.2)
RowHeight = #.##
(Default=0.16)
CommentHeight = #.##
(Default=0.16)
NarrativeHeight = #.##
(Default=0.16)
PrintBorder = Y or N
(Default=Y)
TitleBorder = N or N
(Default=N)
TitleHorizontalAlign = Left,Right,Center
(Default=Center)
CourseNameHorizontalAlign = Left,Right,Center
(Default=Left)
VerticalBodyAlign = Left,Right,Center
(Default=Center)
PrintVerticalLines = Y or N
(Default=Y)
PrintLineAfterXCourses = #
(Default=0)
PrintWhichColumns = 1,2,3,4,5,6,7,8,9,10 (Select Columns you wish to appear on the
card.)
PrintColumnHeaderEveryCourse = N or Y
(Default=N)
PrintCommentTextWhere = Right1Column,Right2Column, Below (Default=Right1Column
PrintColumnAveragesAndFont = Y or N
(Default=Y)
TitleAndFont =(Text String)
(Default=Course Table)
PrintColumnHeaderAndFont = Y or N
(Default=Y)
PrintBodyAndFont = Y or N
(Default=Y)
PrintNarrativeAndFont = N or Y
(Default=N)
~CourseTableSpecEnd~
~PrintCourseTable = #, WhichCourses = (See Below**), Left = X, Top = Y~
Default is: ~PrintCourseTable = #, WhichCourses = All, Left = 0, Top = 0.5~
**WhichCourses can equal:
Skills, Nonskills, ALL, ALLSkillsFirst,ALLNonSkillsFirst
Course numbers separated by commas. 121,221,50,60
Range of Courses: 400-900, 200-300
Course numbers and range together: 121,400-500,600
Report Cards Manual
D-27
Chapter D
Skills and Concepts
New Box Codes
Advanced Specification Box
This box is used to print courses with skills & without skills within the same box on the
report card. More than one box can be used in designing where courses are to print.
~AdvancedSpecBox=#~
(Default=1)
(Defines the global specifications for the advanced box to include the course, comment,
concept, and narrative components.)
:GeneralSpecStart
~REM~INSERT ~REM~ BEFORE AutoCalcAll TO ENABLE INDIVIDUAL SPECS
AutoCalcAll
NumBoxAcross = #
(Default=2)
MaxBoxDown = Auto or #
(Default=Auto)
CellGapDown =#.##
(Default=0)
CellGapAcross = #.##
(Default=0)
TableGapDown = #.##
(Default=0.1)
TableGapAcross = #.##
(Default=0.2)
BoxWidth = Auto or #.##
(Default=Auto)
:GeneralSpecEnd (Determines the parameters of the course section of the advanced box.)
:CourseCellStart=1
Print = Y or N
PrintDescription = N or Y
CharPerColumn = 3 or 5
IncludeSkills = Y or N
PrintWhichColumns = 1,2,3,4,5,6,7,8,9
CellHeight = Auto or #.##
TitleHeight =#.##
DescriptionWidth = #.##
MinGradingColumnWidth = #.##
LeftBorderWidth = #
RightBorderWidth = #
TopBorderWidth = #
BottomBorderWidth = #
TitleHorizontalAlign = Left, Right,Center
SkillHeaderAlignment = Left, Right,Center
PrintBorder = Y or N
TitleBorder = N or Y
BlankLineBeforeHeader = N or Y
TitleAndFont =(Text String)
PrintCourseNameAndFont = Y or N
PrintTeacherAndFont = Y or N
PrintSkillHeaderAndFont = Y or N
PrintSkillsAndFont = Y or N
PrintColumnHeaderAndFont = Y or N
:CourseCellEnd
:CourseCellEnd
:CommentCellStart=#
Print = Y or N
CellHeight = Auto or #.##
LeftBorderWidth = #
RightBorderWidth = #
TopBorderwidth = #
BottomBorderWidth = #
TitleHorizontalAlign = Left, Right, Center
D-28
Report Cards Manual
(Default=Y)
(Default=N)
(Default=3)
(Default=Y)
(Select columns you wish to print)
(Default=Auto)
(Default=0.2)
(Default=2.25)
(Default=0.35)
(Default=0)
(Default=0)
(Default=0)
(Default=0)
(Default=Center)
(Default=Center)
(Default=Y)
(Default=N)
(Default=N)
(Default=Academic Record)
(Default=Y)
(Default=Y)
(Default=Y)
(Default=Y)
(Default=Y)
(Default=Y)
(Default=Auto)
(Default=0)
(Default=0)
(Default=0)
(Default=0)
(Default=Left)
Skills and Concepts
New Box Codes
PrintBorder = Y or N
(continued)
TitleBorder = N or Y
TitleAndFont =(Text String)
PrintBodyAndFont = Y or N
:CommentCellEnd
(Default=Y)
(Default=N)
(Default=Comments)
(Default=Y)
:ConceptsCellStart=#
Print = Y or N
CellHeight = Auto or #.##
LeftBorderWidth = #
RightBorderWidth = #
TopBorderWidth = #
BottomBorderWidth = #
TitleHorizontalAlign = Left, Right, Center
PrintBorder = Y or N
TitleBorder = N or Y
TitleAndFont =(Text String)
PrintBodyAndFont = Y or N
:ConceptsCellEnd
(Default=Y)
(Default=Auto)
(Default=0)
(Default=0)
(Default=0)
(Default=0)
(Default=Left)
(Default=Y)
(Default=N)
(Default=Concepts)
(Default=Y)
:NarrativeCellStart=#
Print = Y or N
WidthIfRight = #.##
CellHeight = Auto or #.##
LeftBorderWidth = #
RightBorderWidth = #
TopBorderWidth = #
BottomBorderWidth = #
TitleHorizontalAlign = Left, Right, Center
PrintBorder = Y or N
TitleBorder = N or Y
TitleAndFont =(Text String)
PrintBodyAndFont = Y or N
~AdvancedSpecEnd~
(Default=Y)
(Default=1)
(Default=Auto)
(Default=0)
(Default=0)
(Default=0)
(Default=0)
(Default=Left)
(Default=Y)
(Default=N)
(Default=Narratives)
(Default=Y)
~PrintAdvancedBox=#,WhichCourses=(See Below**),Left=X,Top=Y~
(Default is ~ PrintAdvancedBox=1,WhichCourses=AllLeft=0,Top=0.5~)
**WhichCourses can equal:
Skills, Nonskills, ALL, ALLSkillsFirst,ALLNonSkillsFirst
Course numbers separated by commas. 121,221,50,60
Range of Courses: 400-900, 200-300
Course numbers and range together: 121,400-500,600
Report Cards Manual
D-29
Chapter D
Skills and Concepts
New Box Codes
GPA Box
If you want to put a box containing GPA information on your report card or transcript,
use the codes below to define the box. Remember that in order for the GPA box to print,
the Report Card Report Writer Specification 1) “Print GPA Information?” must be set
to one of the following options: “Current GPA Data (Adjusted)”, “Current & Update
GPA Data (Adjusted)”,“Current GPA Data (Simple)”,“Current & Update GPA Data
(Simple)”.
~GpaBoxStart~
BoxHeight =#.##
BoxWidth =#
BoxGap =#.#
BorderWidth =#
PrintBorder =Y or N
TitleBorder =Y or N
TitleHorizontalAlign =Left, Right, Center
TitleAndFont1 =
TitleAndFont2 =
TitleAndFont3 =
TitleAndFont4 =
BodyFont
~GpaBoxEnd~
~PrintGpaBox, Left = X, Top = Y~
(Default= 0.75)
(Default= 2)
(Default= 0.1)
(Default= 0)
(Default= Y)
(Default= N)
(Default=Center)
(Default=Left=0, Top=0.5)
Honor Roll Box
To print a box on the report card that contains the Honor Roll information, use the code
below. The box will only print if the Report Card Report Writer Specification A) “Print
Honor Roll Status?” on page 2 is set to “Yes”.
~HonorRollBoxStart~
BoxHeight =#.##
BoxWidth = #.##
BorderWidth =#
TopGap =#.##
MiddleGap =#.##
PrintBorder =Y or N
TitleBorder =Y or N
TitleHorizontalAlign =
TitleAndFont=HONOR ROLL STATUS
BodyFont
~HonorRollBoxEnd~
~PrintHonorRollBox, Left = X, Top = Y~
D-30
Report Cards Manual
(Default= 0.5)
(Default=2)
(Default=0)
(Default= 0.1)
(Default= 0.2)
(Default= Y)
(Default= Y)
(Default= Center)
(Default=Left=0, Top=0.5)
Skills and Concepts
New Box Codes
Print Image
This code allows you to print an image such as a school logo or a background image on
the report card. To insert this code into a report, click the Insert Image button at the top
of the View/Edit Letters Reports Window. Note: For background images, remove the
~PrintImage~ command, set the zoom to “0”, Everypage to “Y” and Stretch to “Y”.
~ImageStart =#~
Zoom = ###
FileName "Image File Name"
BoxWidth =#.##
BoxHeight =#.##
Stretch = Y or N
EveryPage = Y or N
ImageLeft = #
ImageTop = #
~ImageEnd~
~PrintImage = 1, Left = 0, Top = 0~
(Default= 1)
(Default=100)
(Default=Y)
(Default=N)
(Default=0)
(Default=0)
Report Cards Manual
D-31
Chapter D
Skills and Concepts
Box Code Definitions
Box Code Definitions
~AdvancedSpecStart=#~
(Advanced Box)
~AdvancedSpecEnd~
Indicates the start and end of the AdvancedSpecBox specification. Since more than one
Advance Box can be defined in one report, “#” is the specification number for the table.
This number will default to 1 if not specified.
Align=(L,R or C)
(Draw Box)
X determines if the information between the ~PrintBox:#~ and ~EndPrintBox:#~ commands will be left or right justified or centered.
~AttendanceBoxStart=#~
(Attendance Box)
~AtendanceBoxEnd~
Indicates the start and end of the Attendance Box specifications. Since more than one
Advance Box can be defined in one report, “#” is the number for the table. This number
will default to 1 if not specified.
Auto or AutoCalc or AutoCalcAll
(Course Table, Advanced
Specifications: General)
If this keyword is present in the procedure code, the program ignores all the heights and
widths of all the boxes specified. Dimensions of the all the boxes are determined by the
program based on the page height and page width. The default is to include it in the procedure. Adding ~REM~ before the statement means the program will ignore this line.
BlankLineBeforeHeader=Y or N
(AdvancedSpecifications: Course)
To print a blank line before the skills heading, set this to “Y” for Yes. The default is
“N” for No.
BodyFont
(Attendance, Course Table,
Advanced Specifications: Course,
Comment, Concepts, Narrative, GPA &
Honor Roll)
To change the font and size of the Body, set the word “BodyFont” to the desired font
and size required for the report. If this specification is omitted from the code, the default
is black, Arial, 8 pitch and bold.
BorderWidth=#
(Draw Box, GPA & Honor Roll)
Defines the width of the border using a range of 0-3, 0 is the thinnest and 3 is the thickest.
LeftBorderWidth=#
(Attendance, Course Table,
Advanced Specifications:
Draw BoxRightBorderWidth=#
course, comments, concepts
and narratives)
TopBorderWidth=#
BottomBorderWidth=#
These four parameters set the width of the box border. The setting range is from 0 to 3,
0 being the thinnest and 3 the thickest. Each side of the box can be set separately.
D-32
Report Cards Manual
Skills and Concepts
Box Code Definitions
BoxGap=#.##
(GPA)
This parameter defines in inches the horizontal spacing between individual cells. The
default is 0.1 inch. BoxHeight=#.## or Auto
(Draw Box, Attendance, Course Table, GPA, Honor Roll)
The maximum height of a course table, or, in the case of an advanced specification table, the height of the course section, comment section, or narrative section. Do not confuse the height of each course row with the course section. Rows that will not fit in this
height will be truncated. Box Height is set in inches.
BoxHeight=#.##
(Image)
Defines the width of the image, provided the Stretch parameter is set as “Y”. If the image should not be stretched, then the image's aspect ratio will be maintained and the size
will be adjusted to best fit in the given Width and Height. Setting of BoxWidth & BoxHeight causes the Zoom parameter to be ignored.
BoxWidth=#.## or Auto
(Draw Box, Attendance, Course
Table, Advanced Specification:
General, GPA, Honor Roll)
Indicates the width of the cell. In the Advanced Specification box, it also defines globally the width of all the different cells (course, comment, concept, and narrative). Columns that will not fit in this width will be truncated. Boxwidth is defined in inches.
Default is Auto.
CellHeight=#.## or Auto
(Draw Box, Advanced
Specifications: Course, Comment,
Concepts, Narrative)
The maximum height of a course cell, or, in the case of an advanced specification table,
the height of the course section, comment section, or narrative section. Do not confuse
the height of each course row with the course section. Rows that will not fit in this
height will be truncated. Cell Height is set in inches.
CellGapAcross=#.##
(Advanced Specifications:
General)
This parameter determines the vertical spacing in inches between cells. The default is 0
CellGapDown=#.##
(Advanced Specifications:
General)
The horizontal spacing between cells. Parameter type is in inches. Default is 0
CharPerColumn=3 or 5
(Advanced Specifications:
Courses)
Set the command to 3 if the desired column header for the marking period is three characters. Set the command to 5 if you prefer the 5 character column header for the marking period. The 3 and 5 column headers are defined in the Customized RC, Customize
Report Card Columns program.
ColumnContents=Qtr1,Qtr2,Qtr3, Qtr4,Qtr5,Qtr6,RCSpec Range, YTD,Total
(Attendance)
Any or all of these parameters may be printed in any order separated by commas. Qtr16 prints the attendance for the specified quarter based on the quarter ending dates in the
Calendar program. RCSpecRange prints the attendance between and including the
dates specified in the Report Card Report Writer, Specs #A & #B. YTD (Year-to-Date)
prints the attendance through the date listed in the RCRW Spec. #C. Total prints the attendance for the year.
Report Cards Manual
D-33
Chapter D
Skills and Concepts
Box Code Definitions
ColumnHeaderHeight=#.##
(Attendance)
Indicates the height in inches of the column row. The default is .4
ColumnHeaderAndFont=
(Attendance, Course Table,
Advanced Specifications: Course)
To change the font and size of the Column Header, set the word ìColumnHeaderFontî
to the desired font and size required for the report. If this specification is omitted from
the code, the default is black, Arial, 8 pitch and bold.
ColumnHeadersAndFont=
(DateQtr1,DateQtr2,DateQtr3,DateQtr4,DateQtr5,DateQtr6,DateRCSpecRange, DateYTD,Total)
(Attendance)
Any or all of these parameters in any order, separated by comments, may be set.
DateQtr1 prints the first day in the calendar to the last day of Qtr1 as entered in the Calendar specifications. DateRCSpecRange prints RCRW specs #A & #B. DateYTD
prints “Year to <RCRW Spec. #3>”. Anything else prints as entered. The header is
printed with the font of this code. Each word may be substituted to a text string of your
choice. Instead of dates, you may use 1st, 2nd,3rd, 4th, etc.
ColumnWidth=#.##
(Attendance)
Indicates the width of data columns in inches. If the ColumnWidth keyword is not specified. The default is Auto.
ContentAndFont#=Text String
(Draw Box)
This keyword requires a text string. If a Draw Box requires more than one text string
additional ContentAndFont lines may be added. The # sign indicates the line # of the
text string. These numbers should be sequential such as ContentAndFont1=(Text
String), ContentAndFont2=(Text String). To create an empty box on the report card
simply set the border to .01 and leave the ContentAndFont line blank.
:CommentCellStart=#
(Advanced Specification:
Comment)
:CommentCellEnd
The start and end of the comment cell parameters in an Advanced Specification Box.
The parameter lets you determine what order you want the comment, concept and narrative box to print.
CommentHeight=#.## or Auto
(Course Table)
When comments are printed below a course, the height of the row of the comment box
is determined by this command. If auto is specified it takes the total text height, without
truncating any information.
CommentWidth=#.##
(Course Table)
Sets the width of the comment columns in inches. If the comments are printed in two
separate columns, then both the columns are of equal width. The default is 1.5.
:ConceptsCellStart=#
(Advanced Specifications:
Concepts)
:ConceptsCellEnd
The start and end of the comment cell parameters. The parameter lets you determine
what order you want the comment, concept and narrative box to print.
D-34
Report Cards Manual
Skills and Concepts
Box Code Definitions
:CourseCellStart=1
(Advanced Specifications: Course)
:CourseCellEnd
The start and end of the course cell parameters. If printed, this will be the first cell in
the course box and the parameter is always 1.
CourseNameFont
(Advanced Specifications: Course)
This parameter is defined in the Advanced Specification Box. When you change the
font and size for the word 'CourseNameFont', it also changes it for the level, course/section number and credit if these options are set to print in the Report Card Report Writer
specifications.
CourseNameHorizontalAlign=Left, Right, Center(Course Table)
Sets the alignment for the course name or description to left, right, or center. The default
is Left.
CourseNumberWidth=#.##
(Course Table)
Sets the width of the course number column in inches. Default is .4.
~CourseTableSpecStart=#~
(Course Table)
~CourseTableEnd~
Indicates the start and end of the Course Table box. The # is the table number and will
default to 1 if not specified. More than one table can be defined in a WLABEL file.
Each table should have its own number.
CreditWidth=#.##
(Course Table)
Sets the width of the credit column in inches. Default width is .5.
DescriptionWidth=#.##
(Advanced Specifications: Course)
Sets the width of the column containing the course & skills description. Minimum description width is 1.75 inches. The default width is 2.25.
EveryPage=Y or N
(Image)
If EveryPage ='Y', the image will be printed on every page as a background image. The
Left and Top positions are determined by the ImageLeft and ImageTop parameters respectively. When printing a background image the ~PrintImage...~ code should be deleted.
Filename= (Image)
The file name of the image. This must be a valid image file that is stored inside the folder “RS4\PPImages”.
:GeneralSpecStart
(Advanced Specifications:
General)
:GeneralSpecEnd
Indicates the start and end of the global specifications for the Advanced Specifications
box.
~GPABoxStart~
(GPA)
~GPABoxEnd~
Indicates the start and end of the parameters for the GPA box.
Report Cards Manual
D-35
Chapter D
Skills and Concepts
Box Code Definitions
Height = (# or Blank for “Auto”)
(Attendance)
The Attendance box Height in inches. If left blank (auto), the box height is determined
by the number of rows to print. If the available space is insufficient to print all the attendance, then rows (from the bottom) will be truncated.
~HonorRollBoxStart~
~HonorRollBoxEnd~
(Attendance)
Indicates the start and end of the parameters for the Honor Roll box.
ImageLeft
(Image)
Determines the Left position of the image if EveryPage = “Y”. If EveryPage = N, the
ImageLeft parameter is ignored.
ImageTop
(Image)
Determines the Top position of the image if EveryPage = “Y”. This parameter is ignored if EveryPage = “N”.
~ImageStart = #~
(Image)
~ImageEnd~
(Image)
Denotes the start and end of the image specification. Since multiple images can be defined in a report, the # symbol in the ~ImageStart~ code is replaced by the image number. The ~PrintImage = #~ command searches for this number and tells the program
where the image will print.
IncludeSkills=Y or N
(Advanced Specifications: Course)
If you wish the skills to print, this parameter is set to Y for Yes. Y is the default. There
may be a case where the course has skills but only certain grade levels use them. Setting
this to N, removes them from the report card.
Left=#.##
(Draw Box)
Left indicates distance in inches from the left-hand margin.
LevelWidth=#.##
(Course Table)
Sets the width of the level column in inches. Default is .35.
MaxBoxDown=#
(Advanced Specifications: General)
This setting determines the number of courses to print in a column. If a high value is
set, the program fits the maximum number of boxes possible depending on page height.
Default is Auto
MiddleGap=#.##
(Honor Roll)
Sets the height of the gap between the title line and Honor Roll status line.
MinGradingColumnWidth=#.##
(Course Table, Advanced Specifications: Course)
Sets the width of the grading columns. After all the calculations, extra space is equally
distributed among the grading columns. It will never be less than 0.3. The default is .35
D-36
Report Cards Manual
Skills and Concepts
Box Code Definitions
:NarrativeCellStart
(Advanced Specifications:
Narratives)
:NarrativeCellEnd
Indicates the start and end of the parameters for the narratives.
NarrativeHeight=#.## or Auto
(Course Table)
If a narrative is to be printed, this command would set the height of this row. If Auto is
specified it takes the total text height, without truncating any information.
NumBoxAcross=#
(Advanced Specifications: General)
This setting determines the number of columns to place across the page for the course
cells in the Advanced Specifications box. If a high value is set, the program fits the
maximum number of boxes possible depending on page width. The default is 2.
Print=Y or N
(Advanced Specifications: Course, Concept, Comment,
Narrative)
If you choose not to print a course, section, concept, or narrative section of the Advanced Specification box, or the Attendance box, you can prevent it from printing by
setting this parameter to N for No. Default is set to Y.
~PrintAdvancedBox=#,WhichCourses=Z,Left=X,Top=Y~(Advance)
Determines the distance the Advance Box will print from the left and top margins respectively. Since multiple Advance Boxes can be defined in a single report, “#” indicates the Advance Box number. X is replaced by the number of inches(#.##) the
Advance Box will print from left margin. Y is replaced by the number of inches (#.##)
the Advance Box will print from the top margin. Z can equal: Skills, Nonskills, ALL,
ALLSkillsFirst,ALLNonSkillsFirst, Course numbers separated by commas.
121,221,50,60, or Range of Courses: 400-900, 200-300. Course numbers and range together: 121,400-500,600.
~PrintAttendanceBox=1, Left=X, Top=Y~
(Attendance)
Determines the distance the Attendance Box will print from the left and top margins respectively. Since multiple Attendance Boxes can be defined in a single report, “#” indicates the Advance Box number. X determines the distance in inches the attendance
box will print from the left-hand margin. Y determines the distance down the page in
inches.
PrintBorder=Y or N
(Attendance, Honor Roll, GPA,
Draw, Course Table, Advance:
course, comment, concepts,
narrative)
Set this parameter to “Y” to print the borders around each box.
PrintBox=#, Left=X, Top=Y~
Determines where the Draw Box defined as with the corresponding specification number (#) will print. X is replaced by the distance in inches (#.##) from the left margin. Y
is replaced by the distance in inches (#.##) from the top margin.
PrintColumnAveragesAndFont=Y or N
(Course Table)
To change the font and size of the Average row, set the word PrintColumnAveragesAndFont to the desired font and size required for the report. The default is black, Arial,
8 pitch and bold.
Report Cards Manual
D-37
Chapter D
Skills and Concepts
Box Code Definitions
PrintColumnHeaderAndFont=Y or N
(Advanced Specifications:
Course)
The Marking period headers are printed with the font of this Keyword. ìNî suppresses
printing. Default is black, Arial, 8 pitch and Bold.
PrintColumnHeaderEveryCourse=Y or N
(Course Table)
In our course box, to print the column headers after each course set this specification to
Y for Yes. The default is N for No.
PrintCommentTextWhere=Right1Column, Right2Column, or Below
(Course Table)
Prints the comment description using values in Report Card Columns, 12 and 13. If this
is set to “Right1Column”, comments are printed in one column separated by a semicolon. The header reads Comment 1 name/Comment 2 name. If this command is set to
Right2Column, comments are printed in two separate columns. This command uses
commentwidth to set the width of the columns. The text will word wrap to fit within the
specified row height. If Below is chosen, comments will print in an additional row under the course details, separated by semi-colon with the height set by CommentHeight.
PrintCourseNameAndFont=Y or N
(Course Table)
Course name, level, course/section number and credit if flagged to print in Report Card
Specifications are printed in the font of this keyword. “N” supresses printing. The default font is black, Arial, 8 point. (Advanced Specifications: Course)
~PrintCourseTable=#, WhichCourses=Z, Left=X, Top=Y~
This command determines where the Course Table box will print on the page. X defines
where the box will be printed from the left-hand margin in inches. Y defines how far
down from the top margin the box will print. The Z can indicate:
All
Course numbers separated by commas.
Range of Courses.
numbers and range can be used together:
500,600
Example: 121,221,50,60
Example: 400-900Course
Example:
121,400-
PrintDescription=Y or N
(Course Table, Advanced
Specifications: Courses)
If you wish to print the Description of the course name, set this command to Y for Yes.
It ignores whatever is set in the Report Writer Specifications. If this command is omitted from the WLABEL report, the specification will be honored.
~PrintGPABox, Left=X, Top=Y~
(GPA)
This command determines where the GPA Box will print on the page. X defines where
the box will be printed from the left-hand margin in inches. Y defines how far down
from the top margin the box will print.
~PrintHonorRollBox, Left=X, Top=Y~
(Honor Roll)
This command determines where the Honor Roll Box will print on the page. X defines
where the box will be printed from the left-hand margin in inches. Y defines how far
down from the top margin the box will print.
D-38
Report Cards Manual
Skills and Concepts
Box Code Definitions
PrintLineAfterXCourses=#
(Course Table)
To print lines between a specified number of courses, set # in the command to a number.
If you choose not to print lines, set # to 0.
Print NarrativeAndFont=Y or N
(Course Table)
If set to Y, it prints the narratives with the font of the keyword ìPrintNarrativeAndFontî.
PrintSkillHeaderAndFont=Y or N
(Advanced
Specifications:
Course)
The skill header is printed with the font of this keyword. “N” suppresses printing. Default is Black, Arial, 8 point size.
PrintSkillsAndFont=Y or N
(Advanced
Specifications:
Course)
The Skills description and grades are printed with the font of this keyword. ìNî suppresses printing. Default is black, Arial, 8 point size.
PrintTeacherAndFont=Y or N
(Advance)
The Teacher name if flagged to print is printed with the font of this keyword. ‘N’ suppresses printing.
PrintVerticalLines=Y or N
If you choose Y for ìYesî, this specification allows you to draw vertical lines between
the columns. Choose N for ìNoî, if no lines are to print. (Course Table)
PrintWhichColumns=#,#,...
(Course Table,
Advanced
Specifications: Course)
Any or all of the 13 marking periods (separated by commas), may entered in the desired
order. When column numbers are specified, this setting overrides the Report Card
Specification settings. If you have a request to print skills courses using columns 1,3,5
and academic courses where you need to show 1,2,3,4,5, using two boxes with separate
column settings will give you the desired results.
RowContentsAndFont = (A,T,P,D,DOS,MEM)
(Attendance)
Any or all of these parameters may be printed in any order, separated by commas. Data
is printed with the font of this code. The codes stand for the following:
A = Absences
T=Tardies
D=Dismissals
P=Present
DOS=Days of School (Session Days)
MEM=Membership Days for the Student
RowHeadersAndFont(Attendance)
Row Headers can be any single-worded text to denote Absences, Tardies, Dismissals,
Present, Session Days, Membership Days for those parameters specified in RowContentsAndFont above.
RowHeaderWidth-#.##
(Attendance)
Width of the horizontal header column to contain the text for RowHeadersAndFont
above.
Report Cards Manual
D-39
Chapter D
Skills and Concepts
Box Code Definitions
RowHeight=#.##
(Course Table)
The maximum height of the subject and average rows in inches (#.##). The default
height is 0.16.
SectionWidth=#.##
(Course Table)
Sets the width of the section column in inches. Default is 0.3.
SkillsFont
(Advanced Specifications: Course)
To change the font and size of the Skills, set the word ìSkillsFontî to the desired font
and size required for the report. If this specification is omitted from the code, the default is black, Arial, 8 pitch and bold.
SkillHeaderAlignment=Left, Right, Center
(Advanced Specifications: Course)
Alignment of the skills header can be set to Left, right or center. The default is center.
SkillHeaderFont
(Advanced Specifications: Course)
To change the font and size of the Skills Header, set the word “SkillHeaderFont” to the
desired font and size required for the report. If this specification is omitted from the
code, the default is black, Arial, 8 pitch and bold.
~StartBoxDef=#~
(Draw Box)
~EndBoxDef~
Several boxes can be defined on any one report card. The boxes are numbered to match
the ~PrintBox:#~ specification and the ~EndPrintBox:#~. It clearly identifies which set
of parameters are associated with the box to print.
Stretch
(Image)
Set the Stretch parameter to Y if you wish to stretch the image without maintaining the
aspect ratio.
SubjectWidth=#.##
(Course Table)
Sets the width of the subject column in inches. Default is .75.
TableGapAcross=#.##
(Advanced Specifications: General)
Horizontal space between course boxes. Parameter is in inches. The default is 0.
TableGapDown=#.##
(Advanced Specifications: General)
Vertical space between course boxes. Parameter is in inches. Default is 0
TeacherFont
(Advanced Specifications: Course)
To change the font and size of the Teacher, set the word “TeacherFont” to the desired
font and size. If this specification is omitted from the code, the default is black, Arial,
8 pitch and bold.
TeacherWidth=#.##
Sets the width of the Teacher Name column in inches. The default is .75. (Course Table)
D-40
Report Cards Manual
Skills and Concepts
Box Code Definitions
TitleAndFont=<TitleText>
(Attendance, Course Table, GPA,
Honor Roll, Advanced Specifications: Course, Comment, Concept,
Narratives)
To print text at the top of the box, type the text string after the equal sign. The font and
size of the text string determines how it will appear on the report. Use ~CR~ as part of
the text to insert a line break.
For example, Course~CR~Information will print as:
Course
Information
Course ~CR~~CR~Information is printed as:
Course
Information
TitleBorder=Y or N
(Course Table, Advanced Specifications: Course, Comment, Concepts, Narratives; Attendance)
To draw a border around the title set this specification to Y for Yes. The default is N
for No.
TitleHeight=#.##
(Course Table; Advanced specifications: Course; Attendance)
A title may be placed at the top of the course box in a cell of its own. The height of this
cell is set in inches. (Course Table, default is .5; Advanced Specifications: Course, default is .3, Attendance, default is .2)
TitleHorizontalAlign=Left, Right, Center
(Attendance, Course Table, Advance GPA, Honor Roll, Advance:
comment, concept, course narrative)
The title can be set to print from left aligned, right aligned or centered. The default is
centered.
Top=#.##
(Draw Box)
In the Draw Box, top indicates distance from the top margin in inches.
VerticalBodyAlign=Top,Bottom,Center
(Course Table)
Sets the positioning of the text in the subject and averages row to either print at the top,
bottom or center. The default is the center.
Width = (# or Blank for “Auto”)
(Attendance)
Sets the width of the Attendance box. If left blank (Auto), the box width is determined
by the number of columns to print. If the available space is insufficient to print all the
attendance, then columns (from the right) will be truncated.
Zoom = 100
(Image)
Determines the zoom percentage of an image. If Zoom = 100 the image will be printed
as its actual size, Zoom = 200 prints the image with double the size. Setting a value
for the Zoom parameter causes the Stretch parameter value to be ignored.
Report Cards Manual
D-41
Chapter D
Skills and Concepts
Sample Skill-based Report Card Template
Sample Skill-based Report Card Template
The following is the report body of the sample skills-based report car shown on the front
cover of this manual. The report prints the sample landscape report shown on last page
of this document. It includes the Advance and and Attendance box codes.
~REM~ SKRC: WIDE PLAIN 2COL LASER V3
~REM~ MARGINS: L=0.25 R=0.25 T=0.25 B=0.25 ORIENTATION: LANDSCAPE
~PGSTART~
~T0.25~~FN~ ~LN~~T2.5~#~ID~~T4.5~GRADE ~GR~~T6.7~HR:
~7~~T9.5~~DATE~
~ADVANCE:0.5~
~T0.25~PARENT/GUARDIAN NAME & ADDRESS ~T4.5~MESSAGE
~T0.25~~1~~T4~~!MSG1:35~
~T0.25~~2~~T4~~!MSG2:35~
~T0.25~~3~, ~4~ ~5~~T4~~!MSG3:35~
~!CNNN:10.5~
~!CNUN:10.5~
~PGEND~
~ENDPAGE~
~PGNUM=1~
~PRINTPAGEHEADER~
~AttendanceBoxStart = 1~
Print = Y
BoxWidth = 2.5
RowHeaderWidth = .8
ColumnWidth = Auto
LeftBorderWidth = 0
RightBorderWidth = 0
TopBorderWidth = 0
BottomBorderWidth = 0
BoxHeight = 1
TitleHeight = 0.2
ColumnHeaderHeight = 0.4
RowHeight = 0.2
PrintBorder = Y
TitleBorder = N
TitleHorizontalAlign = Center
ColumnContents = RCSpecRange,YTD
TitleAndFont = Attendance
ColumnHeadersAndFont = DateRCSpecRange,DateYTD
RowContentsAndFont = A,T,D
RowHeadersAndFont = Absences, Tardies, Dismissals
~AttendanceBoxEnd~
~PrintAttendanceBox = 1, Left=7.5, Top=.4~
~AdvancedSpecStart = 1~
:GeneralSpecStart
~REM~INSERT ~REM~ BEFORE AutoCalcAll TO ENABLE INDIVIDUAL
SPECS
D-42
Report Cards Manual
Skills and Concepts
Sample Skill-based Report Card Template
~REM~AutoCalcAll
NumBoxAcross = 2
MaxBoxDown = Auto
CellGapDown = 0
CellGapAcross = 0
TableGapDown = 0.1
TableGapAcross = 0.2
BoxWidth = Auto
:GeneralSpecEnd
:CourseCellStart = 1
Print = Y
PrintDescription = N
CharPerColumn = 3
IncludeSkills = Y
~REM~PrintWhichColumns = 1,2,3,4,5,6,7,8,9
CellHeight = Auto
TitleHeight = 0.2
DescriptionWidth = 3
MinGradingColumnWidth = 0.35
LeftBorderWidth = 0
RightBorderWidth = 0
TopBorderWidth = 0
BottomBorderWidth = 0
TitleHorizontalAlign = Center
SkillHeaderAlignment = Left
PrintBorder = Y
TitleBorder = N
BlankLineBeforeHeader = N
TitleAndFont =
PrintCourseNameAndFont = Y
PrintTeacherAndFont = Y
PrintSkillHeaderAndFont = Y
PrintSkillsAndFont = Y
PrintColumnHeaderAndFont = Y
:CourseCellEnd
:CommentCellStart = 2
Print = Y
CellHeight = Auto
LeftBorderWidth = 0
RightBorderWidth = 0
TopBorderwidth = 0
BottomBorderWidth = 0
TitleHorizontalAlign = Left
PrintBorder = Y
TitleBorder = N
TitleAndFont =Comments
PrintBodyAndFont = Y
:CommentCellEnd
:ConceptsCellStart = 3
Print = Y
CellHeight = Auto
Report Cards Manual
D-43
Chapter D
Skills and Concepts
Sample Skill-based Report Card Template
LeftBorderWidth = 0
(continued)
RightBorderWidth = 0
TopBorderWidth = 0
BottomBorderWidth = 0
TitleHorizontalAlign = Left
PrintBorder = Y
TitleBorder = N
TitleAndFont =Concepts
PrintBodyAndFont = Y
:ConceptsCellEnd
:NarrativeCellStart = 4
Print = Y
WidthIfRight = 1
CellHeight = Auto
LeftBorderWidth = 0
RightBorderWidth = 0
TopBorderWidth = 0
BottomBorderWidth = 0
TitleHorizontalAlign = Left
PrintBorder = Y
TitleBorder = N
TitleAndFont =Narratives
PrintBodyAndFont = Y
:NarrativeCellEnd
~AdvancedSpecEnd~
~PrintAdvancedBox = 1, WhichCourses=Skills, Left = .2, Top = 1.8~
D-44
Report Cards Manual
Index
Numerics
Class Rank Reports
defining, 8-68
obtaining, 8-65
1 Student Per Phone #, 7-37
A
Column Limits for Numeric Grades
Adding Students to Courses
& Sections, 4-8
Adjusted GPA
Comment Codes
setting, 3-30
Changing, 1-10
Comment Distribution Report, 3-31
Course
Definition, 1-9
Archive
withdrawing student from, 6-5
description, 1-10
Course Settings
Archiving Grades
setting amount, 1-13
how to, 1-4, C-2
Courses
ASCII Export
adding students, 4-8
removing students, 4-9
Export
ASCII, 7-37
Creating new Skill Standards, D-14
Customize RC
Averages
how are they calculated, 5-8
description, 1-7
B
D
Before You Begin
Data Entry Forms
prerequisites, 1-2
description, 1-7
Blank Report Card Columns, 5-16
Buttons
in View/Edit Letters/Reports, 7-33 to 7-35
Data Entry Forms, Print Grade
Distribution Reports
description, 1-8
Data Entry Forms, Print Grade Entry
Forms
C
Calculate Averages
description, 1-7
description, 1-8
reading the Log, 5-15
specifications, 5-3
Data Entry Forms, Print Grade Verification
Forms
description, 1-7
Calculating Averages
Default Comments Codes
for which columns?, 5-7
changing, 1-10
Calculating Credits
Deleting
general rules, 8-41
Reports, 7-34
Changing
generic or default comment codes, 1-10
Index-1
E
Entry Forms
manual grade, 3-4
scanner, 3-13
Edit Menu
in View/Edit Letters/Reports, 7-34
Example
Editing
Daily Attendance Information in the Minus
Years, 6-8
grades, 4-6
Master Course Fields, 2-4
OVR column, 6-5
Teacher (TCH) Column in the Minus Years, 6-8
end of year updating, 8-55
Examples
final average calculations, 5-12
midyear average calculations, 5-11
Exporting
the honor roll to ASCII, 7-7
Editing GPA, Quality Points, Weight & Credits,
F
6-6
Editing Grades, 6-3
Editing Letters & Reports, 7-32
Enrollment Report
File Menu
in View/Edit Letters/Reports, 7-33 to 7-34
Final Average Calculations
by teacher, 3-32
examples, 5-12
Enter Courses
Fixed Length Fields, 7-37
Fonts
description, 1-7
Enter Courses, Enter Course Section List
Color, 7-39
in the Report Writer, 7-38 to 7-40
Size, 7-39
description, 1-7
Enter Courses, Enter Master Course List
Forms
description, 1-7
Enter Grades
grade verification, 3-23
Function Keys
description, 1-8
Enter Grades, Enter Students’ Grades
in View/Edit Letters/Reports, 7-38
description, 1-8
Enter Grades, Enter Students’ Schedules
description, 1-8
G
Generating a Form Letter, 7-8
Generic Comments Codes
Enter Skills Grades Manually, D-9
Entering
changing, 1-10
grades, 4-6
grades manually, 4-3
weight for each column, 5-5
GPAs & Credits, 8-37
Entering and Editing Grades in the Minus
Years, 6-7
Entering Grades Or Skills Manually, 4-10
Entering Skills Grades, 4-10
Entering Skills Grades in GradeQuick, D-17
calculating, 8-41
general updating rules, 8-41
updating & resetting, 8-37
Grade
scanning, 4-16
Grade Change Log
enable/disable, 1-14
Grade Distribution Report, 3-27
Index-2
M
Grade Point Averages, 8-3
Grade Verification Forms, 3-23
GradeQuick
Mailing Labels
printing, 7-12
entering skills grades, D-17
interfacing with Admin Plus, D-10
preparing Admin Plus to use with GQ, D-10
preparing GradeQuick to use with Admin Plus, D12
GradeQuickSending skills to GQ, D-12
Grades
entering manually, 4-3
entering or editing, 4-6
how to archive, 1-4, C-2
letter, 5-9
number, 5-9
viewing & editing, 6-3
Manual Grade Entry Forms, 3-4
filling them out, 3-8
Master Course And Section Lists
specifictions, 3-33
Master Course and Section Lists, 3-33
Master Course and Section Lists Print Window
using, 3-35
Master Course Fields
editing, 2-4
Master Course Lists, 3-33
Midyear Average Calculations
examples, 5-11
N
H
Narrow Report Cards
Honor Roll Print Specifications
printing, 7-5
inspect/change, 8-10
Narrow Transcript by Department
Honor Rolls, 8-4
printing, 7-6
using, 8-2
Narrow Transcript by Year
HROLL.ASC, 7-7
printing, 7-5
Number Grades, 5-9
I
scanning, 3-22
Interfacing with GradeQuick, D-10
preparing Administrator’s Plus, D-10
preparing GradeQuick, D-12
O
Options Menu
in View/Edit Letters Reports, 7-36 to 7-37
L
OVR Column
Letter Grades, 5-9
Letters
editing, 6-5
viewing & editing, 7-32
P
Linking Skills to Standards, D-14
Log
Page Setup
in the Report Writer, 7-41
calculate averages, 5-15
Permanent Lables
printing, 7-6
Pre-defined
reports, 7-84
Index-3
Prerequisites, 1-2
Preview
Report Cards
skills-based, D-20
Report Cards Report Writer
Generate Report, 7-36
Print Menu
description, 1-9
Print Menu, 7-27
report cards report writer, 7-27
Reports
Print Schedule Scan Forms
iewing & editing, 7-32
pre-defined, 7-84
description, 1-10
Printing
honor roll certificates, 7-7
list of Students within grade limits, 7-10
mailing labels for a course, 7-12
narrow report cards, 7-5
narrow transcript by department, 7-6
narrow transcript by year, 7-5
one report card per course,
sorted by teacher, 7-11
one separate report card per course, 7-6
permanent lables, 7-6
progress report, 7-9
rosters, 7-11
transcript view, 6-5
wide report cards, 7-5
wide transcript by year, 7-5
wide transcript by year by department, 7-5
Reset Credits, GPAs, Last Update Data To
Zero, 8-40
Reset Last Update Data Only to Zero, 8-39
Rosters
printing, 7-11
section, 3-24
S
Scan Schedules
description, 1-10
Scanner
entry forms, 3-13
Scanner Grade Entry forms
filling them out, 3-19
Scanning
number grades, 3-22
Pro-Rate Weights
why, 8-6
Scanning Grades, 4-16
Pro-Rating
troubleshooting, 4-17
Scanning LEtter Grades
defined, 8-5
how to, 3-21
Search
R
in the Report Writer, 7-41
Rank Reports
Search Menu
obtaining, 8-65
Removing Students to Courses & Sections, 4-9
Rename Reports, 7-39
Report
comment distribution, 3-31
enrollment by teacher, 3-32
grade distribution, 3-27
in View/Edit Letters/Reports, 7-35 to 7-36
Section
withdrawing student from, 6-5
Section Lists (and Master Course), 3-33
Section Rosters, 3-24
Sections
adding students, 4-8
removing students, 4-9
Report Card Columns
blank, 5-16
Sending Skills to GradeQuick, D-12
Index-4
Setting
scanning grades, 4-17
column limits for numeric grades, 3-30
course grade numbers, 1-13
U
Skills
Customized lists of skills, D-4
Entering Customized Lists of Skills and
Concepts, D-4
Skills &Concepts
enter custom, D-4
Skills Assessment Scale, D-15
Skills Grades
Universal GPA Specifications
inspect/change, 8-28
un-update, 8-37
Un-Update GPAs & Credits, 8-37
Using Honor Rolls, 8-2
V
View/Change, Schedule View
entering, 4-10
description, 1-9
Skills-based Report Cards, D-20
Specifications
View/Change/Add/Drop
calculate averages, 5-3
for the Master Course And Section Lists, 3-33
Split Grading System
description, 1-8
View/Change/Add/Drop, Transcript View
description, 1-8
View/Edit Letters/Reports
using, 1-3
Toolbar Menus, 7-38
Statistical Reports
View?edit Course Section
description, 1-9
Statistical Reports, Print Class Rank Report
description, 1-10
Statistical Reports, Update Career GPAs
options described, 2-4
Viewi Grades, 6-3
Viewing Letters & Reports, 7-32
description, 1-9
W
T
Wide Report Cards
printing, 7-5
Task List
Wide Transcript by Year
using, 7-4
printing, 7-5
Third Quarter Update
Wide Transcript by Year by Department
how to, 8-35
printing, 7-5
Toolbar
in View/Edit Letters/Reports,
Window Menu
7-38
in View/Edit Letters/Reports, 7-38
Transfer Credits & GPA
Withdrawing Student from Course/Section, 6-5
description, 1-10
Troubleshooting
Index-5
Appendix
Master Course List
If you are using SCHEDULING PLUS to schedule your
students, your course master list has already been entered.
Otherwise, it must be built by assigning each course a
unique number from 001 to 999. It is generally recommended to group courses from the same department in the
same hundreds. In this sample, all of the ENGLISH
courses are numbers 001 through 099.
For each course, you will also enter its name, level, credits,
weight, GPA factor, optimum size, length, code and priority
of importance for scheduling.
The GPA FACTOR and WEIGHT are used to calculate students' grade point averages for honor rolls and career class
rank. The GPA FACTOR is used to give more quality
points to higher level courses than to average courses.
The "length" of a master course is whether all of the sections of the course will meet for the entire year, a semester
or a quarter. The "code" is used to group courses together
when printing a four year transcript with students' courses
sorted by subject.
Schools also have the option to enter a text book name, text
book fee and course fee for each course. These fees and
book names can later be made to print on schedules.
i
COURSE SECTION LIST
If you have already used SCHEDULING PLUS to schedule
your students into their courses, your course section list has
already been built. Otherwise, each master course must be
divided into sections.
Each section of a master course may meet at a different time
in a different room and be taught by a different teacher.
Moreover, if the master course is a semester or quarter course,
the sections may meet different semesters or quarters. For
example, on this report, course #001, "Reading", has been
divided into six sections. The first three sections meet semester one (S 1) while the last three sections meet semester two
(S 2).
A flexible time system allows for the easy entry of double and
triple periods as well as sections meeting only some days of
the week. A meeting time of "A135" means that the section
meets first period on Monday, Wednesday and Friday. A
meeting time of "A135B1" means that this same course meets
for a double period on Monday.
ii
REPORT CARD COMMENTS
Up to 99 comments may be entered into REPORT
CARDS PLUS.
For each marking period, teachers may choose two
comments for each student.
The entire text of each of these two comments may be
directly printed on the report cards.
The comments printed here are the defualt comments
that come with Report Cards Plus. The left column
contains positive comments while the right column
conatins negative ones. You may easily delete them
all, edit them or add your own.
iii
Blank Manual Grade Entry Form
No Section Info Printed On The Top
In order for students' names to appear on grade entry
forms, students' schedules must have been entered into
the computer either with SCHEDULING PLUS, manually or with a scanner.
A "BLANK" manual entry form is a form without students' names that will help you in entering students'
schedules manually. On these forms, teachers will write
in students' names and ID numbers from where they can
be entered into the computer.
These forms may also be used to simultaneously enter
students' first marking period grades into the computer.
There are two types of "blank" manual grade entry forms.
This type does not have the course name printed at the
top. Consequently, one copy may be quickly printed and
copied to be handed out to teachers who will fill in the
information at the top.
iv
Blank Manual Grade Entry Form
Section Info Printed At The Top
In order for students' names to appear on grade entry forms,
students' schedules must have been entered into the computer
either with SCHEDULING PLUS, manually or with a scanner.
A "BLANK" manual entry form is a form without students'
names that will help you in entering students' schedules manually. On these forms, teachers will write in students' names
and ID numbers from where they can be entered into the computer.
These forms may also be used to simultaneously enter students' first marking period grades into the computer.
There are two types of "blank" manual grade entry forms.
This type has the course name and other information about the
course printed at the top. If you use this type, one form must
be printed for each section which will take longer than printing one copy of the previous sample and subsequently copying it for each section.
v
Manual Grade Entry Form
Students Already In Sections
Once students' schedules are in the computer, manual grade entry forms may be printed for each
course section that include the names of the students in each section.
These forms are printed sorted by teacher which
makes them easy to distribute. They may also be
printed for individual sections of your choice.
On this sample form, a teacher would record students' grades for the second marking period. Midyear exam grades may also be recorded in the
"MEX" column, midyear grades in the "MID" column and comment codes in the "C1" and "C2" columns. Although REPORT CARDS PLUS can
automatically calculate midyear and final averages,
it will not overwrite any grades that have been previously entered by a teacher.
vi
Manual Grade Entry Form
How To Fill Them Out
The italic entries demonstrate how a teacher would
enter their first marking period grades and comments. Note that a student who was not on the roster
was manually written in at the bottom of the form.
vii
Manual Grade Entry Form
With Previous Grades
As this sample shows, any previous grades
that students' have will be printed on the
manual grade entry forms. This sample form
will be used by teachers to enter students'
second marking period grades as well as to
verify the grades that they gave for the first
marking period.
These forms are printed sorted by teacher
which makes them easy to distribute. They
may also be printed for individual sections of
your choice.
viii
SCANNER GRADE ENTRY FORM
LETTER GRADES
Different scanner forms are used for grade
entry depending upon whether your school
uses number or letter grades. This is a sample
of a scanner entry form that will be used for
letter grades.
REPORT CARDS PLUS pre-prints the names
of the students on the forms and fills in the
"PAGE NO." bubbles in the upper right hand
corner. Each form contains space for up to six
different marks to be entered per student.
When the forms are scanned, you will tell the
computer into which report card column each
mark should be placed. For example, you will
tell the computer whether the "exam grade"
should be placed into the midyear exam column or into the final exam column. It could
even be placed into both columns simultaneously!
ix
SCANNER GRADE ENTRY FORM
NUMERIC GRADES
Different scanner forms are used for grade entry depending upon whether your school uses number or letter
grades. This is a sample of a numeric scanner entry form.
REPORT CARDS PLUS pre-prints the names of the students on the forms and fills in the "PAGE NO." bubbles
in the upper right hand corner. Each form contains space
for up to six different marks to be entered per student.
When the forms are scanned, you will tell the computer
into which report card column each mark should be
placed. For example, you will tell the computer whether
the "exam grade" should be placed into the midyear exam
column or into the final exam column. It could even be
placed into both columns simultaneously!
The "C1" and "C2" columns are used for bubbling in the
two comment codes while the "OPT" column may be
used to bubble in the grade for any of your customized
x
COURSE SECTION ROSTERS
Course section rosters contain the names of
all of the students in a course section.
They may be printed for all sections sorted
by teacher or for individual sections. Sorting by teacher means that the rosters for all
of the sections taught by a teacher will be
printed together. In this manner, the rosters
for all or individual teachers may be
printed.
xi
xii
The forms are carbonless three part forms. Schools have the
option of having their names and logos pre-printed on the
top for only a small additional charge. Otherwise, the computer will print their names using a large nice looking type
face. As of this time, including freight, the three part forms
with a school's name pre-printed are only $156 per box of
1200 plus $95 per order for the printing charge. The same
forms without a school's name pre-printed are only $144 per
box of 1200.
No other report cards software package uses forms that look
as nice as those used by REPORT CARDS PLUS. This
copy does not do justice to the forms because you can't see
the blue background shadings that make the different sections stand out from each other. If an original report card
form has not been included with this booklet, please request
one from REDIKER SOFTWARE or your dealer.
Pre-printed Report Card Form
xiii
This is a sample wide report card on plain papaer
printed at the end of the year. On the bottom of the
report card this school has chosen to show how students’ career credits and FPA’s have been updated.
Wide Report Card
xiv
This is a sample wide report card on plain paper
printed at the end of the year. On hte bottom of hte
repor card, this school has chosen NOT to show how
students’ career credits an GPA’s have been updated.
Instead, they have just printed students’ career totals
Wide Report Card
Narrow Report Card
Although most schols will print their report cards
using our great looking forms, it is possible to print
them on either norrow or wide plain white paper.
This is a sample narrow report card printed after the
first marking period with comments.
You have ocmplete control over virtually everything
that prints on the report card. For example, you
choose whether or not to print the averages at the
bottom of each column, which columns to print,
whether or not the attendance should be printed at
the bottom and whether or not students’ career credits and GPA should be printed. If you want, students’ rank in class may even be printed on their
report card.
xv
Narrow Report Card
Although most schols will print their report cards
using our great looking forms, it is possible to print
them on either norrow or wide plain white paper.
This is a sample narrow report card printed after the
first marking period without comments.
You have ocmplete control over virtually everything
that prints on the report card. For example, you
choose whether or not to print the averages at the
bottom of each column, which columns to print,
whether or not the attendance should be printed at
the bottom and whether or not students’ career credits and GPA should be printed. If you want, students’ rank in class may even be printed on their
report card.
xvi
HONOR ROLL REPORT
This page contains two sample honor roll reports. Both are "HIGH HONOR" honor roll reports including only students with GPA's of 95 or higher. (You enter the name of the honor roll as well as its criteria
using the screen on the previous page.)
The top report contains students printed in rank order. In-other-words, the student with the top GPA is
printed first. The bottom report prints students alphabetically with their rank and GPA next to their
name. The top report also has students' first names printed first while the bottom report has them printed
last.
Both reports contain the number of courses upon which the GPA is based next to students' names. Inother-words, the GPA of the number one student, Richard Rediker, is only based on three courses. He
may have only taken three courses or received grades of "P" or "W" in his other courses.
xvii
CLASS RANK REPORT
The class rank report is based on students' GPA's for their entire
career in your school. As with the honor roll report, the class rank
report may be printed in many different ways. The top report contains all 149 students in grade 12 listed in alphabetical order with
their rank and career GPA printed next to their name.
Class rank reports may also be printed using quality points or
credits instead of the GPA as the ranking factor. The bottom
report is an example of a class rank report using credits as the
ranking factor. By entering "12" as the maximum number of credits, a report can be produced that in effect searches for and prints
those grade 12 students with less than 12 career credits.
xviii
Narrow Transcript By Department
Two Column, Semester Grades
This transcript was printed, using Report #55, on a dot matrix printer on narrow, 8.5 x 11"
plain paper. Because it is two columns you can get four years on a single piece of paper.
Use this report if you are a semester school with two credit columns, in this case the midyear
column and the final column. These columns, along with the credit earned after each semester, are the only grade columns that print. Because the courses are organized by department
and not by year, attendance data does not appear on the transcript
xx
The bottom of the transcript prints students' rank in class at
the end of a specified period as well as the credits the student
earned in each subject. You define the subject names and
which courses are counted for each subject.
This transcript contains four quadrants with each quadrant
containing a student's record for one year. For example, on
this sample the student's grade 9 record is in the upper left
quadrant. As always, the transcript is totally user customizable. In-other-words, amongst other things, you specify
which report card columns should be included and whether or
not the attendance and teachers' names should be printed.
Only REPORT CARDS PLUS produces transcripts that look
as nice as this. The transcript may be produced in two different ways. This is a sample transcript with a student's courses
sorted by year. The next sample shows one with a student's
courses sorted by subject. Either type may be printed on a
hard stock two color form as well as on plain white paper.
TRANSCRIPT SORTED BY YEAR
The bottom of the transcript prints students' rank in
class at the end of a specified period as well as the
credits the student earned in each subject.
Either type of transcript may be printed in a "standard"
or "semester" format. This is an example of a semester
format in which only semester grades are printed along
with the number of credits earned for each grade. On
the far right for each course are the total number of
credits earned for that course.
Under each subject, a student's courses are listed in the
order they were taken. In-other-words, they are listed
by year. You may define up to ten different subject
areas and identify which courses should be counted for
each of these areas.
This is a sample transcript with a student's courses
sorted by subject. The previous sample shows one
with a student's courses sorted by year.
Semester Transcript Sorted By Subject
This transcript contains four quadrants with each quadrant containing a student's record for one year. For example, on this sample the student's grade 9 record is in the upper left quadrant. As
always, the transcript is totally user customizable. In-otherwords, amongst other things, you specify which report card columns should be included and whether or not the attendance and
teachers' names should be printed.
Only REPORT CARDS PLUS produces transcripts that look as
nice as this. The transcript may be produced in two different
ways. This is a sample transcript with a student's courses sorted
by year. The next sample shows one with a student's courses
sorted by subject. Either type may be printed on a hard stock two
color form as well as on plain white paper.
TRANSCRIPT SORTED BY YEAR
GRADE SEARCH REPORTS
REPORT CARDS PLUS makes it easy to search for
students who received any specific grade or range of
grades for any report card column.
The top report on this page is a grade RANGE
search. It prints in alphabetical order those students
who received grades of from 60 to 65 in any of their
courses for the first marking period. Course and
teacher names are included in the report. In a letter
grading system, a grade RANGE search could be
used to find any student receiving a D+, D, or D-.
To accomplish this, enter a "D-" as the start of the
range and a "D+" as the end of the range.
The bottom report is an EXACT grade search. In
this case it is a search for all students who received
an "I" for "incomplete" during the first marking
period.
Grade Distribution Report By Teacher
Once grades have been entered into the computer, many
reports are available that would take days to put together
by hand. This report shows the distribution of grades
given by each teacher for the report card column of your
choice.
Teachers are listed in alphabetical order. Under teachers'
names are the courses they taught and the number and percent of each type of grade they gave. The last line for
each teacher shows that teacher's totals for all of their
courses. Totals for the entire school appear at the very end
of the report.
Only REPORT CARDS PLUS pays attention to details
such as not splitting a teacher between two pages of the
report. If there isn't enough room for all of the courses of
the next teacher on the current page, it moves to the top of
the next page.
xxiv
Grade Distribution Report By Course & Department
This report is a sample grade distribution report by course and
department for a school using letter grades. Under each
course is the grade distribution for each of its sections. This
report enables you to compare the grades given by different
teachers of the same course.
At the end of each course are the totals for that course and at
the end of courses numbered in the same hundreds are the
totals for that department. In this example, the ENGLISH
department is the "100's department". At the end of the entire
report are the GRAND TOTALS for the entire school.
xxv
Teacher Enrollment Report
This report enables you to easily see each
teacher's work load for any marking period or for
the entire year. Teachers are printed alphabetically with each of their course sections printed
under their names. Next to each course section is
the current enrollment in the section. Lastly, for
each teacher, their total number of students is
printed as well as their average class size.
The report ends with a school summary that
includes the average class size for the entire
school.
xxvi
Scanner Schedule Form
If you have not scheduled your students with SCHEDULING PLUS, this form may used to quickly enter students'
schedules into the computer with a scanner.
Students will use this form to bubble in bubble in both the
course and section number of each section in which they
have been scheduled.
The computer will pre-print students' names and ID numbers on each form so that they will not have to be manually
bubbled.
xxvii
Appendix
xxviii