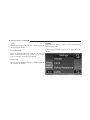
1
86(5ҋ60$18$/
8FRQQHFW7RXFK
70
SECTION
TABLE OF CONTENTS
PAGE
1
INTRODUCTION . . . . . . . . . . . . . . . . . . . . . . . . . . . . . . . . . . . . . . . . . . . . . . . . . . . . . . . . . . . . 3
1
2
Uconnect Touch™ 4.3 SYSTEM . . . . . . . . . . . . . . . . . . . . . . . . . . . . . . . . . . . . . . . . . . . . . . . . . . 11
2
3
Uconnect Touch™ 8.4 SYSTEM . . . . . . . . . . . . . . . . . . . . . . . . . . . . . . . . . . . . . . . . . . . . . . . . . . 35
3
4
SAFETY GUIDELINES . . . . . . . . . . . . . . . . . . . . . . . . . . . . . . . . . . . . . . . . . . . . . . . . . . . . . . . 121
4
INTRODUCTION
CONTENTS
䡵 Introduction . . . . . . . . . . . . . . . . . . . . . . . . . . . 4
▫ Uconnect Touch™ System (4.3) . . . . . . . . . . . . 4
▫ Uconnect Touch™ System (8.4 & 8.4 NAV) . . . . 7
1
4 INTRODUCTION
INTRODUCTION
Uconnect Touch™ System (4.3)
1
2
3
4
—
—
—
—
ON/OFF & Volume Control
Manual Climate Controls
Climate Controls hard-key
Player hard-key
5 — Radio hard-key
6 — Settings hard-key
7 — More hard-key
8 — Screen Off hard-key
9 — Enter/Browse & Tune/Scroll knob
10 — CD slot
INTRODUCTION 5
(1) ON/OFF & VOLUME
(5) RADIO
Press the ON/OFF button to turn the system ON or OFF. Press the RADIO hard-key to enter the Radio Mode. The
Rotate the rotary knob to adjust the Volume.
different tuner modes; AM, FM and SAT can be selected
by touching the corresponding soft-keys in the Radio
NOTE: If the ignition is switched OFF with the radio in
Mode.
standby mode, the radio memorizes the standby mode
when the ignition is turned ON again. Press the ON/OFF (6) SETTINGS
VOLUME Control to turn the radio ON. It is possible to Press the SETTINGS hard-key to access the Settings list.
eject the CD and to display the time if the system is off. Clock, Display, Audio, Bluetooth and Sirius Settings are
described in this manual. See your vehicles Owner’s
(2)(3) CLIMATE CONTROLS
Manual on the DVD for more details.
Manual Climate Controls and Climate Control Hard-key.
Refer to Climate Controls in your vehicles Owner’s (7) MORE
Press the MORE hard-key to access additional options.
Manual on the DVD for further details.
Options available such as: Uconnect™ Phone and Com(4) PLAYER
pass can be accessed by touching the corresponding
Press the PLAYER hard-key to access media sources such
soft-key in the More Menu.
as: Disc, USB Device and AUX as long as the requested
media is present.
1
6 INTRODUCTION
(8) SCREEN OFF
(10) CD SLOT
Press the SCREEN OFF hard-key to turn the touch-screen When inserting a disc, make sure the label is facing up.
OFF. To turn the screen back ON, just touch the screen. Press the Eject button to eject the disc.
(9) ENTER/BROWSE & TUNE/SCROLL
Press the ENTER/BROWSE button to accept a highlighted selection on the screen. Rotate the TUNE/
SCROLL rotary knob to scroll through a list or tune a
radio station.
INTRODUCTION 7
Uconnect Touch™ System (8.4 & 8.4 Nav)
1
1
2
3
4
—
—
—
—
ON/OFF & Volume Control
Manual Climate Control
Radio soft-key
Player soft-key
5
6
7
8
—
—
—
—
Controls soft-key
Climate soft-key
Nav soft-key
Phone soft-key
9— More soft-key
10— Enter/Browse & Tune/Scroll knob
11 — SD Card slot
12 — CD/DVD slot
8 INTRODUCTION
(1) ON/OFF VOLUME
(3) RADIO
Press the ON/OFF button to turn the unit ON or OFF. Press the Radio soft-key to enter the Radio Mode. The
Rotate the rotary knob to adjust the Volume.
different tuner modes; AM, FM and SAT can be selected
by touching the corresponding soft-keys in the Radio
NOTE: If the ignition is switched OFF with the radio in
Mode.
standby mode, the radio memorizes the standby mode
when the ignition is turned ON again. Press the ON/OFF (4) PLAYER
VOLUME Control to turn the radio ON. It is possible to Press the Player soft-key to access media sources such as:
eject the CD and to display the time if the system is off. Disc, USB Device and AUX as long as the requested
The navigation software is always working when the media is present.
ignition is switched ON, even if the radio is in standby
(5) CONTROLS
mode. It is possible to eject the CD and to display the
Press the Controls soft-key to access the Settings list.
time if the unit is switched off.
Controls such as; Heated Seats, Heated Steering Wheel,
(2) CLIMATE CONTROLS (Manual Controls)
Ventilated Seats, etc. can be selected or turned ON/OFF
Refer to Climate Controls in your vehicles Owner’s by touching the corresponding soft-key.
Manual on the DVD for further details.
(6) CLIMATE (On-Screen Controls)
Refer to Climate Controls in your vehicles Owner’s
Manual on the DVD for further details.
INTRODUCTION 9
(7) NAV
Press the Nav soft-key to access the Navigation feature.
Refer to the Navigation section in this manual for further
details.
(10) ENTER/BROWSE & TUNE/SCROLL
Press the ENTER/BROWSE button to accept a highlighted selection on the screen. Rotate the TUNE/
SCROLL rotary knob to scroll through a list or tune a
radio station.
(8) PHONE
Press the Phone soft-key to access the Uconnect™ Phone (11) SD CARD SLOT
feature. Refer to the Uconnect™ Phone section in the Insert an SD Card containing audio media in order to
play them through the vehicles sound system.
Owner’s Manual on the DVD for further details.
(9) MORE
(12) CD/DVD SLOT
Press the More soft-key to access additional options. When inserting a disc, make sure the label is facing up.
Options available such as: Settings and SIRIUS Travel Press the Eject button to eject the disc.
Link can be accessed by touching the corresponding
soft-key in the More Menu.
1
Uconnect Touch™ 4.3 SYSTEM
2
CONTENTS
䡵 Operating Instructions – Radio Mode . . . . . . . . 13
▫ Seek Up/Down . . . . . . . . . . . . . . . . . . . . . . 24
▫ Overview . . . . . . . . . . . . . . . . . . . . . . . . . . . 13
▫ Browse . . . . . . . . . . . . . . . . . . . . . . . . . . . . 24
▫ Common Radio Functions . . . . . . . . . . . . . . . 13
▫ Source . . . . . . . . . . . . . . . . . . . . . . . . . . . . . 24
▫ Seek And Direct Tune Functions . . . . . . . . . . . 14
▫ Info . . . . . . . . . . . . . . . . . . . . . . . . . . . . . . . 24
▫ Setting Presets . . . . . . . . . . . . . . . . . . . . . . . 16
▫ Shuffle . . . . . . . . . . . . . . . . . . . . . . . . . . . . . 24
▫ Audio . . . . . . . . . . . . . . . . . . . . . . . . . . . . . 18
▫ Audio . . . . . . . . . . . . . . . . . . . . . . . . . . . . . 25
▫ Sirius Satellite Radio Mode . . . . . . . . . . . . . . 19
䡵 Operating Instructions – USB/iPod Mode . . . . . 25
䡵 Operating Instructions – CD Mode . . . . . . . . . . 22
▫ Overview . . . . . . . . . . . . . . . . . . . . . . . . . . . 25
▫ Overview . . . . . . . . . . . . . . . . . . . . . . . . . . . 22
▫ Seek Up/Down . . . . . . . . . . . . . . . . . . . . . . 25
12 Uconnect Touch™ 4.3 SYSTEM
▫ Browse . . . . . . . . . . . . . . . . . . . . . . . . . . . . 26
▫ Seek Up/Down . . . . . . . . . . . . . . . . . . . . . . 28
▫ Source . . . . . . . . . . . . . . . . . . . . . . . . . . . . . 26
▫ Source . . . . . . . . . . . . . . . . . . . . . . . . . . . . . 28
▫ Info . . . . . . . . . . . . . . . . . . . . . . . . . . . . . . . 26
▫ Info . . . . . . . . . . . . . . . . . . . . . . . . . . . . . . . 28
▫ Shuffle . . . . . . . . . . . . . . . . . . . . . . . . . . . . . 26
▫ Audio . . . . . . . . . . . . . . . . . . . . . . . . . . . . . 28
▫ Audio . . . . . . . . . . . . . . . . . . . . . . . . . . . . . 26
䡵 Operating Instructions – More & Settings
. . . . . 29
䡵 Operating Instructions – AUX Mode . . . . . . . . . 26
▫ More Main Menu . . . . . . . . . . . . . . . . . . . . . 29
▫ Overview . . . . . . . . . . . . . . . . . . . . . . . . . . . 26
▫ Clock Setting . . . . . . . . . . . . . . . . . . . . . . . . 30
▫ Source . . . . . . . . . . . . . . . . . . . . . . . . . . . . . 27
▫ Settings Main Menu . . . . . . . . . . . . . . . . . . . 31
▫ Audio . . . . . . . . . . . . . . . . . . . . . . . . . . . . . 27
▫ Display . . . . . . . . . . . . . . . . . . . . . . . . . . . . 32
䡵 Operating Instructions – Bluetooth Mode . . . . . . 27
▫ Overview . . . . . . . . . . . . . . . . . . . . . . . . . . . 27
Uconnect Touch™ 4.3 SYSTEM 13
OPERATING INSTRUCTIONS – RADIO MODE
Overview
Touch the Radio hard-key, upper left corner, to enter the
Radio Mode. The different tuner modes; AM, FM, and
SAT, can then, be selected by touching the corresponding
soft-keys on the screen.
Common Radio Functions
The following operations offer the same functionality
across all Radio Modes, and further instructions are
provided where differences exit.
ON/OFF & Volume Control
Push the ON/OFF Volume control knob to turn
on the radio. Push the ON/OFF Volume control knob a second time to turn off the radio.
The radio is equipped with the following modes:
• FM
• AM
• SAT SIRIUS Satellite Radio (if equipped)
The electronic volume control turns continuously (360
degrees) in either direction, without stopping. Turning
the Volume control knob clockwise increases the volume,
and anti-clockwise decreases it.
2
14 Uconnect Touch™ 4.3 SYSTEM
When the audio system is turned on, the sound will be Go
Touch the green GO soft-key to allow you to commit an
set at the same volume level as last played.
entry, at which time, the radio will tune to the entered
Enter/Browse & Tune/Scroll Control
Channel, and close the Direct Tune Screen. The GO
Turn the rotary TUNE/SCROLL control knob
soft-key is only for SIRIUS Satellite radio mode.
clockwise to increase or counterclockwise to
decrease the radio station frequency. Push the Seek and Direct Tune Functions
ENTER/BROWSE button to choose a selection. The Seek Up and Down functions are activated by
touching the double arrow soft-keys to the right and left
Info
of the radio station display, or by pressing the left
Touch the info soft-key to display channel number/
Steering Wheel Audio Control (if equipped) up or down.
frequency, song title, genre and artist. This feature is only
Seek Up
available in FM and SAT modes.
Touch and release the Seek Up soft-key to tune the radio
Exit
to the next listenable station or channel.
The Exit soft-key, provides a means to close the Direct
Tune Screen.
During a Seek Up function, if the radio reaches the
starting station after passing through the entire band two
times, the radio will stop at the station where it began.
Uconnect Touch™ 4.3 SYSTEM 15
Fast Seek Up
Direct Tune
Touch and hold the Seek Up soft-key to advance the radio
through the available stations or channels at a faster rate,
the radio stops at the next available station or channel
when the soft-key is released.
Seek Down
Touch and release the Seek Down soft-key to tune the
radio to the next listenable station or channel.
During a Seek Down function, if the radio reaches the
starting station after passing through the entire band two
times, the radio will stop at the station where it began.
Fast Seek Down
Touch and hold the Seek Down soft-key to advance the
radio through the available stations or channel at a faster
rate, the radio stops at the next available station or
channel when the soft-key is released.
The Direct Tune soft-key screen is available in AM, FM,
and SAT radio modes and can be used to direct tune the
radio to a desired station or channel. Press the Tune
soft-key located at the bottom of the radio screen.
2
16 Uconnect Touch™ 4.3 SYSTEM
Press the available number soft-key to begin selecting a Setting Presets
desired station. Once a number has been entered, any
numbers that are no longer possible (stations that cannot
be reached) will become deactivated / grayed out
If you accidently entered the wrong station number,
touch the CLR soft-key to clear the radio station numbers
and reenter the correct station number.
Once the last digit of a station has been entered, the
DIRECT TUNE screen will close and the system will
automatically tune to that station.
The selected Station or Channel number is displayed in
the Direct Tune text box.
The Presets are available for all Radio Modes, and are
activated by touching any of the four Preset soft keys,
located at the top of the screen.
Uconnect Touch™ 4.3 SYSTEM 17
When you are receiving a station that you wish to All Presets Button
commit into memory, press and hold the desired numbered soft-key for more that 2 seconds or until you hear
a confirmation beep.
The Radio stores up to 12 presets in each of the Radio
modes. A set of 4 presets are visible at the top of the radio
screen.
Touching the ⬙all⬙ soft-key on the radio home screen will
display all of the preset stations for that mode.
Return to Main Radio Screen
You can return to the Main Radio Screen, by either
touching Exit soft-key or pressing the Radio hard-key.
2
18 Uconnect Touch™ 4.3 SYSTEM
Audio
1. Press the SETTINGS hard-key on the right side of the
unit.
2. Then scroll down and press the Audio soft-key to get
to the Audio menu.
3. The Audio Menu shows the following options for you
to customize your audio settings.
• Equalizer
Touch the Equalizer soft-key to adjust the Bass, Mid
and Treble. Use the + or - soft-key to adjust the
equalizer to your desired settings. Press the back
arrow soft-key when done.
• Balance/Fade
Touch the Balance/Fade soft-key to adjust the
sound from the speakers. Use the arrow soft-key to
adjust the sound level from the front and rear or
right and left side speakers. Touch the Center ⬙C⬙
soft-key to reset the balance and fade to the factory
setting. Press the back arrow soft-key when done.
• Speed Adjusted Volume
Touch the Speed Adjusted Volume soft-key to select
between OFF, 1, 2 or 3. This will decrease the radio
volume relative to a decrease in vehicle speed. Press
the back arrow soft-key when done.
4. Touch the Exit soft-key to exit from the Audio Menu.
Uconnect Touch™ 4.3 SYSTEM 19
SIRIUS Satellite Radio Mode
Satellite radio uses direct satellite-to-receiver broadcasting technology to provide clear digital sound, coast to
coast. The subscription service provider is SIRIUS Satellite Radio. This service offers over 130 channels of music,
sports, news, entertainment, and programming for children, directly from its satellites and broadcasting studios.
A one-year SIRIUS Satellite Radio subscription is included.
SIRIUS XM and all related marks and logos are trademarks of SIRIUS XM Radio Inc. and its subsidiaries.
SIRIUS Radio requires a subscription, sold separately
after trial subscription included with vehicle purchase.
Prices and programming are provided by SIRIUS and are
subject to change. Subscriptions governed by Terms &
Conditions available at sirius.com/serviceterms. SIRIUS
Radio U.S. service only available to those at least 18 years
of age in the 48 contiguous United States, D.C., and PR.
Service available in Canada; see www.siriuscanada.ca.
This functionality is only available for radios equipped
with a Satellite receiver. In order to receive satellite radio,
the vehicle needs to be outside with a clear view to the
sky.
If the screen shows Acquiring Signal, you might have to
change the vehicle’s position in order to receive a signal.
In most cases, the satellite radio does not receive a signal
in underground parking garages or tunnels.
No Subscription
Radios equipped with a Satellite receiver, require a
subscription to the Sirius Service. When the Radio does
not have the necessary subscription, the Radio is able to
receive the Traffic/Weather channel only.
2
20 Uconnect Touch™ 4.3 SYSTEM
Acquiring SIRIUS Subscription
When in Satellite mode:
• The SIRIUS Presets are displayed at the top of the
screen.
• The SIRIUS Channel Number is displayed along with
Artist and Song name
• The SIRIUS function soft-keys are displayed on the
bottom.
In addition to the tuning functions common to all Radio
modes, the browse,info, and more hard-key functions are
available in SIRIUS Mode. Touching the more button
slides over the additional functions that are on the second
To activate the SIRIUS subscription, call the toll free level of the bottom bar. This second level stays for
number on the SIRIUS Settings. You will need to provide 10 seconds and then returns to the main top level of the
bottom bar. The second level displays audio, fav, gamthe Sirius ID (SID) located on your vehicle’s screen.
ezone and replay buttons.
The satellite mode is activated by touching the AM/SAT
soft-key located at the bottom of the radio screen. Touch
the AM/SAT soft-key and then touch the SAT soft-key.
Uconnect Touch™ 4.3 SYSTEM 21
Browse
Gamezone
Touch the browse soft-key at the bottom left of the screen Touch the more... soft-key and then the gamezone softto enter the Browse screen
key to access the gamezone feature. This feature provides
you with the ability to Select teams, edit the selection,
The Browse screen in SAT mode provides you the ability
and set Alerts.
to browse by All, Favorites or Genres. You can also access
Gamezone, and Traffic and Weather settings in the Replay
The replay function provides a means to store and replay
Browse screen.
up to 22 minutes of music audio and 48 minutes of talk
Favorites
radio.
Touch the more... soft-key and then the fav soft-key to
access the favorites feature.
Touch the replay soft-key. The play/pause, rewind/
forward and live soft-keys will display at the top of the
The favorites feature enables you to set a favorite artist,
screen, along with the replay time.
or song. The Radio then uses this information to alert you
when either the favorite song, or works by the favorite Replay can be exited by touching the replay soft-key, any
artist are being played at any time by any of the SIRIUS time during the Replay mode.
Channels.
2
22 Uconnect Touch™ 4.3 SYSTEM
touch of the FW soft-key also forwards the content. The
Touch the Pause or Play soft-key to pause playing of the Radio begins playing the content at the point at which the
content at any time that the content is playing live or touch is release.
rewound content. Play can be resumed again by touching Live
of the Pause/Play soft-key.
Touch the Live soft-key to resume playing of Live
content.
Rewind
Play/Pause
Touch the RW soft-key to rewind the content in steps of OPERATING INSTRUCTIONS – CD MODE
5 seconds. Touching the RW soft-key for more than
2 seconds rewinds the content. The Radio begins playing Overview
CD Mode is entered by either inserting a CD or by
the content at the point at which the touch is released.
touching the Player hard-key located left of the display.
Forward
Once in Player Mode, touch the source soft-key and select
Each touch of the FW soft-key forwards the content in Disc.
steps of 5 seconds. Forwarding of the content can only be
A “No Disc” message will be displayed on the screen in
done when the content is previously rewound, and
the Disc mode when a Disc is not present in the Radio.
therefore, can not be done for live content. A continuous
Uconnect Touch™ 4.3 SYSTEM 23
Inserting Compact Disc
Gently insert one CD into the CD player with the CD
label facing up. The CD will automatically be pulled into
the CD player and the CD icon will illuminate on the
radio display. If a CD does not go into the slot more than
1.0 in (2.5 cm), a disc may already be loaded and must be
ejected before a new disc can be loaded.
CAUTION! (Continued)
• Do not use adhesive labels. These labels can peel
away and jam the player mechanism.
• Uconnect Touch™ 4.3 is a single CD player. Do not
attempt to insert a second CD if one is already
loaded.
• Dual-media disc types (one side is a DVD, the
other side is a CD) should not be used, and they
can cause damage to the player.
If you insert a disc with the ignition ON and the radio
ON, the unit will switch to CD mode and begin to play
when you insert the disc. The display will show the track
number, and index time in minutes and seconds. Play EJECT Button - Ejecting a CD
will begin at the start of track 1.
Press the EJECT button to eject the CD.
CAUTION!
• This CD player will accept 4-3/4 in (12 cm) discs
only. The use of other sized discs may damage the
CD player mechanism.
(Continued)
If you have ejected a disc and have not removed it within
10 seconds, it will be reloaded. If the CD is not removed,
the radio will reinsert the CD but will not play it.
A disc can be ejected with the radio and ignition OFF.
2
24 Uconnect Touch™ 4.3 SYSTEM
Seek Up/Down
Touch and release the right arrow soft-key for the next
selection on the CD. Touch and release the left arrow
soft-key to return to the beginning of the current selection, or return to the beginning of the previous selection
if the CD is within the first second of the current
selection.
Browse
Touch the browse soft-key to scroll through and select a
desired track on the CD. Touch the exit soft-key if you
wish to cancel the browse function.
Source
Touch the Source soft-key to select the desired audio
source, CD, AUX or USB. This screen will time out after
Fast Seek Up
a few seconds and return to the main radio screen if no
Touch and hold the right arrow soft-key and the CD selection is made.
player will begin to fast forward through the current
Info
track until the soft-key is released.
Touch the Info soft-key to display the current track
information. Touch the ⬙X⬙ soft-key to cancel this feature.
Fast Seek Down
Touch and hold the left arrow soft-key and the CD player
Shuffle
will begin to rewind through the current track until the
Touch the more... soft-key then the shuffle soft-key to
soft-key is released.
play the selections on the compact disc in random order
to provide an interesting change of pace. Touch the
soft-key a second time to turn this feature off.
Uconnect Touch™ 4.3 SYSTEM 25
Audio
Seek Up/Down
Refer to Operating Instructions – Radio Mode for adjust- Touch and release the right arrow soft-key for the next
ing the audio settings.
selection on the USB/iPod device. Touch and release the
left arrow soft-key to return to the beginning of the
OPERATING INSTRUCTIONS – USB/iPod MODE
current selection, or return to the beginning of the
previous selection if the USB/iPod device is within the
Overview
USB/iPod Mode is entered by either inserting a USB first second of the current selection.
Jump Drive or iPod cable into the USB port or by Fast Seek Up
touching the Player hard-key located left of the display. Touch and hold the right arrow soft-key and the USB/
Once in Player Mode, touch the source soft-key and select iPod device will begin to fast forward through the
USB/iPod.
current track until the soft-key is released.
Inserting USB/iPod Device
Fast Seek Down
Gently insert the USB/iPod device into the USB Port. If Touch and hold the left arrow soft-key and the USB/iPod
you insert a USB/iPod device with the ignition ON and device will begin to rewind through the current track
the radio ON, the unit will switch to USB/iPod mode and until the soft-key is released.
begin to play when you insert the device. The display
will show the track number, and index time in minutes
and seconds. Play will begin at the start of track 1.
2
26 Uconnect Touch™ 4.3 SYSTEM
Browse
Touch the Browse soft-key to select Artist, Albums,
Genres, Songs, Playlists or Folders from the USB/iPod
device. Once the desired selection is made you can chose
from the available media by touching the soft-key. Touch
the exit soft-key if you wish to cancel the browse
function.
Source
Touch the Source soft-key to select the desired audio
source, CD, AUX or USB/iPod. This screen will time out
after a few seconds and return to the main radio screen if
no selection is made.
order to provide an interesting change of pace. Touch the
soft-key a second time to turn this feature off.
Audio
Refer to Operating Instructions – Radio Mode for adjusting the audio settings.
OPERATING INSTRUCTIONS – AUX MODE
Overview
AUX Mode is entered by inserting a AUX device using a
cable with a 3.5 mm audio jack into the AUX port or by
touching the Player hard-key located left of the display.
Once in Player Mode, touch the source soft-key and select
AUX.
Info
Touch the Info soft-key to display the current track Inserting Auxiliary Device
information. Touch the ⬙X⬙ soft-key to cancel this feature. Gently insert the Auxiliary device cable into the AUX
Port. If you insert a Auxiliary device with the ignition ON
Shuffle
Touch the more... soft-key then the shuffle soft-key to and the radio ON, the unit will switch to AUX mode and
play the selections on the USB/iPod device in random begin to play when you insert the device cable.
Uconnect Touch™ 4.3 SYSTEM 27
Controlling the Auxiliary Device
The control of the auxiliary device (e.g., selecting playlists, play, fast forward, etc.) cannot be provided by the
radio; use the device controls instead. Adjust the volume
with the ON/OFF VOLUME rotary knob, or with the
volume of the attached device.
Audio
Refer to Operating Instructions – Radio Mode for adjusting the audio settings.
OPERATING INSTRUCTIONS – Bluetooth MODE
Overview
NOTE: The vehicle radio unit is acting as the amplifier Bluetooth Streaming Audio (BTSA) or Bluetooth Mode is
for audio output from the Auxiliary device. Therefore if entered by pairing a Bluetooth device, containing music,
the volume control on the Auxiliary device is set too low, to the Uconnect Touch™ system.
there will be insufficient audio signal for the radio unit to Before proceeding, the Bluetooth device needs to be
play the music on the device.
paired through Uconnect™ Phone in order to communicate with the Uconnect Touch™ System.
Source
Touch the Source soft-key to select the desired audio NOTE: See the pairing procedure in the Owner’s
source, CD, AUX or USB. This screen will time out after Manual on the DVD for more details.
a few seconds and return to the main radio screen if no
Once the Bluetooth device is paired to the Uconnect
selection is made.
Touch™ System, touch the Player hard-key located on
the left side of the display. Once in Player Mode, touch
the source soft-key and select Bluetooth.
2
28 Uconnect Touch™ 4.3 SYSTEM
Seek Up/Down
Touch and release the right arrow soft-key for the next
selection on the Bluetooth device. Touch and release the
left arrow soft-key to return to the beginning of the
current selection, or return to the beginning of the
previous selection if the Bluetooth device is within the
first second of the current selection.
Source
Touch the Source soft-key to select the desired audio
source, CD, USB/iPod, AUX or Bluetooth. This screen
will time out after a few seconds and return to the main
radio screen if no selection is made.
Info
Touch the Info soft-key to display the current track
Fast Seek Up
information. Touch the Info soft-key a second time to
Touch and hold the right arrow soft-key and the cancel this feature.
Bluetooth device will begin to fast forward through the
Audio
current track until the soft-key is released.
Refer to Operating Instructions – Radio Mode for adjusting the audio settings.
Fast Seek Down
Touch and hold the left arrow soft-key and the Bluetooth
device will begin to rewind through the current track
until the soft-key is released.
Uconnect Touch™ 4.3 SYSTEM 29
OPERATING INSTRUCTIONS – MORE &
SETTINGS
More Main Menu
Press the More hard-key to display the More Main Menu.
The More Main Menu contains the following options:
• Economy (If Equipped)
• Outlet (If Equipped)
Refer to ⬙Understanding The Features Of Your Vehicle⬙, ⬙Power Inverter⬙ section in your vehicle Owner’s Manual on the DVD for details.
• Time
Refer to this section for details.
Refer to ⬙Understanding Your Instrument Panel⬙,
• Compass
⬙Uconnect Touch™ System⬙ section in your vehicle
Refer to ⬙Understanding Your Instrument Panel⬙,
Owner’s Manual on the DVD for details.
⬙Uconnect Touch™ System⬙ section in your vehicle
• Phone
Owner’s Manual on the DVD for details.
Refer to ⬙Understanding The Features Of Your Vehicle⬙, ⬙Uconnect Touch™ 4.3⬙ section in your vehicle
Owner’s Manual on the DVD for details.
2
30 Uconnect Touch™ 4.3 SYSTEM
Clock Setting
1. There are two ways to enter the clock setting procedure on the Uconnect Touch™ 4.3.
1. Press the More hard-key on the right side of the
display, next press the Time soft-key and then press the
Set soft-key.
2. Press the Settings hard-key on the right side of the
display, then press the Clock soft-key. The Time setting
screen is displayed and the clock can be adjusted as
described in the following procedure.
NOTE: In the Clock Setting Menu you can also select 3. Once the time is set press the ⬙Done⬙ soft-key to exit
Display Clock. Display Clock turns the clock display in the time screen.
the status bar on or off.
2. Touch the Up or Down arrows to adjust the hours or
minutes, next select the AM or PM soft-key. You can also
select 12hr or 24hr format by touching the desires softkey.
Uconnect Touch™ 4.3 SYSTEM 31
Settings Main Menu
• Doors & Locks
Press the Settings hard-key to display the Settings Main
Refer to ⬙Understanding Your Instrument Panel⬙,
Menu. The Settings Main Menu contains the following
⬙Uconnect Touch™ System⬙ section in your vehicle
options:
Owner’s Manual on the DVD for details.
• Display
• Heated Seats
Refer to this section for details.
Refer to ⬙Understanding The Features Of Your Ve• Clock
hicle⬙, ⬙Seats⬙ section in your vehicle Owner’s Manual
on the DVD for details.
Refer to this section for details.
• Safety/Assistance
Refer to ⬙Understanding Your Instrument Panel⬙,
⬙Uconnect Touch™ System⬙ section in your vehicle
Owner’s Manual on the DVD for details.
• Lights
Refer to ⬙Understanding Your Instrument Panel⬙,
⬙Uconnect Touch™ System⬙ section in your vehicle
Owner’s Manual on the DVD for details.
• Engine Off Options
Refer to ⬙Understanding Your Instrument Panel⬙,
⬙Uconnect Touch™ System⬙ section in your vehicle
Owner’s Manual on the DVD for details.
• Compass Settings
Refer to ⬙Understanding Your Instrument Panel⬙,
⬙Uconnect Touch™ System⬙ section in your vehicle
Owner’s Manual on the DVD for details.
2
32 Uconnect Touch™ 4.3 SYSTEM
• Audio
Display
Your Uconnect Touch™ display can be customized by
Refer to the Operating Instructions – Radio section in
following the steps:
this manual for details.
1. Press the SETTINGS hard-key on the right side of the
• Phone/Bluetooth
display.
Refer to ⬙Understanding The Features Of Your Vehicle⬙, ⬙Uconnect Touch™ 4.3⬙ section in your vehicle
Owner’s Manual on the DVD for details.
• Sirius Setup
Refer to the Operating Instructions – Radio section in
this manual for details.
2. Then press the Display soft-key.
Uconnect Touch™ 4.3 SYSTEM 33
3. The Display Menu shows the following options for
you to customize your display.
• Brightness
Touch the Brightness soft-key and use the + or soft-keys to adjust the brightness of the display
screen with the headlights on or off. Press the back
arrow soft-key when done.
• Mode
• Units
Touch the Units soft-key to select between U.S. and
Metric units of measure. Press the back arrow
soft-key when done.
• Touch Screen Beep
Touch the Touch Screen Beep soft-key to turn the
ON or OFF the sound heard when a screen soft-key
is pressed. Press the back arrow soft-key when done.
Touch the Mode soft-key to adjust the display screen 4. Touch the Exit soft-key to exit from the Display Menu.
brightness for Day, Night or Auto selection. Press
the back arrow soft-key when done.
• Language
Touch the Language soft-key to select between
English, French or Spanish. Press the back arrow
soft-key when done.
2
Uconnect Touch™ 8.4 SYSTEM
CONTENTS
䡵 Operating Instructions – Radio Mode . . . . . . . . 38
▫ Overview . . . . . . . . . . . . . . . . . . . . . . . . . . . 53
▫ Overview . . . . . . . . . . . . . . . . . . . . . . . . . . . 38
▫ Seek Up/Down . . . . . . . . . . . . . . . . . . . . . . 55
▫ Common Radio Functions . . . . . . . . . . . . . . . 38
▫ Browse . . . . . . . . . . . . . . . . . . . . . . . . . . . . 55
▫ Seek And Direct Tune Functions . . . . . . . . . . . 39
▫ Source . . . . . . . . . . . . . . . . . . . . . . . . . . . . . 55
▫ Setting Presets . . . . . . . . . . . . . . . . . . . . . . . 41
▫ Repeat . . . . . . . . . . . . . . . . . . . . . . . . . . . . . 55
▫ Sirius Satellite Radio Mode . . . . . . . . . . . . . . 43
▫ Shuffle . . . . . . . . . . . . . . . . . . . . . . . . . . . . . 56
▫ Browse In SAT . . . . . . . . . . . . . . . . . . . . . . . 47
▫ Info . . . . . . . . . . . . . . . . . . . . . . . . . . . . . . . 56
▫ Audio . . . . . . . . . . . . . . . . . . . . . . . . . . . . . 50
▫ Tracks . . . . . . . . . . . . . . . . . . . . . . . . . . . . . 56
䡵 Operating Instructions – Disc Mode . . . . . . . . . 53
▫ Audio . . . . . . . . . . . . . . . . . . . . . . . . . . . . . 56
3
36 Uconnect Touch™ 8.4 SYSTEM
䡵 Operating Instructions – USB/iPod Mode . . . . . 57
▫ Audio . . . . . . . . . . . . . . . . . . . . . . . . . . . . . 64
▫ Overview . . . . . . . . . . . . . . . . . . . . . . . . . . . 57
䡵 Operating Instructions – SD Card Mode . . . . . . 64
▫ Seek Up/Down . . . . . . . . . . . . . . . . . . . . . . 58
▫ Overview . . . . . . . . . . . . . . . . . . . . . . . . . . . 64
▫ Browse . . . . . . . . . . . . . . . . . . . . . . . . . . . . 58
▫ Seek Up/Down . . . . . . . . . . . . . . . . . . . . . . 65
▫ Source . . . . . . . . . . . . . . . . . . . . . . . . . . . . . 61
▫ Browse . . . . . . . . . . . . . . . . . . . . . . . . . . . . 65
▫ Repeat . . . . . . . . . . . . . . . . . . . . . . . . . . . . . 61
▫ Source . . . . . . . . . . . . . . . . . . . . . . . . . . . . . 68
▫ Shuffle . . . . . . . . . . . . . . . . . . . . . . . . . . . . . 62
▫ Repeat . . . . . . . . . . . . . . . . . . . . . . . . . . . . . 68
▫ Info . . . . . . . . . . . . . . . . . . . . . . . . . . . . . . . 62
▫ Shuffle . . . . . . . . . . . . . . . . . . . . . . . . . . . . . 69
▫ Tracks . . . . . . . . . . . . . . . . . . . . . . . . . . . . . 62
▫ Info . . . . . . . . . . . . . . . . . . . . . . . . . . . . . . . 69
▫ Audio . . . . . . . . . . . . . . . . . . . . . . . . . . . . . 62
▫ Tracks . . . . . . . . . . . . . . . . . . . . . . . . . . . . . 69
䡵 Operating Instructions – AUX Mode . . . . . . . . . 63
▫ Audio . . . . . . . . . . . . . . . . . . . . . . . . . . . . . 69
▫ Overview . . . . . . . . . . . . . . . . . . . . . . . . . . . 63
䡵 Operating Instructions – Bluetooth Mode . . . . . . 70
▫ Source . . . . . . . . . . . . . . . . . . . . . . . . . . . . . 64
▫ Overview . . . . . . . . . . . . . . . . . . . . . . . . . . . 70
Uconnect Touch™ 8.4 SYSTEM 37
▫ Seek Up/Down . . . . . . . . . . . . . . . . . . . . . . 70
▫ Navigation Voice Commands . . . . . . . . . . . . . 92
▫ Source . . . . . . . . . . . . . . . . . . . . . . . . . . . . . 70
▫ Customizing The Settings . . . . . . . . . . . . . . . 95
▫ Repeat . . . . . . . . . . . . . . . . . . . . . . . . . . . . . 71
▫ Garmin威 Traffic . . . . . . . . . . . . . . . . . . . . . . 97
▫ Info . . . . . . . . . . . . . . . . . . . . . . . . . . . . . . . 71
▫ Sirius Travel Link . . . . . . . . . . . . . . . . . . . . . 99
▫ Tracks . . . . . . . . . . . . . . . . . . . . . . . . . . . . . 71
▫ Updating The Software . . . . . . . . . . . . . . . . 101
▫ Audio . . . . . . . . . . . . . . . . . . . . . . . . . . . . . 71
▫ Updating The Map Data . . . . . . . . . . . . . . . 102
䡵 Operating Instructions – Navigation (8.4N
Only). . . . . . . . . . . . . . . . . . . . . . . . . . . . . . . . 72
▫ Safety Precautions And Important
Information . . . . . . . . . . . . . . . . . . . . . . . . 102
▫ Getting Started . . . . . . . . . . . . . . . . . . . . . . . 72 䡵 Operation Instructions – More . . . . . . . . . . . . 114
▫ Find It And Go! . . . . . . . . . . . . . . . . . . . . . . 73
▫ More Main Menu . . . . . . . . . . . . . . . . . . . . 114
▫ Where To? . . . . . . . . . . . . . . . . . . . . . . . . . . 79
▫ Settings Main Menu . . . . . . . . . . . . . . . . . . 114
▫ Favorites . . . . . . . . . . . . . . . . . . . . . . . . . . . 83
▫ Display . . . . . . . . . . . . . . . . . . . . . . . . . . . 116
▫ The Main Pages . . . . . . . . . . . . . . . . . . . . . . 86
▫ Clock Setting . . . . . . . . . . . . . . . . . . . . . . . 118
▫ Creating And Editing Routes . . . . . . . . . . . . . 90
3
38 Uconnect Touch™ 8.4 SYSTEM
OPERATING INSTRUCTIONS – RADIO MODE
Overview
Touch the RADIO Soft Key, bottom left corner, to enter
the Radio Mode. The different tuner modes; AM, FM, and
SAT, can then, be selected by touching the corresponding
soft-keys in the Radio mode.
Common Radio Functions
The following operations offer the same functionality
across all Radio Modes, and further instructions are
provided where differences exit.
ON/OFF & Volume Control
Push the ON/OFF Volume control knob to turn
on the radio. Push the ON/OFF Volume control knob a second time to turn off the radio.
The radio is equipped with the following modes:
• FM
• AM
• SAT SIRIUS Satellite Radio (if equipped)
The electronic volume control turns continuously (360
degrees) in either direction, without stopping. Turning
the Volume control knob clockwise increases the volume,
and anti-clockwise decreases it.
Uconnect Touch™ 8.4 SYSTEM 39
When the audio system is turned on, the sound will be Screen Close
The Red X Soft key at the top right, provides a means to
set at the same volume level as last played.
close the Direct Tune Screen. The Direct Tune Screen also
Tune/Scroll Control
auto closes if no activity occurs within 10 seconds.
Turn the rotary TUNE/SCROLL control knob
clockwise to increase or counterclockwise to Seek and Direct Tune Functions
decrease the radio station frequency. Push the The Seek Up and Down functions are activated by
ENTER/BROWSE button to choose a selection. touching the double arrow soft-keys to the right and left
of the radio station display, or by pressing the left
Undo
Steering Wheel Audio Control (if equipped) up or down.
You can backspace an entry by touching the bottom left
Undo soft key.
Seek Up
Touch and release the Seek Up soft-key to tune the radio
GO
to the next listenable station or channel.
When touched, the green GO soft key allows the you to
commit an entry, at which time the radio will tune to the During a Seek Up function, if the radio reaches the
entered station or channel and close the Direct Tune starting station after passing through the entire band two
Screen.
times, the radio will stop at the station where it began.
3
40 Uconnect Touch™ 8.4 SYSTEM
Fast Seek Up
Direct Tune
Touch and hold the Seek Up soft-key to advance the radio
through the available stations or channels at a faster rate,
the radio stops at the next available station or channel
when the soft-key is released.
Seek Down
Touch and release the Seek Down soft-key to tune the
radio to the next listenable station or channel.
During a Seek Down function, if the radio reaches the
starting station after passing through the entire band two
times, the radio will stop at the station where it began.
Fast Seek Down
Touch and hold the Seek Down soft-key to advance the
radio through the available stations or channel at a faster
rate, the radio stops at the next available station or
channel when the soft-key is released.
Press the Tune soft-key located at the bottom of the radio
screen. The Direct Tune soft-key screen is available in
AM, FM, and SAT radio modes and can be used to direct
tune the radio to a desired station or channel.
Uconnect Touch™ 8.4 SYSTEM 41
The selected Station or Channel number is displayed in
the Direct Tune text box.
Setting Presets
The Presets are available for all Radio Modes, and are
activated by touching any of the six Preset soft keys,
located at the top of the screen.
When you are receiving a station that you wish to
commit into memory, press and hold the desired numbered soft-key for more that 2 seconds or until you hear
a confirmation beep.
The Radio stores up to 12 presets in each of the Radio
Press the available number soft-key to begin selecting a
modes. A set of 6 presets are visible at the top of the radio
desired station. Once a number has been entered, any
screen.
numbers that are no longer possible (stations that cannot
be reached) will become deactivated / grayed out
You can switch between the two radio presets by touching the arrow soft key located in the upper right of the
Once the last digit of a station has been entered, the
radio screen.
DIRECT TUNE screen will close and the system will
automatically tune to that station.
3
42 Uconnect Touch™ 8.4 SYSTEM
Browse in AM/FM
Scrolling Preset List
When in either AM or FM, the Browse Screen provides a Once in the Browse Presets screen, you can scroll the
means to edit the Presets List and is entered by touching preset list by rotation of the Tune Knob, or by touching
the browse soft key.
the Up and Down arrow keys, located on the right of the
screen.
Uconnect Touch™ 8.4 SYSTEM 43
Preset Selection from List
SIRIUS Satellite Radio Mode
A Preset can be selected by touching any of the listed
Presets, or by pressing the ENTER/BROWSE button on
the Tune Knob to select the currently highlighted Preset.
When selected, the radio tunes to the station stored in the
Preset and returns to the main radio screen.
3
Deleting Presets
A Preset can be deleted in the Presets Browse screen by
touching the Trash Can Icon for the corresponding Preset.
Return to Main Radio Screen
You can return to the Main Radio Screen, by touching the
X soft key when in the Browse Presets screen.
Satellite radio uses direct satellite-to-receiver broadcasting technology to provide clear digital sound, coast to
coast. The subscription service provider is SIRIUS Satellite Radio. This service offers over 130 channels of music,
44 Uconnect Touch™ 8.4 SYSTEM
sports, news, entertainment, and programming for children, directly from its satellites and broadcasting studios.
A one-year SIRIUS Satellite Radio subscription is included.
If the screen shows Acquiring Signal, you might have to
change the vehicle’s position in order to receive a signal.
In most cases, the satellite radio does not receive a signal
in underground parking garages or tunnels.
SIRIUS XM and all related marks and logos are trademarks of SIRIUS XM Radio Inc. and its subsidiaries.
SIRIUS Radio requires a subscription, sold separately
after trial subscription included with vehicle purchase.
Prices and programming are provided by SIRIUS and are
subject to change. Subscriptions governed by Terms &
Conditions available at sirius.com/serviceterms. SIRIUS
Radio U.S. service only available to those at least 18 years
of age in the 48 contiguous United States, D.C., and PR.
Service available in Canada; see www.siriuscanada.ca.
No Subscription
Radios equipped with a Satellite receiver, require a
subscription to the Sirius Service. When the Radio does
not have the necessary subscription, the Radio is able to
receive the Traffic/Weather channel only.
Acquiring SIRIUS Subscription
To activate the Sirius subscription, call the toll free
number on the Weather channel. You will need to provide the Sirius ID (SID) located at the bottom of the
Channel 0 screen.
This functionality is only available for radios equipped
The Satellite Mode is activated by a touch of the SAT
with a Satellite receiver. In order to receive satellite radio,
soft-key.
the vehicle needs to be outside with a clear view to the
sky.
Uconnect Touch™ 8.4 SYSTEM 45
When in Satellite mode:
• The SAT button is highlighted blue.
In addition to the tuning Operation functions common to
all Radio modes, the replay, Traffic/Weather Jump, and
fav soft-key functions are available in SIRIUS Mode.
• The SIRIUS Presets are displayed at the top of the
Replay
screen.
The replay function provides a means to store and replay
• The Genre is displayed below the Presets Bar.
up to 22 minutes of music audio and 48 minutes of talk
radio.
• The SIRIUS Channel Number is displayed in the
center.
Touch the replay soft-key. The play/pause, rewind/
forward and live soft-keys will display at the top of the
• The Program Information is displayed at the bottom of
screen, along with the replay time.
the Channel Number.
Replay can be exited by touching the replay soft-key, any
• The SIRIUS function soft-keys are displayed below the
time during the Replay mode.
Program Information.
Play/Pause
Tuning is done by operating the Tune Knob or by Direct
Tune, similar to other Radio Bands, see Presets, browse, Touch the Pause or Play soft-key to pause playing of the
content at any time that the content is playing live or
Tune Knob, and Direct Tune.
rewound content. Play can be resumed again by touching
of the Pause/Play soft-key.
3
46 Uconnect Touch™ 8.4 SYSTEM
Rewind
Favorites
Touch the RW soft-key to rewind the content in steps of Touch the fav. soft-key to activate the favorites menu,
5 seconds. Touching the RW soft-key for more than which will time out in 5 seconds in absence of user
2 seconds rewinds the content. The Radio begins playing interaction.
the content at the point at which the touch is released.
You can exit the Favorites Menu by a touch of the X in the
top right corner.
Forward
Each touch of the FW soft-key forwards the content in
steps of 5 seconds. Forwarding of the content can only be
done when the content is previously rewound, and
therefore, can not be done for live content. A continuous
touch of the FW soft-key also forwards the content. The
Radio begins playing the content at the point at which the
touch is release.
Live
The favorites feature enables you to set a favorite artist,
or song that is currently playing. The Radio then uses this
information to alert you when either the favorite song, or
favorite artist are being played at any time by any of the
SIRIUS Channels.
The maximum number of favorites that can be stored in
the Radio is 50.
Fav. Artist
Touch the Live soft-key to resume playing of Live While the song is playing to set a Favorite Artist, touch
content.
the fav. soft-key and then the Fav. Artist soft-key.
Uconnect Touch™ 8.4 SYSTEM 47
Fav. Song
Browse in SAT
While the song is playing to set a Favorite Song, touch the
fav. soft-key and then the Fav Song soft-key.
Jump
Touch the Jump soft-key (Curved Arrow) to tune to a
SIRIUS Traffic and Weather channel. To set a Traffic &
Weather alert for any one of the cities in the Jump Browse
list, see Browse in SAT.
3
When the Jump soft-key (Curved Arrow) is touched, the
Jump Traffic & Weather channel is tuned.
If the Traffic/Weather alert City is not set, you are
presented with a pop up to allow you to select the Touch the browse soft-key to edit Presets, Favorites,
favorite city using the Browse Screen.
Game Zone, and Jump settings, along with providing the
SIRIUS Channel List.
This Screen contains many sub menus. You can exit a sub
menu to get back to a parent menu by a touch of the Back
Arrow.
48 Uconnect Touch™ 8.4 SYSTEM
All
Touch the All soft-key at the left of the Browse Screen.
Channel List
Touch the Channel List to display all the SIRIUS Channel
Numbers along with the corresponding Genre. You can
scroll the Channel list by touching the up and down
arrows, located on the right side of the screen. Scrolling
can also be done by operating the Tune/Scroll Knob.
Genre
You can scroll the Presets list touching the up and down
arrows, located at the right side of the screen. Scrolling
can also be done by operating the Tune/Scroll Knob as
well.
Preset Selection
A Preset can be selected by touching any of the listed
Presets, or by pressing the ENTER/BROWSE button on
the Tune Knob to select the currently highlighted Preset.
When selected, the Radio tunes to the station stored in
the Preset, and returns to the main Radio screen.
Touch the Genre button to display a list of Genres. You
can select any desired Genre by touching the Genre list, at Deleting a Preset
which point, the Radio tunes to a channel with the A Preset can be deleted in the Presets Browse screen by
touching the Trash Can Icon for the corresponding Preset.
content in the selected Genre.
Presets
Favorites
Touch the Presets soft-key located at the left of the Touch the Favorites soft-key, located at the left of the
Browse screen.
Browse screen.
Uconnect Touch™ 8.4 SYSTEM 49
The Favorites menu provides a means to Edit the Favorites list and to configure the Alert Settings, along with
providing a list of Channels currently airing any of the
items in the Favorites list.
Alert Settings
Touch the Alert Setting tab at the top of the screen. The
Alert Settings menu allows you to choose from a Visual
alert or Audible and Visual alert when one of your
You can scroll the Favorites list touching the up and favorites is airing on any of the SIRIUS channels.
down arrows, located at the right side of the screen.
Game Zone
Scrolling can also be done by operating the Tune/Scroll
Touch the Game Zone soft-key, located at the left of the
Knob as well.
Browse screen. This feature provides you with the ability
to select teams, edit the selection, and set alerts.
On Air
Touch the On-Air tab at the top of the screen. The On-Air On Air
list provides a list of Channels currently airing any of the
Touch the On-Air tab at the top of the screen. The On-Air
items in the Favorites list, and touching any of the items
list provides a list of Channels currently airing any of the
in the list tunes the radio to that channel.
items in the Selections list, and touching any of the items
in the list tunes the radio to that channel.
Remove Favorites
Touch the Remove Favorites tab at the top of the screen. Select Teams
Touch the Delete All soft-key to delete all of the Favorites
or touch the Trash Can icon next to the Favorite to be Touch the Select Teams soft-key to activate the League
Scroll list. Touch the chosen league and a scroll list of all
deleted.
3
50 Uconnect Touch™ 8.4 SYSTEM
teams within the league will appear, then you can select Jump
a team by touching the corresponding box. A check mark Touch the Jump (Curved Arrow) soft-key, located at the
left of the Browse Screen to select a City for Traffic and
appears for all teams that are chosen.
Weather Reports
Remove Selection
Touch the Remove Selection tab at the top of the screen. Touch the Up and Down arrows to the right side of the
Touch the Delete All soft-key to delete all of the Selections list to view all the available cities. This operation can also
or touch the Trash Can icon next to the Selection to be be done with operation of the Scroll/Tune Knob.
deleted.
Alert Settings
Touch the Alert Setting tab at the top of the screen. The
Alert Settings menu allows you to choose from “Alert me
to on-air games upon start” or “Alert upon score update”
or both when one or more of your selections is airing on
any of the SIRIUS channels.
Touch the check box next to the desired City. A check
mark appears besides the selected City.
Audio
Touch of the Audio soft-key to activate the Audio settings
screen to adjust Balance\Fade, Equalizer, And Speed
Adjusted Volume.
You can return to the Radio screen by touching the X
located at the top right.
Uconnect Touch™ 8.4 SYSTEM 51
Balance/Fade
Equalizer
Touch the Balance/Fade soft-key to Balance audio be- Touch the Equalizer soft-key to activate the Equalizer
tween the front speakers or fade the audio between the screen.
rear and front speakers.
3
Touch the + or - soft-keys, or by touching and dragging
Touching the Front, Rear, Left, or Right soft-keys or touch over the level bar for each of the equalizer bands. The
and drag the blue Speaker Icon to adjust the level value, which spans between ±9, is displayed at the
Balance/Fade.
bottom of each of the Bands.
52 Uconnect Touch™ 8.4 SYSTEM
Speed Adjusted Volume
Music Info Cleanup
Touch the Speed Adjusted Volume soft-key to activate the Touch the On soft-key to activate the Music Info Cleanup.
Speed Adjusted Volume screen.
Touch Off to deactivate this feature.
The Speed Adjusted Volume is adjusted by touching of Music Info Cleanup, powered by Gracenote威, organizes
the Off, 1, 2 or 3 soft-keys. This alters the automatic and cleans up your music on your connected device so
adjustment of the audio volume with variation to vehicle that it is easier to search or browse.
speed.
Uconnect Touch™ 8.4 SYSTEM 53
Surround Sound
OPERATING INSTRUCTIONS – DISC MODE
Overview
Disc Mode is entered by either inserting a Disc or by
touching the Player soft-key located on the bottom of the
display. Once in Player Mode, touch the source soft-key
and select Disc.
Touch the On soft-key to activate Surround Sound. Touch
Off to deactivate this feature.
Surround sound technology delivers an immersive, accurate sound-stage to every seating position. This surround effect is available for audio from any source.
3
54 Uconnect Touch™ 8.4 SYSTEM
A “No Disc” message will be displayed on the screen in
the Disc mode when a Disc is not present in the Radio.
CAUTION!
Inserting Compact Disc
Gently insert one Disc into the Disc player with the Disc
label facing up. The Disc will automatically be pulled
into the player and the Disc icon will illuminate on the
radio display. If a Disc does not go into the slot more than
1.0 in (2.5 cm), a disc may already be loaded and must be
ejected before a new disc can be loaded.
• This Disc player will accept 4-3/4 in (12 cm) discs
only. The use of other sized discs may damage the
Disc player mechanism.
• Do not use adhesive labels. These labels can peel
away and jam the player mechanism.
• Uconnect Touch™ 8.4 is a single Disc player. Do
not attempt to insert a second Disc if one is already
loaded.
If you insert a disc with the ignition ON and the radio
ON, the unit will switch from to Disc mode and begin to EJECT Button - Ejecting a Disc
play when you insert the disc. The display will show the
Press the EJECT button to eject the Disc.
track number, and index time in minutes and seconds.
Play will begin at the start of track 1.
If you have ejected a disc and have not removed it within
10 seconds, it will be reloaded. If the Disc is not removed,
the radio will reinsert the Disc but will not play it.
A disc can be ejected with the radio and ignition OFF.
Uconnect Touch™ 8.4 SYSTEM 55
Seek Up/Down
Touch and release the right arrow soft-key for the next
selection on the Disc. Touch and release the left arrow
soft-key to return to the beginning of the current selection, or return to the beginning of the previous selection
if the Disc is within the first second of the current
selection.
you can browse through the contents of the Disc. If
supported by the device, you can browse by Folders,
Artists, Playlists, Albums, Songs, etc. Touch the desired
soft-key on the left side of the screen. The center of the
browse window shows items and it’s sub-functions,
which can be scrolled by touching the Up and Down
soft-keys to the right. The Scroll/Tune knob can also be
used to scroll.
Fast Seek Up
Touch and hold the right arrow soft-key and the Disc Source
player will begin to fast forward through the current Touch the Source soft-key to select the desired audio
source, Disc, USB/iPod, SD Card, AUX or Bluetooth. This
track until the soft-key is released.
screen will time out after a few seconds and return to the
Fast Seek Down
main radio screen if no selection is made.
Touch and hold the left arrow soft-key and the Disc
player will begin to rewind through the current track Repeat
Touch the repeat soft-key to toggle the repeat functionuntil the soft-key is released.
ality. The Repeat soft-key is highlighted when active. The
Browse
Radio will continue to play the current track, repeatedly,
Touch the browse soft-key to display the browse window.
as long as the repeat is active.
The left side of the browse window displays a list of ways
3
56 Uconnect Touch™ 8.4 SYSTEM
Shuffle
Touch the shuffle soft-key to play the selections on the
compact disc in random order to provide an interesting
change of pace. Touch the soft-key a second time to turn
this feature off.
Info
Touch the Info soft-key to display the current track
information. Touch the Info soft-key a second time to
cancel this feature.
Tracks
Touch the trks soft-key to display a pop up with the Song
List. The currently playing song is indicated by an arrow Touching the trks soft-key while the pop up is displayed
will close the pop up.
and lines above and below the song title.
Audio
Refer to Operating Instructions – Radio Mode for adjusting the audio settings.
Uconnect Touch™ 8.4 SYSTEM 57
OPERATING INSTRUCTIONS – USB/iPod MODE
3
Overview
USB/iPod Mode is entered by either inserting a USB
device or iPod and cable into the USB Port or by touching
the Player soft-key located on the bottom of the display.
Once in Player Mode, touch the source soft-key and select
iPod.
Inserting USB/iPod Device
Gently insert the USB/iPod device into the USB Port. If
you insert a USB/iPod device with the ignition ON and
the radio ON, the unit will switch to USB/iPod mode and
begin to play when you insert the device. The display
will show the track number, and index time in minutes
and seconds. Play will begin at the start of track 1.
58 Uconnect Touch™ 8.4 SYSTEM
Seek Up/Down
Touch and release the right arrow soft-key for the next
selection on the USB device/iPod. Touch and release the
left arrow soft-key to return to the beginning of the
current selection, or return to the beginning of the
previous selection if the USB device/iPod is within the
first second of the current selection.
you can browse through the contents of the USB device/
iPod. If supported by the device, you can browse by
Folders, Artists, Playlists, Albums, Songs, etc. Touch the
desired soft-key on the left side of the screen. The center
of the browse window shows items and it’s subfunctions, which can be scrolled by touching the Up and
Down soft-keys to the right. The Scroll/Tune knob can
also be used to scroll.
Fast Seek Up
Touch and hold the right arrow soft-key and the USB ABC Jump
device/iPod will begin to fast forward through the Touch the ABC Jump soft-key tab at the top of the screen
to search an alpha numeric keypad used to search by
current track until the soft-key is released.
letter/number for a certain Folder, Artist, Song, Album,
Fast Seek Down
or Genre. Touch one letter to select all contents that start
Touch and hold the left arrow soft-key and the USB
with that letter. Touch the 123 soft-key to display all
device/iPod will begin to rewind through the current
contents that start with numbers. Touch the 123 soft-key
track until the soft-key is released.
again to return to letters. Touch the X soft-key to exit the
Browse
ABC Jump feature.
Touch the browse soft-key to display the browse window.
The left side of the browse window displays a list of ways
Uconnect Touch™ 8.4 SYSTEM 59
NOTE: Many features of this system are speed dependent. For your own safety these features may be grayed
out and not accessible while the vehicle is in motion. Pull
over at a safe location to complete your task.
Search
Touch the Search soft-key tab at the top of the screen to
display the Keyboard. This allows you to enter a folder or
file name to be searched.
3
Up Arrow
Touch the Up Arrow soft-key to toggle between Upper
Case and Lower Case keys.
60 Uconnect Touch™ 8.4 SYSTEM
ABC, ÅØÜ and 1234!&#@
Touch the ABC key to activate a keyboard with Alphabetic characters, or touch the ÅØÜ to activate a keyboard
with accented characters or touch the 1234!&#@ key to
activate a keyboard with Numeric plus Special
characters.
Folders – If Equipped
Touch the Folders soft-key on the left side of the screen to
display the Folders scroll menu. The Folders list consists
of folders and files sorted alphanumerically, followed by
a list of files sorted similarly. You can Browse the contents
of a subfolder by touching the Folder Name in the list. Artist
Touch the Back Arrow soft-key to return or back up to a Touch the Artist soft-key on the left side of the screen to
previous folder level.
display the Artists list in which you can Scroll, Search,
and Jump to operations.
Playlists – If Equipped
Touch the Playlists soft-key on the left side of the screen
to display the current playlist information.
Uconnect Touch™ 8.4 SYSTEM 61
Songs
Albums
Touch the Albums soft-key on the left side of the screen to
display the Albums list in which you can Scroll, Search,
and Jump to operations.
Genres
Touch the Genres soft-key to display the Albums list in
which you can Scroll, Search, and Jump to operations.
Source
Touch the Source soft-key to select the desired audio
source, Disc, USB/iPod, SD Card, AUX or Bluetooth. This
screen will time out after a few seconds and return to the
main radio screen if no selection is made.
Touch the Songs soft-key on the left side of the screen to
Repeat
display the Songs list in which the user can Scroll, Search,
Touch the repeat soft-key to toggle the repeat functionand Jump to operations.
ality. The Repeat soft-key is highlighted when active. The
The currently playing song is displayed with a black Radio will continue to play the current track, repeatedly,
as long as the repeat is active.
background, and lines both above and below the title.
3
62 Uconnect Touch™ 8.4 SYSTEM
Shuffle
Touch the shuffle soft-key to play the selections on the
USB/iPod device in random order to provide an interesting change of pace. Touch the soft-key a second time to
turn this feature off.
Info
Touch the Info soft-key to display the current track
information. Touch the Info soft-key a second time to
cancel this feature.
Tracks
Touch the trks soft-key to display a pop up with the Song
List. The currently playing song is indicated by an arrow
and lines above and below the song title. When in the
Tracks List screen you can rotate the TUNE/SCROLL
knob to highlight a track (indicated by the line above and
below the track name) and then press the ENTER/
BROWSE knob to start playing that track.
Touching the trks soft-key while the pop up is displayed
will close the pop up.
Audio
Refer to Operating Instructions – Radio Mode for adjusting the audio settings.
Uconnect Touch™ 8.4 SYSTEM 63
Inserting Auxiliary Device
Gently insert the Auxiliary device cable into the AUX
Overview
Port. If you insert an Auxiliary device with the ignition
AUX Mode is entered by inserting an AUX device using
ON and the radio ON, the unit will switch to AUX mode
a cable with a 3.5 mm audio jack into the AUX port or by
and begin to play when you insert the device cable.
touching the Player soft-key located at the bottom of the
display. Once in Player Mode, touch the source soft-key Controlling the Auxiliary Device
The control of the auxiliary device (e.g., selecting playand select AUX.
lists, play, fast forward, etc.) cannot be provided by the
radio; use the device controls instead. Adjust the volume
with the ON/OFF VOLUME rotary knob, or with the
volume of the attached device.
OPERATING INSTRUCTIONS – AUX MODE
NOTE: The vehicle radio unit is acting as the amplifier
for audio output from the Auxiliary device. Therefore if
the volume control on the Auxiliary device is set too low,
there will be insufficient audio signal for the radio unit to
play the music on the device.
3
64 Uconnect Touch™ 8.4 SYSTEM
Source
Touch the Source soft-key to select the desired audio
source, Disc, USB/iPod, SD Card, AUX or Bluetooth. This
screen will time out after a few seconds and return to the
main radio screen if no selection is made.
Audio
Refer to Operating Instructions – Radio Mode for adjusting the audio settings.
OPERATING INSTRUCTIONS – SD CARD MODE
Overview
SD Card Mode is entered by inserting a SD Card containing music into the SD Card slot above the Disc slot on the
Instrument Panel or by touching the Player soft-key
located at the bottom of the display. Once in Player
Mode, touch the source soft-key and select SD Card.
Inserting SD Card
Gently insert the SD Card into the SD Card slot. If you
insert a SD Card with the ignition ON and the radio ON,
the unit will switch to SD Card mode and begin to play
when you insert the card. The display will show the track
number, and index time in minutes and seconds. Play
will begin at the start of track 1.
Uconnect Touch™ 8.4 SYSTEM 65
Seek Up/Down
Touch and release the right arrow soft-key for the next
selection on the SD Card. Touch and release the left arrow
soft-key to return to the beginning of the current selection, or return to the beginning of the previous selection
if the SD Card is within the first second of the current
selection.
Fast Seek Up
Touch and hold the right arrow soft-key and the SD Card
will begin to fast forward through the current track until
the soft-key is released.
you can browse through the contents of the SD Card. If
equipped, you can browse by Folders, Artists, Playlists,
Albums, Songs, etc. Touch the desired soft-key on the left
side of the screen. The center of the browse window
shows items and it’s sub-functions, which can be scrolled
by touching the Up and Down soft-keys to the right. The
Scroll/Tune knob can also be used to scroll.
ABC Jump
Touch the ABC Jump soft-key tab at the top of the screen
to display a alpha numeric keypad used to search by
letter/number for a certain Folder, Artist, Song, Album,
or Genre. Touch one letter to select all contents that start
Fast Seek Down
with that letter. Touch the 123 soft-key to search all
Touch and hold the left arrow soft-key and the SD Card
contents that start with numbers. Touch the 123 soft-key
will begin to rewind through the current track until the
to return to letters. Touch the X soft-key to exit the ABC
soft-key is released.
Jump feature.
Browse
NOTE: Many features of this system are speed depenTouch the browse soft-key to display the browse window.
dent. For your own safety these features may be grayed
The left side of the browse window displays a list of ways
3
66 Uconnect Touch™ 8.4 SYSTEM
out and not accessible while the vehicle is in motion. Pull
over at a safe location to complete your task.
Up Arrow
Touch the Up Arrow soft-key to toggle between Upper
Search
Case and Lower Case keys.
Touch the Search soft-key tab at the top of the screen to
display the Keyboard. This allows you to enter a folder or
file name to be searched.
Uconnect Touch™ 8.4 SYSTEM 67
ABC, ÅØÜ and 1234!&#@
Touch the ABC key to activate a keyboard with Alphabetic characters, or touch the ÅØÜ to activate a keyboard
with accented characters or touch the 1234!&#@ key to
activate a keyboard with Numeric plus Special
characters.
3
Folders – If Equipped
Touch the Folders soft-key on the left side of the screen to
display the Folders scroll menu. The Folders list consists
of folders, and files sorted alphanumerical, followed by a
list of files sorted similarly. You can Browse the contents
of a sub-folder by touching the Folder Name in the list. Artist
Touch the Back Arrow soft-key to return or back up to a Touch the Artist soft-key on the left side of the screen to
previous folder level.
display the Artists list in which you can Scroll, Search,
and Jump to operations.
Playlists – If Equipped
Touch the Playlists soft-key on the left side of the screen
to display the current playlist information.
68 Uconnect Touch™ 8.4 SYSTEM
Songs
Albums
Touch the Albums soft-key on the left side of the screen to
display the Albums list in which you can Scroll, Search,
and Jump to operations.
Genres
Touch the Genres soft-key to display the Albums list in
which you can Scroll, Search, and Jump to operations.
Source
Touch the Source soft-key to select the desired audio
source, Disc, USB/iPod, SD Card, AUX or Bluetooth. This
screen will time out after a few seconds and return to the
main radio screen if no selection is made.
Touch the Songs soft-key on the left side of the screen to
Repeat
display the Songs list in which the user can Scroll, Search,
Touch the repeat soft-key to toggle the repeat functionand Jump to operations.
ality. The Repeat soft-key is highlighted when active. The
The currently playing song is displayed with a black Radio will continue to play the current track, repeatedly,
background, and blue lines both above and below the as long as the repeat is active.
title.
Uconnect Touch™ 8.4 SYSTEM 69
Shuffle
Touch the Shuffle soft-key to play the selections on the
Auxiliary device in random order to provide an interesting change of pace. Touch the soft-key a second time to
turn this feature off.
3
Info
Touch the Info soft-key to display the current track
information. Touch the Info soft-key a second time to
cancel this feature.
Tracks
Touch the trks soft-key to display a pop up with the Song
List. The currently playing song is indicated by an arrow
and lines above and below the song title. When in the
Tracks List screen you can rotate the TUNE/SCROLL
knob to highlight a track (indicated by the line above and
below the track name) and then press the ENTER/
BROWSE knob to start playing that track.
Touching the trks soft-key while the pop up is displayed
will close the pop up.
Audio
Refer to Operating Instructions – Radio Mode for adjusting the audio settings.
70 Uconnect Touch™ 8.4 SYSTEM
left arrow soft-key to return to the beginning of the
current selection, or return to the beginning of the
Overview
previous selection if the Bluetooth device is within the
Bluetooth Streaming Audio (BTSA) or Bluetooth Mode is
first second of the current selection.
entered by pairing a Bluetooth device, containing music,
Fast Seek Up
to the Uconnect Touch™ system.
Touch and hold the right arrow soft-key and the
Before proceeding, the Bluetooth device needs to be
Bluetooth device will begin to fast forward through the
paired through Uconnect™ Phone in order to communicurrent track until the soft-key is released.
cate with the Uconnect Touch™ System.
Fast Seek Down
NOTE: See the pairing procedure in the Owner’s
Touch and hold the left arrow soft-key and the Bluetooth
Manual on the DVD for more details.
device will begin to rewind through the current track
Once the Bluetooth device is paired to the Uconnect until the soft-key is released.
Touch™ System, touch the Player soft-key located on the
Source
bottom of the display. Once in Player Mode, touch the
Touch the Source soft-key to select the desired audio
source soft-key and select Bluetooth.
source, Disc, USB/iPod, SD Card, AUX or Bluetooth. This
Seek Up/Down
screen will time out after a few seconds and return to the
Touch and release the right arrow soft-key for the next main radio screen if no selection is made.
selection on the Bluetooth device. Touch and release the
OPERATING INSTRUCTIONS – Bluetooth MODE
Uconnect Touch™ 8.4 SYSTEM 71
Repeat
Touch the repeat soft-key to toggle the repeat functionality. The Repeat soft-key is highlighted when active. The
Radio will continue to play the current track, repeatedly,
as long as the repeat is active.
3
Info
Touch the Info soft-key to display the current track
information. Touch the Info soft-key a second time to
cancel this feature.
Tracks
Touch the trks soft-key to display a pop up with the Song
List. The currently playing song is indicated by a blue Touching the trks soft-key while the pop up is displayed
will close the pop up.
arrow and lines above and below the song title.
Audio
Refer to Operating Instructions – Radio Mode for adjusting the audio settings.
72 Uconnect Touch™ 8.4 SYSTEM
OPERATING INSTRUCTIONS – NAVIGATION (8.4N
ONLY)
Getting Started
To access the Navigation system, touch the Nav soft-key
on bottom of the screen.
Help When You Need It
The first time you use your navigation system, you need
to set up your system. The Help menu provides additional information
Touch Tools then Help to get more information about
using your navigation system. Touch a category to view
information about a topic.
1. Touch Tools then touch Help.
Uconnect Touch™ 8.4 SYSTEM 73
2. Touch one of the categories to view the available Help 3. To search the Help topics for a keyword, touch Search.
topics. For example touch Settings then touch Navigation to view helpful information on the Navigation
settings.
3
Help is also available through Voice Command. Refer to
the vehicle Owner’s Manual for details on Voice
Command.
Find It and Go!
The Where To? page provides several different categories
for you to use when searching for addresses, cities, and
74 Uconnect Touch™ 8.4 SYSTEM
other locations. The detailed map loaded in your naviga- 2. Select a category.
tion system contains millions of points of interest, such as
restaurants, hotels, and auto services.
Finding a Point of Interest
1. Touch Where To?.
Uconnect Touch™ 8.4 SYSTEM 75
3. Select a subcategory.
3
76 Uconnect Touch™ 8.4 SYSTEM
4. Select a destination.
5. Select a place.
Uconnect Touch™ 8.4 SYSTEM 77
6. Touch Go! , or touch Press for More to see the Review the top of the map. A checkered flag marks your destination. The upper-left corner indicates the distance to
page.
your next maneuver. If you depart from the original
route, your navigation system recalculates the route and
provides new directions.
Adding a Via Point
You can add a stop (Via Point) to your route. The
navigation system gives you directions to the stop and to
your final destination.
1. With a route active, touch
touch Where To?.
(back icon) and then
2. Search for the extra stop.
NOTE: Perform Finding a Point of Interest procedure to
Following Your Route
Your route is marked with a magenta line. As you travel, find an extra stop.
your navigation system guides you to your destination
3. Touch Go!.
with voice prompts, arrows on the map, and directions at
3
78 Uconnect Touch™ 8.4 SYSTEM
4. Touch Add As a Via Point to add this stop before your Custom POIs (Points of Interest)
You can manually load custom points of interest (POI)
destination.
databases, available from various companies on the InTaking a Detour
ternet. Some custom POI databases contain alert inforIf a road on your route is closed, you can take a detour.
mation for points such as safety cameras and school
1. With a route active, touch
.
zones. The navigation system can notify you when you
approach one of these points.
2. Touch Detour.
The navigation system attempts to get you back on your
original route as quickly as possible. If the route you are
currently taking is the only reasonable option, the navigation system might not calculate a detour.
Stopping the Route
1. With a route active, touch
2. Touch Stop.
.
CAUTION!
Garmin and Chrysler LLC are not responsible for the
consequences of using a custom POI database, or for
the accuracy of the safety camera or other custom POI
database.
After downloading your POI database, use the Garmin
POI Loader to install the POIs onto a DVD. Use the DVD
to load the POIs. The POI Loader is available at
Uconnect Touch™ 8.4 SYSTEM 79
www.garmin.com/products/poiloader. Refer to the POI 2. Touch My Data.
Loader Help file for more information; click Help to open
3. Touch Custom POIs.
the Help file.
4. Touch Delete All.
NOTE: Each time you load custom POIs to the navigation system, any other custom POIs already saved in the 5. Lastly, touch Yes to confirm.
system will be overwritten.
Where To?
Finding Custom POIs
The Where To? page provides several different categories
To view a list of the custom POIs loaded in your you can use to search for locations.
navigation system:
Searching Near Another Location
Your navigation system automatically searches for places
1. Touch Where To?.
near your current location.
2. Then touch Extras.
1. Touch Where To? , then touch Near.
3. Lastly, touch Custom POIs.
2. Select an option:
Deleting Custom POIs
To delete all custom POIs from your navigation system:
• Where I Am Now — search near your current
location.
1. Touch Tools.
• A Different City — search near the city you enter.
3
80 Uconnect Touch™ 8.4 SYSTEM
• A Recent Destination — search near a recent destination.
• A Favorite Destination — search near a favorite
destination.
• My Current Route — search along your route.
• My Destination — search near your current
destination.
3. Touch OK.
Go! Page Options
Touch an item in the search results list to view the Go!
page.
1. Touch to save this location to your Favorites.
2. Touch to create a turn-by-turn route to this location.
3. Touch to return to the previous page.
4. Touch Press for More to view more information about
the location.
Uconnect Touch™ 8.4 SYSTEM 81
Finding an Address
The steps to find an address can vary depending on the
maps that are loaded on your navigation system. Not all
map data provides postal-code searching.
1. Touch Where To? , then touch Address.
2. Touch Change State/Country , if necessary.
3. Touch Search All.
OR
Touch Spell City. Enter the city using the keyboard, and
touch Done. Select the city.
5. Touch
to switch between a 3D (three-dimensional)
map and a 2D (two-dimensional) map.
4. Enter the number of the address, and touch Done.
6. Touch
to rotate the viewing angle in 3D view.
5. Enter the street name, and touch Done.
6. Select the correct street in the list, if necessary.
7. Touch the address, if necessary.
3
82 Uconnect Touch™ 8.4 SYSTEM
Finding a Place by Spelling the Name
If you know the name of the location you are looking for,
you can spell it using the on-screen keyboard. You can
also enter letters contained in the name to narrow the
search.
1. Touch Where To? , then touch Points of Interest and
then Spell Name.
2. Using the on-screen keyboard, enter letters in the
name.
3. Touch Done.
•
Using the On-Screen Keyboard
When an on-screen keyboard appears, touch a letter or
•
number to enter it.
•
NOTE: Many features of this system are speed dependent. For your own safety these features may be grayed
out and not accessible while the vehicle is in motion. Pull •
over at a safe location to complete your task.
Touch
to add a space.
Touch
and
to move the cursor.
Touch
to delete the character, or touch and hold to
delete the entire entry.
Touch
to select words you have recently typed
and selected.
Uconnect Touch™ 8.4 SYSTEM 83
• Touch
to change the keyboard language mode.
• Touch
to enter special characters.
Finding Places in a Different Area
You can search for locations in a different area, such as a
different city or near your destination.
1. From the subcategories list, touch Near.
2. Select one of the search options.
Narrowing Your Search
To narrow your search, you can search near a different
city.
1. Touch Where To? , then touch Near.
2. Touch A Different City.
3. Enter part of the name, and touch Done.
Favorites
You can save all of your favorites places in Favorites. You
can also save your home location in Favorites.
Saving Places You Find
1. After you have found a place you want to save, touch
Save on the Go! page.
3
84 Uconnect Touch™ 8.4 SYSTEM
2. Touch OK. The place is saved in Favorites.
3. Touch Save Location to save your current location.
Saving Your Current Location
1. Touch View Map.
2. Touch
.
Setting a Home Location
You can set a Home Location for the place you return to
most often.
1. Touch Where To? , then touch Go Home.
Uconnect Touch™ 8.4 SYSTEM 85
2. Select an option.
Editing Saved Places
• Enter My Address – enter an address for the 1.
location using the on-screen keyboard.
2.
• Use my current location – sets your current location
3.
as your Home Location.
4.
• Choose from Recently Found – select a location
from your recently found locations.
5.
Touch Where To? , then touch Favorites.
Touch the location you want to edit.
Touch Press for More.
Touch Edit.
Touch the item you want to edit.
After you set your Home Location, touch Where To? ,
then touch Go Home.
• Change Name – enter a new name for the location
using the on-screen keyboard.
Finding Saved Places
• Change Map Symbol – touch a new symbol.
1. Touch Where To?.
• Change Phone Number – enter a phone number,
and touch Done.
2. Touch Favorites.
3. Touch a category. Your saved locations are listed.
• Change Categories – create or change the category
in which this location is saved.
3
86 Uconnect Touch™ 8.4 SYSTEM
Deleting a Favorite
1. Touch Tools , then touch My Data.
2. Touch Delete Favorite(s).
3. Select the Favorite to delete.
1. Distance to the next turn. Touch to view and hear next
turn details. Lane assistance also displays in this area.
2. While navigating a route, touch the text bar to open
the Turn List.
3. Touch
to zoom in.
4. Touch Delete.
to zoom out.
4. Touch
The Main Pages
5. Touch to change the data field.
This section provides details about the Map Page, the
Trip Computer, the Turn List, Lane assist, and the GPS 6. Touch the Speed data field to open the Trip Computer.
Info Page.
to view the Where Am I? page.
7. Touch
Viewing the Map Page
NOTE:
Touch View Map to open the map. Touch an area of the
• A speed limit icon
may appear as you travel on
map to see additional information, as shown below. The
major roadways. This icon displays the current speed
shows your current location.
vehicle icon
limit of the roadway.
• The speed limit icon function is for information only
and does not replace the driver’s responsibility to
Uconnect Touch™ 8.4 SYSTEM 87
abide by all posted speed limits and to use safe driving
judgment at all times. Chrysler Group LLC and
Garmin shall not be responsible for any traffic fines or
citations that the user may receive for failing to follow
all applicable traffic laws.
3
Trip Computer
The Trip Computer displays your current speed and
provides helpful statistics about your trip. To view the
Trip Computer, touch the Speed field on the Map page.
Resetting Trip Information
If you want accurate trip information, reset the trip
information before beginning a trip. Touch Reset to reset
the information on the Trip Computer page.
88 Uconnect Touch™ 8.4 SYSTEM
Turn List
When you are navigating a route, the Turn List displays
turn-by-turn instructions for your entire route and the
distance between turns. Touch the text bar on the top of
the Map page to view the Turn List. Touch a turn on the
list to view the Next Turn page for that turn. Touch Show
Map to view the entire route on the map.
Next Turn Page
When you are navigating a route, the Next Turn page
shows the turn on the map and the distance and time left
before you reach the turn. To view an upcoming turn on
the map, touch the upperleft corner of the Map page, or
touch any turn on the Turn List page.
Uconnect Touch™ 8.4 SYSTEM 89
Lane Assist Page
GPS Info Page
When available, the Lane Assist page may display a view From the Nav Menu page, touch in the upper left corner
of the upcoming junction and in which lane you should to view the GPS Info page.
be driving. To view the Lane Assist page, touch the
upper-left corner of the Map page. You can also access the
Lane Assist page from the Next Turn page.
1. Sky view
2. Satellite signal-strength bars
3
90 Uconnect Touch™ 8.4 SYSTEM
The sky view shows the satellites you are receiving. The 3. Touch New.
satellite signal-strength bars indicate the strength of each
4. Touch Add New Start Point.
satellite you are receiving. A solid bar indicates that the
5. Find a location for your starting point, and touch
GPS satellite is ready for use.
Select.
Dead Reckoning
Dead Reckoning technology uses the speed sensors at- NOTE: Perform Finding a Point of Interest procedure to
tached to your vehicle’s drivetrain and a gyroscope to find your starting point.
supplement the existing GPS data. The combined data
6. Touch Add New Start Point.
provides accurate positioning for your vehicle in tunnels,
indoor parking garages, urban canyons, and any other 7. Find a location for your ending point, and touch
Select.
area where GPS signals can become obstructed.
NOTE: Perform Finding a Point of Interest procedure to
Creating and Editing Routes
This section describes how to create and customize your find your ending point.
routes.
8. Touch + to add another location to your route. Touch
– to remove a location.
Creating a New Custom Route
1. Touch Where To? (or Tools).
2. Touch Routes.
9. Touch Next to calculate your route and view it on the
map. Touch Save to save your changes.
Uconnect Touch™ 8.4 SYSTEM 91
Editing Custom Routes
Touch Where To? (or Tools) , then touch Routes.
Your changes are saved automatically when you exit any
of the route edit pages.
1. Select the route you want to edit.
Saving and Modifying the Active Route
2. Touch Edit.
1. Touch Where To? (or Tools) , then touch Routes.
3. Touch the item to edit.
2. Touch Active Route.
• Change Name – enter a new name, and touch Done. 3. Touch Add or Remove Points.
• Add or Remove Points – add or remove points from 4. Add, remove or reorder the points.
the route.
5. Touch Next.
• Manually Reorder Points – change the order of
6. Touch Save.
points along your route.
Navigating a Saved Route
• Optimally Reorder Points – automatically order the
1. Touch Where To? (or Tools) , then touch Routes.
points.
• Recalculate – recalculates the route.
• Delete – remove this route.
2. Touch the route you want to navigate, and touch Go!.
3
92 Uconnect Touch™ 8.4 SYSTEM
2. Touch My Data.
The navigation system attempts to get you back on your
original route as quickly as possible. If the route you are
currently taking is the only reasonable option, the navigation system might not calculate a detour.
3. Touch Deleted Selected Route(s).
Navigation Voice Commands
4. Touch Select All.
• When in the Navigation feature, you can simply Say
What You See on the touch-screen to give a navigation
voice command.
Deleting All Saved Routes
1. Touch Tools.
5. Lastly, touch Delete.
Stopping Your Route
With a route active, touch
• Locating an address can be given as a one shot entry.
For example, after saying “Find Address” and the
Adding a Detour to a Route
system is ready, you can say the entire address in one
If a road on your route is closed or congested with traffic,
command, “1234 1st Street, Any Town, Michigan.” If
you can take a detour.
you are searching for a particular address or Point Of
Interest, the available voice commands depend on
.
1. With a route active on the Main Map, touch
what is displayed on the touch-screen.
2. Touch Detour.
, then touch Stop.
Uconnect Touch™ 8.4 SYSTEM 93
• When the Voice Command system is ready to be given
a command, the green indicator is visible in the right
corner of the touch-screen.
• The following chart lists the navigation voice commands that may be available.
3
94 Uconnect Touch™ 8.4 SYSTEM
Navigation Voice
Commands:
“Where To?” (Main Menu command)
“View Map” (Main Menu command)
“Repeat guidance”
“Cancel Route”
“Detour” (During a Route Guidance)
“Where Am I?”
“Find Address”
“Go Home”
“Find Place by Category”
“Find Place by Name”
“Find Recently Found”
“Find Favorite”
“Find City”
“Find Nearest Restaurant”
“Find Nearest Fuel”
NOTE: Refer to your vehicle Owner’s Manual for
details on Voice Command.
“Find
“Find
“Find
“Find
“Find
“Find
“Find
“Find
“Find
“Find
“Find
“Find
“Find
“Find
“Find
Nearest Transit”
Nearest Lodging”
Nearest Shopping”
Nearest Bank”
Nearest Parking”
Nearest Entertainment”
Nearest Recreation”
Nearest Attractions”
Nearest Hospitals”
Nearest Community”
Nearest Auto Services”
Nearest Airport”
Nearest Police Stations”
Nearest Fire Stations”
Nearest Auto Dealers”
Uconnect Touch™ 8.4 SYSTEM 95
Customizing the Settings
Changing the Map Settings
This section describes how to customize the settings of Touch Settings , then touch Map.
your GPS navigation system
• Map Detail – adjust the amount of detail shown on the
map. More detail may cause the map to redraw slower.
Customizing the Navigation System
1. Touch Settings.
• Map View – select a map perspective.
• Vehicle – touch Change to change the icon used to
display your position on the map. Touch the icon you
3. Touch the button above the setting name to change it.
want to use, and touch OK.
Changing the System Settings
• Trip Log – show or hide the log of your travels. To
Touch Settings , then touch System.
clear your trip log:
• GPS Simulator – enable the simulator to turn off the
1. Touch Tools.
GPS mode and simulate navigation.
2. Touch My Data.
• Keyboard Layout – select keyboard layout.
3. Lastly, touch Clear Trip Log.
• About – display the software version number, the unit
number and the unit ID number.
2. Touch the setting you want to change.
• Restore – restore the original system settings
3
96 Uconnect Touch™ 8.4 SYSTEM
• Map Data Layout – select Standard to display the Adjusting the Display Settings
default data fields on the Map. Select More Data to Touch Settings , then touch Display.
display additional, customizable data fields on the left
• Color Mode – select Day for a light background,
side of the map.
Night for a background, or Auto to automatically
• Info – view the maps loaded on your navigation
switch between the two.
system and their version. Touch a map to enable
• Restore – restore the original display settings.
(check mark) or disable (no check mark) that map.
Updating the Time Settings
• Restore – restore the original map settings.
Touch Settings , then touch Time.
Changing the Navigation Settings
• Time Format – select a 12–hour, 24–hour or UTC time
Touch Settings , then touch Navigation.
format.
• Route Preference – select a preference for calculating
• Current Time – select Automatic to update the time
your route.
automatically. When Automatic is not selected, you
• Avoidances – select the road types you want to avoid
can adjust the time in 15–minute increments.
or you would prefer to use on your routes.
• Restore – restore the original time settings.
• Restore – restore the original navigation settings.
• Voice Prompts – turn voice prompts on or off.
Uconnect Touch™ 8.4 SYSTEM 97
Setting the Languages
Touch Settings , then touch Language.
Garmin姞 Traffic
• Voice Language – select a voice.
• Keyboard – select the keyboard for your language.
You can also change the keyboard language mode
from any keyboard by touching the Mode button.
3
• Restore – restore the original languages.
• When you are receiving traffic information, a traffic
icon
appears on the map
• The traffic icon changes color to indicate the severity
of the traffic conditions on your route or on the road
you are currently traveling.
98 Uconnect Touch™ 8.4 SYSTEM
Color
Green
Description
Low severity
Yellow
Medium severity
Red
High severity
Gray
No data
Meaning
Traffic is flowing
normally
Traffic is slightly
congested
Traffic is heavily
congested or
stopped
Traffic data has not
updated
Manually Avoid Traffic on Your Route
• While navigating a route, touch the traffic icon
.
• Touch Traffic On Route.
• If necessary, touch the arrows to view other traffic
delays on your route.
• Touch the desired delay and touch Avoid.
Uconnect Touch™ 8.4 SYSTEM 99
View the Traffic Map
SIRIUS Travel Link
Now, in addition to delivering over 130 channels of the
• The traffic map shows color-coded traffic flow and
best sports, entertainment, talk and 100% commercialdelays on nearby roads.
free music, SIRIUS now offers premium infotainment
• From the map, touch the traffic icon
.
services that work in conjunction with compatible navigation systems.
• Touch Traffic Map to view the traffic incidents on a
map.
To access SIRIUS Travel Link, press the MENU hard-key
then touch the Travel Link soft-key.
Search for Traffic Delays
SIRIUS Travel Link brings a wealth of useful information
.
• From the map, touch the traffic icon
into your vehicle and right to your fingertips:
• Touch Traffic Search to view a list of traffic delays.
Weather
• Touch an item in the list to view delays on the road.
• View detailed current conditions at your current loca• If there is more than one delay, touch the arrows to
tion.
view additional delays.
• Check extended 12–hour and 5–day forecasts.
• Store a favorite location for quick access to weather
conditions and forecasts.
3
100 Uconnect Touch™ 8.4 SYSTEM
Ski Info
Movie Listings
• View ski and snowboarding conditions at ski resorts.
• Check which movies are playing at theaters near your
current location.
• Store a favorite location for quick access to snow
• Sort the list of theaters by distance or alphabetically.
conditions.
Fuel Prices
• Show movie titles, start times, ratings, run length, and
summaries.
• Check detailed price information for fuel stations near
• Store a favorite theater for quick access to schedules.
your current location.
• Sort the list of closest fuel stations by price, distance or Sports Scores
alphabetically.
• View scores and upcoming events for all major sports.
• Route to selected fuel station.
• Store your favorite teams for quick access to the scores
and schedules.
• Store a favorite fuel station for quick access to pricing.
NOTE: SIRIUS Travel Link data services subscription is
separate from your SIRIUS Satellite Radio (audio) subscription.
Uconnect Touch™ 8.4 SYSTEM 101
CAUTION!
Neither SIRIUS nor Chrysler Group LLC is responsible for any errors in accuracies in the SIRIUS data
services or its use in vehicles.
SIRIUS XM and all related marks and logos are trademarks of SIRIUS XM Radio Inc. and its subsidiaries.
SIRIUS Radio requires a subscription, sold separately
after trial subscription included with vehicle purchase.
Prices and programming are provided by SIRIUS and are
subject to change. Subscriptions governed by Terms &
Conditions available at sirius.com/serviceterms. SIRIUS
Radio U.S. service only available to those at least 18 years
of age in the 48 contiguous United States, D.C., & PR.
Visit www.sirius.com/TravelLink for more information
on SIRIUS Travel Link.
Updating the Software
To update the navigation system software, you must
have a writable DVD, DVD drive and an Internet connection.
To update the navigation software:
1. Go to www.garmin.com/chrysler. Select Software Updates, then select Download.
2. Read and accept the terms of the Software License
Agreement.
3. Follow the instructions on the Web site to complete the
installation of the update software.
Current Software Version
To view your current software version:
• Touch Settings , then touch System.
• Touch the About soft-key, then touch Software
Versions.
3
102 Uconnect Touch™ 8.4 SYSTEM
Updating the Map Data
The navigation system will provide periodic notification
at startup when the preloaded maps are considered out
of date. You can purchase a DVD of updated map data
from Garmin, or ask your dealer or service center for
details.
NOTE: There is also Map version information available
in System Settings.
• Touch the Settings soft-key.
• Do not watch or fix your eyes on the unit’s display
when you are driving for any extended period.
Safety Precautions and Important Information
Read this information carefully before starting to operate
the navigation system and follow the instructions in this
manual. Neither Chrysler Group LLC nor Garmin shall
1. Go to www.garmin.com/chrysler. Select Order Map be liable for problems or accidents resulting from failure
Updates, and then follow the Web site checkout proce- to observe the instructions in this manual.
dure.
WARNINGS
2. After you receive your new map data DVD, follow the To prevent injury or fire, take the following precauinstructions provided with the DVD to install the new tions:
map data in your unit.
• To prevent a short circuit, never put or leave any
Current Map Data
metallic objects (such as coins or metal tools) inside the
To view your current version of Map Data:
unit.
• Touch the Map soft-key, then touch Info.
Uconnect Touch™ 8.4 SYSTEM 103
Failure to avoid the following potentially hazardous
situations could result in an accident or collision resulting in death or serious injury.
When navigating, carefully compare information displayed on the navigation system to all available navigation sources, including information from street signs,
visual sightings, and maps. For safety, always resolve any
discrepancies or questions before continuing navigation.
Always operate the vehicle in a safe manner.
Do not become distracted by the navigation system while
driving, and always be fully aware of all driving conditions. Minimize the amount of time spent viewing the
screen of the navigation system while driving.
Do not enter destinations, change settings, or access any
functions requiring prolonged use of the navigation
system controls while driving. Stop your vehicle in a safe
and legal manner before attempting such operations.
Keep the system volume at a low enough level to be able
to hear outside noises while driving. If you can no longer
hear outside noises, you may be unable to react adequately to the traffic situation.
This may cause accidents.
The navigation system will not display the correct current position of the vehicle the first time it is used after
purchase, or if the vehicle battery is disconnected. GPS
satellite signals will soon be received, however, and the
correct position will be displayed.
Be careful of the ambient temperature. Using the navigation system at extreme temperatures can lead to malfunction or damage. Also note that the unit can be damaged
by strong vibration, by metal objects, or by water getting
inside the unit.
CAUTIONS
Failure to avoid the following potentially hazardous
situations may result in injury or property damage.
3
104 Uconnect Touch™ 8.4 SYSTEM
The navigation system is designed to provide you with
route suggestions. It does not reflect road closures or road
conditions, weather conditions, or other factors that may
affect safety or timing while driving.
Use the navigation system only as a navigational aid. Do
not attempt to use the navigation system for any purpose
requiring precise measurement of direction, distance,
location, or topography.
The Global Positioning System (GPS) is operated by the
United States government, which is solely responsible for
its accuracy and maintenance. The government system is
subject to changes that could affect the accuracy and
performance of all GPS equipment, including the navigation system.
Although the navigation system is a precision navigation
device, any navigation device can be misused or misinterpreted and, therefore, become unsafe.
IMPORTANT INFORMATION
Vehicle Battery Preservation
This navigation system can be used when the ignition
key is turned to ON or ACC. To preserve the battery,
however, it should be used with the engine running
whenever possible. Using the navigation system for a
long time with the engine switched off can cause the
battery to run down.
Map Data Information
One of our goals is to provide customers with the most
complete and accurate cartography that is available to us
at a reasonable cost. We use a combination of governmental and private data sources, which we identify in
product literature and copyright messages displayed to
the consumer. Virtually all data sources contain some
inaccurate or incomplete data. In some countries, complete and accurate map information is either not available
or is prohibitively expensive.
Uconnect Touch™ 8.4 SYSTEM 105
Software License Agreement
BY USING THIS NAVIGATION SYSTEM, YOU AGREE
TO BE BOUND BY THE TERMS AND CONDITIONS OF
THE FOLLOWING SOFTWARE LICENSE AGREEMENT.
PLEASE READ THIS AGREEMENT CAREFULLY.
Garmin grants you a limited license to use the software
embedded in this device (the “Software”) in binary
executable form in the normal operation of the product.
Title, ownership rights, and intellectual property rights in
and to the Software remain in Garmin.
You acknowledge that the Software is the property of
Garmin and is protected under the United States of
America copyright laws and international copyright treaties. You further acknowledge that the structure, organization, and code of the Software are valuable trade
secrets of Garmin and that the Software in source code
form remains a valuable trade secret of Garmin. You
agree not to decompile, disassemble, modify, reverse
assemble, reverse engineer, or reduce to human readable
form the Software or any part thereof or create any
derivative works based on the Software. You agree not to
export or re-export the Software to any country in
violation of the export control laws of the United States of
America.
NAVTEQ威 End-user License Agreement
The software embedded in your Garmin product (the
“Software”) is owned by Garmin Ltd. or its subsidiaries
(“Garmin”). The third-party map data embedded in or
accompanying your Garmin product (the “Data”) is
owned by NAVTEQ North America LLC and is licensed
to Garmin. Both the Software and Data are protected
under copyright laws and international copyright treaties. The Software and Data are licensed, not sold. The
Software and Data are provided under the following
license and are subject to the following terms and conditions which are agreed to by End User (“you” or “your”),
3
106 Uconnect Touch™ 8.4 SYSTEM
on the one hand, and Garmin and its licensors (including
their licensors and suppliers) and affiliated companies on
the other hand.
IMPORTANT: CAREFULLY READ THIS LICENSE BEFORE USING THIS PRODUCT. INSTALLING, COPYING,
OR OTHERWISE USING THIS PRODUCT INDICATES
YOUR ACKNOWLEDGMENT THAT YOU HAVE READ
THIS LICENSE AND AGREE TO ITS TERMS. IF YOU DO
NOT AGREE, RETURN THE COMPLETE PRODUCT
WITHIN 10 DAYS OF THE DATE YOU ACQUIRED IT (IF
PURCHASED NEW) FOR A FULL REFUND TO ONE OF
THE FOLLOWING: (1) THE DEALER FROM WHICH
YOU PURCHASED THIS PRODUCT; (2) Garmin INTERNATIONAL, INC. CUSTOMER SERVICE, 1200 EAST
151st STREET, OLATHE, KS 66062, USA; (3) Garmin
(EUROPE) LTD., LIBERTY HOUSE, HOUNSDOWN
BUSINESS PARK, SOUTHAMPTON, SO40 9LR, UNITED
KINGDOM; OR (4) Garmin CORPORATION CUSTOMER
SERVICE, No. 68, JANGSHU 2nd ROAD, SIJHIH, TAIPEI
COUNTY, TAIWAN.
License Terms and Conditions
Garmin (“we” or “us”) provides you with storage media
containing the computer Software (the “Software”) and
the embedded or accompanying digital map Data, including any “online” or electronic documentation and
printed materials (together called the “Product” for purposes of this License Agreement), and grants you a
limited, non-exclusive license to use the Product in
accordance with the terms of this Agreement. You agree
to use this Data together with the Garmin product for
solely personal, or if applicable, for use in your business’
internal operations, and not for service bureau, timesharing, resale or other similar purposes. Accordingly,
but subject to the restrictions set forth in the following
paragraphs, you may copy this Data only as necessary for
your use to (i) view it, and (ii) save it, provided that you
do not remove any copyright notices that appear and do
not modify the Software or Data in any way. You agree
not to otherwise reproduce, copy, modify, decompile,
Uconnect Touch™ 8.4 SYSTEM 107
disassemble, reverse engineer or create derivative works
of any portion of the Product, and may not transfer or
distribute it in any form, for any purpose, except to the
extent permitted by mandatory laws.
Restrictions. Except where you have been specifically
licensed to do so by Garmin, and without limiting the
preceding paragraph, you may not use this Data with
any products, systems, or applications installed or otherwise connected to or in communication with vehicles,
and which are capable of dispatch, fleet management or
similar applications where the Data is used by a central
control center in dispatching a fleet of vehicles. In addition, you are prohibited from renting or leasing the Data
or the Garmin products containing the Data to any other
person or third party. Only those rental car companies
that are specifically authorized by Garmin in writing to
rent Garmin products containing the Data to their rental
customers are permitted to rent out such products.
No Warranty. This Product (including the Data) is provided to you “as is,” and you agree to use it at your own
risk. Garmin and its licensors (and their licensors and
suppliers) make no guarantees, representations or warranties of any kind, express or implied, arising by law or
otherwise, including but not limited to, content, quality,
accuracy, completeness, effectiveness, reliability, merchantability, fitness for a particular purpose, usefulness,
use or results to be obtained from the Product, or that the
Data or server will be uninterrupted or error-free.
Disclaimer of Warranty. Garmin AND ITS LICENSORS
(INCLUDING THEIR LICENSORS AND SUPPLIERS)
DISCLAIM ANY WARRANTIES, EXPRESS OR IMPLIED, OF QUALITY, PERFORMANCE, MERCHANTABILITY, FITNESS FOR A PARTICULAR PURPOSE OR
NONINFRINGEMENT. NO ORAL OR WRITTEN ADVICE OR INFORMATION PROVIDED BY Garmin OR
ITS SUPPLIERS AND LICENSORS SHALL CREATE A
WARRANTY, AND YOU ARE NOT ENTITLED TO RELY
3
108 Uconnect Touch™ 8.4 SYSTEM
ON ANY SUCH ADVICE OR INFORMATION. THIS
DISCLAIMER OF WARRANTIES IS AN ESSENTIAL
CONDITION OF THIS AGREEMENT. Some States, Territories and Countries do not allow certain warranty
exclusions, so to that extent the above exclusion may not
apply to you.
Disclaimer of Liability. Garmin AND ITS LICENSORS
(INCLUDING THEIR LICENSORS AND SUPPLIERS)
SHALL NOT BE LIABLE TO YOU: IN RESPECT OF ANY
CLAIM, DEMAND OR ACTION, IRRESPECTIVE OF
THE NATURE OF THE CAUSE OF THE CLAIM, DEMAND OR ACTION ALLEGING ANY LOSS, INJURY
OR DAMAGES, DIRECT OR INDIRECT, WHICH MAY
RESULT FROM THE USE OR POSSESSION OF THE
INFORMATION; OR FOR ANY LOSS OF PROFIT, REVENUE, CONTRACTS OR SAVINGS, OR ANY OTHER
DIRECT, INDIRECT, INCIDENTAL, SPECIAL OR CONSEQUENTIAL DAMAGES ARISING OUT OF YOUR
USE OF OR INABILITY TO USE THIS INFORMATION,
ANY DEFECT IN THE DATA OR INFORMATION, OR
THE BREACH OF THESE TERMS OR CONDITIONS,
WHETHER IN AN ACTION IN CONTRACT OR TORT
OR BASED ON A WARRANTY, EVEN IF Garmin OR ITS
LICENSORS HAVE BEEN ADVISED OF THE POSSIBILITY OF SUCH DAMAGES. Garmin’S AND ITS LICENSORS’ TOTAL AGGREGATE LIABILITY WITH RESPECT TO ITS OBLIGATIONS UNDER THIS
AGREEMENT OR OTHERWISE WITH RESPECT TO
THE Garmin PRODUCT OR THE DATA SHALL NOT
EXCEED $1.00. Some States, Territories and Countries do
not allow certain liability exclusions or damages limitations, so to that extent the above may not apply to you.
Disclaimer of Endorsement. Reference to any products,
services, processes, hypertext links to third parties or
other Data by trade name, trademark, manufacturer,
supplier or otherwise does not necessarily constitute or
imply its endorsement, sponsorship or recommendation
Uconnect Touch™ 8.4 SYSTEM 109
by Garmin or its licensors. Product and service information are the sole responsibility of each individual vendor.
The NAVTEQ name and logo, the NAVTEQ and
NAVTEQ ON BOARD trademarks and logos, and other
trademarks and trade names owned by NAVTEQ North
America LLC may not be used in any commercial manner without the prior written consent of NAVTEQ.
Export Control. You agree not to export from anywhere
any part of the Data provided to you or any direct
product thereof except in compliance with, and with all
licenses and approvals required under, applicable export
laws, rules and regulations.
Indemnity. You agree to indemnify, defend and hold
Garmin and its licensors (including their respective licensors, suppliers, assignees, subsidiaries, affiliated companies, and the respective officers, directors, employees,
shareholders, agents and representatives of each of them)
free and harmless from and against any liability, loss,
injury (including injuries resulting in death), demand,
action, cost, expense, or claim of any kind or character,
including but not limited to attorney’s fees, arising out of
or in connection with any use or possession by you of the
Product (including the Data).
Entire Agreement. These terms and conditions constitute
the entire agreement between Garmin (and its licensors,
including their licensors and suppliers) and you pertaining to the subject matter hereof, and supersedes in their
entirety any and all written or oral agreements previously existing between us with respect to such subject
matter.
Governing Law. (a) For European Union NAVTEQ Data
The above terms and conditions shall be governed by the
laws of the Netherlands, without giving effect to (i) its
conflict of laws provisions, or (ii) the United Nations
Convention for Contracts for the International Sale of
Goods, which is explicitly excluded. You agree to submit
to the jurisdiction of the Netherlands for any and all
disputes, claims and actions arising from or in connection
3
110 Uconnect Touch™ 8.4 SYSTEM
with the Data provided to you hereunder. (b) For North
American NAVTEQ Data and other non-European Union
NAVTEQ Data The above terms and conditions shall be
governed by the laws of Illinois, without giving effect to
(i) its conflict of laws provisions, or (ii) the United
Nations Convention for Contracts for the International
Sale of Goods, which is explicitly excluded. You agree to
submit to the jurisdiction of Illinois for any and all
disputes, claims and actions arising from or in connection
with the Data provided to you hereunder.
Government End Users. If End User is an agency, department, or other entity of the United States Government, or
funded in whole or in part by the U.S. Government, then
use, duplication, reproduction, release, modification, disclosure or transfer of the Product and accompanying
documentation is subject to restrictions as set forth in
DFARS 252.227-7014(a)(1) (JUN 1995) (DOD commercial
computer software definition), DFARS 27.7202-1 (DOD
policy on commercial computer software), FAR 52.227-19
(JUN 1987) (commercial computer software clause for
civilian agencies), DFARS 252.227-7015 (NOV 1995)
(DOD technical data – commercial items clause); FAR
52.227-14 Alternates I, II, and III (JUN 1987) (civilian
agency technical data and noncommercial computer software clause); and/or FAR 12.211 and FAR 12.212 (commercial item acquisitions), as applicable. In case of conflict between any of the FAR and DFARS provisions listed
herein and this License, the construction that provides
greater limitations on the Government’s rights shall
control. The contractor/manufacturer is Garmin International, Inc., 1200 East 151st Street, Olathe, KS 66062, USA
and NAVTEQ North America LLC, 222 Merchandise
Mart Plaza, Suite 900, Chicago, Illinois 60654.
DMTI Spatial, Inc. End User License Agreement
The software embedded in your Garmin product is
owned by Garmin Ltd. or its subsidiaries (“Garmin”).
Uconnect Touch™ 8.4 SYSTEM 111
The third-party postal code data (the “Licensed Product”) embedded in or accompanying your Garmin product is owned by DMTI Spatial, Inc. and is licensed to
Garmin. Both the software and Licensed Product are
protected under copyright laws and international copyright treaties. THIS is a legal Agreement between you, the
end user, and DMTI Spatial, Inc. BY LOADING THE
PRODUCT(S) WITH THIS AGREEMENT YOU ARE
AGREEING TO BE BOUND BY THE TERMS OF THIS
AGREEMENT. IF YOU DO NOT AGREE TO THE
TERMS OF THIS AGREEMENT, PROMPTLY (within
7 days of purchase) RETURN THE PRODUCTS AND
ANY ACCOMPANYING ITEMS (including written materials) TO Garmin INTERNATIONAL, INC. CUSTOMER SERVICE, 1200 EAST 151ST STREET, OLATHE,
KANSAS 66062, FOR A REFUND.
DMTI Spatial hereby grants to you a non-exclusive,
non-transferable license to use the data contained on the
media in this package (the “Licensed Product”) solely for
personal non-commercial use or internal use in your
business, on a single computer, Pocket PC, or Palm
device in conjunction with Garmin software, and with
compatible Garmin products that you personally own.
Your use of the data is subject to the following terms and
conditions:
You acknowledge that the Licensed Product(s) belong
to DMTI Spatial and its third party supplier, and that
the Licensed Product(s) are copyrighted. Unauthorized
copying of the Licensed Product(s), is expressly forbidden and you may be held legally responsible for
copyright infringement which is caused or encouraged
by your failure to abide by the terms of this agreement.
You may make one archival copy of the Licensed
Product(s), solely for your own use, subject to the
following restrictions: (1) The archival copy must be
treated in the same way as the original copy; (2) No
copy may be used while any other copy is in use. If you
3
112 Uconnect Touch™ 8.4 SYSTEM
make an archival copy of the Licensed Product(s), you
must include on it the copyright notice that is on the
original media.
You may not reproduce, sell, rent, lease, loan, distribute or sublicense the Licensed Product(s) or otherwise
transfer the Licensed Product(s) to any third party, use
the Licensed Product for commercial purposes except
for internal use in your business, decompile, disassemble, reverseengineer the Licensed Product(s), or
use the Licensed Product to create any derived product
for any of these prohibited purposes. You may not
place the Licensed Product(s) on the Internet without a
prior written agreement with DMTI Spatial.
In no event shall DMTI Spatial or its third party
supplier(s) be liable to you or your organization for
any indirect damages including any lost profits, lost
savings, interruption of business, loss of business
opportunities or other incidental or consequential
damages, arising out of your possession, use of, or
inability to use the Licensed Product(s), even if DMTI
Spatial, its third party supplier(s), or any authorized
dealer, has been advised of the possibility of the
damages, or for any claim by any other party. In no
event shall DMTI Spatial have any liability for damage
in excess of the license fee paid for the Licensed
Product(s).
You shall indemnify and hold DMTI Spatial, its third
party supplier(s) and their officers, employees and
agents, harmless from and against any claim, demand
or action, irrespective of the nature of the claim,
demand or action, alleging loss, costs, damages, expenses, or injury (including injury from death) resulting from your authorized or unauthorized, use, possession, modification, or alteration of the Licensed
Product(s).
Uconnect Touch™ 8.4 SYSTEM 113
THE LICENSED PRODUCT(S) AND THE ASSOCIATED
WRITTEN MATERIALS IN CONNECTION THEREWITH ARE PROVIDED “AS IS” WITHOUT WARRANTY OF ANY KIND, EITHER EXPRESSED OR IMPLIED, ARISING BY LAW OR OTHERWISE,
INCLUDING BUT NOT LIMITED TO WARRANTIES OF
EFFECTIVENESS, COMPLETENESS, ACCURACY,
MERCHANTABILITY OR FITNESS FOR A PARTICULAR PURPOSE. THE ENTIRE RISK AS TO THE QUALITY AND PERFORMANCE OF THE LICENSED PRODUCT(S) IS WITH YOU, THE END USER. NO ORAL OR
WRITTEN ADVICE GIVEN BY DMTI SPATIAL OR ITS
DEALERS, DISTRIBUTORS, AGENTS OR EMPLOYEES
CREATES A WARRANTY OR IN NAY WAY INCREASES
DMTI SPATIAL’S LIABILITY AND YOU MAY NOT
RELY ON ANY SUCH INFORMATION OR ADVICE.
No statement or recommendation made or assistance
given by DMTI Spatial or by its representatives or
employees shall constitute a waiver by DMTI Spatial or
any of the provisions herein. Nor does or will DMTI
Spatial warrant any services it may provide in connection
with the use of the Licensed product(s), to include any
assistance, training, or other consultation with you.
This license is effective until terminated. This license will
terminate automatically without notice from DMTI Spatial if you fail to comply with any provision of this
License Agreement. Upon termination, you shall destroy
or return the Licensed Product(s) including any written
materials and all copies of the Licensed Product(s) and
any written materials in connection therewith have been
destroyed or returned to DMTI Spatial.
This Agreement shall be governed by the laws of the
Province of Ontario.
©2007 DMTI Spatial Inc. (except for data licensed from
third parties).
DMTI Spatial is an authorized user and distributor of
selected Statistics Canada Computer files under Licensing Agreement 6230.
3
114 Uconnect Touch™ 8.4 SYSTEM
© Copyright, HER MAJESTY THE QUEEN IN RIGHT Settings Main Menu
OF CANADA, as represented by the Minister of Industry,
Statistics Canada 1996.
Digital Topographic Data produced under license from
Her Majesty the Queen in Right of Canada, with permission of Natural Resources Canada.
OPERATION INSTRUCTIONS – MORE
More Main Menu
The More Main Menu consists of the following options:
• Settings
Refer to the Settings information in this section for
Touch the Settings soft-key to display the list of available
more details.
settings.
• SIRIUS Travel Link
The Setting Main Menu consists of the following options.
Refer to the Navigation section in this manual for
• Display
more details.
Refer to this section for more details.
Uconnect Touch™ 8.4 SYSTEM 115
• Clock
Refer to this section for more details.
• Safety & Driving Assistance
• Auto–On Comfort & Remote Start
Refer to ⬙Understanding Your Instrument Panel⬙,
⬙Uconnect Touch™ System⬙ section in your vehicle
Owner’s Manual on the DVD for details.
Refer to ⬙Understanding Your Instrument Panel⬙,
• Engine Off
⬙Uconnect Touch™ System⬙ section in your vehicle
Refer to ⬙Understanding Your Instrument
Owner’s Manual on the DVD for details.
⬙Uconnect Touch™ System⬙ section in your
• Lights
Owner’s Manual on the DVD for details.
Refer to ⬙Understanding Your Instrument Panel⬙,
• Compass
⬙Uconnect Touch™ System⬙ section in your vehicle
Refer to ⬙Understanding Your Instrument
Owner’s Manual on the DVD for details.
⬙Uconnect Touch™ System⬙ section in your
• Doors & Locks
Owner’s Manual on the DVD for details.
Refer to ⬙Understanding Your Instrument Panel⬙,
• Audio
⬙Uconnect Touch™ System⬙ section in your vehicle
Refer to this section for more details.
Owner’s Manual on the DVD for details.
3
Panel⬙,
vehicle
Panel⬙,
vehicle
116 Uconnect Touch™ 8.4 SYSTEM
• Phone/Bluetooth
2. Then press the Settings soft-key.
Refer to ⬙Understanding The Features Of Your Vehicle⬙, ⬙Uconnect Touch™ 8.4⬙ section in your vehicle
Owner’s Manual on the DVD for details.
• Sirius Setup
Refer to the Radio section in this manual for more
details.
Display
Your Uconnect Touch™ display can be customized by
following the steps:
1. Press the More soft-key on the bottom of the screen.
3. Press the Display soft-key to enter the Display Menu
Uconnect Touch™ 8.4 SYSTEM 117
• Set Language
• Units
• Voice Response Length
• Touchscreen Beep
• Navigation Turn-by-Turn Displayed in the Cluster
(If Equipped)
• Fuel Saver Displayed in the Cluster (If Equipped)
5. Touch the + or – soft-key to change the Brightness. Or
touch the check mark or empty box to change a selection.
4. The Display Menu shows the following options for
NOTE: The check-mark indicates the current selection is
you to customize your display.
active.
• Display Mode
6. Touch the X soft-key to exit from the Display Menu
• Display Brightness with Headlights On
and Settings.
• Display Brightness with Headlights Off
3
118 Uconnect Touch™ 8.4 SYSTEM
Clock Setting
3. Press the Clock soft-key to enter the Clock Menu
1. Press the More soft-key on the bottom of the screen.
2. Then press the Settings soft-key.
4. In the Set Time screen, press the + or – soft-keys to
adjust the hours or minutes.
NOTE: The Clock Setting Menu can also be accessed by
touching the time as it is displayed on the screen.
Uconnect Touch™ 8.4 SYSTEM 119
5. Other options available:
• Sync with GPS Time
• Time Format
• Show Time in Status Bar
6. Touch the check mark or empty box to change a
selection.
NOTE: The check-mark indicates the current selection is
active.
3
SAFETY GUIDELINES
CONTENTS
䡵 Safety Guidelines
. . . . . . . . . . . . . . . . . . . . . 122
▫ System Care . . . . . . . . . . . . . . . . . . . . . . . . 123
▫ Warnings . . . . . . . . . . . . . . . . . . . . . . . . . . 122
▫ Gracenote威 . . . . . . . . . . . . . . . . . . . . . . . . . 125
▫ Safety References . . . . . . . . . . . . . . . . . . . . 123
▫ Dolby威 . . . . . . . . . . . . . . . . . . . . . . . . . . . 128
▫ Intended Use . . . . . . . . . . . . . . . . . . . . . . . 123
4
122 SAFETY GUIDELINES
SAFETY GUIDELINES
• Make certain that the volume level of the system is set
Ensure that all persons read this manual carefully before
to a level that still allows you to hear outside traffic
using the radio system. It contains instructions on how to
and emergency vehicles.
use the system in a safe and effective manner.
• The law in some states prohibits the Front Seat DVD
Viewer. As a result, it may be disabled prior to delivery
WARNING!
to you. If you move to another state, you should
consult your dealer for the proper enable/disable
Please read and follow these safety precautions.
setting for your new state. Currently all states prohibit
Failure to do so may result in injury or property
front seat video viewers except for: Arkansas, Deladamage.
ware, Georgia, Hawaii, Idaho, Iowa, Kentucky, Mississippi, Missouri, Montana, North Dakota and Ohio.
• Glance at the screen only when necessary and safe to
do so. If prolonged viewing of the screen is necessary,
Warnings
pull over at a safe location.
This manual contains WARNINGS against operating
• Stop use immediately if a problem occurs. Failure to procedures that could result in an accident or bodily
do so may cause injury or damage to the product. injury. If you do not read the entire manual, you may
miss important information. Observe all WARNINGS!
Return it to your authorized dealer to repair.
The information given in this manual is subject to
change.
SAFETY GUIDELINES 123
Safety References
Before operating this system for the first time, please read
this manual carefully. Note the safety precautions described in this manual. If you have any questions, please
contact the vehicle manufacturer or your authorized
dealer.
Permanent hearing loss may occur if you play your music
or the system at loud volumes. Exercise caution when
setting the volume on your system.
Driving is a complex activity that requires your full
attention. If you’re engaged in driving or any activity that
requires your full attention, we recommend that you not
use your system.
Intended Use
Generally recognized rules of radio technology were
NOTE: Many features of this system are speed depenmaintained during the development and manufacture of
dent. For your own safety, it is not possible to use the
this system. When using this product, be aware of
touch screen keyboard while the vehicle is in motion.
state/province-specific norms and guidelines.
Keep drinks, rain, and other sources of moisture away
System Care
from your system. Besides damage to your system,
moisture can cause electric shocks as with any electronic
Safe Usage of the Uconnect™ Touch System
Read all instructions in this manual carefully before device.
using your system to ensure proper usage!
Your system is a sophisticated electronic device. Do not
let young children use your system.
4
124 SAFETY GUIDELINES
Connections
Never force any connector into the ports of your system.
Make sure your connectors are the correct shape and size
before you connect.
If necessary, use a lint-free cloth dampened with a
cleaning solution, such as isopropyl alcohol, or an isopropyl alcohol and water solution ratio of 50:50. Be sure
to follow the solvent manufacturer’s precautions and
directions.
Any attached cable should be routed so that it will not
CD/DVD Drive
apply any pressure to the connection.
Do not insert any damaged, warped, scratched or dirty
Touch Screen
CDs or DVDs into the CD/DVD player.
Do not touch the screen with any hard or sharp objects
(pen, USB stick, jewelry, etc.) which could scratch the Discs that have been modified with an adhesive label
touch screen surface!
should not be used in the CD/DVD player.
NOTE: It is possible to use a plastic stylus for press Do not insert more than one CD/DVD at a time into the
screen enabled devices such as a PDA and Pocket PCs. drive slot.
Do not spray any liquid or caustic chemicals directly on GPS Navigation Antenna – If Equipped
the screen! Use a clean and dry micro fiber lens cleaning The antenna for the navigation GPS system is mounted in
various locations (depending on the vehicle model)
cloth in order to clean the touch screen.
within the dashboard. Do not place items on the dashboard around the GPS antenna location. Objects placed
SAFETY GUIDELINES 125
within the line of sight of the antenna will decrease Gracenote姞
performance. Do not place items directly on or above the
antenna.
Satellite Radio Antenna – If Equipped
The antenna for the satellite radio and SIRIUS Backseat
TV™ is mounted on the roof of the vehicle. Do not place
items on the roof around the roof top antenna location.
Objects placed within the line of sight of the antenna will
cause decreased performance. Larger luggage items
should be placed as far from the antenna as possible. Do
not place items directly on or above the antenna.
Other Electronic Devices
You may bring other electronic devices into your vehicle
(e.g., PDA, iPod, laptop computer, etc.). Some of these
devices may cause electromagnetic interference with the
GPS. If a degradation in the navigation system is observed, turn the devices off, or keep them as far away
from the GPS antenna as possible.
4
This navigation radio is equipped with the Gracenote威
Music Recognition Service, with an embedded database
to look up album, song title, genre and artist information.
Data will be found for most Audio CDs (CDA discs).
Data will not be found for DVDs or data discs (those with
MP3 or WMA files).
126 SAFETY GUIDELINES
About Gracenote
Music recognition technology and related data are provided by Gracenote威. Gracenote is the industry standard
in music recognition technology and related content
delivery. For more information visit www.gracenote.com.
NOTE:
Visit www.chrysler.com, www.jeep.com,
www.dodge.com or www.ramtrucks.com for update
information.
Gracenote威 End User License Agreement
This application or device contains software from
Gracenote, Inc. of Emeryville, California (“Gracenote”).
The software from Gracenote (the “Gracenote Software”)
enables this application to perform disc and/or file
identification and obtain music-related information, including name, artist, track, and title information
(“Gracenote Data”) from online servers or embedded
databases (collectively, “Gracenote Servers”) and to perform other functions. You may use Gracenote Data only
by means of the intended End-User functions of this
application or device.
Gracenote Proprietary Legends
CD and music-related data from Gracenote, Inc., copyright © 2000 to present Gracenote. Gracenote Software,
copyright © 2000 to present Gracenote. One or more
patents owned by Gracenote apply to this product and
service. See the Gracenote website for a non-exhaustive
list of applicable Gracenote patents. Gracenote, CDDB,
MusicID, MediaVOCS, the Gracenote logo and logotype,
and the ⬙Powered by Gracenote⬙ logo are either registered trademarks or trademarks of Gracenote in the
United States and/or other countries.
You agree that you will use Gracenote Data, the
Gracenote Software, and Gracenote Servers for your own
personal non-commercial use only. You agree not to
assign, copy, transfer or transmit the Gracenote Software
SAFETY GUIDELINES 127
The Gracenote service uses a unique identifier to track
queries for statistical purposes. The purpose of a randomly assigned numeric identifier is to allow the
Gracenote service to count queries without knowing
You agree that your non-exclusive license to use the anything about who you are. For more information, see
Gracenote Data, the Gracenote Software, and Gracenote the web page for the Gracenote Privacy Policy for the
Servers will terminate if you violate these restrictions. If Gracenote service.
your license terminates, you agree to cease any and all The Gracenote Software and each item of Gracenote Data
use of the Gracenote Data, the Gracenote Software, and are licensed to you “AS IS.” Gracenote makes no repreGracenote Servers. Gracenote reserves all rights in sentations or warranties, express or implied, regarding
Gracenote Data, the Gracenote Software, and the the accuracy of any Gracenote Data from in the
Gracenote Servers, including all ownership rights. Under Gracenote Servers. Gracenote reserves the right to delete
no circumstances will Gracenote become liable for any data from the Gracenote Servers or to change data
payment to you for any information that you provide. categories for any cause that Gracenote deems sufficient.
You agree that Gracenote, Inc. may enforce its rights No warranty is made that the Gracenote Software or
under this Agreement against you directly in its own Gracenote Servers are error-free or that functioning of
Gracenote Software or Gracenote Servers will be unintername.
rupted. Gracenote is not obligated to provide you with
or any Gracenote Data to any third party. YOU AGREE
NOT TO USE OR EXPLOIT GRACENOTE DATA, THE
GRACENOTE SOFTWARE, OR GRACENOTE SERVERS, EXCEPT AS EXPRESSLY PERMITTED HEREIN.
4
128 SAFETY GUIDELINES
new enhanced or additional data types or categories that DOLBY姞
Gracenote may provide in the future and is free to Dolby and the double-D symbol are registered trademarks of Dolby Laboratories.
discontinue its services at any time.
GRACENOTE DISCLAIMS ALL WARRANTIES EXPRESS OR IMPLIED, INCLUDING, BUT NOT LIMITED
TO, IMPLIED WARRANTIES OF MERCHANTABILITY,
FITNESS FOR A PARTICULAR PURPOSE, TITLE, AND
NON-INFRINGEMENT. GRACENOTE DOES NOT
WARRANT THE RESULTS THAT WILL BE OBTAINED
BY YOUR USE OF THE GRACENOTE SOFTWARE OR
ANY GRACENOTE SERVER. IN NO CASE WILL
GRACENOTE BE LIABLE FOR ANY CONSEQUENTIAL OR INCIDENTAL DAMAGES OR FOR ANY LOST
PROFITS OR LOST REVENUES.
copyright © 2000 to present Gracenote
Chrysler Group LLC
11CTP-226-AB
11CTP-226-AA
Second
Edition
First Edition
Printed
in U.S.A.
Printed
in U.S.A.