1
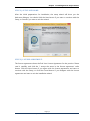
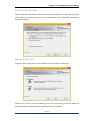
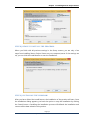
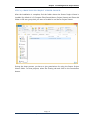
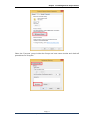
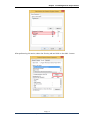
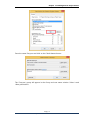
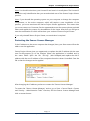
Contents Page | 1 Seavus Project Viewer Concurrent Installation Instructions Contents Contents CONTENTS 2 CHAPTER 1: INSTALLING SEAVUS PROJECT VIEWER 3 INSTALLATION INSTRUCTION CONFIGURATION INSTRUCTIONS ACTIVATION INSTRUCTIONS RESTARTING THE SEAVUS LICENSE MANAGER 3 9 14 15 CHAPTER 2: CLIENT ACCESS 17 AVAILABLE OPTIONS FOR USING CONCURRENT SEAVUS PROJECT VIEWER INSTALL PREREQUISITES FOR SHAREPOINT INTEGRATION FEATURE 17 17 Page | 2 Seavus Project Viewer Concurrent Installation Instructions Chapter 1: Installing Seavus Project Viewer Chapter 1: Installing Seavus Project Viewer Installation Instruction After you have downloaded the setup, start the installation by double-clicking the setup file in Windows Explorer or use the “Run” command from the Start menu. Note: Before you start the setup, you should check the section "System Requirements" in the “User Manual” document for information about the minimal hardware and software configuration required to run the product. STEP 1) SETUP INITIALIZATION: Once the setup is initialized and the initialization dialog appears, the Setup wizard will automatically continue with the installation. Note: Click the Cancel button if you wish to exit the installation Page | 3 Seavus Project Viewer Concurrent Installation Instructions Chapter 1: Installing Seavus Project Viewer STEP 2) SETUP WELCOME: After the initial preparations for installation; the setup wizard will show you the Welcome dialogue. You should click the Next button if you want to continue with the Setup, or Cancel if you want to exit the wizard. STEP 3) LICENSE AGREEMENT: The license agreement shows the End User License Agreement for the product. Please read it carefully, and click the “I accept the terms in the license agreement” radio button. Click the Next button if you agree with the License agreement and want to continue with the Setup; or click the Cancel button if you disagree with the License agreement and want to exit the installation wizard. Page | 4 Seavus Project Viewer Concurrent Installation Instructions Chapter 1: Installing Seavus Project Viewer STEP 4) CUSTOMER INFORMATION: This dialog box collects the information about the user who performs the installation, and the license key information which consists of two parts Organization and Serial Number. You must insert the correct serial number if you want to continue the Setup, otherwise you will not be allowed to install the product on your computer/server. STEP 5) LANGUAGE DIALOG: Page | 5 Seavus Project Viewer Concurrent Installation Instructions Chapter 1: Installing Seavus Project Viewer This dialog box allows you to select which language Seavus Project Viewer will be installed on your PC. You may install Seavus Project Viewer in the following languages: English, German, French, Spanish, Czech, Russian, Chinese, Japanese, Dutch and Polish. STEP 6) IP ADDRESS FOR LICENSE MANAGER: After selecting the language for Seavus Project Viewer, you will need to enter the computer’s IP address, on which the application is installed. In case you don’t know the IP address, click on the Start button and select the Run option. In the Run window, type cmd and click on the Ok button. Inside the Command Prompt window type ipconfig and you will be able to view the computer’s IP address. Page | 6 Seavus Project Viewer Concurrent Installation Instructions Chapter 1: Installing Seavus Project Viewer STEP 7) SETUP OPTIONS: Select if Seavus Project Viewer should be the default application for opening .mpp files, which shortcuts should be placed for the application and if SharePoint integration should be installed. STEP 8) SETUP TYPE: Complete option will install it on the default location with all components. Selecting the Custom type of installation gives you an opportunity to choose where the product will be installed and which components will be installed. Page | 7 Seavus Project Viewer Concurrent Installation Instructions Chapter 1: Installing Seavus Project Viewer STEP 8) READY TO INSTALL THE PROGRAM: When you finish with all previous settings in the Setup screens, you are only a few steps from installing Seavus Project Viewer on your computer/server. If the settings are ok, you can click the Install button to start the installation. STEP 9) INSTALLING THE PROGRAM: After you have clicked the Install button, the installation of the product will start. Once the installation dialog appears; you have the option to stop the installation by clicking the Cancel button. Cancelling the installation process will rollback the installation and remove all the data related to this product. Page | 8 Seavus Project Viewer Concurrent Installation Instructions Chapter 1: Installing Seavus Project Viewer STEP 10) SETUP COMPLETED: If the installation was successful; the Installation Completed dialog box will appear, informing you that the product is successfully installed on your computer/server. Click the Finish button, the complete the installation process. Configuration Instructions In order for the client users to be able to access and use the Concurrent application, the installation folder on the server machine must be shared and the application must be activated as explained below. Page | 9 Seavus Project Viewer Concurrent Installation Instructions Chapter 1: Installing Seavus Project Viewer STEP 1) SHARE SEAVUS PROJECT VIEWER FOLDER: After the installation is complete, find the folder where the Seavus Project Viewer is installed (by default it is C:\Program Files\Seavus\Seavus Project Viewer) and Share this folder to the user group that you want to be able to use Seavus Project Viewer. During the share process, you have to give permissions for using the Seavus Project Viewer folder. For that purpose, select the Sharing tab and click on the Permissions button. Page | 10 Seavus Project Viewer Concurrent Installation Instructions Chapter 1: Installing Seavus Project Viewer Select the ‘Everyone’ group inside the Groups and user name window and check all permissions for everyone. Page | 11 Seavus Project Viewer Concurrent Installation Instructions Chapter 1: Installing Seavus Project Viewer After performing this action, select the Security tab and click on the Add… button. Page | 12 Seavus Project Viewer Concurrent Installation Instructions Chapter 1: Installing Seavus Project Viewer Enter the name Everyone and click on the Check Names button. The ‘Everyone’ group will appear in the Group and user name window. Select it and ‘allow permissions’ Page | 13 Seavus Project Viewer Concurrent Installation Instructions Chapter 1: Installing Seavus Project Viewer Activation Instructions The activation can be performed on following ways: Using your Internet connection – Seavus Project Viewer is contacting our secure Activation Centre using https protocol and receives the activation key. Contacting our Customer Service representatives via telephone ( +389 2 3094-061 and +46 40 578 883 for Europe and 1 888 573 2887 for Americas), or via email ([email protected]) If you decide to use the activation by contacting our Customer Service representatives, a dialog that shows License ID and Hardware ID will appear. You should read these two IDs to our customer service representative if you are using a telephone for communication, or to send these IDs over the email to the email address stated above. You will get back the confirmation ID from our customer service representative, immediately if you are using telephone or for maximum one working day if you are using email communication. The confirmation ID must be inserted into fields marked with A, B, C, D, E, F, G and H, and then you should press Next button to finalize the activation. If the confirmation ID is inserted correctly the product will be ready for use, but if the confirmation ID is not correct you will get a message that will tell you that the activation is unsuccessful. Page | 14 Seavus Project Viewer Concurrent Installation Instructions Chapter 1: Installing Seavus Project Viewer Note: You should write down your License ID and store it in a safe place. The License ID will be the only identification that you are authorized user of the Seavus Project Viewer product. Note: If you reinstall the operating system on your computer or change the computer components, or the entire computer, which will require a new installation of the product, you must reactivate the Seavus Project Viewer application. This means that you must contact our Customer Service representatives on the contact phone provided above and explain the reason for reinstallation of the viewer. After that you will get a new the confirmation ID which will activate your version of Seavus Project Viewer. If you only reinstall Seavus Project Viewer, no reactivation is required. Restarting the Seavus License Manager If the IP address on the server computer has changed, then your client users will not be able to use the application. Seavus Project Viewer gives you opportunity to replace the old IP address with the new one. For this purpose, go to the location where the application is installed and in the same folder open the file “SPV.cfg” (with Notepad) and replace the old IP address with the new IP address of the computer where the viewer is installed. Save the file so that the changes can be applied. After changing the IP address you have to restart the “Seavus License Manager” To restart the “Seavus License Manager” service, go to Start->Control Panel->System and Security ->Administrative Tools->Services, find the Seavus License Manager and click on restart button. Page | 15 Seavus Project Viewer Concurrent Installation Instructions Chapter 1: Installing Seavus Project Viewer Now you are ready to use Seavus Project Viewer from N computers connected in the network with the computer where Seavus Project Viewer is installed, by starting the “SeavusProjectViewer.exe” file. Page | 16 Seavus Project Viewer Concurrent Installation Instructions Chapter 2: Client Access Chapter 2: Client Access Available options for using Concurrent Seavus Project Viewer With the Concurrent license type, there is no need for installing the application on the client machines. However, in case the SharePoint integration is installed on the server and the client needs to use the SharePoint integration, there are some prerequisites that will need to be installed on the client system so the client can use this feature. For instructions about the needed prerequisites, please check Install prerequisites for SharePoint integration feature. On the initial application start by the client, the “SeavusProjectViewer.exe” needs to be started from the shared drive on the server machine which can be accessed through UNC link provided to the client by the Administrator in this format: \\10.0.0.1\Seavus Project Viewer With that, a local copy of the whole Seavus Project Viewer folder will be created on the client PC. By this we want to save on needed network bandwidth so users can start the application faster. The local copy of the folder can be found on the following location: C:\Users\ <UserName> \AppData\Local\Seavus\Seavus Project Viewer\App\ Note that you will have to replace <UserName> with your actual user name. Once the local copy is found, the client can create shortcut to the “SeavusProjectViewer.exe” inside and always run the application through the shortcut. With starting the exe, if the user has proper connection to the application server where the License Service runs, it will reserve one of the available concurrent licenses. The license will be reserved until the user closes all application instances opened locally on the users’ machine. Install prerequisites for SharePoint integration feature In order the Microsoft® SharePoint functionality to work properly, the following prerequisites need to be installed on the clients’ systems: Page | 17 Seavus Project Viewer Concurrent Installation Instructions Chapter 2: Client Access Microsoft .NET framework 4 Client profile Microsoft SharePoint Client Runtime Windows Identity Foundation for the appropriate OS All of the above prerequisites can be found in the Seavus Project Viewer installation folder – in the Prerequisites subfolder. Page | 18 Seavus Project Viewer Concurrent Installation Instructions Chapter 2: Client Access Page | 19 Seavus Project Viewer Concurrent Installation Instructions