1
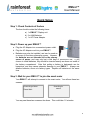
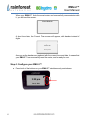
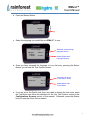
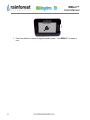
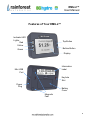
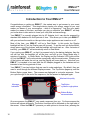
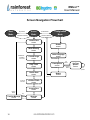
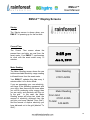
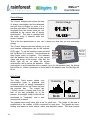
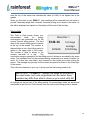
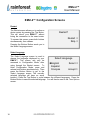
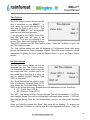
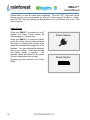
EMU-2™ Energy Monitoring Unit User Manual Version 2.0bch July 2015 EMU-2™ User Manual Copyright © 2015 by RAINFOREST AUTOMATION, INC (“RFA”). All rights reserved. No part of this manual may be reproduced or transmitted in any from without the expressed, written permission of RFA. Under copyright law, this manual or the software described within, cannot be copied, in whole or part, without the written consent of the manufacturer, except in the normal use of the software to make a backup copy. The same proprietary and copyright notices must be affixed to any permitted copies as were affixed to the original. This exception does not allow copies to be made for others, whether or not sold, but all of the material purchased (with all backup copies) can be sold, given, or loaned to another person. Under the law, copying includes translating into another language or format. Rainforest Automation may have patents, patent applications, trademarks, copyrights, or other intellectual property rights covering subject matter in this document. Except as expressly provided in any written license agreement from Rainforest Automation, the furnishing of this document does not give you any license to these patents, trademarks, copyrights, or other intellectual property. Trademarks Third-party brands and company names mentioned herein may be trademarks and/or registered trademarks of their respective companies and are the sole property of their respective manufacturers. Notice The author(s) assumes no responsibility for any errors or omissions that may appear in this document nor does it make a commitment to update the information contained herein. 2 EMU-2™ User Manual EMU-2™ – Energy Monitoring Unit RFA-Z105-2 Version 2.0bch User Manual Table of Contents Regulatory information ............................................................................................. 4 Quick Setup ................................................................................................................ 5 Features of Your EMU-2™ ........................................................................................ 9 Introduction to Your EMU-2™................................................................................. 10 Screen Navigation Flowchart.................................................................................. 12 EMU-2™ Display Screens ....................................................................................... 13 Startup ............................................................................................................. 13 Current Time .................................................................................................... 13 Meter Reading ................................................................................................. 13 Current Usage ................................................................................................. 14 Daily Totals ...................................................................................................... 14 Total to Date .................................................................................................... 15 Previous Totals ................................................................................................ 16 Current Price .................................................................................................... 16 Message .......................................................................................................... 17 Confirm Message ............................................................................................. 17 EMU-2™ Configuration Screens............................................................................. 18 Restart ............................................................................................................. 18 Select Language .............................................................................................. 18 Time Options ................................................................................................... 19 Set Time Options ............................................................................................. 19 Power Source .................................................................................................. 20 Troubleshooting Guide ........................................................................................... 21 Technical Support ............................................................................................ 22 3 EMU-2™ User Manual Regulatory information FCC Notices This device complies with part 15 of the FCC Rules. Operation is subject to the following two conditions: (1) This device may not cause harmful interference, and (2) this device must accept any interference received, including interference that may cause undesired operation. Changes or modifications not expressly approved by the manufacturer could void the user’s authority to operate the equipment. FCC/IC RF Exposure Statement This equipment complies with FCC and Industry Canada radiation exposure limits set forth for an uncontrolled environment. The antenna(s) used for this equipment must be installed to provide a separation distance of at least 8 inches (20cm) from all persons. ICES-003 Compliance This Class B digital apparatus complies with Canadian ICES-003. Note: This equipment has been tested and found to comply with the limits for a Class B digital device, pursuant to part 15 of the FCC Rules. These limits are designed to provide reasonable protection against harmful interference in a residential installation. This equipment generates, uses and can radiate radio frequency energy and, if not installed and used in accordance with the instructions, may cause harmful interference to radio communications. However, there is no guarantee that interference will not occur in a particular installation. If this equipment does cause harmful interference to radio or television reception, which can be determined by turning the equipment off and on, the user is encouraged to try to correct the interference by one or more of the following measures: 4 Reorient or relocate the receiving antenna. Increase the separation between the equipment and receiver. Connect the equipment into an outlet on a circuit different from that to which the receiver is connected. Consult the dealer or an experienced radio/TV technician for help. EMU-2™ User Manual Quick Setup Step 1: Check Contents of the box The box should contain the following items: a) 1 x EMU-2™ Display unit b) 2 x AAA Batteries c) 1 x AC Power Adapter Step 2: Power up your EMU-2™ a. Plug the AC Adapter into a convenient power outlet. b. Plug the AC Adapter cord into your EMU-2™. c. Batteries may also be installed, and can be used as a source of short-term alternative power. However, the batteries are not intended to be the primary source of power, and may only last a few days of continuous use. If you choose to install batteries, they should be inserted exactly as shown on inside of the battery compartment. Note that putting a battery in backwards can be hazardous, and may cause extensive damage to your EMU-2™. Always use alkaline batteries; never mix battery types. Replace all batteries at the same time. Step 3: Wait for your EMU-2™ to join the smart meter Your EMU-2™ will attempt to connect to the smart meter. You will see these two screens: Connecting to Meter Please Wait... Searching for meters You may see these two screens a few times. This could take 1-2 minutes. 5 EMU-2™ User Manual When your EMU-2™ finds the smart meter and successfully communicates with it, you will see this screen: Joined Network A short time later, the Current Time screen will appear, with dashes instead of digits: --:-- ---- --, ---As soon as the dashes are replaced with the current time and date, it means that your EMU-2™ has successfully read the meter, and is ready for use. Step 4: Configure your EMU-2™ a. Press both of the buttons on your EMU-2™ simultaneously and release. 3:25 pm Jun 3, 2011 6 EMU-2™ User Manual b. Press the Bottom Button. Restart? Restart Skip c. Select the language you would like your EMU-2™ to use. Select Language English Español Français Select Accept Top Button scrolls through language choices Bottom Button saves language selection d. Once you have accepted the language of your choice by pressing the Bottom Button, you will see the Time Options screen. Time Options Zone: Auto Set Skip Top Button sends you to “set options” screen Bottom Button skips to next screen e. If you are not in the Pacific time zone, and need to change the time zone, press the Top Button and follow the directions for the Set Time Options screen in the Configurations Screens section of this manual. Otherwise, press the Bottom button to see the Power Source screen: 7 EMU-2™ User Manual Power Source f. Press any button to return to regular monitor mode. Your EMU-2™ is ready to use. 8 EMU-2™ User Manual Features of Your EMU-2™ Indicator LED Lights: Red Yellow Top Button Bottom Button Green Display Information Label Mini USB Port Keyhole Slot Power Plug Battery Cover Magnetic Feet 9 EMU-2™ User Manual Introduction to Your EMU-2™ Congratulations on getting an EMU-2™, the easiest way to get access to your smart meter energy information. This simple device tracks your energy usage for you, and makes you aware of your consumption – while it is happening. Just like your watch makes you aware of the time, and helps you stay on schedule, your EMU-2™ will help you know when to take action to lower your utility bills and save energy. Your EMU-2™ is normally plugged into its AC Adapter, but it can also be powered by standard AAA batteries for short periods of time. This allows you to take your EMU-2™ with you and see the results on-the-spot when major appliances are turned on or off. Most of the time, your EMU-2™ will be in Rest Mode. In this mode, the Display backlight will be off, but the Display can still be read. To put the unit into Active Mode, simply press one of the buttons, and the backlight will come back on. After 4 minutes of inactivity, your EMU-2™ will automatically return to Rest Mode. If you unplug your EMU-2™, so that it is powered only by the backup batteries, then the unit will run with the backlight off all the time, and will go into Sleep Mode after 2 minutes of inactivity. In Sleep Mode, the Display and the Indicator LED Lights will be off, but the EMU-2™ will communicate occasionally with the smart meter. Pressing one of the buttons will wake the unit up, and the Display will come back on. Note that your EMU-2™ is intended to be used with the AC Adapter plugged in; the batteries are not intended to last for long periods of time. Your EMU-2™ has two buttons that are used to make selections. By default, they are used to scroll through the different Display screens. The Top Button pages up, and the Bottom Button pages down. The screens are displayed in a circular sequence. Once you cycle through to the end of the sequence, the first screen is displayed again. Wireless link quality Message Indication Top Button cycles through options Bottom Button saves selection On some screens, the EMU-2™ may need a response from you. For these screens the buttons will behave differently. The button functions will be indicated on the right side of the screen. When the EMU-2™ presents you with options to choose from, pressing the 10 EMU-2™ User Manual Top Button cycles through the different options to select, and pressing the Bottom Button saves the selected option and pages to the next screen. Your EMU-2™ communicates wirelessly with the smart meter to get usage information, and presents this information on the Display. The accumulated usage information is updated every 4 minutes while the unit is in Active Mode. The electricity price per kWh is checked every 2 minutes. Your EMU-2™ checks every 2 minutes for a new text message from your utility. An envelope icon is shown in the upper left hand corner of the screen if there is an active message stored on your EMU-2™. The quality of the wireless signal from the smart meter is indicated by the small bar graph in the upper right hand corner of the Active Mode screens. Four bars are shown for a good signal; fewer bars indicate a lower quality signal. If the connection to the smart meter is lost, a large “X” will replace the bar graph. There are also a number of configuration screens. These are accessed by pressing and releasing both buttons simultaneously to put your EMU-2™ into Configuration Mode. Note that your EMU-2™ should have successfully connected to the smart meter before putting it into Configuration Mode. There are Indicator LED Lights to the left of the Display that show your rate of energy usage in relation to a threshold that you can set. The Red light means you are consuming a lot of energy; the Green light means your usage is low. Also, when there is a new text message waiting to be read, the red and yellow LEDs will flash in an alternating pattern. The EMU-2™ displays your immediate energy usage on the Current Usage screen. Use this screen like a speedometer for your home; it shows you how fast you are using energy right now. This screen reacts quickly to changes in electricity use, so you can observe changes in real time and see what a difference it makes when you turn electrical loads on and off. Your EMU-2™ also keeps track of your energy usage over time. The Daily Totals screen displays the total cost and usage, as well a graph of usage for each hour, for the previous day and the current day so far. This allows you to spot patterns in your daily electricity use, and to compare one day to the next. The Total to Date and Previous Totals screens give you information about your energy consumption over longer periods of time. The Total to Date screen shows your accumulated usage in the current billing period, while the Previous Totals screen shows your totals from the previous 2-month billing period. 11 EMU-2™ User Manual Screen Navigation Flowchart Rest Mode any button Active Mode 4 minutes inactivity both buttons 1 minute inactivity Configuration Mode Current Time screen Restart screen Meter Reading screen Set Baseline: Top Button 5 seconds Bottom Button Select Language screen Current Usage screen Bottom Button Time Options screen Daily Totals screen Bottom Button Total to Date screen not shown if no data Previous Totals screen Current Price screen Bottom Button Confirm Message screen 12 Top Button Message screen Any Button Battery screen Top Button Bottom Button Set Time Options screen set options EMU-2™ User Manual EMU-2™ Display Screens Startup The Startup screen is shown when your EMU-2™ is powering up for the first time. Current Time The Current Time screen shows the present time and date, as read from the smart meter. Your EMU-2™ synchronizes its clock with the smart meter every 15 minutes. 3:25 pm Jun 3, 2011 Meter Reading The Meter Reading screen shows the raw total accumulated electricity usage reading in kilowatt-hours from the smart meter. Your EMU-2™ updates this data every 4 minutes while it is in Active Mode. If you are generating your own electricity, and have a Net Metering agreement with your utility, then there may be times when you will be producing more energy than you are using, and electricity will flow out to the grid. In this case, the Meter Reading screen will show two totals: the amount of electricity delivered from the grid into your home (labeled “From Grid”), and the amount of surplus electricity you have delivered out to the grid (labeled “To Grid”). Meter Reading 21031.4 kWh Meter Reading From Grid: 21031.4 kWh To Grid: 342.6kWh 13 EMU-2™ User Manual Current Usage The Current Usage screen shows the rate of energy consumption and the estimated cost per hour in dollars (or cents, if it is less than one dollar). The estimated cost is calculated from the current price per unit multiplied by the current rate of energy consumption. The data is updated from the meter every 8 seconds while this screen is shown. Current Usage $1.21 /hr 10.123kW This is like the speedometer in your car; it shows you how fast you are consuming energy. The Current Usage screen also allows you to set your baseline consumption rate for the Indicator Press and LED Lights. To set the baseline, press and hold Red hold Top the Top Button for 5 seconds. You should see all Button for Amber 5 seconds three Lights come on together. This indicates Green that the baseline has been set to the current usage rate shown on the screen. After that, the Green light will be on when the current consumption rate is below the baseline. When consumption is at the baseline rate or greater (up to 5x the baseline rate), the Amber light will be on. When consumption is more than 5x the baseline rate, the Red light will be on. Daily Totals The Daily Totals screen shows your accumulated totals in graphical and numerical format for energy consumption and estimated cost for the current day and the previous day. The current day (“Today”) shows a running total from the start of the day (midnight) up to the present. At midnight, today’s totals will be transferred to “Yesterday”, and a new running total is started. Yesterday Today 6 70.4kWh 47.1kWh $6.34 $3.34 The graphs show hourly data, with a bar for each hour. The height of the bars is proportional to the number of kWh consumed for each hour. The graphs are autoscaling, and meant to show relative, rather than absolute values. The small number 14 EMU-2™ User Manual near the top of the center line indicates the value (in kWh) of the highest bar in the graphs. When you first start up your EMU-2™, past readings will be retrieved from the meter to provide Yesterday usage data. However, historical pricing is not stored in the meter, so this will be displayed as dashes for Yesterday until the end of the first day. Total to Date The Total to Date screen shows your Since Dec 1 accumulated totals for energy consumption and estimated cost for the current 2-month billing period. The start 14.5 days date of the current billing period is shown at the top of the screen. The number of average: elapsed days so far in this billing period is 987kWh $10.09/day shown in the upper right of the screen. The number of days is shown to the nearest one-tenth of a day. The cumulative energy consumption for the billing period is shown as recorded by the smart meter. The estimated cost for the recorded energy consumption is shown in dollars (or cents, if it is less than one dollar), and is based on the current price value during the period. The average cost per day for the current time period is shown in the lower right of the screen. $146.34 This is like the odometer in your car; it shows you the total energy used so far. IMPORTANT: The EMU-2™ displays the usage as recorded by the smart meter, and costs programmed into the meter; these numbers may differ from what is shown on your actual utility bill. At midnight on the last day of the billing period, the accumulated totals are saved and transferred to the Previous Totals screen, and the new current billing period is started. 15 EMU-2™ User Manual Previous Totals The Previous Totals screen shows your accumulated totals for energy consumption and estimated cost for the previous 2-month billing period. The start and end dates of the previous billing period are shown at the top of the screen. The number of days in the previous billing period is shown in the upper right of the screen. The average cost per day for the previous billing period is shown in the lower right of the screen. Apr 27 to May 26 $246.85 1987kWh 30.0 days average: $8.23/day This screen is overwritten with the values from the Total to Date screen each time the current billing period is restarted. This screen will not be displayed until the end of the first billing period. Current Price The Current Price screen shows the price of electricity that is currently in effect. The rate is shown in cents per kilowatt-hour (kWh). A graphic is shown that illustrates the 2-step rates, with usage shown like a thermometer. The active price is shown in bold, and the threshold between the steps is shown at the bottom, expressed in kWh. Price per kWh 11.3¢ 7.5¢ 1350 At the beginning of the billing period, the Step 1 price (shown on the left) will be in effect. When the threshold usage is reached, then the Step 2 price (shown on the right) comes into effect. The price information is obtained from the smart meter. If no price value has been set in the meter, then dashes are shown for the price digits 16 EMU-2™ User Manual Message The Message screen will display a text message when there is a message from Message your utility. Your EMU-2™ checks every 2 Your bill is past due. minutes for a new message. When a new message is received, the Indicator LED Please contact us at your Lights will flash in a special red-yellow earliest convenience at the sequence to show that a new message is waiting for you to see. The envelope icon following number: ▼ will also appear in the upper left hand corner of the screen to indicate that there is an active message. To see the message, use the buttons to go to the Message screen, and the message will be displayed. A message can be up to 100 characters long. If the message is too long to fit on the screen, a continuation character (“▼”) will be shown at the end of the bottom line, and the message will automatically scroll up until the whole message has been displayed. Once the end of the message is reached, it will start again after a short pause. If the message requires an acknowledgment, you will automatically be sent to the Confirm Message screen. Viewing the message resets the Indicator LED Lights, but the envelope icon will remain on until the message has expired. Confirm Message The Confirm Message screen allows you to send a confirmation to your utility, telling Confirm message them that you have read the latest text message that they have sent to you. If you View message wish to view the message again, press the Top Button, and you will be sent back to Confirm the Message screen. Once the message has been displayed, you will be returned to the Confirm Message screen. To send your confirmation, press the Bottom Button. You will then be sent to the Current Time screen. 17 EMU-2™ User Manual EMU-2™ Configuration Screens Restart The Restart screen allows you to perform a device restart by pressing the Top Button. This will reboot your EMU-2™ without losing the connection to the smart meter. To access this screen, press both buttons simultaneously, then release. Restart? Restart Skip Pressing the Bottom Button sends you to the Select Language screen. Select Language The Select Language screen is used to Select Language change the language displayed by your EMU-2™. This screen can only be accessed in Configuration Mode, after English Select going through the Restart screen. To Español enter Configuration Mode, press and release both buttons simultaneously. Then Français Accept press the Bottom Button to get to the Select Language screen. The currently selected language will have an arrow beside it. Press the Top Button to cycle between the different languages. Press the Bottom Button to save the selected language. You will then be sent to the Time Options screen. 18 EMU-2™ User Manual Time Options The Time Options screen shows how the time is calculated by your EMU-2™. In most cases, the meter provides the local time, and the Zone is set to “Auto”. This means the EMU-2™ will automatically read the local time from the meter. Time Options Zone: Auto Set Skip If you are not in the Pacific Time Zone, then the local time will have to be calculated. To do this, you will need to set up the Time Zone and Daylight Savings Time (DST) options in the Set Time Options screen. Press the Top Button to get to the Set Time Options screen. The Time Options screen can only be accessed in Configuration Mode, after going through the Restart and Select Language screens. Once this screen shows the correct parameters for getting the time, press the Bottom Button to go to the Power Source screen. Set Time Options The Set Time Options screen can only be accessed from the Time Options screen. It is used when the meter does not provide the correct local time. It allows you to set the current Time Zone that is in effect, as well as whether Daylight Savings Time (DST) is calculated. Set Time Options Zone: UTC-7 MT Change Keep DST: off The “Zone:” field shows the offset in hours from Coordinated Universal Time (UTC) (also known as Greenwich Mean Time or GMT) for the current time zone. Beneath this is the abbreviation for the Time Zone: PT = Pacific Time (UTC-8) MT = Mountain Time (UTC-7) The “DST:” field shows whether Daylight Savings Time will be calculated. If DST=on, then Daylight Saving Time will be automatically calculated when needed. If DST=off, then Daylight Saving Time will not be calculated, and you will always see Standard Time. When you enter the screen, the “Zone:” field value will be flashing. To change this value, press the Top Button to cycle through all of the supported time zones. Press the 19 EMU-2™ User Manual Bottom Button to save the value that is displayed. Then the “DST:” field value will be flashing, and you can cycle between “on” and “off” values using the Top Button. Finally, save the DST value by pressing the Bottom Button, and you will exit back to the Time Options screen. Power Source When your EMU-2™ is powered by its AC adapter, the Power Source screen will show a graphic of a power plug. When your EMU-2™ is running on battery power, the Power Source screen will show the outline of a battery that contains a bar graph that indicates the charge level of the batteries. Four bars indicates the batteries have a good charge. Fewer bars indicate the battery charge is reduced. The batteries should be replaced if the Power Source screen shows only one bar. Pressing any button returns you to Active Mode. 20 Power Source Power Source EMU-2™ User Manual Troubleshooting Guide Generally, there are only 3 things that can go wrong with your EMU-2™: 1. The device stops working and needs to be restarted 2. There is no power to the unit 3. The device cannot connect to the smart meter If the screen is dark and the unit does not respond to button presses, then either there is a problem with power (see Step 2 below), or the unit requires a restart (see Step 1). If the wireless link bar graph in the upper right corner of the screen is down to 1 bar, or has been replaced by an “X”, then your EMU-2™ is having trouble connecting to the smart meter (see Step 3). Step 1. Restart the EMU-2™ If the EMU-2™ screen is not displaying anything, and it does not respond to button presses, then try restarting the unit. To restart your EMU-2™: a) Remove the batteries, if installed b) Unplug the power plug c) Wait 10 seconds d) Plug the power plug back in e) Check the display to verify EMU-2™ is working Step 2. Check the Power If the EMU-2™ is not responsive, and restarting it has no effect, check to see if the AC Adapter is working correctly. This can easily be done by unplugging the unit and installing new batteries. If the EMU-2™ works with the batteries, then the AC Adapter is probably faulty. Notes on Battery Replacement Your EMU-2™ uses 2 AAA batteries for short-term alternative power. To ensure a trouble-free battery operation: a) Replace the batteries when the battery indicator shows 1 bar. 21 EMU-2™ User Manual b) Replace all batteries at the same time with new batteries. c) Use new batteries with a current best before date. d) Do not use rechargeable batteries unless they are marked as ‘rechargeable alkaline’ and have a rating of 1.5V. Step 3. Check the Smart Meter Connection The wireless connection between your EMU-2™ and the smart meter can be disrupted for a variety of reasons. Try the following: a) Move the EMU-2™ to a different location that is closer to the smart meter. b) Move the EMU-2™ away from wireless routers, cordless phones, microwave ovens, or large metal objects. c) Try different areas of your house and different orientations in each room until you find one that works. If there is a power outage in your neighborhood at the moment, please wait until power is restored and try again. Technical Support 22 Contact us at: [email protected] For more information: rainforestautomation.com/emu2_support