1
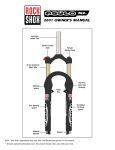
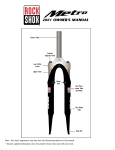
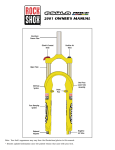
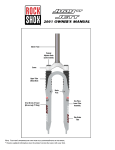
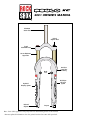
2001 OWNER'S MANUAL Aluminum Steerer Tube Preload Adjuster Knob Forged Aluminum Crown 30 mm Aluminum Upper Tube Brake Post Vari-Adjust All Travel System HydraCoil Damping System Rebound Adjuster One Piece Lower Tube Assembly Dropout Note: Your fork’s appearance may vary from the illustrations/photos in this manual. * Denotes updated information since the printed version that came with your fork. Congratulations! You have the best in suspension components on your bicycle! This manual contains important information about the safe operation and maintenance of your fork. To insure that your RockShox fork performs properly, we recommend that you have your fork installed by a qualified bicycle mechanic. We also urge you to follow our recommendations to help make your bicycling experience more enjoyable and trouble-free. IM PO RTA N T Consumer Safety Information 1. Before riding the bicycle, be sure the brakes are properly installed and adjusted. If the brakes do not work properly, the rider could suffer serious and/or fatal injuries. 2. If the fork ever loses oil or if it makes sounds of excessive topping out, stop riding the bicycle immediately and have the fork inspected by a dealer or call RockShox. Continuing to ride with the shock in these conditions could result in loss of control of the bicycle with possible serious and/or fatal injuries. 3. Always use genuine RockShox parts. Use of aftermarket replacement parts voids the warranty and could cause structural failure to the shock. Structural failure could result in loss of control of the bicycle with possible serious and/or fatal injuries. 4. Use extreme caution not to tilt the bicycle to either side when mounting the bicycle to a carrier by the fork drop-outs (front wheel removed). The fork legs may suffer structural damage if the bicycle is tilted while the drop-outs are in the carrier. Make sure the fork is securely fastened down with a quick release. Make sure the rear wheel is fastened down when using ANY bike carrier that secures the fork’s drop-outs. Not securing the rear can allow the bike’s mass to sideload the drop-outs, causing them to break or crack. If the bicycle tilts or falls out of its carrier, do not ride the bicycle until the fork is properly examined for possible damage. Return the fork to your dealer for inspection or call RockShox if there is any question of possible damage (See the International Distributor List). A fork leg or drop-out failure could result in loss of control of the bicycle with possible serious and/or fatal injuries. 5. Only mount cantilever-type brakes to the existing brake posts. Forks with hangerless style braces are only designed for ‘V’- style or hydraulic cantilever brakes. Do not use any cantilever brake other than those intended by the brake manufacturer to work with a hangerless brace. Do not route the front brake cable and/or cable housing through the stem or any other mounts or cable stops. Do not use a front brake cable leverage device mounted to the brace. ROCKSHOX FORKS ARE DESIGNED FOR COMPETITIVE OFF-ROAD RIDING AND DO NOT COME WITH THE PROPER REFLECTORS FOR ON-ROAD USE. YOUR DEALER SHOULD INSTALL PROPER REFLECTORS TO MEET THE CONSUMER PRODUCT SAFETY COMMISSION’S (CPSC) REQUIREMENTS FOR BICYCLE STANDARDS IF THE FORK IS GOING TO BE USED ON PUBLIC ROADS AT ANY TIME. I N S TA L L AT I O N It is extremely important that your RockShox fork is installed correctly by a qualified bicycle mechanic. Improperly installed forks are extremely dangerous and can result in severe and/or fatal injuries. 1. Remove the existing fork from the bicycle and the crown race from the fork. Measure the length of the fork steerer tube against the length of the RockShox steerer tube. The RockShox steerer tube may need cutting to the proper length. Make sure there is sufficient length to clamp the stem (refer to the stem manufacturer's instructions). ! WARNING DO NOT ADD THREADS TO ROCKSHOX THREADLESS STEERERS. THE STEERER TUBE CROWN ASSEMBLY IS A ONE-TIME PRESS FIT. REPLACEMENT OF THE ASSEMBLY MUST BE DONE TO CHANGE THE LENGTH, DIAMETER OR HEADSET TYPE (THREADED OR THREADLESS). DO NOT REMOVE OR REPLACE THE STEERER TUBE. THIS COULD RESULT IN THE LOSS OF CONTROL OF THE BICYCLE WITH POSSIBLE SERIOUS AND/OR FATAL INJURIES. 2. Install the headset crown race (26.4mm for 1" steerers, 29.9mm for 1 1/8" steerers) firmly against the top of the fork crown. Install the fork assembly on the bike. Adjust the headset until you feel no play or drag. 3. Install the brakes according to the manufacturer's instructions and adjust brake pads properly. Use the fork only with V-type or hydraulic cantilever brakes mounted to the existing brake posts or disc style brakes mounted through the provided mounting holes. Do not use any cantilever brake other than those intended by the brake manufacturer to work with a hangerless brace. 4. Adjust the front wheel quick release to clear the dropout's counter bore. The quick release nut must be tightened after the wheel is properly seated into the dropout's counter bore. Make sure four or more threads are engaged in the quick release nut when it is closed. Orient the quick release lever in front of and parallel to the lower tube in the locked position. 5. Keep in mind tire clearance as you choose tires. Maximum size is 2.6" wide or 347 mm radius installed. Be sure to check this radius whenever you change tires. To do this, remove the air and compress the fork completely to make sure at least 5mm of clearance exists between the top of the tire and the bottom of the crown. Exceeding maximum tire size will cause the tire to jam against the crown when the fork is fully compressed. PERFORMANCE TUNING RockShox Psylo forks can be tuned for your particular weight, riding style, and terrain. Setting Sag Psylo forks are designed to sag when you are sitting on your bike. Sag is the compression of the fork caused by the rider's weight. Proper sag allows the front wheel to follow the contour of the terrain as you ride. Sag is adjusted by turning the top cap preload adjuster. Turning the adjuster clockwise increases spring preload (i.e. stiffening the spring) decreasing sag. Turning the adjuster counter clockwise decreases spring preload which increases sag. Fork Travel Sag 80 mm 13-20 mm 100 mm 18-25 mm 125 mm 20-31 mm To measure sag, install a zip tie on the upper tube of the fork flush against the XXX seal. Sit on the bike with normal riding apparel. Step off the bike, and measure the distance between the XXX seal and the zip tie. This is your sag. If you're unable to achieve optimum sag by turning the preload adjuster, you may need to change the fork's spring rate. Changing the Spring Rate Spring rate is the amount of force needed to compress a spring one inch. Changing your Psylo fork's coil spring for a spring of a higher or lower rate will alter the overall feel of your fork. Higher spring rates make the fork feel more "stiff", while lower spring rates make the fork more "supple". Contact your local RockShox dealer to order replacement springs. E x t e r n a l R e b o u n d Ad j u s t m e n t To change the rebound damping on your Psylo, locate the adjuster knob on the lower right leg. A clockwise adjustment will increase the rebound damping; a counterclockwise adjustment will decrease the rebound damping. The knob offers 90 degrees of adjustment. Do not turn the rebound adjuster past its stop limits. Small changes in knob position will make large changes on the trail. Start in the middle, and increase or decrease as necessary. Va r i - Ad j u s t A l l Tra ve l ( F i g s. 1 - 3 ) Psylo forks can can be adjusted for 80, 100, or 125 mm of travel (or anywhere in between!). To determine the travel on your fork, measure the amount of exposed upper tube (from the bottom of crown to the XXX dust wiper). Compare this measurement to the chart below) Fork Travel XXX Seal to Crown (+/- 3mm) 80 mm 100 mm 100 mm 120 mm 125 mm 145 mm C H A N G I N G T R AV E L 1. 2. 3. 4. Using a 24mm socket remove the left top cap. Remove the coil spring. Insert a long, flat blade screwdriver into the upper tube. The screwdriver will engage the Vari-Adjust plunger at the bottom of the upper tube. From full counterclockwise (80mm travel), 43 turns clockwise are required to achieve 125mm travel. Use the chart below as a guide when adjusting travel. Fork Travel Turns from 80mm Travel 90 mm 10 Turns 100 mm 20 Turns 110 mm 30 Turns 125 mm 43 Turns 5. Re-install spring and top cap. Torque top cap to 40 in-lbs. 6. To maximize available travel, it may be necessary to change spring rate. Be sure to check your sag following any change in travel. MAINTENANCE To maintain the high performance, safety, and long life of your fork, periodic maintenance is required. If you ride in extreme conditions, maintenance should be performed more frequently. B e fo re E ve r y R i d e Check the other components on your bicycle in accordance with the manuals supplied by the manufacturer to make sure they are in working order. A f t e r E ve r y R i d e Clean and dry the exterior of your fork. Avoid directing water pressure at the upper tube/XXX seal junction. E ve r y 2 5 h o u rs of R i d i n g • Using a thin blade screwdriver, carefully push the XXX seal up from the lower tubes. Saturate the foam wiper with 5 weight oil. Refit wiper in lower tube. NOTE: TO PREVENT SCRATCHING THE UPPER TUBES, COVER THE SCREWDRIVER TIP WITH A SOFT CLOTH. CAREFULLY LIFT THE FOAM LUBRICATION RING. ENSURE THAT THE FOAM RING IS CLEAN AND FREE OF DEBRIS. • Check top cap assemblies, brake post bolts, and shaft bolts for proper torque. Torque Tightening Values Top Caps Brake Posts Shaft Bolts 40 in-lb 80 in-lb 60 in-lb E ve r y 1 0 0 H o u rs of R i d i n g NOTE: SERVICE ON YOUR PSYLO CAN BE PERFORMED WITH IT STILL INSTALLED ON YOUR BICYCLE. YOU WILL NEED TO DISCONNECT THE FRONT BRAKE CABLE AND REMOVE THE WHEEL. Tools Required 5mm Hex Wrench Internal Snap Ring Pliers 24mm 6-point Socket RockShox 5 wt. Oil Torque Wrench Plastic Face Mallet Small Blade Screwdriver Safety Glasses R E M O V E S P R I N G S TA C K (F I G S . 1-2, 4) 1. Using a 24mm socket remove the top cap from each leg. 2. Remove the coil spring from the left leg. 3. Using a small blade screwdriver, carefully push the XXX seals (gray) up from the lower tubes. NOTE:TO PREVENT SCRATCHING THE UPPER TUBES, COVER THE SCREWDRIVER TIP WITH A SOFT CLOTH. CLEAN AND FREE OF DEBRIS. LEAVE CAREFULLY LIFT THE FOAM LUBRICATION RING. ENSURE THAT THE FOAM RING IS EACH ON UPPER TUBE. R E M O V E L O W E R T U B E A S S E M B LY (F I G . 5) 4. 5. 6. 7. 8. Gently pull downward to remove adjuster knob. Loosen shaft bolts 5 turns and tap firmly with a plastic faced mallet to separate the shafts from the lower tubes. Keep a bucket nearby to catch oil. Inspect the condition of removed oil. If the oil is opaque and/or milky (water contamination), the lower tube assembly should be cleaned. Remove shaft bolts. Carefully slide lower tube assembly off of upper tubes. Fig. 1 Fig. 2 Fig. 3 Fig. 4 Fig. 5 C L E A N L O W E R T U B E A S S E M B LY 9. Use a biodegradable solvent (Simple Green, Pedro's, or equivalent) and a 12" long, 1 ¼" diameter soft bristle bottle brush to clean the lower tube internals. Dry thoroughly. REMOVE DAMPER AND V A R I -A D J U S T P L U N G E R (F I G . 6) 10. Using internal snap ring pliers, remove the retaining ring from the bottom of the upper tube. Slide the damper assembly (right side, rider's perspective) and the VariAdjust plunger assembly (left side, rider's perspective) out of the upper tube. I N S TA L L D A M P E R AND PLUNGER SHAFT 11. Install damper shaft assembly (right leg, rider's perspective) and plunger shaft assembly (left leg, rider's perspective) through the bottom of the upper tube. 12. Re-install the retaining ring in the upper tube. 13. Install coil spring (left leg, rider's perspective) and top caps. I N S TA L L L O W E R T U B E A S S E M B LY (F I G . 7) 14. Slide cleaned XXX seal and foam filter onto upper tubes. 15. Carefully slide the lower tube assembly onto the upper tubes. 16. Install shaft bolts and torque to 60 in-lbs. R E F I L L F L U I D S (F I G S . 8-9) 17. 18. 19. 20. 21. 22. Remove top caps Extend the fork and fill the right leg with 155 cc RockShox 5 weight oil. Fill the left leg with 20 cc 5 weight oil. Install top caps and torque to 40 in/lbs. Install damper adjuster knob. Install foam ring and XXX seal, pressing the XXX seal flush with the lower leg assembly. A small cable tie inserted between the upper tube and the seal will help eliminate air build-up behind the seal on installation. Remove the cable tie following seal installation. Fig. 6 Fig. 8 Fig. 7 Fig. 9 WA R R A N T Y RockShox, Inc. warrants its products for a period of one year from original date of purchase to be free from defects in materials or workmanship. Any RockShox product that is returned to the factory and is found by RockShox to be defective in materials or workmanship will be repaired or replaced at the option of RockShox, Inc. This warranty is the sole and exclusive remedy. RockShox shall not be held liable for any indirect, special, or consequential damages. The warranty does not apply to products which have not been properly installed and adjusted according to RockShox installation instructions. The warranty does not cover any product that has been subject to misuse or whose serial number has been altered, defaced or removed. This warranty does not cover paint damage or modifications to the product. Proof of purchase is required. Wa r ra n t y R e p a i r If for any reason it should be necessary to have warranty work done, return the product to the place of purchase. In the USA, Dealers should call for a Return Authorization number (RA#) prior to returning product. Products returned for inspection must be sent freight prepaid and with proof of purchase to: RockShox, Inc. 1610 Garden of the Gods Colorado Spring, CO 80907 For more technical information, visit our website at www.rockshox.com. For toll-free technical support in the USA, call 1.800.677.7177. Customers in countries other than the USA should contact their local dealer or distributor. I N T E R N AT I O N A L D I S T R I B U TO R L I S T Argentina Broni S.A. Phone: 54 11 4292 3000 FAX: 54 11 4292 4453 J.J. PASO 1260, (1832) LOMAS DE ZAMORA, BUENOS AIRES Australia Steve Cramer Products Phone: 61 3 9587 1466 FAX: 61 3 9587 2018 39 INDUSTRIAL DRIVE BRAESIDE, VICTORIA 3192 Austria Barisitz-Austria Phone: 43 512 39 22 87 FAX: 43 512 39 45 19 BERNHARD-HOEFELSTRASSE 14, A-6020, INNSBRUCK Belgium Vertex Cycle Systems BV Phone: 31 23 57 18184 FAX: 31 23 57 18606 FLEMINGSTRAAT 100A, 2041 VL ZANDVOORT HOLLAND Canada Bell Sports Canada Phone: 403 273 1427 (Calgary) FAX: 403 248 1221 BAY 147, 2760 45TH AVE SE CALGARY, ALBERTA T2B 3M1 Chile Bicicletas Belda Limitada Phone: 56 32 881799 FAX: 56 32 978799 14 NORTE 1001 VINA DEL MAR Colombia Disandina Ltda. Phone: 574-288-8322 FAX: 574-288-6211 CIUDADELA INDUSTRIAL, SIERRA MORENA BODEGA No. 207, CRA. 43 A No. 61 SIR 152, SABANETA Costa Rica Inversiones Y Sistemes Garvi Phone: 506 296 3383 FAX: 506 289 7013 P.O. BOX 4805-1000, SAN JOSE Czech Republic Vanek Praha Phone: 42 0 312 698 1889 FAX: 42 0 312 698 025 CERRENY UJEZD 185, UNHOST, 27351 Denmark Duell A/S Phone: 45 86 36 7800 FAX: 45 86 36 7377 MOLLERUPVEJ 3, TAASTRUP, 8410 RONDE Ecuador Bici Sport Phone 5932 248737 FAX: 5932 253691 AV DE DICIEMBRE 6327, ENTRE LOUVRE Y TOMAS DE, BERLANGA.LOCAL #3, QUITO Estonia Hawaii Express Phone: 372 6 398 508 FAX: 372 6 398 566 REGATI 1, 5K-102, TALLINN, 11911, Estonia Or Estonian Unidream Phone: 372 636 7470 Fax: 372 636 7470 Paavli 2A, Tallinn EE0004, Estonia Finland Mr. Cool OY Phone: 358 9 3250817 FAX: 358 9 3250609 LINNAVUORENTIE 28, HELSINKI, 00950 France Royal Velo France Phone: 33 325 433 730 Fax: 33 325 43 95 95 4 RUE DES AZALEES, P.A. SUD-CHAMPANGE ST THIBAULT, 10800 Germany Sport Import GmbH Phone: 49 44 05 9280 0 FAX: 49 44 05 9280 49 INDUSTRIESTRASSE 41 B, EDEWECHT, 26188 Greece Gatsoulis Stefanos Imports Phone: 30 12512 779 FAX: 30 12533 960 8 THESSALONIKIS STREET, NEW FILADELFIA, ATHENS, T.T. 14342 Guatemala BYS Importaciones S.A. Phone: 502 366 7709 FAX: 502 363 3918 18 CALLE 7-48, ZONA 10, GUATEMALA Holland Vertex Cycle Systems BV Phone: 31 23 57 18184 FAX: 31 23 57 18606 FLEMINGSTRAAT 100A, 2041 VL ZANDVOORT HOLLAND Hong Kong Flying Ball Bicycle Company Phone: 852 23813661 FAX: 852 23974406 201 TUNG CHOI ST. G/F, MONGKOK KOWLOON Hungary Prokero Ltd Co. Phone 361 331 3184 FAX: 361 331 3184 KALMAN IMRE UTCA 23, BUDAPEST, 1054 Iceland Orninn Hjol Ltd Phone: 354 588 9892 FAX: 354 588 9896 SKEIFAN 11, P.O. BOX 8036, REYKJAVIK Ireland Madison Phone: 44 181 385 3385 Fax: 44 208 345 3443 BUCKINGHAME HOUSE EAST, THE BROADWAY STANMORE, MIDDLESEX HA7 4EA UNITED KINGDOM Israel S.I. Noam Phone: 972 3659 7928 Fax: 972 3659 7928 4 HA'ATZMAUT AVE, BAT-YAM, ISRAEL 59441 Italy Motorquality Phone: 39 02 24 951 1 FAX: 39 02 24 951 228 20099 SESTO S. GIOVANNI, (MI) I VIA VENEZIA, (ANG. VIA CARDUCCI), MILANO Japan Yoshigai Corporation Phone: 81 729 88 5461 FAX: 81 729 88 5463 5-19, 1-CHOME, SHIMOROKUMANGI-CHO, HIGASHIOSAKA JAPAN 579 Korea KS Sports Phone: 822 548 5408 FAX: 822 512 3230 SHIN SEUNG BLDG 4TH FLR, 115-4 NONHYUN-DONG, KANGNAM-KU, SEOUL Latvia Veloserviss Phone: 371 750 1292 Fax: 371 750 1298 1/1 HAPSALAS ST., RIGA, LV-1005 Luxembourg Vertex Cycle Systems BV Phone: 31 23 57 18184 FAX: 31 23 57 18606 FLEMINGSTRAAT 100A, 2041 VL ZANDVOORT HOLLAND Mexico Tekno Bike Phone: 52 8 336 5602 FAX : 52 8 338 5663 HUMBERTO LOBO #780, COL. DEL VALLE, GARZA GARCIA, MEXICO, CP, 66220, Mexico New Zealand W.H. Whorrall & Co. Ltd. Phone: 64 9 63 6 06 41 FAX: 64 9 63 6 06 31 43 FELIX ST PENROSE, AUCKLAND NEW ZEALAND Norway Hallman Sports Phone: 46 18 56 16 00 FAX: 46 18 50 03 22 HALLNASGATAN 8, S-75228 UPPSALA, SWEDEN Panama Distribuidora Rali S.A. Phone: 507 220-3844 FAX: 507 220-5303 VIA ESPANS EDIFICA CARCEP, P.O. BOX 87-0852, PANAMA 7 Switzerland Cilo Bike Service SA Phone: 41 21 641 63 30 FAX: 41 21 641 63 82 CH. DE L'ORIO 30 A, CASE POSTALE 64, ROMANEL S. LAUSANNE Peru Rojo Sports Phone: 511 447 0838 FAX: 511 447 0838 AV. REPUBLICA DE, PANAMA 6513, LIMA 33 Taiwan Biketech Co. Ltd. Phone: 886 22 694 5806 FAX: 886 22 694 6133 NO. 12 FU TEH ROAD, 266 LANE, 37 ALLEY HSICHIH, TAIPEI HSIEN, TAIWAN, R.O.C. Poland Giant Polska S.P. ZOO Phone: 48 22 645 14 34 FAX: 48 22 645 14 36 AL NIEPODLEGLOSCI 221-4, 02-087 WARSZAWA Portugal Bicimax Phone: 351 44 553276 FAX: 351 44 553187 APARTADO 34, 2431 MARINHA GRANDE Russia Sportex Phone: 7095 288 4524 FAX: 7095 288 6888 KUDRINSKAYA PL., 1,, P.O.BOX 33, MOSCOW, 123242 St. Maarten Tri-Sport International Phone: 5995 43462 FAX: 5995 43928 8 AIRPORT BOULEVARD, SIMPSON BAY, NAMIBIA Singapore Treknology Bikes 3 Phone: 65 466 2673 FAX: 65 466 7610 24 HOLLAND GROVE ROAD, SINGAPORE, 1545 Slovak Republic Paul Lange Oslany Phone: 42 1 862 5492 344 FAX: 42 1 862 5492 350 MIEROVA 854/37 OSLANY, 97247 SLOVAKIA Slovenia Proloco Trade Phone: 386 64 380 200 FAX: 386 64 380 2022 ENOTA KRANJ, BRITOF 96A, 4000 KRANJ South Africa Coolheat (SA) (PTY) Ltd. Phone: 27 11 807 5282 FAX: 27 11 807 2998 3 RUARGH STREET, PARK CENTRAL, P O BOX 740, JOHANNESBURG 2001 Spain K. Motor Dealer S.L. Phone: 34 9 1 637 70 97 FAX: 34 9 1 637 72 64 PARQUE INDUSTRIAL, EUROPOLIS EDIFICO BRUSELA, BLOQUE 4, NAVE 1, LAS ROZAS (MADRID), N/A, 28230 Sweden Hallman Sports Phone: 46 18 56 16 00 FAX: 46 18 50 03 22 HALLNASGATAN 8, S-75228 UPPSALA CH- 1032 Thailand Probike Co. Ltd. Phone: 662 254 1077 FAX: 662 254 1078 237/2 SARASIN ROAD, LUMPINNE, PATUMWAN, BANGKOK, 10330 Turkey EBSAT Phone: 90 212 514 0525 FAX: 90 212 519 4846 EBSAT EMEK BISIKLET, EBUSSUUD CAD NO.67, 34410 SIRKECI, ISTANBUL, 34410 United Kingdom Madison Phone: 44 181 385 3385 Fax: 44 208 345 3443 BUCKINGHAME HOUSE EAST, THE BROADWAY STANMORE, MIDDLESEX HA7 4EA UNITED KINGDOM Uruguay International Sports Phone: 5982 782498 FAX: 5982 622532 AVDA. BRASIL 2567, 11800 MONTEVIDEO Venezuela Bike Sports Phone 582 751 9709 FAX: 582 753 5071 CENTRO COMERCIAL IBARRA, PLANTA BAJA, LOCAL 3-A CALLE GARCILAZO, COLINAS DE BELLO, 0, CARACAS