1
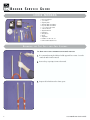
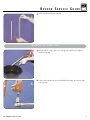
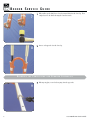
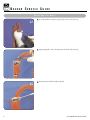
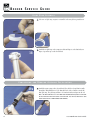
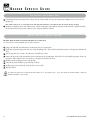
1999-2001 Bo xx er Service Guid e 1999-2001 Bo xx er Service Guide Removing the Top Caps and Coil Springs . . . . . . . . . . . . . . . . . . . . . . . . . . . . . . . . . . . . . . . . . . . . . . . . . . . . . 2 Removing the Lower Leg. . . . . . . . . . . . . . . . . . . . . . . . . . . . . . . . . . . . . . . . . . . . . . . . . . . . . . . . . . . . . . . . 3 Removing the Compression and Rebound Assemblies. . . . . . . . . . . . . . . . . . . . . . . . . . . . . . . . . . . . . . . . . . . . . . 4 Servicing the Seals . . . . . . . . . . . . . . . . . . . . . . . . . . . . . . . . . . . . . . . . . . . . . . . . . . . . . . . . . . . . . . . . . . . 6 Servicing the Rebound Assembly. . . . . . . . . . . . . . . . . . . . . . . . . . . . . . . . . . . . . . . . . . . . . . . . . . . . . . . . . . . 8 Servicing the Compression Assembly . . . . . . . . . . . . . . . . . . . . . . . . . . . . . . . . . . . . . . . . . . . . . . . . . . . . . . . 11 Compression and Rebound Assembly Installation . . . . . . . . . . . . . . . . . . . . . . . . . . . . . . . . . . . . . . . . . . . . . . . 12 Glide Ring Assembly . . . . . . . . . . . . . . . . . . . . . . . . . . . . . . . . . . . . . . . . . . . . . . . . . . . . . . . . . . . . . . . . . . 12 Installing the Lower Legs . . . . . . . . . . . . . . . . . . . . . . . . . . . . . . . . . . . . . . . . . . . . . . . . . . . . . . . . . . . . . . 14 Installing the Springs and Oil. . . . . . . . . . . . . . . . . . . . . . . . . . . . . . . . . . . . . . . . . . . . . . . . . . . . . . . . . . . . 14 International Distributors . . . . . . . . . . . . . . . . . . . . . . . . . . . . . . . . . . . . . . . . . . . . . . . . . . . . . . . . . . . . . . 16 For exploded diagram and part number information, refer to the 2001 Spare Parts Catalog, P/N 950-005604-00. Contact your local distributor or visit the RockShox website at www.rockshox.com for ordering information. Information contained in this publication is subject to change at anytime without prior notice. For the latest technical information, visit our website at www.rockshox.com. Names used in this manual may be trademarks or registered trademarks of others. © RockShox, Inc. January 2001 PN 950-004978-00, Rev. A01 BOXXER SERVICE GUIDE Tool s Need ed • • • • • • • • • • • • • • REMOVING 2 THE Plastic Faced Mallet 3/8 “ Ratchet Snap Ring Pliers Small Flat Blade Screw Driver Large Flat Blade Screw Driver 4, 6, 22 and 32 mm Socket 3 mm Hex Wrench Adjustable Wrench Dental Pick Safety Glasses Oil Pan Judy Butter RockShox 10 and 15 wt. oil Boxxer Shaft Installation Tool TOP CAPS TIP: RIGHT AND COIL SPRINGS AND LEFT SIDE IS DETERMINED FROM THE RIDER’S PERSPECTIVE. 1. We recommend removing the fork from both the upper and lower crowns. Loosen the crown bolts with a 4 mm hex wrench. 2. Remove the top caps using a 22 mm socket wrench. 3. Compress the fork and remove the volume spacers. 3 2 1999-2001 Boxxer Service Guide BOXXER SERVICE GUIDE 4. Remove springs from both sides of the fork. 4 REMOVING 5 6 PN 950-004978-00, Rev. A01 THE LOWER LEG 5. Invert the fork into a large oil pan. Cycle each upper tube until the oil is completely drained from the fork. 6. Using a 6 mm socket wrench, unscrew both shaft bolts three turns. Do not remove shaft bolts completely. 3 BOXXER SERVICE GUIDE 7 8 REMOVING THE 7. With a mallet, tap the shaft bolts to release the internal shafts from the lower legs. Then completely remove the shaft bolts using the 6 mm hex wrench. 8. Remove each upper tube from the lower legs. COMPRESSION AND REBOUND ASSEMBLIES 9. With snap ring pliers, remove both snap rings from the upper tubes. 9 4 1999-2001 Boxxer Service Guide BOXXER SERVICE GUIDE 10 10. Remove the compression assembly (silver) from the bottom of the left upper tube. Remove the rebound assembly (black) from the bottom of the right upper tube. 11. Examine the compression assembly and rebound assembly for placement and orientation of parts. It is important that they are assembled correctly for the fork to perform properly. Reference figure 11 “a” and “b” for orientation of parts and for parts identification. 11a PN 950-004978-00, Rev. A01 11b 5 BOXXER SERVICE GUIDE SERVICING THE SEALS 12. Use a large flat blade screwdriver to pop the wiper seals out of the lower legs. 12 13. Using snap ring pliers, remove the snap rings on both sides of the lower legs. 13 14 6 14. Remove the main seal washer with a dental pick. 1999-2001 Boxxer Service Guide BOXXER SERVICE GUIDE 15. With a large flat blade screwdriver, remove the main seal from both sides of the lower legs. 15 16 19 PN 950-004978-00, Rev. A01 16. Lubricate the new main seals inside and out with Judy Butter. Then place a 1-1/4 inch (32 mm) socket on top of the seal. Firmly press on the socket with the palm of your hand to install the seal. Ensure the seal is completely seated in the lower leg. 17. Re-install the main seal washer on both sides (see picture 14). 18. With snap ring pliers, install the snap rings on both sides (see picture 13). 19. Lubricate the inside of the wipers with Judy Butter and press them into the lower legs by hand. Ensure they sit flush on top of the lower legs. 7 BOXXER SERVICE GUIDE SERVICING 20 THE R E B O U N D A S S E M B LY 20. Remove the end plug on the rebound assembly using an adjustable wrench. TIP: PLACING THE FLATS ON THE SILVER END OF THE ROD IN A VISE KEEPS IT STATIONARY WHILE REMOVING THE END PLUG. 21. Using a dental pick, remove the seal o-ring on the end plug and replace it with a new one. 21 22. Remove the retaining ring from the top of the rebound shaft using the dental pick. 22 8 1999-2001 Boxxer Service Guide BOXXER SERVICE GUIDE 23 Steel Pin 24a 23. After removing the retaining ring, remove the wavy washer that sits underneath the retaining ring. NOTE: KEEP THE SHAFT VERTICAL TO PREVENT THE INTERNALS FROM FALLING OUT. 24. Install the handle of a flat blade screwdriver in a vice. Then place the rebound assembly on top of the screwdriver and slowly push the internal shaft up until a small steel pin pops up (picture 24a). Once the steel index pin pops up, remove the index plate (picture 24b). NOTE: BE CAREFUL NOT TO LOOSE THE SMALL STEEL BALL THAT SITS UNDER THE INDEX PLATE. 24b 25. Push the internal shaft all the way out. Note the orientation of the internal shaft. 25a Retaining Ring 25b Wavy Washer Pin Index Plate Steel Ball Internal Rebound Shaft PN 950-004978-00, Rev. A01 9 BOXXER SERVICE GUIDE 26 O-ring 26. Using a dental pic, remove the three o-rings from the internal shaft. All shaft o-rings are identical in specifications. Lubricate the new o-rings and install them onto the shaft. O-ring O-ring Nub 27 27. Lubricate the entire internal shaft with a light coat of Judy Butter and slide it into the rebound shaft. Ensure you do not tear the three o-rings you replaced. The internal shaft had a nub on the end and should face the top end of the rebound shaft. Also notice a hole near the top of the internal shaft. This hole should match with the slit in the outer shaft when the internal shaft is installed all the way. Hole NOTE: THE INTERNAL SHAFT IS INSTALLED CORRECTLY WHEN YOU CAN SEE THROUGH THE SLIT AND THE END OF THE INTERNAL SHAFT IS FLUSH WITH THE BOTTOM OF THE REBOUND SHAFT. 28. Install the parts from the internal shaft (see picture 25b) in the same orientation they came out in. If they are assembled incorrectly, the rebound adjustment will not function. 29. Lubricate the bottom side of the index plate and place the small steel ball in the round seat on the bottom of the index plate. The grease keeps the small steel ball from falling of the index plate. Slit Half Circle 30 Steel Ball 30. Place the index plate inside the rebound shaft. NOTE: THE INDEX PLATE WILL HAVE A HALF CIRCLE ON ONE SIDE. ENSURE THIS HALF CIRCLE MATCHES A HALF CIRCLE ON THE REBOUND SHAFT. 31. Install the pin, wavy washer and retaining ring (ssee pictures 22 to 24). 10 1999-2001 Boxxer Service Guide BOXXER SERVICE GUIDE 32 SERVICING 34 35a 32. Check the accuracy of the rebuild by inserting a 3 mm hex wrench through the bottom of the rebound shaft assembly. You should be able to make up to a 90-degree adjustment. You should also feel the adjustment clicks when turning the hex wrench. 33. Using Judy Butter, lubricate the o-ring on the end plug. Then screw the end plug into the rebound shaft. Torque to 30 in-lb. THE C O M P R E S S I O N A S S E M B LY 34. Remove the end plug from the compression rod assembly using an adjustable wrench. 35. Remove the large o-ring from the end plug and replace it with a new one (picture 35a). Then remove the small o-ring from the top of the end plug and replace it with a new one (picture 35b). IMPORTANT: DO NOT TAKE ROCKSHOX SPECIFICATIONS. THE COMPRESSION VALVE ASSEMBLY APART. THIS ASSEMBLY IS PRESET TO 36. Lubricate the large o-ring and reinstall the compression end plug using an adjustable wrench. 35b PN 950-004978-00, Rev. A01 11 BOXXER SERVICE GUIDE G L I D E R I N G A S S E M B LY 37a 37. If the new steel glide ring energizer is not installed on the new glide ring, install it now. 37b 38. Install the new glide ring on the compression shaft and shape it on the shaft with your fingers. Repeat this step on the rebound shaft. 38 COMPRESSION AND 39a R E B O U N D A S S E M B LY I N S TA L L AT I O N 39. Install the negative spring on the rebound shaft. Then slide the rebound shaft assembly through the shaft installation tool. The thin walled side of the tool will face towards the white glide ring. The glide ring will have to be form fitted with your fingers into the tool. NOTE: THE SHAFT INSTALLATION TOOL CAN BE MADE FROM A ROCKSHOX JUDY SL, XC OR C UPPER TUBE. CUT TWO INCHES FROM THE BOTTOM PORTION OF THE UPPER TUBE. YOU MAY ALSO MAKE THE TOOL USING 28 MM TUBING THAT HAS A 26MM MINIMUM INSIDE DIAMETER. 39b 12 1999-2001 Boxxer Service Guide BOXXER SERVICE GUIDE 40 41 43 PN 950-004978-00, Rev. A01 40. Insert the rebound shaft assembly (with shaft installation tool) into the bottom of the right upper tube until it stops in the upper tube. 41. With the rebound assembly in the upper tube, push the bottom of the shaft up into the upper tube. When the shaft is an inch from the bottom of the upper tube, remove the shaft installation tool. This must be performed to get the glide ring into the upper tube. 42. Repeat steps 39 to 41 to install the compression shaft into the left upper tube. 43. Reinstall the rebound and compression base valve assemblies into the bottom of the right and left upper tubes. Refer to picture 11b for the proper orientation of the base valve assembly pieces. 44. Once all the base valve assemblies are installed, proceed to install the snap ring on each upper tube with snap ring pliers. 13 BOXXER SERVICE GUIDE I N S TA L L I N G THE LOWER LEGS 45. Using Judy Butter, lubricate the inside of the resi-wipers and seals. Then install the lower legs onto the upper tubes making sure not to roll over the resiwiper lip edge. NOTE: ADDING A THIN FILM OF OIL ON THE OUTSIDE OF THE UPPER TUBES BEFORE INSTALLATION OF THE LOWER LEGS HELPS THE FORK FEEL SMOOTH IN ITS TRAVEL. 46. Install new crush washers into the crush washer retainers. Slide the crush washer retainer (with crush washer) onto the shaft bolts. Install the shaft bolts into the bottom of the lower legs using a 5 mm hex socket. Torque the shaft bolts to 60 in-lb. I N S TA L L I N G IMPORTANT: READ TIP: RIGHT THE SPRINGS AND OIL THIS ENTIRE SECTION BEFORE PERFORMING THE FOLLOWING STEPS! AND LEFT SIDE IS DETERMINED FROM THE RIDER’S PERSPECTIVE. 47. Compress the fork all the way until it bottoms out and ensure there are no springs inside. 48. Install 10 wt. oil into the left upper tube and 15 wt. oil into the right upper tube. There should be 120 mm between the top of the upper tube and where the oil sits. 49. Cycle the upper tubes five or six times. This allows the oil to fill the valve cavities. 50. Compress the upper tubes all the way until they bottom out and measure the oil height again. If the oil has decreased, install the appropriate oil into each upper tube to achieve 120 mm of space between the top of the upper tube and where the oil sits. 51. Install the springs and spring spacers into each upper tube. 52. Using a 22 mm socket, install the top caps and torque to 60 in-lb. 53. Install the upper fork crown and bolts. Torque the fork crown to 65 in-lb. 54. Wipe the fork clean For further information visit our website at www.rockshox.com or call 1.800.677.7177. If you live outside of the United States, contact the RockShox distributor in your country. 14 1999-2001 Boxxer Service Guide BOXXER SERVICE GUIDE PN 950-004978-00, Rev. A01 15 I N T E R N AT I O N A L D I S T R I B U TO R S Argentina Broni S.A. Phone: 54 11 4292 3000 FAX: 54 11 4292 4453 J.J. PASO 1260, (1832) LOMAS DE ZAMORA, BUENOS AIRES Australia Steve Cramer Products Phone: 61 3 9587 1466 FAX: 61 3 9587 2018 39 INDUSTRIAL DRIVE BRAESIDE, VICTORIA 3192 Austria Barisitz-Austria Phone: 43 512 39 22 87 FAX: 43 512 39 45 19 BERNHARD-HOEFELSTRASSE 14, A-6020, INNSBRUCK Belgium Vertex Cycle Systems BV Phone: 31 23 57 18184 FAX: 31 23 57 18606 FLEMINGSTRAAT 100A, 2041 VL ZANDVOORT HOLLAND Canada Bell Sports Canada Phone: 403 273 1427 (Calgary) FAX: 403 248 1221 BAY 147, 2760 45TH AVE SE CALGARY, ALBERTA T2B 3M1 Chile Bicicletas Belda Limitada Phone: 56 32 881799 FAX: 56 32 978799 14 NORTE 1001 VINA DEL MAR Costa Rica Inversiones Y Sistemes Garvi Phone: 506 296 3383 FAX: 506 289 7013 P.O. BOX 4805-1000, SAN JOSE Croatia Ciklo-Centar Phone: 385 1 234 22 24 FAX: 385 1 234 34 22 JURJA VES 30A 10000 ZAGREB Czech Republic Vanek Praha Phone: 42 0 312 698 1889 FAX: 42 0 312 698 025 CERRENY UJEZD 185, UNHOST, 27351 16 Denmark Duell A/S Phone: 45 86 36 7800 FAX: 45 86 36 7377 MOLLERUPVEJ 3, TAASTRUP, 8410 RONDE Ecuador Bici Sport Phone 5932 248737 FAX: 5932 253691 AV DE DICIEMBRE 6327, ENTRE LOUVRE Y TOMAS DE, BERLANGA.LOCAL #3, QUITO Holland Vertex Cycle Systems BV Phone: 31 23 57 18184 FAX: 31 23 57 18606 FLEMINGSTRAAT 100A, 2041 VL ZANDVOORT HOLLAND Hong Kong Flying Ball Bicycle Company Phone: 852 23813661 FAX: 852 23974406 201 TUNG CHOI ST. G/F, MONGKOK KOWLOON Estonia Hawaii Express Phone: 372 6 398 508 FAX: 372 6 398 566 REGATI 1, 5K-102, TALLINN, 11911, Estonia Or Estonian Unidream Phone: 372 636 7470 Fax: 372 636 7470 Paavli 2A, Tallinn EE0004, Estonia Hungary Prokero Ltd Co. Phone 361 331 3184 FAX: 361 331 3184 KALMAN IMRE UTCA 23, BUDAPEST, 1054 Finland Mr. Cool OY Phone: 358 9 3250817 FAX: 358 9 3250609 LINNAVUORENTIE 28, HELSINKI, 00950 Ireland Madison Phone: 44 181 385 3385 Fax: 44 208 345 3443 BUCKINGHAME HOUSE EAST, THE BROADWAY STANMORE, MIDDLESEX HA7 4EA UNITED KINGDOM France Royal Velo France Phone: 33 325 433 730 Fax: 33 325 43 95 95 4 RUE DES AZALEES, P.A. SUD-CHAMPANGE ST THIBAULT, 10800 Germany Sport Import GmbH Phone: 49 44 05 9280 0 FAX: 49 44 05 9280 49 INDUSTRIESTRASSE 41 B, EDEWECHT, 26188 Greece Gatsoulis Stefanos Imports Phone: 30 12512 779 FAX: 30 12533 960 8 THESSALONIKIS STREET, NEW FILADELFIA, ATHENS, T.T. 14342 Guatemala BYS Importaciones S.A. Phone: 502 366 7709 FAX: 502 363 3918 18 CALLE 7-48, ZONA 10, GUATEMALA Iceland Orninn Hjol Ltd Phone: 354 588 9892 FAX: 354 588 9896 SKEIFAN 11, P.O. BOX 8036, REYKJAVIK Israel S.I. Noam Phone: 972 3659 7928 Fax: 972 3659 7928 4 HA’ATZMAUT AVE, BAT-YAM, ISRAEL 59441 Italy Motorquality Phone: 39 02 24 951 1 FAX: 39 02 24 951 228 20099 SESTO S. GIOVANNI, (MI) I VIA VENEZIA, (ANG. VIA CARDUCCI), MILANO Japan Yoshigai Corporation Phone: 81 729 88 5461 FAX: 81 729 88 5463 5-19, 1-CHOME, SHIMOROKUMANGI-CHO, HIGASHI-OSAKA JAPAN 579 Korea KS Sports Phone: 822 548 5408 FAX: 822 512 3230 SHIN SEUNG BLDG 4TH FLR, 115-4 NONHYUNDONG, KANGNAM-KU, SEOUL 1999-2001 Boxxer Service Guide I N T E R N AT I O N A L D I S T R I B U TO R S Latvia Veloserviss Phone: 371 750 1292 Fax: 371 750 1298 1/1 HAPSALAS ST., RIGA, LV-1005 Luxembourg Vertex Cycle Systems BV Phone: 31 23 57 18184 FAX: 31 23 57 18606 FLEMINGSTRAAT 100A, 2041 VL ZANDVOORT HOLLAND Mexico Tekno Bike Phone: 52 8 336 5602 FAX : 52 8 338 5663 HUMBERTO LOBO #780, COL. DEL VALLE, GARZA GARCIA, MEXICO, CP, 66220, Mexico New Zealand W.H. Whorrall & Co. Ltd. Phone: 64 9 63 6 06 41 FAX: 64 9 63 6 06 31 43 FELIX ST PENROSE, AUCKLAND NEW ZEALAND Norway Hallman Sports Phone: 46 18 56 16 00 FAX: 46 18 50 03 22 HALLNASGATAN 8, S-75228 UPPSALA, SWEDEN Panama Distribuidora Rali S.A. Phone: 507 220-3844 FAX: 507 220-5303 VIA ESPANS EDIFICA CARCEP, P.O. BOX 870852, PANAMA 7 Russia Sportex Phone: 7095 288 4524 FAX: 7095 288 6888 KUDRINSKAYA PL., 1,, P.O.BOX 33, MOSCOW, 123242 Taiwan Biketech Co. Ltd. Phone: 886 22 694 5806 FAX: 886 22 694 6133 NO. 12 FU TEH ROAD, 266 LANE, 37 ALLEY HSICHIH, TAIPEI HSIEN, TAIWAN, R.O.C. St. Maarten Tri-Sport International Phone: 5995 43462 FAX: 5995 43928 8 AIRPORT BOULEVARD, SIMPSON BAY, NAMIBIA Thailand Probike Co. Ltd. Phone: 662 254 1077 FAX: 662 254 1078 237/2 SARASIN ROAD, LUMPINNE, PATUMWAN, BANGKOK, 10330 Singapore Treknology Bikes 3 Phone: 65 466 2673 FAX: 65 466 7610 24 HOLLAND GROVE ROAD, SINGAPORE, 1545 Turkey EBSAT Phone: 90 212 514 0525 FAX: 90 212 519 4846 EBSAT EMEK BISIKLET, EBUSSUUD CAD NO.67, 34410 SIRKECI, ISTANBUL, 34410 Slovak Republic Paul Lange Oslany Phone: 42 1 862 5492 344 FAX: 42 1 862 5492 350 MIEROVA 854/37 OSLANY, 97247 SLOVAKIA Slovenia Proloco Trade Phone: 386 64 380 200 FAX: 386 64 380 2022 ENOTA KRANJ, BRITOF 96A, 4000 KRANJ South Africa Coolheat (SA) (PTY) Ltd. Phone: 27 11 807 5282 FAX: 27 11 807 2998 3 RUARGH STREET, PARK CENTRAL, P O BOX 740, JOHANNESBURG 2001 Peru Rojo Sports Phone: 511 447 0838 FAX: 511 447 0838 AV. REPUBLICA DE, PANAMA 6513, LIMA 33 Spain K. Motor Dealer S.L. Phone: 34 9 1 637 70 97 FAX: 34 9 1 637 72 64 PARQUE INDUSTRIAL, EUROPOLIS EDIFICO BRUSELA, BLOQUE 4, NAVE 1, LAS ROZAS (MADRID), N/A, 28230 Poland Giant Polska S.P. ZOO Phone: 48 22 645 14 34 FAX: 48 22 645 14 36 AL NIEPODLEGLOSCI 221-4, 02-087 WARSZAWA Sweden Hallman Sports Phone: 46 18 56 16 00 FAX: 46 18 50 03 22 HALLNASGATAN 8, S-75228 UPPSALA Portugal Bicimax Phone: 351 244 553276 FAX: 351 244 553187 APARTADO 34, 2431 MARINHA GRANDE Switzerland Cilo Bike Service SA Phone: 41 21 641 63 30 FAX: 41 21 641 63 82 CH. DE L’ORIO 30 A, CASE POSTALE 64, 1032 ROMANEL S. LAUSANNE PN 950-004978-00, Rev. A01 United Kingdom Madison Phone: 44 181 385 3385 Fax: 44 208 345 3443 BUCKINGHAME HOUSE EAST, THE BROADWAY STANMORE, MIDDLESEX HA7 4EA UNITED KINGDOM Uruguay International Sports Phone: 5982 782498 FAX: 5982 622532 AVDA. BRASIL 2567, 11800 MONTEVIDEO Venezuela Bike Sports Phone 582 751 9709 FAX: 582 753 5071 CENTRO COMERCIAL IBARRA, PLANTA BAJA, LOCAL 3-A CALLE GARCILAZO, COLINAS DE BELLO, 0, CARACAS CH- 17