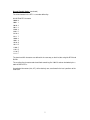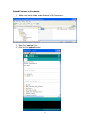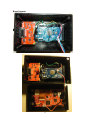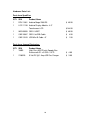
1
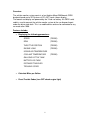
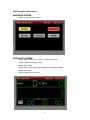
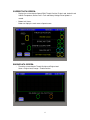
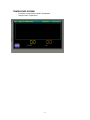
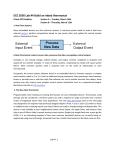
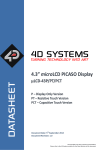
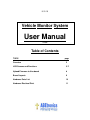
5-31-15
Vehicle Monitor System
User Manual
V1.00
Table of Contents
TOPIC
page
Overview
2
LCD Screens and Functions
3-7
Upload Firmware to Uno board
8
Board Layouts
9
Hardware Parts List
10
Hardware Electrical Print
11
Overview:
The vehicle monitor system consists of an Arduino Mega 2560 board, OBDII
breakout board and a 4D Systems uLCD-43PT touch screen display.
The boards and display are powered by the 12vdc car battery. An OBDII serial
cable is used to connect the vehicle monitor system to the car diagnostic port
under the driver side dash. This is a mobile device and can be connected to any
car made after 1996.
Features Include:
o Displaying the following parameters:
SPEED
(TREND)
RPM
(TREND)
THROTTLE POSITION
(TREND)
ENGINE LOAD
(TREND)
INTAKE AIR TEMPERATURE
COOLANT TEMPERATURE
(TREND)
GALLONS LEFT IN TANK
BATTERY VOLTAGE
DISTANCE TRAVELED
TROUBLE CODES
o Calculate Miles per Gallon.
o Reset Trouble Codes (turn OFF check engine light)
2
LCD Screens and Functions:
MAIN MENU SCREEN:
o
Buttons to select different screens.
SPEED DATA SCREEN:
o
Display Speed, RPM values as well as trending these values.
(yellow = Speed and orange = RPM).
o
Bottom Left to Right:
Display Gallons left in tank, coolant temperature, and battery voltage.
o
Bottom Left Corner:
Button to display the main menu.
3
CURRENT DATA SCREEN:
o
Displays the current data for Speed, RPM, Throttle Position, Engine Load, Intake Air and
Coolant Temperature, Gallons Left in Tank and Battery Voltage. Value Update is 1
second.
o
Bottom Left Corner:
Buttons to display the main menu or Speed screen.
ENGINE DATA SCREEN:
o
Trends the current data for Throttle Position and Engine Load.
Green = Engine Load, Orange = Throttle Position
4
TEMPERATURE SCREEN:
o
o
Trends the current data for Coolant Temperature.
Displays Intake Temperature.
5
TROUBLE CODE SCREEN:
o
Button to ”Display Trouble Codes”, when pressed and if alarms active will be displayed
in the display below. See charts below to decode trouble code description.
o
Button to “Reset Trouble Codes”, when pressed the trouble codes reset to 0 until a new
alarm is encountered.
Note: this will also reset the distance traveled value in the green box.
Decode Trouble Codes:
Each trouble code requires 2 bytes to describe. The text description of a trouble code may be
decoded as follows. The first character in the trouble code is determined by the first two bits in the
first byte:
A7-A6 First DTC character
00 P - Powertrain
01 C - Chassis
10 B - Body
11 U - Network
The two following digits are encoded as 2 bits.
The second character in the DTC is a number defined by the following table:
A5-A4 Second DTC character
00 0
01 1
10 2
11 3
6
Decode Trouble Codes: (continued)
The third character in the DTC is a number defined by:
A3-A0 Third DTC character
0000 0
0001 1
0010 2
0011 3
0100 4
0101 5
0110 6
0111 7
1000 8
1001 9
1010 A
1011 B
1100 C
1101 D
1110 E
1111 F
The fourth and fifth characters are defined in the same way as the third, but using bits B7-B4 and
B3-B0.
The resulting five-character code should look something like "U0158" and can be looked up in a
table of OBD-II DTCs.
Hexadecimal characters (0-9, A-F), while relatively rare, are allowed in the last 3 positions of the
code itself.
7
Upload Firmware to Uno board:
1. Make new sketch folder under Arduino in My Documents.
2. Open the “vms.ino” file.
3. Click on the “upload” button.
8
Board Layouts:
9
Hardware Parts List:
Parts from SparkFun:
QTY SKU
Product Name
1
DEV-11061 Arduino Mega 2560 R3
1
LCD-11740 Arduino Display Module - 4.3"
Touchscreen LCD
$ 45.95
$144.95
1
WIG-09555 OBD-II UART
$ 49.95
1
CAB-10087 OBD-II to DB9 Cable
$
4.95
1
CAB-13243 USB Mini-B Cable - 6"
$
1.95
Parts from Jameco Electronics:
QTY SKU
1
18893
1
2158320
Product Name
High Class ABS Plastic Speedy Box
Enclosure 6.0"L x 3.5"W x 1.9"D
$ 4.95
5 Volt DC @ 1 Amp USB Car Charger
$ 3.95
10
Hardware Electrical Print:
11