1
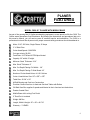
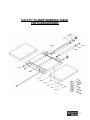
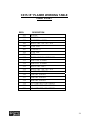
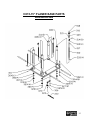
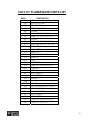
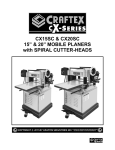
CX15 & CX20 15” & 20” MOBILE PLANERS User Manual Table of Contents General Safety Instructions------------------------------------------------------------------Specific Safety Instructions ------------------------------------------------------------------CX15 Features----------------------------------------------------------------------------------CX20 Features----------------------------------------------------------------------------------Physical Features ------------------------------------------------------------------------------- 3 4 5 6 7 Setup----------------------------------------------------------------------------------------------- 8 Un-packing---------------------------------------------------------------------------------------- 8 Proper Grounding --------------------------------------------------------------------------------9 Assembly----------------------------------------------------------------------------------------- 9 Foot Pedal and Caster ------------------------------------------------------------------------ 9 Extension Wings -------------------------------------------------------------------------------- 10 Magnetic Switch -------------------------------------------------------------------------------- 11 Dust Hood ---------------------------------------------------------------------------------------- 11 Hand Wheel-------------------------------------------------------------------------------------- 11 Gear Box Pull Handle ------------------------------------------------------------------------- 12 Test Run ------------------------------------------------------------------------------------------ 12 Operations & Adjustment ------------------------------------------------------------------ 13 Basic Controls ----------------------------------------------------------------------------------- 13 Depth of Cut ------------------------------------------------------------------------------------- 13 Feed Speed Control --------------------------------------------------------------------------- 14 Table Roller Height ---------------------------------------------------------------------------- 14 In-feed & Out-feed Rollers ------------------------------------------------------------------- 15 Chip Breaker & Pressure Bar --------------------------------------------------------------- 15 Anti-Kickback Fingers ------------------------------------------------------------------------- 15 Return Rollers ----------------------------------------------------------------------------------- 16 Inspecting the Cutter Head Knives--------------------------------------------------------- 16 Knife Replacement & Adjustment ---------------------------------------------------------- 16 V-belt Tension ----------------------------------------------------------------------------------- 17 Roller Spring Tension ------------------------------------------------------------------------- 17 Lubrications ------------------------------------------------------------------------------------ 18 Feed Roller Bushings ------------------------------------------------------------------------- 18 Table Height Worm Gear--------------------------------------------------------------------- 18 Columns and Lead Screws ------------------------------------------------------------------ 18 Gearbox------------------------------------------------------------------------------------------- 19 Table Height Chain & Sprockets ----------------------------------------------------------- 19 Drive Chain and Sprockets ------------------------------------------------------------------ 19 Parts List and Parts Breakdown ---------------------------------------------------- -20-41 Warranty ------------------------------------------------------------------------------------------ 42 2 GENERAL SAFETY INSTRUCTIONS Extreme caution should be used when operating all power tools. Know your power tool, be familiar with its operation, read through the owner’s manual and practice safe usage procedures at all times. CONNECT your machine ONLY to the matched and specific power source. ALWAYS wear safety glasses respirators, hearing protection and safety shoes, when operating your machine. blades, knives or making other adjustments or repairs. NEVER leave a tool unattended while it is in operation. NEVER reach over the table when the tool is in operation. DO NOT wear loose clothing or jewelry when operating your machine. ALWAYS keep blades, knives and bits sharpened and properly aligned. A SAFE ENVIRONMENT is important. Keep the area free of dust, dirt and other debris in the immediate vicinity of your machine. ALWAYS keep all safety guards in place and ensure their proper function. BE ALERT! DO prescription or other may affect your judgment to safely machine. NOT use drugs that ability or use your DISCONNECT the power source when changing drill bits, hollow chisels, router bits, shaper heads, ALWAYS use push sticks and feather boards to safely feed your work through the machine. ALWAYS make sure that any tools used for adjustments are removed before operating the machine. ALWAYS keep the bystanders safely away while the machine is in operation. 3 CX15-15” / CX20-20” Thickness Planer Specific Safety Instructions If you are not familiar with the screws operation of a thickness planer, you materials should planning. obtain instruction the from advice a and/or qualified and any and other foreign defects before Keep hands away from the surface of professional. the wood as it nears the in-feed Never reach into or through the throat rollers. of the thickness planer. Even with the Make all adjustments with the power power turned off, the cutter-knives are OFF. very sharp. Always keep the machine clean and Keep the cutter head and knives free of sawdust and wood chips. They clean and free of tar and pitch. may contain moisture that could Be sure that the motor switch is cause the cast-iron surfaces to rust. properly grounded. Turn OFF power before removing Check each and every board to be wood shavings and sawdust from the surfaced surface of in-feed & out-feed tables. for loose knots, nails, THINK SAFETY. WORK SAFELY IMPORTANT The safety instructions given above can not be complete because the environment in every shop is different. Always consider safety first as it applies to your individual working conditions. 4 PLANER FEATURES MODEL CX15-15” PLANER WITH MOBILE BASE As part of the growing line of Craftex woodworking equipment, we are proud to offer the CX15. The Craftex name guarantees Craft Excellence. By following the instructions and procedures laid out in this owner’s manual, you will receive years of excellent service and satisfaction. The CX15 is a professional tool and like all power tools, proper care and safety procedures should be adhered to. Motor: 3HP, 220 Volts, Single Phase, 15 Amps, TEFC 3 “V” Belts Drive Cutter Head Speed: 5,000 RPM Cuts per minute : 15,000 Feed Rate: 16 FPM and 30 FPM plus Neutral. Capacity: 15” Width, 8” Height Minimum Stock Thickness: 3/16” Max. Stock Thickness: 8” Max. Cut Depth Planing Full Width – 3/32” Max. Cut Depth Planing 6 Inch Wide Board 1/8” Number of Cutter-Head Knives: 3 Knives H.S.S, Jack-Screw Cutter-Head Cutter –Head Knives Size: 15" x 3/4" x 1/8" Table Size: 20” x 15” All Ball Bearing and Cast-Iron Construction Precision Ground Cast Iron In-feed and Out-feed Tables with Rollers Oil-Bath Gear Box supplies 2 speeds and neutral to the in-feed and out-feed rollers Powder Coated Paint Mobile Base with Locking Foot Pedal 4” Dust Port is Included Weight: 650 lbs. Length, Width & Height 42” x 32-1/2” x 45-7/8” Warranty – 3 YEARS 5 PLANER FEATURES MODEL CX20-20” PLANER WITH MOBILE BASE As part of the growing line of Craftex woodworking equipment, we are proud to offer the CX20. The Craftex name guarantees Craft Excellence. By following the instructions and procedures laid out in this owner’s manual, you will receive years of excellent service and satisfaction. The CX20 is a professional tool and like all power tools, proper care and safety procedures should be adhered to. Motor: 5 HP, 220 Volts, Single Phase, 25 Amps 3 ‘V’ Belts Drive. Cutter Head Speed: 5,000 RPM Cuts per minute: 20,000 Feed Rate: 16 FPM and 20 FPM plus Neutral. Capacity: 20” width, 8” height. Minimum Stock Thickness: 3/16” Max. Stock Thickness: 8” Max. Cut Depth Planing Full Width – 1/8” Max. Cut Depth Planing 6” Wide Board 1/8” Number of Cutter-Head Knives: 4 H.S.S Knives Cutter –Head Knives Size: 20" x 3/4" x 1/8" Table Size: 25-3/4” x 20” All Ball Bearing and Cast-Iron Construction Precision Ground Cast Iron In-feed and Out-feed Tables with Rollers Oil-Bath Gear Box supplies 2 speeds and Neutral to the in-feed and out-feed rollers. Powder Coated Paint Mobile Base with Locking Foot Pedal 5” Dust Port is Included Weight: 880 lbs. Length, Width & Height 56” x 39” x 45-7/8” Warranty – 3 YEARS 6 PHYSICAL FEATURES Magnetic ON/OFF Switch Top Return Rollers Table Height Hand wheel Feed Rate Knob Bed Rollers Solid Iron Cast Front Extension Wing Table Locks Lifting Bars Table Height Scale Pedal for Mobile Base Cabinet Panel 7 SETUP Unpacking To setup the machine you need an assistant to help you. For the protection of your eyes both of you need to have safety glasses. The unpainted surfaces of the planer are coated with rust prevention waxy oil and you will want to remove this before you begin assembly. Use a solvent cleaner that will not damage painted surfaces. IMPORTANT CX15/CX20 is a heavy machine. Do not over-exert yourself. For safe moving method get the help of assistant. The planer is properly packaged in a wooden crate. When unpacking, carefully inspect the crate and ensure that nothing has been damaged during transit. Open the crate and check that the machine is in a good condition. The machine is heavy and you should use a fork truck or get assistance to move the machine for safe moving method. The cabinet stand is equipped with 4 lifting handles (rods) that pull out. Use only these handles when moving the machine with the fork truck. You should also remove the top cover and clean the cutter-head, table, feed rollers and extension wings before assembly and operation. IMPORTANT When setting up your machine, you will want to find an ideal spot where your planer will most likely be positioned most of the time. Consider your complete work environment as well as working comfortable with the jointer before placing your machine in the ideal spot. Minimum work space for CX15 and CX20 8 Proper Grounding The machine is pre-wired to be used with a 220-volts power supply. Ensure the cord is plugged into a grounded power outlet. To prevent possible electrical hazards, have a qualified electrician ensure that the line is properly wired Once you have removed the front panel, you can begin assembling the integrated mobile base. Remove the hex bolt and hex nut that is comes installed on the foot pedal bracket. Align the holes on the caster assembly with the holes on the bracket and flange and insert the bolt, tighten the screws. Now align the holes on the foot pedal with the foot pedal bracket and secure it with the help of the washers and screws provided. See Figure-4 Figure-1 220-Volts Outlet for CX15 & CX20 ASSEMBLY Installing Foot Pedal & the Caster For clarity, it is recommended that you may want to remove the front panel on the base of the machine. See Figure-2 Figure-4 Installing the foot pedal and the caster Your mobile base should now be installed and ready to us. You can now lower the machine back to the ground. Once the machine is sitting back on solid ground, you can lock the mobile base in the place Figure-2 Removing the front panel 9 Assembly by lifting the foot pedal up. When you are ready to move your machine again, it is recommended that you use the lifting handles (or once the table extension wings are in place) as leverage when operating the foot pedal so that you do not hurt your back (the machine is very heavy, so a strong rigid mobile base has been provided). The extension tables are equipped with adjusting set screws that make these adjustments very easy. See Figure-6 Installing the Extension Wings Remove the extension wings from the cardboard box. Starting with either the front or the back of the machine, take the first extension table and line the holes of the table bed with the holes of the extension table. Using the hex bolts, lock washers and flat washers provided, finger-tighten all the holes so that the table is secure. Do not fully tighten at this time. See Figure-5 Figure-6 Adjusting the set screws It is important to use a straight edge at this time as a guide and the set screws for leveling to make sure it is attached properly. Position the extension wings even with the main bed and once fully leveled, tighten all hex bolts. See Figure-7 Figure-5 Installing the extension wings Once you have installed both extension wings, you can begin the process of leveling out the tables to make sure that they are both flush machine. Figure-7 Leveling the wings using straight edge Repeat the same procedure for the other extension wing. 10 Assembly Installing the Magnetic Switch The magnetic switch is in a protective brown box. Remove the packaging of the magnetic switch and attach it to the switch bracket located on the left front of the machine. Using the two screws and washers provided, tighten the magnetic switch in place. See Figure-8 Figure-9 Attaching the dust hood Installing the Hand Wheel Locate the hand wheel shaft on the right side of the machine, opposite the magnetic switch. Remove the screw and washer off the keyway shaft and set them aside. Place the hand wheel onto the keyway shaft and put the screw and washer back into the shaft, tightening to secure the hand wheel. Now insert the turning handle for hand wheel onto the threaded hole on the actual hand wheel and tighten. See Figure-10 Figure-8 Installing the magnetic switch Attaching the Dust Hood Attach the dust hood to the top of the planer first by using the hex bolts, flat washers and hex nuts provided. Then attach the bottom of the dust hood to the planer in the same manner. See Figure-9 Figure-10 Installing the hand-wheel 11 Assembly Installing Gear Box Pull Handle Locate the gearbox pull handle and screw it into the gearbox. See Figure-11 TEST RUN Once you have assembled your machine completely, then it is time for a test run to make sure that the machine works properly and is ready for operation. During the test run if there is an unusual noise coming from the machine or the machine vibrates, there problem might be because of the following: 1- Belts slapping cover 2- V-belts worn or loose 3- Pulley loose 4- Motor mounts loose or broken Figure-11 Gear box pull handle installed This will allow you to change your feed speeds and will explained later in the manual (See Page-19) After you investigate and If you find that the problem with your machine is one of the above, 1- Replace or realign the belts with a matched set 2- Replace the belts with a new matched set 3- Realign or replace shaft, pulley, setscrew and key 4- Tighten or replace the motor mount Check Gear Box Oil Before you test run the machine it is important to make sure that there is oil in the gear box. It is best to start with fresh oil. For details see page 19 Normal break-in procedure is to refill the gear box oil after the first 20 hours of operation. WARNING Before starting the planer please make sure that you have read and understood the manual and you are familiar with the functions and safety features on this machine. Failure to do this may cause serious personal injury 12 OPERATIONS & ADJUSTMENTS Basic Controls The basic controls of the planer are shown in the figure below. Use this figure and read the text to know what the basic controls of this planer are. A E B D WARNING Accidents are frequently caused by the lack of familiarity and failure to pay attention.If you have never used any type of this machine before, we recommond you to read and understand this user manual, or get formal training, so that you have enough knowledge about your machine before starting any project. Depth of Cut C To control depth of cut, use the table height hand-wheel and you can read the dept of cut in inch and metric on the scale provided. The distance of upward or downward movement is controlled by the hand wheel. One revolution of the hand wheel is 1.5mm (0.059”). Figure-12 Showing basic controls of the planer A. Magnetic Switch: Starts and stops the planer. B. Table Height Hand-Wheel: Controls the height of the table under the cutterhead. C. Table Locks: Locks the table in your desired position so that it does not move during the operation. Depth of Cut Scale D. Feed Rate Control Knob: Changes the speed rate of the in-feed rollers. E. Return Rollers: Makes it easy to move wood to the in-feed side of the planer. Figure-13 Depth of cut scale 13 Operations & Adjustments Feed Speed Control Table Roller Height Your machine has a spiral, serrated infeed roller and they turn to feed the stock in. The feed rollers are driven by chains and the sprockets, which takes the power directly from the cutter-head through the oil bath gear box. Your planer is supplied with two table rollers in the middle of the planer bed to move stock. As all wood behaves different it is hard to specify the exact dimensions on the proper height settings. However, as a general rule, keep the bed roller height within 0.002”-0.020”.above the table surface as u can see in figure-15. The feeding speed can be changed by using the feed rate control knob. When the knob is in the middle the speed rate is 0. Pulling out the knob, the feed roller operates on rate 30 FPM (CX15) and 20 FPM (CX20), while pushing it in, the feed roller operates on rate 16 FPM. See Figure-14 Figure-15 Setting the table roller height Figure-14 Feed Speed Control Knob positions for CX15 and CX20 IMPORTANT: Only change the speed rate while the machine is moving, but not in the time of any cutting operation. When planing rough stock, the table rollers should be set at a high position and when planing smooth stock the table rollers should be set low. If you wish to adjust the rollers, loosen the screws on both side of the table and turn the eccentric shafts to raise or lower the table rollers. When the proper height is obtained, tighten the screws. The table rollers must be adjusted on the opposite side of the table as well. Be sure that the height of the front and rear rollers are the same. 14 Operations & Adjustments In-feed and Out-feed Rollers In-feed and Out-feed rollers are the part of machine that feed the stock while planning. Both the rollers are under spring tension and this tension must be sufficient to feed the stock uniformly through the planer without slipping but it should not be so tight that it causes damage to the board. The tension should be equal on both ends of each roller. The spring tension on both the rollers can be adjusted by turning the set screw on the opposite ends of the in-feed and outfeed rollers. If you loosen the screw it makes the rollers to come down and if you tighten the screw the rollers goes up. See figure-16 Figure 20 Figure-16 Setting the rollers spring tension Figure-17 Adjusting chip breaker & pressure bar with the cutter-head Chip Breaker & Pressure Bar Anti-Kickback Fingers The in-feed roller, chip-breaker, pressure bar and out-feed roller are adjusted at the factory. The in-feed roller and chipbreaker is (0.004”) below the cutting circle. The pressure bar is (0.008”) and the out feed roller is (0.02”) below the cutting circle. See Figure-17 To prevent from possible injuries, your machine is provided with anti-kick back fingers. These fingers should be inspected occasionally to make sure they are free of gum and pitch so that they can move independently and operate correctly. 15 Operations & Adjustments To inspect the cutter-heads disconnect the planer from the power source and remove the cutter-head guard so that you can have access to the cutter-head. Figure-18 Anti-kick back fingers Return Rollers The planer has two rollers on the top which serves as convenient stock rest. You can move the stock to the in-feed side on these rollers while working which save the time and motion. See Figure-19 Now, take a straight edge and put it on the out-feed table so that it hangs over the cutter-head. Rotate the cutter head body and check the height of each knife with the out-feed table. The knife should just touch the bottom of the straight edge. If any of the knives is set too high or too low then it should be adjusted. Knife Replacement & Adjustment Remove the screws holding the knifehead cover and set aside. To remove the knives, loosen the knife locking bar by turning the six knife locking screws into the knife locking bar and remove the knife locking bar, knife and springs located under the knifes. Remove the remaining three knives in the same manner. Clean the knife slots, knife locking bars, springs and locking screws. When changing your knives, inspect to ensure the knives do not have any nicks, cuts or wire edges. Hone the knives slights using a stone or honing guide. Figure-19 Top return rollers Inspecting Cutter-Head Knives The cutter-head knives are supposed to be at the same height with each other. If one of the knives is higher than the others, you will get a poor result while doing any cutting operation. Place the knife gauge over the knife and while holding down, loosen all six locking screws by turning them into the locking bar until the cutting edge of the knife comes into contact with the protrusion of the gauge. Now snug up the knife locking bar by slightly backing out the six screws against the slot. The knife gauge should touch all three points of the roller and knife. (See figure-20) 16 Knife Gauge Figure-20 Knife Gauge touching 3-points Replace and reset the other three knives in the same manner. All four knives are set with the screws just snug back and tighten the six screws against the slot starting with the end screws first and then the center screws until the knife is securely held in the cutter-head. Tighten the remaining three knives in the same manner. Replacing V-Belts & Adjusting VBelts Tension CX15/CX20 planer is provided with three V-belts from the motor to the cutter head, in-feed and out-feed rollers through the gear box. To access the V-belts, remove the front cabinet panel of the machine. If the Vbelts need to be replaced, raise the motor to release the belt tension and then replace them with a matching set of 3 belts. Figure-21 Correct belt tension Adjusting Roller Spring Tension The spring tension should be adjusted so that the work pieces move through the planer properly The roller tension varies depending upon the type of wood you are planing. If the stock consistently stops feeding during the planing, the roller spring tension should be increased and if the roller is leaving indents in the wood as it leaves the planer, the tension should be decreased. To adjust the roller spring tension disconnect the planer from power and adjust the #1, #2 and #3 cap screws as shown in Figure 22, so that they protrude 1/8” and adjust the #4 cap screw so that it protrudes 5/16” above the head casting. See Figure 22 To Adjust the V-belt, loosen the top motor hex nuts and adjust the bottom hex nuts to raise or lower the motor. If there is approximately 3/4" deflection when a moderate pressure is applied to the Vbelts, the V-belts are correctly tensioned. See Figure-21 Figure-22 Set screws for the roller spring tension adjustment 17 LUBRICATION For long life and trouble-free operation of your planer it is important to lubricate some components of the machine. Feed Roller Bushings The In-feed and Out-feed rollers rotate inside bushing blocks on both ends of the rollers. Lubricate feed roller bushing by adding 2-3 drops of SAE 30W oil to the center hole of the four feed roller adjustment bolts on the top of the head casting. See Figure-23 Figure-24 Worm gear lubrication location Columns and Lead Screws The table moves up and down by the rotation of the Lead screws inside the columns. Loosen the dust sleeve (CX20) and apply a thin coat of SAE 30W oil to the outside surface of the columns and put a light application of multi-purpose grease to the lead screws threads. See Figure-25 Figure-23 Lubrication holes for the feed rollers Table Height Worm Gear To lubricate the gear teeth remove the three cap screws from the worm gear housing and lift the housing and hand wheel off the machine. Clean the gear and then apply a moderate amount of multi-purpose grease on the gear teeth. See Figure-24 Figure-25 Column dust sleeve 18 Lubrication Gearbox Remove the drain plug and the filler cap and drain the oil (80W-90W). It is best to start with fresh oil. Un-tighten the drainplug and now fill with clean lubricant though the hole. (See figure-26). Normal break-in procedure is to refill the gearbox oil after the first 20 hours of operation. Figure-27 Table height chain and sprockets Drive Chain and Sprockets Figure-26 Lubricating the gear box To lubricate the in-feed and out-feed drive chain and sprockets first remove the table height hand wheel and safety covers attached to the drive chain to access these parts. Then clean the chain and the sprockets and apply a light coat of multipurpose grease on both. See figure-28 Table Height Chain & Sprockets Remove the front and rear cabinet panels to access these parts, clean away debris and grime, and then brush on a light coat of multi-purpose grease to the chain and sprockets. See Figure-27 Figure-28 Drive chain & sprockets 19 CX15-15” PLANER HEADSTOCK PARTS LIST 20 CX15-15” PLANER HEADSTOCK PARTS LIST REF# 1 2 3 4 5 6 7 8 9 10 11 12 13 14 15 19 20 21 22 23 24 25 26 27 28 29 30 31 32 33 DESCRIPTION HANDLE M12 HEX NUT FLAT WASHER HAND WHEEL LABEL HAND WHEEL COLLAR 32MM RETAINING RING BEARING 4X20 KEY WORM GEAR WORM HOUSING M5X55 HEX SOC HD SCR ROLLER ROLLER STAND M5X14 HEX SOC HD SCR DUST HOOD M8X20 HEX SOC HD SCR M6X10 HEX BOLT M6 HEX NUT 6MM FLAT WASHER UPPER COVER HEX LOCTITE SCR FOAM PIECE REF# DESCRIPTION 34 35 36 37 38 39 40 41 42 48 49 50 51 52 53 54 55 56 57 58 SHAFT COLLAR SPRING HANGER M6X8 HEX SOC HD SCR CHIP DEFLECTOR PLATE HEX LOCTITE SCR PRESS PLATE HEX LOCTITE SCR CUTTERHEAD C8X36 KEY BEARING M6X16 HEX BOLT FLAT WASHER SPROCKET SCALE 6MM FLAT WASHER M6X12 CROSS PAN HD SCR. POINTER 6MM FLAT WASHER 59 M6X12 CROSS PAN HD SCR. GEAR BOX COVER SPEED RATE LABEL M8X45 HEX SOC HD SCR 6X20 SPRING PIN SAFETY HATCH HEX LOCTITE SCR BRACKET 21 REF# DESCRIPTION 60 CUT LIMIT PLATE M6X8 CROSS COUNTERSUNK 61 HD SCR 62 HEAD CASTING 63 OUTFEED ROLLER 64 C5X16 KEY 65 SPRING 66 ADJUSTING SCR 67 BUSHING 68 PLATE 69 M8X16 HEX BOLT 70 M5X12MM HEX SOC SET SCR 71 M5 HEX NUT 72 SHAFT 73 M6X20 HEX SOC SET SCR 74 CHIP BREAKER 75 M6X18 HEX SOC SET SCR 76 M6 HEX NUT 77 NAMEPLATE 77A 2X4MM RIVET 78 LOCKING BOLT 79 8MM LOCK WASHER 79A M8X12 HEX BOLT 80 12MM LOCK WASHER 81 M12 HEX NUT 82 15MM RETAINING RING 83 COLLAR 84 ANTI-KICKBACK FINGER 85 SHAFT 86 M6X18 HEX SOC SET SCR REF# DESCRIPTION M6X16 HEX BOLT 87 88 FLAT WASHER 89 SPROCKET 90 CHAIN 91 C5X16 KEY 92 IN-FEED ROLLER 93 FLAT WASHER 94 M6X12 HEX BOLT 95 CUTTERHEAD PULLEY 96 MOTOR PULLEY 97 COLLAR 98 M8X20 HEX BOLT 99 BELT GUARD 100 HEX LOCTITE SCR 101 BOLT M6X12 COUNTERSUNK 102 HD SCR 103 V-BELT 104 BELT COVER 105 WARNING LABEL 106 NUT 107 SWITCH PLATE 108 M6X12 HEX SOC HD SCR 109 6MM FLAT WASHER 110 MAGNETIC SWITCH 111 M5X20 CROSS PAN HD SCR. 112 5MM FLAT WASHER 113 M5 HEX NUT 22 CX15-15” PLANER WORKING TABLE PARTS BREAKDOWN 23 CX15-15” PLANER WORKING TABLE PARTS LIST REF# 202 203 204 205 206 207 208 209 210 211 212 213 214 215 216 217 218 219 220 221 DESCRIPTION ROLLER BEARING ECCENTRIC SHAFT M6X16 HEX SOC SET SCR LOCK BOLT LOCKSMITH LOCK BAR KNOB TABLE CASTING EXTENSION 8MM LOCK WASHER 8MM FLAT WASHER M8X30 HEX BOLT M8X20 HEX SOC SET SCR 2.5MM HEX WRENCH 3MM HEX WRENCH 4MM HEX WRENCH 6MM HEX WRENCH 10-12MM OPEN END WRENCH 14-17MM OPEN END WRENCH 17-19MM OPEN END WRENCH 24 CX15-15” PLANER BASE PARTS BREAKDOWN 25 CX15-15” PLANER BASE PARTS LIST REF# 301 302 303 304 305 306 307 308 309 310 311 312 313 314 315 316 317 318 319 320 321 322 323 323A 323B 324 325 326 327 328 329 330 DESCRIPTION BASE M12X45 HEX BOLT M12 HEX NUT 12MM FLAT WASHER COLUMN BALL BEARING 60302Z 42MM INT REATINING RING COLUMN 40MM INT REATINING RING M10X12MM HEX SOC SET SCR LEAD SCREW LEAD SCREW LEAD NUT M6X20MM HEX SOC HD SCR BUSHING GEAR 4X12MM KEY 12MM EXT RETAINING RING SPROCKET C5X16 KEY FLAT WASHER M10 HEX NUT BRACKET BRACKET EXT RETAINING RING 15MM M8X20 HEX BOLT CHAIN SPROCKET FLAT WASHER CRANE POST 15MM EXT RETAINING RING CHAIN 12.7A×134 26 CX15-15” PLANER CABINET PARTS BREAKDOWN 27 CX15-15” PLANER CABINET PARTS LIST REF# 501A 501B 501C 501D 502 503 504 505 506 506A 507 508 509 510 511 512 513 514 515 516 517 518 519 520 521 522 523 524 525 526 527 528 DESCRIPTION FRAME FRAME SUPPORT 5/16-18X19 HEX BOLT 5/16-18 HEX NUT COVER M6X20 CROSS COUNTERSUNK HD SCR MOTOR PLATE M6X12 HEX SOC SET SCR PLATE CONNECTING ROD COLLAR M8X12 HEX SOC SET SCR PLATE CONNECTING ROD M10X70 HEX BOLT 10MM FLAT WASHER M10 HEX NUT COLLAR M6X8 HEX SOC SET SCR ADJUST BOLT M12 HEX NUT 12MM FLAT WASHER MOTOR 5X30 KEY FLAT WASHER M8 HEX NUT M8X45 HEX BOLT STRAIN RELIEF M8 SPECIAL HEX NUT 8MM FLAT WASHER SLEEVE UNIVERSAL PULLEY M8X65 HEX BOLT RUBBER FEET REF# 529 530 531 532 533 534 535 536 537 538 539 540 541 542 543 544 545 546 547 548 549 DESCRIPTION 9MM RETAINING RING 12MM FLAT WASHER SHAFT M8X50 HEX BOLT 8MM FLAT WASHER M8 SPECIAL HEX NUT M10 HEX NUT 10MM FLAT WASHER M8X100 HEX BOLT 8MM FLAT WASHER SPECIAL BOLT 35MM RETAINING RING 6202Z BEARING TROLLEY WHEEL SLEEVE TROLLEY UNIVERSAL KIT 10MM WASHER M10 SPECIAL HEX NUT M10X55 HEX BOLT BRACKET PEDAL 28 CX15-15” PLANER GEARBOX PARTS BREAKDOWN 29 CX15-15” PLANER GEARBOX PARTS LIST REF# 401 402 403 404 405 406 407 408 409 410 411 412 413 414 415 416 417 418 419 420 421 DESCRIPTION GEAR BOX COVER M6X25MM HEX SOC HD SCR SPROCKET FLAT WASHER 8MM M8X16 HEX BOLT CHAIN BALL KNOB SHAFT BALL BEARING 80201 GEAR C5X14 KEY SHAFT BALL BEARING 80201 GEAR C5X10 KEY OIL SEAL 20×35×7 SHAFT BALL BEARING 80204 20MM EXT REATINING RING BALL BEARING 80201 M6X8 CROSS PAN HD SCR. REF# 422 423 424 425 426 427 428 429 430 431 432 433 434 435 436 437 438 439 440 441 442 DESCRIPTION 6MM FLAT WASHER COMPRESSION SPRING 4MM STEEL BALL GEAR 5X50 KEY GASKET GEAR BOX M8X50MM HEX SOC HD SCR OIL PLUG FLANGE COVER M5X12 COUNTERSUNK HD SCR OIL SEAL 5×10 PIN CLUTCH HANDLE SHAFT 16×2.4 O-RING HEX LOCTITE SCR C5X16 KEY BALL BEARING 80204Z GEAR M6X20MM HEX SOC HD SCR 30 CX20-20” PLANER HEADSTOCK PARTS BREAKDOWN 31 CX20-20” PLANER HEADSTOCK PARTS LIST REF# 1 2 3 4 5 6 7 8 9 10 11 12 13 14 15 19 20 21 22 23 24 25 26 27 28 29 30 31 31A 32 DESCRIPTION HANDLE M12 HEX NUT FLAT WASHER HAND WHEEL LABEL HAND WHEEL COLLAR 32MM RETAINING RING BALL BEARING 4X20 KEY WORM GEAR WORM HOUSING M5X55 HEX SOC HD SCR ROLLER ROLLER STAND M6X16 HEX SOC HD SCR DUST HOOD HEX SOC HD SCREW UPPER COVER HEX LOCTITE SCR FOAM PIECE GEAR BOX COVER SPEED CHANGE LABEL HEX LOCTITE SCR 6X20 ROLL PIN SAFETY HATCH SAFETY HATCH HEX LOCTITE SCR BRACKET ASSEMBLY SHAFT REF# 33 34 35 36 37 38 39 40 41 42 43 44 45 46 47 48 54 55 56 57 58 59 60 61 62 63 64 65 66 DESCRIPTION COLLAR EXTENSION SPRING HANGER M6X10 HEX SOC HD SCR CHIP DEFLECTOR PLATE M6X16 FLANGE BOLT 6MM FLAT WASHER SPRING PLATE HEX LOCTITE SCR SPRING PLATE HEX LOCTITE SCR ADJUSTING SHAFT M6X12MM HEX SOC SET SCR M6X12MM HEX SOC SET SCR M6 HEX NUT CUTTERHEAD C8X36 KEY BALL BEARING 6206 M6X16 HEX BOLT FLAT WASHER SPROCKET FOR DOUBLE CHAIN SCALE 6MM FLAT WASHER PHLP HD SCR M6-1X12 CUT LIMIT POINTER 6MM FLAT WASHER M6X12 CROSS PAN HD SCR. CUT LIMITER PLATE M5X12 COUNTERSUNK 32 67 68 69 70 71 72 73 74 75 76 77 78 79 80 81 82 83 84 84A 85 85A 86 87 88 89 90 91 92 93 HEAD CASTING OUT-FEED ROLLER C5X22 KEY COMPRESSION SPRING ADJUSTING SCR BUSHING PLATE M8X20 HEX BOLT M6X20 HEX SOC SET SCR M6 HEX NUT SHAFT M6X16 HEX SOC SET SCR CHIP BREAKER M6X20 HEX SOC SET SCR M6 HEX NUT BRACKET LOCKING ROD 8MM FLAT WASHER M8X12 HEX BOLT M12 HEX NUT 12MM LOCK WASHER PRESSURE PLATE M8X20 HEX BOLT 8MM LOCK WASHER 15MM RETAINING RING COLLAR ANTI-KICKBACK FINGER ANTI-KICKBACK SHAFT M6X12 HEX SOC SET SCR 94 95 96 97 98 99 100 101 102 103 104 105 106 107 108 109 110 111 112 113 114 115 118 119 120 121 122 M6X16 HEX BOLT FLAT WASHER SPROCKET CHAIN C5X22 KEY IN-FEED ROLLER M6X12 HEX BOLT FLAT WASHER CUTTERHEAD PULLEY MOTOR PULLEY FLAT WASHER M8X25 HEX BOLT BELT GUARD HEX LOCTITE SCR SPECIAL BOLT 8MM FLAT WASHER 8MM HEX NUT V-BELT BELT COVER WARNING LABEL KNOB MAG-SWITCH MOUNTING PLATE MAGNETIC SWITCH M5X20 CROSS PAN HD SCR. 5MM FLAT WASHER M5 HEX NUT M5 HEX NUT 33 CX20-15” PLANER WORKING TABLE PARTS BREAKDOWN 34 CX20-20” PLANER WORKING TABLE PARTS LIST REF# 201 202 203 204 205 206 207 208 209 210 211 212 213 214 215 216 217 218 219 220 221 DESCRIPTION INTERMEDIATE TABLE ROLLER BEARING ECCENTRIC SHAFT M6X16 HEX SOC SET SCR LOCK BOLT LOCKSMITH LOCK BAR KNOB TABLE CASTING EXTENSION 8MM LOCK WASHER 8MM FLAT WASHER M8X35 HEX BOLT M8X20 HEX SOC SET SCR 3MM HEX WRENCH 4MM HEX WRENCH 5MM HEX WRENCH 6MM HEX WRENCH 8-10MM OPEN END WRENCH 12-14MM OPEN END WRENCH 17-19MM OPEN END WRENCH 35 CX20-20” PLANER BASE PARTS BREAKDOWN 36 CX20-20” PLANER BASE PARTS LIST REF # 301 302 303 304 305 306 307 308 309 310 311 312 313 314 315 316 317 318 319 320 321 322 323 323A 323B 324 325 326 327 328 329 330 331 332 DESCRIPTION BASE M12X60 HEX BOLT M12 HEX NUT 12MM FLAT WASHER COLUMN BALL BEARING 6202 35MM INT RETAINING RING COLUMN 38MM INT RETAINING RING M10X12MM HEX SOC SET SCR LEAD SCREW LEAD SCREW LEAD UNT M8X20MM HEX SOC HD SCR BUSHING GEAR 4X12MM KEY 12MM EXT RETAINING RING SPROCKET C5X16 KEY 10MM FLAT WASHER 10MM M10 HEX NUT BRACKET ASSY SHAFT BRACKET 15MM EXT RETAINING RING M8×25 HEX BOLT SPROCKET FLAT WASHER GRANE POST 21MM EXT RETAINING RING PIPE BAND M5X10 CROSS PAN HD SCR. DUST BOOT 37 CX20-20” PLANER CABINET PARTS BREAKDOWN 38 CX20-20” PLANER CABINET PARTS LIST REF# DESCRIPTION 501 502 ENCLOSED STAND COVER M6X20 CROSS COUNTERSUNK HD SCR MOTOR PLATE M6X12 HEX SOC SET SCR PLATE CONNECTING ROD M8X12 HEX SOC SET SCR PLATE CONNECTING ROD M10X70 HEX BOLT 10MM FLAT WASHER M10 HEX NUT COLLAR M6X8 HEX SOC SET SCR ADJUST BOLT M12 HEX NUT 12MM FLAT WASHER MOTOR 5HP 220V 5X30 KEY FLAT WASHER M8 HEX NUT M8X45 HEX BOLT STRAIN RELIEF M8 SPECIAL HEX NUT 8MM FLAT WASHER 503 504 505 506 507 508 509 510 511 512 513 514 515 516 517 518 519 520 521 522 523 524 REF# 525 526 527 528 529 530 531 532 533 534 535 536 537 538 539 540 541 542 543 544 545 546 547 548 549 DESCRIPTION SLEEVE UNIVERSAL PULLEY M8X65 HEX BOLT RUBBER FEET 9MM RETAINING RING 12MM FLAT WASHER SHAFT M8X50 HEX BOLT 8MM FLAT WASHER M8 SPECIAL HEX NUT M10 HEX NUT 10MM FLAT WASHER M8X100 HEX BOLT 8MM FLAT WASHER SPECIAL BOLT 35MM RETAINING RING BEARING TROLLEY WHEEL SLEEVE TROLLEY UNIVERSAL KIT 10MM WASHER M10 SPECIAL HEX NUT M10X55 HEX BOLT BRACKET PEDAL 39 CX20-20” PLANER GEAR BOX PARTS BREAKDOWN 40 CX20-20” PLANER GEAR BOX PARTS LIST REF# 401 402 403 404 405 406 407 408 409 410 411 412 413 414 415 416 417 418 419 420 421 422 DESCRIPTION GEAR BOX COVER M6X25MM HEX SOC HD SCR SPROCKET 8MM FLAT WASHER M8X16 HEX BOLT CHAIN BALL KNOB SHAFT BALL BEARING 6201 GEAR C5X14 KEY SHAFT BALL BEARING 6201 GEAR C5X10 KEY OIL SEAL 20X35X7 SHAFT BALL BEARING 6204 20MM EXT RETAINING RING BALL BEARING 6201 M6X8 CROSS PAN HD SCR. 6MM FLAT WASHER REF# 423 424 425 426 427 428 429 430 431 432 433 434 435 436 437 438 439 440 441 442 DESCRIPTION COMPRESSION SPRING 4MM STEEL BALL GEAR 5X50 KEY GASKET GEAR BOX M8X50MM HEX SOC HD SCR OIL PLUG FLANGE COVER M5X12 COUNTERSUNK HD SCR OIL SEAL 5×10 PIN CLUTCH HANDLE SHAFT 16×2.4 O-RING HEX LOCTITE SCR C5X16 KEY BALL BEARING GEAR M6X20MM HEX SOC HD SCR 41 WARRANTY CRAFTEX 3 YEAR LIMITED WARRANTY Craftex warrants every product to be free from defects in materials and agrees to correct such defects where applicable. This warranty covers three years for parts and 90 days for labour (unless specified otherwise), to the original purchaser from the date of purchase but does not apply to malfunctions arising directly or indirectly from misuse, abuse, improper installation or assembly, negligence, accidents, repairs or alterations or lack of maintenance. Proof of purchase is necessary. All warranty claims are subject to inspection of such products or part thereof and Craftex reserves the right to inspect any returned item before a refund or replacement may be issued. This warranty shall not apply to consumable products such as blades, bits, belts, cutters, chisels, punches etceteras. Craftex shall in no event be liable for injuries, accidental or otherwise, death to persons or damage to property or for incidental contingent, special or consequential damages arising from the use of our products. RETURNS, REPAIRS AND REPLACEMENTS To return, repair, or replace a Craftex product, you must visit the appropriate Busy Bee Tools showroom or call 1-800-461-BUSY. Craftex is a brand of equipment that is exclusive to Busy Bee Tools. For replacement parts directly from Busy Bee Tools, for this machine, please call 1-800-461-BUSY (2879), and have your credit card and part number handy. All returned merchandise will be subject to a minimum charge of 15% for re-stocking and handling with the following qualifications. Returns must be pre-authorized by us in writing. We do not accept collect shipments. Items returned for warranty purposes must be insured and shipped pre-paid to the nearest warehouse Returns must be accompanied with a copy of your original invoice as proof of purchase. Returns must be in an un-used condition and shipped in their original packaging a letter explaining your reason for the return. Incurred shipping and handling charges are not refundable. Busy Bee will repair or replace the item at our discretion and subject to our inspection. Repaired or replaced items will be returned to you pre-paid by our choice of carriers. Busy Bee reserves the right to refuse reimbursement or repairs or replacement if a third party without our prior authorization has carried out repairs to the item. Repairs made by Busy Bee are warranted for 30 days on parts and labour. Any unforeseen repair charges will be reported to you for acceptance prior to making the repairs. The Busy Bee Parts & Service Departments are fully equipped to do repairs on all products purchased from us with the exception of some products that require the return to their authorized repair depots. A Busy Bee representative will provide you with the necessary information to have this done. For faster service it is advisable to contact the nearest Busy Bee location for parts availability prior to bringing your product in for repairs. 42