1
Spirometrics
Flowmate III
User's Manual - Rev. 02
FLOWMATE III USER’S MANUAL
Copyright 2000, 2004
Spirometrics
P O Box 680, 22 Shaker Road
Gray, ME 04039 USA
http://www.spirometrics.com
REV 02
January 2004
(1)
Spirometrics
Flowmate III
User's Manual - Rev. 02
Congratulations...
You have a lot to look forward to with your new
Flowmate III!
You have purchased a Spirometrics Medical Equipment Co.
Flowmate III spirometer. The brilliant simplicity and
unmatched performance of the Flowmate III will allow both
you and your patients to benefit from spirometry.
For generations, Maine's reputation for affordable, quality
craftsmanship has endured the test of time. It is this heritage
which has inspired the people at Spirometrics. We are proud
to be a Maine-owned and operated company, and are
dedicated to sharing Maine's tradition of excellence with you.
Spirometrics has created a complete line of premium
diagnostic, lung function testing equipment. For over 16 years
we have been helping the world's most successful health
facilities achieve a common goal...providing quality health
care.
(2)
Spirometrics
Flowmate III
User's Manual - Rev. 02
How To Use This Manual
This guide is arranged by category for your convenience. If you
have any additional questions about this product or would like
information on the full Spirometrics' product line, please call Inside
Sales at 800-767-0004.
Definition of Statements..................................................4
Introduction to the Flowmate III ...........................5
Features..............................................................5
Main Keyboard................................................................9
Installation and Customization ........................................14
Standard Configuration Chart .........................................16
Customization Routine....................................................18
Setting the Time and Date ..............................................23
Calibration.......................................................................24
Entering Patient Data......................................................26
Patient Preparation .........................................................29
Testing............................................................................30
FVC Testing - Forced Vital Capacity Test ...........31
MVV Testing - Maximum Voluntary Ventilation
Test ..................................................................33
VC Testing - Vital Capacity Test..........................35
Post -Bronchodilator Testing ...............................37
Methacholine Challenge ......................................38
Patient Reports ...................................................41
Retrieving Test Results .......................................41
Printing Patient Reports ......................................42
Erasing a Test .....................................................43
Summary Reports ...............................................44
Test Storage Capacities ......................................45
Memory Card ......................................................46
Installing the Memory Card:...........................47
Checking the Position of the Memory Card:...47
Saving Patient Tests on the Memory Card: ...49
Printing Tests Using the Memory Card: .........49
Erasing Patient Tests on the Memory Card: ..49
Interpretations .....................................................50
Maintenance ...................................................................51
Cleaning the Flowmate III....................................51
Disassembling the Flowmate III Flow Sensor ......52
Cleaning the Flow Sensor ...................................53
Assembling the Flowmate III Flow Sensor...........54
Troubleshooting ..............................................................55
(3)
Spirometrics
Flowmate III
User's Manual - Rev. 02
(Table of Contents Continued)
Appendices .....................................................................59
Normals Table.....................................................59
ATPS and BTPS .................................................63
BTPS Correction Factors ....................................64
Feet / Inches / Centimeters Conversion Chart.....65
Pounds / Kilograms Conversion Chart.................66
Sample Test Reports ......................................................67
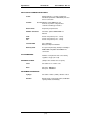
Specifications..................................................................71
Accessories + Reorder information .................................75
(4)
Spirometrics
Flowmate III
User's Manual - Rev. 02
Definition of Statements
WARNING: This manual outlines the correct method of operating
Spirometrics' Flowmate III. These guidelines must be followed in
order to ensure safe operation.
CAUTION: Means there is a possibility of procedures which, if not
observed, could result in damage to equipment.
NOTES
NOTE: Notes provide points of important information for more
efficient and convenient operation.
(5)
Spirometrics
Flowmate III
User's Manual - Rev. 02
INTRODUCTION TO THE Flowmate III
Features
• Compact design and battery-powered portability
• Unit memory 5 patients (optional memory card allows for
additional 118 patients)
• Automatic calculation and optional test interpretations
• Menu-driven simplicity
• Bacterial/Viral filter
• Compliance with ATS, NIOSH and OSHA standards
Please read this manual carefully before setting up and operating
your new Flowmate III.
STOP!
BEFORE SETTING UP, PLEASE COMPLETE THE ATTACHED
WARRANTY CARD ON THE NEXT PAGE TO ENSURE THAT
YOUR WARRANTY RIGHTS ARE COVERED.
(6)
Spirometrics
Flowmate III
User's Manual - Rev. 02
For the device warranty to be in effect, the attached warranty card must be
returned to Spirometrics Medical Equipment Co. for warranty registration. Please
take this time to fill out the enclosed postage paid warranty card. You may also
register your warranty by calling 800-767-0004 or 207-657-6700 or faxing the
information to 207-657-4123.
All Spirometrics spirometers are warranted to be free from defects in workmanship
and material for a period of TWO YEARS from the date of purchase as validated
by the return of the warranty card. If the warranty card is not returned or otherwise
registered by phone, the two-year warranty begins from the date of manufacture.
During the warranty period, any and all original parts and or workmanship proven
to be defective will be replaced or repaired at an authorized service center
provided the equipment has been operated and maintained in accordance with the
instructions contained in the Operator’s Manual. This warranty applies to the
original user only, is not transferable, and does not extend to any product or
component which has been repaired or altered by anyone other than personnel
authorized by Spirometrics. This warranty is in lieu of and excludes any warranty
as to merchantability and all other warranties expressed or implied and does not
cover consequential damages due to improper use or application of the product.
(7)
Spirometrics
Flowmate III
Warranty Card
This page set aside for the WARRANTY CARD insert.
(8)
User's Manual - Rev. 02
Spirometrics
Flowmate III
User's Manual - Rev. 02
This page is intentionally left blank for warranty card attached to the previous page
(WARRANTY CARD insert).
(9)
Spirometrics
Flowmate III
User's Manual - Rev. 02
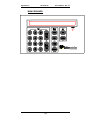
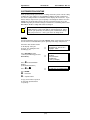
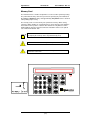
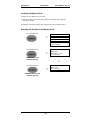
MAIN KEYBOARD
flowmate III
(10)
Spirometrics
Flowmate III
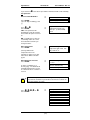
PATIENT KEY -
User's Manual - Rev. 02
This key allows you to clear the current screen at any point
during calibration, customization or a test in order to start
over at the Main Menu.
MAIN MENU
MENU
1= Patient
2= Customization
3= Calibration
4= Time (or Output)
By pressing the following keys at the MAIN MENU you may access the following
options:
INPUT
RESULT
By Pressing
You can enter patient information and
testing mode.
By Pressing
The customization parameters can be
modified.
By Pressing
You may set and check the calibration
of the spirometer.
By Pressing
TEST KEY -
You can set the correct date and time.
Displays the test option selections. Once you select the test
you would like, you are in TEST MODE.
Which test would you like?
1=FVC
2=MVV
3=VC
4=CHAL (or Output)
(11)
Spirometrics
Flowmate III
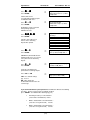
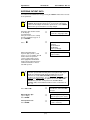
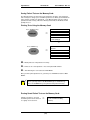
DISPLAY KEY -
User's Manual - Rev. 02
At Main MENU the display indicates how many patients are
stored either in unit memory or RAM card memory (if RAM
card is installed).
Database
usage:
SYS MEM:
1 of 5
(Press any key)
In TEST MODE this display cycles through test indices on the
display.
Index Unt Meas Pred %Pred %Var
FVC L 3.67 2.86 128 n/a
"SCROLL THROUGH INDICES"
Index Unt Meas Pred %Pred %Var
FVC L X.XX X.XX
XXX n/a
Press DISPLAY
Index Unt Meas Pred %Pred %Var
FEV1 L X.XX X.XX XXX n/a
Repeatedly Press DISPLAY To Scroll Through the Indices.
(12)
Spirometrics
Flowmate III
User's Manual - Rev. 02
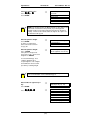
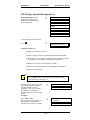
PRINT KEY - Prints reports after a test is given when printer is present.
At the Main MENU when you press PRINT you can choose to
print specific patients or all patients.
Batch Print all or some
patients?
1=All
2=Some
3=None
INPUT
RESULT
By Pressing
Prints all patients in storage
(including memory card if installed).
By Pressing
Prints desired patient tests. You must
first enter the patient ID Numbers you
would like printed (after pressing
for "some" patients).
This will bring you back to the Main
MENU.
By Pressing
In Testing Mode you can print reports after a test is given, when
a printer is present.
SUMMARY KEY -
In the Main MENU you can print out a directory of the patients in
the system memory and optional memory card. The patient
directory lists patients by ID number, age, and gender.
Prints the Best Test
Summary Report
In testing mode you can print the Best Test Summary Reports.
(13)
Spirometrics
Flowmate III
User's Manual - Rev. 02
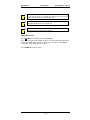
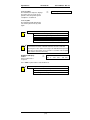
ERASE KEY - At Main MENU erases test data (but, only if confirmed).
Erase all or part of
patient database?
1=All
2=RAM Card only
3=None
In Test Mode you can erase selected tests.
Sure you want to erase
Test No. 01?
(Press YES or NO)
When Entering Patient Information :
Indicates YES, or enters
responses.
Indicates NO, or clears last
response.
Press once = Will erase last
character entered.
Press twice = Will erase last
entry.
(14)
Spirometrics
Flowmate III
User's Manual - Rev. 02
INSTALLATION AND CUSTOMIZATION
This section provides you with information on the rechargeable batteries, printer
connection and customizing the Flowmate III to meet your needs.
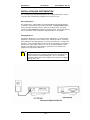
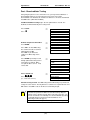
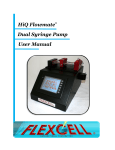
Battery InformationThe Flowmate III is equipped with six standard AA NiCad rechargeable batteries
for portable operation and a dual colored power light. A GREEN POWER light in
battery operation will indicate that the spirometer is fully charged. A beeping
sound and a RED POWER light indicates low battery power. If the battery power is
low, the spirometer can be used while being powered by the AC adapter.
Charging BatteriesCharging the Flowmate III is a simple procedure. Spirometrics recommends that
batteries be charged for at least 15 hours before portable operation. The battery
power will deplete after approximately 4 1/2 hours of continual use. To charge the
spirometer, connect the AC adapter to the spirometer and plug it into a standard
AC outlet. The power switch can be in the "on" or "off" position while the unit is
charging. The battery will charge while the spirometer is in use with the AC
adapter or when the power switch is off.
NOTES
NOTE: As with all NiCad batteries, it is important to periodically
allow the battery to be completely depleted before recharging. This
practice will ensure maximum battery life. The use of batteries
other than NiCads will result in leakage and or explosion resulting in
damage to the unit.
Flowmate III (Model # 2500LTE)
(15)
Spirometrics
Flowmate III
User's Manual - Rev. 02
Printer InstallationThe Flowmate III provides a parallel output so that you can connect a variety of
parallel printers. Connect your printer by attaching the standard parallel cable from
the parallel output on the right side of the Flowmate III. Refer to the printer's
owner's manual for information on compatibility and operation. The printer, when
properly connected, prints after each test if you select the automatic test printout
option. (You may select this in Customization p.18).
NOTES
NOTE: You will probably need to select the spirometers’
customization to match the printer you are using. If your printer is
not named in the Customization Routine (p.18), refer to the printer
manual. Most printers can emulate two or more types of printers.
Configure your printer to match one within the Flowmate III's
customization routine.
Printer Requirements- External parallel printer compatible with MS-DOS® with an
emulation configurable to one of the following:
•
•
•
•
•
EPSON FX
EPSON LQ
IBM Proprinter
IBM Proprinter X24
HP Laser / DeskJet
(16)
Spirometrics
Flowmate III
User's Manual - Rev. 02
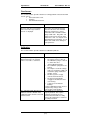
CustomizationYour Flowmate III spirometer comes pre-set with the standard configuration. You
should, however, go through the customization routine (See Customization Routine
p. 18) to customize operation according to your preferences and needs.
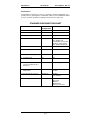
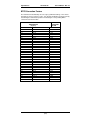
STANDARD CONFIGURATION CHART
Function
Standard
Configuration
Options
1. Short Form/ Expanded Form
Short
Expanded
2. Interpretation
Yes
No
3. Normals
Composite
4. Automatic Test Printout
No
Knudson, Crapo, Morris,
Hsu, ECCS, Lam
or Industrial Version with
Knudson, Crapo, Morris,
Hsu, ECCS, Knudson76
Yes
5. Patient Weight
Yes
No
6. Weight in Lbs or Kgs
Lbs
Kgs
7. Location I.D. #
No
Yes
8. Re-enter Location I.D.#
(each time Flowmate III is
turned on.)
No
Yes (16 digits)
9. Avg. Ambient Air
Temperature
72 F
50-104F or
10-40C
10. Avg. Barometric Pressure
760mm Hg
20-35in.,
500 - 900mm
11. Printer Type
IBM Pro
Epson LQ,
Epson FX
IBM Pro,
IBM Pro-X24
HP Laser / DeskJet
(17)
Spirometrics
Flowmate III
User's Manual - Rev. 02
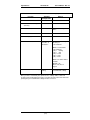
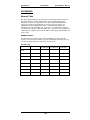
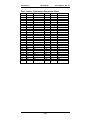
STANDARD CONFIGURATION CHART (Cont.)
Function
Standard
Configuration
Yes
No
13. Print Flow Volume Loops on
Summary
Yes
No
14. Print Best Test Curves
Both
VT Curve, FV Loop,
None
15. Print COPD Risk
Yes
No
16. Print Lung Age
Yes
No
17. Inhalation Defaults
Yes = Default is
5 breaths of
inhalation?
NO = Enter how many
breaths per
concentration?
12. Print Volume Time Curves
Options
What is methacholine
concentration?
(#2) = .025mg
(#3) = .250
(#4) = 2.500
(#5) = 10.00
(#6) = 25.00
What is the lower limit of
normal?
Default = 08
Enter cum dose in
mg/ml.
18. Print Customization Settings
No default
setting
Select Yes or No to print
customization settings
Once you have customized your spirometer, the settings will be retained in
memory (protected by battery back-up) even after the unit is turned off. Consider
printing out your customization settings for future reference.
(18)
Spirometrics
Flowmate III
User's Manual - Rev. 02
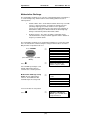
CUSTOMIZATION ROUTINE
Each question prompts you to choose a setting, and shows you the current setting
for that item. If you simply press the ENTER key without entering a number first,
the current setting remains. The Flowmate III then displays the next choice. If you
want to change only one item, you can quickly scan through the routine. Press the
ENTER key repeatedly until you get to the item you want to change. Press the
PATIENT key after you enter the change to exit from the customizing routine to the
Main MENU. All other settings will remain unchanged.
NOTES
NOTE: All customization changes are saved and protected in NV
RAM, which has a Super Cap (battery equivalent) back-up. When
you turn your spirometer on, it will use your customization settings
from your previous use - unless you choose to change them.
To Start:
Turn the Flowmate III on by pressing the POWER switch, located on the left side of
the unit. Power on indicator will be green signaling a full charge and power on.
Check the date and time shown
on the display. If they are
incorrect, See Setting the Time
and Date pg. 23.
Flowmate III version 2.6a
04/06/99 09:30 Spirometrics
Copyright 1999
Press ANY KEY or wait 5
seconds (this will bring you to the
MAIN MENU).
MENU:
1=Patient
2=Customization
3=Calibration
4=Time (or Output)
Press
for Customization
Routine
(Customization Routine)
Press
Select desired format: Now 1
(1=short form, 2=expanded form)
or
Press ENTER
= short form
= expanded form
See pg. 59 for indices reported
in short and expanded forms
respectively.
(19)
Spirometrics
Press
Flowmate III
User's Manual - Rev. 02
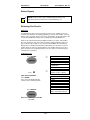
Diagnostic Interpretations? Now
1 (1=YES, 2=NO)
or
Press ENTER
Simple interpretation message
of test data. This prints at the end
of the Best Test Summary
Report. Interpretation Scheme
described on pg. 50.
Select Desired Normals
Which Normals? Now 1
1=Composite
2=Knudson
3=Crapo
4=Morris
5=Hsu
6=ECCS
7=Lam or optional Knudson 76
, , , ,
Press
or
Press ENTER
See pg. 59 - 62 for description
of Normals.
Automatic Test Printout? Now 2
(1=YES, 2=NO)
Press
or
Press ENTER
YES= prints test report
Immediately after patient
effort.
NO= Must press PRINT
to print reports.
Do you want to record patient
weight? Now 1 (1=YES, 2=NO)
Press
or
Press ENTER
NOTES
NOTE: Weight is not used in any of the Normals tables. It is
unnecessary in calculating test results.
Will weight be entered in LBS or
KGS? (1=LBS, 2=KGS)
Now 1
Press
or
Press ENTER
Question will not be asked if you
choose NOT to record weight.
Do you use a Location ID
number? (1=YES, 2=NO)
Now 2
Press
or
Press ENTER
You may want a Location
ID if you test in a variety
of locations and move the
spirometer from site to site.
(20)
Spirometrics
If you answered
two questions:
Flowmate III
User's Manual - Rev. 02
to the above question the Flowmate III will ask the following
Enter Location ID Number
Enter the location ID number:
Press ENTER
(up to 16 digits including (/) and
(.))
(up to 16 digits) Now 000
Press
or
Press ENTER
YES = The spirometer will
immediately ask for the location
ID each time the power is turned
on.
Do you want to re-enter the
Location ID each time you
power-up? (1=YES, 2=NO)
Now 2
NO = You will have to enter the
customizing routine to re-enter
the location ID each time you
change locations.
Enter Temperature
Press ENTER
Enter the Average Air
Temperature:(50F-104F, 10C40C) Now 72º F.
(Average Ambient air
temperature where the
spirometer is being used.) This
value affects BTPS correction
pg. 63.
Enter Barometric Pressure
Press ENTER
Enter the Average Barometric
Pressure:
(in inches or millimeters of
mercury (Hg)). The Flowmate III
automatically determines inches
or centimeters when a number is
entered.
(20-35 in, 500-900 mm)
NOTES
Now 760 mm Hg.
NOTE: It is important to enter the average barometric pressure
based on the elevation of your location, otherwise there will be an
error in the BTPS correction.
, , ,
Press
Press ENTER
Which printer?
or
1=Epson FX
2=Epson LQ
3=IBM Pro
4=IBM Pro-X24
5=HP Laser/ DeskJet
(21)
Spirometrics
Flowmate III
User's Manual - Rev. 02
Do you want to print
Volume/Time Curves? (1=YES,
2=NO) Now 1
Press
or
Press ENTER
Volume/Time Curve
is included when printing report
for individual FVC tests.
Do you want to print
Flow/Volume Loops? (1=YES,
2=NO) Now 1
Press
or
Press ENTER
Flow/Volume Loop is included
when printing report for
individual FV tests.
,
Press
,
Press ENTER
Graph Best Test Curve(s) on
Summary?
or
1=Both
Includes chosen Best Test
Curves on the Summary
Report when printed.
2=VT Curve
3=FV Loop
4=None
Do you want to print COPD
Risk? (1=YES, 2=NO) Now 1
Press
or
Press ENTER
COPD Risk (Chronic Obstructive
Pulmonary Disease) assessment
to be printed on the Summary
Report.
Do you want to print Lung Age?
(1=YES, 2=NO) Now 1
Press
or
Press ENTER
Lung Age calculation to be
printed on the Summary Report.
Press YES or NO
Inhalation Challenge defaults
okay? (Press YES or NO)
YES = See default settings
pgs. 16 & 17.
NO = May change the
methacholine default values for
each dosage.
If you answered NO to the prior question the Flowmate III will ask the following
questions: (Answer each question accordingly and then
press ENTER. See Methacholine Challenge pg. 38.)
•
How many breaths per concentration?
(enter number of inhalations) Now 5
•
What is methacholine concentration #2 ?
(enter dose in mg /ml/ breath) 00.025
•
What is methacholine concentration #3 ?
(enter dose in mg /ml/ breath) 00.250
(22)
Spirometrics
Flowmate III
•
What is methacholine concentration #4 ?
(enter dose in mg/ ml/ breath) 02.500
•
What is methacholine concentration #5 ?
(enter dose in mg/ ml/ breath? 10.000
•
What is methacholine concentration #6?
(enter dose in mg/ ml/ breath) 25.000
•
What is the lower limit of normal?
(enter cum dose in mg/ ml) 8
Press YES or NO
Would you like a printout of the
settings you've just made?
(YES or NO)
YES = Printout of
customization settings
you have just made if printer is
connected.
NOTES
User's Manual - Rev. 02
NOTE: Settings will be retained in memory when the spirometer is
turned off. Spirometrics recommends that you printout a copy of
your customization settings and retain for future reference.
(23)
Spirometrics
Flowmate III
User's Manual - Rev. 02
SETTING THE TIME AND DATE
This routine sets the internal time/date, which are printed on reports.
Press PATIENT
MENU:
(this will bring you to the Main
Menu)
1=Patient
2=Customization
3=Calibration
4=Time (or Output)
Press
Enter the Correct Time
(by entering four digits)
What time is it: 12:01 (enter
time, or press ENTER if
correct)
Press ENTER
Press YES or NO
What time is it: 12:01 Is that
PM? (Press YES or NO)
The Flowmate III does not ask
the question listed above if a 24
hour time is used.
Enter the correct time scale.
Press ENTER
12= American or 12 hour format
24= European or 24 hour format
Do you want time to be printed
in 12 or 24 hour scale?
Press
Press
Print American or European
date format? ( 1=mm/dd/yy ;
NOW 12
or
ENTER
2 =dd/mm/yy): Now 1
=month/day/year (American)
=day/month/year (European)
Enter Correct Date
Press ENTER
Do not use the / when entering
the date.
Set the date: Now 01/15/94
Confirms time and date entered.
Time is: 12:01 PM
(in American format; slashes
not needed)
(12 hour scale)
Date is: 01/01/94
(American format)
The Flowmate III will
automatically bring you back to
the Main MENU.
MENU:
1=Patient
2=Customization
3=Calibration
4=Time (or Output)
(24)
Spirometrics
Flowmate III
User's Manual - Rev. 02
CALIBRATION
Calibrating your Flowmate III ensures accurate test results. Calibrate your
spirometer before you use it for the first time. Re-calibrate your spirometer at
routine intervals. Spirometrics recommends daily calibrations to assure that the
spirometer is calibrated and working properly.
1. To perform a calibration, a calibration syringe and a calibration syringe
adapter seal will be needed. (See pg. 75 for Flowmate III accessories).
2. Connect the adapter seal to the end of the calibration syringe. (See pg.
75 for Flowmate III accessories).
3. Connect the Flow Sensor Mouthpiece firmly to the calibration syringe.
NOTES
NOTE: In keeping with the American Thoracic Society’s 1994
Standardization of Spirometry and good quality control procedures,
it is recommended that the linearity of the flow sensing pneumotach
should be checked on a weekly basis. This can quickly and easily
be accomplished by injecting your calibration syringe at three
different flow rates during a Follow-up Injection. As an example,
taking a three liter syringe and injecting it 1, 3, and 6 seconds would
create flow rates of 3 l/s, 1 l/s, and 0.5 l/s respectively. Answer YES
to the question “Do You Want To Check Calibration Again?”, and
repeat for each subsequent follow-up injection desired to check.
The volumes measured at the flow rates used, should all be within
the stated +/- tolerance to be considered acceptable.
(25)
Spirometrics
Flowmate III
Press PATIENT
(This will bring you to the
Main MENU.)
User's Manual - Rev. 02
MENU:
1=Patient
2=Customization
3=Calibration
4=Time (or Output)
Press
Enter correct syringe volumei.e., 3 liters
Press ENTER
What is the test syringe
volume? Now - (ENTER
volume: 1-9 liters)
(Flowmate III will prompt you to
inject the volume of air from the
syringe.)
Press ENTER
MEDIUM rate injection about 1.5 sec.
(Press ENTER when ready then inject)
Inject syringe.
Keep the calibration puck in the
boundaries of the target range.
Too Slow [---OKAY---] too fast
Injection is acceptable.
Inject syringe.
Injection OK
Now inject syringe to check
calibration
If injection is not acceptable, the
following message will appear.
Injection too slow. Please
retry.
OR
Injection too fast. Please retry
Injection is OK. A calibration
report will print automatically if
printer is connected.
Injected volume = 3.00 L;
Reading OK
Press YES or NO.
Review the calibration report.
Do you want to check
calibration again?
YES =Inject syringe again
to check calibration at
different flow rates.
NO = Will automatically
display the Main MENU.
NOTES
NOTE: If calibration check message does not confirm the
calibration setting, ("Calibration O.K.") clean the flow sensor.
(26)
Spirometrics
Flowmate III
User's Manual - Rev. 02
ENTERING PATIENT DATA
If needed, turn the Flowmate III on by pressing the POWER switch on the left side
of the spirometer.
NOTES
NOTE: When the Flowmate III is plugged into the AC adapter, The
POWER switch indicator will be green. To check for a full charge,
remove the AC adapter and turn the spirometer on. If the POWER
light remains green the batteries are fully charged.
Check the date and time shown
on the display.
(01/15/94 09:30)
If they are incorrect, See setting
the Time and Date on pg. 23. or
press PATIENT.
Flowmate III version 2.6a
Spirometrics, Copyright 1999
Press
MENU:
1=Patient
2=Customization
3=Calibration
4=Time (or Output)
Enter Patient ID number,
Up to 16 digits- periods (.) and
slashes (/) are acceptable. The ID
number can be the patient's
social security number or any
other appropriate identification
number. Each patient must have
a different ID number. Do not
start with a period.
What is patient's ID number?
(or press TEST)
NOTES
NOTE: You can use the Test key to jump directly to the Test
Selection question without having to first enter patient data. If you
do this, the Flowmate III will display and print the test results.
However, the results will not include predicted, percent of
predicted, or interpretations, since there is no patient data on which
to base the predicted. Also, the patient's test results will not be
stored when you enter a new patient. The PATIENT DATA
REPORT will be marked with the fictitious name of "John Doe -01,
02"... etc.
Press YES or NO
Is this Post-BD? If already
Pre-BD test, and no Post-BD
test yet.
Enter Patient's Age.
(up to 3 digits).
Press ENTER
What is the patient's age?
Enter the age in years. (27yrs)
Select patient's sex.
Press ENTER
What is the patient's sex
(1=male; 2=female)
(27)
Spirometrics
Flowmate III
Select the patient's race.
User's Manual - Rev. 02
What is the patient's race?
Caucasian
, ,
Press
or
Press ENTER
1=Caucasian
2=Black
3=Non-Caucasian
NOTES
NOTE: The predicted values for Black patients are 85% of those for
Caucasian or "Non-Caucasian" patients (as per most popular
Normals studies). Caucasian and non-Caucasian are calculated
equally - and are used to denote different origin on the report. See
the Normals Table pg. 59.
Enter the patient's height.
Press ENTER
(in inches or centimeters)
Conversion chart feet/in/cm
See pg. 65.
What is the patient's height?
72 (30-89 inches,
Enter the patient's weight.
Press ENTER
If the patient's weight is not
desired on results - do not enter
weight-Press ENTER.
What is the patient's weight?
165 lbs (optional, enter in Lbs)
90-250 centimeters)
See Customization pg. 18 to
configure Flowmate III to
accept kilograms or to configure
the Flowmate III not to ask this
question by recording weight.
NOTES
NOTE: This question is optional since weight is not a parameter in
test result evaluation. See Customization pg. 18.
Enter number of cigarettes per
day.
Press ENTER
Press
, ,
How many cigarettes are
smoked per day? (0 - 60)
Which TEST would you like?
or
1=FVC
2=MVV
3=VC
4=CHAL (or Output)
(28)
Spirometrics
NOTES
Flowmate III
User's Manual - Rev. 02
NOTE: If the wrong test selection is entered, press TEST key then
re-select desired test. For example, you may have pressed 1 for an
FVC test and you wish to select an MVV test.
NOTES
NOTE: Following test selection (as seen above) the Flowmate III
will automatically enter the testing mode.
NOTES
NOTE: If you breathe without selecting a test type, then FVC test is
assumed and the testing mode is entered.
Editing Patient DataPress PATIENT - this will bring you to the Main MENU.
Press
to review and/or edit patient entries. The entry routine will begin again,
showing the data that was entered. Scroll through entries by pressing YES for
correct entries and changing incorrect data.
Press ENTER when data is correct.
(29)
Spirometrics
Flowmate III
User's Manual - Rev. 02
PATIENT PREPARATION
Explain
...A spirometer is used to assess lung function. The purpose
of the Spirometry test to you (the patient): is to measure how
hard and how fast you can breathe and how much air is in
your lungs. If properly performed the test results can indicate
the presence or absence of an obstructive or restrictive lung
disorder.
Direct
...the patient to:
• Remove or loosen tight clothing such as tight collars or
necktie.
• Remove dentures (optional).
• Stand in front of the Spirometer. (Patient should not take
the test sitting down unless he/she can not stand).
• Elevate chin and extend neck slightly.
• Use a nose clip, if available. (Have the patient pinch
his/her nose if unavailable) see the Flowmate III
Accessories pg. 75.
Demonstrate
...the procedure yourself:
• Take the deepest breath possible.
• Place mouth and teeth tightly around a mouthpiece.
• Do not block the opening with the tongue.
• Then, blow out as hard and fast and completely as
possible- getting all the air out. If a loop is being tested,
inhale deeply back through the sensor.
• Pull away from the mouthpiece.
Instruct
...the patient firmly and enthusiastically, "Take a good deep breath. Pull it
ALL in. Push it all OUT!...Blow as hard as possible and then breathe it all
back in... Good job!"
NOTE:
NOTES
Testing may be affected if the patient:
•
Smoked a cigarette or drank caffeinated coffee or tea
within the last hour.
•
Has used an aerosol bronchodilator within the last six
hours.
•
•
Has eaten a heavy meal within the past hour.
Is acutely ill or has suffered from upper or lower
respiratory problems within the past three weeks.
(30)
Spirometrics
Flowmate III
User's Manual - Rev. 02
TESTING
Press Patient
MENU:
1=Patient
2=Customization
3=Calibration
4=Time (or Output)
Press
What is the patient's ID
number?
Enter patient ID Number.
Press ENTER
Press enter repeatedly to scroll
through patient data.
(or press Test)
NOTE: If a NEW patient See Entering Patient Data (pg. 26); If
retrieving a previous patient's test, scroll through patient data and
change information as necessary.
NOTES
Press
, ,
Which test would you like?
or
1=FVC
2=MVV
3=VC
4=CHAL (or Output)
.
See the following test descriptions and operations:
1) FVC -
Forced Vital Capacity
Page 31
2) MVV -
Maximum Voluntary
Ventilation
Vital Capacity
Page 33
3) VC-
Page 35
4) POST -
Bronchodilator
Testing
Page 37
5) CHAL-
Methacholine
Challenge
Page 38
(31)
Spirometrics
Flowmate III
User's Manual - Rev. 02
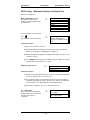
FVC Testing - Forced Vital Capacity Test
FVC testing begins after the
patient data is entered. The
Flowmate III will automatically
be in testing mode.
Which test would you like?
1=FVC
2=VC
3=MVV
4=CHAL (or Output)
Insert a new filter for each patient.
Test No. 01
FVC
(Exhale hard! Then inhale.)
Press
Instruct the Patient to:
1) Place a noseclip on his/her nose.
2) Take as deep a breath as possible through the mouth and hold it.
3) Put the flow sensor mouthpiece in mouth- past teeth and form a tight
seal. Make sure the tongue is not blocking the mouthpiece.
4) Blast ALL the air out as hard and fast as possible.
5) Inhale as deeply and quickly as possible through the mouthpiece.
6) Remove the mouthpiece.
NOTES
NOTE: Flowmate III numbers each test consecutively, 01,
02,03...regardless of test type. This lets you recall the test later.
See Retrieving-Test Results p. 41.
The Flowmate III shows an incentive
bar graph of expiratory volume as
the patient breathes into the
mouthpiece. The screen incentive
will continue to encourage the
patient until the unit senses no more
airflow.
∗ = Target
1 2 3 4 5 6 7 8 9 Lit
ÛÛ Û Û Û Û Û
Press YES or NO.
Once the patient has performed an
FVC effort the technician must
determine if the effort is acceptable.
∗
Was the patient effort
acceptable?
(Press YES or NO)
(32)
Spirometrics
Flowmate III
Answering YES
The Flowmate III computes, displays
and stores the test results, of the
patient's effort, and prints report if
"autoprint" is customized.
User's Manual - Rev. 02
Calculating test results...
Answering NO
The Flowmate III will abandon the
test and the patient must try effort
again.
NOTES
NOTES
NOTE: Patient effort is acceptable if the patient:
•
•
•
•
Started with the deepest possible inspiration.
Exhaled maximally with a good, fast start.
Inhaled maximally after the expiration.
Inhaled and exhaled smoothly. No coughing!
NOTE: The spirometer may display a message indicating that the
test trial was too short, or that the start was too slow. Note that
even if you see one of these messages, the unit will still accept and
store the test in memory. (If test is under 1 second it is not accepted
and another effort must be made.)
Flowmate III displays
results
when a patient test is
accepted.
Index Unit Meas Pred % Pred %Var
FVC L
x.xx x.xx
xxx x.xx
Press TEST or just breathe to start another test.
NOTES
NOTE: The patient should perform three valid tests:
•
•
Three tests should be reproducible within 5%.
The patient must put forth maximal effort, both
inhaling and exhaling.
(33)
Spirometrics
Flowmate III
User's Manual - Rev. 02
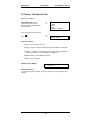
MVV Testing - Maximum Voluntary Ventilation Test
Entering Testing Mode...
MVV testing begins after the
patient data is entered. The
Flowmate III will automatically be
in testing mode.
Which test would you like?
1=FVC
2=MVV
3=VC
4=CHAL (or Output)
Insert a new filter for each patient.
Begin MVV RUNNING
START. When effort is
good, press ENTER to begin
test.
Press
(See below to instruct the patient).
Instruct the Patient...
1) Place a noseclip on his/her nose.
2) Position mouthpiece in mouth past teeth and form a tight seal with lips.
Make sure the tongue is not blocking the mouthpiece.
3) Breathe through the mouthpiece as rapidly and deeply as possible - like a
strenuous exercise.
4) Press ENTER when the patient is breathing deep and regular. The patient
should continue to breathe for 12 seconds.
Patient Incentive Screen
-L/S 3 2 1 0 1 2 3 +L/S
ÛÛ Û Û Û Û Û
∗
Instruct the Patient...
1) To look at the display while trying to make the bar move to the right and to
the left as quickly and as far as he/she can.
2) As the patient breathes, the Flowmate III shows the incentive display of
inspiratory and expiratory volume. The bar moves right on an exhale and
left on an inhale. This display indicates the breathing pattern.
3) Remove the mouthpiece after 12 seconds have passed.
Press YES or NO.
Once the patient has performed
an MVV effort the technician must
determine if the effort is
acceptable.
Was the patient's effort
acceptable?
(Press YES or NO)
(34)
Spirometrics
Flowmate III
Answering YES
The Flowmate III computes,
displays and stores the test results
of the patient's effort, and prints
report if "autoprint" has been
chosen in customization.
User's Manual - Rev. 02
Calculating test results.
Answering NO
The Flowmate III will abandon the
test and the patient must try effort
again.
NOTES
NOTE: Patient effort is acceptable if the patient:
•
•
•
Made a maximum effort.
Lasted a full 12 seconds.
Did NOT cough.
Flowmate III displays results
when patient test is accepted.
Index Unt Meas Pred %Pred %Var Mvv
L
x.xx x.xx xxx
xxx xx.x x.x
Press TEST to start another test.
NOTES
NOTE: The MVV test is an exhausting test. It should not be
repeated without a rest period. Some elderly or ill people cannot
repeat this test, even after a rest period.
(35)
Spirometrics
Flowmate III
User's Manual - Rev. 02
VC Testing - Vital Capacity Test
Entering Testing Mode...
VC testing begins after the
patient data is entered. The
Flowmate III will automatically be
in testing mode.
Which test would you like?
1=FVC
2=MVV
3=VC
4=CHAL (or Output)
Insert a new filter for each patient.
Test No. 1 VC
(Exhale slowly...)
Press
Instruct the Patient...
1) Place a noseclip on his/her nose.
2) Take as deep a breath as possible through the mouthpiece and hold it.
3) To place mouthpiece in mouth past teeth and form a tight seal with lips.
Make sure the tongue is not blocking the mouthpiece.
4) Exhale slowly...push EVERY bit of air out.
5) Remove the mouthpiece.
Patient Incentive Display
1 2 3 4 5
ÛÛ Û Û Û Û Û
6
7 8 9
*
Lit
Instruct the Patient...
...to look at the incentive display. Try to make the bar move to the right as far as
possible.
(36)
Spirometrics
Flowmate III
Press YES or NO
Once the patient has performed a
VC effort the technician must
determine if the effort is
acceptable.
User's Manual - Rev. 02
Was the patient effort
acceptable?
Press YES or NO
Answering YES
The Flowmate III computes,
displays and stores the test results
of the patient's effort, and prints
report if "autoprint" has been
chosen in customization.
Answering NO
The Flowmate III will abandon the
test and the patient must try effort
again.
NOTES
NOTE: Patient effort is acceptable if the patient:
•
•
•
Made a maximum effort.
Exhaled completely.
Exhaled smoothly-NO coughing.
Flowmate III displays results
when patient effort is acceptable.
Index Unit Meas Pred % Pred%Var
VC
L xx.x
xx.x
xxx xx.x
(37)
Spirometrics
Flowmate III
User's Manual - Rev. 02
Post - Bronchodilator Testing
After giving the patient a series of baseline tests, you may want to administer a
bronchodilator and then retest the patient to measure the effect of the
bronchodilator. The Flowmate III calculates the differences in various Pre-BD and
Post-BD indices. (BD= Bronchodilator)
Post-Bronchodilator Testing begins after the patient data is entered. The
Flowmate III will automatically be in testing mode.
Press Patient
MENU:
Press
1=Patient
2=Customization
3=Calibration
4=Time (or Output)
Re-Enter the patient's ID number.
Press ENTER
What is the patients ID # ?
(or press test)
Press YES = for Post-BD testing.
This confirms that the tests which
follow will be Post-BD.
Press NO = If you wanted to
continue Pre-BD testing on this
patient.
Is this Post-BD?
Press ENTER repeatedly to scroll
through patient data until you have
reached the test options. Make
sure patient data is correct. If not,
correct data.
Which test would you like?
1=FVC
2=MVV
3=VC
4=CHAL (or Output)
Press desired test
Test No. 3 VC-Post Bronchodilator
, ,
Press
(i.e., 3 was chosen here.)
(Exhale slowly...)
Continue testing as usual. Post-BD testing and Pre-BD testing are performed in
exactly the same manner. The only difference is that the test reports label the "PreBD" and the "Post-BD" results on the Best Test Summary Report.
NOTES
NOTE: In order to do Post-BD testing on a patient, the Flowmate III
must have the patient's Pre-BD tests stored in memory. Only five
patients can be stored in memory at the same time. Therefore, you
must be careful not to accidentally erase the Pre-BD data by testing
a sixth patient before the first has had Post-BD tests. See
Retrieving Test Results (pg. 41).
EXCEPTION: If a memory card is used you can store 118 patients.
(38)
Spirometrics
Flowmate III
User's Manual - Rev. 02
Methacholine Challenge
The methacholine challenge test is a means of determining airways reactivation. It
is useful for diagnosing "variant asthma" and to identify predictive factors in
asthma patients.
•
Variant asthma: This is an intermittent asthma, which may occur with
exercises, cold air, infections, or at night. The patient's baseline
spirometry might appear normal, and there isn't a significant
response to a bronchodilator, hence they appear non-asthmatic. A
methacholine challenge test will demonstrate an abnormally high
airways reactivation in patients with variant asthma.
•
Predictive Factors: The degree of airways reactivation may be
correlated with the severity of asthma symptoms and the duration or
frequency of asthma attacks.
The methacholine challenge test is performed by inhaling successively increasing
doses of methacholine, and measuring the change in FEV1 between each dose.
Only the FEV1 is important in this test.
Press PATIENT
MENU:
1=Patient
2=Customization
3=Calibration
(This will bring you to the Main
MENU).
4=Time (or Output)
What is the patient's ID
number? (or press TEST)
Press
Press ENTER repeatedly to scroll
through patient data until you
reach the test selection question.
Methacholine Challenge testing
begins after the patient data is
entered. The Flowmate III will
automatically be in testing mode.
Which test would you like?
1=FVC
2=MVV
3=VC
4=CHAL (or Output)
Insert a new filter for each patient.
Administer 5 breaths of
diluent. (press ENTER when
ready for FVC test)
Press
(39)
Spirometrics
NOTES
Flowmate III
User's Manual - Rev. 02
NOTE: Diluent is a saline solution with no methacholine in it. It is a
placebo, which will give a baseline spirometry reading. Once the
diluent has been administered, and the ENTER key pressed, the
normal FVC routine is entered. The FVC test is conducted as usual
and all FVC and FEV1 indicies are the same as the normal FVC
testing (with the exception of the test header).
Instruct the Patient... (SEE FVC TESTING SECTION pg. 31)
1) Place a noseclip on his/her nose.
2) Position the flow sensor mouthpiece in mouth- past teeth and form a tight seal.
Make sure the tongue is not blocking the mouthpiece.
3) Take as deep a breath as possible through the mouthpiece and hold it.
4) Blast ALL the air out as hard and fast as possible.
5) Inhale as deeply and quickly as possible through the mouthpiece.
6) Remove the mouthpiece.
Press TEST
Each time you would like to start
a new test. The Flowmate III will
ask if you would like to increase
the challenge dose.
NOTES
Do you want to increase the
challenge dose? (YES, NO, or
exhale for another FVC)
NOTE: Several baseline FVC tests should be performed until the
%Var is less than 5%. You (the technician/physician) must
determine whether to repeat another baseline test or continue with
the challenge. Also, whether to continue another FVC for that dose,
or whether to increase dosage.
Press ENTER
LOW FEV1; CHALLENGE
NOT RECOMMENDED!!
The Flowmate III selects the best
test as per the normal best test
algorithm, and then checks to see
if the FEV1 %Pred is less than
70%. It is not recommended to
continue testing if results are less
than 70%. The Flowmate III
displays a flashing Warning
message recommending that the
challenge be stopped.
Press CLEAR to stop;
ENTER for challenge test
CLEAR = The Flowmate III will
revert back to the test selection
prompt, but the baseline test is
saved.
Which test would you like?
1=FVC
2=MVV
3=VC
4=CHAL (or Output)
(40)
Spirometrics
Flowmate III
If ENTER is pressed:
The methacholine test will
continue.
NOTES
Administer 5 breaths of xx.xx
mg/ml -#n
Press ENTER when ready for
FVC tests
NOTE: In the display above, xx.xx is the dosage of methacholine in
mg/ml corresponding to sequence number n, as set in the
customization routine (pg. 18). The baseline test has a sequence
number of 1. There are up to seven sequences.
Once ENTER is pressed:
The normal FVC test routine is
performed, but the display and
report for the challenge test are
different. The index of primary
interest is the FEV1. The display
also has columns with BASE and
%CHNG (for baseline readings).
NOTES
User's Manual - Rev. 02
Index Unt Meas Base %Chng%Var
FEV1
L x.xx
x.xx
x.xx
xxx
NOTE: The DISPLAY key may be used as normal to scroll through
the test indices. FVC tests should be continued for this dosage
until the %Var is less than 5%. The only indices reported in the
methacholine challenge tests are the FEV1 and FVC.
Press TEST to continue testing once the test results are displayed.
Administer five breaths
There are up to five sequences of
methacholine (#2-6) and then one
sequence (#7) of bronchodilator to
open the airway back to normal.
Perform the FVC maneuver.
Continue to perform the FVC
maneuver on the patient with the
same dosage until the % Var is
less than 5%.
Administer 5 breaths
of xx.xx #x
Press ENTER when ready for
FVC test.
Administer Bronchodilator
After a sequence of six tests has
been performed or the patient's
FEV 1 has dropped 20%,
administer a bronchodilator to open
the airway back to normal.
Press ENTER and perform another
FVC test.
Administer Bronchodilator.
Press ENTER to continue.
FEV 1 has Dropped
If there is a 20% drop in the FEV1
from the base line, this will appear
on the display.
FEV 1 has dropped xx%,
challenge complete.
Press YES or NO
This question will appear if the test
key is pressed after the
bronchodilator sequence
i.e., #1-#7.
YES = end of challenge
Do you want to end
challenge?
Press ENTER to continue.
(YES, NO, or exhale for
another).
(41)
Spirometrics
Flowmate III
User's Manual - Rev. 02
Patient Reports
NOTE: A patient report can be automatically printed after each
spirometry effort is performed. See Customization pg. 18.
NOTES
Retrieving Test Results
Retrieving:
The Flowmate III stores each test in memory as the test is completed. You can
recall this test data later for displaying, printing, or erasing. For example, you may
want to erase a previous test, because it was poorly done, or you may want to refer
to a pre-bronchodilator test while you are giving a post-bronchodilator test.
Each test for a given patient has two digit test numbers 01,02,03...This number
increases by one for each consecutive test on the patient regardless of the test
type, or whether the testing is in pre- or post- bronchodilator. The Flowmate III
displays the test number just before the patient takes the selected test. The test
number prints on each test report for all tests. The number of the best test also
prints on the Best Test Summary Report. You can recall a test from memory by
referring to its test number.
To Recall a Test:
Press PATIENT
MENU:
1=Patient
2=Customization
3=Calibration
4=Time (or Output)
What is the patient's ID
number? (or press TEST):
Press
Input Patient ID Number
Press ENTER
Press enter repeatedly until you
reach the test selection question.
Which test would you like?
1=FVC
2=MVV
3=VC
4=CHAL (or Output)
Press DISPLAY
For which test would you like
data? (enter number of test).
Enter test number you would like
to select.
(42)
Spirometrics
NOTES
Flowmate III
User's Manual - Rev. 02
NOTE: If you are unable to remember the patient ID number you
desire, you may return to the Main MENU (press PATIENT key).
Press the SUMMARY key for a printout of the patient directory.
When a patient has finished a test and you have indicated that the patient's effort
was acceptable, the spirometer automatically displays the results of the test.
You can use the DISPLAY and PRINT key to control the data as follows:
DISPLAY KEY
Press repeatedly to scroll
through the various test
indices. After the last index is
displayed, the sequence will
loop around to the first index.
The indices appear in the
same order they are printed
on the test report.
Printing Patient Reports
PRINT KEY
(printer must be connected)
In Main MENU
Press to Batch print the
tests of all or some of the
patients.
In Testing Mode Press to
print a report of the current
test. If you select "auto print"
in the customization routine,
the report automatically
prints out at the completion
of the test, just as if you
pressed print.
(43)
Spirometrics
Flowmate III
User's Manual - Rev. 02
Erasing a Test
ERASE KEY
In Main MENU
Press to erase the tests of all
or some of the patients.
In Testing Mode Press to
erase the test data from a
single patient. As a safety
check, the Flowmate III will
always ask you if you are
sure you would like to erase
data. Use the erase key if
you have accepted a patient
test, but after review decide
to delete the data.
Press ERASE
Which test would you like?
1=FVC
2=MVV
3=VC
at the test selection question
4=CHAL (or Output)
Enter the number of the test that
you want to erase
Which test would you like to
erase? ( enter number of test)
Be sure you want to erase the test.
Once you erase it, there is no
recovery.
Are you sure you want to
erase test NO. xx ? (press
YES or NO)
(44)
Spirometrics
Flowmate III
User's Manual - Rev. 02
Summary Reports
SUMMARY KEY
Press to print a Best Test
Summary Report of all the
data in memory for that
patient. If this is used during
the Methacholine Challenge
it gives only the
Methacholine Challenge
Summary.
The following are possible summary reports:
• Pre Testing
• Best Post BD Summary
• Inhalation Challenge
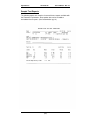
Report Header: Each test report has a header that gives the type of test, the
number of the test (to recall test from memory), and the date and
time of the test.
Index:
This column indicates the names of the various test indices. Read
across the line to receive values for an index.
Unt: (unit)
Indicates that L= liters, L/M = liters per minute, and L/S = liters per
second.
Meas:
Indicates the actual measured value for that index, in the units
indicated in the "UNT" column.
Pred:
Indicates the predicted value for the index, based on the patient
data (age, sex, height, and race). If you skipped the patient data
entry routine, or the given patient is out of range for the selected
predicted Normals table, then the Flowmate III prints a "N/A" (not
applicable) in the appropriate columns.
%Pred:
Compares the patient's measured result to the predicted normal
result for that index, expressed as a percentage.
% Predicted = (Measured/Predicted) X 100%.
%Var:
Indicates the variability or reproducibility of the test index, as
compared to the best previous measured value for that index.
This value must be less than 5% for the FVC and FEV1 indices in
order for the FVC test to be regarded as reproducible. Continue
testing until the % Var is less that 5% for these indices. The %
Var is not critical for other indices, but it should be as low as
possible.
Diff:
Indicates the variability of test indices between Best Test Post
effort to Best Test Pre effort. The comparison is in indices units of
measure.
%Diff:
Indicates the variability of test indices between Best Test Post
effort to Best Test Pre effort. The comparison is expressed in %
Difference.
NOTES
NOTE: The variability (%VAR) does not appear on the first test taken
since there are no indices in memory to compare it to.
(45)
Spirometrics
Flowmate III
User's Manual - Rev. 02
Test Storage Capacities
The Flowmate III patient storage memory will automatically store up to five
patients. The patient storage memory will always discard the earliest patient once
the Flowmate III reaches the maximum patient storage. Always print or erase
patients in storage.
The optional memory card is only an extension of the system memory. It is only
temporary storage for the patient tests until they are printed. The optional memory
card will store an additional 118 patients. (See Accessories pg. 75).
(46)
Spirometrics
Flowmate III
User's Manual - Rev. 02
Memory Card
The Flowmate III has a number of optional accessories to aid in spirometry testing.
The patient data memory card can be purchased separately for your Flowmate III.
By adding the optional memory card approximately 118 patients can be stored for
future printing or processing.
The memory card is an extension of your spirometers memory. When saving,
retrieving, editing, printing or, erasing patient tests on the memory card, follow the
instructions in the respective sections in this manual. The only difference when
working with the memory card is that it must be installed in order to save patient
tests and to work with this data.
NOTES
NOTE: Please refer to the memory card reference (This will
accompany the memory card or be printed directly on it).
CAUTION: Do NOT use memory card as permanent storage.
CAUTION: Do not remove or install memory card while the
spirometer is turned on.
flowm ate III
(47)
Spirometrics
Flowmate III
User's Manual - Rev. 02
Installing the Memory Card:
1) Make sure the spirometer is turned off.
2) Slide the memory card into the slot, making sure that the card is properly
oriented as shown.
3) Gently push until the memory card seats into place and can go no further.
Checking the Position of the Memory Card:
Press PATIENT Key
MENU
1=Patient
2=Customization
3=Calibration
4=Time (Output)
Press DISPLAY Key
Pat. Database usage: SYS
MEM: 0 of 5
RAM Card: 1 of 118
(Press any key)
(WITH Memory card
installed properly)
Press DISPLAY Key
Pat. Database usage: SYS
MEM: 0 of 5
(Press any key)
(WITHOUT Memory card
installed properly)
(48)
Spirometrics
NOTES
NOTES
Flowmate III
User's Manual - Rev. 02
NOTE: For efficient management of memory, we recommend that
patient tests be erased from the memory card after printout.
NOTE: There is a write-protect switch located on the memory card.
The Flowmate III cannot communicate properly with the memory
card when this switch is set to ON. The switch must be turned to
OFF in order to store patient tests. Keep the write-protect switch set
to OFF.
Insert this side into the Flowmate III
The switch is OFF
Memory Card
Write-Protect Switch
The write protect
switch is OFF (writable
to the memory card)
initially. The card can
not be written to when
the switch is in the ON
position as shown.
The switch is ON
(49)
Spirometrics
Flowmate III
User's Manual - Rev. 02
Saving Patient Tests on the Memory Card:
The Memory Card is an extension of your spirometers memory. Your spirometer
unit memory has storage space to hold five patient tests. When you do Patient No.
6 the memory card will save Patient No. 1. The Memory Card stores the earliest
patient in the unit memory. When the Memory Card is full, the Flowmate III will
prompt the user:
Printing Tests Using the Memory Card:
Press PATIENT Key
MENU
1=Patient
2=Customization
3=Calibration
4=Time (Output)
Press PRINT key
Batch Print all or some
patients?
1=All
2=Some
3=None
= Batch print tests of all patients in memory.
= Print tests of selected patients - must enter patient ID numbers.
= This will bring the user back to the Main MENU.
Once you have printed patient tests, you must press PATIENT to return to Main
MENU.
NOTES
NOTE: If you are unable to remember the patient ID number you
desire, you may return to the Main MENU (press PATIENT key).
Press the SUMMARY key for a printout of the patient directory.
Erasing Saved Patient Tests on the Memory Card:
Patient tests that are saved on
the Memory Card can be deleted
as a group or one at a time.
Erase all of the Patient Database?
(1=All, 2=RAM Card Only,
3=None)
(50)
Spirometrics
Flowmate III
User's Manual - Rev. 02
Interpretations
The Flowmate III can make simple diagnostic interpretations of the spirometric test
data. The interpretation scheme is designed to distinguish normal from abnormal
pulmonary function test results without making a diagnosis. All relevant data must
be taken into account when making a valid diagnosis. Spirometry test data cannot
stand by itself. When the Flowmate III interprets a patient's spirometric test results
as abnormal, or suggests a disorder; the patient should be referred to a pulmonary
specialist for further testing. It is important to coach patients to their maximal
efforts.
Warning: Spirometry tests must be evaluated by a qualified
physician. The interpretations printed by the Flowmate III are
suggestive only, and not conclusive.
Press Summary to print a Best Test Summary Report. An interpretation of the test
results will be printed at the end of the report. You can choose NOT to print the
interpretations in the Customizing Routine (See pg. 18).
Interpretations are based entirely on two indices: FVC and FEV1. The Flowmate III
uses the best of each of these indices. (See Specifications
Pg. 73).
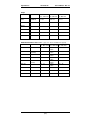
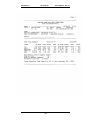
Interpretations Table
The following table gives the interpretation scheme and corresponding diagnostic
messages:
%PRED FVC
%PRED
FEV1
FEV1/FVC
INTERPRETIVE
MESSAGE
< 75%
≤ 75%
LOW FEV1 Suggests
Obstructive Disorder
< 60%
≥ 75%
LOW FEV1 Suggests
Ventilatory Disorder
< 75%
≥ 75%
LOW FVC Suggests
Restrictive Disorder
< 60%
< 75%
LOW FVC Suggests
Ventilatory Disorder
IN ALL OTHER CASES SPIROMETRICS RESULTS APPEAR NORMAL
(51)
Spirometrics
Flowmate III
User's Manual - Rev. 02
MAINTENANCE
Cleaning the Flowmate III
The most important maintenance routine for the Flowmate III is cleaning the Flow
Sensor. The outer surface of the Flowmate III needs no special cleaning.
WARNING: Spirometrics recommends wearing rubber gloves while
cleaning to protect against cross-contamination.
(52)
Spirometrics
Flowmate III
User's Manual - Rev. 02
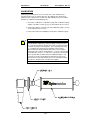
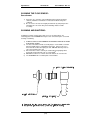
Disassembling the Flowmate III Flow Sensor
You must disassemble the flow sensor to clean it. Refer to the figure below to learn
the names of the different parts of the flow sensor.
CAUTION: Do not use alcohol on Flow Sensor or any other
Flowmate III parts.
WARNING: To reduce the risk of cross contamination Spirometrics
states that you replace the Filter Mouthpiece Housing between
patients. The EASY CLEAN Cartridge’s recommended cleaning
schedule when the 2195 Filter Mouthpiece Housing is used, is
monthly or every 60 patients, whichever comes first.
When testing a patient with an active communicable disease, the
EASY CLEAN Cartridge should be cleaned before reuse even when
the 2195 Filter Mouthpiece Housing is used. This is especially
important after you test any patient with an active communicable
disease.
WARNING: Always unplug the Flowmate III before cleaning to
avoid electric shock.
Disassembling the Flow Sensor:
1)
Unscrew the EASY CLEAN Cartridge with a counter clockwise motion.
2) Continue to turn the EASY CLEAN Cartridge until the threads are dis-engaged
from the handle assembly.
3) Pull Entire Easy Clean Cartridge when it is no longer engaged with the sensor
core housing.
CAUTION: Please DO NOT disassemble the core element. The
Easy Clean Cartridge can be cleaned fully assembled.
(53)
Spirometrics
Flowmate III
User's Manual - Rev. 02
CLEANING THE FLOW SENSOR:
Core element:
1)
2)
Clean the core element in cold sterilization fluid (a protein dissolving
solution). Follow the manufacturer's instruction for disinfecting and
sterilizing.
Be sure to rinse in water thoroughly and allow to dry completely before
attempting to re-insert the Easy Clean Cartridge into the handle
assembly.
CLEANING AND SANITIZING:
In addition to regular cleaning of the flow sensor as described above, the
remaining parts of the FLOWMATE III may become soiled and require occasional
cleaning or sanitizing.
1)
2)
3)
4)
5)
ALWAYS UNPLUG THE FLOWMATE III BEFORE CLEANING TO AVOID
ELECTRICAL SHOCK.
The base unit and the handle assembly may be cleaned with a soft cloth
dampened with water or a mild disinfectant soap. Squeeze all excess
water from the cloth before wiping the unit. DO NOT allow any water to
enter any opening on the unit.
External surfaces of the unit may be sanitized by gently wiping with a
®
disposable germicidal cloth such as a Sani-Cloth .
DO NOT use abrasives or harsh chemical solutions to clean the unit.
The FLOWMATE III is not waterproof or autoclavable.
(54)
Spirometrics
Flowmate III
User's Manual - Rev. 02
Assembling the Flowmate III Flow Sensor
1) Insert the EASY CLEAN Cartridge back into the Sensor Assembly and
turn clockwise to tighten.
2) Insert the back of the Easy Clean Cartridge into the handle assembly
towards the finger grips.
3) Insert into sensor handle and turn clockwise to tighten. Once the
EASY CLEAN Cartridge has contacted the inner core housing outer
face, turn until snug (about a 1/32 of a turn or roughly a quarter [1/4] of
an inch). Over tightening can damage the sensor handle alignment
pins.
WARNING: Do not disassemble core element. The core element
can be cleaned fully assembled.
(55)
Spirometrics
Flowmate III
User's Manual - Rev. 02
TROUBLESHOOTING
If your Flowmate III is not operating properly, try the following suggestions.
If any problems persist or seem too complex to solve immediately, you can contact
us at [email protected] or call us at 207-657-6700 or
800-767-0004.
Power Related:
This section contains solutions for solving possible power related problems such
as:
•
AC adapter
•
Battery power
•
Memory back-up.
Problem
Solution
Spirometer unit will not
power on when power
switch is on.
•
•
Spirometer unit will not
power even with AC
adapter.
•
•
•
•
•
•
•
Check battery installation.
Connect provided AC adapter to base unit.
Plug into standard 120 volt 60hz outlet.
Turn the POWER switch on.
A green POWER light should be seen and the
display screen will show text.
Check outlet.
Be sure your outlet has power.
Test your outlet by plugging in a working lamp.
If the lamp lights, your outlet has power. If
lamp does not light, have your circuit breaker
checked.
If your outlet works and your spirometer will
not power-up, it is possible that your AC
adapter is damaged.
Contact your local distributor or Spirometrics.
Batteries will not hold a
charge.
To completely charge your batteries plug your AC
adapter into a standard wall outlet and allow the
spirometer to charge for 15 hours before portable
use.
Indicator light is RED and
the spirometer beeps.
Batteries used to power the spirometer are low.
Connect the base unit to provided AC adapter and
continue use while adapter is connected. If the
spirometer continues to display the RED indicator
light or beeps, or fails to display, then check the
DC output voltage of the wall transformer (should
be between 9 – 12 volts).
Flowmate III will not hold
the Time/Date or
Customization.
A rechargeable Super Cap is used to retain
Time/Date and Customization Settings. It is
possible that the memory back-up voltage is low.
The Super Cap is designed to be periodically
recharged. This is accomplished by turning the
unit on for 5 – 10 seconds every two to three
weeks when the unit is not being used regularly.
(56)
Spirometrics
Flowmate III
User's Manual - Rev. 02
Flow Sensor:
This section contains possible solutions for solving problems related to the Flow
Sensor such as:
• Connection to base unit
• Cleaning
• Core Element Placement
Possible Problem
Solution
The base unit does not recognize
flow sensor. Message "Connect
Sensor" is displayed.
Check the connection of the Flow
Sensor to the base unit. Provided
with your spirometer is a coiled
retractable cable cord with modular
plugs at both ends. Plug either end
into the Flow Sensor, then the other
into the base unit. Use only the cord
provided with your spirometer. Use of
other cords could cause damage to
your spirometer.
Calibration:
This section contains possible solutions for calibration problems.
Problem
Solution
When performing linearity check at
different flow rates, the reported
values exceed the +/- tolerances.
Check the Following...
• The proper reference value of
the calibration syringe is entered.
ie., 3Liter value for a
3Liter Calibration Syringe.
• The calibration syringe does not
leak air.
• The adapter seal for air leakagemake sure it provides a tight seal
around the syringe nozzle and
the filter system.
• The filter system is snugly
connected to Flow Sensor.
• The Easy Clean Cartridge
snuggly screwed into the outer
core housing.
• Is Core free from moisture
buildup?
Perform calibration linearity check to
verify that any changes have
corrected the earlier problem.
Check that the core element is
properly installed. This requires
complete insertion of the core
element into the handle assembly.
Refer to the maintenance section for
assembly instruction.
The calibration graph will not move
within the tolerance window of the
calibration routine and the sensor will
not detect flow.
(57)
Spirometrics
Flowmate III
User's Manual - Rev. 02
Problem
Solution
Can not keep the calibration puck
within the tolerance window in the
calibration routine.
Calibration of the Flow Sensor
requires a steady even injection from
the calibration syringes.
Check the Following...
• The proper reference value of
the calibration syringe is entered.
(ie., 3Liter value for a
3Liter Calibration Syringe.)
• The calibration syringe does not
leak air.
• The adapter seal for air leakagemake sure it provides a tight seal
around the syringe nozzle and
the filter system.
• The cap on the assembled filter
system is tight.
Check that the core element is
properly installed. This requires
complete insertion of the core
element into the handle assembly.
Refer to the maintenance section for
assembly instruction (pg. 54).
The calibration puck will not move
within the tolerance window of the
calibration routine and the sensor will
not detect flow.
Patient Storage:
This section contains possible solutions to patient storage problems.
Problem
Solution
Flowmate III will not store more than
5 patients in the unit memory.
In order to store more than 5 patients
you will require a memory card. Call
your local distributor or Spirometrics
Inside Sales Department.
You will need the following:
minimum 1/2 Megabyte SRAM card
with a battery; 68 pin PCMCIA 2.0
compatible. (See Accessories
pg.75)
Flowmate III will not store more than
5 patients with a memory card.
(A Memory Card will provide
additional storage- this is separate
from the unit memory.)
Check that your Memory Card is
properly installed into the Memory
Card slot. The card will only be
accepted into the slot when properly
inserted.
When the memory card is properly
installed the display will read:
Check to see if your card is properly
installed: Press the DISPLAY key at
the Main MENU to see if the
Flowmate III recognizes the Memory
Card. The second line on the display
will state the status of the Memory
Card. If it does not recognize the
Memory Card, no status will be
displayed on the second line.
Pat. Database usage:SYS MEM: 0 of 5
RAM Card: 1 of 118
(Press any key)
(58)
Spirometrics
Flowmate III
User's Manual - Rev. 02
Problem
Solution
Can not recall a stored patient.
Storage of patient data is automatic.
Patients are stored by patient ID,
when patient data is first entered. To
determine what is stored in the
Flowmate III's memory:
• Connect a printer to the
spirometers port.
• Turn the printer on.
• Press the SUMMARY key at the
Main MENU. Make sure the
spirometer is customized to the
type of printer being used. A list
of patients stored by ID number
and age will be printed.
• Search for the ID of the patient
desired (by pressing ENTER
repeatedly).
NOTES
NOTE: The patient storage memory will always discard the earliest
patient once the Flowmate III reaches the maximum patient
storage. Always print or erase patients in storage. Remember that
the Memory Card is only temporary storage for the patients until
they are printed. The Memory Card is only an extension of the
system memory.
Printer:
The following is a possible solution for a printer problem.
Problem
Solution
Your printer is not printing when it is
connected to your Flowmate III.
The Flowmate III has a specific
number of printer drivers to choose
from. Printer drivers are instructions
to control the format and behavior of
your printer when connected to the
Flowmate III. If you do not find the
selection of your printer in the
Customization Routine refer to the
printer's user manual. It is possible
that your printer can be configured to
one of the printer selections provided
in the Flowmate III's Customization
Routine. Check your printer manual
for customization options and
configuration instructions.
(59)
Spirometrics
Flowmate III
User's Manual - Rev. 02
APPENDICES
Normals Table
One of the principal functions of a spirometer is to determine whether a patient’s
pulmonary function is normal or abnormal. A "predicted normal" value for a
spirometric test index is a "prediction" of the value a patient SHOULD attain if
he/she were "normal". The predictions are based on extensive studies of a
population done by leading pulmonologists. To obtain predicted values the
technician must enter the height, age, sex and race. The spirometric test indices
from thousands of people of different height, age, sex and race were analyzed and
compiled into an equation. Each normals table is named by the pulmonologist who
led the study.
NORMALS TABLES
The Flowmate III has normals tables from the following five studies stored in
memory. Select the table you want to use in Customizing the Flowmate III on pg.
19. Note the applicable indices and ranges for each study.
Knudson 1983
SEX
INDICES
HEIGHT
AGE
Yrs -Min-max cm - Min-max
HEIGHT
in - Min-max
6 - 10
106.7 - 147.3
42 - 58
FEV1/FVC
11 - 19
132.1 - 182.9
52 - 72
FEF 25-75
20 - 69
147.3 - 180.3
58 - 71
FEF 50
70 - 87
147.3 - 167.6
58 - 66
6 - 11
111.8 - 154.9
44 - 61
12 - 24
139.7 - 193.0
55 - 76
25 - 84
157.5 - 195.6
62 - 77
FVC
FEV1
FEMALE:
MALE:
(60)
Spirometrics
Flowmate III
User's Manual - Rev. 02
Crapo
INDICES:
SEX
AGE
HEIGHT
Yrs - Min-max cm. Min-max
HEIGHT
in. Min-max
FVC
FEMALE
17-84
146-178
57-71
FEV1
MALE
15-91
157-194
61-77
FEV3
FEV1/FVC%
FEF 25-75%
MVV vol
ECCS with Knudson 1983 Children (ages 18 - 24 are evaluated as age 25)
HEIGHT
HEIGHT
SEX
AGE
INDICES
Yrs, Min - max cm - Min-max in - Min-max
FVC
FEMALE:
25 - 90
145.0 56 - 72
180.0
FEV1
CHILDREN:
6 - 10
106.7 42 - 58
(female)
147.3
FEV1/FVC
11 - 17
132.1 52 - 72
182.9
FEF 25-75
MALE:
25 - 90
155.0 58 - 80
195.0
PEF
CHILDREN:
6 - 11
111.8 44 - 61
(male)
154.9
FEF 50
12 - 17
139.7 55 - 76
193.0
FIVC
MVV vol
VC
(61)
Spirometrics
Flowmate III
User's Manual - Rev. 02
Morris
INDICES
SEX
AGE
yrs - Min-max
HEIGHT
HEIGHT
cm - Min-max in - Min-max
FVC
FEMALE:
20 - 90
145.0-180.0
56 - 72
MALE:
20 - 90
155.0-195.0
58 - 80
FEV1
FEV1/FVC
FEF .1 - 1.2
FEF 25-75
FEF 75-85
HSU 1979 (Using Journal of Pediatrics 1979)
SEX
AGE
INDICES
yrs- Min-max
HEIGHT
cm - Min-max
FVC
FEMALE:
7 - 20
111 - 180
43 - 71
FEV1
MALE:
7-20
111 - 190
43 - 75
LAM 1982
INDICES
SEX
AGE
yrs- Min-max
HEIGHT
cm - Min-max
HEIGHT
in - Min-max
FVC
FEMALE:
5 - 74
Height range
not specified
in study.
Height range
not specified
in study.
FEV1
MALE:
5 - 74
Height range
not specified
in study.
Height range
not specified
in study.
HEIGHT
in - Min-max
FEF 25-75
PEF
PEF
(62)
Spirometrics
Flowmate III
User's Manual - Rev. 02
COMPOSITEThis is the Default normals selection. These normals provide predicted values for
most indices.
INDICES
AUTHOR
FVC
Knudson 83
FEV1
Knudson 83
FEF 50
Knudson 83
FEV3
Knudson 83
FEF 25-75
Knudson 83
FEF 75-85
Morris
PEF
ECCS
FIVC
Knudson 83
FIF 50
No Predicted
PIF
No Predicted
FEV1/FVC
Knudson 83
FEF 2-1.2
Morris
MVV Vol
Crapo
VC
Knudson 83
(63)
Spirometrics
Flowmate III
User's Manual - Rev. 02
ATPS and BTPS
BTPS: The air in the patient's lungs is said to be "BTPS conditions". BTPS is an
abbreviation for Body Temperature, Standard Pressure, and Saturated with water
vapor.
ATPS: The air measured by the Flow Sensor is said to be at "ATPS conditions".
ATPS is an abbreviation for the Ambient Temperature, Standard Pressure, and
Saturated with water vapor.
AUTOMATIC EXPIRATORY BTPS CALCULATION: The air inside the patient's
lungs is at body temperature (98.6 degrees Fahrenheit or 37 degrees Centigrade).
A patient exhales into the Flow Sensor, the air cools. As the air cools, it contracts
and becomes a smaller volume than it was in the patient's lungs. The volume you
want to measure is the larger volume in the patient's lungs, not the smaller volume
measured by the Flow Sensor.
To calculate the volume of air in the patient's lungs, the Flowmate III automatically
multiplies the volume measured by the Flow Sensor. The correction factor is based
on temperature present in the testing room.
NOTES
NOTE: Average Barometric pressure must be entered in
Customization Pg. 20.
AUTOMATIC INSPIRATORY BTPS CALCULATIONS: The air that the patient
inspires through the Flow Sensor is at ambient temperature (the temperature of the
immediate surroundings). As the patient inhales through the Flow Sensor, the air
heats up in the lungs. As the air heats up it expands and becomes a larger volume
than it was before. The volume you want to measure is the larger volume in the
patient's lungs, not the smaller volume measured by the Flow Sensor.
To calculate the volume of air in the patient's lungs, the Flowmate III automatically
multiplies the volume measured by the Flow Sensor and the BTPS correction
factor. The inspiratory BTPS correction factor for the Flowmate III is variable,
based on the average air temperature and average standard barometric pressure
you entered in the Customization Routine. (See pg. 20).
(64)
Spirometrics
Flowmate III
User's Manual - Rev. 02
BTPS Correction Factors
The Flowmate III automatically corrects to give you BTPS readings. This chart is
included for reference purposes only. You calculate the BTPS correction factor by
determining the ambient temperature and locating the corresponding BTPS
correction factor on this table.
AMBIENT
TEMPERATURE
(degrees)
CO
10
11
12
13
14
15
16
17
18
19
20
21
22
23
24
25
26
27
28
29
30
31
32
33
34
35
36
37
38
39
40
BTPS
EXPIRATORY
FACTOR
FO
50.0
51.8
53.6
55.4
57.2
59.0
60.8
62.6
64.4
66.2
68.0
69.8
71.6
73.4
75.2
77.0
78.8
80.6
82.4
84.2
86.0
87.8
89.6
91.4
93.2
95.0
96.8
98.6
100.4
102.2
104.0
1.153
1.148
1.143
1.138
1.133
1.128
1.123
1.118
1.114
1.111
1.102
1.096
1.091
1.085
1.080
1.075
1.068
1.063
1.057
1.051
1.045
1.039
1.032
1.026
1.020
1.014
1.007
1.000
0.994
0.987
0.980
(65)
Spirometrics
Flowmate III
User's Manual - Rev. 02
Feet / Inches / Centimeters Conversion Chart
FEET
INCHES
CENTIMETERS
FEET
INCHES
CENTIMETRES
3'0"
3'1"
3'2"
3'3"
3'4"
3'5"
3'6"
3'7"
3'8"
3'9"
3'10"
3'11"
4'0"
4'1"
4'2"
4'3"
4'4"
4'5"
4'6"
4'7"
4'8"
4'9"
4'10"
4'11"
5'0"
5'1"
5'2"
5'3"
36"
37"
38"
39"
40"
41"
42"
43"
44"
45"
46"
47"
48"
49"
50"
51"
52"
53"
54"
55"
56"
57"
58"
59"
60"
61"
62"
63"
92
94
97
99
102
105
107
110
112
115
117
120
122
125
127
130
132
135
138
140
143
145
148
150
153
155
158
160
5'4"
5'5"
5'6"
5'7"
5'8"
5'9"
5'10"
5'11"
6'0"
6'1"
6'2"
6'3"
6'4"
6'5"
6'6"
6'7"
6'8"
6'9"
6'10"
6'11"
7'0"
7'1"
7'2"
7'3"
7'4"
7'5"
7'6"
64"
65"
66"
67"
68"
69"
70"
71"
72"
73"
74"
75"
76"
77"
78"
79"
80"
81"
82"
83"
84"
85"
86"
87"
88"
89"
90"
163
165
168
171
173
176
178
181
183
186
188
191
193
196
198
201
204
206
209
211
214
216
219
221
224
226
229
--
(66)
--
--
Spirometrics
Flowmate III
User's Manual - Rev. 02
Pounds / Kilograms Conversion Chart
LBS KGS
50
51
52
53
54
55
56
57
58
59
60
61
62
63
64
65
66
67
68
69
70
71
72
73
74
75
76
77
78
79
80
81
82
83
84
85
86
87
88
89
90
91
92
93
94
95
96
97
98
99
23
23
24
24
25
25
25
26
26
27
27
28
28
29
29
30
30
30
31
31
32
32
33
33
34
34
35
35
35
36
36
37
37
38
38
39
39
40
40
40
41
41
42
42
43
43
44
44
45
45
LBS KGS
100
101
102
103
104
105
106
107
108
109
110
111
112
113
114
115
116
117
118
119
120
121
122
123
124
125
126
127
128
129
130
131
132
133
134
135
136
137
138
139
140
141
142
143
144
145
146
147
148
149
45
46
46
47
47
48
48
49
49
50
50
50
51
51
52
52
53
53
54
54
55
55
55
56
56
57
57
58
58
59
59
60
60
60
61
61
62
62
63
63
64
64
65
65
65
66
66
67
67
68
LBS KGS
150
151
152
153
154
155
156
157
158
159
160
161
162
163
164
165
166
167
168
169
170
171
172
173
174
175
176
177
178
179
180
181
182
183
184
185
186
187
188
189
190
191
192
193
194
195
196
197
198
199
(67)
68
69
69
70
70
70
71
71
72
72
73
73
74
74
75
75
75
76
76
77
77
78
78
79
79
80
80
80
81
81
82
82
83
83
84
84
85
85
85
86
86
87
87
88
88
89
89
90
90
90
LBS KGS
200
201
202
203
204
205
206
207
208
209
210
211
212
213
214
215
216
217
218
219
220
221
222
223
224
225
226
227
228
229
230
231
232
233
234
235
236
237
238
239
240
241
242
243
244
245
246
247
248
249
91
91
92
92
93
93
94
94
95
95
95
96
96
97
97
98
98
99
99
100
100
100
101
101
102
102
103
103
104
104
105
105
105
106
106
107
107
108
108
109
109
110
110
110
111
111
112
112
113
113
Spirometrics
Flowmate III
User's Manual - Rev. 02
Sample Test Reports
The following reports are samples of some of the test reports available with
the Flowmate III spirometer. Some patient data can be included or
excluded on these reports. (See Customization pg. 18).
(68)
Spirometrics
Flowmate III
(69)
User's Manual - Rev. 02
Spirometrics
Flowmate III
(70)
User's Manual - Rev. 02
Spirometrics
Flowmate III
(71)
User's Manual - Rev. 02
Spirometrics
Flowmate III
User's Manual - Rev. 02
SPECIFICATIONS
PHYSICAL
Height
Depth
Width
Weight
-
2.25 inches
5.50 inches
9.0 inches
2 Lbs
( 5.7 cm)
(14.0 cm)
(22.9 cm)
(0.9 kg)
POWER REQUIREMENTS
Battery & ACRequires 6 1.2 volt AA NiCad batteries
500 mhr; AC adapter is a UL 544 recognized 9 volts DC at 1
amp; Power consumption is 200 Milliamps in operation;
Battery recharge time is 15 hrs which provides 4.5 hrs of
continuous use under battery power.
Amperage200 Milliamps in use.
Electrical RequirementsMeets UL544 requirements, AC Adapter provided. Plugs into
any standard 120 VAC 60 Hz
ENVIRONMENTALTemperatureOperating range
500F-1040F
Max storage temperature 400F-1100F
100C-400C
50C-460C
USER INTERFACEDisplayKeypad-
2 line by 40 character LCD display
20 key membrane switch with audible feedback
PATIENT DATA- (Verification report is printed after entering all patient data.)
ID numberAgeSexRaceHeightWeight
TEST-
Maneuvers-
Up to 16 digits (incl. '/' and "." )
Up to 3 digits
Male, Female
Caucasian, Black, Other
Up to 3 digits, 36 to 89 inches; 90 to 250 centimeters
automatically determines units of measurement
Up to 3 digits (optional); Selectable as Lbs or Kgs
FVC maneuver
MVV maneuver
VC maneuver
Methacholine Challenge (Inhalation Challenge
Maneuver)
(72)
Spirometrics
Flowmate III
User's Manual - Rev. 02
INDICES CALCULATEDFVC ManeuverFVC
FEV1
FEV3
FEV1/FVC%
FEF 25-75
FEF 75-85
FEF 200-1200
PEF
FEF50
FIVC
FIF50
FEF50/FIF50%
PIF
COPD
Forced Vital Capacity
Forced Expiratory Vol-1 sec
* Forced Expiratory Vol-3 sec
FEV1 Ratio
Mid Expiratory Flow Rate
* Late Expiratory Flow Rate
* Forced Expiratory Flow Rate in between
200ml 1200ml
Peak Expiratory Flow Rate
* Forced Expiratory Flow Rate at 50% of
FVC
* Forced Inspiratory Vital Capacity
* Forced Inspiratory Flow at 50% of FIVC
* Ratio of FEF50 to FIF50
* Peak Inspiratory Flow
(Chronic Obstructive Pulmonary Disease)
Risk Assessment
* These indices appear only on expanded reports
FEV TimingFEV timings based on back extrapolation
MVV ManeuverMVV volume
MVV rate
Minute expired volume
Breaths per minute
VC ManeuverVC
ATI
Vital capacity
Air Trapping Index
Max VolumeMax Flow RateAccuracyResolutionSampling RateBack Pressure-
10 liters
+/- 16 liters/sec
+/- 3% of reading
1ml/Sec/LSB (12 Bit A/D)
150 HZ
Less than 1.5 cm H2O/L/S
BTPS CONVERSION-
(Calculated in real time)
User Input Temp-
50 to 104 F
10 to 40 C
Automatically determines units
User Input Pressure-
20-35 inches of mercury 500-900 millimeters of
mercury automatically determines units.
(73)
Spirometrics
VALIDITY DETERMINATION-
Flowmate III
User's Manual - Rev. 02
(Pertinent only for the FVC trials)
Best FVC-
Largest, regardless of trace
Best FEV1-
Largest, regardless of trace
Best Ratio-
Best FEV1/Best FVC
Best Flow Rates-
Taken from trace with greatest sum of FVC
and FEV1
Patient Effort-
Requires clinician to evaluate acceptable or
unacceptable patient effort. Discards
unacceptable trials upon answering NO to
“Was the Patient effort acceptable”.
Variability-
Compares indices of current test with best in
memory; displays and prints variability as %
deviation. Variability greater than 5% for FVC
and FEV1 is regarded as poor reproducibility;
prints message.
Expiratory Time-
If forced expiratory time is:
Less than 6 seconds a "TEST was short but
OK, Blow Longer" message will be displayed.
A less than 1 second TEST is not accepted
because it is too short.
Extrapolated Vol-
If extrapolated volume is greater than 5% of
FVC a "SLOW START" message will be
displayed.
CHOICE OF NORMALS-
Composite
Knudson (incl. pediatrics)
Crapo (ITS)
ECCS
HSU
MORRIS
LAM
Knudson76 is an available option – Call Inside
Sales to inquire
INTERPRETATIONS-
Obstruction, Restriction, or Abnormality
GRAPHIC OUTPUT-
ATS specification for Time Scale, Volume
Scale & Flow rate Scale
PRINTER-
External Printer with selectable drivers
(optional)
Reports-
Standard 81/2" X 11" paper printed reports;
Automatic printout after each trial
(selectable).
(74)
Spirometrics
Flowmate III
User's Manual - Rev. 02
INPUT/OUTPUT COMMUNICATION PORTS
RS232 I/O port is a custom modular jack
handshake (CTS/RTS or DTR/DSR); Port Use:
Sensor connection.
Serial-
Parallel-
Standard DB-25 Female IBM PC pin out.
Connects to printers using standard
centronics Parallel type interface.
Data Format-
Proprietary to Spirometrics
Number of Patients-
5 Patients; optional RAM CARD 118
Patients
FVCMVVVC-
6 trials each patient (3 Pre-, 3 Post)
2 trials each patient (1 Pre-, 1 Post)
6 trials each patient (3 Pre-, 3 Post)
Internal RAM-
Size 128k Bytes
Battery backup Internal RAM
Memory Card-
Accepts a 68 pin battery backup 512 Kilobytes
RAM CARD compatible with PCMCIA 2.0
connection.
TEST NUMBERING-
CALENDAR /CLOCK-
Numbers each patient's trials consecutively
regardless of type (for recall)
(Stamps time and date on test reports)
Time-
Selectable as 12 or 24 hr scale
Date-
American - MM/DD/YY
European - DD/MM/YY
INSTRUMENT CALIBRATION
Syringe-
Selectable 1-9 liters (ATPS); default is 3 liters
Routine-
Display leads user through routine; Calibration
reports printout automatically.
(75)
Spirometrics
Flowmate III
User's Manual - Rev. 02
ACCESSORIES + REORDER INFORMATION
The following is a list of accessories and model numbers for the Flowmate III
Spirometry System.
Description
Model #
Flowmate III Portable Spirometer
2500LTE
Patient Data Memory Card
Nose Clips
(Pkg. of 100)
Filter, Disposable - Single Patient Use
(Box of 100)
2122
2104
3-Liter Calibration Syringe
2125
Adapter Seal, Calibration Syringe
30-0015
Spirometer, EASY CLEAN Cartridge (Flowmate III)
18225
Printer Cable
Re-Chargeable NiCad Batteries
(Requires 6)
3355
15120
Spirometer, AC Adapter
18002
Flowmate III Operator's Manual
M2500III
Coiled Cord
15027
2195
Call your local distributor for more information on Flowmate III Accessories.
Printers available through Spirometrics
Please contact Inside Sales for complete computer / printer options.
207-657-6700
or
800-767-0004
Fax 207-657-4123
www.spirometrics.com
email [email protected]
(76)