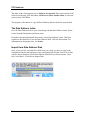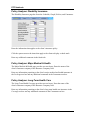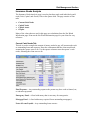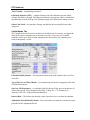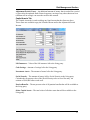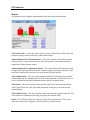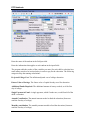
1
PFP Notebook™ Software and User Manual (Version 2005.00) Copyright © 1993-2005, Brentmark Software, Inc., All Rights Reserved. ISBN 1-888390-05-0 January 19, 2005 ® Brentmark Software, Inc. 3505 Lake Lynda Drive, Suite 212 Orlando, FL 32817-8327 Sales 1-800-879-6665 Technical Assistance (407) 306-6160 Fax (407) 306-6107 http://www.brentmark.com [email protected] [email protected] Table of Contents About the Author...............................................................................................v Preface............................................................................................. 1 A Guide to Financial Planning..........................................................................3 Opportunities and Challenges.......................................................................3 Why Enter the Field? ....................................................................................3 Your Role in Personal Financial Planning.....................................................4 Entering the Field..........................................................................................7 Marketing ......................................................................................................9 Creating the Financial Plan.........................................................................12 Chapter 1: Starting an Analysis .................................................. 19 The Data Gatherer & the Initial Forms Packet ............................................19 The Data Gatherer ......................................................................................19 The Data Gatherer Letter............................................................................22 Import from Data Gatherer Disk..................................................................22 Initial Forms Packet ....................................................................................23 Chapter 2: Helpful Features......................................................... 25 Other Features............................................................................................26 Action Checklist ..........................................................................................27 Chapter 3: Client Files.................................................................. 29 Select Client................................................................................................29 Find Button .................................................................................................29 Delete Client ...............................................................................................29 Copy Client .................................................................................................29 Transfer Clients Between Computers .........................................................30 Backup or Export Clients ............................................................................30 Restore or Import Clients ............................................................................30 Chapter 4: Client Section ............................................................. 33 Client Information........................................................................................33 Summary of Goals and Objectives .............................................................34 Key Factors.................................................................................................34 Progress Schedule......................................................................................35 Chapter 5: Financial Data Section .............................................. 37 General .......................................................................................................37 Net Worth Information.................................................................................38 i PFP Notebook Budget Information ..................................................................................... 38 Changing the Master Text .......................................................................... 39 Net Worth Projections................................................................................. 40 Fill from Mortgage....................................................................................... 40 Budget Projections ..................................................................................... 42 Mortgage Payment Computation................................................................ 44 Debt Structure ............................................................................................ 45 Chapter 6: Risk Management Section......................................... 47 General....................................................................................................... 47 Policy Analyzer: Life Insurance .................................................................. 47 Policy Analyzer: Disability Insurance.......................................................... 48 Policy Analyzer: Major Medical & Health .................................................... 48 Policy Analyzer: Long-Term Health Care ................................................... 48 Insurance Needs Analysis .......................................................................... 49 Life Insurance Questionnaire...................................................................... 53 Insurance Action Letters............................................................................. 53 Chapter 7: Investments Section .................................................. 55 General....................................................................................................... 55 Portfolio Allocation Worksheet.................................................................... 55 Investment Portfolio.................................................................................... 56 Investment Strategy Worksheet ................................................................. 56 Chapter 8: Retirement Planning Section .................................... 57 General....................................................................................................... 57 Retirement Income Requirements Worksheet............................................ 58 Retirement Planning Worksheet................................................................. 59 Amount Needed to Fund Retirement .......................................................... 62 Asset Life Schedule.................................................................................... 64 Yearly Retirement Funding......................................................................... 65 Chapter 9: Estate Planning Section ............................................ 75 General....................................................................................................... 75 Extract of Will and Trust Worksheet ........................................................... 75 Checklist: Estate Planning.......................................................................... 75 Checklist: Effectiveness of Estate Planning ............................................... 76 Forthcoming Asset Expectancies ............................................................... 76 Estate/Gift Tax Worksheet.......................................................................... 78 Checklist: Power of Attorney for Health Care ............................................. 81 Estate Distribution Flowchart...................................................................... 81 Chapter 10: Education Funding Section..................................... 83 General....................................................................................................... 83 ii Table of Contents College Cost Estimation: General...............................................................83 College Cost Estimation: Scholarships & Loans .........................................85 College Cost Estimation: Student Options ..................................................86 Funding Required: All Students ..................................................................86 College Cost Estimation: Saving Analysis ..................................................87 College Cost Estimation: Cost Breakdown .................................................87 College Cost Estimation: Report Options ...................................................87 Chapter 11: Income Tax Section ................................................. 89 General .......................................................................................................89 Income Tax Worksheet ...............................................................................89 Income Tax Checklist..................................................................................90 Income Tax Estimation ...............................................................................90 Chapter 12: The Final Report ...................................................... 93 Reports and Schedules...............................................................................93 Paragraphs .................................................................................................94 Letters.........................................................................................................94 Action Checklist ..........................................................................................94 Chapter 13: Letters and Master Text .......................................... 95 Letters.........................................................................................................95 Customize Master Text ...............................................................................97 Update Policy .............................................................................. 101 Technical Assistance ................................................................. 101 Index ............................................................................................ 103 License Agreement..................................................................... 105 iii PFP Notebook iv About the Author James H. Wilson, CPA/PFS, is the original author of PFP Notebook. He holds a BBA in Accounting from the University of Miami, an MBA in Management from Florida Atlantic University, and has earned the PFS (Personal Financial Specialist) designation, which is awarded by the American Institute of CPAs (AICPA). He has served as a faculty member at the Florida Trust School co-sponsored by the University of Florida and the Florida Bankers Association. He was also a faculty member of King College in Bristol, Tennessee, from August 1983 until May 1988. He has spoken at seminars sponsored by the American Institute of Banking, the AICPA, Estate Planning Councils, and other national organizations. Jim has served as chairman of the American Institute of CPAs’ Personal Financial Planning Conference Committee. He also served as a member of the Executive Committee of the Personal Financial Planning Division of the American Institute of CPAs. He is past chairman of the PFP Committee of the Tennessee Society of CPAs. The author of The CPA’s Guide to Financial Planning, published by Longman Financial Services Publishing, Inc., he has also published articles in numerous professional journals. On November 1, 1988, the PFP Division awarded Jim with the first annual Outstanding Service Award. The award is given to a CPA who has served the public interest by enhancing the quality of personal financial planning services and has provided outstanding service to the AICPA’s PFP Division. In July 1990, the LINC Society of CPA Financial Planners selected Jim as the “CPA Financial Planner of the Year.” In 1990 and 1991 he was designated as the outstanding presenter of AICPA CPE courses in Tennessee. Jim’s most recent projects include authoring a course for the AICPA entitled “Wealth Utilization and Transfer,” and developing a computer program to assist practitioners in providing Personal Financial Planning services to their clients. Many thanks to Bud Shore, who has donated countless hours to provide us with invaluable feedback about PFP Notebook. Bud has generously donated his time and energy to beta testing PFP over the last few years. v PFP Notebook vi Preface This section was put together by Jim Wilson; he wanted to share his philosophy on financial planning. He takes you step by step through the roles that you represent as a financial planner. He also shares some helpful hints for dealing with a client. He will take you through the information gathering phase and the interview process, and finally, preparing your client’s report. 1 PFP Notebook 2 A Guide to Financial Planning Personal financial planning engagement is defined, by the PFP Division of the AICPA, as one that involves developing strategies and making recommendations to assist a client in defining and achieving financial goals. Opportunities and Challenges In the course of designing a plan for your clients, you’ll seek to help them optimize the way they use their financial resources. One of the challenges of that process, however, is to take into account the uniqueness of each client, especially in his or her current stage of life. Clearly, the financial needs of a young businessperson who is just beginning a career are different from those of a middle-aged couple with college-aged children. Both will benefit from personal financial planning, but their plans will be quite different. The professional who combines sensitivity to clients’ personal and financial situations with his or her own professional expertise opens a door onto the ground floor of a new business for which he or she is uniquely qualified. In today’s marketplace, there are few professionals truly equipped to bring together all the information and skills needed to create a comprehensive financial plan that will enable clients to see their total financial picture. Why Enter the Field? Your clients want and need financial planning, and they are becoming familiar with the term from current media sources. Read such national publications as U.S. News and World Report, Money, The Wall Street Journal, Time, and Newsweek, and you’ll see articles and advertisements discussing the concept. Because financial planning is a relatively new profession, some of the people claiming to practice the concept may not be qualified. Therefore, professionals who are qualified should learn how to market and produce the service for their clients. The financial planning process allows you to build stronger ties with your clients, establishing a relationship that may last for years. John Naisbitt, in his book Megatrends, points out the need for a compensating personal relationship in this age of high technology. He labels this relationship as “high-tech/high-touch.” Essentially, he argues that the increasing sophistication of today’s technology is costing human relationships. So, people are anxious to find professionals who are willing to function as counselors and friends rather than as computers or machines. From your vantage point as a professional, financial planning is extremely interesting work. It can also be very profitable. Once you’ve served your current nucleus of clients, their word-of-mouth praise will open doors to new clients and new opportunities. The Market Some experts cite the upper middleincome or middle-income class— around $50,000 or more in annual income, as the client who would benefit 3 PFP Notebook from a personal financial plan. However, just about everyone can become a candidate for this type of service. While some clients may not require the full gamut of a professionally prepared plan, they can probably benefit from at least some selected portions of financial planning. You can tailor your fees and services in this area to meet almost any situation. If you are already in practice, your own list of clients offers a built-in, ready market for personal financial planning. Many professionals fail to recognize that their existing clients’ files provide a virtually untapped gold mine of opportunity for expanding financial planning services. If you don’t have an established client roster, or you wish to extend that roster, the marketing techniques discussed later will help you promote these services outside your current client base. Your Role in Personal Financial Planning A good personal financial planner functions as a coordinator and catalyst to assist the clients in developing their financial plans. You’ll need to become adept in a number of other roles as well. Coordinator In this function, you must be responsible for bringing together all the information necessary to begin the planning process. You’ll also need to work through and synthesize this information into a comprehensive report. Through your role as a coordinator, you’ll need to respond as a generalist, 4 not as a specialist. Few, if any, programs can be all things to all people. As a financial planner, you need to understand the basic concepts that are involved in producing a financial planning report for your client. You’ll need to work with your client in extracting the information needed for that report. You’ll work with other professionals in analyzing the information and in formulating strategies for the plan. Catalyst As a catalyst, you’ll need to motivate your client to think in terms of the future. You’ll also find yourself acting as “the resident nag” to assure that the plan that has been adopted by the client is implemented. As you’ll discover in using this computer program, you and your client will be able to get a firm grip on what has to be done, using a simple reporting format. That same format allows you to follow up with the client periodically to see if the plan is being executed or whether changes in fiscal conditions mean the plan needs to be altered. Communicator Because of the intensely personal aspect of financial planning, anyone in this field must be able to communicate to clients the concepts that are involved. Be able to gather the information that is needed to work through a plan, and generate the finished product—the actual planning report—which should be concise and easy to understand. Preface Educator Many of the underlying concepts involved in financial planning are going to be new and strange even to sophisticated executives. So, the planner must assume the role of a teacher. Your clients don’t have to understand all of the finer points of income tax planning or estate planning or investment strategies, but they do need to receive from you a basic understanding of what you are proposing and why they should be doing what you are advising. Psychologist Since you must go beyond their financial data and extract information regarding certain personal preferences, such as attitudes and family relationships, you’ll also need to be a fairly decent “amateur shrink.” That is, you’ll need to be sensitive to the needs and the situations that may evolve as a result of discussing a client’s goals and objectives. Strategist Setting forth a cogent, comprehensive financial plan resembles the game strategy of a football coach or the battle plan of a general. This plan has to be laid out in a comprehensive, logical, and intelligent fashion. So, you must be a good strategist. Technician A successful practitioner of financial planning does not have to be the world’s greatest technician. However, a basically sound understanding of the major facets of financial planning services is a must. Help should be sought in those areas where you may be somewhat weak. A reasonable amount of apprenticeship with a more experienced financial planner will equip you with an excellent base for further professional growth. As you practice financial planning, you’ll find that these various roles must be acted out simultaneously. For example, a husband and wife once entered the initial financial planning interview displaying a good deal of tension between them. The experienced planner noticed the tension and began with a line of probing questions. The particular couple had been married for more than 30 years. However, they had a tremendous communication problem, even down to the highly personal aspect of each spouse’s will. Neither knew what was contained in the other’s will. As a result of the questions asked by the financial planner, they learned for the first time what each desired concerning the disposition of their property upon death. During the questioning, the planner also learned that the husband took early retirement. He had done nothing for two years subsequent to that, and was driving his wife crazy by being around the house and under foot. These elements, while truly personal, had to be rectified as part of the personal financial planning process. The job of ferreting out these details was part of the financial planner’s role in helping the couple reach their goals and objectives. In preparing a comprehensive financial plan, you’ll also explore with your 5 PFP Notebook client the effects of death, disability, and retirement on the family. Together, you’ll need to review the estate tax picture so that you can develop a comprehensive estate plan. Another element of the financial plan to review with your client is an investment strategy that encompasses a review of discretionary income—budgeting advice, if necessary, and a model investment portfolio recommendation that fits the needs and investment preferences of your client. Success in personal financial planning services depends on the overriding consideration that the client’s goals and objectives be met. Each client faces a unique set of problems, investment preferences, personal values, and family circumstances. The personal financial plans that you develop for your clients should be understandable and serve as a road map for their future financial actions. However, the plan should not be a ponderous tome loaded with meaningless boilerplate solutions that resemble a department store catalog. For example, what steps should be taken now to help meet future education or retirement needs? Should a client’s net worth rise, how can taxes be kept low? The need for people who can answer such questions in the context of a comprehensive, personalized financial plan is growing daily. People qualified to perform this service, however, are in short supply. PFP Notebook presents the confidence-building tools that will enable you to jump into the burgeoning 6 financial planning market and meet the needs of your clients effectively and well. It will also take you step-by-step through proven processes that have enabled many firms to enter the personal financial planning area in a cost-effective, profitable way. Actual worksheets are included that will enable you to gather client information and turn it into a comprehensive picture of your client’s total financial plan. By following the detailed instructions, you’ll be able to take this information and prepare an income and cash-flow statement, a balance sheet that measures growth, liquidity, and progress toward meeting the client’s financial goals, and an analysis of the adequacy of the client’s current insurance situation. Using the forms and suggestions in this program, you’ll perform tax calculations and evaluate wills for their tax implications. The implementation schedule you create will list detailed recommendations for client action that will best move him or her towards the accomplishment of the personal financial goals. Even the finest skills in financial planning however, don’t automatically provide the practitioner with a healthy business. To take care of that side of the coin, we offer guides to steps that have enabled many professionals to successfully enter the financial planning business. You’ll discover how to gear up your firm to bring in and handle the expanded activity. Extensive marketing tips will show you how to attract and hold the kind of clients who benefit most—and reward you the best—as a result of sound financial planning advice. Preface The fact of rapid change in the financial service world has caused some professionals to dig in their heels and spend all their energy trying to keep things the same as they always were. To others, the changes are simply signs of growth and an opportunity to take on new challenges and find a secure place in an evolving situation. With this handbook, software program, your own skills, and your experience as the raw material, you have every reason to look forward to the creation of a new business, full of personal satisfaction and financial promise. Entering the Field Once you’ve decided to enter the financial planning industry, your commitment will help organize the efforts of your staff. In addition, specific tools can be used to guide your firm in preparing profitable financial plans. One of the problems confronting many financial planners is combining a quality product—a good report—with a fair profit for the professional. Before approaching a personal financial planning assignment, you must develop the proper philosophy. Second only to that philosophy is a highly systematic approach to financial planning. If you lack either of these, you will encounter many problems when attempting to offer financial planning reports to your clients. Philosophy of Planning As you begin offering financial planning services, you will find that in the vast majority of cases, the client with whom you are working has one or more areas in his or her personal financial life that have been completely overlooked, unattended to, or sadly mistreated. You can look at these as drawbacks, of course. However, if clients could do financial planning effectively, they wouldn’t benefit from your services. Where financial planning is weak, you have an opportunity to perform a very worthwhile service by whipping these financial problems into shape. Also, by correcting these elements first, you won’t have to spend a large amount of time and effort in devising esoteric plans that the client is not going to feel comfortable with and that may take him or her too far too fast. As a financial planner, you are attempting to give your clients quality service at a reasonable price and within a reasonable time frame. In order to accomplish this, you will need to adopt an engagement philosophy in which you seek a good solution that fits the needs of your particular client, fully understanding that the plan you propose may not be the optimum solution. There are two questions that you must ask yourself when working in personal financial planning: 1. Is the time spent in developing what may or may not be an optimum plan that much better for your client, when viewed in terms of cost and a realistic time frame? 7 PFP Notebook 2. Is it fair to you, as a financial planner, to spend an inordinate amount of time seeking the optimum solution, only to face the strong likelihood that the fees for that solution will not cover the excessive time you invested? Many practitioners become disenchanted with the work because they have a difficult time producing a financial planning report in a reasonable time for a reasonable fee. To be successful, you must adopt a philosophy of seeking the “good” solution, not necessarily the “best” solution, which will greatly benefit your clients and enable you to perform the service while realizing a fair profit from the engagement. Once you’ve settled on the proper philosophy for performing financial planning, then you will need to develop a systematic approach for handling engagements. These forms and worksheets are important to provide orderly and comprehensive accumulation, organization, and analysis of data. They provide a road map for conducting the initial interview with the client. It’s very important that you be in control of the interview as various facets of the client’s situation are gathered. By using the fact-gathering forms and the engagement worksheets as an outline, you can structure your interview with the client. This saves a considerable amount of time in the initial interview. Compensation Once you’ve established a proper system, as long as you use the financial planning forms correctly, you will soon find that you can employ trained assistants in both the assembling of the data and the preparation of the first draft of the report. By carefully and slowly grooming an assistant, you’ll find you can reduce your professional involvement in the engagement and also provide a good backup in the event that you are unable to finish the final report. Using others also enables the end product to be produced at a more reasonable cost, thus keeping you competitive in the marketplace without sacrificing good realization rates. PFP Notebook enables you to produce the final report in a very cost-effective manner. Some financial planners base their fees on the net worth of the clients. Others try to tie the fee in with commissions earned in the sale of products. Still others work on a time basis, trying to realize at least $100 per hour for their services and $50 per hour for their assistants. Using the last approach, the client is given an engagement letter stating that the work will be performed at standard rates. Once you’ve done a number of personal financial plans, you’ll be able to set an estimated fee. After beginning the assignment, if you find at any point that your estimate is going to be off by more than 10 percent, don’t proceed with the engagement until you discuss this matter with your client. With this program, you should be able to realize a minimum of $75 per hour for each hour spent on the engagement. 8 Preface In some instances, the realization rate approaches or exceeds $100 per hour, depending on the actual circumstances of each individual engagement and based on billing rates of $100 per hour for the financial planner and $50 per hour for an assistant. Average case fees are in the range of $1200 to $1500 for a “diagnostic” financial plan. Please note that these amounts will fluctuate based upon local conditions regarding fees. While some people will require more extensive work, and the fee may rise substantially, many individuals do not need the full financial planning service. These clients can be served adequately with a short letter report that focuses on one or more particular areas of their financial picture. For them, the fees are considerably less, usually ranging in the area of $500 to $1,000. The key to successful fee setting is to make sure that you can provide a quality service at a reasonable price and still realize a fair profit. Such services, which are mutually beneficial to the client and to your firm, have tremendous appeal. However, this can happen only if you have everything under control, use the proper systematic worksheet approach coupled with the philosophy of achieving a “good” solution, not the “optimum” solution, and an efficient, user-friendly computer program. Marketing Finding the effective marketing method for your financial planning services requires careful selection of your target market. Segment your market consciously, choosing which end you wish to serve. Review your marketing mix and make sure you blend what marketing people call the four Ps of their trade: • • • • Product Place Price Promotion Each of these should be designed to suit your target market. As a professional, you may be somewhat thrown by the realization that you’re now in the marketing arena. How you handle yourself in that arena will determine your future, not merely your profitability but also your continued existence. Competition in financial planning is keen. It is an aggressive marketing environment in which market-oriented firms will prosper. Marketing concepts can be implemented with good taste and make good business sense. A marketing strategy can be consistent with the aggressive environment and still be true to your own sense of propriety. Target Market Deciding which end of the market to pursue depends on both your personal temperament and your professional background. Different clients demand different types of technical expertise. In addition, the target market you select determines how you interact with clients, so make sure that your client choice suits your own preferences. Recent studies show that financial planning firms that specialize in the upper or lower end of the market appear to do better than those firms that 9 PFP Notebook attempt to handle the whole spectrum. Naturally, if you offer personal financial planning services to the lower end of the market, you cannot afford to spend much time in personal client contact. Opinions vary widely as to what figures define ideal candidates for personal financial planning. However, we are addressing primarily the client who has a minimum family income of approximately $50,000 and a minimum net worth of $250,000 to $300,000. Clients who fit this profile usually allow you to justify a fee of between $1,200 and $1,500 because you should be able to show immediate tax savings coupled with financial strategies that more than justify the expenditure for the fee. The present profile of your practice, of course, largely dictates the market you plan to serve. If your clients are not affluent, or if you practice in an area that does not have a large number of wealthy people, the decision has been made for you. However, you can still serve the lower end of the market well. Using the principles propounded, you’ll still be able to make financial planning services a good profit center. Marketing Philosophy Marketing meets needs. It has a distinct orientation, and it works to achieve client satisfaction through the efforts of your entire organization. As a professional, you consider the needs of your clients to be paramount and realize that financial planning is a unique process for each client. You know that you must be sensitive to what your client needs, not what you may 10 think the client needs. In financial planning particularly, that old cliché “the customer is king” should be your abiding rule and should permeate your attitude and actions. In order to achieve successful client orientation, your main focus must be toward the client rather than toward the internal activities of your firm. Implementing personal financial planning services requires an integrated company effort that begins with top management and must filter down to the lowest level of responsibility in the firm. A company that applies an integrated effort to achieve the marketing concept will have complete cooperation within and among all departments of the firm. This is contrary to the way most firms function, as often members of each department erect fences around their perceived domains and jealously guard client relationships and their own responsibilities. In firms where the marketing concept is fully accepted, the fences frequently come down. While the individual departments are still present, the total system’s effort is guided by what customers want and what the firm can deliver, rather than by what the various departments would like to do. Finally, since the ultimate goal of any profit-making enterprise is to survive, there must be a strong profit motivation. You must properly price services, bill promptly for services, and collect the fees. If you succeed in achieving client satisfaction, profit is much easier to attain. Preface Implementation of the marketing concept may require three related changes within your firm: • • • A change in the firm’s organizational structure. A change in management methods and procedures. A change in management attitudes towards meeting clients’ needs. Changes in all three areas are probably required, if your firm really wants to adopt the marketing concept necessary for offering financial planning services. Cornering Your Share of the Market A recent article in a major news magazine noted that one-third of the largest corporations now offer financial counseling as a fringe benefit for executives. With today’s unsettled fiscal climate, this percentage should grow rapidly in the future. Fees for financial counseling are usually substantial. Some brokerage houses offer this service for a minimum fee of $2,500 that may range up to a maximum of $5,000, depending on the details required. You can provide this service at a more reasonable cost if you have an organized, efficient program to work with. In fact, your approach can put financial counseling services within the reach of more people and thus enhance your marketing success. Direct Selling How do you communicate to the target market that you have the expertise and tools needed for good financial counseling? The obvious answer is to begin with your personal contacts. As a professional, you have a built-in clientele that can be approached as a proper target market for your financial planning services. Brochures An excellent tool for conveying your message to clients is an attractive and informative brochure. Marketers in other professions know that there are four criteria for a good brochure design. An effective brochure must accomplish four fundamental promotional tasks: 1. 2. 3. 4. Get attention Hold interest Arouse desire Obtain action To remember these essential elements, keep in mind the acronym, AIDA (Attention, Interest, Desire, Action), which is also the name of a well-known Verdi opera. Incorporate these four elements, and chances are you’ll have an effective brochure for marketing financial planning. Brochures can be purchased from various organizations so that you don’t have to re-invent the wheel. A brochure should also be straightforward and clean. For example, a three-panel brochure can be folded to fit easily inside an envelope or a coat pocket. You can hand your brochures to clients, place copies prominently on your desk and in your reception area, and insert them into seminar packets. For accountants, the individual taxfiling season is a good time to give current clients a copy of your financial planning brochure. You can include the brochure with their completed 1040 11 PFP Notebook forms. Sometimes a personal note written on the brochure suggesting a consultation after April 15 is effective. Seminars You can also promote your financial planning services through the use of seminars. Indeed, a seminar is one of the best and least expensive means of communicating with a selected segment of your clients. The audience selected to attend the seminar should be homogeneous. For instance, you won’t want to mix retired people with those who are still working, if you can help it. It’s also generally wise to segregate professionals from corporate executives. The Engagement Letter Once the engagement has been secured, an engagement letter should cover it. This letter should spell out the terms of the engagement, clearly disclosing your role as coordinator and catalyst in the financial planning process and also disclosing the approximate amount of the fee or the manner in which the fee is determined. The sample engagement letters provided in this program illustrate the format to be followed. You have the option of customizing any of the letters and text material to suit your own situation. Client Caveat: Don’t Expect Miracles You should be careful to impress upon your client that financial planning cannot accomplish miracles. Your clients won’t become instant millionaires. Stress that your role as a 12 coordinator and a catalyst to this process is to help your clients see in a concise form an outline of their personal profiles and a presentation of their financial situations. Help them pinpoint their objectives and offer concrete suggestions for improving their present fiscal situation. After a report is completed and delivered to the client, point out the positive benefits flowing to your clients as a result of the financial planning process. This is a very important and necessary step in reinforcing the value of the service to your clients. Emphasize the value of having a written document in the form of your report, which sets forth all of the important data surrounding the client’s financial life and the quantity of benefits received. Throughout the marketing process, remember to keep your enthusiasm high. After you’ve shown your clients the need for financial planning, you can close the sale with your brochure and engagement letters. Creating the Financial Plan Designing a good, comprehensive financial plan requires a coordinated effort between your firm and your client. On your part, you’ll need to understand your client’s personal situation and goals, including the client’s season of life. Much of this understanding is based on a careful analysis of where your client is at the time of the first contact, and where he or she wants to be at various points in the future. Once you’ve obtained a financial planning engagement, approach the Preface project in a planned, organized, and efficient manner. Otherwise, you’ll have an inordinate amount of nonbillable time. You’ll want to monitor your time very closely, as it has a way of increasing rapidly. mark it “Discussion subject to change.” The forms used in this program guide you through the information gathering process. The plan creation process may be summarized with a checklist like the one below. Final report presented to client by financial planner, along with a letter of transmittal and an implementation schedule. The report should also be forwarded to any other professionals needing it for their specialized work areas. The procurement of a signed engagement letter. General information forms, the list of documents required, the goal and objective sheet, and disclosure statement supplied to client. Date set for the initial client interview at which time the client returns with the completed general information form and other requested documents. Client interview with client and spouse conducted. (Attempt to obtain all of the basic information needed to produce a draft copy of the financial planning report). Information turned over to an assistant who works through the forms and makes sure enough information has been obtained to prepare a draft copy of the report. The program may cut your preparation time by as much as 50%. First draft of the financial planning report reviewed and edited by you. Prepare report for the client and Client and financial planner meet to make any further changes in the plan and to discuss implementation. Client follow-up (instructions in the program). To keep specific report progress under control, we’ve provided a schedule to keep track of all engagements in process. It tells you instantly what has been promised for the report and what still needs to be done to meet that deadline. Even if you have staff members working on different aspects of the report, this keeps everyone’s efforts coordinated and helps you make sure nothing has fallen between the cracks. Doing personal financial planning, however, is about more than simply filling in forms and making general recommendations. To produce a superior product, you have to work from a perspective that helps you respond to each client’s personal situation. Using Forms Forms are tools for generating a plan without wasting precious time. When properly used, forms can guide you and your clients. You can adapt these forms to fit the needs of your target clients. 13 PFP Notebook Remember that the forms and worksheets simply help you gather, organize, and analyze the pertinent financial data. Use the forms in client interviews. However, the only forms that you should actually give to your client are: • • • • • • List of documents required. Personal profile forms. Goals and objectives form. Budget form. Net worth statement. Pass forms. Suggest that the client very quickly complete these preliminary forms, gather the documents requested, and participate in the initial financial planning interview with you. During the client interview, obtain the balance of data needed and clarify the information presented. Initial Client Interview If the client is married, it’s wise to request that the initial interview include both the client and spouse. At that time, review the general information sheet, ask questions to gather additional information, and then review the documents. Usually, your client presents information regarding assets and liabilities on the forms provided. Of course, you’ll want to ask them how they arrived at the fair market value of various assets. Provided you are satisfied that these assets are not grossly overestimated or underestimated, you don’t have to be concerned with exactitude in this area. A financial planning engagement is merely an attempt to chart a financial road map for the client. As such, it 14 doesn’t require a highly detailed, definitive statement of assets and liabilities. During the initial client interview, you’ll also want to question your clients so that you can better understand their needs, goals, and objectives. As a financial planner, you’ll find this information just as important as the objective financial data on the forms. For example, perhaps your client notes, during the interview, a desire to take early retirement in a few years. So you suggest saving more now. Then your client explains that current savings are earmarked for the purchase of a Mercedes. That’s also important information and gives you an opportunity to explain some concepts about priorities. In such a situation, you would need to explain the time value of money in a pension fund, as compared to spending it now. Using either a calculator or a computer, you can back up your explanation with a specific comparison of your client’s options. However, you can’t rely too heavily on “what if” computations, either. Telling your client that it’s better to invest than to spend can be both a truism and unrealistic. For example, the compounding effect of money suggests that retirement plans do much better when they are funded early in life. But you’ll have a hard time getting anyone under 30 to invest in one, with the exception of companysponsored plans. It should be noted that a younger person’s priorities might be in saving for a house rather than a retirement. This is an acceptable priority and should not be discouraged. Preface Remember—it’s the client’s plan—not yours. During this interview, you’ll also want to begin asking questions about the family’s goals and objectives. Do they want to pay for a private college education for their children, or do they anticipate their offspring will attend a state school and work to help defray some of the costs? Do they feel a need to pay cash for their retirement home, or would they be just as secure holding a mortgage? Answers to these and other questions will help you formulate a comprehensive personal financial plan for them. Review the information pertaining to their assets and liabilities, as well as other information, and make appropriate notes on your fact-gathering sheets. When the information gathering process and worksheets have been completed, you’ll be able to enter the information into the computer as the first step in report preparation. Keeping on Track You’ll want to keep the initial interview as informal and casual as possible. As you make entries on the various forms, try to do it in an unobtrusive fashion, so that your clients aren’t made to feel ill at ease. When you keep your clients relaxed, you’ll elicit a good exchange of information and ideas. Sometimes, however, you’ll find the client digressing and offering you extraneous information, which is either not needed or premature. You’ll want to be careful to keep the conversation on track in the interests of your own time management. However, remember that the most important form to be filled out during this engagement is the one that lists goals and objectives. The entire engagement must be based on what the client wants, not on what the planner feels is best for the client. Make suggestions and inform the client as to the various alternatives available, but be careful not to impose preconceived ideas on your client. As you complete your fact-gathering assignment, you’ll develop impressions of your clients as individuals. Because of the intensely personal nature of financial planning, you need to understand who your clients are and what their aspirations are. In order to develop a good rapport with them, the initial client interview should consume no more than two hours and frequently can be done in less time. After the Initial Interview Once the fact-gathering forms have been completed, begin inputting worksheets into the system. The design of the report format is based upon years of experience in dealing with PFP clients. This format assists greatly in client understanding and in final implementation. The initial financial planning report that you send to the client should be labeled “Discussion draft subject to change.” It’s important to use this technique, because if there’s a misunderstanding between you and your client, the use of a discussion draft gives you a way to make corrections gracefully without having your client lose confidence in your abilities. 15 PFP Notebook The Second Interview After the client has an opportunity to review the discussion draft, you’re ready for the second interview. The main function of this interview is to correct any errors in understanding and to clarify those areas where your client may be confused by certain concepts supplied in the report. If there are any questions on the elements of the report, you can answer them in depth. Ninetynine percent of the time the second interview is more of an educational session because the report is usually substantially correct and often can be finalized with few corrections. Remember that simplicity and clarity should be the theme of the client’s report. The personal financial report that you prepare should not engage in long dissertations that attempt to educate the client on all the intricacies of tax planning, estate planning, and various investment strategies. Typically, this interview can run anywhere from thirty minutes to one hour, depending on the client’s questions and the need for clarification. Preparing the Report When presenting the finished report to the client, you can reinforce the report’s value in your letter of transmittal. A sample letter of transmittal is available in the program as a guide when preparing your own. Your letter of transmittal should stress that the report assembles in one place all of the key information regarding the client’s finances, personal data, and goals. You also want to note that the report presents a realistic picture of the client’s current situation and is a game 16 plan for the client to follow to achieve his or her goals. You’ll want to emphasize special areas in which implementation of the plan will result in tax savings, increased cash flow, or potential net worth gain. By quantifying the benefits of the plan, you reinforce client satisfaction and facilitate collection of the fee. Generally, it’s wise to advise the client to give a copy of the report to his or her personal attorney or investment advisor before implementing the plan. This saves considerable time for the other financial professionals involved in acting on the plan. It also introduces your firm as a financial planner to those other professionals, who may in turn refer other clients to you. Don’t procrastinate in providing the report in a timely manner. You can use the progress schedule form to make sure that you stay on target. Assuming that your client is cooperative, the time period from the initial interview to the presentation of the draft report should be approximately thirty days. Once the client signs an engagement letter, he or she is usually quite anxious to get the results. By using a systematic approach, you can move the financial planning process through your office expeditiously, thus resulting in good cash flow for you and good service to your client. Follow Up The system has built in follow-up procedures. The schedule produced will notify you when the follow-up letter and action checklist is to be mailed. The letter, check list and evaluation form (if you choose to use it) can be produced Preface instantly without spending time searching files or dictating letters. The program also provides annual or biennial (every two years) letters to stimulate the client to take action for updates of the original plan. 17 PFP Notebook 18 Chapter 1: Starting an Analysis The Data Gatherer & the Initial Forms Packet PFP Notebook provides two ways of collecting client information, as described briefly in the Quick Start Guide. You may use the Data Gatherer or the Initial Forms Packet. The Data Gatherer provides a way to electronically import the client information into the program. The Initial Forms Packet requires manual entry on the planner’s part. Make sure to set yourself up as a planner first, as described in the Quick Start Guide. The Data Gatherer The Data Gatherer Disk is an easy-to-use computer interview that your client fills out. It is a good idea to familiarize yourself with the Data Gatherer to see the type of questions that are included. Learning how it works will help to answer any questions that your client may have about the information gathering process. When the clients reach the end of the interview, the program prompts them to return the disk to you or to send the file back via e-mail. Click OK. At this time, the client proceeds to save the work by selecting Save or Save As from the File pull-down menu. Then import the information from the disk into the client’s file in PFP Notebook. This method saves you and your clients both time and money by allowing you to import their information from the disk directly into the program. 19 PFP Notebook The Data Gatherer is accessed by selecting Data Gatherer from the File pull-down menu or by opening the file from a Data Gatherer disk. Create the Financial Planning Data Gatherer Disk Select Data Gatherer from the File pull-down menu. Click on #2, Create Data Gatherer disk. Click Next to continue. 20 Starting an Analysis The default is to create a Data Gatherer for e-mail. You can make the e-mail into a zip file that can be sent more quickly. You can also create a Data Gatherer disk. Select the first option if you are using Drive A or the second option if you are using another drive for your floppy disk. Check the disk before giving it to your client to make sure that the FINDATA.exe file is on the disk. This is the file your client should access. Enter your company information. If you have already entered the information in the Company Information window (Edit, Company Information), then click the Import from Company Information button. The program automatically enters the information. Once the information is entered or imported, click Next. If you do not have a file for the client already, leave this window blank and click Next. Create a Data Gatherer file from a PFP Notebook client if you already have some information on this client. When you click on Yes, create a Data Gatherer file from a PFP Notebook client, the program will import any information you already have on this client into the corresponding data input fields of the Data Gatherer Disk. 21 PFP Notebook The name of the client appears next to Client to be exported. If the correct name of the client is not showing, click the button, Click here to select another client, to select the correct client. Click Next. The program will continue to copy the Data Gatherer and the client files onto the disk. The Data Gatherer Letter Give the Data Gatherer Disk to your client along with the Data Gatherer Letter. Select Letters from the Documents pull-down menu. From the Letter description pull-down arrow, select Data Gatherer Letter. This letter explains to the client how to use the Data Gatherer Disk. Click the Print button. For information on editing the letter, see Letters. Import from Data Gatherer Disk Once you receive the e-mailed file or disk from your client, you have to retrieve the information from the disk and place it into a designated file for that client. This is done with the Import function. Select Data Gatherer from the File pull-down menu. From here, select step 4: Click Here to Import Data. 22 Starting an Analysis Create New Client from Data? This feature is used for new clients only. Click Create new client from data? and the new client window appears. Enter a Client ID, your Client’s Name, identify the planner for the client, and answer yes to the question, “Import Data from Financial Planning Data Gatherer?” in step 4. Click OK. In the following window select your client’s file name from the A Drive. The program will proceed to import the client’s information. Overwrite existing client’s data? This feature allows you to update information for existing clients only. The program alerts you that selecting this feature overwrites any current client information. Be sure all files are complete before overwriting. Initial Forms Packet The Initial Forms Packet is the “traditional” way of collecting information. You print the packet for your clients to fill out. Once you receive the forms, you manually enter the information into their files in PFP Notebook. Generate the Initial Forms Packet Select Initial Forms Packet from the Documents pull-down menu to display the Initial Forms Packet window. Click either the Married Packet or Single Packet button. If you click the Married button, two copies of some of the documents are printed. If you click the Single button, only one copy of the documents is printed. 23 PFP Notebook Click the Forms Transmittal Letter button to print the letter that accompanies the Initial Forms Packet. This letter instructs your clients to fill out and return the packet. This letter contains variables that allow you to customize the letter for a specific client (see Letters). Click the Close button to return to the Client Section window. Entering client data when the Initial Forms Packet was used Enter the client into PFP Notebook using this procedure if you gave your client the Initial Forms Packet to fill out. 1. 2. 3. 4. 5. From the File menu, select Clients. Click the New button. Enter the client’s ID number. Enter the client’s name. Select your name from the list of planners. If your name does not appear in the list of planners, exit this window and set yourself up as a planner. 6. At Import from Data Gatherer, select No. PFP Notebook will open to the general tab of the Client Section. Begin entering the client’s information from the Initial Forms Packet. The program assumes you want to begin entering information starting from the first page of the first section of the program. You may skip to other sections of the program by clicking on the tabs at the bottom of the window or by using the navigation buttons located at the top-right of the window. Since every client is unique, keep in mind that you may not use all of the modules (notebook sections) for each client plan. 24 Chapter 2: Helpful Features PFP Notebook™ provides some tools that help calculate or keep notes throughout the process of creating the best plan for your client. The extra features are located in the Tools pull-down menu. Sample Client PFP ships with one sample client, so you can see an analysis for a couple, Jonathan and Sarah Edwards. Do not overwrite the sample client. Standard Calculator From the Tools pull-down menu, choose Calculator and select Standard. Notice the standard calculator is the same calculator used in Windows. Use the number keys placed on the top row of your keyboard or use the number keypad. If you need further assistance with the calculator, use the online help, which is available from the Help pull-down menu. Financial Calculator From the Tools pull-down menu, choose Calculator and select Financial. The financial calculator allows you to calculate a variety of financial scenarios. Use the Copy to Clipboard button to paste the result of the calculation into a document or spreadsheet. Types of Calculations If you are not sure when to use this calculator, the following examples of each type of calculation should clear up any questions. Present Value of Future Amount – If your clients will have $100,000 when they retire, what is the amount worth today. Present Value of Annuity – If your client has a series of fixed payments coming his way (Social Security), what is the present value of them. Future Value of Present Amount – If your client has $100,000, what will it be worth when he retires. 25 PFP Notebook Future Value of Annuity – If your client receives $100,000 every year, how much will the amount be worth in ten years. Payment Amount for Present Value – If your client has $100,000, how much can he take out in an allotted period of time before he runs out of it. Payment Amount for Future Value – If your client wants to save $100,000 by the time he retires, how much will he have to save to reach that goal. Other Features The following features do not have to be done immediately after installing the program, but they should be done at some point in order to create the most complete and customized plan for your client. Insurance Company Listing Enter information about your client’s insurance company(ies). The program allows you to keep a list of insurance companies so that you may send query letters for your client if needed. On the Edit menu, select Insurance Company Listing. 1. 2. 3. 4. 5. 6. 7. Click New. In the New Insurance Company window, enter an Insurance Company ID (up to five characters). Enter the name of the Insurance Company. Click OK to save the information and return to the Insurance Companies window. The program automatically enters the Company ID and Company Name in the Insurance Companies window. In step 2 in the Insurance Company window, enter the address, city, state, ZIP, and country. In step 3, enter the telephone and fax numbers. Also, enter the contact person and the salutation (e.g., Dear Sir) you would prefer to use in future letters to this company. Use the Planner Notes to enter any comments or reminders to yourself. These notes will not print or appear anywhere else in the program. Viewing or Deleting Insurance Company Listings 1. On the Edit menu, select Insurance Company Listing. 2. On the Insurance Companies window, select from the list of insurance companies. Click the Edit button. 3. Enter any changes in the desired input fields. Note: Insurance Companies IDs may not be edited. To change an insurance company’s ID, follow the procedure for creating a new insurance company listing and provide a new ID. Then, delete the insurance company with the old ID. 26 Helpful Features Action Checklist Create a plan of action for each client by using the Action Checklist. Entering a New Action on the List 1. From the Documents menu, select Action Checklist. 2. Click New. Select the action you want to add from the list or enter a new action in the space provided. 3. Select the check box in the Include column if you want to include the event in the Action Checklist report. Changing the Order of Actions on the List 1. Select the Action you want to move. 2. Click Up or Down to change the order of the Actions. Deleting an Action from the List 1. Select the Action you want to delete. 2. Click Delete. 3. Click Yes to confirm the deletion. 27 PFP Notebook 28 Chapter 3: Client Files PFP Notebook has several different ways of handling client files. You can delete, copy, backup, or transfer a file. Select Client You can select a client to work with from the database. 1. 2. 3. 4. On the File menu, choose Clients. Click the planner that is associated with the client you wish to work with. A list will appear of all the clients associated with the selected planner. Click the + button to see the entire list of clients. Choose the name of the client you want to work with. Click OK. This action opens the client you selected. Find Button Click the Find button on the Clients window to search for a client. After you click “Find,” type in a name (or part of a name) and click OK. The Clients window now contains only those Clients that match your search. To return to viewing a list of all clients click OK without entering any search term. Sorting the clients also returns the list to including all clients. Delete Client You can delete a client from the database. You cannot delete the currently active client. 1. 2. 3. On the File menu, select Clients. Choose the name of the client you want to delete. Click Delete. This action removes the client from your system. Copy Client Duplicate the active client’s information so that you can develop several financial scenarios. 1. 2. 3. On the File menu, select Clients. The Clients window appears. Click on the client to copy and click Copy. Enter a new ID for the selected client. Click OK to begin copying. The current client file will be duplicated under a new ID. 29 PFP Notebook Transfer Clients Between Computers The process of transferring clients from one location to another requires making a backup of the client information by exporting it to a disk or drive and importing the client information from that location to another one. If there are unassigned clients, double click on the name to have the client reassigned to you. Backup or Export Clients 1. 2. 3. 4. 5. From the File menu, choose Clients. Click the Import-Export button. Click the Export Clients radio button. Choose whether to export the selected client or all clients. Click the Next button. Select a location for the backup or exported file: a floppy disk, a drive, or an email export file. The program will give this file a default name using the date of the export; you may change this by typing in the File name field. It will create a Zip Archive in the location you have specified. Click the Next button. 6. The program will run through the export and display a progress graph. Restore or Import Clients 1. 2. 3. 4. From the File menu, choose Clients. Click the Import-Export button. Click the Import Clients radio button. Choose whether to import the selected client or all clients. Click the Next button. 5. Locate the backup or exported file you wish to import from a floppy disk, a drive, or an e-mail export file. You may import the following file types: • PFP Notebook versions prior to version 2002 • PFP Notebook versions 2002 and later • Foreign tables into PFP Notebook • PFP database files. 6. Click the Next button. 7. The program will run through the export and display a progress graph. If there is an ID conflict for any of the clients you selected, there will be an exclamation mark in the ID Conflict column. In the event of an ID conflict, you may either Overwrite the current ID or you may enter a new ID. How to Fix an ID Conflict • If you are updating the information for the selected client, select Yes under the Overwrite Existing column to overwrite the current client ID. It is not necessary to enter a new ID (this field will not be available). • If you want to make a copy of the selected client’s file, select No under the Overwrite Existing column. This will leave the current client intact and it will 30 Client Files create a new client file. This option will require that you enter a new ID under the New ID column. Once you have selected which clients to restore/import, click Next. This will complete the restoration of the files. 31 PFP Notebook 32 Chapter 4: Client Section The Client Section consists of four pages: 1. 2. 3. 4. Client Information Summary of Goals and Objectives Key Factors Progress Schedule Client Information The Client Information page holds contact information and notes about the client. Enter the information regarding your client in the fields and type notes as needed in the text box provided. Be sure to enter the client and partner names in all four locations (under Client Name and in the Salutation fields—Couple, Client I and Client II) so the right name prints on all your reports. Under Report Detail, choose either Summary for a truncated report or Detailed. Next, click the Personal button to proceed to the next area of data entry. 33 PFP Notebook Client info is carried over from the Client Info page. You can also enter employment information on the first window. Click on each item of the Menu to enter information about the clients, union details, children and dependents, and education. List names and dates of birth of dependents under Children/Dependents. Use the Education page of the Menu to list educational background for the client and partner. The Client Comment page allows you to record information about the client and partner’s parents, their health, and their cause of death. You may also list any known family health problems. Next proceed to the Client Advisors page. Enter the names of the client’s attorney, accountant, banker, and insurance agent. When you’re done here, click on the Client tab, located at the very bottom of the window. Proceed to step 2: Summary of Goals and Objectives. Summary of Goals and Objectives The Summary of Goals and Objectives page provides an opportunity for you to assess your client’s present and future financial obligations and overall financial goals. Work your way through the 11 questions that ask about • Goals and objectives • Financial security within the next five years • Major present financial obligations • Future financial obligations • How the client will provide for spouse, children, and other beneficiaries • Gifs to charities, lifetime gifts, or testimony gifts • Retirement and second career goals and considerations • What constitutes adequate retirement income • Planned investment structures and whether they address the client’s income requirements • Overall retirement income concerns. Key Factors The Key Factors page provides an opportunity to explain and clarify your use of any factors that might be confusing or unclear to your client. Key factors can be information you have specifically tailored for your client. For instance key factors may pertain to your choice of certain values in General Assumptions. 34 Client Section Enter the name of the key factor by clicking New in the Key Factor window. Type any explanatory information in the text box labeled Significant Assumptions. Click New to add as many Key Factors as you need. Progress Schedule The Progress Schedule page provides a schedule chart to help you stay on track. Some Event Descriptions are already provided for you. Here is a sample schedule, according to the Jonathan and Sarah Edwards case: Click the Target Date of an event and enter the date you expect to complete it (mm/dd/yy). When an event is completed, check the Completed checkbox and the date will be automatically updated. PFP Notebook places an exclamation mark in the Late column if the current date is later than the target date. Adding or Deleting a Description You can add more descriptions with the New button or discard any descriptions with the Delete button. To add a New Event Description, click the New button. The following window will appear: Enter a new name for the event in the Description field. Then, enter the target date (mm/dd/yyyy). 35 PFP Notebook Click on a Description you wish to discard. This action highlights the description. Click the Delete button. 36 Chapter 5: Financial Data Section The Financial Data Section is made up of seven pages: 1. 2. 3. 4. 5. 6. 7. General Net Worth Information Budget Information Net Worth Projections Budget Projections Mortgage Payment Computation Debt Structure This section inputs net worth and budget information that is collected from the client and makes projections on that information. It allows mortgage payment calculations and the production of amortization schedules, plus the ability to record any significant assumptions that are going to affect the overall plan. General The General page is made up of two text boxes: Financial Documents Provided and General Comments—Financial Data. Enter the name or description of any documents the client provides for you in the Financial Documents Provided text box. And, enter any other comments concerning your client’s financial data in the General Comments text box. 37 PFP Notebook Net Worth Information The Net Worth Information page is a chart set up to collect investment, savings, and ownership information about your client. The date the client’s file was created automatically appears in the statement date. You may update this date any time new items or values are added or changed. Items fall into one of five categories: 1. 2. 3. 4. 5. Liquid Assets Investment Assets Personal Assets Short-Term Obligations Long-Term Obligations Enter the amount owned or owed by the Client, Spouse, or both (Joint), in the appropriate category and column. PFP Notebook automatically totals the values. Scroll down to complete the spreadsheet. Place the cursor where you want to add or delete an item and click the New or Delete button. NOTE: When you create a new client, the program automatically generates default items. Enter values for only the items that apply to your client and delete the rest to avoid clutter and confusion. The figures on the bottom right of the window provide a running calculation of the client’s total Net Worth. Budget Information The Budget Information page is a chart for preparing a budget for your client. The current date automatically appears in the date input. You may update this date any time new items or values are added or changed. 38 Financial Data Section Items fall into one of six categories: 1. 2. 3. 4. 5. 6. Employment Income Other Income Income Taxes Committed Expenditures Somewhat Discretionary Very Discretionary Enter values in the Monthly and Yearly columns for each budget item that applies to the client’s financial scenario. Scroll down to complete the chart. Place the cursor where you want to add or delete an Item and click the New or Delete button. NOTE: When you create a new client, the program automatically generates default items. Enter values for only the items that apply to your client. Delete the rest to avoid clutter and confusion. The box on the bottom right of the window provides a running calculation of the client’s total income, expenditures, and what is available for savings. Changing the Master Text PFP Notebook provides a master text for the Net Worth Information page and the Budget Information page. The master text allows you to change the default settings for Categories and Items. Go to the Documents window and choose Customize Master Text. Choose Net Worth and Budget. Click New and then click New Category. Click Delete to remove a category. NOTE: Any changes you make apply to all future clients. 39 PFP Notebook Net Worth Projections The Net Worth Projections page uses the information from the Net Worth Information page to project your client’s Net Worth into the future. The date the client’s file was created automatically appears in the Statement Date. You may update this date any time new items or values are added or changed. Change the Projection Years input or use the default years already provided by PFP Notebook. If you change the years, enter them from left to right in increasing order. Use the Growth column to indicate a percentage rate of annual growth to apply to each item. Use the Growth Amount column to indicate an annual dollar increase. PFP Notebook automatically calculates and enters information into the projected years’ columns. Scroll down to complete the page. Scroll to the right to see the projected figures for the chosen years. Click anywhere inside the box to see the Totals window. This window provides a more detailed version of these calculations. The window displays the results for the Current year and the projected years. Use the scroll bar to see the results for the projected years. Fill from Mortgage You can easily enter mortgage loan information about your client to this page by clicking the Fill from Mortgage button. Click the field in the row into which you want to import the loan information. Then, click the Mortgage Fill button. 40 Financial Data Section The Financial Data: Mortgage Fill window appears: Click the pull-down arrow at the bottom of the window to choose a mortgage. After selecting a mortgage, click the Import button. NOTE: The Import function can only be used if you have previously completed the Mortgage Payment Computation page. The mortgage information is imported from the Mortgage Payment Computation page into this window. Once the information is entered into the Financial Data: Fill Mortgage window, click OK. This action closes the window and inserts the mortgage information into the spreadsheet. NOTE: When mortgage information is imported, it overrides the information for each year. If you change the projection year, make sure to re-enter the mortgage information so the program can recalculate the new figures. Creating and Removing an Override The fields in the Projection Years columns contain values based on entries in the Growth, Growth Amounts, and Current Amounts columns. You can override any of the amounts in the Projection Years columns. Click the field to override. This action displays the Create Override button at the bottom left of the window. Click the Create Override button to override the selected value. The field you selected is highlighted in red, indicating that the override was confirmed. Type in the new amount in the field and press Enter. The following amounts in that row change accordingly. 41 PFP Notebook To remove an override, click on the red highlighted field you wish to remove. The Remove Override button appears at the bottom left of the window. Click the Remove Override button to cancel the override. The field returns to the previous value. The following amounts in that row change accordingly. Budget Projections The Budget Projections page uses the information from the Budget Information page to project your client’s budget into the future. The present date automatically appears in the Budget Statement Date input. You may update this date any time new items or values are added or changed. Change the Projection Years input or use the default years already provided by PFP Notebook. If you change the years, enter them from left to right in increasing order. Use the Growth column to indicate a percentage annual growth to apply to each item. Use the Growth Amount column to indicate an annual dollar increase. PFP Notebook automatically calculates and enters information into the projected years’ columns. Scroll down to complete the page. Scroll to the right to see the projected figures for the chosen years. The box on the bottom right corner of the window provides a running calculation of the client’s current and projected Budget. It also includes what the client has left. Click anywhere inside the box to see the Totals window. This window provides a more detailed summary of the calculations. The window displays the results for the Current year and the projected years. Use the scroll bar to see the results for the projected years. 42 Financial Data Section Creating and Removing Overrides The fields in the Projection Years columns contain values based on entries in the Growth, Growth Amounts, and Current Amounts columns. You can override any of the amounts in the Projection Years columns. Click the field to override. This action displays the Create Override button at the bottom left of the window. Click the Create Override button to override the selected value. The field you selected is highlighted in red, indicating that the override was confirmed. Type in the new amount in the field and press Enter. The following amounts in that row change accordingly. To remove an override, click on the red highlighted field you wish to remove. The Remove Override button appears at the bottom left of the window. Click the Remove Override button to cancel the override. The field returns to the previous value. The following amounts in that row change accordingly. 43 PFP Notebook Mortgage Payment Computation The Mortgage Payment Computation Page has five tabs, allowing you to record and calculate mortgage payments for an unlimited number of mortgages: Enter a Description of the mortgage in the first field and continue to enter the pertaining information for that mortgage in the remaining fields. The lower portion of the panel shows a running calculation of each payment period. After the client’s mortgage information is entered, PFP Notebook calculates payments for each payment period. This enables you to show your client every possibility. The program uses the following formula for each payment period. Use the given variables: Effective Interest Rate = A Length of Mortgage = B Number of Payments per Year = X (Use 1 for Annual, 2 for SemiAnnual, 4 for Quarterly, and 12 for Monthly) Enter the numbers into the formula. A X Amount Borrowed ∗ 1− 1 A (B * X ) (1 + ) X Use the Amortization schedule pull-down menu to specify how the Report should print: 44 Financial Data Section • • Annual: Displays the payment schedule by year. The schedule assumes that the client makes payments on a monthly basis. Monthly: Displays the payment schedule by month. NOTE: Click the Print Preview button to review the information. Use the Report Type pull-down menu to specify what type of Report to print: • Active Mortgage: Only the currently selected Mortgage tab prints. • All Mortgages: All completed Mortgage tabs print. Debt Structure The Debt Structure page gives you the opportunity to briefly summarize and comment on your client’s debt structure. Type appropriate client information in the text boxes provided. 45 PFP Notebook 46 Chapter 6: Risk Management Section The Risk Management Section is made up of eight pages: 1. 2. 3. 4. 5. 6. 7. 8. General Policy Analyzer: Life Insurance Policy Analyzer: Disability Insurance Policy Analyzer: Major Medical & Health Policy Analyzer: Long-Term Health Care Insurance Needs Analysis Life Insurance Questionnaire Insurance Action Letters This section collects the client’s current insurance information. It determines the insurance needs and the best life insurance vehicle for the client. Plus it enables you to customize letters for the client’s use in updating the coverage with the insurance company. General The General page is made up of two text boxes: Insurance Documents Provided and General Comments – Risk Management. Enter the name or description of any insurance documents that the client provides to you in the Insurance Documents Provided text box. And, enter any other comments in the General Comments – Risk Management text box. Policy Analyzer: Life Insurance The Life Insurance page allows you to enter information about your client’s life insurance policies. The page allows an unlimited number of policies. The page has two tabs. The Insurance Policies tab is the first tab. Enter the information needed for each life insurance policy. When all the information on the listed life insurance policies has been entered, select the Recommendations tab. Enter the amounts that pertain to the recommended face value of the insurance coverage. Enter any additional comments about your clients’ life insurance in the last text box. 47 PFP Notebook Policy Analyzer: Disability Insurance The Disability Insurance page has four tabs: Schedule, Graph, Policies, and Comments. Enter the information that applies to the client’s insurance policy. Click the squares next to the items that apply to the client to display a check mark. Enter any additional comments in the fourth tab. Policy Analyzer: Major Medical & Health The Major Medical & Health page provides two text boxes. Enter the name of the client’s insurance company in the Insurance Company field. Enter any information pertaining to the client’s major medical and health insurance in the Coverage text box and any additional comments in the Comments text box. Policy Analyzer: Long-Term Health Care The Long-Term Health Care page provides two text boxes. Enter the name of the client’s insurance company in the Insurance Company field. Enter any information pertaining to the client’s long-term health care insurance in the Coverage text box and any additional comments in the Comments text box. 48 Risk Management Section Insurance Needs Analysis The Insurance Needs Analysis page is used to plan how much each individual would need (Cash, Capital, and Assets) if his or her spouse died. The page consists of four tabs: • • • • Current Cash Needs Capital Needs Capital Assets Graphs Many of the values that are used in this page are calculations from the Net Worth Information page. Print out the Net Worth Information page for your client for easy reference. Current Cash Needs Tab This tab is used to compile the amount of money needed to pay off current needs such as outstanding loans and expenses. Enter the cash amount that the client would need, assuming the spouse were to die. Use the spouse column to enter the spouse’s cash needs, assuming the client were to die. Final Expenses – Any outstanding expenses the person may have such as funeral, car, or education payments. Emergency Fund – A fund with money that is necessary for emergencies. Mortgage Fund – A fund with money required for an outstanding mortgage(s). Notes & Loans Payable – Any outstanding loans or notes. 49 PFP Notebook Taxes Payable – Outstanding tax balance. Education Expenses (NPV) – Amount of money used for education (private school, college) that needs to be paid. The Education Expenses (net present value) is transferred automatically from the College Cost Estimation page in the Education Funding section. Other Cash Needs– Any amount of money needed that does not qualify in the other categories. Capital Needs Tab The Capital Needs tab is used to calculate how much income is necessary to support the client or the spouse assuming one or the other was to die. If you are ever in doubt, round the values up to allow a safety margin on the conservative side, ensuring your client is adequately covered. Lifetime Monthly Income – The amount the client needs each month for the rest of his or her life. Age of Survivor at Time of Death – An estimated age for the surviving party at the time of death of the spouse. Survivor Life Expectancy – A calculated value for the age of the survivor at the time of death of the spouse. Value determined by Table V (Reg. Sec. 1.72 Ordinary Life Annuities, One Life – Expected Return Multiples). Interest Rate – The interest rate that the couple expects to receive on their investments. Adjustment Period Monthly Income – Does not assume any interest is earned on money put aside for the Adjustment Period. 50 Risk Management Section Adjustment Period (Years) – An additional amount of money that is needed for a period of years after the assumed death. Funeral expenses, moving or any other short-term cost (children still in college) can cause the need for this amount. Capital Assets Tab The Capital Assets tab is used to add up any liquid assets that the client may have. These assets are available to pay the Lifetime Income and/or the Adjustment Period Income. Life Insurance – Value of the life insurance left to the living party. Cash Savings – Amount of savings left to the living party. Investment Assets – The amount of assets left to the living party. Social Security – The amount of money left by Social Security to the living party. Calculate the net present value of the Social Security to be received for entry. An estimate of $100,000 often works well. Pension Benefits – The net present value of all pension benefits that will be available to the living party. Other Capital Assets – The total value of all other assets that will be available to the living party. 51 PFP Notebook Graphs The graphs provide a graphic representation of the data on the preceding tabs. Total Cash Needs – Sum of the values on the Current Cash Needs tab. This is the total amount of money needed at the time of the assumed death. Amount Required for Lifetime Income – This value is based on the lifetime income needed, survivor’s age, and interest rate. This is the amount of investment needed to support the lifetime income needed. Amount Required for Adjustment Period – This is the amount of investment needed to support the Adjustment Period income. Funeral expenses, moving or any other shortterm cost (children still in college) can cause the need for this amount. Total Capital Needs – The sum of the Amount Required for Lifetime Income and the Amount Required for Adjustment Period. This is the amount the client should invest to pay for Lifetime Income and Adjustment Income after the assumed death. Total Needs – The sum of all the values entered in the Total Cash Needs tab and the Total Capital Needs tab. This is the total amount the living party will need after the assumed death. Total Capital Assets – The sum of all the values entered on the Capital Assets tab. This is the total assets available to the living party after the assumed death. Deficit – The difference between Total Needs and Total Capital Assets. This is how much more money the living party will need after the assumed death. 52 Risk Management Section Life Insurance Questionnaire The Life Insurance Questionnaire page helps you assess the best way to meet your client’s life insurance needs. The questionnaire is made up of twelve questions. Scroll down to access all the questions on this page. Use the red arrows to move the solid bar back-and–forth through the fields to select the desired answer for the question. Insurance Action Letters The Insurance Action Letters page collects information that becomes part of the Insurance Letters. The Insurance Letters are located in the Documents menu under Edit Letters. Enter the values that apply to the client and the spouse. 53 PFP Notebook 54 Chapter 7: Investments Section The Investments Section is made up of four pages: 1. 2. 3. 4. General Portfolio Allocation Worksheet Investment Portfolio Investment Strategy Worksheet The Investments section records the client’s present investment portfolio and risk aversions. General This page contains two text boxes: Investment Documents Provided and General Comments – Investments. Enter the name or description of any investment documents your client provides in the Investment Documents Provided text box. Enter any additional comments concerning your client’s investment data in the General comments text box. Portfolio Allocation Worksheet The Portfolio Allocation Worksheet page is used to analyze the client’s investment goals. It provides a list of statements, which the client can assess and score according to the level of interest. By scoring the statements, the program is able to calculate the best scenario for the client. The first part of this worksheet is used to determine an accurate risk assessment. The Client Questionnaire contains four questions for determining your clients’ risk tolerance. It also tests risk tolerance for the spouse. Click the Proceed to Recommendations button to see how the portfolio should be allocated, based on the client’s previous answers. 55 PFP Notebook Investment Portfolio The Investment Portfolio page is used to list client investments and financial information about each investment. Enter any additional investments by clicking the New button. Rename any Description by double-clicking the field and typing. Import The Import from Net Worth button is used to quickly enter investments that you previously entered in the Net Worth Information page. 1. Click the Import button. The Import from Net Worth window appears showing a list of all the investments that are available from the Net Worth Information page. 2. The program assumes all investments will be imported. Clear the check box for every investment you do not want to import. 3. Define every investment by choosing Cash, Fixed Income, or Equities by clicking the Portfolio Category. 4. Click OK. Investment Strategy Worksheet The Investment Strategy Worksheet is used to note the client’s investment strengths, weaknesses, and preferences. In this manner, you can develop an investment plan tailored to the client’s financial and personal situation. 56 Chapter 8: Retirement Planning Section The Retirement Planning section is made up of five pages: 1. 2. 3. 4. 5. General Retirement Income Requirements Worksheet Retirement Planning Worksheet Asset Life Schedule Yearly Retirement Funding This section helps you and your client assess how well your client’s current retirement plan will meet future financial needs. Note: We recommend using the Yearly Retirement Funding Analysis instead of the Retirement Planning Worksheet if your client has: • • • Income or Expenses that occur after retirement or end during retirement. Prioritization of investments. Minimum Distributions. General This page contains two text boxes: Plans and documents provided and General comments – Retirement Planning. List any retirement plans and documents your client provides in the Investment documents provided text box. And, add any additional notes or comments in the General comments text box. 57 PFP Notebook Retirement Income Requirements Worksheet The Retirement Income Requirements Worksheet page enables you to determine the annual income requirements for the client. Enter the expense amounts in the categories listed on this page. (Be sure to express the total expenses in terms of today’s dollars.) Notice the Total Expenses in today’s dollars and your client’s Projected Annual Retirement Income Requirements. The Projected Expense figure is automatically calculated by PFP but the results may also be obtained by using the Financial Calculator. 58 Retirement Planning Section Retirement Planning Worksheet The Retirement Planning Worksheet is used to compute the amount that clients need to contribute annually to reach retirement goals and to provide for an increasing annuity payment. The philosophy of this worksheet differs from that of many retirement worksheets that try to build in a “false exactitude.” Such worksheets try to project such things as the time of retirement, future increases to company pension plans, and anticipated rates of return on those funds. We feel that the problem with this approach is that future employment, income, and other financial factors are often uncertain. Our approach is not contingent on how contributions are made to the funds or what the source of those funds happens to be. If your clients meet the amount designated as the annual contribution required to cover the shortfall, then they know that they have the amount needed for retirement. By furnishing your clients with this bottom line number, they know that on an annual basis they have to meet that amount with some type of savings program. Our approach provides the information they need, regardless of how their personal circumstances work out in the future. We believe that this is a much sounder approach to retirement planning than trying to nail down every individual item when looking into an uncertain future. 59 PFP Notebook The worksheet consists of four numbered and labeled tabs. 1. 2. 3. 4. Future Value of Retirement Income Required Present Value of Amount Needed at Date of Retirement Amount Needed to Fund Retirement Schedule and Graphs 1: Future Value of Retirement Income Required The first tab helps you determine the future value of your clients’ retirement income at their date of retirement. Values are automatically taken from the General Assumptions. (To change values go to the Edit pull-down menu and select General Assumptions.) Net Income Needed – The current Estimate of Retirement Income minus the total of the Guaranteed Annual Payments. Future Value of Annual Retirement Income Goal as of the Year of Retirement Net Income Needed x (1 + (Rate of Inflation/ 100)) Years to Retirement. Items that are indexed for inflation and will be received commencing with the clients’ retirement, reduce the stated value of retirement income in terms of today’s dollars. Any retirement payments that begin after the date of retirement or are not indexed should appear in the third tab of the worksheet. Providing amounts for social security, pension, and other guaranteed payments reduces the estimated retirement income amount. This reduction helps you more accurately determine how much supplemental income your client needs above these guaranteed amounts. 60 Retirement Planning Section 2: Present Value of Amount Needed at Date of Retirement The second tab shows the present value of the amount your client needs by their retirement date: If the Post-Retirement Return on Investments equals the Post-Retirement Rate of Inflation, then the Total Dollar Amount Needed to Fund Retirement Over Life Expectancy equals the Future Value of Annual Retirement Income × Life Expectancy from Date of Retirement. The Post-Retirement Return on Investments, minus the Post-Retirement Rate of Inflation provides a calculation showing how much your client needs to pay as an increase in annuity over a number of years. Reducing the estimated return on investment by the rate of inflation automatically increases the present value, which makes a provision for the increased annuity payments. Life Expectancy from Date of Retirement - The remaining life expectancy years from your client’s age at the onset of Social Security benefits to the expected age at death. Total Dollar Amount Needed to Fund Retirement Over Life Expectancy – (PostRetirement Return on Investments – Rate of Inflation) / 100 with Life Expectancy from Date of Retirement as the Period. 61 PFP Notebook In all other cases, the Total Dollar Amount Needed to Fund Retirement Over Life Expectancy is Future Value of Annual Retirement Income × Life Expectancy from Date of Retirement 1 1 − 1 + ((Post - Retirement Return on Investments - Rate of Inflation) / 100) ((Post - Retirement Return on Investments - Rate of Inflation) / 100) This computation is a quick estimate of how much the clients need to provide for an increasing annuity payment, from the date of their retirement through the remainder of their lives. Amount Needed to Fund Retirement This tab shows how much your clients will need to fund their retirement in the future. Total Dollar Amount Needed to Fund Retirement – The value is brought over from the second tab. This amount is the minimum your client needs to provide an increasing annuity over his or her life expectancy. Future Value of Current Investments – This is generally the amount of investments your client presently holds. The sum of the investments is deducted from the Total Dollar Amount Needed to Fund Retirement. The number of years is the time until the client’s date of retirement. The percentage is flexible, depending on the type of investment and whether or not it is in a tax sheltered environment. 62 Retirement Planning Section Present Value of Future Annual Payments - Other resources are also deducted. One example is Social Security (if the retiree plans to stop working prior to receiving Social Security). To compute this amount, use the anticipated annual Social Security payments, beginning with the age at which the client expects to start drawing Social Security, discounting it at a rate of pretax return on investment (for example 7%). The reason for using the pretax return on investments is that these items are considered resources and are carried over to the amount used on the next worksheet, which is the Asset Life Schedule. The pension amounts are also computed on the same basis, as are any other payments that are anticipated. For example, if a person anticipates working on a part-time or fulltime basis, those earnings for any given period of time are discounted back to a present value. In each instance, all of these discount rates are the pretax rate on investments used on the Asset Life Schedule. Different assets may have different rates of return, so that the total future value can be computed with greater accuracy. Total Resources - Future Value of Current Investments minus Present Value of Future Annual Payments. Shortage – Total Dollar Amount Needed to Fund Retirement minus Total Resources. Pre-Retirement Return on Investments – The rate of return your client’s investments will earn before retirement. Annual Contribution Required to Cover Shortfall – If Years to Retirement is greater than 0, then: The Annual Contribution is a Payment Amount for Future Value using Shortage, Pre-Retirement Return on Investments / 100, and Year to Retirement as the period. Otherwise: Annual Contribution = Shortage If your client has assets already equal to or in excess of the amount needed for retirement, then based on the assumptions of return on investment, you can determine that your client has adequate assets to meet his or her retirement goal. The calculations in this panel subtract the client’s future financial resources from the first calculation to determine if there is a shortfall in the amount needed and in the amount that will be available. If there is an overage, then the amounts show up as negative numbers. If there is a shortfall, then the deficit shows up as a total future sum and as the annual savings needed to reach the future sum. The final computation is the amount the client needs to fund annually in order to cover the shortage, in case there is one, and meet the retirement funding goal. 63 PFP Notebook Asset Life Schedule The purpose of this page is to show your client how long this pool of assets will last, assuming a given return on investments and a given rate of inflation. This schedule indicates not only the year but also the age of your client based on the assumed retirement date: The values in this panel are supplied from values entered in other areas of PFP Notebook. NOTE: If you change these values, a red “I” button will be displayed. The “I” button lets you know there’s an inconsistency between the values entered here and those entered in other areas. Click the “I” button to see what the other values are and where they are located. You can select Yes to change the value here to correspond to the values listed elsewhere in the notebook. Desired Income from Investments – This value comes from the Retirement Planning Worksheet, under Tab 1. It is the Future Value of Annual Retirement Income Goal as of the Year of Retirement. Income Producing Assets – This value comes from the Retirement Planning Worksheet, under Tab 2. It is the Total Dollar Amount Needed to Fund Retirement Over Life Expectancy. Assumed Return on Investments – This value comes from the General Assumptions. To change the values on the General Assumptions go to the Section pull-down menu and select General Assumptions. 64 Retirement Planning Section Assumed Inflation Rate – This value comes from the General Assumptions. To change the values on the General Assumptions go to the Section pull-down menu and select General Assumptions. Age at Retirement – Takes the client’s birth date from the system and adds the Years to Retirement from the Retirement Planning Worksheet, under Tab 1. Take Income at Beginning of Year – Select the check box to assume your client will take out income at the beginning of the year (a conservative move). To assume income will be taken at the end of the year (less conservative move), leave the check box clear. The second panel is a Comments text box. Enter any comments related to your client’s asset life schedule. When the page is completed, select Print Preview from the File pull-down menu to view the report before printing it. In the report, notice the last five column headings. The following table shows the calculations that were done to obtain the results for each particular column. Many of the variables in the Calculation column of the table are from the input window. Yearly Retirement Funding This page illustrates how Income, Expense, and Investment affect a retirement schedule. Once items are entered, the program provides and annual schedule of how the items interact, including any surplus or deficit. There are three basic steps to create a plan for your client’s retirement. Step 1 – Enter the years the reports cover. 65 PFP Notebook Step 2 – Enter items in any of the following categories: • Income • Expenses • Investments Click New to add. Step 3 – View reports or graphs showing growth or loss for the retirement schedule. Click the Options button to see a list of available reports. Step 1: Entering the Dates Use this panel to mark the current year and the years that begin and end the client’s reports. These years must be entered in increasing order (Current, First, Last). Current Year – Enter the current year. Every item has a Current value that is defined at the end of the Current Year. First Year – Enter the first year of the reports. Last Year – Enter the last year that the reports will cover. Step 2: Entering Items Use the panel (labeled #2) to enter items for each of the categories: Income, Expense, and Investment. 66 Retirement Planning Section Income: General Information Click the New button and enter the General information for each item: 1. Enter a Title for the item. 2. Enter the Current Value as of the end of the year. An item’s Current Value is defined at the end of the current year. th 3. Specify an income occurrence of every n year. The income item still grows every year by the applicable growth rate, but it only appears on the reports and affects the th calculations every n year. (1=Every Year) 4. Enter the Income Tax Rate for your client. Income: Growth Information Enter the years that will affect the growth of the item. Current Year – This is the current year. An item exists and grows from the current year, but it does not appear on the schedule until the Begin year. Begin Year – This is the first year that the item will appear. Note: The Begin Year may not be the same year as the First Year of the report. The item may have existed at the Current Year and even grown at a pre-retirement growth rate until the Begin Year but the item does not appear on the schedule and does not affect calculations until the Begin Year. End Year – This is the last year that the item will appear. Note: The End Year may not be the same year as the Last Year of the report. The End Year marks the end of the Post-Retirement growth for the item. The item becomes zero. Enter the growth rate and amount information for each item: 67 PFP Notebook Enter the Pre-Retirement Growth Rate and Amount. The Pre-Retirement Growth Rate is applied to the item from the end of the Current Year through the end of the Begin Year. The Pre-Retirement Growth Amount is calculated from the end of the Current Year through the end of the Begin Year. 2. Enter the Post-Retirement Growth Rate and Amount. The Post-Retirement Growth Rate is applied to the item from the end of the Begin Year through the end of the End Year. The Post-Retirement Growth Amount is calculated from the end of the Begin Year through the end of the End Year. 1. Expense: General Information Click the New button and then enter the General information for each Expense item: 1. Enter a Title for the item. 2. Enter the Current Value as of the end of the year. An item’s Current Value is defined at the end of the current year. 3. Specify an expense occurrence of every nth year. The expense item still grows every year by the applicable growth rate, but it only appears on the reports and affects the calculations every nth year. (1=Annual) Expense: Growth Information Enter the years that will affect the growth of the Expense item. Current Year – This is the current year. An item exists and grows from the current year, but it does not appear on the schedule until the Begin year. Begin Year – This is the first year that the item will appear. Note: The Begin Year may not be the same year as the First Year of the report. The item may have existed at the Current Year and even grown at a pre-retirement growth rate until the Begin Year but the item does not appear on the schedule and does not affect calculations until the Begin Year. End Year – This is the last year that the item will appear. Note: The End Year may not be the same year as the Last Year of the report. The End Year marks the end of the Post-Retirement growth for the item. The item becomes zero. Enter the growth rate and amount information for each item: 1. Enter the Pre-Retirement Growth Rate and Amount. The Pre-Retirement Growth Rate is applied to the item from the end of the Current Year through the end of the Begin Year. The Pre-Retirement Growth Amount is calculated from the end of the Current Year through the end of the Begin Year. 2. Enter the Post-Retirement Growth Rate and Amount. The Post-Retirement Growth Rate is applied to the item from the end of the Begin Year through the end of the End Year. The Post-Retirement Growth Amount is calculated from the end of the Begin Year through the end of the End Year. 68 Retirement Planning Section Investment: General Information Enter the General information for each item: 1. Enter a Title for the item. 2. Enter the Current Value as of the end of the year. An item’s Current Value is defined at the end of the current year. 3. Enter the Income Tax Rate for your client. Investment: Growth Information Enter the years that will affect the growth of the item. Current Year – This is the current year. An item exists and grows from the current year, but it does not appear in the reports until the Begin year. Begin Year – This is the first year that the item will appear. Note: The Begin Year may not be the same year as the First Year of the report. The item may have existed at the Current Year and even grown at a pre-retirement growth rate until the Begin Year but the item does not appear in the schedule and does not affect calculations until the Begin Year. End Year – This is the last year that the item will appear. Note: The End Year may not be the same year as the Last Year of the report. The item carries on its last value for the remainder of the reports, and it is only affected by a surplus or deficit. Enter the growth rate and amount information for each item: 69 PFP Notebook 1. Enter the Pre-Retirement Growth Rate and Amount. The Pre-Retirement Growth Rate is applied to the item from the end of the Current Year through the end of the Begin Year. The Pre-Retirement Growth Amount is calculated from the end of the Current Year through the end of the Begin Year. The Begin Year is the first year that the item appears in the reports. The item may have existed at the Current Year and even grown at a pre-retirement growth rate until the Begin Year but the item does not appear in the reports and does not affect calculations until the Begin Year. 2. Enter the Post-Retirement Growth Rate and Amount. The Post-Retirement Growth Rate is applied to the item from the end of the Begin Year through the end of the End Year. The Post-Retirement Growth Amount is calculated from the end of the Begin Year through the end of the End Year. Click the Import button to select each individual item you want to include in the report. The default setting will automatically assume that you want to import all information by showing an X in the boxes under the Import column. 70 Retirement Planning Section Investment: Surplus & Deficit Information Withdrawal Priority – Unlike income, taxes, and expenses, investments must be adjusted to account for the surplus or deficit created by the difference between income and expenses. When a deficit exists for a particular year, that deficit is deducted from the investment with the highest Withdrawal Priority. When that investment is completely depleted, the deficit is taken from the investment with the next highest priority and so on. Investment Surplus – In the case of a surplus, this excess amount is divided among the investments according to their Investment Surplus value. An exception to this case occurs when no investments are available. Recall that an investment’s availability is determined by its Begin Year. Investments may exist before the Begin Year but they do not appear on any schedule nor are they available to handle a surplus deficit until their Begin Year. If no Investments are available, the surplus or deficit accumulates under the “Add (Withdraw)” column of the summary report. Note The Investment Surplus for all items must total 100%. 71 PFP Notebook Investment: Minimum Distributions Information If an investment is subject to Minimum Distributions, click the Minimum Distributions Apply check box. Select and include the appropriate information for the item. Life Expectancy: Select Joint or Single. The program’s default setting uses Joint life expectancy. Owner’s Birth Date: The program automatically enters the owner’s birth date as it appears in the Client Section. If at the Current Year, the client is 70½ years old or older, an input field asking for the current value of the item will appear at the bottom of the panel. This should be the value of the item at the end of the previous year. Beneficiary’s Birth Date: Enter the birth date of the beneficiary. The program’s default setting uses the birth date of the client’s spouse. Beneficiary is Spouse: Click the check box if the plan beneficiary is the plan owner’s spouse. Recalculate Owner’s Life Expectancy*: Click the check box to recalculate the owner’s life expectancy or clear the check box to use Term Certain. Recalculate Beneficiary’s Life Expectancy*: Click the check box to recalculate the beneficiary’s life expectancy or clear the check box to use Term Certain. *Note: The program assumes the 2002 final regulations are used for calculating minimum distributions in all years after 2001. Consequently, the recalculate checkboxes will not be available if the first year is after 2001. Note: The program calculates Minimum Distribution amounts by dividing the previous year’s investment value by the appropriate life expectancy. The previous year’s investment value is an end-of-year value. Step 3: Viewing the Reports Use this panel to view any of the reports: Income Report – Shows all entered Income items throughout the Retirement Plan (yearly basis). 72 Retirement Planning Section Taxes and Expenses Report – Shows all entered Expenses items throughout the Retirement Plan (yearly basis). Shows the tax from each entered income. Investments Report – Shows all entered Investment items throughout the Retirement Plan (yearly basis). The report shows the value of the investment after it has grown for the year, but before any other money is added or subtracted. Income from Minimum Distributions Report – Shows how much money was withdrawn from each investment to fill minimum distribution requirements. The program calculates Minimum Distribution amounts by dividing the previous year’s investment value by the appropriate life expectancy. The previous year’s investment value is an end-of-year value. Taxes on Investments Report – Shows the tax on withdrawals from investments. This includes tax on minimum distributions. Amounts Invested Report – Shows how much money was deposited in each investment. Summary Report – Shows how all the items affect the Retirement Plan. This report may be printed for your client. Here is a description of each column in the report: • • • • • • • • Year: Shows each year of the Retirement Plan. Income: Adds entered Income items and minimum distributions. Taxes and Expenses: Adds entered Expenses items, taxes on Income, and taxes on Investments. Available Investments: Adds the previous year’s Adjusted Investment and Current year’s growth rate. Surplus (Deficit): Subtracts Expenses from Income. Minimum Distributions: Shows the calculated minimum distributions. The minimum Distributions amount is determined by dividing the previous year’s investment value by the appropriate life expectancy. The previous year’s investment value is an end of year value. Adjusted Investments: Adds Available Investments and Surplus (Deficit). Then, subtracts Minimum Distributions from the sum. Accumulations (Shortfall): Shows a running total of money that could not be invested because no investment was available, or a debt that could not be paid. This column does not appear if always zero. Click the Options button to view and print the report list and graphs. 73 PFP Notebook 74 Chapter 9: Estate Planning Section The Estate Planning Section is made up of eight pages: 1. 2. 3. 4. 5. 6. 7. 8. General Extract of Will and Trust Worksheet Checklist: Estate Planning Checklist: Effectiveness of Estate Planning Forthcoming Asset Expectancies Estate/Gift Tax Worksheet Checklist: Power of Attorney for Health Care Estate Distribution Flowchart This section is used to remind you of major estate planning considerations and alternatives through the use of checklists. It also helps to provide documentation of files or items provided by or used by the client, and any decisions made by the client. This section also makes simple estate and gift tax calculations and shows total assets to be distributed by the use of the plan. General The General page is made up of two text boxes: Estate documents provided and General comments – Estate Planning. Enter the name or description of any documents the client provides for you in the Estate documents provided text box. And, enter any other comments concerning your client’s financial data in the General comments text box. Extract of Will and Trust Worksheet • Extract of Will and Trust – Enter any information about the client’s existing will or trusts. • Comments – Type any additional comments, concerns, or reminders about the client’s existing will or trust. Checklist: Estate Planning Use this four pages of this checklist to help you consider most of the major estate planning options available for your client. Each question contains a pull-down menu from which to select Yes, No, or N/A and a corresponding text box to include any additional comments. 75 PFP Notebook Checklist: Effectiveness of Estate Planning Use this checklist to work through eight questions as a review after you have completed the estate plan. This review helps you insure that the plan meets the goals of the client. You can incorporate this checklist into the final report. Each question contains a text box to include comments. Forthcoming Asset Expectancies This page presents six questions that deal with expected future incomes, such as the impact of any future inheritance or other significant asset expectancies, on the estate plan. 76 Estate Planning Section The “future interest expected for children or other beneficiaries” panel is used in deciding how to distribute the client’s estate. Although inheritances are never guaranteed, usually more tax dollars can be saved by seeing that asset expectancies are properly structured to keep them out of the client’s estate. 77 PFP Notebook Estate/Gift Tax Worksheet The Estate/Gift Tax Worksheet is designed to calculate the gross gift or estate tax, applies the proper unified credit, and determines the net tax payable. It also calculates the remaining net estate and the percentages of the gross estate lost in taxes. It is made up of two tabs (Estate Tax and Gift Tax). Estate Tax Tab The Estate Tax tab collects information about the client’s estate tax situation. Complete all input fields with the client’s information. Year of Death – Enter the year that the decedent died. Valid Year inputs are 1984 or later. Taxable Estate – Enter the value of the Taxable Estate. The Taxable Estate is the Gross Estate minus Deductions. Tentative Tax Base – Enter the amount of any Adjusted Taxable Gifts. If there are no Adjusted Taxable Gifts, the tentative tax base will be equal to the Taxable Estate. Unified Credit – Enter the Unified Credit remaining. This value will be filled automatically when the Year of Death is entered. (See the Unified Credit Table under the Gift Tax explanation.) The window shows that the federal estate taxes are payable if a transfer at death is made. The results also show the net estate remaining and the percent of the estate that is lost to the federal estate tax. Estate Tax Calculations – Estate Tax Calculations–The Economic Growth and Tax Relief Act Reconciliation Act of 2001 included significant changes to the federal estate tax. The exemption for estate tax purposes increases to $1 million in 2002, $1.5 million in 2004, $2 million in 2006, and $3.5 million in 2009, with repeal in 2010. In 2002, the 5% surtax and rates in excess of 50% were repealed with top rates going to 49% in 2003, 48% in 2004, 47% in 2005, 46% in 2006, 45% in 2007, and 0% in 2010. The state death tax credit is reduced by 25% in 2002, 50% in 2003, and 75% in 2004 and repealed in 2005. If there is no change, sunset provisions would result in a return to prior 78 Estate Planning Section scheduled rates in 2011 or a top rate of 55% with an equivalent exemption of $1,000,000. Choose from: • 2011 Sunset • 2010 Repeal in 2010+ • 2009 Rates in 2009+ These choices will affect program computations for 2010 and later years only. Explanation: 2011 Sunset (current law with sunset): Assumes repeal occurs in 2010 and prior law returns in 2011 with a 55% top rate and $1 million exemption. This is way the tax law is currently written. This may be a reasonable assumption if one believes that no changes to the current law are likely and that the sunset provisions will prevail. One of the other two choices may be a better assumption if one believes that the sunset provisions will not be implemented due to future law changes. 2010 Repeal in 2010+ (current law modified to remove sunset and make repeal permanent): Assumes repeal becomes effective in 2010 and stays effective thereafter. This is what was originally intended by the tax writers, but ultimate repeal remains uncertain due to the inclusion of sunset provisions. This may be a reasonable assumption if one believes that the sunset provisions will not be implemented and repeal will ultimately prevail. 2009 Rates in 2009+ (current law modified to continue estate tax with no repeal): Assumes repeal never occurs and last scheduled rates are used in future years. This may be a reasonable assumption if one believes that repeal is unlikely to occur. 79 PFP Notebook Gift Tax Tab The Gift Tax tab collects information about the client’s Gift Tax situation. Complete all input fields with the client’s information. Year of Gift – Enter the year that the gift was made. Valid year inputs are 1987 or later. Taxable Gift – Enter the amount of the Taxable Gift. The gift tax calculation handles cases where there have not been prior gifts resulting in tax paid. To properly handle gift tax situations where there have been prior taxable gifts that only used unified credit, you must add the prior taxable gifts to the current taxable gifts and enter the total at this input field. Unified Credit – Enter the amount of unified credit, not subtracting out prior unified credit that was used in order to properly handle cases involving prior taxable gifts. This value will be filled automatically when the Year of Gift is entered. The following table shows the Unified Credit values for each year. The information was obtained from the Taxpayer Relief Act of 1997 (H.R. 2014). Year 1997 1998 1999 2000, 2001 2002, 2003 2004 2005 2006 80 Unified Credit $192,800 $202,050 $211,300 $220,550 $229,800 $287,300 $326,300 $345,800 Estate Planning Section The window shows the federal gift tax that is payable if a lifetime gift is made. It also shows the net estate remaining and the percent of the estate that is lost to the federal gift tax. Checklist: Power of Attorney for Health Care Contains a list of significant features to include in a living will, in order to create a comprehensive durable power of attorney for health care. Enter any comments in the Comments text box. Estate Distribution Flowchart The Estate Distribution Flowchart provides a guide for distributing estate should a spouse die. In the first panel, click the pull-down arrow next to the Decedent field to select Husband or Wife. Year of Death–Enter the decedent’s year of death. Decedent’s Gross Estate – Enter the value of the decedent’s entire estate. Debts, Expenses, & Taxes – Enter the outstanding balance of the decedent’s debts, expenses and taxes. Use Credit Shelter Trust: Reply yes or no Remainder of Estate – The Decedent’s Growth Estate minus the Debts, Expenses, & Taxes. Estate Tax Calculations–The Economic Growth and Tax Relief Act Reconciliation Act of 2001 included significant changes to the federal estate tax. The exemption for estate tax purposes increases to $1 million in 2002, $1.5 million in 2004, $2 million in 2006, and $3.5 million in 2009, with repeal in 2010. In 2002, the 5% surtax and rates in 81 PFP Notebook excess of 50% are repealed with top rates going to 49% in 2003, 48% in 2004, 47% in 2005, 46% in 2006, 45% in 2007, and 0% in 2010. The state death tax credit is reduced by 25% in 2002, 50% in 2003, and 75% in 2004 and repealed in 2005. If there is no change, sunset provisions would result in a return to prior scheduled rates in 2011 or a top rate of 55% with an equivalent exemption of $1,000,000. Choose from: • 2011 Sunset • 2010 Repeal in 2010+ • 2009 Rates in 2009+ These choices will affect program computations for 2010 and later years only. Explanation: 2011 Sunset (current law with sunset): Assumes repeal occurs in 2010 and prior law returns in 2011 with a 55% top rate and $1 million exemption. This is way the tax law is currently written. This may be a reasonable assumption if one believes that no changes to the current law are likely and that the sunset provisions will prevail. One of the other two choices may be a better assumption if one believes that the sunset provisions will not be implemented due to future law changes. 2010 Repeal in 2010+ (current law modified to remove sunset and make repeal permanent): Assumes repeal becomes effective in 2010 and stays effective thereafter. This is what was originally intended by the tax writers, but ultimate repeal remains uncertain due to the inclusion of sunset provisions. This may be a reasonable assumption if one believes that the sunset provisions will not be implemented and repeal will ultimately prevail. 2009 Rates in 2009+ (current law modified to continue estate tax with no repeal): Assumes repeal never occurs and last scheduled rates are used in future years. This may be a reasonable assumption if one believes that repeal is unlikely to occur. Panel 2 To Surviving Spouse – The amount that the surviving spouse receives. Surviving Spouse’s Separate Assets – The value of the surviving spouse’s assets. (Separate from those of the deceased.) Gross Estate – To Surviving Spouse plus Surviving Spouse’s Separate Assets. Debts, Expenses, & Taxes – The outstanding balance of the surviving spouse’s debts, expenses and taxes. Remainder of Estate – Gross Estate minus Survivor’s Debts, Expenses & Taxes. Panel 3 To Heirs and Trust – Remainder of Estate minus To Surviving Spouse. Total to Heirs & Trust – To Heirs and Trust plus Survivor’s Remainder of Estate. 82 Chapter 10: Education Funding Section The Education Funding Section consists of two pages: 1. General 2. College Cost Estimation This section calculates the cost of educating children. It also summarizes and records any funding alternatives that are discussed with the client. There have been significant changes to the reports generated with the data entered in this section of the program. Click the Print Preview button to see an example. General The General page is made up of two text boxes: General Comments – Education Funding and Education Funding Options. Enter any comments from your client about funding children’s education in the General Comments text box. Also, enter any information regarding other possible options for funding an education, in the Education Funding Options text box. College Cost Estimation: General The College Cost Estimation page provides a worksheet to estimate how much money needs to be invested today in order to pay for the education. The goal is to have the education paid for before the student begins school. In other words, no payments will be necessary once school starts. 83 PFP Notebook Enter the name of the student in the field provided. Enter the information that applies to each student in the input fields. The program adds the results (of the variables you enter) for each child to calculate how much money needs to be invested today in order to pay for the education. The following categories keep the running calculations: Projected College Cost: The inflation-adjusted cost of college education. Future Value of Savings: The future value of capital already saved for education. Additional Funds Required: The additional amount of money needed, as of the first day of college. Single Payment to Fund: A single payment, which if made now, would fund all of the child’s education. Annual Contribution: The annual amount needed to fund the education (from now until the first day of college). Monthly contribution: The monthly amount needed to fund the education (from now until the first day of college.) 84 Education Funding Section NOTE: The window assumes that an individual’s college fund is completed as of the first day of college, and that savings earmarked for that individual’s college do not grow during the college years. Click on the All Students button on the Funding Required window to see the Totals shows the total amount of available money and how much is needed, for all students. College Cost Estimation: Scholarships & Loans Click New to add scholarships and loans and fill in the dollar amount, the growth percentage and the start and end years. Indicate whether it is a scholarship or a loan by clicking the appropriate button. 85 PFP Notebook College Cost Estimation: Student Options Click whether to take a more conservative or a more aggressive approach to funding the student’s education. Funding Required: All Students This window shows how much money is needed to pay the deficit in one payment or on an annual basis. The calculations are described as follows: Total Years of College: The total years of college for all students. Total Current Savings: The total amount of savings for all students. Total Value of Scholarship: The total amount of any additional scholarship money. Total Value of Loans: The total amount of any additional loan money. Total Projected College Cost: The total amount of money needed to pay for the entire education of each student. Total Future Value of Savings: The future value of the savings for each student. 86 Education Funding Section Total Additional Funds Required: The total amount of additional money that is needed for all students involved in the plan. Total Single Payment Needed to Fund Deficit: The total amount of money that needs to be invested today in order to pay for the education of all of students’ in the plan. Total Initial Annual Contribution to fund Deficit: The total amount of money, invested annually in order to pay for the education of all students’ in the plan. College Cost Estimation: Saving Analysis Select either a schedule or a graph to see the saving analysis. The schedule provides a deficit column to show the need gap. The graph shows a graphic representation of the same information. College Cost Estimation: Cost Breakdown Select the current students or all students and show the information in a schedule format or as a graph. College Cost Estimation: Report Options Choose whether to include “Total” schedules on the report. “Total” schedules and graphs combine the data from every student. 87 PFP Notebook 88 Chapter 11: Income Tax Section The Income Tax section consists of four pages: 1. 2. 3. 4. General Income Tax Worksheet Income Tax Checklist Income Tax Estimation This section is designed to organize information from the client’s prior tax returns. You can review the client’s situation and consider various tax savings alternatives and make an explanation of the client’s income tax liability. General Estate documents provided – Keep a list of any documents that the client provides. For example: copies of a W-2, copies of previous years’ tax return. General Comments – Estate Planning – Type any additional comments, concerns, or reminders about the client’s income tax data. Income Tax Worksheet The Income Tax Worksheet collects the client’s income tax information for the current year and the past three years. This page allows you to assess the client’s past, present and possible future income situation. 89 PFP Notebook Scroll down and enter any information that applies to the client. Income Tax Checklist The checklist has items that you may want to discuss with your client. Select every item that has already been discussed. Type any additional comments in the Comments tab. Income Tax Estimation The Income Tax Estimation page allows you to do a quick and simple estimation of your client’s income tax liability. For all years up to and the current year, the program performs an exact tax calculation. For years following, the program uses the entered inflation rate to estimate the income tax. Each year, Brentmark Software updates the program with more current tax brackets. 90 Income Tax Section This page allows you to store up to five tax years or several copies of the same year. The current year is listed in the top left corner. You can enter additional years by using the New button or discard any years by using the Delete button. Click the Sort button by ascending year or descending year. Filling Out the Income Tax Form Enter the values for each data input field: 1. Tax Year – Enter the year for which payable taxes are being calculated. The program handles years 1987 through 2099. Click New to create a tax form for the year you wish to calculate. You may copy the inputs from the current year or just add a blank year. Enter a year and hit the Enter key. A new form is created. A button inscribed with the year appears on the top-left of the window. 2. Filing Status– Enter the applicable filing status. 3. Adjusted Gross Income – Enter the estimated amount of adjusted gross income in which taxes are being calculated. 4. Total Itemized Deductions – Enter the estimated total of allowable itemized deductions. 5. Deductions not subject to phaseout – Enter the estimated total of allowable medical, casualty, or theft losses, and investment-interest deductions (subject to the regular limits and restrictions discussed above). 6. Anticipated Inflation Adjustment – Enter a percent rate by which by which inflation is expected to rise each year. If you are calculating tax for past years, this input is not applicable. 91 PFP Notebook 7. Number of personal exemptions– Enter the number of allowable personal and dependency exemptions. 8. Age in tax year – Enter the taxpayer’s age for the tax year of this analysis. 9. Spouse’s age in tax year – Enter the age of the taxpayer’s spouse for the tax year of this analysis. The tax information will automatically be calculated on the right side of the window as you enter the information into the fields on the left side of the window. The results display the federal income tax due based on the adjusted gross income, itemized deductions, filing status, and number of personal and dependency exemptions. Results are calculated for joint, single, and separate taxpayers as well as those filing as “head of household.” The Include on Report checkbox is used in conjunction with the Preview and Print functions of the program. Include the year’s tax data on the report by checking the box. 92 Chapter 12: The Final Report Once you have all the information for your client entered in the appropriate places of PFP Notebook, you are ready to create the Final Report. To clear all the components from the Final Report, click the Clear button. If you decide not to clear all the items, hit the Cancel button to leave the window without deleting the items from the Final Report. If you do clear the components of the Final Report, by sure to reset your Options (on the Options tab), as PFP returns to the default settings. From the Documents pull-down menu, select Final Report. Click New. The new reports window allows you to select, view and print each selection individually. This section contains all the components needed to create a complete report for your client. Click New to begin a new final report. Then select where you want the report to be added—at the beginning, before the current item, or at the end of the report. Then pick the type of report you would like to add—reports and schedules, paragraphs, letters or an action checklist. Click on the boxes next to the sections you want to include. A check mark means the section will be included. Reports and Schedules When you click the reports and schedules button, you’ll see the sections that can be included in the final report. Choose from the list by clicking the box next to the report or schedule you want to include. You may preview by clicking on the Preview Before You Pick button. 93 PFP Notebook Paragraphs The Paragraphs selection includes a list of pre-written paragraphs for each section of the program. The paragraphs pertain to the Client, Financial Data, Risk Management, Investments, Retirement Planning, Estate Planning, Education Funding, and Income Tax. You may preview the paragraphs before you select them by clicking on Preview Before You Pick. Letters Select from the list of letters to include them in the final report. Choose from the following: Life Insurance Letter, Medical Insurance Letter, Disability Insurance Letter, Combined Insurance Letter, Real Estate Insurance Letter, Umbrella Policy Letter, Engagement Letter (Diagnostic), Engagement Letter (Segmented), Engagement Letter (Updated), Follow-Up Letter, Report Transmittal, Forms Transmittal, and Data Gatherer Letter. Action Checklist Click to include the action checklist you have already created in the final report. 94 Chapter 13: Letters and Master Text For ease-of-use, PFP Notebook provides many pre-designed lists and letters. For those of you who would rather create your own list items and letters, those features are available. Letters The Letters section is used to choose and print letters for your client or insurance companies at different stages of your client’s financial planning. This section can also be used to reword or update any of the letters that are used for the client or for the insurance companies. From the Documents pull-down menu, select Letters. You may spell check the letters by clicking on the Spell Check button that appears at the bottom of the letter. In the Client Letters tab, select a letter from the list: Life Insurance Letter, Medical Insurance Letter, Disability Insurance Letter, Combined Insurance Letter, Real Estate Insurance Letter, Umbrella Policy Letter, Engagement Letter (Diagnostic), Engagement Letter (Segmented), Engagement Letter (Updated), Follow-Up Letter, Report Transmittal, Forms Transmittal, and Data Gatherer Letter. Click New or double click on 95 PFP Notebook the name of the letter you want to use. The chosen letter is then displayed in the text box. From the Insurance Letters tab, create a letter that will be sent to the client’s insurance company. What are Variables? As you look through the letters, you will notice places where words or a combination of letters are placed within double brackets (e.g., <<name>>). These are called variables; they represent specific entries that have already been entered into the program. They save time by keeping information current. Anytime you enter or edit variable information, the information is automatically updated. Certain input fields throughout PFP Notebook are given special codes (variables) so that you can easily enter the codes in the brackets without having to type the entire entry. PFP Notebook prints the information on the letter though they are not visible on the actual window. Only the variable is visible on the window. Use the Preview button to verify that you have entered the correct variable code into the bracket field. The Preview window will show the actual information instead of the variables. Changing Variables If you want to change the variables used in a letter, you can edit them right on the Edit Letters window. For example you can switch <<Address1>> to <<Name>>. Be sure to enclose the new variable in double brackets. If you do not know the name of a certain variable, you will have to activate the variable feature. From the Options pull-down menu, select Show Variable Names. A check mark appears next to the selection, informing that the feature is activated. By activating this feature, a variable in a highlighted box appears every time the cursor runs over a coded entry. For example: ADDRESS1 is the variable that appears for Address line 1 when the cursor is placed anywhere in that input field. (This variable is found in the Client Section – General tab.) Once you note the variable name, return to the Letters window. Type the variable name into the letter. NOTE: If information is changed, remember to change it in the appropriate section of PFP Notebook so that the variable is updated. Do not just type the new information in the Edit Letters window. 96 Letters and Master Text Customize Master Text The program provides all-ready-made lists and paragraphs, yet it provides the freedom to customize for your field of expertise. Master text is provided for the following areas: • • • • • Paragraphs Letters Action Checklist Items Net Worth & Budget Items Progress Schedule Items Note: Remember, all changes made to the Master Text of any area affects all future clients (The Paragraph, and Letters section are dismissed from this rule. Check each section for further explanation.) From the Document pull-down menu, choose Customize Master Text. Use the following buttons to further enhance your master text: 1. 2. 3. 4. 5. 6. New – creates a new paragraph. Up—moves the paragraph up in the sequence Down—moves the paragraph down in the sequence Edit—make changes to the paragraph Print – Accesses the print options of the program. Apply changes– applies the changes you have specified. 97 PFP Notebook Paragraphs: Master Text The Paragraph Master Text section contains all of the paragraphs that are available for the final report. From the Documents pull-down menu, choose Customize Master Text and select Paragraphs. The Paragraph Master Text window appears: Letters: Master Text The Letter Master Text contains all the prewritten letters that are available in the program. From the Documents pull-down menu, choose Customize Master Text and select Letters. The Letter Master Text window appears: 98 Letters and Master Text Action Checklist Items: Master Text The Action Checklist master text contains a list of events you might want to take with your client. Since you may have a different and unique way of working with your clients, the program has a master list that may be changed at any time. From the Documents pull-down menu, choose Customize Master Text and select Action Checklist Items. The Action Checklist Master Items window appears: NOTE: Any changes you make to the Checklist affect only future clients. It does not alter any information on your present clients. Progress Schedule Items: Master Text The Progress Schedule master text contains a list of events used in the Progress Schedule of the Client section. From the Documents pull-down menu, choose Customize Master Text and select Net Progress Schedule Items. The Progress Schedule Master Items window appears: Create a completely new item with the New button. Click the New button and a new cell appears. Proceed to enter a new description. NOTE: Any changes you make only affect future clients. It does not alter any information on your present clients. Net Worth and Budget Items: Master Text The Net Worth and Budget Items allows you to set up the Item Descriptions for the Net Worth and Budget pages in the Financial Data section. From the Documents pulldown menu, choose Customize Master Text and select Net Worth and Budget Items. The Net Worth and Budget Master Items window appears: Create a completely new item with the New button. Click the New button and the Financial Data: New Item window appears. Select the Category where the new item should be placed. Then, provide a description for the item. NOTE: Any changes you make only affect future clients. It does not alter any information on your present clients. 99 PFP Notebook 100 Update Policy When you initially license the program, you are automatically covered by maintenance for an initial six-month period. Before the end of the period, you will be sent an invoice to sign up for the optional maintenance for coverage of the next twelve months. You are eligible for any major and minor updates that are released during the duration of your maintenance agreement. Major updates reflect tax law changes or addition of new features. When new features are added or changes are made due to a tax law change, customers with maintenance will automatically be sent the major update. Minor updates reflect user-interface problems, typos, or minor changes to a calculation. Visit our web site to learn what the latest version is http://www.brentmark.com. Customers with maintenance may call and request the latest version. We are always interested in hearing from you about ways to improve the program. Whether it’s a small change to the user-interface or a new area of coverage, we would like to hear from you. Technical Assistance Technical assistance is available by telephone, FAX, postal mail, e-mail, or the Internet. • • • • • For assistance by e-mail, contact us at [email protected]. For assistance using the Internet, visit our web site at http://www.brentmark.com. For assistance by telephone call (407) 306-6160 between 9:00 AM and 6:00 PM eastern time, Monday through Friday. For assistance by FAX, send your FAX to (407) 306-6107. For assistance by mail, send a sample printout to: Brentmark Software 3505 Lake Lynda Dr., Ste. 212 Orlando, FL 32817-8327 If your questions concern calculations, please have a list of your exact input values available when you contact us. We want the software to be as accurate as possible, and we want you to be satisfied that it is accurate. We would like to hear from you if you think there is a problem. 101 PFP Notebook 102 Index Index A D Action Checklist · 27 Adding Description · 35 Advanced Settings: Customize Master Text · 99; Edit Letters · 97 Amounts Invested Report · 74 Asset Life Schedule · 65 Data Gatherer Disk: Create · 20; Import · 22 Debt Structure · 45 Delete Client · 29 Deleting Description · 35 B Begin Year · 68 Budget Information · 38; Changing the Master Text · 39 Budget Projections · 42; Creating an Override · 41, 43; Removing an Override · 43 C Calculator: Standard · 25 Capital Assets · 51 Checklist: Power of Attorney for Health Care · 81 Client: Action Checklist · 27 Client Section: Client Information · 33; Goals and Objectives · 34; Key Factors · 34; Progress Schedule · 35 College Cost Estimation · 85, 87, 88, 89 Contents · i Copy Client · 29 Current Year · 68 Customize Master Text · 99; Action Checklist Items; Master Text · 101; Letters; Master Text · 100; Net Worth and Budget Items; Master Text · 101; Paragraphs; Master Text · 100; Progress Schedule Items; Master Text · 101 E Edit Letters · 97; Changing Variables · 98; Variables · 98 Edit menu: Insurance company listing · 26 End Year · 68 Estate Distribution Flowchart · 82 Estate Planning Section: Checklist; Effectiveness of Estate Planning · 76; Estate Planning · 76 Estate/Gift Tax Worksheet · 78; Estate Tax · 78; Gift Tax · 80 Expenses Report · 74 Extract of Will and Trust Worksheet · 75 F Financial Data Section: Net Worth Information · 38 Find Button · 29 Forthcoming Asset Expectancies · 77 I ID Conflict · 30 Income Report · 74 Income Tax Section: Income Tax Checklist · 92; Income Tax Estimation · 92; Income Tax Worksheet · 91 Initial Forms Packet · 23; Generate · 23 Insurance Action Letters · 53 Insurance company listing · 26 Insurance Needs Analysis · 49; Capital Needs · 50; Current Cash Needs · 49 Investment Portfolio · 56; Import from Net Worth · 56 Investment Strategy Worksheet · 56 Investment Surplus · 72 Investments Report · 74 Investments section: General page · 55 103 PFP Notebook L S Life Expectancy · 73 Life Insurance Questionnaire · 53 Select Client · 29 Summary Report · 74 M T Minimum Distributions · 73 Minimum Distributions Report · 74 Mortgage Payment Computation · 44 Taxes on Investments Report · 74 Technical Assistance · 103 Transfer Clients · 30 N U Net Worth Information · 38 Net Worth Projections · 40; Removing an Override · 41 Update Policy · 103 P V Variables · 98; Changing · 98 Policy Analyzer: Disability Insurance · 48; Life Insurance · 47; Long-Term Health Care · 48; Major Medical & Health · 48 Portfolio Allocation Worksheet · 55 Progress Schedule · 35 R Retirement Income Requirements Worksheet · 58 Retirement planning section: Retirement income requirements worksheet page · 58 Retirement Planning Worksheet · 59; Future Value of Reirement Income Required · 60; Present Value of Amount at Date of Retirement · 61 104 W Withdrawal Priority · 72 Y Yearly Retirement Funding · 66; Entering the Dates · 67 License Agreement This software is protected by both United States copyright law and international treaty provisions. You must treat this software just like a book, except that you may copy it onto a computer to be used and you may make archival copies of the software for the sole purpose of backing up our software and protecting your investment from loss. You must also agree not to reverse engineer the software. By saying “just like a book,” Brentmark means, for example, that this software may be used by any number of people, and may be freely moved from one computer location to another, so long as there is no possibility of it being used at one location or on one computer while it is being used at another. Just as a book cannot be read by two different people in two different places at the same time, neither can the software be used by two different people in two different places at the same time (unless, of course, Brentmark’s copyright is being violated). Limited Warranty Brentmark Software, Inc. warrants the physical diskette(s) and physical documentation enclosed herein to be free of defects in materials and workmanship for a period of sixty days from the purchase date. If Brentmark receives notification within the warranty period of defects in materials or workmanship, and such notification is determined by Brentmark to be correct, Brentmark will replace the defective diskette(s) or documentation. The entire and exclusive liability and remedy for breach of this Limited Warranty shall be limited to replacement of defective diskette(s) or documentation and shall not include or extend to any claim for or right to recover any other damages, including but not limited to, loss of profit, data or use of the software, or special, incidental or consequential damages or other similar claims, even if Brentmark has been specifically advised of the possibility of such damages. In no event will Brentmark’s liability for any damages to you or any other person ever exceed the lower of suggested list price or actual price paid for the license to use the software, regardless of any form of the claim. BRENTMARK SOFTWARE, INC. SPECIFICALLY DISCLAIMS ALL OTHER WARRANTIES, EXPRESS OR IMPLIED, INCLUDING BUT NOT LIMITED TO, ANY IMPLIED WARRANTY OF MERCHANTABILITY OR FITNESS FOR A PARTICULAR PURPOSE. Specifically, Brentmark makes no representation or warranty that the software is fit for any particular purpose and any implied warranty of merchantability is limited to the 60-day duration of the Limited Warranty covering the physical diskette(s) and physical documentation only (and not the software) and is otherwise expressly and specifically disclaimed. The limited warranty gives you specific legal rights; you may have others that may vary from state to state. Some states do not allow the exclusion of incidental or consequential damages, or the limitation on how long an implied warranty lasts, so some of the above may not apply to you. Governing Law and General Provisions The License Statement and Limited Warranty shall be construed, interpreted and governed by the laws of the State of Florida and any action hereunder shall be brought only in Florida. If any provision is found void, invalid or unenforceable it will not affect the validity of the balance of this License and Limited Warranty that shall remain valid and enforceable according to its terms. If any remedy hereunder is determined to have failed of its essential purpose, all limitations of liability and exclusion of damages set forth herein shall remain in full force and effect. This License and Limited Warranty may only be modified in writing signed by you and a specifically authorized representative of Brentmark. All rights not specifically granted in this statement are reserved by Brentmark.