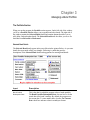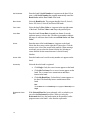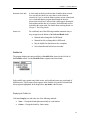
1
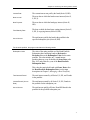
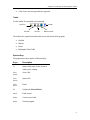
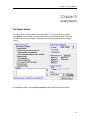
Savings Bond Toolkit
Software and User Manual (Version 2002.10)
Copyright © 2000-2002, Brentmark Software, Inc., All Rights Reserved.
May 3, 2002
Brentmark® Software, Inc.
3505 Lake Lynda Drive, Suite 212
Orlando, FL 32817-8327
Sales
1-800-879-6665
Technical Assistance
407-306-6160
Fax
407-306-6107
www.brentmark.com
[email protected]
[email protected]
[email protected]
2
Table of Contents
Chapter 1 ..............................................................................................5
Introducing the Savings Bond Toolkit.................................................................................. 5
Installing the Program.............................................................................................. 5
Uninstalling the Program ......................................................................................... 5
An Overview of the Savings Bond Toolkit ..................................................................... 5
Organizing a Portfolio.............................................................................................. 5
Entering Data into a Bond Portfolio ........................................................................ 6
Viewing Results ....................................................................................................... 6
Printing Reports ....................................................................................................... 8
Reissuing Bonds....................................................................................................... 8
Getting Help ............................................................................................................. 8
Toolbar......................................................................................................................... 9
Shortcuts Keys ............................................................................................................. 9
Chapter 2 ........................................................................................... 11
Working with Files ............................................................................................................ 11
Creating a New File ............................................................................................... 11
Opening an Existing File ....................................................................................... 11
Importing Data from an EZBond File.................................................................... 11
Saving a File ........................................................................................................... 11
Saving an Existing File with a New Name or to a New Location......................... 12
File Location.......................................................................................................... 12
Reopen File ............................................................................................................ 12
Exiting the Program ............................................................................................... 12
Chapter 3 ........................................................................................... 13
Managing a Bond Portfolio................................................................................................ 13
The Portfolio Section .................................................................................................... 13
Selected Bond Details ................................................................................................ 13
Portfolio List.............................................................................................................. 15
Displaying the Portfolio List.................................................................................. 15
Selecting a Bond from the Portfolio List ............................................................... 16
Adding a New Bond to a Portfolio ........................................................................ 16
Deleting a Bond from a Portfolio........................................................................... 16
Updating a Bond in a Portfolio .............................................................................. 17
Redeeming a Bond ................................................................................................. 17
Finding a Bond in a Portfolio................................................................................. 17
Chapter 4 ........................................................................................... 19
Creating Reports ............................................................................................................... 19
The Reports Section...................................................................................................... 19
Previewing Reports................................................................................................ 21
Setting up a Printer................................................................................................. 22
Printing Reports ..................................................................................................... 22
Saving a Report as a Text or Spreadsheet File ...................................................... 22
The Report Options Window ........................................................................................ 23
Formatting the Text of a Report............................................................................. 23
Formatting Page Margins....................................................................................... 23
Printing the Date and Time .................................................................................... 23
Printing Page Numbers .......................................................................................... 23
Selecting the Number of Copies to Print ............................................................... 23
Printing for Windows NT ...................................................................................... 23
Chapter 5 ........................................................................................... 25
Working with Forms .......................................................................................................... 25
The Forms Section ........................................................................................................ 25
Selecting Forms ...................................................................................................... 25
Entering Form Data................................................................................................ 26
Selecting Bonds to Reissue .................................................................................... 26
Excluding Bonds from the Select Bond Tab.......................................................... 27
Previewing Forms .................................................................................................. 27
Printing Completed Forms ..................................................................................... 28
License Agreement......................................................................... 29
Index ................................................................................................... 30
4
Chapter 2: Introducing the Savings Bond Toolkit
Chapter 1
Introducing the Savings Bond Toolkit
Getting started with the Savings Bond Toolkit is easy. Before you install the program, be
sure that you’re running a Windows 95 or later operating system. The Savings Bond
Toolkit does not run on Windows 3.1 or earlier operating systems.
Installing the Program
1. Insert the disk into the disk drive.
2. On the Windows Taskbar, click the Start button.
3. On the Start menu, click Run. The Run dialog box appears. In the Open box,
A:\SETUP.EXE should appear. If it doesn’t, type A:\SETUP.EXE.
4. Click OK.
5. The setup program begins. Follow the instructions in the setup program.
Uninstalling the Program
1. On the Windows Taskbar, click the Start button.
2. Point to Settings and click Control Panel. The Control Panel window appears.
3. Click Add/Remove Programs. The Add/Remove Program Properties dialog box
appears.
4. Use the scrollbar to find the Savings Bond Toolkit. When you find it, click the
program title. Notice that the Add/Remove button is now functional.
5. Click the Add/Remove button. The uninstall program begins. Follow the
instruction in the uninstall program.
An Overview of the Savings Bond Toolkit
The Savings Bond Toolkit allows you to quickly and easily manage a client’s bond
portfolio. The program allows you to value Series E, Series S, Series EE, Series I, Series
H, and Series HH bonds, to print and format bond reports, and to prepare bond reissue
forms.
Organizing a Portfolio
When you open the program, the left side of the window displays the contents of the
current file. The Help file and this manual, refer to this section as the Portfolio List. Use
5
the Portfolio List to group the file’s contents and to select individual bonds. For more
details, see Chapter 3, Managing a Bond Portfolio.
Entering Data into a Bond Portfolio
When you open the program, the right side of the window displays details for the
Selected Bond. Use this section to add, delete, update, or find bonds. Also, use this
section to identify bonds as Redeemed or Reissued.
The program makes it easy to enter multiple bonds. For example, if you enter a valid
Serial Number, the program automatically enters the Series and Face Value . Or if
you’re entering bonds that have the same Owner, the program automatically enters the
Social Security Number. For more details, see Chapter 3, Managing a Portfolio.
Viewing Results
When you open the program, the bottom portion of the window displays the results in
two columns of results. The left column lists the results of the Selected Bond. The right
column lists values for the Entire Portfolio.
To calculate the report values, the program uses the Redemption Value Table, published
by the Bureau of Public Debt.
Following are descriptions of what the program calculates. To create reports, see Chapter
4, Creating Reports.
For each bond the program calculates the following results:
Redemption Value
The value of the bond as of the Bond Portfolio
Redemption Date. For bonds with Issue Dates after May
1997 and within five years of the Bond Portfolio
Redemption Date, this value always includes the 3-month
interest penalty.
Total Interest Earned
The total interest earned since the Issue Date (Series E, S,
EE, I).
Interest Earned (Year to
Date)
The total interest earned as of the redemption year (Series
E, S, EE, I).
Yield to Date
The average interest rate since the Issue Date (Series E, S,
EE, I).
6
Chapter 2: Introducing the Savings Bond Toolkit
Interest Rate
The current interest rate paid by the bond (Series H, HH).
Next Accrual
The next date at which the bond accrues interest (Series E,
S, EE, I).
Next Payment
The next date at which the bond pays interest (Series H,
HH).
Final Maturity Date
The date at which the bond stops earning interest (Series E,
S, EE, I) or paying interest (Series H, HH).
Annual Income
The total income paid by the bond in the portfolio in the
specified redemption year (Series H, HH).
For the entire portfolio, the program calculates the following results:
Redemption Value
The value of the entire portfolio as of the Bond Portfolio
Redemption date. Indicating bonds as Reissued or
Redeemed lowers the Redemption Value for the entire
portfolio. This value includes any 3-month interest
penalties that may occur for bonds with Issue Dates after
May 1997 and within five years of the Bond Portfolio
Redemption Date.
This value does not include bonds with Issue Dates after
the Bond Portfolio Redemption Date (see the input
descriptions in Chapter 3, Managing a Bond Portfolio).
Total Interest Earned
The total interest earned by all Series E, S, EE, and I bonds
in the portfolio.
Interest Earned (Year to
Date)
The total interest earned by all Series E, S, EE, I bonds in
the portfolio for the redemption year.
Annual Income
The total income paid by all Series H and HH bonds in the
portfolio for the specified redemption year.
7
Printing Reports
The program gives you a variety of printing and report options. For example, print only
bonds that are Matured and Exchangeable or print only bonds that are Matured and
Non-exchangeable. For more details, see Chapter 4, Creating Reports.
Reissuing Bonds
The program allows you to prepare bond reissue forms. You can enter your request
directly into the program, and the program will automatically fill out the request form. Or
you can print a form and complete it yourself. For more details, see Chapter 5, Reissuing
Bonds.
Getting Help
A Hint Line appears below the results. The Hint Line displays short hints to help you
with data entry. As you move the pointer across buttons, boxes, and other areas of the
window, the Hint Line displays information specific to each item.
The program also has an online Help system. Just click the question mark graphic and a
Help topic for the section in which you’re working appears. Or use the Help menu to
view the Help Contents or to search the Help Index.
Brentmark also provides technical assistance.
•
Assistance by telephone is available Monday through Friday between 9:00 AM
and 6:00PM Eastern Standard Time at (407) 306-6160.
•
For assistance by fax, send your fax to (407) 306-6107.
•
For assistance via e-mail, send your questions and comments to
[email protected].
•
For assistance by postal mail, write to:
Brentmark Software, Inc.
3505 Lake Lynda Drive, Suite 212
Orlando, FL 32817-8327
Please include the following information in your correspondence:
8
•
The name to which the program is registered.
•
A contact phone number.
•
The program name and version number.
•
Your system configuration.
•
A sample printout or description of the problem.
Chapter 2: Introducing the Savings Bond Toolkit
•
A list of any error messages that have appeared.
Toolbar
Use the toolbar for commonly used commands.
Open Files.
Save Files.
Get Help.
Print Files.
Brentmark Online.
The toolbar also contains four buttons that access each section of the program:
•
Portfolio
•
Reports
•
Forms
•
Redemption Value Table
Shortcuts Keys
The program provides a number of Shortcut Keys.
Keys
Description
F1
Opens a Help topic for the section in
which you’re working.
F2 or
Ctrl+S
Saves a file.
F3 or
Ctrl+O
Opens a file.
F6 or
Ctrl+P
Prints.
F9
Updates the Selected Bond.
Ctrl+F
Finds a bond.
Ctrl-N
Creates a new bond.
Alt-F4
Exits the program.
9
10
Chapter 2: Introducing the Savings Bond Toolkit
Chapter 2
Working with Files
Refer to this chapter for procedures that you’ll frequently use when working with files.
Creating a New File
•
On the File menu, click New. If you have not saved the open file, the program
prompts you to save it before creating a new file.
Opening an Existing File
1. On the File menu click Open. Or on the toolbar, click the Open graphic. The
Open dialog appears.
2. In the File name box, enter the name of the file and proper extension. Be sure you
have selected the proper drive and folder of your file.
Importing Data from an EZBond File
1. On the File menu click Import from EZBond. The Open dialog appears.
2. In the File name box, enter the name of the file and proper extension (.db). Be
sure you have selected the proper drive and folder of your file.
Note
EZBond was a bond program that was distributed through Jane Schuck & Associates.
Saving a File
•
On the File menu, click Save. Or on the toolbar, click the Save graphic. The
program saves the file using the current file name.
1. If the file has not been saved before, the Save As dialog appears.
2. Select the drive and folder in which to save the file.
3. In the File name box, type a name for the file. The program automatically adds
the proper extension (.svt) to the file name.
11
Saving an Existing File with a New Name or to a New Location
1. Open an existing file.
2. On the File menu click Save As. The Save As dialog appears.
3. Select the drive and folder in which you want to save the file.
4. In the File name box, enter a name for the new file. The program automatically
adds the proper extension (.svt) to the file name.
File Location
On the File menu, click File Location. This option allows you to specify a default folder
where data files will be stored to or opened from. When this option is selected, the
program will use the specified default folder the next time you open or save a file. Note
that when a file is opened or saved from some other folder, then that other folder
becomes the default folder for subsequent open or save operations.
Reopen File
On the File menu, click Reopen File. A list of recently used files appears. Select the file
you wish to reopen.
Exiting the Program
1. Save the file with which you are working.
2. On the File menu, click Exit. If you haven’t saved your work, the program
prompts you to save it.
12
Chapter 3
Managing a Bond Portfolio
The Portfolio Section
When you run the program, the Portfolio section appears. On the left side of the window
you’ll see a Portfolio List that allows you to organize and select bonds. The right side of
the window contains the Selected Bond details and contains buttons that allow you to
add, delete, find and update bonds. The Selected Bond details also allow you to see if a
bond has been Reissued or Redeemed.
Selected Bond Details
The Selected Bond details appear in the part of the window pictured below. As you enter
details, the report totals reflect your changes. Following is a table that provides
descriptions of the Selected Bond details and suggestions for entering bond details.
Input
Description
Bond Portfolio
Redemption Date
This is the date for which the program values a bonds portfolio.
The Bond Portfolio Redemption Date does not have to be the
actual date of the bond’s maturity. By default, the program uses
the current date. To enter another date, clear the Use Current
Date check box and enter a date in month/year format.
Serial Number
Enter the bond’s Serial Number as it appears on the bond. If you
enter a valid Serial Number, the program automatically enters the
Bond Series and the Face Value of the bond.
Bond Series
Select the Bond Series. The program handles Series E, Series S,
Series EE, Series I, Series H, and Series HH bonds.
Face Value
Select the bond’s Face Value as it appears in the top-right corner
of the bond. The Face Value is not always the purchase price.
Issue Date
Enter the bond’s Issue Date in month/year format. Or use the
up/down arrows to select a date. The dates in parentheses indicate
the range of valid issue dates for the current Bond Series and Face
Value.
Owner
Enter the name of the bond Owner as it appears on the bond.
Notice the down-arrow on the right side of Owner box. Click the
arrow to view a list of the owners in the portfolio. When entering a
new bond, you can select the Owner from the list. Selecting an
owner from the list also enters that owner’s Social Security
Number.
Owner SSN
Enter the bond owner’s social security number as it appears on the
bond.
Ownership
Select the how the bond is registered
•
Click Single if only the owner’s name appears on the bond.
•
Click with Co-Owner if a co-owner’s name appears on the
bond. The co-owner has a current interest and future
interest in the bond.
•
Click with Beneficiary if a beneficiary’s name appears on
the bond. The beneficiary has no current interest in the
bond.
Note
The Co-Owner box or the Beneficiary box only appear if Ownership is not
Single.
Redeemed Check
Box
14
If the Selected Bond has been redeemed, sold, or cashed in, you
can select the Redeemed check box. When you select the
Redeemed check box, the bond remains in the portfolio, but the
program removes the bond’s value from the report totals.
Chapter 4: Creating Reports
Reissued Check Box
A check mark in this box indicates that a bond has been reissued.
You can click the check box at any time to mark a bond as
reissued. Or if you’ve used the forms section to reissue a bond, and
you’ve indicated that the program should mark the bond as
reissued, this check box is selected and a label appears bearing the
form number and the date of re-issuance. Reissued bonds are not
included in the report totals. For details about reissuing bonds, see
Chapter 5, Reissuing Bonds.
Status Line
For each bond, one of the following reminder statements may or
may not appear at the bottom of the Selected Bond details.
•
Matured and exchangeable for HH bonds.
•
Matured but Not exchangeable for HH bonds.
•
May be eligible for education tax-free exemption.
•
Not redeemable until held at least 6 months.
Portfolio List
The program displays the entire portfolio in a Portfolio List, located on the left side of
the Portfolio section. Use the Portfolio List to organize and select bonds.
Each portfolio may contain many bond owners, and each bond owner may own bonds of
different series. The file name always appears in the Portfolio List, and the Selected Bond
always appears highlighted. In the image above, my bonds is the file name.
Displaying the Portfolio List
Click the Group by box and select one of the following methods:
•
None —Groups the bonds alpha numerically by serial number.
•
Owner —Groups the bonds by Owner name.
15
•
Co-Owner —Groups bonds by Co-Owner name. Bonds with no co-owner appear
under the heading (no-coowner).
•
Beneficiary —Groups the bonds by Beneficiary name. Bonds with no co-owner
appear under the heading (no beneficiary).
•
Series —Groups the bonds by series.
Selecting a Bond from the Portfolio List
•
In the Portfolio List, click the bond for which you want to display details. The
program highlights the bond in the Portfolio List and displays the bond’s details
in the right side of the window.
Adding a New Bond to a Portfolio
There are four ways to add a bond to a portfolio:
•
On the File menu, click New Bond.
•
In the Portfolio section, click the New Bond button.
•
On the keyboard, press Ctrl+N.
•
If the last click occurred in the Portfolio List, press the insert key on the
keyboard.
When entering a new bond, the words (New_Bond) appear in the Serial Number box
and in the Portfolio List. As you enter the bond details, the program appropriately
positions the bond in the Portfolio List and updates the report totals.
When adding new bonds, the program includes the following features to keep data entry
minimal:
•
If you enter a valid Serial Number, the program automatically enters the Series
and Face Value of the bond.
•
When adding new bonds, the program assumes the Owner and CoOwner/Beneficiary of the last Selected Bond are the same as those of the new
bond.
•
If the new bond’s Owner is already part of a portfolio, the program automatically
enters that Owner’s SSN (social security number).
Deleting a Bond from a Portfolio
1. In the Portfolio List, click the bond that you want to delete.
2. Delete the bond one of the following ways:
•
16
Click the Delete Bond button.
Chapter 4: Creating Reports
•
Click Delete Bond on the File menu.
•
Press the Delete key on your keyboard.
Updating a Bond in a Portfolio
In the Portfolio List, click the bond to update. The details of the Selected Bond appear
in the right side of the window. As you edit the Selected Bond, the Update Bond button
appears. The program updates the bond each time you:
•
Press Enter or Tab on your keyboard.
•
Press F9 on your keyboard.
•
Click the Update Bond button.
•
Click another input box.
•
Click the Portfolio List.
Redeeming a Bond
1. In the Portfolio List, click the bond to redeem. The details of the Selected Bond
appear in the right side of the window.
2. Click the Redeemed check box. The program removes the value of the bond from
the portfolio and the reports, but leaves the bond details in the portfolio.
Finding a Bond in a Portfolio
You can quickly search for a bond using its Serial Number. Begin your search one of the
following ways:
•
On the File menu, click Find Bond.
•
In the Portfolio section, click the Find Bond button.
•
On your keyboard, press CTRL+F.
Any of these methods causes the Find box to appear. In the Find box, enter the bond’s
Serial Number and click OK or press the Enter key. The program finds the bond,
highlights it in the Portfolio List, and displays its details. If the program does not find the
bond, the message Not found appears in the Find box.
17
18
Chapter 4: Creating Reports
Chapter 4
Creating Reports
The Reports Section
Use the Reports section to prepare results for printing. To access the Reports section,
click Reports on the toolbar. A portion of the Reports section appears below. Following
is a table that provides descriptions of the Reports section and suggestions for preparing
reports.
For additional options, click the Report Options button at the bottom of the window.
19
Input
Description
Summary of Portfolio
Click the radio button to select a report that is a summary of
the portfolio. The summary is an inventory of the bond
portfolio by Accrual bonds (Series E, S, EE, I) and Current
Income bonds (Series H, HH) and shows the number of
bonds, inventory value, redemption value and interest earned.
Redemption value equals the value of all bonds in the
portfolio if they were redeemed. This excludes nonredeemable bonds (held less than six months). Inventory value
equals the redemption value of all bonds in the portfolio plus
the purchase price of all non-redeemable bonds. *
Entire Portfolio
Click this radio button to print a report that includes all bonds
in a portfolio.
Interest Earning (not
matured) bonds
Click this radio button to print a report of interest earning
bonds. Select the types of interest earning bonds to include:
Redeemable or Non-redeemable.
Redeemable or
Exchangeable
Click this check box to print a report that includes bonds that
are eligible for redemption or exchange. Only Series E, EE,
and S bonds can be exchanged for HH bonds. These bonds are
eligible for redemption or exchange six months after their
issue dates. They become non-exchangeable one year after the
final maturity date.
Non-Redeemable (held
less than 6 months)
Click this check box to print a report that includes interestearning bonds that are non-redeemable bonds. Bond owners
cannot redeem bonds if they’ve held them for less than six
months.
Matured Bonds
Click this radio button to print a report of matured bonds.
Exchangeable
Click this check box to print a report that includes matured
bonds that are exchangeable. Only Series E, EE, and S bonds
are exchangeable for Series HH bonds. These bonds are
exchangeable six months after their issue dates and up to one
year after their final maturity dates (the date at which a bond
stops earning interest).
Non-Exchangeable
Click this check box to print a report that includes matured
bonds that are not exchangeable. Bonds are non-exchangeable
within the first six months of their issue dates and one year
after their final maturity dates (the date at which a bond stops
earning interest).
20
Chapter 4: Creating Reports
Education Tax Exempt
Bonds
If bond owners meet certain qualifications and they use their
Series EE and I bonds for educational tuition, the Series EE
and I bonds may qualify for tax exemption. Click this radio
button to print a report of bonds that may be eligible for tax
exemption.
Reissued
Click this radio button to print a report of reissued bonds.
Redeemed
Click this radio button to print a report of redeemed bonds.
You have to mark bonds as redeemed by clicking the
Redeemed check box in the Portfolio section.
Series E, Series S, Series
EE, Series I, Series H,
Series HH
The program values bonds of these series. Click the bond
series to include in the reports.
Owner, Co-Owner,
Beneficiary
You can print reports according to Ownership. For example,
if you want to print reports for all of the beneficiaries in a
portfolio, click the Beneficiary radio button. Then from the
Beneficiary list, click All. Or you may want to print reports
for a single Co-Owner in a portfolio. In this case, click the
Co-Owner radio button. Then from the Co-Owner list, click
the name of the particular Co-Owner for whom you want to
print reports.
All or Range
You can print reports according to Issue Dates. Click All to
print all bonds issued to selected Owner(s), Co-Owner(s) or
Beneficiary(ies). To print reports for bonds issued within a
range of dates, click the Range radio button and enter the
range using month/year format.
Heading
Use the Heading box to include introductory text for your
reports. On the printed reports, the text appears below the
Report Title. To view your Heading, click the Print Preview
button at the bottom of the Reports section.
*Note: Unlike the rest of the program, the summary report
does not include non-redeemable bonds when reporting the
redemption value. Instead, it illustrates the total value of the
portfolio in the column titled “Inventory Value.”
Previewing Reports
To preview reports before printing, click the Print Preview button that appears in the
lower portion of the Reports section. The Print Preview window appears. To magnify the
21
window’s contents, click Zoom. To view more of the window’s contents, use the scroll
bar on the right side of the window.
Setting up a Printer
1. On the File menu, click Print Setup. Or in the Reports section, click the Printer
Setup button. The Print Setup dialog appears.
2. For help setting up a printer, click the ? button that appears in the top-right corner
of the dialog box. A question mark appears.
3. Move the cursor to the item with which you need help and click. A Help topic
appears for that item.
Printing Reports
1. In the Reports section, select the type of report to print.
2. Select the bonds to include on the report.
3. Select the issue dates to include on the report
Note
For details, see the description of the inputs at the beginning of this chapter.
Saving a Report as a Text or Spreadsheet File
1. Click the Reports button on the toolbar. The Reports section appears.
2. Click the Print to File button, located near the bottom of the window. The
Exporting Reports box appears.
3. Click Text File or Spreadsheet File.
4. Click Create File.
22
Chapter 4: Creating Reports
The Report Options Window
Use the Report Options window to format your reports for printing. The Report Options
window allows you to format text and layout and include other options for printing. All
report options are automatically saved, so the next time you run the program, you don’t
have to reformat your reports. To access the Report Options window, click Report
Options on the File menu.
Formatting the Text of a Report
1. Under the Fonts heading in the Report Options window, click the text you want
to format. The Font dialog box appears.
2. Select the Font, Style, and Size to apply to the text and click OK.
3. Notice the description of the text in the Report Options window has changed.
Formatting Page Margins
•
Under the Page Margins heading in the Report Options window, enter the Top,
Bottom, Left, and Right page margins (in inches).
Printing the Date and Time
•
Under the Printing Options heading of the Report Options window, click the
Print Date and Print Time check boxes. The date and time will appear in the
report’s title bar.
Printing Page Numbers
There are two ways to include page numbers on printed reports:
•
Under the Printing Options heading of the Report Options window, click the
Print Page Numbers check box.
Selecting the Number of Copies to Print
•
Under the Printing Options heading of the Report Options window, enter a
number in the Number of Copies box.
Printing for Windows NT
•
Under the Printing Options heading of the Report Options window, click NT
Printing.
23
24
Chapter 5
Working with Forms
The Forms Section
One of the most useful features of the Savings Bond Toolkit is its ability to automatically
fill out and print bond reissue forms. How does this work? Using a step-by-step process,
the Savings Bond Toolkit allows you to enter all of a form’s information directly into the
program. After you’ve entered the required information, the Savings Bond Toolkit works
seamlessly with the Adobe Acrobat Reader, allowing you to view and print a completed
form in Portable Document Format, or PDF.
Many late model computers already have the Adobe Acrobat Reader installed. If you
don’t have Adobe Acrobat Reader 4.0 or later, the program displays one of the following
messages:
•
A message indicating that Adobe Acrobat Reader is not installed.
•
A message indicating the version installed on your system and that Version 4.0 is
required.
If you need Adobe Acrobat Reader, you can download a free copy from the Adobe
website. Just point your web browser to www.adobe.com.
Use the Forms section to select forms, enter form data, select bonds to reissue, preview
forms and print forms.
Selecting Forms
To select a form, use the Step 1 tab in the Forms section. The program includes the
following forms:
Form 1851
Use this form to request a reissue of United States Savings Bonds to a
personal trust.
Form 1938
Use this form to request a reissue of United States Savings Bonds/Notes
during the lives of both co-owners. For Series I, use Form 5387.
Form 4000
Use this form to request a reissue of United States Savings Bonds (or to
add beneficiary or co-owner, remove beneficiary or decedent, show
change of name, and/or correct error in registration). For Series I, use
Form 5387.
Form 5387
Use this form to request a reissue of Series I United States Savings
Bonds.
You must prepare a separate reissue form for each Owner and Co-Owner/Beneficiary
combination. The reason is that the forms only allow the signatures of two people. Also,
if you think that you will have questions while entering data, print a blank form and view
the detailed instructions that each form provides. To print a blank form, click the Print
Blank Form button on the Step 1 tab.
Entering Form Data
Use the Step 2 and Step 3 tabs in the Forms section to enter the data that each form
requires. If you have questions while entering data, print a blank form and view the
detailed instructions that each form provides. To print a blank form, click the Print
Blank Form button on the Step 1 tab.
Selecting Bonds to Reissue
Use the Select Bonds tab to select the bonds for which you are requesting reissues. You
can select bonds using the top portion of the tab, pictured below, or you can select
individual bonds by clicking each bond in the list that appears at the bottom of the tab.
26
Chapter 7: Printing Reports
Excluding Bonds from the Select Bond Tab
By default, the program prints all bonds appearing in the list at the bottom of the Select
Bond tab. However, you may want to exclude bonds from the list. To exclude bonds,
hold down the Ctrl key and click the bonds that you want to exclude. If you accidentally
exclude all bonds, simply reselect the Owner that you previously specified. The program
then selects the entire list again.
Input
Description
Owner
The Owner determines which bonds you can select. Click the
Owner drop-down list and select an Owner.
Co-Owner/Beneficiary
Click the Co-Owner check box or click the Beneficiary check
box and select the appropriate name from their respective dropdown lists. You can also clear both check boxes. Notice the
bottom portion of the Select Bonds tab displays bonds associated
with the Owner and Co-Owner/ Beneficiary that you’ve
selected. Also, remember you must complete a separate reissue
form for each Owner and Co-Owner/Beneficiary combination.
The reason is that the forms only allow the signatures of two
people.
Series Types
Click the Series types check boxes that identify the series of
bonds for which you want to request reissues. Only bonds of
these series appear in the Reissued Bond List.
Issue Dates
Click All to include all bonds of the specified Series Types that
were issued in the names of the Owner and CoOwner/Beneficiary that you’ve selected. Click Range and enter
a range of dates to include bonds that were issued within a range
of Issue Dates.
Reissued Bond List
The bottom portion of the Select Bonds tab displays all bonds
associated with the Owner, Co-Owner/Beneficiary, Series
Types, and Issue Dates that you’ve selected.
Previewing Forms
Clicking the Preview Form button that appears at the bottom of the Select Bonds tab
opens the form into the Adobe Acrobat Reader. Each form contains a page that displays
the bonds that should be reissued. However, this page may not display all of the bonds
that you’ve selected. This does not mean that the bonds will not print. The form page
27
only has room for a certain number of bonds. The program will print any bonds that do
not fit into this section on an additional page. Unfortunately, you cannot preview this
additional page.
Printing Completed Forms
Note
When you Print from the Forms section and your selected printer is different than your default printer, the
program overrides your selected printer and prints the forms to your default printer.
To print a completed form
1. Click the Print Form button located at the bottom of the Select Bonds tab. A
confirmation prompt appears, indicating that the forms will print to the default
printer.
2. Click Yes to print the forms. A second prompt appears. If you click Yes to
indicate that the bonds are reissued, the program selects the Reissued check box
in the Portfolio section and displays the date on which you print the form.
Remember, the program leaves the Reissued bonds in the portfolio, but removes
their values from the report totals. If you click No, the program prints the form,
but does not indicate that the bonds are Reissued and does not remove their
values from the report totals.
28
Chapter 7: Printing Reports
License Agreement
This software is protected by both United States copyright law and international treaty provisions. You
must treat this software just like a book, except that you may copy it onto a computer to be used and you
may make archival copies of the software for the sole purpose of backing up our software and protecting
your investment from loss. You must also agree not to reverse engineer the software.
By saying “just like a book, Brentmark means, for example, that this software may be used by any number
of people, and may be freely moved from one computer location to another, so long as there is no
possibility of it being used at one location or on one computer while it is being used at another. Just as a
book cannot be read by two different people in two different places at the same time, neither can the
software be used by two different people in two different places at the same time (unless, of course,
Brentmark's copyright is being violated).
Limited Warranty
Brentmark Software, Inc. warrants the physical diskette(s) and physical documentation enclosed herein to
be free of defects in materials and workmanship for a period of sixty days from the purchase date. If
Brentmark receives notification within the warranty period of defects in materials or workmanship, and
such notification is determined by Brentmark to be correct, Brentmark will replace the defective diskette(s)
or documentation.
The entire and exclusive liability and remedy for breach of this Limited Warranty shall be limited to
replacement of defective diskette(s) or documentation and shall not include or extend to any claim for or
right to recover any other damages, including but not limited to, loss of profit, data or use of the software,
or special, incidental or consequential damages or other similar claims, even if Brentmark has been
specifically advised of the possibility of such damages. In no event will Brentmark's liability for any
damages to you or any other person ever exceed the lower of suggested list price or actual price paid for the
license to use the software, regardless of any form of the claim.
BRENTMARK SOFTWARE, INC. SPECIFICALLY DISCLAIMS ALL OTHER WARRANTIES,
EXPRESS OR IMPLIED, INCLUDING BUT NOT LIMITED TO, ANY IMPLIED WARRANTY OF
MERCHANTABILITY OR FITNESS FOR A PARTICULAR PURPOSE. Specifically, Brentmark makes
no representation or warranty that the software is fit for any particular purpose and any implied warranty of
merchantability is limited to the 60-day duration of the Limited Warranty covering the physical diskette(s)
and physical documentation only (and not the software) and is otherwise expressly and specifically
disclaimed.
The limited warranty gives you specific legal rights; you may have others that may vary from state to state.
Some states do not allow the exclusion of incidental or consequential damages, or the limitation on how
long an implied warranty lasts, so some of the above may not apply to you.
Governing Law and General Provisions
The License Statement and Limited Warranty shall be construed, interpreted and governed by the laws of
the State of Florida and any action hereunder shall be brought only in Florida. If any provision is found
void, invalid or unenforceable it will not affect the validity of the balance of this License and Limited
Warranty which shall remain valid and enforceable according to its terms. If any remedy hereunder is
determined to have failed of its essential purpose, all limitations of liability and exclusion of damages set
forth herein shall remain in full force and effect. This License and Limited Warranty may only be modified
in writing signed by you and a specifically authorized representative of Brentmark. All rights not
specifically granted in this statement are reserved by Brentmark.
29
Index
B
N
Beneficiary........................ 14, 16, 21, 27
Bond Portfolio Redemption Date........ 13
Bond Series ......................................... 14
Bonds ............................................ 14, 16
Adding............................................. 16
Deleting ........................................... 16
Updating .......................................... 17
Brentmark Software .............................. 8
Next Accrual Date................................. 7
C
Date and Time ..................................... 23
Page Margins ....................................... 23
Page Numbers ..................................... 23
Portfolio List ....................................... 15
Printing.......................................... 19, 22
Report Options ................................ 23
Setting up a Printer .......................... 22
E
R
EZBond Files ...................................... 11
Face Value ........................................... 14
Files ............................................... 11, 12
Final Maturity Date ............................... 7
Forms .................................................. 25
Redeemed Check Box......................... 14
Redemption Value ............................. 6, 7
Redemption Value Table ...................... 6
Reissued Check Box ........................... 15
Report Options .................................... 23
Report Text ......................................... 23
Reports ................................................ 19
G
S
Group by Box...................................... 15
Selected Bond ..................................... 13
Serial Number ..................................... 14
Series ................................................... 16
Series Type.......................................... 27
Shortcut Keys ........................................ 9
Spreadsheet File .................................. 22
Status Line ........................................... 15
Co-Owner................................ 16, 21, 27
D
F
H
Heading ............................................... 21
I
Interest Earned ...................................... 6
Issue Dates .................................... 14, 27
L
License Agreement ............................. 29
30
O
Owner...................................... 14, 15, 27
Owner SSN ......................................... 14
Ownership ........................................... 14
P
T
Text File .............................................. 22
Toolbar.................................................. 9
Total Interest Earned ............................. 6
Chapter 7: Printing Reports
W
Y
Windows ............................................... 5
Yield to Date ......................................... 6
31