1
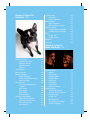
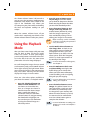
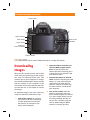
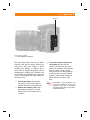
Spine = 0.58"
Photography/Techniques/Equipment
$19.99 US/$23.99 CAN
Full
Color!
Your Nikon D90 is simply revolutionary — the first dSLR that
also lets you shoot live HD video straight from the image sensor by using
Live View. With so much to know about this remarkable camera, you’ll
want to take this book along on every shoot. It covers all the settings, modes,
and menus; explores the applications for every available lens; guides you through
lighting essentials; and provides advice for capturing great still and video images
in a dozen situations.
• Learn to compose your photos with the LCD monitor for clear,
vibrant shots
• Shoot high-quality video, even in low light, with excellent sound
quality
• Make the most of the versatile AF-S Nikkor 18-105mm VR lens
• Use Nikon’s Creative Lighting System
• Explore professional secrets for getting great shots of people,
landscapes, products, wildlife, and pets
J. Dennis Thomas is a professional photographer and author based in Austin, TX. He owns Dead
Sailor Productions and has photographed for many notable clients. He has authored seven Digital
Field Guides and has published articles in national photography magazines.
Visit our Web site at www.wiley.com/compbooks
Full Color Throughout!
Nikon D90
Digital Field Guide
®
Nikon D90
Digital Field Guide
®
J. Dennis Thomas
Nikon® D90 Digital Field Guide
Published by
Wiley Publishing, Inc.
10475 Crosspoint Boulevard
Indianapolis, IN 46256
www.wiley.com
Copyright © 2009 by Wiley Publishing, Inc., Indianapolis, Indiana
Published simultaneously in Canada
ISBN: 978-0-470-44992-9
Manufactured in the United States of America
10 9 8 7 6 5 4 3 2 1
No part of this publication may be reproduced, stored in a retrieval system or transmitted in any
form or by any means, electronic, mechanical, photocopying, recording, scanning or otherwise,
except as permitted under Sections 107 or 108 of the 1976 United States Copyright Act, without
either the prior written permission of the Publisher, or authorization through payment of the
appropriate per-copy fee to the Copyright Clearance Center, 222 Rosewood Drive, Danvers, MA
01923, (978) 750-8400, fax (978) 646-8600. Requests to the Publisher for permission should be
addressed to the Permissions Department, John Wiley & Sons, Inc., 111 River Street, Hoboken, NJ
07030, (201) 748-6011, fax (201) 748-6008, or online at http://www.wiley.com/go/permissions.
LIMIT OF LIABILITY/DISCLAIMER OF WARRANTY: THE PUBLISHER AND THE AUTHOR MAKE NO
REPRESENTATIONS OR WARRANTIES WITH RESPECT TO THE ACCURACY OR COMPLETENESS
OF THE CONTENTS OF THIS WORK AND SPECIFICALLY DISCLAIM ALL WARRANTIES, INCLUDING WITHOUT LIMITATION WARRANTIES OF FITNESS FOR A PARTICULAR PURPOSE. NO WARRANTY MAY BE CREATED OR EXTENDED BY SALES OR PROMOTIONAL MATERIALS. THE
ADVICE AND STRATEGIES CONTAINED HEREIN MAY NOT BE SUITABLE FOR EVERY SITUATION.
THIS WORK IS SOLD WITH THE UNDERSTANDING THAT THE PUBLISHER IS NOT ENGAGED IN
RENDERING LEGAL, ACCOUNTING, OR OTHER PROFESSIONAL SERVICES. IF PROFESSIONAL
ASSISTANCE IS REQUIRED, THE SERVICES OF A COMPETENT PROFESSIONAL PERSON SHOULD
BE SOUGHT. NEITHER THE PUBLISHER NOR THE AUTHOR SHALL BE LIABLE FOR DAMAGES
ARISING HEREFROM. THE FACT THAT AN ORGANIZATION OR WEB SITE IS REFERRED TO IN
THIS WORK AS A CITATION AND/OR A POTENTIAL SOURCE OF FURTHER INFORMATION DOES
NOT MEAN THAT THE AUTHOR OR THE PUBLISHER ENDORSES THE INFORMATION THE ORGANIZATION OF WEB SITE MAY PROVIDE OR RECOMMENDATIONS IT MAY MAKE. FURTHER,
READERS SHOULD BE AWARE THAT INTERNET WEB SITES LISTED IN THIS WORK MAY HAVE
CHANGED OR DISAPPEARED BETWEEN WHEN THIS WORK WAS WRITTEN AND WHEN IT IS
READ.
For general information on our other products and services or to obtain technical support, please
contact our Customer Care Department within the U.S. at (877) 762-2974, outside the U.S. at (317)
572-3993 or fax (317) 572-4002.
Wiley also publishes its books in a variety of electronic formats. Some content that appears in print
may not be available in electronic books.
Cataloging-in-Publication Data is available from the Publisher.
Trademarks: Wiley and the Wiley Publishing logo are trademarks or registered trademarks of John
Wiley & Sons, Inc. and/or its affiliates. Nikon is a registered trademark of Nikon Corporation. All
other trademarks are the property of their respective owners. Wiley Publishing, Inc. is not associated
with any product or vendor mentioned in this book.
About the Author
J. Dennis Thomas is a freelance photographer based out of Austin, Texas. He’s been using
a camera for fun and profit for almost 25 years. Schooled in photography first in high school
and then at Austin College, he has won numerous awards for both his film and digital photography. Denny has a passion for teaching others about photography and teaches blackand-white film photography to area middle school students as well as lighting and digital
photography seminars in Austin. His photographic subjects are diverse, from shooting weddings and studio portraits to photographing concerts and extreme sports events for Red
Bull. He has written six highly successful Digital Field Guides for Wiley Publishing and has
another in the works. His photographs have been featured in magazines and newspapers in
the central Texas area and beyond.
Credits
Acquisitions Editor
Courtney Allen
Project Coordinator
Kristie Rees
Senior Project Editor
Cricket Krengel
Graphics and Production Specialists
Andrea Hornberger, Christin Swinford
Project Editor
Christopher Stolle
Quality Control Technician
David Faust
Technical Editor
Ben Holland
Proofreading
Cindy Lee Ballew, Precisely Write
Copy Editor
Kim Heusel
Indexing
Steve Rath
Editorial Manager
Robyn B. Siesky
Vice President and Group Executive
Publisher
Richard Swadley
Vice President and Executive Publisher
Barry Pruett
Business Manager
Amy Knies
Senior Marketing Manager
Sandy Smith
Acknowledgments
T
hanks to everyone at Wiley: Courtney, Cricket, Laura, and Chris. You guys rock!
Thanks to Robert and the rest of the staff at Precision Camera in Austin. Thanks to
Shausta at Nikon.
Contents at a Glance
Acknowledgments . . . . . . . . . . . . . . . . . . . . . . . . . . . . . . . . . . . . . . . . . . . . . . . . . . . . . . . viii
Introduction . . . . . . . . . . . . . . . . . . . . . . . . . . . . . . . . . . . . . . . . . . . . . . . . . . . . . . . . . . . . xix
Quick Tour . . . . . . . . . . . . . . . . . . . . . . . . . . . . . . . . . . . . . . . . . . . . . . . . . . . . . . . . . . . . . . 1
Part I: Using the Nikon D90 . . . . . . . . . . . . . . . . . . . . . . . . . . . . . . . . . . . . . 9
Chapter 1: Exploring the Nikon D90 . . . . . . . . . . . . . . . . . . . . . . . . . . . . . . . . . . . . . . . . 11
Chapter 2: Nikon D90 Essentials . . . . . . . . . . . . . . . . . . . . . . . . . . . . . . . . . . . . . . . . . . . 39
Chapter 3: Using the Nikon D90 Menus . . . . . . . . . . . . . . . . . . . . . . . . . . . . . . . . . . . . . 71
Part II: Capturing Great Images with the Nikon D90. . . . . . . . . . . . . . . 109
Chapter 4: Selecting and Using Lenses for the Nikon D90 . . . . . . . . . . . . . . . . . . . . . 111
Chapter 5: Essential Photography Concepts . . . . . . . . . . . . . . . . . . . . . . . . . . . . . . . . . 131
Chapter 6: Working with Light . . . . . . . . . . . . . . . . . . . . . . . . . . . . . . . . . . . . . . . . . . . . 145
Chapter 7: D-Movie . . . . . . . . . . . . . . . . . . . . . . . . . . . . . . . . . . . . . . . . . . . . . . . . . . . . . 181
Chapter 8: Advanced Shooting Techniques . . . . . . . . . . . . . . . . . . . . . . . . . . . . . . . . . 189
Chapter 9: Viewing, Downloading, and In-Camera Editing . . . . . . . . . . . . . . . . . . . . . 235
Part III: Appendixes. . . . . . . . . . . . . . . . . . . . . . . . . . . . . . . . . . . . . . . . . . 253
Appendix A: Accessories . . . . . . . . . . . . . . . . . . . . . . . . . . . . . . . . . . . . . . . . . . . . . . . . . 255
Glossary . . . . . . . . . . . . . . . . . . . . . . . . . . . . . . . . . . . . . . . . . . . . . . . . . . . . . . . . . . . . . . 263
Index . . . . . . . . . . . . . . . . . . . . . . . . . . . . . . . . . . . . . . . . . . . . . . . . . . . . . . . . . . . . . . . . . 269
Contents
Acknowledgments
Introduction
Part I: Using the
xix Nikon D90 9
viii
Chapter 1: Exploring
the Nikon D90
Quick Tour 1
Selecting a Shooting Mode
Focusing
Using the Playback Mode
Downloading Images
1
4
5
6
Key Components of the D90
Top of the camera
Back of the camera
Front of the camera
Sides and bottom of camera
D90 CMOS Sensor
From analog to digital
CMOS versus CCD
Pixels
Viewfinder Display
Control Panel
Shooting Info Display
11
12
14
18
21
24
24
25
25
26
29
32
Chapter 2: Nikon D90
Essentials 39
ISO Sensitivity
Auto ISO
Noise reduction
White Balance
What is Kelvin?
White balance settings
Picture Controls
Original Picture Controls
Custom Picture Controls
JPEG
Image Size
Image Quality
NEF Files
Live View
52
53
54
55
56
56
59
60
60
66
67
67
67
69
Chapter 3: Using the
Nikon D90 Menus 71
Exposure Modes
Programmed Auto
Aperture Priority
Shutter Priority
Manual
Scene Modes
Release Modes
Metering Modes
Matrix metering
Center-weighted metering
Spot metering
Focus Modes
How the D90 autofocus
works
AF-C mode
AF-S mode
AF-A mode
Manual mode
Autofocus Area Modes
Single Point AF mode
Dynamic Area AF mode
3D Tracking mode
Auto Area AF
40
40
41
41
42
43
45
46
47
48
48
49
49
50
50
50
51
51
51
51
52
52
Playback Menu
Delete
Hide image
Display mode
Image review
Rotate tall
Pictmotion
Slide show
Print set (DPOF)
Shooting Menu
Set Picture Control
Manage Picture Control
Image quality
Image size
White balance
ISO sensitivity settings
Active D-Lighting
72
72
74
74
75
75
76
76
76
77
77
78
79
80
80
85
86
Color space
Long exp. NR
High ISO NR
Active folder
Multiple exposure
Movie settings
Custom Setting Menu
Reset custom settings
CSM a Autofocus
CSM b Metering/exposure
CSM c Timers/AE lock
CSM d Shooting/display
CSM e Bracketing/flash
CSM f Controls
Setup Menu
Format memory card
LCD brightness
Clean image sensor
Lock mirror up for cleaning
Video mode
HDMI
World time
Language
Image comment
Auto image rotation
Image Dust Off ref photo
Battery info
GPS
Firmware version
Retouch Menu
My Menu
Quick Settings Display
86
87
87
87
88
89
90
90
90
93
95
97
99
100
103
103
103
104
104
104
104
105
105
105
105
105
105
106
106
106
106
108
Part II: Capturing
Great Images with
the Nikon D90 109
Chapter 4: Selecting and Using
Lenses for the Nikon D90 111
Lens Compatibility
Wide-Angle and Ultrawide-Angle
Lenses
When to use a wide-angle
lens
Understanding limitations
Midrange Zoom Lenses
Telephoto Lenses
Special-Purpose Lenses
Micro-Nikkor lenses
Defocus Control lenses
Fisheye lenses
Using Vibration Reduction Lenses
112
114
116
117
120
121
126
126
128
128
129
Chapter 5: Essential
Photography Concepts 131
Exposure Review
Shutter speed
ISO
Aperture
Understanding Depth of Field
Rules of Composition
Keep it simple
The Rule of Thirds
Leading lines and S-curves
Helpful hints
Lighting Essentials
Hard light
Soft light
Chapter 6: Working with
Light 145
131
132
133
134
135
137
137
138
141
142
143
143
144
Natural Light
D90 Flash Basics
Guide Number
Aperture
Distance
Guide Number/
Distance = Aperture
Flash Exposure Modes
i-TTL mode
Manual mode
Auto mode
Auto Aperture mode
Guide Number Distance
Priority mode
Repeating Flash mode
Flash Sync Modes
Sync speed
Front-Curtain Sync mode
Red-Eye Reduction mode
Slow Sync mode
Rear-Curtain Sync mode
Flash Exposure Compensation
Fill Flash
Bounce Flash
Nikon Creative Lighting
System Basics
Understanding the Creative
Lighting System
Speedlights
Using the Built-In Speedlight
Strobes and Monolights
146
147
148
148
148
149
149
149
150
150
150
150
150
151
151
153
154
155
155
156
156
159
160
160
161
166
168
Continuous Lighting
Incandescent and halogen
Fluorescent
HMI
Light Modifiers
Umbrellas
Softboxes
Diffusion panels
Other light modifiers
171
172
173
174
174
174
176
177
179
Chapter 8: Advanced Shooting
Techniques 189
Chapter 7: D-Movie 181
About Video
Progressive versus
interlaced
Frame rate
Shutter
Setting up D-Movie
Recording
Tricks, Tips, and Workarounds
Video-Editing Software
182
182
183
183
184
185
186
188
Action and Sports Photography
Inspiration
Action and sports
photography practice
Action and sports
photography tips
Architectural Photography
Inspiration
Architectural photography
practice
Architectural photography
tips
Concert Photography
Inspiration
Concert photography
practice
Concert photography tips
189
191
192
193
194
194
196
198
198
199
200
202
Landscape and Nature
Photography
Inspiration
Landscape photography
practice
Landscape photography tips
Macro Photography
Inspiration
Macro photography practice
Macro photography tips
Night Photography
Inspiration
Night photography practice
Night photography tips
Pet Photography
Inspiration
Pet photography practice
Pet photography tips
Portrait Photography
Studio considerations
Portrait lighting patterns
Posing and composition
considerations
Indoor
Outdoor
Portrait photography practice
Portrait photography tips
Still-Life and Product Photography
Inspiration
Still-life and product
photography practice
Still-life and product
photography tips
202
204
205
206
207
209
210
212
212
212
214
215
216
216
217
218
219
220
220
223
224
226
227
229
229
231
232
234
Chapter 9: Viewing,
Downloading, and In-Camera
Editing 235
Viewing Your Images
Downloading Images
Using Nikon Transfer
Transferring your images
Using the Retouch Menu Options
D-Lighting
Red-Eye correction
Trim
Monochrome
Filter effects
Color balance
Small picture
Image overlay
NEF processing
Quick retouch
Straighten
Distortion control
Fisheye
Side-by-side comparison
235
238
238
243
243
245
245
246
246
247
248
248
249
250
250
251
251
252
252
Part III: Appendixes 253
Glossary 263
Appendix A: Accessories 255
MB-D80 Battery Grip
ML-L3 Wireless Remote Control
MC-DC2 Remote Cord
GP-1 GPS Unit
Tripods
When to use a tripod
Which tripod is right for you?
Camera Bags and Cases
255
256
257
257
257
260
260
261
Index 269
Introduction
W
elcome to the Nikon D90 Digital Field Guide. This book is a handy reference for
you to get started learning about all the features and functions of your Nikon
D90 dSLR camera.
This Digital Field Guide isn’t meant to replace the user’s manual but is an adjunct to the
manual, explaining things in a simpler and more detailed manner than the manual. The
guide is aimed at D90 owners that are just beginning in the world of dSLRs up to advanced
users with more hands-on knowledge of photography.
The D90 Digital Field Guide not only covers the specifics of the D90 but also covers many
other facets of digital photography, from the basics of exposure to lighting and composition.
There’s also a chapter to help you get started with Nikon’s Creative Lighting System and all
the possibilities that Nikon’s Speedlights offer.
About This Book
The D90 will likely be used by a wide variety of users, from first-time dSLR owners to people
who have owned other dSLRs and have plenty of experience with photography. This book
contains information for D90 users of all levels. The first few chapters cover the basics of the
camera: the buttons and switches, the menu options, and the different settings. These are
all described in detail, including some tips on how to effectively use them.
Other chapters include information on lenses, how they work, and for what applications
specific lenses are best used. There’s a primer on working with different lighting types as
well as a chapter that teaches you how to take on different photographic tasks.
To put it simply, there’s a lot of information in this book. There’s a good bit of information
for everyone, from the new photographer to the advanced hobbyist.
About the D90
The D90 is the successor of Nikon’s hugely successful D80 camera and isn’t just a mild
upgrade but almost a whole new camera. The D90 has inherited quite a few features from
Nikon’s high-end cameras — the D3, D700, and D300 — as well as offering some features
that no other dSLR offers, such as the ability to record HD video clips.
xx Introduction
The D90 is the first camera in Nikon’s line of cameras to feature a CMOS sensor. The D90’s
DX-format 12.3-megapixel CMOS sensor gives the camera a high signal-to-noise ratio.
Combining this sensor with EXPEED image processing inherited from the venerable D3, the
D90 offers incredible images with low noise rivaling the D300 images, especially at high ISO
settings.
Like the D300 and Nikon’s FX-format cameras, the D90 has Live View. Live View allows you
to view exactly what’s coming through the lens right on the rear-panel LCD. This feature
enables you to use the LCD monitor to compose your photographs in situations where it
may be awkward to put your eye up to the viewfinder.
The Live View feature enables the camera to shoot live HD video straight from the image
sensor. This feature has never been available on any dSLR previous to the D90. The built-in
microphone allows you to record sound as you’re recording video and has surprisingly good
sound quality.
This new video ability allows you to record and share your memories like never before by
using only one camera. Additionally, the D90 sensor is larger than that of most video cameras, allowing you to shoot higher-quality videos in low light. This larger sensor also allows
you to get a much more shallow depth of field, giving your videos a more creative look.
Nikon has designed a brand-new lens to complement the D90: the AF-S Nikkor 18-105mm
f/3.5-5.6G ED VR. This is a great all-around lens that covers the most-used focal lengths.
From the moderately wide 18mm to use for architecture, interiors, and landscapes to
105mm, which is perfect for portraits and some sports, this lens covers most of your basic
photography needs. The added bonus of Nikon’s Vibration Reduction allows you to handhold the camera at slower shutter speeds without worrying about blurry pictures caused by
camera shake. The Silent Wave motor in the lens allows for quick, nearly silent focusing.
Another great thing about the D90 is that like all other Nikon dSLRs, you can use almost all
lenses manufactured by Nikon in the last 75 years. Nikon is known for having some of the
highest-quality optics in the industry.
Your Nikon D90 is a well-built camera that will serve you for many years to come, and I
hope this book helps you in all your photographic endeavors.
Quick Tour
T
his Quick Tour is designed to cover the basic functions
you need to know to help you immediately start using
your Nikon D90. It’s by no means meant to be an in-depth
look at the menus and modes, so if you’re ready for that information, you can just give this section a quick once-over and
move on to the later chapters, where everything is discussed
in more detail.
If you already use a Nikon dSLR, a lot of this may be familiar
to you. In fact, if you’ve used a D80, the setup for the D90 is
very similar. If you’re upgrading from a compact digital camera, you should probably read the entire Quick Tour to familiarize yourself with the camera’s layout.
This Quick Tour assumes that you’ve already unpacked the
camera, read the manual, charged the batteries, mounted a
lens, and inserted the memory card. If you haven’t done these
things, please do them now.
Selecting a Shooting Mode
If you’re anything like me, I’m sure you’re ready to get out
there and start taking pictures with your new camera. The
great thing about the D90 is that you can start taking great
photos right out of the box. The D90 has some automatic
Shooting modes that choose the proper settings for you. All
you really have to do is point the camera at something and
shoot!
The first thing you need to do is turn the camera on. The On/
Off switch is located right on top of the camera and surrounds
the Shutter Release button.
QT
✦
✦
✦
✦
In This Quick Tour
Selecting a Shooting
mode
Focusing
Using the Playback
mode
Downloading images
✦
✦
✦
✦
2 Nikon D90 Digital Field Guide
On/Off switch
known as Flexible Program, and it
allows you to control the settings
while maintaining the same exposure. Use this mode when taking
snapshots or when controlling the
shutter speed and the amount of
the image that’s in focus aren’t as
important as simply getting the
photo.
Mode dial
Image courtesy of Nikon
QT.1 The On/Off switch
Choosing a Shooting mode is simple: Rotate
the Mode dial located on the top of the
camera. The Shooting mode also appears in
the top-left corner of the LCD, where the
shooting information is displayed.
The D90 has four standard Shooting modes:
✦ P. Also known as Programmed
Auto mode. This is a fully automatic
Shooting mode in which the camera decides both the aperture setting and shutter speed. You can
use the Main Command dial to
adjust the aperture and shutter to
better suit your needs. This is
Image courtesy of Nikon
QT.2 Rotate the Mode dial to select a
Shooting mode.
QT ✦ Quick Tour
✦ S. Also known as Shutter Priority
mode. This is a semiautomatic
mode in which you decide the
shutter speed to use and then the
camera chooses the appropriate
aperture. Use this mode when you
need fast shutter speeds to freeze
action or slow shutter speeds to
show motion blur. Be sure not to
use this mode when you need to
control the amount of the image
that’s in focus.
✦ A. Also known as Aperture Priority
mode. This is another semiautomatic mode where you adjust the
aperture to control how much of
the image is in focus (the depth of
field). Use this mode when you
want to isolate a subject by focusing on it and letting the background go soft or if you want to
ensure that everything in the picture is in sharp focus.
✦ M. Also known as Manual mode.
With this mode, you decide the
shutter speed and aperture. You
can use this mode when you want
to completely control the exposure
in order to achieve a certain tonality in your image by purposefully
over- or underexposing the image.
To help you when using this mode,
you can check the D90 light meter
in the viewfinder.
In addition to these modes, the D90 also
employs what Nikon terms Scene modes.
These are modes that apply settings that are
optimized to the type of scene you’re shooting. The following Scene modes are available:
Auto. This is a point-and-shoot
mode in which the camera controls all the settings, including
shutter speed, aperture, and ISO.
3
If the camera deems it necessary,
the built-in flash automatically
activates.
Auto (flash off). This setting is
similar to the Auto mode; the
camera controls all settings.
However, in this mode, the flash
is disabled. This is a good setting
to use when natural lighting is
preferred or the use of flash isn’t
allowed (such as in a museum).
Portrait. This mode uses a wider
aperture, allowing the background to be soft while giving
you sharp focus on your subject.
Landscape. This mode chooses
a smaller aperture to ensure that
focus is achieved throughout the
image. The camera also
enhances blues and greens to
accentuate the sky and foliage in
the scene.
Close-Up. This setting provides
sharp details of the subject while
allowing the background to
soften to draw attention to the
subject.
Sports. With this setting, the
camera chooses a higher shutter
speed to freeze the action.
Night Portrait. This setting uses
flash to capture your subject
while maintaining a longer shutter speed to capture the ambient
light of the background, resulting
in an evenly balanced and more
natural-looking exposure.
The Scene modes take care of all the settings for you, including activating the flash.
These modes are handy when starting out,
4 Nikon D90 Digital Field Guide
but you’re limited in fine-tuning the settings.
After you become more familiar with the
camera settings, such as aperture and shutter speed, you may find yourself eschewing
these Scene modes in favor of choosing the
more flexible Shooting modes.
Focusing
Your Nikon D90 camera can automatically
focus on a subject when using the lens that
comes with the D90 kit or when using any
of Nikon’s many other autofocus lenses.
The lens that comes with the D90 kit is the
AF-S DX Nikkor 18-105mm f/3.5-5.6G VR.
This lens can be focused automatically or
manually. To use the AF feature, you must
first ensure that the switches on the lens
and the camera body are set to AF.
Autofocusing the camera is done simply by
pressing the Shutter Release button halfway
down. The focus areas that are used to
determine focus are shown in the viewfinder
as tiny squares. One or more of these
squares is momentarily lit up in red when
the camera achieves focus. The active target
is indicated by lit brackets.
By default, the camera automatically focuses
on the closest subject in all modes except
for the Close-Up mode, in which the camera
uses the center focus point, or the Sports
mode, in which the camera uses the center
focus point by default and tracks the subject
if it leaves the center of the frame.
After the camera locks the focus, a small
green light in the bottom-left corner of the
viewfinder lights up. If you want to lock focus
and exposure settings, you can simply keep
Lens autofocus switch
Camera autofocus switch
Image courtesy of Nikon
QT.3 The A/M switch on the kit lens and the AF/M switch on the camera body
QT ✦ Quick Tour
the Shutter Release button half-pressed or
you can press the AE-L/AF-L (Autoexposure/
Autofocus Lock) button that’s found to the
right of the viewfinder. This allows you
to recompose your photo while maintaining
the focus and exposure readings on your
subject.
When the camera achieves focus, all you
need to do is completely press down on the
Shutter Release button to take your picture.
Using the Playback
Mode
After you shoot some images with your D90,
you can look at them on the big, bright,
3-inch LCD screen. To view your images,
press the Play button on the back of the camera to the left of the LCD. The most recent
photo taken is the first image displayed.
To scroll through the images that are stored
on the memory card, press the Multi-selector
left or right. Pressing the right button allows
you to view the images in the sequence that
they were taken. Pressing the left button
displays the images in reverse order.
There are a few other options available to
you when the camera is in Playback mode:
✦ Press the Thumbnail/Zoom Out
button to view thumbnails. You
can choose to view either four,
nine, or 72 images at a time or a
calendar view that shows images
from a specific day. When in
Thumbnail mode, use the Multiselector buttons to navigate among
the thumbnails to highlight one.
You can then press the OK button
to bring the selected image to a
full-sized preview.
5
✦ Press the Zoom In button to magnify the image. This button allows
you to check for sharpness or look for
details. Pressing this button also takes
you out of the thumbnail preview.
✦ Press the Protect button to save
images from being deleted. The
Protect button (denoted by a key)
locks the image to prevent you
from accidentally erasing it when
editing your images in the camera.
When a memory card is formatted,
all images, including the protected
ones, are erased.
✦ Use the Multi-selector buttons to
view image data. To check to see
what settings were used when the
photograph was taken, press the
Multi-selector up or down. This also
allows you to check the histogram,
which is a visual representation of
the tonality of the image.
For more information on histograms,
see Chapter 5.
✦ Press the OK button to do in-camera photo editing. Pressing the OK
button brings you to a menu that
allows you to do some rudimentary
in-camera editing, such as D-Lighting,
fixing red-eye, and cropping.
For more information on in-camera
editing, see Chapter 8.
✦ Press the Delete button to erase
images. The Delete button has an
icon shaped like a trash can. Press
this button to permanently erase
the image from your memory card.
When the Delete button is pressed,
the camera asks for confirmation.
Press the Delete button again to
complete the deletion.
For more information on settings, see
Chapter 2 for modes and Chapter 3
for menus.
6 Nikon D90 Digital Field Guide
Delete button
Playback button
Multi-selector
OK button
Menu button
Protect button
ThumbnailZoom Out button
Zoom In button
Image courtesy of Nikon
QT.4 These buttons can be used in Playback mode for a variety of functions.
Downloading
Images
When you fill a memory card or you’re ready
to do some post-processing of your images,
you want to download them from your
memory card to your computer for storage.
You can either download the images straight
from the camera to your computer or you
can remove the memory card from the camera and then use a card reader to transfer
the images.
To download images from your camera by
using the USB cable, follow these steps:
1. Turn off the camera. Be sure that
the camera is off when connecting
it to the computer to ensure that
the camera’s or computer’s electronics aren’t damaged.
2. Open the rubber cover that conceals the D90’s output connections. On the left side of the
camera with the back facing you is
a cover that has the camera’s USB
and video-out ports.
3. Connect the camera to the USB
cable. Inside the box that your D90
came in is a USB cable. Plug the
small end of the cable into the
camera’s USB port and then plug
the other end into a USB slot on
your computer.
4. Turn on the camera. Once the
camera is turned on, your computer should recognize the camera
as a mass storage device. You can
then drag and drop your files or
you can use a software program,
such as Adobe Bridge or Nikon
Transfer, to transfer your files.
QT ✦ Quick Tour
7
USB port
Image courtesy of Nikon
QT.5 The camera’s USB port
The D90 comes with a free copy of Nikon
Transfer inside the box. Nikon Transfer can
help you to keep your images in order.
Installing this software is optional, but if
you’re new to digital photography and file
management, installing this software may
be beneficial. To download your images by
using a SecureDigital (SD) card reader, follow these steps:
1. Turn off the camera. Be sure that
the camera is off to ensure that the
camera’s electronics aren’t damaged.
2. Remove the memory card. Open
the memory card door cover and
then press the SD memory card in
to eject it.
3. Insert the memory card into the
card reader. Be sure that the
reader is connected to your computer. Your computer should recognize the card as a mass storage
device, and you can drag and drop
the files or you can use a software
program, such as Adobe Bridge or
Nikon Transfer, to transfer your
files.
Depending on your software and
how your computer is set up, your
computer may offer to automatically transfer the files to a predetermined destination.