1
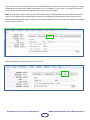
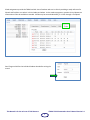
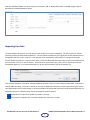
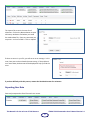
Student Data – PlacementPro User’s Manual Version 2.1
User Data: Students
User Information is the most extensive enhancement for V2.1 and adds additional functionality and use case
options for facilities and schools. This feature is optional for schools and facilities to use based upon the efficiency of
current student information practices and partner interactions. Schools and Facilities are encouraged to closely review
the User Information features of PlacementPro and compare it to current practices.
Student Data
The addition of Student data to PlacementPro is an optional feature, but adds the ability to closely monitor and track
students in the healthcare setting. The Home screens for Instructors, Schools, and Facilities have the Student Snapshot
feature for the organization. By sharing this feature, schools and facilities may maintain access to student requirements
and other related information.
The design of the student data feature does not contain protected information. All active students are available to
Instructors and Educational Users through the Student link and subsequent index page. Student data remains accessible
for as long as the individual is a student. Once they graduate, their information is archived and the student will drop off
the active student index for a given school.
No student information is visible to facilities unless the student is assigned to a placement for the current academic term
to that facility through a PCode.
Accessing Student Data
Using the Student Snapshot, individual student data may
be accessed from the home page. For this information to
be displayed for a facility, the student must be assigned to
a placement via the PCode for that facility. Schools will see
all students that are assigned to their specific school.
There are two tabs on the Student Snapshot: Today and
ALL. Students listed under the TODAY tab will be in the
clinical setting today based upon their PCode assignment.
Students listed under the ALL tab are all students in the
system assigned to the school; or all students assigned to a
given facility by PCode during the current academic term.
From the home page, you can click on a student’s name to
access all information that has been provided for the
student. Use the tabs to access each category:
Organization, Requirements, Training, Skills, and Assigned PCodes.
The Student Snapshot also has the ability to search for a specific student by name, Student ID or PCode.
Schools & Student Data
The Instructor and Educational Users’ Student Link provides the ability to access and manage student information. From
this page you can search, add students individually, or as an upload. You can also export student information as needed.
Once a student is in the system, each academic term individual students can be assigned to a particular facility through a
PCode which then provides the students’ information to the facility. For facilities that are not using TCPS PlacementPro
as their clinical placement management system, student information may be exported via spreadsheet to them as
needed.
Should additional information need to be stored for a student, contact the System Administrator to add the additional
fields to the system.
Adding Students
From the Student Index, all students in the system related to your organization are listed. Using the tools under the
Actions column, students may be viewed, edited and deleted. Instructors and Schools will see all their students;
Facilities will only see students that have been assigned to one of their clinical placements by a School Partner. Facilities
may also add students from non-partner schools. Students may be added to the system based upon role. Schools may
add students individually or in a bulk upload. Facilities may only add students from Non-Partner schools on an
individual basis.
Click on Add Student on the Student Index screen to add students individually.
This Manual is for the sole use of TCPS Partners.
©2014 TCPS PlacementPro User’s Manual Version 2.1
2
Enter the student data into the data form. Note that First and Last Names are the only Required Fields.
Click on Create.
Click on any of the tabs to add Requirements, Training, Skills, and PCodes with their related dates. Dropdown selections
are available for the various student tabs along with a date field using a calendar widget.
SCHOOL NOTE: When an Educational User adds a student, the Organization will default to the School.
This Manual is for the sole use of TCPS Partners.
©2014 TCPS PlacementPro User’s Manual Version 2.1
3
FACILITY NOTE: When a facility adds a non-partner student, the Organization will default to the Facility. Be sure and
add the organization of the appropriate non-partner school. If the non-partner school is not available in the dropdown,
contact the Site Administrator to have it added to the dropdown listing.
Data under the Requirements Tab provides the review date of all requirements related to screenings, health status and
those requirements that have a date-expiration such as BLS Training. Requirements may be entered individually, or in
bulk through a file upload.
This Manual is for the sole use of TCPS Partners.
©2014 TCPS PlacementPro User’s Manual Version 2.1
4
If your school or facility is using TCPS OrientPro to provide the online orientation training for your students, this training
completion will be automatically added to the system once it is completed. If your school is not using TCPS OrientPro,
contact your System Administrator to add Specific Training Topics to the system.
NOTE: Training data for partners that use the TCPS OrientPro system is uploaded based upon the Student’s ID number
and can only be automatically uploaded when students have provided their School Student ID when using the TCPS
OrientPro Quiz Management System. Students are instructed to add this to their user profile, but should be encouraged
to follow these instructions.
Skills may be added as students complete skills check offs.
This Manual is for the sole use of TCPS Partners.
©2014 TCPS PlacementPro User’s Manual Version 2.1
5
PCode assignments provide the TODAY and ALL view of students who are in clinicals providing a ready reference for
Schools and Facilities as to who is in clinical today and where. As the student progresses, previous clinical placement
information will also be available as needed. PCodes may be entered individually, or in bulk through a file upload.
Don’t forget to SAVE to the individual Student data before exiting the
screen!
This Manual is for the sole use of TCPS Partners.
©2014 TCPS PlacementPro User’s Manual Version 2.1
6
School Editing Student Data
Student information may be edited at any time. Search for the student and select the student’s record. Open the
Update User screen by clicking the EDIT icon in the ACTION Column of the Student Index screen.
Once the individual update user screen opens, you may edit, add, or delete information as needed using the tabs as
described in the Adding Students section.
This Manual is for the sole use of TCPS Partners.
©2014 TCPS PlacementPro User’s Manual Version 2.1
7
Facility Editing Student Data entered by the Facility
Student information entered by the Facility may be edited at any time. Search for the student and select the student’s
record to edit using the VIEW icon in the ACTION Column of the Student Index screen.
Search for or find the student that was added by your facility in the Student Index screen. Note the organization will be
listed as your facility. Click on the VIEW icon in the Action Column.
Click on Edit User in the upper left of the screen. This link is ONLY available to the Facility user for students entered by
the Facility User.
This Manual is for the sole use of TCPS Partners.
©2014 TCPS PlacementPro User’s Manual Version 2.1
8
Once the individual Update User screen opens, you may edit, add, or delete information as needed using the tabs as
described in the Adding Students section.
Importing User Data
To import student data in bulk, you will need to enter the data in an excel spreadsheet. The same process is used for
importing Instructors and Preceptors/Mentors. You may obtain the data entry Excel grid from the Site Administrator or
through the HELP link on the menu bar. Using the grid, enter each student’s information on a single line using the
column headers to guide you. Save your work often. Once all student data has been entered, save the spreadsheet one
last time either in an .xls or .xlsx file format. This will become your master copy. Next, click on Save As and save the
spreadsheet again as a .csv (Comma Delimited) file. Be sure and note where you have saved the file.
From the User (Students, Instructors, Preceptors/Mentors) Screen, there are several ways to import data: users with or
without additional data). If the user is already in the system, additional information may be imported using the Import
User Requirements and Training button or the Import Students PCodes button (Instructors and Preceptors/Mentors are
assigned to PCodes in a different way). Export will export these data subsets.
The Student ID is required to update any student’s records.
The Instructor’s Employee ID is required to update any Instructor’s records.
This Manual is for the sole use of TCPS Partners.
©2014 TCPS PlacementPro User’s Manual Version 2.1
9
The Import File screen is the same for all
selections. Click on the Browse button to open
a directory window to find where you saved
the student data file. Enter any comments you
may want – such as Fall 2013. Click on Upload.
If there are errors in your file, you will see an error message. In this
case, there was a column header that was wrong. If the problem is
on a row of data, the data row will be displayed to help you find the
error.
If you have difficulty with this process, contact the Site Administrator for assistance.
Exporting User Data
Data may be exported to Excel from each user screen.
This Manual is for the sole use of TCPS Partners.
©2014 TCPS PlacementPro User’s Manual Version 2.1
10