1
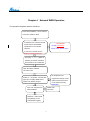
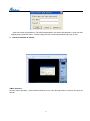
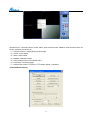
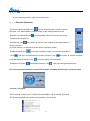
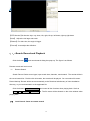
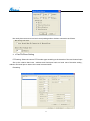
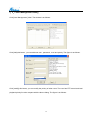
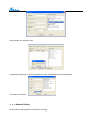
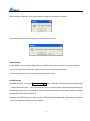
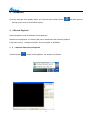
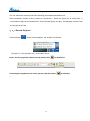
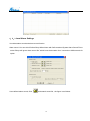
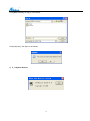
1
Contents
NOTICE ..............................................................................................................................................................................4
1.INSTALLATION ENVIRONMENT .........................................................................................................................................4
2.ACCESSORIES ...............................................................................................................................................................4
CHAPTER 1 .SPECIFICATIONS AND MAIN FEATURE ......................................................................................................5
1.1. SPECIFICATION .............................................................................................................................................................5
1.2. FUNCTION AND FEATURE ................................................................................................................................................6
CHAPTER 2 PRECAUTIONS ..............................................................................................................................................7
2.1INSULATION RESISTANCE .................................................................................................................................................7
2.2 ELECTRIC STRENGTH .....................................................................................................................................................7
2.3LEAKAGE CURRENT .........................................................................................................................................................7
2.4OVERHEATING ................................................................................................................................................................7
2.5TEMPERATURE ...............................................................................................................................................................7
2.6 FLAME RETARDANT ........................................................................................................................................................7
CHAPTER 3 NVS STRUCTURE AND INTRODUCTION .....................................................................................................8
3.1FRONT PANEL .................................................................................................................................................................8
3.2 REAR PANEL ..................................................................................................................................................................8
RECOVER DEFAULT SETTINGS
CHAPTER 4
..............................................................................................................................................8
NETWORK WEB OPERATION ....................................................................................................................9
4.1CLIENT SOFTWARE FUNCTION ...................................................................................................................................... 11
4.1.1Login .............................................................................................................................................................12
4.1.2 Exit ...............................................................................................................................................................15
4.1.3Function Operation .......................................................................................................................................15
4.1.4 Search Record and Playback.......................................................................................................................16
4.2 FRONT –END SYSTEM SETTING ..........................................................................................................................................17
4.2.1 Video Selection ............................................................................................................................................17
4.2.2Detection and Alarm......................................................................................................................................18
4.2.3Auto work plan ..............................................................................................................................................20
2.4 Pan/Tilt/Zoom Setting ........................................................................................................................................21
4.2.5User Management Setting ............................................................................................................................22
4.2.6Network Setting.............................................................................................................................................23
4.2.7 Public Setting ...............................................................................................................................................24
4.2.8Device Info ....................................................................................................................................................26
4.3 SNAPSHOT ...............................................................................................................................................................26
4.4RECORD PLAYBACK ....................................................................................................................................................27
4.4.1Network Video Record Playback ...................................................................................................................27
4.4.2Record Playback ...........................................................................................................................................28
4.5ATTACHED FILE ..........................................................................................................................................................29
2
4.5.1Real-time Monitoring Info Statistic ................................................................................................................29
4.5.2Remote Alarm Upload Info. ...........................................................................................................................29
4.5.3Local Alarm Settings .....................................................................................................................................30
4.5.4Local Record Setting.....................................................................................................................................31
4.5.5Log Management ..........................................................................................................................................31
4.5.6P/T/Z presetting position ...............................................................................................................................31
4.5.7Disk cleaning and writing error info ...............................................................................................................32
4.5.8 System Version ............................................................................................................................................33
3
Notice
1. Installation environment
1.1 Keep this device away form heat sources or hot overheat places;
1.2 Do not expose it in the direct sunlight;
1.3 Do not place it at moist places;
1.4Install it horizontally or on the wall;
1.5Keep it away from the fierce vibration;
1.6 Do not put it on another network video servers;
1.7Install it at the places of well-ventilated , do not block up the intake.
2.Accessories
Please check the accessories inside the package immediately when it’s opened.
―Accessories are subject to the attached accessories list‖
2.1 User’s manual ×1 pcs
2.2 CD with client software ×1 pcs
2.3 Product certificate×1 pcs
2.4 220V power cable ×1 pcs
2.4 Warranty card×1 pcs
4
Chapter1 Specifications and main feature
1.1.Specification
BL-E711F
Model
Basic
BL-E71
BL-E712F
BL-E712FD
BL-E704F
BL-E704FD
1FD
Operation
Interface
Video input
Audio input
Audio output
Storage
Video display
Embedded linux
WEB mode or client software
1-ch
1-ch
2-ch
2-ch
4-ch
LINE mode: input peak value<2.5Vpp, input impedance >10KΩ
MIC mode:Vbias=2.5V, built-in 20dB amplifier, input impedance >3KΩ
2 audio out, output peak value <4Vpp, rated power<1W, load>8Ω stereo single track
output jack
—
support
—
support
—
support
1-ch
1-ch
2-ch
2-ch
4-ch
4-ch
Video standard
PAL(625TVL,50Hz/sec)NTSC(525TVL,60Hz /sec)
Image resolution
VGA,HD1,CIF,QVGA,QCIF
Motion detection
Zone setting: max pictures: 20x15 testing zone;
Sensitivity setting:
100 grades
Image compression
H.264 fixed stream, constant bit rate, H.264 variable bit rate
Audio compression
ADPCM/PCM
Video record speed
Real time mode: PAL 1 frame/sec/ch-25frame/sec/ch adjustable, NTSC 1 frame /
sec / ch / -30frame/sec/ch adjustable
Intercom
1 channel
Image quality
6 grades
Alarm input
4 channels
Alarm output
2channels
Alarm relay
30VDC 1A ,125V
RS232 port
4-ch
Common
0.5A
cluster
port(debug),keyboard
connector&
transparent
port,(network transmit cluster input and output)
Network port
RJ45 10M/100M
Ethernet port
RS485 port
Support RS485 alarm decoder total,Pan/Tilt control port, multi-protocols
Power supply
AC100-240V 50/60hz
Consumption
10W
Working temperature
5-50℃
Working Humidity
20℅-80℅
Atmospheric Pressure
86kpa-106kpa
Dimension
210MM(L)×310MM(W)×53MM(H)
Weight
N.W 1.9KG
Installation
Desktop/wall-mount
25W
10W
25W
5
10W
25W
cluster
1.2. Function and Feature
User
management
·Each group has its administration authority .Each group includes several users.
·Surveillance authority can be set up at will if without any users logging in .
·basing on users configuration and strategy , video data can be stored the center server through
alarm and timing setting.
Data storage
·User can record the video through local client software .Record video can be saved on the client
software running computer.
·Real time respond to external alarm input( within 200MS) , can deal with it according to user’s
presettings, and prompt by on-screen words& pre-record voice.
Alarm
function
·With remote reminding function when there are external alarm input signals.
·With video loss alarm function according user’s presettings.
·With 9MB storage space to pre-record.
· Remind users by email when alarms occur.
·Transmit the compressed video and audio data to the terminals via network
·delay within 1 second ,if bandwidth allows.
Network
·Can be visited by 8-10 users simultaneously.
·Audio data transmission: HTTP,TCP,UDP,MULTICAST, RTP/RTCP etc.
·Transmit several alarm data by using SMTP protocols.
·Can be visited by using Windows IE.
Management
Peripherals
·Manage the NVS through Ethernet
·Supports both Windows IE and client software access
·Control peripherals control , set-up peripheral control protocols and linkage ports freely.
·With RS232,RS485 control ports.
·NTSC/PAL video system switch
Assistant
·Display system information and working status.
·With diary function
6
Chapter 2 Precautions
Pay attention to the housing of NVS connecting to the ground(GND).
2.1 Insulation resistance
The insulation resistance between power(AC) input terminal and the metal housing is no less than 100MΩ in the dry
environment, it’s no less than 10MΩ in the moist environment.
2.2 Electric strength
Can resist the electric strength testing of AC 50Hz 1500V, no break over or flashover occurs during 1 minute
testing .
2.3 Leakage current
Less than 5mA.(AC peak value)
2.4 Overheating
The device will not burn within its regulated temperature, the housing temperature will not higher 65 celsius degree,
there is no risk of scald.
2.5 Temperature
The housing of device should not be more than 65℃ .The heating components have been used continuously for 4
hours and the temperature could not be over the regulated value.
2.6 Flame Retardant
The housing was tested by 5 times, 5 seconds per time ,
support combustion.
7
It proves that the housing doesn’t burn ,nor does it
Chapter 3 NVS Structure and Introduction
3.1 Front panel
Figure 3-1
1.green: working status LED indicator lamp
2. Red: power LED indicator lamp
3.2 Rear panel
Figure 3-2
Recover default settings
Figure 3-2,Use the reset button, which is on the rear panel of the device, to recover default settings. The procedure is :
Switch the device on , it works normally .
Press reset button for 15 seconds, then working status LED indicator lamp on the front panel flashes .
Loose the button.
Press the reset button again for 5 seconds (within 10 seconds after loosing)
Loose the button again ,then the system reboots, the settings recovers default one.
8
Chapter 4 Network WEB Operation
The operation flow(flow chart for reference):
Finish NVS installation , correct network
connection ,220AC to NVS.
IP address of PC computer should
NVS default:
be the same as NVS default
192.168.145.108200 ,
specification in one network
subnet mask: 255.255.255.0
segment.
e.g.IP of PC: 192.168.xxx.xxx;
subnet mask and gateway
should be ex-factory default
value.
Use ping ***.***.***.***(NVS IP
address) ,check the connection
and back to TTL ,the value=255
Open IE explorer, address :
192.168.xxx.xxx
IE configuration are
Switch-on
the system , security alert
pops up if accepting WEB control
failure of download control
webrec.cab, please accept it.
The
system
can
recognize
supposed to change, for the
on the network security
the
installation automatically .
Input user and password
restriction.
Default user
after installation.
name and
password: admin
Default IP , subnet mask
and gateway can be
changed after logging
in .
。
9
Website security level setting(Internet options):
IE config : IE explorer【tool】menu→【Internet】, open the window and click the label【security】
select【Local Intranet】.
Click 【custom level】, the dialog box as follows:
Security setting window:;
10
1. click―initialize and script ActiveX controls not marked as safe for security ‖enable or prompt
2. ―Run ActiveX controls and plug-in ‖enableor prompt
Click ok, save the setting
Internet windows , clicksites,the dialog pops up.
Clickadvanced, the dialog pops up, and add the website, click
OK.
192.168.45.200
4.1 Client software function
Put in IP address in IE.
3 languages for option: Simple Chinese, traditional Chinese and English.
11
The main interface:
Video play windows of interface, including time display, image division, login front end system, show
channel name , advance Ptz control . Click the right button of the mouse, it is real time monitor record,
including record, alarm ,open channel sound, talkback, channel name, advance Ptz control function.
4.1.1 Login
1 .Click the icon
to display the following login dialog box:
12
Input user name and password. The default administrator user name and password , which are with
highest priority ,both are admin . Please modify the user name and password after login in time .
2. Interface windows as follows:
3.Main interface :
Shortcut menu operation , main interface shows the zone, click the right button of mouse, the figure as
follows:
13
Shortcut menu : real time monitor, record, alarm, open channel sound, talkback, show channel name, full
screen, advance ptz control etc.
(1)real time monitor : display NVS preview image.
(2)record: record status
(3)alarm: alarm status
(4)talkback: talkback function
(5)show channel name: edit channel name
(6)full screen: full screen image
(7)advance Ptz control: PTZ menu, PTZ rotation speed , presetting.
4.Pan/Tilt/Zoom Control
14
4.1.2 Exit
Close IE explorer directly if login user needs to exit.
4.1.3 Function Operation
【Front-end device setting】Click
Set-up: Video Selection, Detection, Alarm,
Auto plan, PTZ, administration, network setting, Public setting and device info.
【Record File playback】Click
Select playback network record or local record,
Playback window pops up.
【Snapshot】Click
like a button of camera; Click ―snapshot‖ the capture button , if
saving the picture
of current channel , so the picture will be saved in Windows system.
【Status Switch】Click
Click
it includes surveillance status, record and manual alarm
and open all instantaneous monitor channels, click
Click and display all screen. Click
【Attached File】Click
and close all monitor channels.
, auto plan setting and start button.
and display all screen. Click
auto plan setting and start button.
PTZ control(real-time monitor): control PTZ direction, including direction keys, iris,zoom,focus
function. The figure:
【PTZ control】includes menu of【Direction control】
【Iris ±】,【zoom±】、
【focus±】
【PTZ Automatically】Auto rotation control follows a certain angle
15
【PTZ direction】8 direction keys: up, down, left, right, left up, left down, right up,right down.
【Iris±】 Adjust the Iris large and small.
【Zoom±】For wide view, the angle is bigger.
【Focus±】It can adjust the definition.
4.1.4 Search
Record and Playback
Click the button ,
and record search dialog box pops up .The figure is as follows:
Remote record and local record
(1) Remote Search
Search Record: Select record type, input record date ,channels, result search . The results will be in
the record search list . Double-click all records, the records will be played . You can select full-screen .
Record backup: Record will be save automatically to the Download subdirectory of client installation
directory, or you can download it to the appointed file.
Click the buttons playback control bar and control all the functions when playing back. Such as
Save, stop, snapshot, full screen etc. The file name will be showed on the video window when
playing back.
(2) Local Search : Same as remote search
16
4.2 Front –end System Setting
Click front –end system setting in the interface
and the windows pops up :
4.2.1 Video Selection
The left list shows channel number. Channels will be settled when selecting.
Channel name: modify, default name for channel number, such as channel 2 for 2 .
Time and channel: Time and channel name can be modified at will and the current time and channel
name will be shown on the preview image.
Note: Do not modify time of host computer , otherwise it will influence the time of record data
Shelter; The important area could not record in the preview area, such as the password input area of the
safe or bank ,etc. Click[Shelter] , check box in the front, and select a certain place in the video picture,
press the left key of mouse , drag to the suitable place , loose the left key of the mouse , click ―save‖ .
Picture quality setting: 1)Resolution: D1,HD1,CIF,QCIF. 2)1 frame interval:1-255. 3)frame; PAL
(1-25f/sec),NTSC(1-30f/sec);4)bit stream: fixed, changeable(1-6level); 5)maximum rate. Picture
quality setting: 1)brightness 2)contrast 3)saturation 4)color.
17
Default: restore the original setting
Copy the current setting: It can copy the setting specification through this function to make less work,
if the specification is as the same as this channel .
The window pops up after clicking . Select the copy setting spec and Tick [√] before the check box .Click
[all ] ,Select all , press [OK] key and move back.
Save channels: click [save ] button after finishing configuration.
Save all channels: Save all channels setting
Note: [default], [ copy to…],[ save channel], [save all channels] , [close] this button means the function of
―shutdown‖ which is all the same meaning in the manuals .
4.2.2 Detection and Alarm
Click [Detection and alarm] labels, 3 settings: 1)basic 2)alarm linkage record 3)Motion detection
district
Basic Setting:
Detection type: video lost detection , motion detection and probe detection , and manual alarm .
video lost detection ;signal or none
motion detection: to detect the motionless video image
18
probe detection: front-end alarm detection
Input port relating to detector : Channels setting and alarm box input port number relationship, one-one
correspondence.
Output port relating to alarm: Detection type and alarm box output port number,one-one correspondence.
Alarm time duration: Alarm output time from 5 sec to 300 sec for option.
Alarm linkage record
Alarm start record : deploy SD card , record by SD card.
Select linkage record channels , record duration from 30 sec to 600 sec.
Motion Detection District
Detection district setting : press and drag the left key of the mouse on the video and loose the left key of
mouse for selecting the suitable scope , so it is a certain district setting .
19
All district: all preview pictures have been setting to detection district
Clear all : Click and delete all districts.
Sensibility: More sensitive to movement in the detection district, more values
Alarm trigger values: Alarm trigger up to a certain value.
4.2.3 Auto work plan
Click the adding buttons[add], you can add much periods of time ,if necessary. The maximum : 4 periods
Working type can be choosen. It can be single or it can combine with other type . It can record according
to the plan of a certain channel or day . The figure is as follows:
Current setting copy to: week day selection. The figure is as follows: All selection or one day .
20
Non work plan can auto record and record package when wireless connection as follows:
2.4 Pan/Tilt/Zoom Setting
PTZ setting: Select the correct PTZ decoder type according to the decoder of the real channel input.
Set up the relative baud rate , address and Serial port basis on baud rate of decoder setting ,
address and serial port to assure the normal communication
Presetting:
21
4.2.5 User Management Setting
Click [User Management ] label. The window is as follows:
Click [Add] this button , you can add new user , password , level and priority. The figure is as follows:
Click [modify] this button, you can modify the priority of other users. The user has PTZ control and local
playback priority function compare with the above dialog. The figure is as follows:
22
Click [delete], can delete the user.
Click[modify password], it can modify password. Input old password and renew password.
The figure is as follows:
4.2.6 Network Setting
Click [network settings] label, the window is as follows:
23
IP setting: IP Address , Network Mask, Gateway IP
After modifying IP address, Click [Save Network Config], the window is as follows:
Click [reboot the front end device] again, the window is as follows:
DDNS Setting:
Enable DDNS , device domain, DDNS Server IP, DDNS server port, User name and User password.
You can connect ADSL broad band cable directly in case of unattended operation.
The remote control port can be visited through the domain name .
PPPOE Setting:
【Enable PPPOE】 menu, Set PPPOE setting start, input PPPOE user and password provided by ISP
(Internet Server Provider), save and reboot the device. DVR will connect the network automatically by
PPPOE mode after start-up, and then IP will be modified automatically for dynamic IP address obtained
by WAN.【PPPOE Device Address 】
Operation: After PPPOE dial-up, check the IP from【PPPOE Device Address】, obtain device IP address
and visit IP address through the client software.
24
4.2.7 Public Setting
Click [Public Setting] the label, you can control front-end device time, video format , software update,
restore EX –work setting function, etc. The figure is as follows:
After setting time , click the button[Save], and click OK. The figure is as follows:
Select video format and click the button [save], the figure is as follows:
Reboot the front –end device after the front –end software updates.
25
NVS Update Program
BIOS, WEB documents programs, etc have been updated directly . Moreover, IP cameras can be
updated by network client software.
Click open the files: Open the relative documents, ( The update program can be downloaded from
technical service dept or company website) , click the related button and send it out after adding it in the
address field. (Device Automatic Identification Update Software). The current progress bar shows
updating progress and relative hint of update success or failure, finally successful update system will
reboot .
4.2.8 Device Info
Click the label [Device Info ], the window is as follows:
It records front-end device and client software information.
26
4.3 Snapshot
Click any channels of the display district, and click the main interface button
, the taken pictures
will pop up and save to the Windows system.
4.4 Record Playback
Record Playback: Local and Network record playback.
Network record playback : the video of SD card or download to the local and playback.
Local video record: storage record files, documents path X: /DVRData.
4.4.1 Network Video Record Playback
Click this button
Select record playback , the window is as follows:
27
Record search: Search specification is record type, channel number , date and time separately.
You can search the required record files selecting the suitable specification info .
Record playback: forward, reverse, pause etc. Please tick √ before the check box of record files , if
multi-channels play back simultaneously .Click the button [play], and play. This playback record is from
the storage of SD card .
4.4.2 Record Playback
Click this button
Select record playback , the window is as follows:
The figure 6.1, the operation of 6.1 is the same above .
Notes: If select playback network record, please click
for download.
If selecting the playback local record, please click this button,
。
28
and backup .
4.5 Attached File
It includes connect server, setup monitoring channel list , real-time monitor info statistics ,remote
alarm upload info, local alarm settings, log management, change language, Web monitor system, etc.
4.5.1 Real-time Monitoring Info Statistic
Channel: Matter note order; Server name; channel name; channel bit rate; real-time monitoring
streaming rate; record file path
4.5.2 Remote Alarm Upload Info.
Record remote alarm upload time, alarm type, server IP , Server Name and channel name.
Auto popup, auto scroll, save to the file , clear all and close function ,etc all like the above .
29
4.5.3 Local Alarm Settings
It includes alarm sound and alarm record function.
Alarm sound: You can tick off before Beep When Alarm with Self-contained System Alarm Sound File or
select ―Beep will ignore alarm sound file‖ which have the duration from 3 seconds to 900 seconds for
option.
User-defined alarm sound, Click
,and search sound file , the figure is as follows:
30
Alarm Record: Local alarm linkage settings. Alarm record duration is from 15 seconds to 900 seconds for
option.
4.5.4 Local Record Setting
Select the local record storage disk, record file package setting from 1 minute to 120 minutes for option.
4.5.5 Log Management
It includes time and info . Auto popup, auto scroll, save to file , clear and close function all like the above.
31
4.5.6 P/T/Z presetting position
Call the presetting and setting P/T/Z rotation speed.
4.5.7 Disk cleaning and writing error info
Time: Error time, channel, channel number, disk, error disk, record file , record path and name, error info,
error type, save to file , save , clear, clear all .
32
Click [Save To File], the figure is as follows:
Click [Clear All ], The figure is as follows:
4.5.8 System Version
33