1
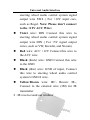
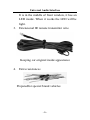
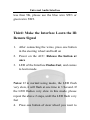
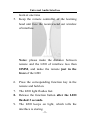
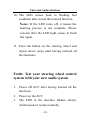
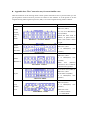
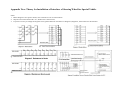
The Third Generation of
Universal Audio Interface
Between Original Steering Wheel
& Aftermarket Head Unit
User’s Manual
Before installing and using the interface, please
read this manual and maintain for reference.
Date: 05-16-2006
Universal Audio Interface
Welcome!
Congratulations on your purchase of this
Universal Audio Interface. This is the third
generation product and it is available for all
vehicles and works with all head units. With this
universal audio interface you can connect your
aftermarket head unit to your original steering
wheel. You will soon enjoy the convenience of
controlling your head unit from the steering
wheel.
Notes:
1. The installation for this interface is a
professional job, so please go to nearby
installation shop for help.
2. Before tearing down the steering wheel,
contact the local dealer or the factory first..
For installation with 95% of vehicles, it is
very simple and you just need to connect 4
wires.
Universal Audio Interface
CONTENTS
FIRST: LET’S LEARN ABOUT THE
INTERFACE ................................................. - 4 SECOND: CONNECT INTERFACE TO THE
STEERING WHEEL .................................... - 7 THIRD: MAKE THE INTERFACE LEARN
THE IR REMOTE SIGNAL......................... - 8 FORTH: TEST YOUR STEERING WHEEL
CONTROL SYSTEM WITH YOUR NEW
AUDIO SYSTEM ....................................... - 10 FIFTH: COMPLETE INSTALLATION ......- 11 TROUBLESHOOTING.............................. - 12 -
-3-
Universal Audio Interface
First: Let’s Learn about the Interface
1. Eight wires in the interface:
z White wire: Input/1, Connect this wire to
steering wheel audio control system signal
output wire SW1 ( For the resistance is
larger than 9K, such as car from Korea and
USA)
z Green wire: Input/2 Connect this wire to
steering wheel audio control system signal
output wire SW2 ( For the resistance is less
than 9K, such as car from Europe and
Japan)
z Blue wire: Input/3 Connect this wire to
steering wheel audio control system signal
output wire SW3 ( For the resistance is less
than 9K, such as car from Europe and
Japan)
z Orange wire: Input/4 Connect this wire to
-4-
Universal Audio Interface
steering wheel audio control system signal
output wire SW4 ( For +12V input cars,
such as Regal. Note: Please don’t connect
to the +12V ACC Wire)
z Violet wire: DIN Connect this wire to
steering wheel audio control system signal
output wire DIN ( For +5V signal output
wires, such as VW, Kreisler, and Nissan)
z Red wire: ACC +12V Connect this wire to
the ACC wire
z Black (thick) wire: GND Connect this wire
to the GND
z Black (thin) wire: GND of input, Connect
this wire to steering wheel audio control
system’s GND-S wire.
z Yellow/Brown wire: IR+\ Brown: IR-,
Connect to the external wire (3M) for IR
transmitter
2 . IR receive/send out window:
-5-
Universal Audio Interface
It is in the middle of front window, it has an
LED inside. When it works the LED will be
light.
3. Extensional IR remote transmitter wire.
Keeping car original inside appearance
4. Extra resistances
Preparedfor special brand vehicles
-6-
Universal Audio Interface
Second: Connect
steering wheel
Interface
to
the
1. Find out the signal output wire and GND-S
wire of the steering wheel audio control
system
2. Use multimeter to test the change of
resistance.
3. Keep the system don’t connect to any other
place and keep no voltage between the two
wires. If there are any other wires connecting
to any other place, please snip the wires.
4. Test the two wires, there should be no
voltage between the two wires, if there are
Voltage between them, please re-check if
there are any other wires connecting to other
place. Find it, snip the connection.
5. Connect GND and ACC
Notes: If the car has more than one signal output
wires, check resistance between signal output
wire and GND-S wire. If the biggest resistance is
larger than 9K, please use the white wire SW1. If
-7-
Universal Audio Interface
less than 9K, please use the blue wire SW3 or
green wire SW2.
Third: Make the Interface Learn the IR
Remote Signal
1. After connecting the wires, press one button
in the steering wheel and hold on
2. Power on the ACC. Release the button at
once
3. LED of the Interface flashes fast, and comes
to learn mode.
Notes: If in normal using mode, the LED flash
very slow, it will flash at one time in 3 Second. If
the LED flashes very slow in this mode, please
repeat the above 2 steps, until the LED flash very
fast
4. Press one button of steer wheel you want to
-8-
Universal Audio Interface
learn at one time
5. Keep the remote controller of the learning
head unit face the receive/send out window
of interface.
Notes: please make the distance between
remote and the LED of interface less than
10MM, and make the remote just in the
front of the LED
6. Press the corresponding function key in the
remote and hold on.
7. The LED light flashes fast.
8. Release the function button after the LED
flashed 3 seconds.
9. The LED keeps on light, which tells the
interface is storing.
-9-
Universal Audio Interface
10. The LED comes back to flashing fast
condition after stored the learned function.
Notes: If the LED turns off, it means the
learning process is not complete. Please
re-learn after the LED light comes to flash
fast again.
11. Press the button on the steering wheel and
repeat above steps until having learned all
the functions.
Forth: Test your steering wheel control
system with your new audio system
1. Power off ACC after having learned all the
functions
2. Power on the ACC
3. The LED in the interface flashes slowly,
which means it works normally.
- 10 -
Universal Audio Interface
4. Power on your audio, and press all buttons in
the steering wheel to test all the functions.
Note: Don’t press the button on the steering
wheel before you power on the ACC.
Otherwise, it may lose the stored functions
in the interface.
Fifth: Complete Installation
1.
2.
3.
Install the interface in a suitable place.
Make the front of the interface face the head
unit and make sure the head unit can receive
signal easily.
Or you can use the extensional IR
transmitter wire (3M) to send out the
signal(make the IR transmitter eye face
head unit). You can hide the transmitter in a
place, such as under head unit, over the real
view mirror, in the ceiling light shell or
some other place
- 11 -
Universal Audio Interface
Troubleshooting
1. The LED light doesn’t flash after powered
on:
z Please check whether the ACC power is OK
and check whether wire is connected right
2. Cannot come to learn mode:
z Please release the button in 1~2 seconds
after ACC powered on. Don’t hold the
button too long after the ACC powered on.
3. Cannot control head unit:
z Please make sure head unit can receive
signal from transmitter, or you have to
change the position of transmitter.
4. There are two or more than two function
buttons that can not work or some of them
are with the same function:
z Please check whether you have connected
the right signal output wire (Green, Blue or
white), please change another wire and try
again.
- 12 -
z Appendix One: The Connection way for most familiar cars:
Take the connector of the steering wheel control system and make it face to yourself. Then you can
get the position of the wires that you need to connect to the interface. S in the picture is for the
original steering wheel signal out put wire (SW), G is for the original steering wheel’s GND-S.
Brand
Vehicle Connector
Mark
Honda:
Accord,
Odyssey,
CRV,
S2000
S: to Green wire (SW2) or
Blue wire (SW3).
G1, G2, G3 to Black(thin)
wire (GND-S)
Honda has three kind of
GND-s, so please have a
check and confirm which
is right.
Mazda:
M2,M3,
M6, MPV
S: to Green wire (SW2) or
Blue wire. (SW3
G to Black(thin) wire
(GND-s)
Mazda:
PREMACY
S: to Green wire (SW2) or
Blue wire. (SW3
G to Black(thin) wire
(GND-S)
Black
wire
(GND-S)
connects to ACC’s GND or
connects to the ground.
Toyota
S1 to Green wire (SW2) or
Blue wire. (SW3
S2 to White wire(SW1)
G to Black(thin) wire
(GND-s)
Ford:
Mondeo
Focus
S: to Green wire (SW2) or
Blue wire(SW3).
G to Black(thin) wire
(GND-s)
Reference Color:
S: Brown/Yellow
G: White/Black
Appendix Two: Theory for Installation of Interface of Steering Wheel for Special Vehicle
Notes:
1. Below diagram is for special vehicle, most vehicles have no so much buttons
2. Snip the wire which mark with a “X”, broken line is the new line,
3. If you have no way to change the original circuit, please add some resistances as diagram 3,diagram 4, them connect to the interface.