1
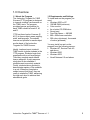
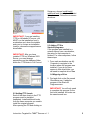
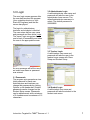
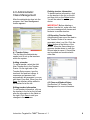
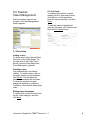
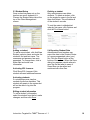
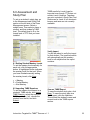
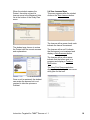
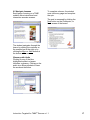
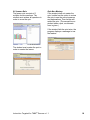
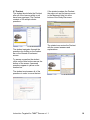
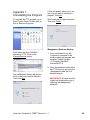
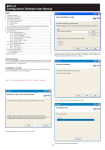
Contemporary’s
Instruction Targeted
for TABE® Success
User Manual
Copyright © 2007 by The McGraw-Hill Companies, Inc. All rights reserved. No part of this manual
may be reproduced, stored in a retrieval system, or transmitted in any form or by any means,
electronic, mechanical, photocopying, recording, or otherwise, without prior permission of the
publisher.
Contemporary’s
Instruction Targeted for TABE Success
Table of Contents
1.0 Overview
1.1
1.2
About the Program
Requirements and Settings
2.0 Installation
2.1
2.2
2.3
2.4
Installation
Adding ITTS Levels
Adding ITTS to Start>All
Programs
Mapping a Drive on Windows
2000 or XP
3.0 Login
3.1
3.2
3.3
3.4
Passwords
Administrator Login
Teacher Login
Student Login
4.0 Administrator:
Class Management
4.1
4.2
4.3
Teacher Setup
Exporting Teacher Roster
Class and Student Setup
5.0 Teacher:
Class Management
5.1
5.2
5.3
5.4
Class Setup
Test Setup
Student Setup
Exporting Student Data
6.0 Assessment and
Study Plan
6.1
6.2
6.3
Setting Student Mastery
Levels
Importing TABE Sessions
Using the Program without
TABE Data
7.0 Reports
7.1
7.2
7.3
7.4
Lesson Reports
Assessment Reports
TABE Reports
Class Reports
8.0 Resource Management
8.1
8.2
8.3
8.4
Adding Resources
Editing Resources
Deleting Resources
Printing Resources
9.0 Student Experience
9.1
9.2
9.3
9.4
9.5
9.6
9.7
Student Main Menu
Study Plan Menu
Pretest
View Lessons Menu
Navigate Lessons
Lesson Quiz
Posttest
Appendix 1:
Uninstalling the Program
Management Database
Backup
Appendix 2:
ITTS Units and Lessons
1.0 Overview
1.1 About the Program
The Instruction Targeted for TABE
Success (ITTS) program is designed
to improve students’ performance on
the TABE® tests. The program
provides lessons and practice for
each TABE subskill at levels E, M,
and D.
ITTS has three levels of lessons (E,
M, D) in three subject areas: reading,
math, and language. The subskill
lessons and quizzes for each subject
are the basis of the Instruction
Targeted for TABE Success.
Ideally, teachers import students’
TABE results to place students in the
ITTS program. Students begin their
experience with a unit level pretest.
Then they complete each subskill
lesson assigned. A print resources
study plan is also available if
students need more study material.
Finally, students take a posttest to
demonstrate mastery of the subskills
in a unit. When they complete a
subject area at their level, they are
ready to retake the TABE, advancing
through each level to achieve their
educational goals.
1.2 Requirements and Settings
To install and run the program you
need
• Windows 2000 or XP
• 128 MB RAM (minimum)
• Color monitor
• 8x or better CD-ROM drive
• Sound card
• Free Disk Space — 600 MB
• 800 x 600 screen resolution
• 256 colors (minimum), thousands
of colors (preferred)
You may install on and run the
program from the following servers:
• Windows NT, Service Pack 4.0
and above
• Windows 2000
• Windows 2003
• Novell Netware 6.0 and above
Instruction Targeted for TABE® Success v 1.1
3
2.0 Installation
2.1 Installation
The complete ITTS program comes
on three CD-ROMs, one for each
TABE level. You can purchase all
three levels or a single level, but
each CD must be installed
independently.
To install
1. Insert an ITTS CD into your CDROM drive.
2.
The installer will automatically
launch. If you have “auto-run”
disabled, click on My Computer.
Then double-click on the CDROM drive. From the CD
contents, double-click the setup
icon.
3.
On the ITTS installation
welcome screen, click on the
Next button.
5. The default installation location is
displayed in the Destination
Folder box. If you want another
location, click on the Browse
button and navigate to the
desired location. Click OK. Then
click the Next button to continue.
6. WAIT for the program to install.
7. The next screen displays the
program file location. Click the
Next button to continue.
4. Read the license agreement and
then click Yes to continue.
8. The next screen displays all ITTS
levels currently installed. These
are the lesson levels to which
students will have access. Click
Finish when done. See section
2.2 of this manual for instructions
on how to install additional levels.
Instruction Targeted for TABE® Success v 1.1
4
Setup.exe, choose Install/Install
additional level from the InstallShield
Wizard screen. Follow the on-screen
directions.
IMPORTANT! If you are installing
ITTS to a Windows NT server, you
MUST run the installation from a
workstation and, when the installer
asks you to choose an installation
location, choose the mapped server
drive/folder.
IMPORTANT! After you have
installed ITTS to a Windows 2003
Server, you must change
permissions on the database folder
within the ITTS folder to Full Control.
2.3 Adding ITTS to
Start>All programs
If the program was installed to a
network server from a workstation,
the setup for that computer is
finished. For other computers, follow
these steps:
1. From each workstation use My
Computer to navigate to the
location where the program was
installed. If you do not have
access to that drive/folder, you
will need to map that drive. See
2.4 Mapping a Drive.
2. Find and click on the file named
ClientSetup.exe. It adds the
program to the Start>All
Programs menu.
2.2 Adding ITTS Levels
Each of the three levels in the ITTS
program must be installed
separately. Install additional levels
from the same computer you used to
install the original program.
After opening the CD and clicking on
Instruction Targeted for TABE® Success v 1.1
IMPORTANT! You will only need
to complete this process for the
first level installed. All levels use
the same launch icon.
5
2.4 Mapping a Drive on Windows
2000 or XP
1. Click Start, click My Network
Places.
2. Select Tools>Map Network
Drive
3. Click the drive letter that you
want to use and then specify
whether you want to
reconnect every time that you
log on to your computer.
4. Click Browse and navigate to
the MHC Interactive Folder on
your server and click OK.
Note: Network drives are
mapped by using letters
starting from the letter Z.
This is the default drive letter
for the first mapped drive you
create. However, you can
select another letter if you
want to use a letter other
than Z.
5. Click Finish.
If you have trouble mapping the
drive, please see your network
administrator.
Instruction Targeted for TABE® Success v 1.1
6
3.0 Login
The user login screen appears after
the user has launched the program
(from a desktop shortcut or from
Start>All Programs) and the title
screen has played.
3.2 Administrator Login
A valid administrator user name and
password will take the user to the
administrator home screen. The
default administrator username is
admin. The default password is
999999999.
The login for administrators,
teachers, and students is identical.
The user enters his/her user name
and password and then clicks Login.
The “smart” login recognizes the
user’s level of accessibility and takes
the user to the appropriate screen.
3.3 Teacher Login
A valid teacher user name and
password will take the user to the
teacher home screen with Class
Setup and Student Setup.
An error message will tell the user if
an invalid user name or password
was entered.
3.1 Passwords
The program auto-generates a nineletter password for each user.
Administrators and teachers can
change their passwords by clicking
Options on the header bar. Student
passwords can be changed on the
Student Setup screen. Passwords
can be alphanumeric with a minimum
of 5 characters and a maximum of 15
characters.
3.4 Student Login
A valid student user name and
password will take the student to the
student main menu.
Instruction Targeted for TABE® Success v 1.1
7
4.0 Administrator:
Class Management
After the administrator logs into the
program, the Class Management
screen appears.
Deleting teacher information
To delete teacher information, click
on the teacher in the list on the left
and then click on the Delete button.
You will be asked to confirm your
choice.
IMPORTANT! Before deleting a
teacher from the list, make sure that
you have reassigned all classes and
students to another teacher.
4.1 Teacher Setup
The first thing the administrator
needs to do is set up the teachers
within the system.
Adding a teacher
To add a teacher, select the Add
New Teacher line in the Teacher
Roster. On the right side of the
Teacher Setup screen, type the
teacher's first and last names. A
username and password will
automatically be generated; you can
edit them if you wish. When you click
Save, the teacher will be added to
the teacher list at the left.
Editing teacher information
To edit teacher information, click on
the teacher in the list on the left and
alter the information in the fields on
the right. Click Save to add your
changes to the database.
4.2 Exporting Teacher Roster
Administrators can export the data in
the Teacher Roster to a comma
separated value (.csv) file. Click the
Export button at the bottom of the
screen. When the Save dialog box
appears, decide where to save the
file and what to name it. Saved files
can be edited and combined with
other files.
4.3 Class and Student Setup
See Section 5.0 Teacher Class
Management for more information.
Instruction Targeted for TABE® Success v 1.1
8
5.0 Teacher:
Class Management
After the teacher logs into the
program, the Class Management
screen appears.
5.2 Test Setup
To change the students’ required
mastery level for tests and quizzes,
click Options on the header bar,
enter the new percentage, and click
Save.
To sort the roster in alphabetical
order by first name, click Options and
click the First Name button.
5.1 Class Setup
Adding a class
To add a class, select the Add New
Class line in the Class Roster. On
the right side of the Class Setup
screen, type the Class Name and
Class Description (optional).
Deleting a class
Only administrators can delete
classes. To delete a class, click on
the class name in the list and then
click Delete. This will delete all
students associated with this class.
To keep the students’ records,
assign the students to a different
Teacher or Class before deleting this
class.
Editing class information
To edit a class, select the class from
the list, make changes, and then
click Save.
Instruction Targeted for TABE® Success v 1.1
9
5.3 Student Setup
Once a class has been set up, the
teacher can enroll students in it.
Choose the Student Setup tab at the
top of the Class Management
screen.
Deleting a student
Only administrators can delete
students. To delete a student, click
on the student’s name in the list and
then click Delete. This will delete all
of the student’s records.
To sort the roster in alphabetical
order by first name, click Options and
click the First Name button.
Adding a student
To add a new student, click Add New
Student, select a class, and enter the
student’s first and last name. The
username and password are auto
generated. To change them, click in
either field and enter new
information.
Activating ESL Lessons
Click Show ESL Lessons if this
student will need additional lessons.
5.4 Exporting Student Data
Administrators and teachers can
export the data in the Student Roster
to a comma separated value (.csv)
file. Click the Export button at the
bottom of the screen. When the Save
dialog box appears, decide where to
save the file and what to name it.
Saved files can be edited and
combined with other files.
Activating students
If a student becomes inactive,
uncheck the Active checkbox. This
student will remain in the system but
will not be able to log into the
program.
Editing student information
To edit a student’s information,
select the student from the list, make
changes, and then click Save.
Instruction Targeted for TABE® Success v 1.1
10
6.0 Assessment and
Study Plan
To set up a student’s study plan, go
to the Assessment and Study Plan
section at the left side of the Class
Management screen. Select a
subject area. Then select a class, a
student, and that student’s TABE
level. The default level is E or the
lowest level of ITTS that you have
installed.
TABE results for Level A can be
imported even though ITTS does not
contain Level A lessons. Teachers
can print a student’s Study Plan Print
Resources for Level A, but electronic
lessons and tests are not currently
available.
Verify Import
You will be asked to verify the import
for that student. The imported results
will automatically set the mastery
level for all subjects that the export
contains.
6.1 Setting Student Mastery Levels
To set the mastery level manually for
each unit, click the appropriate
button. A highlighted button indicates
the mastery level for that unit. When
you have finished manually setting
the mastery levels, click Save.
+ = Mastery
P = Partial Mastery
– = Non Mastery
6.2 Importing TABE Sessions
To set the mastery level based on a
student’s TABE results, click Import
TABE Session, select the exported
TABE results file (.txt), choose the
student from the list, and click
Submit.
Save as TABE Report
To save the student study plan, click
Save. To save the study plan as a
TABE report, click the checkbox.
This will add the student’s name and
current level to the TABE reports
section.
Instruction Targeted for TABE® Success v 1.1
11
View Print Resources Study Plan
To view the print resources study
plan, click View Plan. To print the
student’s print resources study plan
for this entire subject and level, click
the Print Plan button. This will open a
browser window. Click the print icon
or select Print from the File
dropdown menu.
7.0 Reports
7.1 Lesson Reports
To view a student’s lesson progress,
select the class, student, and
subject.
The information is displayed with the
most recent lessons at the top. Time
Spent per Session and Total Time
Spent in the program will be
displayed.
To review the student’s lesson quiz
session, click the Review button in
the Review Quiz column. You will be
able to view one or both quizzes.
If a student has mastered a lesson
outside of the program, click
“Mastered In Class” and then click
Save.
6.3 Using the Program without
TABE Data
If you don’t have any TABE data, you
can still use the program. Set up
teachers, classes, and students as
described elsewhere in this manual.
All tests and forms will be available;
the default level for every student will
be set to the lowest level installed.
Manually select mastery and non
mastery for each subject area for
each student.
To export the data for each student
to a comma delimited file for
reporting and printing purposes, click
the Export button.
Instruction Targeted for TABE® Success v 1.1
12
7.2 Assessment Reports
To view a student’s Pretest and
Posttest progress, select the class,
student, and subject.
To review the student’s pretest or
posttest session, click the Review
button in the Review Test column.
The report displays the student’s test
progress by level and unit.
To export the data to a comma
delimited file for reporting and
printing purposes, click the Export
button.
7.4 Class Reports
To view the Pretest and Posttest
progress of all students in a class,
select teacher, class, all students,
and subject.
To export the data to a comma
delimited file for reporting and
printing purposes, click the Export
button.
You may choose to view all classes,
students, and subjects or any
combination of these.
The report outputs the data you have
selected.
7.3 TABE Reports
To view a student’s TABE session
data, select the class, student, and
subject.
The TABE sessions are displayed by
date and subtest. If a student’s
mastery level was set manually and
saved as a TABE report, the only
information displayed will be the
date, subtest, and level information.
To export the data to a comma
delimited file for reporting and
printing purposes, click the Export
button.
Instruction Targeted for TABE® Success v 1.1
13
8.0 Resource
Management
The Resource Management screen
allows the administrator or teacher to
customize the resource lists used to
create student study plans.
Administrators and teachers may
add, edit, and delete resources.
8.1 Adding Resources
To add a resource, click the Add
Resource button. Enter the resource
and save your information.
8.2 Editing Resources
To edit a resource, click Edit and
make changes within the resource
field. When finished editing, click
Save.
8.3 Deleting Resources
To delete a resource, click Edit and
select all of the data in the field.
Then click the Delete key on your
keyboard.
8.4 Printing Resources
To print the resources for this unit
only, click the Print Resources
button. This will open a browser
window. Click the print icon or select
Print from the File dropdown menu.
If you would like to print a more
complete list of the student’s study
plan, click the Print Plan button on
the Assessment and Study Plan
screen. This will print all unit print
resources within a subject.
Instruction Targeted for TABE® Success v 1.1
14
9.0 Student Experience
9.1 Student Main Menu
The student main menu lists three
subject areas. The student begins by
clicking on a subject area.
9.2 Study Plan Menu
Study plans are lesson assignments
based on the student's TABE
performance (if available).
The units that have been assigned to
each student are listed in the
highlighted box. All the units that
have been mastered are displayed
below the assigned units.
9.3 Pretest
The student should begin assigned
units by taking the Pretest. The
Pretest consists of 20 multiple-choice
questions.
The student navigates through the
questions by clicking on the number
bar at the right or on the forward or
backward arrows at the bottom of the
screen.
To answer a question, the student
clicks on the letter buttons across the
bottom of the screen. The question
number on the number bar at the
right appears yellow after the
question has been answered.
The student must answer all of the
questions in order to score the test.
To locate the questions that were not
answered, refer to the number bar.
Instruction Targeted for TABE® Success v 1.1
15
When the student masters the
Pretest, the entire unit and its
lessons move to the Mastered Units
list at the bottom of the Study Plan
menu.
9.4 View Lessons Menu
This menu appears after the student
clicks on the View Lessons button.
The lessons with a green check mark
indicate the lesson is mastered.
The student may choose to review
the Pretest with the correct answers
and explanations.
The lessons with a red X indicate
that the lesson is not mastered and
display a Quiz Summary button.
The lessons with a yellow arrow
indicate that the lesson quiz is in
progress and display a Continue
Quiz button.
The View Print Resources button
displays the student’s print resources
study plan for that unit.
Once a unit is mastered, the student
can review the lessons but is not
required to take the quizzes or
Posttest.
Instruction Targeted for TABE® Success v 1.1
16
9.5 Navigate Lessons
Each lesson focusing on a TABE
subskill offers instructional and
interactive exercise screens.
To complete a lesson, the student
must visit every page and complete
the quiz.
The quiz is accessed by clicking the
Next button on the Checkpoint, or
final, screen of the lesson.
The student navigates through the
lesson by clicking the numbers on
the number bar at the right or by
clicking the More or Next button at
the bottom of the screen.
Glossary with Audio
Clicking on any of the blue
highlighted words in a lesson
launches a glossary. Clicking on the
audio icon allows students to hear
the word and definition.
Instruction Targeted for TABE® Success v 1.1
17
9.6 Lesson Quiz
The lesson quiz consists of 6
multiple choice questions. The
student must answer all questions in
order to score the quiz.
Quiz Non Mastery
If the student does not master the
quiz, he/she has the option to review
the quiz to see the correct answers
and explanations. Then he/she will
retake the quiz. (The second time a
student takes a quiz, an alternate
form is given.)
If the student fails the quiz twice, the
program displays a message to see
the teacher.
The student must master the quiz in
order to master the lesson.
Instruction Targeted for TABE® Success v 1.1
18
9.7 Posttest
The student should take the Posttest
after all of the lessons within a unit
have been mastered. The Posttest
consists of 20 multiple-choice
questions.
The student navigates through the
questions by clicking on the number
bar or the forward or backward
arrows.
If the student masters the Posttest,
the entire unit and its lessons move
to the Mastered Units list at the
bottom of the Study Plan menu.
The student can review the Posttest
with the correct answers and
explanations.
To answer a question the student
clicks on the letter buttons across the
bottom of the screen. Answered
questions appear in yellow on the
number bar.
The student must answer all of the
questions in order to score the test.
Instruction Targeted for TABE® Success v 1.1
19
Appendix 1:
Uninstalling the Program
A box will appear asking you if you
are sure you want to remove the
program. Click OK.
To uninstall the ITTS program, go to
Start>Control Panel. Double-click on
Add or Remove Programs.
WAIT while the program uninstalls.
Then click Finish.
Management Database Backup
Scroll down the list to find MHC
Interactive: ITTS. Click on the
Change/Remove button.
The InstallShield Wizard will appear.
Click on the button beside Remove.
Then click Next.
1. From a workstation use My
Computer to navigate to the
location where the program was
installed. (Default location:
“C:\Program Files\MHC
Interactive\ITTS)
2. Open the database folder within
the ITTS directory and copy the
“Management.mdb” file to a
backup location.
Instruction Targeted for TABE® Success v 1.1
IMPORTANT! All users must be
logged out while backing up or
restoring the Management
database.
20
Appendix 2:
ITTS Units and Lessons
Mathematics
Level E
Number and Number Operations
Place Value
Comparing and Ordering Numbers
Special Types of Numbers
Decimal Place Value
Number Operations
Number Operations – ESL
Addition of Whole Numbers
Addition Facts
Addition with No Regrouping
Addition with Regrouping
Subtraction of Whole Numbers
Subtraction Facts
Subtraction with No Regrouping
Subtraction with Regrouping
Multiplication of Whole Numbers
Multiplication Facts
Multiplication with No Regrouping
Multiplication with Regrouping
Division of Whole Numbers
Division Facts
Division with No Remainder
Division with a Remainder
Decimals
Decimals
Decimals and Fractions
Adding Decimals
Subtracting Decimals
Estimation
Rounding
Estimation
Problem Solving and Reasoning
Problem-Solving Strategies
Measurement
Calendars
Time
Temperature
Length and Distance
Temperature and Distance – ESL
Mass and Weight
Capacity
Mass, Weight, and Capacity – ESL
Geometry and Spatial Sense
Plane Figures
Plane Figures – ESL
Solid Figures
Spatial Sense
Data Analysis
Tables and Charts
Graphs
Patterns, Functions, Algebra
Number Patterns
Geometric Patterns
Algebraic Expressions
Computation in Context
Fractions
Addition Word Problems
Subtraction Word Problems
Multiplication Word Problems
Division Word Problems
Decimal Word Problems
Instruction Targeted for TABE® Success v 1.1
21
Mathematics
Level M
Number and Number Operations
Place Value
Place Value – ESL
Factors and Multiples
Decimal Place Value
Fractional Parts
Reducing Fractions
Fractions and Decimals
Number Operations
Addition of Whole Numbers
Adding Whole Numbers
Subtraction of Whole Numbers
Subtracting Whole Numbers
Multiplication of Whole Numbers
Multiplication with No Regrouping
Multiplication with Regrouping
Division of Whole Numbers
Division with No Remainder
Division with a Remainder
Decimals
Adding and Subtracting Decimals
Multiplying Decimals and Whole
Numbers
Multiplying Two Decimals
Fractions
Mixed Numbers and Improper
Fractions
Adding Fractions with the Same
Denominator
Adding Fractions with Different
Denominators
Adding Mixed Numbers
Subtracting Fractions with the
Same Denominator
Subtracting Fractions with
Different Denominators
Subtracting Mixed Numbers
Computation in Context
Addition and Subtraction Word
Problems
Multiplication Word Problems
Division Word Problems
Decimal Word Problems
Fraction Word Problems
Estimation
Rounding
Estimation
Problem Solving and Reasoning
Problem-Solving Strategies
Measurement
Tools and Units of Measurement
Tools and Units of Measurement
– ESL
Calculating Measurements
Calculating Measurements – ESL
Perimeter
Geometry and Spatial Sense
Lines
Plane Figures
Plane Figures – ESL
Solid Figures
Spatial Sense
Data Analysis
Tables, Charts, and Diagrams
Graphs
Statistics and Probability
Probability
Statistics
Patterns, Functions, Algebra
Patterns
Functions
Algebraic Expressions
Instruction Targeted for TABE® Success v 1.1
22
Mathematics
Level D
Number and Number Operations
Place Value
Factors and Multiples
Forms of Fractions
Ratios and Proportions
Understanding Percents
Number Operations
Number Operations – ESL
Multiplication of Whole Numbers
Adding Whole Numbers
Subtracting Whole Numbers
Multiplying Whole Numbers
Division of Whole Numbers
Dividing Whole Numbers
Decimals
Adding Decimals
Subtracting Decimals
Multiplying Decimals
Dividing Decimals by Whole
Numbers
Dividing Two Decimals
Fractions
Adding Fractions
Subtracting Fractions
Multiplying Fractions
Dividing Fractions
Computation in Context
Whole Number Word Problems
Decimal Word Problems
Fraction Word Problems
Integers
Positive and Negative Numbers
Adding Positive and Negative
Numbers
Subtracting Positive and Negative
Numbers
Multiplying Positive and Negative
Numbers
Dividing Positive and Negative
Numbers
Percents
Finding the Percent of a Number
Find the Total When a Percent Is
Given
Estimation
Rounding and Estimation
Problem Solving and Reasoning
Problem-Solving Strategies
Measurement
Units of Measurement
Perimeter and Circumference
Area
Geometry and Spatial Sense
Angles
Lines
Plane Figures
Solid Figures
The Coordinate Plane
Data Analysis
Graphic Information
Statistics and Probability
Probability
Statistics
Sampling
Patterns, Functions, Algebra
Patterns
Functions
Algebraic Expressions
Linear Equations
Inequalities
Instruction Targeted for TABE® Success v 1.1
23
Reading
Level E
Interpret Graphic Information
Maps
Graphs
Consumer and Business
Materials
Reference Sources
Reading
Level M
Interpret Graphic Information
Maps and Graphs
Consumer and Business
Materials
Reference Sources
Recall Information
Stated Concepts
Sequence
Sequence – ESL
Recall Information
Stated Concepts
Skimming and Scanning – ESL
Sequence
Sequence – ESL
Words in Context
Context Meaning
Words in Context
Context Meaning
Construct Meaning
Main Idea
Cause and Effect
Comparing and Contrasting
Comparing and Contrasting –
ESL
Drawing Conclusions
Character Traits
Construct Meaning
Main Idea
Summarizing and Paraphrasing
Cause and Effect
Comparing and Contrasting
Drawing Conclusions
Supporting Evidence
Character Traits
Character Traits – ESL
Evaluate/Extend Meaning
Fact and Opinion
Predicting Outcomes
Evaluate/Extend Meaning
Fact and Opinion
Predicting Outcomes
Applying Passage Elements
Author’s Purpose
Instruction Targeted for TABE® Success v 1.1
24
Reading
Level D
Interpret Graphic Information
Maps and Graphs
Consumer and Business
Materials
Reference Sources
Recall Information
Stated Concepts
Sequence
Words in Context
Context Meaning
Construct Meaning
Main Idea
Summarizing and Paraphrasing
Cause and Effect
Comparing and Contrasting
Comparing and Contrasting –
ESL
Drawing Conclusions
Supporting Evidence
Character Traits
Personal Appearance and
Character Traits – ESL
Evaluate/Extend Meaning
Fact and Opinion
Predicting Outcomes
Applying Passage Elements
Genre and Style Techniques
Genre and Style Techniques –
ESL
Author’s Purpose
Instruction Targeted for TABE® Success v 1.1
25
Language
Level E
Usage
Nouns
Pronouns
Pronoun and Antecedent
Agreement
Verb Basics 1
Verb Basics 2
Simple Tenses
Present Tenses – Listening
Comprehension – ESL
Past Tenses – Listening
Comprehension – ESL
Other Tenses
Subject and Verb Agreement
Comparative and Superlative
Adjectives
Sentence Formation
Complete Sentences, Fragments,
and Run-ons
Compound Parts and Sentences
Sentence Structure – ESL
Modifiers
Paragraph Development
Topic Sentences
Supporting Sentences
Sequence and Transitions
Capitalization
Capitalization
Punctuation
End Marks
Commas
Writing Conventions
Quotation Marks
Apostrophes
Letter Parts
Language
Level M
Usage
Nouns
Pronouns
Pronoun and Antecedent
Agreement
Verb Basics
Simple Tenses
Other Tenses
Subject and Verb Agreement
Adjectives
Adverbs
Adjectives vs Adverbs
Negative Words
Negative Words -- ESL
Sentence Formation
Complete Sentences, Fragments,
and Run-ons
Compound Parts and Sentences
Complex Sentences
Modifiers
Paragraph Development
Topic Sentences
Supporting Sentences
Sequence and Transitions
Capitalization
Capitalization
Punctuation
End Marks
Commas
Writing Conventions
Quotation Marks
Apostrophes
Letter Parts
Instruction Targeted for TABE® Success v 1.1
26
Language
Level D
Usage
Nouns
Pronouns
Pronoun and Antecedent
Agreement
Indefinite Pronouns – ESL
Verb Basics
Simple Tenses
Other Tenses
Verb Tenses: Present Tenses –
ESL
Verb Tenses: Past Tenses – ESL
Verb Tenses: Future Tenses –
ESL
Subject and Verb Agreement
Easily Confused Verbs
Adjectives vs Adverbs
Negative Words
Sentence Formation
Complete Sentences, Fragments,
and Run-ons
Compound Parts and Sentences
Complex Sentences
Modifiers
Parallel Structure
Paragraph Development
Topic Sentences
Supporting Sentences
Sequence and Transitions
Capitalization
Capitalization
Punctuation
Commas
Other Punctuation Marks
Writing Conventions
Quotation Marks
Apostrophes
Letter Parts
Instruction Targeted for TABE® Success v 1.1
27