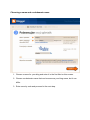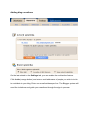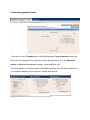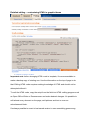
1
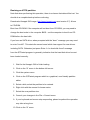
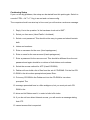
GOLDSMITHS Research Online
Project
Furse, Anna F. D. and Plahuta, Marko
Cyber Studio
You may cite this version as: Furse, Anna F. D. and Plahuta, Marko. 2006.
Cyber Studio. [Project] : Goldsmiths Research Online.
Available at: http://research.gold.ac.uk/135/
COPYRIGHT
All material supplied via Goldsmiths Library and Goldsmiths Research Online (GRO) is
protected by copyright and other intellectual property rights. You may use this copy for personal
study or research, or for educational purposes, as defined by UK copyright law. Other specific
conditions may apply to individual items.
This copy has been supplied on the understanding that it is copyright material. Duplication or
sale of all or part of any of the GRO Data Collections is not permitted, and no quotation or
excerpt from the work may be published without the prior written consent of the copyright
holder/s.
http://eprints-gro.goldsmiths.ac.uk
Contact Goldsmiths Research Online at: [email protected]
Goldsmiths Research Online, 2008
http://eprints.goldsmiths.ac.uk/135
THE CYBER STUDIO*
Setting up your own virtual
rehearsal/writing/research environment for
performance collaboration
User manual by
Marko Plahuta
From a project concept by
Anna Furse with Zeljko Hrs
•
*This term was used by Anna Furse, Artistic Director of Athletes of the
Heart, UK, who commissioned this programme to faciliate collaboration across
3 countries by a company of dispersed performers for the purposes of creating
a text for her production DON JUAN.WHO?/DON JUAN.KDO? in 2007 with
Mladinsko Theatre, Ljubljana, Slovenia.The production was funded by The
British Council, the Arts Council of England, the AHRC and The British
Academy. It premiered in Ljubljana in September and previewed at The
Shunt Vaults in London on October 2007. Produced by ArtsAgenda,
Executive producer Mik Flood, further touring, including to the UK is planned
for 2008 with FeEAST and beyond. For further information visit:
www.athletesoftheheart.org where a link to the original Don Juan site can also
be found.
Contents
Contents ..................................................................................................................... 2
Introduction................................................................................................................. 3
Components of collaborative environment.................................................................. 3
Upstage ...................................................................................................................... 5
Purpose of Upstage software package ................................................................... 5
Installation of Upstage as a server application........................................................ 6
Setting Up An UpStage Linux Server For Windows Users .................................. 6
Dual boot ............................................................................................................. 6
Resizing an NTFS partition.................................................................................. 7
Installing Debian Linux ........................................................................................ 8
Boot from CD-ROM ............................................................................................. 8
Continuing Setup ............................................................................................... 10
Installing Packages............................................................................................ 11
Lame ................................................................................................................. 13
SWFTools.......................................................................................................... 14
Voices for festival .............................................................................................. 15
Installing UpStage itself ..................................................................................... 19
Setting up and customising a blog at Blogger........................................................... 20
Setting up a blog at Blogger.................................................................................. 20
Registering with personal information................................................................ 21
Choosing a name and a subdomain name ........................................................ 22
Customizing the blog appearance......................................................................... 23
Choosing a graphic theme and layout ............................................................... 23
Customizing the general information about the authors and mission purpose .. 24
Adding blog co-authors...................................................................................... 25
Customizing graphic theme ............................................................................... 26
Detailed editing – customizing HTML in graphic theme..................................... 27
File exchange ........................................................................................................... 28
Uploading a file ..................................................................................................... 28
Downloading a file................................................................................................. 28
Possible improvements ............................................................................................ 29
Upstage................................................................................................................. 29
Blog and file exchange applications ...................................................................... 29
Introduction
The manual explains basic procedures to create an interactive, multiuser computer
environment for collaboration in groups with an emphasis on live performance
creation ( though it may be used simply for collective research and/or cyberperformance). It also details main software requirements for setting up such an
environment. The purpose of the environment we created was to enable a group of
artists scattered around the world to collaborate on a theatrical piece. In our project
anonymity was essential in our collaborative online writing process. As was the
possibility of storing our live writing sessions for future editing. We found the Upstage
programme extremely user friendly, and eventually worked more in the dialogue box
than the stage, though avatars did assist in our 'masquerade'. The
'Cyber Studio' assembled by Marko Plahuta was conceived to mimic all the
requirements of an ideal theatrical research environment ie a space for live practice,
a space to record and store such practice, a space for reflective writing and a facility
for collecting research in various media. We also wanted to have a public face during
our two year research process, which was our blog. The Studio provided:
Components of collaborative environment
Upstage - a tool for writing the show/ live improvisation and/or rehearsal
Blog - a multiuser blog that worked as a publishing platform for the authors and
actors to publish their thoughts, comments, questions and creative material.
File repository – a multiuser environment to store Word documents, pictures,
movies and all material that for various reasons (size, ease of publishing, creative
reasons) was not suitable for the blog.
Upstage
Purpose of Upstage software package
To enable the real-time interaction between actors, we decided to use Upstage,
which is a software package for online performance. It’s is an open source server
application and works as a web venue for theatre shows.
Online audiences anywhere in the world participate in live performance events by
going to a web page, without having to download and install any additional software.
Players (logged-in performers) have a variety of tools at their disposal on the stage,
which allow the manipulation of their online personalities, backgrounds and props
which have been previously created and made available in the online repository of
the application. Avatars’ speech appears as speech bubbles on stage and is spoken
aloud by built-in functionality. Players can also draw directly onto the stage in real
time, so they have a variety of tools for creative expression.
Installation of Upstage as a server application
Setting Up An UpStage Linux Server For Windows Users
Documentation surrounding how to get Linux set up with all the required "packages"
for UpStage. This documentation is aimed at those with technical knowledge who
aren't familiar with Linux, and is based on the experience of using Debian Linux 3.1
(Sarge) as the existing server is running Debian Linux. The first section on dual boot
is only relevant if you are not running a dedicated UpStage server.
These notes were compiled by the UpStage Project Team, Auckland University of
Technology, May 2006. Team members are Beau Hardy, Lucy Chu, Francis Palma
and Wise Wang.
Contents:
1. Dual Boot
2. Installing Debian Linux
3. Installing Packages
4. Installing UpStage itself
Dual boot
It is highly recommended that you familiarise yourself with what partitions are and
how they work before continuing.
During development, it is useful to have the UpStage server and Linux running side
by side. If you wish to dual boot Windows/Linux you need to install Windows first.
You should either leave room for the Linux partition (preferred) or resize the windows
partition later.
Resizing an NTFS partition
Note that when performing this operation, there is a chance that data will be lost. You
should do a complete backup before continuing.
Download a Knoppix ISO image (http://www.knoppix.org used version 3.7) & burn
to CD-ROM.
Boot from CD-ROM. If the computer will not boot from CD-ROM, you may need to
change the boot order in the computer BIOS – set the computer to boot from CDROM before the hard disk.
If you have an SATA drive, when prompted with the “boot:” message you may need
to enter “linux26”. This starts the newer kernel which has support for new drivers
including SATA. Otherwise just press Enter. A “no hard disk found” message
from the QTParted program is generally indicative that the hard disk driver has not
been loaded correctly.
1. Wait for the Knoppix GUI to finish loading.
2. Click on the “K” menu in the bottom left corner.
3. Click the system menu.
4. Click on the QTParted program which is a graphical, user friendly partition
editor.
5. Select a disk, select the partition to be resized.
6. Right click with the mouse & choose resize.
7. Select the new partition size.
8. Commit your changes in the File-> Commit menu.
9. If your keyboard and mouse stop responding, please be patient the operation
may take a long time.
10. Click on the “K” menu.
11. Click on “Logout”
12. Click on “Turn off computer”.
13. Remove the CD-ROM when prompted.
14. Start the computer again without the CD-ROM inserted to start Windows. You
may get a message from CHKDSK that it is checking drives, this is expected.
15. Windows should complete booting normally.
Use the Windows explorer to check that all partitions are the expected size and all
data is still present (Right click on each drive and then click Properties).
Installing Debian Linux
You should ideally install Linux on a computer with no operating system installed
(blank hard disk). There is a risk that data will be lost. You should do a full backup
before attempting to install Linux. There should be a blank hard disk, or non
partitioned space available to install Linux as per the “Resizing an NTFS partition”
instructions above.
If you computer is on a network, ensure that the network cable is attached.
Boot from CD-ROM
If you have an SATA drive, you may need to Enter “linux26” when prompted with
“boot:” message. This starts Linux with driver support for newer drivers
including SATA drives. Otherwise, just press Enter.
Select the language using the arrow keys (English). Press Enter
Select the country using the arrow keys (New Zealand). Press Enter.
Select the keyboard layout (American English).
Debian will prompt for a host name. This is the name on the network Then press
Enter. Debian will prompt for a domain name. Then press Enter. Debian will ask
where to install. This step may not appear if installing on a blank disk rather than
using dual boot. Press Enter.
Debian will ask about the partitioning scheme - how many partitions should be
created. (Used “All files in one partition”).
Debian will display information about partitions and ask for confirmation. (Selected
“Finish partitioning and write changes to disk”).
Debian will ask for final confirmation. User the left/right arrow keys to move to
Yes and press Enter. Debian setup will continue.
If you are installing to a computer with no operating system installed, this step will
not appear. If you are doing a dual boot install Debian should inform you that it
has found the Windows operating system and ask you to confirm that this is the
only operating system installed. Select Yes using Enter if Windows is the only
other operating system installed.
Debian setup should inform you that it is complete. Remove the CD-ROM and
reboot. You may now wish to change the boot order in the BIOS so that the CDROM is not longer the first device checked when booting.
Continuing Setup
If you run into big problems, the setup can be started from this point again. Switch to
console CTRL + ALT + F1 log in as root and run base-config.
The computer should now start up in Linux and you will receive a welcome message.
1. Reply Yes to the question “Is the hardware clock set to GMT”.
2. Select you time zone (Used Pacific / Auckland).
3. Select a root password. This should not be easy to guess and should contain
both
4. letters and numbers.
5. Enter a username for the user (Used upstageuser).
6. Enter a name for the user account (Used upstageuser).
7. Enter a password for the user account. This should be different from the root
password and again should be a mixture of both letters and numbers.
8. Select the access method for ATP (Used CD-ROM).
9. Debian will now build a list of files from the set of CD-ROMS. Put the first CD10. ROM in the drive when prompted and press Enter.
11. Put every CD-ROM in the Debian set into the CD-ROM in turn when
prompted. The
12. message presented here is a little ambiguous, but you must put each CDROM in the
13. drive and let Debian read it, in order to build a file index.
14. If you do not have direct Internet access, you will receive a message stating
that ATP
15. cannot access this is expected.
16. Insert the first CD-ROM again when prompted.
17. Debian will ask what packages it needs to install. Select “Desktop
Environment” and
18. “Web Server” using the space bar and press enter.
19. Select Vesa for the X-Windows graphics driver. This should work on most
modern
20. hardware (post 2001).
21. Select Use the Kernel frame buffer when prompted.
22. Select Yes to attempt mouse auto detection.
23. Select Yes to attempt monitor auto detection.
24. Computer should prompt to reboot when setup is complete.
If you do not get a desktop display or get any error messages about XServer you can
run the following as root to reconfigure the graphics card / monitor manually
“dpkg-reconfigure xserver-xfree86”. You should set the maximum resolution to
1024x1280 here.
Installing Packages
You need to install the following packages using the Synaptic Package manager.
Some packages are already installed. Some packages have dependencies which will
be automatically installed when you select a parent package.
Start the package manager from the menu: System Tools -> Synaptic Package
Manager. Enter the root password when prompted.
Steps used to search for packages:
1. Close the “Quick Introduction” window
2. Click “Search” in the menu
3. Enter a package name in the search window.
4. Right click and choose “Mark For Installation” to install or right click and
choose “Mark For Removal” to uninstall.
Note: Green mark before the package means it is already installed.
Packages to install:
1. python (version 2.3.5-2)
2. twisted
a. Python2.3-Twisted (version 1.3.0-8)
b. Python2.3-Twisted-bin (version 1.3.0-8)
3. festival (version 1.4.3-16)
a. Festival-doc (version 1.4.2-2)
b. festvox-kallpc16k (version 1.4.0-5)
c. festvox-kdlpc16k (version 1.4.0-5)
d. festlex-cmu (version 1.4.0-6)
e. festlex-poslex (version 1.4.0-5)
4. netpbm (version 2:10.0)
5. gif2PNG (version 2.4.7-4)
6. tct (version 1.11-6.1)
Third party packages (below)
1.lame (version 3.96.1-1)
2.swftools (version 0.7.0)
3.festival voices
Lame
Download lame from http://www.sourceforge.net/projects/lame (Used version 3.96.1)
and save in a temporary location (will be installed to /usr/local/bin/lame).
1. Start a terminal session as root.
2. Unzip lame
3. gunzip lame-3.96.1.tar.gz
4. Extract from the tar file
5. tar –xvf lame-3.96
6. Change to the directory that was created
7. cd lame-3.96.1
8. configure the environmental variables
9. ./configure
10. Make and install the library
11. make install
12. Change back to the previous directory
13. cd ..
14. Create a link so that lame can be found by all programs
15. ln -s /usr/local/bin/lame /usr/bin/lame
16. ln -s /usr/local/lib/libmp3lame.so.0 /usr/lib/libmp3lame.so.0
SWFTools
Download from http://www.swftools.org/ (Used version 0.7.0) and save in a
temporary location. Start Synaptics Package Manager and install the following
headers/libraries needed for:
1. swftools-0.7.0
2. zlib1g-dev
3. libjpeg62-dev
4. t1lib-dev
5. libungif4-dev
6. libfreetype6-dev
7. libgdbmg1
8. Start a terminal session as root.
9. Extract from tar file
10. tar –xzf swftools-0.7.0.tar.gz
11. Change to the directory that was created
12. cd swftools-0.7.0
13. configure the environmental variables
14. ./configure
15. Make and install the library
16. make install
17. Change back to the previous directory
18. cd ..
Voices for festival
UpStage uses voices from several different places. These need to be sourced and
configured independantly. The voices used include
en1_mbrola
us1_mbrola
us2_mbrola
us3_mbrola
kal_diphone
ked_diphone
don_diphone
rab_diphone
rsynth
1. Install rsynth sourced from http://packages.debian.org
2. dpkg -i rsynth_2.0-6_i386.deb
3. Install some native festival voices (diphone) sourced from
http://packages.debian.org
4. dpkg -i festlex-oald_1.4.0-3_all.deb
5. dpkg -i festvox-ralpc16k_1.4.0-2_all.deb
6. dpkg -i festvox-don_1.4.0-4_all.deb
7. Install the mbrola binaries sourced from
ttp://www.cstr.ed.ac.uk/projects/festival/mbrola.html
8. dpkg -i mbrola-es1_i386.deb
9. Save mbr301h.zip to a temporary directory, Unzip and copy it to
/usr/bin/mbrola
10. unzip mbr301h.zip
11. cp mbrola-linux-i386 /usr/bin/mbrola
12. Install some voices for mbrola sourced from
http://tcts.fpms.ac.be/synthesis/mbrola.html. Save
13. all zip files in a temporary directory unzip and copy to /usr/share/mbrola:
14. unzip en1-980910.zip
15. unzip us1-980512.zip
16. unzip us2-980812.zip
17. unzip us3-990208.zip
18. cp -r * /usr/share/mbrola
19. rm /usr/share/mbrola/en1-980910.zip
20. rm /usr/share/mbrola/us1-980512.zip
21. rm /usr/share/mbrola/us2-980812.zip
22. rm /usr/share/mbrola/us3-990208.zip
23. Install festival wrappers for mbrola voices. Save files in a temporary directory
sourced from http://www.cstr.ed.ac.uk/downloads/festival/1.95/
24. tar -xzf festvox_en1.tar.gz
25. tar -xzf festvox_us1.tar.gz
26. tar -xzf festvox_us2.tar.gz
27. tar -xzf festvox_us3.tar.gz
28. cp -r festival/lib/voices/english/* /usr/share/festival/voices/english
29. Copy the mbrola voices into festival wrappers above
30. cp en1-980810.zip /usr/share/festival/voices/english/en1_mbrola
31. cp us1-980512.zip /usr/share/festival/voices/english/us1_mbrola
32. cp us2-980812.zip /usr/share/festival/voices/english/us2_mbrola
33. cp us3-990208.zip /usr/share/festival/voices/english/us3_mbrola
34. cd /usr/share/festival/voices/english/en1_mbrola
35. unzip en1-980910.zip
36. rm en1-980810.zip
37. cd ../us1_mbrola
38. unzip us1-980512.zip
39. rm us1-980512.zip
40. cd ../us2_mbrola
41. unzip us2-980812.zip
42. rm us2-980812.zip
43. cd ../us3_mbrola
44. unzip us3-990208.zip
45. rm us3-990208.zip
Test that the voices were installed correctly. Run festival.
/usr/bin/festival
All voices mentioned in the outline above should appear when the following
command is entered into festival (voice.list)
Select a new voice and say something using that voice. UpStage does not need a
sound card installed to operate. This command will only work if the computer has a
sound card which has been configured and sound is turned off under the desktop
manager. Error messages about accessing /dev/dsp are indicative that sound is not
configured. Ensure that you get sounds from the GNOME desktop, then turn desktop
sounds off temporally by deselecting Applications > Desktop Preferences > Sound >
Enable Sound Server at Startup.
(voice_en1_mbrola)
(SayText "Say something")
Choose another voice and say something
(voice_us2_mbrola)
(SayText "Say something")
Macromedia flash player web browser plug in (for Linux Mozilla et al.) This is
required only if you want to view UpStage web pages on the server (not likely unless
you are doing development). Download from
http://www.macromedia.com/shockwave/download/index.cgi?Pl_Prod_Version=Shoc
kwaveFlash
Installing UpStage itself
Download from http://www.sourceforge.net/projects/upstage and save in a temporary
location. Log in as root. You need to make a directory to put the upstage in and then
set the permissions so that the upstage user has permissions to use the files.
1. cd /usr/bin
2. mkdir Upstage
3. chown upstageuser Upstage
4. cd Upstage
5. mv /home/upstageuser/Upstage-2004-09-28.tar .
6. chown upstageuser Upstage-2004-09-28.tar
7. exit
8. exit
9. Log in as upstageuser (NOT root)
10. cd /usr/bin/Upstage
11. tar –xvf Upstage-2004-09-28.tar
12. cd Upstage
13. mktap upstage
14. twistd –f upstage.tap
15. ./go.sh
Finally, open a web browser on the server and point it at http://localhost:8081/
The UpStage webpage should appear.
Setting up and customising a blog at Blogger
There are many providers of free blog space. We chose to use the Blogger platform
because it's easily customizable, it offers extended puiblishing options, and it enables
more authors to contribute to the project.
One of the main purposes of publishing material on a blog was to find a workable
alternative to a bulletin system or a message board application. Main drawbacks of
BBS or message board solutions are fragmentation of knowledge in different topics
and diminished ability of contributors over time to efficiently organize and find the
published material.
Blog is also an already organized or self-organizing publishing platform, so whenever
a visitor takes a look at the published material, it's already organized and formatted in
an rational and efficient way that's easily digestible even for users with minimal
computer knowledge.
Setting up a blog at Blogger
Setting up a blog is as easy as going to the main Blogger website
(https://www.blogger.com/start) and following the instructions to create a blog.
One does this by entering personal information like e-mail address, setting up a
password and subdomain name (e.g. theatre.blogspot.com), choosing a layout of
information on the screen from predefined templates and a starting graphic theme
that can be easily modified later.
Registering with personal information
1. Enter your existing e-mail address and repeat it in next field.
2. Choose a password for security reasons repeat it in next field.
3. Enter security code.
4. Accept the terms by clicking the box.
Choosing a name and a subdomain name
1. Choose a name for your blog and enter it in the first field on this screen.
2. Choose a subdomain name that can be same as your blog name, but it can
differ.
3. Enter security code and proceed to the next step.
Customizing the blog appearance
Choosing a graphic theme and layout
1. Choose a graphic template form your blog from the catalog. If you want to
modify the template, chose one that looks as close to your desired one as
possible, then proceed to the next step.
Customizing the general information about the authors and mission
purpose
Here you can enter or change general information about your blog, for instance some
words about the author and the purpose of the blog, you can add an one-line
statement for marketing purposes, ...
On this page it's also possible to enter the blog address in search engines and do
other administrative stuff.
Adding blog co-authors
On the last subtab in the Settings tab, you can enable the multiauthor feature.
Click Invite (orange button) and enter e-mail addresses of people you wish to invite
to contribute to your blog. Enter one e-mail address per line. The Blogger system will
send the invitations and guide your coauthors through the sign-in process.
Customizing graphic theme
To do this, use the Template tab on the Settings page, Page elements menu entry.
Here you can drag and drop page elements to desired place, such as About the
author or Archives paragraphs, header, footer and body text.
It's also possible to configure details of all these sections, the following screens lets
you configure details for the body text, header and archive:
.
Detailed editing – customizing HTML in graphic theme
Important note: before changing HTML code in template, it's recommendable to
make a backup copy of existing one. Use the information on the top of page to do
that. Editing HTML code requires working knowledge of HTML and should not be
attempted without it.
To edit the HTML code, copy the script from the field into HTML editing program such
as Open Office Writer or Dreamweaver and make desired changes. It's possible to
edit almost every element on the page, add pictures and text or even an
advertisement block.
It's always possible to revert to last saved version in case something goes wrong.
File exchange
A web section for file exchange was considered an important part of the collaborative
environment. It's custom made, but available as an open source code at this URL:
http://www.odiseja.net/fileexchange
For users to upload and download files, they had to be authenticated into the web
application. Open version of the application was modified so that the password
protection was removed, and users are free to upload and download files as thy wish.
Uploading a file
To upload a file, click the »Upload« link and choose a local file in the dialog box. The
file transfer will start after confirming the upload. During the file upload in the
background the user can switch to some other task.
Downloading a file
To download a desired file, click its name on the list. The download will start
immediately. Choose target location, click OK and the file will download.-
Possible improvements
During the development and lifecycle of present solutions, a great number of
innovations took place in web computing. There is a host of new and better solutions
for almost every component of present system with notable exception of Upstage
server, which in the meantime progressed to Version 2 with many improvements,
including live audio and video, etc.
Upstage
Upstage should be ugraded to version 2, and all components added to extend the
freedom of expression through computer medium to spoken word and live video.
Blog and file exchange applications
Several new and reliable web services offer a greater level of integration than present
solutions. A group of artists could quickly build an online community centered on a
group in one of existing social networks, such as Facebook Orkut or MySpace.
All of these services allow:
creating accounts for every user,
•
posting text, picture, video and audio material to a multiuser blog – this
enables the group to post a wider range of materials,
•
creating closed gropus with access only to approved users – this functionality
is usable for limiting access to only members of the group.
•
upgrading an user to a group administrator – inevitable functionality for the
group owner or administrator to enable user control; approving users to loin
gropus, view posted material, access Upstage and other restricter sections of
web community, etc.