1
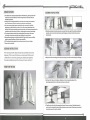
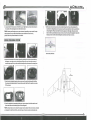
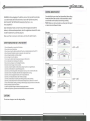
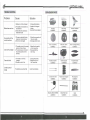
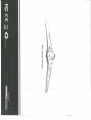
s
O Discover
USER MANUAL
SPECIFICATION
PLEASE READ THIS MANUAL CAREFULLY AND
F O L L O W T H E INSTRUCTION
Thank you for choosing this classic model airplane.
This model is for beginner, intermediate and experienced hobby enthusiast. Hope you have a nice time
w i t h this wonderful model!!! Happy flying !
Disclaimer:
periods
D o not fly Ms Airplane
of time, recommended
20-25
at full-throttle
seconds
Technical Parameter
Wingspan:1600mm(63inch)
Length:737mm(29inch)
weight:1800g
ESC:40A
Servo:9g x 4
Radio:4CH
Motor:brushless KV800
Battery:Lipo 14.8V(4s) 3300-3600 m a h 25C
for long
SAFETY INSTRUCTIONS
burst!
1 . Do n o t f l y in s t o r m s , s t r o n g w i n d s , bad w e a t h e r or l i g h t n i n g
2. NEVER FLY NEAR POWERLINES, o v e r h e a d w i r e s , roads, railroads or a i r p o r t s
3. Never f l y near houses or p e o p l e ! Your GoDiscover can cause d a m a g e t o
p r o p e r t y or i n j u r y !
TABLE OF C O N T E N T S
4. Do n o t f l y w h e r e o t h e r m o d e l s on t h e same f r e q u e n c y are f l y i n g , u n t i l y o u
do a pref I ight check of all y o u r c o n t r o l s
I .GoDlscover specifications
2
2.Safety Instructions
2
3. W h a t ' s in the box
3
4. Assembly Instructions
4
5. M a k e s u r e y o u d o a pref I ight c h e c k - i n s p e c t t h e w h o l e plane and make sure
t h e m o t o r runs s m o o t h l y and all y o u r c o n t r o l s w o r k p r o p e r l y . Do t h i s b e f o r e
EACH FLIGHT!
6. Use o n l y g e n u i n e Hobby King r e p l a c e m e n t parts
7. D o n ' t t r y t o catch t h e GoDiscover d u r i n g f l i g h t - y o u could be badly
5. C e n t e r of Gravity ( C G )
6
6. Charging the Li-Po Battery
7
7. C o n t r o l direction test
8
i n j u r e d ! Take o f f f r o m and land on a s u i t a b l e l a n d i n g s t r i p .
8. N o t r e c o m m e n d e d f o r c h i l d r e n u n d e r 12 years o l d . Children u n d e r 14
should operate the model only w i t h a responisble adult.
9. The G o D i s c o v e r i n c l u d e s small parts ( c h o k i n g hazards) and sharp edges!
A s s e m b l e and store y o u r plane o u t o f t h e reach of c h i l d r e n .
10. Never install b a t t e r i e s i n c o r r e c t l y - check t h e p o l a r i t y
8. Trouble shooting
9
9. R e p l a c e m e n t parts
10
( p o s i t i v e and negative) b e f o r e c o n n e c t i n g or i n s t a l l i n g b a t t e r i e s
11. Keep y o u r GoDiscover o u t o f d i r e c t s u n l i g h t (unless y o u ' r e f l y i n g i t ! )
and away f r o m heat sources. Foam can d i s t o r t w h e n it is o v e r h e a t e d .
12. Fly i n t e l l i g e n t l y - d o n ' t f l y t o w a r d s y o u r s e l f or o t h e r p e o p l e , or s t r u c t u r e s ,
cars, t r e e s , a n i m a l s , or a n y t h i n g else on t h e g r o u n d .
1
toPisc g>ver
DESIGN FEATURES
ASSEMBLY INSTRUCTIONS
1. T h e G o D i s c o v e r is d e s i g n e d s p e c i f i c a l l y for F P V / U A V f l y i n g , t h e large h a t c h a n d
i n s i d e f u s e a r e a l e a v e s p l e n t y of r o o m f o r large b a t t e r i e s a n d s p a c e f o r y o u r
FPV/UAV equipment.
2. C o o l i n g h o l e s a r e d e s i g n e d w i t h i n t h e a i r c r a f t to e n s u r e t h a t y o u r e l e c t r o n i c s
h a v e a c o n t i n u o u s a i r f l o w for m a x i m u m p e r f o r m a n c e a n d l o n g e v i t y .
3 . T h e n o s e c a m e r a g i m b a l s y s t e m a n d t i n t e d A c r y l i c n o s e d o m e is s p e f i c a l l y
d e s i g n e d to a c r a d l e a G o P r o o r s i m i l a r . T h e 2 - a x i s c a m e r a g i m b a l s y s t e m h a s
PAN a n d TILT f u n c t i o n s p r o v i d i n g a p e r f e c t h a v e n f o r y o u r c a m e r a s y s t e m a g a i n s t t h e
c o n d i t i o n s , a n d in t h e c a s e of a c r a s h or a m i s h a p p a r t s a r e e a s y to i n t e r c h a n g e .
4. T h e w i n g s a n d d o m e a r e h e l d o n by r o t a t i n g t h u m b locl< s c r e w s , t h i s e n s u r e
t h a t s e t u p a n d t u n i n g is q u i c k a n d s i m p l e w i t h o u t t h e n e e d of t o o l s .
l . S l l d e t h e w i n g t u b e i n s i d e t h e w i n g , t h e n s e c u r e l y f a s t e n t h e w i n g to t h e p l a s t i c w i n g h o l d e r
a s s e m b l y . I n s e r t a n d r o t a t e t h e t h u m b s c r e w 9 0 d e g r e e s until y o u f e e l t h a t t h e s c r e w h a s
locked inside.
5. R e m o v a b l e w i n g f e n c e s a n d a highly m o d i f i e d EIH s t y l e a i r f o i l e n s u r e s s t a b i l i t y ,
great low s p e e d handling, and heavy cargo capability.
6. P V C l a n d i n g s k i d a n d w i n g t i p s k i d s p r o v i d e g r e a t p r o t e c t i o n o n l a n d i n g s .
7. S u p e r e a s y to a s s e m b l e .
ASSEMBLY INSTRUCTIONS
This m a n u a l p r o v i d e s s i m p l e step by step assembly i n s t r u c t i o n s .
However, if t h i s is y o u r f i r s t p l a n e , w e r e c o m m e n d t h a t y o u ask
a f e l l o w f l i e r f o r s o m e help p u t t i n g y o u r GoDiscover t o g e t h e r .
2 . A d d g l u e on t h e c o n n e c t i n g p a r t for t h e v e r t i c a l w i n g . P a s t e t h e v e r t i c a l w i n g to t h e f u s e l a g e .
They w i l l p r o b a b l y j u m p at t h e chance j u s t t o get a look at i t !
WHAT'S IN THE BOX
3 . C u t d o w n t h e 2 p i e c e s of w i n g f e n c e . A d d g l u e o n t h e c o r r e s p o n d i n g p l a c e o f t h e
1
main w i n g a n d glue t h e m on the wing .(As s h o w n on the pics)
4 . P l u g t h e s e r v o w i r e s Into t h e a p p r o p r i a t e c h a n n e l ' s o n y o u r r e c e i v e r . T h e g i m b a l s y s t e m ' s
s e r v o s c a n b e c o n n e c t e d to a n y a u x i l i a r y c h a n n e l o n y o u r r e c e i v e r . ( P l e a s e s e e y o u r e c e i v e r ' s
instruction m a n u a l for further details)
3
i
*
J
5. C o n n e c t t h e X T - 6 0 c o n n e c t o r of t h e ESC to y o u r flight b a t t e r y . F a s t e n t h e b a t t e r y to
t h e i n s i d e of t h e f u s e l a g e a n d c l o s e t h e b a t t e r y h a t c h .
Note: B a t t e r y
positioning may vary per customer, depending on your model's setup
a n d e q u i p m e n t u s e y o u w i l l n e e d to b a l a n c e y o u r m o d e l for t h e c o r r e c t C . G . ,
p l e a s e r e f e r t o t h e p i c t u r e b e l o w for C G . d e t a i l s .
9. A f t e r y o u c o n n e c t all y o u r s e r v o w i r e s to t h e A U X p o r t i o n of y o u r Rx a n d a d j u s t t h e
m o v e m e n t on t h e g i m b a l s e r v o t r a v e l y o u m a y t h e n s e c u r e l y f a s t e n t h e t o p a n d b o t t o m
s h r o u d t o g e t h e r . P l e a s e n o t e t h a t t h e l e n s h a s g r o o v e on t h e e d g e , this g r o o v e m u s t
lock into t h e t o p a n d b o t t o m s h r o u d c o r r e c t l y . O n c e t h e s h r o u d fits t o g e t h e r r o t a t e t h e
locking s c r e w s on both s i d e s by 9 0 d e g r e e s a n d m a k e s u r e t h e y a r e s e c u r e .
INSTALL THE GIMBAL SYSTEM
10.Assembly finished.
6 . R e m o v e t h e o u t s i d e of t h e c a n o p y s h r o u d s by r o t a t i n g t h e s c r e w s o n b o t h s i d e s by
9 0 d e g r e e s , o n c e t h e s c r e w is t u r n e d t h e n pull t h e s c r e w o u t . O n c e t h e s c r e w s a r e
r e m o v e d y o u m a y lift up on t h e o u t s i d e s h r o u d p l a s t i c s a n d r e m o v e t h e c a n o p y l e n s .
7.Gently rotate the gimbal system d o w n so you see the metal retaining clips holding
t h e c a m e r a s bacl<plate p l a s t i c s . R e m o v e t h e s e m e t a l c l i p s f r o m t h e p o s t s so y o u m a y
fit t h e c a m e r a .
8 . O n c e t h e b a c k p l a t e is r e m o v e d p o s i t i o n y o u r c a m e r a s y s t e m i n s i d e t h e r e t a i n e r a n d
f a s t e n b a c k t h e m e t a l r e t a i n i n g clips to t h e l o c k i n g p o s t .
Note: p l e a s e
m a k e s u r e to c h o o s e t h e p r o p e r c a m e r a a d a p t e r f o r y o u r C a m e r a . I n c l u d e d
a r e a d a p t e r s for G o P r o 2 , G o P r o 3 , a n d o t h e r t y p e s of c a m e r a s y s t e m s c o m m o n l y u s e d .
5
6
CONTROL DIRECTION TEST
W A R N I N G - b e f o r e p l u g g i n g in t h e b a t t e r y , t u r n o n t h e t r a n s m i t t e r a n d make
sure t h e t h r o t t l e and t h e t h r o t t l e t r i m are set t o O F F ( a l l t h e w a y d o w n ) .
KEEP CLEAR OF THE PROPELLER! ( R e m e m b e r t h a t t h i s is v e r y
sharp propeller!)'
You s h o u l d bind y o u r a i r c r a f t and t r a n s m i t t e r b e f o r e d o i n g
t h e s e t e s t s M o v e the c o n t r o l s on the t r a n s m i t t e r to m a k e
s u r e a i r c r a l t c o n t r o l s u r l a c e s are m o v i n g correctly.
N o t e : M a k e sure tail p u s h r o d s m o v e f r e e l y and that paint
or d e c a l s are not a d h e r e d to t h e m .
O p e n t h e b a t t e r y h a t c h cover at t h e t o p o f t h e f u s e l a g e and i n s t a l l t h e
b a t t e r y in t h e f o r w a r d c o m p a r t m e n t , w h i c h is a n g l e d d o w n t o w a r d s t h e nose.
Install t h e b a t t e r y f i r s t , a n d t h e n p l u g i t i n .
Elevator
M a k e sure t h a t no w i r e s are o u t of p l a c e , and close t h e b a t t e r y h a t c h .
Elevator
down
SAFETY INSTRUCTION O F LI-POLY BATTERY
1. Do not disassemble or reconstruct the battery.
2. Do not short-circuitthe battery.
3. D o n o t u s e o r leave the battery nearby the fire,stove or heated place(mcre than 80°C;)
4. Do not immerse the battery i n w a t e r o r s e a water, do not get it wet.
5. Do not charge the battery in direct sunlight.
6. Do not impact ortoss the battery.
7. Do not use the battery with conspicuous damage or deformation.
8. Do not attempt direct soldering on the battery.
9. Do not reverse charge or over discharge the battery.
10. Do not reverse charge or reverse connect.
11. Do not connect the battery to the ordinary charger socl<et or car cigarette jacl<.
12. D o n o t u 5 e t h e battery for unspecified equipment.
13. D 0 not touch the lea l<ing battery directly, pi ease w a s h y o u r s k i n o r c l o t h e s w i t h water.
14. Do not mix the Li-Poly battery with other dis-charged battery in using,
15. Do not continue charging the battery over the prescribed time.
le.Donotuseor keep the battery under the direct sunlight.
17. Do not use the battery nearby the place where generates static electricity.
18. Do not use the battery when the environmental temperature is under 0'C or over 45°C.
19.If you find the battery leaking,smelling or abnormal,stop using it and return it to the seller.
20. Keep the battery away from children.
21. Use the specified charger and observe charging requirement.
22. W h e n u s e d b y m i n o r s , p a r e n t s s h o u l d s h o w t h e m t o t h e correct instruction.
CAUTIONS
Do not o v e r c h a r g e or over d i s - c h a r g e battery.
±20°~±25°
t
j
Aileron
.A,
'5
'
±20°~±25'
Aileron
right
...1
T R O U B L E SHOOTING
Problem
M o t o r d o e s not run
R E P L A C E M E N T PARTS
Cause
Solution
1 . B a t t e r y is not fully c h a r g e d .
1 .Charge the batteries.
2. T h e b a t t e r y of t r a n s m i t t e r is
not s u f f i c i e n t
2 . I n s t a l l a full c h a r g e d
battery
3 . C o n t a c t the l o c a l d e a l e r
3. C h e c k t h e w i r e c o n n e c t i o n
inside the model
No r e a c t i o n o f t h e
control surface
1 . T h e s e r v o c a b l e d i d n ' t plug
p r o p e r l y or i n v e r t e d p l u g .
2 . t h e s e r v o is d a m a g e d
1 . C h e c k t h e c o n n e c t i o n of
the servo cable
2.Change another servo.
C a n not f l y s t r a i g h t
1 . T h e r u d d e r is not in t h e c e n t e r
position o f t h e airframe
2 . T h e m a i n w i n g is not f i x e d in
the center position o f t h e
airframe.
1 .Adjust the trim switch
on t h e t r a n s m i t t e r
2 . R e - a s s e m b l y the
main wing
C a n not c l i m b
1 . T h e b a t t e r y is not fully
charged.
2. E l e v a t o r is out of t r i m .
1 .Charge the battery
2 . A d j u s t t h e t r i m on
the Transmitter.
The batteries are almost flat
Install n e w b a t t e r i e s
Limited control
range
Fuselage
310000122
Main wing
310000123
Vertical Stabilizer
310000124
Clear Lens(dome)
310000125
Reflective d o m e
310000126
IVlain housing(cowling)
310000127
Flexable p r o p e l l e r
310000128
Gimbal systerm
31000012'^
Propeller blades
310000130
Control wire-steel
310000131
Plastic main w i n g b o l t
310000132
PVC skid piece
310000133
Carbon f i b e r t u b e
310000135
Decal
310000136
3
Brushless IVIotor (KV800)
, 310000134
ÜJ
Ci.
m
fD