1
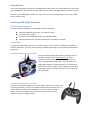
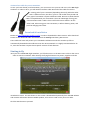
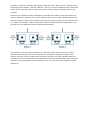
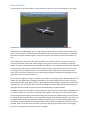
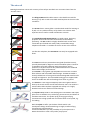
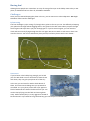
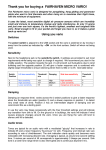
BMI Flight Simulator
user manual
Table of Contents
Introduction............................................................................................................................................. 3
Installing BMI Flight Simulator ................................................................................................................ 3
System Requirements ......................................................................................................................... 3
Controllers ........................................................................................................................................... 3
A dedicated dummy R/C controller ................................................................................................. 3
A standard USB joypad or joystick................................................................................................... 3
An interface cable for your transmitter .......................................................................................... 4
Download & Installation ...................................................................................................................... 4
Starting to fly ........................................................................................................................................... 4
Configuring the controls ...................................................................................................................... 5
Your first flight ..................................................................................................................................... 7
The aircraft .............................................................................................................................................. 8
Changing the flight conditions................................................................................................................. 9
The 'flight conditions' menu ................................................................................................................ 9
Flight Conditions Presets ............................................................................................................... 10
Soaring ................................................................................................................................................... 10
Thermal soaring ................................................................................................................................. 10
Slope soaring ..................................................................................................................................... 11
Having fun! ............................................................................................................................................ 12
Challenges ......................................................................................................................................... 12
Pylon racing ................................................................................................................................... 12
Scarecrow ...................................................................................................................................... 12
3D! (as in the 3rd dimension) ............................................................................................................ 13
Flying at the club ............................................................................................................................... 13
Appendix 1: keyboard commands ......................................................................................................... 13
Appendix 2: improving frame rate ........................................................................................................ 14
Introduction
Are you thinking about taking up the exciting hobby of R/C and do you dream about flying one of the
beautiful BMI kits? Well now here is your chance to test and fly new BMI models as much as you like.
We offer you this BMI flight simulator for free, where you have the possibility to try out the models
before you buy them.
Installing BMI Flight Simulator
System Requirements
You will need the following to run BMI Flight Simulator smoothly:
Microsoft Windows XP/Vista/7, 32- or 64-bit version
A 1.6 GHz CPU or higher
A DirectX 9 compatible video card with 128 Mb of RAM
Microsoft DirectX 9.0c and .NET Framework 2.0 (included in installer)
Controllers
To enjoy flying BMI Flight Simulator in a realistic manner, you'll need a controller that resembles a
real R/C transmitter. There are several options available, depending on your preference and owned
equipment.
A dedicated dummy R/C controller
If you're thinking of flying more often, you might want to
consider buying a like this BMI Game Pilot 6. These
resemble a real transmitter, but instead of an antenna,
they're equipped with a USB cable. These controllers are
plug & play and don't require batteries to run. With the 6
channel ones you'll be able to control flaps and retractable
landing gear with a controller that feels and acts like a real
R/C transmitter.
A standard USB joypad or joystick
If you're just checking out BMI FS or the R/C hobby in general, and you have a
joypad lying around, you can use it without having to invest another cent. A
joypad with two analog sticks resembles the most to a real transmitter.
Keep in mind that a joypad never possesses the same sensitivity and
amount of control as a game Pilot-6.
An interface cable for your transmitter
In case you have already a real transmitter, you can connect it to your PC and use it in the BMI Flight
simulator. In order to do so, you will need an interface cable. One end of this cable fits into the
training jack of your transmitter (depending the mark); while the other
end is a USB connector, that fits in your PC. Be careful! Every brand and
every type of transmitter requires a different cable. Be sure to check that the
cable is compatible with your transmitter. The main advantage of using your
own transmitter with a cable is that it will feel the most realistic. On the
other hand, when using your own transmitter, it will use battery power, and
you’ll be charging more often.
Download & Installation
Browse to http://www.bmi-models.com/fs/ in order to download the latest version. After download
browse to the download folder and double-click the BMIflightsimulator_020.exe icon.
The installer will start and present you a standard installation wizard. The wizard may offer to
automatically download and install DirectX or the .NET Framework. It is highly recommended to do
so, since the simulator requires these specific versions of both libraries.
Starting to fly
Once you've installed BMI Flight Simulator, you'll find an icon it in the Start menu. Click on the icon in
order to start the simulator. After startup, the flying field comes into picture, together with the
introduction screen. The text shown on this screen is downloaded dynamically from the BMI website
and contains information about available updates, so be sure to read it every once in a while.
Click the Start button to proceed.
Tip: press the Alt and Enter key simultaneously to put the simulator in full screen mode.
Configuring the controls
Before taking off, you will have to configure your controls. This must be done only once. Note that
the in-flight menu appears automatically when moving your mouse over the simulator window.
Click on the 'menu' button. We'll go over the entire menu later on in the manual, for now, click on
the button labeled 'controls'.
The first thing that has to be done is calibrating your controller. During the calibrations process, the
neutral point and throw of the transmitter will be synchronized with the throws in the simulation..
Click the 'Calibrate' button and the standard Windows dialog appears displaying the connected
controllers. Select your controller and click the 'Properties' button. Next select the ‘Settings’ tab on
the dialog box that appears. Click the 'Calibrate...' button to start the calibration wizard. The wizard
will ask you to move your sticks around several times. Follow it and after finishing, return to the
simulator.
Now that your controller has been calibrated, you should see the sliders on the right of the menu
move in conjunction with your sticks. The first decision you'll have to make is decide which control
channel to assign to which stick movement. There are lots of options, but the most commonly used
are 'mode 1' and 'mode 2'. Below you’ll find an overview of both transmitter configurations. Ask
your R/C club or an experienced pilot for additional information.
The procedure to set the control assignments is: Move the stick to which you want to assign a
channel and look which of the control input sliders is moving, Next assign that number to the
channel. Check the 'invert' checkbox if the controls are reversed. The 'expo' checkbox makes the
controls less sensitive around the center and gradually more towards the extreme. This is especially
handy for very twitchy planes. Once everything is set up, you can return to the simulator and are
ready to fly!
Your first flight
If you've flown an R/C plane before, you know what to do now. If not, the following is a very basic
introduction. Before flying an real R/C aircraft, always get the help of an experienced pilot.
Start with the included Allegro. This is a high wing (and therefore more stable) electric foamy with
aileron control. Zoom in on the airplane and watch the control surfaces move with your stick inputs.
The ailerons control the bank angle (or roll) of the airplane, the elevator the pitch and rudder the
yaw.
You should always take off into the wind. By default, no wind is present in the sim, so smoothly
increase the throttle stick to full. While rolling on the ground, correct your heading by using the
rudder stick (this is also linked to the steerable nose wheel). As your speed increases, gently pull back
on the elevator stick to get the plane off the ground and start a gentle climb. Once in the air, keep
your wings level by using the ailerons. You'll notice that before long, the airplane becomes very
small. This is the same in real life: you can't keep flying straight for long before losing sight of your
plane. So it's time to make the first turn.
On a 4-channel airplane, turning isn't done by the rudder as you might expect. Without dihedral, the
rudder isn't very effective at changing the heading of an airplane. Make your first turns using only
aileron and elevator input. Apply aileron to get the plane to a bank angle of about 30°. You'll need to
apply elevator ‘up’ to keep the plane from losing altitude. Automatically the plane will start to turn.
Apply the ailerons to level the plane once the desired heading has been reached.
Landing an airplane is the hardest part. Slow the plane down and turn into the wind. Remember that
it's not the elevator that controls the altitude of an airplane. If you apply too much elevator at too
slow an airspeed, the airplane will stall and simply fall out of the sky. While landing, use the elevator
to control airspeed and throttle to control altitude. Keep the airspeed high enough so you don't have
to apply full elevator during the descent. Bring the airplane gently to the ground and right before
touchdown, increase elevator and reduce throttle to idle to flare the airplane and land it as softly as
possible. If you can do this in the simulator, you'll have greatly improved the chances of bringing
home you real airplane in one piece on your first flight.
The aircraft
BMI Flight Simulator comes with a variety of aircraft pre-installed. You can access them from the
'aircraft' menu.
The Allegro 1500 with brushless motor is the ideal first model for
learning to fly with a radio controlled model airplane in the most safe
conditions.
The Arrow electric motor glider is another ideal model for learning to
fly R/C. It's very stable and easy to fly thanks to its ailerons with
separate servo as well as rudder and elevator controls.
The Haviland Canada DHC-2 Beaver is a single engine, high wing
propeller-driven STOL aircraft used for both civil and military
operations. The BMI model is a highly detailled scale version that
comes 90% pre-finished with ready ready covered balsa wings,
tailplane and rudder. It's availabe in the sim in two color schemes.
Just like the real plane, the BMI Beaver can easily be equipped with
floats.
The Carat is an electric powered 2 meter glider (brushless motor),
specially developed for beginners and intermediate pilots. Thanks to
its parabolic wing (self stabilizing) with large ailerons and its
particular V-tail, the Carat has very stable characteristics combined
with excellent flight performances.
The Icon A5 is a flying boat-type amphibious aircraft with a carbon
fiber airframe and retractable undercarriage. The BMI A5 model is
entirely molded out of strong and shock absorbing EPO-FLEX foam for
strength and lightness. The retractable landing gear is supplied with
the kit to enable take-offs and landings from water or ground.
The ATR 72 is a twin-engine turboprop short-haul regional airliner
built by the French-Italian aircraft manufacturer ATR. The model is a
twin brushless balsa airplane equipped with 4 flaps. It's a highly
detailed scale version with an attractive design.
The FlyCat X-75 provides a real challenge for intermediate and expert
pilots since it combines very stable flying characteristics and allows all
aerobatic maneuvers. The pusher prop jet brings great flying
characteristics at high speed and can also be flown at low speed, e.g.
for landing.
With the FlyJet we offer you the best of both worlds. The
aerodynamic design in EPO-FLEX brings strength, excellent flying
characteristics and minimal air
resistance. BMI offers you the possibility to fly the FlyJet with a
64mm ducted fan or with a fast pusher prop system.
Changing the flight conditions
Without doubt the most advanced feature of BMI Flight Simulator is its ability to simulate a
multitude of flight conditions, more specifically wind and thermal activity. This should make the
simulator especially interesting for glider pilots and offers challenging and realistic flight conditions
for other aircraft.
The 'flight conditions' menu
Sets the wind and sky conditions for your flight using this menu. The following controls are available:
Control
Description
Presets selection submenu
Preset flight conditions by time of day and for three different wind
speed classes. See below.
Use this button to customize each of the presets to your liking.
Customize Button
Wind speed
Wind direction
Gust strength
Gust variability
Gust frequency
Turbulence
Thermal size
Thermal strength
Downdrafts
Sky Condition submenu
0 to 43 kph
0 to 360. Once set or reset, it will apply to all other settings and
presets and will be remembered on sim start up.
0 to 43 kph. This is the maximum gust strength. Gusts are additive
to wind speed.
Predictable to very unpredictable in both direction and speed
Low to high
Light to heavy. Turbulence diminishes with altitude to zero at 50
meters.
Small to large. Not active when Thermal Strength is set to off.
Off to strong. When off, the thermal size slider is not active.
Note that under the Scenery menu item of the sim main menu, you
can enable visual representation of thermals.
Off to realistic. Not active when Thermal Strength is set to off.
Five sky conditions are available – sunrise, late morning, midafternoon, sunset and moonlight. This control will override the
preset sky condition for your session.
Flight Conditions Presets
For convenience, there are 15 meteorologically-realistic presets simulating wind, gust, turbulence
and thermal conditions for sunrise, late morning, mid afternoon, sunset, and moonlight. They are
preset for three different typical flying-day wind speed ranges; light airs, breezy and windy. These
presets simulate conditions for a typical summer day with strong afternoon thermals and have skies
more or less suited to the time of day.
Presets can be modified for each session but cannot (yet) be saved. On startup, BMI FS will
remember the preset last used. Choosing the “no weather” preset sets all controls to zero or off, and
leaves the wind direction as is.
If you’re new at RC flying, start off just as you might with an early morning maiden of your new plane
by choosing the morning/light airs preset and doing your test “crashes”. If you want a challenge
flying and landing, choose a cross wind direction on a breezy or windy afternoon and hang on! Try
slope soaring in the evening with a nice steady wind. Soon you’ll find the preset you most enjoy
flying.
Soaring
Thermal soaring
This section describes the different options you have to simulate a fun and realistic thermal soaring
session.
Start by selecting the BMI Carat glider from the 'aircraft' menu. Although this glider is equipped with
an electric motor and can climb using its electro motor, it can also be launched with the help of a tow
plane. You can start a tow by pressing the 'T' key on your keyboard. When reaching a good altitude
the cable will disconnect automatically. If you want to release the cable sooner, you can do so by
pressing the 'T' key again.
Now that you've got the sailplane in the air, it's time to hunt some thermals!
Of course the amount, size and strength of thermals strongly depend on the flight conditions. So
select a flight condition from the 'flight conditions' menu with some thermal activity. The highest
thermal activity occurs in the mid-afternoon presets when there's not too much wind. Of course, the
rising air has to come from somewhere, so around the thermal there are downdrafts (or sinking air)
or that will make your plane lose altitude faster. Get the glider moving slowly and watch the wings.
Soon they will tell you where the lift is, so turn into it and circle to catch the lift. You might even be
surprised by a boomer or two.
BMI FS has a couple of other ways to help you detect thermals. When the sailplane is equipped with
one, you can enable a variometer. The variometer will produce a tone that indicates whether the
airplane is climbing or descending. You can enable or disable the variometer in the 'sound' menu.
The second way to detect thermals is visual. Open the 'scenery' menu and check the 'enable visual
representation of thermals' checkbox. With this option enabled, bubbles will rise from places with
thermal activity.
Slope soaring
The other way to keep a sailplane in the air without an engine is wind. Wind blowing up a slope that
is. BMI Flight Simulator dynamically calculates the wind vector based on the wind speed, direction
and terrain. So wind blowing against a slope will rise, to sink again on the leeward side. Of course the
effect of the slope diminishes with altitude. This effect can keep a sailplane aloft.
BMI FS contains the Carat which is an excellent slope soaring model. Select it from the aircraft menu
and head over to the flight conditions menu. Select a preset with lots of wind. The wind direction is
critical in how much lift is generated on a certain slope. Set it to 'west' as the west side of the slope in
the scenery is best located for slope soaring. After selecting the flight conditions, go to the 'scenery'
menu. There you will find a dropdown list for 'pilot position'. Select 'Top of the hill (slope)' and go
back to the sim. You will find yourself on top a hill. Reset the flight to launch the airplane again into
the wind and try to keep the plane aloft. Always turn into the wind or the glider will quickly fly over
the hill into sinking air. When you get good at that, try finding other spots that have lift, but stay
clear of the windmills!
Having fun!
Although most people see a simulator as a way of saving a few trips to the hobby store to buy a new
plane, it should also be fun. After all, all hobbies should be.
Challenges
Once you've mastered keeping the plane in the air, you can move on to other objectives. BMI Flight
Simulator offers two fun challenges.
Pylon racing
The first challenge is pylon racing: fly through the 7 pylons as fast as you can. The difficulty is keeping
your plane low enough without digging holes in the ground. The clock starts when you pass through
the first gate and stops when you pass through gate 7. If you've missed a gate, you can reset the
clock and start over by flying through the first one again. Be sure to switch to tail cam or chase cam
view for this one. You can use whichever plane you like, but faster planes tend to turn slower...
Scarecrow
If you've been in the hobby long enough, you've had
your fun with birds. You can chase them, thermal soar
with them, they can grab your plane out of the sky...
In the sim, you can have fun with a whole bunch of
them. The scarecrow challenge sets you up amidst 3
cornfields. It is your job to protect the crops against a
flock of 100 birds who haven't had their lunch yet. You
can do that by flying into the flock and scaring them
away. Unfortunately they're a very aggressive breed of
birds and won't stay scared for long. See how long you can keep the cornfields safe...
3D! (as in the 3rd dimension)
With BMI Flight Simulator you don't need special 3D monitors
or video cards to do 3D (although it is perfectly compatible with
the Nvidia 3D drivers). A simple pair of red/cyan glasses like the
ones on the left is enough. They can even be made of
cardboard. Go to the menu and open the 'graphics' settings.
Check the checkbox marked 'Enable anaglyph 3D'. That's it! You
can put on your old-fashioned red/cyan glasses and enjoy the
simulator in three dimensions. Of course for each frame
displayed on screen, the pc has to produce two in the background (one for each eye). So expect the
frame rate to drop a little.
Flying at the club
To simulate a real R/C club where there's constantly airplanes buzzing around, you can add a few
computer controlled aircraft. Open the menu and go into the 'simulation options' screen. Add a
number of other pilots and head back to the sim. You'll see and hear other planes flying around.
Appendix 1: keyboard commands
While in flight:
+ : increase zoom
- : decrease zoom
Enter : reset aircraft and start position
s : toggle smoke
v : toggle camera through various views
b : autozoom - this will keep the aircraft the same size on screen, irrespective the distance
i : show extra information (frame rate, speed, altitude)
F12 : toggle wind vectors - this will display the wind vector in the vicinity of the aircraft
Esc : exit the sim
f : toggle flaps (when equipped)
g : toggle landing gear (when equipped)
t : toggle tow plane (for sailplanes)
Aircraft control (when no controller is attached):
Numeric keypad 1 : rudder left
Numeric keypad 3 : rudder right
Numeric keypad 2 : elevator down
Numeric keypad 8 : elevator up
Numeric keypad 4 : aileron left
Numeric keypad 6 : aileron right
Numeric keypad 7 : throttle idle
Numeric keypad 9 : full throttle
Appendix 2: improving frame rate
Since BMI Flight Simulator uses full 3D environments and shaders for some graphical effects, you
might experience performance problems when running the sim on older systems. Here are some tips
to improve the frame rate:
1. Run in full screen mode. If the sim has the full screen to itself, it will perform better,
especially on systems with a single core CPU. You can enter full screen mode via the
'graphics' menu or by pressing 'ALT' and 'Enter' on the keyboard simultaneously.
2. Reduce the resolution. If you're still having a low frame rate in full screen you might want to
reduce the resolution in 'graphics' menu.
3. Switch off 'dynamic scenery'. By switching off 'dynamic scenery' in the 'scenery' menu, you
might notice an improvement in performance. Dynamic scenery is what adds birds, the
tractor and waving flag to the scene.
4. Reduce graphics quality. Besides turning off dynamic scenery, you can reduce the strain on
the system further by dialing down some other options: in the menu, open the 'graphics'
settings. Reduce 'smoke detail' to low (or don't use smoke). As a last resort, you can select
the 'low' scenery detail setting. This will greatly improve performance, but the pictures won't
look great. Also, avoid enabling the wind vectors (using the F12 key).