1
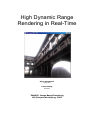
High Dynamic Range
Rendering in Real-Time
Björn Gustafsson
bjogu419
Linus Hilding
linhi307
TNM078, Image Based Rendering
LIU Campus Norrköping, 2007
1 Introduction ......................................................................................................................... 2
1.1 HDR ............................................................................................................................ 2
1.2 Aim of OpenGL demo application ..................................................................................... 2
1.3 Shaders and GLSL ......................................................................................................... 2
2 Techniques used ................................................................................................................... 2
2.1 Cube mapping .............................................................................................................. 2
2.2 FBO (Frame Buffer Object) ............................................................................................. 3
2.3 Tone-Mapping............................................................................................................... 3
2.4 Rahman Retinex............................................................................................................ 4
2.5 S-curve ....................................................................................................................... 4
3. User Manual ........................................................................................................................ 5
3.1 System Requirements .................................................................................................... 5
3.2 Keys used .................................................................................................................... 5
4 Discussion ............................................................................................................................ 5
4.1 General ....................................................................................................................... 5
4.2 Improvements and possible features ................................................................................ 5
4.3 Issues ......................................................................................................................... 6
5 References ........................................................................................................................... 7
1
1 Introduction
1.1 HDR
Most of today's images on computers are today stored with an 8-bit representation with values form 0 255 for each red, green and blue channel. But when the intensity in the images should be post
processed 8 bits are seldom enough. That is why some images are stored in an HDR (High Dynamic
Range) format, where the values are stored with floating point representation or with RGBA.
HDR can be implemented in two ways, either as post-processing when you have "unlimited" time of
processing (used by movie makers and photographers), or it can be implemented in real-time for
example in computer games or as in this demo. Some of the newer computer games have used the
features of HDR-imaging, examples of such games are Far Cry and Oblivion.
1.2 Aim of OpenGL demo application
In this project we try to experiment with HDR rendering in real-time using OpenGL. The aim was to
implement image based diffuse and reflective lighting calculations using environment maps captured in
HDR format. We also wanted to try out some possible post-processing effects such as blooming and
tone-mapping. During the project, we decide to settle with pre-calculated diffuse convolution maps
from HDRShop, instead of doing this in the program.
1.3 Shaders and GLSL
Because this demo is in real-time the HDR calculations have to be done on the GPU (Graphic Processing
Unit) instead of the CPU. That's why we implement the HDR effects with the use of shaders. It exist a
lot of different shading languages but we decided to work with GLSL.
2 Techniques used
2.1 Cube mapping
The method that was used for representing the environment in our scene is cubemapping. We store the
cubemap as a texture consisting of 6 faces (figure 1) and we make use of the HDR cube map images
that are available on Debevec' website [3]. The cubemap texture is then mapped onto a cube in which
the camera is placed inside, to achieve the illusion of a real environment. We use the same cubemap
texture for showing reflections on objects in the scene. This is done in the shader for the objects, where
we use the reflection vector from the incident viewing vector to look up the reflection color in the cube
map.
2
Figure 1
We have another cube map texture for the diffuse lighting onto objects in the scene. This texture is a
precalculated diffuse convolution image, which we constructed using HDR Shop. For each normal vector
situated in the origin of this environment cube, a calculated light value accumulated from each incident
direction is stored. We can look this up in the shader for the objects as well.
2.2 FBO (Frame Buffer Object)
We use framebuffer objects to store our intermediate renderings. Our objective was to maintain the
dynamic range of the pixel values. At first we were worried that clamping at 1.0 would occur, but it
seems to be working, since we have higher values maintained in the texture coming in to the fragment
shader program. This suits our purpose of composing the final image of several HDR format textures,
and tone-map it before rendering to the screen.
2.3 Tone-Mapping
Since the HDR images have values with a much higher dynamic range than the monitor that they
should be represented on, we need some sort of tone-mapping. The tone-mapping says how we shall
transform the HDR data values in images to LDR data that the monitor can show. The easiest way to do
this is by just making a straightforward linear mapping, but the problem with this is that the resulting
image doesn't show details in very bright and very dark areas at the same time. That is why we need a
more advanced tone-mapping which is described below. This uses the higher dynamic range of an HDR
image (figure 2) to create an image with details both in the dark and bright regions (figure 3).
3
Figure 2
Figure 3
2.4 Rahman Retinex
Rahman Retinex is a local tone-mapping operator described in [1] page 281. With this tone-mapping
we use the same blurred images as we use for the blooming. The images were blurred with a Gaussian
filters. Since we only had 4 blurred images when we made the blooming, we here use 4 blurred images,
blurred with gaussian filters with different kernel sizes. This is in our program achieved by blurring
differently scaled images with same kernel size, giving the same result. The equation contains weights
and calculates a weighted sum of a set of single scale retinexed images. There are two parameters f
and k, which affects the weights and the appearance of halo effects respectively.
2.5 S-curve
The S-curve that was implemented is on the form R/Rmax=(I^n)/(I^n+sigma^n) and is taken from [1]
page 198;. The S-curve have two parameters; sigma and the exponent n, which affects the shape of
the curve. R is the photoreceptor response, Rmax is the maximum response and I is the light intensity.
4
3. User Manual
3.1 System Requirements
The recommended graphic card to use is an Nvidia Card. The demo can run on some ATI graphic cards,
but the anti-aliasing will not work, and other artifacts may arise, so we strongly recommend an Nvidia
Graphics Card.
The software required is an OpenGL enabled system with GLSL abilities and GLUT installed.
3.2 Keys used
The movement of the camera is done by using the keys W, A, S and D. The camera can be rotated by
holding down the left mouse button. To change the exposure, the buttons key up/down is used, and to
change the threshold of intensity where blooming will appear, use the left/right keys.
To change which tone-mapping operator to use, the keys V,B,N and M are used. When a value or the
tonemapping is changed, the new value is shown in the command window.
4 Discussion
4.1 General
One of the more often used effects that use HDR is the effect of blooming. Some people think blooming
is a very cool effect and therefore use it too much and over-bloom images. It is important to
experiment and see how much blooming that will generate a nice and natural look. One problem is that
many people bloom the entire image when only the very bright areas shall generate blooming. One
thing we discovered during this project is the lack of support for anti-aliasing on ATI graphic cards when
using the full range floating point format. We later discovered that game developers like Valve have
been implementing blooming effects using parts of the intensity information in a lower dynamic range
to avoid this.
4.2 Improvements and possible features
Lens flare
One cool effect which has been seen in other HDR demos [4] is the lens flare. This will be visible when a
very bright light source comes into the scene. Since we are working with HDR this is an effect that can
be done in a more correct way since the dynamic range is much higher.
Shadows
One effect would be if the sphere in our demo would cast shadows on the ground beneath it. This can
be done in a various ways, some described in [1] and they involve how to turn an environment into a
constellation of light sources. It was this part that seemed tricky to implement and besides, it was not a
major part of our demo, which made us to omit this part.
Generating diffuse map from environment map
In this demo the diffuse convolution map is created from the environment map in advance in HDR Shop
5
[5] and saved as a different file. Another way of creating the diffuse map is to do it in the program
when it starts up or even more advanced, in real-time. The advantage of letting the program create it is
that you can use any HDR image as environment map and then the diffuse map is automatically
created.
More object shader effects
When dealing with objects of special materials for example glass, other effects can be used such as
refraction, Fresnel effect, chromatic dispersion and depth of field. These effects were not implemented
in this program.
4.3 Issues
Initiating an HDR base program
Since this was the first time the group worked with HDR and OpenGL combined, it took some time just
to represent an HDR-image in GLSL. We also had to decide which file format to choose (RGBA or
floating point e.g.), which camera to use, the type of mouse and so on.
Obtaining the normal in world coordinates
In this demo, the sphere has to be placed in the origin, since the normal is currently given only in
object space. This is a limitation within the program, since it has to be developed further to allow for
implementation of several spheres that are moving around. One way we could solve this is to keep
track of the camera transformation matrix and pass to the shaders and do the multiplications there
instead of using the fixed pipeline transformations for translating and rotating.
6
5 References
[1] Erik Reinhard et al, “High Dynamic Range Imaging acquisition, Display and image-based lighting”,
2006.
[2] Stéphane Metz, “High Dynamic Range Rendering” http://www.smetz.fr/?page_id=83, 2007.
[3] Paul Debevec, “Paul Debevec Home Page” http://www.debevec.org/, 2007.
[4] Masaki Kawase, “Real Time High Dynamic Range Image Based Lighting"
http://www.daionet.gr.jp/~masa/rthdribl/, 2007.
[5] Hdrshop, “High Dynamic Range Image Processing and Manipulation" http://www.hdrshop.com/,
2007.
7